An error has occured:
PHPTAL_VariableNotFoundException Object
(
[srcFile] => /home/agsafe5/repositories/elcosh/live/templates/elcosh/record.html/collections
[srcLine] =>
[message:protected] => Attempt to read property 'getID' from NULL value
[string:Exception:private] =>
[code:protected] => 0
[file:protected] => /home/agsafe5/repositories/elcosh/live/templates/elcosh/record.html/collections
[line:protected] =>
[trace:Exception:private] => Array
(
[0] => Array
(
[file] => /home/agsafe5/repositories/elcosh/live/sblib/core/SB_PHPTAL/PHPTAL/PHPTAL/Context.php
[line] => 353
[function] => pathError
[class] => PHPTAL_Context
[type] => ::
[args] => Array
(
[0] =>
[1] => getID
[2] => getID
)
)
[1] => Array
(
[file] => /tmp/tpl_61515a6c_record_macros__gMFg5NvPLybiFfYjAv9Aag.php
[line] => 105
[function] => path
[class] => PHPTAL_Context
[type] => ::
[args] => Array
(
[0] =>
[1] => getID
)
)
[2] => Array
(
[file] => /home/agsafe5/repositories/elcosh/live/sblib/core/SB_PHPTAL/PHPTAL/PHPTAL.php
[line] => 772
[function] => tpl_61515a6c_record_macros__gMFg5NvPLybiFfYjAv9Aag_collections
[args] => Array
(
[0] => PHPTAL Object
(
[_prefilters:protected] => Array
(
)
[_prefilter:PHPTAL:private] => REMOVED: DO NOT USE
[_postfilter:protected] =>
[_repositories:protected] => Array
(
[0] => /home/agsafe5/repositories/elcosh/live/templates/elcosh
)
[_path:protected] => record_macros.html
[_resolvers:protected] => Array
(
)
[_source:protected] => PHPTAL_FileSource Object
(
[_path:PHPTAL_FileSource:private] => /home/agsafe5/repositories/elcosh/live/templates/elcosh/record_macros.html
)
[_codeFile:protected] => /tmp/tpl_61515a6c_record_macros__gMFg5NvPLybiFfYjAv9Aag.php
[_functionName:protected] => tpl_61515a6c_record_macros__gMFg5NvPLybiFfYjAv9Aag
[_prepared:protected] => 1
[_triggers:protected] => Array
(
)
[_translator:protected] =>
[_globalContext:protected] => stdClass Object
(
)
[_context:protected] => PHPTAL_Context Object
(
[_line] =>
[_file] => /home/agsafe5/repositories/elcosh/live/templates/elcosh/record.html
[repeat] => stdClass Object
(
)
[_xmlDeclaration] =>
[_docType] =>
[_nothrow:PHPTAL_Context:private] =>
[_slots:PHPTAL_Context:private] => Array
(
)
[_slotsStack:PHPTAL_Context:private] => Array
(
[0] => Array
(
)
[1] => Array
(
)
)
[_parentContext:PHPTAL_Context:private] => PHPTAL_Context Object
(
[_line] =>
[_file] => /home/agsafe5/repositories/elcosh/live/templates/elcosh/record.html
[repeat] => stdClass Object
(
)
[_xmlDeclaration] =>
[_docType] =>
[_nothrow:PHPTAL_Context:private] =>
[_slots:PHPTAL_Context:private] => Array
(
)
[_slotsStack:PHPTAL_Context:private] => Array
(
[0] => Array
(
)
[1] => Array
(
)
)
[_parentContext:PHPTAL_Context:private] =>
[_globalContext:PHPTAL_Context:private] => stdClass Object
(
)
[_echoDeclarations:PHPTAL_Context:private] =>
[referer] => http://elcosh.org/document/3838/d001307/TBT3%2BPositioning.html
[curr_module] => Record
[styles] => Array
(
)
[javascript] => Array
(
[0] => jquery.min.js
)
[metas] => Array
(
[language] => en
[robots] => index, follow
)
[user] =>
[curr_url] => https://elcosh.org/index.php?module=Record&id=3838&type=document
[base_url] => https://elcosh.org/index.php?module=Record
[title] => eLCOSH : TBT3 Positioning
[language] => en
[search_query] =>
[module] => Record
[new_records] => Array
(
[0] => Search_Result Object
(
[title] => Toolbox Talk: Fixed Ladder
[image] => /record/images/notavailable-p.png
[blurb] => The CPWR Toolbox Talk on Fixed Ladders addresses the potential risks associated with using fixed ladders. The resource includes a brief case example,...
[category] => Array
(
[0] => 15
[1] => 47
[2] => 49
[3] => 51
[4] => 53
[5] => 55
[6] => 60
[7] => 64
[8] => 73
[9] => 76
[10] => 78
[11] => 80
[12] => 86
[13] => 87
[14] => 90
[15] => 92
[16] => 93
[17] => 94
[18] => 100
)
[labels] => Array
(
[0] => Falls
[1] => Work Environment
[2] => Hazards
[3] => Bricklayer
[4] => Trades
[5] => Carpenter
[7] => Cement Mason
[9] => Concrete Polisher
[11] => Electrical Worker
[13] => HVAC
[15] => Laborer
[17] => PCC/Restoration
[19] => Plumber/Pipefitter
[21] => Roofer/Waterproofer
[23] => Sheetmetal Worker
[25] => Welder
[27] => Commercial & Institutional
[28] => Jobsites
[29] => Industrial
[31] => LEED/Green Construction
[33] => Renovations
[35] => Residential
[37] => Toolbox Talks
[38] => Documents
[39] => Media & Documents
)
[type] => Toolbox Talks
[sub_category] =>
[url] => /document/4430/d001660/Toolbox%2BTalk%253A%2BFixed%2BLadder.html
[item:protected] => DocumentRecord Object
(
[records:protected] => Array
(
)
[recordId:protected] =>
[searchWordClass:protected] =>
[searchWordPeerClass:protected] =>
[bok_record:protected] =>
[authors:protected] =>
[organizations:protected] =>
[collections:protected] =>
[categories:protected] => Array
(
[15] => Category Object
(
[languages:protected] =>
[bok_resources:protected] =>
[bok_topics:protected] =>
[bok_keywords:protected] =>
[id:protected] => 15
[type:protected] => category
[parent:protected] => 7
[label:protected] => Falls
[alreadyInSave:protected] =>
[alreadyInValidation:protected] =>
[validationFailures:protected] => Array
(
)
[_new:BaseObject:private] =>
[_deleted:BaseObject:private] =>
[modifiedColumns:protected] => Array
(
)
)
[47] => Category Object
(
[languages:protected] =>
[bok_resources:protected] =>
[bok_topics:protected] =>
[bok_keywords:protected] =>
[id:protected] => 47
[type:protected] => category
[parent:protected] => 2
[label:protected] => Bricklayer
[alreadyInSave:protected] =>
[alreadyInValidation:protected] =>
[validationFailures:protected] => Array
(
)
[_new:BaseObject:private] =>
[_deleted:BaseObject:private] =>
[modifiedColumns:protected] => Array
(
)
)
[49] => Category Object
(
[languages:protected] =>
[bok_resources:protected] =>
[bok_topics:protected] =>
[bok_keywords:protected] =>
[id:protected] => 49
[type:protected] => category
[parent:protected] => 2
[label:protected] => Carpenter
[alreadyInSave:protected] =>
[alreadyInValidation:protected] =>
[validationFailures:protected] => Array
(
)
[_new:BaseObject:private] =>
[_deleted:BaseObject:private] =>
[modifiedColumns:protected] => Array
(
)
)
[51] => Category Object
(
[languages:protected] =>
[bok_resources:protected] =>
[bok_topics:protected] =>
[bok_keywords:protected] =>
[id:protected] => 51
[type:protected] => category
[parent:protected] => 2
[label:protected] => Cement Mason
[alreadyInSave:protected] =>
[alreadyInValidation:protected] =>
[validationFailures:protected] => Array
(
)
[_new:BaseObject:private] =>
[_deleted:BaseObject:private] =>
[modifiedColumns:protected] => Array
(
)
)
[53] => Category Object
(
[languages:protected] =>
[bok_resources:protected] =>
[bok_topics:protected] =>
[bok_keywords:protected] =>
[id:protected] => 53
[type:protected] => category
[parent:protected] => 2
[label:protected] => Concrete Polisher
[alreadyInSave:protected] =>
[alreadyInValidation:protected] =>
[validationFailures:protected] => Array
(
)
[_new:BaseObject:private] =>
[_deleted:BaseObject:private] =>
[modifiedColumns:protected] => Array
(
)
)
[55] => Category Object
(
[languages:protected] =>
[bok_resources:protected] =>
[bok_topics:protected] =>
[bok_keywords:protected] =>
[id:protected] => 55
[type:protected] => category
[parent:protected] => 2
[label:protected] => Electrical Worker
[alreadyInSave:protected] =>
[alreadyInValidation:protected] =>
[validationFailures:protected] => Array
(
)
[_new:BaseObject:private] =>
[_deleted:BaseObject:private] =>
[modifiedColumns:protected] => Array
(
)
)
[60] => Category Object
(
[languages:protected] =>
[bok_resources:protected] =>
[bok_topics:protected] =>
[bok_keywords:protected] =>
[id:protected] => 60
[type:protected] => category
[parent:protected] => 2
[label:protected] => HVAC
[alreadyInSave:protected] =>
[alreadyInValidation:protected] =>
[validationFailures:protected] => Array
(
)
[_new:BaseObject:private] =>
[_deleted:BaseObject:private] =>
[modifiedColumns:protected] => Array
(
)
)
[64] => Category Object
(
[languages:protected] =>
[bok_resources:protected] =>
[bok_topics:protected] =>
[bok_keywords:protected] =>
[id:protected] => 64
[type:protected] => category
[parent:protected] => 2
[label:protected] => Laborer
[alreadyInSave:protected] =>
[alreadyInValidation:protected] =>
[validationFailures:protected] => Array
(
)
[_new:BaseObject:private] =>
[_deleted:BaseObject:private] =>
[modifiedColumns:protected] => Array
(
)
)
[73] => Category Object
(
[languages:protected] =>
[bok_resources:protected] =>
[bok_topics:protected] =>
[bok_keywords:protected] =>
[id:protected] => 73
[type:protected] => category
[parent:protected] => 2
[label:protected] => PCC/Restoration
[alreadyInSave:protected] =>
[alreadyInValidation:protected] =>
[validationFailures:protected] => Array
(
)
[_new:BaseObject:private] =>
[_deleted:BaseObject:private] =>
[modifiedColumns:protected] => Array
(
)
)
[76] => Category Object
(
[languages:protected] =>
[bok_resources:protected] =>
[bok_topics:protected] =>
[bok_keywords:protected] =>
[id:protected] => 76
[type:protected] => category
[parent:protected] => 2
[label:protected] => Plumber/Pipefitter
[alreadyInSave:protected] =>
[alreadyInValidation:protected] =>
[validationFailures:protected] => Array
(
)
[_new:BaseObject:private] =>
[_deleted:BaseObject:private] =>
[modifiedColumns:protected] => Array
(
)
)
[78] => Category Object
(
[languages:protected] =>
[bok_resources:protected] =>
[bok_topics:protected] =>
[bok_keywords:protected] =>
[id:protected] => 78
[type:protected] => category
[parent:protected] => 2
[label:protected] => Roofer/Waterproofer
[alreadyInSave:protected] =>
[alreadyInValidation:protected] =>
[validationFailures:protected] => Array
(
)
[_new:BaseObject:private] =>
[_deleted:BaseObject:private] =>
[modifiedColumns:protected] => Array
(
)
)
[80] => Category Object
(
[languages:protected] =>
[bok_resources:protected] =>
[bok_topics:protected] =>
[bok_keywords:protected] =>
[id:protected] => 80
[type:protected] => category
[parent:protected] => 2
[label:protected] => Sheetmetal Worker
[alreadyInSave:protected] =>
[alreadyInValidation:protected] =>
[validationFailures:protected] => Array
(
)
[_new:BaseObject:private] =>
[_deleted:BaseObject:private] =>
[modifiedColumns:protected] => Array
(
)
)
[86] => Category Object
(
[languages:protected] =>
[bok_resources:protected] =>
[bok_topics:protected] =>
[bok_keywords:protected] =>
[id:protected] => 86
[type:protected] => category
[parent:protected] => 2
[label:protected] => Welder
[alreadyInSave:protected] =>
[alreadyInValidation:protected] =>
[validationFailures:protected] => Array
(
)
[_new:BaseObject:private] =>
[_deleted:BaseObject:private] =>
[modifiedColumns:protected] => Array
(
)
)
[87] => Category Object
(
[languages:protected] =>
[bok_resources:protected] =>
[bok_topics:protected] =>
[bok_keywords:protected] =>
[id:protected] => 87
[type:protected] => category
[parent:protected] => 3
[label:protected] => Commercial & Institutional
[alreadyInSave:protected] =>
[alreadyInValidation:protected] =>
[validationFailures:protected] => Array
(
)
[_new:BaseObject:private] =>
[_deleted:BaseObject:private] =>
[modifiedColumns:protected] => Array
(
)
)
[90] => Category Object
(
[languages:protected] =>
[bok_resources:protected] =>
[bok_topics:protected] =>
[bok_keywords:protected] =>
[id:protected] => 90
[type:protected] => category
[parent:protected] => 3
[label:protected] => Industrial
[alreadyInSave:protected] =>
[alreadyInValidation:protected] =>
[validationFailures:protected] => Array
(
)
[_new:BaseObject:private] =>
[_deleted:BaseObject:private] =>
[modifiedColumns:protected] => Array
(
)
)
[92] => Category Object
(
[languages:protected] =>
[bok_resources:protected] =>
[bok_topics:protected] =>
[bok_keywords:protected] =>
[id:protected] => 92
[type:protected] => category
[parent:protected] => 3
[label:protected] => LEED/Green Construction
[alreadyInSave:protected] =>
[alreadyInValidation:protected] =>
[validationFailures:protected] => Array
(
)
[_new:BaseObject:private] =>
[_deleted:BaseObject:private] =>
[modifiedColumns:protected] => Array
(
)
)
[93] => Category Object
(
[languages:protected] =>
[bok_resources:protected] =>
[bok_topics:protected] =>
[bok_keywords:protected] =>
[id:protected] => 93
[type:protected] => category
[parent:protected] => 3
[label:protected] => Renovations
[alreadyInSave:protected] =>
[alreadyInValidation:protected] =>
[validationFailures:protected] => Array
(
)
[_new:BaseObject:private] =>
[_deleted:BaseObject:private] =>
[modifiedColumns:protected] => Array
(
)
)
[94] => Category Object
(
[languages:protected] =>
[bok_resources:protected] =>
[bok_topics:protected] =>
[bok_keywords:protected] =>
[id:protected] => 94
[type:protected] => category
[parent:protected] => 3
[label:protected] => Residential
[alreadyInSave:protected] =>
[alreadyInValidation:protected] =>
[validationFailures:protected] => Array
(
)
[_new:BaseObject:private] =>
[_deleted:BaseObject:private] =>
[modifiedColumns:protected] => Array
(
)
)
[100] => Category Object
(
[languages:protected] =>
[bok_resources:protected] =>
[bok_topics:protected] =>
[bok_keywords:protected] =>
[id:protected] => 100
[type:protected] => category
[parent:protected] => 6
[label:protected] => Toolbox Talks
[alreadyInSave:protected] =>
[alreadyInValidation:protected] =>
[validationFailures:protected] => Array
(
)
[_new:BaseObject:private] =>
[_deleted:BaseObject:private] =>
[modifiedColumns:protected] => Array
(
)
)
)
[categories_initialized:protected] => 1
[mapped_items:protected] =>
[content:protected] =>
[files:protected] =>
[language:protected] => Language Object
(
[id:protected] => 1
[code:protected] => en
[name:protected] => English
[alreadyInSave:protected] =>
[alreadyInValidation:protected] =>
[validationFailures:protected] => Array
(
)
[_new:BaseObject:private] =>
[_deleted:BaseObject:private] =>
[modifiedColumns:protected] => Array
(
)
)
[old_record:protected] =>
[id:protected] => 4430
[old_id:protected] =>
[elcosh_id:protected] => d001660
[type:protected] => document
[display_type:protected] => HTML only (and links)
[user_id:protected] => 0
[language_id:protected] => 1
[tagging_id:protected] => Mike Aguilar
[priority_id:protected] => 1
[title:protected] => Toolbox Talk: Fixed Ladder
[total_pages:protected] => 0
[billed_pages:protected] => 0
[publication_number:protected] =>
[part_of:protected] =>
[keywords:protected] => Fixed Ladders, Fall Prevention, Falls
[comments:protected] =>
[summary:protected] => The CPWR Toolbox Talk on Fixed Ladders addresses the potential risks associated with using fixed ladders. The resource includes a brief case example, steps to prevent a related injury and questions for discussion. It includes an image that illustrates the hazard, which can be posted in a central location as a reminder of steps to work safely.
Available in English
and Spanish.
[transition_comments:protected] =>
[external_link:protected] =>
[consol_link:protected] =>
[more_like_this:protected] => d001257,d001254,d001255,d001256,d001258,d001262,d001279
[permission_given_by:protected] =>
[published:protected] => T
[billable:protected] => F
[img_name:protected] =>
[img_ext:protected] =>
[img_width:protected] =>
[img_height:protected] =>
[img_credit:protected] =>
[img_practice:protected] =>
[vid_source_id:protected] =>
[vid_running_time:protected] =>
[vid_intended_audience:protected] =>
[vid_acquisition_info:protected] =>
[vid_cost:protected] =>
[vid_producer:protected] =>
[vid_filename:protected] =>
[vid_filename_downloadable:protected] =>
[date_summary:protected] =>
[date_permission_requested:protected] =>
[date_permission_received:protected] =>
[date_review_needed:protected] =>
[date_received:protected] => 06/10/22
[date_completed:protected] => 06/10/22
[date_billed:protected] =>
[date_modified:protected] => 06/16/25
[collBokExports:protected] =>
[lastBokExportCriteria:BaseElcoshItem:private] =>
[alreadyInSave:protected] =>
[alreadyInValidation:protected] =>
[validationFailures:protected] => Array
(
)
[_new:BaseObject:private] =>
[_deleted:BaseObject:private] =>
[modifiedColumns:protected] => Array
(
)
)
)
[1] => Search_Result Object
(
[title] => Toolbox Talk: Work Zone Safety: Working Around Vehicles
[image] => /record/images/notavailable-p.png
[blurb] => The CPWR Toolbox Talk on Working Around Vehicles in the Work Zone addresses methods to avoid being struck-by a vehicle on a construction site. The res...
[category] => Array
(
[0] => 12
[1] => 18
[2] => 52
[3] => 57
[4] => 70
[5] => 85
[6] => 87
[7] => 88
[8] => 89
[9] => 91
[10] => 90
[11] => 92
[12] => 93
[13] => 94
[14] => 95
[15] => 100
)
[labels] => Array
(
[0] => Crushed/Struck By
[1] => Work Environment
[2] => Hazards
[3] => Motor Vehicles/Heavy Equipment
[6] => Commercial Diver
[7] => Trades
[8] => Flagger
[10] => Operating Engineer
[12] => Truck Driver
[14] => Commercial & Institutional
[15] => Jobsites
[16] => Demolition
[18] => Disasters
[20] => Heavy & Highway
[22] => Industrial
[24] => LEED/Green Construction
[26] => Renovations
[28] => Residential
[30] => Underground
[32] => Toolbox Talks
[33] => Documents
[34] => Media & Documents
)
[type] => Toolbox Talks
[sub_category] =>
[url] => /document/4428/d001658/Toolbox%2BTalk%253A%2BWork%2BZone%2BSafety%253A%2BWorking%2BAround%2BVehicles.html
[item:protected] => DocumentRecord Object
(
[records:protected] => Array
(
)
[recordId:protected] =>
[searchWordClass:protected] =>
[searchWordPeerClass:protected] =>
[bok_record:protected] =>
[authors:protected] =>
[organizations:protected] =>
[collections:protected] =>
[categories:protected] => Array
(
[12] => Category Object
(
[languages:protected] =>
[bok_resources:protected] =>
[bok_topics:protected] =>
[bok_keywords:protected] =>
[id:protected] => 12
[type:protected] => category
[parent:protected] => 7
[label:protected] => Crushed/Struck By
[alreadyInSave:protected] =>
[alreadyInValidation:protected] =>
[validationFailures:protected] => Array
(
)
[_new:BaseObject:private] =>
[_deleted:BaseObject:private] =>
[modifiedColumns:protected] => Array
(
)
)
[18] => Category Object
(
[languages:protected] =>
[bok_resources:protected] =>
[bok_topics:protected] =>
[bok_keywords:protected] =>
[id:protected] => 18
[type:protected] => category
[parent:protected] => 7
[label:protected] => Motor Vehicles/Heavy Equipment
[alreadyInSave:protected] =>
[alreadyInValidation:protected] =>
[validationFailures:protected] => Array
(
)
[_new:BaseObject:private] =>
[_deleted:BaseObject:private] =>
[modifiedColumns:protected] => Array
(
)
)
[52] => Category Object
(
[languages:protected] =>
[bok_resources:protected] =>
[bok_topics:protected] =>
[bok_keywords:protected] =>
[id:protected] => 52
[type:protected] => category
[parent:protected] => 2
[label:protected] => Commercial Diver
[alreadyInSave:protected] =>
[alreadyInValidation:protected] =>
[validationFailures:protected] => Array
(
)
[_new:BaseObject:private] =>
[_deleted:BaseObject:private] =>
[modifiedColumns:protected] => Array
(
)
)
[57] => Category Object
(
[languages:protected] =>
[bok_resources:protected] =>
[bok_topics:protected] =>
[bok_keywords:protected] =>
[id:protected] => 57
[type:protected] => category
[parent:protected] => 2
[label:protected] => Flagger
[alreadyInSave:protected] =>
[alreadyInValidation:protected] =>
[validationFailures:protected] => Array
(
)
[_new:BaseObject:private] =>
[_deleted:BaseObject:private] =>
[modifiedColumns:protected] => Array
(
)
)
[70] => Category Object
(
[languages:protected] =>
[bok_resources:protected] =>
[bok_topics:protected] =>
[bok_keywords:protected] =>
[id:protected] => 70
[type:protected] => category
[parent:protected] => 2
[label:protected] => Operating Engineer
[alreadyInSave:protected] =>
[alreadyInValidation:protected] =>
[validationFailures:protected] => Array
(
)
[_new:BaseObject:private] =>
[_deleted:BaseObject:private] =>
[modifiedColumns:protected] => Array
(
)
)
[85] => Category Object
(
[languages:protected] =>
[bok_resources:protected] =>
[bok_topics:protected] =>
[bok_keywords:protected] =>
[id:protected] => 85
[type:protected] => category
[parent:protected] => 2
[label:protected] => Truck Driver
[alreadyInSave:protected] =>
[alreadyInValidation:protected] =>
[validationFailures:protected] => Array
(
)
[_new:BaseObject:private] =>
[_deleted:BaseObject:private] =>
[modifiedColumns:protected] => Array
(
)
)
[87] => Category Object
(
[languages:protected] =>
[bok_resources:protected] =>
[bok_topics:protected] =>
[bok_keywords:protected] =>
[id:protected] => 87
[type:protected] => category
[parent:protected] => 3
[label:protected] => Commercial & Institutional
[alreadyInSave:protected] =>
[alreadyInValidation:protected] =>
[validationFailures:protected] => Array
(
)
[_new:BaseObject:private] =>
[_deleted:BaseObject:private] =>
[modifiedColumns:protected] => Array
(
)
)
[88] => Category Object
(
[languages:protected] =>
[bok_resources:protected] =>
[bok_topics:protected] =>
[bok_keywords:protected] =>
[id:protected] => 88
[type:protected] => category
[parent:protected] => 3
[label:protected] => Demolition
[alreadyInSave:protected] =>
[alreadyInValidation:protected] =>
[validationFailures:protected] => Array
(
)
[_new:BaseObject:private] =>
[_deleted:BaseObject:private] =>
[modifiedColumns:protected] => Array
(
)
)
[89] => Category Object
(
[languages:protected] =>
[bok_resources:protected] =>
[bok_topics:protected] =>
[bok_keywords:protected] =>
[id:protected] => 89
[type:protected] => category
[parent:protected] => 3
[label:protected] => Disasters
[alreadyInSave:protected] =>
[alreadyInValidation:protected] =>
[validationFailures:protected] => Array
(
)
[_new:BaseObject:private] =>
[_deleted:BaseObject:private] =>
[modifiedColumns:protected] => Array
(
)
)
[91] => Category Object
(
[languages:protected] =>
[bok_resources:protected] =>
[bok_topics:protected] =>
[bok_keywords:protected] =>
[id:protected] => 91
[type:protected] => category
[parent:protected] => 3
[label:protected] => Heavy & Highway
[alreadyInSave:protected] =>
[alreadyInValidation:protected] =>
[validationFailures:protected] => Array
(
)
[_new:BaseObject:private] =>
[_deleted:BaseObject:private] =>
[modifiedColumns:protected] => Array
(
)
)
[90] => Category Object
(
[languages:protected] =>
[bok_resources:protected] =>
[bok_topics:protected] =>
[bok_keywords:protected] =>
[id:protected] => 90
[type:protected] => category
[parent:protected] => 3
[label:protected] => Industrial
[alreadyInSave:protected] =>
[alreadyInValidation:protected] =>
[validationFailures:protected] => Array
(
)
[_new:BaseObject:private] =>
[_deleted:BaseObject:private] =>
[modifiedColumns:protected] => Array
(
)
)
[92] => Category Object
(
[languages:protected] =>
[bok_resources:protected] =>
[bok_topics:protected] =>
[bok_keywords:protected] =>
[id:protected] => 92
[type:protected] => category
[parent:protected] => 3
[label:protected] => LEED/Green Construction
[alreadyInSave:protected] =>
[alreadyInValidation:protected] =>
[validationFailures:protected] => Array
(
)
[_new:BaseObject:private] =>
[_deleted:BaseObject:private] =>
[modifiedColumns:protected] => Array
(
)
)
[93] => Category Object
(
[languages:protected] =>
[bok_resources:protected] =>
[bok_topics:protected] =>
[bok_keywords:protected] =>
[id:protected] => 93
[type:protected] => category
[parent:protected] => 3
[label:protected] => Renovations
[alreadyInSave:protected] =>
[alreadyInValidation:protected] =>
[validationFailures:protected] => Array
(
)
[_new:BaseObject:private] =>
[_deleted:BaseObject:private] =>
[modifiedColumns:protected] => Array
(
)
)
[94] => Category Object
(
[languages:protected] =>
[bok_resources:protected] =>
[bok_topics:protected] =>
[bok_keywords:protected] =>
[id:protected] => 94
[type:protected] => category
[parent:protected] => 3
[label:protected] => Residential
[alreadyInSave:protected] =>
[alreadyInValidation:protected] =>
[validationFailures:protected] => Array
(
)
[_new:BaseObject:private] =>
[_deleted:BaseObject:private] =>
[modifiedColumns:protected] => Array
(
)
)
[95] => Category Object
(
[languages:protected] =>
[bok_resources:protected] =>
[bok_topics:protected] =>
[bok_keywords:protected] =>
[id:protected] => 95
[type:protected] => category
[parent:protected] => 3
[label:protected] => Underground
[alreadyInSave:protected] =>
[alreadyInValidation:protected] =>
[validationFailures:protected] => Array
(
)
[_new:BaseObject:private] =>
[_deleted:BaseObject:private] =>
[modifiedColumns:protected] => Array
(
)
)
[100] => Category Object
(
[languages:protected] =>
[bok_resources:protected] =>
[bok_topics:protected] =>
[bok_keywords:protected] =>
[id:protected] => 100
[type:protected] => category
[parent:protected] => 6
[label:protected] => Toolbox Talks
[alreadyInSave:protected] =>
[alreadyInValidation:protected] =>
[validationFailures:protected] => Array
(
)
[_new:BaseObject:private] =>
[_deleted:BaseObject:private] =>
[modifiedColumns:protected] => Array
(
)
)
)
[categories_initialized:protected] => 1
[mapped_items:protected] =>
[content:protected] =>
[files:protected] =>
[language:protected] => Language Object
(
[id:protected] => 1
[code:protected] => en
[name:protected] => English
[alreadyInSave:protected] =>
[alreadyInValidation:protected] =>
[validationFailures:protected] => Array
(
)
[_new:BaseObject:private] =>
[_deleted:BaseObject:private] =>
[modifiedColumns:protected] => Array
(
)
)
[old_record:protected] =>
[id:protected] => 4428
[old_id:protected] =>
[elcosh_id:protected] => d001658
[type:protected] => document
[display_type:protected] => HTML only (and links)
[user_id:protected] => 0
[language_id:protected] => 1
[tagging_id:protected] => Daniela Caceres
[priority_id:protected] => 1
[title:protected] => Toolbox Talk: Work Zone Safety: Working Around Vehicles
[total_pages:protected] => 0
[billed_pages:protected] => 0
[publication_number:protected] =>
[part_of:protected] =>
[keywords:protected] => Struck, Struck by, Vehicle, Work Zone Safety, Truck, Operator, Driver, Mobile Equipment
[comments:protected] =>
[summary:protected] => The CPWR Toolbox Talk on Working Around Vehicles in the Work Zone addresses methods to avoid being struck-by a vehicle on a construction site. The resource includes a case example, steps to prevent a related injury, and questions for discussion. It includes a graphic that illustrates the hazard, which can be posted in a central location as a reminder of steps to work safely. Available in English and Spanish.
[transition_comments:protected] =>
[external_link:protected] =>
[consol_link:protected] =>
[more_like_this:protected] => d001640
[permission_given_by:protected] =>
[published:protected] => T
[billable:protected] => F
[img_name:protected] =>
[img_ext:protected] =>
[img_width:protected] =>
[img_height:protected] =>
[img_credit:protected] =>
[img_practice:protected] =>
[vid_source_id:protected] =>
[vid_running_time:protected] =>
[vid_intended_audience:protected] =>
[vid_acquisition_info:protected] =>
[vid_cost:protected] =>
[vid_producer:protected] =>
[vid_filename:protected] =>
[vid_filename_downloadable:protected] =>
[date_summary:protected] =>
[date_permission_requested:protected] =>
[date_permission_received:protected] =>
[date_review_needed:protected] =>
[date_received:protected] => 12/23/21
[date_completed:protected] => 12/23/21
[date_billed:protected] =>
[date_modified:protected] => 05/19/23
[collBokExports:protected] =>
[lastBokExportCriteria:BaseElcoshItem:private] =>
[alreadyInSave:protected] =>
[alreadyInValidation:protected] =>
[validationFailures:protected] => Array
(
)
[_new:BaseObject:private] =>
[_deleted:BaseObject:private] =>
[modifiedColumns:protected] => Array
(
)
)
)
[2] => Search_Result Object
(
[title] => Construction Dive -- DeWalt's Jobsite Pro headphones recalled for fire hazards
[image] => /record/images/notavailable-p.png
[blurb] => A recall notice by the United States Consumer Product Safety Commission affects over 300,000 DeWalt Jobsite Pro Headphones. The recall is a result of...
[category] => Array
(
[0] => 16
[1] => 44
[2] => 45
[3] => 46
[4] => 47
[5] => 48
[6] => 49
[7] => 50
[8] => 51
[9] => 52
[10] => 53
[11] => 54
[12] => 55
[13] => 56
[14] => 57
[15] => 58
[16] => 59
[17] => 60
[18] => 61
[19] => 64
[20] => 65
[21] => 66
[22] => 67
[23] => 68
[24] => 69
[25] => 70
[26] => 71
[27] => 72
[28] => 73
[29] => 74
[30] => 75
[31] => 76
[32] => 77
[33] => 63
[34] => 78
[35] => 79
[36] => 80
[37] => 81
[38] => 82
[39] => 62
[40] => 83
[41] => 84
[42] => 85
[43] => 86
[44] => 87
[45] => 88
[46] => 89
[47] => 91
[48] => 90
[49] => 92
[50] => 93
[51] => 94
[52] => 95
)
[labels] => Array
(
[0] => Fire & Explosions
[1] => Work Environment
[2] => Hazards
[3] => Acoustical Ceiling Carpenter
[4] => Trades
[5] => Asbestos/Insulator
[7] => Boilermaker
[9] => Bricklayer
[11] => Cabinetmaker
[13] => Carpenter
[15] => Carpet Layer
[17] => Cement Mason
[19] => Commercial Diver
[21] => Concrete Polisher
[23] => Drywall Applicator Specialist
[25] => Electrical Worker
[27] => Elevator Constructor
[29] => Flagger
[31] => Glazier
[33] => Hazardous Waste Cleanup
[35] => HVAC
[37] => Interior Systems Carpenter
[39] => Laborer
[41] => Landscaper
[43] => Lather
[45] => Lead Abatement Worker
[47] => Maintenance Worker
[49] => Millwright
[51] => Operating Engineer
[53] => Painter
[55] => Paper Hanger
[57] => PCC/Restoration
[59] => Pile Driver
[61] => Plasterer
[63] => Plumber/Pipefitter
[65] => Refractory Worker
[67] => Reinforcing Ironworker
[69] => Roofer/Waterproofer
[71] => Scaffold Erector
[73] => Sheetmetal Worker
[75] => Sprinkler Fitter
[77] => Stonemason
[79] => Structural Ironworker
[81] => Terrazzo Worker
[83] => Tile Setter
[85] => Truck Driver
[87] => Welder
[89] => Commercial & Institutional
[90] => Jobsites
[91] => Demolition
[93] => Disasters
[95] => Heavy & Highway
[97] => Industrial
[99] => LEED/Green Construction
[101] => Renovations
[103] => Residential
[105] => Underground
)
[type] =>
[sub_category] =>
[url] => /document/4426/d001656/Construction%2BDive%2B--%2BDeWalt%2527s%2BJobsite%2BPro%2Bheadphones%2Brecalled%2Bfor%2Bfire%2Bhazards.html
[item:protected] => DocumentRecord Object
(
[records:protected] => Array
(
)
[recordId:protected] =>
[searchWordClass:protected] =>
[searchWordPeerClass:protected] =>
[bok_record:protected] =>
[authors:protected] =>
[organizations:protected] =>
[collections:protected] =>
[categories:protected] => Array
(
[16] => Category Object
(
[languages:protected] =>
[bok_resources:protected] =>
[bok_topics:protected] =>
[bok_keywords:protected] =>
[id:protected] => 16
[type:protected] => category
[parent:protected] => 7
[label:protected] => Fire & Explosions
[alreadyInSave:protected] =>
[alreadyInValidation:protected] =>
[validationFailures:protected] => Array
(
)
[_new:BaseObject:private] =>
[_deleted:BaseObject:private] =>
[modifiedColumns:protected] => Array
(
)
)
[44] => Category Object
(
[languages:protected] =>
[bok_resources:protected] =>
[bok_topics:protected] =>
[bok_keywords:protected] =>
[id:protected] => 44
[type:protected] => category
[parent:protected] => 2
[label:protected] => Acoustical Ceiling Carpenter
[alreadyInSave:protected] =>
[alreadyInValidation:protected] =>
[validationFailures:protected] => Array
(
)
[_new:BaseObject:private] =>
[_deleted:BaseObject:private] =>
[modifiedColumns:protected] => Array
(
)
)
[45] => Category Object
(
[languages:protected] =>
[bok_resources:protected] =>
[bok_topics:protected] =>
[bok_keywords:protected] =>
[id:protected] => 45
[type:protected] => category
[parent:protected] => 2
[label:protected] => Asbestos/Insulator
[alreadyInSave:protected] =>
[alreadyInValidation:protected] =>
[validationFailures:protected] => Array
(
)
[_new:BaseObject:private] =>
[_deleted:BaseObject:private] =>
[modifiedColumns:protected] => Array
(
)
)
[46] => Category Object
(
[languages:protected] =>
[bok_resources:protected] =>
[bok_topics:protected] =>
[bok_keywords:protected] =>
[id:protected] => 46
[type:protected] => category
[parent:protected] => 2
[label:protected] => Boilermaker
[alreadyInSave:protected] =>
[alreadyInValidation:protected] =>
[validationFailures:protected] => Array
(
)
[_new:BaseObject:private] =>
[_deleted:BaseObject:private] =>
[modifiedColumns:protected] => Array
(
)
)
[47] => Category Object
(
[languages:protected] =>
[bok_resources:protected] =>
[bok_topics:protected] =>
[bok_keywords:protected] =>
[id:protected] => 47
[type:protected] => category
[parent:protected] => 2
[label:protected] => Bricklayer
[alreadyInSave:protected] =>
[alreadyInValidation:protected] =>
[validationFailures:protected] => Array
(
)
[_new:BaseObject:private] =>
[_deleted:BaseObject:private] =>
[modifiedColumns:protected] => Array
(
)
)
[48] => Category Object
(
[languages:protected] =>
[bok_resources:protected] =>
[bok_topics:protected] =>
[bok_keywords:protected] =>
[id:protected] => 48
[type:protected] => category
[parent:protected] => 2
[label:protected] => Cabinetmaker
[alreadyInSave:protected] =>
[alreadyInValidation:protected] =>
[validationFailures:protected] => Array
(
)
[_new:BaseObject:private] =>
[_deleted:BaseObject:private] =>
[modifiedColumns:protected] => Array
(
)
)
[49] => Category Object
(
[languages:protected] =>
[bok_resources:protected] =>
[bok_topics:protected] =>
[bok_keywords:protected] =>
[id:protected] => 49
[type:protected] => category
[parent:protected] => 2
[label:protected] => Carpenter
[alreadyInSave:protected] =>
[alreadyInValidation:protected] =>
[validationFailures:protected] => Array
(
)
[_new:BaseObject:private] =>
[_deleted:BaseObject:private] =>
[modifiedColumns:protected] => Array
(
)
)
[50] => Category Object
(
[languages:protected] =>
[bok_resources:protected] =>
[bok_topics:protected] =>
[bok_keywords:protected] =>
[id:protected] => 50
[type:protected] => category
[parent:protected] => 2
[label:protected] => Carpet Layer
[alreadyInSave:protected] =>
[alreadyInValidation:protected] =>
[validationFailures:protected] => Array
(
)
[_new:BaseObject:private] =>
[_deleted:BaseObject:private] =>
[modifiedColumns:protected] => Array
(
)
)
[51] => Category Object
(
[languages:protected] =>
[bok_resources:protected] =>
[bok_topics:protected] =>
[bok_keywords:protected] =>
[id:protected] => 51
[type:protected] => category
[parent:protected] => 2
[label:protected] => Cement Mason
[alreadyInSave:protected] =>
[alreadyInValidation:protected] =>
[validationFailures:protected] => Array
(
)
[_new:BaseObject:private] =>
[_deleted:BaseObject:private] =>
[modifiedColumns:protected] => Array
(
)
)
[52] => Category Object
(
[languages:protected] =>
[bok_resources:protected] =>
[bok_topics:protected] =>
[bok_keywords:protected] =>
[id:protected] => 52
[type:protected] => category
[parent:protected] => 2
[label:protected] => Commercial Diver
[alreadyInSave:protected] =>
[alreadyInValidation:protected] =>
[validationFailures:protected] => Array
(
)
[_new:BaseObject:private] =>
[_deleted:BaseObject:private] =>
[modifiedColumns:protected] => Array
(
)
)
[53] => Category Object
(
[languages:protected] =>
[bok_resources:protected] =>
[bok_topics:protected] =>
[bok_keywords:protected] =>
[id:protected] => 53
[type:protected] => category
[parent:protected] => 2
[label:protected] => Concrete Polisher
[alreadyInSave:protected] =>
[alreadyInValidation:protected] =>
[validationFailures:protected] => Array
(
)
[_new:BaseObject:private] =>
[_deleted:BaseObject:private] =>
[modifiedColumns:protected] => Array
(
)
)
[54] => Category Object
(
[languages:protected] =>
[bok_resources:protected] =>
[bok_topics:protected] =>
[bok_keywords:protected] =>
[id:protected] => 54
[type:protected] => category
[parent:protected] => 2
[label:protected] => Drywall Applicator Specialist
[alreadyInSave:protected] =>
[alreadyInValidation:protected] =>
[validationFailures:protected] => Array
(
)
[_new:BaseObject:private] =>
[_deleted:BaseObject:private] =>
[modifiedColumns:protected] => Array
(
)
)
[55] => Category Object
(
[languages:protected] =>
[bok_resources:protected] =>
[bok_topics:protected] =>
[bok_keywords:protected] =>
[id:protected] => 55
[type:protected] => category
[parent:protected] => 2
[label:protected] => Electrical Worker
[alreadyInSave:protected] =>
[alreadyInValidation:protected] =>
[validationFailures:protected] => Array
(
)
[_new:BaseObject:private] =>
[_deleted:BaseObject:private] =>
[modifiedColumns:protected] => Array
(
)
)
[56] => Category Object
(
[languages:protected] =>
[bok_resources:protected] =>
[bok_topics:protected] =>
[bok_keywords:protected] =>
[id:protected] => 56
[type:protected] => category
[parent:protected] => 2
[label:protected] => Elevator Constructor
[alreadyInSave:protected] =>
[alreadyInValidation:protected] =>
[validationFailures:protected] => Array
(
)
[_new:BaseObject:private] =>
[_deleted:BaseObject:private] =>
[modifiedColumns:protected] => Array
(
)
)
[57] => Category Object
(
[languages:protected] =>
[bok_resources:protected] =>
[bok_topics:protected] =>
[bok_keywords:protected] =>
[id:protected] => 57
[type:protected] => category
[parent:protected] => 2
[label:protected] => Flagger
[alreadyInSave:protected] =>
[alreadyInValidation:protected] =>
[validationFailures:protected] => Array
(
)
[_new:BaseObject:private] =>
[_deleted:BaseObject:private] =>
[modifiedColumns:protected] => Array
(
)
)
[58] => Category Object
(
[languages:protected] =>
[bok_resources:protected] =>
[bok_topics:protected] =>
[bok_keywords:protected] =>
[id:protected] => 58
[type:protected] => category
[parent:protected] => 2
[label:protected] => Glazier
[alreadyInSave:protected] =>
[alreadyInValidation:protected] =>
[validationFailures:protected] => Array
(
)
[_new:BaseObject:private] =>
[_deleted:BaseObject:private] =>
[modifiedColumns:protected] => Array
(
)
)
[59] => Category Object
(
[languages:protected] =>
[bok_resources:protected] =>
[bok_topics:protected] =>
[bok_keywords:protected] =>
[id:protected] => 59
[type:protected] => category
[parent:protected] => 2
[label:protected] => Hazardous Waste Cleanup
[alreadyInSave:protected] =>
[alreadyInValidation:protected] =>
[validationFailures:protected] => Array
(
)
[_new:BaseObject:private] =>
[_deleted:BaseObject:private] =>
[modifiedColumns:protected] => Array
(
)
)
[60] => Category Object
(
[languages:protected] =>
[bok_resources:protected] =>
[bok_topics:protected] =>
[bok_keywords:protected] =>
[id:protected] => 60
[type:protected] => category
[parent:protected] => 2
[label:protected] => HVAC
[alreadyInSave:protected] =>
[alreadyInValidation:protected] =>
[validationFailures:protected] => Array
(
)
[_new:BaseObject:private] =>
[_deleted:BaseObject:private] =>
[modifiedColumns:protected] => Array
(
)
)
[61] => Category Object
(
[languages:protected] =>
[bok_resources:protected] =>
[bok_topics:protected] =>
[bok_keywords:protected] =>
[id:protected] => 61
[type:protected] => category
[parent:protected] => 2
[label:protected] => Interior Systems Carpenter
[alreadyInSave:protected] =>
[alreadyInValidation:protected] =>
[validationFailures:protected] => Array
(
)
[_new:BaseObject:private] =>
[_deleted:BaseObject:private] =>
[modifiedColumns:protected] => Array
(
)
)
[64] => Category Object
(
[languages:protected] =>
[bok_resources:protected] =>
[bok_topics:protected] =>
[bok_keywords:protected] =>
[id:protected] => 64
[type:protected] => category
[parent:protected] => 2
[label:protected] => Laborer
[alreadyInSave:protected] =>
[alreadyInValidation:protected] =>
[validationFailures:protected] => Array
(
)
[_new:BaseObject:private] =>
[_deleted:BaseObject:private] =>
[modifiedColumns:protected] => Array
(
)
)
[65] => Category Object
(
[languages:protected] =>
[bok_resources:protected] =>
[bok_topics:protected] =>
[bok_keywords:protected] =>
[id:protected] => 65
[type:protected] => category
[parent:protected] => 2
[label:protected] => Landscaper
[alreadyInSave:protected] =>
[alreadyInValidation:protected] =>
[validationFailures:protected] => Array
(
)
[_new:BaseObject:private] =>
[_deleted:BaseObject:private] =>
[modifiedColumns:protected] => Array
(
)
)
[66] => Category Object
(
[languages:protected] =>
[bok_resources:protected] =>
[bok_topics:protected] =>
[bok_keywords:protected] =>
[id:protected] => 66
[type:protected] => category
[parent:protected] => 2
[label:protected] => Lather
[alreadyInSave:protected] =>
[alreadyInValidation:protected] =>
[validationFailures:protected] => Array
(
)
[_new:BaseObject:private] =>
[_deleted:BaseObject:private] =>
[modifiedColumns:protected] => Array
(
)
)
[67] => Category Object
(
[languages:protected] =>
[bok_resources:protected] =>
[bok_topics:protected] =>
[bok_keywords:protected] =>
[id:protected] => 67
[type:protected] => category
[parent:protected] => 2
[label:protected] => Lead Abatement Worker
[alreadyInSave:protected] =>
[alreadyInValidation:protected] =>
[validationFailures:protected] => Array
(
)
[_new:BaseObject:private] =>
[_deleted:BaseObject:private] =>
[modifiedColumns:protected] => Array
(
)
)
[68] => Category Object
(
[languages:protected] =>
[bok_resources:protected] =>
[bok_topics:protected] =>
[bok_keywords:protected] =>
[id:protected] => 68
[type:protected] => category
[parent:protected] => 2
[label:protected] => Maintenance Worker
[alreadyInSave:protected] =>
[alreadyInValidation:protected] =>
[validationFailures:protected] => Array
(
)
[_new:BaseObject:private] =>
[_deleted:BaseObject:private] =>
[modifiedColumns:protected] => Array
(
)
)
[69] => Category Object
(
[languages:protected] =>
[bok_resources:protected] =>
[bok_topics:protected] =>
[bok_keywords:protected] =>
[id:protected] => 69
[type:protected] => category
[parent:protected] => 2
[label:protected] => Millwright
[alreadyInSave:protected] =>
[alreadyInValidation:protected] =>
[validationFailures:protected] => Array
(
)
[_new:BaseObject:private] =>
[_deleted:BaseObject:private] =>
[modifiedColumns:protected] => Array
(
)
)
[70] => Category Object
(
[languages:protected] =>
[bok_resources:protected] =>
[bok_topics:protected] =>
[bok_keywords:protected] =>
[id:protected] => 70
[type:protected] => category
[parent:protected] => 2
[label:protected] => Operating Engineer
[alreadyInSave:protected] =>
[alreadyInValidation:protected] =>
[validationFailures:protected] => Array
(
)
[_new:BaseObject:private] =>
[_deleted:BaseObject:private] =>
[modifiedColumns:protected] => Array
(
)
)
[71] => Category Object
(
[languages:protected] =>
[bok_resources:protected] =>
[bok_topics:protected] =>
[bok_keywords:protected] =>
[id:protected] => 71
[type:protected] => category
[parent:protected] => 2
[label:protected] => Painter
[alreadyInSave:protected] =>
[alreadyInValidation:protected] =>
[validationFailures:protected] => Array
(
)
[_new:BaseObject:private] =>
[_deleted:BaseObject:private] =>
[modifiedColumns:protected] => Array
(
)
)
[72] => Category Object
(
[languages:protected] =>
[bok_resources:protected] =>
[bok_topics:protected] =>
[bok_keywords:protected] =>
[id:protected] => 72
[type:protected] => category
[parent:protected] => 2
[label:protected] => Paper Hanger
[alreadyInSave:protected] =>
[alreadyInValidation:protected] =>
[validationFailures:protected] => Array
(
)
[_new:BaseObject:private] =>
[_deleted:BaseObject:private] =>
[modifiedColumns:protected] => Array
(
)
)
[73] => Category Object
(
[languages:protected] =>
[bok_resources:protected] =>
[bok_topics:protected] =>
[bok_keywords:protected] =>
[id:protected] => 73
[type:protected] => category
[parent:protected] => 2
[label:protected] => PCC/Restoration
[alreadyInSave:protected] =>
[alreadyInValidation:protected] =>
[validationFailures:protected] => Array
(
)
[_new:BaseObject:private] =>
[_deleted:BaseObject:private] =>
[modifiedColumns:protected] => Array
(
)
)
[74] => Category Object
(
[languages:protected] =>
[bok_resources:protected] =>
[bok_topics:protected] =>
[bok_keywords:protected] =>
[id:protected] => 74
[type:protected] => category
[parent:protected] => 2
[label:protected] => Pile Driver
[alreadyInSave:protected] =>
[alreadyInValidation:protected] =>
[validationFailures:protected] => Array
(
)
[_new:BaseObject:private] =>
[_deleted:BaseObject:private] =>
[modifiedColumns:protected] => Array
(
)
)
[75] => Category Object
(
[languages:protected] =>
[bok_resources:protected] =>
[bok_topics:protected] =>
[bok_keywords:protected] =>
[id:protected] => 75
[type:protected] => category
[parent:protected] => 2
[label:protected] => Plasterer
[alreadyInSave:protected] =>
[alreadyInValidation:protected] =>
[validationFailures:protected] => Array
(
)
[_new:BaseObject:private] =>
[_deleted:BaseObject:private] =>
[modifiedColumns:protected] => Array
(
)
)
[76] => Category Object
(
[languages:protected] =>
[bok_resources:protected] =>
[bok_topics:protected] =>
[bok_keywords:protected] =>
[id:protected] => 76
[type:protected] => category
[parent:protected] => 2
[label:protected] => Plumber/Pipefitter
[alreadyInSave:protected] =>
[alreadyInValidation:protected] =>
[validationFailures:protected] => Array
(
)
[_new:BaseObject:private] =>
[_deleted:BaseObject:private] =>
[modifiedColumns:protected] => Array
(
)
)
[77] => Category Object
(
[languages:protected] =>
[bok_resources:protected] =>
[bok_topics:protected] =>
[bok_keywords:protected] =>
[id:protected] => 77
[type:protected] => category
[parent:protected] => 2
[label:protected] => Refractory Worker
[alreadyInSave:protected] =>
[alreadyInValidation:protected] =>
[validationFailures:protected] => Array
(
)
[_new:BaseObject:private] =>
[_deleted:BaseObject:private] =>
[modifiedColumns:protected] => Array
(
)
)
[63] => Category Object
(
[languages:protected] =>
[bok_resources:protected] =>
[bok_topics:protected] =>
[bok_keywords:protected] =>
[id:protected] => 63
[type:protected] => category
[parent:protected] => 2
[label:protected] => Reinforcing Ironworker
[alreadyInSave:protected] =>
[alreadyInValidation:protected] =>
[validationFailures:protected] => Array
(
)
[_new:BaseObject:private] =>
[_deleted:BaseObject:private] =>
[modifiedColumns:protected] => Array
(
)
)
[78] => Category Object
(
[languages:protected] =>
[bok_resources:protected] =>
[bok_topics:protected] =>
[bok_keywords:protected] =>
[id:protected] => 78
[type:protected] => category
[parent:protected] => 2
[label:protected] => Roofer/Waterproofer
[alreadyInSave:protected] =>
[alreadyInValidation:protected] =>
[validationFailures:protected] => Array
(
)
[_new:BaseObject:private] =>
[_deleted:BaseObject:private] =>
[modifiedColumns:protected] => Array
(
)
)
[79] => Category Object
(
[languages:protected] =>
[bok_resources:protected] =>
[bok_topics:protected] =>
[bok_keywords:protected] =>
[id:protected] => 79
[type:protected] => category
[parent:protected] => 2
[label:protected] => Scaffold Erector
[alreadyInSave:protected] =>
[alreadyInValidation:protected] =>
[validationFailures:protected] => Array
(
)
[_new:BaseObject:private] =>
[_deleted:BaseObject:private] =>
[modifiedColumns:protected] => Array
(
)
)
[80] => Category Object
(
[languages:protected] =>
[bok_resources:protected] =>
[bok_topics:protected] =>
[bok_keywords:protected] =>
[id:protected] => 80
[type:protected] => category
[parent:protected] => 2
[label:protected] => Sheetmetal Worker
[alreadyInSave:protected] =>
[alreadyInValidation:protected] =>
[validationFailures:protected] => Array
(
)
[_new:BaseObject:private] =>
[_deleted:BaseObject:private] =>
[modifiedColumns:protected] => Array
(
)
)
[81] => Category Object
(
[languages:protected] =>
[bok_resources:protected] =>
[bok_topics:protected] =>
[bok_keywords:protected] =>
[id:protected] => 81
[type:protected] => category
[parent:protected] => 2
[label:protected] => Sprinkler Fitter
[alreadyInSave:protected] =>
[alreadyInValidation:protected] =>
[validationFailures:protected] => Array
(
)
[_new:BaseObject:private] =>
[_deleted:BaseObject:private] =>
[modifiedColumns:protected] => Array
(
)
)
[82] => Category Object
(
[languages:protected] =>
[bok_resources:protected] =>
[bok_topics:protected] =>
[bok_keywords:protected] =>
[id:protected] => 82
[type:protected] => category
[parent:protected] => 2
[label:protected] => Stonemason
[alreadyInSave:protected] =>
[alreadyInValidation:protected] =>
[validationFailures:protected] => Array
(
)
[_new:BaseObject:private] =>
[_deleted:BaseObject:private] =>
[modifiedColumns:protected] => Array
(
)
)
[62] => Category Object
(
[languages:protected] =>
[bok_resources:protected] =>
[bok_topics:protected] =>
[bok_keywords:protected] =>
[id:protected] => 62
[type:protected] => category
[parent:protected] => 2
[label:protected] => Structural Ironworker
[alreadyInSave:protected] =>
[alreadyInValidation:protected] =>
[validationFailures:protected] => Array
(
)
[_new:BaseObject:private] =>
[_deleted:BaseObject:private] =>
[modifiedColumns:protected] => Array
(
)
)
[83] => Category Object
(
[languages:protected] =>
[bok_resources:protected] =>
[bok_topics:protected] =>
[bok_keywords:protected] =>
[id:protected] => 83
[type:protected] => category
[parent:protected] => 2
[label:protected] => Terrazzo Worker
[alreadyInSave:protected] =>
[alreadyInValidation:protected] =>
[validationFailures:protected] => Array
(
)
[_new:BaseObject:private] =>
[_deleted:BaseObject:private] =>
[modifiedColumns:protected] => Array
(
)
)
[84] => Category Object
(
[languages:protected] =>
[bok_resources:protected] =>
[bok_topics:protected] =>
[bok_keywords:protected] =>
[id:protected] => 84
[type:protected] => category
[parent:protected] => 2
[label:protected] => Tile Setter
[alreadyInSave:protected] =>
[alreadyInValidation:protected] =>
[validationFailures:protected] => Array
(
)
[_new:BaseObject:private] =>
[_deleted:BaseObject:private] =>
[modifiedColumns:protected] => Array
(
)
)
[85] => Category Object
(
[languages:protected] =>
[bok_resources:protected] =>
[bok_topics:protected] =>
[bok_keywords:protected] =>
[id:protected] => 85
[type:protected] => category
[parent:protected] => 2
[label:protected] => Truck Driver
[alreadyInSave:protected] =>
[alreadyInValidation:protected] =>
[validationFailures:protected] => Array
(
)
[_new:BaseObject:private] =>
[_deleted:BaseObject:private] =>
[modifiedColumns:protected] => Array
(
)
)
[86] => Category Object
(
[languages:protected] =>
[bok_resources:protected] =>
[bok_topics:protected] =>
[bok_keywords:protected] =>
[id:protected] => 86
[type:protected] => category
[parent:protected] => 2
[label:protected] => Welder
[alreadyInSave:protected] =>
[alreadyInValidation:protected] =>
[validationFailures:protected] => Array
(
)
[_new:BaseObject:private] =>
[_deleted:BaseObject:private] =>
[modifiedColumns:protected] => Array
(
)
)
[87] => Category Object
(
[languages:protected] =>
[bok_resources:protected] =>
[bok_topics:protected] =>
[bok_keywords:protected] =>
[id:protected] => 87
[type:protected] => category
[parent:protected] => 3
[label:protected] => Commercial & Institutional
[alreadyInSave:protected] =>
[alreadyInValidation:protected] =>
[validationFailures:protected] => Array
(
)
[_new:BaseObject:private] =>
[_deleted:BaseObject:private] =>
[modifiedColumns:protected] => Array
(
)
)
[88] => Category Object
(
[languages:protected] =>
[bok_resources:protected] =>
[bok_topics:protected] =>
[bok_keywords:protected] =>
[id:protected] => 88
[type:protected] => category
[parent:protected] => 3
[label:protected] => Demolition
[alreadyInSave:protected] =>
[alreadyInValidation:protected] =>
[validationFailures:protected] => Array
(
)
[_new:BaseObject:private] =>
[_deleted:BaseObject:private] =>
[modifiedColumns:protected] => Array
(
)
)
[89] => Category Object
(
[languages:protected] =>
[bok_resources:protected] =>
[bok_topics:protected] =>
[bok_keywords:protected] =>
[id:protected] => 89
[type:protected] => category
[parent:protected] => 3
[label:protected] => Disasters
[alreadyInSave:protected] =>
[alreadyInValidation:protected] =>
[validationFailures:protected] => Array
(
)
[_new:BaseObject:private] =>
[_deleted:BaseObject:private] =>
[modifiedColumns:protected] => Array
(
)
)
[91] => Category Object
(
[languages:protected] =>
[bok_resources:protected] =>
[bok_topics:protected] =>
[bok_keywords:protected] =>
[id:protected] => 91
[type:protected] => category
[parent:protected] => 3
[label:protected] => Heavy & Highway
[alreadyInSave:protected] =>
[alreadyInValidation:protected] =>
[validationFailures:protected] => Array
(
)
[_new:BaseObject:private] =>
[_deleted:BaseObject:private] =>
[modifiedColumns:protected] => Array
(
)
)
[90] => Category Object
(
[languages:protected] =>
[bok_resources:protected] =>
[bok_topics:protected] =>
[bok_keywords:protected] =>
[id:protected] => 90
[type:protected] => category
[parent:protected] => 3
[label:protected] => Industrial
[alreadyInSave:protected] =>
[alreadyInValidation:protected] =>
[validationFailures:protected] => Array
(
)
[_new:BaseObject:private] =>
[_deleted:BaseObject:private] =>
[modifiedColumns:protected] => Array
(
)
)
[92] => Category Object
(
[languages:protected] =>
[bok_resources:protected] =>
[bok_topics:protected] =>
[bok_keywords:protected] =>
[id:protected] => 92
[type:protected] => category
[parent:protected] => 3
[label:protected] => LEED/Green Construction
[alreadyInSave:protected] =>
[alreadyInValidation:protected] =>
[validationFailures:protected] => Array
(
)
[_new:BaseObject:private] =>
[_deleted:BaseObject:private] =>
[modifiedColumns:protected] => Array
(
)
)
[93] => Category Object
(
[languages:protected] =>
[bok_resources:protected] =>
[bok_topics:protected] =>
[bok_keywords:protected] =>
[id:protected] => 93
[type:protected] => category
[parent:protected] => 3
[label:protected] => Renovations
[alreadyInSave:protected] =>
[alreadyInValidation:protected] =>
[validationFailures:protected] => Array
(
)
[_new:BaseObject:private] =>
[_deleted:BaseObject:private] =>
[modifiedColumns:protected] => Array
(
)
)
[94] => Category Object
(
[languages:protected] =>
[bok_resources:protected] =>
[bok_topics:protected] =>
[bok_keywords:protected] =>
[id:protected] => 94
[type:protected] => category
[parent:protected] => 3
[label:protected] => Residential
[alreadyInSave:protected] =>
[alreadyInValidation:protected] =>
[validationFailures:protected] => Array
(
)
[_new:BaseObject:private] =>
[_deleted:BaseObject:private] =>
[modifiedColumns:protected] => Array
(
)
)
[95] => Category Object
(
[languages:protected] =>
[bok_resources:protected] =>
[bok_topics:protected] =>
[bok_keywords:protected] =>
[id:protected] => 95
[type:protected] => category
[parent:protected] => 3
[label:protected] => Underground
[alreadyInSave:protected] =>
[alreadyInValidation:protected] =>
[validationFailures:protected] => Array
(
)
[_new:BaseObject:private] =>
[_deleted:BaseObject:private] =>
[modifiedColumns:protected] => Array
(
)
)
)
[categories_initialized:protected] => 1
[mapped_items:protected] =>
[content:protected] =>
[files:protected] =>
[language:protected] => Language Object
(
[id:protected] => 1
[code:protected] => en
[name:protected] => English
[alreadyInSave:protected] =>
[alreadyInValidation:protected] =>
[validationFailures:protected] => Array
(
)
[_new:BaseObject:private] =>
[_deleted:BaseObject:private] =>
[modifiedColumns:protected] => Array
(
)
)
[old_record:protected] =>
[id:protected] => 4426
[old_id:protected] =>
[elcosh_id:protected] => d001656
[type:protected] => document
[display_type:protected] => HTML only (and links)
[user_id:protected] => 0
[language_id:protected] => 1
[tagging_id:protected] => Mike Aguilar
[priority_id:protected] => 1
[title:protected] => Construction Dive -- DeWalt's Jobsite Pro headphones recalled for fire hazards
[total_pages:protected] => 1
[billed_pages:protected] => 1
[publication_number:protected] =>
[part_of:protected] =>
[keywords:protected] => DeWalt, Fire Hazards, recall, headphones
[comments:protected] =>
[summary:protected] => A recall notice by the United States Consumer Product Safety Commission affects over 300,000 DeWalt Jobsite Pro Headphones. The recall is a result of a malfunction that can cause earbuds to overheat while charging or during use, leading to fire and burn hazards.
[transition_comments:protected] =>
[external_link:protected] => https://www.constructiondive.com/news/dewalts-jobsite-pro-headphones-recalled-for-fire-hazards/611248/?utm_source=Sailthru&utm_medium=email&utm_campaign=Issue:%202021-12-10%20Construction%20Dive%20Newsletter%20%5Bissue:38532%5D&utm_term=Construction%20Dive
[consol_link:protected] =>
[more_like_this:protected] =>
[permission_given_by:protected] =>
[published:protected] => T
[billable:protected] => F
[img_name:protected] =>
[img_ext:protected] =>
[img_width:protected] =>
[img_height:protected] =>
[img_credit:protected] =>
[img_practice:protected] =>
[vid_source_id:protected] =>
[vid_running_time:protected] =>
[vid_intended_audience:protected] =>
[vid_acquisition_info:protected] =>
[vid_cost:protected] =>
[vid_producer:protected] =>
[vid_filename:protected] =>
[vid_filename_downloadable:protected] =>
[date_summary:protected] =>
[date_permission_requested:protected] =>
[date_permission_received:protected] =>
[date_review_needed:protected] =>
[date_received:protected] => 12/13/21
[date_completed:protected] => 12/13/21
[date_billed:protected] =>
[date_modified:protected] => 12/13/21
[collBokExports:protected] =>
[lastBokExportCriteria:BaseElcoshItem:private] =>
[alreadyInSave:protected] =>
[alreadyInValidation:protected] =>
[validationFailures:protected] => Array
(
)
[_new:BaseObject:private] =>
[_deleted:BaseObject:private] =>
[modifiedColumns:protected] => Array
(
)
)
)
[3] => Search_Result Object
(
[title] => Working in an Enclosed Cab
[image] => /record/images/notavailable-p.png
[blurb] => This CPWR Hazard Alert on Working in enclosed cabs provides information on protecting workers from silica dust, how to minimize exposures and the dang...
[category] => Array
(
[0] => 10
[1] => 16
[2] => 24
[3] => 37
[4] => 46
[5] => 48
[6] => 49
[7] => 51
[8] => 53
[9] => 54
[10] => 56
[11] => 58
[12] => 59
[13] => 60
[14] => 61
[15] => 64
[16] => 66
[17] => 68
[18] => 69
[19] => 71
[20] => 73
[21] => 74
[22] => 76
[23] => 77
[24] => 63
[25] => 80
[26] => 82
[27] => 62
[28] => 83
[29] => 84
[30] => 86
[31] => 88
[32] => 89
[33] => 95
[34] => 102
)
[labels] => Array
(
[0] => Confined Spaces
[1] => Work Environment
[2] => Hazards
[3] => Fire & Explosions
[6] => Trenches & Excavations
[9] => Silica /Construction Dust
[10] => Inhalation/Skin Exposures
[12] => Boilermaker
[13] => Trades
[14] => Cabinetmaker
[16] => Carpenter
[18] => Cement Mason
[20] => Concrete Polisher
[22] => Drywall Applicator Specialist
[24] => Elevator Constructor
[26] => Glazier
[28] => Hazardous Waste Cleanup
[30] => HVAC
[32] => Interior Systems Carpenter
[34] => Laborer
[36] => Lather
[38] => Maintenance Worker
[40] => Millwright
[42] => Painter
[44] => PCC/Restoration
[46] => Pile Driver
[48] => Plumber/Pipefitter
[50] => Refractory Worker
[52] => Reinforcing Ironworker
[54] => Sheetmetal Worker
[56] => Stonemason
[58] => Structural Ironworker
[60] => Terrazzo Worker
[62] => Tile Setter
[64] => Welder
[66] => Demolition
[67] => Jobsites
[68] => Disasters
[70] => Underground
[72] => Handouts
[73] => Documents
[74] => Media & Documents
)
[type] => Handouts
[sub_category] =>
[url] => /document/4415/d001651/Working%2Bin%2Ban%2BEnclosed%2BCab.html
[item:protected] => DocumentRecord Object
(
[records:protected] => Array
(
)
[recordId:protected] =>
[searchWordClass:protected] =>
[searchWordPeerClass:protected] =>
[bok_record:protected] =>
[authors:protected] =>
[organizations:protected] =>
[collections:protected] =>
[categories:protected] => Array
(
[10] => Category Object
(
[languages:protected] =>
[bok_resources:protected] =>
[bok_topics:protected] =>
[bok_keywords:protected] =>
[id:protected] => 10
[type:protected] => category
[parent:protected] => 7
[label:protected] => Confined Spaces
[alreadyInSave:protected] =>
[alreadyInValidation:protected] =>
[validationFailures:protected] => Array
(
)
[_new:BaseObject:private] =>
[_deleted:BaseObject:private] =>
[modifiedColumns:protected] => Array
(
)
)
[16] => Category Object
(
[languages:protected] =>
[bok_resources:protected] =>
[bok_topics:protected] =>
[bok_keywords:protected] =>
[id:protected] => 16
[type:protected] => category
[parent:protected] => 7
[label:protected] => Fire & Explosions
[alreadyInSave:protected] =>
[alreadyInValidation:protected] =>
[validationFailures:protected] => Array
(
)
[_new:BaseObject:private] =>
[_deleted:BaseObject:private] =>
[modifiedColumns:protected] => Array
(
)
)
[24] => Category Object
(
[languages:protected] =>
[bok_resources:protected] =>
[bok_topics:protected] =>
[bok_keywords:protected] =>
[id:protected] => 24
[type:protected] => category
[parent:protected] => 7
[label:protected] => Trenches & Excavations
[alreadyInSave:protected] =>
[alreadyInValidation:protected] =>
[validationFailures:protected] => Array
(
)
[_new:BaseObject:private] =>
[_deleted:BaseObject:private] =>
[modifiedColumns:protected] => Array
(
)
)
[37] => Category Object
(
[languages:protected] =>
[bok_resources:protected] =>
[bok_topics:protected] =>
[bok_keywords:protected] =>
[id:protected] => 37
[type:protected] => category
[parent:protected] => 8
[label:protected] => Silica /Construction Dust
[alreadyInSave:protected] =>
[alreadyInValidation:protected] =>
[validationFailures:protected] => Array
(
)
[_new:BaseObject:private] =>
[_deleted:BaseObject:private] =>
[modifiedColumns:protected] => Array
(
)
)
[46] => Category Object
(
[languages:protected] =>
[bok_resources:protected] =>
[bok_topics:protected] =>
[bok_keywords:protected] =>
[id:protected] => 46
[type:protected] => category
[parent:protected] => 2
[label:protected] => Boilermaker
[alreadyInSave:protected] =>
[alreadyInValidation:protected] =>
[validationFailures:protected] => Array
(
)
[_new:BaseObject:private] =>
[_deleted:BaseObject:private] =>
[modifiedColumns:protected] => Array
(
)
)
[48] => Category Object
(
[languages:protected] =>
[bok_resources:protected] =>
[bok_topics:protected] =>
[bok_keywords:protected] =>
[id:protected] => 48
[type:protected] => category
[parent:protected] => 2
[label:protected] => Cabinetmaker
[alreadyInSave:protected] =>
[alreadyInValidation:protected] =>
[validationFailures:protected] => Array
(
)
[_new:BaseObject:private] =>
[_deleted:BaseObject:private] =>
[modifiedColumns:protected] => Array
(
)
)
[49] => Category Object
(
[languages:protected] =>
[bok_resources:protected] =>
[bok_topics:protected] =>
[bok_keywords:protected] =>
[id:protected] => 49
[type:protected] => category
[parent:protected] => 2
[label:protected] => Carpenter
[alreadyInSave:protected] =>
[alreadyInValidation:protected] =>
[validationFailures:protected] => Array
(
)
[_new:BaseObject:private] =>
[_deleted:BaseObject:private] =>
[modifiedColumns:protected] => Array
(
)
)
[51] => Category Object
(
[languages:protected] =>
[bok_resources:protected] =>
[bok_topics:protected] =>
[bok_keywords:protected] =>
[id:protected] => 51
[type:protected] => category
[parent:protected] => 2
[label:protected] => Cement Mason
[alreadyInSave:protected] =>
[alreadyInValidation:protected] =>
[validationFailures:protected] => Array
(
)
[_new:BaseObject:private] =>
[_deleted:BaseObject:private] =>
[modifiedColumns:protected] => Array
(
)
)
[53] => Category Object
(
[languages:protected] =>
[bok_resources:protected] =>
[bok_topics:protected] =>
[bok_keywords:protected] =>
[id:protected] => 53
[type:protected] => category
[parent:protected] => 2
[label:protected] => Concrete Polisher
[alreadyInSave:protected] =>
[alreadyInValidation:protected] =>
[validationFailures:protected] => Array
(
)
[_new:BaseObject:private] =>
[_deleted:BaseObject:private] =>
[modifiedColumns:protected] => Array
(
)
)
[54] => Category Object
(
[languages:protected] =>
[bok_resources:protected] =>
[bok_topics:protected] =>
[bok_keywords:protected] =>
[id:protected] => 54
[type:protected] => category
[parent:protected] => 2
[label:protected] => Drywall Applicator Specialist
[alreadyInSave:protected] =>
[alreadyInValidation:protected] =>
[validationFailures:protected] => Array
(
)
[_new:BaseObject:private] =>
[_deleted:BaseObject:private] =>
[modifiedColumns:protected] => Array
(
)
)
[56] => Category Object
(
[languages:protected] =>
[bok_resources:protected] =>
[bok_topics:protected] =>
[bok_keywords:protected] =>
[id:protected] => 56
[type:protected] => category
[parent:protected] => 2
[label:protected] => Elevator Constructor
[alreadyInSave:protected] =>
[alreadyInValidation:protected] =>
[validationFailures:protected] => Array
(
)
[_new:BaseObject:private] =>
[_deleted:BaseObject:private] =>
[modifiedColumns:protected] => Array
(
)
)
[58] => Category Object
(
[languages:protected] =>
[bok_resources:protected] =>
[bok_topics:protected] =>
[bok_keywords:protected] =>
[id:protected] => 58
[type:protected] => category
[parent:protected] => 2
[label:protected] => Glazier
[alreadyInSave:protected] =>
[alreadyInValidation:protected] =>
[validationFailures:protected] => Array
(
)
[_new:BaseObject:private] =>
[_deleted:BaseObject:private] =>
[modifiedColumns:protected] => Array
(
)
)
[59] => Category Object
(
[languages:protected] =>
[bok_resources:protected] =>
[bok_topics:protected] =>
[bok_keywords:protected] =>
[id:protected] => 59
[type:protected] => category
[parent:protected] => 2
[label:protected] => Hazardous Waste Cleanup
[alreadyInSave:protected] =>
[alreadyInValidation:protected] =>
[validationFailures:protected] => Array
(
)
[_new:BaseObject:private] =>
[_deleted:BaseObject:private] =>
[modifiedColumns:protected] => Array
(
)
)
[60] => Category Object
(
[languages:protected] =>
[bok_resources:protected] =>
[bok_topics:protected] =>
[bok_keywords:protected] =>
[id:protected] => 60
[type:protected] => category
[parent:protected] => 2
[label:protected] => HVAC
[alreadyInSave:protected] =>
[alreadyInValidation:protected] =>
[validationFailures:protected] => Array
(
)
[_new:BaseObject:private] =>
[_deleted:BaseObject:private] =>
[modifiedColumns:protected] => Array
(
)
)
[61] => Category Object
(
[languages:protected] =>
[bok_resources:protected] =>
[bok_topics:protected] =>
[bok_keywords:protected] =>
[id:protected] => 61
[type:protected] => category
[parent:protected] => 2
[label:protected] => Interior Systems Carpenter
[alreadyInSave:protected] =>
[alreadyInValidation:protected] =>
[validationFailures:protected] => Array
(
)
[_new:BaseObject:private] =>
[_deleted:BaseObject:private] =>
[modifiedColumns:protected] => Array
(
)
)
[64] => Category Object
(
[languages:protected] =>
[bok_resources:protected] =>
[bok_topics:protected] =>
[bok_keywords:protected] =>
[id:protected] => 64
[type:protected] => category
[parent:protected] => 2
[label:protected] => Laborer
[alreadyInSave:protected] =>
[alreadyInValidation:protected] =>
[validationFailures:protected] => Array
(
)
[_new:BaseObject:private] =>
[_deleted:BaseObject:private] =>
[modifiedColumns:protected] => Array
(
)
)
[66] => Category Object
(
[languages:protected] =>
[bok_resources:protected] =>
[bok_topics:protected] =>
[bok_keywords:protected] =>
[id:protected] => 66
[type:protected] => category
[parent:protected] => 2
[label:protected] => Lather
[alreadyInSave:protected] =>
[alreadyInValidation:protected] =>
[validationFailures:protected] => Array
(
)
[_new:BaseObject:private] =>
[_deleted:BaseObject:private] =>
[modifiedColumns:protected] => Array
(
)
)
[68] => Category Object
(
[languages:protected] =>
[bok_resources:protected] =>
[bok_topics:protected] =>
[bok_keywords:protected] =>
[id:protected] => 68
[type:protected] => category
[parent:protected] => 2
[label:protected] => Maintenance Worker
[alreadyInSave:protected] =>
[alreadyInValidation:protected] =>
[validationFailures:protected] => Array
(
)
[_new:BaseObject:private] =>
[_deleted:BaseObject:private] =>
[modifiedColumns:protected] => Array
(
)
)
[69] => Category Object
(
[languages:protected] =>
[bok_resources:protected] =>
[bok_topics:protected] =>
[bok_keywords:protected] =>
[id:protected] => 69
[type:protected] => category
[parent:protected] => 2
[label:protected] => Millwright
[alreadyInSave:protected] =>
[alreadyInValidation:protected] =>
[validationFailures:protected] => Array
(
)
[_new:BaseObject:private] =>
[_deleted:BaseObject:private] =>
[modifiedColumns:protected] => Array
(
)
)
[71] => Category Object
(
[languages:protected] =>
[bok_resources:protected] =>
[bok_topics:protected] =>
[bok_keywords:protected] =>
[id:protected] => 71
[type:protected] => category
[parent:protected] => 2
[label:protected] => Painter
[alreadyInSave:protected] =>
[alreadyInValidation:protected] =>
[validationFailures:protected] => Array
(
)
[_new:BaseObject:private] =>
[_deleted:BaseObject:private] =>
[modifiedColumns:protected] => Array
(
)
)
[73] => Category Object
(
[languages:protected] =>
[bok_resources:protected] =>
[bok_topics:protected] =>
[bok_keywords:protected] =>
[id:protected] => 73
[type:protected] => category
[parent:protected] => 2
[label:protected] => PCC/Restoration
[alreadyInSave:protected] =>
[alreadyInValidation:protected] =>
[validationFailures:protected] => Array
(
)
[_new:BaseObject:private] =>
[_deleted:BaseObject:private] =>
[modifiedColumns:protected] => Array
(
)
)
[74] => Category Object
(
[languages:protected] =>
[bok_resources:protected] =>
[bok_topics:protected] =>
[bok_keywords:protected] =>
[id:protected] => 74
[type:protected] => category
[parent:protected] => 2
[label:protected] => Pile Driver
[alreadyInSave:protected] =>
[alreadyInValidation:protected] =>
[validationFailures:protected] => Array
(
)
[_new:BaseObject:private] =>
[_deleted:BaseObject:private] =>
[modifiedColumns:protected] => Array
(
)
)
[76] => Category Object
(
[languages:protected] =>
[bok_resources:protected] =>
[bok_topics:protected] =>
[bok_keywords:protected] =>
[id:protected] => 76
[type:protected] => category
[parent:protected] => 2
[label:protected] => Plumber/Pipefitter
[alreadyInSave:protected] =>
[alreadyInValidation:protected] =>
[validationFailures:protected] => Array
(
)
[_new:BaseObject:private] =>
[_deleted:BaseObject:private] =>
[modifiedColumns:protected] => Array
(
)
)
[77] => Category Object
(
[languages:protected] =>
[bok_resources:protected] =>
[bok_topics:protected] =>
[bok_keywords:protected] =>
[id:protected] => 77
[type:protected] => category
[parent:protected] => 2
[label:protected] => Refractory Worker
[alreadyInSave:protected] =>
[alreadyInValidation:protected] =>
[validationFailures:protected] => Array
(
)
[_new:BaseObject:private] =>
[_deleted:BaseObject:private] =>
[modifiedColumns:protected] => Array
(
)
)
[63] => Category Object
(
[languages:protected] =>
[bok_resources:protected] =>
[bok_topics:protected] =>
[bok_keywords:protected] =>
[id:protected] => 63
[type:protected] => category
[parent:protected] => 2
[label:protected] => Reinforcing Ironworker
[alreadyInSave:protected] =>
[alreadyInValidation:protected] =>
[validationFailures:protected] => Array
(
)
[_new:BaseObject:private] =>
[_deleted:BaseObject:private] =>
[modifiedColumns:protected] => Array
(
)
)
[80] => Category Object
(
[languages:protected] =>
[bok_resources:protected] =>
[bok_topics:protected] =>
[bok_keywords:protected] =>
[id:protected] => 80
[type:protected] => category
[parent:protected] => 2
[label:protected] => Sheetmetal Worker
[alreadyInSave:protected] =>
[alreadyInValidation:protected] =>
[validationFailures:protected] => Array
(
)
[_new:BaseObject:private] =>
[_deleted:BaseObject:private] =>
[modifiedColumns:protected] => Array
(
)
)
[82] => Category Object
(
[languages:protected] =>
[bok_resources:protected] =>
[bok_topics:protected] =>
[bok_keywords:protected] =>
[id:protected] => 82
[type:protected] => category
[parent:protected] => 2
[label:protected] => Stonemason
[alreadyInSave:protected] =>
[alreadyInValidation:protected] =>
[validationFailures:protected] => Array
(
)
[_new:BaseObject:private] =>
[_deleted:BaseObject:private] =>
[modifiedColumns:protected] => Array
(
)
)
[62] => Category Object
(
[languages:protected] =>
[bok_resources:protected] =>
[bok_topics:protected] =>
[bok_keywords:protected] =>
[id:protected] => 62
[type:protected] => category
[parent:protected] => 2
[label:protected] => Structural Ironworker
[alreadyInSave:protected] =>
[alreadyInValidation:protected] =>
[validationFailures:protected] => Array
(
)
[_new:BaseObject:private] =>
[_deleted:BaseObject:private] =>
[modifiedColumns:protected] => Array
(
)
)
[83] => Category Object
(
[languages:protected] =>
[bok_resources:protected] =>
[bok_topics:protected] =>
[bok_keywords:protected] =>
[id:protected] => 83
[type:protected] => category
[parent:protected] => 2
[label:protected] => Terrazzo Worker
[alreadyInSave:protected] =>
[alreadyInValidation:protected] =>
[validationFailures:protected] => Array
(
)
[_new:BaseObject:private] =>
[_deleted:BaseObject:private] =>
[modifiedColumns:protected] => Array
(
)
)
[84] => Category Object
(
[languages:protected] =>
[bok_resources:protected] =>
[bok_topics:protected] =>
[bok_keywords:protected] =>
[id:protected] => 84
[type:protected] => category
[parent:protected] => 2
[label:protected] => Tile Setter
[alreadyInSave:protected] =>
[alreadyInValidation:protected] =>
[validationFailures:protected] => Array
(
)
[_new:BaseObject:private] =>
[_deleted:BaseObject:private] =>
[modifiedColumns:protected] => Array
(
)
)
[86] => Category Object
(
[languages:protected] =>
[bok_resources:protected] =>
[bok_topics:protected] =>
[bok_keywords:protected] =>
[id:protected] => 86
[type:protected] => category
[parent:protected] => 2
[label:protected] => Welder
[alreadyInSave:protected] =>
[alreadyInValidation:protected] =>
[validationFailures:protected] => Array
(
)
[_new:BaseObject:private] =>
[_deleted:BaseObject:private] =>
[modifiedColumns:protected] => Array
(
)
)
[88] => Category Object
(
[languages:protected] =>
[bok_resources:protected] =>
[bok_topics:protected] =>
[bok_keywords:protected] =>
[id:protected] => 88
[type:protected] => category
[parent:protected] => 3
[label:protected] => Demolition
[alreadyInSave:protected] =>
[alreadyInValidation:protected] =>
[validationFailures:protected] => Array
(
)
[_new:BaseObject:private] =>
[_deleted:BaseObject:private] =>
[modifiedColumns:protected] => Array
(
)
)
[89] => Category Object
(
[languages:protected] =>
[bok_resources:protected] =>
[bok_topics:protected] =>
[bok_keywords:protected] =>
[id:protected] => 89
[type:protected] => category
[parent:protected] => 3
[label:protected] => Disasters
[alreadyInSave:protected] =>
[alreadyInValidation:protected] =>
[validationFailures:protected] => Array
(
)
[_new:BaseObject:private] =>
[_deleted:BaseObject:private] =>
[modifiedColumns:protected] => Array
(
)
)
[95] => Category Object
(
[languages:protected] =>
[bok_resources:protected] =>
[bok_topics:protected] =>
[bok_keywords:protected] =>
[id:protected] => 95
[type:protected] => category
[parent:protected] => 3
[label:protected] => Underground
[alreadyInSave:protected] =>
[alreadyInValidation:protected] =>
[validationFailures:protected] => Array
(
)
[_new:BaseObject:private] =>
[_deleted:BaseObject:private] =>
[modifiedColumns:protected] => Array
(
)
)
[102] => Category Object
(
[languages:protected] =>
[bok_resources:protected] =>
[bok_topics:protected] =>
[bok_keywords:protected] =>
[id:protected] => 102
[type:protected] => category
[parent:protected] => 6
[label:protected] => Handouts
[alreadyInSave:protected] =>
[alreadyInValidation:protected] =>
[validationFailures:protected] => Array
(
)
[_new:BaseObject:private] =>
[_deleted:BaseObject:private] =>
[modifiedColumns:protected] => Array
(
)
)
)
[categories_initialized:protected] => 1
[mapped_items:protected] =>
[content:protected] =>
[files:protected] =>
[language:protected] => Language Object
(
[id:protected] => 1
[code:protected] => en
[name:protected] => English
[alreadyInSave:protected] =>
[alreadyInValidation:protected] =>
[validationFailures:protected] => Array
(
)
[_new:BaseObject:private] =>
[_deleted:BaseObject:private] =>
[modifiedColumns:protected] => Array
(
)
)
[old_record:protected] =>
[id:protected] => 4415
[old_id:protected] =>
[elcosh_id:protected] => d001651
[type:protected] => document
[display_type:protected] => HTML only (and links)
[user_id:protected] => 0
[language_id:protected] => 1
[tagging_id:protected] => Valeria Contreras
[priority_id:protected] => 1
[title:protected] => Working in an Enclosed Cab
[total_pages:protected] => 1
[billed_pages:protected] => 1
[publication_number:protected] =>
[part_of:protected] =>
[keywords:protected] => Occupation, construction, safety, health, hazards, work, worker, workplace, OSHA, silicosis, mining, silica, DOE, EEOICPA, labor, lung, CBD, dust, cab, miner, mine
[comments:protected] =>
[summary:protected] => This CPWR Hazard Alert on Working in enclosed cabs provides information on protecting workers from silica dust, how to minimize exposures and the dangers of silica dust. Click on the following links to access the English version and the Spanish version.
[transition_comments:protected] =>
[external_link:protected] =>
[consol_link:protected] =>
[more_like_this:protected] =>
[permission_given_by:protected] =>
[published:protected] => T
[billable:protected] => F
[img_name:protected] =>
[img_ext:protected] =>
[img_width:protected] =>
[img_height:protected] =>
[img_credit:protected] =>
[img_practice:protected] =>
[vid_source_id:protected] =>
[vid_running_time:protected] =>
[vid_intended_audience:protected] =>
[vid_acquisition_info:protected] =>
[vid_cost:protected] =>
[vid_producer:protected] =>
[vid_filename:protected] =>
[vid_filename_downloadable:protected] =>
[date_summary:protected] =>
[date_permission_requested:protected] =>
[date_permission_received:protected] =>
[date_review_needed:protected] =>
[date_received:protected] => 10/08/20
[date_completed:protected] => 10/08/20
[date_billed:protected] =>
[date_modified:protected] => 10/08/20
[collBokExports:protected] =>
[lastBokExportCriteria:BaseElcoshItem:private] =>
[alreadyInSave:protected] =>
[alreadyInValidation:protected] =>
[validationFailures:protected] => Array
(
)
[_new:BaseObject:private] =>
[_deleted:BaseObject:private] =>
[modifiedColumns:protected] => Array
(
)
)
)
[4] => Search_Result Object
(
[title] => Toolbox Talk: Suicide Prevention
[image] => /record/images/notavailable-p.png
[blurb] => The CPWR Toolbox Talk on Suicide Prevention addresses the prevalence of suicide among construction workers. The resource includes a brief case example...
[category] => Array
(
[0] => 13
[1] => 20
[2] => 23
[3] => 40
[4] => 44
[5] => 45
[6] => 46
[7] => 47
[8] => 48
[9] => 49
[10] => 50
[11] => 51
[12] => 52
[13] => 53
[14] => 54
[15] => 55
[16] => 56
[17] => 57
[18] => 58
[19] => 59
[20] => 60
[21] => 61
[22] => 64
[23] => 65
[24] => 66
[25] => 67
[26] => 68
[27] => 69
[28] => 70
[29] => 71
[30] => 72
[31] => 73
[32] => 74
[33] => 75
[34] => 76
[35] => 77
[36] => 63
[37] => 78
[38] => 79
[39] => 80
[40] => 81
[41] => 82
[42] => 62
[43] => 83
[44] => 84
[45] => 85
[46] => 86
[47] => 87
[48] => 88
[49] => 89
[50] => 91
[51] => 90
[52] => 92
[53] => 93
[54] => 94
[55] => 95
[56] => 100
)
[labels] => Array
(
[0] => Drugs, Alcohol & Tobacco
[1] => Work Environment
[2] => Hazards
[3] => Safety Culture
[6] => Stress & Overtime
[9] => Overexertion
[10] => Ergonomic
[12] => Acoustical Ceiling Carpenter
[13] => Trades
[14] => Asbestos/Insulator
[16] => Boilermaker
[18] => Bricklayer
[20] => Cabinetmaker
[22] => Carpenter
[24] => Carpet Layer
[26] => Cement Mason
[28] => Commercial Diver
[30] => Concrete Polisher
[32] => Drywall Applicator Specialist
[34] => Electrical Worker
[36] => Elevator Constructor
[38] => Flagger
[40] => Glazier
[42] => Hazardous Waste Cleanup
[44] => HVAC
[46] => Interior Systems Carpenter
[48] => Laborer
[50] => Landscaper
[52] => Lather
[54] => Lead Abatement Worker
[56] => Maintenance Worker
[58] => Millwright
[60] => Operating Engineer
[62] => Painter
[64] => Paper Hanger
[66] => PCC/Restoration
[68] => Pile Driver
[70] => Plasterer
[72] => Plumber/Pipefitter
[74] => Refractory Worker
[76] => Reinforcing Ironworker
[78] => Roofer/Waterproofer
[80] => Scaffold Erector
[82] => Sheetmetal Worker
[84] => Sprinkler Fitter
[86] => Stonemason
[88] => Structural Ironworker
[90] => Terrazzo Worker
[92] => Tile Setter
[94] => Truck Driver
[96] => Welder
[98] => Commercial & Institutional
[99] => Jobsites
[100] => Demolition
[102] => Disasters
[104] => Heavy & Highway
[106] => Industrial
[108] => LEED/Green Construction
[110] => Renovations
[112] => Residential
[114] => Underground
[116] => Toolbox Talks
[117] => Documents
[118] => Media & Documents
)
[type] => Toolbox Talks
[sub_category] =>
[url] => /document/4419/d001652/Toolbox%2BTalk%253A%2BSuicide%2BPrevention.html
[item:protected] => DocumentRecord Object
(
[records:protected] => Array
(
)
[recordId:protected] =>
[searchWordClass:protected] =>
[searchWordPeerClass:protected] =>
[bok_record:protected] =>
[authors:protected] =>
[organizations:protected] =>
[collections:protected] =>
[categories:protected] => Array
(
[13] => Category Object
(
[languages:protected] =>
[bok_resources:protected] =>
[bok_topics:protected] =>
[bok_keywords:protected] =>
[id:protected] => 13
[type:protected] => category
[parent:protected] => 7
[label:protected] => Drugs, Alcohol & Tobacco
[alreadyInSave:protected] =>
[alreadyInValidation:protected] =>
[validationFailures:protected] => Array
(
)
[_new:BaseObject:private] =>
[_deleted:BaseObject:private] =>
[modifiedColumns:protected] => Array
(
)
)
[20] => Category Object
(
[languages:protected] =>
[bok_resources:protected] =>
[bok_topics:protected] =>
[bok_keywords:protected] =>
[id:protected] => 20
[type:protected] => category
[parent:protected] => 7
[label:protected] => Safety Culture
[alreadyInSave:protected] =>
[alreadyInValidation:protected] =>
[validationFailures:protected] => Array
(
)
[_new:BaseObject:private] =>
[_deleted:BaseObject:private] =>
[modifiedColumns:protected] => Array
(
)
)
[23] => Category Object
(
[languages:protected] =>
[bok_resources:protected] =>
[bok_topics:protected] =>
[bok_keywords:protected] =>
[id:protected] => 23
[type:protected] => category
[parent:protected] => 7
[label:protected] => Stress & Overtime
[alreadyInSave:protected] =>
[alreadyInValidation:protected] =>
[validationFailures:protected] => Array
(
)
[_new:BaseObject:private] =>
[_deleted:BaseObject:private] =>
[modifiedColumns:protected] => Array
(
)
)
[40] => Category Object
(
[languages:protected] =>
[bok_resources:protected] =>
[bok_topics:protected] =>
[bok_keywords:protected] =>
[id:protected] => 40
[type:protected] => category
[parent:protected] => 9
[label:protected] => Overexertion
[alreadyInSave:protected] =>
[alreadyInValidation:protected] =>
[validationFailures:protected] => Array
(
)
[_new:BaseObject:private] =>
[_deleted:BaseObject:private] =>
[modifiedColumns:protected] => Array
(
)
)
[44] => Category Object
(
[languages:protected] =>
[bok_resources:protected] =>
[bok_topics:protected] =>
[bok_keywords:protected] =>
[id:protected] => 44
[type:protected] => category
[parent:protected] => 2
[label:protected] => Acoustical Ceiling Carpenter
[alreadyInSave:protected] =>
[alreadyInValidation:protected] =>
[validationFailures:protected] => Array
(
)
[_new:BaseObject:private] =>
[_deleted:BaseObject:private] =>
[modifiedColumns:protected] => Array
(
)
)
[45] => Category Object
(
[languages:protected] =>
[bok_resources:protected] =>
[bok_topics:protected] =>
[bok_keywords:protected] =>
[id:protected] => 45
[type:protected] => category
[parent:protected] => 2
[label:protected] => Asbestos/Insulator
[alreadyInSave:protected] =>
[alreadyInValidation:protected] =>
[validationFailures:protected] => Array
(
)
[_new:BaseObject:private] =>
[_deleted:BaseObject:private] =>
[modifiedColumns:protected] => Array
(
)
)
[46] => Category Object
(
[languages:protected] =>
[bok_resources:protected] =>
[bok_topics:protected] =>
[bok_keywords:protected] =>
[id:protected] => 46
[type:protected] => category
[parent:protected] => 2
[label:protected] => Boilermaker
[alreadyInSave:protected] =>
[alreadyInValidation:protected] =>
[validationFailures:protected] => Array
(
)
[_new:BaseObject:private] =>
[_deleted:BaseObject:private] =>
[modifiedColumns:protected] => Array
(
)
)
[47] => Category Object
(
[languages:protected] =>
[bok_resources:protected] =>
[bok_topics:protected] =>
[bok_keywords:protected] =>
[id:protected] => 47
[type:protected] => category
[parent:protected] => 2
[label:protected] => Bricklayer
[alreadyInSave:protected] =>
[alreadyInValidation:protected] =>
[validationFailures:protected] => Array
(
)
[_new:BaseObject:private] =>
[_deleted:BaseObject:private] =>
[modifiedColumns:protected] => Array
(
)
)
[48] => Category Object
(
[languages:protected] =>
[bok_resources:protected] =>
[bok_topics:protected] =>
[bok_keywords:protected] =>
[id:protected] => 48
[type:protected] => category
[parent:protected] => 2
[label:protected] => Cabinetmaker
[alreadyInSave:protected] =>
[alreadyInValidation:protected] =>
[validationFailures:protected] => Array
(
)
[_new:BaseObject:private] =>
[_deleted:BaseObject:private] =>
[modifiedColumns:protected] => Array
(
)
)
[49] => Category Object
(
[languages:protected] =>
[bok_resources:protected] =>
[bok_topics:protected] =>
[bok_keywords:protected] =>
[id:protected] => 49
[type:protected] => category
[parent:protected] => 2
[label:protected] => Carpenter
[alreadyInSave:protected] =>
[alreadyInValidation:protected] =>
[validationFailures:protected] => Array
(
)
[_new:BaseObject:private] =>
[_deleted:BaseObject:private] =>
[modifiedColumns:protected] => Array
(
)
)
[50] => Category Object
(
[languages:protected] =>
[bok_resources:protected] =>
[bok_topics:protected] =>
[bok_keywords:protected] =>
[id:protected] => 50
[type:protected] => category
[parent:protected] => 2
[label:protected] => Carpet Layer
[alreadyInSave:protected] =>
[alreadyInValidation:protected] =>
[validationFailures:protected] => Array
(
)
[_new:BaseObject:private] =>
[_deleted:BaseObject:private] =>
[modifiedColumns:protected] => Array
(
)
)
[51] => Category Object
(
[languages:protected] =>
[bok_resources:protected] =>
[bok_topics:protected] =>
[bok_keywords:protected] =>
[id:protected] => 51
[type:protected] => category
[parent:protected] => 2
[label:protected] => Cement Mason
[alreadyInSave:protected] =>
[alreadyInValidation:protected] =>
[validationFailures:protected] => Array
(
)
[_new:BaseObject:private] =>
[_deleted:BaseObject:private] =>
[modifiedColumns:protected] => Array
(
)
)
[52] => Category Object
(
[languages:protected] =>
[bok_resources:protected] =>
[bok_topics:protected] =>
[bok_keywords:protected] =>
[id:protected] => 52
[type:protected] => category
[parent:protected] => 2
[label:protected] => Commercial Diver
[alreadyInSave:protected] =>
[alreadyInValidation:protected] =>
[validationFailures:protected] => Array
(
)
[_new:BaseObject:private] =>
[_deleted:BaseObject:private] =>
[modifiedColumns:protected] => Array
(
)
)
[53] => Category Object
(
[languages:protected] =>
[bok_resources:protected] =>
[bok_topics:protected] =>
[bok_keywords:protected] =>
[id:protected] => 53
[type:protected] => category
[parent:protected] => 2
[label:protected] => Concrete Polisher
[alreadyInSave:protected] =>
[alreadyInValidation:protected] =>
[validationFailures:protected] => Array
(
)
[_new:BaseObject:private] =>
[_deleted:BaseObject:private] =>
[modifiedColumns:protected] => Array
(
)
)
[54] => Category Object
(
[languages:protected] =>
[bok_resources:protected] =>
[bok_topics:protected] =>
[bok_keywords:protected] =>
[id:protected] => 54
[type:protected] => category
[parent:protected] => 2
[label:protected] => Drywall Applicator Specialist
[alreadyInSave:protected] =>
[alreadyInValidation:protected] =>
[validationFailures:protected] => Array
(
)
[_new:BaseObject:private] =>
[_deleted:BaseObject:private] =>
[modifiedColumns:protected] => Array
(
)
)
[55] => Category Object
(
[languages:protected] =>
[bok_resources:protected] =>
[bok_topics:protected] =>
[bok_keywords:protected] =>
[id:protected] => 55
[type:protected] => category
[parent:protected] => 2
[label:protected] => Electrical Worker
[alreadyInSave:protected] =>
[alreadyInValidation:protected] =>
[validationFailures:protected] => Array
(
)
[_new:BaseObject:private] =>
[_deleted:BaseObject:private] =>
[modifiedColumns:protected] => Array
(
)
)
[56] => Category Object
(
[languages:protected] =>
[bok_resources:protected] =>
[bok_topics:protected] =>
[bok_keywords:protected] =>
[id:protected] => 56
[type:protected] => category
[parent:protected] => 2
[label:protected] => Elevator Constructor
[alreadyInSave:protected] =>
[alreadyInValidation:protected] =>
[validationFailures:protected] => Array
(
)
[_new:BaseObject:private] =>
[_deleted:BaseObject:private] =>
[modifiedColumns:protected] => Array
(
)
)
[57] => Category Object
(
[languages:protected] =>
[bok_resources:protected] =>
[bok_topics:protected] =>
[bok_keywords:protected] =>
[id:protected] => 57
[type:protected] => category
[parent:protected] => 2
[label:protected] => Flagger
[alreadyInSave:protected] =>
[alreadyInValidation:protected] =>
[validationFailures:protected] => Array
(
)
[_new:BaseObject:private] =>
[_deleted:BaseObject:private] =>
[modifiedColumns:protected] => Array
(
)
)
[58] => Category Object
(
[languages:protected] =>
[bok_resources:protected] =>
[bok_topics:protected] =>
[bok_keywords:protected] =>
[id:protected] => 58
[type:protected] => category
[parent:protected] => 2
[label:protected] => Glazier
[alreadyInSave:protected] =>
[alreadyInValidation:protected] =>
[validationFailures:protected] => Array
(
)
[_new:BaseObject:private] =>
[_deleted:BaseObject:private] =>
[modifiedColumns:protected] => Array
(
)
)
[59] => Category Object
(
[languages:protected] =>
[bok_resources:protected] =>
[bok_topics:protected] =>
[bok_keywords:protected] =>
[id:protected] => 59
[type:protected] => category
[parent:protected] => 2
[label:protected] => Hazardous Waste Cleanup
[alreadyInSave:protected] =>
[alreadyInValidation:protected] =>
[validationFailures:protected] => Array
(
)
[_new:BaseObject:private] =>
[_deleted:BaseObject:private] =>
[modifiedColumns:protected] => Array
(
)
)
[60] => Category Object
(
[languages:protected] =>
[bok_resources:protected] =>
[bok_topics:protected] =>
[bok_keywords:protected] =>
[id:protected] => 60
[type:protected] => category
[parent:protected] => 2
[label:protected] => HVAC
[alreadyInSave:protected] =>
[alreadyInValidation:protected] =>
[validationFailures:protected] => Array
(
)
[_new:BaseObject:private] =>
[_deleted:BaseObject:private] =>
[modifiedColumns:protected] => Array
(
)
)
[61] => Category Object
(
[languages:protected] =>
[bok_resources:protected] =>
[bok_topics:protected] =>
[bok_keywords:protected] =>
[id:protected] => 61
[type:protected] => category
[parent:protected] => 2
[label:protected] => Interior Systems Carpenter
[alreadyInSave:protected] =>
[alreadyInValidation:protected] =>
[validationFailures:protected] => Array
(
)
[_new:BaseObject:private] =>
[_deleted:BaseObject:private] =>
[modifiedColumns:protected] => Array
(
)
)
[64] => Category Object
(
[languages:protected] =>
[bok_resources:protected] =>
[bok_topics:protected] =>
[bok_keywords:protected] =>
[id:protected] => 64
[type:protected] => category
[parent:protected] => 2
[label:protected] => Laborer
[alreadyInSave:protected] =>
[alreadyInValidation:protected] =>
[validationFailures:protected] => Array
(
)
[_new:BaseObject:private] =>
[_deleted:BaseObject:private] =>
[modifiedColumns:protected] => Array
(
)
)
[65] => Category Object
(
[languages:protected] =>
[bok_resources:protected] =>
[bok_topics:protected] =>
[bok_keywords:protected] =>
[id:protected] => 65
[type:protected] => category
[parent:protected] => 2
[label:protected] => Landscaper
[alreadyInSave:protected] =>
[alreadyInValidation:protected] =>
[validationFailures:protected] => Array
(
)
[_new:BaseObject:private] =>
[_deleted:BaseObject:private] =>
[modifiedColumns:protected] => Array
(
)
)
[66] => Category Object
(
[languages:protected] =>
[bok_resources:protected] =>
[bok_topics:protected] =>
[bok_keywords:protected] =>
[id:protected] => 66
[type:protected] => category
[parent:protected] => 2
[label:protected] => Lather
[alreadyInSave:protected] =>
[alreadyInValidation:protected] =>
[validationFailures:protected] => Array
(
)
[_new:BaseObject:private] =>
[_deleted:BaseObject:private] =>
[modifiedColumns:protected] => Array
(
)
)
[67] => Category Object
(
[languages:protected] =>
[bok_resources:protected] =>
[bok_topics:protected] =>
[bok_keywords:protected] =>
[id:protected] => 67
[type:protected] => category
[parent:protected] => 2
[label:protected] => Lead Abatement Worker
[alreadyInSave:protected] =>
[alreadyInValidation:protected] =>
[validationFailures:protected] => Array
(
)
[_new:BaseObject:private] =>
[_deleted:BaseObject:private] =>
[modifiedColumns:protected] => Array
(
)
)
[68] => Category Object
(
[languages:protected] =>
[bok_resources:protected] =>
[bok_topics:protected] =>
[bok_keywords:protected] =>
[id:protected] => 68
[type:protected] => category
[parent:protected] => 2
[label:protected] => Maintenance Worker
[alreadyInSave:protected] =>
[alreadyInValidation:protected] =>
[validationFailures:protected] => Array
(
)
[_new:BaseObject:private] =>
[_deleted:BaseObject:private] =>
[modifiedColumns:protected] => Array
(
)
)
[69] => Category Object
(
[languages:protected] =>
[bok_resources:protected] =>
[bok_topics:protected] =>
[bok_keywords:protected] =>
[id:protected] => 69
[type:protected] => category
[parent:protected] => 2
[label:protected] => Millwright
[alreadyInSave:protected] =>
[alreadyInValidation:protected] =>
[validationFailures:protected] => Array
(
)
[_new:BaseObject:private] =>
[_deleted:BaseObject:private] =>
[modifiedColumns:protected] => Array
(
)
)
[70] => Category Object
(
[languages:protected] =>
[bok_resources:protected] =>
[bok_topics:protected] =>
[bok_keywords:protected] =>
[id:protected] => 70
[type:protected] => category
[parent:protected] => 2
[label:protected] => Operating Engineer
[alreadyInSave:protected] =>
[alreadyInValidation:protected] =>
[validationFailures:protected] => Array
(
)
[_new:BaseObject:private] =>
[_deleted:BaseObject:private] =>
[modifiedColumns:protected] => Array
(
)
)
[71] => Category Object
(
[languages:protected] =>
[bok_resources:protected] =>
[bok_topics:protected] =>
[bok_keywords:protected] =>
[id:protected] => 71
[type:protected] => category
[parent:protected] => 2
[label:protected] => Painter
[alreadyInSave:protected] =>
[alreadyInValidation:protected] =>
[validationFailures:protected] => Array
(
)
[_new:BaseObject:private] =>
[_deleted:BaseObject:private] =>
[modifiedColumns:protected] => Array
(
)
)
[72] => Category Object
(
[languages:protected] =>
[bok_resources:protected] =>
[bok_topics:protected] =>
[bok_keywords:protected] =>
[id:protected] => 72
[type:protected] => category
[parent:protected] => 2
[label:protected] => Paper Hanger
[alreadyInSave:protected] =>
[alreadyInValidation:protected] =>
[validationFailures:protected] => Array
(
)
[_new:BaseObject:private] =>
[_deleted:BaseObject:private] =>
[modifiedColumns:protected] => Array
(
)
)
[73] => Category Object
(
[languages:protected] =>
[bok_resources:protected] =>
[bok_topics:protected] =>
[bok_keywords:protected] =>
[id:protected] => 73
[type:protected] => category
[parent:protected] => 2
[label:protected] => PCC/Restoration
[alreadyInSave:protected] =>
[alreadyInValidation:protected] =>
[validationFailures:protected] => Array
(
)
[_new:BaseObject:private] =>
[_deleted:BaseObject:private] =>
[modifiedColumns:protected] => Array
(
)
)
[74] => Category Object
(
[languages:protected] =>
[bok_resources:protected] =>
[bok_topics:protected] =>
[bok_keywords:protected] =>
[id:protected] => 74
[type:protected] => category
[parent:protected] => 2
[label:protected] => Pile Driver
[alreadyInSave:protected] =>
[alreadyInValidation:protected] =>
[validationFailures:protected] => Array
(
)
[_new:BaseObject:private] =>
[_deleted:BaseObject:private] =>
[modifiedColumns:protected] => Array
(
)
)
[75] => Category Object
(
[languages:protected] =>
[bok_resources:protected] =>
[bok_topics:protected] =>
[bok_keywords:protected] =>
[id:protected] => 75
[type:protected] => category
[parent:protected] => 2
[label:protected] => Plasterer
[alreadyInSave:protected] =>
[alreadyInValidation:protected] =>
[validationFailures:protected] => Array
(
)
[_new:BaseObject:private] =>
[_deleted:BaseObject:private] =>
[modifiedColumns:protected] => Array
(
)
)
[76] => Category Object
(
[languages:protected] =>
[bok_resources:protected] =>
[bok_topics:protected] =>
[bok_keywords:protected] =>
[id:protected] => 76
[type:protected] => category
[parent:protected] => 2
[label:protected] => Plumber/Pipefitter
[alreadyInSave:protected] =>
[alreadyInValidation:protected] =>
[validationFailures:protected] => Array
(
)
[_new:BaseObject:private] =>
[_deleted:BaseObject:private] =>
[modifiedColumns:protected] => Array
(
)
)
[77] => Category Object
(
[languages:protected] =>
[bok_resources:protected] =>
[bok_topics:protected] =>
[bok_keywords:protected] =>
[id:protected] => 77
[type:protected] => category
[parent:protected] => 2
[label:protected] => Refractory Worker
[alreadyInSave:protected] =>
[alreadyInValidation:protected] =>
[validationFailures:protected] => Array
(
)
[_new:BaseObject:private] =>
[_deleted:BaseObject:private] =>
[modifiedColumns:protected] => Array
(
)
)
[63] => Category Object
(
[languages:protected] =>
[bok_resources:protected] =>
[bok_topics:protected] =>
[bok_keywords:protected] =>
[id:protected] => 63
[type:protected] => category
[parent:protected] => 2
[label:protected] => Reinforcing Ironworker
[alreadyInSave:protected] =>
[alreadyInValidation:protected] =>
[validationFailures:protected] => Array
(
)
[_new:BaseObject:private] =>
[_deleted:BaseObject:private] =>
[modifiedColumns:protected] => Array
(
)
)
[78] => Category Object
(
[languages:protected] =>
[bok_resources:protected] =>
[bok_topics:protected] =>
[bok_keywords:protected] =>
[id:protected] => 78
[type:protected] => category
[parent:protected] => 2
[label:protected] => Roofer/Waterproofer
[alreadyInSave:protected] =>
[alreadyInValidation:protected] =>
[validationFailures:protected] => Array
(
)
[_new:BaseObject:private] =>
[_deleted:BaseObject:private] =>
[modifiedColumns:protected] => Array
(
)
)
[79] => Category Object
(
[languages:protected] =>
[bok_resources:protected] =>
[bok_topics:protected] =>
[bok_keywords:protected] =>
[id:protected] => 79
[type:protected] => category
[parent:protected] => 2
[label:protected] => Scaffold Erector
[alreadyInSave:protected] =>
[alreadyInValidation:protected] =>
[validationFailures:protected] => Array
(
)
[_new:BaseObject:private] =>
[_deleted:BaseObject:private] =>
[modifiedColumns:protected] => Array
(
)
)
[80] => Category Object
(
[languages:protected] =>
[bok_resources:protected] =>
[bok_topics:protected] =>
[bok_keywords:protected] =>
[id:protected] => 80
[type:protected] => category
[parent:protected] => 2
[label:protected] => Sheetmetal Worker
[alreadyInSave:protected] =>
[alreadyInValidation:protected] =>
[validationFailures:protected] => Array
(
)
[_new:BaseObject:private] =>
[_deleted:BaseObject:private] =>
[modifiedColumns:protected] => Array
(
)
)
[81] => Category Object
(
[languages:protected] =>
[bok_resources:protected] =>
[bok_topics:protected] =>
[bok_keywords:protected] =>
[id:protected] => 81
[type:protected] => category
[parent:protected] => 2
[label:protected] => Sprinkler Fitter
[alreadyInSave:protected] =>
[alreadyInValidation:protected] =>
[validationFailures:protected] => Array
(
)
[_new:BaseObject:private] =>
[_deleted:BaseObject:private] =>
[modifiedColumns:protected] => Array
(
)
)
[82] => Category Object
(
[languages:protected] =>
[bok_resources:protected] =>
[bok_topics:protected] =>
[bok_keywords:protected] =>
[id:protected] => 82
[type:protected] => category
[parent:protected] => 2
[label:protected] => Stonemason
[alreadyInSave:protected] =>
[alreadyInValidation:protected] =>
[validationFailures:protected] => Array
(
)
[_new:BaseObject:private] =>
[_deleted:BaseObject:private] =>
[modifiedColumns:protected] => Array
(
)
)
[62] => Category Object
(
[languages:protected] =>
[bok_resources:protected] =>
[bok_topics:protected] =>
[bok_keywords:protected] =>
[id:protected] => 62
[type:protected] => category
[parent:protected] => 2
[label:protected] => Structural Ironworker
[alreadyInSave:protected] =>
[alreadyInValidation:protected] =>
[validationFailures:protected] => Array
(
)
[_new:BaseObject:private] =>
[_deleted:BaseObject:private] =>
[modifiedColumns:protected] => Array
(
)
)
[83] => Category Object
(
[languages:protected] =>
[bok_resources:protected] =>
[bok_topics:protected] =>
[bok_keywords:protected] =>
[id:protected] => 83
[type:protected] => category
[parent:protected] => 2
[label:protected] => Terrazzo Worker
[alreadyInSave:protected] =>
[alreadyInValidation:protected] =>
[validationFailures:protected] => Array
(
)
[_new:BaseObject:private] =>
[_deleted:BaseObject:private] =>
[modifiedColumns:protected] => Array
(
)
)
[84] => Category Object
(
[languages:protected] =>
[bok_resources:protected] =>
[bok_topics:protected] =>
[bok_keywords:protected] =>
[id:protected] => 84
[type:protected] => category
[parent:protected] => 2
[label:protected] => Tile Setter
[alreadyInSave:protected] =>
[alreadyInValidation:protected] =>
[validationFailures:protected] => Array
(
)
[_new:BaseObject:private] =>
[_deleted:BaseObject:private] =>
[modifiedColumns:protected] => Array
(
)
)
[85] => Category Object
(
[languages:protected] =>
[bok_resources:protected] =>
[bok_topics:protected] =>
[bok_keywords:protected] =>
[id:protected] => 85
[type:protected] => category
[parent:protected] => 2
[label:protected] => Truck Driver
[alreadyInSave:protected] =>
[alreadyInValidation:protected] =>
[validationFailures:protected] => Array
(
)
[_new:BaseObject:private] =>
[_deleted:BaseObject:private] =>
[modifiedColumns:protected] => Array
(
)
)
[86] => Category Object
(
[languages:protected] =>
[bok_resources:protected] =>
[bok_topics:protected] =>
[bok_keywords:protected] =>
[id:protected] => 86
[type:protected] => category
[parent:protected] => 2
[label:protected] => Welder
[alreadyInSave:protected] =>
[alreadyInValidation:protected] =>
[validationFailures:protected] => Array
(
)
[_new:BaseObject:private] =>
[_deleted:BaseObject:private] =>
[modifiedColumns:protected] => Array
(
)
)
[87] => Category Object
(
[languages:protected] =>
[bok_resources:protected] =>
[bok_topics:protected] =>
[bok_keywords:protected] =>
[id:protected] => 87
[type:protected] => category
[parent:protected] => 3
[label:protected] => Commercial & Institutional
[alreadyInSave:protected] =>
[alreadyInValidation:protected] =>
[validationFailures:protected] => Array
(
)
[_new:BaseObject:private] =>
[_deleted:BaseObject:private] =>
[modifiedColumns:protected] => Array
(
)
)
[88] => Category Object
(
[languages:protected] =>
[bok_resources:protected] =>
[bok_topics:protected] =>
[bok_keywords:protected] =>
[id:protected] => 88
[type:protected] => category
[parent:protected] => 3
[label:protected] => Demolition
[alreadyInSave:protected] =>
[alreadyInValidation:protected] =>
[validationFailures:protected] => Array
(
)
[_new:BaseObject:private] =>
[_deleted:BaseObject:private] =>
[modifiedColumns:protected] => Array
(
)
)
[89] => Category Object
(
[languages:protected] =>
[bok_resources:protected] =>
[bok_topics:protected] =>
[bok_keywords:protected] =>
[id:protected] => 89
[type:protected] => category
[parent:protected] => 3
[label:protected] => Disasters
[alreadyInSave:protected] =>
[alreadyInValidation:protected] =>
[validationFailures:protected] => Array
(
)
[_new:BaseObject:private] =>
[_deleted:BaseObject:private] =>
[modifiedColumns:protected] => Array
(
)
)
[91] => Category Object
(
[languages:protected] =>
[bok_resources:protected] =>
[bok_topics:protected] =>
[bok_keywords:protected] =>
[id:protected] => 91
[type:protected] => category
[parent:protected] => 3
[label:protected] => Heavy & Highway
[alreadyInSave:protected] =>
[alreadyInValidation:protected] =>
[validationFailures:protected] => Array
(
)
[_new:BaseObject:private] =>
[_deleted:BaseObject:private] =>
[modifiedColumns:protected] => Array
(
)
)
[90] => Category Object
(
[languages:protected] =>
[bok_resources:protected] =>
[bok_topics:protected] =>
[bok_keywords:protected] =>
[id:protected] => 90
[type:protected] => category
[parent:protected] => 3
[label:protected] => Industrial
[alreadyInSave:protected] =>
[alreadyInValidation:protected] =>
[validationFailures:protected] => Array
(
)
[_new:BaseObject:private] =>
[_deleted:BaseObject:private] =>
[modifiedColumns:protected] => Array
(
)
)
[92] => Category Object
(
[languages:protected] =>
[bok_resources:protected] =>
[bok_topics:protected] =>
[bok_keywords:protected] =>
[id:protected] => 92
[type:protected] => category
[parent:protected] => 3
[label:protected] => LEED/Green Construction
[alreadyInSave:protected] =>
[alreadyInValidation:protected] =>
[validationFailures:protected] => Array
(
)
[_new:BaseObject:private] =>
[_deleted:BaseObject:private] =>
[modifiedColumns:protected] => Array
(
)
)
[93] => Category Object
(
[languages:protected] =>
[bok_resources:protected] =>
[bok_topics:protected] =>
[bok_keywords:protected] =>
[id:protected] => 93
[type:protected] => category
[parent:protected] => 3
[label:protected] => Renovations
[alreadyInSave:protected] =>
[alreadyInValidation:protected] =>
[validationFailures:protected] => Array
(
)
[_new:BaseObject:private] =>
[_deleted:BaseObject:private] =>
[modifiedColumns:protected] => Array
(
)
)
[94] => Category Object
(
[languages:protected] =>
[bok_resources:protected] =>
[bok_topics:protected] =>
[bok_keywords:protected] =>
[id:protected] => 94
[type:protected] => category
[parent:protected] => 3
[label:protected] => Residential
[alreadyInSave:protected] =>
[alreadyInValidation:protected] =>
[validationFailures:protected] => Array
(
)
[_new:BaseObject:private] =>
[_deleted:BaseObject:private] =>
[modifiedColumns:protected] => Array
(
)
)
[95] => Category Object
(
[languages:protected] =>
[bok_resources:protected] =>
[bok_topics:protected] =>
[bok_keywords:protected] =>
[id:protected] => 95
[type:protected] => category
[parent:protected] => 3
[label:protected] => Underground
[alreadyInSave:protected] =>
[alreadyInValidation:protected] =>
[validationFailures:protected] => Array
(
)
[_new:BaseObject:private] =>
[_deleted:BaseObject:private] =>
[modifiedColumns:protected] => Array
(
)
)
[100] => Category Object
(
[languages:protected] =>
[bok_resources:protected] =>
[bok_topics:protected] =>
[bok_keywords:protected] =>
[id:protected] => 100
[type:protected] => category
[parent:protected] => 6
[label:protected] => Toolbox Talks
[alreadyInSave:protected] =>
[alreadyInValidation:protected] =>
[validationFailures:protected] => Array
(
)
[_new:BaseObject:private] =>
[_deleted:BaseObject:private] =>
[modifiedColumns:protected] => Array
(
)
)
)
[categories_initialized:protected] => 1
[mapped_items:protected] =>
[content:protected] =>
[files:protected] =>
[language:protected] => Language Object
(
[id:protected] => 1
[code:protected] => en
[name:protected] => English
[alreadyInSave:protected] =>
[alreadyInValidation:protected] =>
[validationFailures:protected] => Array
(
)
[_new:BaseObject:private] =>
[_deleted:BaseObject:private] =>
[modifiedColumns:protected] => Array
(
)
)
[old_record:protected] =>
[id:protected] => 4419
[old_id:protected] =>
[elcosh_id:protected] => d001652
[type:protected] => document
[display_type:protected] => HTML only (and links)
[user_id:protected] => 0
[language_id:protected] => 1
[tagging_id:protected] => Valeria Contreras
[priority_id:protected] => 1
[title:protected] => Toolbox Talk: Suicide Prevention
[total_pages:protected] => 1
[billed_pages:protected] => 1
[publication_number:protected] =>
[part_of:protected] =>
[keywords:protected] => suicide, suicide prevention, mental health, stress, depression, exhaustion, burnout, safety, support, emotional support, health
[comments:protected] =>
[summary:protected] => The CPWR Toolbox Talk on Suicide Prevention addresses the prevalence of suicide among construction workers. The resource includes a brief case example, steps to prevent a related injury or illness, and questions for discussion. It includes an image that illustrates the hazard, which can be posted in a central location as a reminder of steps to work safely.
Available in English and Spanish.
[transition_comments:protected] =>
[external_link:protected] =>
[consol_link:protected] =>
[more_like_this:protected] =>
[permission_given_by:protected] =>
[published:protected] => T
[billable:protected] => F
[img_name:protected] =>
[img_ext:protected] =>
[img_width:protected] =>
[img_height:protected] =>
[img_credit:protected] =>
[img_practice:protected] =>
[vid_source_id:protected] =>
[vid_running_time:protected] =>
[vid_intended_audience:protected] =>
[vid_acquisition_info:protected] =>
[vid_cost:protected] =>
[vid_producer:protected] =>
[vid_filename:protected] =>
[vid_filename_downloadable:protected] =>
[date_summary:protected] =>
[date_permission_requested:protected] =>
[date_permission_received:protected] =>
[date_review_needed:protected] =>
[date_received:protected] => 10/08/20
[date_completed:protected] => 10/08/20
[date_billed:protected] =>
[date_modified:protected] => 05/19/23
[collBokExports:protected] =>
[lastBokExportCriteria:BaseElcoshItem:private] =>
[alreadyInSave:protected] =>
[alreadyInValidation:protected] =>
[validationFailures:protected] => Array
(
)
[_new:BaseObject:private] =>
[_deleted:BaseObject:private] =>
[modifiedColumns:protected] => Array
(
)
)
)
)
[new_images] => Array
(
[0] => Search_Result Object
(
[title] => Toolbox talk - crew view
[image] => /record/images/4005-p.jpg
[blurb] => Photo of crew listening to a toolbox safety talk before starting work....
[category] => Array
(
[0] => 97
[1] => 20
[2] => 47
[3] => 49
[4] => 51
[5] => 55
[6] => 61
[7] => 64
[8] => 71
[9] => 75
[10] => 63
[11] => 79
[12] => 62
[13] => 87
[14] => 88
[15] => 91
[16] => 90
[17] => 93
[18] => 94
[19] => 95
)
[labels] => Array
(
[0] => Images
[1] => Media
[2] => Media & Documents
[3] => Safety Culture
[4] => Work Environment
[5] => Hazards
[6] => Bricklayer
[7] => Trades
[8] => Carpenter
[10] => Cement Mason
[12] => Electrical Worker
[14] => Interior Systems Carpenter
[16] => Laborer
[18] => Painter
[20] => Plasterer
[22] => Reinforcing Ironworker
[24] => Scaffold Erector
[26] => Structural Ironworker
[28] => Commercial & Institutional
[29] => Jobsites
[30] => Demolition
[32] => Heavy & Highway
[34] => Industrial
[36] => Renovations
[38] => Residential
[40] => Underground
)
[type] => Images
[sub_category] =>
[url] => /image/4005/i002692/Toolbox%2Btalk%2B-%2Bcrew%2Bview.html
[item:protected] => ImageRecord Object
(
[records:protected] => Array
(
)
[recordId:protected] =>
[searchWordClass:protected] =>
[searchWordPeerClass:protected] =>
[bok_record:protected] =>
[authors:protected] =>
[organizations:protected] =>
[collections:protected] =>
[categories:protected] => Array
(
[97] => Category Object
(
[languages:protected] =>
[bok_resources:protected] =>
[bok_topics:protected] =>
[bok_keywords:protected] =>
[id:protected] => 97
[type:protected] => category
[parent:protected] => 5
[label:protected] => Images
[alreadyInSave:protected] =>
[alreadyInValidation:protected] =>
[validationFailures:protected] => Array
(
)
[_new:BaseObject:private] =>
[_deleted:BaseObject:private] =>
[modifiedColumns:protected] => Array
(
)
)
[20] => Category Object
(
[languages:protected] =>
[bok_resources:protected] =>
[bok_topics:protected] =>
[bok_keywords:protected] =>
[id:protected] => 20
[type:protected] => category
[parent:protected] => 7
[label:protected] => Safety Culture
[alreadyInSave:protected] =>
[alreadyInValidation:protected] =>
[validationFailures:protected] => Array
(
)
[_new:BaseObject:private] =>
[_deleted:BaseObject:private] =>
[modifiedColumns:protected] => Array
(
)
)
[47] => Category Object
(
[languages:protected] =>
[bok_resources:protected] =>
[bok_topics:protected] =>
[bok_keywords:protected] =>
[id:protected] => 47
[type:protected] => category
[parent:protected] => 2
[label:protected] => Bricklayer
[alreadyInSave:protected] =>
[alreadyInValidation:protected] =>
[validationFailures:protected] => Array
(
)
[_new:BaseObject:private] =>
[_deleted:BaseObject:private] =>
[modifiedColumns:protected] => Array
(
)
)
[49] => Category Object
(
[languages:protected] =>
[bok_resources:protected] =>
[bok_topics:protected] =>
[bok_keywords:protected] =>
[id:protected] => 49
[type:protected] => category
[parent:protected] => 2
[label:protected] => Carpenter
[alreadyInSave:protected] =>
[alreadyInValidation:protected] =>
[validationFailures:protected] => Array
(
)
[_new:BaseObject:private] =>
[_deleted:BaseObject:private] =>
[modifiedColumns:protected] => Array
(
)
)
[51] => Category Object
(
[languages:protected] =>
[bok_resources:protected] =>
[bok_topics:protected] =>
[bok_keywords:protected] =>
[id:protected] => 51
[type:protected] => category
[parent:protected] => 2
[label:protected] => Cement Mason
[alreadyInSave:protected] =>
[alreadyInValidation:protected] =>
[validationFailures:protected] => Array
(
)
[_new:BaseObject:private] =>
[_deleted:BaseObject:private] =>
[modifiedColumns:protected] => Array
(
)
)
[55] => Category Object
(
[languages:protected] =>
[bok_resources:protected] =>
[bok_topics:protected] =>
[bok_keywords:protected] =>
[id:protected] => 55
[type:protected] => category
[parent:protected] => 2
[label:protected] => Electrical Worker
[alreadyInSave:protected] =>
[alreadyInValidation:protected] =>
[validationFailures:protected] => Array
(
)
[_new:BaseObject:private] =>
[_deleted:BaseObject:private] =>
[modifiedColumns:protected] => Array
(
)
)
[61] => Category Object
(
[languages:protected] =>
[bok_resources:protected] =>
[bok_topics:protected] =>
[bok_keywords:protected] =>
[id:protected] => 61
[type:protected] => category
[parent:protected] => 2
[label:protected] => Interior Systems Carpenter
[alreadyInSave:protected] =>
[alreadyInValidation:protected] =>
[validationFailures:protected] => Array
(
)
[_new:BaseObject:private] =>
[_deleted:BaseObject:private] =>
[modifiedColumns:protected] => Array
(
)
)
[64] => Category Object
(
[languages:protected] =>
[bok_resources:protected] =>
[bok_topics:protected] =>
[bok_keywords:protected] =>
[id:protected] => 64
[type:protected] => category
[parent:protected] => 2
[label:protected] => Laborer
[alreadyInSave:protected] =>
[alreadyInValidation:protected] =>
[validationFailures:protected] => Array
(
)
[_new:BaseObject:private] =>
[_deleted:BaseObject:private] =>
[modifiedColumns:protected] => Array
(
)
)
[71] => Category Object
(
[languages:protected] =>
[bok_resources:protected] =>
[bok_topics:protected] =>
[bok_keywords:protected] =>
[id:protected] => 71
[type:protected] => category
[parent:protected] => 2
[label:protected] => Painter
[alreadyInSave:protected] =>
[alreadyInValidation:protected] =>
[validationFailures:protected] => Array
(
)
[_new:BaseObject:private] =>
[_deleted:BaseObject:private] =>
[modifiedColumns:protected] => Array
(
)
)
[75] => Category Object
(
[languages:protected] =>
[bok_resources:protected] =>
[bok_topics:protected] =>
[bok_keywords:protected] =>
[id:protected] => 75
[type:protected] => category
[parent:protected] => 2
[label:protected] => Plasterer
[alreadyInSave:protected] =>
[alreadyInValidation:protected] =>
[validationFailures:protected] => Array
(
)
[_new:BaseObject:private] =>
[_deleted:BaseObject:private] =>
[modifiedColumns:protected] => Array
(
)
)
[63] => Category Object
(
[languages:protected] =>
[bok_resources:protected] =>
[bok_topics:protected] =>
[bok_keywords:protected] =>
[id:protected] => 63
[type:protected] => category
[parent:protected] => 2
[label:protected] => Reinforcing Ironworker
[alreadyInSave:protected] =>
[alreadyInValidation:protected] =>
[validationFailures:protected] => Array
(
)
[_new:BaseObject:private] =>
[_deleted:BaseObject:private] =>
[modifiedColumns:protected] => Array
(
)
)
[79] => Category Object
(
[languages:protected] =>
[bok_resources:protected] =>
[bok_topics:protected] =>
[bok_keywords:protected] =>
[id:protected] => 79
[type:protected] => category
[parent:protected] => 2
[label:protected] => Scaffold Erector
[alreadyInSave:protected] =>
[alreadyInValidation:protected] =>
[validationFailures:protected] => Array
(
)
[_new:BaseObject:private] =>
[_deleted:BaseObject:private] =>
[modifiedColumns:protected] => Array
(
)
)
[62] => Category Object
(
[languages:protected] =>
[bok_resources:protected] =>
[bok_topics:protected] =>
[bok_keywords:protected] =>
[id:protected] => 62
[type:protected] => category
[parent:protected] => 2
[label:protected] => Structural Ironworker
[alreadyInSave:protected] =>
[alreadyInValidation:protected] =>
[validationFailures:protected] => Array
(
)
[_new:BaseObject:private] =>
[_deleted:BaseObject:private] =>
[modifiedColumns:protected] => Array
(
)
)
[87] => Category Object
(
[languages:protected] =>
[bok_resources:protected] =>
[bok_topics:protected] =>
[bok_keywords:protected] =>
[id:protected] => 87
[type:protected] => category
[parent:protected] => 3
[label:protected] => Commercial & Institutional
[alreadyInSave:protected] =>
[alreadyInValidation:protected] =>
[validationFailures:protected] => Array
(
)
[_new:BaseObject:private] =>
[_deleted:BaseObject:private] =>
[modifiedColumns:protected] => Array
(
)
)
[88] => Category Object
(
[languages:protected] =>
[bok_resources:protected] =>
[bok_topics:protected] =>
[bok_keywords:protected] =>
[id:protected] => 88
[type:protected] => category
[parent:protected] => 3
[label:protected] => Demolition
[alreadyInSave:protected] =>
[alreadyInValidation:protected] =>
[validationFailures:protected] => Array
(
)
[_new:BaseObject:private] =>
[_deleted:BaseObject:private] =>
[modifiedColumns:protected] => Array
(
)
)
[91] => Category Object
(
[languages:protected] =>
[bok_resources:protected] =>
[bok_topics:protected] =>
[bok_keywords:protected] =>
[id:protected] => 91
[type:protected] => category
[parent:protected] => 3
[label:protected] => Heavy & Highway
[alreadyInSave:protected] =>
[alreadyInValidation:protected] =>
[validationFailures:protected] => Array
(
)
[_new:BaseObject:private] =>
[_deleted:BaseObject:private] =>
[modifiedColumns:protected] => Array
(
)
)
[90] => Category Object
(
[languages:protected] =>
[bok_resources:protected] =>
[bok_topics:protected] =>
[bok_keywords:protected] =>
[id:protected] => 90
[type:protected] => category
[parent:protected] => 3
[label:protected] => Industrial
[alreadyInSave:protected] =>
[alreadyInValidation:protected] =>
[validationFailures:protected] => Array
(
)
[_new:BaseObject:private] =>
[_deleted:BaseObject:private] =>
[modifiedColumns:protected] => Array
(
)
)
[93] => Category Object
(
[languages:protected] =>
[bok_resources:protected] =>
[bok_topics:protected] =>
[bok_keywords:protected] =>
[id:protected] => 93
[type:protected] => category
[parent:protected] => 3
[label:protected] => Renovations
[alreadyInSave:protected] =>
[alreadyInValidation:protected] =>
[validationFailures:protected] => Array
(
)
[_new:BaseObject:private] =>
[_deleted:BaseObject:private] =>
[modifiedColumns:protected] => Array
(
)
)
[94] => Category Object
(
[languages:protected] =>
[bok_resources:protected] =>
[bok_topics:protected] =>
[bok_keywords:protected] =>
[id:protected] => 94
[type:protected] => category
[parent:protected] => 3
[label:protected] => Residential
[alreadyInSave:protected] =>
[alreadyInValidation:protected] =>
[validationFailures:protected] => Array
(
)
[_new:BaseObject:private] =>
[_deleted:BaseObject:private] =>
[modifiedColumns:protected] => Array
(
)
)
[95] => Category Object
(
[languages:protected] =>
[bok_resources:protected] =>
[bok_topics:protected] =>
[bok_keywords:protected] =>
[id:protected] => 95
[type:protected] => category
[parent:protected] => 3
[label:protected] => Underground
[alreadyInSave:protected] =>
[alreadyInValidation:protected] =>
[validationFailures:protected] => Array
(
)
[_new:BaseObject:private] =>
[_deleted:BaseObject:private] =>
[modifiedColumns:protected] => Array
(
)
)
)
[categories_initialized:protected] => 1
[mapped_items:protected] =>
[content:protected] =>
[files:protected] =>
[language:protected] => Language Object
(
[id:protected] => 1
[code:protected] => en
[name:protected] => English
[alreadyInSave:protected] =>
[alreadyInValidation:protected] =>
[validationFailures:protected] => Array
(
)
[_new:BaseObject:private] =>
[_deleted:BaseObject:private] =>
[modifiedColumns:protected] => Array
(
)
)
[old_record:protected] =>
[id:protected] => 4005
[old_id:protected] =>
[elcosh_id:protected] => i002692
[type:protected] => image
[display_type:protected] => Image
[user_id:protected] => 0
[language_id:protected] => 1
[tagging_id:protected] => Bruce Lippy
[priority_id:protected] => 1
[title:protected] => Toolbox talk - crew view
[total_pages:protected] => 0
[billed_pages:protected] => 0
[publication_number:protected] =>
[part_of:protected] =>
[keywords:protected] => toolbox talk, tailgate talk, safety talk, Spanish
[comments:protected] =>
[summary:protected] => Photo of crew listening to a toolbox safety talk before starting work.
[transition_comments:protected] =>
[external_link:protected] =>
[consol_link:protected] => http://www.cpwrconstructionsolutions.org/electrical/solution/662/worker-training.html
[more_like_this:protected] => i002691,d001269, c000079, d001285
[permission_given_by:protected] =>
[published:protected] => T
[billable:protected] => F
[img_name:protected] =>
[img_ext:protected] => jpg
[img_width:protected] =>
[img_height:protected] =>
[img_credit:protected] => Morgan Zavertnik and Hoar Construction
[img_practice:protected] => good
[vid_source_id:protected] =>
[vid_running_time:protected] =>
[vid_intended_audience:protected] =>
[vid_acquisition_info:protected] =>
[vid_cost:protected] =>
[vid_producer:protected] =>
[vid_filename:protected] =>
[vid_filename_downloadable:protected] =>
[date_summary:protected] => November 2015
[date_permission_requested:protected] =>
[date_permission_received:protected] =>
[date_review_needed:protected] =>
[date_received:protected] => 03/02/16
[date_completed:protected] => 03/02/16
[date_billed:protected] =>
[date_modified:protected] => 03/02/16
[collBokExports:protected] =>
[lastBokExportCriteria:BaseElcoshItem:private] =>
[alreadyInSave:protected] =>
[alreadyInValidation:protected] =>
[validationFailures:protected] => Array
(
)
[_new:BaseObject:private] =>
[_deleted:BaseObject:private] =>
[modifiedColumns:protected] => Array
(
)
)
)
[1] => Search_Result Object
(
[title] => Toolbox talk - long shot
[image] => /record/images/4006-p.jpg
[blurb] => This crew gathered every morning before starting work to discuss a new safety topic....
[category] => Array
(
[0] => 20
[1] => 47
[2] => 49
[3] => 51
[4] => 55
[5] => 64
[6] => 68
[7] => 75
[8] => 76
[9] => 63
[10] => 78
[11] => 79
[12] => 82
[13] => 62
[14] => 87
[15] => 88
[16] => 91
[17] => 90
[18] => 93
[19] => 94
[20] => 95
[21] => 97
)
[labels] => Array
(
[0] => Safety Culture
[1] => Work Environment
[2] => Hazards
[3] => Bricklayer
[4] => Trades
[5] => Carpenter
[7] => Cement Mason
[9] => Electrical Worker
[11] => Laborer
[13] => Maintenance Worker
[15] => Plasterer
[17] => Plumber/Pipefitter
[19] => Reinforcing Ironworker
[21] => Roofer/Waterproofer
[23] => Scaffold Erector
[25] => Stonemason
[27] => Structural Ironworker
[29] => Commercial & Institutional
[30] => Jobsites
[31] => Demolition
[33] => Heavy & Highway
[35] => Industrial
[37] => Renovations
[39] => Residential
[41] => Underground
[43] => Images
[44] => Media
[45] => Media & Documents
)
[type] => Images
[sub_category] =>
[url] => /image/4006/i002693/Toolbox%2Btalk%2B-%2Blong%2Bshot.html
[item:protected] => ImageRecord Object
(
[records:protected] => Array
(
)
[recordId:protected] =>
[searchWordClass:protected] =>
[searchWordPeerClass:protected] =>
[bok_record:protected] =>
[authors:protected] =>
[organizations:protected] =>
[collections:protected] =>
[categories:protected] => Array
(
[20] => Category Object
(
[languages:protected] =>
[bok_resources:protected] =>
[bok_topics:protected] =>
[bok_keywords:protected] =>
[id:protected] => 20
[type:protected] => category
[parent:protected] => 7
[label:protected] => Safety Culture
[alreadyInSave:protected] =>
[alreadyInValidation:protected] =>
[validationFailures:protected] => Array
(
)
[_new:BaseObject:private] =>
[_deleted:BaseObject:private] =>
[modifiedColumns:protected] => Array
(
)
)
[47] => Category Object
(
[languages:protected] =>
[bok_resources:protected] =>
[bok_topics:protected] =>
[bok_keywords:protected] =>
[id:protected] => 47
[type:protected] => category
[parent:protected] => 2
[label:protected] => Bricklayer
[alreadyInSave:protected] =>
[alreadyInValidation:protected] =>
[validationFailures:protected] => Array
(
)
[_new:BaseObject:private] =>
[_deleted:BaseObject:private] =>
[modifiedColumns:protected] => Array
(
)
)
[49] => Category Object
(
[languages:protected] =>
[bok_resources:protected] =>
[bok_topics:protected] =>
[bok_keywords:protected] =>
[id:protected] => 49
[type:protected] => category
[parent:protected] => 2
[label:protected] => Carpenter
[alreadyInSave:protected] =>
[alreadyInValidation:protected] =>
[validationFailures:protected] => Array
(
)
[_new:BaseObject:private] =>
[_deleted:BaseObject:private] =>
[modifiedColumns:protected] => Array
(
)
)
[51] => Category Object
(
[languages:protected] =>
[bok_resources:protected] =>
[bok_topics:protected] =>
[bok_keywords:protected] =>
[id:protected] => 51
[type:protected] => category
[parent:protected] => 2
[label:protected] => Cement Mason
[alreadyInSave:protected] =>
[alreadyInValidation:protected] =>
[validationFailures:protected] => Array
(
)
[_new:BaseObject:private] =>
[_deleted:BaseObject:private] =>
[modifiedColumns:protected] => Array
(
)
)
[55] => Category Object
(
[languages:protected] =>
[bok_resources:protected] =>
[bok_topics:protected] =>
[bok_keywords:protected] =>
[id:protected] => 55
[type:protected] => category
[parent:protected] => 2
[label:protected] => Electrical Worker
[alreadyInSave:protected] =>
[alreadyInValidation:protected] =>
[validationFailures:protected] => Array
(
)
[_new:BaseObject:private] =>
[_deleted:BaseObject:private] =>
[modifiedColumns:protected] => Array
(
)
)
[64] => Category Object
(
[languages:protected] =>
[bok_resources:protected] =>
[bok_topics:protected] =>
[bok_keywords:protected] =>
[id:protected] => 64
[type:protected] => category
[parent:protected] => 2
[label:protected] => Laborer
[alreadyInSave:protected] =>
[alreadyInValidation:protected] =>
[validationFailures:protected] => Array
(
)
[_new:BaseObject:private] =>
[_deleted:BaseObject:private] =>
[modifiedColumns:protected] => Array
(
)
)
[68] => Category Object
(
[languages:protected] =>
[bok_resources:protected] =>
[bok_topics:protected] =>
[bok_keywords:protected] =>
[id:protected] => 68
[type:protected] => category
[parent:protected] => 2
[label:protected] => Maintenance Worker
[alreadyInSave:protected] =>
[alreadyInValidation:protected] =>
[validationFailures:protected] => Array
(
)
[_new:BaseObject:private] =>
[_deleted:BaseObject:private] =>
[modifiedColumns:protected] => Array
(
)
)
[75] => Category Object
(
[languages:protected] =>
[bok_resources:protected] =>
[bok_topics:protected] =>
[bok_keywords:protected] =>
[id:protected] => 75
[type:protected] => category
[parent:protected] => 2
[label:protected] => Plasterer
[alreadyInSave:protected] =>
[alreadyInValidation:protected] =>
[validationFailures:protected] => Array
(
)
[_new:BaseObject:private] =>
[_deleted:BaseObject:private] =>
[modifiedColumns:protected] => Array
(
)
)
[76] => Category Object
(
[languages:protected] =>
[bok_resources:protected] =>
[bok_topics:protected] =>
[bok_keywords:protected] =>
[id:protected] => 76
[type:protected] => category
[parent:protected] => 2
[label:protected] => Plumber/Pipefitter
[alreadyInSave:protected] =>
[alreadyInValidation:protected] =>
[validationFailures:protected] => Array
(
)
[_new:BaseObject:private] =>
[_deleted:BaseObject:private] =>
[modifiedColumns:protected] => Array
(
)
)
[63] => Category Object
(
[languages:protected] =>
[bok_resources:protected] =>
[bok_topics:protected] =>
[bok_keywords:protected] =>
[id:protected] => 63
[type:protected] => category
[parent:protected] => 2
[label:protected] => Reinforcing Ironworker
[alreadyInSave:protected] =>
[alreadyInValidation:protected] =>
[validationFailures:protected] => Array
(
)
[_new:BaseObject:private] =>
[_deleted:BaseObject:private] =>
[modifiedColumns:protected] => Array
(
)
)
[78] => Category Object
(
[languages:protected] =>
[bok_resources:protected] =>
[bok_topics:protected] =>
[bok_keywords:protected] =>
[id:protected] => 78
[type:protected] => category
[parent:protected] => 2
[label:protected] => Roofer/Waterproofer
[alreadyInSave:protected] =>
[alreadyInValidation:protected] =>
[validationFailures:protected] => Array
(
)
[_new:BaseObject:private] =>
[_deleted:BaseObject:private] =>
[modifiedColumns:protected] => Array
(
)
)
[79] => Category Object
(
[languages:protected] =>
[bok_resources:protected] =>
[bok_topics:protected] =>
[bok_keywords:protected] =>
[id:protected] => 79
[type:protected] => category
[parent:protected] => 2
[label:protected] => Scaffold Erector
[alreadyInSave:protected] =>
[alreadyInValidation:protected] =>
[validationFailures:protected] => Array
(
)
[_new:BaseObject:private] =>
[_deleted:BaseObject:private] =>
[modifiedColumns:protected] => Array
(
)
)
[82] => Category Object
(
[languages:protected] =>
[bok_resources:protected] =>
[bok_topics:protected] =>
[bok_keywords:protected] =>
[id:protected] => 82
[type:protected] => category
[parent:protected] => 2
[label:protected] => Stonemason
[alreadyInSave:protected] =>
[alreadyInValidation:protected] =>
[validationFailures:protected] => Array
(
)
[_new:BaseObject:private] =>
[_deleted:BaseObject:private] =>
[modifiedColumns:protected] => Array
(
)
)
[62] => Category Object
(
[languages:protected] =>
[bok_resources:protected] =>
[bok_topics:protected] =>
[bok_keywords:protected] =>
[id:protected] => 62
[type:protected] => category
[parent:protected] => 2
[label:protected] => Structural Ironworker
[alreadyInSave:protected] =>
[alreadyInValidation:protected] =>
[validationFailures:protected] => Array
(
)
[_new:BaseObject:private] =>
[_deleted:BaseObject:private] =>
[modifiedColumns:protected] => Array
(
)
)
[87] => Category Object
(
[languages:protected] =>
[bok_resources:protected] =>
[bok_topics:protected] =>
[bok_keywords:protected] =>
[id:protected] => 87
[type:protected] => category
[parent:protected] => 3
[label:protected] => Commercial & Institutional
[alreadyInSave:protected] =>
[alreadyInValidation:protected] =>
[validationFailures:protected] => Array
(
)
[_new:BaseObject:private] =>
[_deleted:BaseObject:private] =>
[modifiedColumns:protected] => Array
(
)
)
[88] => Category Object
(
[languages:protected] =>
[bok_resources:protected] =>
[bok_topics:protected] =>
[bok_keywords:protected] =>
[id:protected] => 88
[type:protected] => category
[parent:protected] => 3
[label:protected] => Demolition
[alreadyInSave:protected] =>
[alreadyInValidation:protected] =>
[validationFailures:protected] => Array
(
)
[_new:BaseObject:private] =>
[_deleted:BaseObject:private] =>
[modifiedColumns:protected] => Array
(
)
)
[91] => Category Object
(
[languages:protected] =>
[bok_resources:protected] =>
[bok_topics:protected] =>
[bok_keywords:protected] =>
[id:protected] => 91
[type:protected] => category
[parent:protected] => 3
[label:protected] => Heavy & Highway
[alreadyInSave:protected] =>
[alreadyInValidation:protected] =>
[validationFailures:protected] => Array
(
)
[_new:BaseObject:private] =>
[_deleted:BaseObject:private] =>
[modifiedColumns:protected] => Array
(
)
)
[90] => Category Object
(
[languages:protected] =>
[bok_resources:protected] =>
[bok_topics:protected] =>
[bok_keywords:protected] =>
[id:protected] => 90
[type:protected] => category
[parent:protected] => 3
[label:protected] => Industrial
[alreadyInSave:protected] =>
[alreadyInValidation:protected] =>
[validationFailures:protected] => Array
(
)
[_new:BaseObject:private] =>
[_deleted:BaseObject:private] =>
[modifiedColumns:protected] => Array
(
)
)
[93] => Category Object
(
[languages:protected] =>
[bok_resources:protected] =>
[bok_topics:protected] =>
[bok_keywords:protected] =>
[id:protected] => 93
[type:protected] => category
[parent:protected] => 3
[label:protected] => Renovations
[alreadyInSave:protected] =>
[alreadyInValidation:protected] =>
[validationFailures:protected] => Array
(
)
[_new:BaseObject:private] =>
[_deleted:BaseObject:private] =>
[modifiedColumns:protected] => Array
(
)
)
[94] => Category Object
(
[languages:protected] =>
[bok_resources:protected] =>
[bok_topics:protected] =>
[bok_keywords:protected] =>
[id:protected] => 94
[type:protected] => category
[parent:protected] => 3
[label:protected] => Residential
[alreadyInSave:protected] =>
[alreadyInValidation:protected] =>
[validationFailures:protected] => Array
(
)
[_new:BaseObject:private] =>
[_deleted:BaseObject:private] =>
[modifiedColumns:protected] => Array
(
)
)
[95] => Category Object
(
[languages:protected] =>
[bok_resources:protected] =>
[bok_topics:protected] =>
[bok_keywords:protected] =>
[id:protected] => 95
[type:protected] => category
[parent:protected] => 3
[label:protected] => Underground
[alreadyInSave:protected] =>
[alreadyInValidation:protected] =>
[validationFailures:protected] => Array
(
)
[_new:BaseObject:private] =>
[_deleted:BaseObject:private] =>
[modifiedColumns:protected] => Array
(
)
)
[97] => Category Object
(
[languages:protected] =>
[bok_resources:protected] =>
[bok_topics:protected] =>
[bok_keywords:protected] =>
[id:protected] => 97
[type:protected] => category
[parent:protected] => 5
[label:protected] => Images
[alreadyInSave:protected] =>
[alreadyInValidation:protected] =>
[validationFailures:protected] => Array
(
)
[_new:BaseObject:private] =>
[_deleted:BaseObject:private] =>
[modifiedColumns:protected] => Array
(
)
)
)
[categories_initialized:protected] => 1
[mapped_items:protected] =>
[content:protected] =>
[files:protected] =>
[language:protected] => Language Object
(
[id:protected] => 1
[code:protected] => en
[name:protected] => English
[alreadyInSave:protected] =>
[alreadyInValidation:protected] =>
[validationFailures:protected] => Array
(
)
[_new:BaseObject:private] =>
[_deleted:BaseObject:private] =>
[modifiedColumns:protected] => Array
(
)
)
[old_record:protected] =>
[id:protected] => 4006
[old_id:protected] =>
[elcosh_id:protected] => i002693
[type:protected] => image
[display_type:protected] => Image
[user_id:protected] => 0
[language_id:protected] => 1
[tagging_id:protected] => Bruce Lippy
[priority_id:protected] => 1
[title:protected] => Toolbox talk - long shot
[total_pages:protected] => 0
[billed_pages:protected] => 0
[publication_number:protected] =>
[part_of:protected] =>
[keywords:protected] => toolbox talk, tailgate talk, safety minute
[comments:protected] =>
[summary:protected] => This crew gathered every morning before starting work to discuss a new safety topic.
[transition_comments:protected] =>
[external_link:protected] =>
[consol_link:protected] => http://www.cpwrconstructionsolutions.org/electrical/solution/662/worker-training.html
[more_like_this:protected] => i002691,i002692,d001269,d000527
[permission_given_by:protected] =>
[published:protected] => T
[billable:protected] => F
[img_name:protected] =>
[img_ext:protected] => jpg
[img_width:protected] =>
[img_height:protected] =>
[img_credit:protected] => Morgan Zavertnik and Hoar Construction
[img_practice:protected] => good
[vid_source_id:protected] =>
[vid_running_time:protected] =>
[vid_intended_audience:protected] =>
[vid_acquisition_info:protected] =>
[vid_cost:protected] =>
[vid_producer:protected] =>
[vid_filename:protected] =>
[vid_filename_downloadable:protected] =>
[date_summary:protected] => November 2015
[date_permission_requested:protected] =>
[date_permission_received:protected] =>
[date_review_needed:protected] =>
[date_received:protected] => 03/02/16
[date_completed:protected] => 03/02/16
[date_billed:protected] =>
[date_modified:protected] => 03/02/16
[collBokExports:protected] =>
[lastBokExportCriteria:BaseElcoshItem:private] =>
[alreadyInSave:protected] =>
[alreadyInValidation:protected] =>
[validationFailures:protected] => Array
(
)
[_new:BaseObject:private] =>
[_deleted:BaseObject:private] =>
[modifiedColumns:protected] => Array
(
)
)
)
[2] => Search_Result Object
(
[title] => Construction bracing
[image] => /record/images/3995-p.jpg
[blurb] => This shows structural support that prevents collapses during construction....
[category] => Array
(
[0] => 12
[1] => 15
[2] => 21
[3] => 49
[4] => 51
[5] => 55
[6] => 56
[7] => 60
[8] => 64
[9] => 68
[10] => 74
[11] => 63
[12] => 78
[13] => 79
[14] => 80
[15] => 62
[16] => 87
[17] => 90
[18] => 97
)
[labels] => Array
(
[0] => Crushed/Struck By
[1] => Work Environment
[2] => Hazards
[3] => Falls
[6] => Scaffolds
[9] => Carpenter
[10] => Trades
[11] => Cement Mason
[13] => Electrical Worker
[15] => Elevator Constructor
[17] => HVAC
[19] => Laborer
[21] => Maintenance Worker
[23] => Pile Driver
[25] => Reinforcing Ironworker
[27] => Roofer/Waterproofer
[29] => Scaffold Erector
[31] => Sheetmetal Worker
[33] => Structural Ironworker
[35] => Commercial & Institutional
[36] => Jobsites
[37] => Industrial
[39] => Images
[40] => Media
[41] => Media & Documents
)
[type] => Images
[sub_category] =>
[url] => /image/3995/i002690/Construction%2Bbracing.html
[item:protected] => ImageRecord Object
(
[records:protected] => Array
(
)
[recordId:protected] =>
[searchWordClass:protected] =>
[searchWordPeerClass:protected] =>
[bok_record:protected] =>
[authors:protected] =>
[organizations:protected] =>
[collections:protected] =>
[categories:protected] => Array
(
[12] => Category Object
(
[languages:protected] =>
[bok_resources:protected] =>
[bok_topics:protected] =>
[bok_keywords:protected] =>
[id:protected] => 12
[type:protected] => category
[parent:protected] => 7
[label:protected] => Crushed/Struck By
[alreadyInSave:protected] =>
[alreadyInValidation:protected] =>
[validationFailures:protected] => Array
(
)
[_new:BaseObject:private] =>
[_deleted:BaseObject:private] =>
[modifiedColumns:protected] => Array
(
)
)
[15] => Category Object
(
[languages:protected] =>
[bok_resources:protected] =>
[bok_topics:protected] =>
[bok_keywords:protected] =>
[id:protected] => 15
[type:protected] => category
[parent:protected] => 7
[label:protected] => Falls
[alreadyInSave:protected] =>
[alreadyInValidation:protected] =>
[validationFailures:protected] => Array
(
)
[_new:BaseObject:private] =>
[_deleted:BaseObject:private] =>
[modifiedColumns:protected] => Array
(
)
)
[21] => Category Object
(
[languages:protected] =>
[bok_resources:protected] =>
[bok_topics:protected] =>
[bok_keywords:protected] =>
[id:protected] => 21
[type:protected] => category
[parent:protected] => 7
[label:protected] => Scaffolds
[alreadyInSave:protected] =>
[alreadyInValidation:protected] =>
[validationFailures:protected] => Array
(
)
[_new:BaseObject:private] =>
[_deleted:BaseObject:private] =>
[modifiedColumns:protected] => Array
(
)
)
[49] => Category Object
(
[languages:protected] =>
[bok_resources:protected] =>
[bok_topics:protected] =>
[bok_keywords:protected] =>
[id:protected] => 49
[type:protected] => category
[parent:protected] => 2
[label:protected] => Carpenter
[alreadyInSave:protected] =>
[alreadyInValidation:protected] =>
[validationFailures:protected] => Array
(
)
[_new:BaseObject:private] =>
[_deleted:BaseObject:private] =>
[modifiedColumns:protected] => Array
(
)
)
[51] => Category Object
(
[languages:protected] =>
[bok_resources:protected] =>
[bok_topics:protected] =>
[bok_keywords:protected] =>
[id:protected] => 51
[type:protected] => category
[parent:protected] => 2
[label:protected] => Cement Mason
[alreadyInSave:protected] =>
[alreadyInValidation:protected] =>
[validationFailures:protected] => Array
(
)
[_new:BaseObject:private] =>
[_deleted:BaseObject:private] =>
[modifiedColumns:protected] => Array
(
)
)
[55] => Category Object
(
[languages:protected] =>
[bok_resources:protected] =>
[bok_topics:protected] =>
[bok_keywords:protected] =>
[id:protected] => 55
[type:protected] => category
[parent:protected] => 2
[label:protected] => Electrical Worker
[alreadyInSave:protected] =>
[alreadyInValidation:protected] =>
[validationFailures:protected] => Array
(
)
[_new:BaseObject:private] =>
[_deleted:BaseObject:private] =>
[modifiedColumns:protected] => Array
(
)
)
[56] => Category Object
(
[languages:protected] =>
[bok_resources:protected] =>
[bok_topics:protected] =>
[bok_keywords:protected] =>
[id:protected] => 56
[type:protected] => category
[parent:protected] => 2
[label:protected] => Elevator Constructor
[alreadyInSave:protected] =>
[alreadyInValidation:protected] =>
[validationFailures:protected] => Array
(
)
[_new:BaseObject:private] =>
[_deleted:BaseObject:private] =>
[modifiedColumns:protected] => Array
(
)
)
[60] => Category Object
(
[languages:protected] =>
[bok_resources:protected] =>
[bok_topics:protected] =>
[bok_keywords:protected] =>
[id:protected] => 60
[type:protected] => category
[parent:protected] => 2
[label:protected] => HVAC
[alreadyInSave:protected] =>
[alreadyInValidation:protected] =>
[validationFailures:protected] => Array
(
)
[_new:BaseObject:private] =>
[_deleted:BaseObject:private] =>
[modifiedColumns:protected] => Array
(
)
)
[64] => Category Object
(
[languages:protected] =>
[bok_resources:protected] =>
[bok_topics:protected] =>
[bok_keywords:protected] =>
[id:protected] => 64
[type:protected] => category
[parent:protected] => 2
[label:protected] => Laborer
[alreadyInSave:protected] =>
[alreadyInValidation:protected] =>
[validationFailures:protected] => Array
(
)
[_new:BaseObject:private] =>
[_deleted:BaseObject:private] =>
[modifiedColumns:protected] => Array
(
)
)
[68] => Category Object
(
[languages:protected] =>
[bok_resources:protected] =>
[bok_topics:protected] =>
[bok_keywords:protected] =>
[id:protected] => 68
[type:protected] => category
[parent:protected] => 2
[label:protected] => Maintenance Worker
[alreadyInSave:protected] =>
[alreadyInValidation:protected] =>
[validationFailures:protected] => Array
(
)
[_new:BaseObject:private] =>
[_deleted:BaseObject:private] =>
[modifiedColumns:protected] => Array
(
)
)
[74] => Category Object
(
[languages:protected] =>
[bok_resources:protected] =>
[bok_topics:protected] =>
[bok_keywords:protected] =>
[id:protected] => 74
[type:protected] => category
[parent:protected] => 2
[label:protected] => Pile Driver
[alreadyInSave:protected] =>
[alreadyInValidation:protected] =>
[validationFailures:protected] => Array
(
)
[_new:BaseObject:private] =>
[_deleted:BaseObject:private] =>
[modifiedColumns:protected] => Array
(
)
)
[63] => Category Object
(
[languages:protected] =>
[bok_resources:protected] =>
[bok_topics:protected] =>
[bok_keywords:protected] =>
[id:protected] => 63
[type:protected] => category
[parent:protected] => 2
[label:protected] => Reinforcing Ironworker
[alreadyInSave:protected] =>
[alreadyInValidation:protected] =>
[validationFailures:protected] => Array
(
)
[_new:BaseObject:private] =>
[_deleted:BaseObject:private] =>
[modifiedColumns:protected] => Array
(
)
)
[78] => Category Object
(
[languages:protected] =>
[bok_resources:protected] =>
[bok_topics:protected] =>
[bok_keywords:protected] =>
[id:protected] => 78
[type:protected] => category
[parent:protected] => 2
[label:protected] => Roofer/Waterproofer
[alreadyInSave:protected] =>
[alreadyInValidation:protected] =>
[validationFailures:protected] => Array
(
)
[_new:BaseObject:private] =>
[_deleted:BaseObject:private] =>
[modifiedColumns:protected] => Array
(
)
)
[79] => Category Object
(
[languages:protected] =>
[bok_resources:protected] =>
[bok_topics:protected] =>
[bok_keywords:protected] =>
[id:protected] => 79
[type:protected] => category
[parent:protected] => 2
[label:protected] => Scaffold Erector
[alreadyInSave:protected] =>
[alreadyInValidation:protected] =>
[validationFailures:protected] => Array
(
)
[_new:BaseObject:private] =>
[_deleted:BaseObject:private] =>
[modifiedColumns:protected] => Array
(
)
)
[80] => Category Object
(
[languages:protected] =>
[bok_resources:protected] =>
[bok_topics:protected] =>
[bok_keywords:protected] =>
[id:protected] => 80
[type:protected] => category
[parent:protected] => 2
[label:protected] => Sheetmetal Worker
[alreadyInSave:protected] =>
[alreadyInValidation:protected] =>
[validationFailures:protected] => Array
(
)
[_new:BaseObject:private] =>
[_deleted:BaseObject:private] =>
[modifiedColumns:protected] => Array
(
)
)
[62] => Category Object
(
[languages:protected] =>
[bok_resources:protected] =>
[bok_topics:protected] =>
[bok_keywords:protected] =>
[id:protected] => 62
[type:protected] => category
[parent:protected] => 2
[label:protected] => Structural Ironworker
[alreadyInSave:protected] =>
[alreadyInValidation:protected] =>
[validationFailures:protected] => Array
(
)
[_new:BaseObject:private] =>
[_deleted:BaseObject:private] =>
[modifiedColumns:protected] => Array
(
)
)
[87] => Category Object
(
[languages:protected] =>
[bok_resources:protected] =>
[bok_topics:protected] =>
[bok_keywords:protected] =>
[id:protected] => 87
[type:protected] => category
[parent:protected] => 3
[label:protected] => Commercial & Institutional
[alreadyInSave:protected] =>
[alreadyInValidation:protected] =>
[validationFailures:protected] => Array
(
)
[_new:BaseObject:private] =>
[_deleted:BaseObject:private] =>
[modifiedColumns:protected] => Array
(
)
)
[90] => Category Object
(
[languages:protected] =>
[bok_resources:protected] =>
[bok_topics:protected] =>
[bok_keywords:protected] =>
[id:protected] => 90
[type:protected] => category
[parent:protected] => 3
[label:protected] => Industrial
[alreadyInSave:protected] =>
[alreadyInValidation:protected] =>
[validationFailures:protected] => Array
(
)
[_new:BaseObject:private] =>
[_deleted:BaseObject:private] =>
[modifiedColumns:protected] => Array
(
)
)
[97] => Category Object
(
[languages:protected] =>
[bok_resources:protected] =>
[bok_topics:protected] =>
[bok_keywords:protected] =>
[id:protected] => 97
[type:protected] => category
[parent:protected] => 5
[label:protected] => Images
[alreadyInSave:protected] =>
[alreadyInValidation:protected] =>
[validationFailures:protected] => Array
(
)
[_new:BaseObject:private] =>
[_deleted:BaseObject:private] =>
[modifiedColumns:protected] => Array
(
)
)
)
[categories_initialized:protected] => 1
[mapped_items:protected] =>
[content:protected] =>
[files:protected] =>
[language:protected] => Language Object
(
[id:protected] => 1
[code:protected] => en
[name:protected] => English
[alreadyInSave:protected] =>
[alreadyInValidation:protected] =>
[validationFailures:protected] => Array
(
)
[_new:BaseObject:private] =>
[_deleted:BaseObject:private] =>
[modifiedColumns:protected] => Array
(
)
)
[old_record:protected] =>
[id:protected] => 3995
[old_id:protected] =>
[elcosh_id:protected] => i002690
[type:protected] => image
[display_type:protected] => Image
[user_id:protected] => 0
[language_id:protected] => 1
[tagging_id:protected] => Bruce Lippy
[priority_id:protected] => 1
[title:protected] => Construction bracing
[total_pages:protected] => 0
[billed_pages:protected] => 0
[publication_number:protected] =>
[part_of:protected] =>
[keywords:protected] => Bracing, support, scaffold
[comments:protected] =>
[summary:protected] => This shows structural support that prevents collapses during construction.
[transition_comments:protected] =>
[external_link:protected] =>
[consol_link:protected] => http://www.cpwrconstructionsolutions.org/masonry/solution/8/adjustable-tower-scaffold.html
[more_like_this:protected] => i002660
[permission_given_by:protected] =>
[published:protected] => T
[billable:protected] => F
[img_name:protected] =>
[img_ext:protected] => jpg
[img_width:protected] =>
[img_height:protected] =>
[img_credit:protected] => Photo by Pam Susi
[img_practice:protected] => good
[vid_source_id:protected] =>
[vid_running_time:protected] =>
[vid_intended_audience:protected] =>
[vid_acquisition_info:protected] =>
[vid_cost:protected] =>
[vid_producer:protected] =>
[vid_filename:protected] =>
[vid_filename_downloadable:protected] =>
[date_summary:protected] => January 2016
[date_permission_requested:protected] =>
[date_permission_received:protected] =>
[date_review_needed:protected] =>
[date_received:protected] => 02/01/16
[date_completed:protected] => 02/01/16
[date_billed:protected] =>
[date_modified:protected] => 02/01/16
[collBokExports:protected] =>
[lastBokExportCriteria:BaseElcoshItem:private] =>
[alreadyInSave:protected] =>
[alreadyInValidation:protected] =>
[validationFailures:protected] => Array
(
)
[_new:BaseObject:private] =>
[_deleted:BaseObject:private] =>
[modifiedColumns:protected] => Array
(
)
)
)
[3] => Search_Result Object
(
[title] => Suspended Scaffold Outriggers
[image] => /record/images/3975-p.jpg
[blurb] => Suspended scaffolds systems must be designed by a qualified person and inspected daily by a competent person. The supports for the counterweight must...
[category] => Array
(
[0] => 97
[1] => 15
[2] => 47
[3] => 49
[4] => 79
[5] => 87
)
[labels] => Array
(
[0] => Images
[1] => Media
[2] => Media & Documents
[3] => Falls
[4] => Work Environment
[5] => Hazards
[6] => Bricklayer
[7] => Trades
[8] => Carpenter
[10] => Scaffold Erector
[12] => Commercial & Institutional
[13] => Jobsites
)
[type] => Images
[sub_category] =>
[url] => /image/3975/i002683/Suspended%2BScaffold%2BOutriggers.html
[item:protected] => ImageRecord Object
(
[records:protected] => Array
(
)
[recordId:protected] =>
[searchWordClass:protected] =>
[searchWordPeerClass:protected] =>
[bok_record:protected] =>
[authors:protected] =>
[organizations:protected] =>
[collections:protected] =>
[categories:protected] => Array
(
[97] => Category Object
(
[languages:protected] =>
[bok_resources:protected] =>
[bok_topics:protected] =>
[bok_keywords:protected] =>
[id:protected] => 97
[type:protected] => category
[parent:protected] => 5
[label:protected] => Images
[alreadyInSave:protected] =>
[alreadyInValidation:protected] =>
[validationFailures:protected] => Array
(
)
[_new:BaseObject:private] =>
[_deleted:BaseObject:private] =>
[modifiedColumns:protected] => Array
(
)
)
[15] => Category Object
(
[languages:protected] =>
[bok_resources:protected] =>
[bok_topics:protected] =>
[bok_keywords:protected] =>
[id:protected] => 15
[type:protected] => category
[parent:protected] => 7
[label:protected] => Falls
[alreadyInSave:protected] =>
[alreadyInValidation:protected] =>
[validationFailures:protected] => Array
(
)
[_new:BaseObject:private] =>
[_deleted:BaseObject:private] =>
[modifiedColumns:protected] => Array
(
)
)
[47] => Category Object
(
[languages:protected] =>
[bok_resources:protected] =>
[bok_topics:protected] =>
[bok_keywords:protected] =>
[id:protected] => 47
[type:protected] => category
[parent:protected] => 2
[label:protected] => Bricklayer
[alreadyInSave:protected] =>
[alreadyInValidation:protected] =>
[validationFailures:protected] => Array
(
)
[_new:BaseObject:private] =>
[_deleted:BaseObject:private] =>
[modifiedColumns:protected] => Array
(
)
)
[49] => Category Object
(
[languages:protected] =>
[bok_resources:protected] =>
[bok_topics:protected] =>
[bok_keywords:protected] =>
[id:protected] => 49
[type:protected] => category
[parent:protected] => 2
[label:protected] => Carpenter
[alreadyInSave:protected] =>
[alreadyInValidation:protected] =>
[validationFailures:protected] => Array
(
)
[_new:BaseObject:private] =>
[_deleted:BaseObject:private] =>
[modifiedColumns:protected] => Array
(
)
)
[79] => Category Object
(
[languages:protected] =>
[bok_resources:protected] =>
[bok_topics:protected] =>
[bok_keywords:protected] =>
[id:protected] => 79
[type:protected] => category
[parent:protected] => 2
[label:protected] => Scaffold Erector
[alreadyInSave:protected] =>
[alreadyInValidation:protected] =>
[validationFailures:protected] => Array
(
)
[_new:BaseObject:private] =>
[_deleted:BaseObject:private] =>
[modifiedColumns:protected] => Array
(
)
)
[87] => Category Object
(
[languages:protected] =>
[bok_resources:protected] =>
[bok_topics:protected] =>
[bok_keywords:protected] =>
[id:protected] => 87
[type:protected] => category
[parent:protected] => 3
[label:protected] => Commercial & Institutional
[alreadyInSave:protected] =>
[alreadyInValidation:protected] =>
[validationFailures:protected] => Array
(
)
[_new:BaseObject:private] =>
[_deleted:BaseObject:private] =>
[modifiedColumns:protected] => Array
(
)
)
)
[categories_initialized:protected] => 1
[mapped_items:protected] =>
[content:protected] =>
[files:protected] =>
[language:protected] => Language Object
(
[id:protected] => 1
[code:protected] => en
[name:protected] => English
[alreadyInSave:protected] =>
[alreadyInValidation:protected] =>
[validationFailures:protected] => Array
(
)
[_new:BaseObject:private] =>
[_deleted:BaseObject:private] =>
[modifiedColumns:protected] => Array
(
)
)
[old_record:protected] =>
[id:protected] => 3975
[old_id:protected] =>
[elcosh_id:protected] => i002683
[type:protected] => image
[display_type:protected] => Image
[user_id:protected] => 0
[language_id:protected] => 1
[tagging_id:protected] => John Newquist
[priority_id:protected] => 1
[title:protected] => Suspended Scaffold Outriggers
[total_pages:protected] => 0
[billed_pages:protected] => 0
[publication_number:protected] =>
[part_of:protected] =>
[keywords:protected] => suspended, scaffold, swing, stage, fall, protection, counterweight, qualified, person
[comments:protected] =>
[summary:protected] => Suspended scaffolds systems must be designed by a qualified person and inspected daily by a competent person. The supports for the counterweight must be designed with a safety factor of four.
[transition_comments:protected] =>
[external_link:protected] =>
[consol_link:protected] => http://www.cpwrconstructionsolutions.org/task/Erect%2Band%2Bdismantle%2Bscaffolds/
[more_like_this:protected] => d000244,d000359,i000253,i000407
[permission_given_by:protected] =>
[published:protected] => T
[billable:protected] => F
[img_name:protected] =>
[img_ext:protected] => jpg
[img_width:protected] =>
[img_height:protected] =>
[img_credit:protected] => MetroPark, Miller and Long
[img_practice:protected] => not_applicable
[vid_source_id:protected] =>
[vid_running_time:protected] =>
[vid_intended_audience:protected] =>
[vid_acquisition_info:protected] =>
[vid_cost:protected] =>
[vid_producer:protected] =>
[vid_filename:protected] =>
[vid_filename_downloadable:protected] =>
[date_summary:protected] => August 28 2015
[date_permission_requested:protected] =>
[date_permission_received:protected] =>
[date_review_needed:protected] =>
[date_received:protected] => 08/28/15
[date_completed:protected] => 08/28/15
[date_billed:protected] =>
[date_modified:protected] => 08/28/15
[collBokExports:protected] =>
[lastBokExportCriteria:BaseElcoshItem:private] =>
[alreadyInSave:protected] =>
[alreadyInValidation:protected] =>
[validationFailures:protected] => Array
(
)
[_new:BaseObject:private] =>
[_deleted:BaseObject:private] =>
[modifiedColumns:protected] => Array
(
)
)
)
[4] => Search_Result Object
(
[title] => Suspended scaffold
[image] => /record/images/3976-p.jpg
[blurb] => Suspended scaffold outrigger beams must have stops to prevent the hangers from sliding of the end of the outriggers. Wire rope supported must be desig...
[category] => Array
(
[0] => 97
[1] => 15
[2] => 47
[3] => 50
[4] => 79
[5] => 87
)
[labels] => Array
(
[0] => Images
[1] => Media
[2] => Media & Documents
[3] => Falls
[4] => Work Environment
[5] => Hazards
[6] => Bricklayer
[7] => Trades
[8] => Carpet Layer
[10] => Scaffold Erector
[12] => Commercial & Institutional
[13] => Jobsites
)
[type] => Images
[sub_category] =>
[url] => /image/3976/i002684/Suspended%2Bscaffold.html
[item:protected] => ImageRecord Object
(
[records:protected] => Array
(
)
[recordId:protected] =>
[searchWordClass:protected] =>
[searchWordPeerClass:protected] =>
[bok_record:protected] =>
[authors:protected] =>
[organizations:protected] =>
[collections:protected] =>
[categories:protected] => Array
(
[97] => Category Object
(
[languages:protected] =>
[bok_resources:protected] =>
[bok_topics:protected] =>
[bok_keywords:protected] =>
[id:protected] => 97
[type:protected] => category
[parent:protected] => 5
[label:protected] => Images
[alreadyInSave:protected] =>
[alreadyInValidation:protected] =>
[validationFailures:protected] => Array
(
)
[_new:BaseObject:private] =>
[_deleted:BaseObject:private] =>
[modifiedColumns:protected] => Array
(
)
)
[15] => Category Object
(
[languages:protected] =>
[bok_resources:protected] =>
[bok_topics:protected] =>
[bok_keywords:protected] =>
[id:protected] => 15
[type:protected] => category
[parent:protected] => 7
[label:protected] => Falls
[alreadyInSave:protected] =>
[alreadyInValidation:protected] =>
[validationFailures:protected] => Array
(
)
[_new:BaseObject:private] =>
[_deleted:BaseObject:private] =>
[modifiedColumns:protected] => Array
(
)
)
[47] => Category Object
(
[languages:protected] =>
[bok_resources:protected] =>
[bok_topics:protected] =>
[bok_keywords:protected] =>
[id:protected] => 47
[type:protected] => category
[parent:protected] => 2
[label:protected] => Bricklayer
[alreadyInSave:protected] =>
[alreadyInValidation:protected] =>
[validationFailures:protected] => Array
(
)
[_new:BaseObject:private] =>
[_deleted:BaseObject:private] =>
[modifiedColumns:protected] => Array
(
)
)
[50] => Category Object
(
[languages:protected] =>
[bok_resources:protected] =>
[bok_topics:protected] =>
[bok_keywords:protected] =>
[id:protected] => 50
[type:protected] => category
[parent:protected] => 2
[label:protected] => Carpet Layer
[alreadyInSave:protected] =>
[alreadyInValidation:protected] =>
[validationFailures:protected] => Array
(
)
[_new:BaseObject:private] =>
[_deleted:BaseObject:private] =>
[modifiedColumns:protected] => Array
(
)
)
[79] => Category Object
(
[languages:protected] =>
[bok_resources:protected] =>
[bok_topics:protected] =>
[bok_keywords:protected] =>
[id:protected] => 79
[type:protected] => category
[parent:protected] => 2
[label:protected] => Scaffold Erector
[alreadyInSave:protected] =>
[alreadyInValidation:protected] =>
[validationFailures:protected] => Array
(
)
[_new:BaseObject:private] =>
[_deleted:BaseObject:private] =>
[modifiedColumns:protected] => Array
(
)
)
[87] => Category Object
(
[languages:protected] =>
[bok_resources:protected] =>
[bok_topics:protected] =>
[bok_keywords:protected] =>
[id:protected] => 87
[type:protected] => category
[parent:protected] => 3
[label:protected] => Commercial & Institutional
[alreadyInSave:protected] =>
[alreadyInValidation:protected] =>
[validationFailures:protected] => Array
(
)
[_new:BaseObject:private] =>
[_deleted:BaseObject:private] =>
[modifiedColumns:protected] => Array
(
)
)
)
[categories_initialized:protected] => 1
[mapped_items:protected] =>
[content:protected] =>
[files:protected] =>
[language:protected] => Language Object
(
[id:protected] => 1
[code:protected] => en
[name:protected] => English
[alreadyInSave:protected] =>
[alreadyInValidation:protected] =>
[validationFailures:protected] => Array
(
)
[_new:BaseObject:private] =>
[_deleted:BaseObject:private] =>
[modifiedColumns:protected] => Array
(
)
)
[old_record:protected] =>
[id:protected] => 3976
[old_id:protected] =>
[elcosh_id:protected] => i002684
[type:protected] => image
[display_type:protected] => Image
[user_id:protected] => 0
[language_id:protected] => 1
[tagging_id:protected] => John Newquist
[priority_id:protected] => 1
[title:protected] => Suspended scaffold
[total_pages:protected] => 0
[billed_pages:protected] => 0
[publication_number:protected] =>
[part_of:protected] =>
[keywords:protected] => Suspended, scaffold, outrigger, beams, erection, wire, rope, inspection, swing, stage,
[comments:protected] =>
[summary:protected] => Suspended scaffold outrigger beams must have stops to prevent the hangers from sliding of the end of the outriggers. Wire rope supported must be designed with a safety factor of 6. The scaffold must be inspected by a competent person daily.
[transition_comments:protected] =>
[external_link:protected] =>
[consol_link:protected] => http://www.cpwrconstructionsolutions.org/task/Erect%2Band%2Bdismantle%2Bscaffolds/
[more_like_this:protected] => i002683, d000244, i000407, d000606
[permission_given_by:protected] =>
[published:protected] => T
[billable:protected] => F
[img_name:protected] =>
[img_ext:protected] => jpg
[img_width:protected] =>
[img_height:protected] =>
[img_credit:protected] => Metropark, Miller and Long
[img_practice:protected] => not_applicable
[vid_source_id:protected] =>
[vid_running_time:protected] =>
[vid_intended_audience:protected] =>
[vid_acquisition_info:protected] =>
[vid_cost:protected] =>
[vid_producer:protected] =>
[vid_filename:protected] =>
[vid_filename_downloadable:protected] =>
[date_summary:protected] =>
[date_permission_requested:protected] =>
[date_permission_received:protected] =>
[date_review_needed:protected] =>
[date_received:protected] => 08/28/15
[date_completed:protected] => 08/28/15
[date_billed:protected] =>
[date_modified:protected] => 08/28/15
[collBokExports:protected] =>
[lastBokExportCriteria:BaseElcoshItem:private] =>
[alreadyInSave:protected] =>
[alreadyInValidation:protected] =>
[validationFailures:protected] => Array
(
)
[_new:BaseObject:private] =>
[_deleted:BaseObject:private] =>
[modifiedColumns:protected] => Array
(
)
)
)
[5] => Search_Result Object
(
[title] => Three Tower Cranes
[image] => /record/images/3979-p.jpg
[blurb] => Whenever multiple tower cranes are used, there needs to be preplanning to ensure that the tower cranes cannot hit each other loads. This is accomplish...
[category] => Array
(
[0] => 97
[1] => 11
[2] => 64
[3] => 70
[4] => 62
[5] => 87
)
[labels] => Array
(
[0] => Images
[1] => Media
[2] => Media & Documents
[3] => Cranes & Hoists
[4] => Work Environment
[5] => Hazards
[6] => Laborer
[7] => Trades
[8] => Operating Engineer
[10] => Structural Ironworker
[12] => Commercial & Institutional
[13] => Jobsites
)
[type] => Images
[sub_category] =>
[url] => /image/3979/i002687/Three%2BTower%2BCranes.html
[item:protected] => ImageRecord Object
(
[records:protected] => Array
(
)
[recordId:protected] =>
[searchWordClass:protected] =>
[searchWordPeerClass:protected] =>
[bok_record:protected] =>
[authors:protected] =>
[organizations:protected] =>
[collections:protected] =>
[categories:protected] => Array
(
[97] => Category Object
(
[languages:protected] =>
[bok_resources:protected] =>
[bok_topics:protected] =>
[bok_keywords:protected] =>
[id:protected] => 97
[type:protected] => category
[parent:protected] => 5
[label:protected] => Images
[alreadyInSave:protected] =>
[alreadyInValidation:protected] =>
[validationFailures:protected] => Array
(
)
[_new:BaseObject:private] =>
[_deleted:BaseObject:private] =>
[modifiedColumns:protected] => Array
(
)
)
[11] => Category Object
(
[languages:protected] =>
[bok_resources:protected] =>
[bok_topics:protected] =>
[bok_keywords:protected] =>
[id:protected] => 11
[type:protected] => category
[parent:protected] => 7
[label:protected] => Cranes & Hoists
[alreadyInSave:protected] =>
[alreadyInValidation:protected] =>
[validationFailures:protected] => Array
(
)
[_new:BaseObject:private] =>
[_deleted:BaseObject:private] =>
[modifiedColumns:protected] => Array
(
)
)
[64] => Category Object
(
[languages:protected] =>
[bok_resources:protected] =>
[bok_topics:protected] =>
[bok_keywords:protected] =>
[id:protected] => 64
[type:protected] => category
[parent:protected] => 2
[label:protected] => Laborer
[alreadyInSave:protected] =>
[alreadyInValidation:protected] =>
[validationFailures:protected] => Array
(
)
[_new:BaseObject:private] =>
[_deleted:BaseObject:private] =>
[modifiedColumns:protected] => Array
(
)
)
[70] => Category Object
(
[languages:protected] =>
[bok_resources:protected] =>
[bok_topics:protected] =>
[bok_keywords:protected] =>
[id:protected] => 70
[type:protected] => category
[parent:protected] => 2
[label:protected] => Operating Engineer
[alreadyInSave:protected] =>
[alreadyInValidation:protected] =>
[validationFailures:protected] => Array
(
)
[_new:BaseObject:private] =>
[_deleted:BaseObject:private] =>
[modifiedColumns:protected] => Array
(
)
)
[62] => Category Object
(
[languages:protected] =>
[bok_resources:protected] =>
[bok_topics:protected] =>
[bok_keywords:protected] =>
[id:protected] => 62
[type:protected] => category
[parent:protected] => 2
[label:protected] => Structural Ironworker
[alreadyInSave:protected] =>
[alreadyInValidation:protected] =>
[validationFailures:protected] => Array
(
)
[_new:BaseObject:private] =>
[_deleted:BaseObject:private] =>
[modifiedColumns:protected] => Array
(
)
)
[87] => Category Object
(
[languages:protected] =>
[bok_resources:protected] =>
[bok_topics:protected] =>
[bok_keywords:protected] =>
[id:protected] => 87
[type:protected] => category
[parent:protected] => 3
[label:protected] => Commercial & Institutional
[alreadyInSave:protected] =>
[alreadyInValidation:protected] =>
[validationFailures:protected] => Array
(
)
[_new:BaseObject:private] =>
[_deleted:BaseObject:private] =>
[modifiedColumns:protected] => Array
(
)
)
)
[categories_initialized:protected] => 1
[mapped_items:protected] =>
[content:protected] =>
[files:protected] =>
[language:protected] => Language Object
(
[id:protected] => 1
[code:protected] => en
[name:protected] => English
[alreadyInSave:protected] =>
[alreadyInValidation:protected] =>
[validationFailures:protected] => Array
(
)
[_new:BaseObject:private] =>
[_deleted:BaseObject:private] =>
[modifiedColumns:protected] => Array
(
)
)
[old_record:protected] =>
[id:protected] => 3979
[old_id:protected] =>
[elcosh_id:protected] => i002687
[type:protected] => image
[display_type:protected] => Image
[user_id:protected] => 0
[language_id:protected] => 1
[tagging_id:protected] => John Newquist
[priority_id:protected] => 1
[title:protected] => Three Tower Cranes
[total_pages:protected] => 0
[billed_pages:protected] => 0
[publication_number:protected] =>
[part_of:protected] =>
[keywords:protected] =>
[comments:protected] =>
[summary:protected] => Whenever multiple tower cranes are used, there needs to be preplanning to ensure that the tower cranes cannot hit each other loads. This is accomplished by setting swing restrictions, marking the ground for allowable crane travel and training of the crane signal persons.
[transition_comments:protected] =>
[external_link:protected] =>
[consol_link:protected] => http://www.cpwrconstructionsolutions.org/work/6/184/
[more_like_this:protected] => d001029, d000010, i001280, i001221
[permission_given_by:protected] =>
[published:protected] => T
[billable:protected] => F
[img_name:protected] =>
[img_ext:protected] => jpg
[img_width:protected] =>
[img_height:protected] =>
[img_credit:protected] => Metropark
[img_practice:protected] => not_applicable
[vid_source_id:protected] =>
[vid_running_time:protected] =>
[vid_intended_audience:protected] =>
[vid_acquisition_info:protected] =>
[vid_cost:protected] =>
[vid_producer:protected] =>
[vid_filename:protected] =>
[vid_filename_downloadable:protected] =>
[date_summary:protected] => August 28 2015
[date_permission_requested:protected] =>
[date_permission_received:protected] =>
[date_review_needed:protected] =>
[date_received:protected] => 08/28/15
[date_completed:protected] => 08/28/15
[date_billed:protected] =>
[date_modified:protected] => 08/28/15
[collBokExports:protected] =>
[lastBokExportCriteria:BaseElcoshItem:private] =>
[alreadyInSave:protected] =>
[alreadyInValidation:protected] =>
[validationFailures:protected] => Array
(
)
[_new:BaseObject:private] =>
[_deleted:BaseObject:private] =>
[modifiedColumns:protected] => Array
(
)
)
)
)
[preview_mode] =>
[description] => This third in a series of 6 Tool Box Talks on construction ergonomics focuses on proper positioning to avoid injuries. The TBT recommends: 1)prop up a task off of the floor by using a raised surface, cart, baker scaffold, saw horses to prep materials near waist height, 2)move the lift or ladder in the best position for the work, 3)position the lift in front of the area you plan to work without trying to reach too far on either side of the lift.
[keywords] => position, positioning, ergonomics, ergo, carpal tunnel, MSD, musculoskeletal disorder
[related_items] => Array
(
[Handouts] => Array
(
[0] => DocumentRecord Object
(
[records:protected] => Array
(
)
[recordId:protected] =>
[searchWordClass:protected] =>
[searchWordPeerClass:protected] =>
[bok_record:protected] =>
[authors:protected] =>
[organizations:protected] =>
[collections:protected] =>
[categories:protected] =>
[categories_initialized:protected] =>
[mapped_items:protected] =>
[content:protected] =>
[files:protected] =>
[language:protected] => Language Object
(
[id:protected] => 1
[code:protected] => en
[name:protected] => English
[alreadyInSave:protected] =>
[alreadyInValidation:protected] =>
[validationFailures:protected] => Array
(
)
[_new:BaseObject:private] =>
[_deleted:BaseObject:private] =>
[modifiedColumns:protected] => Array
(
)
)
[old_record:protected] =>
[id:protected] => 3833
[old_id:protected] =>
[elcosh_id:protected] => d001303
[type:protected] => document
[display_type:protected] => HTML w/ PDF
[user_id:protected] => 25
[language_id:protected] => 1
[tagging_id:protected] => Bruce Lippy
[priority_id:protected] => 1
[title:protected] => Overview of Toolbox Talks on Ergonomics Developed by Washington University in St. Louis
[total_pages:protected] => 3
[billed_pages:protected] => 3
[publication_number:protected] =>
[part_of:protected] =>
[keywords:protected] => ergonomics, musculoskeletal disorders, MSDs
[comments:protected] => 7-28-2014 - Originally submitted as "HTML w/ doc and PDF", Jeff Nelson asked Bruce Lippy for permission to switch it to "HTML w/ PDF" -- permission was given
[summary:protected] => This overviews provides a background on how Washington University in St. Louis developed this series of six toolbox talks on ergonomics. It also describes how they tested the effectiveness of these communication tools, concluding that the guide was valuable for improving the delivery of ergonomics training and interaction between the safety representative and workers. The researchers recommend preparing site-specific information prior to the talk and interacting with workers to discuss problems and ergonomic solutions during the safety meetings.
[transition_comments:protected] =>
[external_link:protected] =>
[consol_link:protected] =>
[more_like_this:protected] =>
[permission_given_by:protected] => Lisa Jaegers, Washington U. in St. Louis
[published:protected] => T
[billable:protected] => F
[img_name:protected] =>
[img_ext:protected] => png
[img_width:protected] =>
[img_height:protected] =>
[img_credit:protected] =>
[img_practice:protected] =>
[vid_source_id:protected] =>
[vid_running_time:protected] =>
[vid_intended_audience:protected] =>
[vid_acquisition_info:protected] =>
[vid_cost:protected] =>
[vid_producer:protected] =>
[vid_filename:protected] =>
[vid_filename_downloadable:protected] =>
[date_summary:protected] => 2014
[date_permission_requested:protected] =>
[date_permission_received:protected] =>
[date_review_needed:protected] =>
[date_received:protected] => 06/11/14
[date_completed:protected] => 07/29/14
[date_billed:protected] =>
[date_modified:protected] => 07/29/14
[collBokExports:protected] =>
[lastBokExportCriteria:BaseElcoshItem:private] =>
[alreadyInSave:protected] =>
[alreadyInValidation:protected] =>
[validationFailures:protected] => Array
(
)
[_new:BaseObject:private] =>
[_deleted:BaseObject:private] =>
[modifiedColumns:protected] => Array
(
)
)
)
[Toolbox Talks] => Array
(
[0] => DocumentRecord Object
(
[records:protected] => Array
(
)
[recordId:protected] =>
[searchWordClass:protected] =>
[searchWordPeerClass:protected] =>
[bok_record:protected] =>
[authors:protected] =>
[organizations:protected] =>
[collections:protected] =>
[categories:protected] =>
[categories_initialized:protected] =>
[mapped_items:protected] =>
[content:protected] =>
[files:protected] =>
[language:protected] => Language Object
(
[id:protected] => 1
[code:protected] => en
[name:protected] => English
[alreadyInSave:protected] =>
[alreadyInValidation:protected] =>
[validationFailures:protected] => Array
(
)
[_new:BaseObject:private] =>
[_deleted:BaseObject:private] =>
[modifiedColumns:protected] => Array
(
)
)
[old_record:protected] =>
[id:protected] => 3835
[old_id:protected] =>
[elcosh_id:protected] => d001304
[type:protected] => document
[display_type:protected] => HTML w/ PDF
[user_id:protected] => 25
[language_id:protected] => 1
[tagging_id:protected] => Bruce Lippy
[priority_id:protected] => 1
[title:protected] => Ergonomics Tool Box Talks (TBT) Training Guide
[total_pages:protected] => 2
[billed_pages:protected] => 2
[publication_number:protected] =>
[part_of:protected] =>
[keywords:protected] => Ergonomics, carpal tunnel, muscular skeletal disorders, msd
[comments:protected] =>
[summary:protected] => CPWR-funded ergonomics research by Washington University at St. Louis led to the development of 6 tool box talks. This guide is an explanation of how to deliver the talks for maximum effectiveness. This guide should be reviewed before delivering any of the talks because it makes important recommendations like:
• If possible, give the TBTs as a part of the crew’s regular safety meetings so that ergonomics is included in the safety discussion.
• Try to locate an area with few distractions for gathering the crew.
• For a team approach, invite the work crew, site superintendent, project manager and other general contractor and/or subcontractor reps who you feel may be helpful in supporting the training and ergonomics solutions.
[transition_comments:protected] =>
[external_link:protected] =>
[consol_link:protected] =>
[more_like_this:protected] => d001303,d001305,d001306,d001307,d001308,d001309,d001310
[permission_given_by:protected] =>
[published:protected] => T
[billable:protected] => F
[img_name:protected] =>
[img_ext:protected] => png
[img_width:protected] =>
[img_height:protected] =>
[img_credit:protected] =>
[img_practice:protected] =>
[vid_source_id:protected] =>
[vid_running_time:protected] =>
[vid_intended_audience:protected] =>
[vid_acquisition_info:protected] =>
[vid_cost:protected] =>
[vid_producer:protected] =>
[vid_filename:protected] =>
[vid_filename_downloadable:protected] =>
[date_summary:protected] => 2014
[date_permission_requested:protected] =>
[date_permission_received:protected] =>
[date_review_needed:protected] =>
[date_received:protected] => 06/12/14
[date_completed:protected] => 07/29/14
[date_billed:protected] =>
[date_modified:protected] => 07/29/14
[collBokExports:protected] =>
[lastBokExportCriteria:BaseElcoshItem:private] =>
[alreadyInSave:protected] =>
[alreadyInValidation:protected] =>
[validationFailures:protected] => Array
(
)
[_new:BaseObject:private] =>
[_deleted:BaseObject:private] =>
[modifiedColumns:protected] => Array
(
)
)
[1] => DocumentRecord Object
(
[records:protected] => Array
(
)
[recordId:protected] =>
[searchWordClass:protected] =>
[searchWordPeerClass:protected] =>
[bok_record:protected] =>
[authors:protected] =>
[organizations:protected] =>
[collections:protected] =>
[categories:protected] =>
[categories_initialized:protected] =>
[mapped_items:protected] =>
[content:protected] =>
[files:protected] =>
[language:protected] => Language Object
(
[id:protected] => 1
[code:protected] => en
[name:protected] => English
[alreadyInSave:protected] =>
[alreadyInValidation:protected] =>
[validationFailures:protected] => Array
(
)
[_new:BaseObject:private] =>
[_deleted:BaseObject:private] =>
[modifiedColumns:protected] => Array
(
)
)
[old_record:protected] =>
[id:protected] => 3836
[old_id:protected] =>
[elcosh_id:protected] => d001305
[type:protected] => document
[display_type:protected] => HTML w/ PDF
[user_id:protected] => 25
[language_id:protected] => 1
[tagging_id:protected] => Bruce Lippy
[priority_id:protected] => 1
[title:protected] => TBT1 Ergonomics in Construction
[total_pages:protected] => 5
[billed_pages:protected] => 5
[publication_number:protected] =>
[part_of:protected] =>
[keywords:protected] => ergonomics, ergo, msd, musculoskeletal disorders, risk factors, lifting, carpal tunnel, repetition, awkward postures
[comments:protected] => 7-28-2014 Jeff Nelson asked Bruce Lippy about what to do with a sentence included toward the top of the doc, "Fill them in on page 2 'Other Questions.'" -- Bruce said this sentence could be deleted from the HTML.
[summary:protected] => This is the first in a series of 6 Tool Box Talks produced by Washington University in St. Louis on ergonomics in construction work. This one should be delivered first because it covers what ergonomics is, why construction workers need to talk about it, what the risk factors are for developing a health problem and how to prevent these problems.
[transition_comments:protected] =>
[external_link:protected] =>
[consol_link:protected] => http://www.cpwrconstructionsolutions.org/pipes_vessels/solution/50/participatory-ergonomics-program.html
[more_like_this:protected] => d001303,d001304,d001306,d001307,d001308,d001309
[permission_given_by:protected] => Lisa Jaegers, Washington U. in St. Louis
[published:protected] => T
[billable:protected] => F
[img_name:protected] =>
[img_ext:protected] => png
[img_width:protected] =>
[img_height:protected] =>
[img_credit:protected] =>
[img_practice:protected] =>
[vid_source_id:protected] =>
[vid_running_time:protected] =>
[vid_intended_audience:protected] =>
[vid_acquisition_info:protected] =>
[vid_cost:protected] =>
[vid_producer:protected] =>
[vid_filename:protected] =>
[vid_filename_downloadable:protected] =>
[date_summary:protected] => 2014
[date_permission_requested:protected] =>
[date_permission_received:protected] =>
[date_review_needed:protected] =>
[date_received:protected] => 06/12/14
[date_completed:protected] => 07/28/14
[date_billed:protected] =>
[date_modified:protected] => 10/09/15
[collBokExports:protected] =>
[lastBokExportCriteria:BaseElcoshItem:private] =>
[alreadyInSave:protected] =>
[alreadyInValidation:protected] =>
[validationFailures:protected] => Array
(
)
[_new:BaseObject:private] =>
[_deleted:BaseObject:private] =>
[modifiedColumns:protected] => Array
(
)
)
[2] => DocumentRecord Object
(
[records:protected] => Array
(
)
[recordId:protected] =>
[searchWordClass:protected] =>
[searchWordPeerClass:protected] =>
[bok_record:protected] =>
[authors:protected] =>
[organizations:protected] =>
[collections:protected] =>
[categories:protected] =>
[categories_initialized:protected] =>
[mapped_items:protected] =>
[content:protected] =>
[files:protected] =>
[language:protected] => Language Object
(
[id:protected] => 1
[code:protected] => en
[name:protected] => English
[alreadyInSave:protected] =>
[alreadyInValidation:protected] =>
[validationFailures:protected] => Array
(
)
[_new:BaseObject:private] =>
[_deleted:BaseObject:private] =>
[modifiedColumns:protected] => Array
(
)
)
[old_record:protected] =>
[id:protected] => 3837
[old_id:protected] =>
[elcosh_id:protected] => d001306
[type:protected] => document
[display_type:protected] => HTML w/ PDF
[user_id:protected] => 25
[language_id:protected] => 1
[tagging_id:protected] => Bruce Lippy
[priority_id:protected] => 1
[title:protected] => TBT2 Keep Reach Close
[total_pages:protected] => 4
[billed_pages:protected] => 4
[publication_number:protected] =>
[part_of:protected] =>
[keywords:protected] => reach, ergonomic, ergo, MSD, carpal tunnel, repetition, awkward positions
[comments:protected] => 7-28-2014 Jeff Nelson asked Bruce Lippy about what to do with a sentence included toward the top of the doc, "Fill them in on page 2 'Other Questions.'" -- Bruce said this sentence could be deleted from the HTML.
[summary:protected] => This is the second of six Tool Box Talks created by Washington University in St. Louis on ergonomics in construction. There is a guide with the series that describes how to deliver these talks. This one deals with how to avoid awkward reaching during tasks to prevent injuries. try to work with your hands below your head and close to our body to reduce your risk of shoulder strains and back discomfort. This TBT recommends considering ways to move close to the task, keeping the work area free of obstacles, and talking with each other to provide constructive feedback about your working position.
[transition_comments:protected] =>
[external_link:protected] =>
[consol_link:protected] => http://www.cpwrconstructionsolutions.org/hazard/959/lifting-and-carrying-manual-materials-handling.html
[more_like_this:protected] => d001303,d001304,d001305,d001307,d001308,e001309
[permission_given_by:protected] =>
[published:protected] => T
[billable:protected] => F
[img_name:protected] =>
[img_ext:protected] => png
[img_width:protected] =>
[img_height:protected] =>
[img_credit:protected] =>
[img_practice:protected] =>
[vid_source_id:protected] =>
[vid_running_time:protected] =>
[vid_intended_audience:protected] =>
[vid_acquisition_info:protected] =>
[vid_cost:protected] =>
[vid_producer:protected] =>
[vid_filename:protected] =>
[vid_filename_downloadable:protected] =>
[date_summary:protected] => 2014
[date_permission_requested:protected] =>
[date_permission_received:protected] =>
[date_review_needed:protected] =>
[date_received:protected] => 06/12/14
[date_completed:protected] => 07/28/14
[date_billed:protected] =>
[date_modified:protected] => 11/02/16
[collBokExports:protected] =>
[lastBokExportCriteria:BaseElcoshItem:private] =>
[alreadyInSave:protected] =>
[alreadyInValidation:protected] =>
[validationFailures:protected] => Array
(
)
[_new:BaseObject:private] =>
[_deleted:BaseObject:private] =>
[modifiedColumns:protected] => Array
(
)
)
[3] => DocumentRecord Object
(
[records:protected] => Array
(
)
[recordId:protected] =>
[searchWordClass:protected] =>
[searchWordPeerClass:protected] =>
[bok_record:protected] =>
[authors:protected] =>
[organizations:protected] =>
[collections:protected] =>
[categories:protected] =>
[categories_initialized:protected] =>
[mapped_items:protected] =>
[content:protected] =>
[files:protected] =>
[language:protected] => Language Object
(
[id:protected] => 1
[code:protected] => en
[name:protected] => English
[alreadyInSave:protected] =>
[alreadyInValidation:protected] =>
[validationFailures:protected] => Array
(
)
[_new:BaseObject:private] =>
[_deleted:BaseObject:private] =>
[modifiedColumns:protected] => Array
(
)
)
[old_record:protected] =>
[id:protected] => 3839
[old_id:protected] =>
[elcosh_id:protected] => d001308
[type:protected] => document
[display_type:protected] => HTML w/ PDF
[user_id:protected] => 23
[language_id:protected] => 1
[tagging_id:protected] => Bruce Lippy
[priority_id:protected] => 1
[title:protected] => TBT4 Move Materials With Assist
[total_pages:protected] => 4
[billed_pages:protected] => 4
[publication_number:protected] =>
[part_of:protected] =>
[keywords:protected] => lifting, back injury, ergonomics, ergo, MSD, buddy system
[comments:protected] => 7-28-2014 Jeff Nelson asked Bruce Lippy about what to do with a sentence included toward the top of the doc, "Fill them in on page 2 'Other Questions.'" -- Bruce said this sentence could be deleted from the HTML.
[summary:protected] => This tool box talk is fourth in a series of 6 developed by Washington University in St. Louis on construction ergonomics. This one focuses on preventing back injuries by getting an assist when manually lifting. It recommends using a cart for transporting loads, taking less trips, avoiding carrying materials on the shoulder and helping each other to lift large or heavy materials when a cart or hoist is not available.
[transition_comments:protected] =>
[external_link:protected] =>
[consol_link:protected] => http://www.cpwrconstructionsolutions.org/hazard/959/lifting-and-carrying-manual-materials-handling.html
[more_like_this:protected] => d001303,d001304,d001305,d001306,d001307,d001309
[permission_given_by:protected] => Lisa Jaegers, Washington U. in St. Louis
[published:protected] => T
[billable:protected] => F
[img_name:protected] =>
[img_ext:protected] => png
[img_width:protected] =>
[img_height:protected] =>
[img_credit:protected] =>
[img_practice:protected] =>
[vid_source_id:protected] =>
[vid_running_time:protected] =>
[vid_intended_audience:protected] =>
[vid_acquisition_info:protected] =>
[vid_cost:protected] =>
[vid_producer:protected] =>
[vid_filename:protected] =>
[vid_filename_downloadable:protected] =>
[date_summary:protected] => 2014
[date_permission_requested:protected] =>
[date_permission_received:protected] =>
[date_review_needed:protected] =>
[date_received:protected] => 06/12/14
[date_completed:protected] => 07/29/14
[date_billed:protected] =>
[date_modified:protected] => 10/09/15
[collBokExports:protected] =>
[lastBokExportCriteria:BaseElcoshItem:private] =>
[alreadyInSave:protected] =>
[alreadyInValidation:protected] =>
[validationFailures:protected] => Array
(
)
[_new:BaseObject:private] =>
[_deleted:BaseObject:private] =>
[modifiedColumns:protected] => Array
(
)
)
[4] => DocumentRecord Object
(
[records:protected] => Array
(
)
[recordId:protected] =>
[searchWordClass:protected] =>
[searchWordPeerClass:protected] =>
[bok_record:protected] =>
[authors:protected] =>
[organizations:protected] =>
[collections:protected] =>
[categories:protected] =>
[categories_initialized:protected] =>
[mapped_items:protected] =>
[content:protected] =>
[files:protected] =>
[language:protected] => Language Object
(
[id:protected] => 1
[code:protected] => en
[name:protected] => English
[alreadyInSave:protected] =>
[alreadyInValidation:protected] =>
[validationFailures:protected] => Array
(
)
[_new:BaseObject:private] =>
[_deleted:BaseObject:private] =>
[modifiedColumns:protected] => Array
(
)
)
[old_record:protected] =>
[id:protected] => 3840
[old_id:protected] =>
[elcosh_id:protected] => d001309
[type:protected] => document
[display_type:protected] => HTML w/ PDF
[user_id:protected] => 23
[language_id:protected] => 1
[tagging_id:protected] => Bruce Lippy
[priority_id:protected] => 1
[title:protected] => TBT5 Manual Tools
[total_pages:protected] => 4
[billed_pages:protected] => 4
[publication_number:protected] =>
[part_of:protected] =>
[keywords:protected] => ergonomic, hand tools, handles, MSD, musculoskeletal disorder, carpal tunnel
[comments:protected] => 7-28-2014 Jeff Nelson asked Bruce Lippy about what to do with a sentence included toward the top of the doc, "Fill them in on page 2 'Other Questions.'" -- Bruce said this sentence could be deleted from the HTML.
[summary:protected] => This is the fifth in a series of 6 tool box talks on construction ergonomics produced by the University of Washington in St. Louis. This one focuses on manual tools. It asks the following 6 key questions. Does the tool…
1. Fit the task?
2. Allow a good power grip?
3. Keep the wrist in a straight posture?
4. Feel comfortable?
5. Take less effort than other tools for the task?
6. Work effectively?
[transition_comments:protected] =>
[external_link:protected] =>
[consol_link:protected] => http://www.cpwrconstructionsolutions.org/masonry/solution/383/ergonomic-hand-tools.html
[more_like_this:protected] => d001303,d001304,d001305,d001306,d001307,d001308,d001310
[permission_given_by:protected] => Lisa Jaegers, U. Wash. St. Louis
[published:protected] => T
[billable:protected] => F
[img_name:protected] =>
[img_ext:protected] => png
[img_width:protected] =>
[img_height:protected] =>
[img_credit:protected] =>
[img_practice:protected] =>
[vid_source_id:protected] =>
[vid_running_time:protected] =>
[vid_intended_audience:protected] =>
[vid_acquisition_info:protected] =>
[vid_cost:protected] =>
[vid_producer:protected] =>
[vid_filename:protected] =>
[vid_filename_downloadable:protected] =>
[date_summary:protected] => 2014
[date_permission_requested:protected] =>
[date_permission_received:protected] =>
[date_review_needed:protected] =>
[date_received:protected] => 06/12/14
[date_completed:protected] => 07/29/14
[date_billed:protected] =>
[date_modified:protected] => 10/09/15
[collBokExports:protected] =>
[lastBokExportCriteria:BaseElcoshItem:private] =>
[alreadyInSave:protected] =>
[alreadyInValidation:protected] =>
[validationFailures:protected] => Array
(
)
[_new:BaseObject:private] =>
[_deleted:BaseObject:private] =>
[modifiedColumns:protected] => Array
(
)
)
)
)
[collections] => Array
(
[3834] =>
)
[record] => DocumentRecord Object
(
[records:protected] => Array
(
)
[recordId:protected] =>
[searchWordClass:protected] =>
[searchWordPeerClass:protected] =>
[bok_record:protected] =>
[authors:protected] => Array
(
)
[organizations:protected] => Array
(
[182] => Organization Object
(
[id:protected] => 182
[elcosh_id:protected] => o000205
[user_id:protected] => 14
[province_id:protected] => 0
[country_id:protected] => 0
[title:protected] => Washington University - St. Louis
[address:protected] =>
[postal_code:protected] =>
[city:protected] =>
[department:protected] =>
[phone:protected] =>
[fax:protected] =>
[email:protected] =>
[website:protected] =>
[filename:protected] =>
[about:protected] =>
[comments:protected] =>
[logo_available:protected] => T
[no_details:protected] => T
[date_received:protected] => 2009-08-06
[date_completed:protected] => 2009-08-06
[date_billed:protected] =>
[alreadyInSave:protected] =>
[alreadyInValidation:protected] =>
[validationFailures:protected] => Array
(
)
[_new:BaseObject:private] =>
[_deleted:BaseObject:private] =>
[modifiedColumns:protected] => Array
(
)
)
)
[collections:protected] => Array
(
[3834] =>
)
[categories:protected] =>
[categories_initialized:protected] =>
[mapped_items:protected] => Array
(
[3833] => DocumentRecord Object
(
[records:protected] => Array
(
)
[recordId:protected] =>
[searchWordClass:protected] =>
[searchWordPeerClass:protected] =>
[bok_record:protected] =>
[authors:protected] =>
[organizations:protected] =>
[collections:protected] =>
[categories:protected] =>
[categories_initialized:protected] =>
[mapped_items:protected] =>
[content:protected] =>
[files:protected] =>
[language:protected] =>
[old_record:protected] =>
[id:protected] => 3833
[old_id:protected] =>
[elcosh_id:protected] => d001303
[type:protected] => document
[display_type:protected] => HTML w/ PDF
[user_id:protected] => 25
[language_id:protected] => 1
[tagging_id:protected] => Bruce Lippy
[priority_id:protected] => 1
[title:protected] => Overview of Toolbox Talks on Ergonomics Developed by Washington University in St. Louis
[total_pages:protected] => 3
[billed_pages:protected] => 3
[publication_number:protected] =>
[part_of:protected] =>
[keywords:protected] => ergonomics, musculoskeletal disorders, MSDs
[comments:protected] => 7-28-2014 - Originally submitted as "HTML w/ doc and PDF", Jeff Nelson asked Bruce Lippy for permission to switch it to "HTML w/ PDF" -- permission was given
[summary:protected] => This overviews provides a background on how Washington University in St. Louis developed this series of six toolbox talks on ergonomics. It also describes how they tested the effectiveness of these communication tools, concluding that the guide was valuable for improving the delivery of ergonomics training and interaction between the safety representative and workers. The researchers recommend preparing site-specific information prior to the talk and interacting with workers to discuss problems and ergonomic solutions during the safety meetings.
[transition_comments:protected] =>
[external_link:protected] =>
[consol_link:protected] =>
[more_like_this:protected] =>
[permission_given_by:protected] => Lisa Jaegers, Washington U. in St. Louis
[published:protected] => T
[billable:protected] => F
[img_name:protected] =>
[img_ext:protected] => png
[img_width:protected] =>
[img_height:protected] =>
[img_credit:protected] =>
[img_practice:protected] =>
[vid_source_id:protected] =>
[vid_running_time:protected] =>
[vid_intended_audience:protected] =>
[vid_acquisition_info:protected] =>
[vid_cost:protected] =>
[vid_producer:protected] =>
[vid_filename:protected] =>
[vid_filename_downloadable:protected] =>
[date_summary:protected] => 2014
[date_permission_requested:protected] =>
[date_permission_received:protected] =>
[date_review_needed:protected] =>
[date_received:protected] => 06/11/14
[date_completed:protected] => 07/29/14
[date_billed:protected] =>
[date_modified:protected] => 07/29/14
[collBokExports:protected] =>
[lastBokExportCriteria:BaseElcoshItem:private] =>
[alreadyInSave:protected] =>
[alreadyInValidation:protected] =>
[validationFailures:protected] => Array
(
)
[_new:BaseObject:private] =>
[_deleted:BaseObject:private] =>
[modifiedColumns:protected] => Array
(
)
)
[3835] => DocumentRecord Object
(
[records:protected] => Array
(
)
[recordId:protected] =>
[searchWordClass:protected] =>
[searchWordPeerClass:protected] =>
[bok_record:protected] =>
[authors:protected] =>
[organizations:protected] =>
[collections:protected] =>
[categories:protected] =>
[categories_initialized:protected] =>
[mapped_items:protected] =>
[content:protected] =>
[files:protected] =>
[language:protected] =>
[old_record:protected] =>
[id:protected] => 3835
[old_id:protected] =>
[elcosh_id:protected] => d001304
[type:protected] => document
[display_type:protected] => HTML w/ PDF
[user_id:protected] => 25
[language_id:protected] => 1
[tagging_id:protected] => Bruce Lippy
[priority_id:protected] => 1
[title:protected] => Ergonomics Tool Box Talks (TBT) Training Guide
[total_pages:protected] => 2
[billed_pages:protected] => 2
[publication_number:protected] =>
[part_of:protected] =>
[keywords:protected] => Ergonomics, carpal tunnel, muscular skeletal disorders, msd
[comments:protected] =>
[summary:protected] => CPWR-funded ergonomics research by Washington University at St. Louis led to the development of 6 tool box talks. This guide is an explanation of how to deliver the talks for maximum effectiveness. This guide should be reviewed before delivering any of the talks because it makes important recommendations like:
• If possible, give the TBTs as a part of the crew’s regular safety meetings so that ergonomics is included in the safety discussion.
• Try to locate an area with few distractions for gathering the crew.
• For a team approach, invite the work crew, site superintendent, project manager and other general contractor and/or subcontractor reps who you feel may be helpful in supporting the training and ergonomics solutions.
[transition_comments:protected] =>
[external_link:protected] =>
[consol_link:protected] =>
[more_like_this:protected] => d001303,d001305,d001306,d001307,d001308,d001309,d001310
[permission_given_by:protected] =>
[published:protected] => T
[billable:protected] => F
[img_name:protected] =>
[img_ext:protected] => png
[img_width:protected] =>
[img_height:protected] =>
[img_credit:protected] =>
[img_practice:protected] =>
[vid_source_id:protected] =>
[vid_running_time:protected] =>
[vid_intended_audience:protected] =>
[vid_acquisition_info:protected] =>
[vid_cost:protected] =>
[vid_producer:protected] =>
[vid_filename:protected] =>
[vid_filename_downloadable:protected] =>
[date_summary:protected] => 2014
[date_permission_requested:protected] =>
[date_permission_received:protected] =>
[date_review_needed:protected] =>
[date_received:protected] => 06/12/14
[date_completed:protected] => 07/29/14
[date_billed:protected] =>
[date_modified:protected] => 07/29/14
[collBokExports:protected] =>
[lastBokExportCriteria:BaseElcoshItem:private] =>
[alreadyInSave:protected] =>
[alreadyInValidation:protected] =>
[validationFailures:protected] => Array
(
)
[_new:BaseObject:private] =>
[_deleted:BaseObject:private] =>
[modifiedColumns:protected] => Array
(
)
)
[3836] => DocumentRecord Object
(
[records:protected] => Array
(
)
[recordId:protected] =>
[searchWordClass:protected] =>
[searchWordPeerClass:protected] =>
[bok_record:protected] =>
[authors:protected] =>
[organizations:protected] =>
[collections:protected] =>
[categories:protected] =>
[categories_initialized:protected] =>
[mapped_items:protected] =>
[content:protected] =>
[files:protected] =>
[language:protected] =>
[old_record:protected] =>
[id:protected] => 3836
[old_id:protected] =>
[elcosh_id:protected] => d001305
[type:protected] => document
[display_type:protected] => HTML w/ PDF
[user_id:protected] => 25
[language_id:protected] => 1
[tagging_id:protected] => Bruce Lippy
[priority_id:protected] => 1
[title:protected] => TBT1 Ergonomics in Construction
[total_pages:protected] => 5
[billed_pages:protected] => 5
[publication_number:protected] =>
[part_of:protected] =>
[keywords:protected] => ergonomics, ergo, msd, musculoskeletal disorders, risk factors, lifting, carpal tunnel, repetition, awkward postures
[comments:protected] => 7-28-2014 Jeff Nelson asked Bruce Lippy about what to do with a sentence included toward the top of the doc, "Fill them in on page 2 'Other Questions.'" -- Bruce said this sentence could be deleted from the HTML.
[summary:protected] => This is the first in a series of 6 Tool Box Talks produced by Washington University in St. Louis on ergonomics in construction work. This one should be delivered first because it covers what ergonomics is, why construction workers need to talk about it, what the risk factors are for developing a health problem and how to prevent these problems.
[transition_comments:protected] =>
[external_link:protected] =>
[consol_link:protected] => http://www.cpwrconstructionsolutions.org/pipes_vessels/solution/50/participatory-ergonomics-program.html
[more_like_this:protected] => d001303,d001304,d001306,d001307,d001308,d001309
[permission_given_by:protected] => Lisa Jaegers, Washington U. in St. Louis
[published:protected] => T
[billable:protected] => F
[img_name:protected] =>
[img_ext:protected] => png
[img_width:protected] =>
[img_height:protected] =>
[img_credit:protected] =>
[img_practice:protected] =>
[vid_source_id:protected] =>
[vid_running_time:protected] =>
[vid_intended_audience:protected] =>
[vid_acquisition_info:protected] =>
[vid_cost:protected] =>
[vid_producer:protected] =>
[vid_filename:protected] =>
[vid_filename_downloadable:protected] =>
[date_summary:protected] => 2014
[date_permission_requested:protected] =>
[date_permission_received:protected] =>
[date_review_needed:protected] =>
[date_received:protected] => 06/12/14
[date_completed:protected] => 07/28/14
[date_billed:protected] =>
[date_modified:protected] => 10/09/15
[collBokExports:protected] =>
[lastBokExportCriteria:BaseElcoshItem:private] =>
[alreadyInSave:protected] =>
[alreadyInValidation:protected] =>
[validationFailures:protected] => Array
(
)
[_new:BaseObject:private] =>
[_deleted:BaseObject:private] =>
[modifiedColumns:protected] => Array
(
)
)
[3837] => DocumentRecord Object
(
[records:protected] => Array
(
)
[recordId:protected] =>
[searchWordClass:protected] =>
[searchWordPeerClass:protected] =>
[bok_record:protected] =>
[authors:protected] =>
[organizations:protected] =>
[collections:protected] =>
[categories:protected] =>
[categories_initialized:protected] =>
[mapped_items:protected] =>
[content:protected] =>
[files:protected] =>
[language:protected] =>
[old_record:protected] =>
[id:protected] => 3837
[old_id:protected] =>
[elcosh_id:protected] => d001306
[type:protected] => document
[display_type:protected] => HTML w/ PDF
[user_id:protected] => 25
[language_id:protected] => 1
[tagging_id:protected] => Bruce Lippy
[priority_id:protected] => 1
[title:protected] => TBT2 Keep Reach Close
[total_pages:protected] => 4
[billed_pages:protected] => 4
[publication_number:protected] =>
[part_of:protected] =>
[keywords:protected] => reach, ergonomic, ergo, MSD, carpal tunnel, repetition, awkward positions
[comments:protected] => 7-28-2014 Jeff Nelson asked Bruce Lippy about what to do with a sentence included toward the top of the doc, "Fill them in on page 2 'Other Questions.'" -- Bruce said this sentence could be deleted from the HTML.
[summary:protected] => This is the second of six Tool Box Talks created by Washington University in St. Louis on ergonomics in construction. There is a guide with the series that describes how to deliver these talks. This one deals with how to avoid awkward reaching during tasks to prevent injuries. try to work with your hands below your head and close to our body to reduce your risk of shoulder strains and back discomfort. This TBT recommends considering ways to move close to the task, keeping the work area free of obstacles, and talking with each other to provide constructive feedback about your working position.
[transition_comments:protected] =>
[external_link:protected] =>
[consol_link:protected] => http://www.cpwrconstructionsolutions.org/hazard/959/lifting-and-carrying-manual-materials-handling.html
[more_like_this:protected] => d001303,d001304,d001305,d001307,d001308,e001309
[permission_given_by:protected] =>
[published:protected] => T
[billable:protected] => F
[img_name:protected] =>
[img_ext:protected] => png
[img_width:protected] =>
[img_height:protected] =>
[img_credit:protected] =>
[img_practice:protected] =>
[vid_source_id:protected] =>
[vid_running_time:protected] =>
[vid_intended_audience:protected] =>
[vid_acquisition_info:protected] =>
[vid_cost:protected] =>
[vid_producer:protected] =>
[vid_filename:protected] =>
[vid_filename_downloadable:protected] =>
[date_summary:protected] => 2014
[date_permission_requested:protected] =>
[date_permission_received:protected] =>
[date_review_needed:protected] =>
[date_received:protected] => 06/12/14
[date_completed:protected] => 07/28/14
[date_billed:protected] =>
[date_modified:protected] => 11/02/16
[collBokExports:protected] =>
[lastBokExportCriteria:BaseElcoshItem:private] =>
[alreadyInSave:protected] =>
[alreadyInValidation:protected] =>
[validationFailures:protected] => Array
(
)
[_new:BaseObject:private] =>
[_deleted:BaseObject:private] =>
[modifiedColumns:protected] => Array
(
)
)
[3839] => DocumentRecord Object
(
[records:protected] => Array
(
)
[recordId:protected] =>
[searchWordClass:protected] =>
[searchWordPeerClass:protected] =>
[bok_record:protected] =>
[authors:protected] =>
[organizations:protected] =>
[collections:protected] =>
[categories:protected] =>
[categories_initialized:protected] =>
[mapped_items:protected] =>
[content:protected] =>
[files:protected] =>
[language:protected] =>
[old_record:protected] =>
[id:protected] => 3839
[old_id:protected] =>
[elcosh_id:protected] => d001308
[type:protected] => document
[display_type:protected] => HTML w/ PDF
[user_id:protected] => 23
[language_id:protected] => 1
[tagging_id:protected] => Bruce Lippy
[priority_id:protected] => 1
[title:protected] => TBT4 Move Materials With Assist
[total_pages:protected] => 4
[billed_pages:protected] => 4
[publication_number:protected] =>
[part_of:protected] =>
[keywords:protected] => lifting, back injury, ergonomics, ergo, MSD, buddy system
[comments:protected] => 7-28-2014 Jeff Nelson asked Bruce Lippy about what to do with a sentence included toward the top of the doc, "Fill them in on page 2 'Other Questions.'" -- Bruce said this sentence could be deleted from the HTML.
[summary:protected] => This tool box talk is fourth in a series of 6 developed by Washington University in St. Louis on construction ergonomics. This one focuses on preventing back injuries by getting an assist when manually lifting. It recommends using a cart for transporting loads, taking less trips, avoiding carrying materials on the shoulder and helping each other to lift large or heavy materials when a cart or hoist is not available.
[transition_comments:protected] =>
[external_link:protected] =>
[consol_link:protected] => http://www.cpwrconstructionsolutions.org/hazard/959/lifting-and-carrying-manual-materials-handling.html
[more_like_this:protected] => d001303,d001304,d001305,d001306,d001307,d001309
[permission_given_by:protected] => Lisa Jaegers, Washington U. in St. Louis
[published:protected] => T
[billable:protected] => F
[img_name:protected] =>
[img_ext:protected] => png
[img_width:protected] =>
[img_height:protected] =>
[img_credit:protected] =>
[img_practice:protected] =>
[vid_source_id:protected] =>
[vid_running_time:protected] =>
[vid_intended_audience:protected] =>
[vid_acquisition_info:protected] =>
[vid_cost:protected] =>
[vid_producer:protected] =>
[vid_filename:protected] =>
[vid_filename_downloadable:protected] =>
[date_summary:protected] => 2014
[date_permission_requested:protected] =>
[date_permission_received:protected] =>
[date_review_needed:protected] =>
[date_received:protected] => 06/12/14
[date_completed:protected] => 07/29/14
[date_billed:protected] =>
[date_modified:protected] => 10/09/15
[collBokExports:protected] =>
[lastBokExportCriteria:BaseElcoshItem:private] =>
[alreadyInSave:protected] =>
[alreadyInValidation:protected] =>
[validationFailures:protected] => Array
(
)
[_new:BaseObject:private] =>
[_deleted:BaseObject:private] =>
[modifiedColumns:protected] => Array
(
)
)
[3840] => DocumentRecord Object
(
[records:protected] => Array
(
)
[recordId:protected] =>
[searchWordClass:protected] =>
[searchWordPeerClass:protected] =>
[bok_record:protected] =>
[authors:protected] =>
[organizations:protected] =>
[collections:protected] =>
[categories:protected] =>
[categories_initialized:protected] =>
[mapped_items:protected] =>
[content:protected] =>
[files:protected] =>
[language:protected] =>
[old_record:protected] =>
[id:protected] => 3840
[old_id:protected] =>
[elcosh_id:protected] => d001309
[type:protected] => document
[display_type:protected] => HTML w/ PDF
[user_id:protected] => 23
[language_id:protected] => 1
[tagging_id:protected] => Bruce Lippy
[priority_id:protected] => 1
[title:protected] => TBT5 Manual Tools
[total_pages:protected] => 4
[billed_pages:protected] => 4
[publication_number:protected] =>
[part_of:protected] =>
[keywords:protected] => ergonomic, hand tools, handles, MSD, musculoskeletal disorder, carpal tunnel
[comments:protected] => 7-28-2014 Jeff Nelson asked Bruce Lippy about what to do with a sentence included toward the top of the doc, "Fill them in on page 2 'Other Questions.'" -- Bruce said this sentence could be deleted from the HTML.
[summary:protected] => This is the fifth in a series of 6 tool box talks on construction ergonomics produced by the University of Washington in St. Louis. This one focuses on manual tools. It asks the following 6 key questions. Does the tool…
1. Fit the task?
2. Allow a good power grip?
3. Keep the wrist in a straight posture?
4. Feel comfortable?
5. Take less effort than other tools for the task?
6. Work effectively?
[transition_comments:protected] =>
[external_link:protected] =>
[consol_link:protected] => http://www.cpwrconstructionsolutions.org/masonry/solution/383/ergonomic-hand-tools.html
[more_like_this:protected] => d001303,d001304,d001305,d001306,d001307,d001308,d001310
[permission_given_by:protected] => Lisa Jaegers, U. Wash. St. Louis
[published:protected] => T
[billable:protected] => F
[img_name:protected] =>
[img_ext:protected] => png
[img_width:protected] =>
[img_height:protected] =>
[img_credit:protected] =>
[img_practice:protected] =>
[vid_source_id:protected] =>
[vid_running_time:protected] =>
[vid_intended_audience:protected] =>
[vid_acquisition_info:protected] =>
[vid_cost:protected] =>
[vid_producer:protected] =>
[vid_filename:protected] =>
[vid_filename_downloadable:protected] =>
[date_summary:protected] => 2014
[date_permission_requested:protected] =>
[date_permission_received:protected] =>
[date_review_needed:protected] =>
[date_received:protected] => 06/12/14
[date_completed:protected] => 07/29/14
[date_billed:protected] =>
[date_modified:protected] => 10/09/15
[collBokExports:protected] =>
[lastBokExportCriteria:BaseElcoshItem:private] =>
[alreadyInSave:protected] =>
[alreadyInValidation:protected] =>
[validationFailures:protected] => Array
(
)
[_new:BaseObject:private] =>
[_deleted:BaseObject:private] =>
[modifiedColumns:protected] => Array
(
)
)
)
[content:protected] =>
[files:protected] => Array
(
[559] =>
[560] =>
[546] => File Object
(
[id:protected] => 546
[filename:protected] => 3.jpg
[downloadable:protected] => F
[timestamp:protected] => 2009-07-03 12:54:22
[alreadyInSave:protected] =>
[alreadyInValidation:protected] =>
[validationFailures:protected] => Array
(
)
[_new:BaseObject:private] =>
[_deleted:BaseObject:private] =>
[modifiedColumns:protected] => Array
(
)
)
[9643] => File Object
(
[id:protected] => 9643
[filename:protected] => d001307.pdf
[downloadable:protected] => T
[timestamp:protected] => 2014-07-27 19:09:19
[alreadyInSave:protected] =>
[alreadyInValidation:protected] =>
[validationFailures:protected] => Array
(
)
[_new:BaseObject:private] =>
[_deleted:BaseObject:private] =>
[modifiedColumns:protected] => Array
(
)
)
[566] => File Object
(
[id:protected] => 566
[filename:protected] => 4.jpg
[downloadable:protected] => F
[timestamp:protected] => 2009-07-03 12:54:23
[alreadyInSave:protected] =>
[alreadyInValidation:protected] =>
[validationFailures:protected] => Array
(
)
[_new:BaseObject:private] =>
[_deleted:BaseObject:private] =>
[modifiedColumns:protected] => Array
(
)
)
)
[language:protected] => Language Object
(
[id:protected] => 1
[code:protected] => en
[name:protected] => English
[alreadyInSave:protected] =>
[alreadyInValidation:protected] =>
[validationFailures:protected] => Array
(
)
[_new:BaseObject:private] =>
[_deleted:BaseObject:private] =>
[modifiedColumns:protected] => Array
(
)
)
[old_record:protected] =>
[id:protected] => 3838
[old_id:protected] =>
[elcosh_id:protected] => d001307
[type:protected] => document
[display_type:protected] => HTML w/ PDF
[user_id:protected] => 25
[language_id:protected] => 1
[tagging_id:protected] => Bruce Lippy
[priority_id:protected] => 1
[title:protected] => TBT3 Positioning
[total_pages:protected] => 4
[billed_pages:protected] => 4
[publication_number:protected] =>
[part_of:protected] =>
[keywords:protected] => position, positioning, ergonomics, ergo, carpal tunnel, MSD, musculoskeletal disorder
[comments:protected] => 7-28-2014 Jeff Nelson asked Bruce Lippy about what to do with a sentence included toward the top of the doc, "Fill them in on page 2 'Other Questions.'" -- Bruce said this sentence could be deleted from the HTML.
[summary:protected] => This third in a series of 6 Tool Box Talks on construction ergonomics focuses on proper positioning to avoid injuries. The TBT recommends: 1)prop up a task off of the floor by using a raised surface, cart, baker scaffold, saw horses to prep materials near waist height, 2)move the lift or ladder in the best position for the work, 3)position the lift in front of the area you plan to work without trying to reach too far on either side of the lift.
[transition_comments:protected] =>
[external_link:protected] =>
[consol_link:protected] => http://www.cpwrconstructionsolutions.org/hazard/959/lifting-and-carrying-manual-materials-handling.html
[more_like_this:protected] => d001303,d001304,d001305,d001306,d001308,d001309
[permission_given_by:protected] => Lisa Jaegers, WU-St. Louis
[published:protected] => T
[billable:protected] => F
[img_name:protected] =>
[img_ext:protected] => png
[img_width:protected] =>
[img_height:protected] =>
[img_credit:protected] =>
[img_practice:protected] =>
[vid_source_id:protected] =>
[vid_running_time:protected] =>
[vid_intended_audience:protected] =>
[vid_acquisition_info:protected] =>
[vid_cost:protected] =>
[vid_producer:protected] =>
[vid_filename:protected] =>
[vid_filename_downloadable:protected] =>
[date_summary:protected] => 2014
[date_permission_requested:protected] =>
[date_permission_received:protected] =>
[date_review_needed:protected] =>
[date_received:protected] => 06/12/14
[date_completed:protected] => 07/28/14
[date_billed:protected] =>
[date_modified:protected] => 10/09/15
[collBokExports:protected] =>
[lastBokExportCriteria:BaseElcoshItem:private] =>
[alreadyInSave:protected] =>
[alreadyInValidation:protected] =>
[validationFailures:protected] => Array
(
)
[_new:BaseObject:private] =>
[_deleted:BaseObject:private] =>
[modifiedColumns:protected] => Array
(
)
)
[show_text] =>
[document_content] => ElcoshItemDocumentContent Object
(
[id:protected] => 2906
[item_id:protected] => 3838
[type:protected] => main
[title:protected] =>
[content:protected] =>
Facilitator / Leader Tasks Before the Tool Box Talk (TBT)
- Read through this TBT guide.
- Walk the job site to find ergonomics examples based on the TBT. If possible, take photos of “safe” and “unsafe” examples at the site to be used during the TBT.
- Write down discussion questions to ask the group.
Learning Goals
After discussing this training topic, workers will have gained a general understanding of:
- Unsafe work positions.
- Solutions to improve work positioning.
TRAINING CARD

The last page of this PDF has directions for printing and laminating the training cards.
TRAINER’S TALKING POINTS
Why should we talk about positioning?
 Construction work requires working in high, low, and tight spaces which often forces you to work in an awkward or uncomfortable position. Working in awkward reaching and bent positions can lead to shoulder and back discomfort and possible injury over time.
Demonstration: The training card provides examples of the range of reaching and the point at which the reach is unsafe. Hold your arms straight out in front of you. Look at your hands and wrists while I discuss each of the reach zones on the training card.
 The Green Zone shows the ideal location for working with your hands. When possible, try to keep your work tasks as far out as your wrists.
The Orange Zone is for occasional work since it involves more weight on your shoulders and low back since your hands are away from your body. If needed, keep the reach distance as far as your fingertips.
 The Red Zone is away from your body so far that it places you at higher risk for falls when in the air and shoulder and back discomfort. Limit the time you work reaching beyond your fingertips.
End of Demonstration
Discussion Question: Can anyone describe to us an awkward position that they work in or have seen someone work in?
- What does it feel like in your neck, back or arms when working in that position?
- Other Questions:_____________________________________________
Training Note: Here are examples of hazards in different construction trades. Choose your trade or one that is similar to your group’s line of work that can be used as hazards and solutions examples.
| Trade | Awkward Posture Hazards | Potential Solution |
|---|---|---|
| Carpenter-Drywall | Leaning over the side of a scissor lift to reach and operating a screw gun with the arm fully extended (reaching in the red zone past the fingertips). | Before starting to install the line of screws to the side of the lift, move the lift to re-center it for the next 2 lines of screws to be installed. |
| Floor Layer | Spreading mortar overhead on a wall with the bakers scaffold one foot away from the wall due to buckets on the floor below (reach in the red zone, past the fingertips). | Pre-plan this task by removing all objects in the path of the bakers scaffold. Having an open path allows you to work closer to the task. |
| Sheet Metal Worker | Prepping duct parts on the floor while bending the back and reaching to work on them. | Pre-plan this task by setting up a waist-height workstation on extra materials, a cart, or saw horses. |
Now let’s put this information into practice. What are some tricks or techniques that you use to work in a comfortable position?
- Other Questions:_____________________________________________
Here are a few other ideas that are listed on your training card:
Prop up your tasks off of the floor by using a raised surface, cart, baker scaffold, saw horses to prep materials near waist height.
Move the lift or ladder in the best position for the work – close to the work tasks.
For safety & comfort, try to position the lift in front of the area you plan to work without trying to reach too far on either side of the lift.
In summary, it is important to work in a safe position when possible in order to reduce the risk of falls and discomfort due to awkward working positions. Consider ways that you can work in the green/comfort zone and orange zone and avoid the unsafe red zone.
References
[Images modified from Grandjean & Eastman Kodak Co.]
1. Grandjean, E. 1988. Fitting the task to the man: A textbook of occupational ergonomics. 4th ed. Taylor & Francis.
2. Eastman Kodak Co. 1983. Ergonomic Design for People at Work. Vol 1. Wiley, John & Sons, Incorporated.
Refer to the resources at our website: oshr.im.wustl.edu for more Tool Box TIPS.
TRAINING ATTENDANCE SHEET
Training Topic: Ergonomics -- Positioning
Date:
| ATTENDEES | |
|---|---|
Directions for Making Laminated Training Cards
The last page of this PDF has directions for printing and laminating the training cards.
[content_transformed:protected] =>Facilitator / Leader Tasks Before the Tool Box Talk (TBT)
- Read through this TBT guide.
- Walk the job site to find ergonomics examples based on the TBT. If possible, take photos of “safe” and “unsafe” examples at the site to be used during the TBT.
- Write down discussion questions to ask the group.
Learning Goals
After discussing this training topic, workers will have gained a general understanding of:
- Unsafe work positions.
- Solutions to improve work positioning.
TRAINING CARD
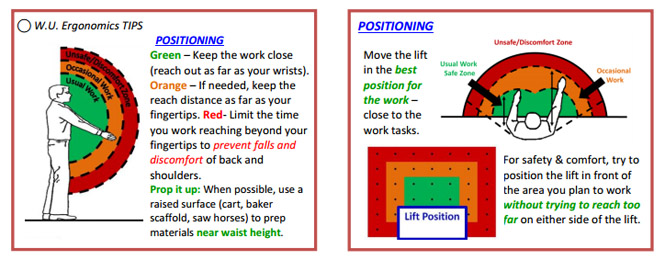
The last page of this PDF has directions for printing and laminating the training cards.
TRAINER’S TALKING POINTS
Why should we talk about positioning?
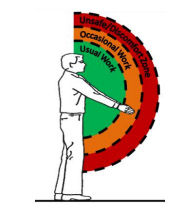 Construction work requires working in high, low, and tight spaces which often forces you to work in an awkward or uncomfortable position. Working in awkward reaching and bent positions can lead to shoulder and back discomfort and possible injury over time.
Demonstration: The training card provides examples of the range of reaching and the point at which the reach is unsafe. Hold your arms straight out in front of you. Look at your hands and wrists while I discuss each of the reach zones on the training card.
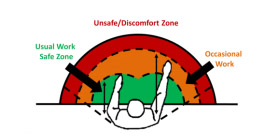 The Green Zone shows the ideal location for working with your hands. When possible, try to keep your work tasks as far out as your wrists.
The Orange Zone is for occasional work since it involves more weight on your shoulders and low back since your hands are away from your body. If needed, keep the reach distance as far as your fingertips.
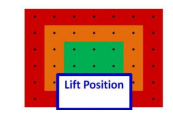 The Red Zone is away from your body so far that it places you at higher risk for falls when in the air and shoulder and back discomfort. Limit the time you work reaching beyond your fingertips.
End of Demonstration
Discussion Question: Can anyone describe to us an awkward position that they work in or have seen someone work in?
- What does it feel like in your neck, back or arms when working in that position?
- Other Questions:_____________________________________________
Training Note: Here are examples of hazards in different construction trades. Choose your trade or one that is similar to your group’s line of work that can be used as hazards and solutions examples.
| Trade | Awkward Posture Hazards | Potential Solution |
|---|---|---|
| Carpenter-Drywall | Leaning over the side of a scissor lift to reach and operating a screw gun with the arm fully extended (reaching in the red zone past the fingertips). | Before starting to install the line of screws to the side of the lift, move the lift to re-center it for the next 2 lines of screws to be installed. |
| Floor Layer | Spreading mortar overhead on a wall with the bakers scaffold one foot away from the wall due to buckets on the floor below (reach in the red zone, past the fingertips). | Pre-plan this task by removing all objects in the path of the bakers scaffold. Having an open path allows you to work closer to the task. |
| Sheet Metal Worker | Prepping duct parts on the floor while bending the back and reaching to work on them. | Pre-plan this task by setting up a waist-height workstation on extra materials, a cart, or saw horses. |
Now let’s put this information into practice. What are some tricks or techniques that you use to work in a comfortable position?
- Other Questions:_____________________________________________
Here are a few other ideas that are listed on your training card:
Prop up your tasks off of the floor by using a raised surface, cart, baker scaffold, saw horses to prep materials near waist height.
Move the lift or ladder in the best position for the work – close to the work tasks.
For safety & comfort, try to position the lift in front of the area you plan to work without trying to reach too far on either side of the lift.
In summary, it is important to work in a safe position when possible in order to reduce the risk of falls and discomfort due to awkward working positions. Consider ways that you can work in the green/comfort zone and orange zone and avoid the unsafe red zone.
References
[Images modified from Grandjean & Eastman Kodak Co.]
1. Grandjean, E. 1988. Fitting the task to the man: A textbook of occupational ergonomics. 4th ed. Taylor & Francis.
2. Eastman Kodak Co. 1983. Ergonomic Design for People at Work. Vol 1. Wiley, John & Sons, Incorporated.
Refer to the resources at our website: oshr.im.wustl.edu for more Tool Box TIPS.
TRAINING ATTENDANCE SHEET
Training Topic: Ergonomics -- Positioning
Date:
| ATTENDEES | |
|---|---|
Directions for Making Laminated Training Cards
The last page of this PDF has directions for printing and laminating the training cards.
[disclaimer:protected] => [disclaimer_transformed:protected] => [alreadyInSave:protected] => [alreadyInValidation:protected] => [validationFailures:protected] => Array ( ) [_new:BaseObject:private] => [_deleted:BaseObject:private] => [modifiedColumns:protected] => Array ( ) ) [template] => record ) [_globalContext:PHPTAL_Context:private] => stdClass Object ( ) [_echoDeclarations:PHPTAL_Context:private] => [referer] => http://elcosh.org/document/3838/d001307/TBT3%2BPositioning.html [curr_module] => Record [styles] => Array ( ) [javascript] => Array ( [0] => jquery.min.js ) [metas] => Array ( [language] => en [robots] => index, follow ) [user] => [curr_url] => https://elcosh.org/index.php?module=Record&id=3838&type=document [base_url] => https://elcosh.org/index.php?module=Record [title] => eLCOSH : TBT3 Positioning [language] => en [search_query] => [module] => Record [new_records] => Array ( [0] => Search_Result Object ( [title] => Toolbox Talk: Fixed Ladder [image] => /record/images/notavailable-p.png [blurb] => The CPWR Toolbox Talk on Fixed Ladders addresses the potential risks associated with using fixed ladders. The resource includes a brief case example,... [category] => Array ( [0] => 15 [1] => 47 [2] => 49 [3] => 51 [4] => 53 [5] => 55 [6] => 60 [7] => 64 [8] => 73 [9] => 76 [10] => 78 [11] => 80 [12] => 86 [13] => 87 [14] => 90 [15] => 92 [16] => 93 [17] => 94 [18] => 100 ) [labels] => Array ( [0] => Falls [1] => Work Environment [2] => Hazards [3] => Bricklayer [4] => Trades [5] => Carpenter [7] => Cement Mason [9] => Concrete Polisher [11] => Electrical Worker [13] => HVAC [15] => Laborer [17] => PCC/Restoration [19] => Plumber/Pipefitter [21] => Roofer/Waterproofer [23] => Sheetmetal Worker [25] => Welder [27] => Commercial & Institutional [28] => Jobsites [29] => Industrial [31] => LEED/Green Construction [33] => Renovations [35] => Residential [37] => Toolbox Talks [38] => Documents [39] => Media & Documents ) [type] => Toolbox Talks [sub_category] => [url] => /document/4430/d001660/Toolbox%2BTalk%253A%2BFixed%2BLadder.html [item:protected] => DocumentRecord Object ( [records:protected] => Array ( ) [recordId:protected] => [searchWordClass:protected] => [searchWordPeerClass:protected] => [bok_record:protected] => [authors:protected] => [organizations:protected] => [collections:protected] => [categories:protected] => Array ( [15] => Category Object ( [languages:protected] => [bok_resources:protected] => [bok_topics:protected] => [bok_keywords:protected] => [id:protected] => 15 [type:protected] => category [parent:protected] => 7 [label:protected] => Falls [alreadyInSave:protected] => [alreadyInValidation:protected] => [validationFailures:protected] => Array ( ) [_new:BaseObject:private] => [_deleted:BaseObject:private] => [modifiedColumns:protected] => Array ( ) ) [47] => Category Object ( [languages:protected] => [bok_resources:protected] => [bok_topics:protected] => [bok_keywords:protected] => [id:protected] => 47 [type:protected] => category [parent:protected] => 2 [label:protected] => Bricklayer [alreadyInSave:protected] => [alreadyInValidation:protected] => [validationFailures:protected] => Array ( ) [_new:BaseObject:private] => [_deleted:BaseObject:private] => [modifiedColumns:protected] => Array ( ) ) [49] => Category Object ( [languages:protected] => [bok_resources:protected] => [bok_topics:protected] => [bok_keywords:protected] => [id:protected] => 49 [type:protected] => category [parent:protected] => 2 [label:protected] => Carpenter [alreadyInSave:protected] => [alreadyInValidation:protected] => [validationFailures:protected] => Array ( ) [_new:BaseObject:private] => [_deleted:BaseObject:private] => [modifiedColumns:protected] => Array ( ) ) [51] => Category Object ( [languages:protected] => [bok_resources:protected] => [bok_topics:protected] => [bok_keywords:protected] => [id:protected] => 51 [type:protected] => category [parent:protected] => 2 [label:protected] => Cement Mason [alreadyInSave:protected] => [alreadyInValidation:protected] => [validationFailures:protected] => Array ( ) [_new:BaseObject:private] => [_deleted:BaseObject:private] => [modifiedColumns:protected] => Array ( ) ) [53] => Category Object ( [languages:protected] => [bok_resources:protected] => [bok_topics:protected] => [bok_keywords:protected] => [id:protected] => 53 [type:protected] => category [parent:protected] => 2 [label:protected] => Concrete Polisher [alreadyInSave:protected] => [alreadyInValidation:protected] => [validationFailures:protected] => Array ( ) [_new:BaseObject:private] => [_deleted:BaseObject:private] => [modifiedColumns:protected] => Array ( ) ) [55] => Category Object ( [languages:protected] => [bok_resources:protected] => [bok_topics:protected] => [bok_keywords:protected] => [id:protected] => 55 [type:protected] => category [parent:protected] => 2 [label:protected] => Electrical Worker [alreadyInSave:protected] => [alreadyInValidation:protected] => [validationFailures:protected] => Array ( ) [_new:BaseObject:private] => [_deleted:BaseObject:private] => [modifiedColumns:protected] => Array ( ) ) [60] => Category Object ( [languages:protected] => [bok_resources:protected] => [bok_topics:protected] => [bok_keywords:protected] => [id:protected] => 60 [type:protected] => category [parent:protected] => 2 [label:protected] => HVAC [alreadyInSave:protected] => [alreadyInValidation:protected] => [validationFailures:protected] => Array ( ) [_new:BaseObject:private] => [_deleted:BaseObject:private] => [modifiedColumns:protected] => Array ( ) ) [64] => Category Object ( [languages:protected] => [bok_resources:protected] => [bok_topics:protected] => [bok_keywords:protected] => [id:protected] => 64 [type:protected] => category [parent:protected] => 2 [label:protected] => Laborer [alreadyInSave:protected] => [alreadyInValidation:protected] => [validationFailures:protected] => Array ( ) [_new:BaseObject:private] => [_deleted:BaseObject:private] => [modifiedColumns:protected] => Array ( ) ) [73] => Category Object ( [languages:protected] => [bok_resources:protected] => [bok_topics:protected] => [bok_keywords:protected] => [id:protected] => 73 [type:protected] => category [parent:protected] => 2 [label:protected] => PCC/Restoration [alreadyInSave:protected] => [alreadyInValidation:protected] => [validationFailures:protected] => Array ( ) [_new:BaseObject:private] => [_deleted:BaseObject:private] => [modifiedColumns:protected] => Array ( ) ) [76] => Category Object ( [languages:protected] => [bok_resources:protected] => [bok_topics:protected] => [bok_keywords:protected] => [id:protected] => 76 [type:protected] => category [parent:protected] => 2 [label:protected] => Plumber/Pipefitter [alreadyInSave:protected] => [alreadyInValidation:protected] => [validationFailures:protected] => Array ( ) [_new:BaseObject:private] => [_deleted:BaseObject:private] => [modifiedColumns:protected] => Array ( ) ) [78] => Category Object ( [languages:protected] => [bok_resources:protected] => [bok_topics:protected] => [bok_keywords:protected] => [id:protected] => 78 [type:protected] => category [parent:protected] => 2 [label:protected] => Roofer/Waterproofer [alreadyInSave:protected] => [alreadyInValidation:protected] => [validationFailures:protected] => Array ( ) [_new:BaseObject:private] => [_deleted:BaseObject:private] => [modifiedColumns:protected] => Array ( ) ) [80] => Category Object ( [languages:protected] => [bok_resources:protected] => [bok_topics:protected] => [bok_keywords:protected] => [id:protected] => 80 [type:protected] => category [parent:protected] => 2 [label:protected] => Sheetmetal Worker [alreadyInSave:protected] => [alreadyInValidation:protected] => [validationFailures:protected] => Array ( ) [_new:BaseObject:private] => [_deleted:BaseObject:private] => [modifiedColumns:protected] => Array ( ) ) [86] => Category Object ( [languages:protected] => [bok_resources:protected] => [bok_topics:protected] => [bok_keywords:protected] => [id:protected] => 86 [type:protected] => category [parent:protected] => 2 [label:protected] => Welder [alreadyInSave:protected] => [alreadyInValidation:protected] => [validationFailures:protected] => Array ( ) [_new:BaseObject:private] => [_deleted:BaseObject:private] => [modifiedColumns:protected] => Array ( ) ) [87] => Category Object ( [languages:protected] => [bok_resources:protected] => [bok_topics:protected] => [bok_keywords:protected] => [id:protected] => 87 [type:protected] => category [parent:protected] => 3 [label:protected] => Commercial & Institutional [alreadyInSave:protected] => [alreadyInValidation:protected] => [validationFailures:protected] => Array ( ) [_new:BaseObject:private] => [_deleted:BaseObject:private] => [modifiedColumns:protected] => Array ( ) ) [90] => Category Object ( [languages:protected] => [bok_resources:protected] => [bok_topics:protected] => [bok_keywords:protected] => [id:protected] => 90 [type:protected] => category [parent:protected] => 3 [label:protected] => Industrial [alreadyInSave:protected] => [alreadyInValidation:protected] => [validationFailures:protected] => Array ( ) [_new:BaseObject:private] => [_deleted:BaseObject:private] => [modifiedColumns:protected] => Array ( ) ) [92] => Category Object ( [languages:protected] => [bok_resources:protected] => [bok_topics:protected] => [bok_keywords:protected] => [id:protected] => 92 [type:protected] => category [parent:protected] => 3 [label:protected] => LEED/Green Construction [alreadyInSave:protected] => [alreadyInValidation:protected] => [validationFailures:protected] => Array ( ) [_new:BaseObject:private] => [_deleted:BaseObject:private] => [modifiedColumns:protected] => Array ( ) ) [93] => Category Object ( [languages:protected] => [bok_resources:protected] => [bok_topics:protected] => [bok_keywords:protected] => [id:protected] => 93 [type:protected] => category [parent:protected] => 3 [label:protected] => Renovations [alreadyInSave:protected] => [alreadyInValidation:protected] => [validationFailures:protected] => Array ( ) [_new:BaseObject:private] => [_deleted:BaseObject:private] => [modifiedColumns:protected] => Array ( ) ) [94] => Category Object ( [languages:protected] => [bok_resources:protected] => [bok_topics:protected] => [bok_keywords:protected] => [id:protected] => 94 [type:protected] => category [parent:protected] => 3 [label:protected] => Residential [alreadyInSave:protected] => [alreadyInValidation:protected] => [validationFailures:protected] => Array ( ) [_new:BaseObject:private] => [_deleted:BaseObject:private] => [modifiedColumns:protected] => Array ( ) ) [100] => Category Object ( [languages:protected] => [bok_resources:protected] => [bok_topics:protected] => [bok_keywords:protected] => [id:protected] => 100 [type:protected] => category [parent:protected] => 6 [label:protected] => Toolbox Talks [alreadyInSave:protected] => [alreadyInValidation:protected] => [validationFailures:protected] => Array ( ) [_new:BaseObject:private] => [_deleted:BaseObject:private] => [modifiedColumns:protected] => Array ( ) ) ) [categories_initialized:protected] => 1 [mapped_items:protected] => [content:protected] => [files:protected] => [language:protected] => Language Object ( [id:protected] => 1 [code:protected] => en [name:protected] => English [alreadyInSave:protected] => [alreadyInValidation:protected] => [validationFailures:protected] => Array ( ) [_new:BaseObject:private] => [_deleted:BaseObject:private] => [modifiedColumns:protected] => Array ( ) ) [old_record:protected] => [id:protected] => 4430 [old_id:protected] => [elcosh_id:protected] => d001660 [type:protected] => document [display_type:protected] => HTML only (and links) [user_id:protected] => 0 [language_id:protected] => 1 [tagging_id:protected] => Mike Aguilar [priority_id:protected] => 1 [title:protected] => Toolbox Talk: Fixed Ladder [total_pages:protected] => 0 [billed_pages:protected] => 0 [publication_number:protected] => [part_of:protected] => [keywords:protected] => Fixed Ladders, Fall Prevention, Falls [comments:protected] => [summary:protected] => The CPWR Toolbox Talk on Fixed Ladders addresses the potential risks associated with using fixed ladders. The resource includes a brief case example, steps to prevent a related injury and questions for discussion. It includes an image that illustrates the hazard, which can be posted in a central location as a reminder of steps to work safely. Available in English and Spanish. [transition_comments:protected] => [external_link:protected] => [consol_link:protected] => [more_like_this:protected] => d001257,d001254,d001255,d001256,d001258,d001262,d001279 [permission_given_by:protected] => [published:protected] => T [billable:protected] => F [img_name:protected] => [img_ext:protected] => [img_width:protected] => [img_height:protected] => [img_credit:protected] => [img_practice:protected] => [vid_source_id:protected] => [vid_running_time:protected] => [vid_intended_audience:protected] => [vid_acquisition_info:protected] => [vid_cost:protected] => [vid_producer:protected] => [vid_filename:protected] => [vid_filename_downloadable:protected] => [date_summary:protected] => [date_permission_requested:protected] => [date_permission_received:protected] => [date_review_needed:protected] => [date_received:protected] => 06/10/22 [date_completed:protected] => 06/10/22 [date_billed:protected] => [date_modified:protected] => 06/16/25 [collBokExports:protected] => [lastBokExportCriteria:BaseElcoshItem:private] => [alreadyInSave:protected] => [alreadyInValidation:protected] => [validationFailures:protected] => Array ( ) [_new:BaseObject:private] => [_deleted:BaseObject:private] => [modifiedColumns:protected] => Array ( ) ) ) [1] => Search_Result Object ( [title] => Toolbox Talk: Work Zone Safety: Working Around Vehicles [image] => /record/images/notavailable-p.png [blurb] => The CPWR Toolbox Talk on Working Around Vehicles in the Work Zone addresses methods to avoid being struck-by a vehicle on a construction site. The res... [category] => Array ( [0] => 12 [1] => 18 [2] => 52 [3] => 57 [4] => 70 [5] => 85 [6] => 87 [7] => 88 [8] => 89 [9] => 91 [10] => 90 [11] => 92 [12] => 93 [13] => 94 [14] => 95 [15] => 100 ) [labels] => Array ( [0] => Crushed/Struck By [1] => Work Environment [2] => Hazards [3] => Motor Vehicles/Heavy Equipment [6] => Commercial Diver [7] => Trades [8] => Flagger [10] => Operating Engineer [12] => Truck Driver [14] => Commercial & Institutional [15] => Jobsites [16] => Demolition [18] => Disasters [20] => Heavy & Highway [22] => Industrial [24] => LEED/Green Construction [26] => Renovations [28] => Residential [30] => Underground [32] => Toolbox Talks [33] => Documents [34] => Media & Documents ) [type] => Toolbox Talks [sub_category] => [url] => /document/4428/d001658/Toolbox%2BTalk%253A%2BWork%2BZone%2BSafety%253A%2BWorking%2BAround%2BVehicles.html [item:protected] => DocumentRecord Object ( [records:protected] => Array ( ) [recordId:protected] => [searchWordClass:protected] => [searchWordPeerClass:protected] => [bok_record:protected] => [authors:protected] => [organizations:protected] => [collections:protected] => [categories:protected] => Array ( [12] => Category Object ( [languages:protected] => [bok_resources:protected] => [bok_topics:protected] => [bok_keywords:protected] => [id:protected] => 12 [type:protected] => category [parent:protected] => 7 [label:protected] => Crushed/Struck By [alreadyInSave:protected] => [alreadyInValidation:protected] => [validationFailures:protected] => Array ( ) [_new:BaseObject:private] => [_deleted:BaseObject:private] => [modifiedColumns:protected] => Array ( ) ) [18] => Category Object ( [languages:protected] => [bok_resources:protected] => [bok_topics:protected] => [bok_keywords:protected] => [id:protected] => 18 [type:protected] => category [parent:protected] => 7 [label:protected] => Motor Vehicles/Heavy Equipment [alreadyInSave:protected] => [alreadyInValidation:protected] => [validationFailures:protected] => Array ( ) [_new:BaseObject:private] => [_deleted:BaseObject:private] => [modifiedColumns:protected] => Array ( ) ) [52] => Category Object ( [languages:protected] => [bok_resources:protected] => [bok_topics:protected] => [bok_keywords:protected] => [id:protected] => 52 [type:protected] => category [parent:protected] => 2 [label:protected] => Commercial Diver [alreadyInSave:protected] => [alreadyInValidation:protected] => [validationFailures:protected] => Array ( ) [_new:BaseObject:private] => [_deleted:BaseObject:private] => [modifiedColumns:protected] => Array ( ) ) [57] => Category Object ( [languages:protected] => [bok_resources:protected] => [bok_topics:protected] => [bok_keywords:protected] => [id:protected] => 57 [type:protected] => category [parent:protected] => 2 [label:protected] => Flagger [alreadyInSave:protected] => [alreadyInValidation:protected] => [validationFailures:protected] => Array ( ) [_new:BaseObject:private] => [_deleted:BaseObject:private] => [modifiedColumns:protected] => Array ( ) ) [70] => Category Object ( [languages:protected] => [bok_resources:protected] => [bok_topics:protected] => [bok_keywords:protected] => [id:protected] => 70 [type:protected] => category [parent:protected] => 2 [label:protected] => Operating Engineer [alreadyInSave:protected] => [alreadyInValidation:protected] => [validationFailures:protected] => Array ( ) [_new:BaseObject:private] => [_deleted:BaseObject:private] => [modifiedColumns:protected] => Array ( ) ) [85] => Category Object ( [languages:protected] => [bok_resources:protected] => [bok_topics:protected] => [bok_keywords:protected] => [id:protected] => 85 [type:protected] => category [parent:protected] => 2 [label:protected] => Truck Driver [alreadyInSave:protected] => [alreadyInValidation:protected] => [validationFailures:protected] => Array ( ) [_new:BaseObject:private] => [_deleted:BaseObject:private] => [modifiedColumns:protected] => Array ( ) ) [87] => Category Object ( [languages:protected] => [bok_resources:protected] => [bok_topics:protected] => [bok_keywords:protected] => [id:protected] => 87 [type:protected] => category [parent:protected] => 3 [label:protected] => Commercial & Institutional [alreadyInSave:protected] => [alreadyInValidation:protected] => [validationFailures:protected] => Array ( ) [_new:BaseObject:private] => [_deleted:BaseObject:private] => [modifiedColumns:protected] => Array ( ) ) [88] => Category Object ( [languages:protected] => [bok_resources:protected] => [bok_topics:protected] => [bok_keywords:protected] => [id:protected] => 88 [type:protected] => category [parent:protected] => 3 [label:protected] => Demolition [alreadyInSave:protected] => [alreadyInValidation:protected] => [validationFailures:protected] => Array ( ) [_new:BaseObject:private] => [_deleted:BaseObject:private] => [modifiedColumns:protected] => Array ( ) ) [89] => Category Object ( [languages:protected] => [bok_resources:protected] => [bok_topics:protected] => [bok_keywords:protected] => [id:protected] => 89 [type:protected] => category [parent:protected] => 3 [label:protected] => Disasters [alreadyInSave:protected] => [alreadyInValidation:protected] => [validationFailures:protected] => Array ( ) [_new:BaseObject:private] => [_deleted:BaseObject:private] => [modifiedColumns:protected] => Array ( ) ) [91] => Category Object ( [languages:protected] => [bok_resources:protected] => [bok_topics:protected] => [bok_keywords:protected] => [id:protected] => 91 [type:protected] => category [parent:protected] => 3 [label:protected] => Heavy & Highway [alreadyInSave:protected] => [alreadyInValidation:protected] => [validationFailures:protected] => Array ( ) [_new:BaseObject:private] => [_deleted:BaseObject:private] => [modifiedColumns:protected] => Array ( ) ) [90] => Category Object ( [languages:protected] => [bok_resources:protected] => [bok_topics:protected] => [bok_keywords:protected] => [id:protected] => 90 [type:protected] => category [parent:protected] => 3 [label:protected] => Industrial [alreadyInSave:protected] => [alreadyInValidation:protected] => [validationFailures:protected] => Array ( ) [_new:BaseObject:private] => [_deleted:BaseObject:private] => [modifiedColumns:protected] => Array ( ) ) [92] => Category Object ( [languages:protected] => [bok_resources:protected] => [bok_topics:protected] => [bok_keywords:protected] => [id:protected] => 92 [type:protected] => category [parent:protected] => 3 [label:protected] => LEED/Green Construction [alreadyInSave:protected] => [alreadyInValidation:protected] => [validationFailures:protected] => Array ( ) [_new:BaseObject:private] => [_deleted:BaseObject:private] => [modifiedColumns:protected] => Array ( ) ) [93] => Category Object ( [languages:protected] => [bok_resources:protected] => [bok_topics:protected] => [bok_keywords:protected] => [id:protected] => 93 [type:protected] => category [parent:protected] => 3 [label:protected] => Renovations [alreadyInSave:protected] => [alreadyInValidation:protected] => [validationFailures:protected] => Array ( ) [_new:BaseObject:private] => [_deleted:BaseObject:private] => [modifiedColumns:protected] => Array ( ) ) [94] => Category Object ( [languages:protected] => [bok_resources:protected] => [bok_topics:protected] => [bok_keywords:protected] => [id:protected] => 94 [type:protected] => category [parent:protected] => 3 [label:protected] => Residential [alreadyInSave:protected] => [alreadyInValidation:protected] => [validationFailures:protected] => Array ( ) [_new:BaseObject:private] => [_deleted:BaseObject:private] => [modifiedColumns:protected] => Array ( ) ) [95] => Category Object ( [languages:protected] => [bok_resources:protected] => [bok_topics:protected] => [bok_keywords:protected] => [id:protected] => 95 [type:protected] => category [parent:protected] => 3 [label:protected] => Underground [alreadyInSave:protected] => [alreadyInValidation:protected] => [validationFailures:protected] => Array ( ) [_new:BaseObject:private] => [_deleted:BaseObject:private] => [modifiedColumns:protected] => Array ( ) ) [100] => Category Object ( [languages:protected] => [bok_resources:protected] => [bok_topics:protected] => [bok_keywords:protected] => [id:protected] => 100 [type:protected] => category [parent:protected] => 6 [label:protected] => Toolbox Talks [alreadyInSave:protected] => [alreadyInValidation:protected] => [validationFailures:protected] => Array ( ) [_new:BaseObject:private] => [_deleted:BaseObject:private] => [modifiedColumns:protected] => Array ( ) ) ) [categories_initialized:protected] => 1 [mapped_items:protected] => [content:protected] => [files:protected] => [language:protected] => Language Object ( [id:protected] => 1 [code:protected] => en [name:protected] => English [alreadyInSave:protected] => [alreadyInValidation:protected] => [validationFailures:protected] => Array ( ) [_new:BaseObject:private] => [_deleted:BaseObject:private] => [modifiedColumns:protected] => Array ( ) ) [old_record:protected] => [id:protected] => 4428 [old_id:protected] => [elcosh_id:protected] => d001658 [type:protected] => document [display_type:protected] => HTML only (and links) [user_id:protected] => 0 [language_id:protected] => 1 [tagging_id:protected] => Daniela Caceres [priority_id:protected] => 1 [title:protected] => Toolbox Talk: Work Zone Safety: Working Around Vehicles [total_pages:protected] => 0 [billed_pages:protected] => 0 [publication_number:protected] => [part_of:protected] => [keywords:protected] => Struck, Struck by, Vehicle, Work Zone Safety, Truck, Operator, Driver, Mobile Equipment [comments:protected] => [summary:protected] => The CPWR Toolbox Talk on Working Around Vehicles in the Work Zone addresses methods to avoid being struck-by a vehicle on a construction site. The resource includes a case example, steps to prevent a related injury, and questions for discussion. It includes a graphic that illustrates the hazard, which can be posted in a central location as a reminder of steps to work safely. Available in English and Spanish. [transition_comments:protected] => [external_link:protected] => [consol_link:protected] => [more_like_this:protected] => d001640 [permission_given_by:protected] => [published:protected] => T [billable:protected] => F [img_name:protected] => [img_ext:protected] => [img_width:protected] => [img_height:protected] => [img_credit:protected] => [img_practice:protected] => [vid_source_id:protected] => [vid_running_time:protected] => [vid_intended_audience:protected] => [vid_acquisition_info:protected] => [vid_cost:protected] => [vid_producer:protected] => [vid_filename:protected] => [vid_filename_downloadable:protected] => [date_summary:protected] => [date_permission_requested:protected] => [date_permission_received:protected] => [date_review_needed:protected] => [date_received:protected] => 12/23/21 [date_completed:protected] => 12/23/21 [date_billed:protected] => [date_modified:protected] => 05/19/23 [collBokExports:protected] => [lastBokExportCriteria:BaseElcoshItem:private] => [alreadyInSave:protected] => [alreadyInValidation:protected] => [validationFailures:protected] => Array ( ) [_new:BaseObject:private] => [_deleted:BaseObject:private] => [modifiedColumns:protected] => Array ( ) ) ) [2] => Search_Result Object ( [title] => Construction Dive -- DeWalt's Jobsite Pro headphones recalled for fire hazards [image] => /record/images/notavailable-p.png [blurb] => A recall notice by the United States Consumer Product Safety Commission affects over 300,000 DeWalt Jobsite Pro Headphones. The recall is a result of... [category] => Array ( [0] => 16 [1] => 44 [2] => 45 [3] => 46 [4] => 47 [5] => 48 [6] => 49 [7] => 50 [8] => 51 [9] => 52 [10] => 53 [11] => 54 [12] => 55 [13] => 56 [14] => 57 [15] => 58 [16] => 59 [17] => 60 [18] => 61 [19] => 64 [20] => 65 [21] => 66 [22] => 67 [23] => 68 [24] => 69 [25] => 70 [26] => 71 [27] => 72 [28] => 73 [29] => 74 [30] => 75 [31] => 76 [32] => 77 [33] => 63 [34] => 78 [35] => 79 [36] => 80 [37] => 81 [38] => 82 [39] => 62 [40] => 83 [41] => 84 [42] => 85 [43] => 86 [44] => 87 [45] => 88 [46] => 89 [47] => 91 [48] => 90 [49] => 92 [50] => 93 [51] => 94 [52] => 95 ) [labels] => Array ( [0] => Fire & Explosions [1] => Work Environment [2] => Hazards [3] => Acoustical Ceiling Carpenter [4] => Trades [5] => Asbestos/Insulator [7] => Boilermaker [9] => Bricklayer [11] => Cabinetmaker [13] => Carpenter [15] => Carpet Layer [17] => Cement Mason [19] => Commercial Diver [21] => Concrete Polisher [23] => Drywall Applicator Specialist [25] => Electrical Worker [27] => Elevator Constructor [29] => Flagger [31] => Glazier [33] => Hazardous Waste Cleanup [35] => HVAC [37] => Interior Systems Carpenter [39] => Laborer [41] => Landscaper [43] => Lather [45] => Lead Abatement Worker [47] => Maintenance Worker [49] => Millwright [51] => Operating Engineer [53] => Painter [55] => Paper Hanger [57] => PCC/Restoration [59] => Pile Driver [61] => Plasterer [63] => Plumber/Pipefitter [65] => Refractory Worker [67] => Reinforcing Ironworker [69] => Roofer/Waterproofer [71] => Scaffold Erector [73] => Sheetmetal Worker [75] => Sprinkler Fitter [77] => Stonemason [79] => Structural Ironworker [81] => Terrazzo Worker [83] => Tile Setter [85] => Truck Driver [87] => Welder [89] => Commercial & Institutional [90] => Jobsites [91] => Demolition [93] => Disasters [95] => Heavy & Highway [97] => Industrial [99] => LEED/Green Construction [101] => Renovations [103] => Residential [105] => Underground ) [type] => [sub_category] => [url] => /document/4426/d001656/Construction%2BDive%2B--%2BDeWalt%2527s%2BJobsite%2BPro%2Bheadphones%2Brecalled%2Bfor%2Bfire%2Bhazards.html [item:protected] => DocumentRecord Object ( [records:protected] => Array ( ) [recordId:protected] => [searchWordClass:protected] => [searchWordPeerClass:protected] => [bok_record:protected] => [authors:protected] => [organizations:protected] => [collections:protected] => [categories:protected] => Array ( [16] => Category Object ( [languages:protected] => [bok_resources:protected] => [bok_topics:protected] => [bok_keywords:protected] => [id:protected] => 16 [type:protected] => category [parent:protected] => 7 [label:protected] => Fire & Explosions [alreadyInSave:protected] => [alreadyInValidation:protected] => [validationFailures:protected] => Array ( ) [_new:BaseObject:private] => [_deleted:BaseObject:private] => [modifiedColumns:protected] => Array ( ) ) [44] => Category Object ( [languages:protected] => [bok_resources:protected] => [bok_topics:protected] => [bok_keywords:protected] => [id:protected] => 44 [type:protected] => category [parent:protected] => 2 [label:protected] => Acoustical Ceiling Carpenter [alreadyInSave:protected] => [alreadyInValidation:protected] => [validationFailures:protected] => Array ( ) [_new:BaseObject:private] => [_deleted:BaseObject:private] => [modifiedColumns:protected] => Array ( ) ) [45] => Category Object ( [languages:protected] => [bok_resources:protected] => [bok_topics:protected] => [bok_keywords:protected] => [id:protected] => 45 [type:protected] => category [parent:protected] => 2 [label:protected] => Asbestos/Insulator [alreadyInSave:protected] => [alreadyInValidation:protected] => [validationFailures:protected] => Array ( ) [_new:BaseObject:private] => [_deleted:BaseObject:private] => [modifiedColumns:protected] => Array ( ) ) [46] => Category Object ( [languages:protected] => [bok_resources:protected] => [bok_topics:protected] => [bok_keywords:protected] => [id:protected] => 46 [type:protected] => category [parent:protected] => 2 [label:protected] => Boilermaker [alreadyInSave:protected] => [alreadyInValidation:protected] => [validationFailures:protected] => Array ( ) [_new:BaseObject:private] => [_deleted:BaseObject:private] => [modifiedColumns:protected] => Array ( ) ) [47] => Category Object ( [languages:protected] => [bok_resources:protected] => [bok_topics:protected] => [bok_keywords:protected] => [id:protected] => 47 [type:protected] => category [parent:protected] => 2 [label:protected] => Bricklayer [alreadyInSave:protected] => [alreadyInValidation:protected] => [validationFailures:protected] => Array ( ) [_new:BaseObject:private] => [_deleted:BaseObject:private] => [modifiedColumns:protected] => Array ( ) ) [48] => Category Object ( [languages:protected] => [bok_resources:protected] => [bok_topics:protected] => [bok_keywords:protected] => [id:protected] => 48 [type:protected] => category [parent:protected] => 2 [label:protected] => Cabinetmaker [alreadyInSave:protected] => [alreadyInValidation:protected] => [validationFailures:protected] => Array ( ) [_new:BaseObject:private] => [_deleted:BaseObject:private] => [modifiedColumns:protected] => Array ( ) ) [49] => Category Object ( [languages:protected] => [bok_resources:protected] => [bok_topics:protected] => [bok_keywords:protected] => [id:protected] => 49 [type:protected] => category [parent:protected] => 2 [label:protected] => Carpenter [alreadyInSave:protected] => [alreadyInValidation:protected] => [validationFailures:protected] => Array ( ) [_new:BaseObject:private] => [_deleted:BaseObject:private] => [modifiedColumns:protected] => Array ( ) ) [50] => Category Object ( [languages:protected] => [bok_resources:protected] => [bok_topics:protected] => [bok_keywords:protected] => [id:protected] => 50 [type:protected] => category [parent:protected] => 2 [label:protected] => Carpet Layer [alreadyInSave:protected] => [alreadyInValidation:protected] => [validationFailures:protected] => Array ( ) [_new:BaseObject:private] => [_deleted:BaseObject:private] => [modifiedColumns:protected] => Array ( ) ) [51] => Category Object ( [languages:protected] => [bok_resources:protected] => [bok_topics:protected] => [bok_keywords:protected] => [id:protected] => 51 [type:protected] => category [parent:protected] => 2 [label:protected] => Cement Mason [alreadyInSave:protected] => [alreadyInValidation:protected] => [validationFailures:protected] => Array ( ) [_new:BaseObject:private] => [_deleted:BaseObject:private] => [modifiedColumns:protected] => Array ( ) ) [52] => Category Object ( [languages:protected] => [bok_resources:protected] => [bok_topics:protected] => [bok_keywords:protected] => [id:protected] => 52 [type:protected] => category [parent:protected] => 2 [label:protected] => Commercial Diver [alreadyInSave:protected] => [alreadyInValidation:protected] => [validationFailures:protected] => Array ( ) [_new:BaseObject:private] => [_deleted:BaseObject:private] => [modifiedColumns:protected] => Array ( ) ) [53] => Category Object ( [languages:protected] => [bok_resources:protected] => [bok_topics:protected] => [bok_keywords:protected] => [id:protected] => 53 [type:protected] => category [parent:protected] => 2 [label:protected] => Concrete Polisher [alreadyInSave:protected] => [alreadyInValidation:protected] => [validationFailures:protected] => Array ( ) [_new:BaseObject:private] => [_deleted:BaseObject:private] => [modifiedColumns:protected] => Array ( ) ) [54] => Category Object ( [languages:protected] => [bok_resources:protected] => [bok_topics:protected] => [bok_keywords:protected] => [id:protected] => 54 [type:protected] => category [parent:protected] => 2 [label:protected] => Drywall Applicator Specialist [alreadyInSave:protected] => [alreadyInValidation:protected] => [validationFailures:protected] => Array ( ) [_new:BaseObject:private] => [_deleted:BaseObject:private] => [modifiedColumns:protected] => Array ( ) ) [55] => Category Object ( [languages:protected] => [bok_resources:protected] => [bok_topics:protected] => [bok_keywords:protected] => [id:protected] => 55 [type:protected] => category [parent:protected] => 2 [label:protected] => Electrical Worker [alreadyInSave:protected] => [alreadyInValidation:protected] => [validationFailures:protected] => Array ( ) [_new:BaseObject:private] => [_deleted:BaseObject:private] => [modifiedColumns:protected] => Array ( ) ) [56] => Category Object ( [languages:protected] => [bok_resources:protected] => [bok_topics:protected] => [bok_keywords:protected] => [id:protected] => 56 [type:protected] => category [parent:protected] => 2 [label:protected] => Elevator Constructor [alreadyInSave:protected] => [alreadyInValidation:protected] => [validationFailures:protected] => Array ( ) [_new:BaseObject:private] => [_deleted:BaseObject:private] => [modifiedColumns:protected] => Array ( ) ) [57] => Category Object ( [languages:protected] => [bok_resources:protected] => [bok_topics:protected] => [bok_keywords:protected] => [id:protected] => 57 [type:protected] => category [parent:protected] => 2 [label:protected] => Flagger [alreadyInSave:protected] => [alreadyInValidation:protected] => [validationFailures:protected] => Array ( ) [_new:BaseObject:private] => [_deleted:BaseObject:private] => [modifiedColumns:protected] => Array ( ) ) [58] => Category Object ( [languages:protected] => [bok_resources:protected] => [bok_topics:protected] => [bok_keywords:protected] => [id:protected] => 58 [type:protected] => category [parent:protected] => 2 [label:protected] => Glazier [alreadyInSave:protected] => [alreadyInValidation:protected] => [validationFailures:protected] => Array ( ) [_new:BaseObject:private] => [_deleted:BaseObject:private] => [modifiedColumns:protected] => Array ( ) ) [59] => Category Object ( [languages:protected] => [bok_resources:protected] => [bok_topics:protected] => [bok_keywords:protected] => [id:protected] => 59 [type:protected] => category [parent:protected] => 2 [label:protected] => Hazardous Waste Cleanup [alreadyInSave:protected] => [alreadyInValidation:protected] => [validationFailures:protected] => Array ( ) [_new:BaseObject:private] => [_deleted:BaseObject:private] => [modifiedColumns:protected] => Array ( ) ) [60] => Category Object ( [languages:protected] => [bok_resources:protected] => [bok_topics:protected] => [bok_keywords:protected] => [id:protected] => 60 [type:protected] => category [parent:protected] => 2 [label:protected] => HVAC [alreadyInSave:protected] => [alreadyInValidation:protected] => [validationFailures:protected] => Array ( ) [_new:BaseObject:private] => [_deleted:BaseObject:private] => [modifiedColumns:protected] => Array ( ) ) [61] => Category Object ( [languages:protected] => [bok_resources:protected] => [bok_topics:protected] => [bok_keywords:protected] => [id:protected] => 61 [type:protected] => category [parent:protected] => 2 [label:protected] => Interior Systems Carpenter [alreadyInSave:protected] => [alreadyInValidation:protected] => [validationFailures:protected] => Array ( ) [_new:BaseObject:private] => [_deleted:BaseObject:private] => [modifiedColumns:protected] => Array ( ) ) [64] => Category Object ( [languages:protected] => [bok_resources:protected] => [bok_topics:protected] => [bok_keywords:protected] => [id:protected] => 64 [type:protected] => category [parent:protected] => 2 [label:protected] => Laborer [alreadyInSave:protected] => [alreadyInValidation:protected] => [validationFailures:protected] => Array ( ) [_new:BaseObject:private] => [_deleted:BaseObject:private] => [modifiedColumns:protected] => Array ( ) ) [65] => Category Object ( [languages:protected] => [bok_resources:protected] => [bok_topics:protected] => [bok_keywords:protected] => [id:protected] => 65 [type:protected] => category [parent:protected] => 2 [label:protected] => Landscaper [alreadyInSave:protected] => [alreadyInValidation:protected] => [validationFailures:protected] => Array ( ) [_new:BaseObject:private] => [_deleted:BaseObject:private] => [modifiedColumns:protected] => Array ( ) ) [66] => Category Object ( [languages:protected] => [bok_resources:protected] => [bok_topics:protected] => [bok_keywords:protected] => [id:protected] => 66 [type:protected] => category [parent:protected] => 2 [label:protected] => Lather [alreadyInSave:protected] => [alreadyInValidation:protected] => [validationFailures:protected] => Array ( ) [_new:BaseObject:private] => [_deleted:BaseObject:private] => [modifiedColumns:protected] => Array ( ) ) [67] => Category Object ( [languages:protected] => [bok_resources:protected] => [bok_topics:protected] => [bok_keywords:protected] => [id:protected] => 67 [type:protected] => category [parent:protected] => 2 [label:protected] => Lead Abatement Worker [alreadyInSave:protected] => [alreadyInValidation:protected] => [validationFailures:protected] => Array ( ) [_new:BaseObject:private] => [_deleted:BaseObject:private] => [modifiedColumns:protected] => Array ( ) ) [68] => Category Object ( [languages:protected] => [bok_resources:protected] => [bok_topics:protected] => [bok_keywords:protected] => [id:protected] => 68 [type:protected] => category [parent:protected] => 2 [label:protected] => Maintenance Worker [alreadyInSave:protected] => [alreadyInValidation:protected] => [validationFailures:protected] => Array ( ) [_new:BaseObject:private] => [_deleted:BaseObject:private] => [modifiedColumns:protected] => Array ( ) ) [69] => Category Object ( [languages:protected] => [bok_resources:protected] => [bok_topics:protected] => [bok_keywords:protected] => [id:protected] => 69 [type:protected] => category [parent:protected] => 2 [label:protected] => Millwright [alreadyInSave:protected] => [alreadyInValidation:protected] => [validationFailures:protected] => Array ( ) [_new:BaseObject:private] => [_deleted:BaseObject:private] => [modifiedColumns:protected] => Array ( ) ) [70] => Category Object ( [languages:protected] => [bok_resources:protected] => [bok_topics:protected] => [bok_keywords:protected] => [id:protected] => 70 [type:protected] => category [parent:protected] => 2 [label:protected] => Operating Engineer [alreadyInSave:protected] => [alreadyInValidation:protected] => [validationFailures:protected] => Array ( ) [_new:BaseObject:private] => [_deleted:BaseObject:private] => [modifiedColumns:protected] => Array ( ) ) [71] => Category Object ( [languages:protected] => [bok_resources:protected] => [bok_topics:protected] => [bok_keywords:protected] => [id:protected] => 71 [type:protected] => category [parent:protected] => 2 [label:protected] => Painter [alreadyInSave:protected] => [alreadyInValidation:protected] => [validationFailures:protected] => Array ( ) [_new:BaseObject:private] => [_deleted:BaseObject:private] => [modifiedColumns:protected] => Array ( ) ) [72] => Category Object ( [languages:protected] => [bok_resources:protected] => [bok_topics:protected] => [bok_keywords:protected] => [id:protected] => 72 [type:protected] => category [parent:protected] => 2 [label:protected] => Paper Hanger [alreadyInSave:protected] => [alreadyInValidation:protected] => [validationFailures:protected] => Array ( ) [_new:BaseObject:private] => [_deleted:BaseObject:private] => [modifiedColumns:protected] => Array ( ) ) [73] => Category Object ( [languages:protected] => [bok_resources:protected] => [bok_topics:protected] => [bok_keywords:protected] => [id:protected] => 73 [type:protected] => category [parent:protected] => 2 [label:protected] => PCC/Restoration [alreadyInSave:protected] => [alreadyInValidation:protected] => [validationFailures:protected] => Array ( ) [_new:BaseObject:private] => [_deleted:BaseObject:private] => [modifiedColumns:protected] => Array ( ) ) [74] => Category Object ( [languages:protected] => [bok_resources:protected] => [bok_topics:protected] => [bok_keywords:protected] => [id:protected] => 74 [type:protected] => category [parent:protected] => 2 [label:protected] => Pile Driver [alreadyInSave:protected] => [alreadyInValidation:protected] => [validationFailures:protected] => Array ( ) [_new:BaseObject:private] => [_deleted:BaseObject:private] => [modifiedColumns:protected] => Array ( ) ) [75] => Category Object ( [languages:protected] => [bok_resources:protected] => [bok_topics:protected] => [bok_keywords:protected] => [id:protected] => 75 [type:protected] => category [parent:protected] => 2 [label:protected] => Plasterer [alreadyInSave:protected] => [alreadyInValidation:protected] => [validationFailures:protected] => Array ( ) [_new:BaseObject:private] => [_deleted:BaseObject:private] => [modifiedColumns:protected] => Array ( ) ) [76] => Category Object ( [languages:protected] => [bok_resources:protected] => [bok_topics:protected] => [bok_keywords:protected] => [id:protected] => 76 [type:protected] => category [parent:protected] => 2 [label:protected] => Plumber/Pipefitter [alreadyInSave:protected] => [alreadyInValidation:protected] => [validationFailures:protected] => Array ( ) [_new:BaseObject:private] => [_deleted:BaseObject:private] => [modifiedColumns:protected] => Array ( ) ) [77] => Category Object ( [languages:protected] => [bok_resources:protected] => [bok_topics:protected] => [bok_keywords:protected] => [id:protected] => 77 [type:protected] => category [parent:protected] => 2 [label:protected] => Refractory Worker [alreadyInSave:protected] => [alreadyInValidation:protected] => [validationFailures:protected] => Array ( ) [_new:BaseObject:private] => [_deleted:BaseObject:private] => [modifiedColumns:protected] => Array ( ) ) [63] => Category Object ( [languages:protected] => [bok_resources:protected] => [bok_topics:protected] => [bok_keywords:protected] => [id:protected] => 63 [type:protected] => category [parent:protected] => 2 [label:protected] => Reinforcing Ironworker [alreadyInSave:protected] => [alreadyInValidation:protected] => [validationFailures:protected] => Array ( ) [_new:BaseObject:private] => [_deleted:BaseObject:private] => [modifiedColumns:protected] => Array ( ) ) [78] => Category Object ( [languages:protected] => [bok_resources:protected] => [bok_topics:protected] => [bok_keywords:protected] => [id:protected] => 78 [type:protected] => category [parent:protected] => 2 [label:protected] => Roofer/Waterproofer [alreadyInSave:protected] => [alreadyInValidation:protected] => [validationFailures:protected] => Array ( ) [_new:BaseObject:private] => [_deleted:BaseObject:private] => [modifiedColumns:protected] => Array ( ) ) [79] => Category Object ( [languages:protected] => [bok_resources:protected] => [bok_topics:protected] => [bok_keywords:protected] => [id:protected] => 79 [type:protected] => category [parent:protected] => 2 [label:protected] => Scaffold Erector [alreadyInSave:protected] => [alreadyInValidation:protected] => [validationFailures:protected] => Array ( ) [_new:BaseObject:private] => [_deleted:BaseObject:private] => [modifiedColumns:protected] => Array ( ) ) [80] => Category Object ( [languages:protected] => [bok_resources:protected] => [bok_topics:protected] => [bok_keywords:protected] => [id:protected] => 80 [type:protected] => category [parent:protected] => 2 [label:protected] => Sheetmetal Worker [alreadyInSave:protected] => [alreadyInValidation:protected] => [validationFailures:protected] => Array ( ) [_new:BaseObject:private] => [_deleted:BaseObject:private] => [modifiedColumns:protected] => Array ( ) ) [81] => Category Object ( [languages:protected] => [bok_resources:protected] => [bok_topics:protected] => [bok_keywords:protected] => [id:protected] => 81 [type:protected] => category [parent:protected] => 2 [label:protected] => Sprinkler Fitter [alreadyInSave:protected] => [alreadyInValidation:protected] => [validationFailures:protected] => Array ( ) [_new:BaseObject:private] => [_deleted:BaseObject:private] => [modifiedColumns:protected] => Array ( ) ) [82] => Category Object ( [languages:protected] => [bok_resources:protected] => [bok_topics:protected] => [bok_keywords:protected] => [id:protected] => 82 [type:protected] => category [parent:protected] => 2 [label:protected] => Stonemason [alreadyInSave:protected] => [alreadyInValidation:protected] => [validationFailures:protected] => Array ( ) [_new:BaseObject:private] => [_deleted:BaseObject:private] => [modifiedColumns:protected] => Array ( ) ) [62] => Category Object ( [languages:protected] => [bok_resources:protected] => [bok_topics:protected] => [bok_keywords:protected] => [id:protected] => 62 [type:protected] => category [parent:protected] => 2 [label:protected] => Structural Ironworker [alreadyInSave:protected] => [alreadyInValidation:protected] => [validationFailures:protected] => Array ( ) [_new:BaseObject:private] => [_deleted:BaseObject:private] => [modifiedColumns:protected] => Array ( ) ) [83] => Category Object ( [languages:protected] => [bok_resources:protected] => [bok_topics:protected] => [bok_keywords:protected] => [id:protected] => 83 [type:protected] => category [parent:protected] => 2 [label:protected] => Terrazzo Worker [alreadyInSave:protected] => [alreadyInValidation:protected] => [validationFailures:protected] => Array ( ) [_new:BaseObject:private] => [_deleted:BaseObject:private] => [modifiedColumns:protected] => Array ( ) ) [84] => Category Object ( [languages:protected] => [bok_resources:protected] => [bok_topics:protected] => [bok_keywords:protected] => [id:protected] => 84 [type:protected] => category [parent:protected] => 2 [label:protected] => Tile Setter [alreadyInSave:protected] => [alreadyInValidation:protected] => [validationFailures:protected] => Array ( ) [_new:BaseObject:private] => [_deleted:BaseObject:private] => [modifiedColumns:protected] => Array ( ) ) [85] => Category Object ( [languages:protected] => [bok_resources:protected] => [bok_topics:protected] => [bok_keywords:protected] => [id:protected] => 85 [type:protected] => category [parent:protected] => 2 [label:protected] => Truck Driver [alreadyInSave:protected] => [alreadyInValidation:protected] => [validationFailures:protected] => Array ( ) [_new:BaseObject:private] => [_deleted:BaseObject:private] => [modifiedColumns:protected] => Array ( ) ) [86] => Category Object ( [languages:protected] => [bok_resources:protected] => [bok_topics:protected] => [bok_keywords:protected] => [id:protected] => 86 [type:protected] => category [parent:protected] => 2 [label:protected] => Welder [alreadyInSave:protected] => [alreadyInValidation:protected] => [validationFailures:protected] => Array ( ) [_new:BaseObject:private] => [_deleted:BaseObject:private] => [modifiedColumns:protected] => Array ( ) ) [87] => Category Object ( [languages:protected] => [bok_resources:protected] => [bok_topics:protected] => [bok_keywords:protected] => [id:protected] => 87 [type:protected] => category [parent:protected] => 3 [label:protected] => Commercial & Institutional [alreadyInSave:protected] => [alreadyInValidation:protected] => [validationFailures:protected] => Array ( ) [_new:BaseObject:private] => [_deleted:BaseObject:private] => [modifiedColumns:protected] => Array ( ) ) [88] => Category Object ( [languages:protected] => [bok_resources:protected] => [bok_topics:protected] => [bok_keywords:protected] => [id:protected] => 88 [type:protected] => category [parent:protected] => 3 [label:protected] => Demolition [alreadyInSave:protected] => [alreadyInValidation:protected] => [validationFailures:protected] => Array ( ) [_new:BaseObject:private] => [_deleted:BaseObject:private] => [modifiedColumns:protected] => Array ( ) ) [89] => Category Object ( [languages:protected] => [bok_resources:protected] => [bok_topics:protected] => [bok_keywords:protected] => [id:protected] => 89 [type:protected] => category [parent:protected] => 3 [label:protected] => Disasters [alreadyInSave:protected] => [alreadyInValidation:protected] => [validationFailures:protected] => Array ( ) [_new:BaseObject:private] => [_deleted:BaseObject:private] => [modifiedColumns:protected] => Array ( ) ) [91] => Category Object ( [languages:protected] => [bok_resources:protected] => [bok_topics:protected] => [bok_keywords:protected] => [id:protected] => 91 [type:protected] => category [parent:protected] => 3 [label:protected] => Heavy & Highway [alreadyInSave:protected] => [alreadyInValidation:protected] => [validationFailures:protected] => Array ( ) [_new:BaseObject:private] => [_deleted:BaseObject:private] => [modifiedColumns:protected] => Array ( ) ) [90] => Category Object ( [languages:protected] => [bok_resources:protected] => [bok_topics:protected] => [bok_keywords:protected] => [id:protected] => 90 [type:protected] => category [parent:protected] => 3 [label:protected] => Industrial [alreadyInSave:protected] => [alreadyInValidation:protected] => [validationFailures:protected] => Array ( ) [_new:BaseObject:private] => [_deleted:BaseObject:private] => [modifiedColumns:protected] => Array ( ) ) [92] => Category Object ( [languages:protected] => [bok_resources:protected] => [bok_topics:protected] => [bok_keywords:protected] => [id:protected] => 92 [type:protected] => category [parent:protected] => 3 [label:protected] => LEED/Green Construction [alreadyInSave:protected] => [alreadyInValidation:protected] => [validationFailures:protected] => Array ( ) [_new:BaseObject:private] => [_deleted:BaseObject:private] => [modifiedColumns:protected] => Array ( ) ) [93] => Category Object ( [languages:protected] => [bok_resources:protected] => [bok_topics:protected] => [bok_keywords:protected] => [id:protected] => 93 [type:protected] => category [parent:protected] => 3 [label:protected] => Renovations [alreadyInSave:protected] => [alreadyInValidation:protected] => [validationFailures:protected] => Array ( ) [_new:BaseObject:private] => [_deleted:BaseObject:private] => [modifiedColumns:protected] => Array ( ) ) [94] => Category Object ( [languages:protected] => [bok_resources:protected] => [bok_topics:protected] => [bok_keywords:protected] => [id:protected] => 94 [type:protected] => category [parent:protected] => 3 [label:protected] => Residential [alreadyInSave:protected] => [alreadyInValidation:protected] => [validationFailures:protected] => Array ( ) [_new:BaseObject:private] => [_deleted:BaseObject:private] => [modifiedColumns:protected] => Array ( ) ) [95] => Category Object ( [languages:protected] => [bok_resources:protected] => [bok_topics:protected] => [bok_keywords:protected] => [id:protected] => 95 [type:protected] => category [parent:protected] => 3 [label:protected] => Underground [alreadyInSave:protected] => [alreadyInValidation:protected] => [validationFailures:protected] => Array ( ) [_new:BaseObject:private] => [_deleted:BaseObject:private] => [modifiedColumns:protected] => Array ( ) ) ) [categories_initialized:protected] => 1 [mapped_items:protected] => [content:protected] => [files:protected] => [language:protected] => Language Object ( [id:protected] => 1 [code:protected] => en [name:protected] => English [alreadyInSave:protected] => [alreadyInValidation:protected] => [validationFailures:protected] => Array ( ) [_new:BaseObject:private] => [_deleted:BaseObject:private] => [modifiedColumns:protected] => Array ( ) ) [old_record:protected] => [id:protected] => 4426 [old_id:protected] => [elcosh_id:protected] => d001656 [type:protected] => document [display_type:protected] => HTML only (and links) [user_id:protected] => 0 [language_id:protected] => 1 [tagging_id:protected] => Mike Aguilar [priority_id:protected] => 1 [title:protected] => Construction Dive -- DeWalt's Jobsite Pro headphones recalled for fire hazards [total_pages:protected] => 1 [billed_pages:protected] => 1 [publication_number:protected] => [part_of:protected] => [keywords:protected] => DeWalt, Fire Hazards, recall, headphones [comments:protected] => [summary:protected] => A recall notice by the United States Consumer Product Safety Commission affects over 300,000 DeWalt Jobsite Pro Headphones. The recall is a result of a malfunction that can cause earbuds to overheat while charging or during use, leading to fire and burn hazards. [transition_comments:protected] => [external_link:protected] => https://www.constructiondive.com/news/dewalts-jobsite-pro-headphones-recalled-for-fire-hazards/611248/?utm_source=Sailthru&utm_medium=email&utm_campaign=Issue:%202021-12-10%20Construction%20Dive%20Newsletter%20%5Bissue:38532%5D&utm_term=Construction%20Dive [consol_link:protected] => [more_like_this:protected] => [permission_given_by:protected] => [published:protected] => T [billable:protected] => F [img_name:protected] => [img_ext:protected] => [img_width:protected] => [img_height:protected] => [img_credit:protected] => [img_practice:protected] => [vid_source_id:protected] => [vid_running_time:protected] => [vid_intended_audience:protected] => [vid_acquisition_info:protected] => [vid_cost:protected] => [vid_producer:protected] => [vid_filename:protected] => [vid_filename_downloadable:protected] => [date_summary:protected] => [date_permission_requested:protected] => [date_permission_received:protected] => [date_review_needed:protected] => [date_received:protected] => 12/13/21 [date_completed:protected] => 12/13/21 [date_billed:protected] => [date_modified:protected] => 12/13/21 [collBokExports:protected] => [lastBokExportCriteria:BaseElcoshItem:private] => [alreadyInSave:protected] => [alreadyInValidation:protected] => [validationFailures:protected] => Array ( ) [_new:BaseObject:private] => [_deleted:BaseObject:private] => [modifiedColumns:protected] => Array ( ) ) ) [3] => Search_Result Object ( [title] => Working in an Enclosed Cab [image] => /record/images/notavailable-p.png [blurb] => This CPWR Hazard Alert on Working in enclosed cabs provides information on protecting workers from silica dust, how to minimize exposures and the dang... [category] => Array ( [0] => 10 [1] => 16 [2] => 24 [3] => 37 [4] => 46 [5] => 48 [6] => 49 [7] => 51 [8] => 53 [9] => 54 [10] => 56 [11] => 58 [12] => 59 [13] => 60 [14] => 61 [15] => 64 [16] => 66 [17] => 68 [18] => 69 [19] => 71 [20] => 73 [21] => 74 [22] => 76 [23] => 77 [24] => 63 [25] => 80 [26] => 82 [27] => 62 [28] => 83 [29] => 84 [30] => 86 [31] => 88 [32] => 89 [33] => 95 [34] => 102 ) [labels] => Array ( [0] => Confined Spaces [1] => Work Environment [2] => Hazards [3] => Fire & Explosions [6] => Trenches & Excavations [9] => Silica /Construction Dust [10] => Inhalation/Skin Exposures [12] => Boilermaker [13] => Trades [14] => Cabinetmaker [16] => Carpenter [18] => Cement Mason [20] => Concrete Polisher [22] => Drywall Applicator Specialist [24] => Elevator Constructor [26] => Glazier [28] => Hazardous Waste Cleanup [30] => HVAC [32] => Interior Systems Carpenter [34] => Laborer [36] => Lather [38] => Maintenance Worker [40] => Millwright [42] => Painter [44] => PCC/Restoration [46] => Pile Driver [48] => Plumber/Pipefitter [50] => Refractory Worker [52] => Reinforcing Ironworker [54] => Sheetmetal Worker [56] => Stonemason [58] => Structural Ironworker [60] => Terrazzo Worker [62] => Tile Setter [64] => Welder [66] => Demolition [67] => Jobsites [68] => Disasters [70] => Underground [72] => Handouts [73] => Documents [74] => Media & Documents ) [type] => Handouts [sub_category] => [url] => /document/4415/d001651/Working%2Bin%2Ban%2BEnclosed%2BCab.html [item:protected] => DocumentRecord Object ( [records:protected] => Array ( ) [recordId:protected] => [searchWordClass:protected] => [searchWordPeerClass:protected] => [bok_record:protected] => [authors:protected] => [organizations:protected] => [collections:protected] => [categories:protected] => Array ( [10] => Category Object ( [languages:protected] => [bok_resources:protected] => [bok_topics:protected] => [bok_keywords:protected] => [id:protected] => 10 [type:protected] => category [parent:protected] => 7 [label:protected] => Confined Spaces [alreadyInSave:protected] => [alreadyInValidation:protected] => [validationFailures:protected] => Array ( ) [_new:BaseObject:private] => [_deleted:BaseObject:private] => [modifiedColumns:protected] => Array ( ) ) [16] => Category Object ( [languages:protected] => [bok_resources:protected] => [bok_topics:protected] => [bok_keywords:protected] => [id:protected] => 16 [type:protected] => category [parent:protected] => 7 [label:protected] => Fire & Explosions [alreadyInSave:protected] => [alreadyInValidation:protected] => [validationFailures:protected] => Array ( ) [_new:BaseObject:private] => [_deleted:BaseObject:private] => [modifiedColumns:protected] => Array ( ) ) [24] => Category Object ( [languages:protected] => [bok_resources:protected] => [bok_topics:protected] => [bok_keywords:protected] => [id:protected] => 24 [type:protected] => category [parent:protected] => 7 [label:protected] => Trenches & Excavations [alreadyInSave:protected] => [alreadyInValidation:protected] => [validationFailures:protected] => Array ( ) [_new:BaseObject:private] => [_deleted:BaseObject:private] => [modifiedColumns:protected] => Array ( ) ) [37] => Category Object ( [languages:protected] => [bok_resources:protected] => [bok_topics:protected] => [bok_keywords:protected] => [id:protected] => 37 [type:protected] => category [parent:protected] => 8 [label:protected] => Silica /Construction Dust [alreadyInSave:protected] => [alreadyInValidation:protected] => [validationFailures:protected] => Array ( ) [_new:BaseObject:private] => [_deleted:BaseObject:private] => [modifiedColumns:protected] => Array ( ) ) [46] => Category Object ( [languages:protected] => [bok_resources:protected] => [bok_topics:protected] => [bok_keywords:protected] => [id:protected] => 46 [type:protected] => category [parent:protected] => 2 [label:protected] => Boilermaker [alreadyInSave:protected] => [alreadyInValidation:protected] => [validationFailures:protected] => Array ( ) [_new:BaseObject:private] => [_deleted:BaseObject:private] => [modifiedColumns:protected] => Array ( ) ) [48] => Category Object ( [languages:protected] => [bok_resources:protected] => [bok_topics:protected] => [bok_keywords:protected] => [id:protected] => 48 [type:protected] => category [parent:protected] => 2 [label:protected] => Cabinetmaker [alreadyInSave:protected] => [alreadyInValidation:protected] => [validationFailures:protected] => Array ( ) [_new:BaseObject:private] => [_deleted:BaseObject:private] => [modifiedColumns:protected] => Array ( ) ) [49] => Category Object ( [languages:protected] => [bok_resources:protected] => [bok_topics:protected] => [bok_keywords:protected] => [id:protected] => 49 [type:protected] => category [parent:protected] => 2 [label:protected] => Carpenter [alreadyInSave:protected] => [alreadyInValidation:protected] => [validationFailures:protected] => Array ( ) [_new:BaseObject:private] => [_deleted:BaseObject:private] => [modifiedColumns:protected] => Array ( ) ) [51] => Category Object ( [languages:protected] => [bok_resources:protected] => [bok_topics:protected] => [bok_keywords:protected] => [id:protected] => 51 [type:protected] => category [parent:protected] => 2 [label:protected] => Cement Mason [alreadyInSave:protected] => [alreadyInValidation:protected] => [validationFailures:protected] => Array ( ) [_new:BaseObject:private] => [_deleted:BaseObject:private] => [modifiedColumns:protected] => Array ( ) ) [53] => Category Object ( [languages:protected] => [bok_resources:protected] => [bok_topics:protected] => [bok_keywords:protected] => [id:protected] => 53 [type:protected] => category [parent:protected] => 2 [label:protected] => Concrete Polisher [alreadyInSave:protected] => [alreadyInValidation:protected] => [validationFailures:protected] => Array ( ) [_new:BaseObject:private] => [_deleted:BaseObject:private] => [modifiedColumns:protected] => Array ( ) ) [54] => Category Object ( [languages:protected] => [bok_resources:protected] => [bok_topics:protected] => [bok_keywords:protected] => [id:protected] => 54 [type:protected] => category [parent:protected] => 2 [label:protected] => Drywall Applicator Specialist [alreadyInSave:protected] => [alreadyInValidation:protected] => [validationFailures:protected] => Array ( ) [_new:BaseObject:private] => [_deleted:BaseObject:private] => [modifiedColumns:protected] => Array ( ) ) [56] => Category Object ( [languages:protected] => [bok_resources:protected] => [bok_topics:protected] => [bok_keywords:protected] => [id:protected] => 56 [type:protected] => category [parent:protected] => 2 [label:protected] => Elevator Constructor [alreadyInSave:protected] => [alreadyInValidation:protected] => [validationFailures:protected] => Array ( ) [_new:BaseObject:private] => [_deleted:BaseObject:private] => [modifiedColumns:protected] => Array ( ) ) [58] => Category Object ( [languages:protected] => [bok_resources:protected] => [bok_topics:protected] => [bok_keywords:protected] => [id:protected] => 58 [type:protected] => category [parent:protected] => 2 [label:protected] => Glazier [alreadyInSave:protected] => [alreadyInValidation:protected] => [validationFailures:protected] => Array ( ) [_new:BaseObject:private] => [_deleted:BaseObject:private] => [modifiedColumns:protected] => Array ( ) ) [59] => Category Object ( [languages:protected] => [bok_resources:protected] => [bok_topics:protected] => [bok_keywords:protected] => [id:protected] => 59 [type:protected] => category [parent:protected] => 2 [label:protected] => Hazardous Waste Cleanup [alreadyInSave:protected] => [alreadyInValidation:protected] => [validationFailures:protected] => Array ( ) [_new:BaseObject:private] => [_deleted:BaseObject:private] => [modifiedColumns:protected] => Array ( ) ) [60] => Category Object ( [languages:protected] => [bok_resources:protected] => [bok_topics:protected] => [bok_keywords:protected] => [id:protected] => 60 [type:protected] => category [parent:protected] => 2 [label:protected] => HVAC [alreadyInSave:protected] => [alreadyInValidation:protected] => [validationFailures:protected] => Array ( ) [_new:BaseObject:private] => [_deleted:BaseObject:private] => [modifiedColumns:protected] => Array ( ) ) [61] => Category Object ( [languages:protected] => [bok_resources:protected] => [bok_topics:protected] => [bok_keywords:protected] => [id:protected] => 61 [type:protected] => category [parent:protected] => 2 [label:protected] => Interior Systems Carpenter [alreadyInSave:protected] => [alreadyInValidation:protected] => [validationFailures:protected] => Array ( ) [_new:BaseObject:private] => [_deleted:BaseObject:private] => [modifiedColumns:protected] => Array ( ) ) [64] => Category Object ( [languages:protected] => [bok_resources:protected] => [bok_topics:protected] => [bok_keywords:protected] => [id:protected] => 64 [type:protected] => category [parent:protected] => 2 [label:protected] => Laborer [alreadyInSave:protected] => [alreadyInValidation:protected] => [validationFailures:protected] => Array ( ) [_new:BaseObject:private] => [_deleted:BaseObject:private] => [modifiedColumns:protected] => Array ( ) ) [66] => Category Object ( [languages:protected] => [bok_resources:protected] => [bok_topics:protected] => [bok_keywords:protected] => [id:protected] => 66 [type:protected] => category [parent:protected] => 2 [label:protected] => Lather [alreadyInSave:protected] => [alreadyInValidation:protected] => [validationFailures:protected] => Array ( ) [_new:BaseObject:private] => [_deleted:BaseObject:private] => [modifiedColumns:protected] => Array ( ) ) [68] => Category Object ( [languages:protected] => [bok_resources:protected] => [bok_topics:protected] => [bok_keywords:protected] => [id:protected] => 68 [type:protected] => category [parent:protected] => 2 [label:protected] => Maintenance Worker [alreadyInSave:protected] => [alreadyInValidation:protected] => [validationFailures:protected] => Array ( ) [_new:BaseObject:private] => [_deleted:BaseObject:private] => [modifiedColumns:protected] => Array ( ) ) [69] => Category Object ( [languages:protected] => [bok_resources:protected] => [bok_topics:protected] => [bok_keywords:protected] => [id:protected] => 69 [type:protected] => category [parent:protected] => 2 [label:protected] => Millwright [alreadyInSave:protected] => [alreadyInValidation:protected] => [validationFailures:protected] => Array ( ) [_new:BaseObject:private] => [_deleted:BaseObject:private] => [modifiedColumns:protected] => Array ( ) ) [71] => Category Object ( [languages:protected] => [bok_resources:protected] => [bok_topics:protected] => [bok_keywords:protected] => [id:protected] => 71 [type:protected] => category [parent:protected] => 2 [label:protected] => Painter [alreadyInSave:protected] => [alreadyInValidation:protected] => [validationFailures:protected] => Array ( ) [_new:BaseObject:private] => [_deleted:BaseObject:private] => [modifiedColumns:protected] => Array ( ) ) [73] => Category Object ( [languages:protected] => [bok_resources:protected] => [bok_topics:protected] => [bok_keywords:protected] => [id:protected] => 73 [type:protected] => category [parent:protected] => 2 [label:protected] => PCC/Restoration [alreadyInSave:protected] => [alreadyInValidation:protected] => [validationFailures:protected] => Array ( ) [_new:BaseObject:private] => [_deleted:BaseObject:private] => [modifiedColumns:protected] => Array ( ) ) [74] => Category Object ( [languages:protected] => [bok_resources:protected] => [bok_topics:protected] => [bok_keywords:protected] => [id:protected] => 74 [type:protected] => category [parent:protected] => 2 [label:protected] => Pile Driver [alreadyInSave:protected] => [alreadyInValidation:protected] => [validationFailures:protected] => Array ( ) [_new:BaseObject:private] => [_deleted:BaseObject:private] => [modifiedColumns:protected] => Array ( ) ) [76] => Category Object ( [languages:protected] => [bok_resources:protected] => [bok_topics:protected] => [bok_keywords:protected] => [id:protected] => 76 [type:protected] => category [parent:protected] => 2 [label:protected] => Plumber/Pipefitter [alreadyInSave:protected] => [alreadyInValidation:protected] => [validationFailures:protected] => Array ( ) [_new:BaseObject:private] => [_deleted:BaseObject:private] => [modifiedColumns:protected] => Array ( ) ) [77] => Category Object ( [languages:protected] => [bok_resources:protected] => [bok_topics:protected] => [bok_keywords:protected] => [id:protected] => 77 [type:protected] => category [parent:protected] => 2 [label:protected] => Refractory Worker [alreadyInSave:protected] => [alreadyInValidation:protected] => [validationFailures:protected] => Array ( ) [_new:BaseObject:private] => [_deleted:BaseObject:private] => [modifiedColumns:protected] => Array ( ) ) [63] => Category Object ( [languages:protected] => [bok_resources:protected] => [bok_topics:protected] => [bok_keywords:protected] => [id:protected] => 63 [type:protected] => category [parent:protected] => 2 [label:protected] => Reinforcing Ironworker [alreadyInSave:protected] => [alreadyInValidation:protected] => [validationFailures:protected] => Array ( ) [_new:BaseObject:private] => [_deleted:BaseObject:private] => [modifiedColumns:protected] => Array ( ) ) [80] => Category Object ( [languages:protected] => [bok_resources:protected] => [bok_topics:protected] => [bok_keywords:protected] => [id:protected] => 80 [type:protected] => category [parent:protected] => 2 [label:protected] => Sheetmetal Worker [alreadyInSave:protected] => [alreadyInValidation:protected] => [validationFailures:protected] => Array ( ) [_new:BaseObject:private] => [_deleted:BaseObject:private] => [modifiedColumns:protected] => Array ( ) ) [82] => Category Object ( [languages:protected] => [bok_resources:protected] => [bok_topics:protected] => [bok_keywords:protected] => [id:protected] => 82 [type:protected] => category [parent:protected] => 2 [label:protected] => Stonemason [alreadyInSave:protected] => [alreadyInValidation:protected] => [validationFailures:protected] => Array ( ) [_new:BaseObject:private] => [_deleted:BaseObject:private] => [modifiedColumns:protected] => Array ( ) ) [62] => Category Object ( [languages:protected] => [bok_resources:protected] => [bok_topics:protected] => [bok_keywords:protected] => [id:protected] => 62 [type:protected] => category [parent:protected] => 2 [label:protected] => Structural Ironworker [alreadyInSave:protected] => [alreadyInValidation:protected] => [validationFailures:protected] => Array ( ) [_new:BaseObject:private] => [_deleted:BaseObject:private] => [modifiedColumns:protected] => Array ( ) ) [83] => Category Object ( [languages:protected] => [bok_resources:protected] => [bok_topics:protected] => [bok_keywords:protected] => [id:protected] => 83 [type:protected] => category [parent:protected] => 2 [label:protected] => Terrazzo Worker [alreadyInSave:protected] => [alreadyInValidation:protected] => [validationFailures:protected] => Array ( ) [_new:BaseObject:private] => [_deleted:BaseObject:private] => [modifiedColumns:protected] => Array ( ) ) [84] => Category Object ( [languages:protected] => [bok_resources:protected] => [bok_topics:protected] => [bok_keywords:protected] => [id:protected] => 84 [type:protected] => category [parent:protected] => 2 [label:protected] => Tile Setter [alreadyInSave:protected] => [alreadyInValidation:protected] => [validationFailures:protected] => Array ( ) [_new:BaseObject:private] => [_deleted:BaseObject:private] => [modifiedColumns:protected] => Array ( ) ) [86] => Category Object ( [languages:protected] => [bok_resources:protected] => [bok_topics:protected] => [bok_keywords:protected] => [id:protected] => 86 [type:protected] => category [parent:protected] => 2 [label:protected] => Welder [alreadyInSave:protected] => [alreadyInValidation:protected] => [validationFailures:protected] => Array ( ) [_new:BaseObject:private] => [_deleted:BaseObject:private] => [modifiedColumns:protected] => Array ( ) ) [88] => Category Object ( [languages:protected] => [bok_resources:protected] => [bok_topics:protected] => [bok_keywords:protected] => [id:protected] => 88 [type:protected] => category [parent:protected] => 3 [label:protected] => Demolition [alreadyInSave:protected] => [alreadyInValidation:protected] => [validationFailures:protected] => Array ( ) [_new:BaseObject:private] => [_deleted:BaseObject:private] => [modifiedColumns:protected] => Array ( ) ) [89] => Category Object ( [languages:protected] => [bok_resources:protected] => [bok_topics:protected] => [bok_keywords:protected] => [id:protected] => 89 [type:protected] => category [parent:protected] => 3 [label:protected] => Disasters [alreadyInSave:protected] => [alreadyInValidation:protected] => [validationFailures:protected] => Array ( ) [_new:BaseObject:private] => [_deleted:BaseObject:private] => [modifiedColumns:protected] => Array ( ) ) [95] => Category Object ( [languages:protected] => [bok_resources:protected] => [bok_topics:protected] => [bok_keywords:protected] => [id:protected] => 95 [type:protected] => category [parent:protected] => 3 [label:protected] => Underground [alreadyInSave:protected] => [alreadyInValidation:protected] => [validationFailures:protected] => Array ( ) [_new:BaseObject:private] => [_deleted:BaseObject:private] => [modifiedColumns:protected] => Array ( ) ) [102] => Category Object ( [languages:protected] => [bok_resources:protected] => [bok_topics:protected] => [bok_keywords:protected] => [id:protected] => 102 [type:protected] => category [parent:protected] => 6 [label:protected] => Handouts [alreadyInSave:protected] => [alreadyInValidation:protected] => [validationFailures:protected] => Array ( ) [_new:BaseObject:private] => [_deleted:BaseObject:private] => [modifiedColumns:protected] => Array ( ) ) ) [categories_initialized:protected] => 1 [mapped_items:protected] => [content:protected] => [files:protected] => [language:protected] => Language Object ( [id:protected] => 1 [code:protected] => en [name:protected] => English [alreadyInSave:protected] => [alreadyInValidation:protected] => [validationFailures:protected] => Array ( ) [_new:BaseObject:private] => [_deleted:BaseObject:private] => [modifiedColumns:protected] => Array ( ) ) [old_record:protected] => [id:protected] => 4415 [old_id:protected] => [elcosh_id:protected] => d001651 [type:protected] => document [display_type:protected] => HTML only (and links) [user_id:protected] => 0 [language_id:protected] => 1 [tagging_id:protected] => Valeria Contreras [priority_id:protected] => 1 [title:protected] => Working in an Enclosed Cab [total_pages:protected] => 1 [billed_pages:protected] => 1 [publication_number:protected] => [part_of:protected] => [keywords:protected] => Occupation, construction, safety, health, hazards, work, worker, workplace, OSHA, silicosis, mining, silica, DOE, EEOICPA, labor, lung, CBD, dust, cab, miner, mine [comments:protected] => [summary:protected] => This CPWR Hazard Alert on Working in enclosed cabs provides information on protecting workers from silica dust, how to minimize exposures and the dangers of silica dust. Click on the following links to access the English version and the Spanish version. [transition_comments:protected] => [external_link:protected] => [consol_link:protected] => [more_like_this:protected] => [permission_given_by:protected] => [published:protected] => T [billable:protected] => F [img_name:protected] => [img_ext:protected] => [img_width:protected] => [img_height:protected] => [img_credit:protected] => [img_practice:protected] => [vid_source_id:protected] => [vid_running_time:protected] => [vid_intended_audience:protected] => [vid_acquisition_info:protected] => [vid_cost:protected] => [vid_producer:protected] => [vid_filename:protected] => [vid_filename_downloadable:protected] => [date_summary:protected] => [date_permission_requested:protected] => [date_permission_received:protected] => [date_review_needed:protected] => [date_received:protected] => 10/08/20 [date_completed:protected] => 10/08/20 [date_billed:protected] => [date_modified:protected] => 10/08/20 [collBokExports:protected] => [lastBokExportCriteria:BaseElcoshItem:private] => [alreadyInSave:protected] => [alreadyInValidation:protected] => [validationFailures:protected] => Array ( ) [_new:BaseObject:private] => [_deleted:BaseObject:private] => [modifiedColumns:protected] => Array ( ) ) ) [4] => Search_Result Object ( [title] => Toolbox Talk: Suicide Prevention [image] => /record/images/notavailable-p.png [blurb] => The CPWR Toolbox Talk on Suicide Prevention addresses the prevalence of suicide among construction workers. The resource includes a brief case example... [category] => Array ( [0] => 13 [1] => 20 [2] => 23 [3] => 40 [4] => 44 [5] => 45 [6] => 46 [7] => 47 [8] => 48 [9] => 49 [10] => 50 [11] => 51 [12] => 52 [13] => 53 [14] => 54 [15] => 55 [16] => 56 [17] => 57 [18] => 58 [19] => 59 [20] => 60 [21] => 61 [22] => 64 [23] => 65 [24] => 66 [25] => 67 [26] => 68 [27] => 69 [28] => 70 [29] => 71 [30] => 72 [31] => 73 [32] => 74 [33] => 75 [34] => 76 [35] => 77 [36] => 63 [37] => 78 [38] => 79 [39] => 80 [40] => 81 [41] => 82 [42] => 62 [43] => 83 [44] => 84 [45] => 85 [46] => 86 [47] => 87 [48] => 88 [49] => 89 [50] => 91 [51] => 90 [52] => 92 [53] => 93 [54] => 94 [55] => 95 [56] => 100 ) [labels] => Array ( [0] => Drugs, Alcohol & Tobacco [1] => Work Environment [2] => Hazards [3] => Safety Culture [6] => Stress & Overtime [9] => Overexertion [10] => Ergonomic [12] => Acoustical Ceiling Carpenter [13] => Trades [14] => Asbestos/Insulator [16] => Boilermaker [18] => Bricklayer [20] => Cabinetmaker [22] => Carpenter [24] => Carpet Layer [26] => Cement Mason [28] => Commercial Diver [30] => Concrete Polisher [32] => Drywall Applicator Specialist [34] => Electrical Worker [36] => Elevator Constructor [38] => Flagger [40] => Glazier [42] => Hazardous Waste Cleanup [44] => HVAC [46] => Interior Systems Carpenter [48] => Laborer [50] => Landscaper [52] => Lather [54] => Lead Abatement Worker [56] => Maintenance Worker [58] => Millwright [60] => Operating Engineer [62] => Painter [64] => Paper Hanger [66] => PCC/Restoration [68] => Pile Driver [70] => Plasterer [72] => Plumber/Pipefitter [74] => Refractory Worker [76] => Reinforcing Ironworker [78] => Roofer/Waterproofer [80] => Scaffold Erector [82] => Sheetmetal Worker [84] => Sprinkler Fitter [86] => Stonemason [88] => Structural Ironworker [90] => Terrazzo Worker [92] => Tile Setter [94] => Truck Driver [96] => Welder [98] => Commercial & Institutional [99] => Jobsites [100] => Demolition [102] => Disasters [104] => Heavy & Highway [106] => Industrial [108] => LEED/Green Construction [110] => Renovations [112] => Residential [114] => Underground [116] => Toolbox Talks [117] => Documents [118] => Media & Documents ) [type] => Toolbox Talks [sub_category] => [url] => /document/4419/d001652/Toolbox%2BTalk%253A%2BSuicide%2BPrevention.html [item:protected] => DocumentRecord Object ( [records:protected] => Array ( ) [recordId:protected] => [searchWordClass:protected] => [searchWordPeerClass:protected] => [bok_record:protected] => [authors:protected] => [organizations:protected] => [collections:protected] => [categories:protected] => Array ( [13] => Category Object ( [languages:protected] => [bok_resources:protected] => [bok_topics:protected] => [bok_keywords:protected] => [id:protected] => 13 [type:protected] => category [parent:protected] => 7 [label:protected] => Drugs, Alcohol & Tobacco [alreadyInSave:protected] => [alreadyInValidation:protected] => [validationFailures:protected] => Array ( ) [_new:BaseObject:private] => [_deleted:BaseObject:private] => [modifiedColumns:protected] => Array ( ) ) [20] => Category Object ( [languages:protected] => [bok_resources:protected] => [bok_topics:protected] => [bok_keywords:protected] => [id:protected] => 20 [type:protected] => category [parent:protected] => 7 [label:protected] => Safety Culture [alreadyInSave:protected] => [alreadyInValidation:protected] => [validationFailures:protected] => Array ( ) [_new:BaseObject:private] => [_deleted:BaseObject:private] => [modifiedColumns:protected] => Array ( ) ) [23] => Category Object ( [languages:protected] => [bok_resources:protected] => [bok_topics:protected] => [bok_keywords:protected] => [id:protected] => 23 [type:protected] => category [parent:protected] => 7 [label:protected] => Stress & Overtime [alreadyInSave:protected] => [alreadyInValidation:protected] => [validationFailures:protected] => Array ( ) [_new:BaseObject:private] => [_deleted:BaseObject:private] => [modifiedColumns:protected] => Array ( ) ) [40] => Category Object ( [languages:protected] => [bok_resources:protected] => [bok_topics:protected] => [bok_keywords:protected] => [id:protected] => 40 [type:protected] => category [parent:protected] => 9 [label:protected] => Overexertion [alreadyInSave:protected] => [alreadyInValidation:protected] => [validationFailures:protected] => Array ( ) [_new:BaseObject:private] => [_deleted:BaseObject:private] => [modifiedColumns:protected] => Array ( ) ) [44] => Category Object ( [languages:protected] => [bok_resources:protected] => [bok_topics:protected] => [bok_keywords:protected] => [id:protected] => 44 [type:protected] => category [parent:protected] => 2 [label:protected] => Acoustical Ceiling Carpenter [alreadyInSave:protected] => [alreadyInValidation:protected] => [validationFailures:protected] => Array ( ) [_new:BaseObject:private] => [_deleted:BaseObject:private] => [modifiedColumns:protected] => Array ( ) ) [45] => Category Object ( [languages:protected] => [bok_resources:protected] => [bok_topics:protected] => [bok_keywords:protected] => [id:protected] => 45 [type:protected] => category [parent:protected] => 2 [label:protected] => Asbestos/Insulator [alreadyInSave:protected] => [alreadyInValidation:protected] => [validationFailures:protected] => Array ( ) [_new:BaseObject:private] => [_deleted:BaseObject:private] => [modifiedColumns:protected] => Array ( ) ) [46] => Category Object ( [languages:protected] => [bok_resources:protected] => [bok_topics:protected] => [bok_keywords:protected] => [id:protected] => 46 [type:protected] => category [parent:protected] => 2 [label:protected] => Boilermaker [alreadyInSave:protected] => [alreadyInValidation:protected] => [validationFailures:protected] => Array ( ) [_new:BaseObject:private] => [_deleted:BaseObject:private] => [modifiedColumns:protected] => Array ( ) ) [47] => Category Object ( [languages:protected] => [bok_resources:protected] => [bok_topics:protected] => [bok_keywords:protected] => [id:protected] => 47 [type:protected] => category [parent:protected] => 2 [label:protected] => Bricklayer [alreadyInSave:protected] => [alreadyInValidation:protected] => [validationFailures:protected] => Array ( ) [_new:BaseObject:private] => [_deleted:BaseObject:private] => [modifiedColumns:protected] => Array ( ) ) [48] => Category Object ( [languages:protected] => [bok_resources:protected] => [bok_topics:protected] => [bok_keywords:protected] => [id:protected] => 48 [type:protected] => category [parent:protected] => 2 [label:protected] => Cabinetmaker [alreadyInSave:protected] => [alreadyInValidation:protected] => [validationFailures:protected] => Array ( ) [_new:BaseObject:private] => [_deleted:BaseObject:private] => [modifiedColumns:protected] => Array ( ) ) [49] => Category Object ( [languages:protected] => [bok_resources:protected] => [bok_topics:protected] => [bok_keywords:protected] => [id:protected] => 49 [type:protected] => category [parent:protected] => 2 [label:protected] => Carpenter [alreadyInSave:protected] => [alreadyInValidation:protected] => [validationFailures:protected] => Array ( ) [_new:BaseObject:private] => [_deleted:BaseObject:private] => [modifiedColumns:protected] => Array ( ) ) [50] => Category Object ( [languages:protected] => [bok_resources:protected] => [bok_topics:protected] => [bok_keywords:protected] => [id:protected] => 50 [type:protected] => category [parent:protected] => 2 [label:protected] => Carpet Layer [alreadyInSave:protected] => [alreadyInValidation:protected] => [validationFailures:protected] => Array ( ) [_new:BaseObject:private] => [_deleted:BaseObject:private] => [modifiedColumns:protected] => Array ( ) ) [51] => Category Object ( [languages:protected] => [bok_resources:protected] => [bok_topics:protected] => [bok_keywords:protected] => [id:protected] => 51 [type:protected] => category [parent:protected] => 2 [label:protected] => Cement Mason [alreadyInSave:protected] => [alreadyInValidation:protected] => [validationFailures:protected] => Array ( ) [_new:BaseObject:private] => [_deleted:BaseObject:private] => [modifiedColumns:protected] => Array ( ) ) [52] => Category Object ( [languages:protected] => [bok_resources:protected] => [bok_topics:protected] => [bok_keywords:protected] => [id:protected] => 52 [type:protected] => category [parent:protected] => 2 [label:protected] => Commercial Diver [alreadyInSave:protected] => [alreadyInValidation:protected] => [validationFailures:protected] => Array ( ) [_new:BaseObject:private] => [_deleted:BaseObject:private] => [modifiedColumns:protected] => Array ( ) ) [53] => Category Object ( [languages:protected] => [bok_resources:protected] => [bok_topics:protected] => [bok_keywords:protected] => [id:protected] => 53 [type:protected] => category [parent:protected] => 2 [label:protected] => Concrete Polisher [alreadyInSave:protected] => [alreadyInValidation:protected] => [validationFailures:protected] => Array ( ) [_new:BaseObject:private] => [_deleted:BaseObject:private] => [modifiedColumns:protected] => Array ( ) ) [54] => Category Object ( [languages:protected] => [bok_resources:protected] => [bok_topics:protected] => [bok_keywords:protected] => [id:protected] => 54 [type:protected] => category [parent:protected] => 2 [label:protected] => Drywall Applicator Specialist [alreadyInSave:protected] => [alreadyInValidation:protected] => [validationFailures:protected] => Array ( ) [_new:BaseObject:private] => [_deleted:BaseObject:private] => [modifiedColumns:protected] => Array ( ) ) [55] => Category Object ( [languages:protected] => [bok_resources:protected] => [bok_topics:protected] => [bok_keywords:protected] => [id:protected] => 55 [type:protected] => category [parent:protected] => 2 [label:protected] => Electrical Worker [alreadyInSave:protected] => [alreadyInValidation:protected] => [validationFailures:protected] => Array ( ) [_new:BaseObject:private] => [_deleted:BaseObject:private] => [modifiedColumns:protected] => Array ( ) ) [56] => Category Object ( [languages:protected] => [bok_resources:protected] => [bok_topics:protected] => [bok_keywords:protected] => [id:protected] => 56 [type:protected] => category [parent:protected] => 2 [label:protected] => Elevator Constructor [alreadyInSave:protected] => [alreadyInValidation:protected] => [validationFailures:protected] => Array ( ) [_new:BaseObject:private] => [_deleted:BaseObject:private] => [modifiedColumns:protected] => Array ( ) ) [57] => Category Object ( [languages:protected] => [bok_resources:protected] => [bok_topics:protected] => [bok_keywords:protected] => [id:protected] => 57 [type:protected] => category [parent:protected] => 2 [label:protected] => Flagger [alreadyInSave:protected] => [alreadyInValidation:protected] => [validationFailures:protected] => Array ( ) [_new:BaseObject:private] => [_deleted:BaseObject:private] => [modifiedColumns:protected] => Array ( ) ) [58] => Category Object ( [languages:protected] => [bok_resources:protected] => [bok_topics:protected] => [bok_keywords:protected] => [id:protected] => 58 [type:protected] => category [parent:protected] => 2 [label:protected] => Glazier [alreadyInSave:protected] => [alreadyInValidation:protected] => [validationFailures:protected] => Array ( ) [_new:BaseObject:private] => [_deleted:BaseObject:private] => [modifiedColumns:protected] => Array ( ) ) [59] => Category Object ( [languages:protected] => [bok_resources:protected] => [bok_topics:protected] => [bok_keywords:protected] => [id:protected] => 59 [type:protected] => category [parent:protected] => 2 [label:protected] => Hazardous Waste Cleanup [alreadyInSave:protected] => [alreadyInValidation:protected] => [validationFailures:protected] => Array ( ) [_new:BaseObject:private] => [_deleted:BaseObject:private] => [modifiedColumns:protected] => Array ( ) ) [60] => Category Object ( [languages:protected] => [bok_resources:protected] => [bok_topics:protected] => [bok_keywords:protected] => [id:protected] => 60 [type:protected] => category [parent:protected] => 2 [label:protected] => HVAC [alreadyInSave:protected] => [alreadyInValidation:protected] => [validationFailures:protected] => Array ( ) [_new:BaseObject:private] => [_deleted:BaseObject:private] => [modifiedColumns:protected] => Array ( ) ) [61] => Category Object ( [languages:protected] => [bok_resources:protected] => [bok_topics:protected] => [bok_keywords:protected] => [id:protected] => 61 [type:protected] => category [parent:protected] => 2 [label:protected] => Interior Systems Carpenter [alreadyInSave:protected] => [alreadyInValidation:protected] => [validationFailures:protected] => Array ( ) [_new:BaseObject:private] => [_deleted:BaseObject:private] => [modifiedColumns:protected] => Array ( ) ) [64] => Category Object ( [languages:protected] => [bok_resources:protected] => [bok_topics:protected] => [bok_keywords:protected] => [id:protected] => 64 [type:protected] => category [parent:protected] => 2 [label:protected] => Laborer [alreadyInSave:protected] => [alreadyInValidation:protected] => [validationFailures:protected] => Array ( ) [_new:BaseObject:private] => [_deleted:BaseObject:private] => [modifiedColumns:protected] => Array ( ) ) [65] => Category Object ( [languages:protected] => [bok_resources:protected] => [bok_topics:protected] => [bok_keywords:protected] => [id:protected] => 65 [type:protected] => category [parent:protected] => 2 [label:protected] => Landscaper [alreadyInSave:protected] => [alreadyInValidation:protected] => [validationFailures:protected] => Array ( ) [_new:BaseObject:private] => [_deleted:BaseObject:private] => [modifiedColumns:protected] => Array ( ) ) [66] => Category Object ( [languages:protected] => [bok_resources:protected] => [bok_topics:protected] => [bok_keywords:protected] => [id:protected] => 66 [type:protected] => category [parent:protected] => 2 [label:protected] => Lather [alreadyInSave:protected] => [alreadyInValidation:protected] => [validationFailures:protected] => Array ( ) [_new:BaseObject:private] => [_deleted:BaseObject:private] => [modifiedColumns:protected] => Array ( ) ) [67] => Category Object ( [languages:protected] => [bok_resources:protected] => [bok_topics:protected] => [bok_keywords:protected] => [id:protected] => 67 [type:protected] => category [parent:protected] => 2 [label:protected] => Lead Abatement Worker [alreadyInSave:protected] => [alreadyInValidation:protected] => [validationFailures:protected] => Array ( ) [_new:BaseObject:private] => [_deleted:BaseObject:private] => [modifiedColumns:protected] => Array ( ) ) [68] => Category Object ( [languages:protected] => [bok_resources:protected] => [bok_topics:protected] => [bok_keywords:protected] => [id:protected] => 68 [type:protected] => category [parent:protected] => 2 [label:protected] => Maintenance Worker [alreadyInSave:protected] => [alreadyInValidation:protected] => [validationFailures:protected] => Array ( ) [_new:BaseObject:private] => [_deleted:BaseObject:private] => [modifiedColumns:protected] => Array ( ) ) [69] => Category Object ( [languages:protected] => [bok_resources:protected] => [bok_topics:protected] => [bok_keywords:protected] => [id:protected] => 69 [type:protected] => category [parent:protected] => 2 [label:protected] => Millwright [alreadyInSave:protected] => [alreadyInValidation:protected] => [validationFailures:protected] => Array ( ) [_new:BaseObject:private] => [_deleted:BaseObject:private] => [modifiedColumns:protected] => Array ( ) ) [70] => Category Object ( [languages:protected] => [bok_resources:protected] => [bok_topics:protected] => [bok_keywords:protected] => [id:protected] => 70 [type:protected] => category [parent:protected] => 2 [label:protected] => Operating Engineer [alreadyInSave:protected] => [alreadyInValidation:protected] => [validationFailures:protected] => Array ( ) [_new:BaseObject:private] => [_deleted:BaseObject:private] => [modifiedColumns:protected] => Array ( ) ) [71] => Category Object ( [languages:protected] => [bok_resources:protected] => [bok_topics:protected] => [bok_keywords:protected] => [id:protected] => 71 [type:protected] => category [parent:protected] => 2 [label:protected] => Painter [alreadyInSave:protected] => [alreadyInValidation:protected] => [validationFailures:protected] => Array ( ) [_new:BaseObject:private] => [_deleted:BaseObject:private] => [modifiedColumns:protected] => Array ( ) ) [72] => Category Object ( [languages:protected] => [bok_resources:protected] => [bok_topics:protected] => [bok_keywords:protected] => [id:protected] => 72 [type:protected] => category [parent:protected] => 2 [label:protected] => Paper Hanger [alreadyInSave:protected] => [alreadyInValidation:protected] => [validationFailures:protected] => Array ( ) [_new:BaseObject:private] => [_deleted:BaseObject:private] => [modifiedColumns:protected] => Array ( ) ) [73] => Category Object ( [languages:protected] => [bok_resources:protected] => [bok_topics:protected] => [bok_keywords:protected] => [id:protected] => 73 [type:protected] => category [parent:protected] => 2 [label:protected] => PCC/Restoration [alreadyInSave:protected] => [alreadyInValidation:protected] => [validationFailures:protected] => Array ( ) [_new:BaseObject:private] => [_deleted:BaseObject:private] => [modifiedColumns:protected] => Array ( ) ) [74] => Category Object ( [languages:protected] => [bok_resources:protected] => [bok_topics:protected] => [bok_keywords:protected] => [id:protected] => 74 [type:protected] => category [parent:protected] => 2 [label:protected] => Pile Driver [alreadyInSave:protected] => [alreadyInValidation:protected] => [validationFailures:protected] => Array ( ) [_new:BaseObject:private] => [_deleted:BaseObject:private] => [modifiedColumns:protected] => Array ( ) ) [75] => Category Object ( [languages:protected] => [bok_resources:protected] => [bok_topics:protected] => [bok_keywords:protected] => [id:protected] => 75 [type:protected] => category [parent:protected] => 2 [label:protected] => Plasterer [alreadyInSave:protected] => [alreadyInValidation:protected] => [validationFailures:protected] => Array ( ) [_new:BaseObject:private] => [_deleted:BaseObject:private] => [modifiedColumns:protected] => Array ( ) ) [76] => Category Object ( [languages:protected] => [bok_resources:protected] => [bok_topics:protected] => [bok_keywords:protected] => [id:protected] => 76 [type:protected] => category [parent:protected] => 2 [label:protected] => Plumber/Pipefitter [alreadyInSave:protected] => [alreadyInValidation:protected] => [validationFailures:protected] => Array ( ) [_new:BaseObject:private] => [_deleted:BaseObject:private] => [modifiedColumns:protected] => Array ( ) ) [77] => Category Object ( [languages:protected] => [bok_resources:protected] => [bok_topics:protected] => [bok_keywords:protected] => [id:protected] => 77 [type:protected] => category [parent:protected] => 2 [label:protected] => Refractory Worker [alreadyInSave:protected] => [alreadyInValidation:protected] => [validationFailures:protected] => Array ( ) [_new:BaseObject:private] => [_deleted:BaseObject:private] => [modifiedColumns:protected] => Array ( ) ) [63] => Category Object ( [languages:protected] => [bok_resources:protected] => [bok_topics:protected] => [bok_keywords:protected] => [id:protected] => 63 [type:protected] => category [parent:protected] => 2 [label:protected] => Reinforcing Ironworker [alreadyInSave:protected] => [alreadyInValidation:protected] => [validationFailures:protected] => Array ( ) [_new:BaseObject:private] => [_deleted:BaseObject:private] => [modifiedColumns:protected] => Array ( ) ) [78] => Category Object ( [languages:protected] => [bok_resources:protected] => [bok_topics:protected] => [bok_keywords:protected] => [id:protected] => 78 [type:protected] => category [parent:protected] => 2 [label:protected] => Roofer/Waterproofer [alreadyInSave:protected] => [alreadyInValidation:protected] => [validationFailures:protected] => Array ( ) [_new:BaseObject:private] => [_deleted:BaseObject:private] => [modifiedColumns:protected] => Array ( ) ) [79] => Category Object ( [languages:protected] => [bok_resources:protected] => [bok_topics:protected] => [bok_keywords:protected] => [id:protected] => 79 [type:protected] => category [parent:protected] => 2 [label:protected] => Scaffold Erector [alreadyInSave:protected] => [alreadyInValidation:protected] => [validationFailures:protected] => Array ( ) [_new:BaseObject:private] => [_deleted:BaseObject:private] => [modifiedColumns:protected] => Array ( ) ) [80] => Category Object ( [languages:protected] => [bok_resources:protected] => [bok_topics:protected] => [bok_keywords:protected] => [id:protected] => 80 [type:protected] => category [parent:protected] => 2 [label:protected] => Sheetmetal Worker [alreadyInSave:protected] => [alreadyInValidation:protected] => [validationFailures:protected] => Array ( ) [_new:BaseObject:private] => [_deleted:BaseObject:private] => [modifiedColumns:protected] => Array ( ) ) [81] => Category Object ( [languages:protected] => [bok_resources:protected] => [bok_topics:protected] => [bok_keywords:protected] => [id:protected] => 81 [type:protected] => category [parent:protected] => 2 [label:protected] => Sprinkler Fitter [alreadyInSave:protected] => [alreadyInValidation:protected] => [validationFailures:protected] => Array ( ) [_new:BaseObject:private] => [_deleted:BaseObject:private] => [modifiedColumns:protected] => Array ( ) ) [82] => Category Object ( [languages:protected] => [bok_resources:protected] => [bok_topics:protected] => [bok_keywords:protected] => [id:protected] => 82 [type:protected] => category [parent:protected] => 2 [label:protected] => Stonemason [alreadyInSave:protected] => [alreadyInValidation:protected] => [validationFailures:protected] => Array ( ) [_new:BaseObject:private] => [_deleted:BaseObject:private] => [modifiedColumns:protected] => Array ( ) ) [62] => Category Object ( [languages:protected] => [bok_resources:protected] => [bok_topics:protected] => [bok_keywords:protected] => [id:protected] => 62 [type:protected] => category [parent:protected] => 2 [label:protected] => Structural Ironworker [alreadyInSave:protected] => [alreadyInValidation:protected] => [validationFailures:protected] => Array ( ) [_new:BaseObject:private] => [_deleted:BaseObject:private] => [modifiedColumns:protected] => Array ( ) ) [83] => Category Object ( [languages:protected] => [bok_resources:protected] => [bok_topics:protected] => [bok_keywords:protected] => [id:protected] => 83 [type:protected] => category [parent:protected] => 2 [label:protected] => Terrazzo Worker [alreadyInSave:protected] => [alreadyInValidation:protected] => [validationFailures:protected] => Array ( ) [_new:BaseObject:private] => [_deleted:BaseObject:private] => [modifiedColumns:protected] => Array ( ) ) [84] => Category Object ( [languages:protected] => [bok_resources:protected] => [bok_topics:protected] => [bok_keywords:protected] => [id:protected] => 84 [type:protected] => category [parent:protected] => 2 [label:protected] => Tile Setter [alreadyInSave:protected] => [alreadyInValidation:protected] => [validationFailures:protected] => Array ( ) [_new:BaseObject:private] => [_deleted:BaseObject:private] => [modifiedColumns:protected] => Array ( ) ) [85] => Category Object ( [languages:protected] => [bok_resources:protected] => [bok_topics:protected] => [bok_keywords:protected] => [id:protected] => 85 [type:protected] => category [parent:protected] => 2 [label:protected] => Truck Driver [alreadyInSave:protected] => [alreadyInValidation:protected] => [validationFailures:protected] => Array ( ) [_new:BaseObject:private] => [_deleted:BaseObject:private] => [modifiedColumns:protected] => Array ( ) ) [86] => Category Object ( [languages:protected] => [bok_resources:protected] => [bok_topics:protected] => [bok_keywords:protected] => [id:protected] => 86 [type:protected] => category [parent:protected] => 2 [label:protected] => Welder [alreadyInSave:protected] => [alreadyInValidation:protected] => [validationFailures:protected] => Array ( ) [_new:BaseObject:private] => [_deleted:BaseObject:private] => [modifiedColumns:protected] => Array ( ) ) [87] => Category Object ( [languages:protected] => [bok_resources:protected] => [bok_topics:protected] => [bok_keywords:protected] => [id:protected] => 87 [type:protected] => category [parent:protected] => 3 [label:protected] => Commercial & Institutional [alreadyInSave:protected] => [alreadyInValidation:protected] => [validationFailures:protected] => Array ( ) [_new:BaseObject:private] => [_deleted:BaseObject:private] => [modifiedColumns:protected] => Array ( ) ) [88] => Category Object ( [languages:protected] => [bok_resources:protected] => [bok_topics:protected] => [bok_keywords:protected] => [id:protected] => 88 [type:protected] => category [parent:protected] => 3 [label:protected] => Demolition [alreadyInSave:protected] => [alreadyInValidation:protected] => [validationFailures:protected] => Array ( ) [_new:BaseObject:private] => [_deleted:BaseObject:private] => [modifiedColumns:protected] => Array ( ) ) [89] => Category Object ( [languages:protected] => [bok_resources:protected] => [bok_topics:protected] => [bok_keywords:protected] => [id:protected] => 89 [type:protected] => category [parent:protected] => 3 [label:protected] => Disasters [alreadyInSave:protected] => [alreadyInValidation:protected] => [validationFailures:protected] => Array ( ) [_new:BaseObject:private] => [_deleted:BaseObject:private] => [modifiedColumns:protected] => Array ( ) ) [91] => Category Object ( [languages:protected] => [bok_resources:protected] => [bok_topics:protected] => [bok_keywords:protected] => [id:protected] => 91 [type:protected] => category [parent:protected] => 3 [label:protected] => Heavy & Highway [alreadyInSave:protected] => [alreadyInValidation:protected] => [validationFailures:protected] => Array ( ) [_new:BaseObject:private] => [_deleted:BaseObject:private] => [modifiedColumns:protected] => Array ( ) ) [90] => Category Object ( [languages:protected] => [bok_resources:protected] => [bok_topics:protected] => [bok_keywords:protected] => [id:protected] => 90 [type:protected] => category [parent:protected] => 3 [label:protected] => Industrial [alreadyInSave:protected] => [alreadyInValidation:protected] => [validationFailures:protected] => Array ( ) [_new:BaseObject:private] => [_deleted:BaseObject:private] => [modifiedColumns:protected] => Array ( ) ) [92] => Category Object ( [languages:protected] => [bok_resources:protected] => [bok_topics:protected] => [bok_keywords:protected] => [id:protected] => 92 [type:protected] => category [parent:protected] => 3 [label:protected] => LEED/Green Construction [alreadyInSave:protected] => [alreadyInValidation:protected] => [validationFailures:protected] => Array ( ) [_new:BaseObject:private] => [_deleted:BaseObject:private] => [modifiedColumns:protected] => Array ( ) ) [93] => Category Object ( [languages:protected] => [bok_resources:protected] => [bok_topics:protected] => [bok_keywords:protected] => [id:protected] => 93 [type:protected] => category [parent:protected] => 3 [label:protected] => Renovations [alreadyInSave:protected] => [alreadyInValidation:protected] => [validationFailures:protected] => Array ( ) [_new:BaseObject:private] => [_deleted:BaseObject:private] => [modifiedColumns:protected] => Array ( ) ) [94] => Category Object ( [languages:protected] => [bok_resources:protected] => [bok_topics:protected] => [bok_keywords:protected] => [id:protected] => 94 [type:protected] => category [parent:protected] => 3 [label:protected] => Residential [alreadyInSave:protected] => [alreadyInValidation:protected] => [validationFailures:protected] => Array ( ) [_new:BaseObject:private] => [_deleted:BaseObject:private] => [modifiedColumns:protected] => Array ( ) ) [95] => Category Object ( [languages:protected] => [bok_resources:protected] => [bok_topics:protected] => [bok_keywords:protected] => [id:protected] => 95 [type:protected] => category [parent:protected] => 3 [label:protected] => Underground [alreadyInSave:protected] => [alreadyInValidation:protected] => [validationFailures:protected] => Array ( ) [_new:BaseObject:private] => [_deleted:BaseObject:private] => [modifiedColumns:protected] => Array ( ) ) [100] => Category Object ( [languages:protected] => [bok_resources:protected] => [bok_topics:protected] => [bok_keywords:protected] => [id:protected] => 100 [type:protected] => category [parent:protected] => 6 [label:protected] => Toolbox Talks [alreadyInSave:protected] => [alreadyInValidation:protected] => [validationFailures:protected] => Array ( ) [_new:BaseObject:private] => [_deleted:BaseObject:private] => [modifiedColumns:protected] => Array ( ) ) ) [categories_initialized:protected] => 1 [mapped_items:protected] => [content:protected] => [files:protected] => [language:protected] => Language Object ( [id:protected] => 1 [code:protected] => en [name:protected] => English [alreadyInSave:protected] => [alreadyInValidation:protected] => [validationFailures:protected] => Array ( ) [_new:BaseObject:private] => [_deleted:BaseObject:private] => [modifiedColumns:protected] => Array ( ) ) [old_record:protected] => [id:protected] => 4419 [old_id:protected] => [elcosh_id:protected] => d001652 [type:protected] => document [display_type:protected] => HTML only (and links) [user_id:protected] => 0 [language_id:protected] => 1 [tagging_id:protected] => Valeria Contreras [priority_id:protected] => 1 [title:protected] => Toolbox Talk: Suicide Prevention [total_pages:protected] => 1 [billed_pages:protected] => 1 [publication_number:protected] => [part_of:protected] => [keywords:protected] => suicide, suicide prevention, mental health, stress, depression, exhaustion, burnout, safety, support, emotional support, health [comments:protected] => [summary:protected] =>The CPWR Toolbox Talk on Suicide Prevention addresses the prevalence of suicide among construction workers. The resource includes a brief case example, steps to prevent a related injury or illness, and questions for discussion. It includes an image that illustrates the hazard, which can be posted in a central location as a reminder of steps to work safely.
Available in English and Spanish. [transition_comments:protected] => [external_link:protected] => [consol_link:protected] => [more_like_this:protected] => [permission_given_by:protected] => [published:protected] => T [billable:protected] => F [img_name:protected] => [img_ext:protected] => [img_width:protected] => [img_height:protected] => [img_credit:protected] => [img_practice:protected] => [vid_source_id:protected] => [vid_running_time:protected] => [vid_intended_audience:protected] => [vid_acquisition_info:protected] => [vid_cost:protected] => [vid_producer:protected] => [vid_filename:protected] => [vid_filename_downloadable:protected] => [date_summary:protected] => [date_permission_requested:protected] => [date_permission_received:protected] => [date_review_needed:protected] => [date_received:protected] => 10/08/20 [date_completed:protected] => 10/08/20 [date_billed:protected] => [date_modified:protected] => 05/19/23 [collBokExports:protected] => [lastBokExportCriteria:BaseElcoshItem:private] => [alreadyInSave:protected] => [alreadyInValidation:protected] => [validationFailures:protected] => Array ( ) [_new:BaseObject:private] => [_deleted:BaseObject:private] => [modifiedColumns:protected] => Array ( ) ) ) ) [new_images] => Array ( [0] => Search_Result Object ( [title] => Toolbox talk - crew view [image] => /record/images/4005-p.jpg [blurb] => Photo of crew listening to a toolbox safety talk before starting work.... [category] => Array ( [0] => 97 [1] => 20 [2] => 47 [3] => 49 [4] => 51 [5] => 55 [6] => 61 [7] => 64 [8] => 71 [9] => 75 [10] => 63 [11] => 79 [12] => 62 [13] => 87 [14] => 88 [15] => 91 [16] => 90 [17] => 93 [18] => 94 [19] => 95 ) [labels] => Array ( [0] => Images [1] => Media [2] => Media & Documents [3] => Safety Culture [4] => Work Environment [5] => Hazards [6] => Bricklayer [7] => Trades [8] => Carpenter [10] => Cement Mason [12] => Electrical Worker [14] => Interior Systems Carpenter [16] => Laborer [18] => Painter [20] => Plasterer [22] => Reinforcing Ironworker [24] => Scaffold Erector [26] => Structural Ironworker [28] => Commercial & Institutional [29] => Jobsites [30] => Demolition [32] => Heavy & Highway [34] => Industrial [36] => Renovations [38] => Residential [40] => Underground ) [type] => Images [sub_category] => [url] => /image/4005/i002692/Toolbox%2Btalk%2B-%2Bcrew%2Bview.html [item:protected] => ImageRecord Object ( [records:protected] => Array ( ) [recordId:protected] => [searchWordClass:protected] => [searchWordPeerClass:protected] => [bok_record:protected] => [authors:protected] => [organizations:protected] => [collections:protected] => [categories:protected] => Array ( [97] => Category Object ( [languages:protected] => [bok_resources:protected] => [bok_topics:protected] => [bok_keywords:protected] => [id:protected] => 97 [type:protected] => category [parent:protected] => 5 [label:protected] => Images [alreadyInSave:protected] => [alreadyInValidation:protected] => [validationFailures:protected] => Array ( ) [_new:BaseObject:private] => [_deleted:BaseObject:private] => [modifiedColumns:protected] => Array ( ) ) [20] => Category Object ( [languages:protected] => [bok_resources:protected] => [bok_topics:protected] => [bok_keywords:protected] => [id:protected] => 20 [type:protected] => category [parent:protected] => 7 [label:protected] => Safety Culture [alreadyInSave:protected] => [alreadyInValidation:protected] => [validationFailures:protected] => Array ( ) [_new:BaseObject:private] => [_deleted:BaseObject:private] => [modifiedColumns:protected] => Array ( ) ) [47] => Category Object ( [languages:protected] => [bok_resources:protected] => [bok_topics:protected] => [bok_keywords:protected] => [id:protected] => 47 [type:protected] => category [parent:protected] => 2 [label:protected] => Bricklayer [alreadyInSave:protected] => [alreadyInValidation:protected] => [validationFailures:protected] => Array ( ) [_new:BaseObject:private] => [_deleted:BaseObject:private] => [modifiedColumns:protected] => Array ( ) ) [49] => Category Object ( [languages:protected] => [bok_resources:protected] => [bok_topics:protected] => [bok_keywords:protected] => [id:protected] => 49 [type:protected] => category [parent:protected] => 2 [label:protected] => Carpenter [alreadyInSave:protected] => [alreadyInValidation:protected] => [validationFailures:protected] => Array ( ) [_new:BaseObject:private] => [_deleted:BaseObject:private] => [modifiedColumns:protected] => Array ( ) ) [51] => Category Object ( [languages:protected] => [bok_resources:protected] => [bok_topics:protected] => [bok_keywords:protected] => [id:protected] => 51 [type:protected] => category [parent:protected] => 2 [label:protected] => Cement Mason [alreadyInSave:protected] => [alreadyInValidation:protected] => [validationFailures:protected] => Array ( ) [_new:BaseObject:private] => [_deleted:BaseObject:private] => [modifiedColumns:protected] => Array ( ) ) [55] => Category Object ( [languages:protected] => [bok_resources:protected] => [bok_topics:protected] => [bok_keywords:protected] => [id:protected] => 55 [type:protected] => category [parent:protected] => 2 [label:protected] => Electrical Worker [alreadyInSave:protected] => [alreadyInValidation:protected] => [validationFailures:protected] => Array ( ) [_new:BaseObject:private] => [_deleted:BaseObject:private] => [modifiedColumns:protected] => Array ( ) ) [61] => Category Object ( [languages:protected] => [bok_resources:protected] => [bok_topics:protected] => [bok_keywords:protected] => [id:protected] => 61 [type:protected] => category [parent:protected] => 2 [label:protected] => Interior Systems Carpenter [alreadyInSave:protected] => [alreadyInValidation:protected] => [validationFailures:protected] => Array ( ) [_new:BaseObject:private] => [_deleted:BaseObject:private] => [modifiedColumns:protected] => Array ( ) ) [64] => Category Object ( [languages:protected] => [bok_resources:protected] => [bok_topics:protected] => [bok_keywords:protected] => [id:protected] => 64 [type:protected] => category [parent:protected] => 2 [label:protected] => Laborer [alreadyInSave:protected] => [alreadyInValidation:protected] => [validationFailures:protected] => Array ( ) [_new:BaseObject:private] => [_deleted:BaseObject:private] => [modifiedColumns:protected] => Array ( ) ) [71] => Category Object ( [languages:protected] => [bok_resources:protected] => [bok_topics:protected] => [bok_keywords:protected] => [id:protected] => 71 [type:protected] => category [parent:protected] => 2 [label:protected] => Painter [alreadyInSave:protected] => [alreadyInValidation:protected] => [validationFailures:protected] => Array ( ) [_new:BaseObject:private] => [_deleted:BaseObject:private] => [modifiedColumns:protected] => Array ( ) ) [75] => Category Object ( [languages:protected] => [bok_resources:protected] => [bok_topics:protected] => [bok_keywords:protected] => [id:protected] => 75 [type:protected] => category [parent:protected] => 2 [label:protected] => Plasterer [alreadyInSave:protected] => [alreadyInValidation:protected] => [validationFailures:protected] => Array ( ) [_new:BaseObject:private] => [_deleted:BaseObject:private] => [modifiedColumns:protected] => Array ( ) ) [63] => Category Object ( [languages:protected] => [bok_resources:protected] => [bok_topics:protected] => [bok_keywords:protected] => [id:protected] => 63 [type:protected] => category [parent:protected] => 2 [label:protected] => Reinforcing Ironworker [alreadyInSave:protected] => [alreadyInValidation:protected] => [validationFailures:protected] => Array ( ) [_new:BaseObject:private] => [_deleted:BaseObject:private] => [modifiedColumns:protected] => Array ( ) ) [79] => Category Object ( [languages:protected] => [bok_resources:protected] => [bok_topics:protected] => [bok_keywords:protected] => [id:protected] => 79 [type:protected] => category [parent:protected] => 2 [label:protected] => Scaffold Erector [alreadyInSave:protected] => [alreadyInValidation:protected] => [validationFailures:protected] => Array ( ) [_new:BaseObject:private] => [_deleted:BaseObject:private] => [modifiedColumns:protected] => Array ( ) ) [62] => Category Object ( [languages:protected] => [bok_resources:protected] => [bok_topics:protected] => [bok_keywords:protected] => [id:protected] => 62 [type:protected] => category [parent:protected] => 2 [label:protected] => Structural Ironworker [alreadyInSave:protected] => [alreadyInValidation:protected] => [validationFailures:protected] => Array ( ) [_new:BaseObject:private] => [_deleted:BaseObject:private] => [modifiedColumns:protected] => Array ( ) ) [87] => Category Object ( [languages:protected] => [bok_resources:protected] => [bok_topics:protected] => [bok_keywords:protected] => [id:protected] => 87 [type:protected] => category [parent:protected] => 3 [label:protected] => Commercial & Institutional [alreadyInSave:protected] => [alreadyInValidation:protected] => [validationFailures:protected] => Array ( ) [_new:BaseObject:private] => [_deleted:BaseObject:private] => [modifiedColumns:protected] => Array ( ) ) [88] => Category Object ( [languages:protected] => [bok_resources:protected] => [bok_topics:protected] => [bok_keywords:protected] => [id:protected] => 88 [type:protected] => category [parent:protected] => 3 [label:protected] => Demolition [alreadyInSave:protected] => [alreadyInValidation:protected] => [validationFailures:protected] => Array ( ) [_new:BaseObject:private] => [_deleted:BaseObject:private] => [modifiedColumns:protected] => Array ( ) ) [91] => Category Object ( [languages:protected] => [bok_resources:protected] => [bok_topics:protected] => [bok_keywords:protected] => [id:protected] => 91 [type:protected] => category [parent:protected] => 3 [label:protected] => Heavy & Highway [alreadyInSave:protected] => [alreadyInValidation:protected] => [validationFailures:protected] => Array ( ) [_new:BaseObject:private] => [_deleted:BaseObject:private] => [modifiedColumns:protected] => Array ( ) ) [90] => Category Object ( [languages:protected] => [bok_resources:protected] => [bok_topics:protected] => [bok_keywords:protected] => [id:protected] => 90 [type:protected] => category [parent:protected] => 3 [label:protected] => Industrial [alreadyInSave:protected] => [alreadyInValidation:protected] => [validationFailures:protected] => Array ( ) [_new:BaseObject:private] => [_deleted:BaseObject:private] => [modifiedColumns:protected] => Array ( ) ) [93] => Category Object ( [languages:protected] => [bok_resources:protected] => [bok_topics:protected] => [bok_keywords:protected] => [id:protected] => 93 [type:protected] => category [parent:protected] => 3 [label:protected] => Renovations [alreadyInSave:protected] => [alreadyInValidation:protected] => [validationFailures:protected] => Array ( ) [_new:BaseObject:private] => [_deleted:BaseObject:private] => [modifiedColumns:protected] => Array ( ) ) [94] => Category Object ( [languages:protected] => [bok_resources:protected] => [bok_topics:protected] => [bok_keywords:protected] => [id:protected] => 94 [type:protected] => category [parent:protected] => 3 [label:protected] => Residential [alreadyInSave:protected] => [alreadyInValidation:protected] => [validationFailures:protected] => Array ( ) [_new:BaseObject:private] => [_deleted:BaseObject:private] => [modifiedColumns:protected] => Array ( ) ) [95] => Category Object ( [languages:protected] => [bok_resources:protected] => [bok_topics:protected] => [bok_keywords:protected] => [id:protected] => 95 [type:protected] => category [parent:protected] => 3 [label:protected] => Underground [alreadyInSave:protected] => [alreadyInValidation:protected] => [validationFailures:protected] => Array ( ) [_new:BaseObject:private] => [_deleted:BaseObject:private] => [modifiedColumns:protected] => Array ( ) ) ) [categories_initialized:protected] => 1 [mapped_items:protected] => [content:protected] => [files:protected] => [language:protected] => Language Object ( [id:protected] => 1 [code:protected] => en [name:protected] => English [alreadyInSave:protected] => [alreadyInValidation:protected] => [validationFailures:protected] => Array ( ) [_new:BaseObject:private] => [_deleted:BaseObject:private] => [modifiedColumns:protected] => Array ( ) ) [old_record:protected] => [id:protected] => 4005 [old_id:protected] => [elcosh_id:protected] => i002692 [type:protected] => image [display_type:protected] => Image [user_id:protected] => 0 [language_id:protected] => 1 [tagging_id:protected] => Bruce Lippy [priority_id:protected] => 1 [title:protected] => Toolbox talk - crew view [total_pages:protected] => 0 [billed_pages:protected] => 0 [publication_number:protected] => [part_of:protected] => [keywords:protected] => toolbox talk, tailgate talk, safety talk, Spanish [comments:protected] => [summary:protected] => Photo of crew listening to a toolbox safety talk before starting work. [transition_comments:protected] => [external_link:protected] => [consol_link:protected] => http://www.cpwrconstructionsolutions.org/electrical/solution/662/worker-training.html [more_like_this:protected] => i002691,d001269, c000079, d001285 [permission_given_by:protected] => [published:protected] => T [billable:protected] => F [img_name:protected] => [img_ext:protected] => jpg [img_width:protected] => [img_height:protected] => [img_credit:protected] => Morgan Zavertnik and Hoar Construction [img_practice:protected] => good [vid_source_id:protected] => [vid_running_time:protected] => [vid_intended_audience:protected] => [vid_acquisition_info:protected] => [vid_cost:protected] => [vid_producer:protected] => [vid_filename:protected] => [vid_filename_downloadable:protected] => [date_summary:protected] => November 2015 [date_permission_requested:protected] => [date_permission_received:protected] => [date_review_needed:protected] => [date_received:protected] => 03/02/16 [date_completed:protected] => 03/02/16 [date_billed:protected] => [date_modified:protected] => 03/02/16 [collBokExports:protected] => [lastBokExportCriteria:BaseElcoshItem:private] => [alreadyInSave:protected] => [alreadyInValidation:protected] => [validationFailures:protected] => Array ( ) [_new:BaseObject:private] => [_deleted:BaseObject:private] => [modifiedColumns:protected] => Array ( ) ) ) [1] => Search_Result Object ( [title] => Toolbox talk - long shot [image] => /record/images/4006-p.jpg [blurb] => This crew gathered every morning before starting work to discuss a new safety topic.... [category] => Array ( [0] => 20 [1] => 47 [2] => 49 [3] => 51 [4] => 55 [5] => 64 [6] => 68 [7] => 75 [8] => 76 [9] => 63 [10] => 78 [11] => 79 [12] => 82 [13] => 62 [14] => 87 [15] => 88 [16] => 91 [17] => 90 [18] => 93 [19] => 94 [20] => 95 [21] => 97 ) [labels] => Array ( [0] => Safety Culture [1] => Work Environment [2] => Hazards [3] => Bricklayer [4] => Trades [5] => Carpenter [7] => Cement Mason [9] => Electrical Worker [11] => Laborer [13] => Maintenance Worker [15] => Plasterer [17] => Plumber/Pipefitter [19] => Reinforcing Ironworker [21] => Roofer/Waterproofer [23] => Scaffold Erector [25] => Stonemason [27] => Structural Ironworker [29] => Commercial & Institutional [30] => Jobsites [31] => Demolition [33] => Heavy & Highway [35] => Industrial [37] => Renovations [39] => Residential [41] => Underground [43] => Images [44] => Media [45] => Media & Documents ) [type] => Images [sub_category] => [url] => /image/4006/i002693/Toolbox%2Btalk%2B-%2Blong%2Bshot.html [item:protected] => ImageRecord Object ( [records:protected] => Array ( ) [recordId:protected] => [searchWordClass:protected] => [searchWordPeerClass:protected] => [bok_record:protected] => [authors:protected] => [organizations:protected] => [collections:protected] => [categories:protected] => Array ( [20] => Category Object ( [languages:protected] => [bok_resources:protected] => [bok_topics:protected] => [bok_keywords:protected] => [id:protected] => 20 [type:protected] => category [parent:protected] => 7 [label:protected] => Safety Culture [alreadyInSave:protected] => [alreadyInValidation:protected] => [validationFailures:protected] => Array ( ) [_new:BaseObject:private] => [_deleted:BaseObject:private] => [modifiedColumns:protected] => Array ( ) ) [47] => Category Object ( [languages:protected] => [bok_resources:protected] => [bok_topics:protected] => [bok_keywords:protected] => [id:protected] => 47 [type:protected] => category [parent:protected] => 2 [label:protected] => Bricklayer [alreadyInSave:protected] => [alreadyInValidation:protected] => [validationFailures:protected] => Array ( ) [_new:BaseObject:private] => [_deleted:BaseObject:private] => [modifiedColumns:protected] => Array ( ) ) [49] => Category Object ( [languages:protected] => [bok_resources:protected] => [bok_topics:protected] => [bok_keywords:protected] => [id:protected] => 49 [type:protected] => category [parent:protected] => 2 [label:protected] => Carpenter [alreadyInSave:protected] => [alreadyInValidation:protected] => [validationFailures:protected] => Array ( ) [_new:BaseObject:private] => [_deleted:BaseObject:private] => [modifiedColumns:protected] => Array ( ) ) [51] => Category Object ( [languages:protected] => [bok_resources:protected] => [bok_topics:protected] => [bok_keywords:protected] => [id:protected] => 51 [type:protected] => category [parent:protected] => 2 [label:protected] => Cement Mason [alreadyInSave:protected] => [alreadyInValidation:protected] => [validationFailures:protected] => Array ( ) [_new:BaseObject:private] => [_deleted:BaseObject:private] => [modifiedColumns:protected] => Array ( ) ) [55] => Category Object ( [languages:protected] => [bok_resources:protected] => [bok_topics:protected] => [bok_keywords:protected] => [id:protected] => 55 [type:protected] => category [parent:protected] => 2 [label:protected] => Electrical Worker [alreadyInSave:protected] => [alreadyInValidation:protected] => [validationFailures:protected] => Array ( ) [_new:BaseObject:private] => [_deleted:BaseObject:private] => [modifiedColumns:protected] => Array ( ) ) [64] => Category Object ( [languages:protected] => [bok_resources:protected] => [bok_topics:protected] => [bok_keywords:protected] => [id:protected] => 64 [type:protected] => category [parent:protected] => 2 [label:protected] => Laborer [alreadyInSave:protected] => [alreadyInValidation:protected] => [validationFailures:protected] => Array ( ) [_new:BaseObject:private] => [_deleted:BaseObject:private] => [modifiedColumns:protected] => Array ( ) ) [68] => Category Object ( [languages:protected] => [bok_resources:protected] => [bok_topics:protected] => [bok_keywords:protected] => [id:protected] => 68 [type:protected] => category [parent:protected] => 2 [label:protected] => Maintenance Worker [alreadyInSave:protected] => [alreadyInValidation:protected] => [validationFailures:protected] => Array ( ) [_new:BaseObject:private] => [_deleted:BaseObject:private] => [modifiedColumns:protected] => Array ( ) ) [75] => Category Object ( [languages:protected] => [bok_resources:protected] => [bok_topics:protected] => [bok_keywords:protected] => [id:protected] => 75 [type:protected] => category [parent:protected] => 2 [label:protected] => Plasterer [alreadyInSave:protected] => [alreadyInValidation:protected] => [validationFailures:protected] => Array ( ) [_new:BaseObject:private] => [_deleted:BaseObject:private] => [modifiedColumns:protected] => Array ( ) ) [76] => Category Object ( [languages:protected] => [bok_resources:protected] => [bok_topics:protected] => [bok_keywords:protected] => [id:protected] => 76 [type:protected] => category [parent:protected] => 2 [label:protected] => Plumber/Pipefitter [alreadyInSave:protected] => [alreadyInValidation:protected] => [validationFailures:protected] => Array ( ) [_new:BaseObject:private] => [_deleted:BaseObject:private] => [modifiedColumns:protected] => Array ( ) ) [63] => Category Object ( [languages:protected] => [bok_resources:protected] => [bok_topics:protected] => [bok_keywords:protected] => [id:protected] => 63 [type:protected] => category [parent:protected] => 2 [label:protected] => Reinforcing Ironworker [alreadyInSave:protected] => [alreadyInValidation:protected] => [validationFailures:protected] => Array ( ) [_new:BaseObject:private] => [_deleted:BaseObject:private] => [modifiedColumns:protected] => Array ( ) ) [78] => Category Object ( [languages:protected] => [bok_resources:protected] => [bok_topics:protected] => [bok_keywords:protected] => [id:protected] => 78 [type:protected] => category [parent:protected] => 2 [label:protected] => Roofer/Waterproofer [alreadyInSave:protected] => [alreadyInValidation:protected] => [validationFailures:protected] => Array ( ) [_new:BaseObject:private] => [_deleted:BaseObject:private] => [modifiedColumns:protected] => Array ( ) ) [79] => Category Object ( [languages:protected] => [bok_resources:protected] => [bok_topics:protected] => [bok_keywords:protected] => [id:protected] => 79 [type:protected] => category [parent:protected] => 2 [label:protected] => Scaffold Erector [alreadyInSave:protected] => [alreadyInValidation:protected] => [validationFailures:protected] => Array ( ) [_new:BaseObject:private] => [_deleted:BaseObject:private] => [modifiedColumns:protected] => Array ( ) ) [82] => Category Object ( [languages:protected] => [bok_resources:protected] => [bok_topics:protected] => [bok_keywords:protected] => [id:protected] => 82 [type:protected] => category [parent:protected] => 2 [label:protected] => Stonemason [alreadyInSave:protected] => [alreadyInValidation:protected] => [validationFailures:protected] => Array ( ) [_new:BaseObject:private] => [_deleted:BaseObject:private] => [modifiedColumns:protected] => Array ( ) ) [62] => Category Object ( [languages:protected] => [bok_resources:protected] => [bok_topics:protected] => [bok_keywords:protected] => [id:protected] => 62 [type:protected] => category [parent:protected] => 2 [label:protected] => Structural Ironworker [alreadyInSave:protected] => [alreadyInValidation:protected] => [validationFailures:protected] => Array ( ) [_new:BaseObject:private] => [_deleted:BaseObject:private] => [modifiedColumns:protected] => Array ( ) ) [87] => Category Object ( [languages:protected] => [bok_resources:protected] => [bok_topics:protected] => [bok_keywords:protected] => [id:protected] => 87 [type:protected] => category [parent:protected] => 3 [label:protected] => Commercial & Institutional [alreadyInSave:protected] => [alreadyInValidation:protected] => [validationFailures:protected] => Array ( ) [_new:BaseObject:private] => [_deleted:BaseObject:private] => [modifiedColumns:protected] => Array ( ) ) [88] => Category Object ( [languages:protected] => [bok_resources:protected] => [bok_topics:protected] => [bok_keywords:protected] => [id:protected] => 88 [type:protected] => category [parent:protected] => 3 [label:protected] => Demolition [alreadyInSave:protected] => [alreadyInValidation:protected] => [validationFailures:protected] => Array ( ) [_new:BaseObject:private] => [_deleted:BaseObject:private] => [modifiedColumns:protected] => Array ( ) ) [91] => Category Object ( [languages:protected] => [bok_resources:protected] => [bok_topics:protected] => [bok_keywords:protected] => [id:protected] => 91 [type:protected] => category [parent:protected] => 3 [label:protected] => Heavy & Highway [alreadyInSave:protected] => [alreadyInValidation:protected] => [validationFailures:protected] => Array ( ) [_new:BaseObject:private] => [_deleted:BaseObject:private] => [modifiedColumns:protected] => Array ( ) ) [90] => Category Object ( [languages:protected] => [bok_resources:protected] => [bok_topics:protected] => [bok_keywords:protected] => [id:protected] => 90 [type:protected] => category [parent:protected] => 3 [label:protected] => Industrial [alreadyInSave:protected] => [alreadyInValidation:protected] => [validationFailures:protected] => Array ( ) [_new:BaseObject:private] => [_deleted:BaseObject:private] => [modifiedColumns:protected] => Array ( ) ) [93] => Category Object ( [languages:protected] => [bok_resources:protected] => [bok_topics:protected] => [bok_keywords:protected] => [id:protected] => 93 [type:protected] => category [parent:protected] => 3 [label:protected] => Renovations [alreadyInSave:protected] => [alreadyInValidation:protected] => [validationFailures:protected] => Array ( ) [_new:BaseObject:private] => [_deleted:BaseObject:private] => [modifiedColumns:protected] => Array ( ) ) [94] => Category Object ( [languages:protected] => [bok_resources:protected] => [bok_topics:protected] => [bok_keywords:protected] => [id:protected] => 94 [type:protected] => category [parent:protected] => 3 [label:protected] => Residential [alreadyInSave:protected] => [alreadyInValidation:protected] => [validationFailures:protected] => Array ( ) [_new:BaseObject:private] => [_deleted:BaseObject:private] => [modifiedColumns:protected] => Array ( ) ) [95] => Category Object ( [languages:protected] => [bok_resources:protected] => [bok_topics:protected] => [bok_keywords:protected] => [id:protected] => 95 [type:protected] => category [parent:protected] => 3 [label:protected] => Underground [alreadyInSave:protected] => [alreadyInValidation:protected] => [validationFailures:protected] => Array ( ) [_new:BaseObject:private] => [_deleted:BaseObject:private] => [modifiedColumns:protected] => Array ( ) ) [97] => Category Object ( [languages:protected] => [bok_resources:protected] => [bok_topics:protected] => [bok_keywords:protected] => [id:protected] => 97 [type:protected] => category [parent:protected] => 5 [label:protected] => Images [alreadyInSave:protected] => [alreadyInValidation:protected] => [validationFailures:protected] => Array ( ) [_new:BaseObject:private] => [_deleted:BaseObject:private] => [modifiedColumns:protected] => Array ( ) ) ) [categories_initialized:protected] => 1 [mapped_items:protected] => [content:protected] => [files:protected] => [language:protected] => Language Object ( [id:protected] => 1 [code:protected] => en [name:protected] => English [alreadyInSave:protected] => [alreadyInValidation:protected] => [validationFailures:protected] => Array ( ) [_new:BaseObject:private] => [_deleted:BaseObject:private] => [modifiedColumns:protected] => Array ( ) ) [old_record:protected] => [id:protected] => 4006 [old_id:protected] => [elcosh_id:protected] => i002693 [type:protected] => image [display_type:protected] => Image [user_id:protected] => 0 [language_id:protected] => 1 [tagging_id:protected] => Bruce Lippy [priority_id:protected] => 1 [title:protected] => Toolbox talk - long shot [total_pages:protected] => 0 [billed_pages:protected] => 0 [publication_number:protected] => [part_of:protected] => [keywords:protected] => toolbox talk, tailgate talk, safety minute [comments:protected] => [summary:protected] => This crew gathered every morning before starting work to discuss a new safety topic. [transition_comments:protected] => [external_link:protected] => [consol_link:protected] => http://www.cpwrconstructionsolutions.org/electrical/solution/662/worker-training.html [more_like_this:protected] => i002691,i002692,d001269,d000527 [permission_given_by:protected] => [published:protected] => T [billable:protected] => F [img_name:protected] => [img_ext:protected] => jpg [img_width:protected] => [img_height:protected] => [img_credit:protected] => Morgan Zavertnik and Hoar Construction [img_practice:protected] => good [vid_source_id:protected] => [vid_running_time:protected] => [vid_intended_audience:protected] => [vid_acquisition_info:protected] => [vid_cost:protected] => [vid_producer:protected] => [vid_filename:protected] => [vid_filename_downloadable:protected] => [date_summary:protected] => November 2015 [date_permission_requested:protected] => [date_permission_received:protected] => [date_review_needed:protected] => [date_received:protected] => 03/02/16 [date_completed:protected] => 03/02/16 [date_billed:protected] => [date_modified:protected] => 03/02/16 [collBokExports:protected] => [lastBokExportCriteria:BaseElcoshItem:private] => [alreadyInSave:protected] => [alreadyInValidation:protected] => [validationFailures:protected] => Array ( ) [_new:BaseObject:private] => [_deleted:BaseObject:private] => [modifiedColumns:protected] => Array ( ) ) ) [2] => Search_Result Object ( [title] => Construction bracing [image] => /record/images/3995-p.jpg [blurb] => This shows structural support that prevents collapses during construction.... [category] => Array ( [0] => 12 [1] => 15 [2] => 21 [3] => 49 [4] => 51 [5] => 55 [6] => 56 [7] => 60 [8] => 64 [9] => 68 [10] => 74 [11] => 63 [12] => 78 [13] => 79 [14] => 80 [15] => 62 [16] => 87 [17] => 90 [18] => 97 ) [labels] => Array ( [0] => Crushed/Struck By [1] => Work Environment [2] => Hazards [3] => Falls [6] => Scaffolds [9] => Carpenter [10] => Trades [11] => Cement Mason [13] => Electrical Worker [15] => Elevator Constructor [17] => HVAC [19] => Laborer [21] => Maintenance Worker [23] => Pile Driver [25] => Reinforcing Ironworker [27] => Roofer/Waterproofer [29] => Scaffold Erector [31] => Sheetmetal Worker [33] => Structural Ironworker [35] => Commercial & Institutional [36] => Jobsites [37] => Industrial [39] => Images [40] => Media [41] => Media & Documents ) [type] => Images [sub_category] => [url] => /image/3995/i002690/Construction%2Bbracing.html [item:protected] => ImageRecord Object ( [records:protected] => Array ( ) [recordId:protected] => [searchWordClass:protected] => [searchWordPeerClass:protected] => [bok_record:protected] => [authors:protected] => [organizations:protected] => [collections:protected] => [categories:protected] => Array ( [12] => Category Object ( [languages:protected] => [bok_resources:protected] => [bok_topics:protected] => [bok_keywords:protected] => [id:protected] => 12 [type:protected] => category [parent:protected] => 7 [label:protected] => Crushed/Struck By [alreadyInSave:protected] => [alreadyInValidation:protected] => [validationFailures:protected] => Array ( ) [_new:BaseObject:private] => [_deleted:BaseObject:private] => [modifiedColumns:protected] => Array ( ) ) [15] => Category Object ( [languages:protected] => [bok_resources:protected] => [bok_topics:protected] => [bok_keywords:protected] => [id:protected] => 15 [type:protected] => category [parent:protected] => 7 [label:protected] => Falls [alreadyInSave:protected] => [alreadyInValidation:protected] => [validationFailures:protected] => Array ( ) [_new:BaseObject:private] => [_deleted:BaseObject:private] => [modifiedColumns:protected] => Array ( ) ) [21] => Category Object ( [languages:protected] => [bok_resources:protected] => [bok_topics:protected] => [bok_keywords:protected] => [id:protected] => 21 [type:protected] => category [parent:protected] => 7 [label:protected] => Scaffolds [alreadyInSave:protected] => [alreadyInValidation:protected] => [validationFailures:protected] => Array ( ) [_new:BaseObject:private] => [_deleted:BaseObject:private] => [modifiedColumns:protected] => Array ( ) ) [49] => Category Object ( [languages:protected] => [bok_resources:protected] => [bok_topics:protected] => [bok_keywords:protected] => [id:protected] => 49 [type:protected] => category [parent:protected] => 2 [label:protected] => Carpenter [alreadyInSave:protected] => [alreadyInValidation:protected] => [validationFailures:protected] => Array ( ) [_new:BaseObject:private] => [_deleted:BaseObject:private] => [modifiedColumns:protected] => Array ( ) ) [51] => Category Object ( [languages:protected] => [bok_resources:protected] => [bok_topics:protected] => [bok_keywords:protected] => [id:protected] => 51 [type:protected] => category [parent:protected] => 2 [label:protected] => Cement Mason [alreadyInSave:protected] => [alreadyInValidation:protected] => [validationFailures:protected] => Array ( ) [_new:BaseObject:private] => [_deleted:BaseObject:private] => [modifiedColumns:protected] => Array ( ) ) [55] => Category Object ( [languages:protected] => [bok_resources:protected] => [bok_topics:protected] => [bok_keywords:protected] => [id:protected] => 55 [type:protected] => category [parent:protected] => 2 [label:protected] => Electrical Worker [alreadyInSave:protected] => [alreadyInValidation:protected] => [validationFailures:protected] => Array ( ) [_new:BaseObject:private] => [_deleted:BaseObject:private] => [modifiedColumns:protected] => Array ( ) ) [56] => Category Object ( [languages:protected] => [bok_resources:protected] => [bok_topics:protected] => [bok_keywords:protected] => [id:protected] => 56 [type:protected] => category [parent:protected] => 2 [label:protected] => Elevator Constructor [alreadyInSave:protected] => [alreadyInValidation:protected] => [validationFailures:protected] => Array ( ) [_new:BaseObject:private] => [_deleted:BaseObject:private] => [modifiedColumns:protected] => Array ( ) ) [60] => Category Object ( [languages:protected] => [bok_resources:protected] => [bok_topics:protected] => [bok_keywords:protected] => [id:protected] => 60 [type:protected] => category [parent:protected] => 2 [label:protected] => HVAC [alreadyInSave:protected] => [alreadyInValidation:protected] => [validationFailures:protected] => Array ( ) [_new:BaseObject:private] => [_deleted:BaseObject:private] => [modifiedColumns:protected] => Array ( ) ) [64] => Category Object ( [languages:protected] => [bok_resources:protected] => [bok_topics:protected] => [bok_keywords:protected] => [id:protected] => 64 [type:protected] => category [parent:protected] => 2 [label:protected] => Laborer [alreadyInSave:protected] => [alreadyInValidation:protected] => [validationFailures:protected] => Array ( ) [_new:BaseObject:private] => [_deleted:BaseObject:private] => [modifiedColumns:protected] => Array ( ) ) [68] => Category Object ( [languages:protected] => [bok_resources:protected] => [bok_topics:protected] => [bok_keywords:protected] => [id:protected] => 68 [type:protected] => category [parent:protected] => 2 [label:protected] => Maintenance Worker [alreadyInSave:protected] => [alreadyInValidation:protected] => [validationFailures:protected] => Array ( ) [_new:BaseObject:private] => [_deleted:BaseObject:private] => [modifiedColumns:protected] => Array ( ) ) [74] => Category Object ( [languages:protected] => [bok_resources:protected] => [bok_topics:protected] => [bok_keywords:protected] => [id:protected] => 74 [type:protected] => category [parent:protected] => 2 [label:protected] => Pile Driver [alreadyInSave:protected] => [alreadyInValidation:protected] => [validationFailures:protected] => Array ( ) [_new:BaseObject:private] => [_deleted:BaseObject:private] => [modifiedColumns:protected] => Array ( ) ) [63] => Category Object ( [languages:protected] => [bok_resources:protected] => [bok_topics:protected] => [bok_keywords:protected] => [id:protected] => 63 [type:protected] => category [parent:protected] => 2 [label:protected] => Reinforcing Ironworker [alreadyInSave:protected] => [alreadyInValidation:protected] => [validationFailures:protected] => Array ( ) [_new:BaseObject:private] => [_deleted:BaseObject:private] => [modifiedColumns:protected] => Array ( ) ) [78] => Category Object ( [languages:protected] => [bok_resources:protected] => [bok_topics:protected] => [bok_keywords:protected] => [id:protected] => 78 [type:protected] => category [parent:protected] => 2 [label:protected] => Roofer/Waterproofer [alreadyInSave:protected] => [alreadyInValidation:protected] => [validationFailures:protected] => Array ( ) [_new:BaseObject:private] => [_deleted:BaseObject:private] => [modifiedColumns:protected] => Array ( ) ) [79] => Category Object ( [languages:protected] => [bok_resources:protected] => [bok_topics:protected] => [bok_keywords:protected] => [id:protected] => 79 [type:protected] => category [parent:protected] => 2 [label:protected] => Scaffold Erector [alreadyInSave:protected] => [alreadyInValidation:protected] => [validationFailures:protected] => Array ( ) [_new:BaseObject:private] => [_deleted:BaseObject:private] => [modifiedColumns:protected] => Array ( ) ) [80] => Category Object ( [languages:protected] => [bok_resources:protected] => [bok_topics:protected] => [bok_keywords:protected] => [id:protected] => 80 [type:protected] => category [parent:protected] => 2 [label:protected] => Sheetmetal Worker [alreadyInSave:protected] => [alreadyInValidation:protected] => [validationFailures:protected] => Array ( ) [_new:BaseObject:private] => [_deleted:BaseObject:private] => [modifiedColumns:protected] => Array ( ) ) [62] => Category Object ( [languages:protected] => [bok_resources:protected] => [bok_topics:protected] => [bok_keywords:protected] => [id:protected] => 62 [type:protected] => category [parent:protected] => 2 [label:protected] => Structural Ironworker [alreadyInSave:protected] => [alreadyInValidation:protected] => [validationFailures:protected] => Array ( ) [_new:BaseObject:private] => [_deleted:BaseObject:private] => [modifiedColumns:protected] => Array ( ) ) [87] => Category Object ( [languages:protected] => [bok_resources:protected] => [bok_topics:protected] => [bok_keywords:protected] => [id:protected] => 87 [type:protected] => category [parent:protected] => 3 [label:protected] => Commercial & Institutional [alreadyInSave:protected] => [alreadyInValidation:protected] => [validationFailures:protected] => Array ( ) [_new:BaseObject:private] => [_deleted:BaseObject:private] => [modifiedColumns:protected] => Array ( ) ) [90] => Category Object ( [languages:protected] => [bok_resources:protected] => [bok_topics:protected] => [bok_keywords:protected] => [id:protected] => 90 [type:protected] => category [parent:protected] => 3 [label:protected] => Industrial [alreadyInSave:protected] => [alreadyInValidation:protected] => [validationFailures:protected] => Array ( ) [_new:BaseObject:private] => [_deleted:BaseObject:private] => [modifiedColumns:protected] => Array ( ) ) [97] => Category Object ( [languages:protected] => [bok_resources:protected] => [bok_topics:protected] => [bok_keywords:protected] => [id:protected] => 97 [type:protected] => category [parent:protected] => 5 [label:protected] => Images [alreadyInSave:protected] => [alreadyInValidation:protected] => [validationFailures:protected] => Array ( ) [_new:BaseObject:private] => [_deleted:BaseObject:private] => [modifiedColumns:protected] => Array ( ) ) ) [categories_initialized:protected] => 1 [mapped_items:protected] => [content:protected] => [files:protected] => [language:protected] => Language Object ( [id:protected] => 1 [code:protected] => en [name:protected] => English [alreadyInSave:protected] => [alreadyInValidation:protected] => [validationFailures:protected] => Array ( ) [_new:BaseObject:private] => [_deleted:BaseObject:private] => [modifiedColumns:protected] => Array ( ) ) [old_record:protected] => [id:protected] => 3995 [old_id:protected] => [elcosh_id:protected] => i002690 [type:protected] => image [display_type:protected] => Image [user_id:protected] => 0 [language_id:protected] => 1 [tagging_id:protected] => Bruce Lippy [priority_id:protected] => 1 [title:protected] => Construction bracing [total_pages:protected] => 0 [billed_pages:protected] => 0 [publication_number:protected] => [part_of:protected] => [keywords:protected] => Bracing, support, scaffold [comments:protected] => [summary:protected] => This shows structural support that prevents collapses during construction. [transition_comments:protected] => [external_link:protected] => [consol_link:protected] => http://www.cpwrconstructionsolutions.org/masonry/solution/8/adjustable-tower-scaffold.html [more_like_this:protected] => i002660 [permission_given_by:protected] => [published:protected] => T [billable:protected] => F [img_name:protected] => [img_ext:protected] => jpg [img_width:protected] => [img_height:protected] => [img_credit:protected] => Photo by Pam Susi [img_practice:protected] => good [vid_source_id:protected] => [vid_running_time:protected] => [vid_intended_audience:protected] => [vid_acquisition_info:protected] => [vid_cost:protected] => [vid_producer:protected] => [vid_filename:protected] => [vid_filename_downloadable:protected] => [date_summary:protected] => January 2016 [date_permission_requested:protected] => [date_permission_received:protected] => [date_review_needed:protected] => [date_received:protected] => 02/01/16 [date_completed:protected] => 02/01/16 [date_billed:protected] => [date_modified:protected] => 02/01/16 [collBokExports:protected] => [lastBokExportCriteria:BaseElcoshItem:private] => [alreadyInSave:protected] => [alreadyInValidation:protected] => [validationFailures:protected] => Array ( ) [_new:BaseObject:private] => [_deleted:BaseObject:private] => [modifiedColumns:protected] => Array ( ) ) ) [3] => Search_Result Object ( [title] => Suspended Scaffold Outriggers [image] => /record/images/3975-p.jpg [blurb] => Suspended scaffolds systems must be designed by a qualified person and inspected daily by a competent person. The supports for the counterweight must... [category] => Array ( [0] => 97 [1] => 15 [2] => 47 [3] => 49 [4] => 79 [5] => 87 ) [labels] => Array ( [0] => Images [1] => Media [2] => Media & Documents [3] => Falls [4] => Work Environment [5] => Hazards [6] => Bricklayer [7] => Trades [8] => Carpenter [10] => Scaffold Erector [12] => Commercial & Institutional [13] => Jobsites ) [type] => Images [sub_category] => [url] => /image/3975/i002683/Suspended%2BScaffold%2BOutriggers.html [item:protected] => ImageRecord Object ( [records:protected] => Array ( ) [recordId:protected] => [searchWordClass:protected] => [searchWordPeerClass:protected] => [bok_record:protected] => [authors:protected] => [organizations:protected] => [collections:protected] => [categories:protected] => Array ( [97] => Category Object ( [languages:protected] => [bok_resources:protected] => [bok_topics:protected] => [bok_keywords:protected] => [id:protected] => 97 [type:protected] => category [parent:protected] => 5 [label:protected] => Images [alreadyInSave:protected] => [alreadyInValidation:protected] => [validationFailures:protected] => Array ( ) [_new:BaseObject:private] => [_deleted:BaseObject:private] => [modifiedColumns:protected] => Array ( ) ) [15] => Category Object ( [languages:protected] => [bok_resources:protected] => [bok_topics:protected] => [bok_keywords:protected] => [id:protected] => 15 [type:protected] => category [parent:protected] => 7 [label:protected] => Falls [alreadyInSave:protected] => [alreadyInValidation:protected] => [validationFailures:protected] => Array ( ) [_new:BaseObject:private] => [_deleted:BaseObject:private] => [modifiedColumns:protected] => Array ( ) ) [47] => Category Object ( [languages:protected] => [bok_resources:protected] => [bok_topics:protected] => [bok_keywords:protected] => [id:protected] => 47 [type:protected] => category [parent:protected] => 2 [label:protected] => Bricklayer [alreadyInSave:protected] => [alreadyInValidation:protected] => [validationFailures:protected] => Array ( ) [_new:BaseObject:private] => [_deleted:BaseObject:private] => [modifiedColumns:protected] => Array ( ) ) [49] => Category Object ( [languages:protected] => [bok_resources:protected] => [bok_topics:protected] => [bok_keywords:protected] => [id:protected] => 49 [type:protected] => category [parent:protected] => 2 [label:protected] => Carpenter [alreadyInSave:protected] => [alreadyInValidation:protected] => [validationFailures:protected] => Array ( ) [_new:BaseObject:private] => [_deleted:BaseObject:private] => [modifiedColumns:protected] => Array ( ) ) [79] => Category Object ( [languages:protected] => [bok_resources:protected] => [bok_topics:protected] => [bok_keywords:protected] => [id:protected] => 79 [type:protected] => category [parent:protected] => 2 [label:protected] => Scaffold Erector [alreadyInSave:protected] => [alreadyInValidation:protected] => [validationFailures:protected] => Array ( ) [_new:BaseObject:private] => [_deleted:BaseObject:private] => [modifiedColumns:protected] => Array ( ) ) [87] => Category Object ( [languages:protected] => [bok_resources:protected] => [bok_topics:protected] => [bok_keywords:protected] => [id:protected] => 87 [type:protected] => category [parent:protected] => 3 [label:protected] => Commercial & Institutional [alreadyInSave:protected] => [alreadyInValidation:protected] => [validationFailures:protected] => Array ( ) [_new:BaseObject:private] => [_deleted:BaseObject:private] => [modifiedColumns:protected] => Array ( ) ) ) [categories_initialized:protected] => 1 [mapped_items:protected] => [content:protected] => [files:protected] => [language:protected] => Language Object ( [id:protected] => 1 [code:protected] => en [name:protected] => English [alreadyInSave:protected] => [alreadyInValidation:protected] => [validationFailures:protected] => Array ( ) [_new:BaseObject:private] => [_deleted:BaseObject:private] => [modifiedColumns:protected] => Array ( ) ) [old_record:protected] => [id:protected] => 3975 [old_id:protected] => [elcosh_id:protected] => i002683 [type:protected] => image [display_type:protected] => Image [user_id:protected] => 0 [language_id:protected] => 1 [tagging_id:protected] => John Newquist [priority_id:protected] => 1 [title:protected] => Suspended Scaffold Outriggers [total_pages:protected] => 0 [billed_pages:protected] => 0 [publication_number:protected] => [part_of:protected] => [keywords:protected] => suspended, scaffold, swing, stage, fall, protection, counterweight, qualified, person [comments:protected] => [summary:protected] => Suspended scaffolds systems must be designed by a qualified person and inspected daily by a competent person. The supports for the counterweight must be designed with a safety factor of four. [transition_comments:protected] => [external_link:protected] => [consol_link:protected] => http://www.cpwrconstructionsolutions.org/task/Erect%2Band%2Bdismantle%2Bscaffolds/ [more_like_this:protected] => d000244,d000359,i000253,i000407 [permission_given_by:protected] => [published:protected] => T [billable:protected] => F [img_name:protected] => [img_ext:protected] => jpg [img_width:protected] => [img_height:protected] => [img_credit:protected] => MetroPark, Miller and Long [img_practice:protected] => not_applicable [vid_source_id:protected] => [vid_running_time:protected] => [vid_intended_audience:protected] => [vid_acquisition_info:protected] => [vid_cost:protected] => [vid_producer:protected] => [vid_filename:protected] => [vid_filename_downloadable:protected] => [date_summary:protected] => August 28 2015 [date_permission_requested:protected] => [date_permission_received:protected] => [date_review_needed:protected] => [date_received:protected] => 08/28/15 [date_completed:protected] => 08/28/15 [date_billed:protected] => [date_modified:protected] => 08/28/15 [collBokExports:protected] => [lastBokExportCriteria:BaseElcoshItem:private] => [alreadyInSave:protected] => [alreadyInValidation:protected] => [validationFailures:protected] => Array ( ) [_new:BaseObject:private] => [_deleted:BaseObject:private] => [modifiedColumns:protected] => Array ( ) ) ) [4] => Search_Result Object ( [title] => Suspended scaffold [image] => /record/images/3976-p.jpg [blurb] => Suspended scaffold outrigger beams must have stops to prevent the hangers from sliding of the end of the outriggers. Wire rope supported must be desig... [category] => Array ( [0] => 97 [1] => 15 [2] => 47 [3] => 50 [4] => 79 [5] => 87 ) [labels] => Array ( [0] => Images [1] => Media [2] => Media & Documents [3] => Falls [4] => Work Environment [5] => Hazards [6] => Bricklayer [7] => Trades [8] => Carpet Layer [10] => Scaffold Erector [12] => Commercial & Institutional [13] => Jobsites ) [type] => Images [sub_category] => [url] => /image/3976/i002684/Suspended%2Bscaffold.html [item:protected] => ImageRecord Object ( [records:protected] => Array ( ) [recordId:protected] => [searchWordClass:protected] => [searchWordPeerClass:protected] => [bok_record:protected] => [authors:protected] => [organizations:protected] => [collections:protected] => [categories:protected] => Array ( [97] => Category Object ( [languages:protected] => [bok_resources:protected] => [bok_topics:protected] => [bok_keywords:protected] => [id:protected] => 97 [type:protected] => category [parent:protected] => 5 [label:protected] => Images [alreadyInSave:protected] => [alreadyInValidation:protected] => [validationFailures:protected] => Array ( ) [_new:BaseObject:private] => [_deleted:BaseObject:private] => [modifiedColumns:protected] => Array ( ) ) [15] => Category Object ( [languages:protected] => [bok_resources:protected] => [bok_topics:protected] => [bok_keywords:protected] => [id:protected] => 15 [type:protected] => category [parent:protected] => 7 [label:protected] => Falls [alreadyInSave:protected] => [alreadyInValidation:protected] => [validationFailures:protected] => Array ( ) [_new:BaseObject:private] => [_deleted:BaseObject:private] => [modifiedColumns:protected] => Array ( ) ) [47] => Category Object ( [languages:protected] => [bok_resources:protected] => [bok_topics:protected] => [bok_keywords:protected] => [id:protected] => 47 [type:protected] => category [parent:protected] => 2 [label:protected] => Bricklayer [alreadyInSave:protected] => [alreadyInValidation:protected] => [validationFailures:protected] => Array ( ) [_new:BaseObject:private] => [_deleted:BaseObject:private] => [modifiedColumns:protected] => Array ( ) ) [50] => Category Object ( [languages:protected] => [bok_resources:protected] => [bok_topics:protected] => [bok_keywords:protected] => [id:protected] => 50 [type:protected] => category [parent:protected] => 2 [label:protected] => Carpet Layer [alreadyInSave:protected] => [alreadyInValidation:protected] => [validationFailures:protected] => Array ( ) [_new:BaseObject:private] => [_deleted:BaseObject:private] => [modifiedColumns:protected] => Array ( ) ) [79] => Category Object ( [languages:protected] => [bok_resources:protected] => [bok_topics:protected] => [bok_keywords:protected] => [id:protected] => 79 [type:protected] => category [parent:protected] => 2 [label:protected] => Scaffold Erector [alreadyInSave:protected] => [alreadyInValidation:protected] => [validationFailures:protected] => Array ( ) [_new:BaseObject:private] => [_deleted:BaseObject:private] => [modifiedColumns:protected] => Array ( ) ) [87] => Category Object ( [languages:protected] => [bok_resources:protected] => [bok_topics:protected] => [bok_keywords:protected] => [id:protected] => 87 [type:protected] => category [parent:protected] => 3 [label:protected] => Commercial & Institutional [alreadyInSave:protected] => [alreadyInValidation:protected] => [validationFailures:protected] => Array ( ) [_new:BaseObject:private] => [_deleted:BaseObject:private] => [modifiedColumns:protected] => Array ( ) ) ) [categories_initialized:protected] => 1 [mapped_items:protected] => [content:protected] => [files:protected] => [language:protected] => Language Object ( [id:protected] => 1 [code:protected] => en [name:protected] => English [alreadyInSave:protected] => [alreadyInValidation:protected] => [validationFailures:protected] => Array ( ) [_new:BaseObject:private] => [_deleted:BaseObject:private] => [modifiedColumns:protected] => Array ( ) ) [old_record:protected] => [id:protected] => 3976 [old_id:protected] => [elcosh_id:protected] => i002684 [type:protected] => image [display_type:protected] => Image [user_id:protected] => 0 [language_id:protected] => 1 [tagging_id:protected] => John Newquist [priority_id:protected] => 1 [title:protected] => Suspended scaffold [total_pages:protected] => 0 [billed_pages:protected] => 0 [publication_number:protected] => [part_of:protected] => [keywords:protected] => Suspended, scaffold, outrigger, beams, erection, wire, rope, inspection, swing, stage, [comments:protected] => [summary:protected] => Suspended scaffold outrigger beams must have stops to prevent the hangers from sliding of the end of the outriggers. Wire rope supported must be designed with a safety factor of 6. The scaffold must be inspected by a competent person daily. [transition_comments:protected] => [external_link:protected] => [consol_link:protected] => http://www.cpwrconstructionsolutions.org/task/Erect%2Band%2Bdismantle%2Bscaffolds/ [more_like_this:protected] => i002683, d000244, i000407, d000606 [permission_given_by:protected] => [published:protected] => T [billable:protected] => F [img_name:protected] => [img_ext:protected] => jpg [img_width:protected] => [img_height:protected] => [img_credit:protected] => Metropark, Miller and Long [img_practice:protected] => not_applicable [vid_source_id:protected] => [vid_running_time:protected] => [vid_intended_audience:protected] => [vid_acquisition_info:protected] => [vid_cost:protected] => [vid_producer:protected] => [vid_filename:protected] => [vid_filename_downloadable:protected] => [date_summary:protected] => [date_permission_requested:protected] => [date_permission_received:protected] => [date_review_needed:protected] => [date_received:protected] => 08/28/15 [date_completed:protected] => 08/28/15 [date_billed:protected] => [date_modified:protected] => 08/28/15 [collBokExports:protected] => [lastBokExportCriteria:BaseElcoshItem:private] => [alreadyInSave:protected] => [alreadyInValidation:protected] => [validationFailures:protected] => Array ( ) [_new:BaseObject:private] => [_deleted:BaseObject:private] => [modifiedColumns:protected] => Array ( ) ) ) [5] => Search_Result Object ( [title] => Three Tower Cranes [image] => /record/images/3979-p.jpg [blurb] => Whenever multiple tower cranes are used, there needs to be preplanning to ensure that the tower cranes cannot hit each other loads. This is accomplish... [category] => Array ( [0] => 97 [1] => 11 [2] => 64 [3] => 70 [4] => 62 [5] => 87 ) [labels] => Array ( [0] => Images [1] => Media [2] => Media & Documents [3] => Cranes & Hoists [4] => Work Environment [5] => Hazards [6] => Laborer [7] => Trades [8] => Operating Engineer [10] => Structural Ironworker [12] => Commercial & Institutional [13] => Jobsites ) [type] => Images [sub_category] => [url] => /image/3979/i002687/Three%2BTower%2BCranes.html [item:protected] => ImageRecord Object ( [records:protected] => Array ( ) [recordId:protected] => [searchWordClass:protected] => [searchWordPeerClass:protected] => [bok_record:protected] => [authors:protected] => [organizations:protected] => [collections:protected] => [categories:protected] => Array ( [97] => Category Object ( [languages:protected] => [bok_resources:protected] => [bok_topics:protected] => [bok_keywords:protected] => [id:protected] => 97 [type:protected] => category [parent:protected] => 5 [label:protected] => Images [alreadyInSave:protected] => [alreadyInValidation:protected] => [validationFailures:protected] => Array ( ) [_new:BaseObject:private] => [_deleted:BaseObject:private] => [modifiedColumns:protected] => Array ( ) ) [11] => Category Object ( [languages:protected] => [bok_resources:protected] => [bok_topics:protected] => [bok_keywords:protected] => [id:protected] => 11 [type:protected] => category [parent:protected] => 7 [label:protected] => Cranes & Hoists [alreadyInSave:protected] => [alreadyInValidation:protected] => [validationFailures:protected] => Array ( ) [_new:BaseObject:private] => [_deleted:BaseObject:private] => [modifiedColumns:protected] => Array ( ) ) [64] => Category Object ( [languages:protected] => [bok_resources:protected] => [bok_topics:protected] => [bok_keywords:protected] => [id:protected] => 64 [type:protected] => category [parent:protected] => 2 [label:protected] => Laborer [alreadyInSave:protected] => [alreadyInValidation:protected] => [validationFailures:protected] => Array ( ) [_new:BaseObject:private] => [_deleted:BaseObject:private] => [modifiedColumns:protected] => Array ( ) ) [70] => Category Object ( [languages:protected] => [bok_resources:protected] => [bok_topics:protected] => [bok_keywords:protected] => [id:protected] => 70 [type:protected] => category [parent:protected] => 2 [label:protected] => Operating Engineer [alreadyInSave:protected] => [alreadyInValidation:protected] => [validationFailures:protected] => Array ( ) [_new:BaseObject:private] => [_deleted:BaseObject:private] => [modifiedColumns:protected] => Array ( ) ) [62] => Category Object ( [languages:protected] => [bok_resources:protected] => [bok_topics:protected] => [bok_keywords:protected] => [id:protected] => 62 [type:protected] => category [parent:protected] => 2 [label:protected] => Structural Ironworker [alreadyInSave:protected] => [alreadyInValidation:protected] => [validationFailures:protected] => Array ( ) [_new:BaseObject:private] => [_deleted:BaseObject:private] => [modifiedColumns:protected] => Array ( ) ) [87] => Category Object ( [languages:protected] => [bok_resources:protected] => [bok_topics:protected] => [bok_keywords:protected] => [id:protected] => 87 [type:protected] => category [parent:protected] => 3 [label:protected] => Commercial & Institutional [alreadyInSave:protected] => [alreadyInValidation:protected] => [validationFailures:protected] => Array ( ) [_new:BaseObject:private] => [_deleted:BaseObject:private] => [modifiedColumns:protected] => Array ( ) ) ) [categories_initialized:protected] => 1 [mapped_items:protected] => [content:protected] => [files:protected] => [language:protected] => Language Object ( [id:protected] => 1 [code:protected] => en [name:protected] => English [alreadyInSave:protected] => [alreadyInValidation:protected] => [validationFailures:protected] => Array ( ) [_new:BaseObject:private] => [_deleted:BaseObject:private] => [modifiedColumns:protected] => Array ( ) ) [old_record:protected] => [id:protected] => 3979 [old_id:protected] => [elcosh_id:protected] => i002687 [type:protected] => image [display_type:protected] => Image [user_id:protected] => 0 [language_id:protected] => 1 [tagging_id:protected] => John Newquist [priority_id:protected] => 1 [title:protected] => Three Tower Cranes [total_pages:protected] => 0 [billed_pages:protected] => 0 [publication_number:protected] => [part_of:protected] => [keywords:protected] => [comments:protected] => [summary:protected] => Whenever multiple tower cranes are used, there needs to be preplanning to ensure that the tower cranes cannot hit each other loads. This is accomplished by setting swing restrictions, marking the ground for allowable crane travel and training of the crane signal persons. [transition_comments:protected] => [external_link:protected] => [consol_link:protected] => http://www.cpwrconstructionsolutions.org/work/6/184/ [more_like_this:protected] => d001029, d000010, i001280, i001221 [permission_given_by:protected] => [published:protected] => T [billable:protected] => F [img_name:protected] => [img_ext:protected] => jpg [img_width:protected] => [img_height:protected] => [img_credit:protected] => Metropark [img_practice:protected] => not_applicable [vid_source_id:protected] => [vid_running_time:protected] => [vid_intended_audience:protected] => [vid_acquisition_info:protected] => [vid_cost:protected] => [vid_producer:protected] => [vid_filename:protected] => [vid_filename_downloadable:protected] => [date_summary:protected] => August 28 2015 [date_permission_requested:protected] => [date_permission_received:protected] => [date_review_needed:protected] => [date_received:protected] => 08/28/15 [date_completed:protected] => 08/28/15 [date_billed:protected] => [date_modified:protected] => 08/28/15 [collBokExports:protected] => [lastBokExportCriteria:BaseElcoshItem:private] => [alreadyInSave:protected] => [alreadyInValidation:protected] => [validationFailures:protected] => Array ( ) [_new:BaseObject:private] => [_deleted:BaseObject:private] => [modifiedColumns:protected] => Array ( ) ) ) ) [preview_mode] => [description] => This third in a series of 6 Tool Box Talks on construction ergonomics focuses on proper positioning to avoid injuries. The TBT recommends: 1)prop up a task off of the floor by using a raised surface, cart, baker scaffold, saw horses to prep materials near waist height, 2)move the lift or ladder in the best position for the work, 3)position the lift in front of the area you plan to work without trying to reach too far on either side of the lift. [keywords] => position, positioning, ergonomics, ergo, carpal tunnel, MSD, musculoskeletal disorder [related_items] => Array ( [Handouts] => Array ( [0] => DocumentRecord Object ( [records:protected] => Array ( ) [recordId:protected] => [searchWordClass:protected] => [searchWordPeerClass:protected] => [bok_record:protected] => [authors:protected] => [organizations:protected] => [collections:protected] => [categories:protected] => [categories_initialized:protected] => [mapped_items:protected] => [content:protected] => [files:protected] => [language:protected] => Language Object ( [id:protected] => 1 [code:protected] => en [name:protected] => English [alreadyInSave:protected] => [alreadyInValidation:protected] => [validationFailures:protected] => Array ( ) [_new:BaseObject:private] => [_deleted:BaseObject:private] => [modifiedColumns:protected] => Array ( ) ) [old_record:protected] => [id:protected] => 3833 [old_id:protected] => [elcosh_id:protected] => d001303 [type:protected] => document [display_type:protected] => HTML w/ PDF [user_id:protected] => 25 [language_id:protected] => 1 [tagging_id:protected] => Bruce Lippy [priority_id:protected] => 1 [title:protected] => Overview of Toolbox Talks on Ergonomics Developed by Washington University in St. Louis [total_pages:protected] => 3 [billed_pages:protected] => 3 [publication_number:protected] => [part_of:protected] => [keywords:protected] => ergonomics, musculoskeletal disorders, MSDs [comments:protected] => 7-28-2014 - Originally submitted as "HTML w/ doc and PDF", Jeff Nelson asked Bruce Lippy for permission to switch it to "HTML w/ PDF" -- permission was given [summary:protected] => This overviews provides a background on how Washington University in St. Louis developed this series of six toolbox talks on ergonomics. It also describes how they tested the effectiveness of these communication tools, concluding that the guide was valuable for improving the delivery of ergonomics training and interaction between the safety representative and workers. The researchers recommend preparing site-specific information prior to the talk and interacting with workers to discuss problems and ergonomic solutions during the safety meetings. [transition_comments:protected] => [external_link:protected] => [consol_link:protected] => [more_like_this:protected] => [permission_given_by:protected] => Lisa Jaegers, Washington U. in St. Louis [published:protected] => T [billable:protected] => F [img_name:protected] => [img_ext:protected] => png [img_width:protected] => [img_height:protected] => [img_credit:protected] => [img_practice:protected] => [vid_source_id:protected] => [vid_running_time:protected] => [vid_intended_audience:protected] => [vid_acquisition_info:protected] => [vid_cost:protected] => [vid_producer:protected] => [vid_filename:protected] => [vid_filename_downloadable:protected] => [date_summary:protected] => 2014 [date_permission_requested:protected] => [date_permission_received:protected] => [date_review_needed:protected] => [date_received:protected] => 06/11/14 [date_completed:protected] => 07/29/14 [date_billed:protected] => [date_modified:protected] => 07/29/14 [collBokExports:protected] => [lastBokExportCriteria:BaseElcoshItem:private] => [alreadyInSave:protected] => [alreadyInValidation:protected] => [validationFailures:protected] => Array ( ) [_new:BaseObject:private] => [_deleted:BaseObject:private] => [modifiedColumns:protected] => Array ( ) ) ) [Toolbox Talks] => Array ( [0] => DocumentRecord Object ( [records:protected] => Array ( ) [recordId:protected] => [searchWordClass:protected] => [searchWordPeerClass:protected] => [bok_record:protected] => [authors:protected] => [organizations:protected] => [collections:protected] => [categories:protected] => [categories_initialized:protected] => [mapped_items:protected] => [content:protected] => [files:protected] => [language:protected] => Language Object ( [id:protected] => 1 [code:protected] => en [name:protected] => English [alreadyInSave:protected] => [alreadyInValidation:protected] => [validationFailures:protected] => Array ( ) [_new:BaseObject:private] => [_deleted:BaseObject:private] => [modifiedColumns:protected] => Array ( ) ) [old_record:protected] => [id:protected] => 3835 [old_id:protected] => [elcosh_id:protected] => d001304 [type:protected] => document [display_type:protected] => HTML w/ PDF [user_id:protected] => 25 [language_id:protected] => 1 [tagging_id:protected] => Bruce Lippy [priority_id:protected] => 1 [title:protected] => Ergonomics Tool Box Talks (TBT) Training Guide [total_pages:protected] => 2 [billed_pages:protected] => 2 [publication_number:protected] => [part_of:protected] => [keywords:protected] => Ergonomics, carpal tunnel, muscular skeletal disorders, msd [comments:protected] => [summary:protected] => CPWR-funded ergonomics research by Washington University at St. Louis led to the development of 6 tool box talks. This guide is an explanation of how to deliver the talks for maximum effectiveness. This guide should be reviewed before delivering any of the talks because it makes important recommendations like: • If possible, give the TBTs as a part of the crew’s regular safety meetings so that ergonomics is included in the safety discussion. • Try to locate an area with few distractions for gathering the crew. • For a team approach, invite the work crew, site superintendent, project manager and other general contractor and/or subcontractor reps who you feel may be helpful in supporting the training and ergonomics solutions. [transition_comments:protected] => [external_link:protected] => [consol_link:protected] => [more_like_this:protected] => d001303,d001305,d001306,d001307,d001308,d001309,d001310 [permission_given_by:protected] => [published:protected] => T [billable:protected] => F [img_name:protected] => [img_ext:protected] => png [img_width:protected] => [img_height:protected] => [img_credit:protected] => [img_practice:protected] => [vid_source_id:protected] => [vid_running_time:protected] => [vid_intended_audience:protected] => [vid_acquisition_info:protected] => [vid_cost:protected] => [vid_producer:protected] => [vid_filename:protected] => [vid_filename_downloadable:protected] => [date_summary:protected] => 2014 [date_permission_requested:protected] => [date_permission_received:protected] => [date_review_needed:protected] => [date_received:protected] => 06/12/14 [date_completed:protected] => 07/29/14 [date_billed:protected] => [date_modified:protected] => 07/29/14 [collBokExports:protected] => [lastBokExportCriteria:BaseElcoshItem:private] => [alreadyInSave:protected] => [alreadyInValidation:protected] => [validationFailures:protected] => Array ( ) [_new:BaseObject:private] => [_deleted:BaseObject:private] => [modifiedColumns:protected] => Array ( ) ) [1] => DocumentRecord Object ( [records:protected] => Array ( ) [recordId:protected] => [searchWordClass:protected] => [searchWordPeerClass:protected] => [bok_record:protected] => [authors:protected] => [organizations:protected] => [collections:protected] => [categories:protected] => [categories_initialized:protected] => [mapped_items:protected] => [content:protected] => [files:protected] => [language:protected] => Language Object ( [id:protected] => 1 [code:protected] => en [name:protected] => English [alreadyInSave:protected] => [alreadyInValidation:protected] => [validationFailures:protected] => Array ( ) [_new:BaseObject:private] => [_deleted:BaseObject:private] => [modifiedColumns:protected] => Array ( ) ) [old_record:protected] => [id:protected] => 3836 [old_id:protected] => [elcosh_id:protected] => d001305 [type:protected] => document [display_type:protected] => HTML w/ PDF [user_id:protected] => 25 [language_id:protected] => 1 [tagging_id:protected] => Bruce Lippy [priority_id:protected] => 1 [title:protected] => TBT1 Ergonomics in Construction [total_pages:protected] => 5 [billed_pages:protected] => 5 [publication_number:protected] => [part_of:protected] => [keywords:protected] => ergonomics, ergo, msd, musculoskeletal disorders, risk factors, lifting, carpal tunnel, repetition, awkward postures [comments:protected] => 7-28-2014 Jeff Nelson asked Bruce Lippy about what to do with a sentence included toward the top of the doc, "Fill them in on page 2 'Other Questions.'" -- Bruce said this sentence could be deleted from the HTML. [summary:protected] => This is the first in a series of 6 Tool Box Talks produced by Washington University in St. Louis on ergonomics in construction work. This one should be delivered first because it covers what ergonomics is, why construction workers need to talk about it, what the risk factors are for developing a health problem and how to prevent these problems. [transition_comments:protected] => [external_link:protected] => [consol_link:protected] => http://www.cpwrconstructionsolutions.org/pipes_vessels/solution/50/participatory-ergonomics-program.html [more_like_this:protected] => d001303,d001304,d001306,d001307,d001308,d001309 [permission_given_by:protected] => Lisa Jaegers, Washington U. in St. Louis [published:protected] => T [billable:protected] => F [img_name:protected] => [img_ext:protected] => png [img_width:protected] => [img_height:protected] => [img_credit:protected] => [img_practice:protected] => [vid_source_id:protected] => [vid_running_time:protected] => [vid_intended_audience:protected] => [vid_acquisition_info:protected] => [vid_cost:protected] => [vid_producer:protected] => [vid_filename:protected] => [vid_filename_downloadable:protected] => [date_summary:protected] => 2014 [date_permission_requested:protected] => [date_permission_received:protected] => [date_review_needed:protected] => [date_received:protected] => 06/12/14 [date_completed:protected] => 07/28/14 [date_billed:protected] => [date_modified:protected] => 10/09/15 [collBokExports:protected] => [lastBokExportCriteria:BaseElcoshItem:private] => [alreadyInSave:protected] => [alreadyInValidation:protected] => [validationFailures:protected] => Array ( ) [_new:BaseObject:private] => [_deleted:BaseObject:private] => [modifiedColumns:protected] => Array ( ) ) [2] => DocumentRecord Object ( [records:protected] => Array ( ) [recordId:protected] => [searchWordClass:protected] => [searchWordPeerClass:protected] => [bok_record:protected] => [authors:protected] => [organizations:protected] => [collections:protected] => [categories:protected] => [categories_initialized:protected] => [mapped_items:protected] => [content:protected] => [files:protected] => [language:protected] => Language Object ( [id:protected] => 1 [code:protected] => en [name:protected] => English [alreadyInSave:protected] => [alreadyInValidation:protected] => [validationFailures:protected] => Array ( ) [_new:BaseObject:private] => [_deleted:BaseObject:private] => [modifiedColumns:protected] => Array ( ) ) [old_record:protected] => [id:protected] => 3837 [old_id:protected] => [elcosh_id:protected] => d001306 [type:protected] => document [display_type:protected] => HTML w/ PDF [user_id:protected] => 25 [language_id:protected] => 1 [tagging_id:protected] => Bruce Lippy [priority_id:protected] => 1 [title:protected] => TBT2 Keep Reach Close [total_pages:protected] => 4 [billed_pages:protected] => 4 [publication_number:protected] => [part_of:protected] => [keywords:protected] => reach, ergonomic, ergo, MSD, carpal tunnel, repetition, awkward positions [comments:protected] => 7-28-2014 Jeff Nelson asked Bruce Lippy about what to do with a sentence included toward the top of the doc, "Fill them in on page 2 'Other Questions.'" -- Bruce said this sentence could be deleted from the HTML. [summary:protected] => This is the second of six Tool Box Talks created by Washington University in St. Louis on ergonomics in construction. There is a guide with the series that describes how to deliver these talks. This one deals with how to avoid awkward reaching during tasks to prevent injuries. try to work with your hands below your head and close to our body to reduce your risk of shoulder strains and back discomfort. This TBT recommends considering ways to move close to the task, keeping the work area free of obstacles, and talking with each other to provide constructive feedback about your working position. [transition_comments:protected] => [external_link:protected] => [consol_link:protected] => http://www.cpwrconstructionsolutions.org/hazard/959/lifting-and-carrying-manual-materials-handling.html [more_like_this:protected] => d001303,d001304,d001305,d001307,d001308,e001309 [permission_given_by:protected] => [published:protected] => T [billable:protected] => F [img_name:protected] => [img_ext:protected] => png [img_width:protected] => [img_height:protected] => [img_credit:protected] => [img_practice:protected] => [vid_source_id:protected] => [vid_running_time:protected] => [vid_intended_audience:protected] => [vid_acquisition_info:protected] => [vid_cost:protected] => [vid_producer:protected] => [vid_filename:protected] => [vid_filename_downloadable:protected] => [date_summary:protected] => 2014 [date_permission_requested:protected] => [date_permission_received:protected] => [date_review_needed:protected] => [date_received:protected] => 06/12/14 [date_completed:protected] => 07/28/14 [date_billed:protected] => [date_modified:protected] => 11/02/16 [collBokExports:protected] => [lastBokExportCriteria:BaseElcoshItem:private] => [alreadyInSave:protected] => [alreadyInValidation:protected] => [validationFailures:protected] => Array ( ) [_new:BaseObject:private] => [_deleted:BaseObject:private] => [modifiedColumns:protected] => Array ( ) ) [3] => DocumentRecord Object ( [records:protected] => Array ( ) [recordId:protected] => [searchWordClass:protected] => [searchWordPeerClass:protected] => [bok_record:protected] => [authors:protected] => [organizations:protected] => [collections:protected] => [categories:protected] => [categories_initialized:protected] => [mapped_items:protected] => [content:protected] => [files:protected] => [language:protected] => Language Object ( [id:protected] => 1 [code:protected] => en [name:protected] => English [alreadyInSave:protected] => [alreadyInValidation:protected] => [validationFailures:protected] => Array ( ) [_new:BaseObject:private] => [_deleted:BaseObject:private] => [modifiedColumns:protected] => Array ( ) ) [old_record:protected] => [id:protected] => 3839 [old_id:protected] => [elcosh_id:protected] => d001308 [type:protected] => document [display_type:protected] => HTML w/ PDF [user_id:protected] => 23 [language_id:protected] => 1 [tagging_id:protected] => Bruce Lippy [priority_id:protected] => 1 [title:protected] => TBT4 Move Materials With Assist [total_pages:protected] => 4 [billed_pages:protected] => 4 [publication_number:protected] => [part_of:protected] => [keywords:protected] => lifting, back injury, ergonomics, ergo, MSD, buddy system [comments:protected] => 7-28-2014 Jeff Nelson asked Bruce Lippy about what to do with a sentence included toward the top of the doc, "Fill them in on page 2 'Other Questions.'" -- Bruce said this sentence could be deleted from the HTML. [summary:protected] => This tool box talk is fourth in a series of 6 developed by Washington University in St. Louis on construction ergonomics. This one focuses on preventing back injuries by getting an assist when manually lifting. It recommends using a cart for transporting loads, taking less trips, avoiding carrying materials on the shoulder and helping each other to lift large or heavy materials when a cart or hoist is not available. [transition_comments:protected] => [external_link:protected] => [consol_link:protected] => http://www.cpwrconstructionsolutions.org/hazard/959/lifting-and-carrying-manual-materials-handling.html [more_like_this:protected] => d001303,d001304,d001305,d001306,d001307,d001309 [permission_given_by:protected] => Lisa Jaegers, Washington U. in St. Louis [published:protected] => T [billable:protected] => F [img_name:protected] => [img_ext:protected] => png [img_width:protected] => [img_height:protected] => [img_credit:protected] => [img_practice:protected] => [vid_source_id:protected] => [vid_running_time:protected] => [vid_intended_audience:protected] => [vid_acquisition_info:protected] => [vid_cost:protected] => [vid_producer:protected] => [vid_filename:protected] => [vid_filename_downloadable:protected] => [date_summary:protected] => 2014 [date_permission_requested:protected] => [date_permission_received:protected] => [date_review_needed:protected] => [date_received:protected] => 06/12/14 [date_completed:protected] => 07/29/14 [date_billed:protected] => [date_modified:protected] => 10/09/15 [collBokExports:protected] => [lastBokExportCriteria:BaseElcoshItem:private] => [alreadyInSave:protected] => [alreadyInValidation:protected] => [validationFailures:protected] => Array ( ) [_new:BaseObject:private] => [_deleted:BaseObject:private] => [modifiedColumns:protected] => Array ( ) ) [4] => DocumentRecord Object ( [records:protected] => Array ( ) [recordId:protected] => [searchWordClass:protected] => [searchWordPeerClass:protected] => [bok_record:protected] => [authors:protected] => [organizations:protected] => [collections:protected] => [categories:protected] => [categories_initialized:protected] => [mapped_items:protected] => [content:protected] => [files:protected] => [language:protected] => Language Object ( [id:protected] => 1 [code:protected] => en [name:protected] => English [alreadyInSave:protected] => [alreadyInValidation:protected] => [validationFailures:protected] => Array ( ) [_new:BaseObject:private] => [_deleted:BaseObject:private] => [modifiedColumns:protected] => Array ( ) ) [old_record:protected] => [id:protected] => 3840 [old_id:protected] => [elcosh_id:protected] => d001309 [type:protected] => document [display_type:protected] => HTML w/ PDF [user_id:protected] => 23 [language_id:protected] => 1 [tagging_id:protected] => Bruce Lippy [priority_id:protected] => 1 [title:protected] => TBT5 Manual Tools [total_pages:protected] => 4 [billed_pages:protected] => 4 [publication_number:protected] => [part_of:protected] => [keywords:protected] => ergonomic, hand tools, handles, MSD, musculoskeletal disorder, carpal tunnel [comments:protected] => 7-28-2014 Jeff Nelson asked Bruce Lippy about what to do with a sentence included toward the top of the doc, "Fill them in on page 2 'Other Questions.'" -- Bruce said this sentence could be deleted from the HTML. [summary:protected] => This is the fifth in a series of 6 tool box talks on construction ergonomics produced by the University of Washington in St. Louis. This one focuses on manual tools. It asks the following 6 key questions. Does the tool… 1. Fit the task? 2. Allow a good power grip? 3. Keep the wrist in a straight posture? 4. Feel comfortable? 5. Take less effort than other tools for the task? 6. Work effectively? [transition_comments:protected] => [external_link:protected] => [consol_link:protected] => http://www.cpwrconstructionsolutions.org/masonry/solution/383/ergonomic-hand-tools.html [more_like_this:protected] => d001303,d001304,d001305,d001306,d001307,d001308,d001310 [permission_given_by:protected] => Lisa Jaegers, U. Wash. St. Louis [published:protected] => T [billable:protected] => F [img_name:protected] => [img_ext:protected] => png [img_width:protected] => [img_height:protected] => [img_credit:protected] => [img_practice:protected] => [vid_source_id:protected] => [vid_running_time:protected] => [vid_intended_audience:protected] => [vid_acquisition_info:protected] => [vid_cost:protected] => [vid_producer:protected] => [vid_filename:protected] => [vid_filename_downloadable:protected] => [date_summary:protected] => 2014 [date_permission_requested:protected] => [date_permission_received:protected] => [date_review_needed:protected] => [date_received:protected] => 06/12/14 [date_completed:protected] => 07/29/14 [date_billed:protected] => [date_modified:protected] => 10/09/15 [collBokExports:protected] => [lastBokExportCriteria:BaseElcoshItem:private] => [alreadyInSave:protected] => [alreadyInValidation:protected] => [validationFailures:protected] => Array ( ) [_new:BaseObject:private] => [_deleted:BaseObject:private] => [modifiedColumns:protected] => Array ( ) ) ) ) [collections] => Array ( [3834] => ) [record] => DocumentRecord Object ( [records:protected] => Array ( ) [recordId:protected] => [searchWordClass:protected] => [searchWordPeerClass:protected] => [bok_record:protected] => [authors:protected] => Array ( ) [organizations:protected] => Array ( [182] => Organization Object ( [id:protected] => 182 [elcosh_id:protected] => o000205 [user_id:protected] => 14 [province_id:protected] => 0 [country_id:protected] => 0 [title:protected] => Washington University - St. Louis [address:protected] => [postal_code:protected] => [city:protected] => [department:protected] => [phone:protected] => [fax:protected] => [email:protected] => [website:protected] => [filename:protected] => [about:protected] => [comments:protected] => [logo_available:protected] => T [no_details:protected] => T [date_received:protected] => 2009-08-06 [date_completed:protected] => 2009-08-06 [date_billed:protected] => [alreadyInSave:protected] => [alreadyInValidation:protected] => [validationFailures:protected] => Array ( ) [_new:BaseObject:private] => [_deleted:BaseObject:private] => [modifiedColumns:protected] => Array ( ) ) ) [collections:protected] => Array ( [3834] => ) [categories:protected] => [categories_initialized:protected] => [mapped_items:protected] => Array ( [3833] => DocumentRecord Object ( [records:protected] => Array ( ) [recordId:protected] => [searchWordClass:protected] => [searchWordPeerClass:protected] => [bok_record:protected] => [authors:protected] => [organizations:protected] => [collections:protected] => [categories:protected] => [categories_initialized:protected] => [mapped_items:protected] => [content:protected] => [files:protected] => [language:protected] => [old_record:protected] => [id:protected] => 3833 [old_id:protected] => [elcosh_id:protected] => d001303 [type:protected] => document [display_type:protected] => HTML w/ PDF [user_id:protected] => 25 [language_id:protected] => 1 [tagging_id:protected] => Bruce Lippy [priority_id:protected] => 1 [title:protected] => Overview of Toolbox Talks on Ergonomics Developed by Washington University in St. Louis [total_pages:protected] => 3 [billed_pages:protected] => 3 [publication_number:protected] => [part_of:protected] => [keywords:protected] => ergonomics, musculoskeletal disorders, MSDs [comments:protected] => 7-28-2014 - Originally submitted as "HTML w/ doc and PDF", Jeff Nelson asked Bruce Lippy for permission to switch it to "HTML w/ PDF" -- permission was given [summary:protected] => This overviews provides a background on how Washington University in St. Louis developed this series of six toolbox talks on ergonomics. It also describes how they tested the effectiveness of these communication tools, concluding that the guide was valuable for improving the delivery of ergonomics training and interaction between the safety representative and workers. The researchers recommend preparing site-specific information prior to the talk and interacting with workers to discuss problems and ergonomic solutions during the safety meetings. [transition_comments:protected] => [external_link:protected] => [consol_link:protected] => [more_like_this:protected] => [permission_given_by:protected] => Lisa Jaegers, Washington U. in St. Louis [published:protected] => T [billable:protected] => F [img_name:protected] => [img_ext:protected] => png [img_width:protected] => [img_height:protected] => [img_credit:protected] => [img_practice:protected] => [vid_source_id:protected] => [vid_running_time:protected] => [vid_intended_audience:protected] => [vid_acquisition_info:protected] => [vid_cost:protected] => [vid_producer:protected] => [vid_filename:protected] => [vid_filename_downloadable:protected] => [date_summary:protected] => 2014 [date_permission_requested:protected] => [date_permission_received:protected] => [date_review_needed:protected] => [date_received:protected] => 06/11/14 [date_completed:protected] => 07/29/14 [date_billed:protected] => [date_modified:protected] => 07/29/14 [collBokExports:protected] => [lastBokExportCriteria:BaseElcoshItem:private] => [alreadyInSave:protected] => [alreadyInValidation:protected] => [validationFailures:protected] => Array ( ) [_new:BaseObject:private] => [_deleted:BaseObject:private] => [modifiedColumns:protected] => Array ( ) ) [3835] => DocumentRecord Object ( [records:protected] => Array ( ) [recordId:protected] => [searchWordClass:protected] => [searchWordPeerClass:protected] => [bok_record:protected] => [authors:protected] => [organizations:protected] => [collections:protected] => [categories:protected] => [categories_initialized:protected] => [mapped_items:protected] => [content:protected] => [files:protected] => [language:protected] => [old_record:protected] => [id:protected] => 3835 [old_id:protected] => [elcosh_id:protected] => d001304 [type:protected] => document [display_type:protected] => HTML w/ PDF [user_id:protected] => 25 [language_id:protected] => 1 [tagging_id:protected] => Bruce Lippy [priority_id:protected] => 1 [title:protected] => Ergonomics Tool Box Talks (TBT) Training Guide [total_pages:protected] => 2 [billed_pages:protected] => 2 [publication_number:protected] => [part_of:protected] => [keywords:protected] => Ergonomics, carpal tunnel, muscular skeletal disorders, msd [comments:protected] => [summary:protected] => CPWR-funded ergonomics research by Washington University at St. Louis led to the development of 6 tool box talks. This guide is an explanation of how to deliver the talks for maximum effectiveness. This guide should be reviewed before delivering any of the talks because it makes important recommendations like: • If possible, give the TBTs as a part of the crew’s regular safety meetings so that ergonomics is included in the safety discussion. • Try to locate an area with few distractions for gathering the crew. • For a team approach, invite the work crew, site superintendent, project manager and other general contractor and/or subcontractor reps who you feel may be helpful in supporting the training and ergonomics solutions. [transition_comments:protected] => [external_link:protected] => [consol_link:protected] => [more_like_this:protected] => d001303,d001305,d001306,d001307,d001308,d001309,d001310 [permission_given_by:protected] => [published:protected] => T [billable:protected] => F [img_name:protected] => [img_ext:protected] => png [img_width:protected] => [img_height:protected] => [img_credit:protected] => [img_practice:protected] => [vid_source_id:protected] => [vid_running_time:protected] => [vid_intended_audience:protected] => [vid_acquisition_info:protected] => [vid_cost:protected] => [vid_producer:protected] => [vid_filename:protected] => [vid_filename_downloadable:protected] => [date_summary:protected] => 2014 [date_permission_requested:protected] => [date_permission_received:protected] => [date_review_needed:protected] => [date_received:protected] => 06/12/14 [date_completed:protected] => 07/29/14 [date_billed:protected] => [date_modified:protected] => 07/29/14 [collBokExports:protected] => [lastBokExportCriteria:BaseElcoshItem:private] => [alreadyInSave:protected] => [alreadyInValidation:protected] => [validationFailures:protected] => Array ( ) [_new:BaseObject:private] => [_deleted:BaseObject:private] => [modifiedColumns:protected] => Array ( ) ) [3836] => DocumentRecord Object ( [records:protected] => Array ( ) [recordId:protected] => [searchWordClass:protected] => [searchWordPeerClass:protected] => [bok_record:protected] => [authors:protected] => [organizations:protected] => [collections:protected] => [categories:protected] => [categories_initialized:protected] => [mapped_items:protected] => [content:protected] => [files:protected] => [language:protected] => [old_record:protected] => [id:protected] => 3836 [old_id:protected] => [elcosh_id:protected] => d001305 [type:protected] => document [display_type:protected] => HTML w/ PDF [user_id:protected] => 25 [language_id:protected] => 1 [tagging_id:protected] => Bruce Lippy [priority_id:protected] => 1 [title:protected] => TBT1 Ergonomics in Construction [total_pages:protected] => 5 [billed_pages:protected] => 5 [publication_number:protected] => [part_of:protected] => [keywords:protected] => ergonomics, ergo, msd, musculoskeletal disorders, risk factors, lifting, carpal tunnel, repetition, awkward postures [comments:protected] => 7-28-2014 Jeff Nelson asked Bruce Lippy about what to do with a sentence included toward the top of the doc, "Fill them in on page 2 'Other Questions.'" -- Bruce said this sentence could be deleted from the HTML. [summary:protected] => This is the first in a series of 6 Tool Box Talks produced by Washington University in St. Louis on ergonomics in construction work. This one should be delivered first because it covers what ergonomics is, why construction workers need to talk about it, what the risk factors are for developing a health problem and how to prevent these problems. [transition_comments:protected] => [external_link:protected] => [consol_link:protected] => http://www.cpwrconstructionsolutions.org/pipes_vessels/solution/50/participatory-ergonomics-program.html [more_like_this:protected] => d001303,d001304,d001306,d001307,d001308,d001309 [permission_given_by:protected] => Lisa Jaegers, Washington U. in St. Louis [published:protected] => T [billable:protected] => F [img_name:protected] => [img_ext:protected] => png [img_width:protected] => [img_height:protected] => [img_credit:protected] => [img_practice:protected] => [vid_source_id:protected] => [vid_running_time:protected] => [vid_intended_audience:protected] => [vid_acquisition_info:protected] => [vid_cost:protected] => [vid_producer:protected] => [vid_filename:protected] => [vid_filename_downloadable:protected] => [date_summary:protected] => 2014 [date_permission_requested:protected] => [date_permission_received:protected] => [date_review_needed:protected] => [date_received:protected] => 06/12/14 [date_completed:protected] => 07/28/14 [date_billed:protected] => [date_modified:protected] => 10/09/15 [collBokExports:protected] => [lastBokExportCriteria:BaseElcoshItem:private] => [alreadyInSave:protected] => [alreadyInValidation:protected] => [validationFailures:protected] => Array ( ) [_new:BaseObject:private] => [_deleted:BaseObject:private] => [modifiedColumns:protected] => Array ( ) ) [3837] => DocumentRecord Object ( [records:protected] => Array ( ) [recordId:protected] => [searchWordClass:protected] => [searchWordPeerClass:protected] => [bok_record:protected] => [authors:protected] => [organizations:protected] => [collections:protected] => [categories:protected] => [categories_initialized:protected] => [mapped_items:protected] => [content:protected] => [files:protected] => [language:protected] => [old_record:protected] => [id:protected] => 3837 [old_id:protected] => [elcosh_id:protected] => d001306 [type:protected] => document [display_type:protected] => HTML w/ PDF [user_id:protected] => 25 [language_id:protected] => 1 [tagging_id:protected] => Bruce Lippy [priority_id:protected] => 1 [title:protected] => TBT2 Keep Reach Close [total_pages:protected] => 4 [billed_pages:protected] => 4 [publication_number:protected] => [part_of:protected] => [keywords:protected] => reach, ergonomic, ergo, MSD, carpal tunnel, repetition, awkward positions [comments:protected] => 7-28-2014 Jeff Nelson asked Bruce Lippy about what to do with a sentence included toward the top of the doc, "Fill them in on page 2 'Other Questions.'" -- Bruce said this sentence could be deleted from the HTML. [summary:protected] => This is the second of six Tool Box Talks created by Washington University in St. Louis on ergonomics in construction. There is a guide with the series that describes how to deliver these talks. This one deals with how to avoid awkward reaching during tasks to prevent injuries. try to work with your hands below your head and close to our body to reduce your risk of shoulder strains and back discomfort. This TBT recommends considering ways to move close to the task, keeping the work area free of obstacles, and talking with each other to provide constructive feedback about your working position. [transition_comments:protected] => [external_link:protected] => [consol_link:protected] => http://www.cpwrconstructionsolutions.org/hazard/959/lifting-and-carrying-manual-materials-handling.html [more_like_this:protected] => d001303,d001304,d001305,d001307,d001308,e001309 [permission_given_by:protected] => [published:protected] => T [billable:protected] => F [img_name:protected] => [img_ext:protected] => png [img_width:protected] => [img_height:protected] => [img_credit:protected] => [img_practice:protected] => [vid_source_id:protected] => [vid_running_time:protected] => [vid_intended_audience:protected] => [vid_acquisition_info:protected] => [vid_cost:protected] => [vid_producer:protected] => [vid_filename:protected] => [vid_filename_downloadable:protected] => [date_summary:protected] => 2014 [date_permission_requested:protected] => [date_permission_received:protected] => [date_review_needed:protected] => [date_received:protected] => 06/12/14 [date_completed:protected] => 07/28/14 [date_billed:protected] => [date_modified:protected] => 11/02/16 [collBokExports:protected] => [lastBokExportCriteria:BaseElcoshItem:private] => [alreadyInSave:protected] => [alreadyInValidation:protected] => [validationFailures:protected] => Array ( ) [_new:BaseObject:private] => [_deleted:BaseObject:private] => [modifiedColumns:protected] => Array ( ) ) [3839] => DocumentRecord Object ( [records:protected] => Array ( ) [recordId:protected] => [searchWordClass:protected] => [searchWordPeerClass:protected] => [bok_record:protected] => [authors:protected] => [organizations:protected] => [collections:protected] => [categories:protected] => [categories_initialized:protected] => [mapped_items:protected] => [content:protected] => [files:protected] => [language:protected] => [old_record:protected] => [id:protected] => 3839 [old_id:protected] => [elcosh_id:protected] => d001308 [type:protected] => document [display_type:protected] => HTML w/ PDF [user_id:protected] => 23 [language_id:protected] => 1 [tagging_id:protected] => Bruce Lippy [priority_id:protected] => 1 [title:protected] => TBT4 Move Materials With Assist [total_pages:protected] => 4 [billed_pages:protected] => 4 [publication_number:protected] => [part_of:protected] => [keywords:protected] => lifting, back injury, ergonomics, ergo, MSD, buddy system [comments:protected] => 7-28-2014 Jeff Nelson asked Bruce Lippy about what to do with a sentence included toward the top of the doc, "Fill them in on page 2 'Other Questions.'" -- Bruce said this sentence could be deleted from the HTML. [summary:protected] => This tool box talk is fourth in a series of 6 developed by Washington University in St. Louis on construction ergonomics. This one focuses on preventing back injuries by getting an assist when manually lifting. It recommends using a cart for transporting loads, taking less trips, avoiding carrying materials on the shoulder and helping each other to lift large or heavy materials when a cart or hoist is not available. [transition_comments:protected] => [external_link:protected] => [consol_link:protected] => http://www.cpwrconstructionsolutions.org/hazard/959/lifting-and-carrying-manual-materials-handling.html [more_like_this:protected] => d001303,d001304,d001305,d001306,d001307,d001309 [permission_given_by:protected] => Lisa Jaegers, Washington U. in St. Louis [published:protected] => T [billable:protected] => F [img_name:protected] => [img_ext:protected] => png [img_width:protected] => [img_height:protected] => [img_credit:protected] => [img_practice:protected] => [vid_source_id:protected] => [vid_running_time:protected] => [vid_intended_audience:protected] => [vid_acquisition_info:protected] => [vid_cost:protected] => [vid_producer:protected] => [vid_filename:protected] => [vid_filename_downloadable:protected] => [date_summary:protected] => 2014 [date_permission_requested:protected] => [date_permission_received:protected] => [date_review_needed:protected] => [date_received:protected] => 06/12/14 [date_completed:protected] => 07/29/14 [date_billed:protected] => [date_modified:protected] => 10/09/15 [collBokExports:protected] => [lastBokExportCriteria:BaseElcoshItem:private] => [alreadyInSave:protected] => [alreadyInValidation:protected] => [validationFailures:protected] => Array ( ) [_new:BaseObject:private] => [_deleted:BaseObject:private] => [modifiedColumns:protected] => Array ( ) ) [3840] => DocumentRecord Object ( [records:protected] => Array ( ) [recordId:protected] => [searchWordClass:protected] => [searchWordPeerClass:protected] => [bok_record:protected] => [authors:protected] => [organizations:protected] => [collections:protected] => [categories:protected] => [categories_initialized:protected] => [mapped_items:protected] => [content:protected] => [files:protected] => [language:protected] => [old_record:protected] => [id:protected] => 3840 [old_id:protected] => [elcosh_id:protected] => d001309 [type:protected] => document [display_type:protected] => HTML w/ PDF [user_id:protected] => 23 [language_id:protected] => 1 [tagging_id:protected] => Bruce Lippy [priority_id:protected] => 1 [title:protected] => TBT5 Manual Tools [total_pages:protected] => 4 [billed_pages:protected] => 4 [publication_number:protected] => [part_of:protected] => [keywords:protected] => ergonomic, hand tools, handles, MSD, musculoskeletal disorder, carpal tunnel [comments:protected] => 7-28-2014 Jeff Nelson asked Bruce Lippy about what to do with a sentence included toward the top of the doc, "Fill them in on page 2 'Other Questions.'" -- Bruce said this sentence could be deleted from the HTML. [summary:protected] => This is the fifth in a series of 6 tool box talks on construction ergonomics produced by the University of Washington in St. Louis. This one focuses on manual tools. It asks the following 6 key questions. Does the tool… 1. Fit the task? 2. Allow a good power grip? 3. Keep the wrist in a straight posture? 4. Feel comfortable? 5. Take less effort than other tools for the task? 6. Work effectively? [transition_comments:protected] => [external_link:protected] => [consol_link:protected] => http://www.cpwrconstructionsolutions.org/masonry/solution/383/ergonomic-hand-tools.html [more_like_this:protected] => d001303,d001304,d001305,d001306,d001307,d001308,d001310 [permission_given_by:protected] => Lisa Jaegers, U. Wash. St. Louis [published:protected] => T [billable:protected] => F [img_name:protected] => [img_ext:protected] => png [img_width:protected] => [img_height:protected] => [img_credit:protected] => [img_practice:protected] => [vid_source_id:protected] => [vid_running_time:protected] => [vid_intended_audience:protected] => [vid_acquisition_info:protected] => [vid_cost:protected] => [vid_producer:protected] => [vid_filename:protected] => [vid_filename_downloadable:protected] => [date_summary:protected] => 2014 [date_permission_requested:protected] => [date_permission_received:protected] => [date_review_needed:protected] => [date_received:protected] => 06/12/14 [date_completed:protected] => 07/29/14 [date_billed:protected] => [date_modified:protected] => 10/09/15 [collBokExports:protected] => [lastBokExportCriteria:BaseElcoshItem:private] => [alreadyInSave:protected] => [alreadyInValidation:protected] => [validationFailures:protected] => Array ( ) [_new:BaseObject:private] => [_deleted:BaseObject:private] => [modifiedColumns:protected] => Array ( ) ) ) [content:protected] => [files:protected] => Array ( [559] => [560] => [546] => File Object ( [id:protected] => 546 [filename:protected] => 3.jpg [downloadable:protected] => F [timestamp:protected] => 2009-07-03 12:54:22 [alreadyInSave:protected] => [alreadyInValidation:protected] => [validationFailures:protected] => Array ( ) [_new:BaseObject:private] => [_deleted:BaseObject:private] => [modifiedColumns:protected] => Array ( ) ) [9643] => File Object ( [id:protected] => 9643 [filename:protected] => d001307.pdf [downloadable:protected] => T [timestamp:protected] => 2014-07-27 19:09:19 [alreadyInSave:protected] => [alreadyInValidation:protected] => [validationFailures:protected] => Array ( ) [_new:BaseObject:private] => [_deleted:BaseObject:private] => [modifiedColumns:protected] => Array ( ) ) [566] => File Object ( [id:protected] => 566 [filename:protected] => 4.jpg [downloadable:protected] => F [timestamp:protected] => 2009-07-03 12:54:23 [alreadyInSave:protected] => [alreadyInValidation:protected] => [validationFailures:protected] => Array ( ) [_new:BaseObject:private] => [_deleted:BaseObject:private] => [modifiedColumns:protected] => Array ( ) ) ) [language:protected] => Language Object ( [id:protected] => 1 [code:protected] => en [name:protected] => English [alreadyInSave:protected] => [alreadyInValidation:protected] => [validationFailures:protected] => Array ( ) [_new:BaseObject:private] => [_deleted:BaseObject:private] => [modifiedColumns:protected] => Array ( ) ) [old_record:protected] => [id:protected] => 3838 [old_id:protected] => [elcosh_id:protected] => d001307 [type:protected] => document [display_type:protected] => HTML w/ PDF [user_id:protected] => 25 [language_id:protected] => 1 [tagging_id:protected] => Bruce Lippy [priority_id:protected] => 1 [title:protected] => TBT3 Positioning [total_pages:protected] => 4 [billed_pages:protected] => 4 [publication_number:protected] => [part_of:protected] => [keywords:protected] => position, positioning, ergonomics, ergo, carpal tunnel, MSD, musculoskeletal disorder [comments:protected] => 7-28-2014 Jeff Nelson asked Bruce Lippy about what to do with a sentence included toward the top of the doc, "Fill them in on page 2 'Other Questions.'" -- Bruce said this sentence could be deleted from the HTML. [summary:protected] => This third in a series of 6 Tool Box Talks on construction ergonomics focuses on proper positioning to avoid injuries. The TBT recommends: 1)prop up a task off of the floor by using a raised surface, cart, baker scaffold, saw horses to prep materials near waist height, 2)move the lift or ladder in the best position for the work, 3)position the lift in front of the area you plan to work without trying to reach too far on either side of the lift. [transition_comments:protected] => [external_link:protected] => [consol_link:protected] => http://www.cpwrconstructionsolutions.org/hazard/959/lifting-and-carrying-manual-materials-handling.html [more_like_this:protected] => d001303,d001304,d001305,d001306,d001308,d001309 [permission_given_by:protected] => Lisa Jaegers, WU-St. Louis [published:protected] => T [billable:protected] => F [img_name:protected] => [img_ext:protected] => png [img_width:protected] => [img_height:protected] => [img_credit:protected] => [img_practice:protected] => [vid_source_id:protected] => [vid_running_time:protected] => [vid_intended_audience:protected] => [vid_acquisition_info:protected] => [vid_cost:protected] => [vid_producer:protected] => [vid_filename:protected] => [vid_filename_downloadable:protected] => [date_summary:protected] => 2014 [date_permission_requested:protected] => [date_permission_received:protected] => [date_review_needed:protected] => [date_received:protected] => 06/12/14 [date_completed:protected] => 07/28/14 [date_billed:protected] => [date_modified:protected] => 10/09/15 [collBokExports:protected] => [lastBokExportCriteria:BaseElcoshItem:private] => [alreadyInSave:protected] => [alreadyInValidation:protected] => [validationFailures:protected] => Array ( ) [_new:BaseObject:private] => [_deleted:BaseObject:private] => [modifiedColumns:protected] => Array ( ) ) [show_text] => [document_content] => ElcoshItemDocumentContent Object ( [id:protected] => 2906 [item_id:protected] => 3838 [type:protected] => main [title:protected] => [content:protected] =>
Facilitator / Leader Tasks Before the Tool Box Talk (TBT)
- Read through this TBT guide.
- Walk the job site to find ergonomics examples based on the TBT. If possible, take photos of “safe” and “unsafe” examples at the site to be used during the TBT.
- Write down discussion questions to ask the group.
Learning Goals
After discussing this training topic, workers will have gained a general understanding of:
- Unsafe work positions.
- Solutions to improve work positioning.
TRAINING CARD
The last page of this PDF has directions for printing and laminating the training cards.
TRAINER’S TALKING POINTS
Why should we talk about positioning?
Construction work requires working in high, low, and tight spaces which often forces you to work in an awkward or uncomfortable position. Working in awkward reaching and bent positions can lead to shoulder and back discomfort and possible injury over time.
Demonstration: The training card provides examples of the range of reaching and the point at which the reach is unsafe. Hold your arms straight out in front of you. Look at your hands and wrists while I discuss each of the reach zones on the training card.
The Green Zone shows the ideal location for working with your hands. When possible, try to keep your work tasks as far out as your wrists.
The Orange Zone is for occasional work since it involves more weight on your shoulders and low back since your hands are away from your body. If needed, keep the reach distance as far as your fingertips.
The Red Zone is away from your body so far that it places you at higher risk for falls when in the air and shoulder and back discomfort. Limit the time you work reaching beyond your fingertips.
End of Demonstration
Discussion Question: Can anyone describe to us an awkward position that they work in or have seen someone work in?
- What does it feel like in your neck, back or arms when working in that position?
- Other Questions:_____________________________________________
Training Note: Here are examples of hazards in different construction trades. Choose your trade or one that is similar to your group’s line of work that can be used as hazards and solutions examples.
| Trade | Awkward Posture Hazards | Potential Solution |
|---|---|---|
| Carpenter-Drywall | Leaning over the side of a scissor lift to reach and operating a screw gun with the arm fully extended (reaching in the red zone past the fingertips). | Before starting to install the line of screws to the side of the lift, move the lift to re-center it for the next 2 lines of screws to be installed. |
| Floor Layer | Spreading mortar overhead on a wall with the bakers scaffold one foot away from the wall due to buckets on the floor below (reach in the red zone, past the fingertips). | Pre-plan this task by removing all objects in the path of the bakers scaffold. Having an open path allows you to work closer to the task. |
| Sheet Metal Worker | Prepping duct parts on the floor while bending the back and reaching to work on them. | Pre-plan this task by setting up a waist-height workstation on extra materials, a cart, or saw horses. |
Now let’s put this information into practice. What are some tricks or techniques that you use to work in a comfortable position?
- Other Questions:_____________________________________________
Here are a few other ideas that are listed on your training card:
Prop up your tasks off of the floor by using a raised surface, cart, baker scaffold, saw horses to prep materials near waist height.
Move the lift or ladder in the best position for the work – close to the work tasks.
For safety & comfort, try to position the lift in front of the area you plan to work without trying to reach too far on either side of the lift.
In summary, it is important to work in a safe position when possible in order to reduce the risk of falls and discomfort due to awkward working positions. Consider ways that you can work in the green/comfort zone and orange zone and avoid the unsafe red zone.
References
[Images modified from Grandjean & Eastman Kodak Co.]
1. Grandjean, E. 1988. Fitting the task to the man: A textbook of occupational ergonomics. 4th ed. Taylor & Francis.
2. Eastman Kodak Co. 1983. Ergonomic Design for People at Work. Vol 1. Wiley, John & Sons, Incorporated.
Refer to the resources at our website: oshr.im.wustl.edu for more Tool Box TIPS.
TRAINING ATTENDANCE SHEET
Training Topic: Ergonomics -- Positioning
Date:
| ATTENDEES | |
|---|---|
Directions for Making Laminated Training Cards
The last page of this PDF has directions for printing and laminating the training cards.
[content_transformed:protected] =>Facilitator / Leader Tasks Before the Tool Box Talk (TBT)
- Read through this TBT guide.
- Walk the job site to find ergonomics examples based on the TBT. If possible, take photos of “safe” and “unsafe” examples at the site to be used during the TBT.
- Write down discussion questions to ask the group.
Learning Goals
After discussing this training topic, workers will have gained a general understanding of:
- Unsafe work positions.
- Solutions to improve work positioning.
TRAINING CARD
The last page of this PDF has directions for printing and laminating the training cards.
TRAINER’S TALKING POINTS
Why should we talk about positioning?
Construction work requires working in high, low, and tight spaces which often forces you to work in an awkward or uncomfortable position. Working in awkward reaching and bent positions can lead to shoulder and back discomfort and possible injury over time.
Demonstration: The training card provides examples of the range of reaching and the point at which the reach is unsafe. Hold your arms straight out in front of you. Look at your hands and wrists while I discuss each of the reach zones on the training card.
The Green Zone shows the ideal location for working with your hands. When possible, try to keep your work tasks as far out as your wrists.
The Orange Zone is for occasional work since it involves more weight on your shoulders and low back since your hands are away from your body. If needed, keep the reach distance as far as your fingertips.
The Red Zone is away from your body so far that it places you at higher risk for falls when in the air and shoulder and back discomfort. Limit the time you work reaching beyond your fingertips.
End of Demonstration
Discussion Question: Can anyone describe to us an awkward position that they work in or have seen someone work in?
- What does it feel like in your neck, back or arms when working in that position?
- Other Questions:_____________________________________________
Training Note: Here are examples of hazards in different construction trades. Choose your trade or one that is similar to your group’s line of work that can be used as hazards and solutions examples.
| Trade | Awkward Posture Hazards | Potential Solution |
|---|---|---|
| Carpenter-Drywall | Leaning over the side of a scissor lift to reach and operating a screw gun with the arm fully extended (reaching in the red zone past the fingertips). | Before starting to install the line of screws to the side of the lift, move the lift to re-center it for the next 2 lines of screws to be installed. |
| Floor Layer | Spreading mortar overhead on a wall with the bakers scaffold one foot away from the wall due to buckets on the floor below (reach in the red zone, past the fingertips). | Pre-plan this task by removing all objects in the path of the bakers scaffold. Having an open path allows you to work closer to the task. |
| Sheet Metal Worker | Prepping duct parts on the floor while bending the back and reaching to work on them. | Pre-plan this task by setting up a waist-height workstation on extra materials, a cart, or saw horses. |
Now let’s put this information into practice. What are some tricks or techniques that you use to work in a comfortable position?
- Other Questions:_____________________________________________
Here are a few other ideas that are listed on your training card:
Prop up your tasks off of the floor by using a raised surface, cart, baker scaffold, saw horses to prep materials near waist height.
Move the lift or ladder in the best position for the work – close to the work tasks.
For safety & comfort, try to position the lift in front of the area you plan to work without trying to reach too far on either side of the lift.
In summary, it is important to work in a safe position when possible in order to reduce the risk of falls and discomfort due to awkward working positions. Consider ways that you can work in the green/comfort zone and orange zone and avoid the unsafe red zone.
References
[Images modified from Grandjean & Eastman Kodak Co.]
1. Grandjean, E. 1988. Fitting the task to the man: A textbook of occupational ergonomics. 4th ed. Taylor & Francis.
2. Eastman Kodak Co. 1983. Ergonomic Design for People at Work. Vol 1. Wiley, John & Sons, Incorporated.
Refer to the resources at our website: oshr.im.wustl.edu for more Tool Box TIPS.
TRAINING ATTENDANCE SHEET
Training Topic: Ergonomics -- Positioning
Date:
| ATTENDEES | |
|---|---|
Directions for Making Laminated Training Cards
The last page of this PDF has directions for printing and laminating the training cards.
[disclaimer:protected] => [disclaimer_transformed:protected] => [alreadyInSave:protected] => [alreadyInValidation:protected] => [validationFailures:protected] => Array ( ) [_new:BaseObject:private] => [_deleted:BaseObject:private] => [modifiedColumns:protected] => Array ( ) ) [template] => record ) [_file] => /home/agsafe5/repositories/elcosh/live/templates/elcosh/record_macros.html [_errors:protected] => Array ( ) [_encoding:protected] => UTF-8 [_outputMode:protected] => 11 [_forceReparse:protected] => [_phpCodeDestination:protected] => /tmp/ [_phpCodeExtension:protected] => php [_cacheLifetime:protected] => 30 [_cachePurgeFrequency:protected] => 30 [externalMacroTemplatesCache:PHPTAL:private] => Array ( ) ) [1] => PHPTAL Object ( [_prefilters:protected] => Array ( ) [_prefilter:PHPTAL:private] => REMOVED: DO NOT USE [_postfilter:protected] => [_repositories:protected] => Array ( ) [_path:protected] => /home/agsafe5/repositories/elcosh/live/templates/elcosh/record.html [_resolvers:protected] => Array ( ) [_source:protected] => PHPTAL_FileSource Object ( [_path:PHPTAL_FileSource:private] => /home/agsafe5/repositories/elcosh/live/templates/elcosh/record.html ) [_codeFile:protected] => /tmp/tpl_61515a6c_record__uvBJJSo8xT_sgOY5gjP7ug.php [_functionName:protected] => tpl_61515a6c_record__uvBJJSo8xT_sgOY5gjP7ug [_prepared:protected] => 1 [_triggers:protected] => Array ( ) [_translator:protected] => [_globalContext:protected] => stdClass Object ( ) [_context:protected] => PHPTAL_Context Object ( [_line] => [_file] => /home/agsafe5/repositories/elcosh/live/templates/elcosh/record_macros.html [repeat] => stdClass Object ( [collection] => PHPTAL_RepeatController Object ( [key] => 3834 [current:PHPTAL_RepeatController:private] => [valid:PHPTAL_RepeatController:private] => [validOnNext:PHPTAL_RepeatController:private] => [uses_groups:PHPTAL_RepeatController:private] => [iterator:protected] => ArrayIterator Object ( [storage:ArrayIterator:private] => Array ( [3834] => ) ) [index] => 0 [end] => 1 [length:PHPTAL_RepeatController:private] => ) ) [_xmlDeclaration] => [_docType] => [_nothrow:PHPTAL_Context:private] => [_slots:PHPTAL_Context:private] => Array ( ) [_slotsStack:PHPTAL_Context:private] => Array ( [0] => Array ( ) [1] => Array ( ) ) [_parentContext:PHPTAL_Context:private] => PHPTAL_Context Object ( [_line] => [_file] => /home/agsafe5/repositories/elcosh/live/templates/elcosh/record_macros.html [repeat] => stdClass Object ( [collection] => PHPTAL_RepeatController Object ( [key] => 3834 [current:PHPTAL_RepeatController:private] => [valid:PHPTAL_RepeatController:private] => [validOnNext:PHPTAL_RepeatController:private] => [uses_groups:PHPTAL_RepeatController:private] => [iterator:protected] => ArrayIterator Object ( [storage:ArrayIterator:private] => Array ( [3834] => ) ) [index] => 0 [end] => 1 [length:PHPTAL_RepeatController:private] => ) ) [_xmlDeclaration] => [_docType] => [_nothrow:PHPTAL_Context:private] => [_slots:PHPTAL_Context:private] => Array ( ) [_slotsStack:PHPTAL_Context:private] => Array ( [0] => Array ( ) [1] => Array ( ) ) [_parentContext:PHPTAL_Context:private] => PHPTAL_Context Object ( [_line] => [_file] => /home/agsafe5/repositories/elcosh/live/templates/elcosh/record.html [repeat] => stdClass Object ( ) [_xmlDeclaration] => [_docType] => [_nothrow:PHPTAL_Context:private] => [_slots:PHPTAL_Context:private] => Array ( ) [_slotsStack:PHPTAL_Context:private] => Array ( [0] => Array ( ) [1] => Array ( ) ) [_parentContext:PHPTAL_Context:private] => [_globalContext:PHPTAL_Context:private] => stdClass Object ( ) [_echoDeclarations:PHPTAL_Context:private] => [referer] => http://elcosh.org/document/3838/d001307/TBT3%2BPositioning.html [curr_module] => Record [styles] => Array ( ) [javascript] => Array ( [0] => jquery.min.js ) [metas] => Array ( [language] => en [robots] => index, follow ) [user] => [curr_url] => https://elcosh.org/index.php?module=Record&id=3838&type=document [base_url] => https://elcosh.org/index.php?module=Record [title] => eLCOSH : TBT3 Positioning [language] => en [search_query] => [module] => Record [new_records] => Array ( [0] => Search_Result Object ( [title] => Toolbox Talk: Fixed Ladder [image] => /record/images/notavailable-p.png [blurb] => The CPWR Toolbox Talk on Fixed Ladders addresses the potential risks associated with using fixed ladders. The resource includes a brief case example,... [category] => Array ( [0] => 15 [1] => 47 [2] => 49 [3] => 51 [4] => 53 [5] => 55 [6] => 60 [7] => 64 [8] => 73 [9] => 76 [10] => 78 [11] => 80 [12] => 86 [13] => 87 [14] => 90 [15] => 92 [16] => 93 [17] => 94 [18] => 100 ) [labels] => Array ( [0] => Falls [1] => Work Environment [2] => Hazards [3] => Bricklayer [4] => Trades [5] => Carpenter [7] => Cement Mason [9] => Concrete Polisher [11] => Electrical Worker [13] => HVAC [15] => Laborer [17] => PCC/Restoration [19] => Plumber/Pipefitter [21] => Roofer/Waterproofer [23] => Sheetmetal Worker [25] => Welder [27] => Commercial & Institutional [28] => Jobsites [29] => Industrial [31] => LEED/Green Construction [33] => Renovations [35] => Residential [37] => Toolbox Talks [38] => Documents [39] => Media & Documents ) [type] => Toolbox Talks [sub_category] => [url] => /document/4430/d001660/Toolbox%2BTalk%253A%2BFixed%2BLadder.html [item:protected] => DocumentRecord Object ( [records:protected] => Array ( ) [recordId:protected] => [searchWordClass:protected] => [searchWordPeerClass:protected] => [bok_record:protected] => [authors:protected] => [organizations:protected] => [collections:protected] => [categories:protected] => Array ( [15] => Category Object ( [languages:protected] => [bok_resources:protected] => [bok_topics:protected] => [bok_keywords:protected] => [id:protected] => 15 [type:protected] => category [parent:protected] => 7 [label:protected] => Falls [alreadyInSave:protected] => [alreadyInValidation:protected] => [validationFailures:protected] => Array ( ) [_new:BaseObject:private] => [_deleted:BaseObject:private] => [modifiedColumns:protected] => Array ( ) ) [47] => Category Object ( [languages:protected] => [bok_resources:protected] => [bok_topics:protected] => [bok_keywords:protected] => [id:protected] => 47 [type:protected] => category [parent:protected] => 2 [label:protected] => Bricklayer [alreadyInSave:protected] => [alreadyInValidation:protected] => [validationFailures:protected] => Array ( ) [_new:BaseObject:private] => [_deleted:BaseObject:private] => [modifiedColumns:protected] => Array ( ) ) [49] => Category Object ( [languages:protected] => [bok_resources:protected] => [bok_topics:protected] => [bok_keywords:protected] => [id:protected] => 49 [type:protected] => category [parent:protected] => 2 [label:protected] => Carpenter [alreadyInSave:protected] => [alreadyInValidation:protected] => [validationFailures:protected] => Array ( ) [_new:BaseObject:private] => [_deleted:BaseObject:private] => [modifiedColumns:protected] => Array ( ) ) [51] => Category Object ( [languages:protected] => [bok_resources:protected] => [bok_topics:protected] => [bok_keywords:protected] => [id:protected] => 51 [type:protected] => category [parent:protected] => 2 [label:protected] => Cement Mason [alreadyInSave:protected] => [alreadyInValidation:protected] => [validationFailures:protected] => Array ( ) [_new:BaseObject:private] => [_deleted:BaseObject:private] => [modifiedColumns:protected] => Array ( ) ) [53] => Category Object ( [languages:protected] => [bok_resources:protected] => [bok_topics:protected] => [bok_keywords:protected] => [id:protected] => 53 [type:protected] => category [parent:protected] => 2 [label:protected] => Concrete Polisher [alreadyInSave:protected] => [alreadyInValidation:protected] => [validationFailures:protected] => Array ( ) [_new:BaseObject:private] => [_deleted:BaseObject:private] => [modifiedColumns:protected] => Array ( ) ) [55] => Category Object ( [languages:protected] => [bok_resources:protected] => [bok_topics:protected] => [bok_keywords:protected] => [id:protected] => 55 [type:protected] => category [parent:protected] => 2 [label:protected] => Electrical Worker [alreadyInSave:protected] => [alreadyInValidation:protected] => [validationFailures:protected] => Array ( ) [_new:BaseObject:private] => [_deleted:BaseObject:private] => [modifiedColumns:protected] => Array ( ) ) [60] => Category Object ( [languages:protected] => [bok_resources:protected] => [bok_topics:protected] => [bok_keywords:protected] => [id:protected] => 60 [type:protected] => category [parent:protected] => 2 [label:protected] => HVAC [alreadyInSave:protected] => [alreadyInValidation:protected] => [validationFailures:protected] => Array ( ) [_new:BaseObject:private] => [_deleted:BaseObject:private] => [modifiedColumns:protected] => Array ( ) ) [64] => Category Object ( [languages:protected] => [bok_resources:protected] => [bok_topics:protected] => [bok_keywords:protected] => [id:protected] => 64 [type:protected] => category [parent:protected] => 2 [label:protected] => Laborer [alreadyInSave:protected] => [alreadyInValidation:protected] => [validationFailures:protected] => Array ( ) [_new:BaseObject:private] => [_deleted:BaseObject:private] => [modifiedColumns:protected] => Array ( ) ) [73] => Category Object ( [languages:protected] => [bok_resources:protected] => [bok_topics:protected] => [bok_keywords:protected] => [id:protected] => 73 [type:protected] => category [parent:protected] => 2 [label:protected] => PCC/Restoration [alreadyInSave:protected] => [alreadyInValidation:protected] => [validationFailures:protected] => Array ( ) [_new:BaseObject:private] => [_deleted:BaseObject:private] => [modifiedColumns:protected] => Array ( ) ) [76] => Category Object ( [languages:protected] => [bok_resources:protected] => [bok_topics:protected] => [bok_keywords:protected] => [id:protected] => 76 [type:protected] => category [parent:protected] => 2 [label:protected] => Plumber/Pipefitter [alreadyInSave:protected] => [alreadyInValidation:protected] => [validationFailures:protected] => Array ( ) [_new:BaseObject:private] => [_deleted:BaseObject:private] => [modifiedColumns:protected] => Array ( ) ) [78] => Category Object ( [languages:protected] => [bok_resources:protected] => [bok_topics:protected] => [bok_keywords:protected] => [id:protected] => 78 [type:protected] => category [parent:protected] => 2 [label:protected] => Roofer/Waterproofer [alreadyInSave:protected] => [alreadyInValidation:protected] => [validationFailures:protected] => Array ( ) [_new:BaseObject:private] => [_deleted:BaseObject:private] => [modifiedColumns:protected] => Array ( ) ) [80] => Category Object ( [languages:protected] => [bok_resources:protected] => [bok_topics:protected] => [bok_keywords:protected] => [id:protected] => 80 [type:protected] => category [parent:protected] => 2 [label:protected] => Sheetmetal Worker [alreadyInSave:protected] => [alreadyInValidation:protected] => [validationFailures:protected] => Array ( ) [_new:BaseObject:private] => [_deleted:BaseObject:private] => [modifiedColumns:protected] => Array ( ) ) [86] => Category Object ( [languages:protected] => [bok_resources:protected] => [bok_topics:protected] => [bok_keywords:protected] => [id:protected] => 86 [type:protected] => category [parent:protected] => 2 [label:protected] => Welder [alreadyInSave:protected] => [alreadyInValidation:protected] => [validationFailures:protected] => Array ( ) [_new:BaseObject:private] => [_deleted:BaseObject:private] => [modifiedColumns:protected] => Array ( ) ) [87] => Category Object ( [languages:protected] => [bok_resources:protected] => [bok_topics:protected] => [bok_keywords:protected] => [id:protected] => 87 [type:protected] => category [parent:protected] => 3 [label:protected] => Commercial & Institutional [alreadyInSave:protected] => [alreadyInValidation:protected] => [validationFailures:protected] => Array ( ) [_new:BaseObject:private] => [_deleted:BaseObject:private] => [modifiedColumns:protected] => Array ( ) ) [90] => Category Object ( [languages:protected] => [bok_resources:protected] => [bok_topics:protected] => [bok_keywords:protected] => [id:protected] => 90 [type:protected] => category [parent:protected] => 3 [label:protected] => Industrial [alreadyInSave:protected] => [alreadyInValidation:protected] => [validationFailures:protected] => Array ( ) [_new:BaseObject:private] => [_deleted:BaseObject:private] => [modifiedColumns:protected] => Array ( ) ) [92] => Category Object ( [languages:protected] => [bok_resources:protected] => [bok_topics:protected] => [bok_keywords:protected] => [id:protected] => 92 [type:protected] => category [parent:protected] => 3 [label:protected] => LEED/Green Construction [alreadyInSave:protected] => [alreadyInValidation:protected] => [validationFailures:protected] => Array ( ) [_new:BaseObject:private] => [_deleted:BaseObject:private] => [modifiedColumns:protected] => Array ( ) ) [93] => Category Object ( [languages:protected] => [bok_resources:protected] => [bok_topics:protected] => [bok_keywords:protected] => [id:protected] => 93 [type:protected] => category [parent:protected] => 3 [label:protected] => Renovations [alreadyInSave:protected] => [alreadyInValidation:protected] => [validationFailures:protected] => Array ( ) [_new:BaseObject:private] => [_deleted:BaseObject:private] => [modifiedColumns:protected] => Array ( ) ) [94] => Category Object ( [languages:protected] => [bok_resources:protected] => [bok_topics:protected] => [bok_keywords:protected] => [id:protected] => 94 [type:protected] => category [parent:protected] => 3 [label:protected] => Residential [alreadyInSave:protected] => [alreadyInValidation:protected] => [validationFailures:protected] => Array ( ) [_new:BaseObject:private] => [_deleted:BaseObject:private] => [modifiedColumns:protected] => Array ( ) ) [100] => Category Object ( [languages:protected] => [bok_resources:protected] => [bok_topics:protected] => [bok_keywords:protected] => [id:protected] => 100 [type:protected] => category [parent:protected] => 6 [label:protected] => Toolbox Talks [alreadyInSave:protected] => [alreadyInValidation:protected] => [validationFailures:protected] => Array ( ) [_new:BaseObject:private] => [_deleted:BaseObject:private] => [modifiedColumns:protected] => Array ( ) ) ) [categories_initialized:protected] => 1 [mapped_items:protected] => [content:protected] => [files:protected] => [language:protected] => Language Object ( [id:protected] => 1 [code:protected] => en [name:protected] => English [alreadyInSave:protected] => [alreadyInValidation:protected] => [validationFailures:protected] => Array ( ) [_new:BaseObject:private] => [_deleted:BaseObject:private] => [modifiedColumns:protected] => Array ( ) ) [old_record:protected] => [id:protected] => 4430 [old_id:protected] => [elcosh_id:protected] => d001660 [type:protected] => document [display_type:protected] => HTML only (and links) [user_id:protected] => 0 [language_id:protected] => 1 [tagging_id:protected] => Mike Aguilar [priority_id:protected] => 1 [title:protected] => Toolbox Talk: Fixed Ladder [total_pages:protected] => 0 [billed_pages:protected] => 0 [publication_number:protected] => [part_of:protected] => [keywords:protected] => Fixed Ladders, Fall Prevention, Falls [comments:protected] => [summary:protected] => The CPWR Toolbox Talk on Fixed Ladders addresses the potential risks associated with using fixed ladders. The resource includes a brief case example, steps to prevent a related injury and questions for discussion. It includes an image that illustrates the hazard, which can be posted in a central location as a reminder of steps to work safely. Available in English and Spanish. [transition_comments:protected] => [external_link:protected] => [consol_link:protected] => [more_like_this:protected] => d001257,d001254,d001255,d001256,d001258,d001262,d001279 [permission_given_by:protected] => [published:protected] => T [billable:protected] => F [img_name:protected] => [img_ext:protected] => [img_width:protected] => [img_height:protected] => [img_credit:protected] => [img_practice:protected] => [vid_source_id:protected] => [vid_running_time:protected] => [vid_intended_audience:protected] => [vid_acquisition_info:protected] => [vid_cost:protected] => [vid_producer:protected] => [vid_filename:protected] => [vid_filename_downloadable:protected] => [date_summary:protected] => [date_permission_requested:protected] => [date_permission_received:protected] => [date_review_needed:protected] => [date_received:protected] => 06/10/22 [date_completed:protected] => 06/10/22 [date_billed:protected] => [date_modified:protected] => 06/16/25 [collBokExports:protected] => [lastBokExportCriteria:BaseElcoshItem:private] => [alreadyInSave:protected] => [alreadyInValidation:protected] => [validationFailures:protected] => Array ( ) [_new:BaseObject:private] => [_deleted:BaseObject:private] => [modifiedColumns:protected] => Array ( ) ) ) [1] => Search_Result Object ( [title] => Toolbox Talk: Work Zone Safety: Working Around Vehicles [image] => /record/images/notavailable-p.png [blurb] => The CPWR Toolbox Talk on Working Around Vehicles in the Work Zone addresses methods to avoid being struck-by a vehicle on a construction site. The res... [category] => Array ( [0] => 12 [1] => 18 [2] => 52 [3] => 57 [4] => 70 [5] => 85 [6] => 87 [7] => 88 [8] => 89 [9] => 91 [10] => 90 [11] => 92 [12] => 93 [13] => 94 [14] => 95 [15] => 100 ) [labels] => Array ( [0] => Crushed/Struck By [1] => Work Environment [2] => Hazards [3] => Motor Vehicles/Heavy Equipment [6] => Commercial Diver [7] => Trades [8] => Flagger [10] => Operating Engineer [12] => Truck Driver [14] => Commercial & Institutional [15] => Jobsites [16] => Demolition [18] => Disasters [20] => Heavy & Highway [22] => Industrial [24] => LEED/Green Construction [26] => Renovations [28] => Residential [30] => Underground [32] => Toolbox Talks [33] => Documents [34] => Media & Documents ) [type] => Toolbox Talks [sub_category] => [url] => /document/4428/d001658/Toolbox%2BTalk%253A%2BWork%2BZone%2BSafety%253A%2BWorking%2BAround%2BVehicles.html [item:protected] => DocumentRecord Object ( [records:protected] => Array ( ) [recordId:protected] => [searchWordClass:protected] => [searchWordPeerClass:protected] => [bok_record:protected] => [authors:protected] => [organizations:protected] => [collections:protected] => [categories:protected] => Array ( [12] => Category Object ( [languages:protected] => [bok_resources:protected] => [bok_topics:protected] => [bok_keywords:protected] => [id:protected] => 12 [type:protected] => category [parent:protected] => 7 [label:protected] => Crushed/Struck By [alreadyInSave:protected] => [alreadyInValidation:protected] => [validationFailures:protected] => Array ( ) [_new:BaseObject:private] => [_deleted:BaseObject:private] => [modifiedColumns:protected] => Array ( ) ) [18] => Category Object ( [languages:protected] => [bok_resources:protected] => [bok_topics:protected] => [bok_keywords:protected] => [id:protected] => 18 [type:protected] => category [parent:protected] => 7 [label:protected] => Motor Vehicles/Heavy Equipment [alreadyInSave:protected] => [alreadyInValidation:protected] => [validationFailures:protected] => Array ( ) [_new:BaseObject:private] => [_deleted:BaseObject:private] => [modifiedColumns:protected] => Array ( ) ) [52] => Category Object ( [languages:protected] => [bok_resources:protected] => [bok_topics:protected] => [bok_keywords:protected] => [id:protected] => 52 [type:protected] => category [parent:protected] => 2 [label:protected] => Commercial Diver [alreadyInSave:protected] => [alreadyInValidation:protected] => [validationFailures:protected] => Array ( ) [_new:BaseObject:private] => [_deleted:BaseObject:private] => [modifiedColumns:protected] => Array ( ) ) [57] => Category Object ( [languages:protected] => [bok_resources:protected] => [bok_topics:protected] => [bok_keywords:protected] => [id:protected] => 57 [type:protected] => category [parent:protected] => 2 [label:protected] => Flagger [alreadyInSave:protected] => [alreadyInValidation:protected] => [validationFailures:protected] => Array ( ) [_new:BaseObject:private] => [_deleted:BaseObject:private] => [modifiedColumns:protected] => Array ( ) ) [70] => Category Object ( [languages:protected] => [bok_resources:protected] => [bok_topics:protected] => [bok_keywords:protected] => [id:protected] => 70 [type:protected] => category [parent:protected] => 2 [label:protected] => Operating Engineer [alreadyInSave:protected] => [alreadyInValidation:protected] => [validationFailures:protected] => Array ( ) [_new:BaseObject:private] => [_deleted:BaseObject:private] => [modifiedColumns:protected] => Array ( ) ) [85] => Category Object ( [languages:protected] => [bok_resources:protected] => [bok_topics:protected] => [bok_keywords:protected] => [id:protected] => 85 [type:protected] => category [parent:protected] => 2 [label:protected] => Truck Driver [alreadyInSave:protected] => [alreadyInValidation:protected] => [validationFailures:protected] => Array ( ) [_new:BaseObject:private] => [_deleted:BaseObject:private] => [modifiedColumns:protected] => Array ( ) ) [87] => Category Object ( [languages:protected] => [bok_resources:protected] => [bok_topics:protected] => [bok_keywords:protected] => [id:protected] => 87 [type:protected] => category [parent:protected] => 3 [label:protected] => Commercial & Institutional [alreadyInSave:protected] => [alreadyInValidation:protected] => [validationFailures:protected] => Array ( ) [_new:BaseObject:private] => [_deleted:BaseObject:private] => [modifiedColumns:protected] => Array ( ) ) [88] => Category Object ( [languages:protected] => [bok_resources:protected] => [bok_topics:protected] => [bok_keywords:protected] => [id:protected] => 88 [type:protected] => category [parent:protected] => 3 [label:protected] => Demolition [alreadyInSave:protected] => [alreadyInValidation:protected] => [validationFailures:protected] => Array ( ) [_new:BaseObject:private] => [_deleted:BaseObject:private] => [modifiedColumns:protected] => Array ( ) ) [89] => Category Object ( [languages:protected] => [bok_resources:protected] => [bok_topics:protected] => [bok_keywords:protected] => [id:protected] => 89 [type:protected] => category [parent:protected] => 3 [label:protected] => Disasters [alreadyInSave:protected] => [alreadyInValidation:protected] => [validationFailures:protected] => Array ( ) [_new:BaseObject:private] => [_deleted:BaseObject:private] => [modifiedColumns:protected] => Array ( ) ) [91] => Category Object ( [languages:protected] => [bok_resources:protected] => [bok_topics:protected] => [bok_keywords:protected] => [id:protected] => 91 [type:protected] => category [parent:protected] => 3 [label:protected] => Heavy & Highway [alreadyInSave:protected] => [alreadyInValidation:protected] => [validationFailures:protected] => Array ( ) [_new:BaseObject:private] => [_deleted:BaseObject:private] => [modifiedColumns:protected] => Array ( ) ) [90] => Category Object ( [languages:protected] => [bok_resources:protected] => [bok_topics:protected] => [bok_keywords:protected] => [id:protected] => 90 [type:protected] => category [parent:protected] => 3 [label:protected] => Industrial [alreadyInSave:protected] => [alreadyInValidation:protected] => [validationFailures:protected] => Array ( ) [_new:BaseObject:private] => [_deleted:BaseObject:private] => [modifiedColumns:protected] => Array ( ) ) [92] => Category Object ( [languages:protected] => [bok_resources:protected] => [bok_topics:protected] => [bok_keywords:protected] => [id:protected] => 92 [type:protected] => category [parent:protected] => 3 [label:protected] => LEED/Green Construction [alreadyInSave:protected] => [alreadyInValidation:protected] => [validationFailures:protected] => Array ( ) [_new:BaseObject:private] => [_deleted:BaseObject:private] => [modifiedColumns:protected] => Array ( ) ) [93] => Category Object ( [languages:protected] => [bok_resources:protected] => [bok_topics:protected] => [bok_keywords:protected] => [id:protected] => 93 [type:protected] => category [parent:protected] => 3 [label:protected] => Renovations [alreadyInSave:protected] => [alreadyInValidation:protected] => [validationFailures:protected] => Array ( ) [_new:BaseObject:private] => [_deleted:BaseObject:private] => [modifiedColumns:protected] => Array ( ) ) [94] => Category Object ( [languages:protected] => [bok_resources:protected] => [bok_topics:protected] => [bok_keywords:protected] => [id:protected] => 94 [type:protected] => category [parent:protected] => 3 [label:protected] => Residential [alreadyInSave:protected] => [alreadyInValidation:protected] => [validationFailures:protected] => Array ( ) [_new:BaseObject:private] => [_deleted:BaseObject:private] => [modifiedColumns:protected] => Array ( ) ) [95] => Category Object ( [languages:protected] => [bok_resources:protected] => [bok_topics:protected] => [bok_keywords:protected] => [id:protected] => 95 [type:protected] => category [parent:protected] => 3 [label:protected] => Underground [alreadyInSave:protected] => [alreadyInValidation:protected] => [validationFailures:protected] => Array ( ) [_new:BaseObject:private] => [_deleted:BaseObject:private] => [modifiedColumns:protected] => Array ( ) ) [100] => Category Object ( [languages:protected] => [bok_resources:protected] => [bok_topics:protected] => [bok_keywords:protected] => [id:protected] => 100 [type:protected] => category [parent:protected] => 6 [label:protected] => Toolbox Talks [alreadyInSave:protected] => [alreadyInValidation:protected] => [validationFailures:protected] => Array ( ) [_new:BaseObject:private] => [_deleted:BaseObject:private] => [modifiedColumns:protected] => Array ( ) ) ) [categories_initialized:protected] => 1 [mapped_items:protected] => [content:protected] => [files:protected] => [language:protected] => Language Object ( [id:protected] => 1 [code:protected] => en [name:protected] => English [alreadyInSave:protected] => [alreadyInValidation:protected] => [validationFailures:protected] => Array ( ) [_new:BaseObject:private] => [_deleted:BaseObject:private] => [modifiedColumns:protected] => Array ( ) ) [old_record:protected] => [id:protected] => 4428 [old_id:protected] => [elcosh_id:protected] => d001658 [type:protected] => document [display_type:protected] => HTML only (and links) [user_id:protected] => 0 [language_id:protected] => 1 [tagging_id:protected] => Daniela Caceres [priority_id:protected] => 1 [title:protected] => Toolbox Talk: Work Zone Safety: Working Around Vehicles [total_pages:protected] => 0 [billed_pages:protected] => 0 [publication_number:protected] => [part_of:protected] => [keywords:protected] => Struck, Struck by, Vehicle, Work Zone Safety, Truck, Operator, Driver, Mobile Equipment [comments:protected] => [summary:protected] => The CPWR Toolbox Talk on Working Around Vehicles in the Work Zone addresses methods to avoid being struck-by a vehicle on a construction site. The resource includes a case example, steps to prevent a related injury, and questions for discussion. It includes a graphic that illustrates the hazard, which can be posted in a central location as a reminder of steps to work safely. Available in English and Spanish. [transition_comments:protected] => [external_link:protected] => [consol_link:protected] => [more_like_this:protected] => d001640 [permission_given_by:protected] => [published:protected] => T [billable:protected] => F [img_name:protected] => [img_ext:protected] => [img_width:protected] => [img_height:protected] => [img_credit:protected] => [img_practice:protected] => [vid_source_id:protected] => [vid_running_time:protected] => [vid_intended_audience:protected] => [vid_acquisition_info:protected] => [vid_cost:protected] => [vid_producer:protected] => [vid_filename:protected] => [vid_filename_downloadable:protected] => [date_summary:protected] => [date_permission_requested:protected] => [date_permission_received:protected] => [date_review_needed:protected] => [date_received:protected] => 12/23/21 [date_completed:protected] => 12/23/21 [date_billed:protected] => [date_modified:protected] => 05/19/23 [collBokExports:protected] => [lastBokExportCriteria:BaseElcoshItem:private] => [alreadyInSave:protected] => [alreadyInValidation:protected] => [validationFailures:protected] => Array ( ) [_new:BaseObject:private] => [_deleted:BaseObject:private] => [modifiedColumns:protected] => Array ( ) ) ) [2] => Search_Result Object ( [title] => Construction Dive -- DeWalt's Jobsite Pro headphones recalled for fire hazards [image] => /record/images/notavailable-p.png [blurb] => A recall notice by the United States Consumer Product Safety Commission affects over 300,000 DeWalt Jobsite Pro Headphones. The recall is a result of... [category] => Array ( [0] => 16 [1] => 44 [2] => 45 [3] => 46 [4] => 47 [5] => 48 [6] => 49 [7] => 50 [8] => 51 [9] => 52 [10] => 53 [11] => 54 [12] => 55 [13] => 56 [14] => 57 [15] => 58 [16] => 59 [17] => 60 [18] => 61 [19] => 64 [20] => 65 [21] => 66 [22] => 67 [23] => 68 [24] => 69 [25] => 70 [26] => 71 [27] => 72 [28] => 73 [29] => 74 [30] => 75 [31] => 76 [32] => 77 [33] => 63 [34] => 78 [35] => 79 [36] => 80 [37] => 81 [38] => 82 [39] => 62 [40] => 83 [41] => 84 [42] => 85 [43] => 86 [44] => 87 [45] => 88 [46] => 89 [47] => 91 [48] => 90 [49] => 92 [50] => 93 [51] => 94 [52] => 95 ) [labels] => Array ( [0] => Fire & Explosions [1] => Work Environment [2] => Hazards [3] => Acoustical Ceiling Carpenter [4] => Trades [5] => Asbestos/Insulator [7] => Boilermaker [9] => Bricklayer [11] => Cabinetmaker [13] => Carpenter [15] => Carpet Layer [17] => Cement Mason [19] => Commercial Diver [21] => Concrete Polisher [23] => Drywall Applicator Specialist [25] => Electrical Worker [27] => Elevator Constructor [29] => Flagger [31] => Glazier [33] => Hazardous Waste Cleanup [35] => HVAC [37] => Interior Systems Carpenter [39] => Laborer [41] => Landscaper [43] => Lather [45] => Lead Abatement Worker [47] => Maintenance Worker [49] => Millwright [51] => Operating Engineer [53] => Painter [55] => Paper Hanger [57] => PCC/Restoration [59] => Pile Driver [61] => Plasterer [63] => Plumber/Pipefitter [65] => Refractory Worker [67] => Reinforcing Ironworker [69] => Roofer/Waterproofer [71] => Scaffold Erector [73] => Sheetmetal Worker [75] => Sprinkler Fitter [77] => Stonemason [79] => Structural Ironworker [81] => Terrazzo Worker [83] => Tile Setter [85] => Truck Driver [87] => Welder [89] => Commercial & Institutional [90] => Jobsites [91] => Demolition [93] => Disasters [95] => Heavy & Highway [97] => Industrial [99] => LEED/Green Construction [101] => Renovations [103] => Residential [105] => Underground ) [type] => [sub_category] => [url] => /document/4426/d001656/Construction%2BDive%2B--%2BDeWalt%2527s%2BJobsite%2BPro%2Bheadphones%2Brecalled%2Bfor%2Bfire%2Bhazards.html [item:protected] => DocumentRecord Object ( [records:protected] => Array ( ) [recordId:protected] => [searchWordClass:protected] => [searchWordPeerClass:protected] => [bok_record:protected] => [authors:protected] => [organizations:protected] => [collections:protected] => [categories:protected] => Array ( [16] => Category Object ( [languages:protected] => [bok_resources:protected] => [bok_topics:protected] => [bok_keywords:protected] => [id:protected] => 16 [type:protected] => category [parent:protected] => 7 [label:protected] => Fire & Explosions [alreadyInSave:protected] => [alreadyInValidation:protected] => [validationFailures:protected] => Array ( ) [_new:BaseObject:private] => [_deleted:BaseObject:private] => [modifiedColumns:protected] => Array ( ) ) [44] => Category Object ( [languages:protected] => [bok_resources:protected] => [bok_topics:protected] => [bok_keywords:protected] => [id:protected] => 44 [type:protected] => category [parent:protected] => 2 [label:protected] => Acoustical Ceiling Carpenter [alreadyInSave:protected] => [alreadyInValidation:protected] => [validationFailures:protected] => Array ( ) [_new:BaseObject:private] => [_deleted:BaseObject:private] => [modifiedColumns:protected] => Array ( ) ) [45] => Category Object ( [languages:protected] => [bok_resources:protected] => [bok_topics:protected] => [bok_keywords:protected] => [id:protected] => 45 [type:protected] => category [parent:protected] => 2 [label:protected] => Asbestos/Insulator [alreadyInSave:protected] => [alreadyInValidation:protected] => [validationFailures:protected] => Array ( ) [_new:BaseObject:private] => [_deleted:BaseObject:private] => [modifiedColumns:protected] => Array ( ) ) [46] => Category Object ( [languages:protected] => [bok_resources:protected] => [bok_topics:protected] => [bok_keywords:protected] => [id:protected] => 46 [type:protected] => category [parent:protected] => 2 [label:protected] => Boilermaker [alreadyInSave:protected] => [alreadyInValidation:protected] => [validationFailures:protected] => Array ( ) [_new:BaseObject:private] => [_deleted:BaseObject:private] => [modifiedColumns:protected] => Array ( ) ) [47] => Category Object ( [languages:protected] => [bok_resources:protected] => [bok_topics:protected] => [bok_keywords:protected] => [id:protected] => 47 [type:protected] => category [parent:protected] => 2 [label:protected] => Bricklayer [alreadyInSave:protected] => [alreadyInValidation:protected] => [validationFailures:protected] => Array ( ) [_new:BaseObject:private] => [_deleted:BaseObject:private] => [modifiedColumns:protected] => Array ( ) ) [48] => Category Object ( [languages:protected] => [bok_resources:protected] => [bok_topics:protected] => [bok_keywords:protected] => [id:protected] => 48 [type:protected] => category [parent:protected] => 2 [label:protected] => Cabinetmaker [alreadyInSave:protected] => [alreadyInValidation:protected] => [validationFailures:protected] => Array ( ) [_new:BaseObject:private] => [_deleted:BaseObject:private] => [modifiedColumns:protected] => Array ( ) ) [49] => Category Object ( [languages:protected] => [bok_resources:protected] => [bok_topics:protected] => [bok_keywords:protected] => [id:protected] => 49 [type:protected] => category [parent:protected] => 2 [label:protected] => Carpenter [alreadyInSave:protected] => [alreadyInValidation:protected] => [validationFailures:protected] => Array ( ) [_new:BaseObject:private] => [_deleted:BaseObject:private] => [modifiedColumns:protected] => Array ( ) ) [50] => Category Object ( [languages:protected] => [bok_resources:protected] => [bok_topics:protected] => [bok_keywords:protected] => [id:protected] => 50 [type:protected] => category [parent:protected] => 2 [label:protected] => Carpet Layer [alreadyInSave:protected] => [alreadyInValidation:protected] => [validationFailures:protected] => Array ( ) [_new:BaseObject:private] => [_deleted:BaseObject:private] => [modifiedColumns:protected] => Array ( ) ) [51] => Category Object ( [languages:protected] => [bok_resources:protected] => [bok_topics:protected] => [bok_keywords:protected] => [id:protected] => 51 [type:protected] => category [parent:protected] => 2 [label:protected] => Cement Mason [alreadyInSave:protected] => [alreadyInValidation:protected] => [validationFailures:protected] => Array ( ) [_new:BaseObject:private] => [_deleted:BaseObject:private] => [modifiedColumns:protected] => Array ( ) ) [52] => Category Object ( [languages:protected] => [bok_resources:protected] => [bok_topics:protected] => [bok_keywords:protected] => [id:protected] => 52 [type:protected] => category [parent:protected] => 2 [label:protected] => Commercial Diver [alreadyInSave:protected] => [alreadyInValidation:protected] => [validationFailures:protected] => Array ( ) [_new:BaseObject:private] => [_deleted:BaseObject:private] => [modifiedColumns:protected] => Array ( ) ) [53] => Category Object ( [languages:protected] => [bok_resources:protected] => [bok_topics:protected] => [bok_keywords:protected] => [id:protected] => 53 [type:protected] => category [parent:protected] => 2 [label:protected] => Concrete Polisher [alreadyInSave:protected] => [alreadyInValidation:protected] => [validationFailures:protected] => Array ( ) [_new:BaseObject:private] => [_deleted:BaseObject:private] => [modifiedColumns:protected] => Array ( ) ) [54] => Category Object ( [languages:protected] => [bok_resources:protected] => [bok_topics:protected] => [bok_keywords:protected] => [id:protected] => 54 [type:protected] => category [parent:protected] => 2 [label:protected] => Drywall Applicator Specialist [alreadyInSave:protected] => [alreadyInValidation:protected] => [validationFailures:protected] => Array ( ) [_new:BaseObject:private] => [_deleted:BaseObject:private] => [modifiedColumns:protected] => Array ( ) ) [55] => Category Object ( [languages:protected] => [bok_resources:protected] => [bok_topics:protected] => [bok_keywords:protected] => [id:protected] => 55 [type:protected] => category [parent:protected] => 2 [label:protected] => Electrical Worker [alreadyInSave:protected] => [alreadyInValidation:protected] => [validationFailures:protected] => Array ( ) [_new:BaseObject:private] => [_deleted:BaseObject:private] => [modifiedColumns:protected] => Array ( ) ) [56] => Category Object ( [languages:protected] => [bok_resources:protected] => [bok_topics:protected] => [bok_keywords:protected] => [id:protected] => 56 [type:protected] => category [parent:protected] => 2 [label:protected] => Elevator Constructor [alreadyInSave:protected] => [alreadyInValidation:protected] => [validationFailures:protected] => Array ( ) [_new:BaseObject:private] => [_deleted:BaseObject:private] => [modifiedColumns:protected] => Array ( ) ) [57] => Category Object ( [languages:protected] => [bok_resources:protected] => [bok_topics:protected] => [bok_keywords:protected] => [id:protected] => 57 [type:protected] => category [parent:protected] => 2 [label:protected] => Flagger [alreadyInSave:protected] => [alreadyInValidation:protected] => [validationFailures:protected] => Array ( ) [_new:BaseObject:private] => [_deleted:BaseObject:private] => [modifiedColumns:protected] => Array ( ) ) [58] => Category Object ( [languages:protected] => [bok_resources:protected] => [bok_topics:protected] => [bok_keywords:protected] => [id:protected] => 58 [type:protected] => category [parent:protected] => 2 [label:protected] => Glazier [alreadyInSave:protected] => [alreadyInValidation:protected] => [validationFailures:protected] => Array ( ) [_new:BaseObject:private] => [_deleted:BaseObject:private] => [modifiedColumns:protected] => Array ( ) ) [59] => Category Object ( [languages:protected] => [bok_resources:protected] => [bok_topics:protected] => [bok_keywords:protected] => [id:protected] => 59 [type:protected] => category [parent:protected] => 2 [label:protected] => Hazardous Waste Cleanup [alreadyInSave:protected] => [alreadyInValidation:protected] => [validationFailures:protected] => Array ( ) [_new:BaseObject:private] => [_deleted:BaseObject:private] => [modifiedColumns:protected] => Array ( ) ) [60] => Category Object ( [languages:protected] => [bok_resources:protected] => [bok_topics:protected] => [bok_keywords:protected] => [id:protected] => 60 [type:protected] => category [parent:protected] => 2 [label:protected] => HVAC [alreadyInSave:protected] => [alreadyInValidation:protected] => [validationFailures:protected] => Array ( ) [_new:BaseObject:private] => [_deleted:BaseObject:private] => [modifiedColumns:protected] => Array ( ) ) [61] => Category Object ( [languages:protected] => [bok_resources:protected] => [bok_topics:protected] => [bok_keywords:protected] => [id:protected] => 61 [type:protected] => category [parent:protected] => 2 [label:protected] => Interior Systems Carpenter [alreadyInSave:protected] => [alreadyInValidation:protected] => [validationFailures:protected] => Array ( ) [_new:BaseObject:private] => [_deleted:BaseObject:private] => [modifiedColumns:protected] => Array ( ) ) [64] => Category Object ( [languages:protected] => [bok_resources:protected] => [bok_topics:protected] => [bok_keywords:protected] => [id:protected] => 64 [type:protected] => category [parent:protected] => 2 [label:protected] => Laborer [alreadyInSave:protected] => [alreadyInValidation:protected] => [validationFailures:protected] => Array ( ) [_new:BaseObject:private] => [_deleted:BaseObject:private] => [modifiedColumns:protected] => Array ( ) ) [65] => Category Object ( [languages:protected] => [bok_resources:protected] => [bok_topics:protected] => [bok_keywords:protected] => [id:protected] => 65 [type:protected] => category [parent:protected] => 2 [label:protected] => Landscaper [alreadyInSave:protected] => [alreadyInValidation:protected] => [validationFailures:protected] => Array ( ) [_new:BaseObject:private] => [_deleted:BaseObject:private] => [modifiedColumns:protected] => Array ( ) ) [66] => Category Object ( [languages:protected] => [bok_resources:protected] => [bok_topics:protected] => [bok_keywords:protected] => [id:protected] => 66 [type:protected] => category [parent:protected] => 2 [label:protected] => Lather [alreadyInSave:protected] => [alreadyInValidation:protected] => [validationFailures:protected] => Array ( ) [_new:BaseObject:private] => [_deleted:BaseObject:private] => [modifiedColumns:protected] => Array ( ) ) [67] => Category Object ( [languages:protected] => [bok_resources:protected] => [bok_topics:protected] => [bok_keywords:protected] => [id:protected] => 67 [type:protected] => category [parent:protected] => 2 [label:protected] => Lead Abatement Worker [alreadyInSave:protected] => [alreadyInValidation:protected] => [validationFailures:protected] => Array ( ) [_new:BaseObject:private] => [_deleted:BaseObject:private] => [modifiedColumns:protected] => Array ( ) ) [68] => Category Object ( [languages:protected] => [bok_resources:protected] => [bok_topics:protected] => [bok_keywords:protected] => [id:protected] => 68 [type:protected] => category [parent:protected] => 2 [label:protected] => Maintenance Worker [alreadyInSave:protected] => [alreadyInValidation:protected] => [validationFailures:protected] => Array ( ) [_new:BaseObject:private] => [_deleted:BaseObject:private] => [modifiedColumns:protected] => Array ( ) ) [69] => Category Object ( [languages:protected] => [bok_resources:protected] => [bok_topics:protected] => [bok_keywords:protected] => [id:protected] => 69 [type:protected] => category [parent:protected] => 2 [label:protected] => Millwright [alreadyInSave:protected] => [alreadyInValidation:protected] => [validationFailures:protected] => Array ( ) [_new:BaseObject:private] => [_deleted:BaseObject:private] => [modifiedColumns:protected] => Array ( ) ) [70] => Category Object ( [languages:protected] => [bok_resources:protected] => [bok_topics:protected] => [bok_keywords:protected] => [id:protected] => 70 [type:protected] => category [parent:protected] => 2 [label:protected] => Operating Engineer [alreadyInSave:protected] => [alreadyInValidation:protected] => [validationFailures:protected] => Array ( ) [_new:BaseObject:private] => [_deleted:BaseObject:private] => [modifiedColumns:protected] => Array ( ) ) [71] => Category Object ( [languages:protected] => [bok_resources:protected] => [bok_topics:protected] => [bok_keywords:protected] => [id:protected] => 71 [type:protected] => category [parent:protected] => 2 [label:protected] => Painter [alreadyInSave:protected] => [alreadyInValidation:protected] => [validationFailures:protected] => Array ( ) [_new:BaseObject:private] => [_deleted:BaseObject:private] => [modifiedColumns:protected] => Array ( ) ) [72] => Category Object ( [languages:protected] => [bok_resources:protected] => [bok_topics:protected] => [bok_keywords:protected] => [id:protected] => 72 [type:protected] => category [parent:protected] => 2 [label:protected] => Paper Hanger [alreadyInSave:protected] => [alreadyInValidation:protected] => [validationFailures:protected] => Array ( ) [_new:BaseObject:private] => [_deleted:BaseObject:private] => [modifiedColumns:protected] => Array ( ) ) [73] => Category Object ( [languages:protected] => [bok_resources:protected] => [bok_topics:protected] => [bok_keywords:protected] => [id:protected] => 73 [type:protected] => category [parent:protected] => 2 [label:protected] => PCC/Restoration [alreadyInSave:protected] => [alreadyInValidation:protected] => [validationFailures:protected] => Array ( ) [_new:BaseObject:private] => [_deleted:BaseObject:private] => [modifiedColumns:protected] => Array ( ) ) [74] => Category Object ( [languages:protected] => [bok_resources:protected] => [bok_topics:protected] => [bok_keywords:protected] => [id:protected] => 74 [type:protected] => category [parent:protected] => 2 [label:protected] => Pile Driver [alreadyInSave:protected] => [alreadyInValidation:protected] => [validationFailures:protected] => Array ( ) [_new:BaseObject:private] => [_deleted:BaseObject:private] => [modifiedColumns:protected] => Array ( ) ) [75] => Category Object ( [languages:protected] => [bok_resources:protected] => [bok_topics:protected] => [bok_keywords:protected] => [id:protected] => 75 [type:protected] => category [parent:protected] => 2 [label:protected] => Plasterer [alreadyInSave:protected] => [alreadyInValidation:protected] => [validationFailures:protected] => Array ( ) [_new:BaseObject:private] => [_deleted:BaseObject:private] => [modifiedColumns:protected] => Array ( ) ) [76] => Category Object ( [languages:protected] => [bok_resources:protected] => [bok_topics:protected] => [bok_keywords:protected] => [id:protected] => 76 [type:protected] => category [parent:protected] => 2 [label:protected] => Plumber/Pipefitter [alreadyInSave:protected] => [alreadyInValidation:protected] => [validationFailures:protected] => Array ( ) [_new:BaseObject:private] => [_deleted:BaseObject:private] => [modifiedColumns:protected] => Array ( ) ) [77] => Category Object ( [languages:protected] => [bok_resources:protected] => [bok_topics:protected] => [bok_keywords:protected] => [id:protected] => 77 [type:protected] => category [parent:protected] => 2 [label:protected] => Refractory Worker [alreadyInSave:protected] => [alreadyInValidation:protected] => [validationFailures:protected] => Array ( ) [_new:BaseObject:private] => [_deleted:BaseObject:private] => [modifiedColumns:protected] => Array ( ) ) [63] => Category Object ( [languages:protected] => [bok_resources:protected] => [bok_topics:protected] => [bok_keywords:protected] => [id:protected] => 63 [type:protected] => category [parent:protected] => 2 [label:protected] => Reinforcing Ironworker [alreadyInSave:protected] => [alreadyInValidation:protected] => [validationFailures:protected] => Array ( ) [_new:BaseObject:private] => [_deleted:BaseObject:private] => [modifiedColumns:protected] => Array ( ) ) [78] => Category Object ( [languages:protected] => [bok_resources:protected] => [bok_topics:protected] => [bok_keywords:protected] => [id:protected] => 78 [type:protected] => category [parent:protected] => 2 [label:protected] => Roofer/Waterproofer [alreadyInSave:protected] => [alreadyInValidation:protected] => [validationFailures:protected] => Array ( ) [_new:BaseObject:private] => [_deleted:BaseObject:private] => [modifiedColumns:protected] => Array ( ) ) [79] => Category Object ( [languages:protected] => [bok_resources:protected] => [bok_topics:protected] => [bok_keywords:protected] => [id:protected] => 79 [type:protected] => category [parent:protected] => 2 [label:protected] => Scaffold Erector [alreadyInSave:protected] => [alreadyInValidation:protected] => [validationFailures:protected] => Array ( ) [_new:BaseObject:private] => [_deleted:BaseObject:private] => [modifiedColumns:protected] => Array ( ) ) [80] => Category Object ( [languages:protected] => [bok_resources:protected] => [bok_topics:protected] => [bok_keywords:protected] => [id:protected] => 80 [type:protected] => category [parent:protected] => 2 [label:protected] => Sheetmetal Worker [alreadyInSave:protected] => [alreadyInValidation:protected] => [validationFailures:protected] => Array ( ) [_new:BaseObject:private] => [_deleted:BaseObject:private] => [modifiedColumns:protected] => Array ( ) ) [81] => Category Object ( [languages:protected] => [bok_resources:protected] => [bok_topics:protected] => [bok_keywords:protected] => [id:protected] => 81 [type:protected] => category [parent:protected] => 2 [label:protected] => Sprinkler Fitter [alreadyInSave:protected] => [alreadyInValidation:protected] => [validationFailures:protected] => Array ( ) [_new:BaseObject:private] => [_deleted:BaseObject:private] => [modifiedColumns:protected] => Array ( ) ) [82] => Category Object ( [languages:protected] => [bok_resources:protected] => [bok_topics:protected] => [bok_keywords:protected] => [id:protected] => 82 [type:protected] => category [parent:protected] => 2 [label:protected] => Stonemason [alreadyInSave:protected] => [alreadyInValidation:protected] => [validationFailures:protected] => Array ( ) [_new:BaseObject:private] => [_deleted:BaseObject:private] => [modifiedColumns:protected] => Array ( ) ) [62] => Category Object ( [languages:protected] => [bok_resources:protected] => [bok_topics:protected] => [bok_keywords:protected] => [id:protected] => 62 [type:protected] => category [parent:protected] => 2 [label:protected] => Structural Ironworker [alreadyInSave:protected] => [alreadyInValidation:protected] => [validationFailures:protected] => Array ( ) [_new:BaseObject:private] => [_deleted:BaseObject:private] => [modifiedColumns:protected] => Array ( ) ) [83] => Category Object ( [languages:protected] => [bok_resources:protected] => [bok_topics:protected] => [bok_keywords:protected] => [id:protected] => 83 [type:protected] => category [parent:protected] => 2 [label:protected] => Terrazzo Worker [alreadyInSave:protected] => [alreadyInValidation:protected] => [validationFailures:protected] => Array ( ) [_new:BaseObject:private] => [_deleted:BaseObject:private] => [modifiedColumns:protected] => Array ( ) ) [84] => Category Object ( [languages:protected] => [bok_resources:protected] => [bok_topics:protected] => [bok_keywords:protected] => [id:protected] => 84 [type:protected] => category [parent:protected] => 2 [label:protected] => Tile Setter [alreadyInSave:protected] => [alreadyInValidation:protected] => [validationFailures:protected] => Array ( ) [_new:BaseObject:private] => [_deleted:BaseObject:private] => [modifiedColumns:protected] => Array ( ) ) [85] => Category Object ( [languages:protected] => [bok_resources:protected] => [bok_topics:protected] => [bok_keywords:protected] => [id:protected] => 85 [type:protected] => category [parent:protected] => 2 [label:protected] => Truck Driver [alreadyInSave:protected] => [alreadyInValidation:protected] => [validationFailures:protected] => Array ( ) [_new:BaseObject:private] => [_deleted:BaseObject:private] => [modifiedColumns:protected] => Array ( ) ) [86] => Category Object ( [languages:protected] => [bok_resources:protected] => [bok_topics:protected] => [bok_keywords:protected] => [id:protected] => 86 [type:protected] => category [parent:protected] => 2 [label:protected] => Welder [alreadyInSave:protected] => [alreadyInValidation:protected] => [validationFailures:protected] => Array ( ) [_new:BaseObject:private] => [_deleted:BaseObject:private] => [modifiedColumns:protected] => Array ( ) ) [87] => Category Object ( [languages:protected] => [bok_resources:protected] => [bok_topics:protected] => [bok_keywords:protected] => [id:protected] => 87 [type:protected] => category [parent:protected] => 3 [label:protected] => Commercial & Institutional [alreadyInSave:protected] => [alreadyInValidation:protected] => [validationFailures:protected] => Array ( ) [_new:BaseObject:private] => [_deleted:BaseObject:private] => [modifiedColumns:protected] => Array ( ) ) [88] => Category Object ( [languages:protected] => [bok_resources:protected] => [bok_topics:protected] => [bok_keywords:protected] => [id:protected] => 88 [type:protected] => category [parent:protected] => 3 [label:protected] => Demolition [alreadyInSave:protected] => [alreadyInValidation:protected] => [validationFailures:protected] => Array ( ) [_new:BaseObject:private] => [_deleted:BaseObject:private] => [modifiedColumns:protected] => Array ( ) ) [89] => Category Object ( [languages:protected] => [bok_resources:protected] => [bok_topics:protected] => [bok_keywords:protected] => [id:protected] => 89 [type:protected] => category [parent:protected] => 3 [label:protected] => Disasters [alreadyInSave:protected] => [alreadyInValidation:protected] => [validationFailures:protected] => Array ( ) [_new:BaseObject:private] => [_deleted:BaseObject:private] => [modifiedColumns:protected] => Array ( ) ) [91] => Category Object ( [languages:protected] => [bok_resources:protected] => [bok_topics:protected] => [bok_keywords:protected] => [id:protected] => 91 [type:protected] => category [parent:protected] => 3 [label:protected] => Heavy & Highway [alreadyInSave:protected] => [alreadyInValidation:protected] => [validationFailures:protected] => Array ( ) [_new:BaseObject:private] => [_deleted:BaseObject:private] => [modifiedColumns:protected] => Array ( ) ) [90] => Category Object ( [languages:protected] => [bok_resources:protected] => [bok_topics:protected] => [bok_keywords:protected] => [id:protected] => 90 [type:protected] => category [parent:protected] => 3 [label:protected] => Industrial [alreadyInSave:protected] => [alreadyInValidation:protected] => [validationFailures:protected] => Array ( ) [_new:BaseObject:private] => [_deleted:BaseObject:private] => [modifiedColumns:protected] => Array ( ) ) [92] => Category Object ( [languages:protected] => [bok_resources:protected] => [bok_topics:protected] => [bok_keywords:protected] => [id:protected] => 92 [type:protected] => category [parent:protected] => 3 [label:protected] => LEED/Green Construction [alreadyInSave:protected] => [alreadyInValidation:protected] => [validationFailures:protected] => Array ( ) [_new:BaseObject:private] => [_deleted:BaseObject:private] => [modifiedColumns:protected] => Array ( ) ) [93] => Category Object ( [languages:protected] => [bok_resources:protected] => [bok_topics:protected] => [bok_keywords:protected] => [id:protected] => 93 [type:protected] => category [parent:protected] => 3 [label:protected] => Renovations [alreadyInSave:protected] => [alreadyInValidation:protected] => [validationFailures:protected] => Array ( ) [_new:BaseObject:private] => [_deleted:BaseObject:private] => [modifiedColumns:protected] => Array ( ) ) [94] => Category Object ( [languages:protected] => [bok_resources:protected] => [bok_topics:protected] => [bok_keywords:protected] => [id:protected] => 94 [type:protected] => category [parent:protected] => 3 [label:protected] => Residential [alreadyInSave:protected] => [alreadyInValidation:protected] => [validationFailures:protected] => Array ( ) [_new:BaseObject:private] => [_deleted:BaseObject:private] => [modifiedColumns:protected] => Array ( ) ) [95] => Category Object ( [languages:protected] => [bok_resources:protected] => [bok_topics:protected] => [bok_keywords:protected] => [id:protected] => 95 [type:protected] => category [parent:protected] => 3 [label:protected] => Underground [alreadyInSave:protected] => [alreadyInValidation:protected] => [validationFailures:protected] => Array ( ) [_new:BaseObject:private] => [_deleted:BaseObject:private] => [modifiedColumns:protected] => Array ( ) ) ) [categories_initialized:protected] => 1 [mapped_items:protected] => [content:protected] => [files:protected] => [language:protected] => Language Object ( [id:protected] => 1 [code:protected] => en [name:protected] => English [alreadyInSave:protected] => [alreadyInValidation:protected] => [validationFailures:protected] => Array ( ) [_new:BaseObject:private] => [_deleted:BaseObject:private] => [modifiedColumns:protected] => Array ( ) ) [old_record:protected] => [id:protected] => 4426 [old_id:protected] => [elcosh_id:protected] => d001656 [type:protected] => document [display_type:protected] => HTML only (and links) [user_id:protected] => 0 [language_id:protected] => 1 [tagging_id:protected] => Mike Aguilar [priority_id:protected] => 1 [title:protected] => Construction Dive -- DeWalt's Jobsite Pro headphones recalled for fire hazards [total_pages:protected] => 1 [billed_pages:protected] => 1 [publication_number:protected] => [part_of:protected] => [keywords:protected] => DeWalt, Fire Hazards, recall, headphones [comments:protected] => [summary:protected] => A recall notice by the United States Consumer Product Safety Commission affects over 300,000 DeWalt Jobsite Pro Headphones. The recall is a result of a malfunction that can cause earbuds to overheat while charging or during use, leading to fire and burn hazards. [transition_comments:protected] => [external_link:protected] => https://www.constructiondive.com/news/dewalts-jobsite-pro-headphones-recalled-for-fire-hazards/611248/?utm_source=Sailthru&utm_medium=email&utm_campaign=Issue:%202021-12-10%20Construction%20Dive%20Newsletter%20%5Bissue:38532%5D&utm_term=Construction%20Dive [consol_link:protected] => [more_like_this:protected] => [permission_given_by:protected] => [published:protected] => T [billable:protected] => F [img_name:protected] => [img_ext:protected] => [img_width:protected] => [img_height:protected] => [img_credit:protected] => [img_practice:protected] => [vid_source_id:protected] => [vid_running_time:protected] => [vid_intended_audience:protected] => [vid_acquisition_info:protected] => [vid_cost:protected] => [vid_producer:protected] => [vid_filename:protected] => [vid_filename_downloadable:protected] => [date_summary:protected] => [date_permission_requested:protected] => [date_permission_received:protected] => [date_review_needed:protected] => [date_received:protected] => 12/13/21 [date_completed:protected] => 12/13/21 [date_billed:protected] => [date_modified:protected] => 12/13/21 [collBokExports:protected] => [lastBokExportCriteria:BaseElcoshItem:private] => [alreadyInSave:protected] => [alreadyInValidation:protected] => [validationFailures:protected] => Array ( ) [_new:BaseObject:private] => [_deleted:BaseObject:private] => [modifiedColumns:protected] => Array ( ) ) ) [3] => Search_Result Object ( [title] => Working in an Enclosed Cab [image] => /record/images/notavailable-p.png [blurb] => This CPWR Hazard Alert on Working in enclosed cabs provides information on protecting workers from silica dust, how to minimize exposures and the dang... [category] => Array ( [0] => 10 [1] => 16 [2] => 24 [3] => 37 [4] => 46 [5] => 48 [6] => 49 [7] => 51 [8] => 53 [9] => 54 [10] => 56 [11] => 58 [12] => 59 [13] => 60 [14] => 61 [15] => 64 [16] => 66 [17] => 68 [18] => 69 [19] => 71 [20] => 73 [21] => 74 [22] => 76 [23] => 77 [24] => 63 [25] => 80 [26] => 82 [27] => 62 [28] => 83 [29] => 84 [30] => 86 [31] => 88 [32] => 89 [33] => 95 [34] => 102 ) [labels] => Array ( [0] => Confined Spaces [1] => Work Environment [2] => Hazards [3] => Fire & Explosions [6] => Trenches & Excavations [9] => Silica /Construction Dust [10] => Inhalation/Skin Exposures [12] => Boilermaker [13] => Trades [14] => Cabinetmaker [16] => Carpenter [18] => Cement Mason [20] => Concrete Polisher [22] => Drywall Applicator Specialist [24] => Elevator Constructor [26] => Glazier [28] => Hazardous Waste Cleanup [30] => HVAC [32] => Interior Systems Carpenter [34] => Laborer [36] => Lather [38] => Maintenance Worker [40] => Millwright [42] => Painter [44] => PCC/Restoration [46] => Pile Driver [48] => Plumber/Pipefitter [50] => Refractory Worker [52] => Reinforcing Ironworker [54] => Sheetmetal Worker [56] => Stonemason [58] => Structural Ironworker [60] => Terrazzo Worker [62] => Tile Setter [64] => Welder [66] => Demolition [67] => Jobsites [68] => Disasters [70] => Underground [72] => Handouts [73] => Documents [74] => Media & Documents ) [type] => Handouts [sub_category] => [url] => /document/4415/d001651/Working%2Bin%2Ban%2BEnclosed%2BCab.html [item:protected] => DocumentRecord Object ( [records:protected] => Array ( ) [recordId:protected] => [searchWordClass:protected] => [searchWordPeerClass:protected] => [bok_record:protected] => [authors:protected] => [organizations:protected] => [collections:protected] => [categories:protected] => Array ( [10] => Category Object ( [languages:protected] => [bok_resources:protected] => [bok_topics:protected] => [bok_keywords:protected] => [id:protected] => 10 [type:protected] => category [parent:protected] => 7 [label:protected] => Confined Spaces [alreadyInSave:protected] => [alreadyInValidation:protected] => [validationFailures:protected] => Array ( ) [_new:BaseObject:private] => [_deleted:BaseObject:private] => [modifiedColumns:protected] => Array ( ) ) [16] => Category Object ( [languages:protected] => [bok_resources:protected] => [bok_topics:protected] => [bok_keywords:protected] => [id:protected] => 16 [type:protected] => category [parent:protected] => 7 [label:protected] => Fire & Explosions [alreadyInSave:protected] => [alreadyInValidation:protected] => [validationFailures:protected] => Array ( ) [_new:BaseObject:private] => [_deleted:BaseObject:private] => [modifiedColumns:protected] => Array ( ) ) [24] => Category Object ( [languages:protected] => [bok_resources:protected] => [bok_topics:protected] => [bok_keywords:protected] => [id:protected] => 24 [type:protected] => category [parent:protected] => 7 [label:protected] => Trenches & Excavations [alreadyInSave:protected] => [alreadyInValidation:protected] => [validationFailures:protected] => Array ( ) [_new:BaseObject:private] => [_deleted:BaseObject:private] => [modifiedColumns:protected] => Array ( ) ) [37] => Category Object ( [languages:protected] => [bok_resources:protected] => [bok_topics:protected] => [bok_keywords:protected] => [id:protected] => 37 [type:protected] => category [parent:protected] => 8 [label:protected] => Silica /Construction Dust [alreadyInSave:protected] => [alreadyInValidation:protected] => [validationFailures:protected] => Array ( ) [_new:BaseObject:private] => [_deleted:BaseObject:private] => [modifiedColumns:protected] => Array ( ) ) [46] => Category Object ( [languages:protected] => [bok_resources:protected] => [bok_topics:protected] => [bok_keywords:protected] => [id:protected] => 46 [type:protected] => category [parent:protected] => 2 [label:protected] => Boilermaker [alreadyInSave:protected] => [alreadyInValidation:protected] => [validationFailures:protected] => Array ( ) [_new:BaseObject:private] => [_deleted:BaseObject:private] => [modifiedColumns:protected] => Array ( ) ) [48] => Category Object ( [languages:protected] => [bok_resources:protected] => [bok_topics:protected] => [bok_keywords:protected] => [id:protected] => 48 [type:protected] => category [parent:protected] => 2 [label:protected] => Cabinetmaker [alreadyInSave:protected] => [alreadyInValidation:protected] => [validationFailures:protected] => Array ( ) [_new:BaseObject:private] => [_deleted:BaseObject:private] => [modifiedColumns:protected] => Array ( ) ) [49] => Category Object ( [languages:protected] => [bok_resources:protected] => [bok_topics:protected] => [bok_keywords:protected] => [id:protected] => 49 [type:protected] => category [parent:protected] => 2 [label:protected] => Carpenter [alreadyInSave:protected] => [alreadyInValidation:protected] => [validationFailures:protected] => Array ( ) [_new:BaseObject:private] => [_deleted:BaseObject:private] => [modifiedColumns:protected] => Array ( ) ) [51] => Category Object ( [languages:protected] => [bok_resources:protected] => [bok_topics:protected] => [bok_keywords:protected] => [id:protected] => 51 [type:protected] => category [parent:protected] => 2 [label:protected] => Cement Mason [alreadyInSave:protected] => [alreadyInValidation:protected] => [validationFailures:protected] => Array ( ) [_new:BaseObject:private] => [_deleted:BaseObject:private] => [modifiedColumns:protected] => Array ( ) ) [53] => Category Object ( [languages:protected] => [bok_resources:protected] => [bok_topics:protected] => [bok_keywords:protected] => [id:protected] => 53 [type:protected] => category [parent:protected] => 2 [label:protected] => Concrete Polisher [alreadyInSave:protected] => [alreadyInValidation:protected] => [validationFailures:protected] => Array ( ) [_new:BaseObject:private] => [_deleted:BaseObject:private] => [modifiedColumns:protected] => Array ( ) ) [54] => Category Object ( [languages:protected] => [bok_resources:protected] => [bok_topics:protected] => [bok_keywords:protected] => [id:protected] => 54 [type:protected] => category [parent:protected] => 2 [label:protected] => Drywall Applicator Specialist [alreadyInSave:protected] => [alreadyInValidation:protected] => [validationFailures:protected] => Array ( ) [_new:BaseObject:private] => [_deleted:BaseObject:private] => [modifiedColumns:protected] => Array ( ) ) [56] => Category Object ( [languages:protected] => [bok_resources:protected] => [bok_topics:protected] => [bok_keywords:protected] => [id:protected] => 56 [type:protected] => category [parent:protected] => 2 [label:protected] => Elevator Constructor [alreadyInSave:protected] => [alreadyInValidation:protected] => [validationFailures:protected] => Array ( ) [_new:BaseObject:private] => [_deleted:BaseObject:private] => [modifiedColumns:protected] => Array ( ) ) [58] => Category Object ( [languages:protected] => [bok_resources:protected] => [bok_topics:protected] => [bok_keywords:protected] => [id:protected] => 58 [type:protected] => category [parent:protected] => 2 [label:protected] => Glazier [alreadyInSave:protected] => [alreadyInValidation:protected] => [validationFailures:protected] => Array ( ) [_new:BaseObject:private] => [_deleted:BaseObject:private] => [modifiedColumns:protected] => Array ( ) ) [59] => Category Object ( [languages:protected] => [bok_resources:protected] => [bok_topics:protected] => [bok_keywords:protected] => [id:protected] => 59 [type:protected] => category [parent:protected] => 2 [label:protected] => Hazardous Waste Cleanup [alreadyInSave:protected] => [alreadyInValidation:protected] => [validationFailures:protected] => Array ( ) [_new:BaseObject:private] => [_deleted:BaseObject:private] => [modifiedColumns:protected] => Array ( ) ) [60] => Category Object ( [languages:protected] => [bok_resources:protected] => [bok_topics:protected] => [bok_keywords:protected] => [id:protected] => 60 [type:protected] => category [parent:protected] => 2 [label:protected] => HVAC [alreadyInSave:protected] => [alreadyInValidation:protected] => [validationFailures:protected] => Array ( ) [_new:BaseObject:private] => [_deleted:BaseObject:private] => [modifiedColumns:protected] => Array ( ) ) [61] => Category Object ( [languages:protected] => [bok_resources:protected] => [bok_topics:protected] => [bok_keywords:protected] => [id:protected] => 61 [type:protected] => category [parent:protected] => 2 [label:protected] => Interior Systems Carpenter [alreadyInSave:protected] => [alreadyInValidation:protected] => [validationFailures:protected] => Array ( ) [_new:BaseObject:private] => [_deleted:BaseObject:private] => [modifiedColumns:protected] => Array ( ) ) [64] => Category Object ( [languages:protected] => [bok_resources:protected] => [bok_topics:protected] => [bok_keywords:protected] => [id:protected] => 64 [type:protected] => category [parent:protected] => 2 [label:protected] => Laborer [alreadyInSave:protected] => [alreadyInValidation:protected] => [validationFailures:protected] => Array ( ) [_new:BaseObject:private] => [_deleted:BaseObject:private] => [modifiedColumns:protected] => Array ( ) ) [66] => Category Object ( [languages:protected] => [bok_resources:protected] => [bok_topics:protected] => [bok_keywords:protected] => [id:protected] => 66 [type:protected] => category [parent:protected] => 2 [label:protected] => Lather [alreadyInSave:protected] => [alreadyInValidation:protected] => [validationFailures:protected] => Array ( ) [_new:BaseObject:private] => [_deleted:BaseObject:private] => [modifiedColumns:protected] => Array ( ) ) [68] => Category Object ( [languages:protected] => [bok_resources:protected] => [bok_topics:protected] => [bok_keywords:protected] => [id:protected] => 68 [type:protected] => category [parent:protected] => 2 [label:protected] => Maintenance Worker [alreadyInSave:protected] => [alreadyInValidation:protected] => [validationFailures:protected] => Array ( ) [_new:BaseObject:private] => [_deleted:BaseObject:private] => [modifiedColumns:protected] => Array ( ) ) [69] => Category Object ( [languages:protected] => [bok_resources:protected] => [bok_topics:protected] => [bok_keywords:protected] => [id:protected] => 69 [type:protected] => category [parent:protected] => 2 [label:protected] => Millwright [alreadyInSave:protected] => [alreadyInValidation:protected] => [validationFailures:protected] => Array ( ) [_new:BaseObject:private] => [_deleted:BaseObject:private] => [modifiedColumns:protected] => Array ( ) ) [71] => Category Object ( [languages:protected] => [bok_resources:protected] => [bok_topics:protected] => [bok_keywords:protected] => [id:protected] => 71 [type:protected] => category [parent:protected] => 2 [label:protected] => Painter [alreadyInSave:protected] => [alreadyInValidation:protected] => [validationFailures:protected] => Array ( ) [_new:BaseObject:private] => [_deleted:BaseObject:private] => [modifiedColumns:protected] => Array ( ) ) [73] => Category Object ( [languages:protected] => [bok_resources:protected] => [bok_topics:protected] => [bok_keywords:protected] => [id:protected] => 73 [type:protected] => category [parent:protected] => 2 [label:protected] => PCC/Restoration [alreadyInSave:protected] => [alreadyInValidation:protected] => [validationFailures:protected] => Array ( ) [_new:BaseObject:private] => [_deleted:BaseObject:private] => [modifiedColumns:protected] => Array ( ) ) [74] => Category Object ( [languages:protected] => [bok_resources:protected] => [bok_topics:protected] => [bok_keywords:protected] => [id:protected] => 74 [type:protected] => category [parent:protected] => 2 [label:protected] => Pile Driver [alreadyInSave:protected] => [alreadyInValidation:protected] => [validationFailures:protected] => Array ( ) [_new:BaseObject:private] => [_deleted:BaseObject:private] => [modifiedColumns:protected] => Array ( ) ) [76] => Category Object ( [languages:protected] => [bok_resources:protected] => [bok_topics:protected] => [bok_keywords:protected] => [id:protected] => 76 [type:protected] => category [parent:protected] => 2 [label:protected] => Plumber/Pipefitter [alreadyInSave:protected] => [alreadyInValidation:protected] => [validationFailures:protected] => Array ( ) [_new:BaseObject:private] => [_deleted:BaseObject:private] => [modifiedColumns:protected] => Array ( ) ) [77] => Category Object ( [languages:protected] => [bok_resources:protected] => [bok_topics:protected] => [bok_keywords:protected] => [id:protected] => 77 [type:protected] => category [parent:protected] => 2 [label:protected] => Refractory Worker [alreadyInSave:protected] => [alreadyInValidation:protected] => [validationFailures:protected] => Array ( ) [_new:BaseObject:private] => [_deleted:BaseObject:private] => [modifiedColumns:protected] => Array ( ) ) [63] => Category Object ( [languages:protected] => [bok_resources:protected] => [bok_topics:protected] => [bok_keywords:protected] => [id:protected] => 63 [type:protected] => category [parent:protected] => 2 [label:protected] => Reinforcing Ironworker [alreadyInSave:protected] => [alreadyInValidation:protected] => [validationFailures:protected] => Array ( ) [_new:BaseObject:private] => [_deleted:BaseObject:private] => [modifiedColumns:protected] => Array ( ) ) [80] => Category Object ( [languages:protected] => [bok_resources:protected] => [bok_topics:protected] => [bok_keywords:protected] => [id:protected] => 80 [type:protected] => category [parent:protected] => 2 [label:protected] => Sheetmetal Worker [alreadyInSave:protected] => [alreadyInValidation:protected] => [validationFailures:protected] => Array ( ) [_new:BaseObject:private] => [_deleted:BaseObject:private] => [modifiedColumns:protected] => Array ( ) ) [82] => Category Object ( [languages:protected] => [bok_resources:protected] => [bok_topics:protected] => [bok_keywords:protected] => [id:protected] => 82 [type:protected] => category [parent:protected] => 2 [label:protected] => Stonemason [alreadyInSave:protected] => [alreadyInValidation:protected] => [validationFailures:protected] => Array ( ) [_new:BaseObject:private] => [_deleted:BaseObject:private] => [modifiedColumns:protected] => Array ( ) ) [62] => Category Object ( [languages:protected] => [bok_resources:protected] => [bok_topics:protected] => [bok_keywords:protected] => [id:protected] => 62 [type:protected] => category [parent:protected] => 2 [label:protected] => Structural Ironworker [alreadyInSave:protected] => [alreadyInValidation:protected] => [validationFailures:protected] => Array ( ) [_new:BaseObject:private] => [_deleted:BaseObject:private] => [modifiedColumns:protected] => Array ( ) ) [83] => Category Object ( [languages:protected] => [bok_resources:protected] => [bok_topics:protected] => [bok_keywords:protected] => [id:protected] => 83 [type:protected] => category [parent:protected] => 2 [label:protected] => Terrazzo Worker [alreadyInSave:protected] => [alreadyInValidation:protected] => [validationFailures:protected] => Array ( ) [_new:BaseObject:private] => [_deleted:BaseObject:private] => [modifiedColumns:protected] => Array ( ) ) [84] => Category Object ( [languages:protected] => [bok_resources:protected] => [bok_topics:protected] => [bok_keywords:protected] => [id:protected] => 84 [type:protected] => category [parent:protected] => 2 [label:protected] => Tile Setter [alreadyInSave:protected] => [alreadyInValidation:protected] => [validationFailures:protected] => Array ( ) [_new:BaseObject:private] => [_deleted:BaseObject:private] => [modifiedColumns:protected] => Array ( ) ) [86] => Category Object ( [languages:protected] => [bok_resources:protected] => [bok_topics:protected] => [bok_keywords:protected] => [id:protected] => 86 [type:protected] => category [parent:protected] => 2 [label:protected] => Welder [alreadyInSave:protected] => [alreadyInValidation:protected] => [validationFailures:protected] => Array ( ) [_new:BaseObject:private] => [_deleted:BaseObject:private] => [modifiedColumns:protected] => Array ( ) ) [88] => Category Object ( [languages:protected] => [bok_resources:protected] => [bok_topics:protected] => [bok_keywords:protected] => [id:protected] => 88 [type:protected] => category [parent:protected] => 3 [label:protected] => Demolition [alreadyInSave:protected] => [alreadyInValidation:protected] => [validationFailures:protected] => Array ( ) [_new:BaseObject:private] => [_deleted:BaseObject:private] => [modifiedColumns:protected] => Array ( ) ) [89] => Category Object ( [languages:protected] => [bok_resources:protected] => [bok_topics:protected] => [bok_keywords:protected] => [id:protected] => 89 [type:protected] => category [parent:protected] => 3 [label:protected] => Disasters [alreadyInSave:protected] => [alreadyInValidation:protected] => [validationFailures:protected] => Array ( ) [_new:BaseObject:private] => [_deleted:BaseObject:private] => [modifiedColumns:protected] => Array ( ) ) [95] => Category Object ( [languages:protected] => [bok_resources:protected] => [bok_topics:protected] => [bok_keywords:protected] => [id:protected] => 95 [type:protected] => category [parent:protected] => 3 [label:protected] => Underground [alreadyInSave:protected] => [alreadyInValidation:protected] => [validationFailures:protected] => Array ( ) [_new:BaseObject:private] => [_deleted:BaseObject:private] => [modifiedColumns:protected] => Array ( ) ) [102] => Category Object ( [languages:protected] => [bok_resources:protected] => [bok_topics:protected] => [bok_keywords:protected] => [id:protected] => 102 [type:protected] => category [parent:protected] => 6 [label:protected] => Handouts [alreadyInSave:protected] => [alreadyInValidation:protected] => [validationFailures:protected] => Array ( ) [_new:BaseObject:private] => [_deleted:BaseObject:private] => [modifiedColumns:protected] => Array ( ) ) ) [categories_initialized:protected] => 1 [mapped_items:protected] => [content:protected] => [files:protected] => [language:protected] => Language Object ( [id:protected] => 1 [code:protected] => en [name:protected] => English [alreadyInSave:protected] => [alreadyInValidation:protected] => [validationFailures:protected] => Array ( ) [_new:BaseObject:private] => [_deleted:BaseObject:private] => [modifiedColumns:protected] => Array ( ) ) [old_record:protected] => [id:protected] => 4415 [old_id:protected] => [elcosh_id:protected] => d001651 [type:protected] => document [display_type:protected] => HTML only (and links) [user_id:protected] => 0 [language_id:protected] => 1 [tagging_id:protected] => Valeria Contreras [priority_id:protected] => 1 [title:protected] => Working in an Enclosed Cab [total_pages:protected] => 1 [billed_pages:protected] => 1 [publication_number:protected] => [part_of:protected] => [keywords:protected] => Occupation, construction, safety, health, hazards, work, worker, workplace, OSHA, silicosis, mining, silica, DOE, EEOICPA, labor, lung, CBD, dust, cab, miner, mine [comments:protected] => [summary:protected] => This CPWR Hazard Alert on Working in enclosed cabs provides information on protecting workers from silica dust, how to minimize exposures and the dangers of silica dust. Click on the following links to access the English version and the Spanish version. [transition_comments:protected] => [external_link:protected] => [consol_link:protected] => [more_like_this:protected] => [permission_given_by:protected] => [published:protected] => T [billable:protected] => F [img_name:protected] => [img_ext:protected] => [img_width:protected] => [img_height:protected] => [img_credit:protected] => [img_practice:protected] => [vid_source_id:protected] => [vid_running_time:protected] => [vid_intended_audience:protected] => [vid_acquisition_info:protected] => [vid_cost:protected] => [vid_producer:protected] => [vid_filename:protected] => [vid_filename_downloadable:protected] => [date_summary:protected] => [date_permission_requested:protected] => [date_permission_received:protected] => [date_review_needed:protected] => [date_received:protected] => 10/08/20 [date_completed:protected] => 10/08/20 [date_billed:protected] => [date_modified:protected] => 10/08/20 [collBokExports:protected] => [lastBokExportCriteria:BaseElcoshItem:private] => [alreadyInSave:protected] => [alreadyInValidation:protected] => [validationFailures:protected] => Array ( ) [_new:BaseObject:private] => [_deleted:BaseObject:private] => [modifiedColumns:protected] => Array ( ) ) ) [4] => Search_Result Object ( [title] => Toolbox Talk: Suicide Prevention [image] => /record/images/notavailable-p.png [blurb] => The CPWR Toolbox Talk on Suicide Prevention addresses the prevalence of suicide among construction workers. The resource includes a brief case example... [category] => Array ( [0] => 13 [1] => 20 [2] => 23 [3] => 40 [4] => 44 [5] => 45 [6] => 46 [7] => 47 [8] => 48 [9] => 49 [10] => 50 [11] => 51 [12] => 52 [13] => 53 [14] => 54 [15] => 55 [16] => 56 [17] => 57 [18] => 58 [19] => 59 [20] => 60 [21] => 61 [22] => 64 [23] => 65 [24] => 66 [25] => 67 [26] => 68 [27] => 69 [28] => 70 [29] => 71 [30] => 72 [31] => 73 [32] => 74 [33] => 75 [34] => 76 [35] => 77 [36] => 63 [37] => 78 [38] => 79 [39] => 80 [40] => 81 [41] => 82 [42] => 62 [43] => 83 [44] => 84 [45] => 85 [46] => 86 [47] => 87 [48] => 88 [49] => 89 [50] => 91 [51] => 90 [52] => 92 [53] => 93 [54] => 94 [55] => 95 [56] => 100 ) [labels] => Array ( [0] => Drugs, Alcohol & Tobacco [1] => Work Environment [2] => Hazards [3] => Safety Culture [6] => Stress & Overtime [9] => Overexertion [10] => Ergonomic [12] => Acoustical Ceiling Carpenter [13] => Trades [14] => Asbestos/Insulator [16] => Boilermaker [18] => Bricklayer [20] => Cabinetmaker [22] => Carpenter [24] => Carpet Layer [26] => Cement Mason [28] => Commercial Diver [30] => Concrete Polisher [32] => Drywall Applicator Specialist [34] => Electrical Worker [36] => Elevator Constructor [38] => Flagger [40] => Glazier [42] => Hazardous Waste Cleanup [44] => HVAC [46] => Interior Systems Carpenter [48] => Laborer [50] => Landscaper [52] => Lather [54] => Lead Abatement Worker [56] => Maintenance Worker [58] => Millwright [60] => Operating Engineer [62] => Painter [64] => Paper Hanger [66] => PCC/Restoration [68] => Pile Driver [70] => Plasterer [72] => Plumber/Pipefitter [74] => Refractory Worker [76] => Reinforcing Ironworker [78] => Roofer/Waterproofer [80] => Scaffold Erector [82] => Sheetmetal Worker [84] => Sprinkler Fitter [86] => Stonemason [88] => Structural Ironworker [90] => Terrazzo Worker [92] => Tile Setter [94] => Truck Driver [96] => Welder [98] => Commercial & Institutional [99] => Jobsites [100] => Demolition [102] => Disasters [104] => Heavy & Highway [106] => Industrial [108] => LEED/Green Construction [110] => Renovations [112] => Residential [114] => Underground [116] => Toolbox Talks [117] => Documents [118] => Media & Documents ) [type] => Toolbox Talks [sub_category] => [url] => /document/4419/d001652/Toolbox%2BTalk%253A%2BSuicide%2BPrevention.html [item:protected] => DocumentRecord Object ( [records:protected] => Array ( ) [recordId:protected] => [searchWordClass:protected] => [searchWordPeerClass:protected] => [bok_record:protected] => [authors:protected] => [organizations:protected] => [collections:protected] => [categories:protected] => Array ( [13] => Category Object ( [languages:protected] => [bok_resources:protected] => [bok_topics:protected] => [bok_keywords:protected] => [id:protected] => 13 [type:protected] => category [parent:protected] => 7 [label:protected] => Drugs, Alcohol & Tobacco [alreadyInSave:protected] => [alreadyInValidation:protected] => [validationFailures:protected] => Array ( ) [_new:BaseObject:private] => [_deleted:BaseObject:private] => [modifiedColumns:protected] => Array ( ) ) [20] => Category Object ( [languages:protected] => [bok_resources:protected] => [bok_topics:protected] => [bok_keywords:protected] => [id:protected] => 20 [type:protected] => category [parent:protected] => 7 [label:protected] => Safety Culture [alreadyInSave:protected] => [alreadyInValidation:protected] => [validationFailures:protected] => Array ( ) [_new:BaseObject:private] => [_deleted:BaseObject:private] => [modifiedColumns:protected] => Array ( ) ) [23] => Category Object ( [languages:protected] => [bok_resources:protected] => [bok_topics:protected] => [bok_keywords:protected] => [id:protected] => 23 [type:protected] => category [parent:protected] => 7 [label:protected] => Stress & Overtime [alreadyInSave:protected] => [alreadyInValidation:protected] => [validationFailures:protected] => Array ( ) [_new:BaseObject:private] => [_deleted:BaseObject:private] => [modifiedColumns:protected] => Array ( ) ) [40] => Category Object ( [languages:protected] => [bok_resources:protected] => [bok_topics:protected] => [bok_keywords:protected] => [id:protected] => 40 [type:protected] => category [parent:protected] => 9 [label:protected] => Overexertion [alreadyInSave:protected] => [alreadyInValidation:protected] => [validationFailures:protected] => Array ( ) [_new:BaseObject:private] => [_deleted:BaseObject:private] => [modifiedColumns:protected] => Array ( ) ) [44] => Category Object ( [languages:protected] => [bok_resources:protected] => [bok_topics:protected] => [bok_keywords:protected] => [id:protected] => 44 [type:protected] => category [parent:protected] => 2 [label:protected] => Acoustical Ceiling Carpenter [alreadyInSave:protected] => [alreadyInValidation:protected] => [validationFailures:protected] => Array ( ) [_new:BaseObject:private] => [_deleted:BaseObject:private] => [modifiedColumns:protected] => Array ( ) ) [45] => Category Object ( [languages:protected] => [bok_resources:protected] => [bok_topics:protected] => [bok_keywords:protected] => [id:protected] => 45 [type:protected] => category [parent:protected] => 2 [label:protected] => Asbestos/Insulator [alreadyInSave:protected] => [alreadyInValidation:protected] => [validationFailures:protected] => Array ( ) [_new:BaseObject:private] => [_deleted:BaseObject:private] => [modifiedColumns:protected] => Array ( ) ) [46] => Category Object ( [languages:protected] => [bok_resources:protected] => [bok_topics:protected] => [bok_keywords:protected] => [id:protected] => 46 [type:protected] => category [parent:protected] => 2 [label:protected] => Boilermaker [alreadyInSave:protected] => [alreadyInValidation:protected] => [validationFailures:protected] => Array ( ) [_new:BaseObject:private] => [_deleted:BaseObject:private] => [modifiedColumns:protected] => Array ( ) ) [47] => Category Object ( [languages:protected] => [bok_resources:protected] => [bok_topics:protected] => [bok_keywords:protected] => [id:protected] => 47 [type:protected] => category [parent:protected] => 2 [label:protected] => Bricklayer [alreadyInSave:protected] => [alreadyInValidation:protected] => [validationFailures:protected] => Array ( ) [_new:BaseObject:private] => [_deleted:BaseObject:private] => [modifiedColumns:protected] => Array ( ) ) [48] => Category Object ( [languages:protected] => [bok_resources:protected] => [bok_topics:protected] => [bok_keywords:protected] => [id:protected] => 48 [type:protected] => category [parent:protected] => 2 [label:protected] => Cabinetmaker [alreadyInSave:protected] => [alreadyInValidation:protected] => [validationFailures:protected] => Array ( ) [_new:BaseObject:private] => [_deleted:BaseObject:private] => [modifiedColumns:protected] => Array ( ) ) [49] => Category Object ( [languages:protected] => [bok_resources:protected] => [bok_topics:protected] => [bok_keywords:protected] => [id:protected] => 49 [type:protected] => category [parent:protected] => 2 [label:protected] => Carpenter [alreadyInSave:protected] => [alreadyInValidation:protected] => [validationFailures:protected] => Array ( ) [_new:BaseObject:private] => [_deleted:BaseObject:private] => [modifiedColumns:protected] => Array ( ) ) [50] => Category Object ( [languages:protected] => [bok_resources:protected] => [bok_topics:protected] => [bok_keywords:protected] => [id:protected] => 50 [type:protected] => category [parent:protected] => 2 [label:protected] => Carpet Layer [alreadyInSave:protected] => [alreadyInValidation:protected] => [validationFailures:protected] => Array ( ) [_new:BaseObject:private] => [_deleted:BaseObject:private] => [modifiedColumns:protected] => Array ( ) ) [51] => Category Object ( [languages:protected] => [bok_resources:protected] => [bok_topics:protected] => [bok_keywords:protected] => [id:protected] => 51 [type:protected] => category [parent:protected] => 2 [label:protected] => Cement Mason [alreadyInSave:protected] => [alreadyInValidation:protected] => [validationFailures:protected] => Array ( ) [_new:BaseObject:private] => [_deleted:BaseObject:private] => [modifiedColumns:protected] => Array ( ) ) [52] => Category Object ( [languages:protected] => [bok_resources:protected] => [bok_topics:protected] => [bok_keywords:protected] => [id:protected] => 52 [type:protected] => category [parent:protected] => 2 [label:protected] => Commercial Diver [alreadyInSave:protected] => [alreadyInValidation:protected] => [validationFailures:protected] => Array ( ) [_new:BaseObject:private] => [_deleted:BaseObject:private] => [modifiedColumns:protected] => Array ( ) ) [53] => Category Object ( [languages:protected] => [bok_resources:protected] => [bok_topics:protected] => [bok_keywords:protected] => [id:protected] => 53 [type:protected] => category [parent:protected] => 2 [label:protected] => Concrete Polisher [alreadyInSave:protected] => [alreadyInValidation:protected] => [validationFailures:protected] => Array ( ) [_new:BaseObject:private] => [_deleted:BaseObject:private] => [modifiedColumns:protected] => Array ( ) ) [54] => Category Object ( [languages:protected] => [bok_resources:protected] => [bok_topics:protected] => [bok_keywords:protected] => [id:protected] => 54 [type:protected] => category [parent:protected] => 2 [label:protected] => Drywall Applicator Specialist [alreadyInSave:protected] => [alreadyInValidation:protected] => [validationFailures:protected] => Array ( ) [_new:BaseObject:private] => [_deleted:BaseObject:private] => [modifiedColumns:protected] => Array ( ) ) [55] => Category Object ( [languages:protected] => [bok_resources:protected] => [bok_topics:protected] => [bok_keywords:protected] => [id:protected] => 55 [type:protected] => category [parent:protected] => 2 [label:protected] => Electrical Worker [alreadyInSave:protected] => [alreadyInValidation:protected] => [validationFailures:protected] => Array ( ) [_new:BaseObject:private] => [_deleted:BaseObject:private] => [modifiedColumns:protected] => Array ( ) ) [56] => Category Object ( [languages:protected] => [bok_resources:protected] => [bok_topics:protected] => [bok_keywords:protected] => [id:protected] => 56 [type:protected] => category [parent:protected] => 2 [label:protected] => Elevator Constructor [alreadyInSave:protected] => [alreadyInValidation:protected] => [validationFailures:protected] => Array ( ) [_new:BaseObject:private] => [_deleted:BaseObject:private] => [modifiedColumns:protected] => Array ( ) ) [57] => Category Object ( [languages:protected] => [bok_resources:protected] => [bok_topics:protected] => [bok_keywords:protected] => [id:protected] => 57 [type:protected] => category [parent:protected] => 2 [label:protected] => Flagger [alreadyInSave:protected] => [alreadyInValidation:protected] => [validationFailures:protected] => Array ( ) [_new:BaseObject:private] => [_deleted:BaseObject:private] => [modifiedColumns:protected] => Array ( ) ) [58] => Category Object ( [languages:protected] => [bok_resources:protected] => [bok_topics:protected] => [bok_keywords:protected] => [id:protected] => 58 [type:protected] => category [parent:protected] => 2 [label:protected] => Glazier [alreadyInSave:protected] => [alreadyInValidation:protected] => [validationFailures:protected] => Array ( ) [_new:BaseObject:private] => [_deleted:BaseObject:private] => [modifiedColumns:protected] => Array ( ) ) [59] => Category Object ( [languages:protected] => [bok_resources:protected] => [bok_topics:protected] => [bok_keywords:protected] => [id:protected] => 59 [type:protected] => category [parent:protected] => 2 [label:protected] => Hazardous Waste Cleanup [alreadyInSave:protected] => [alreadyInValidation:protected] => [validationFailures:protected] => Array ( ) [_new:BaseObject:private] => [_deleted:BaseObject:private] => [modifiedColumns:protected] => Array ( ) ) [60] => Category Object ( [languages:protected] => [bok_resources:protected] => [bok_topics:protected] => [bok_keywords:protected] => [id:protected] => 60 [type:protected] => category [parent:protected] => 2 [label:protected] => HVAC [alreadyInSave:protected] => [alreadyInValidation:protected] => [validationFailures:protected] => Array ( ) [_new:BaseObject:private] => [_deleted:BaseObject:private] => [modifiedColumns:protected] => Array ( ) ) [61] => Category Object ( [languages:protected] => [bok_resources:protected] => [bok_topics:protected] => [bok_keywords:protected] => [id:protected] => 61 [type:protected] => category [parent:protected] => 2 [label:protected] => Interior Systems Carpenter [alreadyInSave:protected] => [alreadyInValidation:protected] => [validationFailures:protected] => Array ( ) [_new:BaseObject:private] => [_deleted:BaseObject:private] => [modifiedColumns:protected] => Array ( ) ) [64] => Category Object ( [languages:protected] => [bok_resources:protected] => [bok_topics:protected] => [bok_keywords:protected] => [id:protected] => 64 [type:protected] => category [parent:protected] => 2 [label:protected] => Laborer [alreadyInSave:protected] => [alreadyInValidation:protected] => [validationFailures:protected] => Array ( ) [_new:BaseObject:private] => [_deleted:BaseObject:private] => [modifiedColumns:protected] => Array ( ) ) [65] => Category Object ( [languages:protected] => [bok_resources:protected] => [bok_topics:protected] => [bok_keywords:protected] => [id:protected] => 65 [type:protected] => category [parent:protected] => 2 [label:protected] => Landscaper [alreadyInSave:protected] => [alreadyInValidation:protected] => [validationFailures:protected] => Array ( ) [_new:BaseObject:private] => [_deleted:BaseObject:private] => [modifiedColumns:protected] => Array ( ) ) [66] => Category Object ( [languages:protected] => [bok_resources:protected] => [bok_topics:protected] => [bok_keywords:protected] => [id:protected] => 66 [type:protected] => category [parent:protected] => 2 [label:protected] => Lather [alreadyInSave:protected] => [alreadyInValidation:protected] => [validationFailures:protected] => Array ( ) [_new:BaseObject:private] => [_deleted:BaseObject:private] => [modifiedColumns:protected] => Array ( ) ) [67] => Category Object ( [languages:protected] => [bok_resources:protected] => [bok_topics:protected] => [bok_keywords:protected] => [id:protected] => 67 [type:protected] => category [parent:protected] => 2 [label:protected] => Lead Abatement Worker [alreadyInSave:protected] => [alreadyInValidation:protected] => [validationFailures:protected] => Array ( ) [_new:BaseObject:private] => [_deleted:BaseObject:private] => [modifiedColumns:protected] => Array ( ) ) [68] => Category Object ( [languages:protected] => [bok_resources:protected] => [bok_topics:protected] => [bok_keywords:protected] => [id:protected] => 68 [type:protected] => category [parent:protected] => 2 [label:protected] => Maintenance Worker [alreadyInSave:protected] => [alreadyInValidation:protected] => [validationFailures:protected] => Array ( ) [_new:BaseObject:private] => [_deleted:BaseObject:private] => [modifiedColumns:protected] => Array ( ) ) [69] => Category Object ( [languages:protected] => [bok_resources:protected] => [bok_topics:protected] => [bok_keywords:protected] => [id:protected] => 69 [type:protected] => category [parent:protected] => 2 [label:protected] => Millwright [alreadyInSave:protected] => [alreadyInValidation:protected] => [validationFailures:protected] => Array ( ) [_new:BaseObject:private] => [_deleted:BaseObject:private] => [modifiedColumns:protected] => Array ( ) ) [70] => Category Object ( [languages:protected] => [bok_resources:protected] => [bok_topics:protected] => [bok_keywords:protected] => [id:protected] => 70 [type:protected] => category [parent:protected] => 2 [label:protected] => Operating Engineer [alreadyInSave:protected] => [alreadyInValidation:protected] => [validationFailures:protected] => Array ( ) [_new:BaseObject:private] => [_deleted:BaseObject:private] => [modifiedColumns:protected] => Array ( ) ) [71] => Category Object ( [languages:protected] => [bok_resources:protected] => [bok_topics:protected] => [bok_keywords:protected] => [id:protected] => 71 [type:protected] => category [parent:protected] => 2 [label:protected] => Painter [alreadyInSave:protected] => [alreadyInValidation:protected] => [validationFailures:protected] => Array ( ) [_new:BaseObject:private] => [_deleted:BaseObject:private] => [modifiedColumns:protected] => Array ( ) ) [72] => Category Object ( [languages:protected] => [bok_resources:protected] => [bok_topics:protected] => [bok_keywords:protected] => [id:protected] => 72 [type:protected] => category [parent:protected] => 2 [label:protected] => Paper Hanger [alreadyInSave:protected] => [alreadyInValidation:protected] => [validationFailures:protected] => Array ( ) [_new:BaseObject:private] => [_deleted:BaseObject:private] => [modifiedColumns:protected] => Array ( ) ) [73] => Category Object ( [languages:protected] => [bok_resources:protected] => [bok_topics:protected] => [bok_keywords:protected] => [id:protected] => 73 [type:protected] => category [parent:protected] => 2 [label:protected] => PCC/Restoration [alreadyInSave:protected] => [alreadyInValidation:protected] => [validationFailures:protected] => Array ( ) [_new:BaseObject:private] => [_deleted:BaseObject:private] => [modifiedColumns:protected] => Array ( ) ) [74] => Category Object ( [languages:protected] => [bok_resources:protected] => [bok_topics:protected] => [bok_keywords:protected] => [id:protected] => 74 [type:protected] => category [parent:protected] => 2 [label:protected] => Pile Driver [alreadyInSave:protected] => [alreadyInValidation:protected] => [validationFailures:protected] => Array ( ) [_new:BaseObject:private] => [_deleted:BaseObject:private] => [modifiedColumns:protected] => Array ( ) ) [75] => Category Object ( [languages:protected] => [bok_resources:protected] => [bok_topics:protected] => [bok_keywords:protected] => [id:protected] => 75 [type:protected] => category [parent:protected] => 2 [label:protected] => Plasterer [alreadyInSave:protected] => [alreadyInValidation:protected] => [validationFailures:protected] => Array ( ) [_new:BaseObject:private] => [_deleted:BaseObject:private] => [modifiedColumns:protected] => Array ( ) ) [76] => Category Object ( [languages:protected] => [bok_resources:protected] => [bok_topics:protected] => [bok_keywords:protected] => [id:protected] => 76 [type:protected] => category [parent:protected] => 2 [label:protected] => Plumber/Pipefitter [alreadyInSave:protected] => [alreadyInValidation:protected] => [validationFailures:protected] => Array ( ) [_new:BaseObject:private] => [_deleted:BaseObject:private] => [modifiedColumns:protected] => Array ( ) ) [77] => Category Object ( [languages:protected] => [bok_resources:protected] => [bok_topics:protected] => [bok_keywords:protected] => [id:protected] => 77 [type:protected] => category [parent:protected] => 2 [label:protected] => Refractory Worker [alreadyInSave:protected] => [alreadyInValidation:protected] => [validationFailures:protected] => Array ( ) [_new:BaseObject:private] => [_deleted:BaseObject:private] => [modifiedColumns:protected] => Array ( ) ) [63] => Category Object ( [languages:protected] => [bok_resources:protected] => [bok_topics:protected] => [bok_keywords:protected] => [id:protected] => 63 [type:protected] => category [parent:protected] => 2 [label:protected] => Reinforcing Ironworker [alreadyInSave:protected] => [alreadyInValidation:protected] => [validationFailures:protected] => Array ( ) [_new:BaseObject:private] => [_deleted:BaseObject:private] => [modifiedColumns:protected] => Array ( ) ) [78] => Category Object ( [languages:protected] => [bok_resources:protected] => [bok_topics:protected] => [bok_keywords:protected] => [id:protected] => 78 [type:protected] => category [parent:protected] => 2 [label:protected] => Roofer/Waterproofer [alreadyInSave:protected] => [alreadyInValidation:protected] => [validationFailures:protected] => Array ( ) [_new:BaseObject:private] => [_deleted:BaseObject:private] => [modifiedColumns:protected] => Array ( ) ) [79] => Category Object ( [languages:protected] => [bok_resources:protected] => [bok_topics:protected] => [bok_keywords:protected] => [id:protected] => 79 [type:protected] => category [parent:protected] => 2 [label:protected] => Scaffold Erector [alreadyInSave:protected] => [alreadyInValidation:protected] => [validationFailures:protected] => Array ( ) [_new:BaseObject:private] => [_deleted:BaseObject:private] => [modifiedColumns:protected] => Array ( ) ) [80] => Category Object ( [languages:protected] => [bok_resources:protected] => [bok_topics:protected] => [bok_keywords:protected] => [id:protected] => 80 [type:protected] => category [parent:protected] => 2 [label:protected] => Sheetmetal Worker [alreadyInSave:protected] => [alreadyInValidation:protected] => [validationFailures:protected] => Array ( ) [_new:BaseObject:private] => [_deleted:BaseObject:private] => [modifiedColumns:protected] => Array ( ) ) [81] => Category Object ( [languages:protected] => [bok_resources:protected] => [bok_topics:protected] => [bok_keywords:protected] => [id:protected] => 81 [type:protected] => category [parent:protected] => 2 [label:protected] => Sprinkler Fitter [alreadyInSave:protected] => [alreadyInValidation:protected] => [validationFailures:protected] => Array ( ) [_new:BaseObject:private] => [_deleted:BaseObject:private] => [modifiedColumns:protected] => Array ( ) ) [82] => Category Object ( [languages:protected] => [bok_resources:protected] => [bok_topics:protected] => [bok_keywords:protected] => [id:protected] => 82 [type:protected] => category [parent:protected] => 2 [label:protected] => Stonemason [alreadyInSave:protected] => [alreadyInValidation:protected] => [validationFailures:protected] => Array ( ) [_new:BaseObject:private] => [_deleted:BaseObject:private] => [modifiedColumns:protected] => Array ( ) ) [62] => Category Object ( [languages:protected] => [bok_resources:protected] => [bok_topics:protected] => [bok_keywords:protected] => [id:protected] => 62 [type:protected] => category [parent:protected] => 2 [label:protected] => Structural Ironworker [alreadyInSave:protected] => [alreadyInValidation:protected] => [validationFailures:protected] => Array ( ) [_new:BaseObject:private] => [_deleted:BaseObject:private] => [modifiedColumns:protected] => Array ( ) ) [83] => Category Object ( [languages:protected] => [bok_resources:protected] => [bok_topics:protected] => [bok_keywords:protected] => [id:protected] => 83 [type:protected] => category [parent:protected] => 2 [label:protected] => Terrazzo Worker [alreadyInSave:protected] => [alreadyInValidation:protected] => [validationFailures:protected] => Array ( ) [_new:BaseObject:private] => [_deleted:BaseObject:private] => [modifiedColumns:protected] => Array ( ) ) [84] => Category Object ( [languages:protected] => [bok_resources:protected] => [bok_topics:protected] => [bok_keywords:protected] => [id:protected] => 84 [type:protected] => category [parent:protected] => 2 [label:protected] => Tile Setter [alreadyInSave:protected] => [alreadyInValidation:protected] => [validationFailures:protected] => Array ( ) [_new:BaseObject:private] => [_deleted:BaseObject:private] => [modifiedColumns:protected] => Array ( ) ) [85] => Category Object ( [languages:protected] => [bok_resources:protected] => [bok_topics:protected] => [bok_keywords:protected] => [id:protected] => 85 [type:protected] => category [parent:protected] => 2 [label:protected] => Truck Driver [alreadyInSave:protected] => [alreadyInValidation:protected] => [validationFailures:protected] => Array ( ) [_new:BaseObject:private] => [_deleted:BaseObject:private] => [modifiedColumns:protected] => Array ( ) ) [86] => Category Object ( [languages:protected] => [bok_resources:protected] => [bok_topics:protected] => [bok_keywords:protected] => [id:protected] => 86 [type:protected] => category [parent:protected] => 2 [label:protected] => Welder [alreadyInSave:protected] => [alreadyInValidation:protected] => [validationFailures:protected] => Array ( ) [_new:BaseObject:private] => [_deleted:BaseObject:private] => [modifiedColumns:protected] => Array ( ) ) [87] => Category Object ( [languages:protected] => [bok_resources:protected] => [bok_topics:protected] => [bok_keywords:protected] => [id:protected] => 87 [type:protected] => category [parent:protected] => 3 [label:protected] => Commercial & Institutional [alreadyInSave:protected] => [alreadyInValidation:protected] => [validationFailures:protected] => Array ( ) [_new:BaseObject:private] => [_deleted:BaseObject:private] => [modifiedColumns:protected] => Array ( ) ) [88] => Category Object ( [languages:protected] => [bok_resources:protected] => [bok_topics:protected] => [bok_keywords:protected] => [id:protected] => 88 [type:protected] => category [parent:protected] => 3 [label:protected] => Demolition [alreadyInSave:protected] => [alreadyInValidation:protected] => [validationFailures:protected] => Array ( ) [_new:BaseObject:private] => [_deleted:BaseObject:private] => [modifiedColumns:protected] => Array ( ) ) [89] => Category Object ( [languages:protected] => [bok_resources:protected] => [bok_topics:protected] => [bok_keywords:protected] => [id:protected] => 89 [type:protected] => category [parent:protected] => 3 [label:protected] => Disasters [alreadyInSave:protected] => [alreadyInValidation:protected] => [validationFailures:protected] => Array ( ) [_new:BaseObject:private] => [_deleted:BaseObject:private] => [modifiedColumns:protected] => Array ( ) ) [91] => Category Object ( [languages:protected] => [bok_resources:protected] => [bok_topics:protected] => [bok_keywords:protected] => [id:protected] => 91 [type:protected] => category [parent:protected] => 3 [label:protected] => Heavy & Highway [alreadyInSave:protected] => [alreadyInValidation:protected] => [validationFailures:protected] => Array ( ) [_new:BaseObject:private] => [_deleted:BaseObject:private] => [modifiedColumns:protected] => Array ( ) ) [90] => Category Object ( [languages:protected] => [bok_resources:protected] => [bok_topics:protected] => [bok_keywords:protected] => [id:protected] => 90 [type:protected] => category [parent:protected] => 3 [label:protected] => Industrial [alreadyInSave:protected] => [alreadyInValidation:protected] => [validationFailures:protected] => Array ( ) [_new:BaseObject:private] => [_deleted:BaseObject:private] => [modifiedColumns:protected] => Array ( ) ) [92] => Category Object ( [languages:protected] => [bok_resources:protected] => [bok_topics:protected] => [bok_keywords:protected] => [id:protected] => 92 [type:protected] => category [parent:protected] => 3 [label:protected] => LEED/Green Construction [alreadyInSave:protected] => [alreadyInValidation:protected] => [validationFailures:protected] => Array ( ) [_new:BaseObject:private] => [_deleted:BaseObject:private] => [modifiedColumns:protected] => Array ( ) ) [93] => Category Object ( [languages:protected] => [bok_resources:protected] => [bok_topics:protected] => [bok_keywords:protected] => [id:protected] => 93 [type:protected] => category [parent:protected] => 3 [label:protected] => Renovations [alreadyInSave:protected] => [alreadyInValidation:protected] => [validationFailures:protected] => Array ( ) [_new:BaseObject:private] => [_deleted:BaseObject:private] => [modifiedColumns:protected] => Array ( ) ) [94] => Category Object ( [languages:protected] => [bok_resources:protected] => [bok_topics:protected] => [bok_keywords:protected] => [id:protected] => 94 [type:protected] => category [parent:protected] => 3 [label:protected] => Residential [alreadyInSave:protected] => [alreadyInValidation:protected] => [validationFailures:protected] => Array ( ) [_new:BaseObject:private] => [_deleted:BaseObject:private] => [modifiedColumns:protected] => Array ( ) ) [95] => Category Object ( [languages:protected] => [bok_resources:protected] => [bok_topics:protected] => [bok_keywords:protected] => [id:protected] => 95 [type:protected] => category [parent:protected] => 3 [label:protected] => Underground [alreadyInSave:protected] => [alreadyInValidation:protected] => [validationFailures:protected] => Array ( ) [_new:BaseObject:private] => [_deleted:BaseObject:private] => [modifiedColumns:protected] => Array ( ) ) [100] => Category Object ( [languages:protected] => [bok_resources:protected] => [bok_topics:protected] => [bok_keywords:protected] => [id:protected] => 100 [type:protected] => category [parent:protected] => 6 [label:protected] => Toolbox Talks [alreadyInSave:protected] => [alreadyInValidation:protected] => [validationFailures:protected] => Array ( ) [_new:BaseObject:private] => [_deleted:BaseObject:private] => [modifiedColumns:protected] => Array ( ) ) ) [categories_initialized:protected] => 1 [mapped_items:protected] => [content:protected] => [files:protected] => [language:protected] => Language Object ( [id:protected] => 1 [code:protected] => en [name:protected] => English [alreadyInSave:protected] => [alreadyInValidation:protected] => [validationFailures:protected] => Array ( ) [_new:BaseObject:private] => [_deleted:BaseObject:private] => [modifiedColumns:protected] => Array ( ) ) [old_record:protected] => [id:protected] => 4419 [old_id:protected] => [elcosh_id:protected] => d001652 [type:protected] => document [display_type:protected] => HTML only (and links) [user_id:protected] => 0 [language_id:protected] => 1 [tagging_id:protected] => Valeria Contreras [priority_id:protected] => 1 [title:protected] => Toolbox Talk: Suicide Prevention [total_pages:protected] => 1 [billed_pages:protected] => 1 [publication_number:protected] => [part_of:protected] => [keywords:protected] => suicide, suicide prevention, mental health, stress, depression, exhaustion, burnout, safety, support, emotional support, health [comments:protected] => [summary:protected] =>The CPWR Toolbox Talk on Suicide Prevention addresses the prevalence of suicide among construction workers. The resource includes a brief case example, steps to prevent a related injury or illness, and questions for discussion. It includes an image that illustrates the hazard, which can be posted in a central location as a reminder of steps to work safely.
Available in English and Spanish. [transition_comments:protected] => [external_link:protected] => [consol_link:protected] => [more_like_this:protected] => [permission_given_by:protected] => [published:protected] => T [billable:protected] => F [img_name:protected] => [img_ext:protected] => [img_width:protected] => [img_height:protected] => [img_credit:protected] => [img_practice:protected] => [vid_source_id:protected] => [vid_running_time:protected] => [vid_intended_audience:protected] => [vid_acquisition_info:protected] => [vid_cost:protected] => [vid_producer:protected] => [vid_filename:protected] => [vid_filename_downloadable:protected] => [date_summary:protected] => [date_permission_requested:protected] => [date_permission_received:protected] => [date_review_needed:protected] => [date_received:protected] => 10/08/20 [date_completed:protected] => 10/08/20 [date_billed:protected] => [date_modified:protected] => 05/19/23 [collBokExports:protected] => [lastBokExportCriteria:BaseElcoshItem:private] => [alreadyInSave:protected] => [alreadyInValidation:protected] => [validationFailures:protected] => Array ( ) [_new:BaseObject:private] => [_deleted:BaseObject:private] => [modifiedColumns:protected] => Array ( ) ) ) ) [new_images] => Array ( [0] => Search_Result Object ( [title] => Toolbox talk - crew view [image] => /record/images/4005-p.jpg [blurb] => Photo of crew listening to a toolbox safety talk before starting work.... [category] => Array ( [0] => 97 [1] => 20 [2] => 47 [3] => 49 [4] => 51 [5] => 55 [6] => 61 [7] => 64 [8] => 71 [9] => 75 [10] => 63 [11] => 79 [12] => 62 [13] => 87 [14] => 88 [15] => 91 [16] => 90 [17] => 93 [18] => 94 [19] => 95 ) [labels] => Array ( [0] => Images [1] => Media [2] => Media & Documents [3] => Safety Culture [4] => Work Environment [5] => Hazards [6] => Bricklayer [7] => Trades [8] => Carpenter [10] => Cement Mason [12] => Electrical Worker [14] => Interior Systems Carpenter [16] => Laborer [18] => Painter [20] => Plasterer [22] => Reinforcing Ironworker [24] => Scaffold Erector [26] => Structural Ironworker [28] => Commercial & Institutional [29] => Jobsites [30] => Demolition [32] => Heavy & Highway [34] => Industrial [36] => Renovations [38] => Residential [40] => Underground ) [type] => Images [sub_category] => [url] => /image/4005/i002692/Toolbox%2Btalk%2B-%2Bcrew%2Bview.html [item:protected] => ImageRecord Object ( [records:protected] => Array ( ) [recordId:protected] => [searchWordClass:protected] => [searchWordPeerClass:protected] => [bok_record:protected] => [authors:protected] => [organizations:protected] => [collections:protected] => [categories:protected] => Array ( [97] => Category Object ( [languages:protected] => [bok_resources:protected] => [bok_topics:protected] => [bok_keywords:protected] => [id:protected] => 97 [type:protected] => category [parent:protected] => 5 [label:protected] => Images [alreadyInSave:protected] => [alreadyInValidation:protected] => [validationFailures:protected] => Array ( ) [_new:BaseObject:private] => [_deleted:BaseObject:private] => [modifiedColumns:protected] => Array ( ) ) [20] => Category Object ( [languages:protected] => [bok_resources:protected] => [bok_topics:protected] => [bok_keywords:protected] => [id:protected] => 20 [type:protected] => category [parent:protected] => 7 [label:protected] => Safety Culture [alreadyInSave:protected] => [alreadyInValidation:protected] => [validationFailures:protected] => Array ( ) [_new:BaseObject:private] => [_deleted:BaseObject:private] => [modifiedColumns:protected] => Array ( ) ) [47] => Category Object ( [languages:protected] => [bok_resources:protected] => [bok_topics:protected] => [bok_keywords:protected] => [id:protected] => 47 [type:protected] => category [parent:protected] => 2 [label:protected] => Bricklayer [alreadyInSave:protected] => [alreadyInValidation:protected] => [validationFailures:protected] => Array ( ) [_new:BaseObject:private] => [_deleted:BaseObject:private] => [modifiedColumns:protected] => Array ( ) ) [49] => Category Object ( [languages:protected] => [bok_resources:protected] => [bok_topics:protected] => [bok_keywords:protected] => [id:protected] => 49 [type:protected] => category [parent:protected] => 2 [label:protected] => Carpenter [alreadyInSave:protected] => [alreadyInValidation:protected] => [validationFailures:protected] => Array ( ) [_new:BaseObject:private] => [_deleted:BaseObject:private] => [modifiedColumns:protected] => Array ( ) ) [51] => Category Object ( [languages:protected] => [bok_resources:protected] => [bok_topics:protected] => [bok_keywords:protected] => [id:protected] => 51 [type:protected] => category [parent:protected] => 2 [label:protected] => Cement Mason [alreadyInSave:protected] => [alreadyInValidation:protected] => [validationFailures:protected] => Array ( ) [_new:BaseObject:private] => [_deleted:BaseObject:private] => [modifiedColumns:protected] => Array ( ) ) [55] => Category Object ( [languages:protected] => [bok_resources:protected] => [bok_topics:protected] => [bok_keywords:protected] => [id:protected] => 55 [type:protected] => category [parent:protected] => 2 [label:protected] => Electrical Worker [alreadyInSave:protected] => [alreadyInValidation:protected] => [validationFailures:protected] => Array ( ) [_new:BaseObject:private] => [_deleted:BaseObject:private] => [modifiedColumns:protected] => Array ( ) ) [61] => Category Object ( [languages:protected] => [bok_resources:protected] => [bok_topics:protected] => [bok_keywords:protected] => [id:protected] => 61 [type:protected] => category [parent:protected] => 2 [label:protected] => Interior Systems Carpenter [alreadyInSave:protected] => [alreadyInValidation:protected] => [validationFailures:protected] => Array ( ) [_new:BaseObject:private] => [_deleted:BaseObject:private] => [modifiedColumns:protected] => Array ( ) ) [64] => Category Object ( [languages:protected] => [bok_resources:protected] => [bok_topics:protected] => [bok_keywords:protected] => [id:protected] => 64 [type:protected] => category [parent:protected] => 2 [label:protected] => Laborer [alreadyInSave:protected] => [alreadyInValidation:protected] => [validationFailures:protected] => Array ( ) [_new:BaseObject:private] => [_deleted:BaseObject:private] => [modifiedColumns:protected] => Array ( ) ) [71] => Category Object ( [languages:protected] => [bok_resources:protected] => [bok_topics:protected] => [bok_keywords:protected] => [id:protected] => 71 [type:protected] => category [parent:protected] => 2 [label:protected] => Painter [alreadyInSave:protected] => [alreadyInValidation:protected] => [validationFailures:protected] => Array ( ) [_new:BaseObject:private] => [_deleted:BaseObject:private] => [modifiedColumns:protected] => Array ( ) ) [75] => Category Object ( [languages:protected] => [bok_resources:protected] => [bok_topics:protected] => [bok_keywords:protected] => [id:protected] => 75 [type:protected] => category [parent:protected] => 2 [label:protected] => Plasterer [alreadyInSave:protected] => [alreadyInValidation:protected] => [validationFailures:protected] => Array ( ) [_new:BaseObject:private] => [_deleted:BaseObject:private] => [modifiedColumns:protected] => Array ( ) ) [63] => Category Object ( [languages:protected] => [bok_resources:protected] => [bok_topics:protected] => [bok_keywords:protected] => [id:protected] => 63 [type:protected] => category [parent:protected] => 2 [label:protected] => Reinforcing Ironworker [alreadyInSave:protected] => [alreadyInValidation:protected] => [validationFailures:protected] => Array ( ) [_new:BaseObject:private] => [_deleted:BaseObject:private] => [modifiedColumns:protected] => Array ( ) ) [79] => Category Object ( [languages:protected] => [bok_resources:protected] => [bok_topics:protected] => [bok_keywords:protected] => [id:protected] => 79 [type:protected] => category [parent:protected] => 2 [label:protected] => Scaffold Erector [alreadyInSave:protected] => [alreadyInValidation:protected] => [validationFailures:protected] => Array ( ) [_new:BaseObject:private] => [_deleted:BaseObject:private] => [modifiedColumns:protected] => Array ( ) ) [62] => Category Object ( [languages:protected] => [bok_resources:protected] => [bok_topics:protected] => [bok_keywords:protected] => [id:protected] => 62 [type:protected] => category [parent:protected] => 2 [label:protected] => Structural Ironworker [alreadyInSave:protected] => [alreadyInValidation:protected] => [validationFailures:protected] => Array ( ) [_new:BaseObject:private] => [_deleted:BaseObject:private] => [modifiedColumns:protected] => Array ( ) ) [87] => Category Object ( [languages:protected] => [bok_resources:protected] => [bok_topics:protected] => [bok_keywords:protected] => [id:protected] => 87 [type:protected] => category [parent:protected] => 3 [label:protected] => Commercial & Institutional [alreadyInSave:protected] => [alreadyInValidation:protected] => [validationFailures:protected] => Array ( ) [_new:BaseObject:private] => [_deleted:BaseObject:private] => [modifiedColumns:protected] => Array ( ) ) [88] => Category Object ( [languages:protected] => [bok_resources:protected] => [bok_topics:protected] => [bok_keywords:protected] => [id:protected] => 88 [type:protected] => category [parent:protected] => 3 [label:protected] => Demolition [alreadyInSave:protected] => [alreadyInValidation:protected] => [validationFailures:protected] => Array ( ) [_new:BaseObject:private] => [_deleted:BaseObject:private] => [modifiedColumns:protected] => Array ( ) ) [91] => Category Object ( [languages:protected] => [bok_resources:protected] => [bok_topics:protected] => [bok_keywords:protected] => [id:protected] => 91 [type:protected] => category [parent:protected] => 3 [label:protected] => Heavy & Highway [alreadyInSave:protected] => [alreadyInValidation:protected] => [validationFailures:protected] => Array ( ) [_new:BaseObject:private] => [_deleted:BaseObject:private] => [modifiedColumns:protected] => Array ( ) ) [90] => Category Object ( [languages:protected] => [bok_resources:protected] => [bok_topics:protected] => [bok_keywords:protected] => [id:protected] => 90 [type:protected] => category [parent:protected] => 3 [label:protected] => Industrial [alreadyInSave:protected] => [alreadyInValidation:protected] => [validationFailures:protected] => Array ( ) [_new:BaseObject:private] => [_deleted:BaseObject:private] => [modifiedColumns:protected] => Array ( ) ) [93] => Category Object ( [languages:protected] => [bok_resources:protected] => [bok_topics:protected] => [bok_keywords:protected] => [id:protected] => 93 [type:protected] => category [parent:protected] => 3 [label:protected] => Renovations [alreadyInSave:protected] => [alreadyInValidation:protected] => [validationFailures:protected] => Array ( ) [_new:BaseObject:private] => [_deleted:BaseObject:private] => [modifiedColumns:protected] => Array ( ) ) [94] => Category Object ( [languages:protected] => [bok_resources:protected] => [bok_topics:protected] => [bok_keywords:protected] => [id:protected] => 94 [type:protected] => category [parent:protected] => 3 [label:protected] => Residential [alreadyInSave:protected] => [alreadyInValidation:protected] => [validationFailures:protected] => Array ( ) [_new:BaseObject:private] => [_deleted:BaseObject:private] => [modifiedColumns:protected] => Array ( ) ) [95] => Category Object ( [languages:protected] => [bok_resources:protected] => [bok_topics:protected] => [bok_keywords:protected] => [id:protected] => 95 [type:protected] => category [parent:protected] => 3 [label:protected] => Underground [alreadyInSave:protected] => [alreadyInValidation:protected] => [validationFailures:protected] => Array ( ) [_new:BaseObject:private] => [_deleted:BaseObject:private] => [modifiedColumns:protected] => Array ( ) ) ) [categories_initialized:protected] => 1 [mapped_items:protected] => [content:protected] => [files:protected] => [language:protected] => Language Object ( [id:protected] => 1 [code:protected] => en [name:protected] => English [alreadyInSave:protected] => [alreadyInValidation:protected] => [validationFailures:protected] => Array ( ) [_new:BaseObject:private] => [_deleted:BaseObject:private] => [modifiedColumns:protected] => Array ( ) ) [old_record:protected] => [id:protected] => 4005 [old_id:protected] => [elcosh_id:protected] => i002692 [type:protected] => image [display_type:protected] => Image [user_id:protected] => 0 [language_id:protected] => 1 [tagging_id:protected] => Bruce Lippy [priority_id:protected] => 1 [title:protected] => Toolbox talk - crew view [total_pages:protected] => 0 [billed_pages:protected] => 0 [publication_number:protected] => [part_of:protected] => [keywords:protected] => toolbox talk, tailgate talk, safety talk, Spanish [comments:protected] => [summary:protected] => Photo of crew listening to a toolbox safety talk before starting work. [transition_comments:protected] => [external_link:protected] => [consol_link:protected] => http://www.cpwrconstructionsolutions.org/electrical/solution/662/worker-training.html [more_like_this:protected] => i002691,d001269, c000079, d001285 [permission_given_by:protected] => [published:protected] => T [billable:protected] => F [img_name:protected] => [img_ext:protected] => jpg [img_width:protected] => [img_height:protected] => [img_credit:protected] => Morgan Zavertnik and Hoar Construction [img_practice:protected] => good [vid_source_id:protected] => [vid_running_time:protected] => [vid_intended_audience:protected] => [vid_acquisition_info:protected] => [vid_cost:protected] => [vid_producer:protected] => [vid_filename:protected] => [vid_filename_downloadable:protected] => [date_summary:protected] => November 2015 [date_permission_requested:protected] => [date_permission_received:protected] => [date_review_needed:protected] => [date_received:protected] => 03/02/16 [date_completed:protected] => 03/02/16 [date_billed:protected] => [date_modified:protected] => 03/02/16 [collBokExports:protected] => [lastBokExportCriteria:BaseElcoshItem:private] => [alreadyInSave:protected] => [alreadyInValidation:protected] => [validationFailures:protected] => Array ( ) [_new:BaseObject:private] => [_deleted:BaseObject:private] => [modifiedColumns:protected] => Array ( ) ) ) [1] => Search_Result Object ( [title] => Toolbox talk - long shot [image] => /record/images/4006-p.jpg [blurb] => This crew gathered every morning before starting work to discuss a new safety topic.... [category] => Array ( [0] => 20 [1] => 47 [2] => 49 [3] => 51 [4] => 55 [5] => 64 [6] => 68 [7] => 75 [8] => 76 [9] => 63 [10] => 78 [11] => 79 [12] => 82 [13] => 62 [14] => 87 [15] => 88 [16] => 91 [17] => 90 [18] => 93 [19] => 94 [20] => 95 [21] => 97 ) [labels] => Array ( [0] => Safety Culture [1] => Work Environment [2] => Hazards [3] => Bricklayer [4] => Trades [5] => Carpenter [7] => Cement Mason [9] => Electrical Worker [11] => Laborer [13] => Maintenance Worker [15] => Plasterer [17] => Plumber/Pipefitter [19] => Reinforcing Ironworker [21] => Roofer/Waterproofer [23] => Scaffold Erector [25] => Stonemason [27] => Structural Ironworker [29] => Commercial & Institutional [30] => Jobsites [31] => Demolition [33] => Heavy & Highway [35] => Industrial [37] => Renovations [39] => Residential [41] => Underground [43] => Images [44] => Media [45] => Media & Documents ) [type] => Images [sub_category] => [url] => /image/4006/i002693/Toolbox%2Btalk%2B-%2Blong%2Bshot.html [item:protected] => ImageRecord Object ( [records:protected] => Array ( ) [recordId:protected] => [searchWordClass:protected] => [searchWordPeerClass:protected] => [bok_record:protected] => [authors:protected] => [organizations:protected] => [collections:protected] => [categories:protected] => Array ( [20] => Category Object ( [languages:protected] => [bok_resources:protected] => [bok_topics:protected] => [bok_keywords:protected] => [id:protected] => 20 [type:protected] => category [parent:protected] => 7 [label:protected] => Safety Culture [alreadyInSave:protected] => [alreadyInValidation:protected] => [validationFailures:protected] => Array ( ) [_new:BaseObject:private] => [_deleted:BaseObject:private] => [modifiedColumns:protected] => Array ( ) ) [47] => Category Object ( [languages:protected] => [bok_resources:protected] => [bok_topics:protected] => [bok_keywords:protected] => [id:protected] => 47 [type:protected] => category [parent:protected] => 2 [label:protected] => Bricklayer [alreadyInSave:protected] => [alreadyInValidation:protected] => [validationFailures:protected] => Array ( ) [_new:BaseObject:private] => [_deleted:BaseObject:private] => [modifiedColumns:protected] => Array ( ) ) [49] => Category Object ( [languages:protected] => [bok_resources:protected] => [bok_topics:protected] => [bok_keywords:protected] => [id:protected] => 49 [type:protected] => category [parent:protected] => 2 [label:protected] => Carpenter [alreadyInSave:protected] => [alreadyInValidation:protected] => [validationFailures:protected] => Array ( ) [_new:BaseObject:private] => [_deleted:BaseObject:private] => [modifiedColumns:protected] => Array ( ) ) [51] => Category Object ( [languages:protected] => [bok_resources:protected] => [bok_topics:protected] => [bok_keywords:protected] => [id:protected] => 51 [type:protected] => category [parent:protected] => 2 [label:protected] => Cement Mason [alreadyInSave:protected] => [alreadyInValidation:protected] => [validationFailures:protected] => Array ( ) [_new:BaseObject:private] => [_deleted:BaseObject:private] => [modifiedColumns:protected] => Array ( ) ) [55] => Category Object ( [languages:protected] => [bok_resources:protected] => [bok_topics:protected] => [bok_keywords:protected] => [id:protected] => 55 [type:protected] => category [parent:protected] => 2 [label:protected] => Electrical Worker [alreadyInSave:protected] => [alreadyInValidation:protected] => [validationFailures:protected] => Array ( ) [_new:BaseObject:private] => [_deleted:BaseObject:private] => [modifiedColumns:protected] => Array ( ) ) [64] => Category Object ( [languages:protected] => [bok_resources:protected] => [bok_topics:protected] => [bok_keywords:protected] => [id:protected] => 64 [type:protected] => category [parent:protected] => 2 [label:protected] => Laborer [alreadyInSave:protected] => [alreadyInValidation:protected] => [validationFailures:protected] => Array ( ) [_new:BaseObject:private] => [_deleted:BaseObject:private] => [modifiedColumns:protected] => Array ( ) ) [68] => Category Object ( [languages:protected] => [bok_resources:protected] => [bok_topics:protected] => [bok_keywords:protected] => [id:protected] => 68 [type:protected] => category [parent:protected] => 2 [label:protected] => Maintenance Worker [alreadyInSave:protected] => [alreadyInValidation:protected] => [validationFailures:protected] => Array ( ) [_new:BaseObject:private] => [_deleted:BaseObject:private] => [modifiedColumns:protected] => Array ( ) ) [75] => Category Object ( [languages:protected] => [bok_resources:protected] => [bok_topics:protected] => [bok_keywords:protected] => [id:protected] => 75 [type:protected] => category [parent:protected] => 2 [label:protected] => Plasterer [alreadyInSave:protected] => [alreadyInValidation:protected] => [validationFailures:protected] => Array ( ) [_new:BaseObject:private] => [_deleted:BaseObject:private] => [modifiedColumns:protected] => Array ( ) ) [76] => Category Object ( [languages:protected] => [bok_resources:protected] => [bok_topics:protected] => [bok_keywords:protected] => [id:protected] => 76 [type:protected] => category [parent:protected] => 2 [label:protected] => Plumber/Pipefitter [alreadyInSave:protected] => [alreadyInValidation:protected] => [validationFailures:protected] => Array ( ) [_new:BaseObject:private] => [_deleted:BaseObject:private] => [modifiedColumns:protected] => Array ( ) ) [63] => Category Object ( [languages:protected] => [bok_resources:protected] => [bok_topics:protected] => [bok_keywords:protected] => [id:protected] => 63 [type:protected] => category [parent:protected] => 2 [label:protected] => Reinforcing Ironworker [alreadyInSave:protected] => [alreadyInValidation:protected] => [validationFailures:protected] => Array ( ) [_new:BaseObject:private] => [_deleted:BaseObject:private] => [modifiedColumns:protected] => Array ( ) ) [78] => Category Object ( [languages:protected] => [bok_resources:protected] => [bok_topics:protected] => [bok_keywords:protected] => [id:protected] => 78 [type:protected] => category [parent:protected] => 2 [label:protected] => Roofer/Waterproofer [alreadyInSave:protected] => [alreadyInValidation:protected] => [validationFailures:protected] => Array ( ) [_new:BaseObject:private] => [_deleted:BaseObject:private] => [modifiedColumns:protected] => Array ( ) ) [79] => Category Object ( [languages:protected] => [bok_resources:protected] => [bok_topics:protected] => [bok_keywords:protected] => [id:protected] => 79 [type:protected] => category [parent:protected] => 2 [label:protected] => Scaffold Erector [alreadyInSave:protected] => [alreadyInValidation:protected] => [validationFailures:protected] => Array ( ) [_new:BaseObject:private] => [_deleted:BaseObject:private] => [modifiedColumns:protected] => Array ( ) ) [82] => Category Object ( [languages:protected] => [bok_resources:protected] => [bok_topics:protected] => [bok_keywords:protected] => [id:protected] => 82 [type:protected] => category [parent:protected] => 2 [label:protected] => Stonemason [alreadyInSave:protected] => [alreadyInValidation:protected] => [validationFailures:protected] => Array ( ) [_new:BaseObject:private] => [_deleted:BaseObject:private] => [modifiedColumns:protected] => Array ( ) ) [62] => Category Object ( [languages:protected] => [bok_resources:protected] => [bok_topics:protected] => [bok_keywords:protected] => [id:protected] => 62 [type:protected] => category [parent:protected] => 2 [label:protected] => Structural Ironworker [alreadyInSave:protected] => [alreadyInValidation:protected] => [validationFailures:protected] => Array ( ) [_new:BaseObject:private] => [_deleted:BaseObject:private] => [modifiedColumns:protected] => Array ( ) ) [87] => Category Object ( [languages:protected] => [bok_resources:protected] => [bok_topics:protected] => [bok_keywords:protected] => [id:protected] => 87 [type:protected] => category [parent:protected] => 3 [label:protected] => Commercial & Institutional [alreadyInSave:protected] => [alreadyInValidation:protected] => [validationFailures:protected] => Array ( ) [_new:BaseObject:private] => [_deleted:BaseObject:private] => [modifiedColumns:protected] => Array ( ) ) [88] => Category Object ( [languages:protected] => [bok_resources:protected] => [bok_topics:protected] => [bok_keywords:protected] => [id:protected] => 88 [type:protected] => category [parent:protected] => 3 [label:protected] => Demolition [alreadyInSave:protected] => [alreadyInValidation:protected] => [validationFailures:protected] => Array ( ) [_new:BaseObject:private] => [_deleted:BaseObject:private] => [modifiedColumns:protected] => Array ( ) ) [91] => Category Object ( [languages:protected] => [bok_resources:protected] => [bok_topics:protected] => [bok_keywords:protected] => [id:protected] => 91 [type:protected] => category [parent:protected] => 3 [label:protected] => Heavy & Highway [alreadyInSave:protected] => [alreadyInValidation:protected] => [validationFailures:protected] => Array ( ) [_new:BaseObject:private] => [_deleted:BaseObject:private] => [modifiedColumns:protected] => Array ( ) ) [90] => Category Object ( [languages:protected] => [bok_resources:protected] => [bok_topics:protected] => [bok_keywords:protected] => [id:protected] => 90 [type:protected] => category [parent:protected] => 3 [label:protected] => Industrial [alreadyInSave:protected] => [alreadyInValidation:protected] => [validationFailures:protected] => Array ( ) [_new:BaseObject:private] => [_deleted:BaseObject:private] => [modifiedColumns:protected] => Array ( ) ) [93] => Category Object ( [languages:protected] => [bok_resources:protected] => [bok_topics:protected] => [bok_keywords:protected] => [id:protected] => 93 [type:protected] => category [parent:protected] => 3 [label:protected] => Renovations [alreadyInSave:protected] => [alreadyInValidation:protected] => [validationFailures:protected] => Array ( ) [_new:BaseObject:private] => [_deleted:BaseObject:private] => [modifiedColumns:protected] => Array ( ) ) [94] => Category Object ( [languages:protected] => [bok_resources:protected] => [bok_topics:protected] => [bok_keywords:protected] => [id:protected] => 94 [type:protected] => category [parent:protected] => 3 [label:protected] => Residential [alreadyInSave:protected] => [alreadyInValidation:protected] => [validationFailures:protected] => Array ( ) [_new:BaseObject:private] => [_deleted:BaseObject:private] => [modifiedColumns:protected] => Array ( ) ) [95] => Category Object ( [languages:protected] => [bok_resources:protected] => [bok_topics:protected] => [bok_keywords:protected] => [id:protected] => 95 [type:protected] => category [parent:protected] => 3 [label:protected] => Underground [alreadyInSave:protected] => [alreadyInValidation:protected] => [validationFailures:protected] => Array ( ) [_new:BaseObject:private] => [_deleted:BaseObject:private] => [modifiedColumns:protected] => Array ( ) ) [97] => Category Object ( [languages:protected] => [bok_resources:protected] => [bok_topics:protected] => [bok_keywords:protected] => [id:protected] => 97 [type:protected] => category [parent:protected] => 5 [label:protected] => Images [alreadyInSave:protected] => [alreadyInValidation:protected] => [validationFailures:protected] => Array ( ) [_new:BaseObject:private] => [_deleted:BaseObject:private] => [modifiedColumns:protected] => Array ( ) ) ) [categories_initialized:protected] => 1 [mapped_items:protected] => [content:protected] => [files:protected] => [language:protected] => Language Object ( [id:protected] => 1 [code:protected] => en [name:protected] => English [alreadyInSave:protected] => [alreadyInValidation:protected] => [validationFailures:protected] => Array ( ) [_new:BaseObject:private] => [_deleted:BaseObject:private] => [modifiedColumns:protected] => Array ( ) ) [old_record:protected] => [id:protected] => 4006 [old_id:protected] => [elcosh_id:protected] => i002693 [type:protected] => image [display_type:protected] => Image [user_id:protected] => 0 [language_id:protected] => 1 [tagging_id:protected] => Bruce Lippy [priority_id:protected] => 1 [title:protected] => Toolbox talk - long shot [total_pages:protected] => 0 [billed_pages:protected] => 0 [publication_number:protected] => [part_of:protected] => [keywords:protected] => toolbox talk, tailgate talk, safety minute [comments:protected] => [summary:protected] => This crew gathered every morning before starting work to discuss a new safety topic. [transition_comments:protected] => [external_link:protected] => [consol_link:protected] => http://www.cpwrconstructionsolutions.org/electrical/solution/662/worker-training.html [more_like_this:protected] => i002691,i002692,d001269,d000527 [permission_given_by:protected] => [published:protected] => T [billable:protected] => F [img_name:protected] => [img_ext:protected] => jpg [img_width:protected] => [img_height:protected] => [img_credit:protected] => Morgan Zavertnik and Hoar Construction [img_practice:protected] => good [vid_source_id:protected] => [vid_running_time:protected] => [vid_intended_audience:protected] => [vid_acquisition_info:protected] => [vid_cost:protected] => [vid_producer:protected] => [vid_filename:protected] => [vid_filename_downloadable:protected] => [date_summary:protected] => November 2015 [date_permission_requested:protected] => [date_permission_received:protected] => [date_review_needed:protected] => [date_received:protected] => 03/02/16 [date_completed:protected] => 03/02/16 [date_billed:protected] => [date_modified:protected] => 03/02/16 [collBokExports:protected] => [lastBokExportCriteria:BaseElcoshItem:private] => [alreadyInSave:protected] => [alreadyInValidation:protected] => [validationFailures:protected] => Array ( ) [_new:BaseObject:private] => [_deleted:BaseObject:private] => [modifiedColumns:protected] => Array ( ) ) ) [2] => Search_Result Object ( [title] => Construction bracing [image] => /record/images/3995-p.jpg [blurb] => This shows structural support that prevents collapses during construction.... [category] => Array ( [0] => 12 [1] => 15 [2] => 21 [3] => 49 [4] => 51 [5] => 55 [6] => 56 [7] => 60 [8] => 64 [9] => 68 [10] => 74 [11] => 63 [12] => 78 [13] => 79 [14] => 80 [15] => 62 [16] => 87 [17] => 90 [18] => 97 ) [labels] => Array ( [0] => Crushed/Struck By [1] => Work Environment [2] => Hazards [3] => Falls [6] => Scaffolds [9] => Carpenter [10] => Trades [11] => Cement Mason [13] => Electrical Worker [15] => Elevator Constructor [17] => HVAC [19] => Laborer [21] => Maintenance Worker [23] => Pile Driver [25] => Reinforcing Ironworker [27] => Roofer/Waterproofer [29] => Scaffold Erector [31] => Sheetmetal Worker [33] => Structural Ironworker [35] => Commercial & Institutional [36] => Jobsites [37] => Industrial [39] => Images [40] => Media [41] => Media & Documents ) [type] => Images [sub_category] => [url] => /image/3995/i002690/Construction%2Bbracing.html [item:protected] => ImageRecord Object ( [records:protected] => Array ( ) [recordId:protected] => [searchWordClass:protected] => [searchWordPeerClass:protected] => [bok_record:protected] => [authors:protected] => [organizations:protected] => [collections:protected] => [categories:protected] => Array ( [12] => Category Object ( [languages:protected] => [bok_resources:protected] => [bok_topics:protected] => [bok_keywords:protected] => [id:protected] => 12 [type:protected] => category [parent:protected] => 7 [label:protected] => Crushed/Struck By [alreadyInSave:protected] => [alreadyInValidation:protected] => [validationFailures:protected] => Array ( ) [_new:BaseObject:private] => [_deleted:BaseObject:private] => [modifiedColumns:protected] => Array ( ) ) [15] => Category Object ( [languages:protected] => [bok_resources:protected] => [bok_topics:protected] => [bok_keywords:protected] => [id:protected] => 15 [type:protected] => category [parent:protected] => 7 [label:protected] => Falls [alreadyInSave:protected] => [alreadyInValidation:protected] => [validationFailures:protected] => Array ( ) [_new:BaseObject:private] => [_deleted:BaseObject:private] => [modifiedColumns:protected] => Array ( ) ) [21] => Category Object ( [languages:protected] => [bok_resources:protected] => [bok_topics:protected] => [bok_keywords:protected] => [id:protected] => 21 [type:protected] => category [parent:protected] => 7 [label:protected] => Scaffolds [alreadyInSave:protected] => [alreadyInValidation:protected] => [validationFailures:protected] => Array ( ) [_new:BaseObject:private] => [_deleted:BaseObject:private] => [modifiedColumns:protected] => Array ( ) ) [49] => Category Object ( [languages:protected] => [bok_resources:protected] => [bok_topics:protected] => [bok_keywords:protected] => [id:protected] => 49 [type:protected] => category [parent:protected] => 2 [label:protected] => Carpenter [alreadyInSave:protected] => [alreadyInValidation:protected] => [validationFailures:protected] => Array ( ) [_new:BaseObject:private] => [_deleted:BaseObject:private] => [modifiedColumns:protected] => Array ( ) ) [51] => Category Object ( [languages:protected] => [bok_resources:protected] => [bok_topics:protected] => [bok_keywords:protected] => [id:protected] => 51 [type:protected] => category [parent:protected] => 2 [label:protected] => Cement Mason [alreadyInSave:protected] => [alreadyInValidation:protected] => [validationFailures:protected] => Array ( ) [_new:BaseObject:private] => [_deleted:BaseObject:private] => [modifiedColumns:protected] => Array ( ) ) [55] => Category Object ( [languages:protected] => [bok_resources:protected] => [bok_topics:protected] => [bok_keywords:protected] => [id:protected] => 55 [type:protected] => category [parent:protected] => 2 [label:protected] => Electrical Worker [alreadyInSave:protected] => [alreadyInValidation:protected] => [validationFailures:protected] => Array ( ) [_new:BaseObject:private] => [_deleted:BaseObject:private] => [modifiedColumns:protected] => Array ( ) ) [56] => Category Object ( [languages:protected] => [bok_resources:protected] => [bok_topics:protected] => [bok_keywords:protected] => [id:protected] => 56 [type:protected] => category [parent:protected] => 2 [label:protected] => Elevator Constructor [alreadyInSave:protected] => [alreadyInValidation:protected] => [validationFailures:protected] => Array ( ) [_new:BaseObject:private] => [_deleted:BaseObject:private] => [modifiedColumns:protected] => Array ( ) ) [60] => Category Object ( [languages:protected] => [bok_resources:protected] => [bok_topics:protected] => [bok_keywords:protected] => [id:protected] => 60 [type:protected] => category [parent:protected] => 2 [label:protected] => HVAC [alreadyInSave:protected] => [alreadyInValidation:protected] => [validationFailures:protected] => Array ( ) [_new:BaseObject:private] => [_deleted:BaseObject:private] => [modifiedColumns:protected] => Array ( ) ) [64] => Category Object ( [languages:protected] => [bok_resources:protected] => [bok_topics:protected] => [bok_keywords:protected] => [id:protected] => 64 [type:protected] => category [parent:protected] => 2 [label:protected] => Laborer [alreadyInSave:protected] => [alreadyInValidation:protected] => [validationFailures:protected] => Array ( ) [_new:BaseObject:private] => [_deleted:BaseObject:private] => [modifiedColumns:protected] => Array ( ) ) [68] => Category Object ( [languages:protected] => [bok_resources:protected] => [bok_topics:protected] => [bok_keywords:protected] => [id:protected] => 68 [type:protected] => category [parent:protected] => 2 [label:protected] => Maintenance Worker [alreadyInSave:protected] => [alreadyInValidation:protected] => [validationFailures:protected] => Array ( ) [_new:BaseObject:private] => [_deleted:BaseObject:private] => [modifiedColumns:protected] => Array ( ) ) [74] => Category Object ( [languages:protected] => [bok_resources:protected] => [bok_topics:protected] => [bok_keywords:protected] => [id:protected] => 74 [type:protected] => category [parent:protected] => 2 [label:protected] => Pile Driver [alreadyInSave:protected] => [alreadyInValidation:protected] => [validationFailures:protected] => Array ( ) [_new:BaseObject:private] => [_deleted:BaseObject:private] => [modifiedColumns:protected] => Array ( ) ) [63] => Category Object ( [languages:protected] => [bok_resources:protected] => [bok_topics:protected] => [bok_keywords:protected] => [id:protected] => 63 [type:protected] => category [parent:protected] => 2 [label:protected] => Reinforcing Ironworker [alreadyInSave:protected] => [alreadyInValidation:protected] => [validationFailures:protected] => Array ( ) [_new:BaseObject:private] => [_deleted:BaseObject:private] => [modifiedColumns:protected] => Array ( ) ) [78] => Category Object ( [languages:protected] => [bok_resources:protected] => [bok_topics:protected] => [bok_keywords:protected] => [id:protected] => 78 [type:protected] => category [parent:protected] => 2 [label:protected] => Roofer/Waterproofer [alreadyInSave:protected] => [alreadyInValidation:protected] => [validationFailures:protected] => Array ( ) [_new:BaseObject:private] => [_deleted:BaseObject:private] => [modifiedColumns:protected] => Array ( ) ) [79] => Category Object ( [languages:protected] => [bok_resources:protected] => [bok_topics:protected] => [bok_keywords:protected] => [id:protected] => 79 [type:protected] => category [parent:protected] => 2 [label:protected] => Scaffold Erector [alreadyInSave:protected] => [alreadyInValidation:protected] => [validationFailures:protected] => Array ( ) [_new:BaseObject:private] => [_deleted:BaseObject:private] => [modifiedColumns:protected] => Array ( ) ) [80] => Category Object ( [languages:protected] => [bok_resources:protected] => [bok_topics:protected] => [bok_keywords:protected] => [id:protected] => 80 [type:protected] => category [parent:protected] => 2 [label:protected] => Sheetmetal Worker [alreadyInSave:protected] => [alreadyInValidation:protected] => [validationFailures:protected] => Array ( ) [_new:BaseObject:private] => [_deleted:BaseObject:private] => [modifiedColumns:protected] => Array ( ) ) [62] => Category Object ( [languages:protected] => [bok_resources:protected] => [bok_topics:protected] => [bok_keywords:protected] => [id:protected] => 62 [type:protected] => category [parent:protected] => 2 [label:protected] => Structural Ironworker [alreadyInSave:protected] => [alreadyInValidation:protected] => [validationFailures:protected] => Array ( ) [_new:BaseObject:private] => [_deleted:BaseObject:private] => [modifiedColumns:protected] => Array ( ) ) [87] => Category Object ( [languages:protected] => [bok_resources:protected] => [bok_topics:protected] => [bok_keywords:protected] => [id:protected] => 87 [type:protected] => category [parent:protected] => 3 [label:protected] => Commercial & Institutional [alreadyInSave:protected] => [alreadyInValidation:protected] => [validationFailures:protected] => Array ( ) [_new:BaseObject:private] => [_deleted:BaseObject:private] => [modifiedColumns:protected] => Array ( ) ) [90] => Category Object ( [languages:protected] => [bok_resources:protected] => [bok_topics:protected] => [bok_keywords:protected] => [id:protected] => 90 [type:protected] => category [parent:protected] => 3 [label:protected] => Industrial [alreadyInSave:protected] => [alreadyInValidation:protected] => [validationFailures:protected] => Array ( ) [_new:BaseObject:private] => [_deleted:BaseObject:private] => [modifiedColumns:protected] => Array ( ) ) [97] => Category Object ( [languages:protected] => [bok_resources:protected] => [bok_topics:protected] => [bok_keywords:protected] => [id:protected] => 97 [type:protected] => category [parent:protected] => 5 [label:protected] => Images [alreadyInSave:protected] => [alreadyInValidation:protected] => [validationFailures:protected] => Array ( ) [_new:BaseObject:private] => [_deleted:BaseObject:private] => [modifiedColumns:protected] => Array ( ) ) ) [categories_initialized:protected] => 1 [mapped_items:protected] => [content:protected] => [files:protected] => [language:protected] => Language Object ( [id:protected] => 1 [code:protected] => en [name:protected] => English [alreadyInSave:protected] => [alreadyInValidation:protected] => [validationFailures:protected] => Array ( ) [_new:BaseObject:private] => [_deleted:BaseObject:private] => [modifiedColumns:protected] => Array ( ) ) [old_record:protected] => [id:protected] => 3995 [old_id:protected] => [elcosh_id:protected] => i002690 [type:protected] => image [display_type:protected] => Image [user_id:protected] => 0 [language_id:protected] => 1 [tagging_id:protected] => Bruce Lippy [priority_id:protected] => 1 [title:protected] => Construction bracing [total_pages:protected] => 0 [billed_pages:protected] => 0 [publication_number:protected] => [part_of:protected] => [keywords:protected] => Bracing, support, scaffold [comments:protected] => [summary:protected] => This shows structural support that prevents collapses during construction. [transition_comments:protected] => [external_link:protected] => [consol_link:protected] => http://www.cpwrconstructionsolutions.org/masonry/solution/8/adjustable-tower-scaffold.html [more_like_this:protected] => i002660 [permission_given_by:protected] => [published:protected] => T [billable:protected] => F [img_name:protected] => [img_ext:protected] => jpg [img_width:protected] => [img_height:protected] => [img_credit:protected] => Photo by Pam Susi [img_practice:protected] => good [vid_source_id:protected] => [vid_running_time:protected] => [vid_intended_audience:protected] => [vid_acquisition_info:protected] => [vid_cost:protected] => [vid_producer:protected] => [vid_filename:protected] => [vid_filename_downloadable:protected] => [date_summary:protected] => January 2016 [date_permission_requested:protected] => [date_permission_received:protected] => [date_review_needed:protected] => [date_received:protected] => 02/01/16 [date_completed:protected] => 02/01/16 [date_billed:protected] => [date_modified:protected] => 02/01/16 [collBokExports:protected] => [lastBokExportCriteria:BaseElcoshItem:private] => [alreadyInSave:protected] => [alreadyInValidation:protected] => [validationFailures:protected] => Array ( ) [_new:BaseObject:private] => [_deleted:BaseObject:private] => [modifiedColumns:protected] => Array ( ) ) ) [3] => Search_Result Object ( [title] => Suspended Scaffold Outriggers [image] => /record/images/3975-p.jpg [blurb] => Suspended scaffolds systems must be designed by a qualified person and inspected daily by a competent person. The supports for the counterweight must... [category] => Array ( [0] => 97 [1] => 15 [2] => 47 [3] => 49 [4] => 79 [5] => 87 ) [labels] => Array ( [0] => Images [1] => Media [2] => Media & Documents [3] => Falls [4] => Work Environment [5] => Hazards [6] => Bricklayer [7] => Trades [8] => Carpenter [10] => Scaffold Erector [12] => Commercial & Institutional [13] => Jobsites ) [type] => Images [sub_category] => [url] => /image/3975/i002683/Suspended%2BScaffold%2BOutriggers.html [item:protected] => ImageRecord Object ( [records:protected] => Array ( ) [recordId:protected] => [searchWordClass:protected] => [searchWordPeerClass:protected] => [bok_record:protected] => [authors:protected] => [organizations:protected] => [collections:protected] => [categories:protected] => Array ( [97] => Category Object ( [languages:protected] => [bok_resources:protected] => [bok_topics:protected] => [bok_keywords:protected] => [id:protected] => 97 [type:protected] => category [parent:protected] => 5 [label:protected] => Images [alreadyInSave:protected] => [alreadyInValidation:protected] => [validationFailures:protected] => Array ( ) [_new:BaseObject:private] => [_deleted:BaseObject:private] => [modifiedColumns:protected] => Array ( ) ) [15] => Category Object ( [languages:protected] => [bok_resources:protected] => [bok_topics:protected] => [bok_keywords:protected] => [id:protected] => 15 [type:protected] => category [parent:protected] => 7 [label:protected] => Falls [alreadyInSave:protected] => [alreadyInValidation:protected] => [validationFailures:protected] => Array ( ) [_new:BaseObject:private] => [_deleted:BaseObject:private] => [modifiedColumns:protected] => Array ( ) ) [47] => Category Object ( [languages:protected] => [bok_resources:protected] => [bok_topics:protected] => [bok_keywords:protected] => [id:protected] => 47 [type:protected] => category [parent:protected] => 2 [label:protected] => Bricklayer [alreadyInSave:protected] => [alreadyInValidation:protected] => [validationFailures:protected] => Array ( ) [_new:BaseObject:private] => [_deleted:BaseObject:private] => [modifiedColumns:protected] => Array ( ) ) [49] => Category Object ( [languages:protected] => [bok_resources:protected] => [bok_topics:protected] => [bok_keywords:protected] => [id:protected] => 49 [type:protected] => category [parent:protected] => 2 [label:protected] => Carpenter [alreadyInSave:protected] => [alreadyInValidation:protected] => [validationFailures:protected] => Array ( ) [_new:BaseObject:private] => [_deleted:BaseObject:private] => [modifiedColumns:protected] => Array ( ) ) [79] => Category Object ( [languages:protected] => [bok_resources:protected] => [bok_topics:protected] => [bok_keywords:protected] => [id:protected] => 79 [type:protected] => category [parent:protected] => 2 [label:protected] => Scaffold Erector [alreadyInSave:protected] => [alreadyInValidation:protected] => [validationFailures:protected] => Array ( ) [_new:BaseObject:private] => [_deleted:BaseObject:private] => [modifiedColumns:protected] => Array ( ) ) [87] => Category Object ( [languages:protected] => [bok_resources:protected] => [bok_topics:protected] => [bok_keywords:protected] => [id:protected] => 87 [type:protected] => category [parent:protected] => 3 [label:protected] => Commercial & Institutional [alreadyInSave:protected] => [alreadyInValidation:protected] => [validationFailures:protected] => Array ( ) [_new:BaseObject:private] => [_deleted:BaseObject:private] => [modifiedColumns:protected] => Array ( ) ) ) [categories_initialized:protected] => 1 [mapped_items:protected] => [content:protected] => [files:protected] => [language:protected] => Language Object ( [id:protected] => 1 [code:protected] => en [name:protected] => English [alreadyInSave:protected] => [alreadyInValidation:protected] => [validationFailures:protected] => Array ( ) [_new:BaseObject:private] => [_deleted:BaseObject:private] => [modifiedColumns:protected] => Array ( ) ) [old_record:protected] => [id:protected] => 3975 [old_id:protected] => [elcosh_id:protected] => i002683 [type:protected] => image [display_type:protected] => Image [user_id:protected] => 0 [language_id:protected] => 1 [tagging_id:protected] => John Newquist [priority_id:protected] => 1 [title:protected] => Suspended Scaffold Outriggers [total_pages:protected] => 0 [billed_pages:protected] => 0 [publication_number:protected] => [part_of:protected] => [keywords:protected] => suspended, scaffold, swing, stage, fall, protection, counterweight, qualified, person [comments:protected] => [summary:protected] => Suspended scaffolds systems must be designed by a qualified person and inspected daily by a competent person. The supports for the counterweight must be designed with a safety factor of four. [transition_comments:protected] => [external_link:protected] => [consol_link:protected] => http://www.cpwrconstructionsolutions.org/task/Erect%2Band%2Bdismantle%2Bscaffolds/ [more_like_this:protected] => d000244,d000359,i000253,i000407 [permission_given_by:protected] => [published:protected] => T [billable:protected] => F [img_name:protected] => [img_ext:protected] => jpg [img_width:protected] => [img_height:protected] => [img_credit:protected] => MetroPark, Miller and Long [img_practice:protected] => not_applicable [vid_source_id:protected] => [vid_running_time:protected] => [vid_intended_audience:protected] => [vid_acquisition_info:protected] => [vid_cost:protected] => [vid_producer:protected] => [vid_filename:protected] => [vid_filename_downloadable:protected] => [date_summary:protected] => August 28 2015 [date_permission_requested:protected] => [date_permission_received:protected] => [date_review_needed:protected] => [date_received:protected] => 08/28/15 [date_completed:protected] => 08/28/15 [date_billed:protected] => [date_modified:protected] => 08/28/15 [collBokExports:protected] => [lastBokExportCriteria:BaseElcoshItem:private] => [alreadyInSave:protected] => [alreadyInValidation:protected] => [validationFailures:protected] => Array ( ) [_new:BaseObject:private] => [_deleted:BaseObject:private] => [modifiedColumns:protected] => Array ( ) ) ) [4] => Search_Result Object ( [title] => Suspended scaffold [image] => /record/images/3976-p.jpg [blurb] => Suspended scaffold outrigger beams must have stops to prevent the hangers from sliding of the end of the outriggers. Wire rope supported must be desig... [category] => Array ( [0] => 97 [1] => 15 [2] => 47 [3] => 50 [4] => 79 [5] => 87 ) [labels] => Array ( [0] => Images [1] => Media [2] => Media & Documents [3] => Falls [4] => Work Environment [5] => Hazards [6] => Bricklayer [7] => Trades [8] => Carpet Layer [10] => Scaffold Erector [12] => Commercial & Institutional [13] => Jobsites ) [type] => Images [sub_category] => [url] => /image/3976/i002684/Suspended%2Bscaffold.html [item:protected] => ImageRecord Object ( [records:protected] => Array ( ) [recordId:protected] => [searchWordClass:protected] => [searchWordPeerClass:protected] => [bok_record:protected] => [authors:protected] => [organizations:protected] => [collections:protected] => [categories:protected] => Array ( [97] => Category Object ( [languages:protected] => [bok_resources:protected] => [bok_topics:protected] => [bok_keywords:protected] => [id:protected] => 97 [type:protected] => category [parent:protected] => 5 [label:protected] => Images [alreadyInSave:protected] => [alreadyInValidation:protected] => [validationFailures:protected] => Array ( ) [_new:BaseObject:private] => [_deleted:BaseObject:private] => [modifiedColumns:protected] => Array ( ) ) [15] => Category Object ( [languages:protected] => [bok_resources:protected] => [bok_topics:protected] => [bok_keywords:protected] => [id:protected] => 15 [type:protected] => category [parent:protected] => 7 [label:protected] => Falls [alreadyInSave:protected] => [alreadyInValidation:protected] => [validationFailures:protected] => Array ( ) [_new:BaseObject:private] => [_deleted:BaseObject:private] => [modifiedColumns:protected] => Array ( ) ) [47] => Category Object ( [languages:protected] => [bok_resources:protected] => [bok_topics:protected] => [bok_keywords:protected] => [id:protected] => 47 [type:protected] => category [parent:protected] => 2 [label:protected] => Bricklayer [alreadyInSave:protected] => [alreadyInValidation:protected] => [validationFailures:protected] => Array ( ) [_new:BaseObject:private] => [_deleted:BaseObject:private] => [modifiedColumns:protected] => Array ( ) ) [50] => Category Object ( [languages:protected] => [bok_resources:protected] => [bok_topics:protected] => [bok_keywords:protected] => [id:protected] => 50 [type:protected] => category [parent:protected] => 2 [label:protected] => Carpet Layer [alreadyInSave:protected] => [alreadyInValidation:protected] => [validationFailures:protected] => Array ( ) [_new:BaseObject:private] => [_deleted:BaseObject:private] => [modifiedColumns:protected] => Array ( ) ) [79] => Category Object ( [languages:protected] => [bok_resources:protected] => [bok_topics:protected] => [bok_keywords:protected] => [id:protected] => 79 [type:protected] => category [parent:protected] => 2 [label:protected] => Scaffold Erector [alreadyInSave:protected] => [alreadyInValidation:protected] => [validationFailures:protected] => Array ( ) [_new:BaseObject:private] => [_deleted:BaseObject:private] => [modifiedColumns:protected] => Array ( ) ) [87] => Category Object ( [languages:protected] => [bok_resources:protected] => [bok_topics:protected] => [bok_keywords:protected] => [id:protected] => 87 [type:protected] => category [parent:protected] => 3 [label:protected] => Commercial & Institutional [alreadyInSave:protected] => [alreadyInValidation:protected] => [validationFailures:protected] => Array ( ) [_new:BaseObject:private] => [_deleted:BaseObject:private] => [modifiedColumns:protected] => Array ( ) ) ) [categories_initialized:protected] => 1 [mapped_items:protected] => [content:protected] => [files:protected] => [language:protected] => Language Object ( [id:protected] => 1 [code:protected] => en [name:protected] => English [alreadyInSave:protected] => [alreadyInValidation:protected] => [validationFailures:protected] => Array ( ) [_new:BaseObject:private] => [_deleted:BaseObject:private] => [modifiedColumns:protected] => Array ( ) ) [old_record:protected] => [id:protected] => 3976 [old_id:protected] => [elcosh_id:protected] => i002684 [type:protected] => image [display_type:protected] => Image [user_id:protected] => 0 [language_id:protected] => 1 [tagging_id:protected] => John Newquist [priority_id:protected] => 1 [title:protected] => Suspended scaffold [total_pages:protected] => 0 [billed_pages:protected] => 0 [publication_number:protected] => [part_of:protected] => [keywords:protected] => Suspended, scaffold, outrigger, beams, erection, wire, rope, inspection, swing, stage, [comments:protected] => [summary:protected] => Suspended scaffold outrigger beams must have stops to prevent the hangers from sliding of the end of the outriggers. Wire rope supported must be designed with a safety factor of 6. The scaffold must be inspected by a competent person daily. [transition_comments:protected] => [external_link:protected] => [consol_link:protected] => http://www.cpwrconstructionsolutions.org/task/Erect%2Band%2Bdismantle%2Bscaffolds/ [more_like_this:protected] => i002683, d000244, i000407, d000606 [permission_given_by:protected] => [published:protected] => T [billable:protected] => F [img_name:protected] => [img_ext:protected] => jpg [img_width:protected] => [img_height:protected] => [img_credit:protected] => Metropark, Miller and Long [img_practice:protected] => not_applicable [vid_source_id:protected] => [vid_running_time:protected] => [vid_intended_audience:protected] => [vid_acquisition_info:protected] => [vid_cost:protected] => [vid_producer:protected] => [vid_filename:protected] => [vid_filename_downloadable:protected] => [date_summary:protected] => [date_permission_requested:protected] => [date_permission_received:protected] => [date_review_needed:protected] => [date_received:protected] => 08/28/15 [date_completed:protected] => 08/28/15 [date_billed:protected] => [date_modified:protected] => 08/28/15 [collBokExports:protected] => [lastBokExportCriteria:BaseElcoshItem:private] => [alreadyInSave:protected] => [alreadyInValidation:protected] => [validationFailures:protected] => Array ( ) [_new:BaseObject:private] => [_deleted:BaseObject:private] => [modifiedColumns:protected] => Array ( ) ) ) [5] => Search_Result Object ( [title] => Three Tower Cranes [image] => /record/images/3979-p.jpg [blurb] => Whenever multiple tower cranes are used, there needs to be preplanning to ensure that the tower cranes cannot hit each other loads. This is accomplish... [category] => Array ( [0] => 97 [1] => 11 [2] => 64 [3] => 70 [4] => 62 [5] => 87 ) [labels] => Array ( [0] => Images [1] => Media [2] => Media & Documents [3] => Cranes & Hoists [4] => Work Environment [5] => Hazards [6] => Laborer [7] => Trades [8] => Operating Engineer [10] => Structural Ironworker [12] => Commercial & Institutional [13] => Jobsites ) [type] => Images [sub_category] => [url] => /image/3979/i002687/Three%2BTower%2BCranes.html [item:protected] => ImageRecord Object ( [records:protected] => Array ( ) [recordId:protected] => [searchWordClass:protected] => [searchWordPeerClass:protected] => [bok_record:protected] => [authors:protected] => [organizations:protected] => [collections:protected] => [categories:protected] => Array ( [97] => Category Object ( [languages:protected] => [bok_resources:protected] => [bok_topics:protected] => [bok_keywords:protected] => [id:protected] => 97 [type:protected] => category [parent:protected] => 5 [label:protected] => Images [alreadyInSave:protected] => [alreadyInValidation:protected] => [validationFailures:protected] => Array ( ) [_new:BaseObject:private] => [_deleted:BaseObject:private] => [modifiedColumns:protected] => Array ( ) ) [11] => Category Object ( [languages:protected] => [bok_resources:protected] => [bok_topics:protected] => [bok_keywords:protected] => [id:protected] => 11 [type:protected] => category [parent:protected] => 7 [label:protected] => Cranes & Hoists [alreadyInSave:protected] => [alreadyInValidation:protected] => [validationFailures:protected] => Array ( ) [_new:BaseObject:private] => [_deleted:BaseObject:private] => [modifiedColumns:protected] => Array ( ) ) [64] => Category Object ( [languages:protected] => [bok_resources:protected] => [bok_topics:protected] => [bok_keywords:protected] => [id:protected] => 64 [type:protected] => category [parent:protected] => 2 [label:protected] => Laborer [alreadyInSave:protected] => [alreadyInValidation:protected] => [validationFailures:protected] => Array ( ) [_new:BaseObject:private] => [_deleted:BaseObject:private] => [modifiedColumns:protected] => Array ( ) ) [70] => Category Object ( [languages:protected] => [bok_resources:protected] => [bok_topics:protected] => [bok_keywords:protected] => [id:protected] => 70 [type:protected] => category [parent:protected] => 2 [label:protected] => Operating Engineer [alreadyInSave:protected] => [alreadyInValidation:protected] => [validationFailures:protected] => Array ( ) [_new:BaseObject:private] => [_deleted:BaseObject:private] => [modifiedColumns:protected] => Array ( ) ) [62] => Category Object ( [languages:protected] => [bok_resources:protected] => [bok_topics:protected] => [bok_keywords:protected] => [id:protected] => 62 [type:protected] => category [parent:protected] => 2 [label:protected] => Structural Ironworker [alreadyInSave:protected] => [alreadyInValidation:protected] => [validationFailures:protected] => Array ( ) [_new:BaseObject:private] => [_deleted:BaseObject:private] => [modifiedColumns:protected] => Array ( ) ) [87] => Category Object ( [languages:protected] => [bok_resources:protected] => [bok_topics:protected] => [bok_keywords:protected] => [id:protected] => 87 [type:protected] => category [parent:protected] => 3 [label:protected] => Commercial & Institutional [alreadyInSave:protected] => [alreadyInValidation:protected] => [validationFailures:protected] => Array ( ) [_new:BaseObject:private] => [_deleted:BaseObject:private] => [modifiedColumns:protected] => Array ( ) ) ) [categories_initialized:protected] => 1 [mapped_items:protected] => [content:protected] => [files:protected] => [language:protected] => Language Object ( [id:protected] => 1 [code:protected] => en [name:protected] => English [alreadyInSave:protected] => [alreadyInValidation:protected] => [validationFailures:protected] => Array ( ) [_new:BaseObject:private] => [_deleted:BaseObject:private] => [modifiedColumns:protected] => Array ( ) ) [old_record:protected] => [id:protected] => 3979 [old_id:protected] => [elcosh_id:protected] => i002687 [type:protected] => image [display_type:protected] => Image [user_id:protected] => 0 [language_id:protected] => 1 [tagging_id:protected] => John Newquist [priority_id:protected] => 1 [title:protected] => Three Tower Cranes [total_pages:protected] => 0 [billed_pages:protected] => 0 [publication_number:protected] => [part_of:protected] => [keywords:protected] => [comments:protected] => [summary:protected] => Whenever multiple tower cranes are used, there needs to be preplanning to ensure that the tower cranes cannot hit each other loads. This is accomplished by setting swing restrictions, marking the ground for allowable crane travel and training of the crane signal persons. [transition_comments:protected] => [external_link:protected] => [consol_link:protected] => http://www.cpwrconstructionsolutions.org/work/6/184/ [more_like_this:protected] => d001029, d000010, i001280, i001221 [permission_given_by:protected] => [published:protected] => T [billable:protected] => F [img_name:protected] => [img_ext:protected] => jpg [img_width:protected] => [img_height:protected] => [img_credit:protected] => Metropark [img_practice:protected] => not_applicable [vid_source_id:protected] => [vid_running_time:protected] => [vid_intended_audience:protected] => [vid_acquisition_info:protected] => [vid_cost:protected] => [vid_producer:protected] => [vid_filename:protected] => [vid_filename_downloadable:protected] => [date_summary:protected] => August 28 2015 [date_permission_requested:protected] => [date_permission_received:protected] => [date_review_needed:protected] => [date_received:protected] => 08/28/15 [date_completed:protected] => 08/28/15 [date_billed:protected] => [date_modified:protected] => 08/28/15 [collBokExports:protected] => [lastBokExportCriteria:BaseElcoshItem:private] => [alreadyInSave:protected] => [alreadyInValidation:protected] => [validationFailures:protected] => Array ( ) [_new:BaseObject:private] => [_deleted:BaseObject:private] => [modifiedColumns:protected] => Array ( ) ) ) ) [preview_mode] => [description] => This third in a series of 6 Tool Box Talks on construction ergonomics focuses on proper positioning to avoid injuries. The TBT recommends: 1)prop up a task off of the floor by using a raised surface, cart, baker scaffold, saw horses to prep materials near waist height, 2)move the lift or ladder in the best position for the work, 3)position the lift in front of the area you plan to work without trying to reach too far on either side of the lift. [keywords] => position, positioning, ergonomics, ergo, carpal tunnel, MSD, musculoskeletal disorder [related_items] => Array ( [Handouts] => Array ( [0] => DocumentRecord Object ( [records:protected] => Array ( ) [recordId:protected] => [searchWordClass:protected] => [searchWordPeerClass:protected] => [bok_record:protected] => [authors:protected] => [organizations:protected] => [collections:protected] => [categories:protected] => [categories_initialized:protected] => [mapped_items:protected] => [content:protected] => [files:protected] => [language:protected] => Language Object ( [id:protected] => 1 [code:protected] => en [name:protected] => English [alreadyInSave:protected] => [alreadyInValidation:protected] => [validationFailures:protected] => Array ( ) [_new:BaseObject:private] => [_deleted:BaseObject:private] => [modifiedColumns:protected] => Array ( ) ) [old_record:protected] => [id:protected] => 3833 [old_id:protected] => [elcosh_id:protected] => d001303 [type:protected] => document [display_type:protected] => HTML w/ PDF [user_id:protected] => 25 [language_id:protected] => 1 [tagging_id:protected] => Bruce Lippy [priority_id:protected] => 1 [title:protected] => Overview of Toolbox Talks on Ergonomics Developed by Washington University in St. Louis [total_pages:protected] => 3 [billed_pages:protected] => 3 [publication_number:protected] => [part_of:protected] => [keywords:protected] => ergonomics, musculoskeletal disorders, MSDs [comments:protected] => 7-28-2014 - Originally submitted as "HTML w/ doc and PDF", Jeff Nelson asked Bruce Lippy for permission to switch it to "HTML w/ PDF" -- permission was given [summary:protected] => This overviews provides a background on how Washington University in St. Louis developed this series of six toolbox talks on ergonomics. It also describes how they tested the effectiveness of these communication tools, concluding that the guide was valuable for improving the delivery of ergonomics training and interaction between the safety representative and workers. The researchers recommend preparing site-specific information prior to the talk and interacting with workers to discuss problems and ergonomic solutions during the safety meetings. [transition_comments:protected] => [external_link:protected] => [consol_link:protected] => [more_like_this:protected] => [permission_given_by:protected] => Lisa Jaegers, Washington U. in St. Louis [published:protected] => T [billable:protected] => F [img_name:protected] => [img_ext:protected] => png [img_width:protected] => [img_height:protected] => [img_credit:protected] => [img_practice:protected] => [vid_source_id:protected] => [vid_running_time:protected] => [vid_intended_audience:protected] => [vid_acquisition_info:protected] => [vid_cost:protected] => [vid_producer:protected] => [vid_filename:protected] => [vid_filename_downloadable:protected] => [date_summary:protected] => 2014 [date_permission_requested:protected] => [date_permission_received:protected] => [date_review_needed:protected] => [date_received:protected] => 06/11/14 [date_completed:protected] => 07/29/14 [date_billed:protected] => [date_modified:protected] => 07/29/14 [collBokExports:protected] => [lastBokExportCriteria:BaseElcoshItem:private] => [alreadyInSave:protected] => [alreadyInValidation:protected] => [validationFailures:protected] => Array ( ) [_new:BaseObject:private] => [_deleted:BaseObject:private] => [modifiedColumns:protected] => Array ( ) ) ) [Toolbox Talks] => Array ( [0] => DocumentRecord Object ( [records:protected] => Array ( ) [recordId:protected] => [searchWordClass:protected] => [searchWordPeerClass:protected] => [bok_record:protected] => [authors:protected] => [organizations:protected] => [collections:protected] => [categories:protected] => [categories_initialized:protected] => [mapped_items:protected] => [content:protected] => [files:protected] => [language:protected] => Language Object ( [id:protected] => 1 [code:protected] => en [name:protected] => English [alreadyInSave:protected] => [alreadyInValidation:protected] => [validationFailures:protected] => Array ( ) [_new:BaseObject:private] => [_deleted:BaseObject:private] => [modifiedColumns:protected] => Array ( ) ) [old_record:protected] => [id:protected] => 3835 [old_id:protected] => [elcosh_id:protected] => d001304 [type:protected] => document [display_type:protected] => HTML w/ PDF [user_id:protected] => 25 [language_id:protected] => 1 [tagging_id:protected] => Bruce Lippy [priority_id:protected] => 1 [title:protected] => Ergonomics Tool Box Talks (TBT) Training Guide [total_pages:protected] => 2 [billed_pages:protected] => 2 [publication_number:protected] => [part_of:protected] => [keywords:protected] => Ergonomics, carpal tunnel, muscular skeletal disorders, msd [comments:protected] => [summary:protected] => CPWR-funded ergonomics research by Washington University at St. Louis led to the development of 6 tool box talks. This guide is an explanation of how to deliver the talks for maximum effectiveness. This guide should be reviewed before delivering any of the talks because it makes important recommendations like: • If possible, give the TBTs as a part of the crew’s regular safety meetings so that ergonomics is included in the safety discussion. • Try to locate an area with few distractions for gathering the crew. • For a team approach, invite the work crew, site superintendent, project manager and other general contractor and/or subcontractor reps who you feel may be helpful in supporting the training and ergonomics solutions. [transition_comments:protected] => [external_link:protected] => [consol_link:protected] => [more_like_this:protected] => d001303,d001305,d001306,d001307,d001308,d001309,d001310 [permission_given_by:protected] => [published:protected] => T [billable:protected] => F [img_name:protected] => [img_ext:protected] => png [img_width:protected] => [img_height:protected] => [img_credit:protected] => [img_practice:protected] => [vid_source_id:protected] => [vid_running_time:protected] => [vid_intended_audience:protected] => [vid_acquisition_info:protected] => [vid_cost:protected] => [vid_producer:protected] => [vid_filename:protected] => [vid_filename_downloadable:protected] => [date_summary:protected] => 2014 [date_permission_requested:protected] => [date_permission_received:protected] => [date_review_needed:protected] => [date_received:protected] => 06/12/14 [date_completed:protected] => 07/29/14 [date_billed:protected] => [date_modified:protected] => 07/29/14 [collBokExports:protected] => [lastBokExportCriteria:BaseElcoshItem:private] => [alreadyInSave:protected] => [alreadyInValidation:protected] => [validationFailures:protected] => Array ( ) [_new:BaseObject:private] => [_deleted:BaseObject:private] => [modifiedColumns:protected] => Array ( ) ) [1] => DocumentRecord Object ( [records:protected] => Array ( ) [recordId:protected] => [searchWordClass:protected] => [searchWordPeerClass:protected] => [bok_record:protected] => [authors:protected] => [organizations:protected] => [collections:protected] => [categories:protected] => [categories_initialized:protected] => [mapped_items:protected] => [content:protected] => [files:protected] => [language:protected] => Language Object ( [id:protected] => 1 [code:protected] => en [name:protected] => English [alreadyInSave:protected] => [alreadyInValidation:protected] => [validationFailures:protected] => Array ( ) [_new:BaseObject:private] => [_deleted:BaseObject:private] => [modifiedColumns:protected] => Array ( ) ) [old_record:protected] => [id:protected] => 3836 [old_id:protected] => [elcosh_id:protected] => d001305 [type:protected] => document [display_type:protected] => HTML w/ PDF [user_id:protected] => 25 [language_id:protected] => 1 [tagging_id:protected] => Bruce Lippy [priority_id:protected] => 1 [title:protected] => TBT1 Ergonomics in Construction [total_pages:protected] => 5 [billed_pages:protected] => 5 [publication_number:protected] => [part_of:protected] => [keywords:protected] => ergonomics, ergo, msd, musculoskeletal disorders, risk factors, lifting, carpal tunnel, repetition, awkward postures [comments:protected] => 7-28-2014 Jeff Nelson asked Bruce Lippy about what to do with a sentence included toward the top of the doc, "Fill them in on page 2 'Other Questions.'" -- Bruce said this sentence could be deleted from the HTML. [summary:protected] => This is the first in a series of 6 Tool Box Talks produced by Washington University in St. Louis on ergonomics in construction work. This one should be delivered first because it covers what ergonomics is, why construction workers need to talk about it, what the risk factors are for developing a health problem and how to prevent these problems. [transition_comments:protected] => [external_link:protected] => [consol_link:protected] => http://www.cpwrconstructionsolutions.org/pipes_vessels/solution/50/participatory-ergonomics-program.html [more_like_this:protected] => d001303,d001304,d001306,d001307,d001308,d001309 [permission_given_by:protected] => Lisa Jaegers, Washington U. in St. Louis [published:protected] => T [billable:protected] => F [img_name:protected] => [img_ext:protected] => png [img_width:protected] => [img_height:protected] => [img_credit:protected] => [img_practice:protected] => [vid_source_id:protected] => [vid_running_time:protected] => [vid_intended_audience:protected] => [vid_acquisition_info:protected] => [vid_cost:protected] => [vid_producer:protected] => [vid_filename:protected] => [vid_filename_downloadable:protected] => [date_summary:protected] => 2014 [date_permission_requested:protected] => [date_permission_received:protected] => [date_review_needed:protected] => [date_received:protected] => 06/12/14 [date_completed:protected] => 07/28/14 [date_billed:protected] => [date_modified:protected] => 10/09/15 [collBokExports:protected] => [lastBokExportCriteria:BaseElcoshItem:private] => [alreadyInSave:protected] => [alreadyInValidation:protected] => [validationFailures:protected] => Array ( ) [_new:BaseObject:private] => [_deleted:BaseObject:private] => [modifiedColumns:protected] => Array ( ) ) [2] => DocumentRecord Object ( [records:protected] => Array ( ) [recordId:protected] => [searchWordClass:protected] => [searchWordPeerClass:protected] => [bok_record:protected] => [authors:protected] => [organizations:protected] => [collections:protected] => [categories:protected] => [categories_initialized:protected] => [mapped_items:protected] => [content:protected] => [files:protected] => [language:protected] => Language Object ( [id:protected] => 1 [code:protected] => en [name:protected] => English [alreadyInSave:protected] => [alreadyInValidation:protected] => [validationFailures:protected] => Array ( ) [_new:BaseObject:private] => [_deleted:BaseObject:private] => [modifiedColumns:protected] => Array ( ) ) [old_record:protected] => [id:protected] => 3837 [old_id:protected] => [elcosh_id:protected] => d001306 [type:protected] => document [display_type:protected] => HTML w/ PDF [user_id:protected] => 25 [language_id:protected] => 1 [tagging_id:protected] => Bruce Lippy [priority_id:protected] => 1 [title:protected] => TBT2 Keep Reach Close [total_pages:protected] => 4 [billed_pages:protected] => 4 [publication_number:protected] => [part_of:protected] => [keywords:protected] => reach, ergonomic, ergo, MSD, carpal tunnel, repetition, awkward positions [comments:protected] => 7-28-2014 Jeff Nelson asked Bruce Lippy about what to do with a sentence included toward the top of the doc, "Fill them in on page 2 'Other Questions.'" -- Bruce said this sentence could be deleted from the HTML. [summary:protected] => This is the second of six Tool Box Talks created by Washington University in St. Louis on ergonomics in construction. There is a guide with the series that describes how to deliver these talks. This one deals with how to avoid awkward reaching during tasks to prevent injuries. try to work with your hands below your head and close to our body to reduce your risk of shoulder strains and back discomfort. This TBT recommends considering ways to move close to the task, keeping the work area free of obstacles, and talking with each other to provide constructive feedback about your working position. [transition_comments:protected] => [external_link:protected] => [consol_link:protected] => http://www.cpwrconstructionsolutions.org/hazard/959/lifting-and-carrying-manual-materials-handling.html [more_like_this:protected] => d001303,d001304,d001305,d001307,d001308,e001309 [permission_given_by:protected] => [published:protected] => T [billable:protected] => F [img_name:protected] => [img_ext:protected] => png [img_width:protected] => [img_height:protected] => [img_credit:protected] => [img_practice:protected] => [vid_source_id:protected] => [vid_running_time:protected] => [vid_intended_audience:protected] => [vid_acquisition_info:protected] => [vid_cost:protected] => [vid_producer:protected] => [vid_filename:protected] => [vid_filename_downloadable:protected] => [date_summary:protected] => 2014 [date_permission_requested:protected] => [date_permission_received:protected] => [date_review_needed:protected] => [date_received:protected] => 06/12/14 [date_completed:protected] => 07/28/14 [date_billed:protected] => [date_modified:protected] => 11/02/16 [collBokExports:protected] => [lastBokExportCriteria:BaseElcoshItem:private] => [alreadyInSave:protected] => [alreadyInValidation:protected] => [validationFailures:protected] => Array ( ) [_new:BaseObject:private] => [_deleted:BaseObject:private] => [modifiedColumns:protected] => Array ( ) ) [3] => DocumentRecord Object ( [records:protected] => Array ( ) [recordId:protected] => [searchWordClass:protected] => [searchWordPeerClass:protected] => [bok_record:protected] => [authors:protected] => [organizations:protected] => [collections:protected] => [categories:protected] => [categories_initialized:protected] => [mapped_items:protected] => [content:protected] => [files:protected] => [language:protected] => Language Object ( [id:protected] => 1 [code:protected] => en [name:protected] => English [alreadyInSave:protected] => [alreadyInValidation:protected] => [validationFailures:protected] => Array ( ) [_new:BaseObject:private] => [_deleted:BaseObject:private] => [modifiedColumns:protected] => Array ( ) ) [old_record:protected] => [id:protected] => 3839 [old_id:protected] => [elcosh_id:protected] => d001308 [type:protected] => document [display_type:protected] => HTML w/ PDF [user_id:protected] => 23 [language_id:protected] => 1 [tagging_id:protected] => Bruce Lippy [priority_id:protected] => 1 [title:protected] => TBT4 Move Materials With Assist [total_pages:protected] => 4 [billed_pages:protected] => 4 [publication_number:protected] => [part_of:protected] => [keywords:protected] => lifting, back injury, ergonomics, ergo, MSD, buddy system [comments:protected] => 7-28-2014 Jeff Nelson asked Bruce Lippy about what to do with a sentence included toward the top of the doc, "Fill them in on page 2 'Other Questions.'" -- Bruce said this sentence could be deleted from the HTML. [summary:protected] => This tool box talk is fourth in a series of 6 developed by Washington University in St. Louis on construction ergonomics. This one focuses on preventing back injuries by getting an assist when manually lifting. It recommends using a cart for transporting loads, taking less trips, avoiding carrying materials on the shoulder and helping each other to lift large or heavy materials when a cart or hoist is not available. [transition_comments:protected] => [external_link:protected] => [consol_link:protected] => http://www.cpwrconstructionsolutions.org/hazard/959/lifting-and-carrying-manual-materials-handling.html [more_like_this:protected] => d001303,d001304,d001305,d001306,d001307,d001309 [permission_given_by:protected] => Lisa Jaegers, Washington U. in St. Louis [published:protected] => T [billable:protected] => F [img_name:protected] => [img_ext:protected] => png [img_width:protected] => [img_height:protected] => [img_credit:protected] => [img_practice:protected] => [vid_source_id:protected] => [vid_running_time:protected] => [vid_intended_audience:protected] => [vid_acquisition_info:protected] => [vid_cost:protected] => [vid_producer:protected] => [vid_filename:protected] => [vid_filename_downloadable:protected] => [date_summary:protected] => 2014 [date_permission_requested:protected] => [date_permission_received:protected] => [date_review_needed:protected] => [date_received:protected] => 06/12/14 [date_completed:protected] => 07/29/14 [date_billed:protected] => [date_modified:protected] => 10/09/15 [collBokExports:protected] => [lastBokExportCriteria:BaseElcoshItem:private] => [alreadyInSave:protected] => [alreadyInValidation:protected] => [validationFailures:protected] => Array ( ) [_new:BaseObject:private] => [_deleted:BaseObject:private] => [modifiedColumns:protected] => Array ( ) ) [4] => DocumentRecord Object ( [records:protected] => Array ( ) [recordId:protected] => [searchWordClass:protected] => [searchWordPeerClass:protected] => [bok_record:protected] => [authors:protected] => [organizations:protected] => [collections:protected] => [categories:protected] => [categories_initialized:protected] => [mapped_items:protected] => [content:protected] => [files:protected] => [language:protected] => Language Object ( [id:protected] => 1 [code:protected] => en [name:protected] => English [alreadyInSave:protected] => [alreadyInValidation:protected] => [validationFailures:protected] => Array ( ) [_new:BaseObject:private] => [_deleted:BaseObject:private] => [modifiedColumns:protected] => Array ( ) ) [old_record:protected] => [id:protected] => 3840 [old_id:protected] => [elcosh_id:protected] => d001309 [type:protected] => document [display_type:protected] => HTML w/ PDF [user_id:protected] => 23 [language_id:protected] => 1 [tagging_id:protected] => Bruce Lippy [priority_id:protected] => 1 [title:protected] => TBT5 Manual Tools [total_pages:protected] => 4 [billed_pages:protected] => 4 [publication_number:protected] => [part_of:protected] => [keywords:protected] => ergonomic, hand tools, handles, MSD, musculoskeletal disorder, carpal tunnel [comments:protected] => 7-28-2014 Jeff Nelson asked Bruce Lippy about what to do with a sentence included toward the top of the doc, "Fill them in on page 2 'Other Questions.'" -- Bruce said this sentence could be deleted from the HTML. [summary:protected] => This is the fifth in a series of 6 tool box talks on construction ergonomics produced by the University of Washington in St. Louis. This one focuses on manual tools. It asks the following 6 key questions. Does the tool… 1. Fit the task? 2. Allow a good power grip? 3. Keep the wrist in a straight posture? 4. Feel comfortable? 5. Take less effort than other tools for the task? 6. Work effectively? [transition_comments:protected] => [external_link:protected] => [consol_link:protected] => http://www.cpwrconstructionsolutions.org/masonry/solution/383/ergonomic-hand-tools.html [more_like_this:protected] => d001303,d001304,d001305,d001306,d001307,d001308,d001310 [permission_given_by:protected] => Lisa Jaegers, U. Wash. St. Louis [published:protected] => T [billable:protected] => F [img_name:protected] => [img_ext:protected] => png [img_width:protected] => [img_height:protected] => [img_credit:protected] => [img_practice:protected] => [vid_source_id:protected] => [vid_running_time:protected] => [vid_intended_audience:protected] => [vid_acquisition_info:protected] => [vid_cost:protected] => [vid_producer:protected] => [vid_filename:protected] => [vid_filename_downloadable:protected] => [date_summary:protected] => 2014 [date_permission_requested:protected] => [date_permission_received:protected] => [date_review_needed:protected] => [date_received:protected] => 06/12/14 [date_completed:protected] => 07/29/14 [date_billed:protected] => [date_modified:protected] => 10/09/15 [collBokExports:protected] => [lastBokExportCriteria:BaseElcoshItem:private] => [alreadyInSave:protected] => [alreadyInValidation:protected] => [validationFailures:protected] => Array ( ) [_new:BaseObject:private] => [_deleted:BaseObject:private] => [modifiedColumns:protected] => Array ( ) ) ) ) [collections] => Array ( [3834] => ) [record] => DocumentRecord Object ( [records:protected] => Array ( ) [recordId:protected] => [searchWordClass:protected] => [searchWordPeerClass:protected] => [bok_record:protected] => [authors:protected] => Array ( ) [organizations:protected] => Array ( [182] => Organization Object ( [id:protected] => 182 [elcosh_id:protected] => o000205 [user_id:protected] => 14 [province_id:protected] => 0 [country_id:protected] => 0 [title:protected] => Washington University - St. Louis [address:protected] => [postal_code:protected] => [city:protected] => [department:protected] => [phone:protected] => [fax:protected] => [email:protected] => [website:protected] => [filename:protected] => [about:protected] => [comments:protected] => [logo_available:protected] => T [no_details:protected] => T [date_received:protected] => 2009-08-06 [date_completed:protected] => 2009-08-06 [date_billed:protected] => [alreadyInSave:protected] => [alreadyInValidation:protected] => [validationFailures:protected] => Array ( ) [_new:BaseObject:private] => [_deleted:BaseObject:private] => [modifiedColumns:protected] => Array ( ) ) ) [collections:protected] => Array ( [3834] => ) [categories:protected] => [categories_initialized:protected] => [mapped_items:protected] => Array ( [3833] => DocumentRecord Object ( [records:protected] => Array ( ) [recordId:protected] => [searchWordClass:protected] => [searchWordPeerClass:protected] => [bok_record:protected] => [authors:protected] => [organizations:protected] => [collections:protected] => [categories:protected] => [categories_initialized:protected] => [mapped_items:protected] => [content:protected] => [files:protected] => [language:protected] => [old_record:protected] => [id:protected] => 3833 [old_id:protected] => [elcosh_id:protected] => d001303 [type:protected] => document [display_type:protected] => HTML w/ PDF [user_id:protected] => 25 [language_id:protected] => 1 [tagging_id:protected] => Bruce Lippy [priority_id:protected] => 1 [title:protected] => Overview of Toolbox Talks on Ergonomics Developed by Washington University in St. Louis [total_pages:protected] => 3 [billed_pages:protected] => 3 [publication_number:protected] => [part_of:protected] => [keywords:protected] => ergonomics, musculoskeletal disorders, MSDs [comments:protected] => 7-28-2014 - Originally submitted as "HTML w/ doc and PDF", Jeff Nelson asked Bruce Lippy for permission to switch it to "HTML w/ PDF" -- permission was given [summary:protected] => This overviews provides a background on how Washington University in St. Louis developed this series of six toolbox talks on ergonomics. It also describes how they tested the effectiveness of these communication tools, concluding that the guide was valuable for improving the delivery of ergonomics training and interaction between the safety representative and workers. The researchers recommend preparing site-specific information prior to the talk and interacting with workers to discuss problems and ergonomic solutions during the safety meetings. [transition_comments:protected] => [external_link:protected] => [consol_link:protected] => [more_like_this:protected] => [permission_given_by:protected] => Lisa Jaegers, Washington U. in St. Louis [published:protected] => T [billable:protected] => F [img_name:protected] => [img_ext:protected] => png [img_width:protected] => [img_height:protected] => [img_credit:protected] => [img_practice:protected] => [vid_source_id:protected] => [vid_running_time:protected] => [vid_intended_audience:protected] => [vid_acquisition_info:protected] => [vid_cost:protected] => [vid_producer:protected] => [vid_filename:protected] => [vid_filename_downloadable:protected] => [date_summary:protected] => 2014 [date_permission_requested:protected] => [date_permission_received:protected] => [date_review_needed:protected] => [date_received:protected] => 06/11/14 [date_completed:protected] => 07/29/14 [date_billed:protected] => [date_modified:protected] => 07/29/14 [collBokExports:protected] => [lastBokExportCriteria:BaseElcoshItem:private] => [alreadyInSave:protected] => [alreadyInValidation:protected] => [validationFailures:protected] => Array ( ) [_new:BaseObject:private] => [_deleted:BaseObject:private] => [modifiedColumns:protected] => Array ( ) ) [3835] => DocumentRecord Object ( [records:protected] => Array ( ) [recordId:protected] => [searchWordClass:protected] => [searchWordPeerClass:protected] => [bok_record:protected] => [authors:protected] => [organizations:protected] => [collections:protected] => [categories:protected] => [categories_initialized:protected] => [mapped_items:protected] => [content:protected] => [files:protected] => [language:protected] => [old_record:protected] => [id:protected] => 3835 [old_id:protected] => [elcosh_id:protected] => d001304 [type:protected] => document [display_type:protected] => HTML w/ PDF [user_id:protected] => 25 [language_id:protected] => 1 [tagging_id:protected] => Bruce Lippy [priority_id:protected] => 1 [title:protected] => Ergonomics Tool Box Talks (TBT) Training Guide [total_pages:protected] => 2 [billed_pages:protected] => 2 [publication_number:protected] => [part_of:protected] => [keywords:protected] => Ergonomics, carpal tunnel, muscular skeletal disorders, msd [comments:protected] => [summary:protected] => CPWR-funded ergonomics research by Washington University at St. Louis led to the development of 6 tool box talks. This guide is an explanation of how to deliver the talks for maximum effectiveness. This guide should be reviewed before delivering any of the talks because it makes important recommendations like: • If possible, give the TBTs as a part of the crew’s regular safety meetings so that ergonomics is included in the safety discussion. • Try to locate an area with few distractions for gathering the crew. • For a team approach, invite the work crew, site superintendent, project manager and other general contractor and/or subcontractor reps who you feel may be helpful in supporting the training and ergonomics solutions. [transition_comments:protected] => [external_link:protected] => [consol_link:protected] => [more_like_this:protected] => d001303,d001305,d001306,d001307,d001308,d001309,d001310 [permission_given_by:protected] => [published:protected] => T [billable:protected] => F [img_name:protected] => [img_ext:protected] => png [img_width:protected] => [img_height:protected] => [img_credit:protected] => [img_practice:protected] => [vid_source_id:protected] => [vid_running_time:protected] => [vid_intended_audience:protected] => [vid_acquisition_info:protected] => [vid_cost:protected] => [vid_producer:protected] => [vid_filename:protected] => [vid_filename_downloadable:protected] => [date_summary:protected] => 2014 [date_permission_requested:protected] => [date_permission_received:protected] => [date_review_needed:protected] => [date_received:protected] => 06/12/14 [date_completed:protected] => 07/29/14 [date_billed:protected] => [date_modified:protected] => 07/29/14 [collBokExports:protected] => [lastBokExportCriteria:BaseElcoshItem:private] => [alreadyInSave:protected] => [alreadyInValidation:protected] => [validationFailures:protected] => Array ( ) [_new:BaseObject:private] => [_deleted:BaseObject:private] => [modifiedColumns:protected] => Array ( ) ) [3836] => DocumentRecord Object ( [records:protected] => Array ( ) [recordId:protected] => [searchWordClass:protected] => [searchWordPeerClass:protected] => [bok_record:protected] => [authors:protected] => [organizations:protected] => [collections:protected] => [categories:protected] => [categories_initialized:protected] => [mapped_items:protected] => [content:protected] => [files:protected] => [language:protected] => [old_record:protected] => [id:protected] => 3836 [old_id:protected] => [elcosh_id:protected] => d001305 [type:protected] => document [display_type:protected] => HTML w/ PDF [user_id:protected] => 25 [language_id:protected] => 1 [tagging_id:protected] => Bruce Lippy [priority_id:protected] => 1 [title:protected] => TBT1 Ergonomics in Construction [total_pages:protected] => 5 [billed_pages:protected] => 5 [publication_number:protected] => [part_of:protected] => [keywords:protected] => ergonomics, ergo, msd, musculoskeletal disorders, risk factors, lifting, carpal tunnel, repetition, awkward postures [comments:protected] => 7-28-2014 Jeff Nelson asked Bruce Lippy about what to do with a sentence included toward the top of the doc, "Fill them in on page 2 'Other Questions.'" -- Bruce said this sentence could be deleted from the HTML. [summary:protected] => This is the first in a series of 6 Tool Box Talks produced by Washington University in St. Louis on ergonomics in construction work. This one should be delivered first because it covers what ergonomics is, why construction workers need to talk about it, what the risk factors are for developing a health problem and how to prevent these problems. [transition_comments:protected] => [external_link:protected] => [consol_link:protected] => http://www.cpwrconstructionsolutions.org/pipes_vessels/solution/50/participatory-ergonomics-program.html [more_like_this:protected] => d001303,d001304,d001306,d001307,d001308,d001309 [permission_given_by:protected] => Lisa Jaegers, Washington U. in St. Louis [published:protected] => T [billable:protected] => F [img_name:protected] => [img_ext:protected] => png [img_width:protected] => [img_height:protected] => [img_credit:protected] => [img_practice:protected] => [vid_source_id:protected] => [vid_running_time:protected] => [vid_intended_audience:protected] => [vid_acquisition_info:protected] => [vid_cost:protected] => [vid_producer:protected] => [vid_filename:protected] => [vid_filename_downloadable:protected] => [date_summary:protected] => 2014 [date_permission_requested:protected] => [date_permission_received:protected] => [date_review_needed:protected] => [date_received:protected] => 06/12/14 [date_completed:protected] => 07/28/14 [date_billed:protected] => [date_modified:protected] => 10/09/15 [collBokExports:protected] => [lastBokExportCriteria:BaseElcoshItem:private] => [alreadyInSave:protected] => [alreadyInValidation:protected] => [validationFailures:protected] => Array ( ) [_new:BaseObject:private] => [_deleted:BaseObject:private] => [modifiedColumns:protected] => Array ( ) ) [3837] => DocumentRecord Object ( [records:protected] => Array ( ) [recordId:protected] => [searchWordClass:protected] => [searchWordPeerClass:protected] => [bok_record:protected] => [authors:protected] => [organizations:protected] => [collections:protected] => [categories:protected] => [categories_initialized:protected] => [mapped_items:protected] => [content:protected] => [files:protected] => [language:protected] => [old_record:protected] => [id:protected] => 3837 [old_id:protected] => [elcosh_id:protected] => d001306 [type:protected] => document [display_type:protected] => HTML w/ PDF [user_id:protected] => 25 [language_id:protected] => 1 [tagging_id:protected] => Bruce Lippy [priority_id:protected] => 1 [title:protected] => TBT2 Keep Reach Close [total_pages:protected] => 4 [billed_pages:protected] => 4 [publication_number:protected] => [part_of:protected] => [keywords:protected] => reach, ergonomic, ergo, MSD, carpal tunnel, repetition, awkward positions [comments:protected] => 7-28-2014 Jeff Nelson asked Bruce Lippy about what to do with a sentence included toward the top of the doc, "Fill them in on page 2 'Other Questions.'" -- Bruce said this sentence could be deleted from the HTML. [summary:protected] => This is the second of six Tool Box Talks created by Washington University in St. Louis on ergonomics in construction. There is a guide with the series that describes how to deliver these talks. This one deals with how to avoid awkward reaching during tasks to prevent injuries. try to work with your hands below your head and close to our body to reduce your risk of shoulder strains and back discomfort. This TBT recommends considering ways to move close to the task, keeping the work area free of obstacles, and talking with each other to provide constructive feedback about your working position. [transition_comments:protected] => [external_link:protected] => [consol_link:protected] => http://www.cpwrconstructionsolutions.org/hazard/959/lifting-and-carrying-manual-materials-handling.html [more_like_this:protected] => d001303,d001304,d001305,d001307,d001308,e001309 [permission_given_by:protected] => [published:protected] => T [billable:protected] => F [img_name:protected] => [img_ext:protected] => png [img_width:protected] => [img_height:protected] => [img_credit:protected] => [img_practice:protected] => [vid_source_id:protected] => [vid_running_time:protected] => [vid_intended_audience:protected] => [vid_acquisition_info:protected] => [vid_cost:protected] => [vid_producer:protected] => [vid_filename:protected] => [vid_filename_downloadable:protected] => [date_summary:protected] => 2014 [date_permission_requested:protected] => [date_permission_received:protected] => [date_review_needed:protected] => [date_received:protected] => 06/12/14 [date_completed:protected] => 07/28/14 [date_billed:protected] => [date_modified:protected] => 11/02/16 [collBokExports:protected] => [lastBokExportCriteria:BaseElcoshItem:private] => [alreadyInSave:protected] => [alreadyInValidation:protected] => [validationFailures:protected] => Array ( ) [_new:BaseObject:private] => [_deleted:BaseObject:private] => [modifiedColumns:protected] => Array ( ) ) [3839] => DocumentRecord Object ( [records:protected] => Array ( ) [recordId:protected] => [searchWordClass:protected] => [searchWordPeerClass:protected] => [bok_record:protected] => [authors:protected] => [organizations:protected] => [collections:protected] => [categories:protected] => [categories_initialized:protected] => [mapped_items:protected] => [content:protected] => [files:protected] => [language:protected] => [old_record:protected] => [id:protected] => 3839 [old_id:protected] => [elcosh_id:protected] => d001308 [type:protected] => document [display_type:protected] => HTML w/ PDF [user_id:protected] => 23 [language_id:protected] => 1 [tagging_id:protected] => Bruce Lippy [priority_id:protected] => 1 [title:protected] => TBT4 Move Materials With Assist [total_pages:protected] => 4 [billed_pages:protected] => 4 [publication_number:protected] => [part_of:protected] => [keywords:protected] => lifting, back injury, ergonomics, ergo, MSD, buddy system [comments:protected] => 7-28-2014 Jeff Nelson asked Bruce Lippy about what to do with a sentence included toward the top of the doc, "Fill them in on page 2 'Other Questions.'" -- Bruce said this sentence could be deleted from the HTML. [summary:protected] => This tool box talk is fourth in a series of 6 developed by Washington University in St. Louis on construction ergonomics. This one focuses on preventing back injuries by getting an assist when manually lifting. It recommends using a cart for transporting loads, taking less trips, avoiding carrying materials on the shoulder and helping each other to lift large or heavy materials when a cart or hoist is not available. [transition_comments:protected] => [external_link:protected] => [consol_link:protected] => http://www.cpwrconstructionsolutions.org/hazard/959/lifting-and-carrying-manual-materials-handling.html [more_like_this:protected] => d001303,d001304,d001305,d001306,d001307,d001309 [permission_given_by:protected] => Lisa Jaegers, Washington U. in St. Louis [published:protected] => T [billable:protected] => F [img_name:protected] => [img_ext:protected] => png [img_width:protected] => [img_height:protected] => [img_credit:protected] => [img_practice:protected] => [vid_source_id:protected] => [vid_running_time:protected] => [vid_intended_audience:protected] => [vid_acquisition_info:protected] => [vid_cost:protected] => [vid_producer:protected] => [vid_filename:protected] => [vid_filename_downloadable:protected] => [date_summary:protected] => 2014 [date_permission_requested:protected] => [date_permission_received:protected] => [date_review_needed:protected] => [date_received:protected] => 06/12/14 [date_completed:protected] => 07/29/14 [date_billed:protected] => [date_modified:protected] => 10/09/15 [collBokExports:protected] => [lastBokExportCriteria:BaseElcoshItem:private] => [alreadyInSave:protected] => [alreadyInValidation:protected] => [validationFailures:protected] => Array ( ) [_new:BaseObject:private] => [_deleted:BaseObject:private] => [modifiedColumns:protected] => Array ( ) ) [3840] => DocumentRecord Object ( [records:protected] => Array ( ) [recordId:protected] => [searchWordClass:protected] => [searchWordPeerClass:protected] => [bok_record:protected] => [authors:protected] => [organizations:protected] => [collections:protected] => [categories:protected] => [categories_initialized:protected] => [mapped_items:protected] => [content:protected] => [files:protected] => [language:protected] => [old_record:protected] => [id:protected] => 3840 [old_id:protected] => [elcosh_id:protected] => d001309 [type:protected] => document [display_type:protected] => HTML w/ PDF [user_id:protected] => 23 [language_id:protected] => 1 [tagging_id:protected] => Bruce Lippy [priority_id:protected] => 1 [title:protected] => TBT5 Manual Tools [total_pages:protected] => 4 [billed_pages:protected] => 4 [publication_number:protected] => [part_of:protected] => [keywords:protected] => ergonomic, hand tools, handles, MSD, musculoskeletal disorder, carpal tunnel [comments:protected] => 7-28-2014 Jeff Nelson asked Bruce Lippy about what to do with a sentence included toward the top of the doc, "Fill them in on page 2 'Other Questions.'" -- Bruce said this sentence could be deleted from the HTML. [summary:protected] => This is the fifth in a series of 6 tool box talks on construction ergonomics produced by the University of Washington in St. Louis. This one focuses on manual tools. It asks the following 6 key questions. Does the tool… 1. Fit the task? 2. Allow a good power grip? 3. Keep the wrist in a straight posture? 4. Feel comfortable? 5. Take less effort than other tools for the task? 6. Work effectively? [transition_comments:protected] => [external_link:protected] => [consol_link:protected] => http://www.cpwrconstructionsolutions.org/masonry/solution/383/ergonomic-hand-tools.html [more_like_this:protected] => d001303,d001304,d001305,d001306,d001307,d001308,d001310 [permission_given_by:protected] => Lisa Jaegers, U. Wash. St. Louis [published:protected] => T [billable:protected] => F [img_name:protected] => [img_ext:protected] => png [img_width:protected] => [img_height:protected] => [img_credit:protected] => [img_practice:protected] => [vid_source_id:protected] => [vid_running_time:protected] => [vid_intended_audience:protected] => [vid_acquisition_info:protected] => [vid_cost:protected] => [vid_producer:protected] => [vid_filename:protected] => [vid_filename_downloadable:protected] => [date_summary:protected] => 2014 [date_permission_requested:protected] => [date_permission_received:protected] => [date_review_needed:protected] => [date_received:protected] => 06/12/14 [date_completed:protected] => 07/29/14 [date_billed:protected] => [date_modified:protected] => 10/09/15 [collBokExports:protected] => [lastBokExportCriteria:BaseElcoshItem:private] => [alreadyInSave:protected] => [alreadyInValidation:protected] => [validationFailures:protected] => Array ( ) [_new:BaseObject:private] => [_deleted:BaseObject:private] => [modifiedColumns:protected] => Array ( ) ) ) [content:protected] => [files:protected] => Array ( [559] => [560] => [546] => File Object ( [id:protected] => 546 [filename:protected] => 3.jpg [downloadable:protected] => F [timestamp:protected] => 2009-07-03 12:54:22 [alreadyInSave:protected] => [alreadyInValidation:protected] => [validationFailures:protected] => Array ( ) [_new:BaseObject:private] => [_deleted:BaseObject:private] => [modifiedColumns:protected] => Array ( ) ) [9643] => File Object ( [id:protected] => 9643 [filename:protected] => d001307.pdf [downloadable:protected] => T [timestamp:protected] => 2014-07-27 19:09:19 [alreadyInSave:protected] => [alreadyInValidation:protected] => [validationFailures:protected] => Array ( ) [_new:BaseObject:private] => [_deleted:BaseObject:private] => [modifiedColumns:protected] => Array ( ) ) [566] => File Object ( [id:protected] => 566 [filename:protected] => 4.jpg [downloadable:protected] => F [timestamp:protected] => 2009-07-03 12:54:23 [alreadyInSave:protected] => [alreadyInValidation:protected] => [validationFailures:protected] => Array ( ) [_new:BaseObject:private] => [_deleted:BaseObject:private] => [modifiedColumns:protected] => Array ( ) ) ) [language:protected] => Language Object ( [id:protected] => 1 [code:protected] => en [name:protected] => English [alreadyInSave:protected] => [alreadyInValidation:protected] => [validationFailures:protected] => Array ( ) [_new:BaseObject:private] => [_deleted:BaseObject:private] => [modifiedColumns:protected] => Array ( ) ) [old_record:protected] => [id:protected] => 3838 [old_id:protected] => [elcosh_id:protected] => d001307 [type:protected] => document [display_type:protected] => HTML w/ PDF [user_id:protected] => 25 [language_id:protected] => 1 [tagging_id:protected] => Bruce Lippy [priority_id:protected] => 1 [title:protected] => TBT3 Positioning [total_pages:protected] => 4 [billed_pages:protected] => 4 [publication_number:protected] => [part_of:protected] => [keywords:protected] => position, positioning, ergonomics, ergo, carpal tunnel, MSD, musculoskeletal disorder [comments:protected] => 7-28-2014 Jeff Nelson asked Bruce Lippy about what to do with a sentence included toward the top of the doc, "Fill them in on page 2 'Other Questions.'" -- Bruce said this sentence could be deleted from the HTML. [summary:protected] => This third in a series of 6 Tool Box Talks on construction ergonomics focuses on proper positioning to avoid injuries. The TBT recommends: 1)prop up a task off of the floor by using a raised surface, cart, baker scaffold, saw horses to prep materials near waist height, 2)move the lift or ladder in the best position for the work, 3)position the lift in front of the area you plan to work without trying to reach too far on either side of the lift. [transition_comments:protected] => [external_link:protected] => [consol_link:protected] => http://www.cpwrconstructionsolutions.org/hazard/959/lifting-and-carrying-manual-materials-handling.html [more_like_this:protected] => d001303,d001304,d001305,d001306,d001308,d001309 [permission_given_by:protected] => Lisa Jaegers, WU-St. Louis [published:protected] => T [billable:protected] => F [img_name:protected] => [img_ext:protected] => png [img_width:protected] => [img_height:protected] => [img_credit:protected] => [img_practice:protected] => [vid_source_id:protected] => [vid_running_time:protected] => [vid_intended_audience:protected] => [vid_acquisition_info:protected] => [vid_cost:protected] => [vid_producer:protected] => [vid_filename:protected] => [vid_filename_downloadable:protected] => [date_summary:protected] => 2014 [date_permission_requested:protected] => [date_permission_received:protected] => [date_review_needed:protected] => [date_received:protected] => 06/12/14 [date_completed:protected] => 07/28/14 [date_billed:protected] => [date_modified:protected] => 10/09/15 [collBokExports:protected] => [lastBokExportCriteria:BaseElcoshItem:private] => [alreadyInSave:protected] => [alreadyInValidation:protected] => [validationFailures:protected] => Array ( ) [_new:BaseObject:private] => [_deleted:BaseObject:private] => [modifiedColumns:protected] => Array ( ) ) [show_text] => [document_content] => ElcoshItemDocumentContent Object ( [id:protected] => 2906 [item_id:protected] => 3838 [type:protected] => main [title:protected] => [content:protected] =>
Facilitator / Leader Tasks Before the Tool Box Talk (TBT)
- Read through this TBT guide.
- Walk the job site to find ergonomics examples based on the TBT. If possible, take photos of “safe” and “unsafe” examples at the site to be used during the TBT.
- Write down discussion questions to ask the group.
Learning Goals
After discussing this training topic, workers will have gained a general understanding of:
- Unsafe work positions.
- Solutions to improve work positioning.
TRAINING CARD
The last page of this PDF has directions for printing and laminating the training cards.
TRAINER’S TALKING POINTS
Why should we talk about positioning?
Construction work requires working in high, low, and tight spaces which often forces you to work in an awkward or uncomfortable position. Working in awkward reaching and bent positions can lead to shoulder and back discomfort and possible injury over time.
Demonstration: The training card provides examples of the range of reaching and the point at which the reach is unsafe. Hold your arms straight out in front of you. Look at your hands and wrists while I discuss each of the reach zones on the training card.
The Green Zone shows the ideal location for working with your hands. When possible, try to keep your work tasks as far out as your wrists.
The Orange Zone is for occasional work since it involves more weight on your shoulders and low back since your hands are away from your body. If needed, keep the reach distance as far as your fingertips.
The Red Zone is away from your body so far that it places you at higher risk for falls when in the air and shoulder and back discomfort. Limit the time you work reaching beyond your fingertips.
End of Demonstration
Discussion Question: Can anyone describe to us an awkward position that they work in or have seen someone work in?
- What does it feel like in your neck, back or arms when working in that position?
- Other Questions:_____________________________________________
Training Note: Here are examples of hazards in different construction trades. Choose your trade or one that is similar to your group’s line of work that can be used as hazards and solutions examples.
| Trade | Awkward Posture Hazards | Potential Solution |
|---|---|---|
| Carpenter-Drywall | Leaning over the side of a scissor lift to reach and operating a screw gun with the arm fully extended (reaching in the red zone past the fingertips). | Before starting to install the line of screws to the side of the lift, move the lift to re-center it for the next 2 lines of screws to be installed. |
| Floor Layer | Spreading mortar overhead on a wall with the bakers scaffold one foot away from the wall due to buckets on the floor below (reach in the red zone, past the fingertips). | Pre-plan this task by removing all objects in the path of the bakers scaffold. Having an open path allows you to work closer to the task. |
| Sheet Metal Worker | Prepping duct parts on the floor while bending the back and reaching to work on them. | Pre-plan this task by setting up a waist-height workstation on extra materials, a cart, or saw horses. |
Now let’s put this information into practice. What are some tricks or techniques that you use to work in a comfortable position?
- Other Questions:_____________________________________________
Here are a few other ideas that are listed on your training card:
Prop up your tasks off of the floor by using a raised surface, cart, baker scaffold, saw horses to prep materials near waist height.
Move the lift or ladder in the best position for the work – close to the work tasks.
For safety & comfort, try to position the lift in front of the area you plan to work without trying to reach too far on either side of the lift.
In summary, it is important to work in a safe position when possible in order to reduce the risk of falls and discomfort due to awkward working positions. Consider ways that you can work in the green/comfort zone and orange zone and avoid the unsafe red zone.
References
[Images modified from Grandjean & Eastman Kodak Co.]
1. Grandjean, E. 1988. Fitting the task to the man: A textbook of occupational ergonomics. 4th ed. Taylor & Francis.
2. Eastman Kodak Co. 1983. Ergonomic Design for People at Work. Vol 1. Wiley, John & Sons, Incorporated.
Refer to the resources at our website: oshr.im.wustl.edu for more Tool Box TIPS.
TRAINING ATTENDANCE SHEET
Training Topic: Ergonomics -- Positioning
Date:
| ATTENDEES | |
|---|---|
Directions for Making Laminated Training Cards
The last page of this PDF has directions for printing and laminating the training cards.
[content_transformed:protected] =>Facilitator / Leader Tasks Before the Tool Box Talk (TBT)
- Read through this TBT guide.
- Walk the job site to find ergonomics examples based on the TBT. If possible, take photos of “safe” and “unsafe” examples at the site to be used during the TBT.
- Write down discussion questions to ask the group.
Learning Goals
After discussing this training topic, workers will have gained a general understanding of:
- Unsafe work positions.
- Solutions to improve work positioning.
TRAINING CARD
The last page of this PDF has directions for printing and laminating the training cards.
TRAINER’S TALKING POINTS
Why should we talk about positioning?
Construction work requires working in high, low, and tight spaces which often forces you to work in an awkward or uncomfortable position. Working in awkward reaching and bent positions can lead to shoulder and back discomfort and possible injury over time.
Demonstration: The training card provides examples of the range of reaching and the point at which the reach is unsafe. Hold your arms straight out in front of you. Look at your hands and wrists while I discuss each of the reach zones on the training card.
The Green Zone shows the ideal location for working with your hands. When possible, try to keep your work tasks as far out as your wrists.
The Orange Zone is for occasional work since it involves more weight on your shoulders and low back since your hands are away from your body. If needed, keep the reach distance as far as your fingertips.
The Red Zone is away from your body so far that it places you at higher risk for falls when in the air and shoulder and back discomfort. Limit the time you work reaching beyond your fingertips.
End of Demonstration
Discussion Question: Can anyone describe to us an awkward position that they work in or have seen someone work in?
- What does it feel like in your neck, back or arms when working in that position?
- Other Questions:_____________________________________________
Training Note: Here are examples of hazards in different construction trades. Choose your trade or one that is similar to your group’s line of work that can be used as hazards and solutions examples.
| Trade | Awkward Posture Hazards | Potential Solution |
|---|---|---|
| Carpenter-Drywall | Leaning over the side of a scissor lift to reach and operating a screw gun with the arm fully extended (reaching in the red zone past the fingertips). | Before starting to install the line of screws to the side of the lift, move the lift to re-center it for the next 2 lines of screws to be installed. |
| Floor Layer | Spreading mortar overhead on a wall with the bakers scaffold one foot away from the wall due to buckets on the floor below (reach in the red zone, past the fingertips). | Pre-plan this task by removing all objects in the path of the bakers scaffold. Having an open path allows you to work closer to the task. |
| Sheet Metal Worker | Prepping duct parts on the floor while bending the back and reaching to work on them. | Pre-plan this task by setting up a waist-height workstation on extra materials, a cart, or saw horses. |
Now let’s put this information into practice. What are some tricks or techniques that you use to work in a comfortable position?
- Other Questions:_____________________________________________
Here are a few other ideas that are listed on your training card:
Prop up your tasks off of the floor by using a raised surface, cart, baker scaffold, saw horses to prep materials near waist height.
Move the lift or ladder in the best position for the work – close to the work tasks.
For safety & comfort, try to position the lift in front of the area you plan to work without trying to reach too far on either side of the lift.
In summary, it is important to work in a safe position when possible in order to reduce the risk of falls and discomfort due to awkward working positions. Consider ways that you can work in the green/comfort zone and orange zone and avoid the unsafe red zone.
References
[Images modified from Grandjean & Eastman Kodak Co.]
1. Grandjean, E. 1988. Fitting the task to the man: A textbook of occupational ergonomics. 4th ed. Taylor & Francis.
2. Eastman Kodak Co. 1983. Ergonomic Design for People at Work. Vol 1. Wiley, John & Sons, Incorporated.
Refer to the resources at our website: oshr.im.wustl.edu for more Tool Box TIPS.
TRAINING ATTENDANCE SHEET
Training Topic: Ergonomics -- Positioning
Date:
| ATTENDEES | |
|---|---|
Directions for Making Laminated Training Cards
The last page of this PDF has directions for printing and laminating the training cards.
[disclaimer:protected] => [disclaimer_transformed:protected] => [alreadyInSave:protected] => [alreadyInValidation:protected] => [validationFailures:protected] => Array ( ) [_new:BaseObject:private] => [_deleted:BaseObject:private] => [modifiedColumns:protected] => Array ( ) ) [template] => record ) [_globalContext:PHPTAL_Context:private] => stdClass Object ( ) [_echoDeclarations:PHPTAL_Context:private] => [referer] => http://elcosh.org/document/3838/d001307/TBT3%2BPositioning.html [curr_module] => Record [styles] => Array ( ) [javascript] => Array ( [0] => jquery.min.js ) [metas] => Array ( [language] => en [robots] => index, follow ) [user] => [curr_url] => https://elcosh.org/index.php?module=Record&id=3838&type=document [base_url] => https://elcosh.org/index.php?module=Record [title] => eLCOSH : TBT3 Positioning [language] => en [search_query] => [module] => Record [new_records] => Array ( [0] => Search_Result Object ( [title] => Toolbox Talk: Fixed Ladder [image] => /record/images/notavailable-p.png [blurb] => The CPWR Toolbox Talk on Fixed Ladders addresses the potential risks associated with using fixed ladders. The resource includes a brief case example,... [category] => Array ( [0] => 15 [1] => 47 [2] => 49 [3] => 51 [4] => 53 [5] => 55 [6] => 60 [7] => 64 [8] => 73 [9] => 76 [10] => 78 [11] => 80 [12] => 86 [13] => 87 [14] => 90 [15] => 92 [16] => 93 [17] => 94 [18] => 100 ) [labels] => Array ( [0] => Falls [1] => Work Environment [2] => Hazards [3] => Bricklayer [4] => Trades [5] => Carpenter [7] => Cement Mason [9] => Concrete Polisher [11] => Electrical Worker [13] => HVAC [15] => Laborer [17] => PCC/Restoration [19] => Plumber/Pipefitter [21] => Roofer/Waterproofer [23] => Sheetmetal Worker [25] => Welder [27] => Commercial & Institutional [28] => Jobsites [29] => Industrial [31] => LEED/Green Construction [33] => Renovations [35] => Residential [37] => Toolbox Talks [38] => Documents [39] => Media & Documents ) [type] => Toolbox Talks [sub_category] => [url] => /document/4430/d001660/Toolbox%2BTalk%253A%2BFixed%2BLadder.html [item:protected] => DocumentRecord Object ( [records:protected] => Array ( ) [recordId:protected] => [searchWordClass:protected] => [searchWordPeerClass:protected] => [bok_record:protected] => [authors:protected] => [organizations:protected] => [collections:protected] => [categories:protected] => Array ( [15] => Category Object ( [languages:protected] => [bok_resources:protected] => [bok_topics:protected] => [bok_keywords:protected] => [id:protected] => 15 [type:protected] => category [parent:protected] => 7 [label:protected] => Falls [alreadyInSave:protected] => [alreadyInValidation:protected] => [validationFailures:protected] => Array ( ) [_new:BaseObject:private] => [_deleted:BaseObject:private] => [modifiedColumns:protected] => Array ( ) ) [47] => Category Object ( [languages:protected] => [bok_resources:protected] => [bok_topics:protected] => [bok_keywords:protected] => [id:protected] => 47 [type:protected] => category [parent:protected] => 2 [label:protected] => Bricklayer [alreadyInSave:protected] => [alreadyInValidation:protected] => [validationFailures:protected] => Array ( ) [_new:BaseObject:private] => [_deleted:BaseObject:private] => [modifiedColumns:protected] => Array ( ) ) [49] => Category Object ( [languages:protected] => [bok_resources:protected] => [bok_topics:protected] => [bok_keywords:protected] => [id:protected] => 49 [type:protected] => category [parent:protected] => 2 [label:protected] => Carpenter [alreadyInSave:protected] => [alreadyInValidation:protected] => [validationFailures:protected] => Array ( ) [_new:BaseObject:private] => [_deleted:BaseObject:private] => [modifiedColumns:protected] => Array ( ) ) [51] => Category Object ( [languages:protected] => [bok_resources:protected] => [bok_topics:protected] => [bok_keywords:protected] => [id:protected] => 51 [type:protected] => category [parent:protected] => 2 [label:protected] => Cement Mason [alreadyInSave:protected] => [alreadyInValidation:protected] => [validationFailures:protected] => Array ( ) [_new:BaseObject:private] => [_deleted:BaseObject:private] => [modifiedColumns:protected] => Array ( ) ) [53] => Category Object ( [languages:protected] => [bok_resources:protected] => [bok_topics:protected] => [bok_keywords:protected] => [id:protected] => 53 [type:protected] => category [parent:protected] => 2 [label:protected] => Concrete Polisher [alreadyInSave:protected] => [alreadyInValidation:protected] => [validationFailures:protected] => Array ( ) [_new:BaseObject:private] => [_deleted:BaseObject:private] => [modifiedColumns:protected] => Array ( ) ) [55] => Category Object ( [languages:protected] => [bok_resources:protected] => [bok_topics:protected] => [bok_keywords:protected] => [id:protected] => 55 [type:protected] => category [parent:protected] => 2 [label:protected] => Electrical Worker [alreadyInSave:protected] => [alreadyInValidation:protected] => [validationFailures:protected] => Array ( ) [_new:BaseObject:private] => [_deleted:BaseObject:private] => [modifiedColumns:protected] => Array ( ) ) [60] => Category Object ( [languages:protected] => [bok_resources:protected] => [bok_topics:protected] => [bok_keywords:protected] => [id:protected] => 60 [type:protected] => category [parent:protected] => 2 [label:protected] => HVAC [alreadyInSave:protected] => [alreadyInValidation:protected] => [validationFailures:protected] => Array ( ) [_new:BaseObject:private] => [_deleted:BaseObject:private] => [modifiedColumns:protected] => Array ( ) ) [64] => Category Object ( [languages:protected] => [bok_resources:protected] => [bok_topics:protected] => [bok_keywords:protected] => [id:protected] => 64 [type:protected] => category [parent:protected] => 2 [label:protected] => Laborer [alreadyInSave:protected] => [alreadyInValidation:protected] => [validationFailures:protected] => Array ( ) [_new:BaseObject:private] => [_deleted:BaseObject:private] => [modifiedColumns:protected] => Array ( ) ) [73] => Category Object ( [languages:protected] => [bok_resources:protected] => [bok_topics:protected] => [bok_keywords:protected] => [id:protected] => 73 [type:protected] => category [parent:protected] => 2 [label:protected] => PCC/Restoration [alreadyInSave:protected] => [alreadyInValidation:protected] => [validationFailures:protected] => Array ( ) [_new:BaseObject:private] => [_deleted:BaseObject:private] => [modifiedColumns:protected] => Array ( ) ) [76] => Category Object ( [languages:protected] => [bok_resources:protected] => [bok_topics:protected] => [bok_keywords:protected] => [id:protected] => 76 [type:protected] => category [parent:protected] => 2 [label:protected] => Plumber/Pipefitter [alreadyInSave:protected] => [alreadyInValidation:protected] => [validationFailures:protected] => Array ( ) [_new:BaseObject:private] => [_deleted:BaseObject:private] => [modifiedColumns:protected] => Array ( ) ) [78] => Category Object ( [languages:protected] => [bok_resources:protected] => [bok_topics:protected] => [bok_keywords:protected] => [id:protected] => 78 [type:protected] => category [parent:protected] => 2 [label:protected] => Roofer/Waterproofer [alreadyInSave:protected] => [alreadyInValidation:protected] => [validationFailures:protected] => Array ( ) [_new:BaseObject:private] => [_deleted:BaseObject:private] => [modifiedColumns:protected] => Array ( ) ) [80] => Category Object ( [languages:protected] => [bok_resources:protected] => [bok_topics:protected] => [bok_keywords:protected] => [id:protected] => 80 [type:protected] => category [parent:protected] => 2 [label:protected] => Sheetmetal Worker [alreadyInSave:protected] => [alreadyInValidation:protected] => [validationFailures:protected] => Array ( ) [_new:BaseObject:private] => [_deleted:BaseObject:private] => [modifiedColumns:protected] => Array ( ) ) [86] => Category Object ( [languages:protected] => [bok_resources:protected] => [bok_topics:protected] => [bok_keywords:protected] => [id:protected] => 86 [type:protected] => category [parent:protected] => 2 [label:protected] => Welder [alreadyInSave:protected] => [alreadyInValidation:protected] => [validationFailures:protected] => Array ( ) [_new:BaseObject:private] => [_deleted:BaseObject:private] => [modifiedColumns:protected] => Array ( ) ) [87] => Category Object ( [languages:protected] => [bok_resources:protected] => [bok_topics:protected] => [bok_keywords:protected] => [id:protected] => 87 [type:protected] => category [parent:protected] => 3 [label:protected] => Commercial & Institutional [alreadyInSave:protected] => [alreadyInValidation:protected] => [validationFailures:protected] => Array ( ) [_new:BaseObject:private] => [_deleted:BaseObject:private] => [modifiedColumns:protected] => Array ( ) ) [90] => Category Object ( [languages:protected] => [bok_resources:protected] => [bok_topics:protected] => [bok_keywords:protected] => [id:protected] => 90 [type:protected] => category [parent:protected] => 3 [label:protected] => Industrial [alreadyInSave:protected] => [alreadyInValidation:protected] => [validationFailures:protected] => Array ( ) [_new:BaseObject:private] => [_deleted:BaseObject:private] => [modifiedColumns:protected] => Array ( ) ) [92] => Category Object ( [languages:protected] => [bok_resources:protected] => [bok_topics:protected] => [bok_keywords:protected] => [id:protected] => 92 [type:protected] => category [parent:protected] => 3 [label:protected] => LEED/Green Construction [alreadyInSave:protected] => [alreadyInValidation:protected] => [validationFailures:protected] => Array ( ) [_new:BaseObject:private] => [_deleted:BaseObject:private] => [modifiedColumns:protected] => Array ( ) ) [93] => Category Object ( [languages:protected] => [bok_resources:protected] => [bok_topics:protected] => [bok_keywords:protected] => [id:protected] => 93 [type:protected] => category [parent:protected] => 3 [label:protected] => Renovations [alreadyInSave:protected] => [alreadyInValidation:protected] => [validationFailures:protected] => Array ( ) [_new:BaseObject:private] => [_deleted:BaseObject:private] => [modifiedColumns:protected] => Array ( ) ) [94] => Category Object ( [languages:protected] => [bok_resources:protected] => [bok_topics:protected] => [bok_keywords:protected] => [id:protected] => 94 [type:protected] => category [parent:protected] => 3 [label:protected] => Residential [alreadyInSave:protected] => [alreadyInValidation:protected] => [validationFailures:protected] => Array ( ) [_new:BaseObject:private] => [_deleted:BaseObject:private] => [modifiedColumns:protected] => Array ( ) ) [100] => Category Object ( [languages:protected] => [bok_resources:protected] => [bok_topics:protected] => [bok_keywords:protected] => [id:protected] => 100 [type:protected] => category [parent:protected] => 6 [label:protected] => Toolbox Talks [alreadyInSave:protected] => [alreadyInValidation:protected] => [validationFailures:protected] => Array ( ) [_new:BaseObject:private] => [_deleted:BaseObject:private] => [modifiedColumns:protected] => Array ( ) ) ) [categories_initialized:protected] => 1 [mapped_items:protected] => [content:protected] => [files:protected] => [language:protected] => Language Object ( [id:protected] => 1 [code:protected] => en [name:protected] => English [alreadyInSave:protected] => [alreadyInValidation:protected] => [validationFailures:protected] => Array ( ) [_new:BaseObject:private] => [_deleted:BaseObject:private] => [modifiedColumns:protected] => Array ( ) ) [old_record:protected] => [id:protected] => 4430 [old_id:protected] => [elcosh_id:protected] => d001660 [type:protected] => document [display_type:protected] => HTML only (and links) [user_id:protected] => 0 [language_id:protected] => 1 [tagging_id:protected] => Mike Aguilar [priority_id:protected] => 1 [title:protected] => Toolbox Talk: Fixed Ladder [total_pages:protected] => 0 [billed_pages:protected] => 0 [publication_number:protected] => [part_of:protected] => [keywords:protected] => Fixed Ladders, Fall Prevention, Falls [comments:protected] => [summary:protected] => The CPWR Toolbox Talk on Fixed Ladders addresses the potential risks associated with using fixed ladders. The resource includes a brief case example, steps to prevent a related injury and questions for discussion. It includes an image that illustrates the hazard, which can be posted in a central location as a reminder of steps to work safely. Available in English and Spanish. [transition_comments:protected] => [external_link:protected] => [consol_link:protected] => [more_like_this:protected] => d001257,d001254,d001255,d001256,d001258,d001262,d001279 [permission_given_by:protected] => [published:protected] => T [billable:protected] => F [img_name:protected] => [img_ext:protected] => [img_width:protected] => [img_height:protected] => [img_credit:protected] => [img_practice:protected] => [vid_source_id:protected] => [vid_running_time:protected] => [vid_intended_audience:protected] => [vid_acquisition_info:protected] => [vid_cost:protected] => [vid_producer:protected] => [vid_filename:protected] => [vid_filename_downloadable:protected] => [date_summary:protected] => [date_permission_requested:protected] => [date_permission_received:protected] => [date_review_needed:protected] => [date_received:protected] => 06/10/22 [date_completed:protected] => 06/10/22 [date_billed:protected] => [date_modified:protected] => 06/16/25 [collBokExports:protected] => [lastBokExportCriteria:BaseElcoshItem:private] => [alreadyInSave:protected] => [alreadyInValidation:protected] => [validationFailures:protected] => Array ( ) [_new:BaseObject:private] => [_deleted:BaseObject:private] => [modifiedColumns:protected] => Array ( ) ) ) [1] => Search_Result Object ( [title] => Toolbox Talk: Work Zone Safety: Working Around Vehicles [image] => /record/images/notavailable-p.png [blurb] => The CPWR Toolbox Talk on Working Around Vehicles in the Work Zone addresses methods to avoid being struck-by a vehicle on a construction site. The res... [category] => Array ( [0] => 12 [1] => 18 [2] => 52 [3] => 57 [4] => 70 [5] => 85 [6] => 87 [7] => 88 [8] => 89 [9] => 91 [10] => 90 [11] => 92 [12] => 93 [13] => 94 [14] => 95 [15] => 100 ) [labels] => Array ( [0] => Crushed/Struck By [1] => Work Environment [2] => Hazards [3] => Motor Vehicles/Heavy Equipment [6] => Commercial Diver [7] => Trades [8] => Flagger [10] => Operating Engineer [12] => Truck Driver [14] => Commercial & Institutional [15] => Jobsites [16] => Demolition [18] => Disasters [20] => Heavy & Highway [22] => Industrial [24] => LEED/Green Construction [26] => Renovations [28] => Residential [30] => Underground [32] => Toolbox Talks [33] => Documents [34] => Media & Documents ) [type] => Toolbox Talks [sub_category] => [url] => /document/4428/d001658/Toolbox%2BTalk%253A%2BWork%2BZone%2BSafety%253A%2BWorking%2BAround%2BVehicles.html [item:protected] => DocumentRecord Object ( [records:protected] => Array ( ) [recordId:protected] => [searchWordClass:protected] => [searchWordPeerClass:protected] => [bok_record:protected] => [authors:protected] => [organizations:protected] => [collections:protected] => [categories:protected] => Array ( [12] => Category Object ( [languages:protected] => [bok_resources:protected] => [bok_topics:protected] => [bok_keywords:protected] => [id:protected] => 12 [type:protected] => category [parent:protected] => 7 [label:protected] => Crushed/Struck By [alreadyInSave:protected] => [alreadyInValidation:protected] => [validationFailures:protected] => Array ( ) [_new:BaseObject:private] => [_deleted:BaseObject:private] => [modifiedColumns:protected] => Array ( ) ) [18] => Category Object ( [languages:protected] => [bok_resources:protected] => [bok_topics:protected] => [bok_keywords:protected] => [id:protected] => 18 [type:protected] => category [parent:protected] => 7 [label:protected] => Motor Vehicles/Heavy Equipment [alreadyInSave:protected] => [alreadyInValidation:protected] => [validationFailures:protected] => Array ( ) [_new:BaseObject:private] => [_deleted:BaseObject:private] => [modifiedColumns:protected] => Array ( ) ) [52] => Category Object ( [languages:protected] => [bok_resources:protected] => [bok_topics:protected] => [bok_keywords:protected] => [id:protected] => 52 [type:protected] => category [parent:protected] => 2 [label:protected] => Commercial Diver [alreadyInSave:protected] => [alreadyInValidation:protected] => [validationFailures:protected] => Array ( ) [_new:BaseObject:private] => [_deleted:BaseObject:private] => [modifiedColumns:protected] => Array ( ) ) [57] => Category Object ( [languages:protected] => [bok_resources:protected] => [bok_topics:protected] => [bok_keywords:protected] => [id:protected] => 57 [type:protected] => category [parent:protected] => 2 [label:protected] => Flagger [alreadyInSave:protected] => [alreadyInValidation:protected] => [validationFailures:protected] => Array ( ) [_new:BaseObject:private] => [_deleted:BaseObject:private] => [modifiedColumns:protected] => Array ( ) ) [70] => Category Object ( [languages:protected] => [bok_resources:protected] => [bok_topics:protected] => [bok_keywords:protected] => [id:protected] => 70 [type:protected] => category [parent:protected] => 2 [label:protected] => Operating Engineer [alreadyInSave:protected] => [alreadyInValidation:protected] => [validationFailures:protected] => Array ( ) [_new:BaseObject:private] => [_deleted:BaseObject:private] => [modifiedColumns:protected] => Array ( ) ) [85] => Category Object ( [languages:protected] => [bok_resources:protected] => [bok_topics:protected] => [bok_keywords:protected] => [id:protected] => 85 [type:protected] => category [parent:protected] => 2 [label:protected] => Truck Driver [alreadyInSave:protected] => [alreadyInValidation:protected] => [validationFailures:protected] => Array ( ) [_new:BaseObject:private] => [_deleted:BaseObject:private] => [modifiedColumns:protected] => Array ( ) ) [87] => Category Object ( [languages:protected] => [bok_resources:protected] => [bok_topics:protected] => [bok_keywords:protected] => [id:protected] => 87 [type:protected] => category [parent:protected] => 3 [label:protected] => Commercial & Institutional [alreadyInSave:protected] => [alreadyInValidation:protected] => [validationFailures:protected] => Array ( ) [_new:BaseObject:private] => [_deleted:BaseObject:private] => [modifiedColumns:protected] => Array ( ) ) [88] => Category Object ( [languages:protected] => [bok_resources:protected] => [bok_topics:protected] => [bok_keywords:protected] => [id:protected] => 88 [type:protected] => category [parent:protected] => 3 [label:protected] => Demolition [alreadyInSave:protected] => [alreadyInValidation:protected] => [validationFailures:protected] => Array ( ) [_new:BaseObject:private] => [_deleted:BaseObject:private] => [modifiedColumns:protected] => Array ( ) ) [89] => Category Object ( [languages:protected] => [bok_resources:protected] => [bok_topics:protected] => [bok_keywords:protected] => [id:protected] => 89 [type:protected] => category [parent:protected] => 3 [label:protected] => Disasters [alreadyInSave:protected] => [alreadyInValidation:protected] => [validationFailures:protected] => Array ( ) [_new:BaseObject:private] => [_deleted:BaseObject:private] => [modifiedColumns:protected] => Array ( ) ) [91] => Category Object ( [languages:protected] => [bok_resources:protected] => [bok_topics:protected] => [bok_keywords:protected] => [id:protected] => 91 [type:protected] => category [parent:protected] => 3 [label:protected] => Heavy & Highway [alreadyInSave:protected] => [alreadyInValidation:protected] => [validationFailures:protected] => Array ( ) [_new:BaseObject:private] => [_deleted:BaseObject:private] => [modifiedColumns:protected] => Array ( ) ) [90] => Category Object ( [languages:protected] => [bok_resources:protected] => [bok_topics:protected] => [bok_keywords:protected] => [id:protected] => 90 [type:protected] => category [parent:protected] => 3 [label:protected] => Industrial [alreadyInSave:protected] => [alreadyInValidation:protected] => [validationFailures:protected] => Array ( ) [_new:BaseObject:private] => [_deleted:BaseObject:private] => [modifiedColumns:protected] => Array ( ) ) [92] => Category Object ( [languages:protected] => [bok_resources:protected] => [bok_topics:protected] => [bok_keywords:protected] => [id:protected] => 92 [type:protected] => category [parent:protected] => 3 [label:protected] => LEED/Green Construction [alreadyInSave:protected] => [alreadyInValidation:protected] => [validationFailures:protected] => Array ( ) [_new:BaseObject:private] => [_deleted:BaseObject:private] => [modifiedColumns:protected] => Array ( ) ) [93] => Category Object ( [languages:protected] => [bok_resources:protected] => [bok_topics:protected] => [bok_keywords:protected] => [id:protected] => 93 [type:protected] => category [parent:protected] => 3 [label:protected] => Renovations [alreadyInSave:protected] => [alreadyInValidation:protected] => [validationFailures:protected] => Array ( ) [_new:BaseObject:private] => [_deleted:BaseObject:private] => [modifiedColumns:protected] => Array ( ) ) [94] => Category Object ( [languages:protected] => [bok_resources:protected] => [bok_topics:protected] => [bok_keywords:protected] => [id:protected] => 94 [type:protected] => category [parent:protected] => 3 [label:protected] => Residential [alreadyInSave:protected] => [alreadyInValidation:protected] => [validationFailures:protected] => Array ( ) [_new:BaseObject:private] => [_deleted:BaseObject:private] => [modifiedColumns:protected] => Array ( ) ) [95] => Category Object ( [languages:protected] => [bok_resources:protected] => [bok_topics:protected] => [bok_keywords:protected] => [id:protected] => 95 [type:protected] => category [parent:protected] => 3 [label:protected] => Underground [alreadyInSave:protected] => [alreadyInValidation:protected] => [validationFailures:protected] => Array ( ) [_new:BaseObject:private] => [_deleted:BaseObject:private] => [modifiedColumns:protected] => Array ( ) ) [100] => Category Object ( [languages:protected] => [bok_resources:protected] => [bok_topics:protected] => [bok_keywords:protected] => [id:protected] => 100 [type:protected] => category [parent:protected] => 6 [label:protected] => Toolbox Talks [alreadyInSave:protected] => [alreadyInValidation:protected] => [validationFailures:protected] => Array ( ) [_new:BaseObject:private] => [_deleted:BaseObject:private] => [modifiedColumns:protected] => Array ( ) ) ) [categories_initialized:protected] => 1 [mapped_items:protected] => [content:protected] => [files:protected] => [language:protected] => Language Object ( [id:protected] => 1 [code:protected] => en [name:protected] => English [alreadyInSave:protected] => [alreadyInValidation:protected] => [validationFailures:protected] => Array ( ) [_new:BaseObject:private] => [_deleted:BaseObject:private] => [modifiedColumns:protected] => Array ( ) ) [old_record:protected] => [id:protected] => 4428 [old_id:protected] => [elcosh_id:protected] => d001658 [type:protected] => document [display_type:protected] => HTML only (and links) [user_id:protected] => 0 [language_id:protected] => 1 [tagging_id:protected] => Daniela Caceres [priority_id:protected] => 1 [title:protected] => Toolbox Talk: Work Zone Safety: Working Around Vehicles [total_pages:protected] => 0 [billed_pages:protected] => 0 [publication_number:protected] => [part_of:protected] => [keywords:protected] => Struck, Struck by, Vehicle, Work Zone Safety, Truck, Operator, Driver, Mobile Equipment [comments:protected] => [summary:protected] => The CPWR Toolbox Talk on Working Around Vehicles in the Work Zone addresses methods to avoid being struck-by a vehicle on a construction site. The resource includes a case example, steps to prevent a related injury, and questions for discussion. It includes a graphic that illustrates the hazard, which can be posted in a central location as a reminder of steps to work safely. Available in English and Spanish. [transition_comments:protected] => [external_link:protected] => [consol_link:protected] => [more_like_this:protected] => d001640 [permission_given_by:protected] => [published:protected] => T [billable:protected] => F [img_name:protected] => [img_ext:protected] => [img_width:protected] => [img_height:protected] => [img_credit:protected] => [img_practice:protected] => [vid_source_id:protected] => [vid_running_time:protected] => [vid_intended_audience:protected] => [vid_acquisition_info:protected] => [vid_cost:protected] => [vid_producer:protected] => [vid_filename:protected] => [vid_filename_downloadable:protected] => [date_summary:protected] => [date_permission_requested:protected] => [date_permission_received:protected] => [date_review_needed:protected] => [date_received:protected] => 12/23/21 [date_completed:protected] => 12/23/21 [date_billed:protected] => [date_modified:protected] => 05/19/23 [collBokExports:protected] => [lastBokExportCriteria:BaseElcoshItem:private] => [alreadyInSave:protected] => [alreadyInValidation:protected] => [validationFailures:protected] => Array ( ) [_new:BaseObject:private] => [_deleted:BaseObject:private] => [modifiedColumns:protected] => Array ( ) ) ) [2] => Search_Result Object ( [title] => Construction Dive -- DeWalt's Jobsite Pro headphones recalled for fire hazards [image] => /record/images/notavailable-p.png [blurb] => A recall notice by the United States Consumer Product Safety Commission affects over 300,000 DeWalt Jobsite Pro Headphones. The recall is a result of... [category] => Array ( [0] => 16 [1] => 44 [2] => 45 [3] => 46 [4] => 47 [5] => 48 [6] => 49 [7] => 50 [8] => 51 [9] => 52 [10] => 53 [11] => 54 [12] => 55 [13] => 56 [14] => 57 [15] => 58 [16] => 59 [17] => 60 [18] => 61 [19] => 64 [20] => 65 [21] => 66 [22] => 67 [23] => 68 [24] => 69 [25] => 70 [26] => 71 [27] => 72 [28] => 73 [29] => 74 [30] => 75 [31] => 76 [32] => 77 [33] => 63 [34] => 78 [35] => 79 [36] => 80 [37] => 81 [38] => 82 [39] => 62 [40] => 83 [41] => 84 [42] => 85 [43] => 86 [44] => 87 [45] => 88 [46] => 89 [47] => 91 [48] => 90 [49] => 92 [50] => 93 [51] => 94 [52] => 95 ) [labels] => Array ( [0] => Fire & Explosions [1] => Work Environment [2] => Hazards [3] => Acoustical Ceiling Carpenter [4] => Trades [5] => Asbestos/Insulator [7] => Boilermaker [9] => Bricklayer [11] => Cabinetmaker [13] => Carpenter [15] => Carpet Layer [17] => Cement Mason [19] => Commercial Diver [21] => Concrete Polisher [23] => Drywall Applicator Specialist [25] => Electrical Worker [27] => Elevator Constructor [29] => Flagger [31] => Glazier [33] => Hazardous Waste Cleanup [35] => HVAC [37] => Interior Systems Carpenter [39] => Laborer [41] => Landscaper [43] => Lather [45] => Lead Abatement Worker [47] => Maintenance Worker [49] => Millwright [51] => Operating Engineer [53] => Painter [55] => Paper Hanger [57] => PCC/Restoration [59] => Pile Driver [61] => Plasterer [63] => Plumber/Pipefitter [65] => Refractory Worker [67] => Reinforcing Ironworker [69] => Roofer/Waterproofer [71] => Scaffold Erector [73] => Sheetmetal Worker [75] => Sprinkler Fitter [77] => Stonemason [79] => Structural Ironworker [81] => Terrazzo Worker [83] => Tile Setter [85] => Truck Driver [87] => Welder [89] => Commercial & Institutional [90] => Jobsites [91] => Demolition [93] => Disasters [95] => Heavy & Highway [97] => Industrial [99] => LEED/Green Construction [101] => Renovations [103] => Residential [105] => Underground ) [type] => [sub_category] => [url] => /document/4426/d001656/Construction%2BDive%2B--%2BDeWalt%2527s%2BJobsite%2BPro%2Bheadphones%2Brecalled%2Bfor%2Bfire%2Bhazards.html [item:protected] => DocumentRecord Object ( [records:protected] => Array ( ) [recordId:protected] => [searchWordClass:protected] => [searchWordPeerClass:protected] => [bok_record:protected] => [authors:protected] => [organizations:protected] => [collections:protected] => [categories:protected] => Array ( [16] => Category Object ( [languages:protected] => [bok_resources:protected] => [bok_topics:protected] => [bok_keywords:protected] => [id:protected] => 16 [type:protected] => category [parent:protected] => 7 [label:protected] => Fire & Explosions [alreadyInSave:protected] => [alreadyInValidation:protected] => [validationFailures:protected] => Array ( ) [_new:BaseObject:private] => [_deleted:BaseObject:private] => [modifiedColumns:protected] => Array ( ) ) [44] => Category Object ( [languages:protected] => [bok_resources:protected] => [bok_topics:protected] => [bok_keywords:protected] => [id:protected] => 44 [type:protected] => category [parent:protected] => 2 [label:protected] => Acoustical Ceiling Carpenter [alreadyInSave:protected] => [alreadyInValidation:protected] => [validationFailures:protected] => Array ( ) [_new:BaseObject:private] => [_deleted:BaseObject:private] => [modifiedColumns:protected] => Array ( ) ) [45] => Category Object ( [languages:protected] => [bok_resources:protected] => [bok_topics:protected] => [bok_keywords:protected] => [id:protected] => 45 [type:protected] => category [parent:protected] => 2 [label:protected] => Asbestos/Insulator [alreadyInSave:protected] => [alreadyInValidation:protected] => [validationFailures:protected] => Array ( ) [_new:BaseObject:private] => [_deleted:BaseObject:private] => [modifiedColumns:protected] => Array ( ) ) [46] => Category Object ( [languages:protected] => [bok_resources:protected] => [bok_topics:protected] => [bok_keywords:protected] => [id:protected] => 46 [type:protected] => category [parent:protected] => 2 [label:protected] => Boilermaker [alreadyInSave:protected] => [alreadyInValidation:protected] => [validationFailures:protected] => Array ( ) [_new:BaseObject:private] => [_deleted:BaseObject:private] => [modifiedColumns:protected] => Array ( ) ) [47] => Category Object ( [languages:protected] => [bok_resources:protected] => [bok_topics:protected] => [bok_keywords:protected] => [id:protected] => 47 [type:protected] => category [parent:protected] => 2 [label:protected] => Bricklayer [alreadyInSave:protected] => [alreadyInValidation:protected] => [validationFailures:protected] => Array ( ) [_new:BaseObject:private] => [_deleted:BaseObject:private] => [modifiedColumns:protected] => Array ( ) ) [48] => Category Object ( [languages:protected] => [bok_resources:protected] => [bok_topics:protected] => [bok_keywords:protected] => [id:protected] => 48 [type:protected] => category [parent:protected] => 2 [label:protected] => Cabinetmaker [alreadyInSave:protected] => [alreadyInValidation:protected] => [validationFailures:protected] => Array ( ) [_new:BaseObject:private] => [_deleted:BaseObject:private] => [modifiedColumns:protected] => Array ( ) ) [49] => Category Object ( [languages:protected] => [bok_resources:protected] => [bok_topics:protected] => [bok_keywords:protected] => [id:protected] => 49 [type:protected] => category [parent:protected] => 2 [label:protected] => Carpenter [alreadyInSave:protected] => [alreadyInValidation:protected] => [validationFailures:protected] => Array ( ) [_new:BaseObject:private] => [_deleted:BaseObject:private] => [modifiedColumns:protected] => Array ( ) ) [50] => Category Object ( [languages:protected] => [bok_resources:protected] => [bok_topics:protected] => [bok_keywords:protected] => [id:protected] => 50 [type:protected] => category [parent:protected] => 2 [label:protected] => Carpet Layer [alreadyInSave:protected] => [alreadyInValidation:protected] => [validationFailures:protected] => Array ( ) [_new:BaseObject:private] => [_deleted:BaseObject:private] => [modifiedColumns:protected] => Array ( ) ) [51] => Category Object ( [languages:protected] => [bok_resources:protected] => [bok_topics:protected] => [bok_keywords:protected] => [id:protected] => 51 [type:protected] => category [parent:protected] => 2 [label:protected] => Cement Mason [alreadyInSave:protected] => [alreadyInValidation:protected] => [validationFailures:protected] => Array ( ) [_new:BaseObject:private] => [_deleted:BaseObject:private] => [modifiedColumns:protected] => Array ( ) ) [52] => Category Object ( [languages:protected] => [bok_resources:protected] => [bok_topics:protected] => [bok_keywords:protected] => [id:protected] => 52 [type:protected] => category [parent:protected] => 2 [label:protected] => Commercial Diver [alreadyInSave:protected] => [alreadyInValidation:protected] => [validationFailures:protected] => Array ( ) [_new:BaseObject:private] => [_deleted:BaseObject:private] => [modifiedColumns:protected] => Array ( ) ) [53] => Category Object ( [languages:protected] => [bok_resources:protected] => [bok_topics:protected] => [bok_keywords:protected] => [id:protected] => 53 [type:protected] => category [parent:protected] => 2 [label:protected] => Concrete Polisher [alreadyInSave:protected] => [alreadyInValidation:protected] => [validationFailures:protected] => Array ( ) [_new:BaseObject:private] => [_deleted:BaseObject:private] => [modifiedColumns:protected] => Array ( ) ) [54] => Category Object ( [languages:protected] => [bok_resources:protected] => [bok_topics:protected] => [bok_keywords:protected] => [id:protected] => 54 [type:protected] => category [parent:protected] => 2 [label:protected] => Drywall Applicator Specialist [alreadyInSave:protected] => [alreadyInValidation:protected] => [validationFailures:protected] => Array ( ) [_new:BaseObject:private] => [_deleted:BaseObject:private] => [modifiedColumns:protected] => Array ( ) ) [55] => Category Object ( [languages:protected] => [bok_resources:protected] => [bok_topics:protected] => [bok_keywords:protected] => [id:protected] => 55 [type:protected] => category [parent:protected] => 2 [label:protected] => Electrical Worker [alreadyInSave:protected] => [alreadyInValidation:protected] => [validationFailures:protected] => Array ( ) [_new:BaseObject:private] => [_deleted:BaseObject:private] => [modifiedColumns:protected] => Array ( ) ) [56] => Category Object ( [languages:protected] => [bok_resources:protected] => [bok_topics:protected] => [bok_keywords:protected] => [id:protected] => 56 [type:protected] => category [parent:protected] => 2 [label:protected] => Elevator Constructor [alreadyInSave:protected] => [alreadyInValidation:protected] => [validationFailures:protected] => Array ( ) [_new:BaseObject:private] => [_deleted:BaseObject:private] => [modifiedColumns:protected] => Array ( ) ) [57] => Category Object ( [languages:protected] => [bok_resources:protected] => [bok_topics:protected] => [bok_keywords:protected] => [id:protected] => 57 [type:protected] => category [parent:protected] => 2 [label:protected] => Flagger [alreadyInSave:protected] => [alreadyInValidation:protected] => [validationFailures:protected] => Array ( ) [_new:BaseObject:private] => [_deleted:BaseObject:private] => [modifiedColumns:protected] => Array ( ) ) [58] => Category Object ( [languages:protected] => [bok_resources:protected] => [bok_topics:protected] => [bok_keywords:protected] => [id:protected] => 58 [type:protected] => category [parent:protected] => 2 [label:protected] => Glazier [alreadyInSave:protected] => [alreadyInValidation:protected] => [validationFailures:protected] => Array ( ) [_new:BaseObject:private] => [_deleted:BaseObject:private] => [modifiedColumns:protected] => Array ( ) ) [59] => Category Object ( [languages:protected] => [bok_resources:protected] => [bok_topics:protected] => [bok_keywords:protected] => [id:protected] => 59 [type:protected] => category [parent:protected] => 2 [label:protected] => Hazardous Waste Cleanup [alreadyInSave:protected] => [alreadyInValidation:protected] => [validationFailures:protected] => Array ( ) [_new:BaseObject:private] => [_deleted:BaseObject:private] => [modifiedColumns:protected] => Array ( ) ) [60] => Category Object ( [languages:protected] => [bok_resources:protected] => [bok_topics:protected] => [bok_keywords:protected] => [id:protected] => 60 [type:protected] => category [parent:protected] => 2 [label:protected] => HVAC [alreadyInSave:protected] => [alreadyInValidation:protected] => [validationFailures:protected] => Array ( ) [_new:BaseObject:private] => [_deleted:BaseObject:private] => [modifiedColumns:protected] => Array ( ) ) [61] => Category Object ( [languages:protected] => [bok_resources:protected] => [bok_topics:protected] => [bok_keywords:protected] => [id:protected] => 61 [type:protected] => category [parent:protected] => 2 [label:protected] => Interior Systems Carpenter [alreadyInSave:protected] => [alreadyInValidation:protected] => [validationFailures:protected] => Array ( ) [_new:BaseObject:private] => [_deleted:BaseObject:private] => [modifiedColumns:protected] => Array ( ) ) [64] => Category Object ( [languages:protected] => [bok_resources:protected] => [bok_topics:protected] => [bok_keywords:protected] => [id:protected] => 64 [type:protected] => category [parent:protected] => 2 [label:protected] => Laborer [alreadyInSave:protected] => [alreadyInValidation:protected] => [validationFailures:protected] => Array ( ) [_new:BaseObject:private] => [_deleted:BaseObject:private] => [modifiedColumns:protected] => Array ( ) ) [65] => Category Object ( [languages:protected] => [bok_resources:protected] => [bok_topics:protected] => [bok_keywords:protected] => [id:protected] => 65 [type:protected] => category [parent:protected] => 2 [label:protected] => Landscaper [alreadyInSave:protected] => [alreadyInValidation:protected] => [validationFailures:protected] => Array ( ) [_new:BaseObject:private] => [_deleted:BaseObject:private] => [modifiedColumns:protected] => Array ( ) ) [66] => Category Object ( [languages:protected] => [bok_resources:protected] => [bok_topics:protected] => [bok_keywords:protected] => [id:protected] => 66 [type:protected] => category [parent:protected] => 2 [label:protected] => Lather [alreadyInSave:protected] => [alreadyInValidation:protected] => [validationFailures:protected] => Array ( ) [_new:BaseObject:private] => [_deleted:BaseObject:private] => [modifiedColumns:protected] => Array ( ) ) [67] => Category Object ( [languages:protected] => [bok_resources:protected] => [bok_topics:protected] => [bok_keywords:protected] => [id:protected] => 67 [type:protected] => category [parent:protected] => 2 [label:protected] => Lead Abatement Worker [alreadyInSave:protected] => [alreadyInValidation:protected] => [validationFailures:protected] => Array ( ) [_new:BaseObject:private] => [_deleted:BaseObject:private] => [modifiedColumns:protected] => Array ( ) ) [68] => Category Object ( [languages:protected] => [bok_resources:protected] => [bok_topics:protected] => [bok_keywords:protected] => [id:protected] => 68 [type:protected] => category [parent:protected] => 2 [label:protected] => Maintenance Worker [alreadyInSave:protected] => [alreadyInValidation:protected] => [validationFailures:protected] => Array ( ) [_new:BaseObject:private] => [_deleted:BaseObject:private] => [modifiedColumns:protected] => Array ( ) ) [69] => Category Object ( [languages:protected] => [bok_resources:protected] => [bok_topics:protected] => [bok_keywords:protected] => [id:protected] => 69 [type:protected] => category [parent:protected] => 2 [label:protected] => Millwright [alreadyInSave:protected] => [alreadyInValidation:protected] => [validationFailures:protected] => Array ( ) [_new:BaseObject:private] => [_deleted:BaseObject:private] => [modifiedColumns:protected] => Array ( ) ) [70] => Category Object ( [languages:protected] => [bok_resources:protected] => [bok_topics:protected] => [bok_keywords:protected] => [id:protected] => 70 [type:protected] => category [parent:protected] => 2 [label:protected] => Operating Engineer [alreadyInSave:protected] => [alreadyInValidation:protected] => [validationFailures:protected] => Array ( ) [_new:BaseObject:private] => [_deleted:BaseObject:private] => [modifiedColumns:protected] => Array ( ) ) [71] => Category Object ( [languages:protected] => [bok_resources:protected] => [bok_topics:protected] => [bok_keywords:protected] => [id:protected] => 71 [type:protected] => category [parent:protected] => 2 [label:protected] => Painter [alreadyInSave:protected] => [alreadyInValidation:protected] => [validationFailures:protected] => Array ( ) [_new:BaseObject:private] => [_deleted:BaseObject:private] => [modifiedColumns:protected] => Array ( ) ) [72] => Category Object ( [languages:protected] => [bok_resources:protected] => [bok_topics:protected] => [bok_keywords:protected] => [id:protected] => 72 [type:protected] => category [parent:protected] => 2 [label:protected] => Paper Hanger [alreadyInSave:protected] => [alreadyInValidation:protected] => [validationFailures:protected] => Array ( ) [_new:BaseObject:private] => [_deleted:BaseObject:private] => [modifiedColumns:protected] => Array ( ) ) [73] => Category Object ( [languages:protected] => [bok_resources:protected] => [bok_topics:protected] => [bok_keywords:protected] => [id:protected] => 73 [type:protected] => category [parent:protected] => 2 [label:protected] => PCC/Restoration [alreadyInSave:protected] => [alreadyInValidation:protected] => [validationFailures:protected] => Array ( ) [_new:BaseObject:private] => [_deleted:BaseObject:private] => [modifiedColumns:protected] => Array ( ) ) [74] => Category Object ( [languages:protected] => [bok_resources:protected] => [bok_topics:protected] => [bok_keywords:protected] => [id:protected] => 74 [type:protected] => category [parent:protected] => 2 [label:protected] => Pile Driver [alreadyInSave:protected] => [alreadyInValidation:protected] => [validationFailures:protected] => Array ( ) [_new:BaseObject:private] => [_deleted:BaseObject:private] => [modifiedColumns:protected] => Array ( ) ) [75] => Category Object ( [languages:protected] => [bok_resources:protected] => [bok_topics:protected] => [bok_keywords:protected] => [id:protected] => 75 [type:protected] => category [parent:protected] => 2 [label:protected] => Plasterer [alreadyInSave:protected] => [alreadyInValidation:protected] => [validationFailures:protected] => Array ( ) [_new:BaseObject:private] => [_deleted:BaseObject:private] => [modifiedColumns:protected] => Array ( ) ) [76] => Category Object ( [languages:protected] => [bok_resources:protected] => [bok_topics:protected] => [bok_keywords:protected] => [id:protected] => 76 [type:protected] => category [parent:protected] => 2 [label:protected] => Plumber/Pipefitter [alreadyInSave:protected] => [alreadyInValidation:protected] => [validationFailures:protected] => Array ( ) [_new:BaseObject:private] => [_deleted:BaseObject:private] => [modifiedColumns:protected] => Array ( ) ) [77] => Category Object ( [languages:protected] => [bok_resources:protected] => [bok_topics:protected] => [bok_keywords:protected] => [id:protected] => 77 [type:protected] => category [parent:protected] => 2 [label:protected] => Refractory Worker [alreadyInSave:protected] => [alreadyInValidation:protected] => [validationFailures:protected] => Array ( ) [_new:BaseObject:private] => [_deleted:BaseObject:private] => [modifiedColumns:protected] => Array ( ) ) [63] => Category Object ( [languages:protected] => [bok_resources:protected] => [bok_topics:protected] => [bok_keywords:protected] => [id:protected] => 63 [type:protected] => category [parent:protected] => 2 [label:protected] => Reinforcing Ironworker [alreadyInSave:protected] => [alreadyInValidation:protected] => [validationFailures:protected] => Array ( ) [_new:BaseObject:private] => [_deleted:BaseObject:private] => [modifiedColumns:protected] => Array ( ) ) [78] => Category Object ( [languages:protected] => [bok_resources:protected] => [bok_topics:protected] => [bok_keywords:protected] => [id:protected] => 78 [type:protected] => category [parent:protected] => 2 [label:protected] => Roofer/Waterproofer [alreadyInSave:protected] => [alreadyInValidation:protected] => [validationFailures:protected] => Array ( ) [_new:BaseObject:private] => [_deleted:BaseObject:private] => [modifiedColumns:protected] => Array ( ) ) [79] => Category Object ( [languages:protected] => [bok_resources:protected] => [bok_topics:protected] => [bok_keywords:protected] => [id:protected] => 79 [type:protected] => category [parent:protected] => 2 [label:protected] => Scaffold Erector [alreadyInSave:protected] => [alreadyInValidation:protected] => [validationFailures:protected] => Array ( ) [_new:BaseObject:private] => [_deleted:BaseObject:private] => [modifiedColumns:protected] => Array ( ) ) [80] => Category Object ( [languages:protected] => [bok_resources:protected] => [bok_topics:protected] => [bok_keywords:protected] => [id:protected] => 80 [type:protected] => category [parent:protected] => 2 [label:protected] => Sheetmetal Worker [alreadyInSave:protected] => [alreadyInValidation:protected] => [validationFailures:protected] => Array ( ) [_new:BaseObject:private] => [_deleted:BaseObject:private] => [modifiedColumns:protected] => Array ( ) ) [81] => Category Object ( [languages:protected] => [bok_resources:protected] => [bok_topics:protected] => [bok_keywords:protected] => [id:protected] => 81 [type:protected] => category [parent:protected] => 2 [label:protected] => Sprinkler Fitter [alreadyInSave:protected] => [alreadyInValidation:protected] => [validationFailures:protected] => Array ( ) [_new:BaseObject:private] => [_deleted:BaseObject:private] => [modifiedColumns:protected] => Array ( ) ) [82] => Category Object ( [languages:protected] => [bok_resources:protected] => [bok_topics:protected] => [bok_keywords:protected] => [id:protected] => 82 [type:protected] => category [parent:protected] => 2 [label:protected] => Stonemason [alreadyInSave:protected] => [alreadyInValidation:protected] => [validationFailures:protected] => Array ( ) [_new:BaseObject:private] => [_deleted:BaseObject:private] => [modifiedColumns:protected] => Array ( ) ) [62] => Category Object ( [languages:protected] => [bok_resources:protected] => [bok_topics:protected] => [bok_keywords:protected] => [id:protected] => 62 [type:protected] => category [parent:protected] => 2 [label:protected] => Structural Ironworker [alreadyInSave:protected] => [alreadyInValidation:protected] => [validationFailures:protected] => Array ( ) [_new:BaseObject:private] => [_deleted:BaseObject:private] => [modifiedColumns:protected] => Array ( ) ) [83] => Category Object ( [languages:protected] => [bok_resources:protected] => [bok_topics:protected] => [bok_keywords:protected] => [id:protected] => 83 [type:protected] => category [parent:protected] => 2 [label:protected] => Terrazzo Worker [alreadyInSave:protected] => [alreadyInValidation:protected] => [validationFailures:protected] => Array ( ) [_new:BaseObject:private] => [_deleted:BaseObject:private] => [modifiedColumns:protected] => Array ( ) ) [84] => Category Object ( [languages:protected] => [bok_resources:protected] => [bok_topics:protected] => [bok_keywords:protected] => [id:protected] => 84 [type:protected] => category [parent:protected] => 2 [label:protected] => Tile Setter [alreadyInSave:protected] => [alreadyInValidation:protected] => [validationFailures:protected] => Array ( ) [_new:BaseObject:private] => [_deleted:BaseObject:private] => [modifiedColumns:protected] => Array ( ) ) [85] => Category Object ( [languages:protected] => [bok_resources:protected] => [bok_topics:protected] => [bok_keywords:protected] => [id:protected] => 85 [type:protected] => category [parent:protected] => 2 [label:protected] => Truck Driver [alreadyInSave:protected] => [alreadyInValidation:protected] => [validationFailures:protected] => Array ( ) [_new:BaseObject:private] => [_deleted:BaseObject:private] => [modifiedColumns:protected] => Array ( ) ) [86] => Category Object ( [languages:protected] => [bok_resources:protected] => [bok_topics:protected] => [bok_keywords:protected] => [id:protected] => 86 [type:protected] => category [parent:protected] => 2 [label:protected] => Welder [alreadyInSave:protected] => [alreadyInValidation:protected] => [validationFailures:protected] => Array ( ) [_new:BaseObject:private] => [_deleted:BaseObject:private] => [modifiedColumns:protected] => Array ( ) ) [87] => Category Object ( [languages:protected] => [bok_resources:protected] => [bok_topics:protected] => [bok_keywords:protected] => [id:protected] => 87 [type:protected] => category [parent:protected] => 3 [label:protected] => Commercial & Institutional [alreadyInSave:protected] => [alreadyInValidation:protected] => [validationFailures:protected] => Array ( ) [_new:BaseObject:private] => [_deleted:BaseObject:private] => [modifiedColumns:protected] => Array ( ) ) [88] => Category Object ( [languages:protected] => [bok_resources:protected] => [bok_topics:protected] => [bok_keywords:protected] => [id:protected] => 88 [type:protected] => category [parent:protected] => 3 [label:protected] => Demolition [alreadyInSave:protected] => [alreadyInValidation:protected] => [validationFailures:protected] => Array ( ) [_new:BaseObject:private] => [_deleted:BaseObject:private] => [modifiedColumns:protected] => Array ( ) ) [89] => Category Object ( [languages:protected] => [bok_resources:protected] => [bok_topics:protected] => [bok_keywords:protected] => [id:protected] => 89 [type:protected] => category [parent:protected] => 3 [label:protected] => Disasters [alreadyInSave:protected] => [alreadyInValidation:protected] => [validationFailures:protected] => Array ( ) [_new:BaseObject:private] => [_deleted:BaseObject:private] => [modifiedColumns:protected] => Array ( ) ) [91] => Category Object ( [languages:protected] => [bok_resources:protected] => [bok_topics:protected] => [bok_keywords:protected] => [id:protected] => 91 [type:protected] => category [parent:protected] => 3 [label:protected] => Heavy & Highway [alreadyInSave:protected] => [alreadyInValidation:protected] => [validationFailures:protected] => Array ( ) [_new:BaseObject:private] => [_deleted:BaseObject:private] => [modifiedColumns:protected] => Array ( ) ) [90] => Category Object ( [languages:protected] => [bok_resources:protected] => [bok_topics:protected] => [bok_keywords:protected] => [id:protected] => 90 [type:protected] => category [parent:protected] => 3 [label:protected] => Industrial [alreadyInSave:protected] => [alreadyInValidation:protected] => [validationFailures:protected] => Array ( ) [_new:BaseObject:private] => [_deleted:BaseObject:private] => [modifiedColumns:protected] => Array ( ) ) [92] => Category Object ( [languages:protected] => [bok_resources:protected] => [bok_topics:protected] => [bok_keywords:protected] => [id:protected] => 92 [type:protected] => category [parent:protected] => 3 [label:protected] => LEED/Green Construction [alreadyInSave:protected] => [alreadyInValidation:protected] => [validationFailures:protected] => Array ( ) [_new:BaseObject:private] => [_deleted:BaseObject:private] => [modifiedColumns:protected] => Array ( ) ) [93] => Category Object ( [languages:protected] => [bok_resources:protected] => [bok_topics:protected] => [bok_keywords:protected] => [id:protected] => 93 [type:protected] => category [parent:protected] => 3 [label:protected] => Renovations [alreadyInSave:protected] => [alreadyInValidation:protected] => [validationFailures:protected] => Array ( ) [_new:BaseObject:private] => [_deleted:BaseObject:private] => [modifiedColumns:protected] => Array ( ) ) [94] => Category Object ( [languages:protected] => [bok_resources:protected] => [bok_topics:protected] => [bok_keywords:protected] => [id:protected] => 94 [type:protected] => category [parent:protected] => 3 [label:protected] => Residential [alreadyInSave:protected] => [alreadyInValidation:protected] => [validationFailures:protected] => Array ( ) [_new:BaseObject:private] => [_deleted:BaseObject:private] => [modifiedColumns:protected] => Array ( ) ) [95] => Category Object ( [languages:protected] => [bok_resources:protected] => [bok_topics:protected] => [bok_keywords:protected] => [id:protected] => 95 [type:protected] => category [parent:protected] => 3 [label:protected] => Underground [alreadyInSave:protected] => [alreadyInValidation:protected] => [validationFailures:protected] => Array ( ) [_new:BaseObject:private] => [_deleted:BaseObject:private] => [modifiedColumns:protected] => Array ( ) ) ) [categories_initialized:protected] => 1 [mapped_items:protected] => [content:protected] => [files:protected] => [language:protected] => Language Object ( [id:protected] => 1 [code:protected] => en [name:protected] => English [alreadyInSave:protected] => [alreadyInValidation:protected] => [validationFailures:protected] => Array ( ) [_new:BaseObject:private] => [_deleted:BaseObject:private] => [modifiedColumns:protected] => Array ( ) ) [old_record:protected] => [id:protected] => 4426 [old_id:protected] => [elcosh_id:protected] => d001656 [type:protected] => document [display_type:protected] => HTML only (and links) [user_id:protected] => 0 [language_id:protected] => 1 [tagging_id:protected] => Mike Aguilar [priority_id:protected] => 1 [title:protected] => Construction Dive -- DeWalt's Jobsite Pro headphones recalled for fire hazards [total_pages:protected] => 1 [billed_pages:protected] => 1 [publication_number:protected] => [part_of:protected] => [keywords:protected] => DeWalt, Fire Hazards, recall, headphones [comments:protected] => [summary:protected] => A recall notice by the United States Consumer Product Safety Commission affects over 300,000 DeWalt Jobsite Pro Headphones. The recall is a result of a malfunction that can cause earbuds to overheat while charging or during use, leading to fire and burn hazards. [transition_comments:protected] => [external_link:protected] => https://www.constructiondive.com/news/dewalts-jobsite-pro-headphones-recalled-for-fire-hazards/611248/?utm_source=Sailthru&utm_medium=email&utm_campaign=Issue:%202021-12-10%20Construction%20Dive%20Newsletter%20%5Bissue:38532%5D&utm_term=Construction%20Dive [consol_link:protected] => [more_like_this:protected] => [permission_given_by:protected] => [published:protected] => T [billable:protected] => F [img_name:protected] => [img_ext:protected] => [img_width:protected] => [img_height:protected] => [img_credit:protected] => [img_practice:protected] => [vid_source_id:protected] => [vid_running_time:protected] => [vid_intended_audience:protected] => [vid_acquisition_info:protected] => [vid_cost:protected] => [vid_producer:protected] => [vid_filename:protected] => [vid_filename_downloadable:protected] => [date_summary:protected] => [date_permission_requested:protected] => [date_permission_received:protected] => [date_review_needed:protected] => [date_received:protected] => 12/13/21 [date_completed:protected] => 12/13/21 [date_billed:protected] => [date_modified:protected] => 12/13/21 [collBokExports:protected] => [lastBokExportCriteria:BaseElcoshItem:private] => [alreadyInSave:protected] => [alreadyInValidation:protected] => [validationFailures:protected] => Array ( ) [_new:BaseObject:private] => [_deleted:BaseObject:private] => [modifiedColumns:protected] => Array ( ) ) ) [3] => Search_Result Object ( [title] => Working in an Enclosed Cab [image] => /record/images/notavailable-p.png [blurb] => This CPWR Hazard Alert on Working in enclosed cabs provides information on protecting workers from silica dust, how to minimize exposures and the dang... [category] => Array ( [0] => 10 [1] => 16 [2] => 24 [3] => 37 [4] => 46 [5] => 48 [6] => 49 [7] => 51 [8] => 53 [9] => 54 [10] => 56 [11] => 58 [12] => 59 [13] => 60 [14] => 61 [15] => 64 [16] => 66 [17] => 68 [18] => 69 [19] => 71 [20] => 73 [21] => 74 [22] => 76 [23] => 77 [24] => 63 [25] => 80 [26] => 82 [27] => 62 [28] => 83 [29] => 84 [30] => 86 [31] => 88 [32] => 89 [33] => 95 [34] => 102 ) [labels] => Array ( [0] => Confined Spaces [1] => Work Environment [2] => Hazards [3] => Fire & Explosions [6] => Trenches & Excavations [9] => Silica /Construction Dust [10] => Inhalation/Skin Exposures [12] => Boilermaker [13] => Trades [14] => Cabinetmaker [16] => Carpenter [18] => Cement Mason [20] => Concrete Polisher [22] => Drywall Applicator Specialist [24] => Elevator Constructor [26] => Glazier [28] => Hazardous Waste Cleanup [30] => HVAC [32] => Interior Systems Carpenter [34] => Laborer [36] => Lather [38] => Maintenance Worker [40] => Millwright [42] => Painter [44] => PCC/Restoration [46] => Pile Driver [48] => Plumber/Pipefitter [50] => Refractory Worker [52] => Reinforcing Ironworker [54] => Sheetmetal Worker [56] => Stonemason [58] => Structural Ironworker [60] => Terrazzo Worker [62] => Tile Setter [64] => Welder [66] => Demolition [67] => Jobsites [68] => Disasters [70] => Underground [72] => Handouts [73] => Documents [74] => Media & Documents ) [type] => Handouts [sub_category] => [url] => /document/4415/d001651/Working%2Bin%2Ban%2BEnclosed%2BCab.html [item:protected] => DocumentRecord Object ( [records:protected] => Array ( ) [recordId:protected] => [searchWordClass:protected] => [searchWordPeerClass:protected] => [bok_record:protected] => [authors:protected] => [organizations:protected] => [collections:protected] => [categories:protected] => Array ( [10] => Category Object ( [languages:protected] => [bok_resources:protected] => [bok_topics:protected] => [bok_keywords:protected] => [id:protected] => 10 [type:protected] => category [parent:protected] => 7 [label:protected] => Confined Spaces [alreadyInSave:protected] => [alreadyInValidation:protected] => [validationFailures:protected] => Array ( ) [_new:BaseObject:private] => [_deleted:BaseObject:private] => [modifiedColumns:protected] => Array ( ) ) [16] => Category Object ( [languages:protected] => [bok_resources:protected] => [bok_topics:protected] => [bok_keywords:protected] => [id:protected] => 16 [type:protected] => category [parent:protected] => 7 [label:protected] => Fire & Explosions [alreadyInSave:protected] => [alreadyInValidation:protected] => [validationFailures:protected] => Array ( ) [_new:BaseObject:private] => [_deleted:BaseObject:private] => [modifiedColumns:protected] => Array ( ) ) [24] => Category Object ( [languages:protected] => [bok_resources:protected] => [bok_topics:protected] => [bok_keywords:protected] => [id:protected] => 24 [type:protected] => category [parent:protected] => 7 [label:protected] => Trenches & Excavations [alreadyInSave:protected] => [alreadyInValidation:protected] => [validationFailures:protected] => Array ( ) [_new:BaseObject:private] => [_deleted:BaseObject:private] => [modifiedColumns:protected] => Array ( ) ) [37] => Category Object ( [languages:protected] => [bok_resources:protected] => [bok_topics:protected] => [bok_keywords:protected] => [id:protected] => 37 [type:protected] => category [parent:protected] => 8 [label:protected] => Silica /Construction Dust [alreadyInSave:protected] => [alreadyInValidation:protected] => [validationFailures:protected] => Array ( ) [_new:BaseObject:private] => [_deleted:BaseObject:private] => [modifiedColumns:protected] => Array ( ) ) [46] => Category Object ( [languages:protected] => [bok_resources:protected] => [bok_topics:protected] => [bok_keywords:protected] => [id:protected] => 46 [type:protected] => category [parent:protected] => 2 [label:protected] => Boilermaker [alreadyInSave:protected] => [alreadyInValidation:protected] => [validationFailures:protected] => Array ( ) [_new:BaseObject:private] => [_deleted:BaseObject:private] => [modifiedColumns:protected] => Array ( ) ) [48] => Category Object ( [languages:protected] => [bok_resources:protected] => [bok_topics:protected] => [bok_keywords:protected] => [id:protected] => 48 [type:protected] => category [parent:protected] => 2 [label:protected] => Cabinetmaker [alreadyInSave:protected] => [alreadyInValidation:protected] => [validationFailures:protected] => Array ( ) [_new:BaseObject:private] => [_deleted:BaseObject:private] => [modifiedColumns:protected] => Array ( ) ) [49] => Category Object ( [languages:protected] => [bok_resources:protected] => [bok_topics:protected] => [bok_keywords:protected] => [id:protected] => 49 [type:protected] => category [parent:protected] => 2 [label:protected] => Carpenter [alreadyInSave:protected] => [alreadyInValidation:protected] => [validationFailures:protected] => Array ( ) [_new:BaseObject:private] => [_deleted:BaseObject:private] => [modifiedColumns:protected] => Array ( ) ) [51] => Category Object ( [languages:protected] => [bok_resources:protected] => [bok_topics:protected] => [bok_keywords:protected] => [id:protected] => 51 [type:protected] => category [parent:protected] => 2 [label:protected] => Cement Mason [alreadyInSave:protected] => [alreadyInValidation:protected] => [validationFailures:protected] => Array ( ) [_new:BaseObject:private] => [_deleted:BaseObject:private] => [modifiedColumns:protected] => Array ( ) ) [53] => Category Object ( [languages:protected] => [bok_resources:protected] => [bok_topics:protected] => [bok_keywords:protected] => [id:protected] => 53 [type:protected] => category [parent:protected] => 2 [label:protected] => Concrete Polisher [alreadyInSave:protected] => [alreadyInValidation:protected] => [validationFailures:protected] => Array ( ) [_new:BaseObject:private] => [_deleted:BaseObject:private] => [modifiedColumns:protected] => Array ( ) ) [54] => Category Object ( [languages:protected] => [bok_resources:protected] => [bok_topics:protected] => [bok_keywords:protected] => [id:protected] => 54 [type:protected] => category [parent:protected] => 2 [label:protected] => Drywall Applicator Specialist [alreadyInSave:protected] => [alreadyInValidation:protected] => [validationFailures:protected] => Array ( ) [_new:BaseObject:private] => [_deleted:BaseObject:private] => [modifiedColumns:protected] => Array ( ) ) [56] => Category Object ( [languages:protected] => [bok_resources:protected] => [bok_topics:protected] => [bok_keywords:protected] => [id:protected] => 56 [type:protected] => category [parent:protected] => 2 [label:protected] => Elevator Constructor [alreadyInSave:protected] => [alreadyInValidation:protected] => [validationFailures:protected] => Array ( ) [_new:BaseObject:private] => [_deleted:BaseObject:private] => [modifiedColumns:protected] => Array ( ) ) [58] => Category Object ( [languages:protected] => [bok_resources:protected] => [bok_topics:protected] => [bok_keywords:protected] => [id:protected] => 58 [type:protected] => category [parent:protected] => 2 [label:protected] => Glazier [alreadyInSave:protected] => [alreadyInValidation:protected] => [validationFailures:protected] => Array ( ) [_new:BaseObject:private] => [_deleted:BaseObject:private] => [modifiedColumns:protected] => Array ( ) ) [59] => Category Object ( [languages:protected] => [bok_resources:protected] => [bok_topics:protected] => [bok_keywords:protected] => [id:protected] => 59 [type:protected] => category [parent:protected] => 2 [label:protected] => Hazardous Waste Cleanup [alreadyInSave:protected] => [alreadyInValidation:protected] => [validationFailures:protected] => Array ( ) [_new:BaseObject:private] => [_deleted:BaseObject:private] => [modifiedColumns:protected] => Array ( ) ) [60] => Category Object ( [languages:protected] => [bok_resources:protected] => [bok_topics:protected] => [bok_keywords:protected] => [id:protected] => 60 [type:protected] => category [parent:protected] => 2 [label:protected] => HVAC [alreadyInSave:protected] => [alreadyInValidation:protected] => [validationFailures:protected] => Array ( ) [_new:BaseObject:private] => [_deleted:BaseObject:private] => [modifiedColumns:protected] => Array ( ) ) [61] => Category Object ( [languages:protected] => [bok_resources:protected] => [bok_topics:protected] => [bok_keywords:protected] => [id:protected] => 61 [type:protected] => category [parent:protected] => 2 [label:protected] => Interior Systems Carpenter [alreadyInSave:protected] => [alreadyInValidation:protected] => [validationFailures:protected] => Array ( ) [_new:BaseObject:private] => [_deleted:BaseObject:private] => [modifiedColumns:protected] => Array ( ) ) [64] => Category Object ( [languages:protected] => [bok_resources:protected] => [bok_topics:protected] => [bok_keywords:protected] => [id:protected] => 64 [type:protected] => category [parent:protected] => 2 [label:protected] => Laborer [alreadyInSave:protected] => [alreadyInValidation:protected] => [validationFailures:protected] => Array ( ) [_new:BaseObject:private] => [_deleted:BaseObject:private] => [modifiedColumns:protected] => Array ( ) ) [66] => Category Object ( [languages:protected] => [bok_resources:protected] => [bok_topics:protected] => [bok_keywords:protected] => [id:protected] => 66 [type:protected] => category [parent:protected] => 2 [label:protected] => Lather [alreadyInSave:protected] => [alreadyInValidation:protected] => [validationFailures:protected] => Array ( ) [_new:BaseObject:private] => [_deleted:BaseObject:private] => [modifiedColumns:protected] => Array ( ) ) [68] => Category Object ( [languages:protected] => [bok_resources:protected] => [bok_topics:protected] => [bok_keywords:protected] => [id:protected] => 68 [type:protected] => category [parent:protected] => 2 [label:protected] => Maintenance Worker [alreadyInSave:protected] => [alreadyInValidation:protected] => [validationFailures:protected] => Array ( ) [_new:BaseObject:private] => [_deleted:BaseObject:private] => [modifiedColumns:protected] => Array ( ) ) [69] => Category Object ( [languages:protected] => [bok_resources:protected] => [bok_topics:protected] => [bok_keywords:protected] => [id:protected] => 69 [type:protected] => category [parent:protected] => 2 [label:protected] => Millwright [alreadyInSave:protected] => [alreadyInValidation:protected] => [validationFailures:protected] => Array ( ) [_new:BaseObject:private] => [_deleted:BaseObject:private] => [modifiedColumns:protected] => Array ( ) ) [71] => Category Object ( [languages:protected] => [bok_resources:protected] => [bok_topics:protected] => [bok_keywords:protected] => [id:protected] => 71 [type:protected] => category [parent:protected] => 2 [label:protected] => Painter [alreadyInSave:protected] => [alreadyInValidation:protected] => [validationFailures:protected] => Array ( ) [_new:BaseObject:private] => [_deleted:BaseObject:private] => [modifiedColumns:protected] => Array ( ) ) [73] => Category Object ( [languages:protected] => [bok_resources:protected] => [bok_topics:protected] => [bok_keywords:protected] => [id:protected] => 73 [type:protected] => category [parent:protected] => 2 [label:protected] => PCC/Restoration [alreadyInSave:protected] => [alreadyInValidation:protected] => [validationFailures:protected] => Array ( ) [_new:BaseObject:private] => [_deleted:BaseObject:private] => [modifiedColumns:protected] => Array ( ) ) [74] => Category Object ( [languages:protected] => [bok_resources:protected] => [bok_topics:protected] => [bok_keywords:protected] => [id:protected] => 74 [type:protected] => category [parent:protected] => 2 [label:protected] => Pile Driver [alreadyInSave:protected] => [alreadyInValidation:protected] => [validationFailures:protected] => Array ( ) [_new:BaseObject:private] => [_deleted:BaseObject:private] => [modifiedColumns:protected] => Array ( ) ) [76] => Category Object ( [languages:protected] => [bok_resources:protected] => [bok_topics:protected] => [bok_keywords:protected] => [id:protected] => 76 [type:protected] => category [parent:protected] => 2 [label:protected] => Plumber/Pipefitter [alreadyInSave:protected] => [alreadyInValidation:protected] => [validationFailures:protected] => Array ( ) [_new:BaseObject:private] => [_deleted:BaseObject:private] => [modifiedColumns:protected] => Array ( ) ) [77] => Category Object ( [languages:protected] => [bok_resources:protected] => [bok_topics:protected] => [bok_keywords:protected] => [id:protected] => 77 [type:protected] => category [parent:protected] => 2 [label:protected] => Refractory Worker [alreadyInSave:protected] => [alreadyInValidation:protected] => [validationFailures:protected] => Array ( ) [_new:BaseObject:private] => [_deleted:BaseObject:private] => [modifiedColumns:protected] => Array ( ) ) [63] => Category Object ( [languages:protected] => [bok_resources:protected] => [bok_topics:protected] => [bok_keywords:protected] => [id:protected] => 63 [type:protected] => category [parent:protected] => 2 [label:protected] => Reinforcing Ironworker [alreadyInSave:protected] => [alreadyInValidation:protected] => [validationFailures:protected] => Array ( ) [_new:BaseObject:private] => [_deleted:BaseObject:private] => [modifiedColumns:protected] => Array ( ) ) [80] => Category Object ( [languages:protected] => [bok_resources:protected] => [bok_topics:protected] => [bok_keywords:protected] => [id:protected] => 80 [type:protected] => category [parent:protected] => 2 [label:protected] => Sheetmetal Worker [alreadyInSave:protected] => [alreadyInValidation:protected] => [validationFailures:protected] => Array ( ) [_new:BaseObject:private] => [_deleted:BaseObject:private] => [modifiedColumns:protected] => Array ( ) ) [82] => Category Object ( [languages:protected] => [bok_resources:protected] => [bok_topics:protected] => [bok_keywords:protected] => [id:protected] => 82 [type:protected] => category [parent:protected] => 2 [label:protected] => Stonemason [alreadyInSave:protected] => [alreadyInValidation:protected] => [validationFailures:protected] => Array ( ) [_new:BaseObject:private] => [_deleted:BaseObject:private] => [modifiedColumns:protected] => Array ( ) ) [62] => Category Object ( [languages:protected] => [bok_resources:protected] => [bok_topics:protected] => [bok_keywords:protected] => [id:protected] => 62 [type:protected] => category [parent:protected] => 2 [label:protected] => Structural Ironworker [alreadyInSave:protected] => [alreadyInValidation:protected] => [validationFailures:protected] => Array ( ) [_new:BaseObject:private] => [_deleted:BaseObject:private] => [modifiedColumns:protected] => Array ( ) ) [83] => Category Object ( [languages:protected] => [bok_resources:protected] => [bok_topics:protected] => [bok_keywords:protected] => [id:protected] => 83 [type:protected] => category [parent:protected] => 2 [label:protected] => Terrazzo Worker [alreadyInSave:protected] => [alreadyInValidation:protected] => [validationFailures:protected] => Array ( ) [_new:BaseObject:private] => [_deleted:BaseObject:private] => [modifiedColumns:protected] => Array ( ) ) [84] => Category Object ( [languages:protected] => [bok_resources:protected] => [bok_topics:protected] => [bok_keywords:protected] => [id:protected] => 84 [type:protected] => category [parent:protected] => 2 [label:protected] => Tile Setter [alreadyInSave:protected] => [alreadyInValidation:protected] => [validationFailures:protected] => Array ( ) [_new:BaseObject:private] => [_deleted:BaseObject:private] => [modifiedColumns:protected] => Array ( ) ) [86] => Category Object ( [languages:protected] => [bok_resources:protected] => [bok_topics:protected] => [bok_keywords:protected] => [id:protected] => 86 [type:protected] => category [parent:protected] => 2 [label:protected] => Welder [alreadyInSave:protected] => [alreadyInValidation:protected] => [validationFailures:protected] => Array ( ) [_new:BaseObject:private] => [_deleted:BaseObject:private] => [modifiedColumns:protected] => Array ( ) ) [88] => Category Object ( [languages:protected] => [bok_resources:protected] => [bok_topics:protected] => [bok_keywords:protected] => [id:protected] => 88 [type:protected] => category [parent:protected] => 3 [label:protected] => Demolition [alreadyInSave:protected] => [alreadyInValidation:protected] => [validationFailures:protected] => Array ( ) [_new:BaseObject:private] => [_deleted:BaseObject:private] => [modifiedColumns:protected] => Array ( ) ) [89] => Category Object ( [languages:protected] => [bok_resources:protected] => [bok_topics:protected] => [bok_keywords:protected] => [id:protected] => 89 [type:protected] => category [parent:protected] => 3 [label:protected] => Disasters [alreadyInSave:protected] => [alreadyInValidation:protected] => [validationFailures:protected] => Array ( ) [_new:BaseObject:private] => [_deleted:BaseObject:private] => [modifiedColumns:protected] => Array ( ) ) [95] => Category Object ( [languages:protected] => [bok_resources:protected] => [bok_topics:protected] => [bok_keywords:protected] => [id:protected] => 95 [type:protected] => category [parent:protected] => 3 [label:protected] => Underground [alreadyInSave:protected] => [alreadyInValidation:protected] => [validationFailures:protected] => Array ( ) [_new:BaseObject:private] => [_deleted:BaseObject:private] => [modifiedColumns:protected] => Array ( ) ) [102] => Category Object ( [languages:protected] => [bok_resources:protected] => [bok_topics:protected] => [bok_keywords:protected] => [id:protected] => 102 [type:protected] => category [parent:protected] => 6 [label:protected] => Handouts [alreadyInSave:protected] => [alreadyInValidation:protected] => [validationFailures:protected] => Array ( ) [_new:BaseObject:private] => [_deleted:BaseObject:private] => [modifiedColumns:protected] => Array ( ) ) ) [categories_initialized:protected] => 1 [mapped_items:protected] => [content:protected] => [files:protected] => [language:protected] => Language Object ( [id:protected] => 1 [code:protected] => en [name:protected] => English [alreadyInSave:protected] => [alreadyInValidation:protected] => [validationFailures:protected] => Array ( ) [_new:BaseObject:private] => [_deleted:BaseObject:private] => [modifiedColumns:protected] => Array ( ) ) [old_record:protected] => [id:protected] => 4415 [old_id:protected] => [elcosh_id:protected] => d001651 [type:protected] => document [display_type:protected] => HTML only (and links) [user_id:protected] => 0 [language_id:protected] => 1 [tagging_id:protected] => Valeria Contreras [priority_id:protected] => 1 [title:protected] => Working in an Enclosed Cab [total_pages:protected] => 1 [billed_pages:protected] => 1 [publication_number:protected] => [part_of:protected] => [keywords:protected] => Occupation, construction, safety, health, hazards, work, worker, workplace, OSHA, silicosis, mining, silica, DOE, EEOICPA, labor, lung, CBD, dust, cab, miner, mine [comments:protected] => [summary:protected] => This CPWR Hazard Alert on Working in enclosed cabs provides information on protecting workers from silica dust, how to minimize exposures and the dangers of silica dust. Click on the following links to access the English version and the Spanish version. [transition_comments:protected] => [external_link:protected] => [consol_link:protected] => [more_like_this:protected] => [permission_given_by:protected] => [published:protected] => T [billable:protected] => F [img_name:protected] => [img_ext:protected] => [img_width:protected] => [img_height:protected] => [img_credit:protected] => [img_practice:protected] => [vid_source_id:protected] => [vid_running_time:protected] => [vid_intended_audience:protected] => [vid_acquisition_info:protected] => [vid_cost:protected] => [vid_producer:protected] => [vid_filename:protected] => [vid_filename_downloadable:protected] => [date_summary:protected] => [date_permission_requested:protected] => [date_permission_received:protected] => [date_review_needed:protected] => [date_received:protected] => 10/08/20 [date_completed:protected] => 10/08/20 [date_billed:protected] => [date_modified:protected] => 10/08/20 [collBokExports:protected] => [lastBokExportCriteria:BaseElcoshItem:private] => [alreadyInSave:protected] => [alreadyInValidation:protected] => [validationFailures:protected] => Array ( ) [_new:BaseObject:private] => [_deleted:BaseObject:private] => [modifiedColumns:protected] => Array ( ) ) ) [4] => Search_Result Object ( [title] => Toolbox Talk: Suicide Prevention [image] => /record/images/notavailable-p.png [blurb] => The CPWR Toolbox Talk on Suicide Prevention addresses the prevalence of suicide among construction workers. The resource includes a brief case example... [category] => Array ( [0] => 13 [1] => 20 [2] => 23 [3] => 40 [4] => 44 [5] => 45 [6] => 46 [7] => 47 [8] => 48 [9] => 49 [10] => 50 [11] => 51 [12] => 52 [13] => 53 [14] => 54 [15] => 55 [16] => 56 [17] => 57 [18] => 58 [19] => 59 [20] => 60 [21] => 61 [22] => 64 [23] => 65 [24] => 66 [25] => 67 [26] => 68 [27] => 69 [28] => 70 [29] => 71 [30] => 72 [31] => 73 [32] => 74 [33] => 75 [34] => 76 [35] => 77 [36] => 63 [37] => 78 [38] => 79 [39] => 80 [40] => 81 [41] => 82 [42] => 62 [43] => 83 [44] => 84 [45] => 85 [46] => 86 [47] => 87 [48] => 88 [49] => 89 [50] => 91 [51] => 90 [52] => 92 [53] => 93 [54] => 94 [55] => 95 [56] => 100 ) [labels] => Array ( [0] => Drugs, Alcohol & Tobacco [1] => Work Environment [2] => Hazards [3] => Safety Culture [6] => Stress & Overtime [9] => Overexertion [10] => Ergonomic [12] => Acoustical Ceiling Carpenter [13] => Trades [14] => Asbestos/Insulator [16] => Boilermaker [18] => Bricklayer [20] => Cabinetmaker [22] => Carpenter [24] => Carpet Layer [26] => Cement Mason [28] => Commercial Diver [30] => Concrete Polisher [32] => Drywall Applicator Specialist [34] => Electrical Worker [36] => Elevator Constructor [38] => Flagger [40] => Glazier [42] => Hazardous Waste Cleanup [44] => HVAC [46] => Interior Systems Carpenter [48] => Laborer [50] => Landscaper [52] => Lather [54] => Lead Abatement Worker [56] => Maintenance Worker [58] => Millwright [60] => Operating Engineer [62] => Painter [64] => Paper Hanger [66] => PCC/Restoration [68] => Pile Driver [70] => Plasterer [72] => Plumber/Pipefitter [74] => Refractory Worker [76] => Reinforcing Ironworker [78] => Roofer/Waterproofer [80] => Scaffold Erector [82] => Sheetmetal Worker [84] => Sprinkler Fitter [86] => Stonemason [88] => Structural Ironworker [90] => Terrazzo Worker [92] => Tile Setter [94] => Truck Driver [96] => Welder [98] => Commercial & Institutional [99] => Jobsites [100] => Demolition [102] => Disasters [104] => Heavy & Highway [106] => Industrial [108] => LEED/Green Construction [110] => Renovations [112] => Residential [114] => Underground [116] => Toolbox Talks [117] => Documents [118] => Media & Documents ) [type] => Toolbox Talks [sub_category] => [url] => /document/4419/d001652/Toolbox%2BTalk%253A%2BSuicide%2BPrevention.html [item:protected] => DocumentRecord Object ( [records:protected] => Array ( ) [recordId:protected] => [searchWordClass:protected] => [searchWordPeerClass:protected] => [bok_record:protected] => [authors:protected] => [organizations:protected] => [collections:protected] => [categories:protected] => Array ( [13] => Category Object ( [languages:protected] => [bok_resources:protected] => [bok_topics:protected] => [bok_keywords:protected] => [id:protected] => 13 [type:protected] => category [parent:protected] => 7 [label:protected] => Drugs, Alcohol & Tobacco [alreadyInSave:protected] => [alreadyInValidation:protected] => [validationFailures:protected] => Array ( ) [_new:BaseObject:private] => [_deleted:BaseObject:private] => [modifiedColumns:protected] => Array ( ) ) [20] => Category Object ( [languages:protected] => [bok_resources:protected] => [bok_topics:protected] => [bok_keywords:protected] => [id:protected] => 20 [type:protected] => category [parent:protected] => 7 [label:protected] => Safety Culture [alreadyInSave:protected] => [alreadyInValidation:protected] => [validationFailures:protected] => Array ( ) [_new:BaseObject:private] => [_deleted:BaseObject:private] => [modifiedColumns:protected] => Array ( ) ) [23] => Category Object ( [languages:protected] => [bok_resources:protected] => [bok_topics:protected] => [bok_keywords:protected] => [id:protected] => 23 [type:protected] => category [parent:protected] => 7 [label:protected] => Stress & Overtime [alreadyInSave:protected] => [alreadyInValidation:protected] => [validationFailures:protected] => Array ( ) [_new:BaseObject:private] => [_deleted:BaseObject:private] => [modifiedColumns:protected] => Array ( ) ) [40] => Category Object ( [languages:protected] => [bok_resources:protected] => [bok_topics:protected] => [bok_keywords:protected] => [id:protected] => 40 [type:protected] => category [parent:protected] => 9 [label:protected] => Overexertion [alreadyInSave:protected] => [alreadyInValidation:protected] => [validationFailures:protected] => Array ( ) [_new:BaseObject:private] => [_deleted:BaseObject:private] => [modifiedColumns:protected] => Array ( ) ) [44] => Category Object ( [languages:protected] => [bok_resources:protected] => [bok_topics:protected] => [bok_keywords:protected] => [id:protected] => 44 [type:protected] => category [parent:protected] => 2 [label:protected] => Acoustical Ceiling Carpenter [alreadyInSave:protected] => [alreadyInValidation:protected] => [validationFailures:protected] => Array ( ) [_new:BaseObject:private] => [_deleted:BaseObject:private] => [modifiedColumns:protected] => Array ( ) ) [45] => Category Object ( [languages:protected] => [bok_resources:protected] => [bok_topics:protected] => [bok_keywords:protected] => [id:protected] => 45 [type:protected] => category [parent:protected] => 2 [label:protected] => Asbestos/Insulator [alreadyInSave:protected] => [alreadyInValidation:protected] => [validationFailures:protected] => Array ( ) [_new:BaseObject:private] => [_deleted:BaseObject:private] => [modifiedColumns:protected] => Array ( ) ) [46] => Category Object ( [languages:protected] => [bok_resources:protected] => [bok_topics:protected] => [bok_keywords:protected] => [id:protected] => 46 [type:protected] => category [parent:protected] => 2 [label:protected] => Boilermaker [alreadyInSave:protected] => [alreadyInValidation:protected] => [validationFailures:protected] => Array ( ) [_new:BaseObject:private] => [_deleted:BaseObject:private] => [modifiedColumns:protected] => Array ( ) ) [47] => Category Object ( [languages:protected] => [bok_resources:protected] => [bok_topics:protected] => [bok_keywords:protected] => [id:protected] => 47 [type:protected] => category [parent:protected] => 2 [label:protected] => Bricklayer [alreadyInSave:protected] => [alreadyInValidation:protected] => [validationFailures:protected] => Array ( ) [_new:BaseObject:private] => [_deleted:BaseObject:private] => [modifiedColumns:protected] => Array ( ) ) [48] => Category Object ( [languages:protected] => [bok_resources:protected] => [bok_topics:protected] => [bok_keywords:protected] => [id:protected] => 48 [type:protected] => category [parent:protected] => 2 [label:protected] => Cabinetmaker [alreadyInSave:protected] => [alreadyInValidation:protected] => [validationFailures:protected] => Array ( ) [_new:BaseObject:private] => [_deleted:BaseObject:private] => [modifiedColumns:protected] => Array ( ) ) [49] => Category Object ( [languages:protected] => [bok_resources:protected] => [bok_topics:protected] => [bok_keywords:protected] => [id:protected] => 49 [type:protected] => category [parent:protected] => 2 [label:protected] => Carpenter [alreadyInSave:protected] => [alreadyInValidation:protected] => [validationFailures:protected] => Array ( ) [_new:BaseObject:private] => [_deleted:BaseObject:private] => [modifiedColumns:protected] => Array ( ) ) [50] => Category Object ( [languages:protected] => [bok_resources:protected] => [bok_topics:protected] => [bok_keywords:protected] => [id:protected] => 50 [type:protected] => category [parent:protected] => 2 [label:protected] => Carpet Layer [alreadyInSave:protected] => [alreadyInValidation:protected] => [validationFailures:protected] => Array ( ) [_new:BaseObject:private] => [_deleted:BaseObject:private] => [modifiedColumns:protected] => Array ( ) ) [51] => Category Object ( [languages:protected] => [bok_resources:protected] => [bok_topics:protected] => [bok_keywords:protected] => [id:protected] => 51 [type:protected] => category [parent:protected] => 2 [label:protected] => Cement Mason [alreadyInSave:protected] => [alreadyInValidation:protected] => [validationFailures:protected] => Array ( ) [_new:BaseObject:private] => [_deleted:BaseObject:private] => [modifiedColumns:protected] => Array ( ) ) [52] => Category Object ( [languages:protected] => [bok_resources:protected] => [bok_topics:protected] => [bok_keywords:protected] => [id:protected] => 52 [type:protected] => category [parent:protected] => 2 [label:protected] => Commercial Diver [alreadyInSave:protected] => [alreadyInValidation:protected] => [validationFailures:protected] => Array ( ) [_new:BaseObject:private] => [_deleted:BaseObject:private] => [modifiedColumns:protected] => Array ( ) ) [53] => Category Object ( [languages:protected] => [bok_resources:protected] => [bok_topics:protected] => [bok_keywords:protected] => [id:protected] => 53 [type:protected] => category [parent:protected] => 2 [label:protected] => Concrete Polisher [alreadyInSave:protected] => [alreadyInValidation:protected] => [validationFailures:protected] => Array ( ) [_new:BaseObject:private] => [_deleted:BaseObject:private] => [modifiedColumns:protected] => Array ( ) ) [54] => Category Object ( [languages:protected] => [bok_resources:protected] => [bok_topics:protected] => [bok_keywords:protected] => [id:protected] => 54 [type:protected] => category [parent:protected] => 2 [label:protected] => Drywall Applicator Specialist [alreadyInSave:protected] => [alreadyInValidation:protected] => [validationFailures:protected] => Array ( ) [_new:BaseObject:private] => [_deleted:BaseObject:private] => [modifiedColumns:protected] => Array ( ) ) [55] => Category Object ( [languages:protected] => [bok_resources:protected] => [bok_topics:protected] => [bok_keywords:protected] => [id:protected] => 55 [type:protected] => category [parent:protected] => 2 [label:protected] => Electrical Worker [alreadyInSave:protected] => [alreadyInValidation:protected] => [validationFailures:protected] => Array ( ) [_new:BaseObject:private] => [_deleted:BaseObject:private] => [modifiedColumns:protected] => Array ( ) ) [56] => Category Object ( [languages:protected] => [bok_resources:protected] => [bok_topics:protected] => [bok_keywords:protected] => [id:protected] => 56 [type:protected] => category [parent:protected] => 2 [label:protected] => Elevator Constructor [alreadyInSave:protected] => [alreadyInValidation:protected] => [validationFailures:protected] => Array ( ) [_new:BaseObject:private] => [_deleted:BaseObject:private] => [modifiedColumns:protected] => Array ( ) ) [57] => Category Object ( [languages:protected] => [bok_resources:protected] => [bok_topics:protected] => [bok_keywords:protected] => [id:protected] => 57 [type:protected] => category [parent:protected] => 2 [label:protected] => Flagger [alreadyInSave:protected] => [alreadyInValidation:protected] => [validationFailures:protected] => Array ( ) [_new:BaseObject:private] => [_deleted:BaseObject:private] => [modifiedColumns:protected] => Array ( ) ) [58] => Category Object ( [languages:protected] => [bok_resources:protected] => [bok_topics:protected] => [bok_keywords:protected] => [id:protected] => 58 [type:protected] => category [parent:protected] => 2 [label:protected] => Glazier [alreadyInSave:protected] => [alreadyInValidation:protected] => [validationFailures:protected] => Array ( ) [_new:BaseObject:private] => [_deleted:BaseObject:private] => [modifiedColumns:protected] => Array ( ) ) [59] => Category Object ( [languages:protected] => [bok_resources:protected] => [bok_topics:protected] => [bok_keywords:protected] => [id:protected] => 59 [type:protected] => category [parent:protected] => 2 [label:protected] => Hazardous Waste Cleanup [alreadyInSave:protected] => [alreadyInValidation:protected] => [validationFailures:protected] => Array ( ) [_new:BaseObject:private] => [_deleted:BaseObject:private] => [modifiedColumns:protected] => Array ( ) ) [60] => Category Object ( [languages:protected] => [bok_resources:protected] => [bok_topics:protected] => [bok_keywords:protected] => [id:protected] => 60 [type:protected] => category [parent:protected] => 2 [label:protected] => HVAC [alreadyInSave:protected] => [alreadyInValidation:protected] => [validationFailures:protected] => Array ( ) [_new:BaseObject:private] => [_deleted:BaseObject:private] => [modifiedColumns:protected] => Array ( ) ) [61] => Category Object ( [languages:protected] => [bok_resources:protected] => [bok_topics:protected] => [bok_keywords:protected] => [id:protected] => 61 [type:protected] => category [parent:protected] => 2 [label:protected] => Interior Systems Carpenter [alreadyInSave:protected] => [alreadyInValidation:protected] => [validationFailures:protected] => Array ( ) [_new:BaseObject:private] => [_deleted:BaseObject:private] => [modifiedColumns:protected] => Array ( ) ) [64] => Category Object ( [languages:protected] => [bok_resources:protected] => [bok_topics:protected] => [bok_keywords:protected] => [id:protected] => 64 [type:protected] => category [parent:protected] => 2 [label:protected] => Laborer [alreadyInSave:protected] => [alreadyInValidation:protected] => [validationFailures:protected] => Array ( ) [_new:BaseObject:private] => [_deleted:BaseObject:private] => [modifiedColumns:protected] => Array ( ) ) [65] => Category Object ( [languages:protected] => [bok_resources:protected] => [bok_topics:protected] => [bok_keywords:protected] => [id:protected] => 65 [type:protected] => category [parent:protected] => 2 [label:protected] => Landscaper [alreadyInSave:protected] => [alreadyInValidation:protected] => [validationFailures:protected] => Array ( ) [_new:BaseObject:private] => [_deleted:BaseObject:private] => [modifiedColumns:protected] => Array ( ) ) [66] => Category Object ( [languages:protected] => [bok_resources:protected] => [bok_topics:protected] => [bok_keywords:protected] => [id:protected] => 66 [type:protected] => category [parent:protected] => 2 [label:protected] => Lather [alreadyInSave:protected] => [alreadyInValidation:protected] => [validationFailures:protected] => Array ( ) [_new:BaseObject:private] => [_deleted:BaseObject:private] => [modifiedColumns:protected] => Array ( ) ) [67] => Category Object ( [languages:protected] => [bok_resources:protected] => [bok_topics:protected] => [bok_keywords:protected] => [id:protected] => 67 [type:protected] => category [parent:protected] => 2 [label:protected] => Lead Abatement Worker [alreadyInSave:protected] => [alreadyInValidation:protected] => [validationFailures:protected] => Array ( ) [_new:BaseObject:private] => [_deleted:BaseObject:private] => [modifiedColumns:protected] => Array ( ) ) [68] => Category Object ( [languages:protected] => [bok_resources:protected] => [bok_topics:protected] => [bok_keywords:protected] => [id:protected] => 68 [type:protected] => category [parent:protected] => 2 [label:protected] => Maintenance Worker [alreadyInSave:protected] => [alreadyInValidation:protected] => [validationFailures:protected] => Array ( ) [_new:BaseObject:private] => [_deleted:BaseObject:private] => [modifiedColumns:protected] => Array ( ) ) [69] => Category Object ( [languages:protected] => [bok_resources:protected] => [bok_topics:protected] => [bok_keywords:protected] => [id:protected] => 69 [type:protected] => category [parent:protected] => 2 [label:protected] => Millwright [alreadyInSave:protected] => [alreadyInValidation:protected] => [validationFailures:protected] => Array ( ) [_new:BaseObject:private] => [_deleted:BaseObject:private] => [modifiedColumns:protected] => Array ( ) ) [70] => Category Object ( [languages:protected] => [bok_resources:protected] => [bok_topics:protected] => [bok_keywords:protected] => [id:protected] => 70 [type:protected] => category [parent:protected] => 2 [label:protected] => Operating Engineer [alreadyInSave:protected] => [alreadyInValidation:protected] => [validationFailures:protected] => Array ( ) [_new:BaseObject:private] => [_deleted:BaseObject:private] => [modifiedColumns:protected] => Array ( ) ) [71] => Category Object ( [languages:protected] => [bok_resources:protected] => [bok_topics:protected] => [bok_keywords:protected] => [id:protected] => 71 [type:protected] => category [parent:protected] => 2 [label:protected] => Painter [alreadyInSave:protected] => [alreadyInValidation:protected] => [validationFailures:protected] => Array ( ) [_new:BaseObject:private] => [_deleted:BaseObject:private] => [modifiedColumns:protected] => Array ( ) ) [72] => Category Object ( [languages:protected] => [bok_resources:protected] => [bok_topics:protected] => [bok_keywords:protected] => [id:protected] => 72 [type:protected] => category [parent:protected] => 2 [label:protected] => Paper Hanger [alreadyInSave:protected] => [alreadyInValidation:protected] => [validationFailures:protected] => Array ( ) [_new:BaseObject:private] => [_deleted:BaseObject:private] => [modifiedColumns:protected] => Array ( ) ) [73] => Category Object ( [languages:protected] => [bok_resources:protected] => [bok_topics:protected] => [bok_keywords:protected] => [id:protected] => 73 [type:protected] => category [parent:protected] => 2 [label:protected] => PCC/Restoration [alreadyInSave:protected] => [alreadyInValidation:protected] => [validationFailures:protected] => Array ( ) [_new:BaseObject:private] => [_deleted:BaseObject:private] => [modifiedColumns:protected] => Array ( ) ) [74] => Category Object ( [languages:protected] => [bok_resources:protected] => [bok_topics:protected] => [bok_keywords:protected] => [id:protected] => 74 [type:protected] => category [parent:protected] => 2 [label:protected] => Pile Driver [alreadyInSave:protected] => [alreadyInValidation:protected] => [validationFailures:protected] => Array ( ) [_new:BaseObject:private] => [_deleted:BaseObject:private] => [modifiedColumns:protected] => Array ( ) ) [75] => Category Object ( [languages:protected] => [bok_resources:protected] => [bok_topics:protected] => [bok_keywords:protected] => [id:protected] => 75 [type:protected] => category [parent:protected] => 2 [label:protected] => Plasterer [alreadyInSave:protected] => [alreadyInValidation:protected] => [validationFailures:protected] => Array ( ) [_new:BaseObject:private] => [_deleted:BaseObject:private] => [modifiedColumns:protected] => Array ( ) ) [76] => Category Object ( [languages:protected] => [bok_resources:protected] => [bok_topics:protected] => [bok_keywords:protected] => [id:protected] => 76 [type:protected] => category [parent:protected] => 2 [label:protected] => Plumber/Pipefitter [alreadyInSave:protected] => [alreadyInValidation:protected] => [validationFailures:protected] => Array ( ) [_new:BaseObject:private] => [_deleted:BaseObject:private] => [modifiedColumns:protected] => Array ( ) ) [77] => Category Object ( [languages:protected] => [bok_resources:protected] => [bok_topics:protected] => [bok_keywords:protected] => [id:protected] => 77 [type:protected] => category [parent:protected] => 2 [label:protected] => Refractory Worker [alreadyInSave:protected] => [alreadyInValidation:protected] => [validationFailures:protected] => Array ( ) [_new:BaseObject:private] => [_deleted:BaseObject:private] => [modifiedColumns:protected] => Array ( ) ) [63] => Category Object ( [languages:protected] => [bok_resources:protected] => [bok_topics:protected] => [bok_keywords:protected] => [id:protected] => 63 [type:protected] => category [parent:protected] => 2 [label:protected] => Reinforcing Ironworker [alreadyInSave:protected] => [alreadyInValidation:protected] => [validationFailures:protected] => Array ( ) [_new:BaseObject:private] => [_deleted:BaseObject:private] => [modifiedColumns:protected] => Array ( ) ) [78] => Category Object ( [languages:protected] => [bok_resources:protected] => [bok_topics:protected] => [bok_keywords:protected] => [id:protected] => 78 [type:protected] => category [parent:protected] => 2 [label:protected] => Roofer/Waterproofer [alreadyInSave:protected] => [alreadyInValidation:protected] => [validationFailures:protected] => Array ( ) [_new:BaseObject:private] => [_deleted:BaseObject:private] => [modifiedColumns:protected] => Array ( ) ) [79] => Category Object ( [languages:protected] => [bok_resources:protected] => [bok_topics:protected] => [bok_keywords:protected] => [id:protected] => 79 [type:protected] => category [parent:protected] => 2 [label:protected] => Scaffold Erector [alreadyInSave:protected] => [alreadyInValidation:protected] => [validationFailures:protected] => Array ( ) [_new:BaseObject:private] => [_deleted:BaseObject:private] => [modifiedColumns:protected] => Array ( ) ) [80] => Category Object ( [languages:protected] => [bok_resources:protected] => [bok_topics:protected] => [bok_keywords:protected] => [id:protected] => 80 [type:protected] => category [parent:protected] => 2 [label:protected] => Sheetmetal Worker [alreadyInSave:protected] => [alreadyInValidation:protected] => [validationFailures:protected] => Array ( ) [_new:BaseObject:private] => [_deleted:BaseObject:private] => [modifiedColumns:protected] => Array ( ) ) [81] => Category Object ( [languages:protected] => [bok_resources:protected] => [bok_topics:protected] => [bok_keywords:protected] => [id:protected] => 81 [type:protected] => category [parent:protected] => 2 [label:protected] => Sprinkler Fitter [alreadyInSave:protected] => [alreadyInValidation:protected] => [validationFailures:protected] => Array ( ) [_new:BaseObject:private] => [_deleted:BaseObject:private] => [modifiedColumns:protected] => Array ( ) ) [82] => Category Object ( [languages:protected] => [bok_resources:protected] => [bok_topics:protected] => [bok_keywords:protected] => [id:protected] => 82 [type:protected] => category [parent:protected] => 2 [label:protected] => Stonemason [alreadyInSave:protected] => [alreadyInValidation:protected] => [validationFailures:protected] => Array ( ) [_new:BaseObject:private] => [_deleted:BaseObject:private] => [modifiedColumns:protected] => Array ( ) ) [62] => Category Object ( [languages:protected] => [bok_resources:protected] => [bok_topics:protected] => [bok_keywords:protected] => [id:protected] => 62 [type:protected] => category [parent:protected] => 2 [label:protected] => Structural Ironworker [alreadyInSave:protected] => [alreadyInValidation:protected] => [validationFailures:protected] => Array ( ) [_new:BaseObject:private] => [_deleted:BaseObject:private] => [modifiedColumns:protected] => Array ( ) ) [83] => Category Object ( [languages:protected] => [bok_resources:protected] => [bok_topics:protected] => [bok_keywords:protected] => [id:protected] => 83 [type:protected] => category [parent:protected] => 2 [label:protected] => Terrazzo Worker [alreadyInSave:protected] => [alreadyInValidation:protected] => [validationFailures:protected] => Array ( ) [_new:BaseObject:private] => [_deleted:BaseObject:private] => [modifiedColumns:protected] => Array ( ) ) [84] => Category Object ( [languages:protected] => [bok_resources:protected] => [bok_topics:protected] => [bok_keywords:protected] => [id:protected] => 84 [type:protected] => category [parent:protected] => 2 [label:protected] => Tile Setter [alreadyInSave:protected] => [alreadyInValidation:protected] => [validationFailures:protected] => Array ( ) [_new:BaseObject:private] => [_deleted:BaseObject:private] => [modifiedColumns:protected] => Array ( ) ) [85] => Category Object ( [languages:protected] => [bok_resources:protected] => [bok_topics:protected] => [bok_keywords:protected] => [id:protected] => 85 [type:protected] => category [parent:protected] => 2 [label:protected] => Truck Driver [alreadyInSave:protected] => [alreadyInValidation:protected] => [validationFailures:protected] => Array ( ) [_new:BaseObject:private] => [_deleted:BaseObject:private] => [modifiedColumns:protected] => Array ( ) ) [86] => Category Object ( [languages:protected] => [bok_resources:protected] => [bok_topics:protected] => [bok_keywords:protected] => [id:protected] => 86 [type:protected] => category [parent:protected] => 2 [label:protected] => Welder [alreadyInSave:protected] => [alreadyInValidation:protected] => [validationFailures:protected] => Array ( ) [_new:BaseObject:private] => [_deleted:BaseObject:private] => [modifiedColumns:protected] => Array ( ) ) [87] => Category Object ( [languages:protected] => [bok_resources:protected] => [bok_topics:protected] => [bok_keywords:protected] => [id:protected] => 87 [type:protected] => category [parent:protected] => 3 [label:protected] => Commercial & Institutional [alreadyInSave:protected] => [alreadyInValidation:protected] => [validationFailures:protected] => Array ( ) [_new:BaseObject:private] => [_deleted:BaseObject:private] => [modifiedColumns:protected] => Array ( ) ) [88] => Category Object ( [languages:protected] => [bok_resources:protected] => [bok_topics:protected] => [bok_keywords:protected] => [id:protected] => 88 [type:protected] => category [parent:protected] => 3 [label:protected] => Demolition [alreadyInSave:protected] => [alreadyInValidation:protected] => [validationFailures:protected] => Array ( ) [_new:BaseObject:private] => [_deleted:BaseObject:private] => [modifiedColumns:protected] => Array ( ) ) [89] => Category Object ( [languages:protected] => [bok_resources:protected] => [bok_topics:protected] => [bok_keywords:protected] => [id:protected] => 89 [type:protected] => category [parent:protected] => 3 [label:protected] => Disasters [alreadyInSave:protected] => [alreadyInValidation:protected] => [validationFailures:protected] => Array ( ) [_new:BaseObject:private] => [_deleted:BaseObject:private] => [modifiedColumns:protected] => Array ( ) ) [91] => Category Object ( [languages:protected] => [bok_resources:protected] => [bok_topics:protected] => [bok_keywords:protected] => [id:protected] => 91 [type:protected] => category [parent:protected] => 3 [label:protected] => Heavy & Highway [alreadyInSave:protected] => [alreadyInValidation:protected] => [validationFailures:protected] => Array ( ) [_new:BaseObject:private] => [_deleted:BaseObject:private] => [modifiedColumns:protected] => Array ( ) ) [90] => Category Object ( [languages:protected] => [bok_resources:protected] => [bok_topics:protected] => [bok_keywords:protected] => [id:protected] => 90 [type:protected] => category [parent:protected] => 3 [label:protected] => Industrial [alreadyInSave:protected] => [alreadyInValidation:protected] => [validationFailures:protected] => Array ( ) [_new:BaseObject:private] => [_deleted:BaseObject:private] => [modifiedColumns:protected] => Array ( ) ) [92] => Category Object ( [languages:protected] => [bok_resources:protected] => [bok_topics:protected] => [bok_keywords:protected] => [id:protected] => 92 [type:protected] => category [parent:protected] => 3 [label:protected] => LEED/Green Construction [alreadyInSave:protected] => [alreadyInValidation:protected] => [validationFailures:protected] => Array ( ) [_new:BaseObject:private] => [_deleted:BaseObject:private] => [modifiedColumns:protected] => Array ( ) ) [93] => Category Object ( [languages:protected] => [bok_resources:protected] => [bok_topics:protected] => [bok_keywords:protected] => [id:protected] => 93 [type:protected] => category [parent:protected] => 3 [label:protected] => Renovations [alreadyInSave:protected] => [alreadyInValidation:protected] => [validationFailures:protected] => Array ( ) [_new:BaseObject:private] => [_deleted:BaseObject:private] => [modifiedColumns:protected] => Array ( ) ) [94] => Category Object ( [languages:protected] => [bok_resources:protected] => [bok_topics:protected] => [bok_keywords:protected] => [id:protected] => 94 [type:protected] => category [parent:protected] => 3 [label:protected] => Residential [alreadyInSave:protected] => [alreadyInValidation:protected] => [validationFailures:protected] => Array ( ) [_new:BaseObject:private] => [_deleted:BaseObject:private] => [modifiedColumns:protected] => Array ( ) ) [95] => Category Object ( [languages:protected] => [bok_resources:protected] => [bok_topics:protected] => [bok_keywords:protected] => [id:protected] => 95 [type:protected] => category [parent:protected] => 3 [label:protected] => Underground [alreadyInSave:protected] => [alreadyInValidation:protected] => [validationFailures:protected] => Array ( ) [_new:BaseObject:private] => [_deleted:BaseObject:private] => [modifiedColumns:protected] => Array ( ) ) [100] => Category Object ( [languages:protected] => [bok_resources:protected] => [bok_topics:protected] => [bok_keywords:protected] => [id:protected] => 100 [type:protected] => category [parent:protected] => 6 [label:protected] => Toolbox Talks [alreadyInSave:protected] => [alreadyInValidation:protected] => [validationFailures:protected] => Array ( ) [_new:BaseObject:private] => [_deleted:BaseObject:private] => [modifiedColumns:protected] => Array ( ) ) ) [categories_initialized:protected] => 1 [mapped_items:protected] => [content:protected] => [files:protected] => [language:protected] => Language Object ( [id:protected] => 1 [code:protected] => en [name:protected] => English [alreadyInSave:protected] => [alreadyInValidation:protected] => [validationFailures:protected] => Array ( ) [_new:BaseObject:private] => [_deleted:BaseObject:private] => [modifiedColumns:protected] => Array ( ) ) [old_record:protected] => [id:protected] => 4419 [old_id:protected] => [elcosh_id:protected] => d001652 [type:protected] => document [display_type:protected] => HTML only (and links) [user_id:protected] => 0 [language_id:protected] => 1 [tagging_id:protected] => Valeria Contreras [priority_id:protected] => 1 [title:protected] => Toolbox Talk: Suicide Prevention [total_pages:protected] => 1 [billed_pages:protected] => 1 [publication_number:protected] => [part_of:protected] => [keywords:protected] => suicide, suicide prevention, mental health, stress, depression, exhaustion, burnout, safety, support, emotional support, health [comments:protected] => [summary:protected] =>The CPWR Toolbox Talk on Suicide Prevention addresses the prevalence of suicide among construction workers. The resource includes a brief case example, steps to prevent a related injury or illness, and questions for discussion. It includes an image that illustrates the hazard, which can be posted in a central location as a reminder of steps to work safely.
Available in English and Spanish. [transition_comments:protected] => [external_link:protected] => [consol_link:protected] => [more_like_this:protected] => [permission_given_by:protected] => [published:protected] => T [billable:protected] => F [img_name:protected] => [img_ext:protected] => [img_width:protected] => [img_height:protected] => [img_credit:protected] => [img_practice:protected] => [vid_source_id:protected] => [vid_running_time:protected] => [vid_intended_audience:protected] => [vid_acquisition_info:protected] => [vid_cost:protected] => [vid_producer:protected] => [vid_filename:protected] => [vid_filename_downloadable:protected] => [date_summary:protected] => [date_permission_requested:protected] => [date_permission_received:protected] => [date_review_needed:protected] => [date_received:protected] => 10/08/20 [date_completed:protected] => 10/08/20 [date_billed:protected] => [date_modified:protected] => 05/19/23 [collBokExports:protected] => [lastBokExportCriteria:BaseElcoshItem:private] => [alreadyInSave:protected] => [alreadyInValidation:protected] => [validationFailures:protected] => Array ( ) [_new:BaseObject:private] => [_deleted:BaseObject:private] => [modifiedColumns:protected] => Array ( ) ) ) ) [new_images] => Array ( [0] => Search_Result Object ( [title] => Toolbox talk - crew view [image] => /record/images/4005-p.jpg [blurb] => Photo of crew listening to a toolbox safety talk before starting work.... [category] => Array ( [0] => 97 [1] => 20 [2] => 47 [3] => 49 [4] => 51 [5] => 55 [6] => 61 [7] => 64 [8] => 71 [9] => 75 [10] => 63 [11] => 79 [12] => 62 [13] => 87 [14] => 88 [15] => 91 [16] => 90 [17] => 93 [18] => 94 [19] => 95 ) [labels] => Array ( [0] => Images [1] => Media [2] => Media & Documents [3] => Safety Culture [4] => Work Environment [5] => Hazards [6] => Bricklayer [7] => Trades [8] => Carpenter [10] => Cement Mason [12] => Electrical Worker [14] => Interior Systems Carpenter [16] => Laborer [18] => Painter [20] => Plasterer [22] => Reinforcing Ironworker [24] => Scaffold Erector [26] => Structural Ironworker [28] => Commercial & Institutional [29] => Jobsites [30] => Demolition [32] => Heavy & Highway [34] => Industrial [36] => Renovations [38] => Residential [40] => Underground ) [type] => Images [sub_category] => [url] => /image/4005/i002692/Toolbox%2Btalk%2B-%2Bcrew%2Bview.html [item:protected] => ImageRecord Object ( [records:protected] => Array ( ) [recordId:protected] => [searchWordClass:protected] => [searchWordPeerClass:protected] => [bok_record:protected] => [authors:protected] => [organizations:protected] => [collections:protected] => [categories:protected] => Array ( [97] => Category Object ( [languages:protected] => [bok_resources:protected] => [bok_topics:protected] => [bok_keywords:protected] => [id:protected] => 97 [type:protected] => category [parent:protected] => 5 [label:protected] => Images [alreadyInSave:protected] => [alreadyInValidation:protected] => [validationFailures:protected] => Array ( ) [_new:BaseObject:private] => [_deleted:BaseObject:private] => [modifiedColumns:protected] => Array ( ) ) [20] => Category Object ( [languages:protected] => [bok_resources:protected] => [bok_topics:protected] => [bok_keywords:protected] => [id:protected] => 20 [type:protected] => category [parent:protected] => 7 [label:protected] => Safety Culture [alreadyInSave:protected] => [alreadyInValidation:protected] => [validationFailures:protected] => Array ( ) [_new:BaseObject:private] => [_deleted:BaseObject:private] => [modifiedColumns:protected] => Array ( ) ) [47] => Category Object ( [languages:protected] => [bok_resources:protected] => [bok_topics:protected] => [bok_keywords:protected] => [id:protected] => 47 [type:protected] => category [parent:protected] => 2 [label:protected] => Bricklayer [alreadyInSave:protected] => [alreadyInValidation:protected] => [validationFailures:protected] => Array ( ) [_new:BaseObject:private] => [_deleted:BaseObject:private] => [modifiedColumns:protected] => Array ( ) ) [49] => Category Object ( [languages:protected] => [bok_resources:protected] => [bok_topics:protected] => [bok_keywords:protected] => [id:protected] => 49 [type:protected] => category [parent:protected] => 2 [label:protected] => Carpenter [alreadyInSave:protected] => [alreadyInValidation:protected] => [validationFailures:protected] => Array ( ) [_new:BaseObject:private] => [_deleted:BaseObject:private] => [modifiedColumns:protected] => Array ( ) ) [51] => Category Object ( [languages:protected] => [bok_resources:protected] => [bok_topics:protected] => [bok_keywords:protected] => [id:protected] => 51 [type:protected] => category [parent:protected] => 2 [label:protected] => Cement Mason [alreadyInSave:protected] => [alreadyInValidation:protected] => [validationFailures:protected] => Array ( ) [_new:BaseObject:private] => [_deleted:BaseObject:private] => [modifiedColumns:protected] => Array ( ) ) [55] => Category Object ( [languages:protected] => [bok_resources:protected] => [bok_topics:protected] => [bok_keywords:protected] => [id:protected] => 55 [type:protected] => category [parent:protected] => 2 [label:protected] => Electrical Worker [alreadyInSave:protected] => [alreadyInValidation:protected] => [validationFailures:protected] => Array ( ) [_new:BaseObject:private] => [_deleted:BaseObject:private] => [modifiedColumns:protected] => Array ( ) ) [61] => Category Object ( [languages:protected] => [bok_resources:protected] => [bok_topics:protected] => [bok_keywords:protected] => [id:protected] => 61 [type:protected] => category [parent:protected] => 2 [label:protected] => Interior Systems Carpenter [alreadyInSave:protected] => [alreadyInValidation:protected] => [validationFailures:protected] => Array ( ) [_new:BaseObject:private] => [_deleted:BaseObject:private] => [modifiedColumns:protected] => Array ( ) ) [64] => Category Object ( [languages:protected] => [bok_resources:protected] => [bok_topics:protected] => [bok_keywords:protected] => [id:protected] => 64 [type:protected] => category [parent:protected] => 2 [label:protected] => Laborer [alreadyInSave:protected] => [alreadyInValidation:protected] => [validationFailures:protected] => Array ( ) [_new:BaseObject:private] => [_deleted:BaseObject:private] => [modifiedColumns:protected] => Array ( ) ) [71] => Category Object ( [languages:protected] => [bok_resources:protected] => [bok_topics:protected] => [bok_keywords:protected] => [id:protected] => 71 [type:protected] => category [parent:protected] => 2 [label:protected] => Painter [alreadyInSave:protected] => [alreadyInValidation:protected] => [validationFailures:protected] => Array ( ) [_new:BaseObject:private] => [_deleted:BaseObject:private] => [modifiedColumns:protected] => Array ( ) ) [75] => Category Object ( [languages:protected] => [bok_resources:protected] => [bok_topics:protected] => [bok_keywords:protected] => [id:protected] => 75 [type:protected] => category [parent:protected] => 2 [label:protected] => Plasterer [alreadyInSave:protected] => [alreadyInValidation:protected] => [validationFailures:protected] => Array ( ) [_new:BaseObject:private] => [_deleted:BaseObject:private] => [modifiedColumns:protected] => Array ( ) ) [63] => Category Object ( [languages:protected] => [bok_resources:protected] => [bok_topics:protected] => [bok_keywords:protected] => [id:protected] => 63 [type:protected] => category [parent:protected] => 2 [label:protected] => Reinforcing Ironworker [alreadyInSave:protected] => [alreadyInValidation:protected] => [validationFailures:protected] => Array ( ) [_new:BaseObject:private] => [_deleted:BaseObject:private] => [modifiedColumns:protected] => Array ( ) ) [79] => Category Object ( [languages:protected] => [bok_resources:protected] => [bok_topics:protected] => [bok_keywords:protected] => [id:protected] => 79 [type:protected] => category [parent:protected] => 2 [label:protected] => Scaffold Erector [alreadyInSave:protected] => [alreadyInValidation:protected] => [validationFailures:protected] => Array ( ) [_new:BaseObject:private] => [_deleted:BaseObject:private] => [modifiedColumns:protected] => Array ( ) ) [62] => Category Object ( [languages:protected] => [bok_resources:protected] => [bok_topics:protected] => [bok_keywords:protected] => [id:protected] => 62 [type:protected] => category [parent:protected] => 2 [label:protected] => Structural Ironworker [alreadyInSave:protected] => [alreadyInValidation:protected] => [validationFailures:protected] => Array ( ) [_new:BaseObject:private] => [_deleted:BaseObject:private] => [modifiedColumns:protected] => Array ( ) ) [87] => Category Object ( [languages:protected] => [bok_resources:protected] => [bok_topics:protected] => [bok_keywords:protected] => [id:protected] => 87 [type:protected] => category [parent:protected] => 3 [label:protected] => Commercial & Institutional [alreadyInSave:protected] => [alreadyInValidation:protected] => [validationFailures:protected] => Array ( ) [_new:BaseObject:private] => [_deleted:BaseObject:private] => [modifiedColumns:protected] => Array ( ) ) [88] => Category Object ( [languages:protected] => [bok_resources:protected] => [bok_topics:protected] => [bok_keywords:protected] => [id:protected] => 88 [type:protected] => category [parent:protected] => 3 [label:protected] => Demolition [alreadyInSave:protected] => [alreadyInValidation:protected] => [validationFailures:protected] => Array ( ) [_new:BaseObject:private] => [_deleted:BaseObject:private] => [modifiedColumns:protected] => Array ( ) ) [91] => Category Object ( [languages:protected] => [bok_resources:protected] => [bok_topics:protected] => [bok_keywords:protected] => [id:protected] => 91 [type:protected] => category [parent:protected] => 3 [label:protected] => Heavy & Highway [alreadyInSave:protected] => [alreadyInValidation:protected] => [validationFailures:protected] => Array ( ) [_new:BaseObject:private] => [_deleted:BaseObject:private] => [modifiedColumns:protected] => Array ( ) ) [90] => Category Object ( [languages:protected] => [bok_resources:protected] => [bok_topics:protected] => [bok_keywords:protected] => [id:protected] => 90 [type:protected] => category [parent:protected] => 3 [label:protected] => Industrial [alreadyInSave:protected] => [alreadyInValidation:protected] => [validationFailures:protected] => Array ( ) [_new:BaseObject:private] => [_deleted:BaseObject:private] => [modifiedColumns:protected] => Array ( ) ) [93] => Category Object ( [languages:protected] => [bok_resources:protected] => [bok_topics:protected] => [bok_keywords:protected] => [id:protected] => 93 [type:protected] => category [parent:protected] => 3 [label:protected] => Renovations [alreadyInSave:protected] => [alreadyInValidation:protected] => [validationFailures:protected] => Array ( ) [_new:BaseObject:private] => [_deleted:BaseObject:private] => [modifiedColumns:protected] => Array ( ) ) [94] => Category Object ( [languages:protected] => [bok_resources:protected] => [bok_topics:protected] => [bok_keywords:protected] => [id:protected] => 94 [type:protected] => category [parent:protected] => 3 [label:protected] => Residential [alreadyInSave:protected] => [alreadyInValidation:protected] => [validationFailures:protected] => Array ( ) [_new:BaseObject:private] => [_deleted:BaseObject:private] => [modifiedColumns:protected] => Array ( ) ) [95] => Category Object ( [languages:protected] => [bok_resources:protected] => [bok_topics:protected] => [bok_keywords:protected] => [id:protected] => 95 [type:protected] => category [parent:protected] => 3 [label:protected] => Underground [alreadyInSave:protected] => [alreadyInValidation:protected] => [validationFailures:protected] => Array ( ) [_new:BaseObject:private] => [_deleted:BaseObject:private] => [modifiedColumns:protected] => Array ( ) ) ) [categories_initialized:protected] => 1 [mapped_items:protected] => [content:protected] => [files:protected] => [language:protected] => Language Object ( [id:protected] => 1 [code:protected] => en [name:protected] => English [alreadyInSave:protected] => [alreadyInValidation:protected] => [validationFailures:protected] => Array ( ) [_new:BaseObject:private] => [_deleted:BaseObject:private] => [modifiedColumns:protected] => Array ( ) ) [old_record:protected] => [id:protected] => 4005 [old_id:protected] => [elcosh_id:protected] => i002692 [type:protected] => image [display_type:protected] => Image [user_id:protected] => 0 [language_id:protected] => 1 [tagging_id:protected] => Bruce Lippy [priority_id:protected] => 1 [title:protected] => Toolbox talk - crew view [total_pages:protected] => 0 [billed_pages:protected] => 0 [publication_number:protected] => [part_of:protected] => [keywords:protected] => toolbox talk, tailgate talk, safety talk, Spanish [comments:protected] => [summary:protected] => Photo of crew listening to a toolbox safety talk before starting work. [transition_comments:protected] => [external_link:protected] => [consol_link:protected] => http://www.cpwrconstructionsolutions.org/electrical/solution/662/worker-training.html [more_like_this:protected] => i002691,d001269, c000079, d001285 [permission_given_by:protected] => [published:protected] => T [billable:protected] => F [img_name:protected] => [img_ext:protected] => jpg [img_width:protected] => [img_height:protected] => [img_credit:protected] => Morgan Zavertnik and Hoar Construction [img_practice:protected] => good [vid_source_id:protected] => [vid_running_time:protected] => [vid_intended_audience:protected] => [vid_acquisition_info:protected] => [vid_cost:protected] => [vid_producer:protected] => [vid_filename:protected] => [vid_filename_downloadable:protected] => [date_summary:protected] => November 2015 [date_permission_requested:protected] => [date_permission_received:protected] => [date_review_needed:protected] => [date_received:protected] => 03/02/16 [date_completed:protected] => 03/02/16 [date_billed:protected] => [date_modified:protected] => 03/02/16 [collBokExports:protected] => [lastBokExportCriteria:BaseElcoshItem:private] => [alreadyInSave:protected] => [alreadyInValidation:protected] => [validationFailures:protected] => Array ( ) [_new:BaseObject:private] => [_deleted:BaseObject:private] => [modifiedColumns:protected] => Array ( ) ) ) [1] => Search_Result Object ( [title] => Toolbox talk - long shot [image] => /record/images/4006-p.jpg [blurb] => This crew gathered every morning before starting work to discuss a new safety topic.... [category] => Array ( [0] => 20 [1] => 47 [2] => 49 [3] => 51 [4] => 55 [5] => 64 [6] => 68 [7] => 75 [8] => 76 [9] => 63 [10] => 78 [11] => 79 [12] => 82 [13] => 62 [14] => 87 [15] => 88 [16] => 91 [17] => 90 [18] => 93 [19] => 94 [20] => 95 [21] => 97 ) [labels] => Array ( [0] => Safety Culture [1] => Work Environment [2] => Hazards [3] => Bricklayer [4] => Trades [5] => Carpenter [7] => Cement Mason [9] => Electrical Worker [11] => Laborer [13] => Maintenance Worker [15] => Plasterer [17] => Plumber/Pipefitter [19] => Reinforcing Ironworker [21] => Roofer/Waterproofer [23] => Scaffold Erector [25] => Stonemason [27] => Structural Ironworker [29] => Commercial & Institutional [30] => Jobsites [31] => Demolition [33] => Heavy & Highway [35] => Industrial [37] => Renovations [39] => Residential [41] => Underground [43] => Images [44] => Media [45] => Media & Documents ) [type] => Images [sub_category] => [url] => /image/4006/i002693/Toolbox%2Btalk%2B-%2Blong%2Bshot.html [item:protected] => ImageRecord Object ( [records:protected] => Array ( ) [recordId:protected] => [searchWordClass:protected] => [searchWordPeerClass:protected] => [bok_record:protected] => [authors:protected] => [organizations:protected] => [collections:protected] => [categories:protected] => Array ( [20] => Category Object ( [languages:protected] => [bok_resources:protected] => [bok_topics:protected] => [bok_keywords:protected] => [id:protected] => 20 [type:protected] => category [parent:protected] => 7 [label:protected] => Safety Culture [alreadyInSave:protected] => [alreadyInValidation:protected] => [validationFailures:protected] => Array ( ) [_new:BaseObject:private] => [_deleted:BaseObject:private] => [modifiedColumns:protected] => Array ( ) ) [47] => Category Object ( [languages:protected] => [bok_resources:protected] => [bok_topics:protected] => [bok_keywords:protected] => [id:protected] => 47 [type:protected] => category [parent:protected] => 2 [label:protected] => Bricklayer [alreadyInSave:protected] => [alreadyInValidation:protected] => [validationFailures:protected] => Array ( ) [_new:BaseObject:private] => [_deleted:BaseObject:private] => [modifiedColumns:protected] => Array ( ) ) [49] => Category Object ( [languages:protected] => [bok_resources:protected] => [bok_topics:protected] => [bok_keywords:protected] => [id:protected] => 49 [type:protected] => category [parent:protected] => 2 [label:protected] => Carpenter [alreadyInSave:protected] => [alreadyInValidation:protected] => [validationFailures:protected] => Array ( ) [_new:BaseObject:private] => [_deleted:BaseObject:private] => [modifiedColumns:protected] => Array ( ) ) [51] => Category Object ( [languages:protected] => [bok_resources:protected] => [bok_topics:protected] => [bok_keywords:protected] => [id:protected] => 51 [type:protected] => category [parent:protected] => 2 [label:protected] => Cement Mason [alreadyInSave:protected] => [alreadyInValidation:protected] => [validationFailures:protected] => Array ( ) [_new:BaseObject:private] => [_deleted:BaseObject:private] => [modifiedColumns:protected] => Array ( ) ) [55] => Category Object ( [languages:protected] => [bok_resources:protected] => [bok_topics:protected] => [bok_keywords:protected] => [id:protected] => 55 [type:protected] => category [parent:protected] => 2 [label:protected] => Electrical Worker [alreadyInSave:protected] => [alreadyInValidation:protected] => [validationFailures:protected] => Array ( ) [_new:BaseObject:private] => [_deleted:BaseObject:private] => [modifiedColumns:protected] => Array ( ) ) [64] => Category Object ( [languages:protected] => [bok_resources:protected] => [bok_topics:protected] => [bok_keywords:protected] => [id:protected] => 64 [type:protected] => category [parent:protected] => 2 [label:protected] => Laborer [alreadyInSave:protected] => [alreadyInValidation:protected] => [validationFailures:protected] => Array ( ) [_new:BaseObject:private] => [_deleted:BaseObject:private] => [modifiedColumns:protected] => Array ( ) ) [68] => Category Object ( [languages:protected] => [bok_resources:protected] => [bok_topics:protected] => [bok_keywords:protected] => [id:protected] => 68 [type:protected] => category [parent:protected] => 2 [label:protected] => Maintenance Worker [alreadyInSave:protected] => [alreadyInValidation:protected] => [validationFailures:protected] => Array ( ) [_new:BaseObject:private] => [_deleted:BaseObject:private] => [modifiedColumns:protected] => Array ( ) ) [75] => Category Object ( [languages:protected] => [bok_resources:protected] => [bok_topics:protected] => [bok_keywords:protected] => [id:protected] => 75 [type:protected] => category [parent:protected] => 2 [label:protected] => Plasterer [alreadyInSave:protected] => [alreadyInValidation:protected] => [validationFailures:protected] => Array ( ) [_new:BaseObject:private] => [_deleted:BaseObject:private] => [modifiedColumns:protected] => Array ( ) ) [76] => Category Object ( [languages:protected] => [bok_resources:protected] => [bok_topics:protected] => [bok_keywords:protected] => [id:protected] => 76 [type:protected] => category [parent:protected] => 2 [label:protected] => Plumber/Pipefitter [alreadyInSave:protected] => [alreadyInValidation:protected] => [validationFailures:protected] => Array ( ) [_new:BaseObject:private] => [_deleted:BaseObject:private] => [modifiedColumns:protected] => Array ( ) ) [63] => Category Object ( [languages:protected] => [bok_resources:protected] => [bok_topics:protected] => [bok_keywords:protected] => [id:protected] => 63 [type:protected] => category [parent:protected] => 2 [label:protected] => Reinforcing Ironworker [alreadyInSave:protected] => [alreadyInValidation:protected] => [validationFailures:protected] => Array ( ) [_new:BaseObject:private] => [_deleted:BaseObject:private] => [modifiedColumns:protected] => Array ( ) ) [78] => Category Object ( [languages:protected] => [bok_resources:protected] => [bok_topics:protected] => [bok_keywords:protected] => [id:protected] => 78 [type:protected] => category [parent:protected] => 2 [label:protected] => Roofer/Waterproofer [alreadyInSave:protected] => [alreadyInValidation:protected] => [validationFailures:protected] => Array ( ) [_new:BaseObject:private] => [_deleted:BaseObject:private] => [modifiedColumns:protected] => Array ( ) ) [79] => Category Object ( [languages:protected] => [bok_resources:protected] => [bok_topics:protected] => [bok_keywords:protected] => [id:protected] => 79 [type:protected] => category [parent:protected] => 2 [label:protected] => Scaffold Erector [alreadyInSave:protected] => [alreadyInValidation:protected] => [validationFailures:protected] => Array ( ) [_new:BaseObject:private] => [_deleted:BaseObject:private] => [modifiedColumns:protected] => Array ( ) ) [82] => Category Object ( [languages:protected] => [bok_resources:protected] => [bok_topics:protected] => [bok_keywords:protected] => [id:protected] => 82 [type:protected] => category [parent:protected] => 2 [label:protected] => Stonemason [alreadyInSave:protected] => [alreadyInValidation:protected] => [validationFailures:protected] => Array ( ) [_new:BaseObject:private] => [_deleted:BaseObject:private] => [modifiedColumns:protected] => Array ( ) ) [62] => Category Object ( [languages:protected] => [bok_resources:protected] => [bok_topics:protected] => [bok_keywords:protected] => [id:protected] => 62 [type:protected] => category [parent:protected] => 2 [label:protected] => Structural Ironworker [alreadyInSave:protected] => [alreadyInValidation:protected] => [validationFailures:protected] => Array ( ) [_new:BaseObject:private] => [_deleted:BaseObject:private] => [modifiedColumns:protected] => Array ( ) ) [87] => Category Object ( [languages:protected] => [bok_resources:protected] => [bok_topics:protected] => [bok_keywords:protected] => [id:protected] => 87 [type:protected] => category [parent:protected] => 3 [label:protected] => Commercial & Institutional [alreadyInSave:protected] => [alreadyInValidation:protected] => [validationFailures:protected] => Array ( ) [_new:BaseObject:private] => [_deleted:BaseObject:private] => [modifiedColumns:protected] => Array ( ) ) [88] => Category Object ( [languages:protected] => [bok_resources:protected] => [bok_topics:protected] => [bok_keywords:protected] => [id:protected] => 88 [type:protected] => category [parent:protected] => 3 [label:protected] => Demolition [alreadyInSave:protected] => [alreadyInValidation:protected] => [validationFailures:protected] => Array ( ) [_new:BaseObject:private] => [_deleted:BaseObject:private] => [modifiedColumns:protected] => Array ( ) ) [91] => Category Object ( [languages:protected] => [bok_resources:protected] => [bok_topics:protected] => [bok_keywords:protected] => [id:protected] => 91 [type:protected] => category [parent:protected] => 3 [label:protected] => Heavy & Highway [alreadyInSave:protected] => [alreadyInValidation:protected] => [validationFailures:protected] => Array ( ) [_new:BaseObject:private] => [_deleted:BaseObject:private] => [modifiedColumns:protected] => Array ( ) ) [90] => Category Object ( [languages:protected] => [bok_resources:protected] => [bok_topics:protected] => [bok_keywords:protected] => [id:protected] => 90 [type:protected] => category [parent:protected] => 3 [label:protected] => Industrial [alreadyInSave:protected] => [alreadyInValidation:protected] => [validationFailures:protected] => Array ( ) [_new:BaseObject:private] => [_deleted:BaseObject:private] => [modifiedColumns:protected] => Array ( ) ) [93] => Category Object ( [languages:protected] => [bok_resources:protected] => [bok_topics:protected] => [bok_keywords:protected] => [id:protected] => 93 [type:protected] => category [parent:protected] => 3 [label:protected] => Renovations [alreadyInSave:protected] => [alreadyInValidation:protected] => [validationFailures:protected] => Array ( ) [_new:BaseObject:private] => [_deleted:BaseObject:private] => [modifiedColumns:protected] => Array ( ) ) [94] => Category Object ( [languages:protected] => [bok_resources:protected] => [bok_topics:protected] => [bok_keywords:protected] => [id:protected] => 94 [type:protected] => category [parent:protected] => 3 [label:protected] => Residential [alreadyInSave:protected] => [alreadyInValidation:protected] => [validationFailures:protected] => Array ( ) [_new:BaseObject:private] => [_deleted:BaseObject:private] => [modifiedColumns:protected] => Array ( ) ) [95] => Category Object ( [languages:protected] => [bok_resources:protected] => [bok_topics:protected] => [bok_keywords:protected] => [id:protected] => 95 [type:protected] => category [parent:protected] => 3 [label:protected] => Underground [alreadyInSave:protected] => [alreadyInValidation:protected] => [validationFailures:protected] => Array ( ) [_new:BaseObject:private] => [_deleted:BaseObject:private] => [modifiedColumns:protected] => Array ( ) ) [97] => Category Object ( [languages:protected] => [bok_resources:protected] => [bok_topics:protected] => [bok_keywords:protected] => [id:protected] => 97 [type:protected] => category [parent:protected] => 5 [label:protected] => Images [alreadyInSave:protected] => [alreadyInValidation:protected] => [validationFailures:protected] => Array ( ) [_new:BaseObject:private] => [_deleted:BaseObject:private] => [modifiedColumns:protected] => Array ( ) ) ) [categories_initialized:protected] => 1 [mapped_items:protected] => [content:protected] => [files:protected] => [language:protected] => Language Object ( [id:protected] => 1 [code:protected] => en [name:protected] => English [alreadyInSave:protected] => [alreadyInValidation:protected] => [validationFailures:protected] => Array ( ) [_new:BaseObject:private] => [_deleted:BaseObject:private] => [modifiedColumns:protected] => Array ( ) ) [old_record:protected] => [id:protected] => 4006 [old_id:protected] => [elcosh_id:protected] => i002693 [type:protected] => image [display_type:protected] => Image [user_id:protected] => 0 [language_id:protected] => 1 [tagging_id:protected] => Bruce Lippy [priority_id:protected] => 1 [title:protected] => Toolbox talk - long shot [total_pages:protected] => 0 [billed_pages:protected] => 0 [publication_number:protected] => [part_of:protected] => [keywords:protected] => toolbox talk, tailgate talk, safety minute [comments:protected] => [summary:protected] => This crew gathered every morning before starting work to discuss a new safety topic. [transition_comments:protected] => [external_link:protected] => [consol_link:protected] => http://www.cpwrconstructionsolutions.org/electrical/solution/662/worker-training.html [more_like_this:protected] => i002691,i002692,d001269,d000527 [permission_given_by:protected] => [published:protected] => T [billable:protected] => F [img_name:protected] => [img_ext:protected] => jpg [img_width:protected] => [img_height:protected] => [img_credit:protected] => Morgan Zavertnik and Hoar Construction [img_practice:protected] => good [vid_source_id:protected] => [vid_running_time:protected] => [vid_intended_audience:protected] => [vid_acquisition_info:protected] => [vid_cost:protected] => [vid_producer:protected] => [vid_filename:protected] => [vid_filename_downloadable:protected] => [date_summary:protected] => November 2015 [date_permission_requested:protected] => [date_permission_received:protected] => [date_review_needed:protected] => [date_received:protected] => 03/02/16 [date_completed:protected] => 03/02/16 [date_billed:protected] => [date_modified:protected] => 03/02/16 [collBokExports:protected] => [lastBokExportCriteria:BaseElcoshItem:private] => [alreadyInSave:protected] => [alreadyInValidation:protected] => [validationFailures:protected] => Array ( ) [_new:BaseObject:private] => [_deleted:BaseObject:private] => [modifiedColumns:protected] => Array ( ) ) ) [2] => Search_Result Object ( [title] => Construction bracing [image] => /record/images/3995-p.jpg [blurb] => This shows structural support that prevents collapses during construction.... [category] => Array ( [0] => 12 [1] => 15 [2] => 21 [3] => 49 [4] => 51 [5] => 55 [6] => 56 [7] => 60 [8] => 64 [9] => 68 [10] => 74 [11] => 63 [12] => 78 [13] => 79 [14] => 80 [15] => 62 [16] => 87 [17] => 90 [18] => 97 ) [labels] => Array ( [0] => Crushed/Struck By [1] => Work Environment [2] => Hazards [3] => Falls [6] => Scaffolds [9] => Carpenter [10] => Trades [11] => Cement Mason [13] => Electrical Worker [15] => Elevator Constructor [17] => HVAC [19] => Laborer [21] => Maintenance Worker [23] => Pile Driver [25] => Reinforcing Ironworker [27] => Roofer/Waterproofer [29] => Scaffold Erector [31] => Sheetmetal Worker [33] => Structural Ironworker [35] => Commercial & Institutional [36] => Jobsites [37] => Industrial [39] => Images [40] => Media [41] => Media & Documents ) [type] => Images [sub_category] => [url] => /image/3995/i002690/Construction%2Bbracing.html [item:protected] => ImageRecord Object ( [records:protected] => Array ( ) [recordId:protected] => [searchWordClass:protected] => [searchWordPeerClass:protected] => [bok_record:protected] => [authors:protected] => [organizations:protected] => [collections:protected] => [categories:protected] => Array ( [12] => Category Object ( [languages:protected] => [bok_resources:protected] => [bok_topics:protected] => [bok_keywords:protected] => [id:protected] => 12 [type:protected] => category [parent:protected] => 7 [label:protected] => Crushed/Struck By [alreadyInSave:protected] => [alreadyInValidation:protected] => [validationFailures:protected] => Array ( ) [_new:BaseObject:private] => [_deleted:BaseObject:private] => [modifiedColumns:protected] => Array ( ) ) [15] => Category Object ( [languages:protected] => [bok_resources:protected] => [bok_topics:protected] => [bok_keywords:protected] => [id:protected] => 15 [type:protected] => category [parent:protected] => 7 [label:protected] => Falls [alreadyInSave:protected] => [alreadyInValidation:protected] => [validationFailures:protected] => Array ( ) [_new:BaseObject:private] => [_deleted:BaseObject:private] => [modifiedColumns:protected] => Array ( ) ) [21] => Category Object ( [languages:protected] => [bok_resources:protected] => [bok_topics:protected] => [bok_keywords:protected] => [id:protected] => 21 [type:protected] => category [parent:protected] => 7 [label:protected] => Scaffolds [alreadyInSave:protected] => [alreadyInValidation:protected] => [validationFailures:protected] => Array ( ) [_new:BaseObject:private] => [_deleted:BaseObject:private] => [modifiedColumns:protected] => Array ( ) ) [49] => Category Object ( [languages:protected] => [bok_resources:protected] => [bok_topics:protected] => [bok_keywords:protected] => [id:protected] => 49 [type:protected] => category [parent:protected] => 2 [label:protected] => Carpenter [alreadyInSave:protected] => [alreadyInValidation:protected] => [validationFailures:protected] => Array ( ) [_new:BaseObject:private] => [_deleted:BaseObject:private] => [modifiedColumns:protected] => Array ( ) ) [51] => Category Object ( [languages:protected] => [bok_resources:protected] => [bok_topics:protected] => [bok_keywords:protected] => [id:protected] => 51 [type:protected] => category [parent:protected] => 2 [label:protected] => Cement Mason [alreadyInSave:protected] => [alreadyInValidation:protected] => [validationFailures:protected] => Array ( ) [_new:BaseObject:private] => [_deleted:BaseObject:private] => [modifiedColumns:protected] => Array ( ) ) [55] => Category Object ( [languages:protected] => [bok_resources:protected] => [bok_topics:protected] => [bok_keywords:protected] => [id:protected] => 55 [type:protected] => category [parent:protected] => 2 [label:protected] => Electrical Worker [alreadyInSave:protected] => [alreadyInValidation:protected] => [validationFailures:protected] => Array ( ) [_new:BaseObject:private] => [_deleted:BaseObject:private] => [modifiedColumns:protected] => Array ( ) ) [56] => Category Object ( [languages:protected] => [bok_resources:protected] => [bok_topics:protected] => [bok_keywords:protected] => [id:protected] => 56 [type:protected] => category [parent:protected] => 2 [label:protected] => Elevator Constructor [alreadyInSave:protected] => [alreadyInValidation:protected] => [validationFailures:protected] => Array ( ) [_new:BaseObject:private] => [_deleted:BaseObject:private] => [modifiedColumns:protected] => Array ( ) ) [60] => Category Object ( [languages:protected] => [bok_resources:protected] => [bok_topics:protected] => [bok_keywords:protected] => [id:protected] => 60 [type:protected] => category [parent:protected] => 2 [label:protected] => HVAC [alreadyInSave:protected] => [alreadyInValidation:protected] => [validationFailures:protected] => Array ( ) [_new:BaseObject:private] => [_deleted:BaseObject:private] => [modifiedColumns:protected] => Array ( ) ) [64] => Category Object ( [languages:protected] => [bok_resources:protected] => [bok_topics:protected] => [bok_keywords:protected] => [id:protected] => 64 [type:protected] => category [parent:protected] => 2 [label:protected] => Laborer [alreadyInSave:protected] => [alreadyInValidation:protected] => [validationFailures:protected] => Array ( ) [_new:BaseObject:private] => [_deleted:BaseObject:private] => [modifiedColumns:protected] => Array ( ) ) [68] => Category Object ( [languages:protected] => [bok_resources:protected] => [bok_topics:protected] => [bok_keywords:protected] => [id:protected] => 68 [type:protected] => category [parent:protected] => 2 [label:protected] => Maintenance Worker [alreadyInSave:protected] => [alreadyInValidation:protected] => [validationFailures:protected] => Array ( ) [_new:BaseObject:private] => [_deleted:BaseObject:private] => [modifiedColumns:protected] => Array ( ) ) [74] => Category Object ( [languages:protected] => [bok_resources:protected] => [bok_topics:protected] => [bok_keywords:protected] => [id:protected] => 74 [type:protected] => category [parent:protected] => 2 [label:protected] => Pile Driver [alreadyInSave:protected] => [alreadyInValidation:protected] => [validationFailures:protected] => Array ( ) [_new:BaseObject:private] => [_deleted:BaseObject:private] => [modifiedColumns:protected] => Array ( ) ) [63] => Category Object ( [languages:protected] => [bok_resources:protected] => [bok_topics:protected] => [bok_keywords:protected] => [id:protected] => 63 [type:protected] => category [parent:protected] => 2 [label:protected] => Reinforcing Ironworker [alreadyInSave:protected] => [alreadyInValidation:protected] => [validationFailures:protected] => Array ( ) [_new:BaseObject:private] => [_deleted:BaseObject:private] => [modifiedColumns:protected] => Array ( ) ) [78] => Category Object ( [languages:protected] => [bok_resources:protected] => [bok_topics:protected] => [bok_keywords:protected] => [id:protected] => 78 [type:protected] => category [parent:protected] => 2 [label:protected] => Roofer/Waterproofer [alreadyInSave:protected] => [alreadyInValidation:protected] => [validationFailures:protected] => Array ( ) [_new:BaseObject:private] => [_deleted:BaseObject:private] => [modifiedColumns:protected] => Array ( ) ) [79] => Category Object ( [languages:protected] => [bok_resources:protected] => [bok_topics:protected] => [bok_keywords:protected] => [id:protected] => 79 [type:protected] => category [parent:protected] => 2 [label:protected] => Scaffold Erector [alreadyInSave:protected] => [alreadyInValidation:protected] => [validationFailures:protected] => Array ( ) [_new:BaseObject:private] => [_deleted:BaseObject:private] => [modifiedColumns:protected] => Array ( ) ) [80] => Category Object ( [languages:protected] => [bok_resources:protected] => [bok_topics:protected] => [bok_keywords:protected] => [id:protected] => 80 [type:protected] => category [parent:protected] => 2 [label:protected] => Sheetmetal Worker [alreadyInSave:protected] => [alreadyInValidation:protected] => [validationFailures:protected] => Array ( ) [_new:BaseObject:private] => [_deleted:BaseObject:private] => [modifiedColumns:protected] => Array ( ) ) [62] => Category Object ( [languages:protected] => [bok_resources:protected] => [bok_topics:protected] => [bok_keywords:protected] => [id:protected] => 62 [type:protected] => category [parent:protected] => 2 [label:protected] => Structural Ironworker [alreadyInSave:protected] => [alreadyInValidation:protected] => [validationFailures:protected] => Array ( ) [_new:BaseObject:private] => [_deleted:BaseObject:private] => [modifiedColumns:protected] => Array ( ) ) [87] => Category Object ( [languages:protected] => [bok_resources:protected] => [bok_topics:protected] => [bok_keywords:protected] => [id:protected] => 87 [type:protected] => category [parent:protected] => 3 [label:protected] => Commercial & Institutional [alreadyInSave:protected] => [alreadyInValidation:protected] => [validationFailures:protected] => Array ( ) [_new:BaseObject:private] => [_deleted:BaseObject:private] => [modifiedColumns:protected] => Array ( ) ) [90] => Category Object ( [languages:protected] => [bok_resources:protected] => [bok_topics:protected] => [bok_keywords:protected] => [id:protected] => 90 [type:protected] => category [parent:protected] => 3 [label:protected] => Industrial [alreadyInSave:protected] => [alreadyInValidation:protected] => [validationFailures:protected] => Array ( ) [_new:BaseObject:private] => [_deleted:BaseObject:private] => [modifiedColumns:protected] => Array ( ) ) [97] => Category Object ( [languages:protected] => [bok_resources:protected] => [bok_topics:protected] => [bok_keywords:protected] => [id:protected] => 97 [type:protected] => category [parent:protected] => 5 [label:protected] => Images [alreadyInSave:protected] => [alreadyInValidation:protected] => [validationFailures:protected] => Array ( ) [_new:BaseObject:private] => [_deleted:BaseObject:private] => [modifiedColumns:protected] => Array ( ) ) ) [categories_initialized:protected] => 1 [mapped_items:protected] => [content:protected] => [files:protected] => [language:protected] => Language Object ( [id:protected] => 1 [code:protected] => en [name:protected] => English [alreadyInSave:protected] => [alreadyInValidation:protected] => [validationFailures:protected] => Array ( ) [_new:BaseObject:private] => [_deleted:BaseObject:private] => [modifiedColumns:protected] => Array ( ) ) [old_record:protected] => [id:protected] => 3995 [old_id:protected] => [elcosh_id:protected] => i002690 [type:protected] => image [display_type:protected] => Image [user_id:protected] => 0 [language_id:protected] => 1 [tagging_id:protected] => Bruce Lippy [priority_id:protected] => 1 [title:protected] => Construction bracing [total_pages:protected] => 0 [billed_pages:protected] => 0 [publication_number:protected] => [part_of:protected] => [keywords:protected] => Bracing, support, scaffold [comments:protected] => [summary:protected] => This shows structural support that prevents collapses during construction. [transition_comments:protected] => [external_link:protected] => [consol_link:protected] => http://www.cpwrconstructionsolutions.org/masonry/solution/8/adjustable-tower-scaffold.html [more_like_this:protected] => i002660 [permission_given_by:protected] => [published:protected] => T [billable:protected] => F [img_name:protected] => [img_ext:protected] => jpg [img_width:protected] => [img_height:protected] => [img_credit:protected] => Photo by Pam Susi [img_practice:protected] => good [vid_source_id:protected] => [vid_running_time:protected] => [vid_intended_audience:protected] => [vid_acquisition_info:protected] => [vid_cost:protected] => [vid_producer:protected] => [vid_filename:protected] => [vid_filename_downloadable:protected] => [date_summary:protected] => January 2016 [date_permission_requested:protected] => [date_permission_received:protected] => [date_review_needed:protected] => [date_received:protected] => 02/01/16 [date_completed:protected] => 02/01/16 [date_billed:protected] => [date_modified:protected] => 02/01/16 [collBokExports:protected] => [lastBokExportCriteria:BaseElcoshItem:private] => [alreadyInSave:protected] => [alreadyInValidation:protected] => [validationFailures:protected] => Array ( ) [_new:BaseObject:private] => [_deleted:BaseObject:private] => [modifiedColumns:protected] => Array ( ) ) ) [3] => Search_Result Object ( [title] => Suspended Scaffold Outriggers [image] => /record/images/3975-p.jpg [blurb] => Suspended scaffolds systems must be designed by a qualified person and inspected daily by a competent person. The supports for the counterweight must... [category] => Array ( [0] => 97 [1] => 15 [2] => 47 [3] => 49 [4] => 79 [5] => 87 ) [labels] => Array ( [0] => Images [1] => Media [2] => Media & Documents [3] => Falls [4] => Work Environment [5] => Hazards [6] => Bricklayer [7] => Trades [8] => Carpenter [10] => Scaffold Erector [12] => Commercial & Institutional [13] => Jobsites ) [type] => Images [sub_category] => [url] => /image/3975/i002683/Suspended%2BScaffold%2BOutriggers.html [item:protected] => ImageRecord Object ( [records:protected] => Array ( ) [recordId:protected] => [searchWordClass:protected] => [searchWordPeerClass:protected] => [bok_record:protected] => [authors:protected] => [organizations:protected] => [collections:protected] => [categories:protected] => Array ( [97] => Category Object ( [languages:protected] => [bok_resources:protected] => [bok_topics:protected] => [bok_keywords:protected] => [id:protected] => 97 [type:protected] => category [parent:protected] => 5 [label:protected] => Images [alreadyInSave:protected] => [alreadyInValidation:protected] => [validationFailures:protected] => Array ( ) [_new:BaseObject:private] => [_deleted:BaseObject:private] => [modifiedColumns:protected] => Array ( ) ) [15] => Category Object ( [languages:protected] => [bok_resources:protected] => [bok_topics:protected] => [bok_keywords:protected] => [id:protected] => 15 [type:protected] => category [parent:protected] => 7 [label:protected] => Falls [alreadyInSave:protected] => [alreadyInValidation:protected] => [validationFailures:protected] => Array ( ) [_new:BaseObject:private] => [_deleted:BaseObject:private] => [modifiedColumns:protected] => Array ( ) ) [47] => Category Object ( [languages:protected] => [bok_resources:protected] => [bok_topics:protected] => [bok_keywords:protected] => [id:protected] => 47 [type:protected] => category [parent:protected] => 2 [label:protected] => Bricklayer [alreadyInSave:protected] => [alreadyInValidation:protected] => [validationFailures:protected] => Array ( ) [_new:BaseObject:private] => [_deleted:BaseObject:private] => [modifiedColumns:protected] => Array ( ) ) [49] => Category Object ( [languages:protected] => [bok_resources:protected] => [bok_topics:protected] => [bok_keywords:protected] => [id:protected] => 49 [type:protected] => category [parent:protected] => 2 [label:protected] => Carpenter [alreadyInSave:protected] => [alreadyInValidation:protected] => [validationFailures:protected] => Array ( ) [_new:BaseObject:private] => [_deleted:BaseObject:private] => [modifiedColumns:protected] => Array ( ) ) [79] => Category Object ( [languages:protected] => [bok_resources:protected] => [bok_topics:protected] => [bok_keywords:protected] => [id:protected] => 79 [type:protected] => category [parent:protected] => 2 [label:protected] => Scaffold Erector [alreadyInSave:protected] => [alreadyInValidation:protected] => [validationFailures:protected] => Array ( ) [_new:BaseObject:private] => [_deleted:BaseObject:private] => [modifiedColumns:protected] => Array ( ) ) [87] => Category Object ( [languages:protected] => [bok_resources:protected] => [bok_topics:protected] => [bok_keywords:protected] => [id:protected] => 87 [type:protected] => category [parent:protected] => 3 [label:protected] => Commercial & Institutional [alreadyInSave:protected] => [alreadyInValidation:protected] => [validationFailures:protected] => Array ( ) [_new:BaseObject:private] => [_deleted:BaseObject:private] => [modifiedColumns:protected] => Array ( ) ) ) [categories_initialized:protected] => 1 [mapped_items:protected] => [content:protected] => [files:protected] => [language:protected] => Language Object ( [id:protected] => 1 [code:protected] => en [name:protected] => English [alreadyInSave:protected] => [alreadyInValidation:protected] => [validationFailures:protected] => Array ( ) [_new:BaseObject:private] => [_deleted:BaseObject:private] => [modifiedColumns:protected] => Array ( ) ) [old_record:protected] => [id:protected] => 3975 [old_id:protected] => [elcosh_id:protected] => i002683 [type:protected] => image [display_type:protected] => Image [user_id:protected] => 0 [language_id:protected] => 1 [tagging_id:protected] => John Newquist [priority_id:protected] => 1 [title:protected] => Suspended Scaffold Outriggers [total_pages:protected] => 0 [billed_pages:protected] => 0 [publication_number:protected] => [part_of:protected] => [keywords:protected] => suspended, scaffold, swing, stage, fall, protection, counterweight, qualified, person [comments:protected] => [summary:protected] => Suspended scaffolds systems must be designed by a qualified person and inspected daily by a competent person. The supports for the counterweight must be designed with a safety factor of four. [transition_comments:protected] => [external_link:protected] => [consol_link:protected] => http://www.cpwrconstructionsolutions.org/task/Erect%2Band%2Bdismantle%2Bscaffolds/ [more_like_this:protected] => d000244,d000359,i000253,i000407 [permission_given_by:protected] => [published:protected] => T [billable:protected] => F [img_name:protected] => [img_ext:protected] => jpg [img_width:protected] => [img_height:protected] => [img_credit:protected] => MetroPark, Miller and Long [img_practice:protected] => not_applicable [vid_source_id:protected] => [vid_running_time:protected] => [vid_intended_audience:protected] => [vid_acquisition_info:protected] => [vid_cost:protected] => [vid_producer:protected] => [vid_filename:protected] => [vid_filename_downloadable:protected] => [date_summary:protected] => August 28 2015 [date_permission_requested:protected] => [date_permission_received:protected] => [date_review_needed:protected] => [date_received:protected] => 08/28/15 [date_completed:protected] => 08/28/15 [date_billed:protected] => [date_modified:protected] => 08/28/15 [collBokExports:protected] => [lastBokExportCriteria:BaseElcoshItem:private] => [alreadyInSave:protected] => [alreadyInValidation:protected] => [validationFailures:protected] => Array ( ) [_new:BaseObject:private] => [_deleted:BaseObject:private] => [modifiedColumns:protected] => Array ( ) ) ) [4] => Search_Result Object ( [title] => Suspended scaffold [image] => /record/images/3976-p.jpg [blurb] => Suspended scaffold outrigger beams must have stops to prevent the hangers from sliding of the end of the outriggers. Wire rope supported must be desig... [category] => Array ( [0] => 97 [1] => 15 [2] => 47 [3] => 50 [4] => 79 [5] => 87 ) [labels] => Array ( [0] => Images [1] => Media [2] => Media & Documents [3] => Falls [4] => Work Environment [5] => Hazards [6] => Bricklayer [7] => Trades [8] => Carpet Layer [10] => Scaffold Erector [12] => Commercial & Institutional [13] => Jobsites ) [type] => Images [sub_category] => [url] => /image/3976/i002684/Suspended%2Bscaffold.html [item:protected] => ImageRecord Object ( [records:protected] => Array ( ) [recordId:protected] => [searchWordClass:protected] => [searchWordPeerClass:protected] => [bok_record:protected] => [authors:protected] => [organizations:protected] => [collections:protected] => [categories:protected] => Array ( [97] => Category Object ( [languages:protected] => [bok_resources:protected] => [bok_topics:protected] => [bok_keywords:protected] => [id:protected] => 97 [type:protected] => category [parent:protected] => 5 [label:protected] => Images [alreadyInSave:protected] => [alreadyInValidation:protected] => [validationFailures:protected] => Array ( ) [_new:BaseObject:private] => [_deleted:BaseObject:private] => [modifiedColumns:protected] => Array ( ) ) [15] => Category Object ( [languages:protected] => [bok_resources:protected] => [bok_topics:protected] => [bok_keywords:protected] => [id:protected] => 15 [type:protected] => category [parent:protected] => 7 [label:protected] => Falls [alreadyInSave:protected] => [alreadyInValidation:protected] => [validationFailures:protected] => Array ( ) [_new:BaseObject:private] => [_deleted:BaseObject:private] => [modifiedColumns:protected] => Array ( ) ) [47] => Category Object ( [languages:protected] => [bok_resources:protected] => [bok_topics:protected] => [bok_keywords:protected] => [id:protected] => 47 [type:protected] => category [parent:protected] => 2 [label:protected] => Bricklayer [alreadyInSave:protected] => [alreadyInValidation:protected] => [validationFailures:protected] => Array ( ) [_new:BaseObject:private] => [_deleted:BaseObject:private] => [modifiedColumns:protected] => Array ( ) ) [50] => Category Object ( [languages:protected] => [bok_resources:protected] => [bok_topics:protected] => [bok_keywords:protected] => [id:protected] => 50 [type:protected] => category [parent:protected] => 2 [label:protected] => Carpet Layer [alreadyInSave:protected] => [alreadyInValidation:protected] => [validationFailures:protected] => Array ( ) [_new:BaseObject:private] => [_deleted:BaseObject:private] => [modifiedColumns:protected] => Array ( ) ) [79] => Category Object ( [languages:protected] => [bok_resources:protected] => [bok_topics:protected] => [bok_keywords:protected] => [id:protected] => 79 [type:protected] => category [parent:protected] => 2 [label:protected] => Scaffold Erector [alreadyInSave:protected] => [alreadyInValidation:protected] => [validationFailures:protected] => Array ( ) [_new:BaseObject:private] => [_deleted:BaseObject:private] => [modifiedColumns:protected] => Array ( ) ) [87] => Category Object ( [languages:protected] => [bok_resources:protected] => [bok_topics:protected] => [bok_keywords:protected] => [id:protected] => 87 [type:protected] => category [parent:protected] => 3 [label:protected] => Commercial & Institutional [alreadyInSave:protected] => [alreadyInValidation:protected] => [validationFailures:protected] => Array ( ) [_new:BaseObject:private] => [_deleted:BaseObject:private] => [modifiedColumns:protected] => Array ( ) ) ) [categories_initialized:protected] => 1 [mapped_items:protected] => [content:protected] => [files:protected] => [language:protected] => Language Object ( [id:protected] => 1 [code:protected] => en [name:protected] => English [alreadyInSave:protected] => [alreadyInValidation:protected] => [validationFailures:protected] => Array ( ) [_new:BaseObject:private] => [_deleted:BaseObject:private] => [modifiedColumns:protected] => Array ( ) ) [old_record:protected] => [id:protected] => 3976 [old_id:protected] => [elcosh_id:protected] => i002684 [type:protected] => image [display_type:protected] => Image [user_id:protected] => 0 [language_id:protected] => 1 [tagging_id:protected] => John Newquist [priority_id:protected] => 1 [title:protected] => Suspended scaffold [total_pages:protected] => 0 [billed_pages:protected] => 0 [publication_number:protected] => [part_of:protected] => [keywords:protected] => Suspended, scaffold, outrigger, beams, erection, wire, rope, inspection, swing, stage, [comments:protected] => [summary:protected] => Suspended scaffold outrigger beams must have stops to prevent the hangers from sliding of the end of the outriggers. Wire rope supported must be designed with a safety factor of 6. The scaffold must be inspected by a competent person daily. [transition_comments:protected] => [external_link:protected] => [consol_link:protected] => http://www.cpwrconstructionsolutions.org/task/Erect%2Band%2Bdismantle%2Bscaffolds/ [more_like_this:protected] => i002683, d000244, i000407, d000606 [permission_given_by:protected] => [published:protected] => T [billable:protected] => F [img_name:protected] => [img_ext:protected] => jpg [img_width:protected] => [img_height:protected] => [img_credit:protected] => Metropark, Miller and Long [img_practice:protected] => not_applicable [vid_source_id:protected] => [vid_running_time:protected] => [vid_intended_audience:protected] => [vid_acquisition_info:protected] => [vid_cost:protected] => [vid_producer:protected] => [vid_filename:protected] => [vid_filename_downloadable:protected] => [date_summary:protected] => [date_permission_requested:protected] => [date_permission_received:protected] => [date_review_needed:protected] => [date_received:protected] => 08/28/15 [date_completed:protected] => 08/28/15 [date_billed:protected] => [date_modified:protected] => 08/28/15 [collBokExports:protected] => [lastBokExportCriteria:BaseElcoshItem:private] => [alreadyInSave:protected] => [alreadyInValidation:protected] => [validationFailures:protected] => Array ( ) [_new:BaseObject:private] => [_deleted:BaseObject:private] => [modifiedColumns:protected] => Array ( ) ) ) [5] => Search_Result Object ( [title] => Three Tower Cranes [image] => /record/images/3979-p.jpg [blurb] => Whenever multiple tower cranes are used, there needs to be preplanning to ensure that the tower cranes cannot hit each other loads. This is accomplish... [category] => Array ( [0] => 97 [1] => 11 [2] => 64 [3] => 70 [4] => 62 [5] => 87 ) [labels] => Array ( [0] => Images [1] => Media [2] => Media & Documents [3] => Cranes & Hoists [4] => Work Environment [5] => Hazards [6] => Laborer [7] => Trades [8] => Operating Engineer [10] => Structural Ironworker [12] => Commercial & Institutional [13] => Jobsites ) [type] => Images [sub_category] => [url] => /image/3979/i002687/Three%2BTower%2BCranes.html [item:protected] => ImageRecord Object ( [records:protected] => Array ( ) [recordId:protected] => [searchWordClass:protected] => [searchWordPeerClass:protected] => [bok_record:protected] => [authors:protected] => [organizations:protected] => [collections:protected] => [categories:protected] => Array ( [97] => Category Object ( [languages:protected] => [bok_resources:protected] => [bok_topics:protected] => [bok_keywords:protected] => [id:protected] => 97 [type:protected] => category [parent:protected] => 5 [label:protected] => Images [alreadyInSave:protected] => [alreadyInValidation:protected] => [validationFailures:protected] => Array ( ) [_new:BaseObject:private] => [_deleted:BaseObject:private] => [modifiedColumns:protected] => Array ( ) ) [11] => Category Object ( [languages:protected] => [bok_resources:protected] => [bok_topics:protected] => [bok_keywords:protected] => [id:protected] => 11 [type:protected] => category [parent:protected] => 7 [label:protected] => Cranes & Hoists [alreadyInSave:protected] => [alreadyInValidation:protected] => [validationFailures:protected] => Array ( ) [_new:BaseObject:private] => [_deleted:BaseObject:private] => [modifiedColumns:protected] => Array ( ) ) [64] => Category Object ( [languages:protected] => [bok_resources:protected] => [bok_topics:protected] => [bok_keywords:protected] => [id:protected] => 64 [type:protected] => category [parent:protected] => 2 [label:protected] => Laborer [alreadyInSave:protected] => [alreadyInValidation:protected] => [validationFailures:protected] => Array ( ) [_new:BaseObject:private] => [_deleted:BaseObject:private] => [modifiedColumns:protected] => Array ( ) ) [70] => Category Object ( [languages:protected] => [bok_resources:protected] => [bok_topics:protected] => [bok_keywords:protected] => [id:protected] => 70 [type:protected] => category [parent:protected] => 2 [label:protected] => Operating Engineer [alreadyInSave:protected] => [alreadyInValidation:protected] => [validationFailures:protected] => Array ( ) [_new:BaseObject:private] => [_deleted:BaseObject:private] => [modifiedColumns:protected] => Array ( ) ) [62] => Category Object ( [languages:protected] => [bok_resources:protected] => [bok_topics:protected] => [bok_keywords:protected] => [id:protected] => 62 [type:protected] => category [parent:protected] => 2 [label:protected] => Structural Ironworker [alreadyInSave:protected] => [alreadyInValidation:protected] => [validationFailures:protected] => Array ( ) [_new:BaseObject:private] => [_deleted:BaseObject:private] => [modifiedColumns:protected] => Array ( ) ) [87] => Category Object ( [languages:protected] => [bok_resources:protected] => [bok_topics:protected] => [bok_keywords:protected] => [id:protected] => 87 [type:protected] => category [parent:protected] => 3 [label:protected] => Commercial & Institutional [alreadyInSave:protected] => [alreadyInValidation:protected] => [validationFailures:protected] => Array ( ) [_new:BaseObject:private] => [_deleted:BaseObject:private] => [modifiedColumns:protected] => Array ( ) ) ) [categories_initialized:protected] => 1 [mapped_items:protected] => [content:protected] => [files:protected] => [language:protected] => Language Object ( [id:protected] => 1 [code:protected] => en [name:protected] => English [alreadyInSave:protected] => [alreadyInValidation:protected] => [validationFailures:protected] => Array ( ) [_new:BaseObject:private] => [_deleted:BaseObject:private] => [modifiedColumns:protected] => Array ( ) ) [old_record:protected] => [id:protected] => 3979 [old_id:protected] => [elcosh_id:protected] => i002687 [type:protected] => image [display_type:protected] => Image [user_id:protected] => 0 [language_id:protected] => 1 [tagging_id:protected] => John Newquist [priority_id:protected] => 1 [title:protected] => Three Tower Cranes [total_pages:protected] => 0 [billed_pages:protected] => 0 [publication_number:protected] => [part_of:protected] => [keywords:protected] => [comments:protected] => [summary:protected] => Whenever multiple tower cranes are used, there needs to be preplanning to ensure that the tower cranes cannot hit each other loads. This is accomplished by setting swing restrictions, marking the ground for allowable crane travel and training of the crane signal persons. [transition_comments:protected] => [external_link:protected] => [consol_link:protected] => http://www.cpwrconstructionsolutions.org/work/6/184/ [more_like_this:protected] => d001029, d000010, i001280, i001221 [permission_given_by:protected] => [published:protected] => T [billable:protected] => F [img_name:protected] => [img_ext:protected] => jpg [img_width:protected] => [img_height:protected] => [img_credit:protected] => Metropark [img_practice:protected] => not_applicable [vid_source_id:protected] => [vid_running_time:protected] => [vid_intended_audience:protected] => [vid_acquisition_info:protected] => [vid_cost:protected] => [vid_producer:protected] => [vid_filename:protected] => [vid_filename_downloadable:protected] => [date_summary:protected] => August 28 2015 [date_permission_requested:protected] => [date_permission_received:protected] => [date_review_needed:protected] => [date_received:protected] => 08/28/15 [date_completed:protected] => 08/28/15 [date_billed:protected] => [date_modified:protected] => 08/28/15 [collBokExports:protected] => [lastBokExportCriteria:BaseElcoshItem:private] => [alreadyInSave:protected] => [alreadyInValidation:protected] => [validationFailures:protected] => Array ( ) [_new:BaseObject:private] => [_deleted:BaseObject:private] => [modifiedColumns:protected] => Array ( ) ) ) ) [preview_mode] => [description] => This third in a series of 6 Tool Box Talks on construction ergonomics focuses on proper positioning to avoid injuries. The TBT recommends: 1)prop up a task off of the floor by using a raised surface, cart, baker scaffold, saw horses to prep materials near waist height, 2)move the lift or ladder in the best position for the work, 3)position the lift in front of the area you plan to work without trying to reach too far on either side of the lift. [keywords] => position, positioning, ergonomics, ergo, carpal tunnel, MSD, musculoskeletal disorder [related_items] => Array ( [Handouts] => Array ( [0] => DocumentRecord Object ( [records:protected] => Array ( ) [recordId:protected] => [searchWordClass:protected] => [searchWordPeerClass:protected] => [bok_record:protected] => [authors:protected] => [organizations:protected] => [collections:protected] => [categories:protected] => [categories_initialized:protected] => [mapped_items:protected] => [content:protected] => [files:protected] => [language:protected] => Language Object ( [id:protected] => 1 [code:protected] => en [name:protected] => English [alreadyInSave:protected] => [alreadyInValidation:protected] => [validationFailures:protected] => Array ( ) [_new:BaseObject:private] => [_deleted:BaseObject:private] => [modifiedColumns:protected] => Array ( ) ) [old_record:protected] => [id:protected] => 3833 [old_id:protected] => [elcosh_id:protected] => d001303 [type:protected] => document [display_type:protected] => HTML w/ PDF [user_id:protected] => 25 [language_id:protected] => 1 [tagging_id:protected] => Bruce Lippy [priority_id:protected] => 1 [title:protected] => Overview of Toolbox Talks on Ergonomics Developed by Washington University in St. Louis [total_pages:protected] => 3 [billed_pages:protected] => 3 [publication_number:protected] => [part_of:protected] => [keywords:protected] => ergonomics, musculoskeletal disorders, MSDs [comments:protected] => 7-28-2014 - Originally submitted as "HTML w/ doc and PDF", Jeff Nelson asked Bruce Lippy for permission to switch it to "HTML w/ PDF" -- permission was given [summary:protected] => This overviews provides a background on how Washington University in St. Louis developed this series of six toolbox talks on ergonomics. It also describes how they tested the effectiveness of these communication tools, concluding that the guide was valuable for improving the delivery of ergonomics training and interaction between the safety representative and workers. The researchers recommend preparing site-specific information prior to the talk and interacting with workers to discuss problems and ergonomic solutions during the safety meetings. [transition_comments:protected] => [external_link:protected] => [consol_link:protected] => [more_like_this:protected] => [permission_given_by:protected] => Lisa Jaegers, Washington U. in St. Louis [published:protected] => T [billable:protected] => F [img_name:protected] => [img_ext:protected] => png [img_width:protected] => [img_height:protected] => [img_credit:protected] => [img_practice:protected] => [vid_source_id:protected] => [vid_running_time:protected] => [vid_intended_audience:protected] => [vid_acquisition_info:protected] => [vid_cost:protected] => [vid_producer:protected] => [vid_filename:protected] => [vid_filename_downloadable:protected] => [date_summary:protected] => 2014 [date_permission_requested:protected] => [date_permission_received:protected] => [date_review_needed:protected] => [date_received:protected] => 06/11/14 [date_completed:protected] => 07/29/14 [date_billed:protected] => [date_modified:protected] => 07/29/14 [collBokExports:protected] => [lastBokExportCriteria:BaseElcoshItem:private] => [alreadyInSave:protected] => [alreadyInValidation:protected] => [validationFailures:protected] => Array ( ) [_new:BaseObject:private] => [_deleted:BaseObject:private] => [modifiedColumns:protected] => Array ( ) ) ) [Toolbox Talks] => Array ( [0] => DocumentRecord Object ( [records:protected] => Array ( ) [recordId:protected] => [searchWordClass:protected] => [searchWordPeerClass:protected] => [bok_record:protected] => [authors:protected] => [organizations:protected] => [collections:protected] => [categories:protected] => [categories_initialized:protected] => [mapped_items:protected] => [content:protected] => [files:protected] => [language:protected] => Language Object ( [id:protected] => 1 [code:protected] => en [name:protected] => English [alreadyInSave:protected] => [alreadyInValidation:protected] => [validationFailures:protected] => Array ( ) [_new:BaseObject:private] => [_deleted:BaseObject:private] => [modifiedColumns:protected] => Array ( ) ) [old_record:protected] => [id:protected] => 3835 [old_id:protected] => [elcosh_id:protected] => d001304 [type:protected] => document [display_type:protected] => HTML w/ PDF [user_id:protected] => 25 [language_id:protected] => 1 [tagging_id:protected] => Bruce Lippy [priority_id:protected] => 1 [title:protected] => Ergonomics Tool Box Talks (TBT) Training Guide [total_pages:protected] => 2 [billed_pages:protected] => 2 [publication_number:protected] => [part_of:protected] => [keywords:protected] => Ergonomics, carpal tunnel, muscular skeletal disorders, msd [comments:protected] => [summary:protected] => CPWR-funded ergonomics research by Washington University at St. Louis led to the development of 6 tool box talks. This guide is an explanation of how to deliver the talks for maximum effectiveness. This guide should be reviewed before delivering any of the talks because it makes important recommendations like: • If possible, give the TBTs as a part of the crew’s regular safety meetings so that ergonomics is included in the safety discussion. • Try to locate an area with few distractions for gathering the crew. • For a team approach, invite the work crew, site superintendent, project manager and other general contractor and/or subcontractor reps who you feel may be helpful in supporting the training and ergonomics solutions. [transition_comments:protected] => [external_link:protected] => [consol_link:protected] => [more_like_this:protected] => d001303,d001305,d001306,d001307,d001308,d001309,d001310 [permission_given_by:protected] => [published:protected] => T [billable:protected] => F [img_name:protected] => [img_ext:protected] => png [img_width:protected] => [img_height:protected] => [img_credit:protected] => [img_practice:protected] => [vid_source_id:protected] => [vid_running_time:protected] => [vid_intended_audience:protected] => [vid_acquisition_info:protected] => [vid_cost:protected] => [vid_producer:protected] => [vid_filename:protected] => [vid_filename_downloadable:protected] => [date_summary:protected] => 2014 [date_permission_requested:protected] => [date_permission_received:protected] => [date_review_needed:protected] => [date_received:protected] => 06/12/14 [date_completed:protected] => 07/29/14 [date_billed:protected] => [date_modified:protected] => 07/29/14 [collBokExports:protected] => [lastBokExportCriteria:BaseElcoshItem:private] => [alreadyInSave:protected] => [alreadyInValidation:protected] => [validationFailures:protected] => Array ( ) [_new:BaseObject:private] => [_deleted:BaseObject:private] => [modifiedColumns:protected] => Array ( ) ) [1] => DocumentRecord Object ( [records:protected] => Array ( ) [recordId:protected] => [searchWordClass:protected] => [searchWordPeerClass:protected] => [bok_record:protected] => [authors:protected] => [organizations:protected] => [collections:protected] => [categories:protected] => [categories_initialized:protected] => [mapped_items:protected] => [content:protected] => [files:protected] => [language:protected] => Language Object ( [id:protected] => 1 [code:protected] => en [name:protected] => English [alreadyInSave:protected] => [alreadyInValidation:protected] => [validationFailures:protected] => Array ( ) [_new:BaseObject:private] => [_deleted:BaseObject:private] => [modifiedColumns:protected] => Array ( ) ) [old_record:protected] => [id:protected] => 3836 [old_id:protected] => [elcosh_id:protected] => d001305 [type:protected] => document [display_type:protected] => HTML w/ PDF [user_id:protected] => 25 [language_id:protected] => 1 [tagging_id:protected] => Bruce Lippy [priority_id:protected] => 1 [title:protected] => TBT1 Ergonomics in Construction [total_pages:protected] => 5 [billed_pages:protected] => 5 [publication_number:protected] => [part_of:protected] => [keywords:protected] => ergonomics, ergo, msd, musculoskeletal disorders, risk factors, lifting, carpal tunnel, repetition, awkward postures [comments:protected] => 7-28-2014 Jeff Nelson asked Bruce Lippy about what to do with a sentence included toward the top of the doc, "Fill them in on page 2 'Other Questions.'" -- Bruce said this sentence could be deleted from the HTML. [summary:protected] => This is the first in a series of 6 Tool Box Talks produced by Washington University in St. Louis on ergonomics in construction work. This one should be delivered first because it covers what ergonomics is, why construction workers need to talk about it, what the risk factors are for developing a health problem and how to prevent these problems. [transition_comments:protected] => [external_link:protected] => [consol_link:protected] => http://www.cpwrconstructionsolutions.org/pipes_vessels/solution/50/participatory-ergonomics-program.html [more_like_this:protected] => d001303,d001304,d001306,d001307,d001308,d001309 [permission_given_by:protected] => Lisa Jaegers, Washington U. in St. Louis [published:protected] => T [billable:protected] => F [img_name:protected] => [img_ext:protected] => png [img_width:protected] => [img_height:protected] => [img_credit:protected] => [img_practice:protected] => [vid_source_id:protected] => [vid_running_time:protected] => [vid_intended_audience:protected] => [vid_acquisition_info:protected] => [vid_cost:protected] => [vid_producer:protected] => [vid_filename:protected] => [vid_filename_downloadable:protected] => [date_summary:protected] => 2014 [date_permission_requested:protected] => [date_permission_received:protected] => [date_review_needed:protected] => [date_received:protected] => 06/12/14 [date_completed:protected] => 07/28/14 [date_billed:protected] => [date_modified:protected] => 10/09/15 [collBokExports:protected] => [lastBokExportCriteria:BaseElcoshItem:private] => [alreadyInSave:protected] => [alreadyInValidation:protected] => [validationFailures:protected] => Array ( ) [_new:BaseObject:private] => [_deleted:BaseObject:private] => [modifiedColumns:protected] => Array ( ) ) [2] => DocumentRecord Object ( [records:protected] => Array ( ) [recordId:protected] => [searchWordClass:protected] => [searchWordPeerClass:protected] => [bok_record:protected] => [authors:protected] => [organizations:protected] => [collections:protected] => [categories:protected] => [categories_initialized:protected] => [mapped_items:protected] => [content:protected] => [files:protected] => [language:protected] => Language Object ( [id:protected] => 1 [code:protected] => en [name:protected] => English [alreadyInSave:protected] => [alreadyInValidation:protected] => [validationFailures:protected] => Array ( ) [_new:BaseObject:private] => [_deleted:BaseObject:private] => [modifiedColumns:protected] => Array ( ) ) [old_record:protected] => [id:protected] => 3837 [old_id:protected] => [elcosh_id:protected] => d001306 [type:protected] => document [display_type:protected] => HTML w/ PDF [user_id:protected] => 25 [language_id:protected] => 1 [tagging_id:protected] => Bruce Lippy [priority_id:protected] => 1 [title:protected] => TBT2 Keep Reach Close [total_pages:protected] => 4 [billed_pages:protected] => 4 [publication_number:protected] => [part_of:protected] => [keywords:protected] => reach, ergonomic, ergo, MSD, carpal tunnel, repetition, awkward positions [comments:protected] => 7-28-2014 Jeff Nelson asked Bruce Lippy about what to do with a sentence included toward the top of the doc, "Fill them in on page 2 'Other Questions.'" -- Bruce said this sentence could be deleted from the HTML. [summary:protected] => This is the second of six Tool Box Talks created by Washington University in St. Louis on ergonomics in construction. There is a guide with the series that describes how to deliver these talks. This one deals with how to avoid awkward reaching during tasks to prevent injuries. try to work with your hands below your head and close to our body to reduce your risk of shoulder strains and back discomfort. This TBT recommends considering ways to move close to the task, keeping the work area free of obstacles, and talking with each other to provide constructive feedback about your working position. [transition_comments:protected] => [external_link:protected] => [consol_link:protected] => http://www.cpwrconstructionsolutions.org/hazard/959/lifting-and-carrying-manual-materials-handling.html [more_like_this:protected] => d001303,d001304,d001305,d001307,d001308,e001309 [permission_given_by:protected] => [published:protected] => T [billable:protected] => F [img_name:protected] => [img_ext:protected] => png [img_width:protected] => [img_height:protected] => [img_credit:protected] => [img_practice:protected] => [vid_source_id:protected] => [vid_running_time:protected] => [vid_intended_audience:protected] => [vid_acquisition_info:protected] => [vid_cost:protected] => [vid_producer:protected] => [vid_filename:protected] => [vid_filename_downloadable:protected] => [date_summary:protected] => 2014 [date_permission_requested:protected] => [date_permission_received:protected] => [date_review_needed:protected] => [date_received:protected] => 06/12/14 [date_completed:protected] => 07/28/14 [date_billed:protected] => [date_modified:protected] => 11/02/16 [collBokExports:protected] => [lastBokExportCriteria:BaseElcoshItem:private] => [alreadyInSave:protected] => [alreadyInValidation:protected] => [validationFailures:protected] => Array ( ) [_new:BaseObject:private] => [_deleted:BaseObject:private] => [modifiedColumns:protected] => Array ( ) ) [3] => DocumentRecord Object ( [records:protected] => Array ( ) [recordId:protected] => [searchWordClass:protected] => [searchWordPeerClass:protected] => [bok_record:protected] => [authors:protected] => [organizations:protected] => [collections:protected] => [categories:protected] => [categories_initialized:protected] => [mapped_items:protected] => [content:protected] => [files:protected] => [language:protected] => Language Object ( [id:protected] => 1 [code:protected] => en [name:protected] => English [alreadyInSave:protected] => [alreadyInValidation:protected] => [validationFailures:protected] => Array ( ) [_new:BaseObject:private] => [_deleted:BaseObject:private] => [modifiedColumns:protected] => Array ( ) ) [old_record:protected] => [id:protected] => 3839 [old_id:protected] => [elcosh_id:protected] => d001308 [type:protected] => document [display_type:protected] => HTML w/ PDF [user_id:protected] => 23 [language_id:protected] => 1 [tagging_id:protected] => Bruce Lippy [priority_id:protected] => 1 [title:protected] => TBT4 Move Materials With Assist [total_pages:protected] => 4 [billed_pages:protected] => 4 [publication_number:protected] => [part_of:protected] => [keywords:protected] => lifting, back injury, ergonomics, ergo, MSD, buddy system [comments:protected] => 7-28-2014 Jeff Nelson asked Bruce Lippy about what to do with a sentence included toward the top of the doc, "Fill them in on page 2 'Other Questions.'" -- Bruce said this sentence could be deleted from the HTML. [summary:protected] => This tool box talk is fourth in a series of 6 developed by Washington University in St. Louis on construction ergonomics. This one focuses on preventing back injuries by getting an assist when manually lifting. It recommends using a cart for transporting loads, taking less trips, avoiding carrying materials on the shoulder and helping each other to lift large or heavy materials when a cart or hoist is not available. [transition_comments:protected] => [external_link:protected] => [consol_link:protected] => http://www.cpwrconstructionsolutions.org/hazard/959/lifting-and-carrying-manual-materials-handling.html [more_like_this:protected] => d001303,d001304,d001305,d001306,d001307,d001309 [permission_given_by:protected] => Lisa Jaegers, Washington U. in St. Louis [published:protected] => T [billable:protected] => F [img_name:protected] => [img_ext:protected] => png [img_width:protected] => [img_height:protected] => [img_credit:protected] => [img_practice:protected] => [vid_source_id:protected] => [vid_running_time:protected] => [vid_intended_audience:protected] => [vid_acquisition_info:protected] => [vid_cost:protected] => [vid_producer:protected] => [vid_filename:protected] => [vid_filename_downloadable:protected] => [date_summary:protected] => 2014 [date_permission_requested:protected] => [date_permission_received:protected] => [date_review_needed:protected] => [date_received:protected] => 06/12/14 [date_completed:protected] => 07/29/14 [date_billed:protected] => [date_modified:protected] => 10/09/15 [collBokExports:protected] => [lastBokExportCriteria:BaseElcoshItem:private] => [alreadyInSave:protected] => [alreadyInValidation:protected] => [validationFailures:protected] => Array ( ) [_new:BaseObject:private] => [_deleted:BaseObject:private] => [modifiedColumns:protected] => Array ( ) ) [4] => DocumentRecord Object ( [records:protected] => Array ( ) [recordId:protected] => [searchWordClass:protected] => [searchWordPeerClass:protected] => [bok_record:protected] => [authors:protected] => [organizations:protected] => [collections:protected] => [categories:protected] => [categories_initialized:protected] => [mapped_items:protected] => [content:protected] => [files:protected] => [language:protected] => Language Object ( [id:protected] => 1 [code:protected] => en [name:protected] => English [alreadyInSave:protected] => [alreadyInValidation:protected] => [validationFailures:protected] => Array ( ) [_new:BaseObject:private] => [_deleted:BaseObject:private] => [modifiedColumns:protected] => Array ( ) ) [old_record:protected] => [id:protected] => 3840 [old_id:protected] => [elcosh_id:protected] => d001309 [type:protected] => document [display_type:protected] => HTML w/ PDF [user_id:protected] => 23 [language_id:protected] => 1 [tagging_id:protected] => Bruce Lippy [priority_id:protected] => 1 [title:protected] => TBT5 Manual Tools [total_pages:protected] => 4 [billed_pages:protected] => 4 [publication_number:protected] => [part_of:protected] => [keywords:protected] => ergonomic, hand tools, handles, MSD, musculoskeletal disorder, carpal tunnel [comments:protected] => 7-28-2014 Jeff Nelson asked Bruce Lippy about what to do with a sentence included toward the top of the doc, "Fill them in on page 2 'Other Questions.'" -- Bruce said this sentence could be deleted from the HTML. [summary:protected] => This is the fifth in a series of 6 tool box talks on construction ergonomics produced by the University of Washington in St. Louis. This one focuses on manual tools. It asks the following 6 key questions. Does the tool… 1. Fit the task? 2. Allow a good power grip? 3. Keep the wrist in a straight posture? 4. Feel comfortable? 5. Take less effort than other tools for the task? 6. Work effectively? [transition_comments:protected] => [external_link:protected] => [consol_link:protected] => http://www.cpwrconstructionsolutions.org/masonry/solution/383/ergonomic-hand-tools.html [more_like_this:protected] => d001303,d001304,d001305,d001306,d001307,d001308,d001310 [permission_given_by:protected] => Lisa Jaegers, U. Wash. St. Louis [published:protected] => T [billable:protected] => F [img_name:protected] => [img_ext:protected] => png [img_width:protected] => [img_height:protected] => [img_credit:protected] => [img_practice:protected] => [vid_source_id:protected] => [vid_running_time:protected] => [vid_intended_audience:protected] => [vid_acquisition_info:protected] => [vid_cost:protected] => [vid_producer:protected] => [vid_filename:protected] => [vid_filename_downloadable:protected] => [date_summary:protected] => 2014 [date_permission_requested:protected] => [date_permission_received:protected] => [date_review_needed:protected] => [date_received:protected] => 06/12/14 [date_completed:protected] => 07/29/14 [date_billed:protected] => [date_modified:protected] => 10/09/15 [collBokExports:protected] => [lastBokExportCriteria:BaseElcoshItem:private] => [alreadyInSave:protected] => [alreadyInValidation:protected] => [validationFailures:protected] => Array ( ) [_new:BaseObject:private] => [_deleted:BaseObject:private] => [modifiedColumns:protected] => Array ( ) ) ) ) [collections] => Array ( [3834] => ) [record] => DocumentRecord Object ( [records:protected] => Array ( ) [recordId:protected] => [searchWordClass:protected] => [searchWordPeerClass:protected] => [bok_record:protected] => [authors:protected] => Array ( ) [organizations:protected] => Array ( [182] => Organization Object ( [id:protected] => 182 [elcosh_id:protected] => o000205 [user_id:protected] => 14 [province_id:protected] => 0 [country_id:protected] => 0 [title:protected] => Washington University - St. Louis [address:protected] => [postal_code:protected] => [city:protected] => [department:protected] => [phone:protected] => [fax:protected] => [email:protected] => [website:protected] => [filename:protected] => [about:protected] => [comments:protected] => [logo_available:protected] => T [no_details:protected] => T [date_received:protected] => 2009-08-06 [date_completed:protected] => 2009-08-06 [date_billed:protected] => [alreadyInSave:protected] => [alreadyInValidation:protected] => [validationFailures:protected] => Array ( ) [_new:BaseObject:private] => [_deleted:BaseObject:private] => [modifiedColumns:protected] => Array ( ) ) ) [collections:protected] => Array ( [3834] => ) [categories:protected] => [categories_initialized:protected] => [mapped_items:protected] => Array ( [3833] => DocumentRecord Object ( [records:protected] => Array ( ) [recordId:protected] => [searchWordClass:protected] => [searchWordPeerClass:protected] => [bok_record:protected] => [authors:protected] => [organizations:protected] => [collections:protected] => [categories:protected] => [categories_initialized:protected] => [mapped_items:protected] => [content:protected] => [files:protected] => [language:protected] => [old_record:protected] => [id:protected] => 3833 [old_id:protected] => [elcosh_id:protected] => d001303 [type:protected] => document [display_type:protected] => HTML w/ PDF [user_id:protected] => 25 [language_id:protected] => 1 [tagging_id:protected] => Bruce Lippy [priority_id:protected] => 1 [title:protected] => Overview of Toolbox Talks on Ergonomics Developed by Washington University in St. Louis [total_pages:protected] => 3 [billed_pages:protected] => 3 [publication_number:protected] => [part_of:protected] => [keywords:protected] => ergonomics, musculoskeletal disorders, MSDs [comments:protected] => 7-28-2014 - Originally submitted as "HTML w/ doc and PDF", Jeff Nelson asked Bruce Lippy for permission to switch it to "HTML w/ PDF" -- permission was given [summary:protected] => This overviews provides a background on how Washington University in St. Louis developed this series of six toolbox talks on ergonomics. It also describes how they tested the effectiveness of these communication tools, concluding that the guide was valuable for improving the delivery of ergonomics training and interaction between the safety representative and workers. The researchers recommend preparing site-specific information prior to the talk and interacting with workers to discuss problems and ergonomic solutions during the safety meetings. [transition_comments:protected] => [external_link:protected] => [consol_link:protected] => [more_like_this:protected] => [permission_given_by:protected] => Lisa Jaegers, Washington U. in St. Louis [published:protected] => T [billable:protected] => F [img_name:protected] => [img_ext:protected] => png [img_width:protected] => [img_height:protected] => [img_credit:protected] => [img_practice:protected] => [vid_source_id:protected] => [vid_running_time:protected] => [vid_intended_audience:protected] => [vid_acquisition_info:protected] => [vid_cost:protected] => [vid_producer:protected] => [vid_filename:protected] => [vid_filename_downloadable:protected] => [date_summary:protected] => 2014 [date_permission_requested:protected] => [date_permission_received:protected] => [date_review_needed:protected] => [date_received:protected] => 06/11/14 [date_completed:protected] => 07/29/14 [date_billed:protected] => [date_modified:protected] => 07/29/14 [collBokExports:protected] => [lastBokExportCriteria:BaseElcoshItem:private] => [alreadyInSave:protected] => [alreadyInValidation:protected] => [validationFailures:protected] => Array ( ) [_new:BaseObject:private] => [_deleted:BaseObject:private] => [modifiedColumns:protected] => Array ( ) ) [3835] => DocumentRecord Object ( [records:protected] => Array ( ) [recordId:protected] => [searchWordClass:protected] => [searchWordPeerClass:protected] => [bok_record:protected] => [authors:protected] => [organizations:protected] => [collections:protected] => [categories:protected] => [categories_initialized:protected] => [mapped_items:protected] => [content:protected] => [files:protected] => [language:protected] => [old_record:protected] => [id:protected] => 3835 [old_id:protected] => [elcosh_id:protected] => d001304 [type:protected] => document [display_type:protected] => HTML w/ PDF [user_id:protected] => 25 [language_id:protected] => 1 [tagging_id:protected] => Bruce Lippy [priority_id:protected] => 1 [title:protected] => Ergonomics Tool Box Talks (TBT) Training Guide [total_pages:protected] => 2 [billed_pages:protected] => 2 [publication_number:protected] => [part_of:protected] => [keywords:protected] => Ergonomics, carpal tunnel, muscular skeletal disorders, msd [comments:protected] => [summary:protected] => CPWR-funded ergonomics research by Washington University at St. Louis led to the development of 6 tool box talks. This guide is an explanation of how to deliver the talks for maximum effectiveness. This guide should be reviewed before delivering any of the talks because it makes important recommendations like: • If possible, give the TBTs as a part of the crew’s regular safety meetings so that ergonomics is included in the safety discussion. • Try to locate an area with few distractions for gathering the crew. • For a team approach, invite the work crew, site superintendent, project manager and other general contractor and/or subcontractor reps who you feel may be helpful in supporting the training and ergonomics solutions. [transition_comments:protected] => [external_link:protected] => [consol_link:protected] => [more_like_this:protected] => d001303,d001305,d001306,d001307,d001308,d001309,d001310 [permission_given_by:protected] => [published:protected] => T [billable:protected] => F [img_name:protected] => [img_ext:protected] => png [img_width:protected] => [img_height:protected] => [img_credit:protected] => [img_practice:protected] => [vid_source_id:protected] => [vid_running_time:protected] => [vid_intended_audience:protected] => [vid_acquisition_info:protected] => [vid_cost:protected] => [vid_producer:protected] => [vid_filename:protected] => [vid_filename_downloadable:protected] => [date_summary:protected] => 2014 [date_permission_requested:protected] => [date_permission_received:protected] => [date_review_needed:protected] => [date_received:protected] => 06/12/14 [date_completed:protected] => 07/29/14 [date_billed:protected] => [date_modified:protected] => 07/29/14 [collBokExports:protected] => [lastBokExportCriteria:BaseElcoshItem:private] => [alreadyInSave:protected] => [alreadyInValidation:protected] => [validationFailures:protected] => Array ( ) [_new:BaseObject:private] => [_deleted:BaseObject:private] => [modifiedColumns:protected] => Array ( ) ) [3836] => DocumentRecord Object ( [records:protected] => Array ( ) [recordId:protected] => [searchWordClass:protected] => [searchWordPeerClass:protected] => [bok_record:protected] => [authors:protected] => [organizations:protected] => [collections:protected] => [categories:protected] => [categories_initialized:protected] => [mapped_items:protected] => [content:protected] => [files:protected] => [language:protected] => [old_record:protected] => [id:protected] => 3836 [old_id:protected] => [elcosh_id:protected] => d001305 [type:protected] => document [display_type:protected] => HTML w/ PDF [user_id:protected] => 25 [language_id:protected] => 1 [tagging_id:protected] => Bruce Lippy [priority_id:protected] => 1 [title:protected] => TBT1 Ergonomics in Construction [total_pages:protected] => 5 [billed_pages:protected] => 5 [publication_number:protected] => [part_of:protected] => [keywords:protected] => ergonomics, ergo, msd, musculoskeletal disorders, risk factors, lifting, carpal tunnel, repetition, awkward postures [comments:protected] => 7-28-2014 Jeff Nelson asked Bruce Lippy about what to do with a sentence included toward the top of the doc, "Fill them in on page 2 'Other Questions.'" -- Bruce said this sentence could be deleted from the HTML. [summary:protected] => This is the first in a series of 6 Tool Box Talks produced by Washington University in St. Louis on ergonomics in construction work. This one should be delivered first because it covers what ergonomics is, why construction workers need to talk about it, what the risk factors are for developing a health problem and how to prevent these problems. [transition_comments:protected] => [external_link:protected] => [consol_link:protected] => http://www.cpwrconstructionsolutions.org/pipes_vessels/solution/50/participatory-ergonomics-program.html [more_like_this:protected] => d001303,d001304,d001306,d001307,d001308,d001309 [permission_given_by:protected] => Lisa Jaegers, Washington U. in St. Louis [published:protected] => T [billable:protected] => F [img_name:protected] => [img_ext:protected] => png [img_width:protected] => [img_height:protected] => [img_credit:protected] => [img_practice:protected] => [vid_source_id:protected] => [vid_running_time:protected] => [vid_intended_audience:protected] => [vid_acquisition_info:protected] => [vid_cost:protected] => [vid_producer:protected] => [vid_filename:protected] => [vid_filename_downloadable:protected] => [date_summary:protected] => 2014 [date_permission_requested:protected] => [date_permission_received:protected] => [date_review_needed:protected] => [date_received:protected] => 06/12/14 [date_completed:protected] => 07/28/14 [date_billed:protected] => [date_modified:protected] => 10/09/15 [collBokExports:protected] => [lastBokExportCriteria:BaseElcoshItem:private] => [alreadyInSave:protected] => [alreadyInValidation:protected] => [validationFailures:protected] => Array ( ) [_new:BaseObject:private] => [_deleted:BaseObject:private] => [modifiedColumns:protected] => Array ( ) ) [3837] => DocumentRecord Object ( [records:protected] => Array ( ) [recordId:protected] => [searchWordClass:protected] => [searchWordPeerClass:protected] => [bok_record:protected] => [authors:protected] => [organizations:protected] => [collections:protected] => [categories:protected] => [categories_initialized:protected] => [mapped_items:protected] => [content:protected] => [files:protected] => [language:protected] => [old_record:protected] => [id:protected] => 3837 [old_id:protected] => [elcosh_id:protected] => d001306 [type:protected] => document [display_type:protected] => HTML w/ PDF [user_id:protected] => 25 [language_id:protected] => 1 [tagging_id:protected] => Bruce Lippy [priority_id:protected] => 1 [title:protected] => TBT2 Keep Reach Close [total_pages:protected] => 4 [billed_pages:protected] => 4 [publication_number:protected] => [part_of:protected] => [keywords:protected] => reach, ergonomic, ergo, MSD, carpal tunnel, repetition, awkward positions [comments:protected] => 7-28-2014 Jeff Nelson asked Bruce Lippy about what to do with a sentence included toward the top of the doc, "Fill them in on page 2 'Other Questions.'" -- Bruce said this sentence could be deleted from the HTML. [summary:protected] => This is the second of six Tool Box Talks created by Washington University in St. Louis on ergonomics in construction. There is a guide with the series that describes how to deliver these talks. This one deals with how to avoid awkward reaching during tasks to prevent injuries. try to work with your hands below your head and close to our body to reduce your risk of shoulder strains and back discomfort. This TBT recommends considering ways to move close to the task, keeping the work area free of obstacles, and talking with each other to provide constructive feedback about your working position. [transition_comments:protected] => [external_link:protected] => [consol_link:protected] => http://www.cpwrconstructionsolutions.org/hazard/959/lifting-and-carrying-manual-materials-handling.html [more_like_this:protected] => d001303,d001304,d001305,d001307,d001308,e001309 [permission_given_by:protected] => [published:protected] => T [billable:protected] => F [img_name:protected] => [img_ext:protected] => png [img_width:protected] => [img_height:protected] => [img_credit:protected] => [img_practice:protected] => [vid_source_id:protected] => [vid_running_time:protected] => [vid_intended_audience:protected] => [vid_acquisition_info:protected] => [vid_cost:protected] => [vid_producer:protected] => [vid_filename:protected] => [vid_filename_downloadable:protected] => [date_summary:protected] => 2014 [date_permission_requested:protected] => [date_permission_received:protected] => [date_review_needed:protected] => [date_received:protected] => 06/12/14 [date_completed:protected] => 07/28/14 [date_billed:protected] => [date_modified:protected] => 11/02/16 [collBokExports:protected] => [lastBokExportCriteria:BaseElcoshItem:private] => [alreadyInSave:protected] => [alreadyInValidation:protected] => [validationFailures:protected] => Array ( ) [_new:BaseObject:private] => [_deleted:BaseObject:private] => [modifiedColumns:protected] => Array ( ) ) [3839] => DocumentRecord Object ( [records:protected] => Array ( ) [recordId:protected] => [searchWordClass:protected] => [searchWordPeerClass:protected] => [bok_record:protected] => [authors:protected] => [organizations:protected] => [collections:protected] => [categories:protected] => [categories_initialized:protected] => [mapped_items:protected] => [content:protected] => [files:protected] => [language:protected] => [old_record:protected] => [id:protected] => 3839 [old_id:protected] => [elcosh_id:protected] => d001308 [type:protected] => document [display_type:protected] => HTML w/ PDF [user_id:protected] => 23 [language_id:protected] => 1 [tagging_id:protected] => Bruce Lippy [priority_id:protected] => 1 [title:protected] => TBT4 Move Materials With Assist [total_pages:protected] => 4 [billed_pages:protected] => 4 [publication_number:protected] => [part_of:protected] => [keywords:protected] => lifting, back injury, ergonomics, ergo, MSD, buddy system [comments:protected] => 7-28-2014 Jeff Nelson asked Bruce Lippy about what to do with a sentence included toward the top of the doc, "Fill them in on page 2 'Other Questions.'" -- Bruce said this sentence could be deleted from the HTML. [summary:protected] => This tool box talk is fourth in a series of 6 developed by Washington University in St. Louis on construction ergonomics. This one focuses on preventing back injuries by getting an assist when manually lifting. It recommends using a cart for transporting loads, taking less trips, avoiding carrying materials on the shoulder and helping each other to lift large or heavy materials when a cart or hoist is not available. [transition_comments:protected] => [external_link:protected] => [consol_link:protected] => http://www.cpwrconstructionsolutions.org/hazard/959/lifting-and-carrying-manual-materials-handling.html [more_like_this:protected] => d001303,d001304,d001305,d001306,d001307,d001309 [permission_given_by:protected] => Lisa Jaegers, Washington U. in St. Louis [published:protected] => T [billable:protected] => F [img_name:protected] => [img_ext:protected] => png [img_width:protected] => [img_height:protected] => [img_credit:protected] => [img_practice:protected] => [vid_source_id:protected] => [vid_running_time:protected] => [vid_intended_audience:protected] => [vid_acquisition_info:protected] => [vid_cost:protected] => [vid_producer:protected] => [vid_filename:protected] => [vid_filename_downloadable:protected] => [date_summary:protected] => 2014 [date_permission_requested:protected] => [date_permission_received:protected] => [date_review_needed:protected] => [date_received:protected] => 06/12/14 [date_completed:protected] => 07/29/14 [date_billed:protected] => [date_modified:protected] => 10/09/15 [collBokExports:protected] => [lastBokExportCriteria:BaseElcoshItem:private] => [alreadyInSave:protected] => [alreadyInValidation:protected] => [validationFailures:protected] => Array ( ) [_new:BaseObject:private] => [_deleted:BaseObject:private] => [modifiedColumns:protected] => Array ( ) ) [3840] => DocumentRecord Object ( [records:protected] => Array ( ) [recordId:protected] => [searchWordClass:protected] => [searchWordPeerClass:protected] => [bok_record:protected] => [authors:protected] => [organizations:protected] => [collections:protected] => [categories:protected] => [categories_initialized:protected] => [mapped_items:protected] => [content:protected] => [files:protected] => [language:protected] => [old_record:protected] => [id:protected] => 3840 [old_id:protected] => [elcosh_id:protected] => d001309 [type:protected] => document [display_type:protected] => HTML w/ PDF [user_id:protected] => 23 [language_id:protected] => 1 [tagging_id:protected] => Bruce Lippy [priority_id:protected] => 1 [title:protected] => TBT5 Manual Tools [total_pages:protected] => 4 [billed_pages:protected] => 4 [publication_number:protected] => [part_of:protected] => [keywords:protected] => ergonomic, hand tools, handles, MSD, musculoskeletal disorder, carpal tunnel [comments:protected] => 7-28-2014 Jeff Nelson asked Bruce Lippy about what to do with a sentence included toward the top of the doc, "Fill them in on page 2 'Other Questions.'" -- Bruce said this sentence could be deleted from the HTML. [summary:protected] => This is the fifth in a series of 6 tool box talks on construction ergonomics produced by the University of Washington in St. Louis. This one focuses on manual tools. It asks the following 6 key questions. Does the tool… 1. Fit the task? 2. Allow a good power grip? 3. Keep the wrist in a straight posture? 4. Feel comfortable? 5. Take less effort than other tools for the task? 6. Work effectively? [transition_comments:protected] => [external_link:protected] => [consol_link:protected] => http://www.cpwrconstructionsolutions.org/masonry/solution/383/ergonomic-hand-tools.html [more_like_this:protected] => d001303,d001304,d001305,d001306,d001307,d001308,d001310 [permission_given_by:protected] => Lisa Jaegers, U. Wash. St. Louis [published:protected] => T [billable:protected] => F [img_name:protected] => [img_ext:protected] => png [img_width:protected] => [img_height:protected] => [img_credit:protected] => [img_practice:protected] => [vid_source_id:protected] => [vid_running_time:protected] => [vid_intended_audience:protected] => [vid_acquisition_info:protected] => [vid_cost:protected] => [vid_producer:protected] => [vid_filename:protected] => [vid_filename_downloadable:protected] => [date_summary:protected] => 2014 [date_permission_requested:protected] => [date_permission_received:protected] => [date_review_needed:protected] => [date_received:protected] => 06/12/14 [date_completed:protected] => 07/29/14 [date_billed:protected] => [date_modified:protected] => 10/09/15 [collBokExports:protected] => [lastBokExportCriteria:BaseElcoshItem:private] => [alreadyInSave:protected] => [alreadyInValidation:protected] => [validationFailures:protected] => Array ( ) [_new:BaseObject:private] => [_deleted:BaseObject:private] => [modifiedColumns:protected] => Array ( ) ) ) [content:protected] => [files:protected] => Array ( [559] => [560] => [546] => File Object ( [id:protected] => 546 [filename:protected] => 3.jpg [downloadable:protected] => F [timestamp:protected] => 2009-07-03 12:54:22 [alreadyInSave:protected] => [alreadyInValidation:protected] => [validationFailures:protected] => Array ( ) [_new:BaseObject:private] => [_deleted:BaseObject:private] => [modifiedColumns:protected] => Array ( ) ) [9643] => File Object ( [id:protected] => 9643 [filename:protected] => d001307.pdf [downloadable:protected] => T [timestamp:protected] => 2014-07-27 19:09:19 [alreadyInSave:protected] => [alreadyInValidation:protected] => [validationFailures:protected] => Array ( ) [_new:BaseObject:private] => [_deleted:BaseObject:private] => [modifiedColumns:protected] => Array ( ) ) [566] => File Object ( [id:protected] => 566 [filename:protected] => 4.jpg [downloadable:protected] => F [timestamp:protected] => 2009-07-03 12:54:23 [alreadyInSave:protected] => [alreadyInValidation:protected] => [validationFailures:protected] => Array ( ) [_new:BaseObject:private] => [_deleted:BaseObject:private] => [modifiedColumns:protected] => Array ( ) ) ) [language:protected] => Language Object ( [id:protected] => 1 [code:protected] => en [name:protected] => English [alreadyInSave:protected] => [alreadyInValidation:protected] => [validationFailures:protected] => Array ( ) [_new:BaseObject:private] => [_deleted:BaseObject:private] => [modifiedColumns:protected] => Array ( ) ) [old_record:protected] => [id:protected] => 3838 [old_id:protected] => [elcosh_id:protected] => d001307 [type:protected] => document [display_type:protected] => HTML w/ PDF [user_id:protected] => 25 [language_id:protected] => 1 [tagging_id:protected] => Bruce Lippy [priority_id:protected] => 1 [title:protected] => TBT3 Positioning [total_pages:protected] => 4 [billed_pages:protected] => 4 [publication_number:protected] => [part_of:protected] => [keywords:protected] => position, positioning, ergonomics, ergo, carpal tunnel, MSD, musculoskeletal disorder [comments:protected] => 7-28-2014 Jeff Nelson asked Bruce Lippy about what to do with a sentence included toward the top of the doc, "Fill them in on page 2 'Other Questions.'" -- Bruce said this sentence could be deleted from the HTML. [summary:protected] => This third in a series of 6 Tool Box Talks on construction ergonomics focuses on proper positioning to avoid injuries. The TBT recommends: 1)prop up a task off of the floor by using a raised surface, cart, baker scaffold, saw horses to prep materials near waist height, 2)move the lift or ladder in the best position for the work, 3)position the lift in front of the area you plan to work without trying to reach too far on either side of the lift. [transition_comments:protected] => [external_link:protected] => [consol_link:protected] => http://www.cpwrconstructionsolutions.org/hazard/959/lifting-and-carrying-manual-materials-handling.html [more_like_this:protected] => d001303,d001304,d001305,d001306,d001308,d001309 [permission_given_by:protected] => Lisa Jaegers, WU-St. Louis [published:protected] => T [billable:protected] => F [img_name:protected] => [img_ext:protected] => png [img_width:protected] => [img_height:protected] => [img_credit:protected] => [img_practice:protected] => [vid_source_id:protected] => [vid_running_time:protected] => [vid_intended_audience:protected] => [vid_acquisition_info:protected] => [vid_cost:protected] => [vid_producer:protected] => [vid_filename:protected] => [vid_filename_downloadable:protected] => [date_summary:protected] => 2014 [date_permission_requested:protected] => [date_permission_received:protected] => [date_review_needed:protected] => [date_received:protected] => 06/12/14 [date_completed:protected] => 07/28/14 [date_billed:protected] => [date_modified:protected] => 10/09/15 [collBokExports:protected] => [lastBokExportCriteria:BaseElcoshItem:private] => [alreadyInSave:protected] => [alreadyInValidation:protected] => [validationFailures:protected] => Array ( ) [_new:BaseObject:private] => [_deleted:BaseObject:private] => [modifiedColumns:protected] => Array ( ) ) [show_text] => [document_content] => ElcoshItemDocumentContent Object ( [id:protected] => 2906 [item_id:protected] => 3838 [type:protected] => main [title:protected] => [content:protected] =>
Facilitator / Leader Tasks Before the Tool Box Talk (TBT)
- Read through this TBT guide.
- Walk the job site to find ergonomics examples based on the TBT. If possible, take photos of “safe” and “unsafe” examples at the site to be used during the TBT.
- Write down discussion questions to ask the group.
Learning Goals
After discussing this training topic, workers will have gained a general understanding of:
- Unsafe work positions.
- Solutions to improve work positioning.
TRAINING CARD
The last page of this PDF has directions for printing and laminating the training cards.
TRAINER’S TALKING POINTS
Why should we talk about positioning?
Construction work requires working in high, low, and tight spaces which often forces you to work in an awkward or uncomfortable position. Working in awkward reaching and bent positions can lead to shoulder and back discomfort and possible injury over time.
Demonstration: The training card provides examples of the range of reaching and the point at which the reach is unsafe. Hold your arms straight out in front of you. Look at your hands and wrists while I discuss each of the reach zones on the training card.
The Green Zone shows the ideal location for working with your hands. When possible, try to keep your work tasks as far out as your wrists.
The Orange Zone is for occasional work since it involves more weight on your shoulders and low back since your hands are away from your body. If needed, keep the reach distance as far as your fingertips.
The Red Zone is away from your body so far that it places you at higher risk for falls when in the air and shoulder and back discomfort. Limit the time you work reaching beyond your fingertips.
End of Demonstration
Discussion Question: Can anyone describe to us an awkward position that they work in or have seen someone work in?
- What does it feel like in your neck, back or arms when working in that position?
- Other Questions:_____________________________________________
Training Note: Here are examples of hazards in different construction trades. Choose your trade or one that is similar to your group’s line of work that can be used as hazards and solutions examples.
| Trade | Awkward Posture Hazards | Potential Solution |
|---|---|---|
| Carpenter-Drywall | Leaning over the side of a scissor lift to reach and operating a screw gun with the arm fully extended (reaching in the red zone past the fingertips). | Before starting to install the line of screws to the side of the lift, move the lift to re-center it for the next 2 lines of screws to be installed. |
| Floor Layer | Spreading mortar overhead on a wall with the bakers scaffold one foot away from the wall due to buckets on the floor below (reach in the red zone, past the fingertips). | Pre-plan this task by removing all objects in the path of the bakers scaffold. Having an open path allows you to work closer to the task. |
| Sheet Metal Worker | Prepping duct parts on the floor while bending the back and reaching to work on them. | Pre-plan this task by setting up a waist-height workstation on extra materials, a cart, or saw horses. |
Now let’s put this information into practice. What are some tricks or techniques that you use to work in a comfortable position?
- Other Questions:_____________________________________________
Here are a few other ideas that are listed on your training card:
Prop up your tasks off of the floor by using a raised surface, cart, baker scaffold, saw horses to prep materials near waist height.
Move the lift or ladder in the best position for the work – close to the work tasks.
For safety & comfort, try to position the lift in front of the area you plan to work without trying to reach too far on either side of the lift.
In summary, it is important to work in a safe position when possible in order to reduce the risk of falls and discomfort due to awkward working positions. Consider ways that you can work in the green/comfort zone and orange zone and avoid the unsafe red zone.
References
[Images modified from Grandjean & Eastman Kodak Co.]
1. Grandjean, E. 1988. Fitting the task to the man: A textbook of occupational ergonomics. 4th ed. Taylor & Francis.
2. Eastman Kodak Co. 1983. Ergonomic Design for People at Work. Vol 1. Wiley, John & Sons, Incorporated.
Refer to the resources at our website: oshr.im.wustl.edu for more Tool Box TIPS.
TRAINING ATTENDANCE SHEET
Training Topic: Ergonomics -- Positioning
Date:
| ATTENDEES | |
|---|---|
Directions for Making Laminated Training Cards
The last page of this PDF has directions for printing and laminating the training cards.
[content_transformed:protected] =>Facilitator / Leader Tasks Before the Tool Box Talk (TBT)
- Read through this TBT guide.
- Walk the job site to find ergonomics examples based on the TBT. If possible, take photos of “safe” and “unsafe” examples at the site to be used during the TBT.
- Write down discussion questions to ask the group.
Learning Goals
After discussing this training topic, workers will have gained a general understanding of:
- Unsafe work positions.
- Solutions to improve work positioning.
TRAINING CARD
The last page of this PDF has directions for printing and laminating the training cards.
TRAINER’S TALKING POINTS
Why should we talk about positioning?
Construction work requires working in high, low, and tight spaces which often forces you to work in an awkward or uncomfortable position. Working in awkward reaching and bent positions can lead to shoulder and back discomfort and possible injury over time.
Demonstration: The training card provides examples of the range of reaching and the point at which the reach is unsafe. Hold your arms straight out in front of you. Look at your hands and wrists while I discuss each of the reach zones on the training card.
The Green Zone shows the ideal location for working with your hands. When possible, try to keep your work tasks as far out as your wrists.
The Orange Zone is for occasional work since it involves more weight on your shoulders and low back since your hands are away from your body. If needed, keep the reach distance as far as your fingertips.
The Red Zone is away from your body so far that it places you at higher risk for falls when in the air and shoulder and back discomfort. Limit the time you work reaching beyond your fingertips.
End of Demonstration
Discussion Question: Can anyone describe to us an awkward position that they work in or have seen someone work in?
- What does it feel like in your neck, back or arms when working in that position?
- Other Questions:_____________________________________________
Training Note: Here are examples of hazards in different construction trades. Choose your trade or one that is similar to your group’s line of work that can be used as hazards and solutions examples.
| Trade | Awkward Posture Hazards | Potential Solution |
|---|---|---|
| Carpenter-Drywall | Leaning over the side of a scissor lift to reach and operating a screw gun with the arm fully extended (reaching in the red zone past the fingertips). | Before starting to install the line of screws to the side of the lift, move the lift to re-center it for the next 2 lines of screws to be installed. |
| Floor Layer | Spreading mortar overhead on a wall with the bakers scaffold one foot away from the wall due to buckets on the floor below (reach in the red zone, past the fingertips). | Pre-plan this task by removing all objects in the path of the bakers scaffold. Having an open path allows you to work closer to the task. |
| Sheet Metal Worker | Prepping duct parts on the floor while bending the back and reaching to work on them. | Pre-plan this task by setting up a waist-height workstation on extra materials, a cart, or saw horses. |
Now let’s put this information into practice. What are some tricks or techniques that you use to work in a comfortable position?
- Other Questions:_____________________________________________
Here are a few other ideas that are listed on your training card:
Prop up your tasks off of the floor by using a raised surface, cart, baker scaffold, saw horses to prep materials near waist height.
Move the lift or ladder in the best position for the work – close to the work tasks.
For safety & comfort, try to position the lift in front of the area you plan to work without trying to reach too far on either side of the lift.
In summary, it is important to work in a safe position when possible in order to reduce the risk of falls and discomfort due to awkward working positions. Consider ways that you can work in the green/comfort zone and orange zone and avoid the unsafe red zone.
References
[Images modified from Grandjean & Eastman Kodak Co.]
1. Grandjean, E. 1988. Fitting the task to the man: A textbook of occupational ergonomics. 4th ed. Taylor & Francis.
2. Eastman Kodak Co. 1983. Ergonomic Design for People at Work. Vol 1. Wiley, John & Sons, Incorporated.
Refer to the resources at our website: oshr.im.wustl.edu for more Tool Box TIPS.
TRAINING ATTENDANCE SHEET
Training Topic: Ergonomics -- Positioning
Date:
| ATTENDEES | |
|---|---|
Directions for Making Laminated Training Cards
The last page of this PDF has directions for printing and laminating the training cards.
[disclaimer:protected] => [disclaimer_transformed:protected] => [alreadyInSave:protected] => [alreadyInValidation:protected] => [validationFailures:protected] => Array ( ) [_new:BaseObject:private] => [_deleted:BaseObject:private] => [modifiedColumns:protected] => Array ( ) ) [template] => record [collection] => ) [_file] => /home/agsafe5/repositories/elcosh/live/templates/elcosh/record.html [_errors:protected] => Array ( ) [_encoding:protected] => UTF-8 [_outputMode:protected] => 11 [_forceReparse:protected] => [_phpCodeDestination:protected] => /tmp/ [_phpCodeExtension:protected] => php [_cacheLifetime:protected] => 30 [_cachePurgeFrequency:protected] => 30 [externalMacroTemplatesCache:PHPTAL:private] => Array ( [macros.html] => PHPTAL Object ( [_prefilters:protected] => Array ( ) [_prefilter:PHPTAL:private] => REMOVED: DO NOT USE [_postfilter:protected] => [_repositories:protected] => Array ( [0] => /home/agsafe5/repositories/elcosh/live/templates/elcosh ) [_path:protected] => macros.html [_resolvers:protected] => Array ( ) [_source:protected] => PHPTAL_FileSource Object ( [_path:PHPTAL_FileSource:private] => /home/agsafe5/repositories/elcosh/live/templates/elcosh/macros.html ) [_codeFile:protected] => /tmp/tpl_61515a6c_macros__EnKHR8AWVA3oW7OmomvoZw.php [_functionName:protected] => tpl_61515a6c_macros__EnKHR8AWVA3oW7OmomvoZw [_prepared:protected] => 1 [_triggers:protected] => Array ( ) [_translator:protected] => [_globalContext:protected] => stdClass Object ( ) [_context:protected] => PHPTAL_Context Object ( [_line] => [_file] => /home/agsafe5/repositories/elcosh/live/templates/elcosh/record.html [repeat] => stdClass Object ( ) [_xmlDeclaration] => [_docType] => [_nothrow:PHPTAL_Context:private] => [_slots:PHPTAL_Context:private] => Array ( ) [_slotsStack:PHPTAL_Context:private] => Array ( [0] => Array ( ) [1] => Array ( ) ) [_parentContext:PHPTAL_Context:private] => PHPTAL_Context Object ( [_line] => [_file] => /home/agsafe5/repositories/elcosh/live/templates/elcosh/record.html [repeat] => stdClass Object ( ) [_xmlDeclaration] => [_docType] => [_nothrow:PHPTAL_Context:private] => [_slots:PHPTAL_Context:private] => Array ( ) [_slotsStack:PHPTAL_Context:private] => Array ( [0] => Array ( ) [1] => Array ( ) ) [_parentContext:PHPTAL_Context:private] => [_globalContext:PHPTAL_Context:private] => stdClass Object ( ) [_echoDeclarations:PHPTAL_Context:private] => [referer] => http://elcosh.org/document/3838/d001307/TBT3%2BPositioning.html [curr_module] => Record [styles] => Array ( ) [javascript] => Array ( [0] => jquery.min.js ) [metas] => Array ( [language] => en [robots] => index, follow ) [user] => [curr_url] => https://elcosh.org/index.php?module=Record&id=3838&type=document [base_url] => https://elcosh.org/index.php?module=Record [title] => eLCOSH : TBT3 Positioning [language] => en [search_query] => [module] => Record [new_records] => Array ( [0] => Search_Result Object ( [title] => Toolbox Talk: Fixed Ladder [image] => /record/images/notavailable-p.png [blurb] => The CPWR Toolbox Talk on Fixed Ladders addresses the potential risks associated with using fixed ladders. The resource includes a brief case example,... [category] => Array ( [0] => 15 [1] => 47 [2] => 49 [3] => 51 [4] => 53 [5] => 55 [6] => 60 [7] => 64 [8] => 73 [9] => 76 [10] => 78 [11] => 80 [12] => 86 [13] => 87 [14] => 90 [15] => 92 [16] => 93 [17] => 94 [18] => 100 ) [labels] => Array ( [0] => Falls [1] => Work Environment [2] => Hazards [3] => Bricklayer [4] => Trades [5] => Carpenter [7] => Cement Mason [9] => Concrete Polisher [11] => Electrical Worker [13] => HVAC [15] => Laborer [17] => PCC/Restoration [19] => Plumber/Pipefitter [21] => Roofer/Waterproofer [23] => Sheetmetal Worker [25] => Welder [27] => Commercial & Institutional [28] => Jobsites [29] => Industrial [31] => LEED/Green Construction [33] => Renovations [35] => Residential [37] => Toolbox Talks [38] => Documents [39] => Media & Documents ) [type] => Toolbox Talks [sub_category] => [url] => /document/4430/d001660/Toolbox%2BTalk%253A%2BFixed%2BLadder.html [item:protected] => DocumentRecord Object ( [records:protected] => Array ( ) [recordId:protected] => [searchWordClass:protected] => [searchWordPeerClass:protected] => [bok_record:protected] => [authors:protected] => [organizations:protected] => [collections:protected] => [categories:protected] => Array ( [15] => Category Object ( [languages:protected] => [bok_resources:protected] => [bok_topics:protected] => [bok_keywords:protected] => [id:protected] => 15 [type:protected] => category [parent:protected] => 7 [label:protected] => Falls [alreadyInSave:protected] => [alreadyInValidation:protected] => [validationFailures:protected] => Array ( ) [_new:BaseObject:private] => [_deleted:BaseObject:private] => [modifiedColumns:protected] => Array ( ) ) [47] => Category Object ( [languages:protected] => [bok_resources:protected] => [bok_topics:protected] => [bok_keywords:protected] => [id:protected] => 47 [type:protected] => category [parent:protected] => 2 [label:protected] => Bricklayer [alreadyInSave:protected] => [alreadyInValidation:protected] => [validationFailures:protected] => Array ( ) [_new:BaseObject:private] => [_deleted:BaseObject:private] => [modifiedColumns:protected] => Array ( ) ) [49] => Category Object ( [languages:protected] => [bok_resources:protected] => [bok_topics:protected] => [bok_keywords:protected] => [id:protected] => 49 [type:protected] => category [parent:protected] => 2 [label:protected] => Carpenter [alreadyInSave:protected] => [alreadyInValidation:protected] => [validationFailures:protected] => Array ( ) [_new:BaseObject:private] => [_deleted:BaseObject:private] => [modifiedColumns:protected] => Array ( ) ) [51] => Category Object ( [languages:protected] => [bok_resources:protected] => [bok_topics:protected] => [bok_keywords:protected] => [id:protected] => 51 [type:protected] => category [parent:protected] => 2 [label:protected] => Cement Mason [alreadyInSave:protected] => [alreadyInValidation:protected] => [validationFailures:protected] => Array ( ) [_new:BaseObject:private] => [_deleted:BaseObject:private] => [modifiedColumns:protected] => Array ( ) ) [53] => Category Object ( [languages:protected] => [bok_resources:protected] => [bok_topics:protected] => [bok_keywords:protected] => [id:protected] => 53 [type:protected] => category [parent:protected] => 2 [label:protected] => Concrete Polisher [alreadyInSave:protected] => [alreadyInValidation:protected] => [validationFailures:protected] => Array ( ) [_new:BaseObject:private] => [_deleted:BaseObject:private] => [modifiedColumns:protected] => Array ( ) ) [55] => Category Object ( [languages:protected] => [bok_resources:protected] => [bok_topics:protected] => [bok_keywords:protected] => [id:protected] => 55 [type:protected] => category [parent:protected] => 2 [label:protected] => Electrical Worker [alreadyInSave:protected] => [alreadyInValidation:protected] => [validationFailures:protected] => Array ( ) [_new:BaseObject:private] => [_deleted:BaseObject:private] => [modifiedColumns:protected] => Array ( ) ) [60] => Category Object ( [languages:protected] => [bok_resources:protected] => [bok_topics:protected] => [bok_keywords:protected] => [id:protected] => 60 [type:protected] => category [parent:protected] => 2 [label:protected] => HVAC [alreadyInSave:protected] => [alreadyInValidation:protected] => [validationFailures:protected] => Array ( ) [_new:BaseObject:private] => [_deleted:BaseObject:private] => [modifiedColumns:protected] => Array ( ) ) [64] => Category Object ( [languages:protected] => [bok_resources:protected] => [bok_topics:protected] => [bok_keywords:protected] => [id:protected] => 64 [type:protected] => category [parent:protected] => 2 [label:protected] => Laborer [alreadyInSave:protected] => [alreadyInValidation:protected] => [validationFailures:protected] => Array ( ) [_new:BaseObject:private] => [_deleted:BaseObject:private] => [modifiedColumns:protected] => Array ( ) ) [73] => Category Object ( [languages:protected] => [bok_resources:protected] => [bok_topics:protected] => [bok_keywords:protected] => [id:protected] => 73 [type:protected] => category [parent:protected] => 2 [label:protected] => PCC/Restoration [alreadyInSave:protected] => [alreadyInValidation:protected] => [validationFailures:protected] => Array ( ) [_new:BaseObject:private] => [_deleted:BaseObject:private] => [modifiedColumns:protected] => Array ( ) ) [76] => Category Object ( [languages:protected] => [bok_resources:protected] => [bok_topics:protected] => [bok_keywords:protected] => [id:protected] => 76 [type:protected] => category [parent:protected] => 2 [label:protected] => Plumber/Pipefitter [alreadyInSave:protected] => [alreadyInValidation:protected] => [validationFailures:protected] => Array ( ) [_new:BaseObject:private] => [_deleted:BaseObject:private] => [modifiedColumns:protected] => Array ( ) ) [78] => Category Object ( [languages:protected] => [bok_resources:protected] => [bok_topics:protected] => [bok_keywords:protected] => [id:protected] => 78 [type:protected] => category [parent:protected] => 2 [label:protected] => Roofer/Waterproofer [alreadyInSave:protected] => [alreadyInValidation:protected] => [validationFailures:protected] => Array ( ) [_new:BaseObject:private] => [_deleted:BaseObject:private] => [modifiedColumns:protected] => Array ( ) ) [80] => Category Object ( [languages:protected] => [bok_resources:protected] => [bok_topics:protected] => [bok_keywords:protected] => [id:protected] => 80 [type:protected] => category [parent:protected] => 2 [label:protected] => Sheetmetal Worker [alreadyInSave:protected] => [alreadyInValidation:protected] => [validationFailures:protected] => Array ( ) [_new:BaseObject:private] => [_deleted:BaseObject:private] => [modifiedColumns:protected] => Array ( ) ) [86] => Category Object ( [languages:protected] => [bok_resources:protected] => [bok_topics:protected] => [bok_keywords:protected] => [id:protected] => 86 [type:protected] => category [parent:protected] => 2 [label:protected] => Welder [alreadyInSave:protected] => [alreadyInValidation:protected] => [validationFailures:protected] => Array ( ) [_new:BaseObject:private] => [_deleted:BaseObject:private] => [modifiedColumns:protected] => Array ( ) ) [87] => Category Object ( [languages:protected] => [bok_resources:protected] => [bok_topics:protected] => [bok_keywords:protected] => [id:protected] => 87 [type:protected] => category [parent:protected] => 3 [label:protected] => Commercial & Institutional [alreadyInSave:protected] => [alreadyInValidation:protected] => [validationFailures:protected] => Array ( ) [_new:BaseObject:private] => [_deleted:BaseObject:private] => [modifiedColumns:protected] => Array ( ) ) [90] => Category Object ( [languages:protected] => [bok_resources:protected] => [bok_topics:protected] => [bok_keywords:protected] => [id:protected] => 90 [type:protected] => category [parent:protected] => 3 [label:protected] => Industrial [alreadyInSave:protected] => [alreadyInValidation:protected] => [validationFailures:protected] => Array ( ) [_new:BaseObject:private] => [_deleted:BaseObject:private] => [modifiedColumns:protected] => Array ( ) ) [92] => Category Object ( [languages:protected] => [bok_resources:protected] => [bok_topics:protected] => [bok_keywords:protected] => [id:protected] => 92 [type:protected] => category [parent:protected] => 3 [label:protected] => LEED/Green Construction [alreadyInSave:protected] => [alreadyInValidation:protected] => [validationFailures:protected] => Array ( ) [_new:BaseObject:private] => [_deleted:BaseObject:private] => [modifiedColumns:protected] => Array ( ) ) [93] => Category Object ( [languages:protected] => [bok_resources:protected] => [bok_topics:protected] => [bok_keywords:protected] => [id:protected] => 93 [type:protected] => category [parent:protected] => 3 [label:protected] => Renovations [alreadyInSave:protected] => [alreadyInValidation:protected] => [validationFailures:protected] => Array ( ) [_new:BaseObject:private] => [_deleted:BaseObject:private] => [modifiedColumns:protected] => Array ( ) ) [94] => Category Object ( [languages:protected] => [bok_resources:protected] => [bok_topics:protected] => [bok_keywords:protected] => [id:protected] => 94 [type:protected] => category [parent:protected] => 3 [label:protected] => Residential [alreadyInSave:protected] => [alreadyInValidation:protected] => [validationFailures:protected] => Array ( ) [_new:BaseObject:private] => [_deleted:BaseObject:private] => [modifiedColumns:protected] => Array ( ) ) [100] => Category Object ( [languages:protected] => [bok_resources:protected] => [bok_topics:protected] => [bok_keywords:protected] => [id:protected] => 100 [type:protected] => category [parent:protected] => 6 [label:protected] => Toolbox Talks [alreadyInSave:protected] => [alreadyInValidation:protected] => [validationFailures:protected] => Array ( ) [_new:BaseObject:private] => [_deleted:BaseObject:private] => [modifiedColumns:protected] => Array ( ) ) ) [categories_initialized:protected] => 1 [mapped_items:protected] => [content:protected] => [files:protected] => [language:protected] => Language Object ( [id:protected] => 1 [code:protected] => en [name:protected] => English [alreadyInSave:protected] => [alreadyInValidation:protected] => [validationFailures:protected] => Array ( ) [_new:BaseObject:private] => [_deleted:BaseObject:private] => [modifiedColumns:protected] => Array ( ) ) [old_record:protected] => [id:protected] => 4430 [old_id:protected] => [elcosh_id:protected] => d001660 [type:protected] => document [display_type:protected] => HTML only (and links) [user_id:protected] => 0 [language_id:protected] => 1 [tagging_id:protected] => Mike Aguilar [priority_id:protected] => 1 [title:protected] => Toolbox Talk: Fixed Ladder [total_pages:protected] => 0 [billed_pages:protected] => 0 [publication_number:protected] => [part_of:protected] => [keywords:protected] => Fixed Ladders, Fall Prevention, Falls [comments:protected] => [summary:protected] => The CPWR Toolbox Talk on Fixed Ladders addresses the potential risks associated with using fixed ladders. The resource includes a brief case example, steps to prevent a related injury and questions for discussion. It includes an image that illustrates the hazard, which can be posted in a central location as a reminder of steps to work safely. Available in English and Spanish. [transition_comments:protected] => [external_link:protected] => [consol_link:protected] => [more_like_this:protected] => d001257,d001254,d001255,d001256,d001258,d001262,d001279 [permission_given_by:protected] => [published:protected] => T [billable:protected] => F [img_name:protected] => [img_ext:protected] => [img_width:protected] => [img_height:protected] => [img_credit:protected] => [img_practice:protected] => [vid_source_id:protected] => [vid_running_time:protected] => [vid_intended_audience:protected] => [vid_acquisition_info:protected] => [vid_cost:protected] => [vid_producer:protected] => [vid_filename:protected] => [vid_filename_downloadable:protected] => [date_summary:protected] => [date_permission_requested:protected] => [date_permission_received:protected] => [date_review_needed:protected] => [date_received:protected] => 06/10/22 [date_completed:protected] => 06/10/22 [date_billed:protected] => [date_modified:protected] => 06/16/25 [collBokExports:protected] => [lastBokExportCriteria:BaseElcoshItem:private] => [alreadyInSave:protected] => [alreadyInValidation:protected] => [validationFailures:protected] => Array ( ) [_new:BaseObject:private] => [_deleted:BaseObject:private] => [modifiedColumns:protected] => Array ( ) ) ) [1] => Search_Result Object ( [title] => Toolbox Talk: Work Zone Safety: Working Around Vehicles [image] => /record/images/notavailable-p.png [blurb] => The CPWR Toolbox Talk on Working Around Vehicles in the Work Zone addresses methods to avoid being struck-by a vehicle on a construction site. The res... [category] => Array ( [0] => 12 [1] => 18 [2] => 52 [3] => 57 [4] => 70 [5] => 85 [6] => 87 [7] => 88 [8] => 89 [9] => 91 [10] => 90 [11] => 92 [12] => 93 [13] => 94 [14] => 95 [15] => 100 ) [labels] => Array ( [0] => Crushed/Struck By [1] => Work Environment [2] => Hazards [3] => Motor Vehicles/Heavy Equipment [6] => Commercial Diver [7] => Trades [8] => Flagger [10] => Operating Engineer [12] => Truck Driver [14] => Commercial & Institutional [15] => Jobsites [16] => Demolition [18] => Disasters [20] => Heavy & Highway [22] => Industrial [24] => LEED/Green Construction [26] => Renovations [28] => Residential [30] => Underground [32] => Toolbox Talks [33] => Documents [34] => Media & Documents ) [type] => Toolbox Talks [sub_category] => [url] => /document/4428/d001658/Toolbox%2BTalk%253A%2BWork%2BZone%2BSafety%253A%2BWorking%2BAround%2BVehicles.html [item:protected] => DocumentRecord Object ( [records:protected] => Array ( ) [recordId:protected] => [searchWordClass:protected] => [searchWordPeerClass:protected] => [bok_record:protected] => [authors:protected] => [organizations:protected] => [collections:protected] => [categories:protected] => Array ( [12] => Category Object ( [languages:protected] => [bok_resources:protected] => [bok_topics:protected] => [bok_keywords:protected] => [id:protected] => 12 [type:protected] => category [parent:protected] => 7 [label:protected] => Crushed/Struck By [alreadyInSave:protected] => [alreadyInValidation:protected] => [validationFailures:protected] => Array ( ) [_new:BaseObject:private] => [_deleted:BaseObject:private] => [modifiedColumns:protected] => Array ( ) ) [18] => Category Object ( [languages:protected] => [bok_resources:protected] => [bok_topics:protected] => [bok_keywords:protected] => [id:protected] => 18 [type:protected] => category [parent:protected] => 7 [label:protected] => Motor Vehicles/Heavy Equipment [alreadyInSave:protected] => [alreadyInValidation:protected] => [validationFailures:protected] => Array ( ) [_new:BaseObject:private] => [_deleted:BaseObject:private] => [modifiedColumns:protected] => Array ( ) ) [52] => Category Object ( [languages:protected] => [bok_resources:protected] => [bok_topics:protected] => [bok_keywords:protected] => [id:protected] => 52 [type:protected] => category [parent:protected] => 2 [label:protected] => Commercial Diver [alreadyInSave:protected] => [alreadyInValidation:protected] => [validationFailures:protected] => Array ( ) [_new:BaseObject:private] => [_deleted:BaseObject:private] => [modifiedColumns:protected] => Array ( ) ) [57] => Category Object ( [languages:protected] => [bok_resources:protected] => [bok_topics:protected] => [bok_keywords:protected] => [id:protected] => 57 [type:protected] => category [parent:protected] => 2 [label:protected] => Flagger [alreadyInSave:protected] => [alreadyInValidation:protected] => [validationFailures:protected] => Array ( ) [_new:BaseObject:private] => [_deleted:BaseObject:private] => [modifiedColumns:protected] => Array ( ) ) [70] => Category Object ( [languages:protected] => [bok_resources:protected] => [bok_topics:protected] => [bok_keywords:protected] => [id:protected] => 70 [type:protected] => category [parent:protected] => 2 [label:protected] => Operating Engineer [alreadyInSave:protected] => [alreadyInValidation:protected] => [validationFailures:protected] => Array ( ) [_new:BaseObject:private] => [_deleted:BaseObject:private] => [modifiedColumns:protected] => Array ( ) ) [85] => Category Object ( [languages:protected] => [bok_resources:protected] => [bok_topics:protected] => [bok_keywords:protected] => [id:protected] => 85 [type:protected] => category [parent:protected] => 2 [label:protected] => Truck Driver [alreadyInSave:protected] => [alreadyInValidation:protected] => [validationFailures:protected] => Array ( ) [_new:BaseObject:private] => [_deleted:BaseObject:private] => [modifiedColumns:protected] => Array ( ) ) [87] => Category Object ( [languages:protected] => [bok_resources:protected] => [bok_topics:protected] => [bok_keywords:protected] => [id:protected] => 87 [type:protected] => category [parent:protected] => 3 [label:protected] => Commercial & Institutional [alreadyInSave:protected] => [alreadyInValidation:protected] => [validationFailures:protected] => Array ( ) [_new:BaseObject:private] => [_deleted:BaseObject:private] => [modifiedColumns:protected] => Array ( ) ) [88] => Category Object ( [languages:protected] => [bok_resources:protected] => [bok_topics:protected] => [bok_keywords:protected] => [id:protected] => 88 [type:protected] => category [parent:protected] => 3 [label:protected] => Demolition [alreadyInSave:protected] => [alreadyInValidation:protected] => [validationFailures:protected] => Array ( ) [_new:BaseObject:private] => [_deleted:BaseObject:private] => [modifiedColumns:protected] => Array ( ) ) [89] => Category Object ( [languages:protected] => [bok_resources:protected] => [bok_topics:protected] => [bok_keywords:protected] => [id:protected] => 89 [type:protected] => category [parent:protected] => 3 [label:protected] => Disasters [alreadyInSave:protected] => [alreadyInValidation:protected] => [validationFailures:protected] => Array ( ) [_new:BaseObject:private] => [_deleted:BaseObject:private] => [modifiedColumns:protected] => Array ( ) ) [91] => Category Object ( [languages:protected] => [bok_resources:protected] => [bok_topics:protected] => [bok_keywords:protected] => [id:protected] => 91 [type:protected] => category [parent:protected] => 3 [label:protected] => Heavy & Highway [alreadyInSave:protected] => [alreadyInValidation:protected] => [validationFailures:protected] => Array ( ) [_new:BaseObject:private] => [_deleted:BaseObject:private] => [modifiedColumns:protected] => Array ( ) ) [90] => Category Object ( [languages:protected] => [bok_resources:protected] => [bok_topics:protected] => [bok_keywords:protected] => [id:protected] => 90 [type:protected] => category [parent:protected] => 3 [label:protected] => Industrial [alreadyInSave:protected] => [alreadyInValidation:protected] => [validationFailures:protected] => Array ( ) [_new:BaseObject:private] => [_deleted:BaseObject:private] => [modifiedColumns:protected] => Array ( ) ) [92] => Category Object ( [languages:protected] => [bok_resources:protected] => [bok_topics:protected] => [bok_keywords:protected] => [id:protected] => 92 [type:protected] => category [parent:protected] => 3 [label:protected] => LEED/Green Construction [alreadyInSave:protected] => [alreadyInValidation:protected] => [validationFailures:protected] => Array ( ) [_new:BaseObject:private] => [_deleted:BaseObject:private] => [modifiedColumns:protected] => Array ( ) ) [93] => Category Object ( [languages:protected] => [bok_resources:protected] => [bok_topics:protected] => [bok_keywords:protected] => [id:protected] => 93 [type:protected] => category [parent:protected] => 3 [label:protected] => Renovations [alreadyInSave:protected] => [alreadyInValidation:protected] => [validationFailures:protected] => Array ( ) [_new:BaseObject:private] => [_deleted:BaseObject:private] => [modifiedColumns:protected] => Array ( ) ) [94] => Category Object ( [languages:protected] => [bok_resources:protected] => [bok_topics:protected] => [bok_keywords:protected] => [id:protected] => 94 [type:protected] => category [parent:protected] => 3 [label:protected] => Residential [alreadyInSave:protected] => [alreadyInValidation:protected] => [validationFailures:protected] => Array ( ) [_new:BaseObject:private] => [_deleted:BaseObject:private] => [modifiedColumns:protected] => Array ( ) ) [95] => Category Object ( [languages:protected] => [bok_resources:protected] => [bok_topics:protected] => [bok_keywords:protected] => [id:protected] => 95 [type:protected] => category [parent:protected] => 3 [label:protected] => Underground [alreadyInSave:protected] => [alreadyInValidation:protected] => [validationFailures:protected] => Array ( ) [_new:BaseObject:private] => [_deleted:BaseObject:private] => [modifiedColumns:protected] => Array ( ) ) [100] => Category Object ( [languages:protected] => [bok_resources:protected] => [bok_topics:protected] => [bok_keywords:protected] => [id:protected] => 100 [type:protected] => category [parent:protected] => 6 [label:protected] => Toolbox Talks [alreadyInSave:protected] => [alreadyInValidation:protected] => [validationFailures:protected] => Array ( ) [_new:BaseObject:private] => [_deleted:BaseObject:private] => [modifiedColumns:protected] => Array ( ) ) ) [categories_initialized:protected] => 1 [mapped_items:protected] => [content:protected] => [files:protected] => [language:protected] => Language Object ( [id:protected] => 1 [code:protected] => en [name:protected] => English [alreadyInSave:protected] => [alreadyInValidation:protected] => [validationFailures:protected] => Array ( ) [_new:BaseObject:private] => [_deleted:BaseObject:private] => [modifiedColumns:protected] => Array ( ) ) [old_record:protected] => [id:protected] => 4428 [old_id:protected] => [elcosh_id:protected] => d001658 [type:protected] => document [display_type:protected] => HTML only (and links) [user_id:protected] => 0 [language_id:protected] => 1 [tagging_id:protected] => Daniela Caceres [priority_id:protected] => 1 [title:protected] => Toolbox Talk: Work Zone Safety: Working Around Vehicles [total_pages:protected] => 0 [billed_pages:protected] => 0 [publication_number:protected] => [part_of:protected] => [keywords:protected] => Struck, Struck by, Vehicle, Work Zone Safety, Truck, Operator, Driver, Mobile Equipment [comments:protected] => [summary:protected] => The CPWR Toolbox Talk on Working Around Vehicles in the Work Zone addresses methods to avoid being struck-by a vehicle on a construction site. The resource includes a case example, steps to prevent a related injury, and questions for discussion. It includes a graphic that illustrates the hazard, which can be posted in a central location as a reminder of steps to work safely. Available in English and Spanish. [transition_comments:protected] => [external_link:protected] => [consol_link:protected] => [more_like_this:protected] => d001640 [permission_given_by:protected] => [published:protected] => T [billable:protected] => F [img_name:protected] => [img_ext:protected] => [img_width:protected] => [img_height:protected] => [img_credit:protected] => [img_practice:protected] => [vid_source_id:protected] => [vid_running_time:protected] => [vid_intended_audience:protected] => [vid_acquisition_info:protected] => [vid_cost:protected] => [vid_producer:protected] => [vid_filename:protected] => [vid_filename_downloadable:protected] => [date_summary:protected] => [date_permission_requested:protected] => [date_permission_received:protected] => [date_review_needed:protected] => [date_received:protected] => 12/23/21 [date_completed:protected] => 12/23/21 [date_billed:protected] => [date_modified:protected] => 05/19/23 [collBokExports:protected] => [lastBokExportCriteria:BaseElcoshItem:private] => [alreadyInSave:protected] => [alreadyInValidation:protected] => [validationFailures:protected] => Array ( ) [_new:BaseObject:private] => [_deleted:BaseObject:private] => [modifiedColumns:protected] => Array ( ) ) ) [2] => Search_Result Object ( [title] => Construction Dive -- DeWalt's Jobsite Pro headphones recalled for fire hazards [image] => /record/images/notavailable-p.png [blurb] => A recall notice by the United States Consumer Product Safety Commission affects over 300,000 DeWalt Jobsite Pro Headphones. The recall is a result of... [category] => Array ( [0] => 16 [1] => 44 [2] => 45 [3] => 46 [4] => 47 [5] => 48 [6] => 49 [7] => 50 [8] => 51 [9] => 52 [10] => 53 [11] => 54 [12] => 55 [13] => 56 [14] => 57 [15] => 58 [16] => 59 [17] => 60 [18] => 61 [19] => 64 [20] => 65 [21] => 66 [22] => 67 [23] => 68 [24] => 69 [25] => 70 [26] => 71 [27] => 72 [28] => 73 [29] => 74 [30] => 75 [31] => 76 [32] => 77 [33] => 63 [34] => 78 [35] => 79 [36] => 80 [37] => 81 [38] => 82 [39] => 62 [40] => 83 [41] => 84 [42] => 85 [43] => 86 [44] => 87 [45] => 88 [46] => 89 [47] => 91 [48] => 90 [49] => 92 [50] => 93 [51] => 94 [52] => 95 ) [labels] => Array ( [0] => Fire & Explosions [1] => Work Environment [2] => Hazards [3] => Acoustical Ceiling Carpenter [4] => Trades [5] => Asbestos/Insulator [7] => Boilermaker [9] => Bricklayer [11] => Cabinetmaker [13] => Carpenter [15] => Carpet Layer [17] => Cement Mason [19] => Commercial Diver [21] => Concrete Polisher [23] => Drywall Applicator Specialist [25] => Electrical Worker [27] => Elevator Constructor [29] => Flagger [31] => Glazier [33] => Hazardous Waste Cleanup [35] => HVAC [37] => Interior Systems Carpenter [39] => Laborer [41] => Landscaper [43] => Lather [45] => Lead Abatement Worker [47] => Maintenance Worker [49] => Millwright [51] => Operating Engineer [53] => Painter [55] => Paper Hanger [57] => PCC/Restoration [59] => Pile Driver [61] => Plasterer [63] => Plumber/Pipefitter [65] => Refractory Worker [67] => Reinforcing Ironworker [69] => Roofer/Waterproofer [71] => Scaffold Erector [73] => Sheetmetal Worker [75] => Sprinkler Fitter [77] => Stonemason [79] => Structural Ironworker [81] => Terrazzo Worker [83] => Tile Setter [85] => Truck Driver [87] => Welder [89] => Commercial & Institutional [90] => Jobsites [91] => Demolition [93] => Disasters [95] => Heavy & Highway [97] => Industrial [99] => LEED/Green Construction [101] => Renovations [103] => Residential [105] => Underground ) [type] => [sub_category] => [url] => /document/4426/d001656/Construction%2BDive%2B--%2BDeWalt%2527s%2BJobsite%2BPro%2Bheadphones%2Brecalled%2Bfor%2Bfire%2Bhazards.html [item:protected] => DocumentRecord Object ( [records:protected] => Array ( ) [recordId:protected] => [searchWordClass:protected] => [searchWordPeerClass:protected] => [bok_record:protected] => [authors:protected] => [organizations:protected] => [collections:protected] => [categories:protected] => Array ( [16] => Category Object ( [languages:protected] => [bok_resources:protected] => [bok_topics:protected] => [bok_keywords:protected] => [id:protected] => 16 [type:protected] => category [parent:protected] => 7 [label:protected] => Fire & Explosions [alreadyInSave:protected] => [alreadyInValidation:protected] => [validationFailures:protected] => Array ( ) [_new:BaseObject:private] => [_deleted:BaseObject:private] => [modifiedColumns:protected] => Array ( ) ) [44] => Category Object ( [languages:protected] => [bok_resources:protected] => [bok_topics:protected] => [bok_keywords:protected] => [id:protected] => 44 [type:protected] => category [parent:protected] => 2 [label:protected] => Acoustical Ceiling Carpenter [alreadyInSave:protected] => [alreadyInValidation:protected] => [validationFailures:protected] => Array ( ) [_new:BaseObject:private] => [_deleted:BaseObject:private] => [modifiedColumns:protected] => Array ( ) ) [45] => Category Object ( [languages:protected] => [bok_resources:protected] => [bok_topics:protected] => [bok_keywords:protected] => [id:protected] => 45 [type:protected] => category [parent:protected] => 2 [label:protected] => Asbestos/Insulator [alreadyInSave:protected] => [alreadyInValidation:protected] => [validationFailures:protected] => Array ( ) [_new:BaseObject:private] => [_deleted:BaseObject:private] => [modifiedColumns:protected] => Array ( ) ) [46] => Category Object ( [languages:protected] => [bok_resources:protected] => [bok_topics:protected] => [bok_keywords:protected] => [id:protected] => 46 [type:protected] => category [parent:protected] => 2 [label:protected] => Boilermaker [alreadyInSave:protected] => [alreadyInValidation:protected] => [validationFailures:protected] => Array ( ) [_new:BaseObject:private] => [_deleted:BaseObject:private] => [modifiedColumns:protected] => Array ( ) ) [47] => Category Object ( [languages:protected] => [bok_resources:protected] => [bok_topics:protected] => [bok_keywords:protected] => [id:protected] => 47 [type:protected] => category [parent:protected] => 2 [label:protected] => Bricklayer [alreadyInSave:protected] => [alreadyInValidation:protected] => [validationFailures:protected] => Array ( ) [_new:BaseObject:private] => [_deleted:BaseObject:private] => [modifiedColumns:protected] => Array ( ) ) [48] => Category Object ( [languages:protected] => [bok_resources:protected] => [bok_topics:protected] => [bok_keywords:protected] => [id:protected] => 48 [type:protected] => category [parent:protected] => 2 [label:protected] => Cabinetmaker [alreadyInSave:protected] => [alreadyInValidation:protected] => [validationFailures:protected] => Array ( ) [_new:BaseObject:private] => [_deleted:BaseObject:private] => [modifiedColumns:protected] => Array ( ) ) [49] => Category Object ( [languages:protected] => [bok_resources:protected] => [bok_topics:protected] => [bok_keywords:protected] => [id:protected] => 49 [type:protected] => category [parent:protected] => 2 [label:protected] => Carpenter [alreadyInSave:protected] => [alreadyInValidation:protected] => [validationFailures:protected] => Array ( ) [_new:BaseObject:private] => [_deleted:BaseObject:private] => [modifiedColumns:protected] => Array ( ) ) [50] => Category Object ( [languages:protected] => [bok_resources:protected] => [bok_topics:protected] => [bok_keywords:protected] => [id:protected] => 50 [type:protected] => category [parent:protected] => 2 [label:protected] => Carpet Layer [alreadyInSave:protected] => [alreadyInValidation:protected] => [validationFailures:protected] => Array ( ) [_new:BaseObject:private] => [_deleted:BaseObject:private] => [modifiedColumns:protected] => Array ( ) ) [51] => Category Object ( [languages:protected] => [bok_resources:protected] => [bok_topics:protected] => [bok_keywords:protected] => [id:protected] => 51 [type:protected] => category [parent:protected] => 2 [label:protected] => Cement Mason [alreadyInSave:protected] => [alreadyInValidation:protected] => [validationFailures:protected] => Array ( ) [_new:BaseObject:private] => [_deleted:BaseObject:private] => [modifiedColumns:protected] => Array ( ) ) [52] => Category Object ( [languages:protected] => [bok_resources:protected] => [bok_topics:protected] => [bok_keywords:protected] => [id:protected] => 52 [type:protected] => category [parent:protected] => 2 [label:protected] => Commercial Diver [alreadyInSave:protected] => [alreadyInValidation:protected] => [validationFailures:protected] => Array ( ) [_new:BaseObject:private] => [_deleted:BaseObject:private] => [modifiedColumns:protected] => Array ( ) ) [53] => Category Object ( [languages:protected] => [bok_resources:protected] => [bok_topics:protected] => [bok_keywords:protected] => [id:protected] => 53 [type:protected] => category [parent:protected] => 2 [label:protected] => Concrete Polisher [alreadyInSave:protected] => [alreadyInValidation:protected] => [validationFailures:protected] => Array ( ) [_new:BaseObject:private] => [_deleted:BaseObject:private] => [modifiedColumns:protected] => Array ( ) ) [54] => Category Object ( [languages:protected] => [bok_resources:protected] => [bok_topics:protected] => [bok_keywords:protected] => [id:protected] => 54 [type:protected] => category [parent:protected] => 2 [label:protected] => Drywall Applicator Specialist [alreadyInSave:protected] => [alreadyInValidation:protected] => [validationFailures:protected] => Array ( ) [_new:BaseObject:private] => [_deleted:BaseObject:private] => [modifiedColumns:protected] => Array ( ) ) [55] => Category Object ( [languages:protected] => [bok_resources:protected] => [bok_topics:protected] => [bok_keywords:protected] => [id:protected] => 55 [type:protected] => category [parent:protected] => 2 [label:protected] => Electrical Worker [alreadyInSave:protected] => [alreadyInValidation:protected] => [validationFailures:protected] => Array ( ) [_new:BaseObject:private] => [_deleted:BaseObject:private] => [modifiedColumns:protected] => Array ( ) ) [56] => Category Object ( [languages:protected] => [bok_resources:protected] => [bok_topics:protected] => [bok_keywords:protected] => [id:protected] => 56 [type:protected] => category [parent:protected] => 2 [label:protected] => Elevator Constructor [alreadyInSave:protected] => [alreadyInValidation:protected] => [validationFailures:protected] => Array ( ) [_new:BaseObject:private] => [_deleted:BaseObject:private] => [modifiedColumns:protected] => Array ( ) ) [57] => Category Object ( [languages:protected] => [bok_resources:protected] => [bok_topics:protected] => [bok_keywords:protected] => [id:protected] => 57 [type:protected] => category [parent:protected] => 2 [label:protected] => Flagger [alreadyInSave:protected] => [alreadyInValidation:protected] => [validationFailures:protected] => Array ( ) [_new:BaseObject:private] => [_deleted:BaseObject:private] => [modifiedColumns:protected] => Array ( ) ) [58] => Category Object ( [languages:protected] => [bok_resources:protected] => [bok_topics:protected] => [bok_keywords:protected] => [id:protected] => 58 [type:protected] => category [parent:protected] => 2 [label:protected] => Glazier [alreadyInSave:protected] => [alreadyInValidation:protected] => [validationFailures:protected] => Array ( ) [_new:BaseObject:private] => [_deleted:BaseObject:private] => [modifiedColumns:protected] => Array ( ) ) [59] => Category Object ( [languages:protected] => [bok_resources:protected] => [bok_topics:protected] => [bok_keywords:protected] => [id:protected] => 59 [type:protected] => category [parent:protected] => 2 [label:protected] => Hazardous Waste Cleanup [alreadyInSave:protected] => [alreadyInValidation:protected] => [validationFailures:protected] => Array ( ) [_new:BaseObject:private] => [_deleted:BaseObject:private] => [modifiedColumns:protected] => Array ( ) ) [60] => Category Object ( [languages:protected] => [bok_resources:protected] => [bok_topics:protected] => [bok_keywords:protected] => [id:protected] => 60 [type:protected] => category [parent:protected] => 2 [label:protected] => HVAC [alreadyInSave:protected] => [alreadyInValidation:protected] => [validationFailures:protected] => Array ( ) [_new:BaseObject:private] => [_deleted:BaseObject:private] => [modifiedColumns:protected] => Array ( ) ) [61] => Category Object ( [languages:protected] => [bok_resources:protected] => [bok_topics:protected] => [bok_keywords:protected] => [id:protected] => 61 [type:protected] => category [parent:protected] => 2 [label:protected] => Interior Systems Carpenter [alreadyInSave:protected] => [alreadyInValidation:protected] => [validationFailures:protected] => Array ( ) [_new:BaseObject:private] => [_deleted:BaseObject:private] => [modifiedColumns:protected] => Array ( ) ) [64] => Category Object ( [languages:protected] => [bok_resources:protected] => [bok_topics:protected] => [bok_keywords:protected] => [id:protected] => 64 [type:protected] => category [parent:protected] => 2 [label:protected] => Laborer [alreadyInSave:protected] => [alreadyInValidation:protected] => [validationFailures:protected] => Array ( ) [_new:BaseObject:private] => [_deleted:BaseObject:private] => [modifiedColumns:protected] => Array ( ) ) [65] => Category Object ( [languages:protected] => [bok_resources:protected] => [bok_topics:protected] => [bok_keywords:protected] => [id:protected] => 65 [type:protected] => category [parent:protected] => 2 [label:protected] => Landscaper [alreadyInSave:protected] => [alreadyInValidation:protected] => [validationFailures:protected] => Array ( ) [_new:BaseObject:private] => [_deleted:BaseObject:private] => [modifiedColumns:protected] => Array ( ) ) [66] => Category Object ( [languages:protected] => [bok_resources:protected] => [bok_topics:protected] => [bok_keywords:protected] => [id:protected] => 66 [type:protected] => category [parent:protected] => 2 [label:protected] => Lather [alreadyInSave:protected] => [alreadyInValidation:protected] => [validationFailures:protected] => Array ( ) [_new:BaseObject:private] => [_deleted:BaseObject:private] => [modifiedColumns:protected] => Array ( ) ) [67] => Category Object ( [languages:protected] => [bok_resources:protected] => [bok_topics:protected] => [bok_keywords:protected] => [id:protected] => 67 [type:protected] => category [parent:protected] => 2 [label:protected] => Lead Abatement Worker [alreadyInSave:protected] => [alreadyInValidation:protected] => [validationFailures:protected] => Array ( ) [_new:BaseObject:private] => [_deleted:BaseObject:private] => [modifiedColumns:protected] => Array ( ) ) [68] => Category Object ( [languages:protected] => [bok_resources:protected] => [bok_topics:protected] => [bok_keywords:protected] => [id:protected] => 68 [type:protected] => category [parent:protected] => 2 [label:protected] => Maintenance Worker [alreadyInSave:protected] => [alreadyInValidation:protected] => [validationFailures:protected] => Array ( ) [_new:BaseObject:private] => [_deleted:BaseObject:private] => [modifiedColumns:protected] => Array ( ) ) [69] => Category Object ( [languages:protected] => [bok_resources:protected] => [bok_topics:protected] => [bok_keywords:protected] => [id:protected] => 69 [type:protected] => category [parent:protected] => 2 [label:protected] => Millwright [alreadyInSave:protected] => [alreadyInValidation:protected] => [validationFailures:protected] => Array ( ) [_new:BaseObject:private] => [_deleted:BaseObject:private] => [modifiedColumns:protected] => Array ( ) ) [70] => Category Object ( [languages:protected] => [bok_resources:protected] => [bok_topics:protected] => [bok_keywords:protected] => [id:protected] => 70 [type:protected] => category [parent:protected] => 2 [label:protected] => Operating Engineer [alreadyInSave:protected] => [alreadyInValidation:protected] => [validationFailures:protected] => Array ( ) [_new:BaseObject:private] => [_deleted:BaseObject:private] => [modifiedColumns:protected] => Array ( ) ) [71] => Category Object ( [languages:protected] => [bok_resources:protected] => [bok_topics:protected] => [bok_keywords:protected] => [id:protected] => 71 [type:protected] => category [parent:protected] => 2 [label:protected] => Painter [alreadyInSave:protected] => [alreadyInValidation:protected] => [validationFailures:protected] => Array ( ) [_new:BaseObject:private] => [_deleted:BaseObject:private] => [modifiedColumns:protected] => Array ( ) ) [72] => Category Object ( [languages:protected] => [bok_resources:protected] => [bok_topics:protected] => [bok_keywords:protected] => [id:protected] => 72 [type:protected] => category [parent:protected] => 2 [label:protected] => Paper Hanger [alreadyInSave:protected] => [alreadyInValidation:protected] => [validationFailures:protected] => Array ( ) [_new:BaseObject:private] => [_deleted:BaseObject:private] => [modifiedColumns:protected] => Array ( ) ) [73] => Category Object ( [languages:protected] => [bok_resources:protected] => [bok_topics:protected] => [bok_keywords:protected] => [id:protected] => 73 [type:protected] => category [parent:protected] => 2 [label:protected] => PCC/Restoration [alreadyInSave:protected] => [alreadyInValidation:protected] => [validationFailures:protected] => Array ( ) [_new:BaseObject:private] => [_deleted:BaseObject:private] => [modifiedColumns:protected] => Array ( ) ) [74] => Category Object ( [languages:protected] => [bok_resources:protected] => [bok_topics:protected] => [bok_keywords:protected] => [id:protected] => 74 [type:protected] => category [parent:protected] => 2 [label:protected] => Pile Driver [alreadyInSave:protected] => [alreadyInValidation:protected] => [validationFailures:protected] => Array ( ) [_new:BaseObject:private] => [_deleted:BaseObject:private] => [modifiedColumns:protected] => Array ( ) ) [75] => Category Object ( [languages:protected] => [bok_resources:protected] => [bok_topics:protected] => [bok_keywords:protected] => [id:protected] => 75 [type:protected] => category [parent:protected] => 2 [label:protected] => Plasterer [alreadyInSave:protected] => [alreadyInValidation:protected] => [validationFailures:protected] => Array ( ) [_new:BaseObject:private] => [_deleted:BaseObject:private] => [modifiedColumns:protected] => Array ( ) ) [76] => Category Object ( [languages:protected] => [bok_resources:protected] => [bok_topics:protected] => [bok_keywords:protected] => [id:protected] => 76 [type:protected] => category [parent:protected] => 2 [label:protected] => Plumber/Pipefitter [alreadyInSave:protected] => [alreadyInValidation:protected] => [validationFailures:protected] => Array ( ) [_new:BaseObject:private] => [_deleted:BaseObject:private] => [modifiedColumns:protected] => Array ( ) ) [77] => Category Object ( [languages:protected] => [bok_resources:protected] => [bok_topics:protected] => [bok_keywords:protected] => [id:protected] => 77 [type:protected] => category [parent:protected] => 2 [label:protected] => Refractory Worker [alreadyInSave:protected] => [alreadyInValidation:protected] => [validationFailures:protected] => Array ( ) [_new:BaseObject:private] => [_deleted:BaseObject:private] => [modifiedColumns:protected] => Array ( ) ) [63] => Category Object ( [languages:protected] => [bok_resources:protected] => [bok_topics:protected] => [bok_keywords:protected] => [id:protected] => 63 [type:protected] => category [parent:protected] => 2 [label:protected] => Reinforcing Ironworker [alreadyInSave:protected] => [alreadyInValidation:protected] => [validationFailures:protected] => Array ( ) [_new:BaseObject:private] => [_deleted:BaseObject:private] => [modifiedColumns:protected] => Array ( ) ) [78] => Category Object ( [languages:protected] => [bok_resources:protected] => [bok_topics:protected] => [bok_keywords:protected] => [id:protected] => 78 [type:protected] => category [parent:protected] => 2 [label:protected] => Roofer/Waterproofer [alreadyInSave:protected] => [alreadyInValidation:protected] => [validationFailures:protected] => Array ( ) [_new:BaseObject:private] => [_deleted:BaseObject:private] => [modifiedColumns:protected] => Array ( ) ) [79] => Category Object ( [languages:protected] => [bok_resources:protected] => [bok_topics:protected] => [bok_keywords:protected] => [id:protected] => 79 [type:protected] => category [parent:protected] => 2 [label:protected] => Scaffold Erector [alreadyInSave:protected] => [alreadyInValidation:protected] => [validationFailures:protected] => Array ( ) [_new:BaseObject:private] => [_deleted:BaseObject:private] => [modifiedColumns:protected] => Array ( ) ) [80] => Category Object ( [languages:protected] => [bok_resources:protected] => [bok_topics:protected] => [bok_keywords:protected] => [id:protected] => 80 [type:protected] => category [parent:protected] => 2 [label:protected] => Sheetmetal Worker [alreadyInSave:protected] => [alreadyInValidation:protected] => [validationFailures:protected] => Array ( ) [_new:BaseObject:private] => [_deleted:BaseObject:private] => [modifiedColumns:protected] => Array ( ) ) [81] => Category Object ( [languages:protected] => [bok_resources:protected] => [bok_topics:protected] => [bok_keywords:protected] => [id:protected] => 81 [type:protected] => category [parent:protected] => 2 [label:protected] => Sprinkler Fitter [alreadyInSave:protected] => [alreadyInValidation:protected] => [validationFailures:protected] => Array ( ) [_new:BaseObject:private] => [_deleted:BaseObject:private] => [modifiedColumns:protected] => Array ( ) ) [82] => Category Object ( [languages:protected] => [bok_resources:protected] => [bok_topics:protected] => [bok_keywords:protected] => [id:protected] => 82 [type:protected] => category [parent:protected] => 2 [label:protected] => Stonemason [alreadyInSave:protected] => [alreadyInValidation:protected] => [validationFailures:protected] => Array ( ) [_new:BaseObject:private] => [_deleted:BaseObject:private] => [modifiedColumns:protected] => Array ( ) ) [62] => Category Object ( [languages:protected] => [bok_resources:protected] => [bok_topics:protected] => [bok_keywords:protected] => [id:protected] => 62 [type:protected] => category [parent:protected] => 2 [label:protected] => Structural Ironworker [alreadyInSave:protected] => [alreadyInValidation:protected] => [validationFailures:protected] => Array ( ) [_new:BaseObject:private] => [_deleted:BaseObject:private] => [modifiedColumns:protected] => Array ( ) ) [83] => Category Object ( [languages:protected] => [bok_resources:protected] => [bok_topics:protected] => [bok_keywords:protected] => [id:protected] => 83 [type:protected] => category [parent:protected] => 2 [label:protected] => Terrazzo Worker [alreadyInSave:protected] => [alreadyInValidation:protected] => [validationFailures:protected] => Array ( ) [_new:BaseObject:private] => [_deleted:BaseObject:private] => [modifiedColumns:protected] => Array ( ) ) [84] => Category Object ( [languages:protected] => [bok_resources:protected] => [bok_topics:protected] => [bok_keywords:protected] => [id:protected] => 84 [type:protected] => category [parent:protected] => 2 [label:protected] => Tile Setter [alreadyInSave:protected] => [alreadyInValidation:protected] => [validationFailures:protected] => Array ( ) [_new:BaseObject:private] => [_deleted:BaseObject:private] => [modifiedColumns:protected] => Array ( ) ) [85] => Category Object ( [languages:protected] => [bok_resources:protected] => [bok_topics:protected] => [bok_keywords:protected] => [id:protected] => 85 [type:protected] => category [parent:protected] => 2 [label:protected] => Truck Driver [alreadyInSave:protected] => [alreadyInValidation:protected] => [validationFailures:protected] => Array ( ) [_new:BaseObject:private] => [_deleted:BaseObject:private] => [modifiedColumns:protected] => Array ( ) ) [86] => Category Object ( [languages:protected] => [bok_resources:protected] => [bok_topics:protected] => [bok_keywords:protected] => [id:protected] => 86 [type:protected] => category [parent:protected] => 2 [label:protected] => Welder [alreadyInSave:protected] => [alreadyInValidation:protected] => [validationFailures:protected] => Array ( ) [_new:BaseObject:private] => [_deleted:BaseObject:private] => [modifiedColumns:protected] => Array ( ) ) [87] => Category Object ( [languages:protected] => [bok_resources:protected] => [bok_topics:protected] => [bok_keywords:protected] => [id:protected] => 87 [type:protected] => category [parent:protected] => 3 [label:protected] => Commercial & Institutional [alreadyInSave:protected] => [alreadyInValidation:protected] => [validationFailures:protected] => Array ( ) [_new:BaseObject:private] => [_deleted:BaseObject:private] => [modifiedColumns:protected] => Array ( ) ) [88] => Category Object ( [languages:protected] => [bok_resources:protected] => [bok_topics:protected] => [bok_keywords:protected] => [id:protected] => 88 [type:protected] => category [parent:protected] => 3 [label:protected] => Demolition [alreadyInSave:protected] => [alreadyInValidation:protected] => [validationFailures:protected] => Array ( ) [_new:BaseObject:private] => [_deleted:BaseObject:private] => [modifiedColumns:protected] => Array ( ) ) [89] => Category Object ( [languages:protected] => [bok_resources:protected] => [bok_topics:protected] => [bok_keywords:protected] => [id:protected] => 89 [type:protected] => category [parent:protected] => 3 [label:protected] => Disasters [alreadyInSave:protected] => [alreadyInValidation:protected] => [validationFailures:protected] => Array ( ) [_new:BaseObject:private] => [_deleted:BaseObject:private] => [modifiedColumns:protected] => Array ( ) ) [91] => Category Object ( [languages:protected] => [bok_resources:protected] => [bok_topics:protected] => [bok_keywords:protected] => [id:protected] => 91 [type:protected] => category [parent:protected] => 3 [label:protected] => Heavy & Highway [alreadyInSave:protected] => [alreadyInValidation:protected] => [validationFailures:protected] => Array ( ) [_new:BaseObject:private] => [_deleted:BaseObject:private] => [modifiedColumns:protected] => Array ( ) ) [90] => Category Object ( [languages:protected] => [bok_resources:protected] => [bok_topics:protected] => [bok_keywords:protected] => [id:protected] => 90 [type:protected] => category [parent:protected] => 3 [label:protected] => Industrial [alreadyInSave:protected] => [alreadyInValidation:protected] => [validationFailures:protected] => Array ( ) [_new:BaseObject:private] => [_deleted:BaseObject:private] => [modifiedColumns:protected] => Array ( ) ) [92] => Category Object ( [languages:protected] => [bok_resources:protected] => [bok_topics:protected] => [bok_keywords:protected] => [id:protected] => 92 [type:protected] => category [parent:protected] => 3 [label:protected] => LEED/Green Construction [alreadyInSave:protected] => [alreadyInValidation:protected] => [validationFailures:protected] => Array ( ) [_new:BaseObject:private] => [_deleted:BaseObject:private] => [modifiedColumns:protected] => Array ( ) ) [93] => Category Object ( [languages:protected] => [bok_resources:protected] => [bok_topics:protected] => [bok_keywords:protected] => [id:protected] => 93 [type:protected] => category [parent:protected] => 3 [label:protected] => Renovations [alreadyInSave:protected] => [alreadyInValidation:protected] => [validationFailures:protected] => Array ( ) [_new:BaseObject:private] => [_deleted:BaseObject:private] => [modifiedColumns:protected] => Array ( ) ) [94] => Category Object ( [languages:protected] => [bok_resources:protected] => [bok_topics:protected] => [bok_keywords:protected] => [id:protected] => 94 [type:protected] => category [parent:protected] => 3 [label:protected] => Residential [alreadyInSave:protected] => [alreadyInValidation:protected] => [validationFailures:protected] => Array ( ) [_new:BaseObject:private] => [_deleted:BaseObject:private] => [modifiedColumns:protected] => Array ( ) ) [95] => Category Object ( [languages:protected] => [bok_resources:protected] => [bok_topics:protected] => [bok_keywords:protected] => [id:protected] => 95 [type:protected] => category [parent:protected] => 3 [label:protected] => Underground [alreadyInSave:protected] => [alreadyInValidation:protected] => [validationFailures:protected] => Array ( ) [_new:BaseObject:private] => [_deleted:BaseObject:private] => [modifiedColumns:protected] => Array ( ) ) ) [categories_initialized:protected] => 1 [mapped_items:protected] => [content:protected] => [files:protected] => [language:protected] => Language Object ( [id:protected] => 1 [code:protected] => en [name:protected] => English [alreadyInSave:protected] => [alreadyInValidation:protected] => [validationFailures:protected] => Array ( ) [_new:BaseObject:private] => [_deleted:BaseObject:private] => [modifiedColumns:protected] => Array ( ) ) [old_record:protected] => [id:protected] => 4426 [old_id:protected] => [elcosh_id:protected] => d001656 [type:protected] => document [display_type:protected] => HTML only (and links) [user_id:protected] => 0 [language_id:protected] => 1 [tagging_id:protected] => Mike Aguilar [priority_id:protected] => 1 [title:protected] => Construction Dive -- DeWalt's Jobsite Pro headphones recalled for fire hazards [total_pages:protected] => 1 [billed_pages:protected] => 1 [publication_number:protected] => [part_of:protected] => [keywords:protected] => DeWalt, Fire Hazards, recall, headphones [comments:protected] => [summary:protected] => A recall notice by the United States Consumer Product Safety Commission affects over 300,000 DeWalt Jobsite Pro Headphones. The recall is a result of a malfunction that can cause earbuds to overheat while charging or during use, leading to fire and burn hazards. [transition_comments:protected] => [external_link:protected] => https://www.constructiondive.com/news/dewalts-jobsite-pro-headphones-recalled-for-fire-hazards/611248/?utm_source=Sailthru&utm_medium=email&utm_campaign=Issue:%202021-12-10%20Construction%20Dive%20Newsletter%20%5Bissue:38532%5D&utm_term=Construction%20Dive [consol_link:protected] => [more_like_this:protected] => [permission_given_by:protected] => [published:protected] => T [billable:protected] => F [img_name:protected] => [img_ext:protected] => [img_width:protected] => [img_height:protected] => [img_credit:protected] => [img_practice:protected] => [vid_source_id:protected] => [vid_running_time:protected] => [vid_intended_audience:protected] => [vid_acquisition_info:protected] => [vid_cost:protected] => [vid_producer:protected] => [vid_filename:protected] => [vid_filename_downloadable:protected] => [date_summary:protected] => [date_permission_requested:protected] => [date_permission_received:protected] => [date_review_needed:protected] => [date_received:protected] => 12/13/21 [date_completed:protected] => 12/13/21 [date_billed:protected] => [date_modified:protected] => 12/13/21 [collBokExports:protected] => [lastBokExportCriteria:BaseElcoshItem:private] => [alreadyInSave:protected] => [alreadyInValidation:protected] => [validationFailures:protected] => Array ( ) [_new:BaseObject:private] => [_deleted:BaseObject:private] => [modifiedColumns:protected] => Array ( ) ) ) [3] => Search_Result Object ( [title] => Working in an Enclosed Cab [image] => /record/images/notavailable-p.png [blurb] => This CPWR Hazard Alert on Working in enclosed cabs provides information on protecting workers from silica dust, how to minimize exposures and the dang... [category] => Array ( [0] => 10 [1] => 16 [2] => 24 [3] => 37 [4] => 46 [5] => 48 [6] => 49 [7] => 51 [8] => 53 [9] => 54 [10] => 56 [11] => 58 [12] => 59 [13] => 60 [14] => 61 [15] => 64 [16] => 66 [17] => 68 [18] => 69 [19] => 71 [20] => 73 [21] => 74 [22] => 76 [23] => 77 [24] => 63 [25] => 80 [26] => 82 [27] => 62 [28] => 83 [29] => 84 [30] => 86 [31] => 88 [32] => 89 [33] => 95 [34] => 102 ) [labels] => Array ( [0] => Confined Spaces [1] => Work Environment [2] => Hazards [3] => Fire & Explosions [6] => Trenches & Excavations [9] => Silica /Construction Dust [10] => Inhalation/Skin Exposures [12] => Boilermaker [13] => Trades [14] => Cabinetmaker [16] => Carpenter [18] => Cement Mason [20] => Concrete Polisher [22] => Drywall Applicator Specialist [24] => Elevator Constructor [26] => Glazier [28] => Hazardous Waste Cleanup [30] => HVAC [32] => Interior Systems Carpenter [34] => Laborer [36] => Lather [38] => Maintenance Worker [40] => Millwright [42] => Painter [44] => PCC/Restoration [46] => Pile Driver [48] => Plumber/Pipefitter [50] => Refractory Worker [52] => Reinforcing Ironworker [54] => Sheetmetal Worker [56] => Stonemason [58] => Structural Ironworker [60] => Terrazzo Worker [62] => Tile Setter [64] => Welder [66] => Demolition [67] => Jobsites [68] => Disasters [70] => Underground [72] => Handouts [73] => Documents [74] => Media & Documents ) [type] => Handouts [sub_category] => [url] => /document/4415/d001651/Working%2Bin%2Ban%2BEnclosed%2BCab.html [item:protected] => DocumentRecord Object ( [records:protected] => Array ( ) [recordId:protected] => [searchWordClass:protected] => [searchWordPeerClass:protected] => [bok_record:protected] => [authors:protected] => [organizations:protected] => [collections:protected] => [categories:protected] => Array ( [10] => Category Object ( [languages:protected] => [bok_resources:protected] => [bok_topics:protected] => [bok_keywords:protected] => [id:protected] => 10 [type:protected] => category [parent:protected] => 7 [label:protected] => Confined Spaces [alreadyInSave:protected] => [alreadyInValidation:protected] => [validationFailures:protected] => Array ( ) [_new:BaseObject:private] => [_deleted:BaseObject:private] => [modifiedColumns:protected] => Array ( ) ) [16] => Category Object ( [languages:protected] => [bok_resources:protected] => [bok_topics:protected] => [bok_keywords:protected] => [id:protected] => 16 [type:protected] => category [parent:protected] => 7 [label:protected] => Fire & Explosions [alreadyInSave:protected] => [alreadyInValidation:protected] => [validationFailures:protected] => Array ( ) [_new:BaseObject:private] => [_deleted:BaseObject:private] => [modifiedColumns:protected] => Array ( ) ) [24] => Category Object ( [languages:protected] => [bok_resources:protected] => [bok_topics:protected] => [bok_keywords:protected] => [id:protected] => 24 [type:protected] => category [parent:protected] => 7 [label:protected] => Trenches & Excavations [alreadyInSave:protected] => [alreadyInValidation:protected] => [validationFailures:protected] => Array ( ) [_new:BaseObject:private] => [_deleted:BaseObject:private] => [modifiedColumns:protected] => Array ( ) ) [37] => Category Object ( [languages:protected] => [bok_resources:protected] => [bok_topics:protected] => [bok_keywords:protected] => [id:protected] => 37 [type:protected] => category [parent:protected] => 8 [label:protected] => Silica /Construction Dust [alreadyInSave:protected] => [alreadyInValidation:protected] => [validationFailures:protected] => Array ( ) [_new:BaseObject:private] => [_deleted:BaseObject:private] => [modifiedColumns:protected] => Array ( ) ) [46] => Category Object ( [languages:protected] => [bok_resources:protected] => [bok_topics:protected] => [bok_keywords:protected] => [id:protected] => 46 [type:protected] => category [parent:protected] => 2 [label:protected] => Boilermaker [alreadyInSave:protected] => [alreadyInValidation:protected] => [validationFailures:protected] => Array ( ) [_new:BaseObject:private] => [_deleted:BaseObject:private] => [modifiedColumns:protected] => Array ( ) ) [48] => Category Object ( [languages:protected] => [bok_resources:protected] => [bok_topics:protected] => [bok_keywords:protected] => [id:protected] => 48 [type:protected] => category [parent:protected] => 2 [label:protected] => Cabinetmaker [alreadyInSave:protected] => [alreadyInValidation:protected] => [validationFailures:protected] => Array ( ) [_new:BaseObject:private] => [_deleted:BaseObject:private] => [modifiedColumns:protected] => Array ( ) ) [49] => Category Object ( [languages:protected] => [bok_resources:protected] => [bok_topics:protected] => [bok_keywords:protected] => [id:protected] => 49 [type:protected] => category [parent:protected] => 2 [label:protected] => Carpenter [alreadyInSave:protected] => [alreadyInValidation:protected] => [validationFailures:protected] => Array ( ) [_new:BaseObject:private] => [_deleted:BaseObject:private] => [modifiedColumns:protected] => Array ( ) ) [51] => Category Object ( [languages:protected] => [bok_resources:protected] => [bok_topics:protected] => [bok_keywords:protected] => [id:protected] => 51 [type:protected] => category [parent:protected] => 2 [label:protected] => Cement Mason [alreadyInSave:protected] => [alreadyInValidation:protected] => [validationFailures:protected] => Array ( ) [_new:BaseObject:private] => [_deleted:BaseObject:private] => [modifiedColumns:protected] => Array ( ) ) [53] => Category Object ( [languages:protected] => [bok_resources:protected] => [bok_topics:protected] => [bok_keywords:protected] => [id:protected] => 53 [type:protected] => category [parent:protected] => 2 [label:protected] => Concrete Polisher [alreadyInSave:protected] => [alreadyInValidation:protected] => [validationFailures:protected] => Array ( ) [_new:BaseObject:private] => [_deleted:BaseObject:private] => [modifiedColumns:protected] => Array ( ) ) [54] => Category Object ( [languages:protected] => [bok_resources:protected] => [bok_topics:protected] => [bok_keywords:protected] => [id:protected] => 54 [type:protected] => category [parent:protected] => 2 [label:protected] => Drywall Applicator Specialist [alreadyInSave:protected] => [alreadyInValidation:protected] => [validationFailures:protected] => Array ( ) [_new:BaseObject:private] => [_deleted:BaseObject:private] => [modifiedColumns:protected] => Array ( ) ) [56] => Category Object ( [languages:protected] => [bok_resources:protected] => [bok_topics:protected] => [bok_keywords:protected] => [id:protected] => 56 [type:protected] => category [parent:protected] => 2 [label:protected] => Elevator Constructor [alreadyInSave:protected] => [alreadyInValidation:protected] => [validationFailures:protected] => Array ( ) [_new:BaseObject:private] => [_deleted:BaseObject:private] => [modifiedColumns:protected] => Array ( ) ) [58] => Category Object ( [languages:protected] => [bok_resources:protected] => [bok_topics:protected] => [bok_keywords:protected] => [id:protected] => 58 [type:protected] => category [parent:protected] => 2 [label:protected] => Glazier [alreadyInSave:protected] => [alreadyInValidation:protected] => [validationFailures:protected] => Array ( ) [_new:BaseObject:private] => [_deleted:BaseObject:private] => [modifiedColumns:protected] => Array ( ) ) [59] => Category Object ( [languages:protected] => [bok_resources:protected] => [bok_topics:protected] => [bok_keywords:protected] => [id:protected] => 59 [type:protected] => category [parent:protected] => 2 [label:protected] => Hazardous Waste Cleanup [alreadyInSave:protected] => [alreadyInValidation:protected] => [validationFailures:protected] => Array ( ) [_new:BaseObject:private] => [_deleted:BaseObject:private] => [modifiedColumns:protected] => Array ( ) ) [60] => Category Object ( [languages:protected] => [bok_resources:protected] => [bok_topics:protected] => [bok_keywords:protected] => [id:protected] => 60 [type:protected] => category [parent:protected] => 2 [label:protected] => HVAC [alreadyInSave:protected] => [alreadyInValidation:protected] => [validationFailures:protected] => Array ( ) [_new:BaseObject:private] => [_deleted:BaseObject:private] => [modifiedColumns:protected] => Array ( ) ) [61] => Category Object ( [languages:protected] => [bok_resources:protected] => [bok_topics:protected] => [bok_keywords:protected] => [id:protected] => 61 [type:protected] => category [parent:protected] => 2 [label:protected] => Interior Systems Carpenter [alreadyInSave:protected] => [alreadyInValidation:protected] => [validationFailures:protected] => Array ( ) [_new:BaseObject:private] => [_deleted:BaseObject:private] => [modifiedColumns:protected] => Array ( ) ) [64] => Category Object ( [languages:protected] => [bok_resources:protected] => [bok_topics:protected] => [bok_keywords:protected] => [id:protected] => 64 [type:protected] => category [parent:protected] => 2 [label:protected] => Laborer [alreadyInSave:protected] => [alreadyInValidation:protected] => [validationFailures:protected] => Array ( ) [_new:BaseObject:private] => [_deleted:BaseObject:private] => [modifiedColumns:protected] => Array ( ) ) [66] => Category Object ( [languages:protected] => [bok_resources:protected] => [bok_topics:protected] => [bok_keywords:protected] => [id:protected] => 66 [type:protected] => category [parent:protected] => 2 [label:protected] => Lather [alreadyInSave:protected] => [alreadyInValidation:protected] => [validationFailures:protected] => Array ( ) [_new:BaseObject:private] => [_deleted:BaseObject:private] => [modifiedColumns:protected] => Array ( ) ) [68] => Category Object ( [languages:protected] => [bok_resources:protected] => [bok_topics:protected] => [bok_keywords:protected] => [id:protected] => 68 [type:protected] => category [parent:protected] => 2 [label:protected] => Maintenance Worker [alreadyInSave:protected] => [alreadyInValidation:protected] => [validationFailures:protected] => Array ( ) [_new:BaseObject:private] => [_deleted:BaseObject:private] => [modifiedColumns:protected] => Array ( ) ) [69] => Category Object ( [languages:protected] => [bok_resources:protected] => [bok_topics:protected] => [bok_keywords:protected] => [id:protected] => 69 [type:protected] => category [parent:protected] => 2 [label:protected] => Millwright [alreadyInSave:protected] => [alreadyInValidation:protected] => [validationFailures:protected] => Array ( ) [_new:BaseObject:private] => [_deleted:BaseObject:private] => [modifiedColumns:protected] => Array ( ) ) [71] => Category Object ( [languages:protected] => [bok_resources:protected] => [bok_topics:protected] => [bok_keywords:protected] => [id:protected] => 71 [type:protected] => category [parent:protected] => 2 [label:protected] => Painter [alreadyInSave:protected] => [alreadyInValidation:protected] => [validationFailures:protected] => Array ( ) [_new:BaseObject:private] => [_deleted:BaseObject:private] => [modifiedColumns:protected] => Array ( ) ) [73] => Category Object ( [languages:protected] => [bok_resources:protected] => [bok_topics:protected] => [bok_keywords:protected] => [id:protected] => 73 [type:protected] => category [parent:protected] => 2 [label:protected] => PCC/Restoration [alreadyInSave:protected] => [alreadyInValidation:protected] => [validationFailures:protected] => Array ( ) [_new:BaseObject:private] => [_deleted:BaseObject:private] => [modifiedColumns:protected] => Array ( ) ) [74] => Category Object ( [languages:protected] => [bok_resources:protected] => [bok_topics:protected] => [bok_keywords:protected] => [id:protected] => 74 [type:protected] => category [parent:protected] => 2 [label:protected] => Pile Driver [alreadyInSave:protected] => [alreadyInValidation:protected] => [validationFailures:protected] => Array ( ) [_new:BaseObject:private] => [_deleted:BaseObject:private] => [modifiedColumns:protected] => Array ( ) ) [76] => Category Object ( [languages:protected] => [bok_resources:protected] => [bok_topics:protected] => [bok_keywords:protected] => [id:protected] => 76 [type:protected] => category [parent:protected] => 2 [label:protected] => Plumber/Pipefitter [alreadyInSave:protected] => [alreadyInValidation:protected] => [validationFailures:protected] => Array ( ) [_new:BaseObject:private] => [_deleted:BaseObject:private] => [modifiedColumns:protected] => Array ( ) ) [77] => Category Object ( [languages:protected] => [bok_resources:protected] => [bok_topics:protected] => [bok_keywords:protected] => [id:protected] => 77 [type:protected] => category [parent:protected] => 2 [label:protected] => Refractory Worker [alreadyInSave:protected] => [alreadyInValidation:protected] => [validationFailures:protected] => Array ( ) [_new:BaseObject:private] => [_deleted:BaseObject:private] => [modifiedColumns:protected] => Array ( ) ) [63] => Category Object ( [languages:protected] => [bok_resources:protected] => [bok_topics:protected] => [bok_keywords:protected] => [id:protected] => 63 [type:protected] => category [parent:protected] => 2 [label:protected] => Reinforcing Ironworker [alreadyInSave:protected] => [alreadyInValidation:protected] => [validationFailures:protected] => Array ( ) [_new:BaseObject:private] => [_deleted:BaseObject:private] => [modifiedColumns:protected] => Array ( ) ) [80] => Category Object ( [languages:protected] => [bok_resources:protected] => [bok_topics:protected] => [bok_keywords:protected] => [id:protected] => 80 [type:protected] => category [parent:protected] => 2 [label:protected] => Sheetmetal Worker [alreadyInSave:protected] => [alreadyInValidation:protected] => [validationFailures:protected] => Array ( ) [_new:BaseObject:private] => [_deleted:BaseObject:private] => [modifiedColumns:protected] => Array ( ) ) [82] => Category Object ( [languages:protected] => [bok_resources:protected] => [bok_topics:protected] => [bok_keywords:protected] => [id:protected] => 82 [type:protected] => category [parent:protected] => 2 [label:protected] => Stonemason [alreadyInSave:protected] => [alreadyInValidation:protected] => [validationFailures:protected] => Array ( ) [_new:BaseObject:private] => [_deleted:BaseObject:private] => [modifiedColumns:protected] => Array ( ) ) [62] => Category Object ( [languages:protected] => [bok_resources:protected] => [bok_topics:protected] => [bok_keywords:protected] => [id:protected] => 62 [type:protected] => category [parent:protected] => 2 [label:protected] => Structural Ironworker [alreadyInSave:protected] => [alreadyInValidation:protected] => [validationFailures:protected] => Array ( ) [_new:BaseObject:private] => [_deleted:BaseObject:private] => [modifiedColumns:protected] => Array ( ) ) [83] => Category Object ( [languages:protected] => [bok_resources:protected] => [bok_topics:protected] => [bok_keywords:protected] => [id:protected] => 83 [type:protected] => category [parent:protected] => 2 [label:protected] => Terrazzo Worker [alreadyInSave:protected] => [alreadyInValidation:protected] => [validationFailures:protected] => Array ( ) [_new:BaseObject:private] => [_deleted:BaseObject:private] => [modifiedColumns:protected] => Array ( ) ) [84] => Category Object ( [languages:protected] => [bok_resources:protected] => [bok_topics:protected] => [bok_keywords:protected] => [id:protected] => 84 [type:protected] => category [parent:protected] => 2 [label:protected] => Tile Setter [alreadyInSave:protected] => [alreadyInValidation:protected] => [validationFailures:protected] => Array ( ) [_new:BaseObject:private] => [_deleted:BaseObject:private] => [modifiedColumns:protected] => Array ( ) ) [86] => Category Object ( [languages:protected] => [bok_resources:protected] => [bok_topics:protected] => [bok_keywords:protected] => [id:protected] => 86 [type:protected] => category [parent:protected] => 2 [label:protected] => Welder [alreadyInSave:protected] => [alreadyInValidation:protected] => [validationFailures:protected] => Array ( ) [_new:BaseObject:private] => [_deleted:BaseObject:private] => [modifiedColumns:protected] => Array ( ) ) [88] => Category Object ( [languages:protected] => [bok_resources:protected] => [bok_topics:protected] => [bok_keywords:protected] => [id:protected] => 88 [type:protected] => category [parent:protected] => 3 [label:protected] => Demolition [alreadyInSave:protected] => [alreadyInValidation:protected] => [validationFailures:protected] => Array ( ) [_new:BaseObject:private] => [_deleted:BaseObject:private] => [modifiedColumns:protected] => Array ( ) ) [89] => Category Object ( [languages:protected] => [bok_resources:protected] => [bok_topics:protected] => [bok_keywords:protected] => [id:protected] => 89 [type:protected] => category [parent:protected] => 3 [label:protected] => Disasters [alreadyInSave:protected] => [alreadyInValidation:protected] => [validationFailures:protected] => Array ( ) [_new:BaseObject:private] => [_deleted:BaseObject:private] => [modifiedColumns:protected] => Array ( ) ) [95] => Category Object ( [languages:protected] => [bok_resources:protected] => [bok_topics:protected] => [bok_keywords:protected] => [id:protected] => 95 [type:protected] => category [parent:protected] => 3 [label:protected] => Underground [alreadyInSave:protected] => [alreadyInValidation:protected] => [validationFailures:protected] => Array ( ) [_new:BaseObject:private] => [_deleted:BaseObject:private] => [modifiedColumns:protected] => Array ( ) ) [102] => Category Object ( [languages:protected] => [bok_resources:protected] => [bok_topics:protected] => [bok_keywords:protected] => [id:protected] => 102 [type:protected] => category [parent:protected] => 6 [label:protected] => Handouts [alreadyInSave:protected] => [alreadyInValidation:protected] => [validationFailures:protected] => Array ( ) [_new:BaseObject:private] => [_deleted:BaseObject:private] => [modifiedColumns:protected] => Array ( ) ) ) [categories_initialized:protected] => 1 [mapped_items:protected] => [content:protected] => [files:protected] => [language:protected] => Language Object ( [id:protected] => 1 [code:protected] => en [name:protected] => English [alreadyInSave:protected] => [alreadyInValidation:protected] => [validationFailures:protected] => Array ( ) [_new:BaseObject:private] => [_deleted:BaseObject:private] => [modifiedColumns:protected] => Array ( ) ) [old_record:protected] => [id:protected] => 4415 [old_id:protected] => [elcosh_id:protected] => d001651 [type:protected] => document [display_type:protected] => HTML only (and links) [user_id:protected] => 0 [language_id:protected] => 1 [tagging_id:protected] => Valeria Contreras [priority_id:protected] => 1 [title:protected] => Working in an Enclosed Cab [total_pages:protected] => 1 [billed_pages:protected] => 1 [publication_number:protected] => [part_of:protected] => [keywords:protected] => Occupation, construction, safety, health, hazards, work, worker, workplace, OSHA, silicosis, mining, silica, DOE, EEOICPA, labor, lung, CBD, dust, cab, miner, mine [comments:protected] => [summary:protected] => This CPWR Hazard Alert on Working in enclosed cabs provides information on protecting workers from silica dust, how to minimize exposures and the dangers of silica dust. Click on the following links to access the English version and the Spanish version. [transition_comments:protected] => [external_link:protected] => [consol_link:protected] => [more_like_this:protected] => [permission_given_by:protected] => [published:protected] => T [billable:protected] => F [img_name:protected] => [img_ext:protected] => [img_width:protected] => [img_height:protected] => [img_credit:protected] => [img_practice:protected] => [vid_source_id:protected] => [vid_running_time:protected] => [vid_intended_audience:protected] => [vid_acquisition_info:protected] => [vid_cost:protected] => [vid_producer:protected] => [vid_filename:protected] => [vid_filename_downloadable:protected] => [date_summary:protected] => [date_permission_requested:protected] => [date_permission_received:protected] => [date_review_needed:protected] => [date_received:protected] => 10/08/20 [date_completed:protected] => 10/08/20 [date_billed:protected] => [date_modified:protected] => 10/08/20 [collBokExports:protected] => [lastBokExportCriteria:BaseElcoshItem:private] => [alreadyInSave:protected] => [alreadyInValidation:protected] => [validationFailures:protected] => Array ( ) [_new:BaseObject:private] => [_deleted:BaseObject:private] => [modifiedColumns:protected] => Array ( ) ) ) [4] => Search_Result Object ( [title] => Toolbox Talk: Suicide Prevention [image] => /record/images/notavailable-p.png [blurb] => The CPWR Toolbox Talk on Suicide Prevention addresses the prevalence of suicide among construction workers. The resource includes a brief case example... [category] => Array ( [0] => 13 [1] => 20 [2] => 23 [3] => 40 [4] => 44 [5] => 45 [6] => 46 [7] => 47 [8] => 48 [9] => 49 [10] => 50 [11] => 51 [12] => 52 [13] => 53 [14] => 54 [15] => 55 [16] => 56 [17] => 57 [18] => 58 [19] => 59 [20] => 60 [21] => 61 [22] => 64 [23] => 65 [24] => 66 [25] => 67 [26] => 68 [27] => 69 [28] => 70 [29] => 71 [30] => 72 [31] => 73 [32] => 74 [33] => 75 [34] => 76 [35] => 77 [36] => 63 [37] => 78 [38] => 79 [39] => 80 [40] => 81 [41] => 82 [42] => 62 [43] => 83 [44] => 84 [45] => 85 [46] => 86 [47] => 87 [48] => 88 [49] => 89 [50] => 91 [51] => 90 [52] => 92 [53] => 93 [54] => 94 [55] => 95 [56] => 100 ) [labels] => Array ( [0] => Drugs, Alcohol & Tobacco [1] => Work Environment [2] => Hazards [3] => Safety Culture [6] => Stress & Overtime [9] => Overexertion [10] => Ergonomic [12] => Acoustical Ceiling Carpenter [13] => Trades [14] => Asbestos/Insulator [16] => Boilermaker [18] => Bricklayer [20] => Cabinetmaker [22] => Carpenter [24] => Carpet Layer [26] => Cement Mason [28] => Commercial Diver [30] => Concrete Polisher [32] => Drywall Applicator Specialist [34] => Electrical Worker [36] => Elevator Constructor [38] => Flagger [40] => Glazier [42] => Hazardous Waste Cleanup [44] => HVAC [46] => Interior Systems Carpenter [48] => Laborer [50] => Landscaper [52] => Lather [54] => Lead Abatement Worker [56] => Maintenance Worker [58] => Millwright [60] => Operating Engineer [62] => Painter [64] => Paper Hanger [66] => PCC/Restoration [68] => Pile Driver [70] => Plasterer [72] => Plumber/Pipefitter [74] => Refractory Worker [76] => Reinforcing Ironworker [78] => Roofer/Waterproofer [80] => Scaffold Erector [82] => Sheetmetal Worker [84] => Sprinkler Fitter [86] => Stonemason [88] => Structural Ironworker [90] => Terrazzo Worker [92] => Tile Setter [94] => Truck Driver [96] => Welder [98] => Commercial & Institutional [99] => Jobsites [100] => Demolition [102] => Disasters [104] => Heavy & Highway [106] => Industrial [108] => LEED/Green Construction [110] => Renovations [112] => Residential [114] => Underground [116] => Toolbox Talks [117] => Documents [118] => Media & Documents ) [type] => Toolbox Talks [sub_category] => [url] => /document/4419/d001652/Toolbox%2BTalk%253A%2BSuicide%2BPrevention.html [item:protected] => DocumentRecord Object ( [records:protected] => Array ( ) [recordId:protected] => [searchWordClass:protected] => [searchWordPeerClass:protected] => [bok_record:protected] => [authors:protected] => [organizations:protected] => [collections:protected] => [categories:protected] => Array ( [13] => Category Object ( [languages:protected] => [bok_resources:protected] => [bok_topics:protected] => [bok_keywords:protected] => [id:protected] => 13 [type:protected] => category [parent:protected] => 7 [label:protected] => Drugs, Alcohol & Tobacco [alreadyInSave:protected] => [alreadyInValidation:protected] => [validationFailures:protected] => Array ( ) [_new:BaseObject:private] => [_deleted:BaseObject:private] => [modifiedColumns:protected] => Array ( ) ) [20] => Category Object ( [languages:protected] => [bok_resources:protected] => [bok_topics:protected] => [bok_keywords:protected] => [id:protected] => 20 [type:protected] => category [parent:protected] => 7 [label:protected] => Safety Culture [alreadyInSave:protected] => [alreadyInValidation:protected] => [validationFailures:protected] => Array ( ) [_new:BaseObject:private] => [_deleted:BaseObject:private] => [modifiedColumns:protected] => Array ( ) ) [23] => Category Object ( [languages:protected] => [bok_resources:protected] => [bok_topics:protected] => [bok_keywords:protected] => [id:protected] => 23 [type:protected] => category [parent:protected] => 7 [label:protected] => Stress & Overtime [alreadyInSave:protected] => [alreadyInValidation:protected] => [validationFailures:protected] => Array ( ) [_new:BaseObject:private] => [_deleted:BaseObject:private] => [modifiedColumns:protected] => Array ( ) ) [40] => Category Object ( [languages:protected] => [bok_resources:protected] => [bok_topics:protected] => [bok_keywords:protected] => [id:protected] => 40 [type:protected] => category [parent:protected] => 9 [label:protected] => Overexertion [alreadyInSave:protected] => [alreadyInValidation:protected] => [validationFailures:protected] => Array ( ) [_new:BaseObject:private] => [_deleted:BaseObject:private] => [modifiedColumns:protected] => Array ( ) ) [44] => Category Object ( [languages:protected] => [bok_resources:protected] => [bok_topics:protected] => [bok_keywords:protected] => [id:protected] => 44 [type:protected] => category [parent:protected] => 2 [label:protected] => Acoustical Ceiling Carpenter [alreadyInSave:protected] => [alreadyInValidation:protected] => [validationFailures:protected] => Array ( ) [_new:BaseObject:private] => [_deleted:BaseObject:private] => [modifiedColumns:protected] => Array ( ) ) [45] => Category Object ( [languages:protected] => [bok_resources:protected] => [bok_topics:protected] => [bok_keywords:protected] => [id:protected] => 45 [type:protected] => category [parent:protected] => 2 [label:protected] => Asbestos/Insulator [alreadyInSave:protected] => [alreadyInValidation:protected] => [validationFailures:protected] => Array ( ) [_new:BaseObject:private] => [_deleted:BaseObject:private] => [modifiedColumns:protected] => Array ( ) ) [46] => Category Object ( [languages:protected] => [bok_resources:protected] => [bok_topics:protected] => [bok_keywords:protected] => [id:protected] => 46 [type:protected] => category [parent:protected] => 2 [label:protected] => Boilermaker [alreadyInSave:protected] => [alreadyInValidation:protected] => [validationFailures:protected] => Array ( ) [_new:BaseObject:private] => [_deleted:BaseObject:private] => [modifiedColumns:protected] => Array ( ) ) [47] => Category Object ( [languages:protected] => [bok_resources:protected] => [bok_topics:protected] => [bok_keywords:protected] => [id:protected] => 47 [type:protected] => category [parent:protected] => 2 [label:protected] => Bricklayer [alreadyInSave:protected] => [alreadyInValidation:protected] => [validationFailures:protected] => Array ( ) [_new:BaseObject:private] => [_deleted:BaseObject:private] => [modifiedColumns:protected] => Array ( ) ) [48] => Category Object ( [languages:protected] => [bok_resources:protected] => [bok_topics:protected] => [bok_keywords:protected] => [id:protected] => 48 [type:protected] => category [parent:protected] => 2 [label:protected] => Cabinetmaker [alreadyInSave:protected] => [alreadyInValidation:protected] => [validationFailures:protected] => Array ( ) [_new:BaseObject:private] => [_deleted:BaseObject:private] => [modifiedColumns:protected] => Array ( ) ) [49] => Category Object ( [languages:protected] => [bok_resources:protected] => [bok_topics:protected] => [bok_keywords:protected] => [id:protected] => 49 [type:protected] => category [parent:protected] => 2 [label:protected] => Carpenter [alreadyInSave:protected] => [alreadyInValidation:protected] => [validationFailures:protected] => Array ( ) [_new:BaseObject:private] => [_deleted:BaseObject:private] => [modifiedColumns:protected] => Array ( ) ) [50] => Category Object ( [languages:protected] => [bok_resources:protected] => [bok_topics:protected] => [bok_keywords:protected] => [id:protected] => 50 [type:protected] => category [parent:protected] => 2 [label:protected] => Carpet Layer [alreadyInSave:protected] => [alreadyInValidation:protected] => [validationFailures:protected] => Array ( ) [_new:BaseObject:private] => [_deleted:BaseObject:private] => [modifiedColumns:protected] => Array ( ) ) [51] => Category Object ( [languages:protected] => [bok_resources:protected] => [bok_topics:protected] => [bok_keywords:protected] => [id:protected] => 51 [type:protected] => category [parent:protected] => 2 [label:protected] => Cement Mason [alreadyInSave:protected] => [alreadyInValidation:protected] => [validationFailures:protected] => Array ( ) [_new:BaseObject:private] => [_deleted:BaseObject:private] => [modifiedColumns:protected] => Array ( ) ) [52] => Category Object ( [languages:protected] => [bok_resources:protected] => [bok_topics:protected] => [bok_keywords:protected] => [id:protected] => 52 [type:protected] => category [parent:protected] => 2 [label:protected] => Commercial Diver [alreadyInSave:protected] => [alreadyInValidation:protected] => [validationFailures:protected] => Array ( ) [_new:BaseObject:private] => [_deleted:BaseObject:private] => [modifiedColumns:protected] => Array ( ) ) [53] => Category Object ( [languages:protected] => [bok_resources:protected] => [bok_topics:protected] => [bok_keywords:protected] => [id:protected] => 53 [type:protected] => category [parent:protected] => 2 [label:protected] => Concrete Polisher [alreadyInSave:protected] => [alreadyInValidation:protected] => [validationFailures:protected] => Array ( ) [_new:BaseObject:private] => [_deleted:BaseObject:private] => [modifiedColumns:protected] => Array ( ) ) [54] => Category Object ( [languages:protected] => [bok_resources:protected] => [bok_topics:protected] => [bok_keywords:protected] => [id:protected] => 54 [type:protected] => category [parent:protected] => 2 [label:protected] => Drywall Applicator Specialist [alreadyInSave:protected] => [alreadyInValidation:protected] => [validationFailures:protected] => Array ( ) [_new:BaseObject:private] => [_deleted:BaseObject:private] => [modifiedColumns:protected] => Array ( ) ) [55] => Category Object ( [languages:protected] => [bok_resources:protected] => [bok_topics:protected] => [bok_keywords:protected] => [id:protected] => 55 [type:protected] => category [parent:protected] => 2 [label:protected] => Electrical Worker [alreadyInSave:protected] => [alreadyInValidation:protected] => [validationFailures:protected] => Array ( ) [_new:BaseObject:private] => [_deleted:BaseObject:private] => [modifiedColumns:protected] => Array ( ) ) [56] => Category Object ( [languages:protected] => [bok_resources:protected] => [bok_topics:protected] => [bok_keywords:protected] => [id:protected] => 56 [type:protected] => category [parent:protected] => 2 [label:protected] => Elevator Constructor [alreadyInSave:protected] => [alreadyInValidation:protected] => [validationFailures:protected] => Array ( ) [_new:BaseObject:private] => [_deleted:BaseObject:private] => [modifiedColumns:protected] => Array ( ) ) [57] => Category Object ( [languages:protected] => [bok_resources:protected] => [bok_topics:protected] => [bok_keywords:protected] => [id:protected] => 57 [type:protected] => category [parent:protected] => 2 [label:protected] => Flagger [alreadyInSave:protected] => [alreadyInValidation:protected] => [validationFailures:protected] => Array ( ) [_new:BaseObject:private] => [_deleted:BaseObject:private] => [modifiedColumns:protected] => Array ( ) ) [58] => Category Object ( [languages:protected] => [bok_resources:protected] => [bok_topics:protected] => [bok_keywords:protected] => [id:protected] => 58 [type:protected] => category [parent:protected] => 2 [label:protected] => Glazier [alreadyInSave:protected] => [alreadyInValidation:protected] => [validationFailures:protected] => Array ( ) [_new:BaseObject:private] => [_deleted:BaseObject:private] => [modifiedColumns:protected] => Array ( ) ) [59] => Category Object ( [languages:protected] => [bok_resources:protected] => [bok_topics:protected] => [bok_keywords:protected] => [id:protected] => 59 [type:protected] => category [parent:protected] => 2 [label:protected] => Hazardous Waste Cleanup [alreadyInSave:protected] => [alreadyInValidation:protected] => [validationFailures:protected] => Array ( ) [_new:BaseObject:private] => [_deleted:BaseObject:private] => [modifiedColumns:protected] => Array ( ) ) [60] => Category Object ( [languages:protected] => [bok_resources:protected] => [bok_topics:protected] => [bok_keywords:protected] => [id:protected] => 60 [type:protected] => category [parent:protected] => 2 [label:protected] => HVAC [alreadyInSave:protected] => [alreadyInValidation:protected] => [validationFailures:protected] => Array ( ) [_new:BaseObject:private] => [_deleted:BaseObject:private] => [modifiedColumns:protected] => Array ( ) ) [61] => Category Object ( [languages:protected] => [bok_resources:protected] => [bok_topics:protected] => [bok_keywords:protected] => [id:protected] => 61 [type:protected] => category [parent:protected] => 2 [label:protected] => Interior Systems Carpenter [alreadyInSave:protected] => [alreadyInValidation:protected] => [validationFailures:protected] => Array ( ) [_new:BaseObject:private] => [_deleted:BaseObject:private] => [modifiedColumns:protected] => Array ( ) ) [64] => Category Object ( [languages:protected] => [bok_resources:protected] => [bok_topics:protected] => [bok_keywords:protected] => [id:protected] => 64 [type:protected] => category [parent:protected] => 2 [label:protected] => Laborer [alreadyInSave:protected] => [alreadyInValidation:protected] => [validationFailures:protected] => Array ( ) [_new:BaseObject:private] => [_deleted:BaseObject:private] => [modifiedColumns:protected] => Array ( ) ) [65] => Category Object ( [languages:protected] => [bok_resources:protected] => [bok_topics:protected] => [bok_keywords:protected] => [id:protected] => 65 [type:protected] => category [parent:protected] => 2 [label:protected] => Landscaper [alreadyInSave:protected] => [alreadyInValidation:protected] => [validationFailures:protected] => Array ( ) [_new:BaseObject:private] => [_deleted:BaseObject:private] => [modifiedColumns:protected] => Array ( ) ) [66] => Category Object ( [languages:protected] => [bok_resources:protected] => [bok_topics:protected] => [bok_keywords:protected] => [id:protected] => 66 [type:protected] => category [parent:protected] => 2 [label:protected] => Lather [alreadyInSave:protected] => [alreadyInValidation:protected] => [validationFailures:protected] => Array ( ) [_new:BaseObject:private] => [_deleted:BaseObject:private] => [modifiedColumns:protected] => Array ( ) ) [67] => Category Object ( [languages:protected] => [bok_resources:protected] => [bok_topics:protected] => [bok_keywords:protected] => [id:protected] => 67 [type:protected] => category [parent:protected] => 2 [label:protected] => Lead Abatement Worker [alreadyInSave:protected] => [alreadyInValidation:protected] => [validationFailures:protected] => Array ( ) [_new:BaseObject:private] => [_deleted:BaseObject:private] => [modifiedColumns:protected] => Array ( ) ) [68] => Category Object ( [languages:protected] => [bok_resources:protected] => [bok_topics:protected] => [bok_keywords:protected] => [id:protected] => 68 [type:protected] => category [parent:protected] => 2 [label:protected] => Maintenance Worker [alreadyInSave:protected] => [alreadyInValidation:protected] => [validationFailures:protected] => Array ( ) [_new:BaseObject:private] => [_deleted:BaseObject:private] => [modifiedColumns:protected] => Array ( ) ) [69] => Category Object ( [languages:protected] => [bok_resources:protected] => [bok_topics:protected] => [bok_keywords:protected] => [id:protected] => 69 [type:protected] => category [parent:protected] => 2 [label:protected] => Millwright [alreadyInSave:protected] => [alreadyInValidation:protected] => [validationFailures:protected] => Array ( ) [_new:BaseObject:private] => [_deleted:BaseObject:private] => [modifiedColumns:protected] => Array ( ) ) [70] => Category Object ( [languages:protected] => [bok_resources:protected] => [bok_topics:protected] => [bok_keywords:protected] => [id:protected] => 70 [type:protected] => category [parent:protected] => 2 [label:protected] => Operating Engineer [alreadyInSave:protected] => [alreadyInValidation:protected] => [validationFailures:protected] => Array ( ) [_new:BaseObject:private] => [_deleted:BaseObject:private] => [modifiedColumns:protected] => Array ( ) ) [71] => Category Object ( [languages:protected] => [bok_resources:protected] => [bok_topics:protected] => [bok_keywords:protected] => [id:protected] => 71 [type:protected] => category [parent:protected] => 2 [label:protected] => Painter [alreadyInSave:protected] => [alreadyInValidation:protected] => [validationFailures:protected] => Array ( ) [_new:BaseObject:private] => [_deleted:BaseObject:private] => [modifiedColumns:protected] => Array ( ) ) [72] => Category Object ( [languages:protected] => [bok_resources:protected] => [bok_topics:protected] => [bok_keywords:protected] => [id:protected] => 72 [type:protected] => category [parent:protected] => 2 [label:protected] => Paper Hanger [alreadyInSave:protected] => [alreadyInValidation:protected] => [validationFailures:protected] => Array ( ) [_new:BaseObject:private] => [_deleted:BaseObject:private] => [modifiedColumns:protected] => Array ( ) ) [73] => Category Object ( [languages:protected] => [bok_resources:protected] => [bok_topics:protected] => [bok_keywords:protected] => [id:protected] => 73 [type:protected] => category [parent:protected] => 2 [label:protected] => PCC/Restoration [alreadyInSave:protected] => [alreadyInValidation:protected] => [validationFailures:protected] => Array ( ) [_new:BaseObject:private] => [_deleted:BaseObject:private] => [modifiedColumns:protected] => Array ( ) ) [74] => Category Object ( [languages:protected] => [bok_resources:protected] => [bok_topics:protected] => [bok_keywords:protected] => [id:protected] => 74 [type:protected] => category [parent:protected] => 2 [label:protected] => Pile Driver [alreadyInSave:protected] => [alreadyInValidation:protected] => [validationFailures:protected] => Array ( ) [_new:BaseObject:private] => [_deleted:BaseObject:private] => [modifiedColumns:protected] => Array ( ) ) [75] => Category Object ( [languages:protected] => [bok_resources:protected] => [bok_topics:protected] => [bok_keywords:protected] => [id:protected] => 75 [type:protected] => category [parent:protected] => 2 [label:protected] => Plasterer [alreadyInSave:protected] => [alreadyInValidation:protected] => [validationFailures:protected] => Array ( ) [_new:BaseObject:private] => [_deleted:BaseObject:private] => [modifiedColumns:protected] => Array ( ) ) [76] => Category Object ( [languages:protected] => [bok_resources:protected] => [bok_topics:protected] => [bok_keywords:protected] => [id:protected] => 76 [type:protected] => category [parent:protected] => 2 [label:protected] => Plumber/Pipefitter [alreadyInSave:protected] => [alreadyInValidation:protected] => [validationFailures:protected] => Array ( ) [_new:BaseObject:private] => [_deleted:BaseObject:private] => [modifiedColumns:protected] => Array ( ) ) [77] => Category Object ( [languages:protected] => [bok_resources:protected] => [bok_topics:protected] => [bok_keywords:protected] => [id:protected] => 77 [type:protected] => category [parent:protected] => 2 [label:protected] => Refractory Worker [alreadyInSave:protected] => [alreadyInValidation:protected] => [validationFailures:protected] => Array ( ) [_new:BaseObject:private] => [_deleted:BaseObject:private] => [modifiedColumns:protected] => Array ( ) ) [63] => Category Object ( [languages:protected] => [bok_resources:protected] => [bok_topics:protected] => [bok_keywords:protected] => [id:protected] => 63 [type:protected] => category [parent:protected] => 2 [label:protected] => Reinforcing Ironworker [alreadyInSave:protected] => [alreadyInValidation:protected] => [validationFailures:protected] => Array ( ) [_new:BaseObject:private] => [_deleted:BaseObject:private] => [modifiedColumns:protected] => Array ( ) ) [78] => Category Object ( [languages:protected] => [bok_resources:protected] => [bok_topics:protected] => [bok_keywords:protected] => [id:protected] => 78 [type:protected] => category [parent:protected] => 2 [label:protected] => Roofer/Waterproofer [alreadyInSave:protected] => [alreadyInValidation:protected] => [validationFailures:protected] => Array ( ) [_new:BaseObject:private] => [_deleted:BaseObject:private] => [modifiedColumns:protected] => Array ( ) ) [79] => Category Object ( [languages:protected] => [bok_resources:protected] => [bok_topics:protected] => [bok_keywords:protected] => [id:protected] => 79 [type:protected] => category [parent:protected] => 2 [label:protected] => Scaffold Erector [alreadyInSave:protected] => [alreadyInValidation:protected] => [validationFailures:protected] => Array ( ) [_new:BaseObject:private] => [_deleted:BaseObject:private] => [modifiedColumns:protected] => Array ( ) ) [80] => Category Object ( [languages:protected] => [bok_resources:protected] => [bok_topics:protected] => [bok_keywords:protected] => [id:protected] => 80 [type:protected] => category [parent:protected] => 2 [label:protected] => Sheetmetal Worker [alreadyInSave:protected] => [alreadyInValidation:protected] => [validationFailures:protected] => Array ( ) [_new:BaseObject:private] => [_deleted:BaseObject:private] => [modifiedColumns:protected] => Array ( ) ) [81] => Category Object ( [languages:protected] => [bok_resources:protected] => [bok_topics:protected] => [bok_keywords:protected] => [id:protected] => 81 [type:protected] => category [parent:protected] => 2 [label:protected] => Sprinkler Fitter [alreadyInSave:protected] => [alreadyInValidation:protected] => [validationFailures:protected] => Array ( ) [_new:BaseObject:private] => [_deleted:BaseObject:private] => [modifiedColumns:protected] => Array ( ) ) [82] => Category Object ( [languages:protected] => [bok_resources:protected] => [bok_topics:protected] => [bok_keywords:protected] => [id:protected] => 82 [type:protected] => category [parent:protected] => 2 [label:protected] => Stonemason [alreadyInSave:protected] => [alreadyInValidation:protected] => [validationFailures:protected] => Array ( ) [_new:BaseObject:private] => [_deleted:BaseObject:private] => [modifiedColumns:protected] => Array ( ) ) [62] => Category Object ( [languages:protected] => [bok_resources:protected] => [bok_topics:protected] => [bok_keywords:protected] => [id:protected] => 62 [type:protected] => category [parent:protected] => 2 [label:protected] => Structural Ironworker [alreadyInSave:protected] => [alreadyInValidation:protected] => [validationFailures:protected] => Array ( ) [_new:BaseObject:private] => [_deleted:BaseObject:private] => [modifiedColumns:protected] => Array ( ) ) [83] => Category Object ( [languages:protected] => [bok_resources:protected] => [bok_topics:protected] => [bok_keywords:protected] => [id:protected] => 83 [type:protected] => category [parent:protected] => 2 [label:protected] => Terrazzo Worker [alreadyInSave:protected] => [alreadyInValidation:protected] => [validationFailures:protected] => Array ( ) [_new:BaseObject:private] => [_deleted:BaseObject:private] => [modifiedColumns:protected] => Array ( ) ) [84] => Category Object ( [languages:protected] => [bok_resources:protected] => [bok_topics:protected] => [bok_keywords:protected] => [id:protected] => 84 [type:protected] => category [parent:protected] => 2 [label:protected] => Tile Setter [alreadyInSave:protected] => [alreadyInValidation:protected] => [validationFailures:protected] => Array ( ) [_new:BaseObject:private] => [_deleted:BaseObject:private] => [modifiedColumns:protected] => Array ( ) ) [85] => Category Object ( [languages:protected] => [bok_resources:protected] => [bok_topics:protected] => [bok_keywords:protected] => [id:protected] => 85 [type:protected] => category [parent:protected] => 2 [label:protected] => Truck Driver [alreadyInSave:protected] => [alreadyInValidation:protected] => [validationFailures:protected] => Array ( ) [_new:BaseObject:private] => [_deleted:BaseObject:private] => [modifiedColumns:protected] => Array ( ) ) [86] => Category Object ( [languages:protected] => [bok_resources:protected] => [bok_topics:protected] => [bok_keywords:protected] => [id:protected] => 86 [type:protected] => category [parent:protected] => 2 [label:protected] => Welder [alreadyInSave:protected] => [alreadyInValidation:protected] => [validationFailures:protected] => Array ( ) [_new:BaseObject:private] => [_deleted:BaseObject:private] => [modifiedColumns:protected] => Array ( ) ) [87] => Category Object ( [languages:protected] => [bok_resources:protected] => [bok_topics:protected] => [bok_keywords:protected] => [id:protected] => 87 [type:protected] => category [parent:protected] => 3 [label:protected] => Commercial & Institutional [alreadyInSave:protected] => [alreadyInValidation:protected] => [validationFailures:protected] => Array ( ) [_new:BaseObject:private] => [_deleted:BaseObject:private] => [modifiedColumns:protected] => Array ( ) ) [88] => Category Object ( [languages:protected] => [bok_resources:protected] => [bok_topics:protected] => [bok_keywords:protected] => [id:protected] => 88 [type:protected] => category [parent:protected] => 3 [label:protected] => Demolition [alreadyInSave:protected] => [alreadyInValidation:protected] => [validationFailures:protected] => Array ( ) [_new:BaseObject:private] => [_deleted:BaseObject:private] => [modifiedColumns:protected] => Array ( ) ) [89] => Category Object ( [languages:protected] => [bok_resources:protected] => [bok_topics:protected] => [bok_keywords:protected] => [id:protected] => 89 [type:protected] => category [parent:protected] => 3 [label:protected] => Disasters [alreadyInSave:protected] => [alreadyInValidation:protected] => [validationFailures:protected] => Array ( ) [_new:BaseObject:private] => [_deleted:BaseObject:private] => [modifiedColumns:protected] => Array ( ) ) [91] => Category Object ( [languages:protected] => [bok_resources:protected] => [bok_topics:protected] => [bok_keywords:protected] => [id:protected] => 91 [type:protected] => category [parent:protected] => 3 [label:protected] => Heavy & Highway [alreadyInSave:protected] => [alreadyInValidation:protected] => [validationFailures:protected] => Array ( ) [_new:BaseObject:private] => [_deleted:BaseObject:private] => [modifiedColumns:protected] => Array ( ) ) [90] => Category Object ( [languages:protected] => [bok_resources:protected] => [bok_topics:protected] => [bok_keywords:protected] => [id:protected] => 90 [type:protected] => category [parent:protected] => 3 [label:protected] => Industrial [alreadyInSave:protected] => [alreadyInValidation:protected] => [validationFailures:protected] => Array ( ) [_new:BaseObject:private] => [_deleted:BaseObject:private] => [modifiedColumns:protected] => Array ( ) ) [92] => Category Object ( [languages:protected] => [bok_resources:protected] => [bok_topics:protected] => [bok_keywords:protected] => [id:protected] => 92 [type:protected] => category [parent:protected] => 3 [label:protected] => LEED/Green Construction [alreadyInSave:protected] => [alreadyInValidation:protected] => [validationFailures:protected] => Array ( ) [_new:BaseObject:private] => [_deleted:BaseObject:private] => [modifiedColumns:protected] => Array ( ) ) [93] => Category Object ( [languages:protected] => [bok_resources:protected] => [bok_topics:protected] => [bok_keywords:protected] => [id:protected] => 93 [type:protected] => category [parent:protected] => 3 [label:protected] => Renovations [alreadyInSave:protected] => [alreadyInValidation:protected] => [validationFailures:protected] => Array ( ) [_new:BaseObject:private] => [_deleted:BaseObject:private] => [modifiedColumns:protected] => Array ( ) ) [94] => Category Object ( [languages:protected] => [bok_resources:protected] => [bok_topics:protected] => [bok_keywords:protected] => [id:protected] => 94 [type:protected] => category [parent:protected] => 3 [label:protected] => Residential [alreadyInSave:protected] => [alreadyInValidation:protected] => [validationFailures:protected] => Array ( ) [_new:BaseObject:private] => [_deleted:BaseObject:private] => [modifiedColumns:protected] => Array ( ) ) [95] => Category Object ( [languages:protected] => [bok_resources:protected] => [bok_topics:protected] => [bok_keywords:protected] => [id:protected] => 95 [type:protected] => category [parent:protected] => 3 [label:protected] => Underground [alreadyInSave:protected] => [alreadyInValidation:protected] => [validationFailures:protected] => Array ( ) [_new:BaseObject:private] => [_deleted:BaseObject:private] => [modifiedColumns:protected] => Array ( ) ) [100] => Category Object ( [languages:protected] => [bok_resources:protected] => [bok_topics:protected] => [bok_keywords:protected] => [id:protected] => 100 [type:protected] => category [parent:protected] => 6 [label:protected] => Toolbox Talks [alreadyInSave:protected] => [alreadyInValidation:protected] => [validationFailures:protected] => Array ( ) [_new:BaseObject:private] => [_deleted:BaseObject:private] => [modifiedColumns:protected] => Array ( ) ) ) [categories_initialized:protected] => 1 [mapped_items:protected] => [content:protected] => [files:protected] => [language:protected] => Language Object ( [id:protected] => 1 [code:protected] => en [name:protected] => English [alreadyInSave:protected] => [alreadyInValidation:protected] => [validationFailures:protected] => Array ( ) [_new:BaseObject:private] => [_deleted:BaseObject:private] => [modifiedColumns:protected] => Array ( ) ) [old_record:protected] => [id:protected] => 4419 [old_id:protected] => [elcosh_id:protected] => d001652 [type:protected] => document [display_type:protected] => HTML only (and links) [user_id:protected] => 0 [language_id:protected] => 1 [tagging_id:protected] => Valeria Contreras [priority_id:protected] => 1 [title:protected] => Toolbox Talk: Suicide Prevention [total_pages:protected] => 1 [billed_pages:protected] => 1 [publication_number:protected] => [part_of:protected] => [keywords:protected] => suicide, suicide prevention, mental health, stress, depression, exhaustion, burnout, safety, support, emotional support, health [comments:protected] => [summary:protected] =>The CPWR Toolbox Talk on Suicide Prevention addresses the prevalence of suicide among construction workers. The resource includes a brief case example, steps to prevent a related injury or illness, and questions for discussion. It includes an image that illustrates the hazard, which can be posted in a central location as a reminder of steps to work safely.
Available in English and Spanish. [transition_comments:protected] => [external_link:protected] => [consol_link:protected] => [more_like_this:protected] => [permission_given_by:protected] => [published:protected] => T [billable:protected] => F [img_name:protected] => [img_ext:protected] => [img_width:protected] => [img_height:protected] => [img_credit:protected] => [img_practice:protected] => [vid_source_id:protected] => [vid_running_time:protected] => [vid_intended_audience:protected] => [vid_acquisition_info:protected] => [vid_cost:protected] => [vid_producer:protected] => [vid_filename:protected] => [vid_filename_downloadable:protected] => [date_summary:protected] => [date_permission_requested:protected] => [date_permission_received:protected] => [date_review_needed:protected] => [date_received:protected] => 10/08/20 [date_completed:protected] => 10/08/20 [date_billed:protected] => [date_modified:protected] => 05/19/23 [collBokExports:protected] => [lastBokExportCriteria:BaseElcoshItem:private] => [alreadyInSave:protected] => [alreadyInValidation:protected] => [validationFailures:protected] => Array ( ) [_new:BaseObject:private] => [_deleted:BaseObject:private] => [modifiedColumns:protected] => Array ( ) ) ) ) [new_images] => Array ( [0] => Search_Result Object ( [title] => Toolbox talk - crew view [image] => /record/images/4005-p.jpg [blurb] => Photo of crew listening to a toolbox safety talk before starting work.... [category] => Array ( [0] => 97 [1] => 20 [2] => 47 [3] => 49 [4] => 51 [5] => 55 [6] => 61 [7] => 64 [8] => 71 [9] => 75 [10] => 63 [11] => 79 [12] => 62 [13] => 87 [14] => 88 [15] => 91 [16] => 90 [17] => 93 [18] => 94 [19] => 95 ) [labels] => Array ( [0] => Images [1] => Media [2] => Media & Documents [3] => Safety Culture [4] => Work Environment [5] => Hazards [6] => Bricklayer [7] => Trades [8] => Carpenter [10] => Cement Mason [12] => Electrical Worker [14] => Interior Systems Carpenter [16] => Laborer [18] => Painter [20] => Plasterer [22] => Reinforcing Ironworker [24] => Scaffold Erector [26] => Structural Ironworker [28] => Commercial & Institutional [29] => Jobsites [30] => Demolition [32] => Heavy & Highway [34] => Industrial [36] => Renovations [38] => Residential [40] => Underground ) [type] => Images [sub_category] => [url] => /image/4005/i002692/Toolbox%2Btalk%2B-%2Bcrew%2Bview.html [item:protected] => ImageRecord Object ( [records:protected] => Array ( ) [recordId:protected] => [searchWordClass:protected] => [searchWordPeerClass:protected] => [bok_record:protected] => [authors:protected] => [organizations:protected] => [collections:protected] => [categories:protected] => Array ( [97] => Category Object ( [languages:protected] => [bok_resources:protected] => [bok_topics:protected] => [bok_keywords:protected] => [id:protected] => 97 [type:protected] => category [parent:protected] => 5 [label:protected] => Images [alreadyInSave:protected] => [alreadyInValidation:protected] => [validationFailures:protected] => Array ( ) [_new:BaseObject:private] => [_deleted:BaseObject:private] => [modifiedColumns:protected] => Array ( ) ) [20] => Category Object ( [languages:protected] => [bok_resources:protected] => [bok_topics:protected] => [bok_keywords:protected] => [id:protected] => 20 [type:protected] => category [parent:protected] => 7 [label:protected] => Safety Culture [alreadyInSave:protected] => [alreadyInValidation:protected] => [validationFailures:protected] => Array ( ) [_new:BaseObject:private] => [_deleted:BaseObject:private] => [modifiedColumns:protected] => Array ( ) ) [47] => Category Object ( [languages:protected] => [bok_resources:protected] => [bok_topics:protected] => [bok_keywords:protected] => [id:protected] => 47 [type:protected] => category [parent:protected] => 2 [label:protected] => Bricklayer [alreadyInSave:protected] => [alreadyInValidation:protected] => [validationFailures:protected] => Array ( ) [_new:BaseObject:private] => [_deleted:BaseObject:private] => [modifiedColumns:protected] => Array ( ) ) [49] => Category Object ( [languages:protected] => [bok_resources:protected] => [bok_topics:protected] => [bok_keywords:protected] => [id:protected] => 49 [type:protected] => category [parent:protected] => 2 [label:protected] => Carpenter [alreadyInSave:protected] => [alreadyInValidation:protected] => [validationFailures:protected] => Array ( ) [_new:BaseObject:private] => [_deleted:BaseObject:private] => [modifiedColumns:protected] => Array ( ) ) [51] => Category Object ( [languages:protected] => [bok_resources:protected] => [bok_topics:protected] => [bok_keywords:protected] => [id:protected] => 51 [type:protected] => category [parent:protected] => 2 [label:protected] => Cement Mason [alreadyInSave:protected] => [alreadyInValidation:protected] => [validationFailures:protected] => Array ( ) [_new:BaseObject:private] => [_deleted:BaseObject:private] => [modifiedColumns:protected] => Array ( ) ) [55] => Category Object ( [languages:protected] => [bok_resources:protected] => [bok_topics:protected] => [bok_keywords:protected] => [id:protected] => 55 [type:protected] => category [parent:protected] => 2 [label:protected] => Electrical Worker [alreadyInSave:protected] => [alreadyInValidation:protected] => [validationFailures:protected] => Array ( ) [_new:BaseObject:private] => [_deleted:BaseObject:private] => [modifiedColumns:protected] => Array ( ) ) [61] => Category Object ( [languages:protected] => [bok_resources:protected] => [bok_topics:protected] => [bok_keywords:protected] => [id:protected] => 61 [type:protected] => category [parent:protected] => 2 [label:protected] => Interior Systems Carpenter [alreadyInSave:protected] => [alreadyInValidation:protected] => [validationFailures:protected] => Array ( ) [_new:BaseObject:private] => [_deleted:BaseObject:private] => [modifiedColumns:protected] => Array ( ) ) [64] => Category Object ( [languages:protected] => [bok_resources:protected] => [bok_topics:protected] => [bok_keywords:protected] => [id:protected] => 64 [type:protected] => category [parent:protected] => 2 [label:protected] => Laborer [alreadyInSave:protected] => [alreadyInValidation:protected] => [validationFailures:protected] => Array ( ) [_new:BaseObject:private] => [_deleted:BaseObject:private] => [modifiedColumns:protected] => Array ( ) ) [71] => Category Object ( [languages:protected] => [bok_resources:protected] => [bok_topics:protected] => [bok_keywords:protected] => [id:protected] => 71 [type:protected] => category [parent:protected] => 2 [label:protected] => Painter [alreadyInSave:protected] => [alreadyInValidation:protected] => [validationFailures:protected] => Array ( ) [_new:BaseObject:private] => [_deleted:BaseObject:private] => [modifiedColumns:protected] => Array ( ) ) [75] => Category Object ( [languages:protected] => [bok_resources:protected] => [bok_topics:protected] => [bok_keywords:protected] => [id:protected] => 75 [type:protected] => category [parent:protected] => 2 [label:protected] => Plasterer [alreadyInSave:protected] => [alreadyInValidation:protected] => [validationFailures:protected] => Array ( ) [_new:BaseObject:private] => [_deleted:BaseObject:private] => [modifiedColumns:protected] => Array ( ) ) [63] => Category Object ( [languages:protected] => [bok_resources:protected] => [bok_topics:protected] => [bok_keywords:protected] => [id:protected] => 63 [type:protected] => category [parent:protected] => 2 [label:protected] => Reinforcing Ironworker [alreadyInSave:protected] => [alreadyInValidation:protected] => [validationFailures:protected] => Array ( ) [_new:BaseObject:private] => [_deleted:BaseObject:private] => [modifiedColumns:protected] => Array ( ) ) [79] => Category Object ( [languages:protected] => [bok_resources:protected] => [bok_topics:protected] => [bok_keywords:protected] => [id:protected] => 79 [type:protected] => category [parent:protected] => 2 [label:protected] => Scaffold Erector [alreadyInSave:protected] => [alreadyInValidation:protected] => [validationFailures:protected] => Array ( ) [_new:BaseObject:private] => [_deleted:BaseObject:private] => [modifiedColumns:protected] => Array ( ) ) [62] => Category Object ( [languages:protected] => [bok_resources:protected] => [bok_topics:protected] => [bok_keywords:protected] => [id:protected] => 62 [type:protected] => category [parent:protected] => 2 [label:protected] => Structural Ironworker [alreadyInSave:protected] => [alreadyInValidation:protected] => [validationFailures:protected] => Array ( ) [_new:BaseObject:private] => [_deleted:BaseObject:private] => [modifiedColumns:protected] => Array ( ) ) [87] => Category Object ( [languages:protected] => [bok_resources:protected] => [bok_topics:protected] => [bok_keywords:protected] => [id:protected] => 87 [type:protected] => category [parent:protected] => 3 [label:protected] => Commercial & Institutional [alreadyInSave:protected] => [alreadyInValidation:protected] => [validationFailures:protected] => Array ( ) [_new:BaseObject:private] => [_deleted:BaseObject:private] => [modifiedColumns:protected] => Array ( ) ) [88] => Category Object ( [languages:protected] => [bok_resources:protected] => [bok_topics:protected] => [bok_keywords:protected] => [id:protected] => 88 [type:protected] => category [parent:protected] => 3 [label:protected] => Demolition [alreadyInSave:protected] => [alreadyInValidation:protected] => [validationFailures:protected] => Array ( ) [_new:BaseObject:private] => [_deleted:BaseObject:private] => [modifiedColumns:protected] => Array ( ) ) [91] => Category Object ( [languages:protected] => [bok_resources:protected] => [bok_topics:protected] => [bok_keywords:protected] => [id:protected] => 91 [type:protected] => category [parent:protected] => 3 [label:protected] => Heavy & Highway [alreadyInSave:protected] => [alreadyInValidation:protected] => [validationFailures:protected] => Array ( ) [_new:BaseObject:private] => [_deleted:BaseObject:private] => [modifiedColumns:protected] => Array ( ) ) [90] => Category Object ( [languages:protected] => [bok_resources:protected] => [bok_topics:protected] => [bok_keywords:protected] => [id:protected] => 90 [type:protected] => category [parent:protected] => 3 [label:protected] => Industrial [alreadyInSave:protected] => [alreadyInValidation:protected] => [validationFailures:protected] => Array ( ) [_new:BaseObject:private] => [_deleted:BaseObject:private] => [modifiedColumns:protected] => Array ( ) ) [93] => Category Object ( [languages:protected] => [bok_resources:protected] => [bok_topics:protected] => [bok_keywords:protected] => [id:protected] => 93 [type:protected] => category [parent:protected] => 3 [label:protected] => Renovations [alreadyInSave:protected] => [alreadyInValidation:protected] => [validationFailures:protected] => Array ( ) [_new:BaseObject:private] => [_deleted:BaseObject:private] => [modifiedColumns:protected] => Array ( ) ) [94] => Category Object ( [languages:protected] => [bok_resources:protected] => [bok_topics:protected] => [bok_keywords:protected] => [id:protected] => 94 [type:protected] => category [parent:protected] => 3 [label:protected] => Residential [alreadyInSave:protected] => [alreadyInValidation:protected] => [validationFailures:protected] => Array ( ) [_new:BaseObject:private] => [_deleted:BaseObject:private] => [modifiedColumns:protected] => Array ( ) ) [95] => Category Object ( [languages:protected] => [bok_resources:protected] => [bok_topics:protected] => [bok_keywords:protected] => [id:protected] => 95 [type:protected] => category [parent:protected] => 3 [label:protected] => Underground [alreadyInSave:protected] => [alreadyInValidation:protected] => [validationFailures:protected] => Array ( ) [_new:BaseObject:private] => [_deleted:BaseObject:private] => [modifiedColumns:protected] => Array ( ) ) ) [categories_initialized:protected] => 1 [mapped_items:protected] => [content:protected] => [files:protected] => [language:protected] => Language Object ( [id:protected] => 1 [code:protected] => en [name:protected] => English [alreadyInSave:protected] => [alreadyInValidation:protected] => [validationFailures:protected] => Array ( ) [_new:BaseObject:private] => [_deleted:BaseObject:private] => [modifiedColumns:protected] => Array ( ) ) [old_record:protected] => [id:protected] => 4005 [old_id:protected] => [elcosh_id:protected] => i002692 [type:protected] => image [display_type:protected] => Image [user_id:protected] => 0 [language_id:protected] => 1 [tagging_id:protected] => Bruce Lippy [priority_id:protected] => 1 [title:protected] => Toolbox talk - crew view [total_pages:protected] => 0 [billed_pages:protected] => 0 [publication_number:protected] => [part_of:protected] => [keywords:protected] => toolbox talk, tailgate talk, safety talk, Spanish [comments:protected] => [summary:protected] => Photo of crew listening to a toolbox safety talk before starting work. [transition_comments:protected] => [external_link:protected] => [consol_link:protected] => http://www.cpwrconstructionsolutions.org/electrical/solution/662/worker-training.html [more_like_this:protected] => i002691,d001269, c000079, d001285 [permission_given_by:protected] => [published:protected] => T [billable:protected] => F [img_name:protected] => [img_ext:protected] => jpg [img_width:protected] => [img_height:protected] => [img_credit:protected] => Morgan Zavertnik and Hoar Construction [img_practice:protected] => good [vid_source_id:protected] => [vid_running_time:protected] => [vid_intended_audience:protected] => [vid_acquisition_info:protected] => [vid_cost:protected] => [vid_producer:protected] => [vid_filename:protected] => [vid_filename_downloadable:protected] => [date_summary:protected] => November 2015 [date_permission_requested:protected] => [date_permission_received:protected] => [date_review_needed:protected] => [date_received:protected] => 03/02/16 [date_completed:protected] => 03/02/16 [date_billed:protected] => [date_modified:protected] => 03/02/16 [collBokExports:protected] => [lastBokExportCriteria:BaseElcoshItem:private] => [alreadyInSave:protected] => [alreadyInValidation:protected] => [validationFailures:protected] => Array ( ) [_new:BaseObject:private] => [_deleted:BaseObject:private] => [modifiedColumns:protected] => Array ( ) ) ) [1] => Search_Result Object ( [title] => Toolbox talk - long shot [image] => /record/images/4006-p.jpg [blurb] => This crew gathered every morning before starting work to discuss a new safety topic.... [category] => Array ( [0] => 20 [1] => 47 [2] => 49 [3] => 51 [4] => 55 [5] => 64 [6] => 68 [7] => 75 [8] => 76 [9] => 63 [10] => 78 [11] => 79 [12] => 82 [13] => 62 [14] => 87 [15] => 88 [16] => 91 [17] => 90 [18] => 93 [19] => 94 [20] => 95 [21] => 97 ) [labels] => Array ( [0] => Safety Culture [1] => Work Environment [2] => Hazards [3] => Bricklayer [4] => Trades [5] => Carpenter [7] => Cement Mason [9] => Electrical Worker [11] => Laborer [13] => Maintenance Worker [15] => Plasterer [17] => Plumber/Pipefitter [19] => Reinforcing Ironworker [21] => Roofer/Waterproofer [23] => Scaffold Erector [25] => Stonemason [27] => Structural Ironworker [29] => Commercial & Institutional [30] => Jobsites [31] => Demolition [33] => Heavy & Highway [35] => Industrial [37] => Renovations [39] => Residential [41] => Underground [43] => Images [44] => Media [45] => Media & Documents ) [type] => Images [sub_category] => [url] => /image/4006/i002693/Toolbox%2Btalk%2B-%2Blong%2Bshot.html [item:protected] => ImageRecord Object ( [records:protected] => Array ( ) [recordId:protected] => [searchWordClass:protected] => [searchWordPeerClass:protected] => [bok_record:protected] => [authors:protected] => [organizations:protected] => [collections:protected] => [categories:protected] => Array ( [20] => Category Object ( [languages:protected] => [bok_resources:protected] => [bok_topics:protected] => [bok_keywords:protected] => [id:protected] => 20 [type:protected] => category [parent:protected] => 7 [label:protected] => Safety Culture [alreadyInSave:protected] => [alreadyInValidation:protected] => [validationFailures:protected] => Array ( ) [_new:BaseObject:private] => [_deleted:BaseObject:private] => [modifiedColumns:protected] => Array ( ) ) [47] => Category Object ( [languages:protected] => [bok_resources:protected] => [bok_topics:protected] => [bok_keywords:protected] => [id:protected] => 47 [type:protected] => category [parent:protected] => 2 [label:protected] => Bricklayer [alreadyInSave:protected] => [alreadyInValidation:protected] => [validationFailures:protected] => Array ( ) [_new:BaseObject:private] => [_deleted:BaseObject:private] => [modifiedColumns:protected] => Array ( ) ) [49] => Category Object ( [languages:protected] => [bok_resources:protected] => [bok_topics:protected] => [bok_keywords:protected] => [id:protected] => 49 [type:protected] => category [parent:protected] => 2 [label:protected] => Carpenter [alreadyInSave:protected] => [alreadyInValidation:protected] => [validationFailures:protected] => Array ( ) [_new:BaseObject:private] => [_deleted:BaseObject:private] => [modifiedColumns:protected] => Array ( ) ) [51] => Category Object ( [languages:protected] => [bok_resources:protected] => [bok_topics:protected] => [bok_keywords:protected] => [id:protected] => 51 [type:protected] => category [parent:protected] => 2 [label:protected] => Cement Mason [alreadyInSave:protected] => [alreadyInValidation:protected] => [validationFailures:protected] => Array ( ) [_new:BaseObject:private] => [_deleted:BaseObject:private] => [modifiedColumns:protected] => Array ( ) ) [55] => Category Object ( [languages:protected] => [bok_resources:protected] => [bok_topics:protected] => [bok_keywords:protected] => [id:protected] => 55 [type:protected] => category [parent:protected] => 2 [label:protected] => Electrical Worker [alreadyInSave:protected] => [alreadyInValidation:protected] => [validationFailures:protected] => Array ( ) [_new:BaseObject:private] => [_deleted:BaseObject:private] => [modifiedColumns:protected] => Array ( ) ) [64] => Category Object ( [languages:protected] => [bok_resources:protected] => [bok_topics:protected] => [bok_keywords:protected] => [id:protected] => 64 [type:protected] => category [parent:protected] => 2 [label:protected] => Laborer [alreadyInSave:protected] => [alreadyInValidation:protected] => [validationFailures:protected] => Array ( ) [_new:BaseObject:private] => [_deleted:BaseObject:private] => [modifiedColumns:protected] => Array ( ) ) [68] => Category Object ( [languages:protected] => [bok_resources:protected] => [bok_topics:protected] => [bok_keywords:protected] => [id:protected] => 68 [type:protected] => category [parent:protected] => 2 [label:protected] => Maintenance Worker [alreadyInSave:protected] => [alreadyInValidation:protected] => [validationFailures:protected] => Array ( ) [_new:BaseObject:private] => [_deleted:BaseObject:private] => [modifiedColumns:protected] => Array ( ) ) [75] => Category Object ( [languages:protected] => [bok_resources:protected] => [bok_topics:protected] => [bok_keywords:protected] => [id:protected] => 75 [type:protected] => category [parent:protected] => 2 [label:protected] => Plasterer [alreadyInSave:protected] => [alreadyInValidation:protected] => [validationFailures:protected] => Array ( ) [_new:BaseObject:private] => [_deleted:BaseObject:private] => [modifiedColumns:protected] => Array ( ) ) [76] => Category Object ( [languages:protected] => [bok_resources:protected] => [bok_topics:protected] => [bok_keywords:protected] => [id:protected] => 76 [type:protected] => category [parent:protected] => 2 [label:protected] => Plumber/Pipefitter [alreadyInSave:protected] => [alreadyInValidation:protected] => [validationFailures:protected] => Array ( ) [_new:BaseObject:private] => [_deleted:BaseObject:private] => [modifiedColumns:protected] => Array ( ) ) [63] => Category Object ( [languages:protected] => [bok_resources:protected] => [bok_topics:protected] => [bok_keywords:protected] => [id:protected] => 63 [type:protected] => category [parent:protected] => 2 [label:protected] => Reinforcing Ironworker [alreadyInSave:protected] => [alreadyInValidation:protected] => [validationFailures:protected] => Array ( ) [_new:BaseObject:private] => [_deleted:BaseObject:private] => [modifiedColumns:protected] => Array ( ) ) [78] => Category Object ( [languages:protected] => [bok_resources:protected] => [bok_topics:protected] => [bok_keywords:protected] => [id:protected] => 78 [type:protected] => category [parent:protected] => 2 [label:protected] => Roofer/Waterproofer [alreadyInSave:protected] => [alreadyInValidation:protected] => [validationFailures:protected] => Array ( ) [_new:BaseObject:private] => [_deleted:BaseObject:private] => [modifiedColumns:protected] => Array ( ) ) [79] => Category Object ( [languages:protected] => [bok_resources:protected] => [bok_topics:protected] => [bok_keywords:protected] => [id:protected] => 79 [type:protected] => category [parent:protected] => 2 [label:protected] => Scaffold Erector [alreadyInSave:protected] => [alreadyInValidation:protected] => [validationFailures:protected] => Array ( ) [_new:BaseObject:private] => [_deleted:BaseObject:private] => [modifiedColumns:protected] => Array ( ) ) [82] => Category Object ( [languages:protected] => [bok_resources:protected] => [bok_topics:protected] => [bok_keywords:protected] => [id:protected] => 82 [type:protected] => category [parent:protected] => 2 [label:protected] => Stonemason [alreadyInSave:protected] => [alreadyInValidation:protected] => [validationFailures:protected] => Array ( ) [_new:BaseObject:private] => [_deleted:BaseObject:private] => [modifiedColumns:protected] => Array ( ) ) [62] => Category Object ( [languages:protected] => [bok_resources:protected] => [bok_topics:protected] => [bok_keywords:protected] => [id:protected] => 62 [type:protected] => category [parent:protected] => 2 [label:protected] => Structural Ironworker [alreadyInSave:protected] => [alreadyInValidation:protected] => [validationFailures:protected] => Array ( ) [_new:BaseObject:private] => [_deleted:BaseObject:private] => [modifiedColumns:protected] => Array ( ) ) [87] => Category Object ( [languages:protected] => [bok_resources:protected] => [bok_topics:protected] => [bok_keywords:protected] => [id:protected] => 87 [type:protected] => category [parent:protected] => 3 [label:protected] => Commercial & Institutional [alreadyInSave:protected] => [alreadyInValidation:protected] => [validationFailures:protected] => Array ( ) [_new:BaseObject:private] => [_deleted:BaseObject:private] => [modifiedColumns:protected] => Array ( ) ) [88] => Category Object ( [languages:protected] => [bok_resources:protected] => [bok_topics:protected] => [bok_keywords:protected] => [id:protected] => 88 [type:protected] => category [parent:protected] => 3 [label:protected] => Demolition [alreadyInSave:protected] => [alreadyInValidation:protected] => [validationFailures:protected] => Array ( ) [_new:BaseObject:private] => [_deleted:BaseObject:private] => [modifiedColumns:protected] => Array ( ) ) [91] => Category Object ( [languages:protected] => [bok_resources:protected] => [bok_topics:protected] => [bok_keywords:protected] => [id:protected] => 91 [type:protected] => category [parent:protected] => 3 [label:protected] => Heavy & Highway [alreadyInSave:protected] => [alreadyInValidation:protected] => [validationFailures:protected] => Array ( ) [_new:BaseObject:private] => [_deleted:BaseObject:private] => [modifiedColumns:protected] => Array ( ) ) [90] => Category Object ( [languages:protected] => [bok_resources:protected] => [bok_topics:protected] => [bok_keywords:protected] => [id:protected] => 90 [type:protected] => category [parent:protected] => 3 [label:protected] => Industrial [alreadyInSave:protected] => [alreadyInValidation:protected] => [validationFailures:protected] => Array ( ) [_new:BaseObject:private] => [_deleted:BaseObject:private] => [modifiedColumns:protected] => Array ( ) ) [93] => Category Object ( [languages:protected] => [bok_resources:protected] => [bok_topics:protected] => [bok_keywords:protected] => [id:protected] => 93 [type:protected] => category [parent:protected] => 3 [label:protected] => Renovations [alreadyInSave:protected] => [alreadyInValidation:protected] => [validationFailures:protected] => Array ( ) [_new:BaseObject:private] => [_deleted:BaseObject:private] => [modifiedColumns:protected] => Array ( ) ) [94] => Category Object ( [languages:protected] => [bok_resources:protected] => [bok_topics:protected] => [bok_keywords:protected] => [id:protected] => 94 [type:protected] => category [parent:protected] => 3 [label:protected] => Residential [alreadyInSave:protected] => [alreadyInValidation:protected] => [validationFailures:protected] => Array ( ) [_new:BaseObject:private] => [_deleted:BaseObject:private] => [modifiedColumns:protected] => Array ( ) ) [95] => Category Object ( [languages:protected] => [bok_resources:protected] => [bok_topics:protected] => [bok_keywords:protected] => [id:protected] => 95 [type:protected] => category [parent:protected] => 3 [label:protected] => Underground [alreadyInSave:protected] => [alreadyInValidation:protected] => [validationFailures:protected] => Array ( ) [_new:BaseObject:private] => [_deleted:BaseObject:private] => [modifiedColumns:protected] => Array ( ) ) [97] => Category Object ( [languages:protected] => [bok_resources:protected] => [bok_topics:protected] => [bok_keywords:protected] => [id:protected] => 97 [type:protected] => category [parent:protected] => 5 [label:protected] => Images [alreadyInSave:protected] => [alreadyInValidation:protected] => [validationFailures:protected] => Array ( ) [_new:BaseObject:private] => [_deleted:BaseObject:private] => [modifiedColumns:protected] => Array ( ) ) ) [categories_initialized:protected] => 1 [mapped_items:protected] => [content:protected] => [files:protected] => [language:protected] => Language Object ( [id:protected] => 1 [code:protected] => en [name:protected] => English [alreadyInSave:protected] => [alreadyInValidation:protected] => [validationFailures:protected] => Array ( ) [_new:BaseObject:private] => [_deleted:BaseObject:private] => [modifiedColumns:protected] => Array ( ) ) [old_record:protected] => [id:protected] => 4006 [old_id:protected] => [elcosh_id:protected] => i002693 [type:protected] => image [display_type:protected] => Image [user_id:protected] => 0 [language_id:protected] => 1 [tagging_id:protected] => Bruce Lippy [priority_id:protected] => 1 [title:protected] => Toolbox talk - long shot [total_pages:protected] => 0 [billed_pages:protected] => 0 [publication_number:protected] => [part_of:protected] => [keywords:protected] => toolbox talk, tailgate talk, safety minute [comments:protected] => [summary:protected] => This crew gathered every morning before starting work to discuss a new safety topic. [transition_comments:protected] => [external_link:protected] => [consol_link:protected] => http://www.cpwrconstructionsolutions.org/electrical/solution/662/worker-training.html [more_like_this:protected] => i002691,i002692,d001269,d000527 [permission_given_by:protected] => [published:protected] => T [billable:protected] => F [img_name:protected] => [img_ext:protected] => jpg [img_width:protected] => [img_height:protected] => [img_credit:protected] => Morgan Zavertnik and Hoar Construction [img_practice:protected] => good [vid_source_id:protected] => [vid_running_time:protected] => [vid_intended_audience:protected] => [vid_acquisition_info:protected] => [vid_cost:protected] => [vid_producer:protected] => [vid_filename:protected] => [vid_filename_downloadable:protected] => [date_summary:protected] => November 2015 [date_permission_requested:protected] => [date_permission_received:protected] => [date_review_needed:protected] => [date_received:protected] => 03/02/16 [date_completed:protected] => 03/02/16 [date_billed:protected] => [date_modified:protected] => 03/02/16 [collBokExports:protected] => [lastBokExportCriteria:BaseElcoshItem:private] => [alreadyInSave:protected] => [alreadyInValidation:protected] => [validationFailures:protected] => Array ( ) [_new:BaseObject:private] => [_deleted:BaseObject:private] => [modifiedColumns:protected] => Array ( ) ) ) [2] => Search_Result Object ( [title] => Construction bracing [image] => /record/images/3995-p.jpg [blurb] => This shows structural support that prevents collapses during construction.... [category] => Array ( [0] => 12 [1] => 15 [2] => 21 [3] => 49 [4] => 51 [5] => 55 [6] => 56 [7] => 60 [8] => 64 [9] => 68 [10] => 74 [11] => 63 [12] => 78 [13] => 79 [14] => 80 [15] => 62 [16] => 87 [17] => 90 [18] => 97 ) [labels] => Array ( [0] => Crushed/Struck By [1] => Work Environment [2] => Hazards [3] => Falls [6] => Scaffolds [9] => Carpenter [10] => Trades [11] => Cement Mason [13] => Electrical Worker [15] => Elevator Constructor [17] => HVAC [19] => Laborer [21] => Maintenance Worker [23] => Pile Driver [25] => Reinforcing Ironworker [27] => Roofer/Waterproofer [29] => Scaffold Erector [31] => Sheetmetal Worker [33] => Structural Ironworker [35] => Commercial & Institutional [36] => Jobsites [37] => Industrial [39] => Images [40] => Media [41] => Media & Documents ) [type] => Images [sub_category] => [url] => /image/3995/i002690/Construction%2Bbracing.html [item:protected] => ImageRecord Object ( [records:protected] => Array ( ) [recordId:protected] => [searchWordClass:protected] => [searchWordPeerClass:protected] => [bok_record:protected] => [authors:protected] => [organizations:protected] => [collections:protected] => [categories:protected] => Array ( [12] => Category Object ( [languages:protected] => [bok_resources:protected] => [bok_topics:protected] => [bok_keywords:protected] => [id:protected] => 12 [type:protected] => category [parent:protected] => 7 [label:protected] => Crushed/Struck By [alreadyInSave:protected] => [alreadyInValidation:protected] => [validationFailures:protected] => Array ( ) [_new:BaseObject:private] => [_deleted:BaseObject:private] => [modifiedColumns:protected] => Array ( ) ) [15] => Category Object ( [languages:protected] => [bok_resources:protected] => [bok_topics:protected] => [bok_keywords:protected] => [id:protected] => 15 [type:protected] => category [parent:protected] => 7 [label:protected] => Falls [alreadyInSave:protected] => [alreadyInValidation:protected] => [validationFailures:protected] => Array ( ) [_new:BaseObject:private] => [_deleted:BaseObject:private] => [modifiedColumns:protected] => Array ( ) ) [21] => Category Object ( [languages:protected] => [bok_resources:protected] => [bok_topics:protected] => [bok_keywords:protected] => [id:protected] => 21 [type:protected] => category [parent:protected] => 7 [label:protected] => Scaffolds [alreadyInSave:protected] => [alreadyInValidation:protected] => [validationFailures:protected] => Array ( ) [_new:BaseObject:private] => [_deleted:BaseObject:private] => [modifiedColumns:protected] => Array ( ) ) [49] => Category Object ( [languages:protected] => [bok_resources:protected] => [bok_topics:protected] => [bok_keywords:protected] => [id:protected] => 49 [type:protected] => category [parent:protected] => 2 [label:protected] => Carpenter [alreadyInSave:protected] => [alreadyInValidation:protected] => [validationFailures:protected] => Array ( ) [_new:BaseObject:private] => [_deleted:BaseObject:private] => [modifiedColumns:protected] => Array ( ) ) [51] => Category Object ( [languages:protected] => [bok_resources:protected] => [bok_topics:protected] => [bok_keywords:protected] => [id:protected] => 51 [type:protected] => category [parent:protected] => 2 [label:protected] => Cement Mason [alreadyInSave:protected] => [alreadyInValidation:protected] => [validationFailures:protected] => Array ( ) [_new:BaseObject:private] => [_deleted:BaseObject:private] => [modifiedColumns:protected] => Array ( ) ) [55] => Category Object ( [languages:protected] => [bok_resources:protected] => [bok_topics:protected] => [bok_keywords:protected] => [id:protected] => 55 [type:protected] => category [parent:protected] => 2 [label:protected] => Electrical Worker [alreadyInSave:protected] => [alreadyInValidation:protected] => [validationFailures:protected] => Array ( ) [_new:BaseObject:private] => [_deleted:BaseObject:private] => [modifiedColumns:protected] => Array ( ) ) [56] => Category Object ( [languages:protected] => [bok_resources:protected] => [bok_topics:protected] => [bok_keywords:protected] => [id:protected] => 56 [type:protected] => category [parent:protected] => 2 [label:protected] => Elevator Constructor [alreadyInSave:protected] => [alreadyInValidation:protected] => [validationFailures:protected] => Array ( ) [_new:BaseObject:private] => [_deleted:BaseObject:private] => [modifiedColumns:protected] => Array ( ) ) [60] => Category Object ( [languages:protected] => [bok_resources:protected] => [bok_topics:protected] => [bok_keywords:protected] => [id:protected] => 60 [type:protected] => category [parent:protected] => 2 [label:protected] => HVAC [alreadyInSave:protected] => [alreadyInValidation:protected] => [validationFailures:protected] => Array ( ) [_new:BaseObject:private] => [_deleted:BaseObject:private] => [modifiedColumns:protected] => Array ( ) ) [64] => Category Object ( [languages:protected] => [bok_resources:protected] => [bok_topics:protected] => [bok_keywords:protected] => [id:protected] => 64 [type:protected] => category [parent:protected] => 2 [label:protected] => Laborer [alreadyInSave:protected] => [alreadyInValidation:protected] => [validationFailures:protected] => Array ( ) [_new:BaseObject:private] => [_deleted:BaseObject:private] => [modifiedColumns:protected] => Array ( ) ) [68] => Category Object ( [languages:protected] => [bok_resources:protected] => [bok_topics:protected] => [bok_keywords:protected] => [id:protected] => 68 [type:protected] => category [parent:protected] => 2 [label:protected] => Maintenance Worker [alreadyInSave:protected] => [alreadyInValidation:protected] => [validationFailures:protected] => Array ( ) [_new:BaseObject:private] => [_deleted:BaseObject:private] => [modifiedColumns:protected] => Array ( ) ) [74] => Category Object ( [languages:protected] => [bok_resources:protected] => [bok_topics:protected] => [bok_keywords:protected] => [id:protected] => 74 [type:protected] => category [parent:protected] => 2 [label:protected] => Pile Driver [alreadyInSave:protected] => [alreadyInValidation:protected] => [validationFailures:protected] => Array ( ) [_new:BaseObject:private] => [_deleted:BaseObject:private] => [modifiedColumns:protected] => Array ( ) ) [63] => Category Object ( [languages:protected] => [bok_resources:protected] => [bok_topics:protected] => [bok_keywords:protected] => [id:protected] => 63 [type:protected] => category [parent:protected] => 2 [label:protected] => Reinforcing Ironworker [alreadyInSave:protected] => [alreadyInValidation:protected] => [validationFailures:protected] => Array ( ) [_new:BaseObject:private] => [_deleted:BaseObject:private] => [modifiedColumns:protected] => Array ( ) ) [78] => Category Object ( [languages:protected] => [bok_resources:protected] => [bok_topics:protected] => [bok_keywords:protected] => [id:protected] => 78 [type:protected] => category [parent:protected] => 2 [label:protected] => Roofer/Waterproofer [alreadyInSave:protected] => [alreadyInValidation:protected] => [validationFailures:protected] => Array ( ) [_new:BaseObject:private] => [_deleted:BaseObject:private] => [modifiedColumns:protected] => Array ( ) ) [79] => Category Object ( [languages:protected] => [bok_resources:protected] => [bok_topics:protected] => [bok_keywords:protected] => [id:protected] => 79 [type:protected] => category [parent:protected] => 2 [label:protected] => Scaffold Erector [alreadyInSave:protected] => [alreadyInValidation:protected] => [validationFailures:protected] => Array ( ) [_new:BaseObject:private] => [_deleted:BaseObject:private] => [modifiedColumns:protected] => Array ( ) ) [80] => Category Object ( [languages:protected] => [bok_resources:protected] => [bok_topics:protected] => [bok_keywords:protected] => [id:protected] => 80 [type:protected] => category [parent:protected] => 2 [label:protected] => Sheetmetal Worker [alreadyInSave:protected] => [alreadyInValidation:protected] => [validationFailures:protected] => Array ( ) [_new:BaseObject:private] => [_deleted:BaseObject:private] => [modifiedColumns:protected] => Array ( ) ) [62] => Category Object ( [languages:protected] => [bok_resources:protected] => [bok_topics:protected] => [bok_keywords:protected] => [id:protected] => 62 [type:protected] => category [parent:protected] => 2 [label:protected] => Structural Ironworker [alreadyInSave:protected] => [alreadyInValidation:protected] => [validationFailures:protected] => Array ( ) [_new:BaseObject:private] => [_deleted:BaseObject:private] => [modifiedColumns:protected] => Array ( ) ) [87] => Category Object ( [languages:protected] => [bok_resources:protected] => [bok_topics:protected] => [bok_keywords:protected] => [id:protected] => 87 [type:protected] => category [parent:protected] => 3 [label:protected] => Commercial & Institutional [alreadyInSave:protected] => [alreadyInValidation:protected] => [validationFailures:protected] => Array ( ) [_new:BaseObject:private] => [_deleted:BaseObject:private] => [modifiedColumns:protected] => Array ( ) ) [90] => Category Object ( [languages:protected] => [bok_resources:protected] => [bok_topics:protected] => [bok_keywords:protected] => [id:protected] => 90 [type:protected] => category [parent:protected] => 3 [label:protected] => Industrial [alreadyInSave:protected] => [alreadyInValidation:protected] => [validationFailures:protected] => Array ( ) [_new:BaseObject:private] => [_deleted:BaseObject:private] => [modifiedColumns:protected] => Array ( ) ) [97] => Category Object ( [languages:protected] => [bok_resources:protected] => [bok_topics:protected] => [bok_keywords:protected] => [id:protected] => 97 [type:protected] => category [parent:protected] => 5 [label:protected] => Images [alreadyInSave:protected] => [alreadyInValidation:protected] => [validationFailures:protected] => Array ( ) [_new:BaseObject:private] => [_deleted:BaseObject:private] => [modifiedColumns:protected] => Array ( ) ) ) [categories_initialized:protected] => 1 [mapped_items:protected] => [content:protected] => [files:protected] => [language:protected] => Language Object ( [id:protected] => 1 [code:protected] => en [name:protected] => English [alreadyInSave:protected] => [alreadyInValidation:protected] => [validationFailures:protected] => Array ( ) [_new:BaseObject:private] => [_deleted:BaseObject:private] => [modifiedColumns:protected] => Array ( ) ) [old_record:protected] => [id:protected] => 3995 [old_id:protected] => [elcosh_id:protected] => i002690 [type:protected] => image [display_type:protected] => Image [user_id:protected] => 0 [language_id:protected] => 1 [tagging_id:protected] => Bruce Lippy [priority_id:protected] => 1 [title:protected] => Construction bracing [total_pages:protected] => 0 [billed_pages:protected] => 0 [publication_number:protected] => [part_of:protected] => [keywords:protected] => Bracing, support, scaffold [comments:protected] => [summary:protected] => This shows structural support that prevents collapses during construction. [transition_comments:protected] => [external_link:protected] => [consol_link:protected] => http://www.cpwrconstructionsolutions.org/masonry/solution/8/adjustable-tower-scaffold.html [more_like_this:protected] => i002660 [permission_given_by:protected] => [published:protected] => T [billable:protected] => F [img_name:protected] => [img_ext:protected] => jpg [img_width:protected] => [img_height:protected] => [img_credit:protected] => Photo by Pam Susi [img_practice:protected] => good [vid_source_id:protected] => [vid_running_time:protected] => [vid_intended_audience:protected] => [vid_acquisition_info:protected] => [vid_cost:protected] => [vid_producer:protected] => [vid_filename:protected] => [vid_filename_downloadable:protected] => [date_summary:protected] => January 2016 [date_permission_requested:protected] => [date_permission_received:protected] => [date_review_needed:protected] => [date_received:protected] => 02/01/16 [date_completed:protected] => 02/01/16 [date_billed:protected] => [date_modified:protected] => 02/01/16 [collBokExports:protected] => [lastBokExportCriteria:BaseElcoshItem:private] => [alreadyInSave:protected] => [alreadyInValidation:protected] => [validationFailures:protected] => Array ( ) [_new:BaseObject:private] => [_deleted:BaseObject:private] => [modifiedColumns:protected] => Array ( ) ) ) [3] => Search_Result Object ( [title] => Suspended Scaffold Outriggers [image] => /record/images/3975-p.jpg [blurb] => Suspended scaffolds systems must be designed by a qualified person and inspected daily by a competent person. The supports for the counterweight must... [category] => Array ( [0] => 97 [1] => 15 [2] => 47 [3] => 49 [4] => 79 [5] => 87 ) [labels] => Array ( [0] => Images [1] => Media [2] => Media & Documents [3] => Falls [4] => Work Environment [5] => Hazards [6] => Bricklayer [7] => Trades [8] => Carpenter [10] => Scaffold Erector [12] => Commercial & Institutional [13] => Jobsites ) [type] => Images [sub_category] => [url] => /image/3975/i002683/Suspended%2BScaffold%2BOutriggers.html [item:protected] => ImageRecord Object ( [records:protected] => Array ( ) [recordId:protected] => [searchWordClass:protected] => [searchWordPeerClass:protected] => [bok_record:protected] => [authors:protected] => [organizations:protected] => [collections:protected] => [categories:protected] => Array ( [97] => Category Object ( [languages:protected] => [bok_resources:protected] => [bok_topics:protected] => [bok_keywords:protected] => [id:protected] => 97 [type:protected] => category [parent:protected] => 5 [label:protected] => Images [alreadyInSave:protected] => [alreadyInValidation:protected] => [validationFailures:protected] => Array ( ) [_new:BaseObject:private] => [_deleted:BaseObject:private] => [modifiedColumns:protected] => Array ( ) ) [15] => Category Object ( [languages:protected] => [bok_resources:protected] => [bok_topics:protected] => [bok_keywords:protected] => [id:protected] => 15 [type:protected] => category [parent:protected] => 7 [label:protected] => Falls [alreadyInSave:protected] => [alreadyInValidation:protected] => [validationFailures:protected] => Array ( ) [_new:BaseObject:private] => [_deleted:BaseObject:private] => [modifiedColumns:protected] => Array ( ) ) [47] => Category Object ( [languages:protected] => [bok_resources:protected] => [bok_topics:protected] => [bok_keywords:protected] => [id:protected] => 47 [type:protected] => category [parent:protected] => 2 [label:protected] => Bricklayer [alreadyInSave:protected] => [alreadyInValidation:protected] => [validationFailures:protected] => Array ( ) [_new:BaseObject:private] => [_deleted:BaseObject:private] => [modifiedColumns:protected] => Array ( ) ) [49] => Category Object ( [languages:protected] => [bok_resources:protected] => [bok_topics:protected] => [bok_keywords:protected] => [id:protected] => 49 [type:protected] => category [parent:protected] => 2 [label:protected] => Carpenter [alreadyInSave:protected] => [alreadyInValidation:protected] => [validationFailures:protected] => Array ( ) [_new:BaseObject:private] => [_deleted:BaseObject:private] => [modifiedColumns:protected] => Array ( ) ) [79] => Category Object ( [languages:protected] => [bok_resources:protected] => [bok_topics:protected] => [bok_keywords:protected] => [id:protected] => 79 [type:protected] => category [parent:protected] => 2 [label:protected] => Scaffold Erector [alreadyInSave:protected] => [alreadyInValidation:protected] => [validationFailures:protected] => Array ( ) [_new:BaseObject:private] => [_deleted:BaseObject:private] => [modifiedColumns:protected] => Array ( ) ) [87] => Category Object ( [languages:protected] => [bok_resources:protected] => [bok_topics:protected] => [bok_keywords:protected] => [id:protected] => 87 [type:protected] => category [parent:protected] => 3 [label:protected] => Commercial & Institutional [alreadyInSave:protected] => [alreadyInValidation:protected] => [validationFailures:protected] => Array ( ) [_new:BaseObject:private] => [_deleted:BaseObject:private] => [modifiedColumns:protected] => Array ( ) ) ) [categories_initialized:protected] => 1 [mapped_items:protected] => [content:protected] => [files:protected] => [language:protected] => Language Object ( [id:protected] => 1 [code:protected] => en [name:protected] => English [alreadyInSave:protected] => [alreadyInValidation:protected] => [validationFailures:protected] => Array ( ) [_new:BaseObject:private] => [_deleted:BaseObject:private] => [modifiedColumns:protected] => Array ( ) ) [old_record:protected] => [id:protected] => 3975 [old_id:protected] => [elcosh_id:protected] => i002683 [type:protected] => image [display_type:protected] => Image [user_id:protected] => 0 [language_id:protected] => 1 [tagging_id:protected] => John Newquist [priority_id:protected] => 1 [title:protected] => Suspended Scaffold Outriggers [total_pages:protected] => 0 [billed_pages:protected] => 0 [publication_number:protected] => [part_of:protected] => [keywords:protected] => suspended, scaffold, swing, stage, fall, protection, counterweight, qualified, person [comments:protected] => [summary:protected] => Suspended scaffolds systems must be designed by a qualified person and inspected daily by a competent person. The supports for the counterweight must be designed with a safety factor of four. [transition_comments:protected] => [external_link:protected] => [consol_link:protected] => http://www.cpwrconstructionsolutions.org/task/Erect%2Band%2Bdismantle%2Bscaffolds/ [more_like_this:protected] => d000244,d000359,i000253,i000407 [permission_given_by:protected] => [published:protected] => T [billable:protected] => F [img_name:protected] => [img_ext:protected] => jpg [img_width:protected] => [img_height:protected] => [img_credit:protected] => MetroPark, Miller and Long [img_practice:protected] => not_applicable [vid_source_id:protected] => [vid_running_time:protected] => [vid_intended_audience:protected] => [vid_acquisition_info:protected] => [vid_cost:protected] => [vid_producer:protected] => [vid_filename:protected] => [vid_filename_downloadable:protected] => [date_summary:protected] => August 28 2015 [date_permission_requested:protected] => [date_permission_received:protected] => [date_review_needed:protected] => [date_received:protected] => 08/28/15 [date_completed:protected] => 08/28/15 [date_billed:protected] => [date_modified:protected] => 08/28/15 [collBokExports:protected] => [lastBokExportCriteria:BaseElcoshItem:private] => [alreadyInSave:protected] => [alreadyInValidation:protected] => [validationFailures:protected] => Array ( ) [_new:BaseObject:private] => [_deleted:BaseObject:private] => [modifiedColumns:protected] => Array ( ) ) ) [4] => Search_Result Object ( [title] => Suspended scaffold [image] => /record/images/3976-p.jpg [blurb] => Suspended scaffold outrigger beams must have stops to prevent the hangers from sliding of the end of the outriggers. Wire rope supported must be desig... [category] => Array ( [0] => 97 [1] => 15 [2] => 47 [3] => 50 [4] => 79 [5] => 87 ) [labels] => Array ( [0] => Images [1] => Media [2] => Media & Documents [3] => Falls [4] => Work Environment [5] => Hazards [6] => Bricklayer [7] => Trades [8] => Carpet Layer [10] => Scaffold Erector [12] => Commercial & Institutional [13] => Jobsites ) [type] => Images [sub_category] => [url] => /image/3976/i002684/Suspended%2Bscaffold.html [item:protected] => ImageRecord Object ( [records:protected] => Array ( ) [recordId:protected] => [searchWordClass:protected] => [searchWordPeerClass:protected] => [bok_record:protected] => [authors:protected] => [organizations:protected] => [collections:protected] => [categories:protected] => Array ( [97] => Category Object ( [languages:protected] => [bok_resources:protected] => [bok_topics:protected] => [bok_keywords:protected] => [id:protected] => 97 [type:protected] => category [parent:protected] => 5 [label:protected] => Images [alreadyInSave:protected] => [alreadyInValidation:protected] => [validationFailures:protected] => Array ( ) [_new:BaseObject:private] => [_deleted:BaseObject:private] => [modifiedColumns:protected] => Array ( ) ) [15] => Category Object ( [languages:protected] => [bok_resources:protected] => [bok_topics:protected] => [bok_keywords:protected] => [id:protected] => 15 [type:protected] => category [parent:protected] => 7 [label:protected] => Falls [alreadyInSave:protected] => [alreadyInValidation:protected] => [validationFailures:protected] => Array ( ) [_new:BaseObject:private] => [_deleted:BaseObject:private] => [modifiedColumns:protected] => Array ( ) ) [47] => Category Object ( [languages:protected] => [bok_resources:protected] => [bok_topics:protected] => [bok_keywords:protected] => [id:protected] => 47 [type:protected] => category [parent:protected] => 2 [label:protected] => Bricklayer [alreadyInSave:protected] => [alreadyInValidation:protected] => [validationFailures:protected] => Array ( ) [_new:BaseObject:private] => [_deleted:BaseObject:private] => [modifiedColumns:protected] => Array ( ) ) [50] => Category Object ( [languages:protected] => [bok_resources:protected] => [bok_topics:protected] => [bok_keywords:protected] => [id:protected] => 50 [type:protected] => category [parent:protected] => 2 [label:protected] => Carpet Layer [alreadyInSave:protected] => [alreadyInValidation:protected] => [validationFailures:protected] => Array ( ) [_new:BaseObject:private] => [_deleted:BaseObject:private] => [modifiedColumns:protected] => Array ( ) ) [79] => Category Object ( [languages:protected] => [bok_resources:protected] => [bok_topics:protected] => [bok_keywords:protected] => [id:protected] => 79 [type:protected] => category [parent:protected] => 2 [label:protected] => Scaffold Erector [alreadyInSave:protected] => [alreadyInValidation:protected] => [validationFailures:protected] => Array ( ) [_new:BaseObject:private] => [_deleted:BaseObject:private] => [modifiedColumns:protected] => Array ( ) ) [87] => Category Object ( [languages:protected] => [bok_resources:protected] => [bok_topics:protected] => [bok_keywords:protected] => [id:protected] => 87 [type:protected] => category [parent:protected] => 3 [label:protected] => Commercial & Institutional [alreadyInSave:protected] => [alreadyInValidation:protected] => [validationFailures:protected] => Array ( ) [_new:BaseObject:private] => [_deleted:BaseObject:private] => [modifiedColumns:protected] => Array ( ) ) ) [categories_initialized:protected] => 1 [mapped_items:protected] => [content:protected] => [files:protected] => [language:protected] => Language Object ( [id:protected] => 1 [code:protected] => en [name:protected] => English [alreadyInSave:protected] => [alreadyInValidation:protected] => [validationFailures:protected] => Array ( ) [_new:BaseObject:private] => [_deleted:BaseObject:private] => [modifiedColumns:protected] => Array ( ) ) [old_record:protected] => [id:protected] => 3976 [old_id:protected] => [elcosh_id:protected] => i002684 [type:protected] => image [display_type:protected] => Image [user_id:protected] => 0 [language_id:protected] => 1 [tagging_id:protected] => John Newquist [priority_id:protected] => 1 [title:protected] => Suspended scaffold [total_pages:protected] => 0 [billed_pages:protected] => 0 [publication_number:protected] => [part_of:protected] => [keywords:protected] => Suspended, scaffold, outrigger, beams, erection, wire, rope, inspection, swing, stage, [comments:protected] => [summary:protected] => Suspended scaffold outrigger beams must have stops to prevent the hangers from sliding of the end of the outriggers. Wire rope supported must be designed with a safety factor of 6. The scaffold must be inspected by a competent person daily. [transition_comments:protected] => [external_link:protected] => [consol_link:protected] => http://www.cpwrconstructionsolutions.org/task/Erect%2Band%2Bdismantle%2Bscaffolds/ [more_like_this:protected] => i002683, d000244, i000407, d000606 [permission_given_by:protected] => [published:protected] => T [billable:protected] => F [img_name:protected] => [img_ext:protected] => jpg [img_width:protected] => [img_height:protected] => [img_credit:protected] => Metropark, Miller and Long [img_practice:protected] => not_applicable [vid_source_id:protected] => [vid_running_time:protected] => [vid_intended_audience:protected] => [vid_acquisition_info:protected] => [vid_cost:protected] => [vid_producer:protected] => [vid_filename:protected] => [vid_filename_downloadable:protected] => [date_summary:protected] => [date_permission_requested:protected] => [date_permission_received:protected] => [date_review_needed:protected] => [date_received:protected] => 08/28/15 [date_completed:protected] => 08/28/15 [date_billed:protected] => [date_modified:protected] => 08/28/15 [collBokExports:protected] => [lastBokExportCriteria:BaseElcoshItem:private] => [alreadyInSave:protected] => [alreadyInValidation:protected] => [validationFailures:protected] => Array ( ) [_new:BaseObject:private] => [_deleted:BaseObject:private] => [modifiedColumns:protected] => Array ( ) ) ) [5] => Search_Result Object ( [title] => Three Tower Cranes [image] => /record/images/3979-p.jpg [blurb] => Whenever multiple tower cranes are used, there needs to be preplanning to ensure that the tower cranes cannot hit each other loads. This is accomplish... [category] => Array ( [0] => 97 [1] => 11 [2] => 64 [3] => 70 [4] => 62 [5] => 87 ) [labels] => Array ( [0] => Images [1] => Media [2] => Media & Documents [3] => Cranes & Hoists [4] => Work Environment [5] => Hazards [6] => Laborer [7] => Trades [8] => Operating Engineer [10] => Structural Ironworker [12] => Commercial & Institutional [13] => Jobsites ) [type] => Images [sub_category] => [url] => /image/3979/i002687/Three%2BTower%2BCranes.html [item:protected] => ImageRecord Object ( [records:protected] => Array ( ) [recordId:protected] => [searchWordClass:protected] => [searchWordPeerClass:protected] => [bok_record:protected] => [authors:protected] => [organizations:protected] => [collections:protected] => [categories:protected] => Array ( [97] => Category Object ( [languages:protected] => [bok_resources:protected] => [bok_topics:protected] => [bok_keywords:protected] => [id:protected] => 97 [type:protected] => category [parent:protected] => 5 [label:protected] => Images [alreadyInSave:protected] => [alreadyInValidation:protected] => [validationFailures:protected] => Array ( ) [_new:BaseObject:private] => [_deleted:BaseObject:private] => [modifiedColumns:protected] => Array ( ) ) [11] => Category Object ( [languages:protected] => [bok_resources:protected] => [bok_topics:protected] => [bok_keywords:protected] => [id:protected] => 11 [type:protected] => category [parent:protected] => 7 [label:protected] => Cranes & Hoists [alreadyInSave:protected] => [alreadyInValidation:protected] => [validationFailures:protected] => Array ( ) [_new:BaseObject:private] => [_deleted:BaseObject:private] => [modifiedColumns:protected] => Array ( ) ) [64] => Category Object ( [languages:protected] => [bok_resources:protected] => [bok_topics:protected] => [bok_keywords:protected] => [id:protected] => 64 [type:protected] => category [parent:protected] => 2 [label:protected] => Laborer [alreadyInSave:protected] => [alreadyInValidation:protected] => [validationFailures:protected] => Array ( ) [_new:BaseObject:private] => [_deleted:BaseObject:private] => [modifiedColumns:protected] => Array ( ) ) [70] => Category Object ( [languages:protected] => [bok_resources:protected] => [bok_topics:protected] => [bok_keywords:protected] => [id:protected] => 70 [type:protected] => category [parent:protected] => 2 [label:protected] => Operating Engineer [alreadyInSave:protected] => [alreadyInValidation:protected] => [validationFailures:protected] => Array ( ) [_new:BaseObject:private] => [_deleted:BaseObject:private] => [modifiedColumns:protected] => Array ( ) ) [62] => Category Object ( [languages:protected] => [bok_resources:protected] => [bok_topics:protected] => [bok_keywords:protected] => [id:protected] => 62 [type:protected] => category [parent:protected] => 2 [label:protected] => Structural Ironworker [alreadyInSave:protected] => [alreadyInValidation:protected] => [validationFailures:protected] => Array ( ) [_new:BaseObject:private] => [_deleted:BaseObject:private] => [modifiedColumns:protected] => Array ( ) ) [87] => Category Object ( [languages:protected] => [bok_resources:protected] => [bok_topics:protected] => [bok_keywords:protected] => [id:protected] => 87 [type:protected] => category [parent:protected] => 3 [label:protected] => Commercial & Institutional [alreadyInSave:protected] => [alreadyInValidation:protected] => [validationFailures:protected] => Array ( ) [_new:BaseObject:private] => [_deleted:BaseObject:private] => [modifiedColumns:protected] => Array ( ) ) ) [categories_initialized:protected] => 1 [mapped_items:protected] => [content:protected] => [files:protected] => [language:protected] => Language Object ( [id:protected] => 1 [code:protected] => en [name:protected] => English [alreadyInSave:protected] => [alreadyInValidation:protected] => [validationFailures:protected] => Array ( ) [_new:BaseObject:private] => [_deleted:BaseObject:private] => [modifiedColumns:protected] => Array ( ) ) [old_record:protected] => [id:protected] => 3979 [old_id:protected] => [elcosh_id:protected] => i002687 [type:protected] => image [display_type:protected] => Image [user_id:protected] => 0 [language_id:protected] => 1 [tagging_id:protected] => John Newquist [priority_id:protected] => 1 [title:protected] => Three Tower Cranes [total_pages:protected] => 0 [billed_pages:protected] => 0 [publication_number:protected] => [part_of:protected] => [keywords:protected] => [comments:protected] => [summary:protected] => Whenever multiple tower cranes are used, there needs to be preplanning to ensure that the tower cranes cannot hit each other loads. This is accomplished by setting swing restrictions, marking the ground for allowable crane travel and training of the crane signal persons. [transition_comments:protected] => [external_link:protected] => [consol_link:protected] => http://www.cpwrconstructionsolutions.org/work/6/184/ [more_like_this:protected] => d001029, d000010, i001280, i001221 [permission_given_by:protected] => [published:protected] => T [billable:protected] => F [img_name:protected] => [img_ext:protected] => jpg [img_width:protected] => [img_height:protected] => [img_credit:protected] => Metropark [img_practice:protected] => not_applicable [vid_source_id:protected] => [vid_running_time:protected] => [vid_intended_audience:protected] => [vid_acquisition_info:protected] => [vid_cost:protected] => [vid_producer:protected] => [vid_filename:protected] => [vid_filename_downloadable:protected] => [date_summary:protected] => August 28 2015 [date_permission_requested:protected] => [date_permission_received:protected] => [date_review_needed:protected] => [date_received:protected] => 08/28/15 [date_completed:protected] => 08/28/15 [date_billed:protected] => [date_modified:protected] => 08/28/15 [collBokExports:protected] => [lastBokExportCriteria:BaseElcoshItem:private] => [alreadyInSave:protected] => [alreadyInValidation:protected] => [validationFailures:protected] => Array ( ) [_new:BaseObject:private] => [_deleted:BaseObject:private] => [modifiedColumns:protected] => Array ( ) ) ) ) [preview_mode] => [description] => This third in a series of 6 Tool Box Talks on construction ergonomics focuses on proper positioning to avoid injuries. The TBT recommends: 1)prop up a task off of the floor by using a raised surface, cart, baker scaffold, saw horses to prep materials near waist height, 2)move the lift or ladder in the best position for the work, 3)position the lift in front of the area you plan to work without trying to reach too far on either side of the lift. [keywords] => position, positioning, ergonomics, ergo, carpal tunnel, MSD, musculoskeletal disorder [related_items] => Array ( [Handouts] => Array ( [0] => DocumentRecord Object ( [records:protected] => Array ( ) [recordId:protected] => [searchWordClass:protected] => [searchWordPeerClass:protected] => [bok_record:protected] => [authors:protected] => [organizations:protected] => [collections:protected] => [categories:protected] => [categories_initialized:protected] => [mapped_items:protected] => [content:protected] => [files:protected] => [language:protected] => Language Object ( [id:protected] => 1 [code:protected] => en [name:protected] => English [alreadyInSave:protected] => [alreadyInValidation:protected] => [validationFailures:protected] => Array ( ) [_new:BaseObject:private] => [_deleted:BaseObject:private] => [modifiedColumns:protected] => Array ( ) ) [old_record:protected] => [id:protected] => 3833 [old_id:protected] => [elcosh_id:protected] => d001303 [type:protected] => document [display_type:protected] => HTML w/ PDF [user_id:protected] => 25 [language_id:protected] => 1 [tagging_id:protected] => Bruce Lippy [priority_id:protected] => 1 [title:protected] => Overview of Toolbox Talks on Ergonomics Developed by Washington University in St. Louis [total_pages:protected] => 3 [billed_pages:protected] => 3 [publication_number:protected] => [part_of:protected] => [keywords:protected] => ergonomics, musculoskeletal disorders, MSDs [comments:protected] => 7-28-2014 - Originally submitted as "HTML w/ doc and PDF", Jeff Nelson asked Bruce Lippy for permission to switch it to "HTML w/ PDF" -- permission was given [summary:protected] => This overviews provides a background on how Washington University in St. Louis developed this series of six toolbox talks on ergonomics. It also describes how they tested the effectiveness of these communication tools, concluding that the guide was valuable for improving the delivery of ergonomics training and interaction between the safety representative and workers. The researchers recommend preparing site-specific information prior to the talk and interacting with workers to discuss problems and ergonomic solutions during the safety meetings. [transition_comments:protected] => [external_link:protected] => [consol_link:protected] => [more_like_this:protected] => [permission_given_by:protected] => Lisa Jaegers, Washington U. in St. Louis [published:protected] => T [billable:protected] => F [img_name:protected] => [img_ext:protected] => png [img_width:protected] => [img_height:protected] => [img_credit:protected] => [img_practice:protected] => [vid_source_id:protected] => [vid_running_time:protected] => [vid_intended_audience:protected] => [vid_acquisition_info:protected] => [vid_cost:protected] => [vid_producer:protected] => [vid_filename:protected] => [vid_filename_downloadable:protected] => [date_summary:protected] => 2014 [date_permission_requested:protected] => [date_permission_received:protected] => [date_review_needed:protected] => [date_received:protected] => 06/11/14 [date_completed:protected] => 07/29/14 [date_billed:protected] => [date_modified:protected] => 07/29/14 [collBokExports:protected] => [lastBokExportCriteria:BaseElcoshItem:private] => [alreadyInSave:protected] => [alreadyInValidation:protected] => [validationFailures:protected] => Array ( ) [_new:BaseObject:private] => [_deleted:BaseObject:private] => [modifiedColumns:protected] => Array ( ) ) ) [Toolbox Talks] => Array ( [0] => DocumentRecord Object ( [records:protected] => Array ( ) [recordId:protected] => [searchWordClass:protected] => [searchWordPeerClass:protected] => [bok_record:protected] => [authors:protected] => [organizations:protected] => [collections:protected] => [categories:protected] => [categories_initialized:protected] => [mapped_items:protected] => [content:protected] => [files:protected] => [language:protected] => Language Object ( [id:protected] => 1 [code:protected] => en [name:protected] => English [alreadyInSave:protected] => [alreadyInValidation:protected] => [validationFailures:protected] => Array ( ) [_new:BaseObject:private] => [_deleted:BaseObject:private] => [modifiedColumns:protected] => Array ( ) ) [old_record:protected] => [id:protected] => 3835 [old_id:protected] => [elcosh_id:protected] => d001304 [type:protected] => document [display_type:protected] => HTML w/ PDF [user_id:protected] => 25 [language_id:protected] => 1 [tagging_id:protected] => Bruce Lippy [priority_id:protected] => 1 [title:protected] => Ergonomics Tool Box Talks (TBT) Training Guide [total_pages:protected] => 2 [billed_pages:protected] => 2 [publication_number:protected] => [part_of:protected] => [keywords:protected] => Ergonomics, carpal tunnel, muscular skeletal disorders, msd [comments:protected] => [summary:protected] => CPWR-funded ergonomics research by Washington University at St. Louis led to the development of 6 tool box talks. This guide is an explanation of how to deliver the talks for maximum effectiveness. This guide should be reviewed before delivering any of the talks because it makes important recommendations like: • If possible, give the TBTs as a part of the crew’s regular safety meetings so that ergonomics is included in the safety discussion. • Try to locate an area with few distractions for gathering the crew. • For a team approach, invite the work crew, site superintendent, project manager and other general contractor and/or subcontractor reps who you feel may be helpful in supporting the training and ergonomics solutions. [transition_comments:protected] => [external_link:protected] => [consol_link:protected] => [more_like_this:protected] => d001303,d001305,d001306,d001307,d001308,d001309,d001310 [permission_given_by:protected] => [published:protected] => T [billable:protected] => F [img_name:protected] => [img_ext:protected] => png [img_width:protected] => [img_height:protected] => [img_credit:protected] => [img_practice:protected] => [vid_source_id:protected] => [vid_running_time:protected] => [vid_intended_audience:protected] => [vid_acquisition_info:protected] => [vid_cost:protected] => [vid_producer:protected] => [vid_filename:protected] => [vid_filename_downloadable:protected] => [date_summary:protected] => 2014 [date_permission_requested:protected] => [date_permission_received:protected] => [date_review_needed:protected] => [date_received:protected] => 06/12/14 [date_completed:protected] => 07/29/14 [date_billed:protected] => [date_modified:protected] => 07/29/14 [collBokExports:protected] => [lastBokExportCriteria:BaseElcoshItem:private] => [alreadyInSave:protected] => [alreadyInValidation:protected] => [validationFailures:protected] => Array ( ) [_new:BaseObject:private] => [_deleted:BaseObject:private] => [modifiedColumns:protected] => Array ( ) ) [1] => DocumentRecord Object ( [records:protected] => Array ( ) [recordId:protected] => [searchWordClass:protected] => [searchWordPeerClass:protected] => [bok_record:protected] => [authors:protected] => [organizations:protected] => [collections:protected] => [categories:protected] => [categories_initialized:protected] => [mapped_items:protected] => [content:protected] => [files:protected] => [language:protected] => Language Object ( [id:protected] => 1 [code:protected] => en [name:protected] => English [alreadyInSave:protected] => [alreadyInValidation:protected] => [validationFailures:protected] => Array ( ) [_new:BaseObject:private] => [_deleted:BaseObject:private] => [modifiedColumns:protected] => Array ( ) ) [old_record:protected] => [id:protected] => 3836 [old_id:protected] => [elcosh_id:protected] => d001305 [type:protected] => document [display_type:protected] => HTML w/ PDF [user_id:protected] => 25 [language_id:protected] => 1 [tagging_id:protected] => Bruce Lippy [priority_id:protected] => 1 [title:protected] => TBT1 Ergonomics in Construction [total_pages:protected] => 5 [billed_pages:protected] => 5 [publication_number:protected] => [part_of:protected] => [keywords:protected] => ergonomics, ergo, msd, musculoskeletal disorders, risk factors, lifting, carpal tunnel, repetition, awkward postures [comments:protected] => 7-28-2014 Jeff Nelson asked Bruce Lippy about what to do with a sentence included toward the top of the doc, "Fill them in on page 2 'Other Questions.'" -- Bruce said this sentence could be deleted from the HTML. [summary:protected] => This is the first in a series of 6 Tool Box Talks produced by Washington University in St. Louis on ergonomics in construction work. This one should be delivered first because it covers what ergonomics is, why construction workers need to talk about it, what the risk factors are for developing a health problem and how to prevent these problems. [transition_comments:protected] => [external_link:protected] => [consol_link:protected] => http://www.cpwrconstructionsolutions.org/pipes_vessels/solution/50/participatory-ergonomics-program.html [more_like_this:protected] => d001303,d001304,d001306,d001307,d001308,d001309 [permission_given_by:protected] => Lisa Jaegers, Washington U. in St. Louis [published:protected] => T [billable:protected] => F [img_name:protected] => [img_ext:protected] => png [img_width:protected] => [img_height:protected] => [img_credit:protected] => [img_practice:protected] => [vid_source_id:protected] => [vid_running_time:protected] => [vid_intended_audience:protected] => [vid_acquisition_info:protected] => [vid_cost:protected] => [vid_producer:protected] => [vid_filename:protected] => [vid_filename_downloadable:protected] => [date_summary:protected] => 2014 [date_permission_requested:protected] => [date_permission_received:protected] => [date_review_needed:protected] => [date_received:protected] => 06/12/14 [date_completed:protected] => 07/28/14 [date_billed:protected] => [date_modified:protected] => 10/09/15 [collBokExports:protected] => [lastBokExportCriteria:BaseElcoshItem:private] => [alreadyInSave:protected] => [alreadyInValidation:protected] => [validationFailures:protected] => Array ( ) [_new:BaseObject:private] => [_deleted:BaseObject:private] => [modifiedColumns:protected] => Array ( ) ) [2] => DocumentRecord Object ( [records:protected] => Array ( ) [recordId:protected] => [searchWordClass:protected] => [searchWordPeerClass:protected] => [bok_record:protected] => [authors:protected] => [organizations:protected] => [collections:protected] => [categories:protected] => [categories_initialized:protected] => [mapped_items:protected] => [content:protected] => [files:protected] => [language:protected] => Language Object ( [id:protected] => 1 [code:protected] => en [name:protected] => English [alreadyInSave:protected] => [alreadyInValidation:protected] => [validationFailures:protected] => Array ( ) [_new:BaseObject:private] => [_deleted:BaseObject:private] => [modifiedColumns:protected] => Array ( ) ) [old_record:protected] => [id:protected] => 3837 [old_id:protected] => [elcosh_id:protected] => d001306 [type:protected] => document [display_type:protected] => HTML w/ PDF [user_id:protected] => 25 [language_id:protected] => 1 [tagging_id:protected] => Bruce Lippy [priority_id:protected] => 1 [title:protected] => TBT2 Keep Reach Close [total_pages:protected] => 4 [billed_pages:protected] => 4 [publication_number:protected] => [part_of:protected] => [keywords:protected] => reach, ergonomic, ergo, MSD, carpal tunnel, repetition, awkward positions [comments:protected] => 7-28-2014 Jeff Nelson asked Bruce Lippy about what to do with a sentence included toward the top of the doc, "Fill them in on page 2 'Other Questions.'" -- Bruce said this sentence could be deleted from the HTML. [summary:protected] => This is the second of six Tool Box Talks created by Washington University in St. Louis on ergonomics in construction. There is a guide with the series that describes how to deliver these talks. This one deals with how to avoid awkward reaching during tasks to prevent injuries. try to work with your hands below your head and close to our body to reduce your risk of shoulder strains and back discomfort. This TBT recommends considering ways to move close to the task, keeping the work area free of obstacles, and talking with each other to provide constructive feedback about your working position. [transition_comments:protected] => [external_link:protected] => [consol_link:protected] => http://www.cpwrconstructionsolutions.org/hazard/959/lifting-and-carrying-manual-materials-handling.html [more_like_this:protected] => d001303,d001304,d001305,d001307,d001308,e001309 [permission_given_by:protected] => [published:protected] => T [billable:protected] => F [img_name:protected] => [img_ext:protected] => png [img_width:protected] => [img_height:protected] => [img_credit:protected] => [img_practice:protected] => [vid_source_id:protected] => [vid_running_time:protected] => [vid_intended_audience:protected] => [vid_acquisition_info:protected] => [vid_cost:protected] => [vid_producer:protected] => [vid_filename:protected] => [vid_filename_downloadable:protected] => [date_summary:protected] => 2014 [date_permission_requested:protected] => [date_permission_received:protected] => [date_review_needed:protected] => [date_received:protected] => 06/12/14 [date_completed:protected] => 07/28/14 [date_billed:protected] => [date_modified:protected] => 11/02/16 [collBokExports:protected] => [lastBokExportCriteria:BaseElcoshItem:private] => [alreadyInSave:protected] => [alreadyInValidation:protected] => [validationFailures:protected] => Array ( ) [_new:BaseObject:private] => [_deleted:BaseObject:private] => [modifiedColumns:protected] => Array ( ) ) [3] => DocumentRecord Object ( [records:protected] => Array ( ) [recordId:protected] => [searchWordClass:protected] => [searchWordPeerClass:protected] => [bok_record:protected] => [authors:protected] => [organizations:protected] => [collections:protected] => [categories:protected] => [categories_initialized:protected] => [mapped_items:protected] => [content:protected] => [files:protected] => [language:protected] => Language Object ( [id:protected] => 1 [code:protected] => en [name:protected] => English [alreadyInSave:protected] => [alreadyInValidation:protected] => [validationFailures:protected] => Array ( ) [_new:BaseObject:private] => [_deleted:BaseObject:private] => [modifiedColumns:protected] => Array ( ) ) [old_record:protected] => [id:protected] => 3839 [old_id:protected] => [elcosh_id:protected] => d001308 [type:protected] => document [display_type:protected] => HTML w/ PDF [user_id:protected] => 23 [language_id:protected] => 1 [tagging_id:protected] => Bruce Lippy [priority_id:protected] => 1 [title:protected] => TBT4 Move Materials With Assist [total_pages:protected] => 4 [billed_pages:protected] => 4 [publication_number:protected] => [part_of:protected] => [keywords:protected] => lifting, back injury, ergonomics, ergo, MSD, buddy system [comments:protected] => 7-28-2014 Jeff Nelson asked Bruce Lippy about what to do with a sentence included toward the top of the doc, "Fill them in on page 2 'Other Questions.'" -- Bruce said this sentence could be deleted from the HTML. [summary:protected] => This tool box talk is fourth in a series of 6 developed by Washington University in St. Louis on construction ergonomics. This one focuses on preventing back injuries by getting an assist when manually lifting. It recommends using a cart for transporting loads, taking less trips, avoiding carrying materials on the shoulder and helping each other to lift large or heavy materials when a cart or hoist is not available. [transition_comments:protected] => [external_link:protected] => [consol_link:protected] => http://www.cpwrconstructionsolutions.org/hazard/959/lifting-and-carrying-manual-materials-handling.html [more_like_this:protected] => d001303,d001304,d001305,d001306,d001307,d001309 [permission_given_by:protected] => Lisa Jaegers, Washington U. in St. Louis [published:protected] => T [billable:protected] => F [img_name:protected] => [img_ext:protected] => png [img_width:protected] => [img_height:protected] => [img_credit:protected] => [img_practice:protected] => [vid_source_id:protected] => [vid_running_time:protected] => [vid_intended_audience:protected] => [vid_acquisition_info:protected] => [vid_cost:protected] => [vid_producer:protected] => [vid_filename:protected] => [vid_filename_downloadable:protected] => [date_summary:protected] => 2014 [date_permission_requested:protected] => [date_permission_received:protected] => [date_review_needed:protected] => [date_received:protected] => 06/12/14 [date_completed:protected] => 07/29/14 [date_billed:protected] => [date_modified:protected] => 10/09/15 [collBokExports:protected] => [lastBokExportCriteria:BaseElcoshItem:private] => [alreadyInSave:protected] => [alreadyInValidation:protected] => [validationFailures:protected] => Array ( ) [_new:BaseObject:private] => [_deleted:BaseObject:private] => [modifiedColumns:protected] => Array ( ) ) [4] => DocumentRecord Object ( [records:protected] => Array ( ) [recordId:protected] => [searchWordClass:protected] => [searchWordPeerClass:protected] => [bok_record:protected] => [authors:protected] => [organizations:protected] => [collections:protected] => [categories:protected] => [categories_initialized:protected] => [mapped_items:protected] => [content:protected] => [files:protected] => [language:protected] => Language Object ( [id:protected] => 1 [code:protected] => en [name:protected] => English [alreadyInSave:protected] => [alreadyInValidation:protected] => [validationFailures:protected] => Array ( ) [_new:BaseObject:private] => [_deleted:BaseObject:private] => [modifiedColumns:protected] => Array ( ) ) [old_record:protected] => [id:protected] => 3840 [old_id:protected] => [elcosh_id:protected] => d001309 [type:protected] => document [display_type:protected] => HTML w/ PDF [user_id:protected] => 23 [language_id:protected] => 1 [tagging_id:protected] => Bruce Lippy [priority_id:protected] => 1 [title:protected] => TBT5 Manual Tools [total_pages:protected] => 4 [billed_pages:protected] => 4 [publication_number:protected] => [part_of:protected] => [keywords:protected] => ergonomic, hand tools, handles, MSD, musculoskeletal disorder, carpal tunnel [comments:protected] => 7-28-2014 Jeff Nelson asked Bruce Lippy about what to do with a sentence included toward the top of the doc, "Fill them in on page 2 'Other Questions.'" -- Bruce said this sentence could be deleted from the HTML. [summary:protected] => This is the fifth in a series of 6 tool box talks on construction ergonomics produced by the University of Washington in St. Louis. This one focuses on manual tools. It asks the following 6 key questions. Does the tool… 1. Fit the task? 2. Allow a good power grip? 3. Keep the wrist in a straight posture? 4. Feel comfortable? 5. Take less effort than other tools for the task? 6. Work effectively? [transition_comments:protected] => [external_link:protected] => [consol_link:protected] => http://www.cpwrconstructionsolutions.org/masonry/solution/383/ergonomic-hand-tools.html [more_like_this:protected] => d001303,d001304,d001305,d001306,d001307,d001308,d001310 [permission_given_by:protected] => Lisa Jaegers, U. Wash. St. Louis [published:protected] => T [billable:protected] => F [img_name:protected] => [img_ext:protected] => png [img_width:protected] => [img_height:protected] => [img_credit:protected] => [img_practice:protected] => [vid_source_id:protected] => [vid_running_time:protected] => [vid_intended_audience:protected] => [vid_acquisition_info:protected] => [vid_cost:protected] => [vid_producer:protected] => [vid_filename:protected] => [vid_filename_downloadable:protected] => [date_summary:protected] => 2014 [date_permission_requested:protected] => [date_permission_received:protected] => [date_review_needed:protected] => [date_received:protected] => 06/12/14 [date_completed:protected] => 07/29/14 [date_billed:protected] => [date_modified:protected] => 10/09/15 [collBokExports:protected] => [lastBokExportCriteria:BaseElcoshItem:private] => [alreadyInSave:protected] => [alreadyInValidation:protected] => [validationFailures:protected] => Array ( ) [_new:BaseObject:private] => [_deleted:BaseObject:private] => [modifiedColumns:protected] => Array ( ) ) ) ) [collections] => Array ( [3834] => ) [record] => DocumentRecord Object ( [records:protected] => Array ( ) [recordId:protected] => [searchWordClass:protected] => [searchWordPeerClass:protected] => [bok_record:protected] => [authors:protected] => Array ( ) [organizations:protected] => Array ( [182] => Organization Object ( [id:protected] => 182 [elcosh_id:protected] => o000205 [user_id:protected] => 14 [province_id:protected] => 0 [country_id:protected] => 0 [title:protected] => Washington University - St. Louis [address:protected] => [postal_code:protected] => [city:protected] => [department:protected] => [phone:protected] => [fax:protected] => [email:protected] => [website:protected] => [filename:protected] => [about:protected] => [comments:protected] => [logo_available:protected] => T [no_details:protected] => T [date_received:protected] => 2009-08-06 [date_completed:protected] => 2009-08-06 [date_billed:protected] => [alreadyInSave:protected] => [alreadyInValidation:protected] => [validationFailures:protected] => Array ( ) [_new:BaseObject:private] => [_deleted:BaseObject:private] => [modifiedColumns:protected] => Array ( ) ) ) [collections:protected] => Array ( [3834] => ) [categories:protected] => [categories_initialized:protected] => [mapped_items:protected] => Array ( [3833] => DocumentRecord Object ( [records:protected] => Array ( ) [recordId:protected] => [searchWordClass:protected] => [searchWordPeerClass:protected] => [bok_record:protected] => [authors:protected] => [organizations:protected] => [collections:protected] => [categories:protected] => [categories_initialized:protected] => [mapped_items:protected] => [content:protected] => [files:protected] => [language:protected] => [old_record:protected] => [id:protected] => 3833 [old_id:protected] => [elcosh_id:protected] => d001303 [type:protected] => document [display_type:protected] => HTML w/ PDF [user_id:protected] => 25 [language_id:protected] => 1 [tagging_id:protected] => Bruce Lippy [priority_id:protected] => 1 [title:protected] => Overview of Toolbox Talks on Ergonomics Developed by Washington University in St. Louis [total_pages:protected] => 3 [billed_pages:protected] => 3 [publication_number:protected] => [part_of:protected] => [keywords:protected] => ergonomics, musculoskeletal disorders, MSDs [comments:protected] => 7-28-2014 - Originally submitted as "HTML w/ doc and PDF", Jeff Nelson asked Bruce Lippy for permission to switch it to "HTML w/ PDF" -- permission was given [summary:protected] => This overviews provides a background on how Washington University in St. Louis developed this series of six toolbox talks on ergonomics. It also describes how they tested the effectiveness of these communication tools, concluding that the guide was valuable for improving the delivery of ergonomics training and interaction between the safety representative and workers. The researchers recommend preparing site-specific information prior to the talk and interacting with workers to discuss problems and ergonomic solutions during the safety meetings. [transition_comments:protected] => [external_link:protected] => [consol_link:protected] => [more_like_this:protected] => [permission_given_by:protected] => Lisa Jaegers, Washington U. in St. Louis [published:protected] => T [billable:protected] => F [img_name:protected] => [img_ext:protected] => png [img_width:protected] => [img_height:protected] => [img_credit:protected] => [img_practice:protected] => [vid_source_id:protected] => [vid_running_time:protected] => [vid_intended_audience:protected] => [vid_acquisition_info:protected] => [vid_cost:protected] => [vid_producer:protected] => [vid_filename:protected] => [vid_filename_downloadable:protected] => [date_summary:protected] => 2014 [date_permission_requested:protected] => [date_permission_received:protected] => [date_review_needed:protected] => [date_received:protected] => 06/11/14 [date_completed:protected] => 07/29/14 [date_billed:protected] => [date_modified:protected] => 07/29/14 [collBokExports:protected] => [lastBokExportCriteria:BaseElcoshItem:private] => [alreadyInSave:protected] => [alreadyInValidation:protected] => [validationFailures:protected] => Array ( ) [_new:BaseObject:private] => [_deleted:BaseObject:private] => [modifiedColumns:protected] => Array ( ) ) [3835] => DocumentRecord Object ( [records:protected] => Array ( ) [recordId:protected] => [searchWordClass:protected] => [searchWordPeerClass:protected] => [bok_record:protected] => [authors:protected] => [organizations:protected] => [collections:protected] => [categories:protected] => [categories_initialized:protected] => [mapped_items:protected] => [content:protected] => [files:protected] => [language:protected] => [old_record:protected] => [id:protected] => 3835 [old_id:protected] => [elcosh_id:protected] => d001304 [type:protected] => document [display_type:protected] => HTML w/ PDF [user_id:protected] => 25 [language_id:protected] => 1 [tagging_id:protected] => Bruce Lippy [priority_id:protected] => 1 [title:protected] => Ergonomics Tool Box Talks (TBT) Training Guide [total_pages:protected] => 2 [billed_pages:protected] => 2 [publication_number:protected] => [part_of:protected] => [keywords:protected] => Ergonomics, carpal tunnel, muscular skeletal disorders, msd [comments:protected] => [summary:protected] => CPWR-funded ergonomics research by Washington University at St. Louis led to the development of 6 tool box talks. This guide is an explanation of how to deliver the talks for maximum effectiveness. This guide should be reviewed before delivering any of the talks because it makes important recommendations like: • If possible, give the TBTs as a part of the crew’s regular safety meetings so that ergonomics is included in the safety discussion. • Try to locate an area with few distractions for gathering the crew. • For a team approach, invite the work crew, site superintendent, project manager and other general contractor and/or subcontractor reps who you feel may be helpful in supporting the training and ergonomics solutions. [transition_comments:protected] => [external_link:protected] => [consol_link:protected] => [more_like_this:protected] => d001303,d001305,d001306,d001307,d001308,d001309,d001310 [permission_given_by:protected] => [published:protected] => T [billable:protected] => F [img_name:protected] => [img_ext:protected] => png [img_width:protected] => [img_height:protected] => [img_credit:protected] => [img_practice:protected] => [vid_source_id:protected] => [vid_running_time:protected] => [vid_intended_audience:protected] => [vid_acquisition_info:protected] => [vid_cost:protected] => [vid_producer:protected] => [vid_filename:protected] => [vid_filename_downloadable:protected] => [date_summary:protected] => 2014 [date_permission_requested:protected] => [date_permission_received:protected] => [date_review_needed:protected] => [date_received:protected] => 06/12/14 [date_completed:protected] => 07/29/14 [date_billed:protected] => [date_modified:protected] => 07/29/14 [collBokExports:protected] => [lastBokExportCriteria:BaseElcoshItem:private] => [alreadyInSave:protected] => [alreadyInValidation:protected] => [validationFailures:protected] => Array ( ) [_new:BaseObject:private] => [_deleted:BaseObject:private] => [modifiedColumns:protected] => Array ( ) ) [3836] => DocumentRecord Object ( [records:protected] => Array ( ) [recordId:protected] => [searchWordClass:protected] => [searchWordPeerClass:protected] => [bok_record:protected] => [authors:protected] => [organizations:protected] => [collections:protected] => [categories:protected] => [categories_initialized:protected] => [mapped_items:protected] => [content:protected] => [files:protected] => [language:protected] => [old_record:protected] => [id:protected] => 3836 [old_id:protected] => [elcosh_id:protected] => d001305 [type:protected] => document [display_type:protected] => HTML w/ PDF [user_id:protected] => 25 [language_id:protected] => 1 [tagging_id:protected] => Bruce Lippy [priority_id:protected] => 1 [title:protected] => TBT1 Ergonomics in Construction [total_pages:protected] => 5 [billed_pages:protected] => 5 [publication_number:protected] => [part_of:protected] => [keywords:protected] => ergonomics, ergo, msd, musculoskeletal disorders, risk factors, lifting, carpal tunnel, repetition, awkward postures [comments:protected] => 7-28-2014 Jeff Nelson asked Bruce Lippy about what to do with a sentence included toward the top of the doc, "Fill them in on page 2 'Other Questions.'" -- Bruce said this sentence could be deleted from the HTML. [summary:protected] => This is the first in a series of 6 Tool Box Talks produced by Washington University in St. Louis on ergonomics in construction work. This one should be delivered first because it covers what ergonomics is, why construction workers need to talk about it, what the risk factors are for developing a health problem and how to prevent these problems. [transition_comments:protected] => [external_link:protected] => [consol_link:protected] => http://www.cpwrconstructionsolutions.org/pipes_vessels/solution/50/participatory-ergonomics-program.html [more_like_this:protected] => d001303,d001304,d001306,d001307,d001308,d001309 [permission_given_by:protected] => Lisa Jaegers, Washington U. in St. Louis [published:protected] => T [billable:protected] => F [img_name:protected] => [img_ext:protected] => png [img_width:protected] => [img_height:protected] => [img_credit:protected] => [img_practice:protected] => [vid_source_id:protected] => [vid_running_time:protected] => [vid_intended_audience:protected] => [vid_acquisition_info:protected] => [vid_cost:protected] => [vid_producer:protected] => [vid_filename:protected] => [vid_filename_downloadable:protected] => [date_summary:protected] => 2014 [date_permission_requested:protected] => [date_permission_received:protected] => [date_review_needed:protected] => [date_received:protected] => 06/12/14 [date_completed:protected] => 07/28/14 [date_billed:protected] => [date_modified:protected] => 10/09/15 [collBokExports:protected] => [lastBokExportCriteria:BaseElcoshItem:private] => [alreadyInSave:protected] => [alreadyInValidation:protected] => [validationFailures:protected] => Array ( ) [_new:BaseObject:private] => [_deleted:BaseObject:private] => [modifiedColumns:protected] => Array ( ) ) [3837] => DocumentRecord Object ( [records:protected] => Array ( ) [recordId:protected] => [searchWordClass:protected] => [searchWordPeerClass:protected] => [bok_record:protected] => [authors:protected] => [organizations:protected] => [collections:protected] => [categories:protected] => [categories_initialized:protected] => [mapped_items:protected] => [content:protected] => [files:protected] => [language:protected] => [old_record:protected] => [id:protected] => 3837 [old_id:protected] => [elcosh_id:protected] => d001306 [type:protected] => document [display_type:protected] => HTML w/ PDF [user_id:protected] => 25 [language_id:protected] => 1 [tagging_id:protected] => Bruce Lippy [priority_id:protected] => 1 [title:protected] => TBT2 Keep Reach Close [total_pages:protected] => 4 [billed_pages:protected] => 4 [publication_number:protected] => [part_of:protected] => [keywords:protected] => reach, ergonomic, ergo, MSD, carpal tunnel, repetition, awkward positions [comments:protected] => 7-28-2014 Jeff Nelson asked Bruce Lippy about what to do with a sentence included toward the top of the doc, "Fill them in on page 2 'Other Questions.'" -- Bruce said this sentence could be deleted from the HTML. [summary:protected] => This is the second of six Tool Box Talks created by Washington University in St. Louis on ergonomics in construction. There is a guide with the series that describes how to deliver these talks. This one deals with how to avoid awkward reaching during tasks to prevent injuries. try to work with your hands below your head and close to our body to reduce your risk of shoulder strains and back discomfort. This TBT recommends considering ways to move close to the task, keeping the work area free of obstacles, and talking with each other to provide constructive feedback about your working position. [transition_comments:protected] => [external_link:protected] => [consol_link:protected] => http://www.cpwrconstructionsolutions.org/hazard/959/lifting-and-carrying-manual-materials-handling.html [more_like_this:protected] => d001303,d001304,d001305,d001307,d001308,e001309 [permission_given_by:protected] => [published:protected] => T [billable:protected] => F [img_name:protected] => [img_ext:protected] => png [img_width:protected] => [img_height:protected] => [img_credit:protected] => [img_practice:protected] => [vid_source_id:protected] => [vid_running_time:protected] => [vid_intended_audience:protected] => [vid_acquisition_info:protected] => [vid_cost:protected] => [vid_producer:protected] => [vid_filename:protected] => [vid_filename_downloadable:protected] => [date_summary:protected] => 2014 [date_permission_requested:protected] => [date_permission_received:protected] => [date_review_needed:protected] => [date_received:protected] => 06/12/14 [date_completed:protected] => 07/28/14 [date_billed:protected] => [date_modified:protected] => 11/02/16 [collBokExports:protected] => [lastBokExportCriteria:BaseElcoshItem:private] => [alreadyInSave:protected] => [alreadyInValidation:protected] => [validationFailures:protected] => Array ( ) [_new:BaseObject:private] => [_deleted:BaseObject:private] => [modifiedColumns:protected] => Array ( ) ) [3839] => DocumentRecord Object ( [records:protected] => Array ( ) [recordId:protected] => [searchWordClass:protected] => [searchWordPeerClass:protected] => [bok_record:protected] => [authors:protected] => [organizations:protected] => [collections:protected] => [categories:protected] => [categories_initialized:protected] => [mapped_items:protected] => [content:protected] => [files:protected] => [language:protected] => [old_record:protected] => [id:protected] => 3839 [old_id:protected] => [elcosh_id:protected] => d001308 [type:protected] => document [display_type:protected] => HTML w/ PDF [user_id:protected] => 23 [language_id:protected] => 1 [tagging_id:protected] => Bruce Lippy [priority_id:protected] => 1 [title:protected] => TBT4 Move Materials With Assist [total_pages:protected] => 4 [billed_pages:protected] => 4 [publication_number:protected] => [part_of:protected] => [keywords:protected] => lifting, back injury, ergonomics, ergo, MSD, buddy system [comments:protected] => 7-28-2014 Jeff Nelson asked Bruce Lippy about what to do with a sentence included toward the top of the doc, "Fill them in on page 2 'Other Questions.'" -- Bruce said this sentence could be deleted from the HTML. [summary:protected] => This tool box talk is fourth in a series of 6 developed by Washington University in St. Louis on construction ergonomics. This one focuses on preventing back injuries by getting an assist when manually lifting. It recommends using a cart for transporting loads, taking less trips, avoiding carrying materials on the shoulder and helping each other to lift large or heavy materials when a cart or hoist is not available. [transition_comments:protected] => [external_link:protected] => [consol_link:protected] => http://www.cpwrconstructionsolutions.org/hazard/959/lifting-and-carrying-manual-materials-handling.html [more_like_this:protected] => d001303,d001304,d001305,d001306,d001307,d001309 [permission_given_by:protected] => Lisa Jaegers, Washington U. in St. Louis [published:protected] => T [billable:protected] => F [img_name:protected] => [img_ext:protected] => png [img_width:protected] => [img_height:protected] => [img_credit:protected] => [img_practice:protected] => [vid_source_id:protected] => [vid_running_time:protected] => [vid_intended_audience:protected] => [vid_acquisition_info:protected] => [vid_cost:protected] => [vid_producer:protected] => [vid_filename:protected] => [vid_filename_downloadable:protected] => [date_summary:protected] => 2014 [date_permission_requested:protected] => [date_permission_received:protected] => [date_review_needed:protected] => [date_received:protected] => 06/12/14 [date_completed:protected] => 07/29/14 [date_billed:protected] => [date_modified:protected] => 10/09/15 [collBokExports:protected] => [lastBokExportCriteria:BaseElcoshItem:private] => [alreadyInSave:protected] => [alreadyInValidation:protected] => [validationFailures:protected] => Array ( ) [_new:BaseObject:private] => [_deleted:BaseObject:private] => [modifiedColumns:protected] => Array ( ) ) [3840] => DocumentRecord Object ( [records:protected] => Array ( ) [recordId:protected] => [searchWordClass:protected] => [searchWordPeerClass:protected] => [bok_record:protected] => [authors:protected] => [organizations:protected] => [collections:protected] => [categories:protected] => [categories_initialized:protected] => [mapped_items:protected] => [content:protected] => [files:protected] => [language:protected] => [old_record:protected] => [id:protected] => 3840 [old_id:protected] => [elcosh_id:protected] => d001309 [type:protected] => document [display_type:protected] => HTML w/ PDF [user_id:protected] => 23 [language_id:protected] => 1 [tagging_id:protected] => Bruce Lippy [priority_id:protected] => 1 [title:protected] => TBT5 Manual Tools [total_pages:protected] => 4 [billed_pages:protected] => 4 [publication_number:protected] => [part_of:protected] => [keywords:protected] => ergonomic, hand tools, handles, MSD, musculoskeletal disorder, carpal tunnel [comments:protected] => 7-28-2014 Jeff Nelson asked Bruce Lippy about what to do with a sentence included toward the top of the doc, "Fill them in on page 2 'Other Questions.'" -- Bruce said this sentence could be deleted from the HTML. [summary:protected] => This is the fifth in a series of 6 tool box talks on construction ergonomics produced by the University of Washington in St. Louis. This one focuses on manual tools. It asks the following 6 key questions. Does the tool… 1. Fit the task? 2. Allow a good power grip? 3. Keep the wrist in a straight posture? 4. Feel comfortable? 5. Take less effort than other tools for the task? 6. Work effectively? [transition_comments:protected] => [external_link:protected] => [consol_link:protected] => http://www.cpwrconstructionsolutions.org/masonry/solution/383/ergonomic-hand-tools.html [more_like_this:protected] => d001303,d001304,d001305,d001306,d001307,d001308,d001310 [permission_given_by:protected] => Lisa Jaegers, U. Wash. St. Louis [published:protected] => T [billable:protected] => F [img_name:protected] => [img_ext:protected] => png [img_width:protected] => [img_height:protected] => [img_credit:protected] => [img_practice:protected] => [vid_source_id:protected] => [vid_running_time:protected] => [vid_intended_audience:protected] => [vid_acquisition_info:protected] => [vid_cost:protected] => [vid_producer:protected] => [vid_filename:protected] => [vid_filename_downloadable:protected] => [date_summary:protected] => 2014 [date_permission_requested:protected] => [date_permission_received:protected] => [date_review_needed:protected] => [date_received:protected] => 06/12/14 [date_completed:protected] => 07/29/14 [date_billed:protected] => [date_modified:protected] => 10/09/15 [collBokExports:protected] => [lastBokExportCriteria:BaseElcoshItem:private] => [alreadyInSave:protected] => [alreadyInValidation:protected] => [validationFailures:protected] => Array ( ) [_new:BaseObject:private] => [_deleted:BaseObject:private] => [modifiedColumns:protected] => Array ( ) ) ) [content:protected] => [files:protected] => Array ( [559] => [560] => [546] => File Object ( [id:protected] => 546 [filename:protected] => 3.jpg [downloadable:protected] => F [timestamp:protected] => 2009-07-03 12:54:22 [alreadyInSave:protected] => [alreadyInValidation:protected] => [validationFailures:protected] => Array ( ) [_new:BaseObject:private] => [_deleted:BaseObject:private] => [modifiedColumns:protected] => Array ( ) ) [9643] => File Object ( [id:protected] => 9643 [filename:protected] => d001307.pdf [downloadable:protected] => T [timestamp:protected] => 2014-07-27 19:09:19 [alreadyInSave:protected] => [alreadyInValidation:protected] => [validationFailures:protected] => Array ( ) [_new:BaseObject:private] => [_deleted:BaseObject:private] => [modifiedColumns:protected] => Array ( ) ) [566] => File Object ( [id:protected] => 566 [filename:protected] => 4.jpg [downloadable:protected] => F [timestamp:protected] => 2009-07-03 12:54:23 [alreadyInSave:protected] => [alreadyInValidation:protected] => [validationFailures:protected] => Array ( ) [_new:BaseObject:private] => [_deleted:BaseObject:private] => [modifiedColumns:protected] => Array ( ) ) ) [language:protected] => Language Object ( [id:protected] => 1 [code:protected] => en [name:protected] => English [alreadyInSave:protected] => [alreadyInValidation:protected] => [validationFailures:protected] => Array ( ) [_new:BaseObject:private] => [_deleted:BaseObject:private] => [modifiedColumns:protected] => Array ( ) ) [old_record:protected] => [id:protected] => 3838 [old_id:protected] => [elcosh_id:protected] => d001307 [type:protected] => document [display_type:protected] => HTML w/ PDF [user_id:protected] => 25 [language_id:protected] => 1 [tagging_id:protected] => Bruce Lippy [priority_id:protected] => 1 [title:protected] => TBT3 Positioning [total_pages:protected] => 4 [billed_pages:protected] => 4 [publication_number:protected] => [part_of:protected] => [keywords:protected] => position, positioning, ergonomics, ergo, carpal tunnel, MSD, musculoskeletal disorder [comments:protected] => 7-28-2014 Jeff Nelson asked Bruce Lippy about what to do with a sentence included toward the top of the doc, "Fill them in on page 2 'Other Questions.'" -- Bruce said this sentence could be deleted from the HTML. [summary:protected] => This third in a series of 6 Tool Box Talks on construction ergonomics focuses on proper positioning to avoid injuries. The TBT recommends: 1)prop up a task off of the floor by using a raised surface, cart, baker scaffold, saw horses to prep materials near waist height, 2)move the lift or ladder in the best position for the work, 3)position the lift in front of the area you plan to work without trying to reach too far on either side of the lift. [transition_comments:protected] => [external_link:protected] => [consol_link:protected] => http://www.cpwrconstructionsolutions.org/hazard/959/lifting-and-carrying-manual-materials-handling.html [more_like_this:protected] => d001303,d001304,d001305,d001306,d001308,d001309 [permission_given_by:protected] => Lisa Jaegers, WU-St. Louis [published:protected] => T [billable:protected] => F [img_name:protected] => [img_ext:protected] => png [img_width:protected] => [img_height:protected] => [img_credit:protected] => [img_practice:protected] => [vid_source_id:protected] => [vid_running_time:protected] => [vid_intended_audience:protected] => [vid_acquisition_info:protected] => [vid_cost:protected] => [vid_producer:protected] => [vid_filename:protected] => [vid_filename_downloadable:protected] => [date_summary:protected] => 2014 [date_permission_requested:protected] => [date_permission_received:protected] => [date_review_needed:protected] => [date_received:protected] => 06/12/14 [date_completed:protected] => 07/28/14 [date_billed:protected] => [date_modified:protected] => 10/09/15 [collBokExports:protected] => [lastBokExportCriteria:BaseElcoshItem:private] => [alreadyInSave:protected] => [alreadyInValidation:protected] => [validationFailures:protected] => Array ( ) [_new:BaseObject:private] => [_deleted:BaseObject:private] => [modifiedColumns:protected] => Array ( ) ) [show_text] => [document_content] => ElcoshItemDocumentContent Object ( [id:protected] => 2906 [item_id:protected] => 3838 [type:protected] => main [title:protected] => [content:protected] =>
Facilitator / Leader Tasks Before the Tool Box Talk (TBT)
- Read through this TBT guide.
- Walk the job site to find ergonomics examples based on the TBT. If possible, take photos of “safe” and “unsafe” examples at the site to be used during the TBT.
- Write down discussion questions to ask the group.
Learning Goals
After discussing this training topic, workers will have gained a general understanding of:
- Unsafe work positions.
- Solutions to improve work positioning.
TRAINING CARD
The last page of this PDF has directions for printing and laminating the training cards.
TRAINER’S TALKING POINTS
Why should we talk about positioning?
Construction work requires working in high, low, and tight spaces which often forces you to work in an awkward or uncomfortable position. Working in awkward reaching and bent positions can lead to shoulder and back discomfort and possible injury over time.
Demonstration: The training card provides examples of the range of reaching and the point at which the reach is unsafe. Hold your arms straight out in front of you. Look at your hands and wrists while I discuss each of the reach zones on the training card.
The Green Zone shows the ideal location for working with your hands. When possible, try to keep your work tasks as far out as your wrists.
The Orange Zone is for occasional work since it involves more weight on your shoulders and low back since your hands are away from your body. If needed, keep the reach distance as far as your fingertips.
The Red Zone is away from your body so far that it places you at higher risk for falls when in the air and shoulder and back discomfort. Limit the time you work reaching beyond your fingertips.
End of Demonstration
Discussion Question: Can anyone describe to us an awkward position that they work in or have seen someone work in?
- What does it feel like in your neck, back or arms when working in that position?
- Other Questions:_____________________________________________
Training Note: Here are examples of hazards in different construction trades. Choose your trade or one that is similar to your group’s line of work that can be used as hazards and solutions examples.
| Trade | Awkward Posture Hazards | Potential Solution |
|---|---|---|
| Carpenter-Drywall | Leaning over the side of a scissor lift to reach and operating a screw gun with the arm fully extended (reaching in the red zone past the fingertips). | Before starting to install the line of screws to the side of the lift, move the lift to re-center it for the next 2 lines of screws to be installed. |
| Floor Layer | Spreading mortar overhead on a wall with the bakers scaffold one foot away from the wall due to buckets on the floor below (reach in the red zone, past the fingertips). | Pre-plan this task by removing all objects in the path of the bakers scaffold. Having an open path allows you to work closer to the task. |
| Sheet Metal Worker | Prepping duct parts on the floor while bending the back and reaching to work on them. | Pre-plan this task by setting up a waist-height workstation on extra materials, a cart, or saw horses. |
Now let’s put this information into practice. What are some tricks or techniques that you use to work in a comfortable position?
- Other Questions:_____________________________________________
Here are a few other ideas that are listed on your training card:
Prop up your tasks off of the floor by using a raised surface, cart, baker scaffold, saw horses to prep materials near waist height.
Move the lift or ladder in the best position for the work – close to the work tasks.
For safety & comfort, try to position the lift in front of the area you plan to work without trying to reach too far on either side of the lift.
In summary, it is important to work in a safe position when possible in order to reduce the risk of falls and discomfort due to awkward working positions. Consider ways that you can work in the green/comfort zone and orange zone and avoid the unsafe red zone.
References
[Images modified from Grandjean & Eastman Kodak Co.]
1. Grandjean, E. 1988. Fitting the task to the man: A textbook of occupational ergonomics. 4th ed. Taylor & Francis.
2. Eastman Kodak Co. 1983. Ergonomic Design for People at Work. Vol 1. Wiley, John & Sons, Incorporated.
Refer to the resources at our website: oshr.im.wustl.edu for more Tool Box TIPS.
TRAINING ATTENDANCE SHEET
Training Topic: Ergonomics -- Positioning
Date:
| ATTENDEES | |
|---|---|
Directions for Making Laminated Training Cards
The last page of this PDF has directions for printing and laminating the training cards.
[content_transformed:protected] =>Facilitator / Leader Tasks Before the Tool Box Talk (TBT)
- Read through this TBT guide.
- Walk the job site to find ergonomics examples based on the TBT. If possible, take photos of “safe” and “unsafe” examples at the site to be used during the TBT.
- Write down discussion questions to ask the group.
Learning Goals
After discussing this training topic, workers will have gained a general understanding of:
- Unsafe work positions.
- Solutions to improve work positioning.
TRAINING CARD
The last page of this PDF has directions for printing and laminating the training cards.
TRAINER’S TALKING POINTS
Why should we talk about positioning?
Construction work requires working in high, low, and tight spaces which often forces you to work in an awkward or uncomfortable position. Working in awkward reaching and bent positions can lead to shoulder and back discomfort and possible injury over time.
Demonstration: The training card provides examples of the range of reaching and the point at which the reach is unsafe. Hold your arms straight out in front of you. Look at your hands and wrists while I discuss each of the reach zones on the training card.
The Green Zone shows the ideal location for working with your hands. When possible, try to keep your work tasks as far out as your wrists.
The Orange Zone is for occasional work since it involves more weight on your shoulders and low back since your hands are away from your body. If needed, keep the reach distance as far as your fingertips.
The Red Zone is away from your body so far that it places you at higher risk for falls when in the air and shoulder and back discomfort. Limit the time you work reaching beyond your fingertips.
End of Demonstration
Discussion Question: Can anyone describe to us an awkward position that they work in or have seen someone work in?
- What does it feel like in your neck, back or arms when working in that position?
- Other Questions:_____________________________________________
Training Note: Here are examples of hazards in different construction trades. Choose your trade or one that is similar to your group’s line of work that can be used as hazards and solutions examples.
| Trade | Awkward Posture Hazards | Potential Solution |
|---|---|---|
| Carpenter-Drywall | Leaning over the side of a scissor lift to reach and operating a screw gun with the arm fully extended (reaching in the red zone past the fingertips). | Before starting to install the line of screws to the side of the lift, move the lift to re-center it for the next 2 lines of screws to be installed. |
| Floor Layer | Spreading mortar overhead on a wall with the bakers scaffold one foot away from the wall due to buckets on the floor below (reach in the red zone, past the fingertips). | Pre-plan this task by removing all objects in the path of the bakers scaffold. Having an open path allows you to work closer to the task. |
| Sheet Metal Worker | Prepping duct parts on the floor while bending the back and reaching to work on them. | Pre-plan this task by setting up a waist-height workstation on extra materials, a cart, or saw horses. |
Now let’s put this information into practice. What are some tricks or techniques that you use to work in a comfortable position?
- Other Questions:_____________________________________________
Here are a few other ideas that are listed on your training card:
Prop up your tasks off of the floor by using a raised surface, cart, baker scaffold, saw horses to prep materials near waist height.
Move the lift or ladder in the best position for the work – close to the work tasks.
For safety & comfort, try to position the lift in front of the area you plan to work without trying to reach too far on either side of the lift.
In summary, it is important to work in a safe position when possible in order to reduce the risk of falls and discomfort due to awkward working positions. Consider ways that you can work in the green/comfort zone and orange zone and avoid the unsafe red zone.
References
[Images modified from Grandjean & Eastman Kodak Co.]
1. Grandjean, E. 1988. Fitting the task to the man: A textbook of occupational ergonomics. 4th ed. Taylor & Francis.
2. Eastman Kodak Co. 1983. Ergonomic Design for People at Work. Vol 1. Wiley, John & Sons, Incorporated.
Refer to the resources at our website: oshr.im.wustl.edu for more Tool Box TIPS.
TRAINING ATTENDANCE SHEET
Training Topic: Ergonomics -- Positioning
Date:
| ATTENDEES | |
|---|---|
Directions for Making Laminated Training Cards
The last page of this PDF has directions for printing and laminating the training cards.
[disclaimer:protected] => [disclaimer_transformed:protected] => [alreadyInSave:protected] => [alreadyInValidation:protected] => [validationFailures:protected] => Array ( ) [_new:BaseObject:private] => [_deleted:BaseObject:private] => [modifiedColumns:protected] => Array ( ) ) [template] => record ) [_globalContext:PHPTAL_Context:private] => stdClass Object ( ) [_echoDeclarations:PHPTAL_Context:private] => [referer] => http://elcosh.org/document/3838/d001307/TBT3%2BPositioning.html [curr_module] => Record [styles] => Array ( ) [javascript] => Array ( [0] => jquery.min.js ) [metas] => Array ( [language] => en [robots] => index, follow ) [user] => [curr_url] => https://elcosh.org/index.php?module=Record&id=3838&type=document [base_url] => https://elcosh.org/index.php?module=Record [title] => eLCOSH : TBT3 Positioning [language] => en [search_query] => [module] => Record [new_records] => Array ( [0] => Search_Result Object ( [title] => Toolbox Talk: Fixed Ladder [image] => /record/images/notavailable-p.png [blurb] => The CPWR Toolbox Talk on Fixed Ladders addresses the potential risks associated with using fixed ladders. The resource includes a brief case example,... [category] => Array ( [0] => 15 [1] => 47 [2] => 49 [3] => 51 [4] => 53 [5] => 55 [6] => 60 [7] => 64 [8] => 73 [9] => 76 [10] => 78 [11] => 80 [12] => 86 [13] => 87 [14] => 90 [15] => 92 [16] => 93 [17] => 94 [18] => 100 ) [labels] => Array ( [0] => Falls [1] => Work Environment [2] => Hazards [3] => Bricklayer [4] => Trades [5] => Carpenter [7] => Cement Mason [9] => Concrete Polisher [11] => Electrical Worker [13] => HVAC [15] => Laborer [17] => PCC/Restoration [19] => Plumber/Pipefitter [21] => Roofer/Waterproofer [23] => Sheetmetal Worker [25] => Welder [27] => Commercial & Institutional [28] => Jobsites [29] => Industrial [31] => LEED/Green Construction [33] => Renovations [35] => Residential [37] => Toolbox Talks [38] => Documents [39] => Media & Documents ) [type] => Toolbox Talks [sub_category] => [url] => /document/4430/d001660/Toolbox%2BTalk%253A%2BFixed%2BLadder.html [item:protected] => DocumentRecord Object ( [records:protected] => Array ( ) [recordId:protected] => [searchWordClass:protected] => [searchWordPeerClass:protected] => [bok_record:protected] => [authors:protected] => [organizations:protected] => [collections:protected] => [categories:protected] => Array ( [15] => Category Object ( [languages:protected] => [bok_resources:protected] => [bok_topics:protected] => [bok_keywords:protected] => [id:protected] => 15 [type:protected] => category [parent:protected] => 7 [label:protected] => Falls [alreadyInSave:protected] => [alreadyInValidation:protected] => [validationFailures:protected] => Array ( ) [_new:BaseObject:private] => [_deleted:BaseObject:private] => [modifiedColumns:protected] => Array ( ) ) [47] => Category Object ( [languages:protected] => [bok_resources:protected] => [bok_topics:protected] => [bok_keywords:protected] => [id:protected] => 47 [type:protected] => category [parent:protected] => 2 [label:protected] => Bricklayer [alreadyInSave:protected] => [alreadyInValidation:protected] => [validationFailures:protected] => Array ( ) [_new:BaseObject:private] => [_deleted:BaseObject:private] => [modifiedColumns:protected] => Array ( ) ) [49] => Category Object ( [languages:protected] => [bok_resources:protected] => [bok_topics:protected] => [bok_keywords:protected] => [id:protected] => 49 [type:protected] => category [parent:protected] => 2 [label:protected] => Carpenter [alreadyInSave:protected] => [alreadyInValidation:protected] => [validationFailures:protected] => Array ( ) [_new:BaseObject:private] => [_deleted:BaseObject:private] => [modifiedColumns:protected] => Array ( ) ) [51] => Category Object ( [languages:protected] => [bok_resources:protected] => [bok_topics:protected] => [bok_keywords:protected] => [id:protected] => 51 [type:protected] => category [parent:protected] => 2 [label:protected] => Cement Mason [alreadyInSave:protected] => [alreadyInValidation:protected] => [validationFailures:protected] => Array ( ) [_new:BaseObject:private] => [_deleted:BaseObject:private] => [modifiedColumns:protected] => Array ( ) ) [53] => Category Object ( [languages:protected] => [bok_resources:protected] => [bok_topics:protected] => [bok_keywords:protected] => [id:protected] => 53 [type:protected] => category [parent:protected] => 2 [label:protected] => Concrete Polisher [alreadyInSave:protected] => [alreadyInValidation:protected] => [validationFailures:protected] => Array ( ) [_new:BaseObject:private] => [_deleted:BaseObject:private] => [modifiedColumns:protected] => Array ( ) ) [55] => Category Object ( [languages:protected] => [bok_resources:protected] => [bok_topics:protected] => [bok_keywords:protected] => [id:protected] => 55 [type:protected] => category [parent:protected] => 2 [label:protected] => Electrical Worker [alreadyInSave:protected] => [alreadyInValidation:protected] => [validationFailures:protected] => Array ( ) [_new:BaseObject:private] => [_deleted:BaseObject:private] => [modifiedColumns:protected] => Array ( ) ) [60] => Category Object ( [languages:protected] => [bok_resources:protected] => [bok_topics:protected] => [bok_keywords:protected] => [id:protected] => 60 [type:protected] => category [parent:protected] => 2 [label:protected] => HVAC [alreadyInSave:protected] => [alreadyInValidation:protected] => [validationFailures:protected] => Array ( ) [_new:BaseObject:private] => [_deleted:BaseObject:private] => [modifiedColumns:protected] => Array ( ) ) [64] => Category Object ( [languages:protected] => [bok_resources:protected] => [bok_topics:protected] => [bok_keywords:protected] => [id:protected] => 64 [type:protected] => category [parent:protected] => 2 [label:protected] => Laborer [alreadyInSave:protected] => [alreadyInValidation:protected] => [validationFailures:protected] => Array ( ) [_new:BaseObject:private] => [_deleted:BaseObject:private] => [modifiedColumns:protected] => Array ( ) ) [73] => Category Object ( [languages:protected] => [bok_resources:protected] => [bok_topics:protected] => [bok_keywords:protected] => [id:protected] => 73 [type:protected] => category [parent:protected] => 2 [label:protected] => PCC/Restoration [alreadyInSave:protected] => [alreadyInValidation:protected] => [validationFailures:protected] => Array ( ) [_new:BaseObject:private] => [_deleted:BaseObject:private] => [modifiedColumns:protected] => Array ( ) ) [76] => Category Object ( [languages:protected] => [bok_resources:protected] => [bok_topics:protected] => [bok_keywords:protected] => [id:protected] => 76 [type:protected] => category [parent:protected] => 2 [label:protected] => Plumber/Pipefitter [alreadyInSave:protected] => [alreadyInValidation:protected] => [validationFailures:protected] => Array ( ) [_new:BaseObject:private] => [_deleted:BaseObject:private] => [modifiedColumns:protected] => Array ( ) ) [78] => Category Object ( [languages:protected] => [bok_resources:protected] => [bok_topics:protected] => [bok_keywords:protected] => [id:protected] => 78 [type:protected] => category [parent:protected] => 2 [label:protected] => Roofer/Waterproofer [alreadyInSave:protected] => [alreadyInValidation:protected] => [validationFailures:protected] => Array ( ) [_new:BaseObject:private] => [_deleted:BaseObject:private] => [modifiedColumns:protected] => Array ( ) ) [80] => Category Object ( [languages:protected] => [bok_resources:protected] => [bok_topics:protected] => [bok_keywords:protected] => [id:protected] => 80 [type:protected] => category [parent:protected] => 2 [label:protected] => Sheetmetal Worker [alreadyInSave:protected] => [alreadyInValidation:protected] => [validationFailures:protected] => Array ( ) [_new:BaseObject:private] => [_deleted:BaseObject:private] => [modifiedColumns:protected] => Array ( ) ) [86] => Category Object ( [languages:protected] => [bok_resources:protected] => [bok_topics:protected] => [bok_keywords:protected] => [id:protected] => 86 [type:protected] => category [parent:protected] => 2 [label:protected] => Welder [alreadyInSave:protected] => [alreadyInValidation:protected] => [validationFailures:protected] => Array ( ) [_new:BaseObject:private] => [_deleted:BaseObject:private] => [modifiedColumns:protected] => Array ( ) ) [87] => Category Object ( [languages:protected] => [bok_resources:protected] => [bok_topics:protected] => [bok_keywords:protected] => [id:protected] => 87 [type:protected] => category [parent:protected] => 3 [label:protected] => Commercial & Institutional [alreadyInSave:protected] => [alreadyInValidation:protected] => [validationFailures:protected] => Array ( ) [_new:BaseObject:private] => [_deleted:BaseObject:private] => [modifiedColumns:protected] => Array ( ) ) [90] => Category Object ( [languages:protected] => [bok_resources:protected] => [bok_topics:protected] => [bok_keywords:protected] => [id:protected] => 90 [type:protected] => category [parent:protected] => 3 [label:protected] => Industrial [alreadyInSave:protected] => [alreadyInValidation:protected] => [validationFailures:protected] => Array ( ) [_new:BaseObject:private] => [_deleted:BaseObject:private] => [modifiedColumns:protected] => Array ( ) ) [92] => Category Object ( [languages:protected] => [bok_resources:protected] => [bok_topics:protected] => [bok_keywords:protected] => [id:protected] => 92 [type:protected] => category [parent:protected] => 3 [label:protected] => LEED/Green Construction [alreadyInSave:protected] => [alreadyInValidation:protected] => [validationFailures:protected] => Array ( ) [_new:BaseObject:private] => [_deleted:BaseObject:private] => [modifiedColumns:protected] => Array ( ) ) [93] => Category Object ( [languages:protected] => [bok_resources:protected] => [bok_topics:protected] => [bok_keywords:protected] => [id:protected] => 93 [type:protected] => category [parent:protected] => 3 [label:protected] => Renovations [alreadyInSave:protected] => [alreadyInValidation:protected] => [validationFailures:protected] => Array ( ) [_new:BaseObject:private] => [_deleted:BaseObject:private] => [modifiedColumns:protected] => Array ( ) ) [94] => Category Object ( [languages:protected] => [bok_resources:protected] => [bok_topics:protected] => [bok_keywords:protected] => [id:protected] => 94 [type:protected] => category [parent:protected] => 3 [label:protected] => Residential [alreadyInSave:protected] => [alreadyInValidation:protected] => [validationFailures:protected] => Array ( ) [_new:BaseObject:private] => [_deleted:BaseObject:private] => [modifiedColumns:protected] => Array ( ) ) [100] => Category Object ( [languages:protected] => [bok_resources:protected] => [bok_topics:protected] => [bok_keywords:protected] => [id:protected] => 100 [type:protected] => category [parent:protected] => 6 [label:protected] => Toolbox Talks [alreadyInSave:protected] => [alreadyInValidation:protected] => [validationFailures:protected] => Array ( ) [_new:BaseObject:private] => [_deleted:BaseObject:private] => [modifiedColumns:protected] => Array ( ) ) ) [categories_initialized:protected] => 1 [mapped_items:protected] => [content:protected] => [files:protected] => [language:protected] => Language Object ( [id:protected] => 1 [code:protected] => en [name:protected] => English [alreadyInSave:protected] => [alreadyInValidation:protected] => [validationFailures:protected] => Array ( ) [_new:BaseObject:private] => [_deleted:BaseObject:private] => [modifiedColumns:protected] => Array ( ) ) [old_record:protected] => [id:protected] => 4430 [old_id:protected] => [elcosh_id:protected] => d001660 [type:protected] => document [display_type:protected] => HTML only (and links) [user_id:protected] => 0 [language_id:protected] => 1 [tagging_id:protected] => Mike Aguilar [priority_id:protected] => 1 [title:protected] => Toolbox Talk: Fixed Ladder [total_pages:protected] => 0 [billed_pages:protected] => 0 [publication_number:protected] => [part_of:protected] => [keywords:protected] => Fixed Ladders, Fall Prevention, Falls [comments:protected] => [summary:protected] => The CPWR Toolbox Talk on Fixed Ladders addresses the potential risks associated with using fixed ladders. The resource includes a brief case example, steps to prevent a related injury and questions for discussion. It includes an image that illustrates the hazard, which can be posted in a central location as a reminder of steps to work safely. Available in English and Spanish. [transition_comments:protected] => [external_link:protected] => [consol_link:protected] => [more_like_this:protected] => d001257,d001254,d001255,d001256,d001258,d001262,d001279 [permission_given_by:protected] => [published:protected] => T [billable:protected] => F [img_name:protected] => [img_ext:protected] => [img_width:protected] => [img_height:protected] => [img_credit:protected] => [img_practice:protected] => [vid_source_id:protected] => [vid_running_time:protected] => [vid_intended_audience:protected] => [vid_acquisition_info:protected] => [vid_cost:protected] => [vid_producer:protected] => [vid_filename:protected] => [vid_filename_downloadable:protected] => [date_summary:protected] => [date_permission_requested:protected] => [date_permission_received:protected] => [date_review_needed:protected] => [date_received:protected] => 06/10/22 [date_completed:protected] => 06/10/22 [date_billed:protected] => [date_modified:protected] => 06/16/25 [collBokExports:protected] => [lastBokExportCriteria:BaseElcoshItem:private] => [alreadyInSave:protected] => [alreadyInValidation:protected] => [validationFailures:protected] => Array ( ) [_new:BaseObject:private] => [_deleted:BaseObject:private] => [modifiedColumns:protected] => Array ( ) ) ) [1] => Search_Result Object ( [title] => Toolbox Talk: Work Zone Safety: Working Around Vehicles [image] => /record/images/notavailable-p.png [blurb] => The CPWR Toolbox Talk on Working Around Vehicles in the Work Zone addresses methods to avoid being struck-by a vehicle on a construction site. The res... [category] => Array ( [0] => 12 [1] => 18 [2] => 52 [3] => 57 [4] => 70 [5] => 85 [6] => 87 [7] => 88 [8] => 89 [9] => 91 [10] => 90 [11] => 92 [12] => 93 [13] => 94 [14] => 95 [15] => 100 ) [labels] => Array ( [0] => Crushed/Struck By [1] => Work Environment [2] => Hazards [3] => Motor Vehicles/Heavy Equipment [6] => Commercial Diver [7] => Trades [8] => Flagger [10] => Operating Engineer [12] => Truck Driver [14] => Commercial & Institutional [15] => Jobsites [16] => Demolition [18] => Disasters [20] => Heavy & Highway [22] => Industrial [24] => LEED/Green Construction [26] => Renovations [28] => Residential [30] => Underground [32] => Toolbox Talks [33] => Documents [34] => Media & Documents ) [type] => Toolbox Talks [sub_category] => [url] => /document/4428/d001658/Toolbox%2BTalk%253A%2BWork%2BZone%2BSafety%253A%2BWorking%2BAround%2BVehicles.html [item:protected] => DocumentRecord Object ( [records:protected] => Array ( ) [recordId:protected] => [searchWordClass:protected] => [searchWordPeerClass:protected] => [bok_record:protected] => [authors:protected] => [organizations:protected] => [collections:protected] => [categories:protected] => Array ( [12] => Category Object ( [languages:protected] => [bok_resources:protected] => [bok_topics:protected] => [bok_keywords:protected] => [id:protected] => 12 [type:protected] => category [parent:protected] => 7 [label:protected] => Crushed/Struck By [alreadyInSave:protected] => [alreadyInValidation:protected] => [validationFailures:protected] => Array ( ) [_new:BaseObject:private] => [_deleted:BaseObject:private] => [modifiedColumns:protected] => Array ( ) ) [18] => Category Object ( [languages:protected] => [bok_resources:protected] => [bok_topics:protected] => [bok_keywords:protected] => [id:protected] => 18 [type:protected] => category [parent:protected] => 7 [label:protected] => Motor Vehicles/Heavy Equipment [alreadyInSave:protected] => [alreadyInValidation:protected] => [validationFailures:protected] => Array ( ) [_new:BaseObject:private] => [_deleted:BaseObject:private] => [modifiedColumns:protected] => Array ( ) ) [52] => Category Object ( [languages:protected] => [bok_resources:protected] => [bok_topics:protected] => [bok_keywords:protected] => [id:protected] => 52 [type:protected] => category [parent:protected] => 2 [label:protected] => Commercial Diver [alreadyInSave:protected] => [alreadyInValidation:protected] => [validationFailures:protected] => Array ( ) [_new:BaseObject:private] => [_deleted:BaseObject:private] => [modifiedColumns:protected] => Array ( ) ) [57] => Category Object ( [languages:protected] => [bok_resources:protected] => [bok_topics:protected] => [bok_keywords:protected] => [id:protected] => 57 [type:protected] => category [parent:protected] => 2 [label:protected] => Flagger [alreadyInSave:protected] => [alreadyInValidation:protected] => [validationFailures:protected] => Array ( ) [_new:BaseObject:private] => [_deleted:BaseObject:private] => [modifiedColumns:protected] => Array ( ) ) [70] => Category Object ( [languages:protected] => [bok_resources:protected] => [bok_topics:protected] => [bok_keywords:protected] => [id:protected] => 70 [type:protected] => category [parent:protected] => 2 [label:protected] => Operating Engineer [alreadyInSave:protected] => [alreadyInValidation:protected] => [validationFailures:protected] => Array ( ) [_new:BaseObject:private] => [_deleted:BaseObject:private] => [modifiedColumns:protected] => Array ( ) ) [85] => Category Object ( [languages:protected] => [bok_resources:protected] => [bok_topics:protected] => [bok_keywords:protected] => [id:protected] => 85 [type:protected] => category [parent:protected] => 2 [label:protected] => Truck Driver [alreadyInSave:protected] => [alreadyInValidation:protected] => [validationFailures:protected] => Array ( ) [_new:BaseObject:private] => [_deleted:BaseObject:private] => [modifiedColumns:protected] => Array ( ) ) [87] => Category Object ( [languages:protected] => [bok_resources:protected] => [bok_topics:protected] => [bok_keywords:protected] => [id:protected] => 87 [type:protected] => category [parent:protected] => 3 [label:protected] => Commercial & Institutional [alreadyInSave:protected] => [alreadyInValidation:protected] => [validationFailures:protected] => Array ( ) [_new:BaseObject:private] => [_deleted:BaseObject:private] => [modifiedColumns:protected] => Array ( ) ) [88] => Category Object ( [languages:protected] => [bok_resources:protected] => [bok_topics:protected] => [bok_keywords:protected] => [id:protected] => 88 [type:protected] => category [parent:protected] => 3 [label:protected] => Demolition [alreadyInSave:protected] => [alreadyInValidation:protected] => [validationFailures:protected] => Array ( ) [_new:BaseObject:private] => [_deleted:BaseObject:private] => [modifiedColumns:protected] => Array ( ) ) [89] => Category Object ( [languages:protected] => [bok_resources:protected] => [bok_topics:protected] => [bok_keywords:protected] => [id:protected] => 89 [type:protected] => category [parent:protected] => 3 [label:protected] => Disasters [alreadyInSave:protected] => [alreadyInValidation:protected] => [validationFailures:protected] => Array ( ) [_new:BaseObject:private] => [_deleted:BaseObject:private] => [modifiedColumns:protected] => Array ( ) ) [91] => Category Object ( [languages:protected] => [bok_resources:protected] => [bok_topics:protected] => [bok_keywords:protected] => [id:protected] => 91 [type:protected] => category [parent:protected] => 3 [label:protected] => Heavy & Highway [alreadyInSave:protected] => [alreadyInValidation:protected] => [validationFailures:protected] => Array ( ) [_new:BaseObject:private] => [_deleted:BaseObject:private] => [modifiedColumns:protected] => Array ( ) ) [90] => Category Object ( [languages:protected] => [bok_resources:protected] => [bok_topics:protected] => [bok_keywords:protected] => [id:protected] => 90 [type:protected] => category [parent:protected] => 3 [label:protected] => Industrial [alreadyInSave:protected] => [alreadyInValidation:protected] => [validationFailures:protected] => Array ( ) [_new:BaseObject:private] => [_deleted:BaseObject:private] => [modifiedColumns:protected] => Array ( ) ) [92] => Category Object ( [languages:protected] => [bok_resources:protected] => [bok_topics:protected] => [bok_keywords:protected] => [id:protected] => 92 [type:protected] => category [parent:protected] => 3 [label:protected] => LEED/Green Construction [alreadyInSave:protected] => [alreadyInValidation:protected] => [validationFailures:protected] => Array ( ) [_new:BaseObject:private] => [_deleted:BaseObject:private] => [modifiedColumns:protected] => Array ( ) ) [93] => Category Object ( [languages:protected] => [bok_resources:protected] => [bok_topics:protected] => [bok_keywords:protected] => [id:protected] => 93 [type:protected] => category [parent:protected] => 3 [label:protected] => Renovations [alreadyInSave:protected] => [alreadyInValidation:protected] => [validationFailures:protected] => Array ( ) [_new:BaseObject:private] => [_deleted:BaseObject:private] => [modifiedColumns:protected] => Array ( ) ) [94] => Category Object ( [languages:protected] => [bok_resources:protected] => [bok_topics:protected] => [bok_keywords:protected] => [id:protected] => 94 [type:protected] => category [parent:protected] => 3 [label:protected] => Residential [alreadyInSave:protected] => [alreadyInValidation:protected] => [validationFailures:protected] => Array ( ) [_new:BaseObject:private] => [_deleted:BaseObject:private] => [modifiedColumns:protected] => Array ( ) ) [95] => Category Object ( [languages:protected] => [bok_resources:protected] => [bok_topics:protected] => [bok_keywords:protected] => [id:protected] => 95 [type:protected] => category [parent:protected] => 3 [label:protected] => Underground [alreadyInSave:protected] => [alreadyInValidation:protected] => [validationFailures:protected] => Array ( ) [_new:BaseObject:private] => [_deleted:BaseObject:private] => [modifiedColumns:protected] => Array ( ) ) [100] => Category Object ( [languages:protected] => [bok_resources:protected] => [bok_topics:protected] => [bok_keywords:protected] => [id:protected] => 100 [type:protected] => category [parent:protected] => 6 [label:protected] => Toolbox Talks [alreadyInSave:protected] => [alreadyInValidation:protected] => [validationFailures:protected] => Array ( ) [_new:BaseObject:private] => [_deleted:BaseObject:private] => [modifiedColumns:protected] => Array ( ) ) ) [categories_initialized:protected] => 1 [mapped_items:protected] => [content:protected] => [files:protected] => [language:protected] => Language Object ( [id:protected] => 1 [code:protected] => en [name:protected] => English [alreadyInSave:protected] => [alreadyInValidation:protected] => [validationFailures:protected] => Array ( ) [_new:BaseObject:private] => [_deleted:BaseObject:private] => [modifiedColumns:protected] => Array ( ) ) [old_record:protected] => [id:protected] => 4428 [old_id:protected] => [elcosh_id:protected] => d001658 [type:protected] => document [display_type:protected] => HTML only (and links) [user_id:protected] => 0 [language_id:protected] => 1 [tagging_id:protected] => Daniela Caceres [priority_id:protected] => 1 [title:protected] => Toolbox Talk: Work Zone Safety: Working Around Vehicles [total_pages:protected] => 0 [billed_pages:protected] => 0 [publication_number:protected] => [part_of:protected] => [keywords:protected] => Struck, Struck by, Vehicle, Work Zone Safety, Truck, Operator, Driver, Mobile Equipment [comments:protected] => [summary:protected] => The CPWR Toolbox Talk on Working Around Vehicles in the Work Zone addresses methods to avoid being struck-by a vehicle on a construction site. The resource includes a case example, steps to prevent a related injury, and questions for discussion. It includes a graphic that illustrates the hazard, which can be posted in a central location as a reminder of steps to work safely. Available in English and Spanish. [transition_comments:protected] => [external_link:protected] => [consol_link:protected] => [more_like_this:protected] => d001640 [permission_given_by:protected] => [published:protected] => T [billable:protected] => F [img_name:protected] => [img_ext:protected] => [img_width:protected] => [img_height:protected] => [img_credit:protected] => [img_practice:protected] => [vid_source_id:protected] => [vid_running_time:protected] => [vid_intended_audience:protected] => [vid_acquisition_info:protected] => [vid_cost:protected] => [vid_producer:protected] => [vid_filename:protected] => [vid_filename_downloadable:protected] => [date_summary:protected] => [date_permission_requested:protected] => [date_permission_received:protected] => [date_review_needed:protected] => [date_received:protected] => 12/23/21 [date_completed:protected] => 12/23/21 [date_billed:protected] => [date_modified:protected] => 05/19/23 [collBokExports:protected] => [lastBokExportCriteria:BaseElcoshItem:private] => [alreadyInSave:protected] => [alreadyInValidation:protected] => [validationFailures:protected] => Array ( ) [_new:BaseObject:private] => [_deleted:BaseObject:private] => [modifiedColumns:protected] => Array ( ) ) ) [2] => Search_Result Object ( [title] => Construction Dive -- DeWalt's Jobsite Pro headphones recalled for fire hazards [image] => /record/images/notavailable-p.png [blurb] => A recall notice by the United States Consumer Product Safety Commission affects over 300,000 DeWalt Jobsite Pro Headphones. The recall is a result of... [category] => Array ( [0] => 16 [1] => 44 [2] => 45 [3] => 46 [4] => 47 [5] => 48 [6] => 49 [7] => 50 [8] => 51 [9] => 52 [10] => 53 [11] => 54 [12] => 55 [13] => 56 [14] => 57 [15] => 58 [16] => 59 [17] => 60 [18] => 61 [19] => 64 [20] => 65 [21] => 66 [22] => 67 [23] => 68 [24] => 69 [25] => 70 [26] => 71 [27] => 72 [28] => 73 [29] => 74 [30] => 75 [31] => 76 [32] => 77 [33] => 63 [34] => 78 [35] => 79 [36] => 80 [37] => 81 [38] => 82 [39] => 62 [40] => 83 [41] => 84 [42] => 85 [43] => 86 [44] => 87 [45] => 88 [46] => 89 [47] => 91 [48] => 90 [49] => 92 [50] => 93 [51] => 94 [52] => 95 ) [labels] => Array ( [0] => Fire & Explosions [1] => Work Environment [2] => Hazards [3] => Acoustical Ceiling Carpenter [4] => Trades [5] => Asbestos/Insulator [7] => Boilermaker [9] => Bricklayer [11] => Cabinetmaker [13] => Carpenter [15] => Carpet Layer [17] => Cement Mason [19] => Commercial Diver [21] => Concrete Polisher [23] => Drywall Applicator Specialist [25] => Electrical Worker [27] => Elevator Constructor [29] => Flagger [31] => Glazier [33] => Hazardous Waste Cleanup [35] => HVAC [37] => Interior Systems Carpenter [39] => Laborer [41] => Landscaper [43] => Lather [45] => Lead Abatement Worker [47] => Maintenance Worker [49] => Millwright [51] => Operating Engineer [53] => Painter [55] => Paper Hanger [57] => PCC/Restoration [59] => Pile Driver [61] => Plasterer [63] => Plumber/Pipefitter [65] => Refractory Worker [67] => Reinforcing Ironworker [69] => Roofer/Waterproofer [71] => Scaffold Erector [73] => Sheetmetal Worker [75] => Sprinkler Fitter [77] => Stonemason [79] => Structural Ironworker [81] => Terrazzo Worker [83] => Tile Setter [85] => Truck Driver [87] => Welder [89] => Commercial & Institutional [90] => Jobsites [91] => Demolition [93] => Disasters [95] => Heavy & Highway [97] => Industrial [99] => LEED/Green Construction [101] => Renovations [103] => Residential [105] => Underground ) [type] => [sub_category] => [url] => /document/4426/d001656/Construction%2BDive%2B--%2BDeWalt%2527s%2BJobsite%2BPro%2Bheadphones%2Brecalled%2Bfor%2Bfire%2Bhazards.html [item:protected] => DocumentRecord Object ( [records:protected] => Array ( ) [recordId:protected] => [searchWordClass:protected] => [searchWordPeerClass:protected] => [bok_record:protected] => [authors:protected] => [organizations:protected] => [collections:protected] => [categories:protected] => Array ( [16] => Category Object ( [languages:protected] => [bok_resources:protected] => [bok_topics:protected] => [bok_keywords:protected] => [id:protected] => 16 [type:protected] => category [parent:protected] => 7 [label:protected] => Fire & Explosions [alreadyInSave:protected] => [alreadyInValidation:protected] => [validationFailures:protected] => Array ( ) [_new:BaseObject:private] => [_deleted:BaseObject:private] => [modifiedColumns:protected] => Array ( ) ) [44] => Category Object ( [languages:protected] => [bok_resources:protected] => [bok_topics:protected] => [bok_keywords:protected] => [id:protected] => 44 [type:protected] => category [parent:protected] => 2 [label:protected] => Acoustical Ceiling Carpenter [alreadyInSave:protected] => [alreadyInValidation:protected] => [validationFailures:protected] => Array ( ) [_new:BaseObject:private] => [_deleted:BaseObject:private] => [modifiedColumns:protected] => Array ( ) ) [45] => Category Object ( [languages:protected] => [bok_resources:protected] => [bok_topics:protected] => [bok_keywords:protected] => [id:protected] => 45 [type:protected] => category [parent:protected] => 2 [label:protected] => Asbestos/Insulator [alreadyInSave:protected] => [alreadyInValidation:protected] => [validationFailures:protected] => Array ( ) [_new:BaseObject:private] => [_deleted:BaseObject:private] => [modifiedColumns:protected] => Array ( ) ) [46] => Category Object ( [languages:protected] => [bok_resources:protected] => [bok_topics:protected] => [bok_keywords:protected] => [id:protected] => 46 [type:protected] => category [parent:protected] => 2 [label:protected] => Boilermaker [alreadyInSave:protected] => [alreadyInValidation:protected] => [validationFailures:protected] => Array ( ) [_new:BaseObject:private] => [_deleted:BaseObject:private] => [modifiedColumns:protected] => Array ( ) ) [47] => Category Object ( [languages:protected] => [bok_resources:protected] => [bok_topics:protected] => [bok_keywords:protected] => [id:protected] => 47 [type:protected] => category [parent:protected] => 2 [label:protected] => Bricklayer [alreadyInSave:protected] => [alreadyInValidation:protected] => [validationFailures:protected] => Array ( ) [_new:BaseObject:private] => [_deleted:BaseObject:private] => [modifiedColumns:protected] => Array ( ) ) [48] => Category Object ( [languages:protected] => [bok_resources:protected] => [bok_topics:protected] => [bok_keywords:protected] => [id:protected] => 48 [type:protected] => category [parent:protected] => 2 [label:protected] => Cabinetmaker [alreadyInSave:protected] => [alreadyInValidation:protected] => [validationFailures:protected] => Array ( ) [_new:BaseObject:private] => [_deleted:BaseObject:private] => [modifiedColumns:protected] => Array ( ) ) [49] => Category Object ( [languages:protected] => [bok_resources:protected] => [bok_topics:protected] => [bok_keywords:protected] => [id:protected] => 49 [type:protected] => category [parent:protected] => 2 [label:protected] => Carpenter [alreadyInSave:protected] => [alreadyInValidation:protected] => [validationFailures:protected] => Array ( ) [_new:BaseObject:private] => [_deleted:BaseObject:private] => [modifiedColumns:protected] => Array ( ) ) [50] => Category Object ( [languages:protected] => [bok_resources:protected] => [bok_topics:protected] => [bok_keywords:protected] => [id:protected] => 50 [type:protected] => category [parent:protected] => 2 [label:protected] => Carpet Layer [alreadyInSave:protected] => [alreadyInValidation:protected] => [validationFailures:protected] => Array ( ) [_new:BaseObject:private] => [_deleted:BaseObject:private] => [modifiedColumns:protected] => Array ( ) ) [51] => Category Object ( [languages:protected] => [bok_resources:protected] => [bok_topics:protected] => [bok_keywords:protected] => [id:protected] => 51 [type:protected] => category [parent:protected] => 2 [label:protected] => Cement Mason [alreadyInSave:protected] => [alreadyInValidation:protected] => [validationFailures:protected] => Array ( ) [_new:BaseObject:private] => [_deleted:BaseObject:private] => [modifiedColumns:protected] => Array ( ) ) [52] => Category Object ( [languages:protected] => [bok_resources:protected] => [bok_topics:protected] => [bok_keywords:protected] => [id:protected] => 52 [type:protected] => category [parent:protected] => 2 [label:protected] => Commercial Diver [alreadyInSave:protected] => [alreadyInValidation:protected] => [validationFailures:protected] => Array ( ) [_new:BaseObject:private] => [_deleted:BaseObject:private] => [modifiedColumns:protected] => Array ( ) ) [53] => Category Object ( [languages:protected] => [bok_resources:protected] => [bok_topics:protected] => [bok_keywords:protected] => [id:protected] => 53 [type:protected] => category [parent:protected] => 2 [label:protected] => Concrete Polisher [alreadyInSave:protected] => [alreadyInValidation:protected] => [validationFailures:protected] => Array ( ) [_new:BaseObject:private] => [_deleted:BaseObject:private] => [modifiedColumns:protected] => Array ( ) ) [54] => Category Object ( [languages:protected] => [bok_resources:protected] => [bok_topics:protected] => [bok_keywords:protected] => [id:protected] => 54 [type:protected] => category [parent:protected] => 2 [label:protected] => Drywall Applicator Specialist [alreadyInSave:protected] => [alreadyInValidation:protected] => [validationFailures:protected] => Array ( ) [_new:BaseObject:private] => [_deleted:BaseObject:private] => [modifiedColumns:protected] => Array ( ) ) [55] => Category Object ( [languages:protected] => [bok_resources:protected] => [bok_topics:protected] => [bok_keywords:protected] => [id:protected] => 55 [type:protected] => category [parent:protected] => 2 [label:protected] => Electrical Worker [alreadyInSave:protected] => [alreadyInValidation:protected] => [validationFailures:protected] => Array ( ) [_new:BaseObject:private] => [_deleted:BaseObject:private] => [modifiedColumns:protected] => Array ( ) ) [56] => Category Object ( [languages:protected] => [bok_resources:protected] => [bok_topics:protected] => [bok_keywords:protected] => [id:protected] => 56 [type:protected] => category [parent:protected] => 2 [label:protected] => Elevator Constructor [alreadyInSave:protected] => [alreadyInValidation:protected] => [validationFailures:protected] => Array ( ) [_new:BaseObject:private] => [_deleted:BaseObject:private] => [modifiedColumns:protected] => Array ( ) ) [57] => Category Object ( [languages:protected] => [bok_resources:protected] => [bok_topics:protected] => [bok_keywords:protected] => [id:protected] => 57 [type:protected] => category [parent:protected] => 2 [label:protected] => Flagger [alreadyInSave:protected] => [alreadyInValidation:protected] => [validationFailures:protected] => Array ( ) [_new:BaseObject:private] => [_deleted:BaseObject:private] => [modifiedColumns:protected] => Array ( ) ) [58] => Category Object ( [languages:protected] => [bok_resources:protected] => [bok_topics:protected] => [bok_keywords:protected] => [id:protected] => 58 [type:protected] => category [parent:protected] => 2 [label:protected] => Glazier [alreadyInSave:protected] => [alreadyInValidation:protected] => [validationFailures:protected] => Array ( ) [_new:BaseObject:private] => [_deleted:BaseObject:private] => [modifiedColumns:protected] => Array ( ) ) [59] => Category Object ( [languages:protected] => [bok_resources:protected] => [bok_topics:protected] => [bok_keywords:protected] => [id:protected] => 59 [type:protected] => category [parent:protected] => 2 [label:protected] => Hazardous Waste Cleanup [alreadyInSave:protected] => [alreadyInValidation:protected] => [validationFailures:protected] => Array ( ) [_new:BaseObject:private] => [_deleted:BaseObject:private] => [modifiedColumns:protected] => Array ( ) ) [60] => Category Object ( [languages:protected] => [bok_resources:protected] => [bok_topics:protected] => [bok_keywords:protected] => [id:protected] => 60 [type:protected] => category [parent:protected] => 2 [label:protected] => HVAC [alreadyInSave:protected] => [alreadyInValidation:protected] => [validationFailures:protected] => Array ( ) [_new:BaseObject:private] => [_deleted:BaseObject:private] => [modifiedColumns:protected] => Array ( ) ) [61] => Category Object ( [languages:protected] => [bok_resources:protected] => [bok_topics:protected] => [bok_keywords:protected] => [id:protected] => 61 [type:protected] => category [parent:protected] => 2 [label:protected] => Interior Systems Carpenter [alreadyInSave:protected] => [alreadyInValidation:protected] => [validationFailures:protected] => Array ( ) [_new:BaseObject:private] => [_deleted:BaseObject:private] => [modifiedColumns:protected] => Array ( ) ) [64] => Category Object ( [languages:protected] => [bok_resources:protected] => [bok_topics:protected] => [bok_keywords:protected] => [id:protected] => 64 [type:protected] => category [parent:protected] => 2 [label:protected] => Laborer [alreadyInSave:protected] => [alreadyInValidation:protected] => [validationFailures:protected] => Array ( ) [_new:BaseObject:private] => [_deleted:BaseObject:private] => [modifiedColumns:protected] => Array ( ) ) [65] => Category Object ( [languages:protected] => [bok_resources:protected] => [bok_topics:protected] => [bok_keywords:protected] => [id:protected] => 65 [type:protected] => category [parent:protected] => 2 [label:protected] => Landscaper [alreadyInSave:protected] => [alreadyInValidation:protected] => [validationFailures:protected] => Array ( ) [_new:BaseObject:private] => [_deleted:BaseObject:private] => [modifiedColumns:protected] => Array ( ) ) [66] => Category Object ( [languages:protected] => [bok_resources:protected] => [bok_topics:protected] => [bok_keywords:protected] => [id:protected] => 66 [type:protected] => category [parent:protected] => 2 [label:protected] => Lather [alreadyInSave:protected] => [alreadyInValidation:protected] => [validationFailures:protected] => Array ( ) [_new:BaseObject:private] => [_deleted:BaseObject:private] => [modifiedColumns:protected] => Array ( ) ) [67] => Category Object ( [languages:protected] => [bok_resources:protected] => [bok_topics:protected] => [bok_keywords:protected] => [id:protected] => 67 [type:protected] => category [parent:protected] => 2 [label:protected] => Lead Abatement Worker [alreadyInSave:protected] => [alreadyInValidation:protected] => [validationFailures:protected] => Array ( ) [_new:BaseObject:private] => [_deleted:BaseObject:private] => [modifiedColumns:protected] => Array ( ) ) [68] => Category Object ( [languages:protected] => [bok_resources:protected] => [bok_topics:protected] => [bok_keywords:protected] => [id:protected] => 68 [type:protected] => category [parent:protected] => 2 [label:protected] => Maintenance Worker [alreadyInSave:protected] => [alreadyInValidation:protected] => [validationFailures:protected] => Array ( ) [_new:BaseObject:private] => [_deleted:BaseObject:private] => [modifiedColumns:protected] => Array ( ) ) [69] => Category Object ( [languages:protected] => [bok_resources:protected] => [bok_topics:protected] => [bok_keywords:protected] => [id:protected] => 69 [type:protected] => category [parent:protected] => 2 [label:protected] => Millwright [alreadyInSave:protected] => [alreadyInValidation:protected] => [validationFailures:protected] => Array ( ) [_new:BaseObject:private] => [_deleted:BaseObject:private] => [modifiedColumns:protected] => Array ( ) ) [70] => Category Object ( [languages:protected] => [bok_resources:protected] => [bok_topics:protected] => [bok_keywords:protected] => [id:protected] => 70 [type:protected] => category [parent:protected] => 2 [label:protected] => Operating Engineer [alreadyInSave:protected] => [alreadyInValidation:protected] => [validationFailures:protected] => Array ( ) [_new:BaseObject:private] => [_deleted:BaseObject:private] => [modifiedColumns:protected] => Array ( ) ) [71] => Category Object ( [languages:protected] => [bok_resources:protected] => [bok_topics:protected] => [bok_keywords:protected] => [id:protected] => 71 [type:protected] => category [parent:protected] => 2 [label:protected] => Painter [alreadyInSave:protected] => [alreadyInValidation:protected] => [validationFailures:protected] => Array ( ) [_new:BaseObject:private] => [_deleted:BaseObject:private] => [modifiedColumns:protected] => Array ( ) ) [72] => Category Object ( [languages:protected] => [bok_resources:protected] => [bok_topics:protected] => [bok_keywords:protected] => [id:protected] => 72 [type:protected] => category [parent:protected] => 2 [label:protected] => Paper Hanger [alreadyInSave:protected] => [alreadyInValidation:protected] => [validationFailures:protected] => Array ( ) [_new:BaseObject:private] => [_deleted:BaseObject:private] => [modifiedColumns:protected] => Array ( ) ) [73] => Category Object ( [languages:protected] => [bok_resources:protected] => [bok_topics:protected] => [bok_keywords:protected] => [id:protected] => 73 [type:protected] => category [parent:protected] => 2 [label:protected] => PCC/Restoration [alreadyInSave:protected] => [alreadyInValidation:protected] => [validationFailures:protected] => Array ( ) [_new:BaseObject:private] => [_deleted:BaseObject:private] => [modifiedColumns:protected] => Array ( ) ) [74] => Category Object ( [languages:protected] => [bok_resources:protected] => [bok_topics:protected] => [bok_keywords:protected] => [id:protected] => 74 [type:protected] => category [parent:protected] => 2 [label:protected] => Pile Driver [alreadyInSave:protected] => [alreadyInValidation:protected] => [validationFailures:protected] => Array ( ) [_new:BaseObject:private] => [_deleted:BaseObject:private] => [modifiedColumns:protected] => Array ( ) ) [75] => Category Object ( [languages:protected] => [bok_resources:protected] => [bok_topics:protected] => [bok_keywords:protected] => [id:protected] => 75 [type:protected] => category [parent:protected] => 2 [label:protected] => Plasterer [alreadyInSave:protected] => [alreadyInValidation:protected] => [validationFailures:protected] => Array ( ) [_new:BaseObject:private] => [_deleted:BaseObject:private] => [modifiedColumns:protected] => Array ( ) ) [76] => Category Object ( [languages:protected] => [bok_resources:protected] => [bok_topics:protected] => [bok_keywords:protected] => [id:protected] => 76 [type:protected] => category [parent:protected] => 2 [label:protected] => Plumber/Pipefitter [alreadyInSave:protected] => [alreadyInValidation:protected] => [validationFailures:protected] => Array ( ) [_new:BaseObject:private] => [_deleted:BaseObject:private] => [modifiedColumns:protected] => Array ( ) ) [77] => Category Object ( [languages:protected] => [bok_resources:protected] => [bok_topics:protected] => [bok_keywords:protected] => [id:protected] => 77 [type:protected] => category [parent:protected] => 2 [label:protected] => Refractory Worker [alreadyInSave:protected] => [alreadyInValidation:protected] => [validationFailures:protected] => Array ( ) [_new:BaseObject:private] => [_deleted:BaseObject:private] => [modifiedColumns:protected] => Array ( ) ) [63] => Category Object ( [languages:protected] => [bok_resources:protected] => [bok_topics:protected] => [bok_keywords:protected] => [id:protected] => 63 [type:protected] => category [parent:protected] => 2 [label:protected] => Reinforcing Ironworker [alreadyInSave:protected] => [alreadyInValidation:protected] => [validationFailures:protected] => Array ( ) [_new:BaseObject:private] => [_deleted:BaseObject:private] => [modifiedColumns:protected] => Array ( ) ) [78] => Category Object ( [languages:protected] => [bok_resources:protected] => [bok_topics:protected] => [bok_keywords:protected] => [id:protected] => 78 [type:protected] => category [parent:protected] => 2 [label:protected] => Roofer/Waterproofer [alreadyInSave:protected] => [alreadyInValidation:protected] => [validationFailures:protected] => Array ( ) [_new:BaseObject:private] => [_deleted:BaseObject:private] => [modifiedColumns:protected] => Array ( ) ) [79] => Category Object ( [languages:protected] => [bok_resources:protected] => [bok_topics:protected] => [bok_keywords:protected] => [id:protected] => 79 [type:protected] => category [parent:protected] => 2 [label:protected] => Scaffold Erector [alreadyInSave:protected] => [alreadyInValidation:protected] => [validationFailures:protected] => Array ( ) [_new:BaseObject:private] => [_deleted:BaseObject:private] => [modifiedColumns:protected] => Array ( ) ) [80] => Category Object ( [languages:protected] => [bok_resources:protected] => [bok_topics:protected] => [bok_keywords:protected] => [id:protected] => 80 [type:protected] => category [parent:protected] => 2 [label:protected] => Sheetmetal Worker [alreadyInSave:protected] => [alreadyInValidation:protected] => [validationFailures:protected] => Array ( ) [_new:BaseObject:private] => [_deleted:BaseObject:private] => [modifiedColumns:protected] => Array ( ) ) [81] => Category Object ( [languages:protected] => [bok_resources:protected] => [bok_topics:protected] => [bok_keywords:protected] => [id:protected] => 81 [type:protected] => category [parent:protected] => 2 [label:protected] => Sprinkler Fitter [alreadyInSave:protected] => [alreadyInValidation:protected] => [validationFailures:protected] => Array ( ) [_new:BaseObject:private] => [_deleted:BaseObject:private] => [modifiedColumns:protected] => Array ( ) ) [82] => Category Object ( [languages:protected] => [bok_resources:protected] => [bok_topics:protected] => [bok_keywords:protected] => [id:protected] => 82 [type:protected] => category [parent:protected] => 2 [label:protected] => Stonemason [alreadyInSave:protected] => [alreadyInValidation:protected] => [validationFailures:protected] => Array ( ) [_new:BaseObject:private] => [_deleted:BaseObject:private] => [modifiedColumns:protected] => Array ( ) ) [62] => Category Object ( [languages:protected] => [bok_resources:protected] => [bok_topics:protected] => [bok_keywords:protected] => [id:protected] => 62 [type:protected] => category [parent:protected] => 2 [label:protected] => Structural Ironworker [alreadyInSave:protected] => [alreadyInValidation:protected] => [validationFailures:protected] => Array ( ) [_new:BaseObject:private] => [_deleted:BaseObject:private] => [modifiedColumns:protected] => Array ( ) ) [83] => Category Object ( [languages:protected] => [bok_resources:protected] => [bok_topics:protected] => [bok_keywords:protected] => [id:protected] => 83 [type:protected] => category [parent:protected] => 2 [label:protected] => Terrazzo Worker [alreadyInSave:protected] => [alreadyInValidation:protected] => [validationFailures:protected] => Array ( ) [_new:BaseObject:private] => [_deleted:BaseObject:private] => [modifiedColumns:protected] => Array ( ) ) [84] => Category Object ( [languages:protected] => [bok_resources:protected] => [bok_topics:protected] => [bok_keywords:protected] => [id:protected] => 84 [type:protected] => category [parent:protected] => 2 [label:protected] => Tile Setter [alreadyInSave:protected] => [alreadyInValidation:protected] => [validationFailures:protected] => Array ( ) [_new:BaseObject:private] => [_deleted:BaseObject:private] => [modifiedColumns:protected] => Array ( ) ) [85] => Category Object ( [languages:protected] => [bok_resources:protected] => [bok_topics:protected] => [bok_keywords:protected] => [id:protected] => 85 [type:protected] => category [parent:protected] => 2 [label:protected] => Truck Driver [alreadyInSave:protected] => [alreadyInValidation:protected] => [validationFailures:protected] => Array ( ) [_new:BaseObject:private] => [_deleted:BaseObject:private] => [modifiedColumns:protected] => Array ( ) ) [86] => Category Object ( [languages:protected] => [bok_resources:protected] => [bok_topics:protected] => [bok_keywords:protected] => [id:protected] => 86 [type:protected] => category [parent:protected] => 2 [label:protected] => Welder [alreadyInSave:protected] => [alreadyInValidation:protected] => [validationFailures:protected] => Array ( ) [_new:BaseObject:private] => [_deleted:BaseObject:private] => [modifiedColumns:protected] => Array ( ) ) [87] => Category Object ( [languages:protected] => [bok_resources:protected] => [bok_topics:protected] => [bok_keywords:protected] => [id:protected] => 87 [type:protected] => category [parent:protected] => 3 [label:protected] => Commercial & Institutional [alreadyInSave:protected] => [alreadyInValidation:protected] => [validationFailures:protected] => Array ( ) [_new:BaseObject:private] => [_deleted:BaseObject:private] => [modifiedColumns:protected] => Array ( ) ) [88] => Category Object ( [languages:protected] => [bok_resources:protected] => [bok_topics:protected] => [bok_keywords:protected] => [id:protected] => 88 [type:protected] => category [parent:protected] => 3 [label:protected] => Demolition [alreadyInSave:protected] => [alreadyInValidation:protected] => [validationFailures:protected] => Array ( ) [_new:BaseObject:private] => [_deleted:BaseObject:private] => [modifiedColumns:protected] => Array ( ) ) [89] => Category Object ( [languages:protected] => [bok_resources:protected] => [bok_topics:protected] => [bok_keywords:protected] => [id:protected] => 89 [type:protected] => category [parent:protected] => 3 [label:protected] => Disasters [alreadyInSave:protected] => [alreadyInValidation:protected] => [validationFailures:protected] => Array ( ) [_new:BaseObject:private] => [_deleted:BaseObject:private] => [modifiedColumns:protected] => Array ( ) ) [91] => Category Object ( [languages:protected] => [bok_resources:protected] => [bok_topics:protected] => [bok_keywords:protected] => [id:protected] => 91 [type:protected] => category [parent:protected] => 3 [label:protected] => Heavy & Highway [alreadyInSave:protected] => [alreadyInValidation:protected] => [validationFailures:protected] => Array ( ) [_new:BaseObject:private] => [_deleted:BaseObject:private] => [modifiedColumns:protected] => Array ( ) ) [90] => Category Object ( [languages:protected] => [bok_resources:protected] => [bok_topics:protected] => [bok_keywords:protected] => [id:protected] => 90 [type:protected] => category [parent:protected] => 3 [label:protected] => Industrial [alreadyInSave:protected] => [alreadyInValidation:protected] => [validationFailures:protected] => Array ( ) [_new:BaseObject:private] => [_deleted:BaseObject:private] => [modifiedColumns:protected] => Array ( ) ) [92] => Category Object ( [languages:protected] => [bok_resources:protected] => [bok_topics:protected] => [bok_keywords:protected] => [id:protected] => 92 [type:protected] => category [parent:protected] => 3 [label:protected] => LEED/Green Construction [alreadyInSave:protected] => [alreadyInValidation:protected] => [validationFailures:protected] => Array ( ) [_new:BaseObject:private] => [_deleted:BaseObject:private] => [modifiedColumns:protected] => Array ( ) ) [93] => Category Object ( [languages:protected] => [bok_resources:protected] => [bok_topics:protected] => [bok_keywords:protected] => [id:protected] => 93 [type:protected] => category [parent:protected] => 3 [label:protected] => Renovations [alreadyInSave:protected] => [alreadyInValidation:protected] => [validationFailures:protected] => Array ( ) [_new:BaseObject:private] => [_deleted:BaseObject:private] => [modifiedColumns:protected] => Array ( ) ) [94] => Category Object ( [languages:protected] => [bok_resources:protected] => [bok_topics:protected] => [bok_keywords:protected] => [id:protected] => 94 [type:protected] => category [parent:protected] => 3 [label:protected] => Residential [alreadyInSave:protected] => [alreadyInValidation:protected] => [validationFailures:protected] => Array ( ) [_new:BaseObject:private] => [_deleted:BaseObject:private] => [modifiedColumns:protected] => Array ( ) ) [95] => Category Object ( [languages:protected] => [bok_resources:protected] => [bok_topics:protected] => [bok_keywords:protected] => [id:protected] => 95 [type:protected] => category [parent:protected] => 3 [label:protected] => Underground [alreadyInSave:protected] => [alreadyInValidation:protected] => [validationFailures:protected] => Array ( ) [_new:BaseObject:private] => [_deleted:BaseObject:private] => [modifiedColumns:protected] => Array ( ) ) ) [categories_initialized:protected] => 1 [mapped_items:protected] => [content:protected] => [files:protected] => [language:protected] => Language Object ( [id:protected] => 1 [code:protected] => en [name:protected] => English [alreadyInSave:protected] => [alreadyInValidation:protected] => [validationFailures:protected] => Array ( ) [_new:BaseObject:private] => [_deleted:BaseObject:private] => [modifiedColumns:protected] => Array ( ) ) [old_record:protected] => [id:protected] => 4426 [old_id:protected] => [elcosh_id:protected] => d001656 [type:protected] => document [display_type:protected] => HTML only (and links) [user_id:protected] => 0 [language_id:protected] => 1 [tagging_id:protected] => Mike Aguilar [priority_id:protected] => 1 [title:protected] => Construction Dive -- DeWalt's Jobsite Pro headphones recalled for fire hazards [total_pages:protected] => 1 [billed_pages:protected] => 1 [publication_number:protected] => [part_of:protected] => [keywords:protected] => DeWalt, Fire Hazards, recall, headphones [comments:protected] => [summary:protected] => A recall notice by the United States Consumer Product Safety Commission affects over 300,000 DeWalt Jobsite Pro Headphones. The recall is a result of a malfunction that can cause earbuds to overheat while charging or during use, leading to fire and burn hazards. [transition_comments:protected] => [external_link:protected] => https://www.constructiondive.com/news/dewalts-jobsite-pro-headphones-recalled-for-fire-hazards/611248/?utm_source=Sailthru&utm_medium=email&utm_campaign=Issue:%202021-12-10%20Construction%20Dive%20Newsletter%20%5Bissue:38532%5D&utm_term=Construction%20Dive [consol_link:protected] => [more_like_this:protected] => [permission_given_by:protected] => [published:protected] => T [billable:protected] => F [img_name:protected] => [img_ext:protected] => [img_width:protected] => [img_height:protected] => [img_credit:protected] => [img_practice:protected] => [vid_source_id:protected] => [vid_running_time:protected] => [vid_intended_audience:protected] => [vid_acquisition_info:protected] => [vid_cost:protected] => [vid_producer:protected] => [vid_filename:protected] => [vid_filename_downloadable:protected] => [date_summary:protected] => [date_permission_requested:protected] => [date_permission_received:protected] => [date_review_needed:protected] => [date_received:protected] => 12/13/21 [date_completed:protected] => 12/13/21 [date_billed:protected] => [date_modified:protected] => 12/13/21 [collBokExports:protected] => [lastBokExportCriteria:BaseElcoshItem:private] => [alreadyInSave:protected] => [alreadyInValidation:protected] => [validationFailures:protected] => Array ( ) [_new:BaseObject:private] => [_deleted:BaseObject:private] => [modifiedColumns:protected] => Array ( ) ) ) [3] => Search_Result Object ( [title] => Working in an Enclosed Cab [image] => /record/images/notavailable-p.png [blurb] => This CPWR Hazard Alert on Working in enclosed cabs provides information on protecting workers from silica dust, how to minimize exposures and the dang... [category] => Array ( [0] => 10 [1] => 16 [2] => 24 [3] => 37 [4] => 46 [5] => 48 [6] => 49 [7] => 51 [8] => 53 [9] => 54 [10] => 56 [11] => 58 [12] => 59 [13] => 60 [14] => 61 [15] => 64 [16] => 66 [17] => 68 [18] => 69 [19] => 71 [20] => 73 [21] => 74 [22] => 76 [23] => 77 [24] => 63 [25] => 80 [26] => 82 [27] => 62 [28] => 83 [29] => 84 [30] => 86 [31] => 88 [32] => 89 [33] => 95 [34] => 102 ) [labels] => Array ( [0] => Confined Spaces [1] => Work Environment [2] => Hazards [3] => Fire & Explosions [6] => Trenches & Excavations [9] => Silica /Construction Dust [10] => Inhalation/Skin Exposures [12] => Boilermaker [13] => Trades [14] => Cabinetmaker [16] => Carpenter [18] => Cement Mason [20] => Concrete Polisher [22] => Drywall Applicator Specialist [24] => Elevator Constructor [26] => Glazier [28] => Hazardous Waste Cleanup [30] => HVAC [32] => Interior Systems Carpenter [34] => Laborer [36] => Lather [38] => Maintenance Worker [40] => Millwright [42] => Painter [44] => PCC/Restoration [46] => Pile Driver [48] => Plumber/Pipefitter [50] => Refractory Worker [52] => Reinforcing Ironworker [54] => Sheetmetal Worker [56] => Stonemason [58] => Structural Ironworker [60] => Terrazzo Worker [62] => Tile Setter [64] => Welder [66] => Demolition [67] => Jobsites [68] => Disasters [70] => Underground [72] => Handouts [73] => Documents [74] => Media & Documents ) [type] => Handouts [sub_category] => [url] => /document/4415/d001651/Working%2Bin%2Ban%2BEnclosed%2BCab.html [item:protected] => DocumentRecord Object ( [records:protected] => Array ( ) [recordId:protected] => [searchWordClass:protected] => [searchWordPeerClass:protected] => [bok_record:protected] => [authors:protected] => [organizations:protected] => [collections:protected] => [categories:protected] => Array ( [10] => Category Object ( [languages:protected] => [bok_resources:protected] => [bok_topics:protected] => [bok_keywords:protected] => [id:protected] => 10 [type:protected] => category [parent:protected] => 7 [label:protected] => Confined Spaces [alreadyInSave:protected] => [alreadyInValidation:protected] => [validationFailures:protected] => Array ( ) [_new:BaseObject:private] => [_deleted:BaseObject:private] => [modifiedColumns:protected] => Array ( ) ) [16] => Category Object ( [languages:protected] => [bok_resources:protected] => [bok_topics:protected] => [bok_keywords:protected] => [id:protected] => 16 [type:protected] => category [parent:protected] => 7 [label:protected] => Fire & Explosions [alreadyInSave:protected] => [alreadyInValidation:protected] => [validationFailures:protected] => Array ( ) [_new:BaseObject:private] => [_deleted:BaseObject:private] => [modifiedColumns:protected] => Array ( ) ) [24] => Category Object ( [languages:protected] => [bok_resources:protected] => [bok_topics:protected] => [bok_keywords:protected] => [id:protected] => 24 [type:protected] => category [parent:protected] => 7 [label:protected] => Trenches & Excavations [alreadyInSave:protected] => [alreadyInValidation:protected] => [validationFailures:protected] => Array ( ) [_new:BaseObject:private] => [_deleted:BaseObject:private] => [modifiedColumns:protected] => Array ( ) ) [37] => Category Object ( [languages:protected] => [bok_resources:protected] => [bok_topics:protected] => [bok_keywords:protected] => [id:protected] => 37 [type:protected] => category [parent:protected] => 8 [label:protected] => Silica /Construction Dust [alreadyInSave:protected] => [alreadyInValidation:protected] => [validationFailures:protected] => Array ( ) [_new:BaseObject:private] => [_deleted:BaseObject:private] => [modifiedColumns:protected] => Array ( ) ) [46] => Category Object ( [languages:protected] => [bok_resources:protected] => [bok_topics:protected] => [bok_keywords:protected] => [id:protected] => 46 [type:protected] => category [parent:protected] => 2 [label:protected] => Boilermaker [alreadyInSave:protected] => [alreadyInValidation:protected] => [validationFailures:protected] => Array ( ) [_new:BaseObject:private] => [_deleted:BaseObject:private] => [modifiedColumns:protected] => Array ( ) ) [48] => Category Object ( [languages:protected] => [bok_resources:protected] => [bok_topics:protected] => [bok_keywords:protected] => [id:protected] => 48 [type:protected] => category [parent:protected] => 2 [label:protected] => Cabinetmaker [alreadyInSave:protected] => [alreadyInValidation:protected] => [validationFailures:protected] => Array ( ) [_new:BaseObject:private] => [_deleted:BaseObject:private] => [modifiedColumns:protected] => Array ( ) ) [49] => Category Object ( [languages:protected] => [bok_resources:protected] => [bok_topics:protected] => [bok_keywords:protected] => [id:protected] => 49 [type:protected] => category [parent:protected] => 2 [label:protected] => Carpenter [alreadyInSave:protected] => [alreadyInValidation:protected] => [validationFailures:protected] => Array ( ) [_new:BaseObject:private] => [_deleted:BaseObject:private] => [modifiedColumns:protected] => Array ( ) ) [51] => Category Object ( [languages:protected] => [bok_resources:protected] => [bok_topics:protected] => [bok_keywords:protected] => [id:protected] => 51 [type:protected] => category [parent:protected] => 2 [label:protected] => Cement Mason [alreadyInSave:protected] => [alreadyInValidation:protected] => [validationFailures:protected] => Array ( ) [_new:BaseObject:private] => [_deleted:BaseObject:private] => [modifiedColumns:protected] => Array ( ) ) [53] => Category Object ( [languages:protected] => [bok_resources:protected] => [bok_topics:protected] => [bok_keywords:protected] => [id:protected] => 53 [type:protected] => category [parent:protected] => 2 [label:protected] => Concrete Polisher [alreadyInSave:protected] => [alreadyInValidation:protected] => [validationFailures:protected] => Array ( ) [_new:BaseObject:private] => [_deleted:BaseObject:private] => [modifiedColumns:protected] => Array ( ) ) [54] => Category Object ( [languages:protected] => [bok_resources:protected] => [bok_topics:protected] => [bok_keywords:protected] => [id:protected] => 54 [type:protected] => category [parent:protected] => 2 [label:protected] => Drywall Applicator Specialist [alreadyInSave:protected] => [alreadyInValidation:protected] => [validationFailures:protected] => Array ( ) [_new:BaseObject:private] => [_deleted:BaseObject:private] => [modifiedColumns:protected] => Array ( ) ) [56] => Category Object ( [languages:protected] => [bok_resources:protected] => [bok_topics:protected] => [bok_keywords:protected] => [id:protected] => 56 [type:protected] => category [parent:protected] => 2 [label:protected] => Elevator Constructor [alreadyInSave:protected] => [alreadyInValidation:protected] => [validationFailures:protected] => Array ( ) [_new:BaseObject:private] => [_deleted:BaseObject:private] => [modifiedColumns:protected] => Array ( ) ) [58] => Category Object ( [languages:protected] => [bok_resources:protected] => [bok_topics:protected] => [bok_keywords:protected] => [id:protected] => 58 [type:protected] => category [parent:protected] => 2 [label:protected] => Glazier [alreadyInSave:protected] => [alreadyInValidation:protected] => [validationFailures:protected] => Array ( ) [_new:BaseObject:private] => [_deleted:BaseObject:private] => [modifiedColumns:protected] => Array ( ) ) [59] => Category Object ( [languages:protected] => [bok_resources:protected] => [bok_topics:protected] => [bok_keywords:protected] => [id:protected] => 59 [type:protected] => category [parent:protected] => 2 [label:protected] => Hazardous Waste Cleanup [alreadyInSave:protected] => [alreadyInValidation:protected] => [validationFailures:protected] => Array ( ) [_new:BaseObject:private] => [_deleted:BaseObject:private] => [modifiedColumns:protected] => Array ( ) ) [60] => Category Object ( [languages:protected] => [bok_resources:protected] => [bok_topics:protected] => [bok_keywords:protected] => [id:protected] => 60 [type:protected] => category [parent:protected] => 2 [label:protected] => HVAC [alreadyInSave:protected] => [alreadyInValidation:protected] => [validationFailures:protected] => Array ( ) [_new:BaseObject:private] => [_deleted:BaseObject:private] => [modifiedColumns:protected] => Array ( ) ) [61] => Category Object ( [languages:protected] => [bok_resources:protected] => [bok_topics:protected] => [bok_keywords:protected] => [id:protected] => 61 [type:protected] => category [parent:protected] => 2 [label:protected] => Interior Systems Carpenter [alreadyInSave:protected] => [alreadyInValidation:protected] => [validationFailures:protected] => Array ( ) [_new:BaseObject:private] => [_deleted:BaseObject:private] => [modifiedColumns:protected] => Array ( ) ) [64] => Category Object ( [languages:protected] => [bok_resources:protected] => [bok_topics:protected] => [bok_keywords:protected] => [id:protected] => 64 [type:protected] => category [parent:protected] => 2 [label:protected] => Laborer [alreadyInSave:protected] => [alreadyInValidation:protected] => [validationFailures:protected] => Array ( ) [_new:BaseObject:private] => [_deleted:BaseObject:private] => [modifiedColumns:protected] => Array ( ) ) [66] => Category Object ( [languages:protected] => [bok_resources:protected] => [bok_topics:protected] => [bok_keywords:protected] => [id:protected] => 66 [type:protected] => category [parent:protected] => 2 [label:protected] => Lather [alreadyInSave:protected] => [alreadyInValidation:protected] => [validationFailures:protected] => Array ( ) [_new:BaseObject:private] => [_deleted:BaseObject:private] => [modifiedColumns:protected] => Array ( ) ) [68] => Category Object ( [languages:protected] => [bok_resources:protected] => [bok_topics:protected] => [bok_keywords:protected] => [id:protected] => 68 [type:protected] => category [parent:protected] => 2 [label:protected] => Maintenance Worker [alreadyInSave:protected] => [alreadyInValidation:protected] => [validationFailures:protected] => Array ( ) [_new:BaseObject:private] => [_deleted:BaseObject:private] => [modifiedColumns:protected] => Array ( ) ) [69] => Category Object ( [languages:protected] => [bok_resources:protected] => [bok_topics:protected] => [bok_keywords:protected] => [id:protected] => 69 [type:protected] => category [parent:protected] => 2 [label:protected] => Millwright [alreadyInSave:protected] => [alreadyInValidation:protected] => [validationFailures:protected] => Array ( ) [_new:BaseObject:private] => [_deleted:BaseObject:private] => [modifiedColumns:protected] => Array ( ) ) [71] => Category Object ( [languages:protected] => [bok_resources:protected] => [bok_topics:protected] => [bok_keywords:protected] => [id:protected] => 71 [type:protected] => category [parent:protected] => 2 [label:protected] => Painter [alreadyInSave:protected] => [alreadyInValidation:protected] => [validationFailures:protected] => Array ( ) [_new:BaseObject:private] => [_deleted:BaseObject:private] => [modifiedColumns:protected] => Array ( ) ) [73] => Category Object ( [languages:protected] => [bok_resources:protected] => [bok_topics:protected] => [bok_keywords:protected] => [id:protected] => 73 [type:protected] => category [parent:protected] => 2 [label:protected] => PCC/Restoration [alreadyInSave:protected] => [alreadyInValidation:protected] => [validationFailures:protected] => Array ( ) [_new:BaseObject:private] => [_deleted:BaseObject:private] => [modifiedColumns:protected] => Array ( ) ) [74] => Category Object ( [languages:protected] => [bok_resources:protected] => [bok_topics:protected] => [bok_keywords:protected] => [id:protected] => 74 [type:protected] => category [parent:protected] => 2 [label:protected] => Pile Driver [alreadyInSave:protected] => [alreadyInValidation:protected] => [validationFailures:protected] => Array ( ) [_new:BaseObject:private] => [_deleted:BaseObject:private] => [modifiedColumns:protected] => Array ( ) ) [76] => Category Object ( [languages:protected] => [bok_resources:protected] => [bok_topics:protected] => [bok_keywords:protected] => [id:protected] => 76 [type:protected] => category [parent:protected] => 2 [label:protected] => Plumber/Pipefitter [alreadyInSave:protected] => [alreadyInValidation:protected] => [validationFailures:protected] => Array ( ) [_new:BaseObject:private] => [_deleted:BaseObject:private] => [modifiedColumns:protected] => Array ( ) ) [77] => Category Object ( [languages:protected] => [bok_resources:protected] => [bok_topics:protected] => [bok_keywords:protected] => [id:protected] => 77 [type:protected] => category [parent:protected] => 2 [label:protected] => Refractory Worker [alreadyInSave:protected] => [alreadyInValidation:protected] => [validationFailures:protected] => Array ( ) [_new:BaseObject:private] => [_deleted:BaseObject:private] => [modifiedColumns:protected] => Array ( ) ) [63] => Category Object ( [languages:protected] => [bok_resources:protected] => [bok_topics:protected] => [bok_keywords:protected] => [id:protected] => 63 [type:protected] => category [parent:protected] => 2 [label:protected] => Reinforcing Ironworker [alreadyInSave:protected] => [alreadyInValidation:protected] => [validationFailures:protected] => Array ( ) [_new:BaseObject:private] => [_deleted:BaseObject:private] => [modifiedColumns:protected] => Array ( ) ) [80] => Category Object ( [languages:protected] => [bok_resources:protected] => [bok_topics:protected] => [bok_keywords:protected] => [id:protected] => 80 [type:protected] => category [parent:protected] => 2 [label:protected] => Sheetmetal Worker [alreadyInSave:protected] => [alreadyInValidation:protected] => [validationFailures:protected] => Array ( ) [_new:BaseObject:private] => [_deleted:BaseObject:private] => [modifiedColumns:protected] => Array ( ) ) [82] => Category Object ( [languages:protected] => [bok_resources:protected] => [bok_topics:protected] => [bok_keywords:protected] => [id:protected] => 82 [type:protected] => category [parent:protected] => 2 [label:protected] => Stonemason [alreadyInSave:protected] => [alreadyInValidation:protected] => [validationFailures:protected] => Array ( ) [_new:BaseObject:private] => [_deleted:BaseObject:private] => [modifiedColumns:protected] => Array ( ) ) [62] => Category Object ( [languages:protected] => [bok_resources:protected] => [bok_topics:protected] => [bok_keywords:protected] => [id:protected] => 62 [type:protected] => category [parent:protected] => 2 [label:protected] => Structural Ironworker [alreadyInSave:protected] => [alreadyInValidation:protected] => [validationFailures:protected] => Array ( ) [_new:BaseObject:private] => [_deleted:BaseObject:private] => [modifiedColumns:protected] => Array ( ) ) [83] => Category Object ( [languages:protected] => [bok_resources:protected] => [bok_topics:protected] => [bok_keywords:protected] => [id:protected] => 83 [type:protected] => category [parent:protected] => 2 [label:protected] => Terrazzo Worker [alreadyInSave:protected] => [alreadyInValidation:protected] => [validationFailures:protected] => Array ( ) [_new:BaseObject:private] => [_deleted:BaseObject:private] => [modifiedColumns:protected] => Array ( ) ) [84] => Category Object ( [languages:protected] => [bok_resources:protected] => [bok_topics:protected] => [bok_keywords:protected] => [id:protected] => 84 [type:protected] => category [parent:protected] => 2 [label:protected] => Tile Setter [alreadyInSave:protected] => [alreadyInValidation:protected] => [validationFailures:protected] => Array ( ) [_new:BaseObject:private] => [_deleted:BaseObject:private] => [modifiedColumns:protected] => Array ( ) ) [86] => Category Object ( [languages:protected] => [bok_resources:protected] => [bok_topics:protected] => [bok_keywords:protected] => [id:protected] => 86 [type:protected] => category [parent:protected] => 2 [label:protected] => Welder [alreadyInSave:protected] => [alreadyInValidation:protected] => [validationFailures:protected] => Array ( ) [_new:BaseObject:private] => [_deleted:BaseObject:private] => [modifiedColumns:protected] => Array ( ) ) [88] => Category Object ( [languages:protected] => [bok_resources:protected] => [bok_topics:protected] => [bok_keywords:protected] => [id:protected] => 88 [type:protected] => category [parent:protected] => 3 [label:protected] => Demolition [alreadyInSave:protected] => [alreadyInValidation:protected] => [validationFailures:protected] => Array ( ) [_new:BaseObject:private] => [_deleted:BaseObject:private] => [modifiedColumns:protected] => Array ( ) ) [89] => Category Object ( [languages:protected] => [bok_resources:protected] => [bok_topics:protected] => [bok_keywords:protected] => [id:protected] => 89 [type:protected] => category [parent:protected] => 3 [label:protected] => Disasters [alreadyInSave:protected] => [alreadyInValidation:protected] => [validationFailures:protected] => Array ( ) [_new:BaseObject:private] => [_deleted:BaseObject:private] => [modifiedColumns:protected] => Array ( ) ) [95] => Category Object ( [languages:protected] => [bok_resources:protected] => [bok_topics:protected] => [bok_keywords:protected] => [id:protected] => 95 [type:protected] => category [parent:protected] => 3 [label:protected] => Underground [alreadyInSave:protected] => [alreadyInValidation:protected] => [validationFailures:protected] => Array ( ) [_new:BaseObject:private] => [_deleted:BaseObject:private] => [modifiedColumns:protected] => Array ( ) ) [102] => Category Object ( [languages:protected] => [bok_resources:protected] => [bok_topics:protected] => [bok_keywords:protected] => [id:protected] => 102 [type:protected] => category [parent:protected] => 6 [label:protected] => Handouts [alreadyInSave:protected] => [alreadyInValidation:protected] => [validationFailures:protected] => Array ( ) [_new:BaseObject:private] => [_deleted:BaseObject:private] => [modifiedColumns:protected] => Array ( ) ) ) [categories_initialized:protected] => 1 [mapped_items:protected] => [content:protected] => [files:protected] => [language:protected] => Language Object ( [id:protected] => 1 [code:protected] => en [name:protected] => English [alreadyInSave:protected] => [alreadyInValidation:protected] => [validationFailures:protected] => Array ( ) [_new:BaseObject:private] => [_deleted:BaseObject:private] => [modifiedColumns:protected] => Array ( ) ) [old_record:protected] => [id:protected] => 4415 [old_id:protected] => [elcosh_id:protected] => d001651 [type:protected] => document [display_type:protected] => HTML only (and links) [user_id:protected] => 0 [language_id:protected] => 1 [tagging_id:protected] => Valeria Contreras [priority_id:protected] => 1 [title:protected] => Working in an Enclosed Cab [total_pages:protected] => 1 [billed_pages:protected] => 1 [publication_number:protected] => [part_of:protected] => [keywords:protected] => Occupation, construction, safety, health, hazards, work, worker, workplace, OSHA, silicosis, mining, silica, DOE, EEOICPA, labor, lung, CBD, dust, cab, miner, mine [comments:protected] => [summary:protected] => This CPWR Hazard Alert on Working in enclosed cabs provides information on protecting workers from silica dust, how to minimize exposures and the dangers of silica dust. Click on the following links to access the English version and the Spanish version. [transition_comments:protected] => [external_link:protected] => [consol_link:protected] => [more_like_this:protected] => [permission_given_by:protected] => [published:protected] => T [billable:protected] => F [img_name:protected] => [img_ext:protected] => [img_width:protected] => [img_height:protected] => [img_credit:protected] => [img_practice:protected] => [vid_source_id:protected] => [vid_running_time:protected] => [vid_intended_audience:protected] => [vid_acquisition_info:protected] => [vid_cost:protected] => [vid_producer:protected] => [vid_filename:protected] => [vid_filename_downloadable:protected] => [date_summary:protected] => [date_permission_requested:protected] => [date_permission_received:protected] => [date_review_needed:protected] => [date_received:protected] => 10/08/20 [date_completed:protected] => 10/08/20 [date_billed:protected] => [date_modified:protected] => 10/08/20 [collBokExports:protected] => [lastBokExportCriteria:BaseElcoshItem:private] => [alreadyInSave:protected] => [alreadyInValidation:protected] => [validationFailures:protected] => Array ( ) [_new:BaseObject:private] => [_deleted:BaseObject:private] => [modifiedColumns:protected] => Array ( ) ) ) [4] => Search_Result Object ( [title] => Toolbox Talk: Suicide Prevention [image] => /record/images/notavailable-p.png [blurb] => The CPWR Toolbox Talk on Suicide Prevention addresses the prevalence of suicide among construction workers. The resource includes a brief case example... [category] => Array ( [0] => 13 [1] => 20 [2] => 23 [3] => 40 [4] => 44 [5] => 45 [6] => 46 [7] => 47 [8] => 48 [9] => 49 [10] => 50 [11] => 51 [12] => 52 [13] => 53 [14] => 54 [15] => 55 [16] => 56 [17] => 57 [18] => 58 [19] => 59 [20] => 60 [21] => 61 [22] => 64 [23] => 65 [24] => 66 [25] => 67 [26] => 68 [27] => 69 [28] => 70 [29] => 71 [30] => 72 [31] => 73 [32] => 74 [33] => 75 [34] => 76 [35] => 77 [36] => 63 [37] => 78 [38] => 79 [39] => 80 [40] => 81 [41] => 82 [42] => 62 [43] => 83 [44] => 84 [45] => 85 [46] => 86 [47] => 87 [48] => 88 [49] => 89 [50] => 91 [51] => 90 [52] => 92 [53] => 93 [54] => 94 [55] => 95 [56] => 100 ) [labels] => Array ( [0] => Drugs, Alcohol & Tobacco [1] => Work Environment [2] => Hazards [3] => Safety Culture [6] => Stress & Overtime [9] => Overexertion [10] => Ergonomic [12] => Acoustical Ceiling Carpenter [13] => Trades [14] => Asbestos/Insulator [16] => Boilermaker [18] => Bricklayer [20] => Cabinetmaker [22] => Carpenter [24] => Carpet Layer [26] => Cement Mason [28] => Commercial Diver [30] => Concrete Polisher [32] => Drywall Applicator Specialist [34] => Electrical Worker [36] => Elevator Constructor [38] => Flagger [40] => Glazier [42] => Hazardous Waste Cleanup [44] => HVAC [46] => Interior Systems Carpenter [48] => Laborer [50] => Landscaper [52] => Lather [54] => Lead Abatement Worker [56] => Maintenance Worker [58] => Millwright [60] => Operating Engineer [62] => Painter [64] => Paper Hanger [66] => PCC/Restoration [68] => Pile Driver [70] => Plasterer [72] => Plumber/Pipefitter [74] => Refractory Worker [76] => Reinforcing Ironworker [78] => Roofer/Waterproofer [80] => Scaffold Erector [82] => Sheetmetal Worker [84] => Sprinkler Fitter [86] => Stonemason [88] => Structural Ironworker [90] => Terrazzo Worker [92] => Tile Setter [94] => Truck Driver [96] => Welder [98] => Commercial & Institutional [99] => Jobsites [100] => Demolition [102] => Disasters [104] => Heavy & Highway [106] => Industrial [108] => LEED/Green Construction [110] => Renovations [112] => Residential [114] => Underground [116] => Toolbox Talks [117] => Documents [118] => Media & Documents ) [type] => Toolbox Talks [sub_category] => [url] => /document/4419/d001652/Toolbox%2BTalk%253A%2BSuicide%2BPrevention.html [item:protected] => DocumentRecord Object ( [records:protected] => Array ( ) [recordId:protected] => [searchWordClass:protected] => [searchWordPeerClass:protected] => [bok_record:protected] => [authors:protected] => [organizations:protected] => [collections:protected] => [categories:protected] => Array ( [13] => Category Object ( [languages:protected] => [bok_resources:protected] => [bok_topics:protected] => [bok_keywords:protected] => [id:protected] => 13 [type:protected] => category [parent:protected] => 7 [label:protected] => Drugs, Alcohol & Tobacco [alreadyInSave:protected] => [alreadyInValidation:protected] => [validationFailures:protected] => Array ( ) [_new:BaseObject:private] => [_deleted:BaseObject:private] => [modifiedColumns:protected] => Array ( ) ) [20] => Category Object ( [languages:protected] => [bok_resources:protected] => [bok_topics:protected] => [bok_keywords:protected] => [id:protected] => 20 [type:protected] => category [parent:protected] => 7 [label:protected] => Safety Culture [alreadyInSave:protected] => [alreadyInValidation:protected] => [validationFailures:protected] => Array ( ) [_new:BaseObject:private] => [_deleted:BaseObject:private] => [modifiedColumns:protected] => Array ( ) ) [23] => Category Object ( [languages:protected] => [bok_resources:protected] => [bok_topics:protected] => [bok_keywords:protected] => [id:protected] => 23 [type:protected] => category [parent:protected] => 7 [label:protected] => Stress & Overtime [alreadyInSave:protected] => [alreadyInValidation:protected] => [validationFailures:protected] => Array ( ) [_new:BaseObject:private] => [_deleted:BaseObject:private] => [modifiedColumns:protected] => Array ( ) ) [40] => Category Object ( [languages:protected] => [bok_resources:protected] => [bok_topics:protected] => [bok_keywords:protected] => [id:protected] => 40 [type:protected] => category [parent:protected] => 9 [label:protected] => Overexertion [alreadyInSave:protected] => [alreadyInValidation:protected] => [validationFailures:protected] => Array ( ) [_new:BaseObject:private] => [_deleted:BaseObject:private] => [modifiedColumns:protected] => Array ( ) ) [44] => Category Object ( [languages:protected] => [bok_resources:protected] => [bok_topics:protected] => [bok_keywords:protected] => [id:protected] => 44 [type:protected] => category [parent:protected] => 2 [label:protected] => Acoustical Ceiling Carpenter [alreadyInSave:protected] => [alreadyInValidation:protected] => [validationFailures:protected] => Array ( ) [_new:BaseObject:private] => [_deleted:BaseObject:private] => [modifiedColumns:protected] => Array ( ) ) [45] => Category Object ( [languages:protected] => [bok_resources:protected] => [bok_topics:protected] => [bok_keywords:protected] => [id:protected] => 45 [type:protected] => category [parent:protected] => 2 [label:protected] => Asbestos/Insulator [alreadyInSave:protected] => [alreadyInValidation:protected] => [validationFailures:protected] => Array ( ) [_new:BaseObject:private] => [_deleted:BaseObject:private] => [modifiedColumns:protected] => Array ( ) ) [46] => Category Object ( [languages:protected] => [bok_resources:protected] => [bok_topics:protected] => [bok_keywords:protected] => [id:protected] => 46 [type:protected] => category [parent:protected] => 2 [label:protected] => Boilermaker [alreadyInSave:protected] => [alreadyInValidation:protected] => [validationFailures:protected] => Array ( ) [_new:BaseObject:private] => [_deleted:BaseObject:private] => [modifiedColumns:protected] => Array ( ) ) [47] => Category Object ( [languages:protected] => [bok_resources:protected] => [bok_topics:protected] => [bok_keywords:protected] => [id:protected] => 47 [type:protected] => category [parent:protected] => 2 [label:protected] => Bricklayer [alreadyInSave:protected] => [alreadyInValidation:protected] => [validationFailures:protected] => Array ( ) [_new:BaseObject:private] => [_deleted:BaseObject:private] => [modifiedColumns:protected] => Array ( ) ) [48] => Category Object ( [languages:protected] => [bok_resources:protected] => [bok_topics:protected] => [bok_keywords:protected] => [id:protected] => 48 [type:protected] => category [parent:protected] => 2 [label:protected] => Cabinetmaker [alreadyInSave:protected] => [alreadyInValidation:protected] => [validationFailures:protected] => Array ( ) [_new:BaseObject:private] => [_deleted:BaseObject:private] => [modifiedColumns:protected] => Array ( ) ) [49] => Category Object ( [languages:protected] => [bok_resources:protected] => [bok_topics:protected] => [bok_keywords:protected] => [id:protected] => 49 [type:protected] => category [parent:protected] => 2 [label:protected] => Carpenter [alreadyInSave:protected] => [alreadyInValidation:protected] => [validationFailures:protected] => Array ( ) [_new:BaseObject:private] => [_deleted:BaseObject:private] => [modifiedColumns:protected] => Array ( ) ) [50] => Category Object ( [languages:protected] => [bok_resources:protected] => [bok_topics:protected] => [bok_keywords:protected] => [id:protected] => 50 [type:protected] => category [parent:protected] => 2 [label:protected] => Carpet Layer [alreadyInSave:protected] => [alreadyInValidation:protected] => [validationFailures:protected] => Array ( ) [_new:BaseObject:private] => [_deleted:BaseObject:private] => [modifiedColumns:protected] => Array ( ) ) [51] => Category Object ( [languages:protected] => [bok_resources:protected] => [bok_topics:protected] => [bok_keywords:protected] => [id:protected] => 51 [type:protected] => category [parent:protected] => 2 [label:protected] => Cement Mason [alreadyInSave:protected] => [alreadyInValidation:protected] => [validationFailures:protected] => Array ( ) [_new:BaseObject:private] => [_deleted:BaseObject:private] => [modifiedColumns:protected] => Array ( ) ) [52] => Category Object ( [languages:protected] => [bok_resources:protected] => [bok_topics:protected] => [bok_keywords:protected] => [id:protected] => 52 [type:protected] => category [parent:protected] => 2 [label:protected] => Commercial Diver [alreadyInSave:protected] => [alreadyInValidation:protected] => [validationFailures:protected] => Array ( ) [_new:BaseObject:private] => [_deleted:BaseObject:private] => [modifiedColumns:protected] => Array ( ) ) [53] => Category Object ( [languages:protected] => [bok_resources:protected] => [bok_topics:protected] => [bok_keywords:protected] => [id:protected] => 53 [type:protected] => category [parent:protected] => 2 [label:protected] => Concrete Polisher [alreadyInSave:protected] => [alreadyInValidation:protected] => [validationFailures:protected] => Array ( ) [_new:BaseObject:private] => [_deleted:BaseObject:private] => [modifiedColumns:protected] => Array ( ) ) [54] => Category Object ( [languages:protected] => [bok_resources:protected] => [bok_topics:protected] => [bok_keywords:protected] => [id:protected] => 54 [type:protected] => category [parent:protected] => 2 [label:protected] => Drywall Applicator Specialist [alreadyInSave:protected] => [alreadyInValidation:protected] => [validationFailures:protected] => Array ( ) [_new:BaseObject:private] => [_deleted:BaseObject:private] => [modifiedColumns:protected] => Array ( ) ) [55] => Category Object ( [languages:protected] => [bok_resources:protected] => [bok_topics:protected] => [bok_keywords:protected] => [id:protected] => 55 [type:protected] => category [parent:protected] => 2 [label:protected] => Electrical Worker [alreadyInSave:protected] => [alreadyInValidation:protected] => [validationFailures:protected] => Array ( ) [_new:BaseObject:private] => [_deleted:BaseObject:private] => [modifiedColumns:protected] => Array ( ) ) [56] => Category Object ( [languages:protected] => [bok_resources:protected] => [bok_topics:protected] => [bok_keywords:protected] => [id:protected] => 56 [type:protected] => category [parent:protected] => 2 [label:protected] => Elevator Constructor [alreadyInSave:protected] => [alreadyInValidation:protected] => [validationFailures:protected] => Array ( ) [_new:BaseObject:private] => [_deleted:BaseObject:private] => [modifiedColumns:protected] => Array ( ) ) [57] => Category Object ( [languages:protected] => [bok_resources:protected] => [bok_topics:protected] => [bok_keywords:protected] => [id:protected] => 57 [type:protected] => category [parent:protected] => 2 [label:protected] => Flagger [alreadyInSave:protected] => [alreadyInValidation:protected] => [validationFailures:protected] => Array ( ) [_new:BaseObject:private] => [_deleted:BaseObject:private] => [modifiedColumns:protected] => Array ( ) ) [58] => Category Object ( [languages:protected] => [bok_resources:protected] => [bok_topics:protected] => [bok_keywords:protected] => [id:protected] => 58 [type:protected] => category [parent:protected] => 2 [label:protected] => Glazier [alreadyInSave:protected] => [alreadyInValidation:protected] => [validationFailures:protected] => Array ( ) [_new:BaseObject:private] => [_deleted:BaseObject:private] => [modifiedColumns:protected] => Array ( ) ) [59] => Category Object ( [languages:protected] => [bok_resources:protected] => [bok_topics:protected] => [bok_keywords:protected] => [id:protected] => 59 [type:protected] => category [parent:protected] => 2 [label:protected] => Hazardous Waste Cleanup [alreadyInSave:protected] => [alreadyInValidation:protected] => [validationFailures:protected] => Array ( ) [_new:BaseObject:private] => [_deleted:BaseObject:private] => [modifiedColumns:protected] => Array ( ) ) [60] => Category Object ( [languages:protected] => [bok_resources:protected] => [bok_topics:protected] => [bok_keywords:protected] => [id:protected] => 60 [type:protected] => category [parent:protected] => 2 [label:protected] => HVAC [alreadyInSave:protected] => [alreadyInValidation:protected] => [validationFailures:protected] => Array ( ) [_new:BaseObject:private] => [_deleted:BaseObject:private] => [modifiedColumns:protected] => Array ( ) ) [61] => Category Object ( [languages:protected] => [bok_resources:protected] => [bok_topics:protected] => [bok_keywords:protected] => [id:protected] => 61 [type:protected] => category [parent:protected] => 2 [label:protected] => Interior Systems Carpenter [alreadyInSave:protected] => [alreadyInValidation:protected] => [validationFailures:protected] => Array ( ) [_new:BaseObject:private] => [_deleted:BaseObject:private] => [modifiedColumns:protected] => Array ( ) ) [64] => Category Object ( [languages:protected] => [bok_resources:protected] => [bok_topics:protected] => [bok_keywords:protected] => [id:protected] => 64 [type:protected] => category [parent:protected] => 2 [label:protected] => Laborer [alreadyInSave:protected] => [alreadyInValidation:protected] => [validationFailures:protected] => Array ( ) [_new:BaseObject:private] => [_deleted:BaseObject:private] => [modifiedColumns:protected] => Array ( ) ) [65] => Category Object ( [languages:protected] => [bok_resources:protected] => [bok_topics:protected] => [bok_keywords:protected] => [id:protected] => 65 [type:protected] => category [parent:protected] => 2 [label:protected] => Landscaper [alreadyInSave:protected] => [alreadyInValidation:protected] => [validationFailures:protected] => Array ( ) [_new:BaseObject:private] => [_deleted:BaseObject:private] => [modifiedColumns:protected] => Array ( ) ) [66] => Category Object ( [languages:protected] => [bok_resources:protected] => [bok_topics:protected] => [bok_keywords:protected] => [id:protected] => 66 [type:protected] => category [parent:protected] => 2 [label:protected] => Lather [alreadyInSave:protected] => [alreadyInValidation:protected] => [validationFailures:protected] => Array ( ) [_new:BaseObject:private] => [_deleted:BaseObject:private] => [modifiedColumns:protected] => Array ( ) ) [67] => Category Object ( [languages:protected] => [bok_resources:protected] => [bok_topics:protected] => [bok_keywords:protected] => [id:protected] => 67 [type:protected] => category [parent:protected] => 2 [label:protected] => Lead Abatement Worker [alreadyInSave:protected] => [alreadyInValidation:protected] => [validationFailures:protected] => Array ( ) [_new:BaseObject:private] => [_deleted:BaseObject:private] => [modifiedColumns:protected] => Array ( ) ) [68] => Category Object ( [languages:protected] => [bok_resources:protected] => [bok_topics:protected] => [bok_keywords:protected] => [id:protected] => 68 [type:protected] => category [parent:protected] => 2 [label:protected] => Maintenance Worker [alreadyInSave:protected] => [alreadyInValidation:protected] => [validationFailures:protected] => Array ( ) [_new:BaseObject:private] => [_deleted:BaseObject:private] => [modifiedColumns:protected] => Array ( ) ) [69] => Category Object ( [languages:protected] => [bok_resources:protected] => [bok_topics:protected] => [bok_keywords:protected] => [id:protected] => 69 [type:protected] => category [parent:protected] => 2 [label:protected] => Millwright [alreadyInSave:protected] => [alreadyInValidation:protected] => [validationFailures:protected] => Array ( ) [_new:BaseObject:private] => [_deleted:BaseObject:private] => [modifiedColumns:protected] => Array ( ) ) [70] => Category Object ( [languages:protected] => [bok_resources:protected] => [bok_topics:protected] => [bok_keywords:protected] => [id:protected] => 70 [type:protected] => category [parent:protected] => 2 [label:protected] => Operating Engineer [alreadyInSave:protected] => [alreadyInValidation:protected] => [validationFailures:protected] => Array ( ) [_new:BaseObject:private] => [_deleted:BaseObject:private] => [modifiedColumns:protected] => Array ( ) ) [71] => Category Object ( [languages:protected] => [bok_resources:protected] => [bok_topics:protected] => [bok_keywords:protected] => [id:protected] => 71 [type:protected] => category [parent:protected] => 2 [label:protected] => Painter [alreadyInSave:protected] => [alreadyInValidation:protected] => [validationFailures:protected] => Array ( ) [_new:BaseObject:private] => [_deleted:BaseObject:private] => [modifiedColumns:protected] => Array ( ) ) [72] => Category Object ( [languages:protected] => [bok_resources:protected] => [bok_topics:protected] => [bok_keywords:protected] => [id:protected] => 72 [type:protected] => category [parent:protected] => 2 [label:protected] => Paper Hanger [alreadyInSave:protected] => [alreadyInValidation:protected] => [validationFailures:protected] => Array ( ) [_new:BaseObject:private] => [_deleted:BaseObject:private] => [modifiedColumns:protected] => Array ( ) ) [73] => Category Object ( [languages:protected] => [bok_resources:protected] => [bok_topics:protected] => [bok_keywords:protected] => [id:protected] => 73 [type:protected] => category [parent:protected] => 2 [label:protected] => PCC/Restoration [alreadyInSave:protected] => [alreadyInValidation:protected] => [validationFailures:protected] => Array ( ) [_new:BaseObject:private] => [_deleted:BaseObject:private] => [modifiedColumns:protected] => Array ( ) ) [74] => Category Object ( [languages:protected] => [bok_resources:protected] => [bok_topics:protected] => [bok_keywords:protected] => [id:protected] => 74 [type:protected] => category [parent:protected] => 2 [label:protected] => Pile Driver [alreadyInSave:protected] => [alreadyInValidation:protected] => [validationFailures:protected] => Array ( ) [_new:BaseObject:private] => [_deleted:BaseObject:private] => [modifiedColumns:protected] => Array ( ) ) [75] => Category Object ( [languages:protected] => [bok_resources:protected] => [bok_topics:protected] => [bok_keywords:protected] => [id:protected] => 75 [type:protected] => category [parent:protected] => 2 [label:protected] => Plasterer [alreadyInSave:protected] => [alreadyInValidation:protected] => [validationFailures:protected] => Array ( ) [_new:BaseObject:private] => [_deleted:BaseObject:private] => [modifiedColumns:protected] => Array ( ) ) [76] => Category Object ( [languages:protected] => [bok_resources:protected] => [bok_topics:protected] => [bok_keywords:protected] => [id:protected] => 76 [type:protected] => category [parent:protected] => 2 [label:protected] => Plumber/Pipefitter [alreadyInSave:protected] => [alreadyInValidation:protected] => [validationFailures:protected] => Array ( ) [_new:BaseObject:private] => [_deleted:BaseObject:private] => [modifiedColumns:protected] => Array ( ) ) [77] => Category Object ( [languages:protected] => [bok_resources:protected] => [bok_topics:protected] => [bok_keywords:protected] => [id:protected] => 77 [type:protected] => category [parent:protected] => 2 [label:protected] => Refractory Worker [alreadyInSave:protected] => [alreadyInValidation:protected] => [validationFailures:protected] => Array ( ) [_new:BaseObject:private] => [_deleted:BaseObject:private] => [modifiedColumns:protected] => Array ( ) ) [63] => Category Object ( [languages:protected] => [bok_resources:protected] => [bok_topics:protected] => [bok_keywords:protected] => [id:protected] => 63 [type:protected] => category [parent:protected] => 2 [label:protected] => Reinforcing Ironworker [alreadyInSave:protected] => [alreadyInValidation:protected] => [validationFailures:protected] => Array ( ) [_new:BaseObject:private] => [_deleted:BaseObject:private] => [modifiedColumns:protected] => Array ( ) ) [78] => Category Object ( [languages:protected] => [bok_resources:protected] => [bok_topics:protected] => [bok_keywords:protected] => [id:protected] => 78 [type:protected] => category [parent:protected] => 2 [label:protected] => Roofer/Waterproofer [alreadyInSave:protected] => [alreadyInValidation:protected] => [validationFailures:protected] => Array ( ) [_new:BaseObject:private] => [_deleted:BaseObject:private] => [modifiedColumns:protected] => Array ( ) ) [79] => Category Object ( [languages:protected] => [bok_resources:protected] => [bok_topics:protected] => [bok_keywords:protected] => [id:protected] => 79 [type:protected] => category [parent:protected] => 2 [label:protected] => Scaffold Erector [alreadyInSave:protected] => [alreadyInValidation:protected] => [validationFailures:protected] => Array ( ) [_new:BaseObject:private] => [_deleted:BaseObject:private] => [modifiedColumns:protected] => Array ( ) ) [80] => Category Object ( [languages:protected] => [bok_resources:protected] => [bok_topics:protected] => [bok_keywords:protected] => [id:protected] => 80 [type:protected] => category [parent:protected] => 2 [label:protected] => Sheetmetal Worker [alreadyInSave:protected] => [alreadyInValidation:protected] => [validationFailures:protected] => Array ( ) [_new:BaseObject:private] => [_deleted:BaseObject:private] => [modifiedColumns:protected] => Array ( ) ) [81] => Category Object ( [languages:protected] => [bok_resources:protected] => [bok_topics:protected] => [bok_keywords:protected] => [id:protected] => 81 [type:protected] => category [parent:protected] => 2 [label:protected] => Sprinkler Fitter [alreadyInSave:protected] => [alreadyInValidation:protected] => [validationFailures:protected] => Array ( ) [_new:BaseObject:private] => [_deleted:BaseObject:private] => [modifiedColumns:protected] => Array ( ) ) [82] => Category Object ( [languages:protected] => [bok_resources:protected] => [bok_topics:protected] => [bok_keywords:protected] => [id:protected] => 82 [type:protected] => category [parent:protected] => 2 [label:protected] => Stonemason [alreadyInSave:protected] => [alreadyInValidation:protected] => [validationFailures:protected] => Array ( ) [_new:BaseObject:private] => [_deleted:BaseObject:private] => [modifiedColumns:protected] => Array ( ) ) [62] => Category Object ( [languages:protected] => [bok_resources:protected] => [bok_topics:protected] => [bok_keywords:protected] => [id:protected] => 62 [type:protected] => category [parent:protected] => 2 [label:protected] => Structural Ironworker [alreadyInSave:protected] => [alreadyInValidation:protected] => [validationFailures:protected] => Array ( ) [_new:BaseObject:private] => [_deleted:BaseObject:private] => [modifiedColumns:protected] => Array ( ) ) [83] => Category Object ( [languages:protected] => [bok_resources:protected] => [bok_topics:protected] => [bok_keywords:protected] => [id:protected] => 83 [type:protected] => category [parent:protected] => 2 [label:protected] => Terrazzo Worker [alreadyInSave:protected] => [alreadyInValidation:protected] => [validationFailures:protected] => Array ( ) [_new:BaseObject:private] => [_deleted:BaseObject:private] => [modifiedColumns:protected] => Array ( ) ) [84] => Category Object ( [languages:protected] => [bok_resources:protected] => [bok_topics:protected] => [bok_keywords:protected] => [id:protected] => 84 [type:protected] => category [parent:protected] => 2 [label:protected] => Tile Setter [alreadyInSave:protected] => [alreadyInValidation:protected] => [validationFailures:protected] => Array ( ) [_new:BaseObject:private] => [_deleted:BaseObject:private] => [modifiedColumns:protected] => Array ( ) ) [85] => Category Object ( [languages:protected] => [bok_resources:protected] => [bok_topics:protected] => [bok_keywords:protected] => [id:protected] => 85 [type:protected] => category [parent:protected] => 2 [label:protected] => Truck Driver [alreadyInSave:protected] => [alreadyInValidation:protected] => [validationFailures:protected] => Array ( ) [_new:BaseObject:private] => [_deleted:BaseObject:private] => [modifiedColumns:protected] => Array ( ) ) [86] => Category Object ( [languages:protected] => [bok_resources:protected] => [bok_topics:protected] => [bok_keywords:protected] => [id:protected] => 86 [type:protected] => category [parent:protected] => 2 [label:protected] => Welder [alreadyInSave:protected] => [alreadyInValidation:protected] => [validationFailures:protected] => Array ( ) [_new:BaseObject:private] => [_deleted:BaseObject:private] => [modifiedColumns:protected] => Array ( ) ) [87] => Category Object ( [languages:protected] => [bok_resources:protected] => [bok_topics:protected] => [bok_keywords:protected] => [id:protected] => 87 [type:protected] => category [parent:protected] => 3 [label:protected] => Commercial & Institutional [alreadyInSave:protected] => [alreadyInValidation:protected] => [validationFailures:protected] => Array ( ) [_new:BaseObject:private] => [_deleted:BaseObject:private] => [modifiedColumns:protected] => Array ( ) ) [88] => Category Object ( [languages:protected] => [bok_resources:protected] => [bok_topics:protected] => [bok_keywords:protected] => [id:protected] => 88 [type:protected] => category [parent:protected] => 3 [label:protected] => Demolition [alreadyInSave:protected] => [alreadyInValidation:protected] => [validationFailures:protected] => Array ( ) [_new:BaseObject:private] => [_deleted:BaseObject:private] => [modifiedColumns:protected] => Array ( ) ) [89] => Category Object ( [languages:protected] => [bok_resources:protected] => [bok_topics:protected] => [bok_keywords:protected] => [id:protected] => 89 [type:protected] => category [parent:protected] => 3 [label:protected] => Disasters [alreadyInSave:protected] => [alreadyInValidation:protected] => [validationFailures:protected] => Array ( ) [_new:BaseObject:private] => [_deleted:BaseObject:private] => [modifiedColumns:protected] => Array ( ) ) [91] => Category Object ( [languages:protected] => [bok_resources:protected] => [bok_topics:protected] => [bok_keywords:protected] => [id:protected] => 91 [type:protected] => category [parent:protected] => 3 [label:protected] => Heavy & Highway [alreadyInSave:protected] => [alreadyInValidation:protected] => [validationFailures:protected] => Array ( ) [_new:BaseObject:private] => [_deleted:BaseObject:private] => [modifiedColumns:protected] => Array ( ) ) [90] => Category Object ( [languages:protected] => [bok_resources:protected] => [bok_topics:protected] => [bok_keywords:protected] => [id:protected] => 90 [type:protected] => category [parent:protected] => 3 [label:protected] => Industrial [alreadyInSave:protected] => [alreadyInValidation:protected] => [validationFailures:protected] => Array ( ) [_new:BaseObject:private] => [_deleted:BaseObject:private] => [modifiedColumns:protected] => Array ( ) ) [92] => Category Object ( [languages:protected] => [bok_resources:protected] => [bok_topics:protected] => [bok_keywords:protected] => [id:protected] => 92 [type:protected] => category [parent:protected] => 3 [label:protected] => LEED/Green Construction [alreadyInSave:protected] => [alreadyInValidation:protected] => [validationFailures:protected] => Array ( ) [_new:BaseObject:private] => [_deleted:BaseObject:private] => [modifiedColumns:protected] => Array ( ) ) [93] => Category Object ( [languages:protected] => [bok_resources:protected] => [bok_topics:protected] => [bok_keywords:protected] => [id:protected] => 93 [type:protected] => category [parent:protected] => 3 [label:protected] => Renovations [alreadyInSave:protected] => [alreadyInValidation:protected] => [validationFailures:protected] => Array ( ) [_new:BaseObject:private] => [_deleted:BaseObject:private] => [modifiedColumns:protected] => Array ( ) ) [94] => Category Object ( [languages:protected] => [bok_resources:protected] => [bok_topics:protected] => [bok_keywords:protected] => [id:protected] => 94 [type:protected] => category [parent:protected] => 3 [label:protected] => Residential [alreadyInSave:protected] => [alreadyInValidation:protected] => [validationFailures:protected] => Array ( ) [_new:BaseObject:private] => [_deleted:BaseObject:private] => [modifiedColumns:protected] => Array ( ) ) [95] => Category Object ( [languages:protected] => [bok_resources:protected] => [bok_topics:protected] => [bok_keywords:protected] => [id:protected] => 95 [type:protected] => category [parent:protected] => 3 [label:protected] => Underground [alreadyInSave:protected] => [alreadyInValidation:protected] => [validationFailures:protected] => Array ( ) [_new:BaseObject:private] => [_deleted:BaseObject:private] => [modifiedColumns:protected] => Array ( ) ) [100] => Category Object ( [languages:protected] => [bok_resources:protected] => [bok_topics:protected] => [bok_keywords:protected] => [id:protected] => 100 [type:protected] => category [parent:protected] => 6 [label:protected] => Toolbox Talks [alreadyInSave:protected] => [alreadyInValidation:protected] => [validationFailures:protected] => Array ( ) [_new:BaseObject:private] => [_deleted:BaseObject:private] => [modifiedColumns:protected] => Array ( ) ) ) [categories_initialized:protected] => 1 [mapped_items:protected] => [content:protected] => [files:protected] => [language:protected] => Language Object ( [id:protected] => 1 [code:protected] => en [name:protected] => English [alreadyInSave:protected] => [alreadyInValidation:protected] => [validationFailures:protected] => Array ( ) [_new:BaseObject:private] => [_deleted:BaseObject:private] => [modifiedColumns:protected] => Array ( ) ) [old_record:protected] => [id:protected] => 4419 [old_id:protected] => [elcosh_id:protected] => d001652 [type:protected] => document [display_type:protected] => HTML only (and links) [user_id:protected] => 0 [language_id:protected] => 1 [tagging_id:protected] => Valeria Contreras [priority_id:protected] => 1 [title:protected] => Toolbox Talk: Suicide Prevention [total_pages:protected] => 1 [billed_pages:protected] => 1 [publication_number:protected] => [part_of:protected] => [keywords:protected] => suicide, suicide prevention, mental health, stress, depression, exhaustion, burnout, safety, support, emotional support, health [comments:protected] => [summary:protected] =>The CPWR Toolbox Talk on Suicide Prevention addresses the prevalence of suicide among construction workers. The resource includes a brief case example, steps to prevent a related injury or illness, and questions for discussion. It includes an image that illustrates the hazard, which can be posted in a central location as a reminder of steps to work safely.
Available in English and Spanish. [transition_comments:protected] => [external_link:protected] => [consol_link:protected] => [more_like_this:protected] => [permission_given_by:protected] => [published:protected] => T [billable:protected] => F [img_name:protected] => [img_ext:protected] => [img_width:protected] => [img_height:protected] => [img_credit:protected] => [img_practice:protected] => [vid_source_id:protected] => [vid_running_time:protected] => [vid_intended_audience:protected] => [vid_acquisition_info:protected] => [vid_cost:protected] => [vid_producer:protected] => [vid_filename:protected] => [vid_filename_downloadable:protected] => [date_summary:protected] => [date_permission_requested:protected] => [date_permission_received:protected] => [date_review_needed:protected] => [date_received:protected] => 10/08/20 [date_completed:protected] => 10/08/20 [date_billed:protected] => [date_modified:protected] => 05/19/23 [collBokExports:protected] => [lastBokExportCriteria:BaseElcoshItem:private] => [alreadyInSave:protected] => [alreadyInValidation:protected] => [validationFailures:protected] => Array ( ) [_new:BaseObject:private] => [_deleted:BaseObject:private] => [modifiedColumns:protected] => Array ( ) ) ) ) [new_images] => Array ( [0] => Search_Result Object ( [title] => Toolbox talk - crew view [image] => /record/images/4005-p.jpg [blurb] => Photo of crew listening to a toolbox safety talk before starting work.... [category] => Array ( [0] => 97 [1] => 20 [2] => 47 [3] => 49 [4] => 51 [5] => 55 [6] => 61 [7] => 64 [8] => 71 [9] => 75 [10] => 63 [11] => 79 [12] => 62 [13] => 87 [14] => 88 [15] => 91 [16] => 90 [17] => 93 [18] => 94 [19] => 95 ) [labels] => Array ( [0] => Images [1] => Media [2] => Media & Documents [3] => Safety Culture [4] => Work Environment [5] => Hazards [6] => Bricklayer [7] => Trades [8] => Carpenter [10] => Cement Mason [12] => Electrical Worker [14] => Interior Systems Carpenter [16] => Laborer [18] => Painter [20] => Plasterer [22] => Reinforcing Ironworker [24] => Scaffold Erector [26] => Structural Ironworker [28] => Commercial & Institutional [29] => Jobsites [30] => Demolition [32] => Heavy & Highway [34] => Industrial [36] => Renovations [38] => Residential [40] => Underground ) [type] => Images [sub_category] => [url] => /image/4005/i002692/Toolbox%2Btalk%2B-%2Bcrew%2Bview.html [item:protected] => ImageRecord Object ( [records:protected] => Array ( ) [recordId:protected] => [searchWordClass:protected] => [searchWordPeerClass:protected] => [bok_record:protected] => [authors:protected] => [organizations:protected] => [collections:protected] => [categories:protected] => Array ( [97] => Category Object ( [languages:protected] => [bok_resources:protected] => [bok_topics:protected] => [bok_keywords:protected] => [id:protected] => 97 [type:protected] => category [parent:protected] => 5 [label:protected] => Images [alreadyInSave:protected] => [alreadyInValidation:protected] => [validationFailures:protected] => Array ( ) [_new:BaseObject:private] => [_deleted:BaseObject:private] => [modifiedColumns:protected] => Array ( ) ) [20] => Category Object ( [languages:protected] => [bok_resources:protected] => [bok_topics:protected] => [bok_keywords:protected] => [id:protected] => 20 [type:protected] => category [parent:protected] => 7 [label:protected] => Safety Culture [alreadyInSave:protected] => [alreadyInValidation:protected] => [validationFailures:protected] => Array ( ) [_new:BaseObject:private] => [_deleted:BaseObject:private] => [modifiedColumns:protected] => Array ( ) ) [47] => Category Object ( [languages:protected] => [bok_resources:protected] => [bok_topics:protected] => [bok_keywords:protected] => [id:protected] => 47 [type:protected] => category [parent:protected] => 2 [label:protected] => Bricklayer [alreadyInSave:protected] => [alreadyInValidation:protected] => [validationFailures:protected] => Array ( ) [_new:BaseObject:private] => [_deleted:BaseObject:private] => [modifiedColumns:protected] => Array ( ) ) [49] => Category Object ( [languages:protected] => [bok_resources:protected] => [bok_topics:protected] => [bok_keywords:protected] => [id:protected] => 49 [type:protected] => category [parent:protected] => 2 [label:protected] => Carpenter [alreadyInSave:protected] => [alreadyInValidation:protected] => [validationFailures:protected] => Array ( ) [_new:BaseObject:private] => [_deleted:BaseObject:private] => [modifiedColumns:protected] => Array ( ) ) [51] => Category Object ( [languages:protected] => [bok_resources:protected] => [bok_topics:protected] => [bok_keywords:protected] => [id:protected] => 51 [type:protected] => category [parent:protected] => 2 [label:protected] => Cement Mason [alreadyInSave:protected] => [alreadyInValidation:protected] => [validationFailures:protected] => Array ( ) [_new:BaseObject:private] => [_deleted:BaseObject:private] => [modifiedColumns:protected] => Array ( ) ) [55] => Category Object ( [languages:protected] => [bok_resources:protected] => [bok_topics:protected] => [bok_keywords:protected] => [id:protected] => 55 [type:protected] => category [parent:protected] => 2 [label:protected] => Electrical Worker [alreadyInSave:protected] => [alreadyInValidation:protected] => [validationFailures:protected] => Array ( ) [_new:BaseObject:private] => [_deleted:BaseObject:private] => [modifiedColumns:protected] => Array ( ) ) [61] => Category Object ( [languages:protected] => [bok_resources:protected] => [bok_topics:protected] => [bok_keywords:protected] => [id:protected] => 61 [type:protected] => category [parent:protected] => 2 [label:protected] => Interior Systems Carpenter [alreadyInSave:protected] => [alreadyInValidation:protected] => [validationFailures:protected] => Array ( ) [_new:BaseObject:private] => [_deleted:BaseObject:private] => [modifiedColumns:protected] => Array ( ) ) [64] => Category Object ( [languages:protected] => [bok_resources:protected] => [bok_topics:protected] => [bok_keywords:protected] => [id:protected] => 64 [type:protected] => category [parent:protected] => 2 [label:protected] => Laborer [alreadyInSave:protected] => [alreadyInValidation:protected] => [validationFailures:protected] => Array ( ) [_new:BaseObject:private] => [_deleted:BaseObject:private] => [modifiedColumns:protected] => Array ( ) ) [71] => Category Object ( [languages:protected] => [bok_resources:protected] => [bok_topics:protected] => [bok_keywords:protected] => [id:protected] => 71 [type:protected] => category [parent:protected] => 2 [label:protected] => Painter [alreadyInSave:protected] => [alreadyInValidation:protected] => [validationFailures:protected] => Array ( ) [_new:BaseObject:private] => [_deleted:BaseObject:private] => [modifiedColumns:protected] => Array ( ) ) [75] => Category Object ( [languages:protected] => [bok_resources:protected] => [bok_topics:protected] => [bok_keywords:protected] => [id:protected] => 75 [type:protected] => category [parent:protected] => 2 [label:protected] => Plasterer [alreadyInSave:protected] => [alreadyInValidation:protected] => [validationFailures:protected] => Array ( ) [_new:BaseObject:private] => [_deleted:BaseObject:private] => [modifiedColumns:protected] => Array ( ) ) [63] => Category Object ( [languages:protected] => [bok_resources:protected] => [bok_topics:protected] => [bok_keywords:protected] => [id:protected] => 63 [type:protected] => category [parent:protected] => 2 [label:protected] => Reinforcing Ironworker [alreadyInSave:protected] => [alreadyInValidation:protected] => [validationFailures:protected] => Array ( ) [_new:BaseObject:private] => [_deleted:BaseObject:private] => [modifiedColumns:protected] => Array ( ) ) [79] => Category Object ( [languages:protected] => [bok_resources:protected] => [bok_topics:protected] => [bok_keywords:protected] => [id:protected] => 79 [type:protected] => category [parent:protected] => 2 [label:protected] => Scaffold Erector [alreadyInSave:protected] => [alreadyInValidation:protected] => [validationFailures:protected] => Array ( ) [_new:BaseObject:private] => [_deleted:BaseObject:private] => [modifiedColumns:protected] => Array ( ) ) [62] => Category Object ( [languages:protected] => [bok_resources:protected] => [bok_topics:protected] => [bok_keywords:protected] => [id:protected] => 62 [type:protected] => category [parent:protected] => 2 [label:protected] => Structural Ironworker [alreadyInSave:protected] => [alreadyInValidation:protected] => [validationFailures:protected] => Array ( ) [_new:BaseObject:private] => [_deleted:BaseObject:private] => [modifiedColumns:protected] => Array ( ) ) [87] => Category Object ( [languages:protected] => [bok_resources:protected] => [bok_topics:protected] => [bok_keywords:protected] => [id:protected] => 87 [type:protected] => category [parent:protected] => 3 [label:protected] => Commercial & Institutional [alreadyInSave:protected] => [alreadyInValidation:protected] => [validationFailures:protected] => Array ( ) [_new:BaseObject:private] => [_deleted:BaseObject:private] => [modifiedColumns:protected] => Array ( ) ) [88] => Category Object ( [languages:protected] => [bok_resources:protected] => [bok_topics:protected] => [bok_keywords:protected] => [id:protected] => 88 [type:protected] => category [parent:protected] => 3 [label:protected] => Demolition [alreadyInSave:protected] => [alreadyInValidation:protected] => [validationFailures:protected] => Array ( ) [_new:BaseObject:private] => [_deleted:BaseObject:private] => [modifiedColumns:protected] => Array ( ) ) [91] => Category Object ( [languages:protected] => [bok_resources:protected] => [bok_topics:protected] => [bok_keywords:protected] => [id:protected] => 91 [type:protected] => category [parent:protected] => 3 [label:protected] => Heavy & Highway [alreadyInSave:protected] => [alreadyInValidation:protected] => [validationFailures:protected] => Array ( ) [_new:BaseObject:private] => [_deleted:BaseObject:private] => [modifiedColumns:protected] => Array ( ) ) [90] => Category Object ( [languages:protected] => [bok_resources:protected] => [bok_topics:protected] => [bok_keywords:protected] => [id:protected] => 90 [type:protected] => category [parent:protected] => 3 [label:protected] => Industrial [alreadyInSave:protected] => [alreadyInValidation:protected] => [validationFailures:protected] => Array ( ) [_new:BaseObject:private] => [_deleted:BaseObject:private] => [modifiedColumns:protected] => Array ( ) ) [93] => Category Object ( [languages:protected] => [bok_resources:protected] => [bok_topics:protected] => [bok_keywords:protected] => [id:protected] => 93 [type:protected] => category [parent:protected] => 3 [label:protected] => Renovations [alreadyInSave:protected] => [alreadyInValidation:protected] => [validationFailures:protected] => Array ( ) [_new:BaseObject:private] => [_deleted:BaseObject:private] => [modifiedColumns:protected] => Array ( ) ) [94] => Category Object ( [languages:protected] => [bok_resources:protected] => [bok_topics:protected] => [bok_keywords:protected] => [id:protected] => 94 [type:protected] => category [parent:protected] => 3 [label:protected] => Residential [alreadyInSave:protected] => [alreadyInValidation:protected] => [validationFailures:protected] => Array ( ) [_new:BaseObject:private] => [_deleted:BaseObject:private] => [modifiedColumns:protected] => Array ( ) ) [95] => Category Object ( [languages:protected] => [bok_resources:protected] => [bok_topics:protected] => [bok_keywords:protected] => [id:protected] => 95 [type:protected] => category [parent:protected] => 3 [label:protected] => Underground [alreadyInSave:protected] => [alreadyInValidation:protected] => [validationFailures:protected] => Array ( ) [_new:BaseObject:private] => [_deleted:BaseObject:private] => [modifiedColumns:protected] => Array ( ) ) ) [categories_initialized:protected] => 1 [mapped_items:protected] => [content:protected] => [files:protected] => [language:protected] => Language Object ( [id:protected] => 1 [code:protected] => en [name:protected] => English [alreadyInSave:protected] => [alreadyInValidation:protected] => [validationFailures:protected] => Array ( ) [_new:BaseObject:private] => [_deleted:BaseObject:private] => [modifiedColumns:protected] => Array ( ) ) [old_record:protected] => [id:protected] => 4005 [old_id:protected] => [elcosh_id:protected] => i002692 [type:protected] => image [display_type:protected] => Image [user_id:protected] => 0 [language_id:protected] => 1 [tagging_id:protected] => Bruce Lippy [priority_id:protected] => 1 [title:protected] => Toolbox talk - crew view [total_pages:protected] => 0 [billed_pages:protected] => 0 [publication_number:protected] => [part_of:protected] => [keywords:protected] => toolbox talk, tailgate talk, safety talk, Spanish [comments:protected] => [summary:protected] => Photo of crew listening to a toolbox safety talk before starting work. [transition_comments:protected] => [external_link:protected] => [consol_link:protected] => http://www.cpwrconstructionsolutions.org/electrical/solution/662/worker-training.html [more_like_this:protected] => i002691,d001269, c000079, d001285 [permission_given_by:protected] => [published:protected] => T [billable:protected] => F [img_name:protected] => [img_ext:protected] => jpg [img_width:protected] => [img_height:protected] => [img_credit:protected] => Morgan Zavertnik and Hoar Construction [img_practice:protected] => good [vid_source_id:protected] => [vid_running_time:protected] => [vid_intended_audience:protected] => [vid_acquisition_info:protected] => [vid_cost:protected] => [vid_producer:protected] => [vid_filename:protected] => [vid_filename_downloadable:protected] => [date_summary:protected] => November 2015 [date_permission_requested:protected] => [date_permission_received:protected] => [date_review_needed:protected] => [date_received:protected] => 03/02/16 [date_completed:protected] => 03/02/16 [date_billed:protected] => [date_modified:protected] => 03/02/16 [collBokExports:protected] => [lastBokExportCriteria:BaseElcoshItem:private] => [alreadyInSave:protected] => [alreadyInValidation:protected] => [validationFailures:protected] => Array ( ) [_new:BaseObject:private] => [_deleted:BaseObject:private] => [modifiedColumns:protected] => Array ( ) ) ) [1] => Search_Result Object ( [title] => Toolbox talk - long shot [image] => /record/images/4006-p.jpg [blurb] => This crew gathered every morning before starting work to discuss a new safety topic.... [category] => Array ( [0] => 20 [1] => 47 [2] => 49 [3] => 51 [4] => 55 [5] => 64 [6] => 68 [7] => 75 [8] => 76 [9] => 63 [10] => 78 [11] => 79 [12] => 82 [13] => 62 [14] => 87 [15] => 88 [16] => 91 [17] => 90 [18] => 93 [19] => 94 [20] => 95 [21] => 97 ) [labels] => Array ( [0] => Safety Culture [1] => Work Environment [2] => Hazards [3] => Bricklayer [4] => Trades [5] => Carpenter [7] => Cement Mason [9] => Electrical Worker [11] => Laborer [13] => Maintenance Worker [15] => Plasterer [17] => Plumber/Pipefitter [19] => Reinforcing Ironworker [21] => Roofer/Waterproofer [23] => Scaffold Erector [25] => Stonemason [27] => Structural Ironworker [29] => Commercial & Institutional [30] => Jobsites [31] => Demolition [33] => Heavy & Highway [35] => Industrial [37] => Renovations [39] => Residential [41] => Underground [43] => Images [44] => Media [45] => Media & Documents ) [type] => Images [sub_category] => [url] => /image/4006/i002693/Toolbox%2Btalk%2B-%2Blong%2Bshot.html [item:protected] => ImageRecord Object ( [records:protected] => Array ( ) [recordId:protected] => [searchWordClass:protected] => [searchWordPeerClass:protected] => [bok_record:protected] => [authors:protected] => [organizations:protected] => [collections:protected] => [categories:protected] => Array ( [20] => Category Object ( [languages:protected] => [bok_resources:protected] => [bok_topics:protected] => [bok_keywords:protected] => [id:protected] => 20 [type:protected] => category [parent:protected] => 7 [label:protected] => Safety Culture [alreadyInSave:protected] => [alreadyInValidation:protected] => [validationFailures:protected] => Array ( ) [_new:BaseObject:private] => [_deleted:BaseObject:private] => [modifiedColumns:protected] => Array ( ) ) [47] => Category Object ( [languages:protected] => [bok_resources:protected] => [bok_topics:protected] => [bok_keywords:protected] => [id:protected] => 47 [type:protected] => category [parent:protected] => 2 [label:protected] => Bricklayer [alreadyInSave:protected] => [alreadyInValidation:protected] => [validationFailures:protected] => Array ( ) [_new:BaseObject:private] => [_deleted:BaseObject:private] => [modifiedColumns:protected] => Array ( ) ) [49] => Category Object ( [languages:protected] => [bok_resources:protected] => [bok_topics:protected] => [bok_keywords:protected] => [id:protected] => 49 [type:protected] => category [parent:protected] => 2 [label:protected] => Carpenter [alreadyInSave:protected] => [alreadyInValidation:protected] => [validationFailures:protected] => Array ( ) [_new:BaseObject:private] => [_deleted:BaseObject:private] => [modifiedColumns:protected] => Array ( ) ) [51] => Category Object ( [languages:protected] => [bok_resources:protected] => [bok_topics:protected] => [bok_keywords:protected] => [id:protected] => 51 [type:protected] => category [parent:protected] => 2 [label:protected] => Cement Mason [alreadyInSave:protected] => [alreadyInValidation:protected] => [validationFailures:protected] => Array ( ) [_new:BaseObject:private] => [_deleted:BaseObject:private] => [modifiedColumns:protected] => Array ( ) ) [55] => Category Object ( [languages:protected] => [bok_resources:protected] => [bok_topics:protected] => [bok_keywords:protected] => [id:protected] => 55 [type:protected] => category [parent:protected] => 2 [label:protected] => Electrical Worker [alreadyInSave:protected] => [alreadyInValidation:protected] => [validationFailures:protected] => Array ( ) [_new:BaseObject:private] => [_deleted:BaseObject:private] => [modifiedColumns:protected] => Array ( ) ) [64] => Category Object ( [languages:protected] => [bok_resources:protected] => [bok_topics:protected] => [bok_keywords:protected] => [id:protected] => 64 [type:protected] => category [parent:protected] => 2 [label:protected] => Laborer [alreadyInSave:protected] => [alreadyInValidation:protected] => [validationFailures:protected] => Array ( ) [_new:BaseObject:private] => [_deleted:BaseObject:private] => [modifiedColumns:protected] => Array ( ) ) [68] => Category Object ( [languages:protected] => [bok_resources:protected] => [bok_topics:protected] => [bok_keywords:protected] => [id:protected] => 68 [type:protected] => category [parent:protected] => 2 [label:protected] => Maintenance Worker [alreadyInSave:protected] => [alreadyInValidation:protected] => [validationFailures:protected] => Array ( ) [_new:BaseObject:private] => [_deleted:BaseObject:private] => [modifiedColumns:protected] => Array ( ) ) [75] => Category Object ( [languages:protected] => [bok_resources:protected] => [bok_topics:protected] => [bok_keywords:protected] => [id:protected] => 75 [type:protected] => category [parent:protected] => 2 [label:protected] => Plasterer [alreadyInSave:protected] => [alreadyInValidation:protected] => [validationFailures:protected] => Array ( ) [_new:BaseObject:private] => [_deleted:BaseObject:private] => [modifiedColumns:protected] => Array ( ) ) [76] => Category Object ( [languages:protected] => [bok_resources:protected] => [bok_topics:protected] => [bok_keywords:protected] => [id:protected] => 76 [type:protected] => category [parent:protected] => 2 [label:protected] => Plumber/Pipefitter [alreadyInSave:protected] => [alreadyInValidation:protected] => [validationFailures:protected] => Array ( ) [_new:BaseObject:private] => [_deleted:BaseObject:private] => [modifiedColumns:protected] => Array ( ) ) [63] => Category Object ( [languages:protected] => [bok_resources:protected] => [bok_topics:protected] => [bok_keywords:protected] => [id:protected] => 63 [type:protected] => category [parent:protected] => 2 [label:protected] => Reinforcing Ironworker [alreadyInSave:protected] => [alreadyInValidation:protected] => [validationFailures:protected] => Array ( ) [_new:BaseObject:private] => [_deleted:BaseObject:private] => [modifiedColumns:protected] => Array ( ) ) [78] => Category Object ( [languages:protected] => [bok_resources:protected] => [bok_topics:protected] => [bok_keywords:protected] => [id:protected] => 78 [type:protected] => category [parent:protected] => 2 [label:protected] => Roofer/Waterproofer [alreadyInSave:protected] => [alreadyInValidation:protected] => [validationFailures:protected] => Array ( ) [_new:BaseObject:private] => [_deleted:BaseObject:private] => [modifiedColumns:protected] => Array ( ) ) [79] => Category Object ( [languages:protected] => [bok_resources:protected] => [bok_topics:protected] => [bok_keywords:protected] => [id:protected] => 79 [type:protected] => category [parent:protected] => 2 [label:protected] => Scaffold Erector [alreadyInSave:protected] => [alreadyInValidation:protected] => [validationFailures:protected] => Array ( ) [_new:BaseObject:private] => [_deleted:BaseObject:private] => [modifiedColumns:protected] => Array ( ) ) [82] => Category Object ( [languages:protected] => [bok_resources:protected] => [bok_topics:protected] => [bok_keywords:protected] => [id:protected] => 82 [type:protected] => category [parent:protected] => 2 [label:protected] => Stonemason [alreadyInSave:protected] => [alreadyInValidation:protected] => [validationFailures:protected] => Array ( ) [_new:BaseObject:private] => [_deleted:BaseObject:private] => [modifiedColumns:protected] => Array ( ) ) [62] => Category Object ( [languages:protected] => [bok_resources:protected] => [bok_topics:protected] => [bok_keywords:protected] => [id:protected] => 62 [type:protected] => category [parent:protected] => 2 [label:protected] => Structural Ironworker [alreadyInSave:protected] => [alreadyInValidation:protected] => [validationFailures:protected] => Array ( ) [_new:BaseObject:private] => [_deleted:BaseObject:private] => [modifiedColumns:protected] => Array ( ) ) [87] => Category Object ( [languages:protected] => [bok_resources:protected] => [bok_topics:protected] => [bok_keywords:protected] => [id:protected] => 87 [type:protected] => category [parent:protected] => 3 [label:protected] => Commercial & Institutional [alreadyInSave:protected] => [alreadyInValidation:protected] => [validationFailures:protected] => Array ( ) [_new:BaseObject:private] => [_deleted:BaseObject:private] => [modifiedColumns:protected] => Array ( ) ) [88] => Category Object ( [languages:protected] => [bok_resources:protected] => [bok_topics:protected] => [bok_keywords:protected] => [id:protected] => 88 [type:protected] => category [parent:protected] => 3 [label:protected] => Demolition [alreadyInSave:protected] => [alreadyInValidation:protected] => [validationFailures:protected] => Array ( ) [_new:BaseObject:private] => [_deleted:BaseObject:private] => [modifiedColumns:protected] => Array ( ) ) [91] => Category Object ( [languages:protected] => [bok_resources:protected] => [bok_topics:protected] => [bok_keywords:protected] => [id:protected] => 91 [type:protected] => category [parent:protected] => 3 [label:protected] => Heavy & Highway [alreadyInSave:protected] => [alreadyInValidation:protected] => [validationFailures:protected] => Array ( ) [_new:BaseObject:private] => [_deleted:BaseObject:private] => [modifiedColumns:protected] => Array ( ) ) [90] => Category Object ( [languages:protected] => [bok_resources:protected] => [bok_topics:protected] => [bok_keywords:protected] => [id:protected] => 90 [type:protected] => category [parent:protected] => 3 [label:protected] => Industrial [alreadyInSave:protected] => [alreadyInValidation:protected] => [validationFailures:protected] => Array ( ) [_new:BaseObject:private] => [_deleted:BaseObject:private] => [modifiedColumns:protected] => Array ( ) ) [93] => Category Object ( [languages:protected] => [bok_resources:protected] => [bok_topics:protected] => [bok_keywords:protected] => [id:protected] => 93 [type:protected] => category [parent:protected] => 3 [label:protected] => Renovations [alreadyInSave:protected] => [alreadyInValidation:protected] => [validationFailures:protected] => Array ( ) [_new:BaseObject:private] => [_deleted:BaseObject:private] => [modifiedColumns:protected] => Array ( ) ) [94] => Category Object ( [languages:protected] => [bok_resources:protected] => [bok_topics:protected] => [bok_keywords:protected] => [id:protected] => 94 [type:protected] => category [parent:protected] => 3 [label:protected] => Residential [alreadyInSave:protected] => [alreadyInValidation:protected] => [validationFailures:protected] => Array ( ) [_new:BaseObject:private] => [_deleted:BaseObject:private] => [modifiedColumns:protected] => Array ( ) ) [95] => Category Object ( [languages:protected] => [bok_resources:protected] => [bok_topics:protected] => [bok_keywords:protected] => [id:protected] => 95 [type:protected] => category [parent:protected] => 3 [label:protected] => Underground [alreadyInSave:protected] => [alreadyInValidation:protected] => [validationFailures:protected] => Array ( ) [_new:BaseObject:private] => [_deleted:BaseObject:private] => [modifiedColumns:protected] => Array ( ) ) [97] => Category Object ( [languages:protected] => [bok_resources:protected] => [bok_topics:protected] => [bok_keywords:protected] => [id:protected] => 97 [type:protected] => category [parent:protected] => 5 [label:protected] => Images [alreadyInSave:protected] => [alreadyInValidation:protected] => [validationFailures:protected] => Array ( ) [_new:BaseObject:private] => [_deleted:BaseObject:private] => [modifiedColumns:protected] => Array ( ) ) ) [categories_initialized:protected] => 1 [mapped_items:protected] => [content:protected] => [files:protected] => [language:protected] => Language Object ( [id:protected] => 1 [code:protected] => en [name:protected] => English [alreadyInSave:protected] => [alreadyInValidation:protected] => [validationFailures:protected] => Array ( ) [_new:BaseObject:private] => [_deleted:BaseObject:private] => [modifiedColumns:protected] => Array ( ) ) [old_record:protected] => [id:protected] => 4006 [old_id:protected] => [elcosh_id:protected] => i002693 [type:protected] => image [display_type:protected] => Image [user_id:protected] => 0 [language_id:protected] => 1 [tagging_id:protected] => Bruce Lippy [priority_id:protected] => 1 [title:protected] => Toolbox talk - long shot [total_pages:protected] => 0 [billed_pages:protected] => 0 [publication_number:protected] => [part_of:protected] => [keywords:protected] => toolbox talk, tailgate talk, safety minute [comments:protected] => [summary:protected] => This crew gathered every morning before starting work to discuss a new safety topic. [transition_comments:protected] => [external_link:protected] => [consol_link:protected] => http://www.cpwrconstructionsolutions.org/electrical/solution/662/worker-training.html [more_like_this:protected] => i002691,i002692,d001269,d000527 [permission_given_by:protected] => [published:protected] => T [billable:protected] => F [img_name:protected] => [img_ext:protected] => jpg [img_width:protected] => [img_height:protected] => [img_credit:protected] => Morgan Zavertnik and Hoar Construction [img_practice:protected] => good [vid_source_id:protected] => [vid_running_time:protected] => [vid_intended_audience:protected] => [vid_acquisition_info:protected] => [vid_cost:protected] => [vid_producer:protected] => [vid_filename:protected] => [vid_filename_downloadable:protected] => [date_summary:protected] => November 2015 [date_permission_requested:protected] => [date_permission_received:protected] => [date_review_needed:protected] => [date_received:protected] => 03/02/16 [date_completed:protected] => 03/02/16 [date_billed:protected] => [date_modified:protected] => 03/02/16 [collBokExports:protected] => [lastBokExportCriteria:BaseElcoshItem:private] => [alreadyInSave:protected] => [alreadyInValidation:protected] => [validationFailures:protected] => Array ( ) [_new:BaseObject:private] => [_deleted:BaseObject:private] => [modifiedColumns:protected] => Array ( ) ) ) [2] => Search_Result Object ( [title] => Construction bracing [image] => /record/images/3995-p.jpg [blurb] => This shows structural support that prevents collapses during construction.... [category] => Array ( [0] => 12 [1] => 15 [2] => 21 [3] => 49 [4] => 51 [5] => 55 [6] => 56 [7] => 60 [8] => 64 [9] => 68 [10] => 74 [11] => 63 [12] => 78 [13] => 79 [14] => 80 [15] => 62 [16] => 87 [17] => 90 [18] => 97 ) [labels] => Array ( [0] => Crushed/Struck By [1] => Work Environment [2] => Hazards [3] => Falls [6] => Scaffolds [9] => Carpenter [10] => Trades [11] => Cement Mason [13] => Electrical Worker [15] => Elevator Constructor [17] => HVAC [19] => Laborer [21] => Maintenance Worker [23] => Pile Driver [25] => Reinforcing Ironworker [27] => Roofer/Waterproofer [29] => Scaffold Erector [31] => Sheetmetal Worker [33] => Structural Ironworker [35] => Commercial & Institutional [36] => Jobsites [37] => Industrial [39] => Images [40] => Media [41] => Media & Documents ) [type] => Images [sub_category] => [url] => /image/3995/i002690/Construction%2Bbracing.html [item:protected] => ImageRecord Object ( [records:protected] => Array ( ) [recordId:protected] => [searchWordClass:protected] => [searchWordPeerClass:protected] => [bok_record:protected] => [authors:protected] => [organizations:protected] => [collections:protected] => [categories:protected] => Array ( [12] => Category Object ( [languages:protected] => [bok_resources:protected] => [bok_topics:protected] => [bok_keywords:protected] => [id:protected] => 12 [type:protected] => category [parent:protected] => 7 [label:protected] => Crushed/Struck By [alreadyInSave:protected] => [alreadyInValidation:protected] => [validationFailures:protected] => Array ( ) [_new:BaseObject:private] => [_deleted:BaseObject:private] => [modifiedColumns:protected] => Array ( ) ) [15] => Category Object ( [languages:protected] => [bok_resources:protected] => [bok_topics:protected] => [bok_keywords:protected] => [id:protected] => 15 [type:protected] => category [parent:protected] => 7 [label:protected] => Falls [alreadyInSave:protected] => [alreadyInValidation:protected] => [validationFailures:protected] => Array ( ) [_new:BaseObject:private] => [_deleted:BaseObject:private] => [modifiedColumns:protected] => Array ( ) ) [21] => Category Object ( [languages:protected] => [bok_resources:protected] => [bok_topics:protected] => [bok_keywords:protected] => [id:protected] => 21 [type:protected] => category [parent:protected] => 7 [label:protected] => Scaffolds [alreadyInSave:protected] => [alreadyInValidation:protected] => [validationFailures:protected] => Array ( ) [_new:BaseObject:private] => [_deleted:BaseObject:private] => [modifiedColumns:protected] => Array ( ) ) [49] => Category Object ( [languages:protected] => [bok_resources:protected] => [bok_topics:protected] => [bok_keywords:protected] => [id:protected] => 49 [type:protected] => category [parent:protected] => 2 [label:protected] => Carpenter [alreadyInSave:protected] => [alreadyInValidation:protected] => [validationFailures:protected] => Array ( ) [_new:BaseObject:private] => [_deleted:BaseObject:private] => [modifiedColumns:protected] => Array ( ) ) [51] => Category Object ( [languages:protected] => [bok_resources:protected] => [bok_topics:protected] => [bok_keywords:protected] => [id:protected] => 51 [type:protected] => category [parent:protected] => 2 [label:protected] => Cement Mason [alreadyInSave:protected] => [alreadyInValidation:protected] => [validationFailures:protected] => Array ( ) [_new:BaseObject:private] => [_deleted:BaseObject:private] => [modifiedColumns:protected] => Array ( ) ) [55] => Category Object ( [languages:protected] => [bok_resources:protected] => [bok_topics:protected] => [bok_keywords:protected] => [id:protected] => 55 [type:protected] => category [parent:protected] => 2 [label:protected] => Electrical Worker [alreadyInSave:protected] => [alreadyInValidation:protected] => [validationFailures:protected] => Array ( ) [_new:BaseObject:private] => [_deleted:BaseObject:private] => [modifiedColumns:protected] => Array ( ) ) [56] => Category Object ( [languages:protected] => [bok_resources:protected] => [bok_topics:protected] => [bok_keywords:protected] => [id:protected] => 56 [type:protected] => category [parent:protected] => 2 [label:protected] => Elevator Constructor [alreadyInSave:protected] => [alreadyInValidation:protected] => [validationFailures:protected] => Array ( ) [_new:BaseObject:private] => [_deleted:BaseObject:private] => [modifiedColumns:protected] => Array ( ) ) [60] => Category Object ( [languages:protected] => [bok_resources:protected] => [bok_topics:protected] => [bok_keywords:protected] => [id:protected] => 60 [type:protected] => category [parent:protected] => 2 [label:protected] => HVAC [alreadyInSave:protected] => [alreadyInValidation:protected] => [validationFailures:protected] => Array ( ) [_new:BaseObject:private] => [_deleted:BaseObject:private] => [modifiedColumns:protected] => Array ( ) ) [64] => Category Object ( [languages:protected] => [bok_resources:protected] => [bok_topics:protected] => [bok_keywords:protected] => [id:protected] => 64 [type:protected] => category [parent:protected] => 2 [label:protected] => Laborer [alreadyInSave:protected] => [alreadyInValidation:protected] => [validationFailures:protected] => Array ( ) [_new:BaseObject:private] => [_deleted:BaseObject:private] => [modifiedColumns:protected] => Array ( ) ) [68] => Category Object ( [languages:protected] => [bok_resources:protected] => [bok_topics:protected] => [bok_keywords:protected] => [id:protected] => 68 [type:protected] => category [parent:protected] => 2 [label:protected] => Maintenance Worker [alreadyInSave:protected] => [alreadyInValidation:protected] => [validationFailures:protected] => Array ( ) [_new:BaseObject:private] => [_deleted:BaseObject:private] => [modifiedColumns:protected] => Array ( ) ) [74] => Category Object ( [languages:protected] => [bok_resources:protected] => [bok_topics:protected] => [bok_keywords:protected] => [id:protected] => 74 [type:protected] => category [parent:protected] => 2 [label:protected] => Pile Driver [alreadyInSave:protected] => [alreadyInValidation:protected] => [validationFailures:protected] => Array ( ) [_new:BaseObject:private] => [_deleted:BaseObject:private] => [modifiedColumns:protected] => Array ( ) ) [63] => Category Object ( [languages:protected] => [bok_resources:protected] => [bok_topics:protected] => [bok_keywords:protected] => [id:protected] => 63 [type:protected] => category [parent:protected] => 2 [label:protected] => Reinforcing Ironworker [alreadyInSave:protected] => [alreadyInValidation:protected] => [validationFailures:protected] => Array ( ) [_new:BaseObject:private] => [_deleted:BaseObject:private] => [modifiedColumns:protected] => Array ( ) ) [78] => Category Object ( [languages:protected] => [bok_resources:protected] => [bok_topics:protected] => [bok_keywords:protected] => [id:protected] => 78 [type:protected] => category [parent:protected] => 2 [label:protected] => Roofer/Waterproofer [alreadyInSave:protected] => [alreadyInValidation:protected] => [validationFailures:protected] => Array ( ) [_new:BaseObject:private] => [_deleted:BaseObject:private] => [modifiedColumns:protected] => Array ( ) ) [79] => Category Object ( [languages:protected] => [bok_resources:protected] => [bok_topics:protected] => [bok_keywords:protected] => [id:protected] => 79 [type:protected] => category [parent:protected] => 2 [label:protected] => Scaffold Erector [alreadyInSave:protected] => [alreadyInValidation:protected] => [validationFailures:protected] => Array ( ) [_new:BaseObject:private] => [_deleted:BaseObject:private] => [modifiedColumns:protected] => Array ( ) ) [80] => Category Object ( [languages:protected] => [bok_resources:protected] => [bok_topics:protected] => [bok_keywords:protected] => [id:protected] => 80 [type:protected] => category [parent:protected] => 2 [label:protected] => Sheetmetal Worker [alreadyInSave:protected] => [alreadyInValidation:protected] => [validationFailures:protected] => Array ( ) [_new:BaseObject:private] => [_deleted:BaseObject:private] => [modifiedColumns:protected] => Array ( ) ) [62] => Category Object ( [languages:protected] => [bok_resources:protected] => [bok_topics:protected] => [bok_keywords:protected] => [id:protected] => 62 [type:protected] => category [parent:protected] => 2 [label:protected] => Structural Ironworker [alreadyInSave:protected] => [alreadyInValidation:protected] => [validationFailures:protected] => Array ( ) [_new:BaseObject:private] => [_deleted:BaseObject:private] => [modifiedColumns:protected] => Array ( ) ) [87] => Category Object ( [languages:protected] => [bok_resources:protected] => [bok_topics:protected] => [bok_keywords:protected] => [id:protected] => 87 [type:protected] => category [parent:protected] => 3 [label:protected] => Commercial & Institutional [alreadyInSave:protected] => [alreadyInValidation:protected] => [validationFailures:protected] => Array ( ) [_new:BaseObject:private] => [_deleted:BaseObject:private] => [modifiedColumns:protected] => Array ( ) ) [90] => Category Object ( [languages:protected] => [bok_resources:protected] => [bok_topics:protected] => [bok_keywords:protected] => [id:protected] => 90 [type:protected] => category [parent:protected] => 3 [label:protected] => Industrial [alreadyInSave:protected] => [alreadyInValidation:protected] => [validationFailures:protected] => Array ( ) [_new:BaseObject:private] => [_deleted:BaseObject:private] => [modifiedColumns:protected] => Array ( ) ) [97] => Category Object ( [languages:protected] => [bok_resources:protected] => [bok_topics:protected] => [bok_keywords:protected] => [id:protected] => 97 [type:protected] => category [parent:protected] => 5 [label:protected] => Images [alreadyInSave:protected] => [alreadyInValidation:protected] => [validationFailures:protected] => Array ( ) [_new:BaseObject:private] => [_deleted:BaseObject:private] => [modifiedColumns:protected] => Array ( ) ) ) [categories_initialized:protected] => 1 [mapped_items:protected] => [content:protected] => [files:protected] => [language:protected] => Language Object ( [id:protected] => 1 [code:protected] => en [name:protected] => English [alreadyInSave:protected] => [alreadyInValidation:protected] => [validationFailures:protected] => Array ( ) [_new:BaseObject:private] => [_deleted:BaseObject:private] => [modifiedColumns:protected] => Array ( ) ) [old_record:protected] => [id:protected] => 3995 [old_id:protected] => [elcosh_id:protected] => i002690 [type:protected] => image [display_type:protected] => Image [user_id:protected] => 0 [language_id:protected] => 1 [tagging_id:protected] => Bruce Lippy [priority_id:protected] => 1 [title:protected] => Construction bracing [total_pages:protected] => 0 [billed_pages:protected] => 0 [publication_number:protected] => [part_of:protected] => [keywords:protected] => Bracing, support, scaffold [comments:protected] => [summary:protected] => This shows structural support that prevents collapses during construction. [transition_comments:protected] => [external_link:protected] => [consol_link:protected] => http://www.cpwrconstructionsolutions.org/masonry/solution/8/adjustable-tower-scaffold.html [more_like_this:protected] => i002660 [permission_given_by:protected] => [published:protected] => T [billable:protected] => F [img_name:protected] => [img_ext:protected] => jpg [img_width:protected] => [img_height:protected] => [img_credit:protected] => Photo by Pam Susi [img_practice:protected] => good [vid_source_id:protected] => [vid_running_time:protected] => [vid_intended_audience:protected] => [vid_acquisition_info:protected] => [vid_cost:protected] => [vid_producer:protected] => [vid_filename:protected] => [vid_filename_downloadable:protected] => [date_summary:protected] => January 2016 [date_permission_requested:protected] => [date_permission_received:protected] => [date_review_needed:protected] => [date_received:protected] => 02/01/16 [date_completed:protected] => 02/01/16 [date_billed:protected] => [date_modified:protected] => 02/01/16 [collBokExports:protected] => [lastBokExportCriteria:BaseElcoshItem:private] => [alreadyInSave:protected] => [alreadyInValidation:protected] => [validationFailures:protected] => Array ( ) [_new:BaseObject:private] => [_deleted:BaseObject:private] => [modifiedColumns:protected] => Array ( ) ) ) [3] => Search_Result Object ( [title] => Suspended Scaffold Outriggers [image] => /record/images/3975-p.jpg [blurb] => Suspended scaffolds systems must be designed by a qualified person and inspected daily by a competent person. The supports for the counterweight must... [category] => Array ( [0] => 97 [1] => 15 [2] => 47 [3] => 49 [4] => 79 [5] => 87 ) [labels] => Array ( [0] => Images [1] => Media [2] => Media & Documents [3] => Falls [4] => Work Environment [5] => Hazards [6] => Bricklayer [7] => Trades [8] => Carpenter [10] => Scaffold Erector [12] => Commercial & Institutional [13] => Jobsites ) [type] => Images [sub_category] => [url] => /image/3975/i002683/Suspended%2BScaffold%2BOutriggers.html [item:protected] => ImageRecord Object ( [records:protected] => Array ( ) [recordId:protected] => [searchWordClass:protected] => [searchWordPeerClass:protected] => [bok_record:protected] => [authors:protected] => [organizations:protected] => [collections:protected] => [categories:protected] => Array ( [97] => Category Object ( [languages:protected] => [bok_resources:protected] => [bok_topics:protected] => [bok_keywords:protected] => [id:protected] => 97 [type:protected] => category [parent:protected] => 5 [label:protected] => Images [alreadyInSave:protected] => [alreadyInValidation:protected] => [validationFailures:protected] => Array ( ) [_new:BaseObject:private] => [_deleted:BaseObject:private] => [modifiedColumns:protected] => Array ( ) ) [15] => Category Object ( [languages:protected] => [bok_resources:protected] => [bok_topics:protected] => [bok_keywords:protected] => [id:protected] => 15 [type:protected] => category [parent:protected] => 7 [label:protected] => Falls [alreadyInSave:protected] => [alreadyInValidation:protected] => [validationFailures:protected] => Array ( ) [_new:BaseObject:private] => [_deleted:BaseObject:private] => [modifiedColumns:protected] => Array ( ) ) [47] => Category Object ( [languages:protected] => [bok_resources:protected] => [bok_topics:protected] => [bok_keywords:protected] => [id:protected] => 47 [type:protected] => category [parent:protected] => 2 [label:protected] => Bricklayer [alreadyInSave:protected] => [alreadyInValidation:protected] => [validationFailures:protected] => Array ( ) [_new:BaseObject:private] => [_deleted:BaseObject:private] => [modifiedColumns:protected] => Array ( ) ) [49] => Category Object ( [languages:protected] => [bok_resources:protected] => [bok_topics:protected] => [bok_keywords:protected] => [id:protected] => 49 [type:protected] => category [parent:protected] => 2 [label:protected] => Carpenter [alreadyInSave:protected] => [alreadyInValidation:protected] => [validationFailures:protected] => Array ( ) [_new:BaseObject:private] => [_deleted:BaseObject:private] => [modifiedColumns:protected] => Array ( ) ) [79] => Category Object ( [languages:protected] => [bok_resources:protected] => [bok_topics:protected] => [bok_keywords:protected] => [id:protected] => 79 [type:protected] => category [parent:protected] => 2 [label:protected] => Scaffold Erector [alreadyInSave:protected] => [alreadyInValidation:protected] => [validationFailures:protected] => Array ( ) [_new:BaseObject:private] => [_deleted:BaseObject:private] => [modifiedColumns:protected] => Array ( ) ) [87] => Category Object ( [languages:protected] => [bok_resources:protected] => [bok_topics:protected] => [bok_keywords:protected] => [id:protected] => 87 [type:protected] => category [parent:protected] => 3 [label:protected] => Commercial & Institutional [alreadyInSave:protected] => [alreadyInValidation:protected] => [validationFailures:protected] => Array ( ) [_new:BaseObject:private] => [_deleted:BaseObject:private] => [modifiedColumns:protected] => Array ( ) ) ) [categories_initialized:protected] => 1 [mapped_items:protected] => [content:protected] => [files:protected] => [language:protected] => Language Object ( [id:protected] => 1 [code:protected] => en [name:protected] => English [alreadyInSave:protected] => [alreadyInValidation:protected] => [validationFailures:protected] => Array ( ) [_new:BaseObject:private] => [_deleted:BaseObject:private] => [modifiedColumns:protected] => Array ( ) ) [old_record:protected] => [id:protected] => 3975 [old_id:protected] => [elcosh_id:protected] => i002683 [type:protected] => image [display_type:protected] => Image [user_id:protected] => 0 [language_id:protected] => 1 [tagging_id:protected] => John Newquist [priority_id:protected] => 1 [title:protected] => Suspended Scaffold Outriggers [total_pages:protected] => 0 [billed_pages:protected] => 0 [publication_number:protected] => [part_of:protected] => [keywords:protected] => suspended, scaffold, swing, stage, fall, protection, counterweight, qualified, person [comments:protected] => [summary:protected] => Suspended scaffolds systems must be designed by a qualified person and inspected daily by a competent person. The supports for the counterweight must be designed with a safety factor of four. [transition_comments:protected] => [external_link:protected] => [consol_link:protected] => http://www.cpwrconstructionsolutions.org/task/Erect%2Band%2Bdismantle%2Bscaffolds/ [more_like_this:protected] => d000244,d000359,i000253,i000407 [permission_given_by:protected] => [published:protected] => T [billable:protected] => F [img_name:protected] => [img_ext:protected] => jpg [img_width:protected] => [img_height:protected] => [img_credit:protected] => MetroPark, Miller and Long [img_practice:protected] => not_applicable [vid_source_id:protected] => [vid_running_time:protected] => [vid_intended_audience:protected] => [vid_acquisition_info:protected] => [vid_cost:protected] => [vid_producer:protected] => [vid_filename:protected] => [vid_filename_downloadable:protected] => [date_summary:protected] => August 28 2015 [date_permission_requested:protected] => [date_permission_received:protected] => [date_review_needed:protected] => [date_received:protected] => 08/28/15 [date_completed:protected] => 08/28/15 [date_billed:protected] => [date_modified:protected] => 08/28/15 [collBokExports:protected] => [lastBokExportCriteria:BaseElcoshItem:private] => [alreadyInSave:protected] => [alreadyInValidation:protected] => [validationFailures:protected] => Array ( ) [_new:BaseObject:private] => [_deleted:BaseObject:private] => [modifiedColumns:protected] => Array ( ) ) ) [4] => Search_Result Object ( [title] => Suspended scaffold [image] => /record/images/3976-p.jpg [blurb] => Suspended scaffold outrigger beams must have stops to prevent the hangers from sliding of the end of the outriggers. Wire rope supported must be desig... [category] => Array ( [0] => 97 [1] => 15 [2] => 47 [3] => 50 [4] => 79 [5] => 87 ) [labels] => Array ( [0] => Images [1] => Media [2] => Media & Documents [3] => Falls [4] => Work Environment [5] => Hazards [6] => Bricklayer [7] => Trades [8] => Carpet Layer [10] => Scaffold Erector [12] => Commercial & Institutional [13] => Jobsites ) [type] => Images [sub_category] => [url] => /image/3976/i002684/Suspended%2Bscaffold.html [item:protected] => ImageRecord Object ( [records:protected] => Array ( ) [recordId:protected] => [searchWordClass:protected] => [searchWordPeerClass:protected] => [bok_record:protected] => [authors:protected] => [organizations:protected] => [collections:protected] => [categories:protected] => Array ( [97] => Category Object ( [languages:protected] => [bok_resources:protected] => [bok_topics:protected] => [bok_keywords:protected] => [id:protected] => 97 [type:protected] => category [parent:protected] => 5 [label:protected] => Images [alreadyInSave:protected] => [alreadyInValidation:protected] => [validationFailures:protected] => Array ( ) [_new:BaseObject:private] => [_deleted:BaseObject:private] => [modifiedColumns:protected] => Array ( ) ) [15] => Category Object ( [languages:protected] => [bok_resources:protected] => [bok_topics:protected] => [bok_keywords:protected] => [id:protected] => 15 [type:protected] => category [parent:protected] => 7 [label:protected] => Falls [alreadyInSave:protected] => [alreadyInValidation:protected] => [validationFailures:protected] => Array ( ) [_new:BaseObject:private] => [_deleted:BaseObject:private] => [modifiedColumns:protected] => Array ( ) ) [47] => Category Object ( [languages:protected] => [bok_resources:protected] => [bok_topics:protected] => [bok_keywords:protected] => [id:protected] => 47 [type:protected] => category [parent:protected] => 2 [label:protected] => Bricklayer [alreadyInSave:protected] => [alreadyInValidation:protected] => [validationFailures:protected] => Array ( ) [_new:BaseObject:private] => [_deleted:BaseObject:private] => [modifiedColumns:protected] => Array ( ) ) [50] => Category Object ( [languages:protected] => [bok_resources:protected] => [bok_topics:protected] => [bok_keywords:protected] => [id:protected] => 50 [type:protected] => category [parent:protected] => 2 [label:protected] => Carpet Layer [alreadyInSave:protected] => [alreadyInValidation:protected] => [validationFailures:protected] => Array ( ) [_new:BaseObject:private] => [_deleted:BaseObject:private] => [modifiedColumns:protected] => Array ( ) ) [79] => Category Object ( [languages:protected] => [bok_resources:protected] => [bok_topics:protected] => [bok_keywords:protected] => [id:protected] => 79 [type:protected] => category [parent:protected] => 2 [label:protected] => Scaffold Erector [alreadyInSave:protected] => [alreadyInValidation:protected] => [validationFailures:protected] => Array ( ) [_new:BaseObject:private] => [_deleted:BaseObject:private] => [modifiedColumns:protected] => Array ( ) ) [87] => Category Object ( [languages:protected] => [bok_resources:protected] => [bok_topics:protected] => [bok_keywords:protected] => [id:protected] => 87 [type:protected] => category [parent:protected] => 3 [label:protected] => Commercial & Institutional [alreadyInSave:protected] => [alreadyInValidation:protected] => [validationFailures:protected] => Array ( ) [_new:BaseObject:private] => [_deleted:BaseObject:private] => [modifiedColumns:protected] => Array ( ) ) ) [categories_initialized:protected] => 1 [mapped_items:protected] => [content:protected] => [files:protected] => [language:protected] => Language Object ( [id:protected] => 1 [code:protected] => en [name:protected] => English [alreadyInSave:protected] => [alreadyInValidation:protected] => [validationFailures:protected] => Array ( ) [_new:BaseObject:private] => [_deleted:BaseObject:private] => [modifiedColumns:protected] => Array ( ) ) [old_record:protected] => [id:protected] => 3976 [old_id:protected] => [elcosh_id:protected] => i002684 [type:protected] => image [display_type:protected] => Image [user_id:protected] => 0 [language_id:protected] => 1 [tagging_id:protected] => John Newquist [priority_id:protected] => 1 [title:protected] => Suspended scaffold [total_pages:protected] => 0 [billed_pages:protected] => 0 [publication_number:protected] => [part_of:protected] => [keywords:protected] => Suspended, scaffold, outrigger, beams, erection, wire, rope, inspection, swing, stage, [comments:protected] => [summary:protected] => Suspended scaffold outrigger beams must have stops to prevent the hangers from sliding of the end of the outriggers. Wire rope supported must be designed with a safety factor of 6. The scaffold must be inspected by a competent person daily. [transition_comments:protected] => [external_link:protected] => [consol_link:protected] => http://www.cpwrconstructionsolutions.org/task/Erect%2Band%2Bdismantle%2Bscaffolds/ [more_like_this:protected] => i002683, d000244, i000407, d000606 [permission_given_by:protected] => [published:protected] => T [billable:protected] => F [img_name:protected] => [img_ext:protected] => jpg [img_width:protected] => [img_height:protected] => [img_credit:protected] => Metropark, Miller and Long [img_practice:protected] => not_applicable [vid_source_id:protected] => [vid_running_time:protected] => [vid_intended_audience:protected] => [vid_acquisition_info:protected] => [vid_cost:protected] => [vid_producer:protected] => [vid_filename:protected] => [vid_filename_downloadable:protected] => [date_summary:protected] => [date_permission_requested:protected] => [date_permission_received:protected] => [date_review_needed:protected] => [date_received:protected] => 08/28/15 [date_completed:protected] => 08/28/15 [date_billed:protected] => [date_modified:protected] => 08/28/15 [collBokExports:protected] => [lastBokExportCriteria:BaseElcoshItem:private] => [alreadyInSave:protected] => [alreadyInValidation:protected] => [validationFailures:protected] => Array ( ) [_new:BaseObject:private] => [_deleted:BaseObject:private] => [modifiedColumns:protected] => Array ( ) ) ) [5] => Search_Result Object ( [title] => Three Tower Cranes [image] => /record/images/3979-p.jpg [blurb] => Whenever multiple tower cranes are used, there needs to be preplanning to ensure that the tower cranes cannot hit each other loads. This is accomplish... [category] => Array ( [0] => 97 [1] => 11 [2] => 64 [3] => 70 [4] => 62 [5] => 87 ) [labels] => Array ( [0] => Images [1] => Media [2] => Media & Documents [3] => Cranes & Hoists [4] => Work Environment [5] => Hazards [6] => Laborer [7] => Trades [8] => Operating Engineer [10] => Structural Ironworker [12] => Commercial & Institutional [13] => Jobsites ) [type] => Images [sub_category] => [url] => /image/3979/i002687/Three%2BTower%2BCranes.html [item:protected] => ImageRecord Object ( [records:protected] => Array ( ) [recordId:protected] => [searchWordClass:protected] => [searchWordPeerClass:protected] => [bok_record:protected] => [authors:protected] => [organizations:protected] => [collections:protected] => [categories:protected] => Array ( [97] => Category Object ( [languages:protected] => [bok_resources:protected] => [bok_topics:protected] => [bok_keywords:protected] => [id:protected] => 97 [type:protected] => category [parent:protected] => 5 [label:protected] => Images [alreadyInSave:protected] => [alreadyInValidation:protected] => [validationFailures:protected] => Array ( ) [_new:BaseObject:private] => [_deleted:BaseObject:private] => [modifiedColumns:protected] => Array ( ) ) [11] => Category Object ( [languages:protected] => [bok_resources:protected] => [bok_topics:protected] => [bok_keywords:protected] => [id:protected] => 11 [type:protected] => category [parent:protected] => 7 [label:protected] => Cranes & Hoists [alreadyInSave:protected] => [alreadyInValidation:protected] => [validationFailures:protected] => Array ( ) [_new:BaseObject:private] => [_deleted:BaseObject:private] => [modifiedColumns:protected] => Array ( ) ) [64] => Category Object ( [languages:protected] => [bok_resources:protected] => [bok_topics:protected] => [bok_keywords:protected] => [id:protected] => 64 [type:protected] => category [parent:protected] => 2 [label:protected] => Laborer [alreadyInSave:protected] => [alreadyInValidation:protected] => [validationFailures:protected] => Array ( ) [_new:BaseObject:private] => [_deleted:BaseObject:private] => [modifiedColumns:protected] => Array ( ) ) [70] => Category Object ( [languages:protected] => [bok_resources:protected] => [bok_topics:protected] => [bok_keywords:protected] => [id:protected] => 70 [type:protected] => category [parent:protected] => 2 [label:protected] => Operating Engineer [alreadyInSave:protected] => [alreadyInValidation:protected] => [validationFailures:protected] => Array ( ) [_new:BaseObject:private] => [_deleted:BaseObject:private] => [modifiedColumns:protected] => Array ( ) ) [62] => Category Object ( [languages:protected] => [bok_resources:protected] => [bok_topics:protected] => [bok_keywords:protected] => [id:protected] => 62 [type:protected] => category [parent:protected] => 2 [label:protected] => Structural Ironworker [alreadyInSave:protected] => [alreadyInValidation:protected] => [validationFailures:protected] => Array ( ) [_new:BaseObject:private] => [_deleted:BaseObject:private] => [modifiedColumns:protected] => Array ( ) ) [87] => Category Object ( [languages:protected] => [bok_resources:protected] => [bok_topics:protected] => [bok_keywords:protected] => [id:protected] => 87 [type:protected] => category [parent:protected] => 3 [label:protected] => Commercial & Institutional [alreadyInSave:protected] => [alreadyInValidation:protected] => [validationFailures:protected] => Array ( ) [_new:BaseObject:private] => [_deleted:BaseObject:private] => [modifiedColumns:protected] => Array ( ) ) ) [categories_initialized:protected] => 1 [mapped_items:protected] => [content:protected] => [files:protected] => [language:protected] => Language Object ( [id:protected] => 1 [code:protected] => en [name:protected] => English [alreadyInSave:protected] => [alreadyInValidation:protected] => [validationFailures:protected] => Array ( ) [_new:BaseObject:private] => [_deleted:BaseObject:private] => [modifiedColumns:protected] => Array ( ) ) [old_record:protected] => [id:protected] => 3979 [old_id:protected] => [elcosh_id:protected] => i002687 [type:protected] => image [display_type:protected] => Image [user_id:protected] => 0 [language_id:protected] => 1 [tagging_id:protected] => John Newquist [priority_id:protected] => 1 [title:protected] => Three Tower Cranes [total_pages:protected] => 0 [billed_pages:protected] => 0 [publication_number:protected] => [part_of:protected] => [keywords:protected] => [comments:protected] => [summary:protected] => Whenever multiple tower cranes are used, there needs to be preplanning to ensure that the tower cranes cannot hit each other loads. This is accomplished by setting swing restrictions, marking the ground for allowable crane travel and training of the crane signal persons. [transition_comments:protected] => [external_link:protected] => [consol_link:protected] => http://www.cpwrconstructionsolutions.org/work/6/184/ [more_like_this:protected] => d001029, d000010, i001280, i001221 [permission_given_by:protected] => [published:protected] => T [billable:protected] => F [img_name:protected] => [img_ext:protected] => jpg [img_width:protected] => [img_height:protected] => [img_credit:protected] => Metropark [img_practice:protected] => not_applicable [vid_source_id:protected] => [vid_running_time:protected] => [vid_intended_audience:protected] => [vid_acquisition_info:protected] => [vid_cost:protected] => [vid_producer:protected] => [vid_filename:protected] => [vid_filename_downloadable:protected] => [date_summary:protected] => August 28 2015 [date_permission_requested:protected] => [date_permission_received:protected] => [date_review_needed:protected] => [date_received:protected] => 08/28/15 [date_completed:protected] => 08/28/15 [date_billed:protected] => [date_modified:protected] => 08/28/15 [collBokExports:protected] => [lastBokExportCriteria:BaseElcoshItem:private] => [alreadyInSave:protected] => [alreadyInValidation:protected] => [validationFailures:protected] => Array ( ) [_new:BaseObject:private] => [_deleted:BaseObject:private] => [modifiedColumns:protected] => Array ( ) ) ) ) [preview_mode] => [description] => This third in a series of 6 Tool Box Talks on construction ergonomics focuses on proper positioning to avoid injuries. The TBT recommends: 1)prop up a task off of the floor by using a raised surface, cart, baker scaffold, saw horses to prep materials near waist height, 2)move the lift or ladder in the best position for the work, 3)position the lift in front of the area you plan to work without trying to reach too far on either side of the lift. [keywords] => position, positioning, ergonomics, ergo, carpal tunnel, MSD, musculoskeletal disorder [related_items] => Array ( [Handouts] => Array ( [0] => DocumentRecord Object ( [records:protected] => Array ( ) [recordId:protected] => [searchWordClass:protected] => [searchWordPeerClass:protected] => [bok_record:protected] => [authors:protected] => [organizations:protected] => [collections:protected] => [categories:protected] => [categories_initialized:protected] => [mapped_items:protected] => [content:protected] => [files:protected] => [language:protected] => Language Object ( [id:protected] => 1 [code:protected] => en [name:protected] => English [alreadyInSave:protected] => [alreadyInValidation:protected] => [validationFailures:protected] => Array ( ) [_new:BaseObject:private] => [_deleted:BaseObject:private] => [modifiedColumns:protected] => Array ( ) ) [old_record:protected] => [id:protected] => 3833 [old_id:protected] => [elcosh_id:protected] => d001303 [type:protected] => document [display_type:protected] => HTML w/ PDF [user_id:protected] => 25 [language_id:protected] => 1 [tagging_id:protected] => Bruce Lippy [priority_id:protected] => 1 [title:protected] => Overview of Toolbox Talks on Ergonomics Developed by Washington University in St. Louis [total_pages:protected] => 3 [billed_pages:protected] => 3 [publication_number:protected] => [part_of:protected] => [keywords:protected] => ergonomics, musculoskeletal disorders, MSDs [comments:protected] => 7-28-2014 - Originally submitted as "HTML w/ doc and PDF", Jeff Nelson asked Bruce Lippy for permission to switch it to "HTML w/ PDF" -- permission was given [summary:protected] => This overviews provides a background on how Washington University in St. Louis developed this series of six toolbox talks on ergonomics. It also describes how they tested the effectiveness of these communication tools, concluding that the guide was valuable for improving the delivery of ergonomics training and interaction between the safety representative and workers. The researchers recommend preparing site-specific information prior to the talk and interacting with workers to discuss problems and ergonomic solutions during the safety meetings. [transition_comments:protected] => [external_link:protected] => [consol_link:protected] => [more_like_this:protected] => [permission_given_by:protected] => Lisa Jaegers, Washington U. in St. Louis [published:protected] => T [billable:protected] => F [img_name:protected] => [img_ext:protected] => png [img_width:protected] => [img_height:protected] => [img_credit:protected] => [img_practice:protected] => [vid_source_id:protected] => [vid_running_time:protected] => [vid_intended_audience:protected] => [vid_acquisition_info:protected] => [vid_cost:protected] => [vid_producer:protected] => [vid_filename:protected] => [vid_filename_downloadable:protected] => [date_summary:protected] => 2014 [date_permission_requested:protected] => [date_permission_received:protected] => [date_review_needed:protected] => [date_received:protected] => 06/11/14 [date_completed:protected] => 07/29/14 [date_billed:protected] => [date_modified:protected] => 07/29/14 [collBokExports:protected] => [lastBokExportCriteria:BaseElcoshItem:private] => [alreadyInSave:protected] => [alreadyInValidation:protected] => [validationFailures:protected] => Array ( ) [_new:BaseObject:private] => [_deleted:BaseObject:private] => [modifiedColumns:protected] => Array ( ) ) ) [Toolbox Talks] => Array ( [0] => DocumentRecord Object ( [records:protected] => Array ( ) [recordId:protected] => [searchWordClass:protected] => [searchWordPeerClass:protected] => [bok_record:protected] => [authors:protected] => [organizations:protected] => [collections:protected] => [categories:protected] => [categories_initialized:protected] => [mapped_items:protected] => [content:protected] => [files:protected] => [language:protected] => Language Object ( [id:protected] => 1 [code:protected] => en [name:protected] => English [alreadyInSave:protected] => [alreadyInValidation:protected] => [validationFailures:protected] => Array ( ) [_new:BaseObject:private] => [_deleted:BaseObject:private] => [modifiedColumns:protected] => Array ( ) ) [old_record:protected] => [id:protected] => 3835 [old_id:protected] => [elcosh_id:protected] => d001304 [type:protected] => document [display_type:protected] => HTML w/ PDF [user_id:protected] => 25 [language_id:protected] => 1 [tagging_id:protected] => Bruce Lippy [priority_id:protected] => 1 [title:protected] => Ergonomics Tool Box Talks (TBT) Training Guide [total_pages:protected] => 2 [billed_pages:protected] => 2 [publication_number:protected] => [part_of:protected] => [keywords:protected] => Ergonomics, carpal tunnel, muscular skeletal disorders, msd [comments:protected] => [summary:protected] => CPWR-funded ergonomics research by Washington University at St. Louis led to the development of 6 tool box talks. This guide is an explanation of how to deliver the talks for maximum effectiveness. This guide should be reviewed before delivering any of the talks because it makes important recommendations like: • If possible, give the TBTs as a part of the crew’s regular safety meetings so that ergonomics is included in the safety discussion. • Try to locate an area with few distractions for gathering the crew. • For a team approach, invite the work crew, site superintendent, project manager and other general contractor and/or subcontractor reps who you feel may be helpful in supporting the training and ergonomics solutions. [transition_comments:protected] => [external_link:protected] => [consol_link:protected] => [more_like_this:protected] => d001303,d001305,d001306,d001307,d001308,d001309,d001310 [permission_given_by:protected] => [published:protected] => T [billable:protected] => F [img_name:protected] => [img_ext:protected] => png [img_width:protected] => [img_height:protected] => [img_credit:protected] => [img_practice:protected] => [vid_source_id:protected] => [vid_running_time:protected] => [vid_intended_audience:protected] => [vid_acquisition_info:protected] => [vid_cost:protected] => [vid_producer:protected] => [vid_filename:protected] => [vid_filename_downloadable:protected] => [date_summary:protected] => 2014 [date_permission_requested:protected] => [date_permission_received:protected] => [date_review_needed:protected] => [date_received:protected] => 06/12/14 [date_completed:protected] => 07/29/14 [date_billed:protected] => [date_modified:protected] => 07/29/14 [collBokExports:protected] => [lastBokExportCriteria:BaseElcoshItem:private] => [alreadyInSave:protected] => [alreadyInValidation:protected] => [validationFailures:protected] => Array ( ) [_new:BaseObject:private] => [_deleted:BaseObject:private] => [modifiedColumns:protected] => Array ( ) ) [1] => DocumentRecord Object ( [records:protected] => Array ( ) [recordId:protected] => [searchWordClass:protected] => [searchWordPeerClass:protected] => [bok_record:protected] => [authors:protected] => [organizations:protected] => [collections:protected] => [categories:protected] => [categories_initialized:protected] => [mapped_items:protected] => [content:protected] => [files:protected] => [language:protected] => Language Object ( [id:protected] => 1 [code:protected] => en [name:protected] => English [alreadyInSave:protected] => [alreadyInValidation:protected] => [validationFailures:protected] => Array ( ) [_new:BaseObject:private] => [_deleted:BaseObject:private] => [modifiedColumns:protected] => Array ( ) ) [old_record:protected] => [id:protected] => 3836 [old_id:protected] => [elcosh_id:protected] => d001305 [type:protected] => document [display_type:protected] => HTML w/ PDF [user_id:protected] => 25 [language_id:protected] => 1 [tagging_id:protected] => Bruce Lippy [priority_id:protected] => 1 [title:protected] => TBT1 Ergonomics in Construction [total_pages:protected] => 5 [billed_pages:protected] => 5 [publication_number:protected] => [part_of:protected] => [keywords:protected] => ergonomics, ergo, msd, musculoskeletal disorders, risk factors, lifting, carpal tunnel, repetition, awkward postures [comments:protected] => 7-28-2014 Jeff Nelson asked Bruce Lippy about what to do with a sentence included toward the top of the doc, "Fill them in on page 2 'Other Questions.'" -- Bruce said this sentence could be deleted from the HTML. [summary:protected] => This is the first in a series of 6 Tool Box Talks produced by Washington University in St. Louis on ergonomics in construction work. This one should be delivered first because it covers what ergonomics is, why construction workers need to talk about it, what the risk factors are for developing a health problem and how to prevent these problems. [transition_comments:protected] => [external_link:protected] => [consol_link:protected] => http://www.cpwrconstructionsolutions.org/pipes_vessels/solution/50/participatory-ergonomics-program.html [more_like_this:protected] => d001303,d001304,d001306,d001307,d001308,d001309 [permission_given_by:protected] => Lisa Jaegers, Washington U. in St. Louis [published:protected] => T [billable:protected] => F [img_name:protected] => [img_ext:protected] => png [img_width:protected] => [img_height:protected] => [img_credit:protected] => [img_practice:protected] => [vid_source_id:protected] => [vid_running_time:protected] => [vid_intended_audience:protected] => [vid_acquisition_info:protected] => [vid_cost:protected] => [vid_producer:protected] => [vid_filename:protected] => [vid_filename_downloadable:protected] => [date_summary:protected] => 2014 [date_permission_requested:protected] => [date_permission_received:protected] => [date_review_needed:protected] => [date_received:protected] => 06/12/14 [date_completed:protected] => 07/28/14 [date_billed:protected] => [date_modified:protected] => 10/09/15 [collBokExports:protected] => [lastBokExportCriteria:BaseElcoshItem:private] => [alreadyInSave:protected] => [alreadyInValidation:protected] => [validationFailures:protected] => Array ( ) [_new:BaseObject:private] => [_deleted:BaseObject:private] => [modifiedColumns:protected] => Array ( ) ) [2] => DocumentRecord Object ( [records:protected] => Array ( ) [recordId:protected] => [searchWordClass:protected] => [searchWordPeerClass:protected] => [bok_record:protected] => [authors:protected] => [organizations:protected] => [collections:protected] => [categories:protected] => [categories_initialized:protected] => [mapped_items:protected] => [content:protected] => [files:protected] => [language:protected] => Language Object ( [id:protected] => 1 [code:protected] => en [name:protected] => English [alreadyInSave:protected] => [alreadyInValidation:protected] => [validationFailures:protected] => Array ( ) [_new:BaseObject:private] => [_deleted:BaseObject:private] => [modifiedColumns:protected] => Array ( ) ) [old_record:protected] => [id:protected] => 3837 [old_id:protected] => [elcosh_id:protected] => d001306 [type:protected] => document [display_type:protected] => HTML w/ PDF [user_id:protected] => 25 [language_id:protected] => 1 [tagging_id:protected] => Bruce Lippy [priority_id:protected] => 1 [title:protected] => TBT2 Keep Reach Close [total_pages:protected] => 4 [billed_pages:protected] => 4 [publication_number:protected] => [part_of:protected] => [keywords:protected] => reach, ergonomic, ergo, MSD, carpal tunnel, repetition, awkward positions [comments:protected] => 7-28-2014 Jeff Nelson asked Bruce Lippy about what to do with a sentence included toward the top of the doc, "Fill them in on page 2 'Other Questions.'" -- Bruce said this sentence could be deleted from the HTML. [summary:protected] => This is the second of six Tool Box Talks created by Washington University in St. Louis on ergonomics in construction. There is a guide with the series that describes how to deliver these talks. This one deals with how to avoid awkward reaching during tasks to prevent injuries. try to work with your hands below your head and close to our body to reduce your risk of shoulder strains and back discomfort. This TBT recommends considering ways to move close to the task, keeping the work area free of obstacles, and talking with each other to provide constructive feedback about your working position. [transition_comments:protected] => [external_link:protected] => [consol_link:protected] => http://www.cpwrconstructionsolutions.org/hazard/959/lifting-and-carrying-manual-materials-handling.html [more_like_this:protected] => d001303,d001304,d001305,d001307,d001308,e001309 [permission_given_by:protected] => [published:protected] => T [billable:protected] => F [img_name:protected] => [img_ext:protected] => png [img_width:protected] => [img_height:protected] => [img_credit:protected] => [img_practice:protected] => [vid_source_id:protected] => [vid_running_time:protected] => [vid_intended_audience:protected] => [vid_acquisition_info:protected] => [vid_cost:protected] => [vid_producer:protected] => [vid_filename:protected] => [vid_filename_downloadable:protected] => [date_summary:protected] => 2014 [date_permission_requested:protected] => [date_permission_received:protected] => [date_review_needed:protected] => [date_received:protected] => 06/12/14 [date_completed:protected] => 07/28/14 [date_billed:protected] => [date_modified:protected] => 11/02/16 [collBokExports:protected] => [lastBokExportCriteria:BaseElcoshItem:private] => [alreadyInSave:protected] => [alreadyInValidation:protected] => [validationFailures:protected] => Array ( ) [_new:BaseObject:private] => [_deleted:BaseObject:private] => [modifiedColumns:protected] => Array ( ) ) [3] => DocumentRecord Object ( [records:protected] => Array ( ) [recordId:protected] => [searchWordClass:protected] => [searchWordPeerClass:protected] => [bok_record:protected] => [authors:protected] => [organizations:protected] => [collections:protected] => [categories:protected] => [categories_initialized:protected] => [mapped_items:protected] => [content:protected] => [files:protected] => [language:protected] => Language Object ( [id:protected] => 1 [code:protected] => en [name:protected] => English [alreadyInSave:protected] => [alreadyInValidation:protected] => [validationFailures:protected] => Array ( ) [_new:BaseObject:private] => [_deleted:BaseObject:private] => [modifiedColumns:protected] => Array ( ) ) [old_record:protected] => [id:protected] => 3839 [old_id:protected] => [elcosh_id:protected] => d001308 [type:protected] => document [display_type:protected] => HTML w/ PDF [user_id:protected] => 23 [language_id:protected] => 1 [tagging_id:protected] => Bruce Lippy [priority_id:protected] => 1 [title:protected] => TBT4 Move Materials With Assist [total_pages:protected] => 4 [billed_pages:protected] => 4 [publication_number:protected] => [part_of:protected] => [keywords:protected] => lifting, back injury, ergonomics, ergo, MSD, buddy system [comments:protected] => 7-28-2014 Jeff Nelson asked Bruce Lippy about what to do with a sentence included toward the top of the doc, "Fill them in on page 2 'Other Questions.'" -- Bruce said this sentence could be deleted from the HTML. [summary:protected] => This tool box talk is fourth in a series of 6 developed by Washington University in St. Louis on construction ergonomics. This one focuses on preventing back injuries by getting an assist when manually lifting. It recommends using a cart for transporting loads, taking less trips, avoiding carrying materials on the shoulder and helping each other to lift large or heavy materials when a cart or hoist is not available. [transition_comments:protected] => [external_link:protected] => [consol_link:protected] => http://www.cpwrconstructionsolutions.org/hazard/959/lifting-and-carrying-manual-materials-handling.html [more_like_this:protected] => d001303,d001304,d001305,d001306,d001307,d001309 [permission_given_by:protected] => Lisa Jaegers, Washington U. in St. Louis [published:protected] => T [billable:protected] => F [img_name:protected] => [img_ext:protected] => png [img_width:protected] => [img_height:protected] => [img_credit:protected] => [img_practice:protected] => [vid_source_id:protected] => [vid_running_time:protected] => [vid_intended_audience:protected] => [vid_acquisition_info:protected] => [vid_cost:protected] => [vid_producer:protected] => [vid_filename:protected] => [vid_filename_downloadable:protected] => [date_summary:protected] => 2014 [date_permission_requested:protected] => [date_permission_received:protected] => [date_review_needed:protected] => [date_received:protected] => 06/12/14 [date_completed:protected] => 07/29/14 [date_billed:protected] => [date_modified:protected] => 10/09/15 [collBokExports:protected] => [lastBokExportCriteria:BaseElcoshItem:private] => [alreadyInSave:protected] => [alreadyInValidation:protected] => [validationFailures:protected] => Array ( ) [_new:BaseObject:private] => [_deleted:BaseObject:private] => [modifiedColumns:protected] => Array ( ) ) [4] => DocumentRecord Object ( [records:protected] => Array ( ) [recordId:protected] => [searchWordClass:protected] => [searchWordPeerClass:protected] => [bok_record:protected] => [authors:protected] => [organizations:protected] => [collections:protected] => [categories:protected] => [categories_initialized:protected] => [mapped_items:protected] => [content:protected] => [files:protected] => [language:protected] => Language Object ( [id:protected] => 1 [code:protected] => en [name:protected] => English [alreadyInSave:protected] => [alreadyInValidation:protected] => [validationFailures:protected] => Array ( ) [_new:BaseObject:private] => [_deleted:BaseObject:private] => [modifiedColumns:protected] => Array ( ) ) [old_record:protected] => [id:protected] => 3840 [old_id:protected] => [elcosh_id:protected] => d001309 [type:protected] => document [display_type:protected] => HTML w/ PDF [user_id:protected] => 23 [language_id:protected] => 1 [tagging_id:protected] => Bruce Lippy [priority_id:protected] => 1 [title:protected] => TBT5 Manual Tools [total_pages:protected] => 4 [billed_pages:protected] => 4 [publication_number:protected] => [part_of:protected] => [keywords:protected] => ergonomic, hand tools, handles, MSD, musculoskeletal disorder, carpal tunnel [comments:protected] => 7-28-2014 Jeff Nelson asked Bruce Lippy about what to do with a sentence included toward the top of the doc, "Fill them in on page 2 'Other Questions.'" -- Bruce said this sentence could be deleted from the HTML. [summary:protected] => This is the fifth in a series of 6 tool box talks on construction ergonomics produced by the University of Washington in St. Louis. This one focuses on manual tools. It asks the following 6 key questions. Does the tool… 1. Fit the task? 2. Allow a good power grip? 3. Keep the wrist in a straight posture? 4. Feel comfortable? 5. Take less effort than other tools for the task? 6. Work effectively? [transition_comments:protected] => [external_link:protected] => [consol_link:protected] => http://www.cpwrconstructionsolutions.org/masonry/solution/383/ergonomic-hand-tools.html [more_like_this:protected] => d001303,d001304,d001305,d001306,d001307,d001308,d001310 [permission_given_by:protected] => Lisa Jaegers, U. Wash. St. Louis [published:protected] => T [billable:protected] => F [img_name:protected] => [img_ext:protected] => png [img_width:protected] => [img_height:protected] => [img_credit:protected] => [img_practice:protected] => [vid_source_id:protected] => [vid_running_time:protected] => [vid_intended_audience:protected] => [vid_acquisition_info:protected] => [vid_cost:protected] => [vid_producer:protected] => [vid_filename:protected] => [vid_filename_downloadable:protected] => [date_summary:protected] => 2014 [date_permission_requested:protected] => [date_permission_received:protected] => [date_review_needed:protected] => [date_received:protected] => 06/12/14 [date_completed:protected] => 07/29/14 [date_billed:protected] => [date_modified:protected] => 10/09/15 [collBokExports:protected] => [lastBokExportCriteria:BaseElcoshItem:private] => [alreadyInSave:protected] => [alreadyInValidation:protected] => [validationFailures:protected] => Array ( ) [_new:BaseObject:private] => [_deleted:BaseObject:private] => [modifiedColumns:protected] => Array ( ) ) ) ) [collections] => Array ( [3834] => ) [record] => DocumentRecord Object ( [records:protected] => Array ( ) [recordId:protected] => [searchWordClass:protected] => [searchWordPeerClass:protected] => [bok_record:protected] => [authors:protected] => Array ( ) [organizations:protected] => Array ( [182] => Organization Object ( [id:protected] => 182 [elcosh_id:protected] => o000205 [user_id:protected] => 14 [province_id:protected] => 0 [country_id:protected] => 0 [title:protected] => Washington University - St. Louis [address:protected] => [postal_code:protected] => [city:protected] => [department:protected] => [phone:protected] => [fax:protected] => [email:protected] => [website:protected] => [filename:protected] => [about:protected] => [comments:protected] => [logo_available:protected] => T [no_details:protected] => T [date_received:protected] => 2009-08-06 [date_completed:protected] => 2009-08-06 [date_billed:protected] => [alreadyInSave:protected] => [alreadyInValidation:protected] => [validationFailures:protected] => Array ( ) [_new:BaseObject:private] => [_deleted:BaseObject:private] => [modifiedColumns:protected] => Array ( ) ) ) [collections:protected] => Array ( [3834] => ) [categories:protected] => [categories_initialized:protected] => [mapped_items:protected] => Array ( [3833] => DocumentRecord Object ( [records:protected] => Array ( ) [recordId:protected] => [searchWordClass:protected] => [searchWordPeerClass:protected] => [bok_record:protected] => [authors:protected] => [organizations:protected] => [collections:protected] => [categories:protected] => [categories_initialized:protected] => [mapped_items:protected] => [content:protected] => [files:protected] => [language:protected] => [old_record:protected] => [id:protected] => 3833 [old_id:protected] => [elcosh_id:protected] => d001303 [type:protected] => document [display_type:protected] => HTML w/ PDF [user_id:protected] => 25 [language_id:protected] => 1 [tagging_id:protected] => Bruce Lippy [priority_id:protected] => 1 [title:protected] => Overview of Toolbox Talks on Ergonomics Developed by Washington University in St. Louis [total_pages:protected] => 3 [billed_pages:protected] => 3 [publication_number:protected] => [part_of:protected] => [keywords:protected] => ergonomics, musculoskeletal disorders, MSDs [comments:protected] => 7-28-2014 - Originally submitted as "HTML w/ doc and PDF", Jeff Nelson asked Bruce Lippy for permission to switch it to "HTML w/ PDF" -- permission was given [summary:protected] => This overviews provides a background on how Washington University in St. Louis developed this series of six toolbox talks on ergonomics. It also describes how they tested the effectiveness of these communication tools, concluding that the guide was valuable for improving the delivery of ergonomics training and interaction between the safety representative and workers. The researchers recommend preparing site-specific information prior to the talk and interacting with workers to discuss problems and ergonomic solutions during the safety meetings. [transition_comments:protected] => [external_link:protected] => [consol_link:protected] => [more_like_this:protected] => [permission_given_by:protected] => Lisa Jaegers, Washington U. in St. Louis [published:protected] => T [billable:protected] => F [img_name:protected] => [img_ext:protected] => png [img_width:protected] => [img_height:protected] => [img_credit:protected] => [img_practice:protected] => [vid_source_id:protected] => [vid_running_time:protected] => [vid_intended_audience:protected] => [vid_acquisition_info:protected] => [vid_cost:protected] => [vid_producer:protected] => [vid_filename:protected] => [vid_filename_downloadable:protected] => [date_summary:protected] => 2014 [date_permission_requested:protected] => [date_permission_received:protected] => [date_review_needed:protected] => [date_received:protected] => 06/11/14 [date_completed:protected] => 07/29/14 [date_billed:protected] => [date_modified:protected] => 07/29/14 [collBokExports:protected] => [lastBokExportCriteria:BaseElcoshItem:private] => [alreadyInSave:protected] => [alreadyInValidation:protected] => [validationFailures:protected] => Array ( ) [_new:BaseObject:private] => [_deleted:BaseObject:private] => [modifiedColumns:protected] => Array ( ) ) [3835] => DocumentRecord Object ( [records:protected] => Array ( ) [recordId:protected] => [searchWordClass:protected] => [searchWordPeerClass:protected] => [bok_record:protected] => [authors:protected] => [organizations:protected] => [collections:protected] => [categories:protected] => [categories_initialized:protected] => [mapped_items:protected] => [content:protected] => [files:protected] => [language:protected] => [old_record:protected] => [id:protected] => 3835 [old_id:protected] => [elcosh_id:protected] => d001304 [type:protected] => document [display_type:protected] => HTML w/ PDF [user_id:protected] => 25 [language_id:protected] => 1 [tagging_id:protected] => Bruce Lippy [priority_id:protected] => 1 [title:protected] => Ergonomics Tool Box Talks (TBT) Training Guide [total_pages:protected] => 2 [billed_pages:protected] => 2 [publication_number:protected] => [part_of:protected] => [keywords:protected] => Ergonomics, carpal tunnel, muscular skeletal disorders, msd [comments:protected] => [summary:protected] => CPWR-funded ergonomics research by Washington University at St. Louis led to the development of 6 tool box talks. This guide is an explanation of how to deliver the talks for maximum effectiveness. This guide should be reviewed before delivering any of the talks because it makes important recommendations like: • If possible, give the TBTs as a part of the crew’s regular safety meetings so that ergonomics is included in the safety discussion. • Try to locate an area with few distractions for gathering the crew. • For a team approach, invite the work crew, site superintendent, project manager and other general contractor and/or subcontractor reps who you feel may be helpful in supporting the training and ergonomics solutions. [transition_comments:protected] => [external_link:protected] => [consol_link:protected] => [more_like_this:protected] => d001303,d001305,d001306,d001307,d001308,d001309,d001310 [permission_given_by:protected] => [published:protected] => T [billable:protected] => F [img_name:protected] => [img_ext:protected] => png [img_width:protected] => [img_height:protected] => [img_credit:protected] => [img_practice:protected] => [vid_source_id:protected] => [vid_running_time:protected] => [vid_intended_audience:protected] => [vid_acquisition_info:protected] => [vid_cost:protected] => [vid_producer:protected] => [vid_filename:protected] => [vid_filename_downloadable:protected] => [date_summary:protected] => 2014 [date_permission_requested:protected] => [date_permission_received:protected] => [date_review_needed:protected] => [date_received:protected] => 06/12/14 [date_completed:protected] => 07/29/14 [date_billed:protected] => [date_modified:protected] => 07/29/14 [collBokExports:protected] => [lastBokExportCriteria:BaseElcoshItem:private] => [alreadyInSave:protected] => [alreadyInValidation:protected] => [validationFailures:protected] => Array ( ) [_new:BaseObject:private] => [_deleted:BaseObject:private] => [modifiedColumns:protected] => Array ( ) ) [3836] => DocumentRecord Object ( [records:protected] => Array ( ) [recordId:protected] => [searchWordClass:protected] => [searchWordPeerClass:protected] => [bok_record:protected] => [authors:protected] => [organizations:protected] => [collections:protected] => [categories:protected] => [categories_initialized:protected] => [mapped_items:protected] => [content:protected] => [files:protected] => [language:protected] => [old_record:protected] => [id:protected] => 3836 [old_id:protected] => [elcosh_id:protected] => d001305 [type:protected] => document [display_type:protected] => HTML w/ PDF [user_id:protected] => 25 [language_id:protected] => 1 [tagging_id:protected] => Bruce Lippy [priority_id:protected] => 1 [title:protected] => TBT1 Ergonomics in Construction [total_pages:protected] => 5 [billed_pages:protected] => 5 [publication_number:protected] => [part_of:protected] => [keywords:protected] => ergonomics, ergo, msd, musculoskeletal disorders, risk factors, lifting, carpal tunnel, repetition, awkward postures [comments:protected] => 7-28-2014 Jeff Nelson asked Bruce Lippy about what to do with a sentence included toward the top of the doc, "Fill them in on page 2 'Other Questions.'" -- Bruce said this sentence could be deleted from the HTML. [summary:protected] => This is the first in a series of 6 Tool Box Talks produced by Washington University in St. Louis on ergonomics in construction work. This one should be delivered first because it covers what ergonomics is, why construction workers need to talk about it, what the risk factors are for developing a health problem and how to prevent these problems. [transition_comments:protected] => [external_link:protected] => [consol_link:protected] => http://www.cpwrconstructionsolutions.org/pipes_vessels/solution/50/participatory-ergonomics-program.html [more_like_this:protected] => d001303,d001304,d001306,d001307,d001308,d001309 [permission_given_by:protected] => Lisa Jaegers, Washington U. in St. Louis [published:protected] => T [billable:protected] => F [img_name:protected] => [img_ext:protected] => png [img_width:protected] => [img_height:protected] => [img_credit:protected] => [img_practice:protected] => [vid_source_id:protected] => [vid_running_time:protected] => [vid_intended_audience:protected] => [vid_acquisition_info:protected] => [vid_cost:protected] => [vid_producer:protected] => [vid_filename:protected] => [vid_filename_downloadable:protected] => [date_summary:protected] => 2014 [date_permission_requested:protected] => [date_permission_received:protected] => [date_review_needed:protected] => [date_received:protected] => 06/12/14 [date_completed:protected] => 07/28/14 [date_billed:protected] => [date_modified:protected] => 10/09/15 [collBokExports:protected] => [lastBokExportCriteria:BaseElcoshItem:private] => [alreadyInSave:protected] => [alreadyInValidation:protected] => [validationFailures:protected] => Array ( ) [_new:BaseObject:private] => [_deleted:BaseObject:private] => [modifiedColumns:protected] => Array ( ) ) [3837] => DocumentRecord Object ( [records:protected] => Array ( ) [recordId:protected] => [searchWordClass:protected] => [searchWordPeerClass:protected] => [bok_record:protected] => [authors:protected] => [organizations:protected] => [collections:protected] => [categories:protected] => [categories_initialized:protected] => [mapped_items:protected] => [content:protected] => [files:protected] => [language:protected] => [old_record:protected] => [id:protected] => 3837 [old_id:protected] => [elcosh_id:protected] => d001306 [type:protected] => document [display_type:protected] => HTML w/ PDF [user_id:protected] => 25 [language_id:protected] => 1 [tagging_id:protected] => Bruce Lippy [priority_id:protected] => 1 [title:protected] => TBT2 Keep Reach Close [total_pages:protected] => 4 [billed_pages:protected] => 4 [publication_number:protected] => [part_of:protected] => [keywords:protected] => reach, ergonomic, ergo, MSD, carpal tunnel, repetition, awkward positions [comments:protected] => 7-28-2014 Jeff Nelson asked Bruce Lippy about what to do with a sentence included toward the top of the doc, "Fill them in on page 2 'Other Questions.'" -- Bruce said this sentence could be deleted from the HTML. [summary:protected] => This is the second of six Tool Box Talks created by Washington University in St. Louis on ergonomics in construction. There is a guide with the series that describes how to deliver these talks. This one deals with how to avoid awkward reaching during tasks to prevent injuries. try to work with your hands below your head and close to our body to reduce your risk of shoulder strains and back discomfort. This TBT recommends considering ways to move close to the task, keeping the work area free of obstacles, and talking with each other to provide constructive feedback about your working position. [transition_comments:protected] => [external_link:protected] => [consol_link:protected] => http://www.cpwrconstructionsolutions.org/hazard/959/lifting-and-carrying-manual-materials-handling.html [more_like_this:protected] => d001303,d001304,d001305,d001307,d001308,e001309 [permission_given_by:protected] => [published:protected] => T [billable:protected] => F [img_name:protected] => [img_ext:protected] => png [img_width:protected] => [img_height:protected] => [img_credit:protected] => [img_practice:protected] => [vid_source_id:protected] => [vid_running_time:protected] => [vid_intended_audience:protected] => [vid_acquisition_info:protected] => [vid_cost:protected] => [vid_producer:protected] => [vid_filename:protected] => [vid_filename_downloadable:protected] => [date_summary:protected] => 2014 [date_permission_requested:protected] => [date_permission_received:protected] => [date_review_needed:protected] => [date_received:protected] => 06/12/14 [date_completed:protected] => 07/28/14 [date_billed:protected] => [date_modified:protected] => 11/02/16 [collBokExports:protected] => [lastBokExportCriteria:BaseElcoshItem:private] => [alreadyInSave:protected] => [alreadyInValidation:protected] => [validationFailures:protected] => Array ( ) [_new:BaseObject:private] => [_deleted:BaseObject:private] => [modifiedColumns:protected] => Array ( ) ) [3839] => DocumentRecord Object ( [records:protected] => Array ( ) [recordId:protected] => [searchWordClass:protected] => [searchWordPeerClass:protected] => [bok_record:protected] => [authors:protected] => [organizations:protected] => [collections:protected] => [categories:protected] => [categories_initialized:protected] => [mapped_items:protected] => [content:protected] => [files:protected] => [language:protected] => [old_record:protected] => [id:protected] => 3839 [old_id:protected] => [elcosh_id:protected] => d001308 [type:protected] => document [display_type:protected] => HTML w/ PDF [user_id:protected] => 23 [language_id:protected] => 1 [tagging_id:protected] => Bruce Lippy [priority_id:protected] => 1 [title:protected] => TBT4 Move Materials With Assist [total_pages:protected] => 4 [billed_pages:protected] => 4 [publication_number:protected] => [part_of:protected] => [keywords:protected] => lifting, back injury, ergonomics, ergo, MSD, buddy system [comments:protected] => 7-28-2014 Jeff Nelson asked Bruce Lippy about what to do with a sentence included toward the top of the doc, "Fill them in on page 2 'Other Questions.'" -- Bruce said this sentence could be deleted from the HTML. [summary:protected] => This tool box talk is fourth in a series of 6 developed by Washington University in St. Louis on construction ergonomics. This one focuses on preventing back injuries by getting an assist when manually lifting. It recommends using a cart for transporting loads, taking less trips, avoiding carrying materials on the shoulder and helping each other to lift large or heavy materials when a cart or hoist is not available. [transition_comments:protected] => [external_link:protected] => [consol_link:protected] => http://www.cpwrconstructionsolutions.org/hazard/959/lifting-and-carrying-manual-materials-handling.html [more_like_this:protected] => d001303,d001304,d001305,d001306,d001307,d001309 [permission_given_by:protected] => Lisa Jaegers, Washington U. in St. Louis [published:protected] => T [billable:protected] => F [img_name:protected] => [img_ext:protected] => png [img_width:protected] => [img_height:protected] => [img_credit:protected] => [img_practice:protected] => [vid_source_id:protected] => [vid_running_time:protected] => [vid_intended_audience:protected] => [vid_acquisition_info:protected] => [vid_cost:protected] => [vid_producer:protected] => [vid_filename:protected] => [vid_filename_downloadable:protected] => [date_summary:protected] => 2014 [date_permission_requested:protected] => [date_permission_received:protected] => [date_review_needed:protected] => [date_received:protected] => 06/12/14 [date_completed:protected] => 07/29/14 [date_billed:protected] => [date_modified:protected] => 10/09/15 [collBokExports:protected] => [lastBokExportCriteria:BaseElcoshItem:private] => [alreadyInSave:protected] => [alreadyInValidation:protected] => [validationFailures:protected] => Array ( ) [_new:BaseObject:private] => [_deleted:BaseObject:private] => [modifiedColumns:protected] => Array ( ) ) [3840] => DocumentRecord Object ( [records:protected] => Array ( ) [recordId:protected] => [searchWordClass:protected] => [searchWordPeerClass:protected] => [bok_record:protected] => [authors:protected] => [organizations:protected] => [collections:protected] => [categories:protected] => [categories_initialized:protected] => [mapped_items:protected] => [content:protected] => [files:protected] => [language:protected] => [old_record:protected] => [id:protected] => 3840 [old_id:protected] => [elcosh_id:protected] => d001309 [type:protected] => document [display_type:protected] => HTML w/ PDF [user_id:protected] => 23 [language_id:protected] => 1 [tagging_id:protected] => Bruce Lippy [priority_id:protected] => 1 [title:protected] => TBT5 Manual Tools [total_pages:protected] => 4 [billed_pages:protected] => 4 [publication_number:protected] => [part_of:protected] => [keywords:protected] => ergonomic, hand tools, handles, MSD, musculoskeletal disorder, carpal tunnel [comments:protected] => 7-28-2014 Jeff Nelson asked Bruce Lippy about what to do with a sentence included toward the top of the doc, "Fill them in on page 2 'Other Questions.'" -- Bruce said this sentence could be deleted from the HTML. [summary:protected] => This is the fifth in a series of 6 tool box talks on construction ergonomics produced by the University of Washington in St. Louis. This one focuses on manual tools. It asks the following 6 key questions. Does the tool… 1. Fit the task? 2. Allow a good power grip? 3. Keep the wrist in a straight posture? 4. Feel comfortable? 5. Take less effort than other tools for the task? 6. Work effectively? [transition_comments:protected] => [external_link:protected] => [consol_link:protected] => http://www.cpwrconstructionsolutions.org/masonry/solution/383/ergonomic-hand-tools.html [more_like_this:protected] => d001303,d001304,d001305,d001306,d001307,d001308,d001310 [permission_given_by:protected] => Lisa Jaegers, U. Wash. St. Louis [published:protected] => T [billable:protected] => F [img_name:protected] => [img_ext:protected] => png [img_width:protected] => [img_height:protected] => [img_credit:protected] => [img_practice:protected] => [vid_source_id:protected] => [vid_running_time:protected] => [vid_intended_audience:protected] => [vid_acquisition_info:protected] => [vid_cost:protected] => [vid_producer:protected] => [vid_filename:protected] => [vid_filename_downloadable:protected] => [date_summary:protected] => 2014 [date_permission_requested:protected] => [date_permission_received:protected] => [date_review_needed:protected] => [date_received:protected] => 06/12/14 [date_completed:protected] => 07/29/14 [date_billed:protected] => [date_modified:protected] => 10/09/15 [collBokExports:protected] => [lastBokExportCriteria:BaseElcoshItem:private] => [alreadyInSave:protected] => [alreadyInValidation:protected] => [validationFailures:protected] => Array ( ) [_new:BaseObject:private] => [_deleted:BaseObject:private] => [modifiedColumns:protected] => Array ( ) ) ) [content:protected] => [files:protected] => Array ( [559] => [560] => [546] => File Object ( [id:protected] => 546 [filename:protected] => 3.jpg [downloadable:protected] => F [timestamp:protected] => 2009-07-03 12:54:22 [alreadyInSave:protected] => [alreadyInValidation:protected] => [validationFailures:protected] => Array ( ) [_new:BaseObject:private] => [_deleted:BaseObject:private] => [modifiedColumns:protected] => Array ( ) ) [9643] => File Object ( [id:protected] => 9643 [filename:protected] => d001307.pdf [downloadable:protected] => T [timestamp:protected] => 2014-07-27 19:09:19 [alreadyInSave:protected] => [alreadyInValidation:protected] => [validationFailures:protected] => Array ( ) [_new:BaseObject:private] => [_deleted:BaseObject:private] => [modifiedColumns:protected] => Array ( ) ) [566] => File Object ( [id:protected] => 566 [filename:protected] => 4.jpg [downloadable:protected] => F [timestamp:protected] => 2009-07-03 12:54:23 [alreadyInSave:protected] => [alreadyInValidation:protected] => [validationFailures:protected] => Array ( ) [_new:BaseObject:private] => [_deleted:BaseObject:private] => [modifiedColumns:protected] => Array ( ) ) ) [language:protected] => Language Object ( [id:protected] => 1 [code:protected] => en [name:protected] => English [alreadyInSave:protected] => [alreadyInValidation:protected] => [validationFailures:protected] => Array ( ) [_new:BaseObject:private] => [_deleted:BaseObject:private] => [modifiedColumns:protected] => Array ( ) ) [old_record:protected] => [id:protected] => 3838 [old_id:protected] => [elcosh_id:protected] => d001307 [type:protected] => document [display_type:protected] => HTML w/ PDF [user_id:protected] => 25 [language_id:protected] => 1 [tagging_id:protected] => Bruce Lippy [priority_id:protected] => 1 [title:protected] => TBT3 Positioning [total_pages:protected] => 4 [billed_pages:protected] => 4 [publication_number:protected] => [part_of:protected] => [keywords:protected] => position, positioning, ergonomics, ergo, carpal tunnel, MSD, musculoskeletal disorder [comments:protected] => 7-28-2014 Jeff Nelson asked Bruce Lippy about what to do with a sentence included toward the top of the doc, "Fill them in on page 2 'Other Questions.'" -- Bruce said this sentence could be deleted from the HTML. [summary:protected] => This third in a series of 6 Tool Box Talks on construction ergonomics focuses on proper positioning to avoid injuries. The TBT recommends: 1)prop up a task off of the floor by using a raised surface, cart, baker scaffold, saw horses to prep materials near waist height, 2)move the lift or ladder in the best position for the work, 3)position the lift in front of the area you plan to work without trying to reach too far on either side of the lift. [transition_comments:protected] => [external_link:protected] => [consol_link:protected] => http://www.cpwrconstructionsolutions.org/hazard/959/lifting-and-carrying-manual-materials-handling.html [more_like_this:protected] => d001303,d001304,d001305,d001306,d001308,d001309 [permission_given_by:protected] => Lisa Jaegers, WU-St. Louis [published:protected] => T [billable:protected] => F [img_name:protected] => [img_ext:protected] => png [img_width:protected] => [img_height:protected] => [img_credit:protected] => [img_practice:protected] => [vid_source_id:protected] => [vid_running_time:protected] => [vid_intended_audience:protected] => [vid_acquisition_info:protected] => [vid_cost:protected] => [vid_producer:protected] => [vid_filename:protected] => [vid_filename_downloadable:protected] => [date_summary:protected] => 2014 [date_permission_requested:protected] => [date_permission_received:protected] => [date_review_needed:protected] => [date_received:protected] => 06/12/14 [date_completed:protected] => 07/28/14 [date_billed:protected] => [date_modified:protected] => 10/09/15 [collBokExports:protected] => [lastBokExportCriteria:BaseElcoshItem:private] => [alreadyInSave:protected] => [alreadyInValidation:protected] => [validationFailures:protected] => Array ( ) [_new:BaseObject:private] => [_deleted:BaseObject:private] => [modifiedColumns:protected] => Array ( ) ) [show_text] => [document_content] => ElcoshItemDocumentContent Object ( [id:protected] => 2906 [item_id:protected] => 3838 [type:protected] => main [title:protected] => [content:protected] =>
Facilitator / Leader Tasks Before the Tool Box Talk (TBT)
- Read through this TBT guide.
- Walk the job site to find ergonomics examples based on the TBT. If possible, take photos of “safe” and “unsafe” examples at the site to be used during the TBT.
- Write down discussion questions to ask the group.
Learning Goals
After discussing this training topic, workers will have gained a general understanding of:
- Unsafe work positions.
- Solutions to improve work positioning.
TRAINING CARD
The last page of this PDF has directions for printing and laminating the training cards.
TRAINER’S TALKING POINTS
Why should we talk about positioning?
Construction work requires working in high, low, and tight spaces which often forces you to work in an awkward or uncomfortable position. Working in awkward reaching and bent positions can lead to shoulder and back discomfort and possible injury over time.
Demonstration: The training card provides examples of the range of reaching and the point at which the reach is unsafe. Hold your arms straight out in front of you. Look at your hands and wrists while I discuss each of the reach zones on the training card.
The Green Zone shows the ideal location for working with your hands. When possible, try to keep your work tasks as far out as your wrists.
The Orange Zone is for occasional work since it involves more weight on your shoulders and low back since your hands are away from your body. If needed, keep the reach distance as far as your fingertips.
The Red Zone is away from your body so far that it places you at higher risk for falls when in the air and shoulder and back discomfort. Limit the time you work reaching beyond your fingertips.
End of Demonstration
Discussion Question: Can anyone describe to us an awkward position that they work in or have seen someone work in?
- What does it feel like in your neck, back or arms when working in that position?
- Other Questions:_____________________________________________
Training Note: Here are examples of hazards in different construction trades. Choose your trade or one that is similar to your group’s line of work that can be used as hazards and solutions examples.
| Trade | Awkward Posture Hazards | Potential Solution |
|---|---|---|
| Carpenter-Drywall | Leaning over the side of a scissor lift to reach and operating a screw gun with the arm fully extended (reaching in the red zone past the fingertips). | Before starting to install the line of screws to the side of the lift, move the lift to re-center it for the next 2 lines of screws to be installed. |
| Floor Layer | Spreading mortar overhead on a wall with the bakers scaffold one foot away from the wall due to buckets on the floor below (reach in the red zone, past the fingertips). | Pre-plan this task by removing all objects in the path of the bakers scaffold. Having an open path allows you to work closer to the task. |
| Sheet Metal Worker | Prepping duct parts on the floor while bending the back and reaching to work on them. | Pre-plan this task by setting up a waist-height workstation on extra materials, a cart, or saw horses. |
Now let’s put this information into practice. What are some tricks or techniques that you use to work in a comfortable position?
- Other Questions:_____________________________________________
Here are a few other ideas that are listed on your training card:
Prop up your tasks off of the floor by using a raised surface, cart, baker scaffold, saw horses to prep materials near waist height.
Move the lift or ladder in the best position for the work – close to the work tasks.
For safety & comfort, try to position the lift in front of the area you plan to work without trying to reach too far on either side of the lift.
In summary, it is important to work in a safe position when possible in order to reduce the risk of falls and discomfort due to awkward working positions. Consider ways that you can work in the green/comfort zone and orange zone and avoid the unsafe red zone.
References
[Images modified from Grandjean & Eastman Kodak Co.]
1. Grandjean, E. 1988. Fitting the task to the man: A textbook of occupational ergonomics. 4th ed. Taylor & Francis.
2. Eastman Kodak Co. 1983. Ergonomic Design for People at Work. Vol 1. Wiley, John & Sons, Incorporated.
Refer to the resources at our website: oshr.im.wustl.edu for more Tool Box TIPS.
TRAINING ATTENDANCE SHEET
Training Topic: Ergonomics -- Positioning
Date:
| ATTENDEES | |
|---|---|
Directions for Making Laminated Training Cards
The last page of this PDF has directions for printing and laminating the training cards.
[content_transformed:protected] =>Facilitator / Leader Tasks Before the Tool Box Talk (TBT)
- Read through this TBT guide.
- Walk the job site to find ergonomics examples based on the TBT. If possible, take photos of “safe” and “unsafe” examples at the site to be used during the TBT.
- Write down discussion questions to ask the group.
Learning Goals
After discussing this training topic, workers will have gained a general understanding of:
- Unsafe work positions.
- Solutions to improve work positioning.
TRAINING CARD
The last page of this PDF has directions for printing and laminating the training cards.
TRAINER’S TALKING POINTS
Why should we talk about positioning?
Construction work requires working in high, low, and tight spaces which often forces you to work in an awkward or uncomfortable position. Working in awkward reaching and bent positions can lead to shoulder and back discomfort and possible injury over time.
Demonstration: The training card provides examples of the range of reaching and the point at which the reach is unsafe. Hold your arms straight out in front of you. Look at your hands and wrists while I discuss each of the reach zones on the training card.
The Green Zone shows the ideal location for working with your hands. When possible, try to keep your work tasks as far out as your wrists.
The Orange Zone is for occasional work since it involves more weight on your shoulders and low back since your hands are away from your body. If needed, keep the reach distance as far as your fingertips.
The Red Zone is away from your body so far that it places you at higher risk for falls when in the air and shoulder and back discomfort. Limit the time you work reaching beyond your fingertips.
End of Demonstration
Discussion Question: Can anyone describe to us an awkward position that they work in or have seen someone work in?
- What does it feel like in your neck, back or arms when working in that position?
- Other Questions:_____________________________________________
Training Note: Here are examples of hazards in different construction trades. Choose your trade or one that is similar to your group’s line of work that can be used as hazards and solutions examples.
| Trade | Awkward Posture Hazards | Potential Solution |
|---|---|---|
| Carpenter-Drywall | Leaning over the side of a scissor lift to reach and operating a screw gun with the arm fully extended (reaching in the red zone past the fingertips). | Before starting to install the line of screws to the side of the lift, move the lift to re-center it for the next 2 lines of screws to be installed. |
| Floor Layer | Spreading mortar overhead on a wall with the bakers scaffold one foot away from the wall due to buckets on the floor below (reach in the red zone, past the fingertips). | Pre-plan this task by removing all objects in the path of the bakers scaffold. Having an open path allows you to work closer to the task. |
| Sheet Metal Worker | Prepping duct parts on the floor while bending the back and reaching to work on them. | Pre-plan this task by setting up a waist-height workstation on extra materials, a cart, or saw horses. |
Now let’s put this information into practice. What are some tricks or techniques that you use to work in a comfortable position?
- Other Questions:_____________________________________________
Here are a few other ideas that are listed on your training card:
Prop up your tasks off of the floor by using a raised surface, cart, baker scaffold, saw horses to prep materials near waist height.
Move the lift or ladder in the best position for the work – close to the work tasks.
For safety & comfort, try to position the lift in front of the area you plan to work without trying to reach too far on either side of the lift.
In summary, it is important to work in a safe position when possible in order to reduce the risk of falls and discomfort due to awkward working positions. Consider ways that you can work in the green/comfort zone and orange zone and avoid the unsafe red zone.
References
[Images modified from Grandjean & Eastman Kodak Co.]
1. Grandjean, E. 1988. Fitting the task to the man: A textbook of occupational ergonomics. 4th ed. Taylor & Francis.
2. Eastman Kodak Co. 1983. Ergonomic Design for People at Work. Vol 1. Wiley, John & Sons, Incorporated.
Refer to the resources at our website: oshr.im.wustl.edu for more Tool Box TIPS.
TRAINING ATTENDANCE SHEET
Training Topic: Ergonomics -- Positioning
Date:
| ATTENDEES | |
|---|---|
Directions for Making Laminated Training Cards
The last page of this PDF has directions for printing and laminating the training cards.
[disclaimer:protected] => [disclaimer_transformed:protected] => [alreadyInSave:protected] => [alreadyInValidation:protected] => [validationFailures:protected] => Array ( ) [_new:BaseObject:private] => [_deleted:BaseObject:private] => [modifiedColumns:protected] => Array ( ) ) [template] => record ) [_file] => /home/agsafe5/repositories/elcosh/live/templates/elcosh/macros.html [_errors:protected] => Array ( ) [_encoding:protected] => UTF-8 [_outputMode:protected] => 11 [_forceReparse:protected] => [_phpCodeDestination:protected] => /tmp/ [_phpCodeExtension:protected] => php [_cacheLifetime:protected] => 30 [_cachePurgeFrequency:protected] => 30 [externalMacroTemplatesCache:PHPTAL:private] => Array ( ) ) [record_macros.html] => PHPTAL Object ( [_prefilters:protected] => Array ( ) [_prefilter:PHPTAL:private] => REMOVED: DO NOT USE [_postfilter:protected] => [_repositories:protected] => Array ( [0] => /home/agsafe5/repositories/elcosh/live/templates/elcosh ) [_path:protected] => record_macros.html [_resolvers:protected] => Array ( ) [_source:protected] => PHPTAL_FileSource Object ( [_path:PHPTAL_FileSource:private] => /home/agsafe5/repositories/elcosh/live/templates/elcosh/record_macros.html ) [_codeFile:protected] => /tmp/tpl_61515a6c_record_macros__gMFg5NvPLybiFfYjAv9Aag.php [_functionName:protected] => tpl_61515a6c_record_macros__gMFg5NvPLybiFfYjAv9Aag [_prepared:protected] => 1 [_triggers:protected] => Array ( ) [_translator:protected] => [_globalContext:protected] => stdClass Object ( ) [_context:protected] => PHPTAL_Context Object ( [_line] => [_file] => /home/agsafe5/repositories/elcosh/live/templates/elcosh/record.html [repeat] => stdClass Object ( ) [_xmlDeclaration] => [_docType] => [_nothrow:PHPTAL_Context:private] => [_slots:PHPTAL_Context:private] => Array ( ) [_slotsStack:PHPTAL_Context:private] => Array ( [0] => Array ( ) [1] => Array ( ) ) [_parentContext:PHPTAL_Context:private] => PHPTAL_Context Object ( [_line] => [_file] => /home/agsafe5/repositories/elcosh/live/templates/elcosh/record.html [repeat] => stdClass Object ( ) [_xmlDeclaration] => [_docType] => [_nothrow:PHPTAL_Context:private] => [_slots:PHPTAL_Context:private] => Array ( ) [_slotsStack:PHPTAL_Context:private] => Array ( [0] => Array ( ) [1] => Array ( ) ) [_parentContext:PHPTAL_Context:private] => [_globalContext:PHPTAL_Context:private] => stdClass Object ( ) [_echoDeclarations:PHPTAL_Context:private] => [referer] => http://elcosh.org/document/3838/d001307/TBT3%2BPositioning.html [curr_module] => Record [styles] => Array ( ) [javascript] => Array ( [0] => jquery.min.js ) [metas] => Array ( [language] => en [robots] => index, follow ) [user] => [curr_url] => https://elcosh.org/index.php?module=Record&id=3838&type=document [base_url] => https://elcosh.org/index.php?module=Record [title] => eLCOSH : TBT3 Positioning [language] => en [search_query] => [module] => Record [new_records] => Array ( [0] => Search_Result Object ( [title] => Toolbox Talk: Fixed Ladder [image] => /record/images/notavailable-p.png [blurb] => The CPWR Toolbox Talk on Fixed Ladders addresses the potential risks associated with using fixed ladders. The resource includes a brief case example,... [category] => Array ( [0] => 15 [1] => 47 [2] => 49 [3] => 51 [4] => 53 [5] => 55 [6] => 60 [7] => 64 [8] => 73 [9] => 76 [10] => 78 [11] => 80 [12] => 86 [13] => 87 [14] => 90 [15] => 92 [16] => 93 [17] => 94 [18] => 100 ) [labels] => Array ( [0] => Falls [1] => Work Environment [2] => Hazards [3] => Bricklayer [4] => Trades [5] => Carpenter [7] => Cement Mason [9] => Concrete Polisher [11] => Electrical Worker [13] => HVAC [15] => Laborer [17] => PCC/Restoration [19] => Plumber/Pipefitter [21] => Roofer/Waterproofer [23] => Sheetmetal Worker [25] => Welder [27] => Commercial & Institutional [28] => Jobsites [29] => Industrial [31] => LEED/Green Construction [33] => Renovations [35] => Residential [37] => Toolbox Talks [38] => Documents [39] => Media & Documents ) [type] => Toolbox Talks [sub_category] => [url] => /document/4430/d001660/Toolbox%2BTalk%253A%2BFixed%2BLadder.html [item:protected] => DocumentRecord Object ( [records:protected] => Array ( ) [recordId:protected] => [searchWordClass:protected] => [searchWordPeerClass:protected] => [bok_record:protected] => [authors:protected] => [organizations:protected] => [collections:protected] => [categories:protected] => Array ( [15] => Category Object ( [languages:protected] => [bok_resources:protected] => [bok_topics:protected] => [bok_keywords:protected] => [id:protected] => 15 [type:protected] => category [parent:protected] => 7 [label:protected] => Falls [alreadyInSave:protected] => [alreadyInValidation:protected] => [validationFailures:protected] => Array ( ) [_new:BaseObject:private] => [_deleted:BaseObject:private] => [modifiedColumns:protected] => Array ( ) ) [47] => Category Object ( [languages:protected] => [bok_resources:protected] => [bok_topics:protected] => [bok_keywords:protected] => [id:protected] => 47 [type:protected] => category [parent:protected] => 2 [label:protected] => Bricklayer [alreadyInSave:protected] => [alreadyInValidation:protected] => [validationFailures:protected] => Array ( ) [_new:BaseObject:private] => [_deleted:BaseObject:private] => [modifiedColumns:protected] => Array ( ) ) [49] => Category Object ( [languages:protected] => [bok_resources:protected] => [bok_topics:protected] => [bok_keywords:protected] => [id:protected] => 49 [type:protected] => category [parent:protected] => 2 [label:protected] => Carpenter [alreadyInSave:protected] => [alreadyInValidation:protected] => [validationFailures:protected] => Array ( ) [_new:BaseObject:private] => [_deleted:BaseObject:private] => [modifiedColumns:protected] => Array ( ) ) [51] => Category Object ( [languages:protected] => [bok_resources:protected] => [bok_topics:protected] => [bok_keywords:protected] => [id:protected] => 51 [type:protected] => category [parent:protected] => 2 [label:protected] => Cement Mason [alreadyInSave:protected] => [alreadyInValidation:protected] => [validationFailures:protected] => Array ( ) [_new:BaseObject:private] => [_deleted:BaseObject:private] => [modifiedColumns:protected] => Array ( ) ) [53] => Category Object ( [languages:protected] => [bok_resources:protected] => [bok_topics:protected] => [bok_keywords:protected] => [id:protected] => 53 [type:protected] => category [parent:protected] => 2 [label:protected] => Concrete Polisher [alreadyInSave:protected] => [alreadyInValidation:protected] => [validationFailures:protected] => Array ( ) [_new:BaseObject:private] => [_deleted:BaseObject:private] => [modifiedColumns:protected] => Array ( ) ) [55] => Category Object ( [languages:protected] => [bok_resources:protected] => [bok_topics:protected] => [bok_keywords:protected] => [id:protected] => 55 [type:protected] => category [parent:protected] => 2 [label:protected] => Electrical Worker [alreadyInSave:protected] => [alreadyInValidation:protected] => [validationFailures:protected] => Array ( ) [_new:BaseObject:private] => [_deleted:BaseObject:private] => [modifiedColumns:protected] => Array ( ) ) [60] => Category Object ( [languages:protected] => [bok_resources:protected] => [bok_topics:protected] => [bok_keywords:protected] => [id:protected] => 60 [type:protected] => category [parent:protected] => 2 [label:protected] => HVAC [alreadyInSave:protected] => [alreadyInValidation:protected] => [validationFailures:protected] => Array ( ) [_new:BaseObject:private] => [_deleted:BaseObject:private] => [modifiedColumns:protected] => Array ( ) ) [64] => Category Object ( [languages:protected] => [bok_resources:protected] => [bok_topics:protected] => [bok_keywords:protected] => [id:protected] => 64 [type:protected] => category [parent:protected] => 2 [label:protected] => Laborer [alreadyInSave:protected] => [alreadyInValidation:protected] => [validationFailures:protected] => Array ( ) [_new:BaseObject:private] => [_deleted:BaseObject:private] => [modifiedColumns:protected] => Array ( ) ) [73] => Category Object ( [languages:protected] => [bok_resources:protected] => [bok_topics:protected] => [bok_keywords:protected] => [id:protected] => 73 [type:protected] => category [parent:protected] => 2 [label:protected] => PCC/Restoration [alreadyInSave:protected] => [alreadyInValidation:protected] => [validationFailures:protected] => Array ( ) [_new:BaseObject:private] => [_deleted:BaseObject:private] => [modifiedColumns:protected] => Array ( ) ) [76] => Category Object ( [languages:protected] => [bok_resources:protected] => [bok_topics:protected] => [bok_keywords:protected] => [id:protected] => 76 [type:protected] => category [parent:protected] => 2 [label:protected] => Plumber/Pipefitter [alreadyInSave:protected] => [alreadyInValidation:protected] => [validationFailures:protected] => Array ( ) [_new:BaseObject:private] => [_deleted:BaseObject:private] => [modifiedColumns:protected] => Array ( ) ) [78] => Category Object ( [languages:protected] => [bok_resources:protected] => [bok_topics:protected] => [bok_keywords:protected] => [id:protected] => 78 [type:protected] => category [parent:protected] => 2 [label:protected] => Roofer/Waterproofer [alreadyInSave:protected] => [alreadyInValidation:protected] => [validationFailures:protected] => Array ( ) [_new:BaseObject:private] => [_deleted:BaseObject:private] => [modifiedColumns:protected] => Array ( ) ) [80] => Category Object ( [languages:protected] => [bok_resources:protected] => [bok_topics:protected] => [bok_keywords:protected] => [id:protected] => 80 [type:protected] => category [parent:protected] => 2 [label:protected] => Sheetmetal Worker [alreadyInSave:protected] => [alreadyInValidation:protected] => [validationFailures:protected] => Array ( ) [_new:BaseObject:private] => [_deleted:BaseObject:private] => [modifiedColumns:protected] => Array ( ) ) [86] => Category Object ( [languages:protected] => [bok_resources:protected] => [bok_topics:protected] => [bok_keywords:protected] => [id:protected] => 86 [type:protected] => category [parent:protected] => 2 [label:protected] => Welder [alreadyInSave:protected] => [alreadyInValidation:protected] => [validationFailures:protected] => Array ( ) [_new:BaseObject:private] => [_deleted:BaseObject:private] => [modifiedColumns:protected] => Array ( ) ) [87] => Category Object ( [languages:protected] => [bok_resources:protected] => [bok_topics:protected] => [bok_keywords:protected] => [id:protected] => 87 [type:protected] => category [parent:protected] => 3 [label:protected] => Commercial & Institutional [alreadyInSave:protected] => [alreadyInValidation:protected] => [validationFailures:protected] => Array ( ) [_new:BaseObject:private] => [_deleted:BaseObject:private] => [modifiedColumns:protected] => Array ( ) ) [90] => Category Object ( [languages:protected] => [bok_resources:protected] => [bok_topics:protected] => [bok_keywords:protected] => [id:protected] => 90 [type:protected] => category [parent:protected] => 3 [label:protected] => Industrial [alreadyInSave:protected] => [alreadyInValidation:protected] => [validationFailures:protected] => Array ( ) [_new:BaseObject:private] => [_deleted:BaseObject:private] => [modifiedColumns:protected] => Array ( ) ) [92] => Category Object ( [languages:protected] => [bok_resources:protected] => [bok_topics:protected] => [bok_keywords:protected] => [id:protected] => 92 [type:protected] => category [parent:protected] => 3 [label:protected] => LEED/Green Construction [alreadyInSave:protected] => [alreadyInValidation:protected] => [validationFailures:protected] => Array ( ) [_new:BaseObject:private] => [_deleted:BaseObject:private] => [modifiedColumns:protected] => Array ( ) ) [93] => Category Object ( [languages:protected] => [bok_resources:protected] => [bok_topics:protected] => [bok_keywords:protected] => [id:protected] => 93 [type:protected] => category [parent:protected] => 3 [label:protected] => Renovations [alreadyInSave:protected] => [alreadyInValidation:protected] => [validationFailures:protected] => Array ( ) [_new:BaseObject:private] => [_deleted:BaseObject:private] => [modifiedColumns:protected] => Array ( ) ) [94] => Category Object ( [languages:protected] => [bok_resources:protected] => [bok_topics:protected] => [bok_keywords:protected] => [id:protected] => 94 [type:protected] => category [parent:protected] => 3 [label:protected] => Residential [alreadyInSave:protected] => [alreadyInValidation:protected] => [validationFailures:protected] => Array ( ) [_new:BaseObject:private] => [_deleted:BaseObject:private] => [modifiedColumns:protected] => Array ( ) ) [100] => Category Object ( [languages:protected] => [bok_resources:protected] => [bok_topics:protected] => [bok_keywords:protected] => [id:protected] => 100 [type:protected] => category [parent:protected] => 6 [label:protected] => Toolbox Talks [alreadyInSave:protected] => [alreadyInValidation:protected] => [validationFailures:protected] => Array ( ) [_new:BaseObject:private] => [_deleted:BaseObject:private] => [modifiedColumns:protected] => Array ( ) ) ) [categories_initialized:protected] => 1 [mapped_items:protected] => [content:protected] => [files:protected] => [language:protected] => Language Object ( [id:protected] => 1 [code:protected] => en [name:protected] => English [alreadyInSave:protected] => [alreadyInValidation:protected] => [validationFailures:protected] => Array ( ) [_new:BaseObject:private] => [_deleted:BaseObject:private] => [modifiedColumns:protected] => Array ( ) ) [old_record:protected] => [id:protected] => 4430 [old_id:protected] => [elcosh_id:protected] => d001660 [type:protected] => document [display_type:protected] => HTML only (and links) [user_id:protected] => 0 [language_id:protected] => 1 [tagging_id:protected] => Mike Aguilar [priority_id:protected] => 1 [title:protected] => Toolbox Talk: Fixed Ladder [total_pages:protected] => 0 [billed_pages:protected] => 0 [publication_number:protected] => [part_of:protected] => [keywords:protected] => Fixed Ladders, Fall Prevention, Falls [comments:protected] => [summary:protected] => The CPWR Toolbox Talk on Fixed Ladders addresses the potential risks associated with using fixed ladders. The resource includes a brief case example, steps to prevent a related injury and questions for discussion. It includes an image that illustrates the hazard, which can be posted in a central location as a reminder of steps to work safely. Available in English and Spanish. [transition_comments:protected] => [external_link:protected] => [consol_link:protected] => [more_like_this:protected] => d001257,d001254,d001255,d001256,d001258,d001262,d001279 [permission_given_by:protected] => [published:protected] => T [billable:protected] => F [img_name:protected] => [img_ext:protected] => [img_width:protected] => [img_height:protected] => [img_credit:protected] => [img_practice:protected] => [vid_source_id:protected] => [vid_running_time:protected] => [vid_intended_audience:protected] => [vid_acquisition_info:protected] => [vid_cost:protected] => [vid_producer:protected] => [vid_filename:protected] => [vid_filename_downloadable:protected] => [date_summary:protected] => [date_permission_requested:protected] => [date_permission_received:protected] => [date_review_needed:protected] => [date_received:protected] => 06/10/22 [date_completed:protected] => 06/10/22 [date_billed:protected] => [date_modified:protected] => 06/16/25 [collBokExports:protected] => [lastBokExportCriteria:BaseElcoshItem:private] => [alreadyInSave:protected] => [alreadyInValidation:protected] => [validationFailures:protected] => Array ( ) [_new:BaseObject:private] => [_deleted:BaseObject:private] => [modifiedColumns:protected] => Array ( ) ) ) [1] => Search_Result Object ( [title] => Toolbox Talk: Work Zone Safety: Working Around Vehicles [image] => /record/images/notavailable-p.png [blurb] => The CPWR Toolbox Talk on Working Around Vehicles in the Work Zone addresses methods to avoid being struck-by a vehicle on a construction site. The res... [category] => Array ( [0] => 12 [1] => 18 [2] => 52 [3] => 57 [4] => 70 [5] => 85 [6] => 87 [7] => 88 [8] => 89 [9] => 91 [10] => 90 [11] => 92 [12] => 93 [13] => 94 [14] => 95 [15] => 100 ) [labels] => Array ( [0] => Crushed/Struck By [1] => Work Environment [2] => Hazards [3] => Motor Vehicles/Heavy Equipment [6] => Commercial Diver [7] => Trades [8] => Flagger [10] => Operating Engineer [12] => Truck Driver [14] => Commercial & Institutional [15] => Jobsites [16] => Demolition [18] => Disasters [20] => Heavy & Highway [22] => Industrial [24] => LEED/Green Construction [26] => Renovations [28] => Residential [30] => Underground [32] => Toolbox Talks [33] => Documents [34] => Media & Documents ) [type] => Toolbox Talks [sub_category] => [url] => /document/4428/d001658/Toolbox%2BTalk%253A%2BWork%2BZone%2BSafety%253A%2BWorking%2BAround%2BVehicles.html [item:protected] => DocumentRecord Object ( [records:protected] => Array ( ) [recordId:protected] => [searchWordClass:protected] => [searchWordPeerClass:protected] => [bok_record:protected] => [authors:protected] => [organizations:protected] => [collections:protected] => [categories:protected] => Array ( [12] => Category Object ( [languages:protected] => [bok_resources:protected] => [bok_topics:protected] => [bok_keywords:protected] => [id:protected] => 12 [type:protected] => category [parent:protected] => 7 [label:protected] => Crushed/Struck By [alreadyInSave:protected] => [alreadyInValidation:protected] => [validationFailures:protected] => Array ( ) [_new:BaseObject:private] => [_deleted:BaseObject:private] => [modifiedColumns:protected] => Array ( ) ) [18] => Category Object ( [languages:protected] => [bok_resources:protected] => [bok_topics:protected] => [bok_keywords:protected] => [id:protected] => 18 [type:protected] => category [parent:protected] => 7 [label:protected] => Motor Vehicles/Heavy Equipment [alreadyInSave:protected] => [alreadyInValidation:protected] => [validationFailures:protected] => Array ( ) [_new:BaseObject:private] => [_deleted:BaseObject:private] => [modifiedColumns:protected] => Array ( ) ) [52] => Category Object ( [languages:protected] => [bok_resources:protected] => [bok_topics:protected] => [bok_keywords:protected] => [id:protected] => 52 [type:protected] => category [parent:protected] => 2 [label:protected] => Commercial Diver [alreadyInSave:protected] => [alreadyInValidation:protected] => [validationFailures:protected] => Array ( ) [_new:BaseObject:private] => [_deleted:BaseObject:private] => [modifiedColumns:protected] => Array ( ) ) [57] => Category Object ( [languages:protected] => [bok_resources:protected] => [bok_topics:protected] => [bok_keywords:protected] => [id:protected] => 57 [type:protected] => category [parent:protected] => 2 [label:protected] => Flagger [alreadyInSave:protected] => [alreadyInValidation:protected] => [validationFailures:protected] => Array ( ) [_new:BaseObject:private] => [_deleted:BaseObject:private] => [modifiedColumns:protected] => Array ( ) ) [70] => Category Object ( [languages:protected] => [bok_resources:protected] => [bok_topics:protected] => [bok_keywords:protected] => [id:protected] => 70 [type:protected] => category [parent:protected] => 2 [label:protected] => Operating Engineer [alreadyInSave:protected] => [alreadyInValidation:protected] => [validationFailures:protected] => Array ( ) [_new:BaseObject:private] => [_deleted:BaseObject:private] => [modifiedColumns:protected] => Array ( ) ) [85] => Category Object ( [languages:protected] => [bok_resources:protected] => [bok_topics:protected] => [bok_keywords:protected] => [id:protected] => 85 [type:protected] => category [parent:protected] => 2 [label:protected] => Truck Driver [alreadyInSave:protected] => [alreadyInValidation:protected] => [validationFailures:protected] => Array ( ) [_new:BaseObject:private] => [_deleted:BaseObject:private] => [modifiedColumns:protected] => Array ( ) ) [87] => Category Object ( [languages:protected] => [bok_resources:protected] => [bok_topics:protected] => [bok_keywords:protected] => [id:protected] => 87 [type:protected] => category [parent:protected] => 3 [label:protected] => Commercial & Institutional [alreadyInSave:protected] => [alreadyInValidation:protected] => [validationFailures:protected] => Array ( ) [_new:BaseObject:private] => [_deleted:BaseObject:private] => [modifiedColumns:protected] => Array ( ) ) [88] => Category Object ( [languages:protected] => [bok_resources:protected] => [bok_topics:protected] => [bok_keywords:protected] => [id:protected] => 88 [type:protected] => category [parent:protected] => 3 [label:protected] => Demolition [alreadyInSave:protected] => [alreadyInValidation:protected] => [validationFailures:protected] => Array ( ) [_new:BaseObject:private] => [_deleted:BaseObject:private] => [modifiedColumns:protected] => Array ( ) ) [89] => Category Object ( [languages:protected] => [bok_resources:protected] => [bok_topics:protected] => [bok_keywords:protected] => [id:protected] => 89 [type:protected] => category [parent:protected] => 3 [label:protected] => Disasters [alreadyInSave:protected] => [alreadyInValidation:protected] => [validationFailures:protected] => Array ( ) [_new:BaseObject:private] => [_deleted:BaseObject:private] => [modifiedColumns:protected] => Array ( ) ) [91] => Category Object ( [languages:protected] => [bok_resources:protected] => [bok_topics:protected] => [bok_keywords:protected] => [id:protected] => 91 [type:protected] => category [parent:protected] => 3 [label:protected] => Heavy & Highway [alreadyInSave:protected] => [alreadyInValidation:protected] => [validationFailures:protected] => Array ( ) [_new:BaseObject:private] => [_deleted:BaseObject:private] => [modifiedColumns:protected] => Array ( ) ) [90] => Category Object ( [languages:protected] => [bok_resources:protected] => [bok_topics:protected] => [bok_keywords:protected] => [id:protected] => 90 [type:protected] => category [parent:protected] => 3 [label:protected] => Industrial [alreadyInSave:protected] => [alreadyInValidation:protected] => [validationFailures:protected] => Array ( ) [_new:BaseObject:private] => [_deleted:BaseObject:private] => [modifiedColumns:protected] => Array ( ) ) [92] => Category Object ( [languages:protected] => [bok_resources:protected] => [bok_topics:protected] => [bok_keywords:protected] => [id:protected] => 92 [type:protected] => category [parent:protected] => 3 [label:protected] => LEED/Green Construction [alreadyInSave:protected] => [alreadyInValidation:protected] => [validationFailures:protected] => Array ( ) [_new:BaseObject:private] => [_deleted:BaseObject:private] => [modifiedColumns:protected] => Array ( ) ) [93] => Category Object ( [languages:protected] => [bok_resources:protected] => [bok_topics:protected] => [bok_keywords:protected] => [id:protected] => 93 [type:protected] => category [parent:protected] => 3 [label:protected] => Renovations [alreadyInSave:protected] => [alreadyInValidation:protected] => [validationFailures:protected] => Array ( ) [_new:BaseObject:private] => [_deleted:BaseObject:private] => [modifiedColumns:protected] => Array ( ) ) [94] => Category Object ( [languages:protected] => [bok_resources:protected] => [bok_topics:protected] => [bok_keywords:protected] => [id:protected] => 94 [type:protected] => category [parent:protected] => 3 [label:protected] => Residential [alreadyInSave:protected] => [alreadyInValidation:protected] => [validationFailures:protected] => Array ( ) [_new:BaseObject:private] => [_deleted:BaseObject:private] => [modifiedColumns:protected] => Array ( ) ) [95] => Category Object ( [languages:protected] => [bok_resources:protected] => [bok_topics:protected] => [bok_keywords:protected] => [id:protected] => 95 [type:protected] => category [parent:protected] => 3 [label:protected] => Underground [alreadyInSave:protected] => [alreadyInValidation:protected] => [validationFailures:protected] => Array ( ) [_new:BaseObject:private] => [_deleted:BaseObject:private] => [modifiedColumns:protected] => Array ( ) ) [100] => Category Object ( [languages:protected] => [bok_resources:protected] => [bok_topics:protected] => [bok_keywords:protected] => [id:protected] => 100 [type:protected] => category [parent:protected] => 6 [label:protected] => Toolbox Talks [alreadyInSave:protected] => [alreadyInValidation:protected] => [validationFailures:protected] => Array ( ) [_new:BaseObject:private] => [_deleted:BaseObject:private] => [modifiedColumns:protected] => Array ( ) ) ) [categories_initialized:protected] => 1 [mapped_items:protected] => [content:protected] => [files:protected] => [language:protected] => Language Object ( [id:protected] => 1 [code:protected] => en [name:protected] => English [alreadyInSave:protected] => [alreadyInValidation:protected] => [validationFailures:protected] => Array ( ) [_new:BaseObject:private] => [_deleted:BaseObject:private] => [modifiedColumns:protected] => Array ( ) ) [old_record:protected] => [id:protected] => 4428 [old_id:protected] => [elcosh_id:protected] => d001658 [type:protected] => document [display_type:protected] => HTML only (and links) [user_id:protected] => 0 [language_id:protected] => 1 [tagging_id:protected] => Daniela Caceres [priority_id:protected] => 1 [title:protected] => Toolbox Talk: Work Zone Safety: Working Around Vehicles [total_pages:protected] => 0 [billed_pages:protected] => 0 [publication_number:protected] => [part_of:protected] => [keywords:protected] => Struck, Struck by, Vehicle, Work Zone Safety, Truck, Operator, Driver, Mobile Equipment [comments:protected] => [summary:protected] => The CPWR Toolbox Talk on Working Around Vehicles in the Work Zone addresses methods to avoid being struck-by a vehicle on a construction site. The resource includes a case example, steps to prevent a related injury, and questions for discussion. It includes a graphic that illustrates the hazard, which can be posted in a central location as a reminder of steps to work safely. Available in English and Spanish. [transition_comments:protected] => [external_link:protected] => [consol_link:protected] => [more_like_this:protected] => d001640 [permission_given_by:protected] => [published:protected] => T [billable:protected] => F [img_name:protected] => [img_ext:protected] => [img_width:protected] => [img_height:protected] => [img_credit:protected] => [img_practice:protected] => [vid_source_id:protected] => [vid_running_time:protected] => [vid_intended_audience:protected] => [vid_acquisition_info:protected] => [vid_cost:protected] => [vid_producer:protected] => [vid_filename:protected] => [vid_filename_downloadable:protected] => [date_summary:protected] => [date_permission_requested:protected] => [date_permission_received:protected] => [date_review_needed:protected] => [date_received:protected] => 12/23/21 [date_completed:protected] => 12/23/21 [date_billed:protected] => [date_modified:protected] => 05/19/23 [collBokExports:protected] => [lastBokExportCriteria:BaseElcoshItem:private] => [alreadyInSave:protected] => [alreadyInValidation:protected] => [validationFailures:protected] => Array ( ) [_new:BaseObject:private] => [_deleted:BaseObject:private] => [modifiedColumns:protected] => Array ( ) ) ) [2] => Search_Result Object ( [title] => Construction Dive -- DeWalt's Jobsite Pro headphones recalled for fire hazards [image] => /record/images/notavailable-p.png [blurb] => A recall notice by the United States Consumer Product Safety Commission affects over 300,000 DeWalt Jobsite Pro Headphones. The recall is a result of... [category] => Array ( [0] => 16 [1] => 44 [2] => 45 [3] => 46 [4] => 47 [5] => 48 [6] => 49 [7] => 50 [8] => 51 [9] => 52 [10] => 53 [11] => 54 [12] => 55 [13] => 56 [14] => 57 [15] => 58 [16] => 59 [17] => 60 [18] => 61 [19] => 64 [20] => 65 [21] => 66 [22] => 67 [23] => 68 [24] => 69 [25] => 70 [26] => 71 [27] => 72 [28] => 73 [29] => 74 [30] => 75 [31] => 76 [32] => 77 [33] => 63 [34] => 78 [35] => 79 [36] => 80 [37] => 81 [38] => 82 [39] => 62 [40] => 83 [41] => 84 [42] => 85 [43] => 86 [44] => 87 [45] => 88 [46] => 89 [47] => 91 [48] => 90 [49] => 92 [50] => 93 [51] => 94 [52] => 95 ) [labels] => Array ( [0] => Fire & Explosions [1] => Work Environment [2] => Hazards [3] => Acoustical Ceiling Carpenter [4] => Trades [5] => Asbestos/Insulator [7] => Boilermaker [9] => Bricklayer [11] => Cabinetmaker [13] => Carpenter [15] => Carpet Layer [17] => Cement Mason [19] => Commercial Diver [21] => Concrete Polisher [23] => Drywall Applicator Specialist [25] => Electrical Worker [27] => Elevator Constructor [29] => Flagger [31] => Glazier [33] => Hazardous Waste Cleanup [35] => HVAC [37] => Interior Systems Carpenter [39] => Laborer [41] => Landscaper [43] => Lather [45] => Lead Abatement Worker [47] => Maintenance Worker [49] => Millwright [51] => Operating Engineer [53] => Painter [55] => Paper Hanger [57] => PCC/Restoration [59] => Pile Driver [61] => Plasterer [63] => Plumber/Pipefitter [65] => Refractory Worker [67] => Reinforcing Ironworker [69] => Roofer/Waterproofer [71] => Scaffold Erector [73] => Sheetmetal Worker [75] => Sprinkler Fitter [77] => Stonemason [79] => Structural Ironworker [81] => Terrazzo Worker [83] => Tile Setter [85] => Truck Driver [87] => Welder [89] => Commercial & Institutional [90] => Jobsites [91] => Demolition [93] => Disasters [95] => Heavy & Highway [97] => Industrial [99] => LEED/Green Construction [101] => Renovations [103] => Residential [105] => Underground ) [type] => [sub_category] => [url] => /document/4426/d001656/Construction%2BDive%2B--%2BDeWalt%2527s%2BJobsite%2BPro%2Bheadphones%2Brecalled%2Bfor%2Bfire%2Bhazards.html [item:protected] => DocumentRecord Object ( [records:protected] => Array ( ) [recordId:protected] => [searchWordClass:protected] => [searchWordPeerClass:protected] => [bok_record:protected] => [authors:protected] => [organizations:protected] => [collections:protected] => [categories:protected] => Array ( [16] => Category Object ( [languages:protected] => [bok_resources:protected] => [bok_topics:protected] => [bok_keywords:protected] => [id:protected] => 16 [type:protected] => category [parent:protected] => 7 [label:protected] => Fire & Explosions [alreadyInSave:protected] => [alreadyInValidation:protected] => [validationFailures:protected] => Array ( ) [_new:BaseObject:private] => [_deleted:BaseObject:private] => [modifiedColumns:protected] => Array ( ) ) [44] => Category Object ( [languages:protected] => [bok_resources:protected] => [bok_topics:protected] => [bok_keywords:protected] => [id:protected] => 44 [type:protected] => category [parent:protected] => 2 [label:protected] => Acoustical Ceiling Carpenter [alreadyInSave:protected] => [alreadyInValidation:protected] => [validationFailures:protected] => Array ( ) [_new:BaseObject:private] => [_deleted:BaseObject:private] => [modifiedColumns:protected] => Array ( ) ) [45] => Category Object ( [languages:protected] => [bok_resources:protected] => [bok_topics:protected] => [bok_keywords:protected] => [id:protected] => 45 [type:protected] => category [parent:protected] => 2 [label:protected] => Asbestos/Insulator [alreadyInSave:protected] => [alreadyInValidation:protected] => [validationFailures:protected] => Array ( ) [_new:BaseObject:private] => [_deleted:BaseObject:private] => [modifiedColumns:protected] => Array ( ) ) [46] => Category Object ( [languages:protected] => [bok_resources:protected] => [bok_topics:protected] => [bok_keywords:protected] => [id:protected] => 46 [type:protected] => category [parent:protected] => 2 [label:protected] => Boilermaker [alreadyInSave:protected] => [alreadyInValidation:protected] => [validationFailures:protected] => Array ( ) [_new:BaseObject:private] => [_deleted:BaseObject:private] => [modifiedColumns:protected] => Array ( ) ) [47] => Category Object ( [languages:protected] => [bok_resources:protected] => [bok_topics:protected] => [bok_keywords:protected] => [id:protected] => 47 [type:protected] => category [parent:protected] => 2 [label:protected] => Bricklayer [alreadyInSave:protected] => [alreadyInValidation:protected] => [validationFailures:protected] => Array ( ) [_new:BaseObject:private] => [_deleted:BaseObject:private] => [modifiedColumns:protected] => Array ( ) ) [48] => Category Object ( [languages:protected] => [bok_resources:protected] => [bok_topics:protected] => [bok_keywords:protected] => [id:protected] => 48 [type:protected] => category [parent:protected] => 2 [label:protected] => Cabinetmaker [alreadyInSave:protected] => [alreadyInValidation:protected] => [validationFailures:protected] => Array ( ) [_new:BaseObject:private] => [_deleted:BaseObject:private] => [modifiedColumns:protected] => Array ( ) ) [49] => Category Object ( [languages:protected] => [bok_resources:protected] => [bok_topics:protected] => [bok_keywords:protected] => [id:protected] => 49 [type:protected] => category [parent:protected] => 2 [label:protected] => Carpenter [alreadyInSave:protected] => [alreadyInValidation:protected] => [validationFailures:protected] => Array ( ) [_new:BaseObject:private] => [_deleted:BaseObject:private] => [modifiedColumns:protected] => Array ( ) ) [50] => Category Object ( [languages:protected] => [bok_resources:protected] => [bok_topics:protected] => [bok_keywords:protected] => [id:protected] => 50 [type:protected] => category [parent:protected] => 2 [label:protected] => Carpet Layer [alreadyInSave:protected] => [alreadyInValidation:protected] => [validationFailures:protected] => Array ( ) [_new:BaseObject:private] => [_deleted:BaseObject:private] => [modifiedColumns:protected] => Array ( ) ) [51] => Category Object ( [languages:protected] => [bok_resources:protected] => [bok_topics:protected] => [bok_keywords:protected] => [id:protected] => 51 [type:protected] => category [parent:protected] => 2 [label:protected] => Cement Mason [alreadyInSave:protected] => [alreadyInValidation:protected] => [validationFailures:protected] => Array ( ) [_new:BaseObject:private] => [_deleted:BaseObject:private] => [modifiedColumns:protected] => Array ( ) ) [52] => Category Object ( [languages:protected] => [bok_resources:protected] => [bok_topics:protected] => [bok_keywords:protected] => [id:protected] => 52 [type:protected] => category [parent:protected] => 2 [label:protected] => Commercial Diver [alreadyInSave:protected] => [alreadyInValidation:protected] => [validationFailures:protected] => Array ( ) [_new:BaseObject:private] => [_deleted:BaseObject:private] => [modifiedColumns:protected] => Array ( ) ) [53] => Category Object ( [languages:protected] => [bok_resources:protected] => [bok_topics:protected] => [bok_keywords:protected] => [id:protected] => 53 [type:protected] => category [parent:protected] => 2 [label:protected] => Concrete Polisher [alreadyInSave:protected] => [alreadyInValidation:protected] => [validationFailures:protected] => Array ( ) [_new:BaseObject:private] => [_deleted:BaseObject:private] => [modifiedColumns:protected] => Array ( ) ) [54] => Category Object ( [languages:protected] => [bok_resources:protected] => [bok_topics:protected] => [bok_keywords:protected] => [id:protected] => 54 [type:protected] => category [parent:protected] => 2 [label:protected] => Drywall Applicator Specialist [alreadyInSave:protected] => [alreadyInValidation:protected] => [validationFailures:protected] => Array ( ) [_new:BaseObject:private] => [_deleted:BaseObject:private] => [modifiedColumns:protected] => Array ( ) ) [55] => Category Object ( [languages:protected] => [bok_resources:protected] => [bok_topics:protected] => [bok_keywords:protected] => [id:protected] => 55 [type:protected] => category [parent:protected] => 2 [label:protected] => Electrical Worker [alreadyInSave:protected] => [alreadyInValidation:protected] => [validationFailures:protected] => Array ( ) [_new:BaseObject:private] => [_deleted:BaseObject:private] => [modifiedColumns:protected] => Array ( ) ) [56] => Category Object ( [languages:protected] => [bok_resources:protected] => [bok_topics:protected] => [bok_keywords:protected] => [id:protected] => 56 [type:protected] => category [parent:protected] => 2 [label:protected] => Elevator Constructor [alreadyInSave:protected] => [alreadyInValidation:protected] => [validationFailures:protected] => Array ( ) [_new:BaseObject:private] => [_deleted:BaseObject:private] => [modifiedColumns:protected] => Array ( ) ) [57] => Category Object ( [languages:protected] => [bok_resources:protected] => [bok_topics:protected] => [bok_keywords:protected] => [id:protected] => 57 [type:protected] => category [parent:protected] => 2 [label:protected] => Flagger [alreadyInSave:protected] => [alreadyInValidation:protected] => [validationFailures:protected] => Array ( ) [_new:BaseObject:private] => [_deleted:BaseObject:private] => [modifiedColumns:protected] => Array ( ) ) [58] => Category Object ( [languages:protected] => [bok_resources:protected] => [bok_topics:protected] => [bok_keywords:protected] => [id:protected] => 58 [type:protected] => category [parent:protected] => 2 [label:protected] => Glazier [alreadyInSave:protected] => [alreadyInValidation:protected] => [validationFailures:protected] => Array ( ) [_new:BaseObject:private] => [_deleted:BaseObject:private] => [modifiedColumns:protected] => Array ( ) ) [59] => Category Object ( [languages:protected] => [bok_resources:protected] => [bok_topics:protected] => [bok_keywords:protected] => [id:protected] => 59 [type:protected] => category [parent:protected] => 2 [label:protected] => Hazardous Waste Cleanup [alreadyInSave:protected] => [alreadyInValidation:protected] => [validationFailures:protected] => Array ( ) [_new:BaseObject:private] => [_deleted:BaseObject:private] => [modifiedColumns:protected] => Array ( ) ) [60] => Category Object ( [languages:protected] => [bok_resources:protected] => [bok_topics:protected] => [bok_keywords:protected] => [id:protected] => 60 [type:protected] => category [parent:protected] => 2 [label:protected] => HVAC [alreadyInSave:protected] => [alreadyInValidation:protected] => [validationFailures:protected] => Array ( ) [_new:BaseObject:private] => [_deleted:BaseObject:private] => [modifiedColumns:protected] => Array ( ) ) [61] => Category Object ( [languages:protected] => [bok_resources:protected] => [bok_topics:protected] => [bok_keywords:protected] => [id:protected] => 61 [type:protected] => category [parent:protected] => 2 [label:protected] => Interior Systems Carpenter [alreadyInSave:protected] => [alreadyInValidation:protected] => [validationFailures:protected] => Array ( ) [_new:BaseObject:private] => [_deleted:BaseObject:private] => [modifiedColumns:protected] => Array ( ) ) [64] => Category Object ( [languages:protected] => [bok_resources:protected] => [bok_topics:protected] => [bok_keywords:protected] => [id:protected] => 64 [type:protected] => category [parent:protected] => 2 [label:protected] => Laborer [alreadyInSave:protected] => [alreadyInValidation:protected] => [validationFailures:protected] => Array ( ) [_new:BaseObject:private] => [_deleted:BaseObject:private] => [modifiedColumns:protected] => Array ( ) ) [65] => Category Object ( [languages:protected] => [bok_resources:protected] => [bok_topics:protected] => [bok_keywords:protected] => [id:protected] => 65 [type:protected] => category [parent:protected] => 2 [label:protected] => Landscaper [alreadyInSave:protected] => [alreadyInValidation:protected] => [validationFailures:protected] => Array ( ) [_new:BaseObject:private] => [_deleted:BaseObject:private] => [modifiedColumns:protected] => Array ( ) ) [66] => Category Object ( [languages:protected] => [bok_resources:protected] => [bok_topics:protected] => [bok_keywords:protected] => [id:protected] => 66 [type:protected] => category [parent:protected] => 2 [label:protected] => Lather [alreadyInSave:protected] => [alreadyInValidation:protected] => [validationFailures:protected] => Array ( ) [_new:BaseObject:private] => [_deleted:BaseObject:private] => [modifiedColumns:protected] => Array ( ) ) [67] => Category Object ( [languages:protected] => [bok_resources:protected] => [bok_topics:protected] => [bok_keywords:protected] => [id:protected] => 67 [type:protected] => category [parent:protected] => 2 [label:protected] => Lead Abatement Worker [alreadyInSave:protected] => [alreadyInValidation:protected] => [validationFailures:protected] => Array ( ) [_new:BaseObject:private] => [_deleted:BaseObject:private] => [modifiedColumns:protected] => Array ( ) ) [68] => Category Object ( [languages:protected] => [bok_resources:protected] => [bok_topics:protected] => [bok_keywords:protected] => [id:protected] => 68 [type:protected] => category [parent:protected] => 2 [label:protected] => Maintenance Worker [alreadyInSave:protected] => [alreadyInValidation:protected] => [validationFailures:protected] => Array ( ) [_new:BaseObject:private] => [_deleted:BaseObject:private] => [modifiedColumns:protected] => Array ( ) ) [69] => Category Object ( [languages:protected] => [bok_resources:protected] => [bok_topics:protected] => [bok_keywords:protected] => [id:protected] => 69 [type:protected] => category [parent:protected] => 2 [label:protected] => Millwright [alreadyInSave:protected] => [alreadyInValidation:protected] => [validationFailures:protected] => Array ( ) [_new:BaseObject:private] => [_deleted:BaseObject:private] => [modifiedColumns:protected] => Array ( ) ) [70] => Category Object ( [languages:protected] => [bok_resources:protected] => [bok_topics:protected] => [bok_keywords:protected] => [id:protected] => 70 [type:protected] => category [parent:protected] => 2 [label:protected] => Operating Engineer [alreadyInSave:protected] => [alreadyInValidation:protected] => [validationFailures:protected] => Array ( ) [_new:BaseObject:private] => [_deleted:BaseObject:private] => [modifiedColumns:protected] => Array ( ) ) [71] => Category Object ( [languages:protected] => [bok_resources:protected] => [bok_topics:protected] => [bok_keywords:protected] => [id:protected] => 71 [type:protected] => category [parent:protected] => 2 [label:protected] => Painter [alreadyInSave:protected] => [alreadyInValidation:protected] => [validationFailures:protected] => Array ( ) [_new:BaseObject:private] => [_deleted:BaseObject:private] => [modifiedColumns:protected] => Array ( ) ) [72] => Category Object ( [languages:protected] => [bok_resources:protected] => [bok_topics:protected] => [bok_keywords:protected] => [id:protected] => 72 [type:protected] => category [parent:protected] => 2 [label:protected] => Paper Hanger [alreadyInSave:protected] => [alreadyInValidation:protected] => [validationFailures:protected] => Array ( ) [_new:BaseObject:private] => [_deleted:BaseObject:private] => [modifiedColumns:protected] => Array ( ) ) [73] => Category Object ( [languages:protected] => [bok_resources:protected] => [bok_topics:protected] => [bok_keywords:protected] => [id:protected] => 73 [type:protected] => category [parent:protected] => 2 [label:protected] => PCC/Restoration [alreadyInSave:protected] => [alreadyInValidation:protected] => [validationFailures:protected] => Array ( ) [_new:BaseObject:private] => [_deleted:BaseObject:private] => [modifiedColumns:protected] => Array ( ) ) [74] => Category Object ( [languages:protected] => [bok_resources:protected] => [bok_topics:protected] => [bok_keywords:protected] => [id:protected] => 74 [type:protected] => category [parent:protected] => 2 [label:protected] => Pile Driver [alreadyInSave:protected] => [alreadyInValidation:protected] => [validationFailures:protected] => Array ( ) [_new:BaseObject:private] => [_deleted:BaseObject:private] => [modifiedColumns:protected] => Array ( ) ) [75] => Category Object ( [languages:protected] => [bok_resources:protected] => [bok_topics:protected] => [bok_keywords:protected] => [id:protected] => 75 [type:protected] => category [parent:protected] => 2 [label:protected] => Plasterer [alreadyInSave:protected] => [alreadyInValidation:protected] => [validationFailures:protected] => Array ( ) [_new:BaseObject:private] => [_deleted:BaseObject:private] => [modifiedColumns:protected] => Array ( ) ) [76] => Category Object ( [languages:protected] => [bok_resources:protected] => [bok_topics:protected] => [bok_keywords:protected] => [id:protected] => 76 [type:protected] => category [parent:protected] => 2 [label:protected] => Plumber/Pipefitter [alreadyInSave:protected] => [alreadyInValidation:protected] => [validationFailures:protected] => Array ( ) [_new:BaseObject:private] => [_deleted:BaseObject:private] => [modifiedColumns:protected] => Array ( ) ) [77] => Category Object ( [languages:protected] => [bok_resources:protected] => [bok_topics:protected] => [bok_keywords:protected] => [id:protected] => 77 [type:protected] => category [parent:protected] => 2 [label:protected] => Refractory Worker [alreadyInSave:protected] => [alreadyInValidation:protected] => [validationFailures:protected] => Array ( ) [_new:BaseObject:private] => [_deleted:BaseObject:private] => [modifiedColumns:protected] => Array ( ) ) [63] => Category Object ( [languages:protected] => [bok_resources:protected] => [bok_topics:protected] => [bok_keywords:protected] => [id:protected] => 63 [type:protected] => category [parent:protected] => 2 [label:protected] => Reinforcing Ironworker [alreadyInSave:protected] => [alreadyInValidation:protected] => [validationFailures:protected] => Array ( ) [_new:BaseObject:private] => [_deleted:BaseObject:private] => [modifiedColumns:protected] => Array ( ) ) [78] => Category Object ( [languages:protected] => [bok_resources:protected] => [bok_topics:protected] => [bok_keywords:protected] => [id:protected] => 78 [type:protected] => category [parent:protected] => 2 [label:protected] => Roofer/Waterproofer [alreadyInSave:protected] => [alreadyInValidation:protected] => [validationFailures:protected] => Array ( ) [_new:BaseObject:private] => [_deleted:BaseObject:private] => [modifiedColumns:protected] => Array ( ) ) [79] => Category Object ( [languages:protected] => [bok_resources:protected] => [bok_topics:protected] => [bok_keywords:protected] => [id:protected] => 79 [type:protected] => category [parent:protected] => 2 [label:protected] => Scaffold Erector [alreadyInSave:protected] => [alreadyInValidation:protected] => [validationFailures:protected] => Array ( ) [_new:BaseObject:private] => [_deleted:BaseObject:private] => [modifiedColumns:protected] => Array ( ) ) [80] => Category Object ( [languages:protected] => [bok_resources:protected] => [bok_topics:protected] => [bok_keywords:protected] => [id:protected] => 80 [type:protected] => category [parent:protected] => 2 [label:protected] => Sheetmetal Worker [alreadyInSave:protected] => [alreadyInValidation:protected] => [validationFailures:protected] => Array ( ) [_new:BaseObject:private] => [_deleted:BaseObject:private] => [modifiedColumns:protected] => Array ( ) ) [81] => Category Object ( [languages:protected] => [bok_resources:protected] => [bok_topics:protected] => [bok_keywords:protected] => [id:protected] => 81 [type:protected] => category [parent:protected] => 2 [label:protected] => Sprinkler Fitter [alreadyInSave:protected] => [alreadyInValidation:protected] => [validationFailures:protected] => Array ( ) [_new:BaseObject:private] => [_deleted:BaseObject:private] => [modifiedColumns:protected] => Array ( ) ) [82] => Category Object ( [languages:protected] => [bok_resources:protected] => [bok_topics:protected] => [bok_keywords:protected] => [id:protected] => 82 [type:protected] => category [parent:protected] => 2 [label:protected] => Stonemason [alreadyInSave:protected] => [alreadyInValidation:protected] => [validationFailures:protected] => Array ( ) [_new:BaseObject:private] => [_deleted:BaseObject:private] => [modifiedColumns:protected] => Array ( ) ) [62] => Category Object ( [languages:protected] => [bok_resources:protected] => [bok_topics:protected] => [bok_keywords:protected] => [id:protected] => 62 [type:protected] => category [parent:protected] => 2 [label:protected] => Structural Ironworker [alreadyInSave:protected] => [alreadyInValidation:protected] => [validationFailures:protected] => Array ( ) [_new:BaseObject:private] => [_deleted:BaseObject:private] => [modifiedColumns:protected] => Array ( ) ) [83] => Category Object ( [languages:protected] => [bok_resources:protected] => [bok_topics:protected] => [bok_keywords:protected] => [id:protected] => 83 [type:protected] => category [parent:protected] => 2 [label:protected] => Terrazzo Worker [alreadyInSave:protected] => [alreadyInValidation:protected] => [validationFailures:protected] => Array ( ) [_new:BaseObject:private] => [_deleted:BaseObject:private] => [modifiedColumns:protected] => Array ( ) ) [84] => Category Object ( [languages:protected] => [bok_resources:protected] => [bok_topics:protected] => [bok_keywords:protected] => [id:protected] => 84 [type:protected] => category [parent:protected] => 2 [label:protected] => Tile Setter [alreadyInSave:protected] => [alreadyInValidation:protected] => [validationFailures:protected] => Array ( ) [_new:BaseObject:private] => [_deleted:BaseObject:private] => [modifiedColumns:protected] => Array ( ) ) [85] => Category Object ( [languages:protected] => [bok_resources:protected] => [bok_topics:protected] => [bok_keywords:protected] => [id:protected] => 85 [type:protected] => category [parent:protected] => 2 [label:protected] => Truck Driver [alreadyInSave:protected] => [alreadyInValidation:protected] => [validationFailures:protected] => Array ( ) [_new:BaseObject:private] => [_deleted:BaseObject:private] => [modifiedColumns:protected] => Array ( ) ) [86] => Category Object ( [languages:protected] => [bok_resources:protected] => [bok_topics:protected] => [bok_keywords:protected] => [id:protected] => 86 [type:protected] => category [parent:protected] => 2 [label:protected] => Welder [alreadyInSave:protected] => [alreadyInValidation:protected] => [validationFailures:protected] => Array ( ) [_new:BaseObject:private] => [_deleted:BaseObject:private] => [modifiedColumns:protected] => Array ( ) ) [87] => Category Object ( [languages:protected] => [bok_resources:protected] => [bok_topics:protected] => [bok_keywords:protected] => [id:protected] => 87 [type:protected] => category [parent:protected] => 3 [label:protected] => Commercial & Institutional [alreadyInSave:protected] => [alreadyInValidation:protected] => [validationFailures:protected] => Array ( ) [_new:BaseObject:private] => [_deleted:BaseObject:private] => [modifiedColumns:protected] => Array ( ) ) [88] => Category Object ( [languages:protected] => [bok_resources:protected] => [bok_topics:protected] => [bok_keywords:protected] => [id:protected] => 88 [type:protected] => category [parent:protected] => 3 [label:protected] => Demolition [alreadyInSave:protected] => [alreadyInValidation:protected] => [validationFailures:protected] => Array ( ) [_new:BaseObject:private] => [_deleted:BaseObject:private] => [modifiedColumns:protected] => Array ( ) ) [89] => Category Object ( [languages:protected] => [bok_resources:protected] => [bok_topics:protected] => [bok_keywords:protected] => [id:protected] => 89 [type:protected] => category [parent:protected] => 3 [label:protected] => Disasters [alreadyInSave:protected] => [alreadyInValidation:protected] => [validationFailures:protected] => Array ( ) [_new:BaseObject:private] => [_deleted:BaseObject:private] => [modifiedColumns:protected] => Array ( ) ) [91] => Category Object ( [languages:protected] => [bok_resources:protected] => [bok_topics:protected] => [bok_keywords:protected] => [id:protected] => 91 [type:protected] => category [parent:protected] => 3 [label:protected] => Heavy & Highway [alreadyInSave:protected] => [alreadyInValidation:protected] => [validationFailures:protected] => Array ( ) [_new:BaseObject:private] => [_deleted:BaseObject:private] => [modifiedColumns:protected] => Array ( ) ) [90] => Category Object ( [languages:protected] => [bok_resources:protected] => [bok_topics:protected] => [bok_keywords:protected] => [id:protected] => 90 [type:protected] => category [parent:protected] => 3 [label:protected] => Industrial [alreadyInSave:protected] => [alreadyInValidation:protected] => [validationFailures:protected] => Array ( ) [_new:BaseObject:private] => [_deleted:BaseObject:private] => [modifiedColumns:protected] => Array ( ) ) [92] => Category Object ( [languages:protected] => [bok_resources:protected] => [bok_topics:protected] => [bok_keywords:protected] => [id:protected] => 92 [type:protected] => category [parent:protected] => 3 [label:protected] => LEED/Green Construction [alreadyInSave:protected] => [alreadyInValidation:protected] => [validationFailures:protected] => Array ( ) [_new:BaseObject:private] => [_deleted:BaseObject:private] => [modifiedColumns:protected] => Array ( ) ) [93] => Category Object ( [languages:protected] => [bok_resources:protected] => [bok_topics:protected] => [bok_keywords:protected] => [id:protected] => 93 [type:protected] => category [parent:protected] => 3 [label:protected] => Renovations [alreadyInSave:protected] => [alreadyInValidation:protected] => [validationFailures:protected] => Array ( ) [_new:BaseObject:private] => [_deleted:BaseObject:private] => [modifiedColumns:protected] => Array ( ) ) [94] => Category Object ( [languages:protected] => [bok_resources:protected] => [bok_topics:protected] => [bok_keywords:protected] => [id:protected] => 94 [type:protected] => category [parent:protected] => 3 [label:protected] => Residential [alreadyInSave:protected] => [alreadyInValidation:protected] => [validationFailures:protected] => Array ( ) [_new:BaseObject:private] => [_deleted:BaseObject:private] => [modifiedColumns:protected] => Array ( ) ) [95] => Category Object ( [languages:protected] => [bok_resources:protected] => [bok_topics:protected] => [bok_keywords:protected] => [id:protected] => 95 [type:protected] => category [parent:protected] => 3 [label:protected] => Underground [alreadyInSave:protected] => [alreadyInValidation:protected] => [validationFailures:protected] => Array ( ) [_new:BaseObject:private] => [_deleted:BaseObject:private] => [modifiedColumns:protected] => Array ( ) ) ) [categories_initialized:protected] => 1 [mapped_items:protected] => [content:protected] => [files:protected] => [language:protected] => Language Object ( [id:protected] => 1 [code:protected] => en [name:protected] => English [alreadyInSave:protected] => [alreadyInValidation:protected] => [validationFailures:protected] => Array ( ) [_new:BaseObject:private] => [_deleted:BaseObject:private] => [modifiedColumns:protected] => Array ( ) ) [old_record:protected] => [id:protected] => 4426 [old_id:protected] => [elcosh_id:protected] => d001656 [type:protected] => document [display_type:protected] => HTML only (and links) [user_id:protected] => 0 [language_id:protected] => 1 [tagging_id:protected] => Mike Aguilar [priority_id:protected] => 1 [title:protected] => Construction Dive -- DeWalt's Jobsite Pro headphones recalled for fire hazards [total_pages:protected] => 1 [billed_pages:protected] => 1 [publication_number:protected] => [part_of:protected] => [keywords:protected] => DeWalt, Fire Hazards, recall, headphones [comments:protected] => [summary:protected] => A recall notice by the United States Consumer Product Safety Commission affects over 300,000 DeWalt Jobsite Pro Headphones. The recall is a result of a malfunction that can cause earbuds to overheat while charging or during use, leading to fire and burn hazards. [transition_comments:protected] => [external_link:protected] => https://www.constructiondive.com/news/dewalts-jobsite-pro-headphones-recalled-for-fire-hazards/611248/?utm_source=Sailthru&utm_medium=email&utm_campaign=Issue:%202021-12-10%20Construction%20Dive%20Newsletter%20%5Bissue:38532%5D&utm_term=Construction%20Dive [consol_link:protected] => [more_like_this:protected] => [permission_given_by:protected] => [published:protected] => T [billable:protected] => F [img_name:protected] => [img_ext:protected] => [img_width:protected] => [img_height:protected] => [img_credit:protected] => [img_practice:protected] => [vid_source_id:protected] => [vid_running_time:protected] => [vid_intended_audience:protected] => [vid_acquisition_info:protected] => [vid_cost:protected] => [vid_producer:protected] => [vid_filename:protected] => [vid_filename_downloadable:protected] => [date_summary:protected] => [date_permission_requested:protected] => [date_permission_received:protected] => [date_review_needed:protected] => [date_received:protected] => 12/13/21 [date_completed:protected] => 12/13/21 [date_billed:protected] => [date_modified:protected] => 12/13/21 [collBokExports:protected] => [lastBokExportCriteria:BaseElcoshItem:private] => [alreadyInSave:protected] => [alreadyInValidation:protected] => [validationFailures:protected] => Array ( ) [_new:BaseObject:private] => [_deleted:BaseObject:private] => [modifiedColumns:protected] => Array ( ) ) ) [3] => Search_Result Object ( [title] => Working in an Enclosed Cab [image] => /record/images/notavailable-p.png [blurb] => This CPWR Hazard Alert on Working in enclosed cabs provides information on protecting workers from silica dust, how to minimize exposures and the dang... [category] => Array ( [0] => 10 [1] => 16 [2] => 24 [3] => 37 [4] => 46 [5] => 48 [6] => 49 [7] => 51 [8] => 53 [9] => 54 [10] => 56 [11] => 58 [12] => 59 [13] => 60 [14] => 61 [15] => 64 [16] => 66 [17] => 68 [18] => 69 [19] => 71 [20] => 73 [21] => 74 [22] => 76 [23] => 77 [24] => 63 [25] => 80 [26] => 82 [27] => 62 [28] => 83 [29] => 84 [30] => 86 [31] => 88 [32] => 89 [33] => 95 [34] => 102 ) [labels] => Array ( [0] => Confined Spaces [1] => Work Environment [2] => Hazards [3] => Fire & Explosions [6] => Trenches & Excavations [9] => Silica /Construction Dust [10] => Inhalation/Skin Exposures [12] => Boilermaker [13] => Trades [14] => Cabinetmaker [16] => Carpenter [18] => Cement Mason [20] => Concrete Polisher [22] => Drywall Applicator Specialist [24] => Elevator Constructor [26] => Glazier [28] => Hazardous Waste Cleanup [30] => HVAC [32] => Interior Systems Carpenter [34] => Laborer [36] => Lather [38] => Maintenance Worker [40] => Millwright [42] => Painter [44] => PCC/Restoration [46] => Pile Driver [48] => Plumber/Pipefitter [50] => Refractory Worker [52] => Reinforcing Ironworker [54] => Sheetmetal Worker [56] => Stonemason [58] => Structural Ironworker [60] => Terrazzo Worker [62] => Tile Setter [64] => Welder [66] => Demolition [67] => Jobsites [68] => Disasters [70] => Underground [72] => Handouts [73] => Documents [74] => Media & Documents ) [type] => Handouts [sub_category] => [url] => /document/4415/d001651/Working%2Bin%2Ban%2BEnclosed%2BCab.html [item:protected] => DocumentRecord Object ( [records:protected] => Array ( ) [recordId:protected] => [searchWordClass:protected] => [searchWordPeerClass:protected] => [bok_record:protected] => [authors:protected] => [organizations:protected] => [collections:protected] => [categories:protected] => Array ( [10] => Category Object ( [languages:protected] => [bok_resources:protected] => [bok_topics:protected] => [bok_keywords:protected] => [id:protected] => 10 [type:protected] => category [parent:protected] => 7 [label:protected] => Confined Spaces [alreadyInSave:protected] => [alreadyInValidation:protected] => [validationFailures:protected] => Array ( ) [_new:BaseObject:private] => [_deleted:BaseObject:private] => [modifiedColumns:protected] => Array ( ) ) [16] => Category Object ( [languages:protected] => [bok_resources:protected] => [bok_topics:protected] => [bok_keywords:protected] => [id:protected] => 16 [type:protected] => category [parent:protected] => 7 [label:protected] => Fire & Explosions [alreadyInSave:protected] => [alreadyInValidation:protected] => [validationFailures:protected] => Array ( ) [_new:BaseObject:private] => [_deleted:BaseObject:private] => [modifiedColumns:protected] => Array ( ) ) [24] => Category Object ( [languages:protected] => [bok_resources:protected] => [bok_topics:protected] => [bok_keywords:protected] => [id:protected] => 24 [type:protected] => category [parent:protected] => 7 [label:protected] => Trenches & Excavations [alreadyInSave:protected] => [alreadyInValidation:protected] => [validationFailures:protected] => Array ( ) [_new:BaseObject:private] => [_deleted:BaseObject:private] => [modifiedColumns:protected] => Array ( ) ) [37] => Category Object ( [languages:protected] => [bok_resources:protected] => [bok_topics:protected] => [bok_keywords:protected] => [id:protected] => 37 [type:protected] => category [parent:protected] => 8 [label:protected] => Silica /Construction Dust [alreadyInSave:protected] => [alreadyInValidation:protected] => [validationFailures:protected] => Array ( ) [_new:BaseObject:private] => [_deleted:BaseObject:private] => [modifiedColumns:protected] => Array ( ) ) [46] => Category Object ( [languages:protected] => [bok_resources:protected] => [bok_topics:protected] => [bok_keywords:protected] => [id:protected] => 46 [type:protected] => category [parent:protected] => 2 [label:protected] => Boilermaker [alreadyInSave:protected] => [alreadyInValidation:protected] => [validationFailures:protected] => Array ( ) [_new:BaseObject:private] => [_deleted:BaseObject:private] => [modifiedColumns:protected] => Array ( ) ) [48] => Category Object ( [languages:protected] => [bok_resources:protected] => [bok_topics:protected] => [bok_keywords:protected] => [id:protected] => 48 [type:protected] => category [parent:protected] => 2 [label:protected] => Cabinetmaker [alreadyInSave:protected] => [alreadyInValidation:protected] => [validationFailures:protected] => Array ( ) [_new:BaseObject:private] => [_deleted:BaseObject:private] => [modifiedColumns:protected] => Array ( ) ) [49] => Category Object ( [languages:protected] => [bok_resources:protected] => [bok_topics:protected] => [bok_keywords:protected] => [id:protected] => 49 [type:protected] => category [parent:protected] => 2 [label:protected] => Carpenter [alreadyInSave:protected] => [alreadyInValidation:protected] => [validationFailures:protected] => Array ( ) [_new:BaseObject:private] => [_deleted:BaseObject:private] => [modifiedColumns:protected] => Array ( ) ) [51] => Category Object ( [languages:protected] => [bok_resources:protected] => [bok_topics:protected] => [bok_keywords:protected] => [id:protected] => 51 [type:protected] => category [parent:protected] => 2 [label:protected] => Cement Mason [alreadyInSave:protected] => [alreadyInValidation:protected] => [validationFailures:protected] => Array ( ) [_new:BaseObject:private] => [_deleted:BaseObject:private] => [modifiedColumns:protected] => Array ( ) ) [53] => Category Object ( [languages:protected] => [bok_resources:protected] => [bok_topics:protected] => [bok_keywords:protected] => [id:protected] => 53 [type:protected] => category [parent:protected] => 2 [label:protected] => Concrete Polisher [alreadyInSave:protected] => [alreadyInValidation:protected] => [validationFailures:protected] => Array ( ) [_new:BaseObject:private] => [_deleted:BaseObject:private] => [modifiedColumns:protected] => Array ( ) ) [54] => Category Object ( [languages:protected] => [bok_resources:protected] => [bok_topics:protected] => [bok_keywords:protected] => [id:protected] => 54 [type:protected] => category [parent:protected] => 2 [label:protected] => Drywall Applicator Specialist [alreadyInSave:protected] => [alreadyInValidation:protected] => [validationFailures:protected] => Array ( ) [_new:BaseObject:private] => [_deleted:BaseObject:private] => [modifiedColumns:protected] => Array ( ) ) [56] => Category Object ( [languages:protected] => [bok_resources:protected] => [bok_topics:protected] => [bok_keywords:protected] => [id:protected] => 56 [type:protected] => category [parent:protected] => 2 [label:protected] => Elevator Constructor [alreadyInSave:protected] => [alreadyInValidation:protected] => [validationFailures:protected] => Array ( ) [_new:BaseObject:private] => [_deleted:BaseObject:private] => [modifiedColumns:protected] => Array ( ) ) [58] => Category Object ( [languages:protected] => [bok_resources:protected] => [bok_topics:protected] => [bok_keywords:protected] => [id:protected] => 58 [type:protected] => category [parent:protected] => 2 [label:protected] => Glazier [alreadyInSave:protected] => [alreadyInValidation:protected] => [validationFailures:protected] => Array ( ) [_new:BaseObject:private] => [_deleted:BaseObject:private] => [modifiedColumns:protected] => Array ( ) ) [59] => Category Object ( [languages:protected] => [bok_resources:protected] => [bok_topics:protected] => [bok_keywords:protected] => [id:protected] => 59 [type:protected] => category [parent:protected] => 2 [label:protected] => Hazardous Waste Cleanup [alreadyInSave:protected] => [alreadyInValidation:protected] => [validationFailures:protected] => Array ( ) [_new:BaseObject:private] => [_deleted:BaseObject:private] => [modifiedColumns:protected] => Array ( ) ) [60] => Category Object ( [languages:protected] => [bok_resources:protected] => [bok_topics:protected] => [bok_keywords:protected] => [id:protected] => 60 [type:protected] => category [parent:protected] => 2 [label:protected] => HVAC [alreadyInSave:protected] => [alreadyInValidation:protected] => [validationFailures:protected] => Array ( ) [_new:BaseObject:private] => [_deleted:BaseObject:private] => [modifiedColumns:protected] => Array ( ) ) [61] => Category Object ( [languages:protected] => [bok_resources:protected] => [bok_topics:protected] => [bok_keywords:protected] => [id:protected] => 61 [type:protected] => category [parent:protected] => 2 [label:protected] => Interior Systems Carpenter [alreadyInSave:protected] => [alreadyInValidation:protected] => [validationFailures:protected] => Array ( ) [_new:BaseObject:private] => [_deleted:BaseObject:private] => [modifiedColumns:protected] => Array ( ) ) [64] => Category Object ( [languages:protected] => [bok_resources:protected] => [bok_topics:protected] => [bok_keywords:protected] => [id:protected] => 64 [type:protected] => category [parent:protected] => 2 [label:protected] => Laborer [alreadyInSave:protected] => [alreadyInValidation:protected] => [validationFailures:protected] => Array ( ) [_new:BaseObject:private] => [_deleted:BaseObject:private] => [modifiedColumns:protected] => Array ( ) ) [66] => Category Object ( [languages:protected] => [bok_resources:protected] => [bok_topics:protected] => [bok_keywords:protected] => [id:protected] => 66 [type:protected] => category [parent:protected] => 2 [label:protected] => Lather [alreadyInSave:protected] => [alreadyInValidation:protected] => [validationFailures:protected] => Array ( ) [_new:BaseObject:private] => [_deleted:BaseObject:private] => [modifiedColumns:protected] => Array ( ) ) [68] => Category Object ( [languages:protected] => [bok_resources:protected] => [bok_topics:protected] => [bok_keywords:protected] => [id:protected] => 68 [type:protected] => category [parent:protected] => 2 [label:protected] => Maintenance Worker [alreadyInSave:protected] => [alreadyInValidation:protected] => [validationFailures:protected] => Array ( ) [_new:BaseObject:private] => [_deleted:BaseObject:private] => [modifiedColumns:protected] => Array ( ) ) [69] => Category Object ( [languages:protected] => [bok_resources:protected] => [bok_topics:protected] => [bok_keywords:protected] => [id:protected] => 69 [type:protected] => category [parent:protected] => 2 [label:protected] => Millwright [alreadyInSave:protected] => [alreadyInValidation:protected] => [validationFailures:protected] => Array ( ) [_new:BaseObject:private] => [_deleted:BaseObject:private] => [modifiedColumns:protected] => Array ( ) ) [71] => Category Object ( [languages:protected] => [bok_resources:protected] => [bok_topics:protected] => [bok_keywords:protected] => [id:protected] => 71 [type:protected] => category [parent:protected] => 2 [label:protected] => Painter [alreadyInSave:protected] => [alreadyInValidation:protected] => [validationFailures:protected] => Array ( ) [_new:BaseObject:private] => [_deleted:BaseObject:private] => [modifiedColumns:protected] => Array ( ) ) [73] => Category Object ( [languages:protected] => [bok_resources:protected] => [bok_topics:protected] => [bok_keywords:protected] => [id:protected] => 73 [type:protected] => category [parent:protected] => 2 [label:protected] => PCC/Restoration [alreadyInSave:protected] => [alreadyInValidation:protected] => [validationFailures:protected] => Array ( ) [_new:BaseObject:private] => [_deleted:BaseObject:private] => [modifiedColumns:protected] => Array ( ) ) [74] => Category Object ( [languages:protected] => [bok_resources:protected] => [bok_topics:protected] => [bok_keywords:protected] => [id:protected] => 74 [type:protected] => category [parent:protected] => 2 [label:protected] => Pile Driver [alreadyInSave:protected] => [alreadyInValidation:protected] => [validationFailures:protected] => Array ( ) [_new:BaseObject:private] => [_deleted:BaseObject:private] => [modifiedColumns:protected] => Array ( ) ) [76] => Category Object ( [languages:protected] => [bok_resources:protected] => [bok_topics:protected] => [bok_keywords:protected] => [id:protected] => 76 [type:protected] => category [parent:protected] => 2 [label:protected] => Plumber/Pipefitter [alreadyInSave:protected] => [alreadyInValidation:protected] => [validationFailures:protected] => Array ( ) [_new:BaseObject:private] => [_deleted:BaseObject:private] => [modifiedColumns:protected] => Array ( ) ) [77] => Category Object ( [languages:protected] => [bok_resources:protected] => [bok_topics:protected] => [bok_keywords:protected] => [id:protected] => 77 [type:protected] => category [parent:protected] => 2 [label:protected] => Refractory Worker [alreadyInSave:protected] => [alreadyInValidation:protected] => [validationFailures:protected] => Array ( ) [_new:BaseObject:private] => [_deleted:BaseObject:private] => [modifiedColumns:protected] => Array ( ) ) [63] => Category Object ( [languages:protected] => [bok_resources:protected] => [bok_topics:protected] => [bok_keywords:protected] => [id:protected] => 63 [type:protected] => category [parent:protected] => 2 [label:protected] => Reinforcing Ironworker [alreadyInSave:protected] => [alreadyInValidation:protected] => [validationFailures:protected] => Array ( ) [_new:BaseObject:private] => [_deleted:BaseObject:private] => [modifiedColumns:protected] => Array ( ) ) [80] => Category Object ( [languages:protected] => [bok_resources:protected] => [bok_topics:protected] => [bok_keywords:protected] => [id:protected] => 80 [type:protected] => category [parent:protected] => 2 [label:protected] => Sheetmetal Worker [alreadyInSave:protected] => [alreadyInValidation:protected] => [validationFailures:protected] => Array ( ) [_new:BaseObject:private] => [_deleted:BaseObject:private] => [modifiedColumns:protected] => Array ( ) ) [82] => Category Object ( [languages:protected] => [bok_resources:protected] => [bok_topics:protected] => [bok_keywords:protected] => [id:protected] => 82 [type:protected] => category [parent:protected] => 2 [label:protected] => Stonemason [alreadyInSave:protected] => [alreadyInValidation:protected] => [validationFailures:protected] => Array ( ) [_new:BaseObject:private] => [_deleted:BaseObject:private] => [modifiedColumns:protected] => Array ( ) ) [62] => Category Object ( [languages:protected] => [bok_resources:protected] => [bok_topics:protected] => [bok_keywords:protected] => [id:protected] => 62 [type:protected] => category [parent:protected] => 2 [label:protected] => Structural Ironworker [alreadyInSave:protected] => [alreadyInValidation:protected] => [validationFailures:protected] => Array ( ) [_new:BaseObject:private] => [_deleted:BaseObject:private] => [modifiedColumns:protected] => Array ( ) ) [83] => Category Object ( [languages:protected] => [bok_resources:protected] => [bok_topics:protected] => [bok_keywords:protected] => [id:protected] => 83 [type:protected] => category [parent:protected] => 2 [label:protected] => Terrazzo Worker [alreadyInSave:protected] => [alreadyInValidation:protected] => [validationFailures:protected] => Array ( ) [_new:BaseObject:private] => [_deleted:BaseObject:private] => [modifiedColumns:protected] => Array ( ) ) [84] => Category Object ( [languages:protected] => [bok_resources:protected] => [bok_topics:protected] => [bok_keywords:protected] => [id:protected] => 84 [type:protected] => category [parent:protected] => 2 [label:protected] => Tile Setter [alreadyInSave:protected] => [alreadyInValidation:protected] => [validationFailures:protected] => Array ( ) [_new:BaseObject:private] => [_deleted:BaseObject:private] => [modifiedColumns:protected] => Array ( ) ) [86] => Category Object ( [languages:protected] => [bok_resources:protected] => [bok_topics:protected] => [bok_keywords:protected] => [id:protected] => 86 [type:protected] => category [parent:protected] => 2 [label:protected] => Welder [alreadyInSave:protected] => [alreadyInValidation:protected] => [validationFailures:protected] => Array ( ) [_new:BaseObject:private] => [_deleted:BaseObject:private] => [modifiedColumns:protected] => Array ( ) ) [88] => Category Object ( [languages:protected] => [bok_resources:protected] => [bok_topics:protected] => [bok_keywords:protected] => [id:protected] => 88 [type:protected] => category [parent:protected] => 3 [label:protected] => Demolition [alreadyInSave:protected] => [alreadyInValidation:protected] => [validationFailures:protected] => Array ( ) [_new:BaseObject:private] => [_deleted:BaseObject:private] => [modifiedColumns:protected] => Array ( ) ) [89] => Category Object ( [languages:protected] => [bok_resources:protected] => [bok_topics:protected] => [bok_keywords:protected] => [id:protected] => 89 [type:protected] => category [parent:protected] => 3 [label:protected] => Disasters [alreadyInSave:protected] => [alreadyInValidation:protected] => [validationFailures:protected] => Array ( ) [_new:BaseObject:private] => [_deleted:BaseObject:private] => [modifiedColumns:protected] => Array ( ) ) [95] => Category Object ( [languages:protected] => [bok_resources:protected] => [bok_topics:protected] => [bok_keywords:protected] => [id:protected] => 95 [type:protected] => category [parent:protected] => 3 [label:protected] => Underground [alreadyInSave:protected] => [alreadyInValidation:protected] => [validationFailures:protected] => Array ( ) [_new:BaseObject:private] => [_deleted:BaseObject:private] => [modifiedColumns:protected] => Array ( ) ) [102] => Category Object ( [languages:protected] => [bok_resources:protected] => [bok_topics:protected] => [bok_keywords:protected] => [id:protected] => 102 [type:protected] => category [parent:protected] => 6 [label:protected] => Handouts [alreadyInSave:protected] => [alreadyInValidation:protected] => [validationFailures:protected] => Array ( ) [_new:BaseObject:private] => [_deleted:BaseObject:private] => [modifiedColumns:protected] => Array ( ) ) ) [categories_initialized:protected] => 1 [mapped_items:protected] => [content:protected] => [files:protected] => [language:protected] => Language Object ( [id:protected] => 1 [code:protected] => en [name:protected] => English [alreadyInSave:protected] => [alreadyInValidation:protected] => [validationFailures:protected] => Array ( ) [_new:BaseObject:private] => [_deleted:BaseObject:private] => [modifiedColumns:protected] => Array ( ) ) [old_record:protected] => [id:protected] => 4415 [old_id:protected] => [elcosh_id:protected] => d001651 [type:protected] => document [display_type:protected] => HTML only (and links) [user_id:protected] => 0 [language_id:protected] => 1 [tagging_id:protected] => Valeria Contreras [priority_id:protected] => 1 [title:protected] => Working in an Enclosed Cab [total_pages:protected] => 1 [billed_pages:protected] => 1 [publication_number:protected] => [part_of:protected] => [keywords:protected] => Occupation, construction, safety, health, hazards, work, worker, workplace, OSHA, silicosis, mining, silica, DOE, EEOICPA, labor, lung, CBD, dust, cab, miner, mine [comments:protected] => [summary:protected] => This CPWR Hazard Alert on Working in enclosed cabs provides information on protecting workers from silica dust, how to minimize exposures and the dangers of silica dust. Click on the following links to access the English version and the Spanish version. [transition_comments:protected] => [external_link:protected] => [consol_link:protected] => [more_like_this:protected] => [permission_given_by:protected] => [published:protected] => T [billable:protected] => F [img_name:protected] => [img_ext:protected] => [img_width:protected] => [img_height:protected] => [img_credit:protected] => [img_practice:protected] => [vid_source_id:protected] => [vid_running_time:protected] => [vid_intended_audience:protected] => [vid_acquisition_info:protected] => [vid_cost:protected] => [vid_producer:protected] => [vid_filename:protected] => [vid_filename_downloadable:protected] => [date_summary:protected] => [date_permission_requested:protected] => [date_permission_received:protected] => [date_review_needed:protected] => [date_received:protected] => 10/08/20 [date_completed:protected] => 10/08/20 [date_billed:protected] => [date_modified:protected] => 10/08/20 [collBokExports:protected] => [lastBokExportCriteria:BaseElcoshItem:private] => [alreadyInSave:protected] => [alreadyInValidation:protected] => [validationFailures:protected] => Array ( ) [_new:BaseObject:private] => [_deleted:BaseObject:private] => [modifiedColumns:protected] => Array ( ) ) ) [4] => Search_Result Object ( [title] => Toolbox Talk: Suicide Prevention [image] => /record/images/notavailable-p.png [blurb] => The CPWR Toolbox Talk on Suicide Prevention addresses the prevalence of suicide among construction workers. The resource includes a brief case example... [category] => Array ( [0] => 13 [1] => 20 [2] => 23 [3] => 40 [4] => 44 [5] => 45 [6] => 46 [7] => 47 [8] => 48 [9] => 49 [10] => 50 [11] => 51 [12] => 52 [13] => 53 [14] => 54 [15] => 55 [16] => 56 [17] => 57 [18] => 58 [19] => 59 [20] => 60 [21] => 61 [22] => 64 [23] => 65 [24] => 66 [25] => 67 [26] => 68 [27] => 69 [28] => 70 [29] => 71 [30] => 72 [31] => 73 [32] => 74 [33] => 75 [34] => 76 [35] => 77 [36] => 63 [37] => 78 [38] => 79 [39] => 80 [40] => 81 [41] => 82 [42] => 62 [43] => 83 [44] => 84 [45] => 85 [46] => 86 [47] => 87 [48] => 88 [49] => 89 [50] => 91 [51] => 90 [52] => 92 [53] => 93 [54] => 94 [55] => 95 [56] => 100 ) [labels] => Array ( [0] => Drugs, Alcohol & Tobacco [1] => Work Environment [2] => Hazards [3] => Safety Culture [6] => Stress & Overtime [9] => Overexertion [10] => Ergonomic [12] => Acoustical Ceiling Carpenter [13] => Trades [14] => Asbestos/Insulator [16] => Boilermaker [18] => Bricklayer [20] => Cabinetmaker [22] => Carpenter [24] => Carpet Layer [26] => Cement Mason [28] => Commercial Diver [30] => Concrete Polisher [32] => Drywall Applicator Specialist [34] => Electrical Worker [36] => Elevator Constructor [38] => Flagger [40] => Glazier [42] => Hazardous Waste Cleanup [44] => HVAC [46] => Interior Systems Carpenter [48] => Laborer [50] => Landscaper [52] => Lather [54] => Lead Abatement Worker [56] => Maintenance Worker [58] => Millwright [60] => Operating Engineer [62] => Painter [64] => Paper Hanger [66] => PCC/Restoration [68] => Pile Driver [70] => Plasterer [72] => Plumber/Pipefitter [74] => Refractory Worker [76] => Reinforcing Ironworker [78] => Roofer/Waterproofer [80] => Scaffold Erector [82] => Sheetmetal Worker [84] => Sprinkler Fitter [86] => Stonemason [88] => Structural Ironworker [90] => Terrazzo Worker [92] => Tile Setter [94] => Truck Driver [96] => Welder [98] => Commercial & Institutional [99] => Jobsites [100] => Demolition [102] => Disasters [104] => Heavy & Highway [106] => Industrial [108] => LEED/Green Construction [110] => Renovations [112] => Residential [114] => Underground [116] => Toolbox Talks [117] => Documents [118] => Media & Documents ) [type] => Toolbox Talks [sub_category] => [url] => /document/4419/d001652/Toolbox%2BTalk%253A%2BSuicide%2BPrevention.html [item:protected] => DocumentRecord Object ( [records:protected] => Array ( ) [recordId:protected] => [searchWordClass:protected] => [searchWordPeerClass:protected] => [bok_record:protected] => [authors:protected] => [organizations:protected] => [collections:protected] => [categories:protected] => Array ( [13] => Category Object ( [languages:protected] => [bok_resources:protected] => [bok_topics:protected] => [bok_keywords:protected] => [id:protected] => 13 [type:protected] => category [parent:protected] => 7 [label:protected] => Drugs, Alcohol & Tobacco [alreadyInSave:protected] => [alreadyInValidation:protected] => [validationFailures:protected] => Array ( ) [_new:BaseObject:private] => [_deleted:BaseObject:private] => [modifiedColumns:protected] => Array ( ) ) [20] => Category Object ( [languages:protected] => [bok_resources:protected] => [bok_topics:protected] => [bok_keywords:protected] => [id:protected] => 20 [type:protected] => category [parent:protected] => 7 [label:protected] => Safety Culture [alreadyInSave:protected] => [alreadyInValidation:protected] => [validationFailures:protected] => Array ( ) [_new:BaseObject:private] => [_deleted:BaseObject:private] => [modifiedColumns:protected] => Array ( ) ) [23] => Category Object ( [languages:protected] => [bok_resources:protected] => [bok_topics:protected] => [bok_keywords:protected] => [id:protected] => 23 [type:protected] => category [parent:protected] => 7 [label:protected] => Stress & Overtime [alreadyInSave:protected] => [alreadyInValidation:protected] => [validationFailures:protected] => Array ( ) [_new:BaseObject:private] => [_deleted:BaseObject:private] => [modifiedColumns:protected] => Array ( ) ) [40] => Category Object ( [languages:protected] => [bok_resources:protected] => [bok_topics:protected] => [bok_keywords:protected] => [id:protected] => 40 [type:protected] => category [parent:protected] => 9 [label:protected] => Overexertion [alreadyInSave:protected] => [alreadyInValidation:protected] => [validationFailures:protected] => Array ( ) [_new:BaseObject:private] => [_deleted:BaseObject:private] => [modifiedColumns:protected] => Array ( ) ) [44] => Category Object ( [languages:protected] => [bok_resources:protected] => [bok_topics:protected] => [bok_keywords:protected] => [id:protected] => 44 [type:protected] => category [parent:protected] => 2 [label:protected] => Acoustical Ceiling Carpenter [alreadyInSave:protected] => [alreadyInValidation:protected] => [validationFailures:protected] => Array ( ) [_new:BaseObject:private] => [_deleted:BaseObject:private] => [modifiedColumns:protected] => Array ( ) ) [45] => Category Object ( [languages:protected] => [bok_resources:protected] => [bok_topics:protected] => [bok_keywords:protected] => [id:protected] => 45 [type:protected] => category [parent:protected] => 2 [label:protected] => Asbestos/Insulator [alreadyInSave:protected] => [alreadyInValidation:protected] => [validationFailures:protected] => Array ( ) [_new:BaseObject:private] => [_deleted:BaseObject:private] => [modifiedColumns:protected] => Array ( ) ) [46] => Category Object ( [languages:protected] => [bok_resources:protected] => [bok_topics:protected] => [bok_keywords:protected] => [id:protected] => 46 [type:protected] => category [parent:protected] => 2 [label:protected] => Boilermaker [alreadyInSave:protected] => [alreadyInValidation:protected] => [validationFailures:protected] => Array ( ) [_new:BaseObject:private] => [_deleted:BaseObject:private] => [modifiedColumns:protected] => Array ( ) ) [47] => Category Object ( [languages:protected] => [bok_resources:protected] => [bok_topics:protected] => [bok_keywords:protected] => [id:protected] => 47 [type:protected] => category [parent:protected] => 2 [label:protected] => Bricklayer [alreadyInSave:protected] => [alreadyInValidation:protected] => [validationFailures:protected] => Array ( ) [_new:BaseObject:private] => [_deleted:BaseObject:private] => [modifiedColumns:protected] => Array ( ) ) [48] => Category Object ( [languages:protected] => [bok_resources:protected] => [bok_topics:protected] => [bok_keywords:protected] => [id:protected] => 48 [type:protected] => category [parent:protected] => 2 [label:protected] => Cabinetmaker [alreadyInSave:protected] => [alreadyInValidation:protected] => [validationFailures:protected] => Array ( ) [_new:BaseObject:private] => [_deleted:BaseObject:private] => [modifiedColumns:protected] => Array ( ) ) [49] => Category Object ( [languages:protected] => [bok_resources:protected] => [bok_topics:protected] => [bok_keywords:protected] => [id:protected] => 49 [type:protected] => category [parent:protected] => 2 [label:protected] => Carpenter [alreadyInSave:protected] => [alreadyInValidation:protected] => [validationFailures:protected] => Array ( ) [_new:BaseObject:private] => [_deleted:BaseObject:private] => [modifiedColumns:protected] => Array ( ) ) [50] => Category Object ( [languages:protected] => [bok_resources:protected] => [bok_topics:protected] => [bok_keywords:protected] => [id:protected] => 50 [type:protected] => category [parent:protected] => 2 [label:protected] => Carpet Layer [alreadyInSave:protected] => [alreadyInValidation:protected] => [validationFailures:protected] => Array ( ) [_new:BaseObject:private] => [_deleted:BaseObject:private] => [modifiedColumns:protected] => Array ( ) ) [51] => Category Object ( [languages:protected] => [bok_resources:protected] => [bok_topics:protected] => [bok_keywords:protected] => [id:protected] => 51 [type:protected] => category [parent:protected] => 2 [label:protected] => Cement Mason [alreadyInSave:protected] => [alreadyInValidation:protected] => [validationFailures:protected] => Array ( ) [_new:BaseObject:private] => [_deleted:BaseObject:private] => [modifiedColumns:protected] => Array ( ) ) [52] => Category Object ( [languages:protected] => [bok_resources:protected] => [bok_topics:protected] => [bok_keywords:protected] => [id:protected] => 52 [type:protected] => category [parent:protected] => 2 [label:protected] => Commercial Diver [alreadyInSave:protected] => [alreadyInValidation:protected] => [validationFailures:protected] => Array ( ) [_new:BaseObject:private] => [_deleted:BaseObject:private] => [modifiedColumns:protected] => Array ( ) ) [53] => Category Object ( [languages:protected] => [bok_resources:protected] => [bok_topics:protected] => [bok_keywords:protected] => [id:protected] => 53 [type:protected] => category [parent:protected] => 2 [label:protected] => Concrete Polisher [alreadyInSave:protected] => [alreadyInValidation:protected] => [validationFailures:protected] => Array ( ) [_new:BaseObject:private] => [_deleted:BaseObject:private] => [modifiedColumns:protected] => Array ( ) ) [54] => Category Object ( [languages:protected] => [bok_resources:protected] => [bok_topics:protected] => [bok_keywords:protected] => [id:protected] => 54 [type:protected] => category [parent:protected] => 2 [label:protected] => Drywall Applicator Specialist [alreadyInSave:protected] => [alreadyInValidation:protected] => [validationFailures:protected] => Array ( ) [_new:BaseObject:private] => [_deleted:BaseObject:private] => [modifiedColumns:protected] => Array ( ) ) [55] => Category Object ( [languages:protected] => [bok_resources:protected] => [bok_topics:protected] => [bok_keywords:protected] => [id:protected] => 55 [type:protected] => category [parent:protected] => 2 [label:protected] => Electrical Worker [alreadyInSave:protected] => [alreadyInValidation:protected] => [validationFailures:protected] => Array ( ) [_new:BaseObject:private] => [_deleted:BaseObject:private] => [modifiedColumns:protected] => Array ( ) ) [56] => Category Object ( [languages:protected] => [bok_resources:protected] => [bok_topics:protected] => [bok_keywords:protected] => [id:protected] => 56 [type:protected] => category [parent:protected] => 2 [label:protected] => Elevator Constructor [alreadyInSave:protected] => [alreadyInValidation:protected] => [validationFailures:protected] => Array ( ) [_new:BaseObject:private] => [_deleted:BaseObject:private] => [modifiedColumns:protected] => Array ( ) ) [57] => Category Object ( [languages:protected] => [bok_resources:protected] => [bok_topics:protected] => [bok_keywords:protected] => [id:protected] => 57 [type:protected] => category [parent:protected] => 2 [label:protected] => Flagger [alreadyInSave:protected] => [alreadyInValidation:protected] => [validationFailures:protected] => Array ( ) [_new:BaseObject:private] => [_deleted:BaseObject:private] => [modifiedColumns:protected] => Array ( ) ) [58] => Category Object ( [languages:protected] => [bok_resources:protected] => [bok_topics:protected] => [bok_keywords:protected] => [id:protected] => 58 [type:protected] => category [parent:protected] => 2 [label:protected] => Glazier [alreadyInSave:protected] => [alreadyInValidation:protected] => [validationFailures:protected] => Array ( ) [_new:BaseObject:private] => [_deleted:BaseObject:private] => [modifiedColumns:protected] => Array ( ) ) [59] => Category Object ( [languages:protected] => [bok_resources:protected] => [bok_topics:protected] => [bok_keywords:protected] => [id:protected] => 59 [type:protected] => category [parent:protected] => 2 [label:protected] => Hazardous Waste Cleanup [alreadyInSave:protected] => [alreadyInValidation:protected] => [validationFailures:protected] => Array ( ) [_new:BaseObject:private] => [_deleted:BaseObject:private] => [modifiedColumns:protected] => Array ( ) ) [60] => Category Object ( [languages:protected] => [bok_resources:protected] => [bok_topics:protected] => [bok_keywords:protected] => [id:protected] => 60 [type:protected] => category [parent:protected] => 2 [label:protected] => HVAC [alreadyInSave:protected] => [alreadyInValidation:protected] => [validationFailures:protected] => Array ( ) [_new:BaseObject:private] => [_deleted:BaseObject:private] => [modifiedColumns:protected] => Array ( ) ) [61] => Category Object ( [languages:protected] => [bok_resources:protected] => [bok_topics:protected] => [bok_keywords:protected] => [id:protected] => 61 [type:protected] => category [parent:protected] => 2 [label:protected] => Interior Systems Carpenter [alreadyInSave:protected] => [alreadyInValidation:protected] => [validationFailures:protected] => Array ( ) [_new:BaseObject:private] => [_deleted:BaseObject:private] => [modifiedColumns:protected] => Array ( ) ) [64] => Category Object ( [languages:protected] => [bok_resources:protected] => [bok_topics:protected] => [bok_keywords:protected] => [id:protected] => 64 [type:protected] => category [parent:protected] => 2 [label:protected] => Laborer [alreadyInSave:protected] => [alreadyInValidation:protected] => [validationFailures:protected] => Array ( ) [_new:BaseObject:private] => [_deleted:BaseObject:private] => [modifiedColumns:protected] => Array ( ) ) [65] => Category Object ( [languages:protected] => [bok_resources:protected] => [bok_topics:protected] => [bok_keywords:protected] => [id:protected] => 65 [type:protected] => category [parent:protected] => 2 [label:protected] => Landscaper [alreadyInSave:protected] => [alreadyInValidation:protected] => [validationFailures:protected] => Array ( ) [_new:BaseObject:private] => [_deleted:BaseObject:private] => [modifiedColumns:protected] => Array ( ) ) [66] => Category Object ( [languages:protected] => [bok_resources:protected] => [bok_topics:protected] => [bok_keywords:protected] => [id:protected] => 66 [type:protected] => category [parent:protected] => 2 [label:protected] => Lather [alreadyInSave:protected] => [alreadyInValidation:protected] => [validationFailures:protected] => Array ( ) [_new:BaseObject:private] => [_deleted:BaseObject:private] => [modifiedColumns:protected] => Array ( ) ) [67] => Category Object ( [languages:protected] => [bok_resources:protected] => [bok_topics:protected] => [bok_keywords:protected] => [id:protected] => 67 [type:protected] => category [parent:protected] => 2 [label:protected] => Lead Abatement Worker [alreadyInSave:protected] => [alreadyInValidation:protected] => [validationFailures:protected] => Array ( ) [_new:BaseObject:private] => [_deleted:BaseObject:private] => [modifiedColumns:protected] => Array ( ) ) [68] => Category Object ( [languages:protected] => [bok_resources:protected] => [bok_topics:protected] => [bok_keywords:protected] => [id:protected] => 68 [type:protected] => category [parent:protected] => 2 [label:protected] => Maintenance Worker [alreadyInSave:protected] => [alreadyInValidation:protected] => [validationFailures:protected] => Array ( ) [_new:BaseObject:private] => [_deleted:BaseObject:private] => [modifiedColumns:protected] => Array ( ) ) [69] => Category Object ( [languages:protected] => [bok_resources:protected] => [bok_topics:protected] => [bok_keywords:protected] => [id:protected] => 69 [type:protected] => category [parent:protected] => 2 [label:protected] => Millwright [alreadyInSave:protected] => [alreadyInValidation:protected] => [validationFailures:protected] => Array ( ) [_new:BaseObject:private] => [_deleted:BaseObject:private] => [modifiedColumns:protected] => Array ( ) ) [70] => Category Object ( [languages:protected] => [bok_resources:protected] => [bok_topics:protected] => [bok_keywords:protected] => [id:protected] => 70 [type:protected] => category [parent:protected] => 2 [label:protected] => Operating Engineer [alreadyInSave:protected] => [alreadyInValidation:protected] => [validationFailures:protected] => Array ( ) [_new:BaseObject:private] => [_deleted:BaseObject:private] => [modifiedColumns:protected] => Array ( ) ) [71] => Category Object ( [languages:protected] => [bok_resources:protected] => [bok_topics:protected] => [bok_keywords:protected] => [id:protected] => 71 [type:protected] => category [parent:protected] => 2 [label:protected] => Painter [alreadyInSave:protected] => [alreadyInValidation:protected] => [validationFailures:protected] => Array ( ) [_new:BaseObject:private] => [_deleted:BaseObject:private] => [modifiedColumns:protected] => Array ( ) ) [72] => Category Object ( [languages:protected] => [bok_resources:protected] => [bok_topics:protected] => [bok_keywords:protected] => [id:protected] => 72 [type:protected] => category [parent:protected] => 2 [label:protected] => Paper Hanger [alreadyInSave:protected] => [alreadyInValidation:protected] => [validationFailures:protected] => Array ( ) [_new:BaseObject:private] => [_deleted:BaseObject:private] => [modifiedColumns:protected] => Array ( ) ) [73] => Category Object ( [languages:protected] => [bok_resources:protected] => [bok_topics:protected] => [bok_keywords:protected] => [id:protected] => 73 [type:protected] => category [parent:protected] => 2 [label:protected] => PCC/Restoration [alreadyInSave:protected] => [alreadyInValidation:protected] => [validationFailures:protected] => Array ( ) [_new:BaseObject:private] => [_deleted:BaseObject:private] => [modifiedColumns:protected] => Array ( ) ) [74] => Category Object ( [languages:protected] => [bok_resources:protected] => [bok_topics:protected] => [bok_keywords:protected] => [id:protected] => 74 [type:protected] => category [parent:protected] => 2 [label:protected] => Pile Driver [alreadyInSave:protected] => [alreadyInValidation:protected] => [validationFailures:protected] => Array ( ) [_new:BaseObject:private] => [_deleted:BaseObject:private] => [modifiedColumns:protected] => Array ( ) ) [75] => Category Object ( [languages:protected] => [bok_resources:protected] => [bok_topics:protected] => [bok_keywords:protected] => [id:protected] => 75 [type:protected] => category [parent:protected] => 2 [label:protected] => Plasterer [alreadyInSave:protected] => [alreadyInValidation:protected] => [validationFailures:protected] => Array ( ) [_new:BaseObject:private] => [_deleted:BaseObject:private] => [modifiedColumns:protected] => Array ( ) ) [76] => Category Object ( [languages:protected] => [bok_resources:protected] => [bok_topics:protected] => [bok_keywords:protected] => [id:protected] => 76 [type:protected] => category [parent:protected] => 2 [label:protected] => Plumber/Pipefitter [alreadyInSave:protected] => [alreadyInValidation:protected] => [validationFailures:protected] => Array ( ) [_new:BaseObject:private] => [_deleted:BaseObject:private] => [modifiedColumns:protected] => Array ( ) ) [77] => Category Object ( [languages:protected] => [bok_resources:protected] => [bok_topics:protected] => [bok_keywords:protected] => [id:protected] => 77 [type:protected] => category [parent:protected] => 2 [label:protected] => Refractory Worker [alreadyInSave:protected] => [alreadyInValidation:protected] => [validationFailures:protected] => Array ( ) [_new:BaseObject:private] => [_deleted:BaseObject:private] => [modifiedColumns:protected] => Array ( ) ) [63] => Category Object ( [languages:protected] => [bok_resources:protected] => [bok_topics:protected] => [bok_keywords:protected] => [id:protected] => 63 [type:protected] => category [parent:protected] => 2 [label:protected] => Reinforcing Ironworker [alreadyInSave:protected] => [alreadyInValidation:protected] => [validationFailures:protected] => Array ( ) [_new:BaseObject:private] => [_deleted:BaseObject:private] => [modifiedColumns:protected] => Array ( ) ) [78] => Category Object ( [languages:protected] => [bok_resources:protected] => [bok_topics:protected] => [bok_keywords:protected] => [id:protected] => 78 [type:protected] => category [parent:protected] => 2 [label:protected] => Roofer/Waterproofer [alreadyInSave:protected] => [alreadyInValidation:protected] => [validationFailures:protected] => Array ( ) [_new:BaseObject:private] => [_deleted:BaseObject:private] => [modifiedColumns:protected] => Array ( ) ) [79] => Category Object ( [languages:protected] => [bok_resources:protected] => [bok_topics:protected] => [bok_keywords:protected] => [id:protected] => 79 [type:protected] => category [parent:protected] => 2 [label:protected] => Scaffold Erector [alreadyInSave:protected] => [alreadyInValidation:protected] => [validationFailures:protected] => Array ( ) [_new:BaseObject:private] => [_deleted:BaseObject:private] => [modifiedColumns:protected] => Array ( ) ) [80] => Category Object ( [languages:protected] => [bok_resources:protected] => [bok_topics:protected] => [bok_keywords:protected] => [id:protected] => 80 [type:protected] => category [parent:protected] => 2 [label:protected] => Sheetmetal Worker [alreadyInSave:protected] => [alreadyInValidation:protected] => [validationFailures:protected] => Array ( ) [_new:BaseObject:private] => [_deleted:BaseObject:private] => [modifiedColumns:protected] => Array ( ) ) [81] => Category Object ( [languages:protected] => [bok_resources:protected] => [bok_topics:protected] => [bok_keywords:protected] => [id:protected] => 81 [type:protected] => category [parent:protected] => 2 [label:protected] => Sprinkler Fitter [alreadyInSave:protected] => [alreadyInValidation:protected] => [validationFailures:protected] => Array ( ) [_new:BaseObject:private] => [_deleted:BaseObject:private] => [modifiedColumns:protected] => Array ( ) ) [82] => Category Object ( [languages:protected] => [bok_resources:protected] => [bok_topics:protected] => [bok_keywords:protected] => [id:protected] => 82 [type:protected] => category [parent:protected] => 2 [label:protected] => Stonemason [alreadyInSave:protected] => [alreadyInValidation:protected] => [validationFailures:protected] => Array ( ) [_new:BaseObject:private] => [_deleted:BaseObject:private] => [modifiedColumns:protected] => Array ( ) ) [62] => Category Object ( [languages:protected] => [bok_resources:protected] => [bok_topics:protected] => [bok_keywords:protected] => [id:protected] => 62 [type:protected] => category [parent:protected] => 2 [label:protected] => Structural Ironworker [alreadyInSave:protected] => [alreadyInValidation:protected] => [validationFailures:protected] => Array ( ) [_new:BaseObject:private] => [_deleted:BaseObject:private] => [modifiedColumns:protected] => Array ( ) ) [83] => Category Object ( [languages:protected] => [bok_resources:protected] => [bok_topics:protected] => [bok_keywords:protected] => [id:protected] => 83 [type:protected] => category [parent:protected] => 2 [label:protected] => Terrazzo Worker [alreadyInSave:protected] => [alreadyInValidation:protected] => [validationFailures:protected] => Array ( ) [_new:BaseObject:private] => [_deleted:BaseObject:private] => [modifiedColumns:protected] => Array ( ) ) [84] => Category Object ( [languages:protected] => [bok_resources:protected] => [bok_topics:protected] => [bok_keywords:protected] => [id:protected] => 84 [type:protected] => category [parent:protected] => 2 [label:protected] => Tile Setter [alreadyInSave:protected] => [alreadyInValidation:protected] => [validationFailures:protected] => Array ( ) [_new:BaseObject:private] => [_deleted:BaseObject:private] => [modifiedColumns:protected] => Array ( ) ) [85] => Category Object ( [languages:protected] => [bok_resources:protected] => [bok_topics:protected] => [bok_keywords:protected] => [id:protected] => 85 [type:protected] => category [parent:protected] => 2 [label:protected] => Truck Driver [alreadyInSave:protected] => [alreadyInValidation:protected] => [validationFailures:protected] => Array ( ) [_new:BaseObject:private] => [_deleted:BaseObject:private] => [modifiedColumns:protected] => Array ( ) ) [86] => Category Object ( [languages:protected] => [bok_resources:protected] => [bok_topics:protected] => [bok_keywords:protected] => [id:protected] => 86 [type:protected] => category [parent:protected] => 2 [label:protected] => Welder [alreadyInSave:protected] => [alreadyInValidation:protected] => [validationFailures:protected] => Array ( ) [_new:BaseObject:private] => [_deleted:BaseObject:private] => [modifiedColumns:protected] => Array ( ) ) [87] => Category Object ( [languages:protected] => [bok_resources:protected] => [bok_topics:protected] => [bok_keywords:protected] => [id:protected] => 87 [type:protected] => category [parent:protected] => 3 [label:protected] => Commercial & Institutional [alreadyInSave:protected] => [alreadyInValidation:protected] => [validationFailures:protected] => Array ( ) [_new:BaseObject:private] => [_deleted:BaseObject:private] => [modifiedColumns:protected] => Array ( ) ) [88] => Category Object ( [languages:protected] => [bok_resources:protected] => [bok_topics:protected] => [bok_keywords:protected] => [id:protected] => 88 [type:protected] => category [parent:protected] => 3 [label:protected] => Demolition [alreadyInSave:protected] => [alreadyInValidation:protected] => [validationFailures:protected] => Array ( ) [_new:BaseObject:private] => [_deleted:BaseObject:private] => [modifiedColumns:protected] => Array ( ) ) [89] => Category Object ( [languages:protected] => [bok_resources:protected] => [bok_topics:protected] => [bok_keywords:protected] => [id:protected] => 89 [type:protected] => category [parent:protected] => 3 [label:protected] => Disasters [alreadyInSave:protected] => [alreadyInValidation:protected] => [validationFailures:protected] => Array ( ) [_new:BaseObject:private] => [_deleted:BaseObject:private] => [modifiedColumns:protected] => Array ( ) ) [91] => Category Object ( [languages:protected] => [bok_resources:protected] => [bok_topics:protected] => [bok_keywords:protected] => [id:protected] => 91 [type:protected] => category [parent:protected] => 3 [label:protected] => Heavy & Highway [alreadyInSave:protected] => [alreadyInValidation:protected] => [validationFailures:protected] => Array ( ) [_new:BaseObject:private] => [_deleted:BaseObject:private] => [modifiedColumns:protected] => Array ( ) ) [90] => Category Object ( [languages:protected] => [bok_resources:protected] => [bok_topics:protected] => [bok_keywords:protected] => [id:protected] => 90 [type:protected] => category [parent:protected] => 3 [label:protected] => Industrial [alreadyInSave:protected] => [alreadyInValidation:protected] => [validationFailures:protected] => Array ( ) [_new:BaseObject:private] => [_deleted:BaseObject:private] => [modifiedColumns:protected] => Array ( ) ) [92] => Category Object ( [languages:protected] => [bok_resources:protected] => [bok_topics:protected] => [bok_keywords:protected] => [id:protected] => 92 [type:protected] => category [parent:protected] => 3 [label:protected] => LEED/Green Construction [alreadyInSave:protected] => [alreadyInValidation:protected] => [validationFailures:protected] => Array ( ) [_new:BaseObject:private] => [_deleted:BaseObject:private] => [modifiedColumns:protected] => Array ( ) ) [93] => Category Object ( [languages:protected] => [bok_resources:protected] => [bok_topics:protected] => [bok_keywords:protected] => [id:protected] => 93 [type:protected] => category [parent:protected] => 3 [label:protected] => Renovations [alreadyInSave:protected] => [alreadyInValidation:protected] => [validationFailures:protected] => Array ( ) [_new:BaseObject:private] => [_deleted:BaseObject:private] => [modifiedColumns:protected] => Array ( ) ) [94] => Category Object ( [languages:protected] => [bok_resources:protected] => [bok_topics:protected] => [bok_keywords:protected] => [id:protected] => 94 [type:protected] => category [parent:protected] => 3 [label:protected] => Residential [alreadyInSave:protected] => [alreadyInValidation:protected] => [validationFailures:protected] => Array ( ) [_new:BaseObject:private] => [_deleted:BaseObject:private] => [modifiedColumns:protected] => Array ( ) ) [95] => Category Object ( [languages:protected] => [bok_resources:protected] => [bok_topics:protected] => [bok_keywords:protected] => [id:protected] => 95 [type:protected] => category [parent:protected] => 3 [label:protected] => Underground [alreadyInSave:protected] => [alreadyInValidation:protected] => [validationFailures:protected] => Array ( ) [_new:BaseObject:private] => [_deleted:BaseObject:private] => [modifiedColumns:protected] => Array ( ) ) [100] => Category Object ( [languages:protected] => [bok_resources:protected] => [bok_topics:protected] => [bok_keywords:protected] => [id:protected] => 100 [type:protected] => category [parent:protected] => 6 [label:protected] => Toolbox Talks [alreadyInSave:protected] => [alreadyInValidation:protected] => [validationFailures:protected] => Array ( ) [_new:BaseObject:private] => [_deleted:BaseObject:private] => [modifiedColumns:protected] => Array ( ) ) ) [categories_initialized:protected] => 1 [mapped_items:protected] => [content:protected] => [files:protected] => [language:protected] => Language Object ( [id:protected] => 1 [code:protected] => en [name:protected] => English [alreadyInSave:protected] => [alreadyInValidation:protected] => [validationFailures:protected] => Array ( ) [_new:BaseObject:private] => [_deleted:BaseObject:private] => [modifiedColumns:protected] => Array ( ) ) [old_record:protected] => [id:protected] => 4419 [old_id:protected] => [elcosh_id:protected] => d001652 [type:protected] => document [display_type:protected] => HTML only (and links) [user_id:protected] => 0 [language_id:protected] => 1 [tagging_id:protected] => Valeria Contreras [priority_id:protected] => 1 [title:protected] => Toolbox Talk: Suicide Prevention [total_pages:protected] => 1 [billed_pages:protected] => 1 [publication_number:protected] => [part_of:protected] => [keywords:protected] => suicide, suicide prevention, mental health, stress, depression, exhaustion, burnout, safety, support, emotional support, health [comments:protected] => [summary:protected] =>The CPWR Toolbox Talk on Suicide Prevention addresses the prevalence of suicide among construction workers. The resource includes a brief case example, steps to prevent a related injury or illness, and questions for discussion. It includes an image that illustrates the hazard, which can be posted in a central location as a reminder of steps to work safely.
Available in English and Spanish. [transition_comments:protected] => [external_link:protected] => [consol_link:protected] => [more_like_this:protected] => [permission_given_by:protected] => [published:protected] => T [billable:protected] => F [img_name:protected] => [img_ext:protected] => [img_width:protected] => [img_height:protected] => [img_credit:protected] => [img_practice:protected] => [vid_source_id:protected] => [vid_running_time:protected] => [vid_intended_audience:protected] => [vid_acquisition_info:protected] => [vid_cost:protected] => [vid_producer:protected] => [vid_filename:protected] => [vid_filename_downloadable:protected] => [date_summary:protected] => [date_permission_requested:protected] => [date_permission_received:protected] => [date_review_needed:protected] => [date_received:protected] => 10/08/20 [date_completed:protected] => 10/08/20 [date_billed:protected] => [date_modified:protected] => 05/19/23 [collBokExports:protected] => [lastBokExportCriteria:BaseElcoshItem:private] => [alreadyInSave:protected] => [alreadyInValidation:protected] => [validationFailures:protected] => Array ( ) [_new:BaseObject:private] => [_deleted:BaseObject:private] => [modifiedColumns:protected] => Array ( ) ) ) ) [new_images] => Array ( [0] => Search_Result Object ( [title] => Toolbox talk - crew view [image] => /record/images/4005-p.jpg [blurb] => Photo of crew listening to a toolbox safety talk before starting work.... [category] => Array ( [0] => 97 [1] => 20 [2] => 47 [3] => 49 [4] => 51 [5] => 55 [6] => 61 [7] => 64 [8] => 71 [9] => 75 [10] => 63 [11] => 79 [12] => 62 [13] => 87 [14] => 88 [15] => 91 [16] => 90 [17] => 93 [18] => 94 [19] => 95 ) [labels] => Array ( [0] => Images [1] => Media [2] => Media & Documents [3] => Safety Culture [4] => Work Environment [5] => Hazards [6] => Bricklayer [7] => Trades [8] => Carpenter [10] => Cement Mason [12] => Electrical Worker [14] => Interior Systems Carpenter [16] => Laborer [18] => Painter [20] => Plasterer [22] => Reinforcing Ironworker [24] => Scaffold Erector [26] => Structural Ironworker [28] => Commercial & Institutional [29] => Jobsites [30] => Demolition [32] => Heavy & Highway [34] => Industrial [36] => Renovations [38] => Residential [40] => Underground ) [type] => Images [sub_category] => [url] => /image/4005/i002692/Toolbox%2Btalk%2B-%2Bcrew%2Bview.html [item:protected] => ImageRecord Object ( [records:protected] => Array ( ) [recordId:protected] => [searchWordClass:protected] => [searchWordPeerClass:protected] => [bok_record:protected] => [authors:protected] => [organizations:protected] => [collections:protected] => [categories:protected] => Array ( [97] => Category Object ( [languages:protected] => [bok_resources:protected] => [bok_topics:protected] => [bok_keywords:protected] => [id:protected] => 97 [type:protected] => category [parent:protected] => 5 [label:protected] => Images [alreadyInSave:protected] => [alreadyInValidation:protected] => [validationFailures:protected] => Array ( ) [_new:BaseObject:private] => [_deleted:BaseObject:private] => [modifiedColumns:protected] => Array ( ) ) [20] => Category Object ( [languages:protected] => [bok_resources:protected] => [bok_topics:protected] => [bok_keywords:protected] => [id:protected] => 20 [type:protected] => category [parent:protected] => 7 [label:protected] => Safety Culture [alreadyInSave:protected] => [alreadyInValidation:protected] => [validationFailures:protected] => Array ( ) [_new:BaseObject:private] => [_deleted:BaseObject:private] => [modifiedColumns:protected] => Array ( ) ) [47] => Category Object ( [languages:protected] => [bok_resources:protected] => [bok_topics:protected] => [bok_keywords:protected] => [id:protected] => 47 [type:protected] => category [parent:protected] => 2 [label:protected] => Bricklayer [alreadyInSave:protected] => [alreadyInValidation:protected] => [validationFailures:protected] => Array ( ) [_new:BaseObject:private] => [_deleted:BaseObject:private] => [modifiedColumns:protected] => Array ( ) ) [49] => Category Object ( [languages:protected] => [bok_resources:protected] => [bok_topics:protected] => [bok_keywords:protected] => [id:protected] => 49 [type:protected] => category [parent:protected] => 2 [label:protected] => Carpenter [alreadyInSave:protected] => [alreadyInValidation:protected] => [validationFailures:protected] => Array ( ) [_new:BaseObject:private] => [_deleted:BaseObject:private] => [modifiedColumns:protected] => Array ( ) ) [51] => Category Object ( [languages:protected] => [bok_resources:protected] => [bok_topics:protected] => [bok_keywords:protected] => [id:protected] => 51 [type:protected] => category [parent:protected] => 2 [label:protected] => Cement Mason [alreadyInSave:protected] => [alreadyInValidation:protected] => [validationFailures:protected] => Array ( ) [_new:BaseObject:private] => [_deleted:BaseObject:private] => [modifiedColumns:protected] => Array ( ) ) [55] => Category Object ( [languages:protected] => [bok_resources:protected] => [bok_topics:protected] => [bok_keywords:protected] => [id:protected] => 55 [type:protected] => category [parent:protected] => 2 [label:protected] => Electrical Worker [alreadyInSave:protected] => [alreadyInValidation:protected] => [validationFailures:protected] => Array ( ) [_new:BaseObject:private] => [_deleted:BaseObject:private] => [modifiedColumns:protected] => Array ( ) ) [61] => Category Object ( [languages:protected] => [bok_resources:protected] => [bok_topics:protected] => [bok_keywords:protected] => [id:protected] => 61 [type:protected] => category [parent:protected] => 2 [label:protected] => Interior Systems Carpenter [alreadyInSave:protected] => [alreadyInValidation:protected] => [validationFailures:protected] => Array ( ) [_new:BaseObject:private] => [_deleted:BaseObject:private] => [modifiedColumns:protected] => Array ( ) ) [64] => Category Object ( [languages:protected] => [bok_resources:protected] => [bok_topics:protected] => [bok_keywords:protected] => [id:protected] => 64 [type:protected] => category [parent:protected] => 2 [label:protected] => Laborer [alreadyInSave:protected] => [alreadyInValidation:protected] => [validationFailures:protected] => Array ( ) [_new:BaseObject:private] => [_deleted:BaseObject:private] => [modifiedColumns:protected] => Array ( ) ) [71] => Category Object ( [languages:protected] => [bok_resources:protected] => [bok_topics:protected] => [bok_keywords:protected] => [id:protected] => 71 [type:protected] => category [parent:protected] => 2 [label:protected] => Painter [alreadyInSave:protected] => [alreadyInValidation:protected] => [validationFailures:protected] => Array ( ) [_new:BaseObject:private] => [_deleted:BaseObject:private] => [modifiedColumns:protected] => Array ( ) ) [75] => Category Object ( [languages:protected] => [bok_resources:protected] => [bok_topics:protected] => [bok_keywords:protected] => [id:protected] => 75 [type:protected] => category [parent:protected] => 2 [label:protected] => Plasterer [alreadyInSave:protected] => [alreadyInValidation:protected] => [validationFailures:protected] => Array ( ) [_new:BaseObject:private] => [_deleted:BaseObject:private] => [modifiedColumns:protected] => Array ( ) ) [63] => Category Object ( [languages:protected] => [bok_resources:protected] => [bok_topics:protected] => [bok_keywords:protected] => [id:protected] => 63 [type:protected] => category [parent:protected] => 2 [label:protected] => Reinforcing Ironworker [alreadyInSave:protected] => [alreadyInValidation:protected] => [validationFailures:protected] => Array ( ) [_new:BaseObject:private] => [_deleted:BaseObject:private] => [modifiedColumns:protected] => Array ( ) ) [79] => Category Object ( [languages:protected] => [bok_resources:protected] => [bok_topics:protected] => [bok_keywords:protected] => [id:protected] => 79 [type:protected] => category [parent:protected] => 2 [label:protected] => Scaffold Erector [alreadyInSave:protected] => [alreadyInValidation:protected] => [validationFailures:protected] => Array ( ) [_new:BaseObject:private] => [_deleted:BaseObject:private] => [modifiedColumns:protected] => Array ( ) ) [62] => Category Object ( [languages:protected] => [bok_resources:protected] => [bok_topics:protected] => [bok_keywords:protected] => [id:protected] => 62 [type:protected] => category [parent:protected] => 2 [label:protected] => Structural Ironworker [alreadyInSave:protected] => [alreadyInValidation:protected] => [validationFailures:protected] => Array ( ) [_new:BaseObject:private] => [_deleted:BaseObject:private] => [modifiedColumns:protected] => Array ( ) ) [87] => Category Object ( [languages:protected] => [bok_resources:protected] => [bok_topics:protected] => [bok_keywords:protected] => [id:protected] => 87 [type:protected] => category [parent:protected] => 3 [label:protected] => Commercial & Institutional [alreadyInSave:protected] => [alreadyInValidation:protected] => [validationFailures:protected] => Array ( ) [_new:BaseObject:private] => [_deleted:BaseObject:private] => [modifiedColumns:protected] => Array ( ) ) [88] => Category Object ( [languages:protected] => [bok_resources:protected] => [bok_topics:protected] => [bok_keywords:protected] => [id:protected] => 88 [type:protected] => category [parent:protected] => 3 [label:protected] => Demolition [alreadyInSave:protected] => [alreadyInValidation:protected] => [validationFailures:protected] => Array ( ) [_new:BaseObject:private] => [_deleted:BaseObject:private] => [modifiedColumns:protected] => Array ( ) ) [91] => Category Object ( [languages:protected] => [bok_resources:protected] => [bok_topics:protected] => [bok_keywords:protected] => [id:protected] => 91 [type:protected] => category [parent:protected] => 3 [label:protected] => Heavy & Highway [alreadyInSave:protected] => [alreadyInValidation:protected] => [validationFailures:protected] => Array ( ) [_new:BaseObject:private] => [_deleted:BaseObject:private] => [modifiedColumns:protected] => Array ( ) ) [90] => Category Object ( [languages:protected] => [bok_resources:protected] => [bok_topics:protected] => [bok_keywords:protected] => [id:protected] => 90 [type:protected] => category [parent:protected] => 3 [label:protected] => Industrial [alreadyInSave:protected] => [alreadyInValidation:protected] => [validationFailures:protected] => Array ( ) [_new:BaseObject:private] => [_deleted:BaseObject:private] => [modifiedColumns:protected] => Array ( ) ) [93] => Category Object ( [languages:protected] => [bok_resources:protected] => [bok_topics:protected] => [bok_keywords:protected] => [id:protected] => 93 [type:protected] => category [parent:protected] => 3 [label:protected] => Renovations [alreadyInSave:protected] => [alreadyInValidation:protected] => [validationFailures:protected] => Array ( ) [_new:BaseObject:private] => [_deleted:BaseObject:private] => [modifiedColumns:protected] => Array ( ) ) [94] => Category Object ( [languages:protected] => [bok_resources:protected] => [bok_topics:protected] => [bok_keywords:protected] => [id:protected] => 94 [type:protected] => category [parent:protected] => 3 [label:protected] => Residential [alreadyInSave:protected] => [alreadyInValidation:protected] => [validationFailures:protected] => Array ( ) [_new:BaseObject:private] => [_deleted:BaseObject:private] => [modifiedColumns:protected] => Array ( ) ) [95] => Category Object ( [languages:protected] => [bok_resources:protected] => [bok_topics:protected] => [bok_keywords:protected] => [id:protected] => 95 [type:protected] => category [parent:protected] => 3 [label:protected] => Underground [alreadyInSave:protected] => [alreadyInValidation:protected] => [validationFailures:protected] => Array ( ) [_new:BaseObject:private] => [_deleted:BaseObject:private] => [modifiedColumns:protected] => Array ( ) ) ) [categories_initialized:protected] => 1 [mapped_items:protected] => [content:protected] => [files:protected] => [language:protected] => Language Object ( [id:protected] => 1 [code:protected] => en [name:protected] => English [alreadyInSave:protected] => [alreadyInValidation:protected] => [validationFailures:protected] => Array ( ) [_new:BaseObject:private] => [_deleted:BaseObject:private] => [modifiedColumns:protected] => Array ( ) ) [old_record:protected] => [id:protected] => 4005 [old_id:protected] => [elcosh_id:protected] => i002692 [type:protected] => image [display_type:protected] => Image [user_id:protected] => 0 [language_id:protected] => 1 [tagging_id:protected] => Bruce Lippy [priority_id:protected] => 1 [title:protected] => Toolbox talk - crew view [total_pages:protected] => 0 [billed_pages:protected] => 0 [publication_number:protected] => [part_of:protected] => [keywords:protected] => toolbox talk, tailgate talk, safety talk, Spanish [comments:protected] => [summary:protected] => Photo of crew listening to a toolbox safety talk before starting work. [transition_comments:protected] => [external_link:protected] => [consol_link:protected] => http://www.cpwrconstructionsolutions.org/electrical/solution/662/worker-training.html [more_like_this:protected] => i002691,d001269, c000079, d001285 [permission_given_by:protected] => [published:protected] => T [billable:protected] => F [img_name:protected] => [img_ext:protected] => jpg [img_width:protected] => [img_height:protected] => [img_credit:protected] => Morgan Zavertnik and Hoar Construction [img_practice:protected] => good [vid_source_id:protected] => [vid_running_time:protected] => [vid_intended_audience:protected] => [vid_acquisition_info:protected] => [vid_cost:protected] => [vid_producer:protected] => [vid_filename:protected] => [vid_filename_downloadable:protected] => [date_summary:protected] => November 2015 [date_permission_requested:protected] => [date_permission_received:protected] => [date_review_needed:protected] => [date_received:protected] => 03/02/16 [date_completed:protected] => 03/02/16 [date_billed:protected] => [date_modified:protected] => 03/02/16 [collBokExports:protected] => [lastBokExportCriteria:BaseElcoshItem:private] => [alreadyInSave:protected] => [alreadyInValidation:protected] => [validationFailures:protected] => Array ( ) [_new:BaseObject:private] => [_deleted:BaseObject:private] => [modifiedColumns:protected] => Array ( ) ) ) [1] => Search_Result Object ( [title] => Toolbox talk - long shot [image] => /record/images/4006-p.jpg [blurb] => This crew gathered every morning before starting work to discuss a new safety topic.... [category] => Array ( [0] => 20 [1] => 47 [2] => 49 [3] => 51 [4] => 55 [5] => 64 [6] => 68 [7] => 75 [8] => 76 [9] => 63 [10] => 78 [11] => 79 [12] => 82 [13] => 62 [14] => 87 [15] => 88 [16] => 91 [17] => 90 [18] => 93 [19] => 94 [20] => 95 [21] => 97 ) [labels] => Array ( [0] => Safety Culture [1] => Work Environment [2] => Hazards [3] => Bricklayer [4] => Trades [5] => Carpenter [7] => Cement Mason [9] => Electrical Worker [11] => Laborer [13] => Maintenance Worker [15] => Plasterer [17] => Plumber/Pipefitter [19] => Reinforcing Ironworker [21] => Roofer/Waterproofer [23] => Scaffold Erector [25] => Stonemason [27] => Structural Ironworker [29] => Commercial & Institutional [30] => Jobsites [31] => Demolition [33] => Heavy & Highway [35] => Industrial [37] => Renovations [39] => Residential [41] => Underground [43] => Images [44] => Media [45] => Media & Documents ) [type] => Images [sub_category] => [url] => /image/4006/i002693/Toolbox%2Btalk%2B-%2Blong%2Bshot.html [item:protected] => ImageRecord Object ( [records:protected] => Array ( ) [recordId:protected] => [searchWordClass:protected] => [searchWordPeerClass:protected] => [bok_record:protected] => [authors:protected] => [organizations:protected] => [collections:protected] => [categories:protected] => Array ( [20] => Category Object ( [languages:protected] => [bok_resources:protected] => [bok_topics:protected] => [bok_keywords:protected] => [id:protected] => 20 [type:protected] => category [parent:protected] => 7 [label:protected] => Safety Culture [alreadyInSave:protected] => [alreadyInValidation:protected] => [validationFailures:protected] => Array ( ) [_new:BaseObject:private] => [_deleted:BaseObject:private] => [modifiedColumns:protected] => Array ( ) ) [47] => Category Object ( [languages:protected] => [bok_resources:protected] => [bok_topics:protected] => [bok_keywords:protected] => [id:protected] => 47 [type:protected] => category [parent:protected] => 2 [label:protected] => Bricklayer [alreadyInSave:protected] => [alreadyInValidation:protected] => [validationFailures:protected] => Array ( ) [_new:BaseObject:private] => [_deleted:BaseObject:private] => [modifiedColumns:protected] => Array ( ) ) [49] => Category Object ( [languages:protected] => [bok_resources:protected] => [bok_topics:protected] => [bok_keywords:protected] => [id:protected] => 49 [type:protected] => category [parent:protected] => 2 [label:protected] => Carpenter [alreadyInSave:protected] => [alreadyInValidation:protected] => [validationFailures:protected] => Array ( ) [_new:BaseObject:private] => [_deleted:BaseObject:private] => [modifiedColumns:protected] => Array ( ) ) [51] => Category Object ( [languages:protected] => [bok_resources:protected] => [bok_topics:protected] => [bok_keywords:protected] => [id:protected] => 51 [type:protected] => category [parent:protected] => 2 [label:protected] => Cement Mason [alreadyInSave:protected] => [alreadyInValidation:protected] => [validationFailures:protected] => Array ( ) [_new:BaseObject:private] => [_deleted:BaseObject:private] => [modifiedColumns:protected] => Array ( ) ) [55] => Category Object ( [languages:protected] => [bok_resources:protected] => [bok_topics:protected] => [bok_keywords:protected] => [id:protected] => 55 [type:protected] => category [parent:protected] => 2 [label:protected] => Electrical Worker [alreadyInSave:protected] => [alreadyInValidation:protected] => [validationFailures:protected] => Array ( ) [_new:BaseObject:private] => [_deleted:BaseObject:private] => [modifiedColumns:protected] => Array ( ) ) [64] => Category Object ( [languages:protected] => [bok_resources:protected] => [bok_topics:protected] => [bok_keywords:protected] => [id:protected] => 64 [type:protected] => category [parent:protected] => 2 [label:protected] => Laborer [alreadyInSave:protected] => [alreadyInValidation:protected] => [validationFailures:protected] => Array ( ) [_new:BaseObject:private] => [_deleted:BaseObject:private] => [modifiedColumns:protected] => Array ( ) ) [68] => Category Object ( [languages:protected] => [bok_resources:protected] => [bok_topics:protected] => [bok_keywords:protected] => [id:protected] => 68 [type:protected] => category [parent:protected] => 2 [label:protected] => Maintenance Worker [alreadyInSave:protected] => [alreadyInValidation:protected] => [validationFailures:protected] => Array ( ) [_new:BaseObject:private] => [_deleted:BaseObject:private] => [modifiedColumns:protected] => Array ( ) ) [75] => Category Object ( [languages:protected] => [bok_resources:protected] => [bok_topics:protected] => [bok_keywords:protected] => [id:protected] => 75 [type:protected] => category [parent:protected] => 2 [label:protected] => Plasterer [alreadyInSave:protected] => [alreadyInValidation:protected] => [validationFailures:protected] => Array ( ) [_new:BaseObject:private] => [_deleted:BaseObject:private] => [modifiedColumns:protected] => Array ( ) ) [76] => Category Object ( [languages:protected] => [bok_resources:protected] => [bok_topics:protected] => [bok_keywords:protected] => [id:protected] => 76 [type:protected] => category [parent:protected] => 2 [label:protected] => Plumber/Pipefitter [alreadyInSave:protected] => [alreadyInValidation:protected] => [validationFailures:protected] => Array ( ) [_new:BaseObject:private] => [_deleted:BaseObject:private] => [modifiedColumns:protected] => Array ( ) ) [63] => Category Object ( [languages:protected] => [bok_resources:protected] => [bok_topics:protected] => [bok_keywords:protected] => [id:protected] => 63 [type:protected] => category [parent:protected] => 2 [label:protected] => Reinforcing Ironworker [alreadyInSave:protected] => [alreadyInValidation:protected] => [validationFailures:protected] => Array ( ) [_new:BaseObject:private] => [_deleted:BaseObject:private] => [modifiedColumns:protected] => Array ( ) ) [78] => Category Object ( [languages:protected] => [bok_resources:protected] => [bok_topics:protected] => [bok_keywords:protected] => [id:protected] => 78 [type:protected] => category [parent:protected] => 2 [label:protected] => Roofer/Waterproofer [alreadyInSave:protected] => [alreadyInValidation:protected] => [validationFailures:protected] => Array ( ) [_new:BaseObject:private] => [_deleted:BaseObject:private] => [modifiedColumns:protected] => Array ( ) ) [79] => Category Object ( [languages:protected] => [bok_resources:protected] => [bok_topics:protected] => [bok_keywords:protected] => [id:protected] => 79 [type:protected] => category [parent:protected] => 2 [label:protected] => Scaffold Erector [alreadyInSave:protected] => [alreadyInValidation:protected] => [validationFailures:protected] => Array ( ) [_new:BaseObject:private] => [_deleted:BaseObject:private] => [modifiedColumns:protected] => Array ( ) ) [82] => Category Object ( [languages:protected] => [bok_resources:protected] => [bok_topics:protected] => [bok_keywords:protected] => [id:protected] => 82 [type:protected] => category [parent:protected] => 2 [label:protected] => Stonemason [alreadyInSave:protected] => [alreadyInValidation:protected] => [validationFailures:protected] => Array ( ) [_new:BaseObject:private] => [_deleted:BaseObject:private] => [modifiedColumns:protected] => Array ( ) ) [62] => Category Object ( [languages:protected] => [bok_resources:protected] => [bok_topics:protected] => [bok_keywords:protected] => [id:protected] => 62 [type:protected] => category [parent:protected] => 2 [label:protected] => Structural Ironworker [alreadyInSave:protected] => [alreadyInValidation:protected] => [validationFailures:protected] => Array ( ) [_new:BaseObject:private] => [_deleted:BaseObject:private] => [modifiedColumns:protected] => Array ( ) ) [87] => Category Object ( [languages:protected] => [bok_resources:protected] => [bok_topics:protected] => [bok_keywords:protected] => [id:protected] => 87 [type:protected] => category [parent:protected] => 3 [label:protected] => Commercial & Institutional [alreadyInSave:protected] => [alreadyInValidation:protected] => [validationFailures:protected] => Array ( ) [_new:BaseObject:private] => [_deleted:BaseObject:private] => [modifiedColumns:protected] => Array ( ) ) [88] => Category Object ( [languages:protected] => [bok_resources:protected] => [bok_topics:protected] => [bok_keywords:protected] => [id:protected] => 88 [type:protected] => category [parent:protected] => 3 [label:protected] => Demolition [alreadyInSave:protected] => [alreadyInValidation:protected] => [validationFailures:protected] => Array ( ) [_new:BaseObject:private] => [_deleted:BaseObject:private] => [modifiedColumns:protected] => Array ( ) ) [91] => Category Object ( [languages:protected] => [bok_resources:protected] => [bok_topics:protected] => [bok_keywords:protected] => [id:protected] => 91 [type:protected] => category [parent:protected] => 3 [label:protected] => Heavy & Highway [alreadyInSave:protected] => [alreadyInValidation:protected] => [validationFailures:protected] => Array ( ) [_new:BaseObject:private] => [_deleted:BaseObject:private] => [modifiedColumns:protected] => Array ( ) ) [90] => Category Object ( [languages:protected] => [bok_resources:protected] => [bok_topics:protected] => [bok_keywords:protected] => [id:protected] => 90 [type:protected] => category [parent:protected] => 3 [label:protected] => Industrial [alreadyInSave:protected] => [alreadyInValidation:protected] => [validationFailures:protected] => Array ( ) [_new:BaseObject:private] => [_deleted:BaseObject:private] => [modifiedColumns:protected] => Array ( ) ) [93] => Category Object ( [languages:protected] => [bok_resources:protected] => [bok_topics:protected] => [bok_keywords:protected] => [id:protected] => 93 [type:protected] => category [parent:protected] => 3 [label:protected] => Renovations [alreadyInSave:protected] => [alreadyInValidation:protected] => [validationFailures:protected] => Array ( ) [_new:BaseObject:private] => [_deleted:BaseObject:private] => [modifiedColumns:protected] => Array ( ) ) [94] => Category Object ( [languages:protected] => [bok_resources:protected] => [bok_topics:protected] => [bok_keywords:protected] => [id:protected] => 94 [type:protected] => category [parent:protected] => 3 [label:protected] => Residential [alreadyInSave:protected] => [alreadyInValidation:protected] => [validationFailures:protected] => Array ( ) [_new:BaseObject:private] => [_deleted:BaseObject:private] => [modifiedColumns:protected] => Array ( ) ) [95] => Category Object ( [languages:protected] => [bok_resources:protected] => [bok_topics:protected] => [bok_keywords:protected] => [id:protected] => 95 [type:protected] => category [parent:protected] => 3 [label:protected] => Underground [alreadyInSave:protected] => [alreadyInValidation:protected] => [validationFailures:protected] => Array ( ) [_new:BaseObject:private] => [_deleted:BaseObject:private] => [modifiedColumns:protected] => Array ( ) ) [97] => Category Object ( [languages:protected] => [bok_resources:protected] => [bok_topics:protected] => [bok_keywords:protected] => [id:protected] => 97 [type:protected] => category [parent:protected] => 5 [label:protected] => Images [alreadyInSave:protected] => [alreadyInValidation:protected] => [validationFailures:protected] => Array ( ) [_new:BaseObject:private] => [_deleted:BaseObject:private] => [modifiedColumns:protected] => Array ( ) ) ) [categories_initialized:protected] => 1 [mapped_items:protected] => [content:protected] => [files:protected] => [language:protected] => Language Object ( [id:protected] => 1 [code:protected] => en [name:protected] => English [alreadyInSave:protected] => [alreadyInValidation:protected] => [validationFailures:protected] => Array ( ) [_new:BaseObject:private] => [_deleted:BaseObject:private] => [modifiedColumns:protected] => Array ( ) ) [old_record:protected] => [id:protected] => 4006 [old_id:protected] => [elcosh_id:protected] => i002693 [type:protected] => image [display_type:protected] => Image [user_id:protected] => 0 [language_id:protected] => 1 [tagging_id:protected] => Bruce Lippy [priority_id:protected] => 1 [title:protected] => Toolbox talk - long shot [total_pages:protected] => 0 [billed_pages:protected] => 0 [publication_number:protected] => [part_of:protected] => [keywords:protected] => toolbox talk, tailgate talk, safety minute [comments:protected] => [summary:protected] => This crew gathered every morning before starting work to discuss a new safety topic. [transition_comments:protected] => [external_link:protected] => [consol_link:protected] => http://www.cpwrconstructionsolutions.org/electrical/solution/662/worker-training.html [more_like_this:protected] => i002691,i002692,d001269,d000527 [permission_given_by:protected] => [published:protected] => T [billable:protected] => F [img_name:protected] => [img_ext:protected] => jpg [img_width:protected] => [img_height:protected] => [img_credit:protected] => Morgan Zavertnik and Hoar Construction [img_practice:protected] => good [vid_source_id:protected] => [vid_running_time:protected] => [vid_intended_audience:protected] => [vid_acquisition_info:protected] => [vid_cost:protected] => [vid_producer:protected] => [vid_filename:protected] => [vid_filename_downloadable:protected] => [date_summary:protected] => November 2015 [date_permission_requested:protected] => [date_permission_received:protected] => [date_review_needed:protected] => [date_received:protected] => 03/02/16 [date_completed:protected] => 03/02/16 [date_billed:protected] => [date_modified:protected] => 03/02/16 [collBokExports:protected] => [lastBokExportCriteria:BaseElcoshItem:private] => [alreadyInSave:protected] => [alreadyInValidation:protected] => [validationFailures:protected] => Array ( ) [_new:BaseObject:private] => [_deleted:BaseObject:private] => [modifiedColumns:protected] => Array ( ) ) ) [2] => Search_Result Object ( [title] => Construction bracing [image] => /record/images/3995-p.jpg [blurb] => This shows structural support that prevents collapses during construction.... [category] => Array ( [0] => 12 [1] => 15 [2] => 21 [3] => 49 [4] => 51 [5] => 55 [6] => 56 [7] => 60 [8] => 64 [9] => 68 [10] => 74 [11] => 63 [12] => 78 [13] => 79 [14] => 80 [15] => 62 [16] => 87 [17] => 90 [18] => 97 ) [labels] => Array ( [0] => Crushed/Struck By [1] => Work Environment [2] => Hazards [3] => Falls [6] => Scaffolds [9] => Carpenter [10] => Trades [11] => Cement Mason [13] => Electrical Worker [15] => Elevator Constructor [17] => HVAC [19] => Laborer [21] => Maintenance Worker [23] => Pile Driver [25] => Reinforcing Ironworker [27] => Roofer/Waterproofer [29] => Scaffold Erector [31] => Sheetmetal Worker [33] => Structural Ironworker [35] => Commercial & Institutional [36] => Jobsites [37] => Industrial [39] => Images [40] => Media [41] => Media & Documents ) [type] => Images [sub_category] => [url] => /image/3995/i002690/Construction%2Bbracing.html [item:protected] => ImageRecord Object ( [records:protected] => Array ( ) [recordId:protected] => [searchWordClass:protected] => [searchWordPeerClass:protected] => [bok_record:protected] => [authors:protected] => [organizations:protected] => [collections:protected] => [categories:protected] => Array ( [12] => Category Object ( [languages:protected] => [bok_resources:protected] => [bok_topics:protected] => [bok_keywords:protected] => [id:protected] => 12 [type:protected] => category [parent:protected] => 7 [label:protected] => Crushed/Struck By [alreadyInSave:protected] => [alreadyInValidation:protected] => [validationFailures:protected] => Array ( ) [_new:BaseObject:private] => [_deleted:BaseObject:private] => [modifiedColumns:protected] => Array ( ) ) [15] => Category Object ( [languages:protected] => [bok_resources:protected] => [bok_topics:protected] => [bok_keywords:protected] => [id:protected] => 15 [type:protected] => category [parent:protected] => 7 [label:protected] => Falls [alreadyInSave:protected] => [alreadyInValidation:protected] => [validationFailures:protected] => Array ( ) [_new:BaseObject:private] => [_deleted:BaseObject:private] => [modifiedColumns:protected] => Array ( ) ) [21] => Category Object ( [languages:protected] => [bok_resources:protected] => [bok_topics:protected] => [bok_keywords:protected] => [id:protected] => 21 [type:protected] => category [parent:protected] => 7 [label:protected] => Scaffolds [alreadyInSave:protected] => [alreadyInValidation:protected] => [validationFailures:protected] => Array ( ) [_new:BaseObject:private] => [_deleted:BaseObject:private] => [modifiedColumns:protected] => Array ( ) ) [49] => Category Object ( [languages:protected] => [bok_resources:protected] => [bok_topics:protected] => [bok_keywords:protected] => [id:protected] => 49 [type:protected] => category [parent:protected] => 2 [label:protected] => Carpenter [alreadyInSave:protected] => [alreadyInValidation:protected] => [validationFailures:protected] => Array ( ) [_new:BaseObject:private] => [_deleted:BaseObject:private] => [modifiedColumns:protected] => Array ( ) ) [51] => Category Object ( [languages:protected] => [bok_resources:protected] => [bok_topics:protected] => [bok_keywords:protected] => [id:protected] => 51 [type:protected] => category [parent:protected] => 2 [label:protected] => Cement Mason [alreadyInSave:protected] => [alreadyInValidation:protected] => [validationFailures:protected] => Array ( ) [_new:BaseObject:private] => [_deleted:BaseObject:private] => [modifiedColumns:protected] => Array ( ) ) [55] => Category Object ( [languages:protected] => [bok_resources:protected] => [bok_topics:protected] => [bok_keywords:protected] => [id:protected] => 55 [type:protected] => category [parent:protected] => 2 [label:protected] => Electrical Worker [alreadyInSave:protected] => [alreadyInValidation:protected] => [validationFailures:protected] => Array ( ) [_new:BaseObject:private] => [_deleted:BaseObject:private] => [modifiedColumns:protected] => Array ( ) ) [56] => Category Object ( [languages:protected] => [bok_resources:protected] => [bok_topics:protected] => [bok_keywords:protected] => [id:protected] => 56 [type:protected] => category [parent:protected] => 2 [label:protected] => Elevator Constructor [alreadyInSave:protected] => [alreadyInValidation:protected] => [validationFailures:protected] => Array ( ) [_new:BaseObject:private] => [_deleted:BaseObject:private] => [modifiedColumns:protected] => Array ( ) ) [60] => Category Object ( [languages:protected] => [bok_resources:protected] => [bok_topics:protected] => [bok_keywords:protected] => [id:protected] => 60 [type:protected] => category [parent:protected] => 2 [label:protected] => HVAC [alreadyInSave:protected] => [alreadyInValidation:protected] => [validationFailures:protected] => Array ( ) [_new:BaseObject:private] => [_deleted:BaseObject:private] => [modifiedColumns:protected] => Array ( ) ) [64] => Category Object ( [languages:protected] => [bok_resources:protected] => [bok_topics:protected] => [bok_keywords:protected] => [id:protected] => 64 [type:protected] => category [parent:protected] => 2 [label:protected] => Laborer [alreadyInSave:protected] => [alreadyInValidation:protected] => [validationFailures:protected] => Array ( ) [_new:BaseObject:private] => [_deleted:BaseObject:private] => [modifiedColumns:protected] => Array ( ) ) [68] => Category Object ( [languages:protected] => [bok_resources:protected] => [bok_topics:protected] => [bok_keywords:protected] => [id:protected] => 68 [type:protected] => category [parent:protected] => 2 [label:protected] => Maintenance Worker [alreadyInSave:protected] => [alreadyInValidation:protected] => [validationFailures:protected] => Array ( ) [_new:BaseObject:private] => [_deleted:BaseObject:private] => [modifiedColumns:protected] => Array ( ) ) [74] => Category Object ( [languages:protected] => [bok_resources:protected] => [bok_topics:protected] => [bok_keywords:protected] => [id:protected] => 74 [type:protected] => category [parent:protected] => 2 [label:protected] => Pile Driver [alreadyInSave:protected] => [alreadyInValidation:protected] => [validationFailures:protected] => Array ( ) [_new:BaseObject:private] => [_deleted:BaseObject:private] => [modifiedColumns:protected] => Array ( ) ) [63] => Category Object ( [languages:protected] => [bok_resources:protected] => [bok_topics:protected] => [bok_keywords:protected] => [id:protected] => 63 [type:protected] => category [parent:protected] => 2 [label:protected] => Reinforcing Ironworker [alreadyInSave:protected] => [alreadyInValidation:protected] => [validationFailures:protected] => Array ( ) [_new:BaseObject:private] => [_deleted:BaseObject:private] => [modifiedColumns:protected] => Array ( ) ) [78] => Category Object ( [languages:protected] => [bok_resources:protected] => [bok_topics:protected] => [bok_keywords:protected] => [id:protected] => 78 [type:protected] => category [parent:protected] => 2 [label:protected] => Roofer/Waterproofer [alreadyInSave:protected] => [alreadyInValidation:protected] => [validationFailures:protected] => Array ( ) [_new:BaseObject:private] => [_deleted:BaseObject:private] => [modifiedColumns:protected] => Array ( ) ) [79] => Category Object ( [languages:protected] => [bok_resources:protected] => [bok_topics:protected] => [bok_keywords:protected] => [id:protected] => 79 [type:protected] => category [parent:protected] => 2 [label:protected] => Scaffold Erector [alreadyInSave:protected] => [alreadyInValidation:protected] => [validationFailures:protected] => Array ( ) [_new:BaseObject:private] => [_deleted:BaseObject:private] => [modifiedColumns:protected] => Array ( ) ) [80] => Category Object ( [languages:protected] => [bok_resources:protected] => [bok_topics:protected] => [bok_keywords:protected] => [id:protected] => 80 [type:protected] => category [parent:protected] => 2 [label:protected] => Sheetmetal Worker [alreadyInSave:protected] => [alreadyInValidation:protected] => [validationFailures:protected] => Array ( ) [_new:BaseObject:private] => [_deleted:BaseObject:private] => [modifiedColumns:protected] => Array ( ) ) [62] => Category Object ( [languages:protected] => [bok_resources:protected] => [bok_topics:protected] => [bok_keywords:protected] => [id:protected] => 62 [type:protected] => category [parent:protected] => 2 [label:protected] => Structural Ironworker [alreadyInSave:protected] => [alreadyInValidation:protected] => [validationFailures:protected] => Array ( ) [_new:BaseObject:private] => [_deleted:BaseObject:private] => [modifiedColumns:protected] => Array ( ) ) [87] => Category Object ( [languages:protected] => [bok_resources:protected] => [bok_topics:protected] => [bok_keywords:protected] => [id:protected] => 87 [type:protected] => category [parent:protected] => 3 [label:protected] => Commercial & Institutional [alreadyInSave:protected] => [alreadyInValidation:protected] => [validationFailures:protected] => Array ( ) [_new:BaseObject:private] => [_deleted:BaseObject:private] => [modifiedColumns:protected] => Array ( ) ) [90] => Category Object ( [languages:protected] => [bok_resources:protected] => [bok_topics:protected] => [bok_keywords:protected] => [id:protected] => 90 [type:protected] => category [parent:protected] => 3 [label:protected] => Industrial [alreadyInSave:protected] => [alreadyInValidation:protected] => [validationFailures:protected] => Array ( ) [_new:BaseObject:private] => [_deleted:BaseObject:private] => [modifiedColumns:protected] => Array ( ) ) [97] => Category Object ( [languages:protected] => [bok_resources:protected] => [bok_topics:protected] => [bok_keywords:protected] => [id:protected] => 97 [type:protected] => category [parent:protected] => 5 [label:protected] => Images [alreadyInSave:protected] => [alreadyInValidation:protected] => [validationFailures:protected] => Array ( ) [_new:BaseObject:private] => [_deleted:BaseObject:private] => [modifiedColumns:protected] => Array ( ) ) ) [categories_initialized:protected] => 1 [mapped_items:protected] => [content:protected] => [files:protected] => [language:protected] => Language Object ( [id:protected] => 1 [code:protected] => en [name:protected] => English [alreadyInSave:protected] => [alreadyInValidation:protected] => [validationFailures:protected] => Array ( ) [_new:BaseObject:private] => [_deleted:BaseObject:private] => [modifiedColumns:protected] => Array ( ) ) [old_record:protected] => [id:protected] => 3995 [old_id:protected] => [elcosh_id:protected] => i002690 [type:protected] => image [display_type:protected] => Image [user_id:protected] => 0 [language_id:protected] => 1 [tagging_id:protected] => Bruce Lippy [priority_id:protected] => 1 [title:protected] => Construction bracing [total_pages:protected] => 0 [billed_pages:protected] => 0 [publication_number:protected] => [part_of:protected] => [keywords:protected] => Bracing, support, scaffold [comments:protected] => [summary:protected] => This shows structural support that prevents collapses during construction. [transition_comments:protected] => [external_link:protected] => [consol_link:protected] => http://www.cpwrconstructionsolutions.org/masonry/solution/8/adjustable-tower-scaffold.html [more_like_this:protected] => i002660 [permission_given_by:protected] => [published:protected] => T [billable:protected] => F [img_name:protected] => [img_ext:protected] => jpg [img_width:protected] => [img_height:protected] => [img_credit:protected] => Photo by Pam Susi [img_practice:protected] => good [vid_source_id:protected] => [vid_running_time:protected] => [vid_intended_audience:protected] => [vid_acquisition_info:protected] => [vid_cost:protected] => [vid_producer:protected] => [vid_filename:protected] => [vid_filename_downloadable:protected] => [date_summary:protected] => January 2016 [date_permission_requested:protected] => [date_permission_received:protected] => [date_review_needed:protected] => [date_received:protected] => 02/01/16 [date_completed:protected] => 02/01/16 [date_billed:protected] => [date_modified:protected] => 02/01/16 [collBokExports:protected] => [lastBokExportCriteria:BaseElcoshItem:private] => [alreadyInSave:protected] => [alreadyInValidation:protected] => [validationFailures:protected] => Array ( ) [_new:BaseObject:private] => [_deleted:BaseObject:private] => [modifiedColumns:protected] => Array ( ) ) ) [3] => Search_Result Object ( [title] => Suspended Scaffold Outriggers [image] => /record/images/3975-p.jpg [blurb] => Suspended scaffolds systems must be designed by a qualified person and inspected daily by a competent person. The supports for the counterweight must... [category] => Array ( [0] => 97 [1] => 15 [2] => 47 [3] => 49 [4] => 79 [5] => 87 ) [labels] => Array ( [0] => Images [1] => Media [2] => Media & Documents [3] => Falls [4] => Work Environment [5] => Hazards [6] => Bricklayer [7] => Trades [8] => Carpenter [10] => Scaffold Erector [12] => Commercial & Institutional [13] => Jobsites ) [type] => Images [sub_category] => [url] => /image/3975/i002683/Suspended%2BScaffold%2BOutriggers.html [item:protected] => ImageRecord Object ( [records:protected] => Array ( ) [recordId:protected] => [searchWordClass:protected] => [searchWordPeerClass:protected] => [bok_record:protected] => [authors:protected] => [organizations:protected] => [collections:protected] => [categories:protected] => Array ( [97] => Category Object ( [languages:protected] => [bok_resources:protected] => [bok_topics:protected] => [bok_keywords:protected] => [id:protected] => 97 [type:protected] => category [parent:protected] => 5 [label:protected] => Images [alreadyInSave:protected] => [alreadyInValidation:protected] => [validationFailures:protected] => Array ( ) [_new:BaseObject:private] => [_deleted:BaseObject:private] => [modifiedColumns:protected] => Array ( ) ) [15] => Category Object ( [languages:protected] => [bok_resources:protected] => [bok_topics:protected] => [bok_keywords:protected] => [id:protected] => 15 [type:protected] => category [parent:protected] => 7 [label:protected] => Falls [alreadyInSave:protected] => [alreadyInValidation:protected] => [validationFailures:protected] => Array ( ) [_new:BaseObject:private] => [_deleted:BaseObject:private] => [modifiedColumns:protected] => Array ( ) ) [47] => Category Object ( [languages:protected] => [bok_resources:protected] => [bok_topics:protected] => [bok_keywords:protected] => [id:protected] => 47 [type:protected] => category [parent:protected] => 2 [label:protected] => Bricklayer [alreadyInSave:protected] => [alreadyInValidation:protected] => [validationFailures:protected] => Array ( ) [_new:BaseObject:private] => [_deleted:BaseObject:private] => [modifiedColumns:protected] => Array ( ) ) [49] => Category Object ( [languages:protected] => [bok_resources:protected] => [bok_topics:protected] => [bok_keywords:protected] => [id:protected] => 49 [type:protected] => category [parent:protected] => 2 [label:protected] => Carpenter [alreadyInSave:protected] => [alreadyInValidation:protected] => [validationFailures:protected] => Array ( ) [_new:BaseObject:private] => [_deleted:BaseObject:private] => [modifiedColumns:protected] => Array ( ) ) [79] => Category Object ( [languages:protected] => [bok_resources:protected] => [bok_topics:protected] => [bok_keywords:protected] => [id:protected] => 79 [type:protected] => category [parent:protected] => 2 [label:protected] => Scaffold Erector [alreadyInSave:protected] => [alreadyInValidation:protected] => [validationFailures:protected] => Array ( ) [_new:BaseObject:private] => [_deleted:BaseObject:private] => [modifiedColumns:protected] => Array ( ) ) [87] => Category Object ( [languages:protected] => [bok_resources:protected] => [bok_topics:protected] => [bok_keywords:protected] => [id:protected] => 87 [type:protected] => category [parent:protected] => 3 [label:protected] => Commercial & Institutional [alreadyInSave:protected] => [alreadyInValidation:protected] => [validationFailures:protected] => Array ( ) [_new:BaseObject:private] => [_deleted:BaseObject:private] => [modifiedColumns:protected] => Array ( ) ) ) [categories_initialized:protected] => 1 [mapped_items:protected] => [content:protected] => [files:protected] => [language:protected] => Language Object ( [id:protected] => 1 [code:protected] => en [name:protected] => English [alreadyInSave:protected] => [alreadyInValidation:protected] => [validationFailures:protected] => Array ( ) [_new:BaseObject:private] => [_deleted:BaseObject:private] => [modifiedColumns:protected] => Array ( ) ) [old_record:protected] => [id:protected] => 3975 [old_id:protected] => [elcosh_id:protected] => i002683 [type:protected] => image [display_type:protected] => Image [user_id:protected] => 0 [language_id:protected] => 1 [tagging_id:protected] => John Newquist [priority_id:protected] => 1 [title:protected] => Suspended Scaffold Outriggers [total_pages:protected] => 0 [billed_pages:protected] => 0 [publication_number:protected] => [part_of:protected] => [keywords:protected] => suspended, scaffold, swing, stage, fall, protection, counterweight, qualified, person [comments:protected] => [summary:protected] => Suspended scaffolds systems must be designed by a qualified person and inspected daily by a competent person. The supports for the counterweight must be designed with a safety factor of four. [transition_comments:protected] => [external_link:protected] => [consol_link:protected] => http://www.cpwrconstructionsolutions.org/task/Erect%2Band%2Bdismantle%2Bscaffolds/ [more_like_this:protected] => d000244,d000359,i000253,i000407 [permission_given_by:protected] => [published:protected] => T [billable:protected] => F [img_name:protected] => [img_ext:protected] => jpg [img_width:protected] => [img_height:protected] => [img_credit:protected] => MetroPark, Miller and Long [img_practice:protected] => not_applicable [vid_source_id:protected] => [vid_running_time:protected] => [vid_intended_audience:protected] => [vid_acquisition_info:protected] => [vid_cost:protected] => [vid_producer:protected] => [vid_filename:protected] => [vid_filename_downloadable:protected] => [date_summary:protected] => August 28 2015 [date_permission_requested:protected] => [date_permission_received:protected] => [date_review_needed:protected] => [date_received:protected] => 08/28/15 [date_completed:protected] => 08/28/15 [date_billed:protected] => [date_modified:protected] => 08/28/15 [collBokExports:protected] => [lastBokExportCriteria:BaseElcoshItem:private] => [alreadyInSave:protected] => [alreadyInValidation:protected] => [validationFailures:protected] => Array ( ) [_new:BaseObject:private] => [_deleted:BaseObject:private] => [modifiedColumns:protected] => Array ( ) ) ) [4] => Search_Result Object ( [title] => Suspended scaffold [image] => /record/images/3976-p.jpg [blurb] => Suspended scaffold outrigger beams must have stops to prevent the hangers from sliding of the end of the outriggers. Wire rope supported must be desig... [category] => Array ( [0] => 97 [1] => 15 [2] => 47 [3] => 50 [4] => 79 [5] => 87 ) [labels] => Array ( [0] => Images [1] => Media [2] => Media & Documents [3] => Falls [4] => Work Environment [5] => Hazards [6] => Bricklayer [7] => Trades [8] => Carpet Layer [10] => Scaffold Erector [12] => Commercial & Institutional [13] => Jobsites ) [type] => Images [sub_category] => [url] => /image/3976/i002684/Suspended%2Bscaffold.html [item:protected] => ImageRecord Object ( [records:protected] => Array ( ) [recordId:protected] => [searchWordClass:protected] => [searchWordPeerClass:protected] => [bok_record:protected] => [authors:protected] => [organizations:protected] => [collections:protected] => [categories:protected] => Array ( [97] => Category Object ( [languages:protected] => [bok_resources:protected] => [bok_topics:protected] => [bok_keywords:protected] => [id:protected] => 97 [type:protected] => category [parent:protected] => 5 [label:protected] => Images [alreadyInSave:protected] => [alreadyInValidation:protected] => [validationFailures:protected] => Array ( ) [_new:BaseObject:private] => [_deleted:BaseObject:private] => [modifiedColumns:protected] => Array ( ) ) [15] => Category Object ( [languages:protected] => [bok_resources:protected] => [bok_topics:protected] => [bok_keywords:protected] => [id:protected] => 15 [type:protected] => category [parent:protected] => 7 [label:protected] => Falls [alreadyInSave:protected] => [alreadyInValidation:protected] => [validationFailures:protected] => Array ( ) [_new:BaseObject:private] => [_deleted:BaseObject:private] => [modifiedColumns:protected] => Array ( ) ) [47] => Category Object ( [languages:protected] => [bok_resources:protected] => [bok_topics:protected] => [bok_keywords:protected] => [id:protected] => 47 [type:protected] => category [parent:protected] => 2 [label:protected] => Bricklayer [alreadyInSave:protected] => [alreadyInValidation:protected] => [validationFailures:protected] => Array ( ) [_new:BaseObject:private] => [_deleted:BaseObject:private] => [modifiedColumns:protected] => Array ( ) ) [50] => Category Object ( [languages:protected] => [bok_resources:protected] => [bok_topics:protected] => [bok_keywords:protected] => [id:protected] => 50 [type:protected] => category [parent:protected] => 2 [label:protected] => Carpet Layer [alreadyInSave:protected] => [alreadyInValidation:protected] => [validationFailures:protected] => Array ( ) [_new:BaseObject:private] => [_deleted:BaseObject:private] => [modifiedColumns:protected] => Array ( ) ) [79] => Category Object ( [languages:protected] => [bok_resources:protected] => [bok_topics:protected] => [bok_keywords:protected] => [id:protected] => 79 [type:protected] => category [parent:protected] => 2 [label:protected] => Scaffold Erector [alreadyInSave:protected] => [alreadyInValidation:protected] => [validationFailures:protected] => Array ( ) [_new:BaseObject:private] => [_deleted:BaseObject:private] => [modifiedColumns:protected] => Array ( ) ) [87] => Category Object ( [languages:protected] => [bok_resources:protected] => [bok_topics:protected] => [bok_keywords:protected] => [id:protected] => 87 [type:protected] => category [parent:protected] => 3 [label:protected] => Commercial & Institutional [alreadyInSave:protected] => [alreadyInValidation:protected] => [validationFailures:protected] => Array ( ) [_new:BaseObject:private] => [_deleted:BaseObject:private] => [modifiedColumns:protected] => Array ( ) ) ) [categories_initialized:protected] => 1 [mapped_items:protected] => [content:protected] => [files:protected] => [language:protected] => Language Object ( [id:protected] => 1 [code:protected] => en [name:protected] => English [alreadyInSave:protected] => [alreadyInValidation:protected] => [validationFailures:protected] => Array ( ) [_new:BaseObject:private] => [_deleted:BaseObject:private] => [modifiedColumns:protected] => Array ( ) ) [old_record:protected] => [id:protected] => 3976 [old_id:protected] => [elcosh_id:protected] => i002684 [type:protected] => image [display_type:protected] => Image [user_id:protected] => 0 [language_id:protected] => 1 [tagging_id:protected] => John Newquist [priority_id:protected] => 1 [title:protected] => Suspended scaffold [total_pages:protected] => 0 [billed_pages:protected] => 0 [publication_number:protected] => [part_of:protected] => [keywords:protected] => Suspended, scaffold, outrigger, beams, erection, wire, rope, inspection, swing, stage, [comments:protected] => [summary:protected] => Suspended scaffold outrigger beams must have stops to prevent the hangers from sliding of the end of the outriggers. Wire rope supported must be designed with a safety factor of 6. The scaffold must be inspected by a competent person daily. [transition_comments:protected] => [external_link:protected] => [consol_link:protected] => http://www.cpwrconstructionsolutions.org/task/Erect%2Band%2Bdismantle%2Bscaffolds/ [more_like_this:protected] => i002683, d000244, i000407, d000606 [permission_given_by:protected] => [published:protected] => T [billable:protected] => F [img_name:protected] => [img_ext:protected] => jpg [img_width:protected] => [img_height:protected] => [img_credit:protected] => Metropark, Miller and Long [img_practice:protected] => not_applicable [vid_source_id:protected] => [vid_running_time:protected] => [vid_intended_audience:protected] => [vid_acquisition_info:protected] => [vid_cost:protected] => [vid_producer:protected] => [vid_filename:protected] => [vid_filename_downloadable:protected] => [date_summary:protected] => [date_permission_requested:protected] => [date_permission_received:protected] => [date_review_needed:protected] => [date_received:protected] => 08/28/15 [date_completed:protected] => 08/28/15 [date_billed:protected] => [date_modified:protected] => 08/28/15 [collBokExports:protected] => [lastBokExportCriteria:BaseElcoshItem:private] => [alreadyInSave:protected] => [alreadyInValidation:protected] => [validationFailures:protected] => Array ( ) [_new:BaseObject:private] => [_deleted:BaseObject:private] => [modifiedColumns:protected] => Array ( ) ) ) [5] => Search_Result Object ( [title] => Three Tower Cranes [image] => /record/images/3979-p.jpg [blurb] => Whenever multiple tower cranes are used, there needs to be preplanning to ensure that the tower cranes cannot hit each other loads. This is accomplish... [category] => Array ( [0] => 97 [1] => 11 [2] => 64 [3] => 70 [4] => 62 [5] => 87 ) [labels] => Array ( [0] => Images [1] => Media [2] => Media & Documents [3] => Cranes & Hoists [4] => Work Environment [5] => Hazards [6] => Laborer [7] => Trades [8] => Operating Engineer [10] => Structural Ironworker [12] => Commercial & Institutional [13] => Jobsites ) [type] => Images [sub_category] => [url] => /image/3979/i002687/Three%2BTower%2BCranes.html [item:protected] => ImageRecord Object ( [records:protected] => Array ( ) [recordId:protected] => [searchWordClass:protected] => [searchWordPeerClass:protected] => [bok_record:protected] => [authors:protected] => [organizations:protected] => [collections:protected] => [categories:protected] => Array ( [97] => Category Object ( [languages:protected] => [bok_resources:protected] => [bok_topics:protected] => [bok_keywords:protected] => [id:protected] => 97 [type:protected] => category [parent:protected] => 5 [label:protected] => Images [alreadyInSave:protected] => [alreadyInValidation:protected] => [validationFailures:protected] => Array ( ) [_new:BaseObject:private] => [_deleted:BaseObject:private] => [modifiedColumns:protected] => Array ( ) ) [11] => Category Object ( [languages:protected] => [bok_resources:protected] => [bok_topics:protected] => [bok_keywords:protected] => [id:protected] => 11 [type:protected] => category [parent:protected] => 7 [label:protected] => Cranes & Hoists [alreadyInSave:protected] => [alreadyInValidation:protected] => [validationFailures:protected] => Array ( ) [_new:BaseObject:private] => [_deleted:BaseObject:private] => [modifiedColumns:protected] => Array ( ) ) [64] => Category Object ( [languages:protected] => [bok_resources:protected] => [bok_topics:protected] => [bok_keywords:protected] => [id:protected] => 64 [type:protected] => category [parent:protected] => 2 [label:protected] => Laborer [alreadyInSave:protected] => [alreadyInValidation:protected] => [validationFailures:protected] => Array ( ) [_new:BaseObject:private] => [_deleted:BaseObject:private] => [modifiedColumns:protected] => Array ( ) ) [70] => Category Object ( [languages:protected] => [bok_resources:protected] => [bok_topics:protected] => [bok_keywords:protected] => [id:protected] => 70 [type:protected] => category [parent:protected] => 2 [label:protected] => Operating Engineer [alreadyInSave:protected] => [alreadyInValidation:protected] => [validationFailures:protected] => Array ( ) [_new:BaseObject:private] => [_deleted:BaseObject:private] => [modifiedColumns:protected] => Array ( ) ) [62] => Category Object ( [languages:protected] => [bok_resources:protected] => [bok_topics:protected] => [bok_keywords:protected] => [id:protected] => 62 [type:protected] => category [parent:protected] => 2 [label:protected] => Structural Ironworker [alreadyInSave:protected] => [alreadyInValidation:protected] => [validationFailures:protected] => Array ( ) [_new:BaseObject:private] => [_deleted:BaseObject:private] => [modifiedColumns:protected] => Array ( ) ) [87] => Category Object ( [languages:protected] => [bok_resources:protected] => [bok_topics:protected] => [bok_keywords:protected] => [id:protected] => 87 [type:protected] => category [parent:protected] => 3 [label:protected] => Commercial & Institutional [alreadyInSave:protected] => [alreadyInValidation:protected] => [validationFailures:protected] => Array ( ) [_new:BaseObject:private] => [_deleted:BaseObject:private] => [modifiedColumns:protected] => Array ( ) ) ) [categories_initialized:protected] => 1 [mapped_items:protected] => [content:protected] => [files:protected] => [language:protected] => Language Object ( [id:protected] => 1 [code:protected] => en [name:protected] => English [alreadyInSave:protected] => [alreadyInValidation:protected] => [validationFailures:protected] => Array ( ) [_new:BaseObject:private] => [_deleted:BaseObject:private] => [modifiedColumns:protected] => Array ( ) ) [old_record:protected] => [id:protected] => 3979 [old_id:protected] => [elcosh_id:protected] => i002687 [type:protected] => image [display_type:protected] => Image [user_id:protected] => 0 [language_id:protected] => 1 [tagging_id:protected] => John Newquist [priority_id:protected] => 1 [title:protected] => Three Tower Cranes [total_pages:protected] => 0 [billed_pages:protected] => 0 [publication_number:protected] => [part_of:protected] => [keywords:protected] => [comments:protected] => [summary:protected] => Whenever multiple tower cranes are used, there needs to be preplanning to ensure that the tower cranes cannot hit each other loads. This is accomplished by setting swing restrictions, marking the ground for allowable crane travel and training of the crane signal persons. [transition_comments:protected] => [external_link:protected] => [consol_link:protected] => http://www.cpwrconstructionsolutions.org/work/6/184/ [more_like_this:protected] => d001029, d000010, i001280, i001221 [permission_given_by:protected] => [published:protected] => T [billable:protected] => F [img_name:protected] => [img_ext:protected] => jpg [img_width:protected] => [img_height:protected] => [img_credit:protected] => Metropark [img_practice:protected] => not_applicable [vid_source_id:protected] => [vid_running_time:protected] => [vid_intended_audience:protected] => [vid_acquisition_info:protected] => [vid_cost:protected] => [vid_producer:protected] => [vid_filename:protected] => [vid_filename_downloadable:protected] => [date_summary:protected] => August 28 2015 [date_permission_requested:protected] => [date_permission_received:protected] => [date_review_needed:protected] => [date_received:protected] => 08/28/15 [date_completed:protected] => 08/28/15 [date_billed:protected] => [date_modified:protected] => 08/28/15 [collBokExports:protected] => [lastBokExportCriteria:BaseElcoshItem:private] => [alreadyInSave:protected] => [alreadyInValidation:protected] => [validationFailures:protected] => Array ( ) [_new:BaseObject:private] => [_deleted:BaseObject:private] => [modifiedColumns:protected] => Array ( ) ) ) ) [preview_mode] => [description] => This third in a series of 6 Tool Box Talks on construction ergonomics focuses on proper positioning to avoid injuries. The TBT recommends: 1)prop up a task off of the floor by using a raised surface, cart, baker scaffold, saw horses to prep materials near waist height, 2)move the lift or ladder in the best position for the work, 3)position the lift in front of the area you plan to work without trying to reach too far on either side of the lift. [keywords] => position, positioning, ergonomics, ergo, carpal tunnel, MSD, musculoskeletal disorder [related_items] => Array ( [Handouts] => Array ( [0] => DocumentRecord Object ( [records:protected] => Array ( ) [recordId:protected] => [searchWordClass:protected] => [searchWordPeerClass:protected] => [bok_record:protected] => [authors:protected] => [organizations:protected] => [collections:protected] => [categories:protected] => [categories_initialized:protected] => [mapped_items:protected] => [content:protected] => [files:protected] => [language:protected] => Language Object ( [id:protected] => 1 [code:protected] => en [name:protected] => English [alreadyInSave:protected] => [alreadyInValidation:protected] => [validationFailures:protected] => Array ( ) [_new:BaseObject:private] => [_deleted:BaseObject:private] => [modifiedColumns:protected] => Array ( ) ) [old_record:protected] => [id:protected] => 3833 [old_id:protected] => [elcosh_id:protected] => d001303 [type:protected] => document [display_type:protected] => HTML w/ PDF [user_id:protected] => 25 [language_id:protected] => 1 [tagging_id:protected] => Bruce Lippy [priority_id:protected] => 1 [title:protected] => Overview of Toolbox Talks on Ergonomics Developed by Washington University in St. Louis [total_pages:protected] => 3 [billed_pages:protected] => 3 [publication_number:protected] => [part_of:protected] => [keywords:protected] => ergonomics, musculoskeletal disorders, MSDs [comments:protected] => 7-28-2014 - Originally submitted as "HTML w/ doc and PDF", Jeff Nelson asked Bruce Lippy for permission to switch it to "HTML w/ PDF" -- permission was given [summary:protected] => This overviews provides a background on how Washington University in St. Louis developed this series of six toolbox talks on ergonomics. It also describes how they tested the effectiveness of these communication tools, concluding that the guide was valuable for improving the delivery of ergonomics training and interaction between the safety representative and workers. The researchers recommend preparing site-specific information prior to the talk and interacting with workers to discuss problems and ergonomic solutions during the safety meetings. [transition_comments:protected] => [external_link:protected] => [consol_link:protected] => [more_like_this:protected] => [permission_given_by:protected] => Lisa Jaegers, Washington U. in St. Louis [published:protected] => T [billable:protected] => F [img_name:protected] => [img_ext:protected] => png [img_width:protected] => [img_height:protected] => [img_credit:protected] => [img_practice:protected] => [vid_source_id:protected] => [vid_running_time:protected] => [vid_intended_audience:protected] => [vid_acquisition_info:protected] => [vid_cost:protected] => [vid_producer:protected] => [vid_filename:protected] => [vid_filename_downloadable:protected] => [date_summary:protected] => 2014 [date_permission_requested:protected] => [date_permission_received:protected] => [date_review_needed:protected] => [date_received:protected] => 06/11/14 [date_completed:protected] => 07/29/14 [date_billed:protected] => [date_modified:protected] => 07/29/14 [collBokExports:protected] => [lastBokExportCriteria:BaseElcoshItem:private] => [alreadyInSave:protected] => [alreadyInValidation:protected] => [validationFailures:protected] => Array ( ) [_new:BaseObject:private] => [_deleted:BaseObject:private] => [modifiedColumns:protected] => Array ( ) ) ) [Toolbox Talks] => Array ( [0] => DocumentRecord Object ( [records:protected] => Array ( ) [recordId:protected] => [searchWordClass:protected] => [searchWordPeerClass:protected] => [bok_record:protected] => [authors:protected] => [organizations:protected] => [collections:protected] => [categories:protected] => [categories_initialized:protected] => [mapped_items:protected] => [content:protected] => [files:protected] => [language:protected] => Language Object ( [id:protected] => 1 [code:protected] => en [name:protected] => English [alreadyInSave:protected] => [alreadyInValidation:protected] => [validationFailures:protected] => Array ( ) [_new:BaseObject:private] => [_deleted:BaseObject:private] => [modifiedColumns:protected] => Array ( ) ) [old_record:protected] => [id:protected] => 3835 [old_id:protected] => [elcosh_id:protected] => d001304 [type:protected] => document [display_type:protected] => HTML w/ PDF [user_id:protected] => 25 [language_id:protected] => 1 [tagging_id:protected] => Bruce Lippy [priority_id:protected] => 1 [title:protected] => Ergonomics Tool Box Talks (TBT) Training Guide [total_pages:protected] => 2 [billed_pages:protected] => 2 [publication_number:protected] => [part_of:protected] => [keywords:protected] => Ergonomics, carpal tunnel, muscular skeletal disorders, msd [comments:protected] => [summary:protected] => CPWR-funded ergonomics research by Washington University at St. Louis led to the development of 6 tool box talks. This guide is an explanation of how to deliver the talks for maximum effectiveness. This guide should be reviewed before delivering any of the talks because it makes important recommendations like: • If possible, give the TBTs as a part of the crew’s regular safety meetings so that ergonomics is included in the safety discussion. • Try to locate an area with few distractions for gathering the crew. • For a team approach, invite the work crew, site superintendent, project manager and other general contractor and/or subcontractor reps who you feel may be helpful in supporting the training and ergonomics solutions. [transition_comments:protected] => [external_link:protected] => [consol_link:protected] => [more_like_this:protected] => d001303,d001305,d001306,d001307,d001308,d001309,d001310 [permission_given_by:protected] => [published:protected] => T [billable:protected] => F [img_name:protected] => [img_ext:protected] => png [img_width:protected] => [img_height:protected] => [img_credit:protected] => [img_practice:protected] => [vid_source_id:protected] => [vid_running_time:protected] => [vid_intended_audience:protected] => [vid_acquisition_info:protected] => [vid_cost:protected] => [vid_producer:protected] => [vid_filename:protected] => [vid_filename_downloadable:protected] => [date_summary:protected] => 2014 [date_permission_requested:protected] => [date_permission_received:protected] => [date_review_needed:protected] => [date_received:protected] => 06/12/14 [date_completed:protected] => 07/29/14 [date_billed:protected] => [date_modified:protected] => 07/29/14 [collBokExports:protected] => [lastBokExportCriteria:BaseElcoshItem:private] => [alreadyInSave:protected] => [alreadyInValidation:protected] => [validationFailures:protected] => Array ( ) [_new:BaseObject:private] => [_deleted:BaseObject:private] => [modifiedColumns:protected] => Array ( ) ) [1] => DocumentRecord Object ( [records:protected] => Array ( ) [recordId:protected] => [searchWordClass:protected] => [searchWordPeerClass:protected] => [bok_record:protected] => [authors:protected] => [organizations:protected] => [collections:protected] => [categories:protected] => [categories_initialized:protected] => [mapped_items:protected] => [content:protected] => [files:protected] => [language:protected] => Language Object ( [id:protected] => 1 [code:protected] => en [name:protected] => English [alreadyInSave:protected] => [alreadyInValidation:protected] => [validationFailures:protected] => Array ( ) [_new:BaseObject:private] => [_deleted:BaseObject:private] => [modifiedColumns:protected] => Array ( ) ) [old_record:protected] => [id:protected] => 3836 [old_id:protected] => [elcosh_id:protected] => d001305 [type:protected] => document [display_type:protected] => HTML w/ PDF [user_id:protected] => 25 [language_id:protected] => 1 [tagging_id:protected] => Bruce Lippy [priority_id:protected] => 1 [title:protected] => TBT1 Ergonomics in Construction [total_pages:protected] => 5 [billed_pages:protected] => 5 [publication_number:protected] => [part_of:protected] => [keywords:protected] => ergonomics, ergo, msd, musculoskeletal disorders, risk factors, lifting, carpal tunnel, repetition, awkward postures [comments:protected] => 7-28-2014 Jeff Nelson asked Bruce Lippy about what to do with a sentence included toward the top of the doc, "Fill them in on page 2 'Other Questions.'" -- Bruce said this sentence could be deleted from the HTML. [summary:protected] => This is the first in a series of 6 Tool Box Talks produced by Washington University in St. Louis on ergonomics in construction work. This one should be delivered first because it covers what ergonomics is, why construction workers need to talk about it, what the risk factors are for developing a health problem and how to prevent these problems. [transition_comments:protected] => [external_link:protected] => [consol_link:protected] => http://www.cpwrconstructionsolutions.org/pipes_vessels/solution/50/participatory-ergonomics-program.html [more_like_this:protected] => d001303,d001304,d001306,d001307,d001308,d001309 [permission_given_by:protected] => Lisa Jaegers, Washington U. in St. Louis [published:protected] => T [billable:protected] => F [img_name:protected] => [img_ext:protected] => png [img_width:protected] => [img_height:protected] => [img_credit:protected] => [img_practice:protected] => [vid_source_id:protected] => [vid_running_time:protected] => [vid_intended_audience:protected] => [vid_acquisition_info:protected] => [vid_cost:protected] => [vid_producer:protected] => [vid_filename:protected] => [vid_filename_downloadable:protected] => [date_summary:protected] => 2014 [date_permission_requested:protected] => [date_permission_received:protected] => [date_review_needed:protected] => [date_received:protected] => 06/12/14 [date_completed:protected] => 07/28/14 [date_billed:protected] => [date_modified:protected] => 10/09/15 [collBokExports:protected] => [lastBokExportCriteria:BaseElcoshItem:private] => [alreadyInSave:protected] => [alreadyInValidation:protected] => [validationFailures:protected] => Array ( ) [_new:BaseObject:private] => [_deleted:BaseObject:private] => [modifiedColumns:protected] => Array ( ) ) [2] => DocumentRecord Object ( [records:protected] => Array ( ) [recordId:protected] => [searchWordClass:protected] => [searchWordPeerClass:protected] => [bok_record:protected] => [authors:protected] => [organizations:protected] => [collections:protected] => [categories:protected] => [categories_initialized:protected] => [mapped_items:protected] => [content:protected] => [files:protected] => [language:protected] => Language Object ( [id:protected] => 1 [code:protected] => en [name:protected] => English [alreadyInSave:protected] => [alreadyInValidation:protected] => [validationFailures:protected] => Array ( ) [_new:BaseObject:private] => [_deleted:BaseObject:private] => [modifiedColumns:protected] => Array ( ) ) [old_record:protected] => [id:protected] => 3837 [old_id:protected] => [elcosh_id:protected] => d001306 [type:protected] => document [display_type:protected] => HTML w/ PDF [user_id:protected] => 25 [language_id:protected] => 1 [tagging_id:protected] => Bruce Lippy [priority_id:protected] => 1 [title:protected] => TBT2 Keep Reach Close [total_pages:protected] => 4 [billed_pages:protected] => 4 [publication_number:protected] => [part_of:protected] => [keywords:protected] => reach, ergonomic, ergo, MSD, carpal tunnel, repetition, awkward positions [comments:protected] => 7-28-2014 Jeff Nelson asked Bruce Lippy about what to do with a sentence included toward the top of the doc, "Fill them in on page 2 'Other Questions.'" -- Bruce said this sentence could be deleted from the HTML. [summary:protected] => This is the second of six Tool Box Talks created by Washington University in St. Louis on ergonomics in construction. There is a guide with the series that describes how to deliver these talks. This one deals with how to avoid awkward reaching during tasks to prevent injuries. try to work with your hands below your head and close to our body to reduce your risk of shoulder strains and back discomfort. This TBT recommends considering ways to move close to the task, keeping the work area free of obstacles, and talking with each other to provide constructive feedback about your working position. [transition_comments:protected] => [external_link:protected] => [consol_link:protected] => http://www.cpwrconstructionsolutions.org/hazard/959/lifting-and-carrying-manual-materials-handling.html [more_like_this:protected] => d001303,d001304,d001305,d001307,d001308,e001309 [permission_given_by:protected] => [published:protected] => T [billable:protected] => F [img_name:protected] => [img_ext:protected] => png [img_width:protected] => [img_height:protected] => [img_credit:protected] => [img_practice:protected] => [vid_source_id:protected] => [vid_running_time:protected] => [vid_intended_audience:protected] => [vid_acquisition_info:protected] => [vid_cost:protected] => [vid_producer:protected] => [vid_filename:protected] => [vid_filename_downloadable:protected] => [date_summary:protected] => 2014 [date_permission_requested:protected] => [date_permission_received:protected] => [date_review_needed:protected] => [date_received:protected] => 06/12/14 [date_completed:protected] => 07/28/14 [date_billed:protected] => [date_modified:protected] => 11/02/16 [collBokExports:protected] => [lastBokExportCriteria:BaseElcoshItem:private] => [alreadyInSave:protected] => [alreadyInValidation:protected] => [validationFailures:protected] => Array ( ) [_new:BaseObject:private] => [_deleted:BaseObject:private] => [modifiedColumns:protected] => Array ( ) ) [3] => DocumentRecord Object ( [records:protected] => Array ( ) [recordId:protected] => [searchWordClass:protected] => [searchWordPeerClass:protected] => [bok_record:protected] => [authors:protected] => [organizations:protected] => [collections:protected] => [categories:protected] => [categories_initialized:protected] => [mapped_items:protected] => [content:protected] => [files:protected] => [language:protected] => Language Object ( [id:protected] => 1 [code:protected] => en [name:protected] => English [alreadyInSave:protected] => [alreadyInValidation:protected] => [validationFailures:protected] => Array ( ) [_new:BaseObject:private] => [_deleted:BaseObject:private] => [modifiedColumns:protected] => Array ( ) ) [old_record:protected] => [id:protected] => 3839 [old_id:protected] => [elcosh_id:protected] => d001308 [type:protected] => document [display_type:protected] => HTML w/ PDF [user_id:protected] => 23 [language_id:protected] => 1 [tagging_id:protected] => Bruce Lippy [priority_id:protected] => 1 [title:protected] => TBT4 Move Materials With Assist [total_pages:protected] => 4 [billed_pages:protected] => 4 [publication_number:protected] => [part_of:protected] => [keywords:protected] => lifting, back injury, ergonomics, ergo, MSD, buddy system [comments:protected] => 7-28-2014 Jeff Nelson asked Bruce Lippy about what to do with a sentence included toward the top of the doc, "Fill them in on page 2 'Other Questions.'" -- Bruce said this sentence could be deleted from the HTML. [summary:protected] => This tool box talk is fourth in a series of 6 developed by Washington University in St. Louis on construction ergonomics. This one focuses on preventing back injuries by getting an assist when manually lifting. It recommends using a cart for transporting loads, taking less trips, avoiding carrying materials on the shoulder and helping each other to lift large or heavy materials when a cart or hoist is not available. [transition_comments:protected] => [external_link:protected] => [consol_link:protected] => http://www.cpwrconstructionsolutions.org/hazard/959/lifting-and-carrying-manual-materials-handling.html [more_like_this:protected] => d001303,d001304,d001305,d001306,d001307,d001309 [permission_given_by:protected] => Lisa Jaegers, Washington U. in St. Louis [published:protected] => T [billable:protected] => F [img_name:protected] => [img_ext:protected] => png [img_width:protected] => [img_height:protected] => [img_credit:protected] => [img_practice:protected] => [vid_source_id:protected] => [vid_running_time:protected] => [vid_intended_audience:protected] => [vid_acquisition_info:protected] => [vid_cost:protected] => [vid_producer:protected] => [vid_filename:protected] => [vid_filename_downloadable:protected] => [date_summary:protected] => 2014 [date_permission_requested:protected] => [date_permission_received:protected] => [date_review_needed:protected] => [date_received:protected] => 06/12/14 [date_completed:protected] => 07/29/14 [date_billed:protected] => [date_modified:protected] => 10/09/15 [collBokExports:protected] => [lastBokExportCriteria:BaseElcoshItem:private] => [alreadyInSave:protected] => [alreadyInValidation:protected] => [validationFailures:protected] => Array ( ) [_new:BaseObject:private] => [_deleted:BaseObject:private] => [modifiedColumns:protected] => Array ( ) ) [4] => DocumentRecord Object ( [records:protected] => Array ( ) [recordId:protected] => [searchWordClass:protected] => [searchWordPeerClass:protected] => [bok_record:protected] => [authors:protected] => [organizations:protected] => [collections:protected] => [categories:protected] => [categories_initialized:protected] => [mapped_items:protected] => [content:protected] => [files:protected] => [language:protected] => Language Object ( [id:protected] => 1 [code:protected] => en [name:protected] => English [alreadyInSave:protected] => [alreadyInValidation:protected] => [validationFailures:protected] => Array ( ) [_new:BaseObject:private] => [_deleted:BaseObject:private] => [modifiedColumns:protected] => Array ( ) ) [old_record:protected] => [id:protected] => 3840 [old_id:protected] => [elcosh_id:protected] => d001309 [type:protected] => document [display_type:protected] => HTML w/ PDF [user_id:protected] => 23 [language_id:protected] => 1 [tagging_id:protected] => Bruce Lippy [priority_id:protected] => 1 [title:protected] => TBT5 Manual Tools [total_pages:protected] => 4 [billed_pages:protected] => 4 [publication_number:protected] => [part_of:protected] => [keywords:protected] => ergonomic, hand tools, handles, MSD, musculoskeletal disorder, carpal tunnel [comments:protected] => 7-28-2014 Jeff Nelson asked Bruce Lippy about what to do with a sentence included toward the top of the doc, "Fill them in on page 2 'Other Questions.'" -- Bruce said this sentence could be deleted from the HTML. [summary:protected] => This is the fifth in a series of 6 tool box talks on construction ergonomics produced by the University of Washington in St. Louis. This one focuses on manual tools. It asks the following 6 key questions. Does the tool… 1. Fit the task? 2. Allow a good power grip? 3. Keep the wrist in a straight posture? 4. Feel comfortable? 5. Take less effort than other tools for the task? 6. Work effectively? [transition_comments:protected] => [external_link:protected] => [consol_link:protected] => http://www.cpwrconstructionsolutions.org/masonry/solution/383/ergonomic-hand-tools.html [more_like_this:protected] => d001303,d001304,d001305,d001306,d001307,d001308,d001310 [permission_given_by:protected] => Lisa Jaegers, U. Wash. St. Louis [published:protected] => T [billable:protected] => F [img_name:protected] => [img_ext:protected] => png [img_width:protected] => [img_height:protected] => [img_credit:protected] => [img_practice:protected] => [vid_source_id:protected] => [vid_running_time:protected] => [vid_intended_audience:protected] => [vid_acquisition_info:protected] => [vid_cost:protected] => [vid_producer:protected] => [vid_filename:protected] => [vid_filename_downloadable:protected] => [date_summary:protected] => 2014 [date_permission_requested:protected] => [date_permission_received:protected] => [date_review_needed:protected] => [date_received:protected] => 06/12/14 [date_completed:protected] => 07/29/14 [date_billed:protected] => [date_modified:protected] => 10/09/15 [collBokExports:protected] => [lastBokExportCriteria:BaseElcoshItem:private] => [alreadyInSave:protected] => [alreadyInValidation:protected] => [validationFailures:protected] => Array ( ) [_new:BaseObject:private] => [_deleted:BaseObject:private] => [modifiedColumns:protected] => Array ( ) ) ) ) [collections] => Array ( [3834] => ) [record] => DocumentRecord Object ( [records:protected] => Array ( ) [recordId:protected] => [searchWordClass:protected] => [searchWordPeerClass:protected] => [bok_record:protected] => [authors:protected] => Array ( ) [organizations:protected] => Array ( [182] => Organization Object ( [id:protected] => 182 [elcosh_id:protected] => o000205 [user_id:protected] => 14 [province_id:protected] => 0 [country_id:protected] => 0 [title:protected] => Washington University - St. Louis [address:protected] => [postal_code:protected] => [city:protected] => [department:protected] => [phone:protected] => [fax:protected] => [email:protected] => [website:protected] => [filename:protected] => [about:protected] => [comments:protected] => [logo_available:protected] => T [no_details:protected] => T [date_received:protected] => 2009-08-06 [date_completed:protected] => 2009-08-06 [date_billed:protected] => [alreadyInSave:protected] => [alreadyInValidation:protected] => [validationFailures:protected] => Array ( ) [_new:BaseObject:private] => [_deleted:BaseObject:private] => [modifiedColumns:protected] => Array ( ) ) ) [collections:protected] => Array ( [3834] => ) [categories:protected] => [categories_initialized:protected] => [mapped_items:protected] => Array ( [3833] => DocumentRecord Object ( [records:protected] => Array ( ) [recordId:protected] => [searchWordClass:protected] => [searchWordPeerClass:protected] => [bok_record:protected] => [authors:protected] => [organizations:protected] => [collections:protected] => [categories:protected] => [categories_initialized:protected] => [mapped_items:protected] => [content:protected] => [files:protected] => [language:protected] => [old_record:protected] => [id:protected] => 3833 [old_id:protected] => [elcosh_id:protected] => d001303 [type:protected] => document [display_type:protected] => HTML w/ PDF [user_id:protected] => 25 [language_id:protected] => 1 [tagging_id:protected] => Bruce Lippy [priority_id:protected] => 1 [title:protected] => Overview of Toolbox Talks on Ergonomics Developed by Washington University in St. Louis [total_pages:protected] => 3 [billed_pages:protected] => 3 [publication_number:protected] => [part_of:protected] => [keywords:protected] => ergonomics, musculoskeletal disorders, MSDs [comments:protected] => 7-28-2014 - Originally submitted as "HTML w/ doc and PDF", Jeff Nelson asked Bruce Lippy for permission to switch it to "HTML w/ PDF" -- permission was given [summary:protected] => This overviews provides a background on how Washington University in St. Louis developed this series of six toolbox talks on ergonomics. It also describes how they tested the effectiveness of these communication tools, concluding that the guide was valuable for improving the delivery of ergonomics training and interaction between the safety representative and workers. The researchers recommend preparing site-specific information prior to the talk and interacting with workers to discuss problems and ergonomic solutions during the safety meetings. [transition_comments:protected] => [external_link:protected] => [consol_link:protected] => [more_like_this:protected] => [permission_given_by:protected] => Lisa Jaegers, Washington U. in St. Louis [published:protected] => T [billable:protected] => F [img_name:protected] => [img_ext:protected] => png [img_width:protected] => [img_height:protected] => [img_credit:protected] => [img_practice:protected] => [vid_source_id:protected] => [vid_running_time:protected] => [vid_intended_audience:protected] => [vid_acquisition_info:protected] => [vid_cost:protected] => [vid_producer:protected] => [vid_filename:protected] => [vid_filename_downloadable:protected] => [date_summary:protected] => 2014 [date_permission_requested:protected] => [date_permission_received:protected] => [date_review_needed:protected] => [date_received:protected] => 06/11/14 [date_completed:protected] => 07/29/14 [date_billed:protected] => [date_modified:protected] => 07/29/14 [collBokExports:protected] => [lastBokExportCriteria:BaseElcoshItem:private] => [alreadyInSave:protected] => [alreadyInValidation:protected] => [validationFailures:protected] => Array ( ) [_new:BaseObject:private] => [_deleted:BaseObject:private] => [modifiedColumns:protected] => Array ( ) ) [3835] => DocumentRecord Object ( [records:protected] => Array ( ) [recordId:protected] => [searchWordClass:protected] => [searchWordPeerClass:protected] => [bok_record:protected] => [authors:protected] => [organizations:protected] => [collections:protected] => [categories:protected] => [categories_initialized:protected] => [mapped_items:protected] => [content:protected] => [files:protected] => [language:protected] => [old_record:protected] => [id:protected] => 3835 [old_id:protected] => [elcosh_id:protected] => d001304 [type:protected] => document [display_type:protected] => HTML w/ PDF [user_id:protected] => 25 [language_id:protected] => 1 [tagging_id:protected] => Bruce Lippy [priority_id:protected] => 1 [title:protected] => Ergonomics Tool Box Talks (TBT) Training Guide [total_pages:protected] => 2 [billed_pages:protected] => 2 [publication_number:protected] => [part_of:protected] => [keywords:protected] => Ergonomics, carpal tunnel, muscular skeletal disorders, msd [comments:protected] => [summary:protected] => CPWR-funded ergonomics research by Washington University at St. Louis led to the development of 6 tool box talks. This guide is an explanation of how to deliver the talks for maximum effectiveness. This guide should be reviewed before delivering any of the talks because it makes important recommendations like: • If possible, give the TBTs as a part of the crew’s regular safety meetings so that ergonomics is included in the safety discussion. • Try to locate an area with few distractions for gathering the crew. • For a team approach, invite the work crew, site superintendent, project manager and other general contractor and/or subcontractor reps who you feel may be helpful in supporting the training and ergonomics solutions. [transition_comments:protected] => [external_link:protected] => [consol_link:protected] => [more_like_this:protected] => d001303,d001305,d001306,d001307,d001308,d001309,d001310 [permission_given_by:protected] => [published:protected] => T [billable:protected] => F [img_name:protected] => [img_ext:protected] => png [img_width:protected] => [img_height:protected] => [img_credit:protected] => [img_practice:protected] => [vid_source_id:protected] => [vid_running_time:protected] => [vid_intended_audience:protected] => [vid_acquisition_info:protected] => [vid_cost:protected] => [vid_producer:protected] => [vid_filename:protected] => [vid_filename_downloadable:protected] => [date_summary:protected] => 2014 [date_permission_requested:protected] => [date_permission_received:protected] => [date_review_needed:protected] => [date_received:protected] => 06/12/14 [date_completed:protected] => 07/29/14 [date_billed:protected] => [date_modified:protected] => 07/29/14 [collBokExports:protected] => [lastBokExportCriteria:BaseElcoshItem:private] => [alreadyInSave:protected] => [alreadyInValidation:protected] => [validationFailures:protected] => Array ( ) [_new:BaseObject:private] => [_deleted:BaseObject:private] => [modifiedColumns:protected] => Array ( ) ) [3836] => DocumentRecord Object ( [records:protected] => Array ( ) [recordId:protected] => [searchWordClass:protected] => [searchWordPeerClass:protected] => [bok_record:protected] => [authors:protected] => [organizations:protected] => [collections:protected] => [categories:protected] => [categories_initialized:protected] => [mapped_items:protected] => [content:protected] => [files:protected] => [language:protected] => [old_record:protected] => [id:protected] => 3836 [old_id:protected] => [elcosh_id:protected] => d001305 [type:protected] => document [display_type:protected] => HTML w/ PDF [user_id:protected] => 25 [language_id:protected] => 1 [tagging_id:protected] => Bruce Lippy [priority_id:protected] => 1 [title:protected] => TBT1 Ergonomics in Construction [total_pages:protected] => 5 [billed_pages:protected] => 5 [publication_number:protected] => [part_of:protected] => [keywords:protected] => ergonomics, ergo, msd, musculoskeletal disorders, risk factors, lifting, carpal tunnel, repetition, awkward postures [comments:protected] => 7-28-2014 Jeff Nelson asked Bruce Lippy about what to do with a sentence included toward the top of the doc, "Fill them in on page 2 'Other Questions.'" -- Bruce said this sentence could be deleted from the HTML. [summary:protected] => This is the first in a series of 6 Tool Box Talks produced by Washington University in St. Louis on ergonomics in construction work. This one should be delivered first because it covers what ergonomics is, why construction workers need to talk about it, what the risk factors are for developing a health problem and how to prevent these problems. [transition_comments:protected] => [external_link:protected] => [consol_link:protected] => http://www.cpwrconstructionsolutions.org/pipes_vessels/solution/50/participatory-ergonomics-program.html [more_like_this:protected] => d001303,d001304,d001306,d001307,d001308,d001309 [permission_given_by:protected] => Lisa Jaegers, Washington U. in St. Louis [published:protected] => T [billable:protected] => F [img_name:protected] => [img_ext:protected] => png [img_width:protected] => [img_height:protected] => [img_credit:protected] => [img_practice:protected] => [vid_source_id:protected] => [vid_running_time:protected] => [vid_intended_audience:protected] => [vid_acquisition_info:protected] => [vid_cost:protected] => [vid_producer:protected] => [vid_filename:protected] => [vid_filename_downloadable:protected] => [date_summary:protected] => 2014 [date_permission_requested:protected] => [date_permission_received:protected] => [date_review_needed:protected] => [date_received:protected] => 06/12/14 [date_completed:protected] => 07/28/14 [date_billed:protected] => [date_modified:protected] => 10/09/15 [collBokExports:protected] => [lastBokExportCriteria:BaseElcoshItem:private] => [alreadyInSave:protected] => [alreadyInValidation:protected] => [validationFailures:protected] => Array ( ) [_new:BaseObject:private] => [_deleted:BaseObject:private] => [modifiedColumns:protected] => Array ( ) ) [3837] => DocumentRecord Object ( [records:protected] => Array ( ) [recordId:protected] => [searchWordClass:protected] => [searchWordPeerClass:protected] => [bok_record:protected] => [authors:protected] => [organizations:protected] => [collections:protected] => [categories:protected] => [categories_initialized:protected] => [mapped_items:protected] => [content:protected] => [files:protected] => [language:protected] => [old_record:protected] => [id:protected] => 3837 [old_id:protected] => [elcosh_id:protected] => d001306 [type:protected] => document [display_type:protected] => HTML w/ PDF [user_id:protected] => 25 [language_id:protected] => 1 [tagging_id:protected] => Bruce Lippy [priority_id:protected] => 1 [title:protected] => TBT2 Keep Reach Close [total_pages:protected] => 4 [billed_pages:protected] => 4 [publication_number:protected] => [part_of:protected] => [keywords:protected] => reach, ergonomic, ergo, MSD, carpal tunnel, repetition, awkward positions [comments:protected] => 7-28-2014 Jeff Nelson asked Bruce Lippy about what to do with a sentence included toward the top of the doc, "Fill them in on page 2 'Other Questions.'" -- Bruce said this sentence could be deleted from the HTML. [summary:protected] => This is the second of six Tool Box Talks created by Washington University in St. Louis on ergonomics in construction. There is a guide with the series that describes how to deliver these talks. This one deals with how to avoid awkward reaching during tasks to prevent injuries. try to work with your hands below your head and close to our body to reduce your risk of shoulder strains and back discomfort. This TBT recommends considering ways to move close to the task, keeping the work area free of obstacles, and talking with each other to provide constructive feedback about your working position. [transition_comments:protected] => [external_link:protected] => [consol_link:protected] => http://www.cpwrconstructionsolutions.org/hazard/959/lifting-and-carrying-manual-materials-handling.html [more_like_this:protected] => d001303,d001304,d001305,d001307,d001308,e001309 [permission_given_by:protected] => [published:protected] => T [billable:protected] => F [img_name:protected] => [img_ext:protected] => png [img_width:protected] => [img_height:protected] => [img_credit:protected] => [img_practice:protected] => [vid_source_id:protected] => [vid_running_time:protected] => [vid_intended_audience:protected] => [vid_acquisition_info:protected] => [vid_cost:protected] => [vid_producer:protected] => [vid_filename:protected] => [vid_filename_downloadable:protected] => [date_summary:protected] => 2014 [date_permission_requested:protected] => [date_permission_received:protected] => [date_review_needed:protected] => [date_received:protected] => 06/12/14 [date_completed:protected] => 07/28/14 [date_billed:protected] => [date_modified:protected] => 11/02/16 [collBokExports:protected] => [lastBokExportCriteria:BaseElcoshItem:private] => [alreadyInSave:protected] => [alreadyInValidation:protected] => [validationFailures:protected] => Array ( ) [_new:BaseObject:private] => [_deleted:BaseObject:private] => [modifiedColumns:protected] => Array ( ) ) [3839] => DocumentRecord Object ( [records:protected] => Array ( ) [recordId:protected] => [searchWordClass:protected] => [searchWordPeerClass:protected] => [bok_record:protected] => [authors:protected] => [organizations:protected] => [collections:protected] => [categories:protected] => [categories_initialized:protected] => [mapped_items:protected] => [content:protected] => [files:protected] => [language:protected] => [old_record:protected] => [id:protected] => 3839 [old_id:protected] => [elcosh_id:protected] => d001308 [type:protected] => document [display_type:protected] => HTML w/ PDF [user_id:protected] => 23 [language_id:protected] => 1 [tagging_id:protected] => Bruce Lippy [priority_id:protected] => 1 [title:protected] => TBT4 Move Materials With Assist [total_pages:protected] => 4 [billed_pages:protected] => 4 [publication_number:protected] => [part_of:protected] => [keywords:protected] => lifting, back injury, ergonomics, ergo, MSD, buddy system [comments:protected] => 7-28-2014 Jeff Nelson asked Bruce Lippy about what to do with a sentence included toward the top of the doc, "Fill them in on page 2 'Other Questions.'" -- Bruce said this sentence could be deleted from the HTML. [summary:protected] => This tool box talk is fourth in a series of 6 developed by Washington University in St. Louis on construction ergonomics. This one focuses on preventing back injuries by getting an assist when manually lifting. It recommends using a cart for transporting loads, taking less trips, avoiding carrying materials on the shoulder and helping each other to lift large or heavy materials when a cart or hoist is not available. [transition_comments:protected] => [external_link:protected] => [consol_link:protected] => http://www.cpwrconstructionsolutions.org/hazard/959/lifting-and-carrying-manual-materials-handling.html [more_like_this:protected] => d001303,d001304,d001305,d001306,d001307,d001309 [permission_given_by:protected] => Lisa Jaegers, Washington U. in St. Louis [published:protected] => T [billable:protected] => F [img_name:protected] => [img_ext:protected] => png [img_width:protected] => [img_height:protected] => [img_credit:protected] => [img_practice:protected] => [vid_source_id:protected] => [vid_running_time:protected] => [vid_intended_audience:protected] => [vid_acquisition_info:protected] => [vid_cost:protected] => [vid_producer:protected] => [vid_filename:protected] => [vid_filename_downloadable:protected] => [date_summary:protected] => 2014 [date_permission_requested:protected] => [date_permission_received:protected] => [date_review_needed:protected] => [date_received:protected] => 06/12/14 [date_completed:protected] => 07/29/14 [date_billed:protected] => [date_modified:protected] => 10/09/15 [collBokExports:protected] => [lastBokExportCriteria:BaseElcoshItem:private] => [alreadyInSave:protected] => [alreadyInValidation:protected] => [validationFailures:protected] => Array ( ) [_new:BaseObject:private] => [_deleted:BaseObject:private] => [modifiedColumns:protected] => Array ( ) ) [3840] => DocumentRecord Object ( [records:protected] => Array ( ) [recordId:protected] => [searchWordClass:protected] => [searchWordPeerClass:protected] => [bok_record:protected] => [authors:protected] => [organizations:protected] => [collections:protected] => [categories:protected] => [categories_initialized:protected] => [mapped_items:protected] => [content:protected] => [files:protected] => [language:protected] => [old_record:protected] => [id:protected] => 3840 [old_id:protected] => [elcosh_id:protected] => d001309 [type:protected] => document [display_type:protected] => HTML w/ PDF [user_id:protected] => 23 [language_id:protected] => 1 [tagging_id:protected] => Bruce Lippy [priority_id:protected] => 1 [title:protected] => TBT5 Manual Tools [total_pages:protected] => 4 [billed_pages:protected] => 4 [publication_number:protected] => [part_of:protected] => [keywords:protected] => ergonomic, hand tools, handles, MSD, musculoskeletal disorder, carpal tunnel [comments:protected] => 7-28-2014 Jeff Nelson asked Bruce Lippy about what to do with a sentence included toward the top of the doc, "Fill them in on page 2 'Other Questions.'" -- Bruce said this sentence could be deleted from the HTML. [summary:protected] => This is the fifth in a series of 6 tool box talks on construction ergonomics produced by the University of Washington in St. Louis. This one focuses on manual tools. It asks the following 6 key questions. Does the tool… 1. Fit the task? 2. Allow a good power grip? 3. Keep the wrist in a straight posture? 4. Feel comfortable? 5. Take less effort than other tools for the task? 6. Work effectively? [transition_comments:protected] => [external_link:protected] => [consol_link:protected] => http://www.cpwrconstructionsolutions.org/masonry/solution/383/ergonomic-hand-tools.html [more_like_this:protected] => d001303,d001304,d001305,d001306,d001307,d001308,d001310 [permission_given_by:protected] => Lisa Jaegers, U. Wash. St. Louis [published:protected] => T [billable:protected] => F [img_name:protected] => [img_ext:protected] => png [img_width:protected] => [img_height:protected] => [img_credit:protected] => [img_practice:protected] => [vid_source_id:protected] => [vid_running_time:protected] => [vid_intended_audience:protected] => [vid_acquisition_info:protected] => [vid_cost:protected] => [vid_producer:protected] => [vid_filename:protected] => [vid_filename_downloadable:protected] => [date_summary:protected] => 2014 [date_permission_requested:protected] => [date_permission_received:protected] => [date_review_needed:protected] => [date_received:protected] => 06/12/14 [date_completed:protected] => 07/29/14 [date_billed:protected] => [date_modified:protected] => 10/09/15 [collBokExports:protected] => [lastBokExportCriteria:BaseElcoshItem:private] => [alreadyInSave:protected] => [alreadyInValidation:protected] => [validationFailures:protected] => Array ( ) [_new:BaseObject:private] => [_deleted:BaseObject:private] => [modifiedColumns:protected] => Array ( ) ) ) [content:protected] => [files:protected] => Array ( [559] => [560] => [546] => File Object ( [id:protected] => 546 [filename:protected] => 3.jpg [downloadable:protected] => F [timestamp:protected] => 2009-07-03 12:54:22 [alreadyInSave:protected] => [alreadyInValidation:protected] => [validationFailures:protected] => Array ( ) [_new:BaseObject:private] => [_deleted:BaseObject:private] => [modifiedColumns:protected] => Array ( ) ) [9643] => File Object ( [id:protected] => 9643 [filename:protected] => d001307.pdf [downloadable:protected] => T [timestamp:protected] => 2014-07-27 19:09:19 [alreadyInSave:protected] => [alreadyInValidation:protected] => [validationFailures:protected] => Array ( ) [_new:BaseObject:private] => [_deleted:BaseObject:private] => [modifiedColumns:protected] => Array ( ) ) [566] => File Object ( [id:protected] => 566 [filename:protected] => 4.jpg [downloadable:protected] => F [timestamp:protected] => 2009-07-03 12:54:23 [alreadyInSave:protected] => [alreadyInValidation:protected] => [validationFailures:protected] => Array ( ) [_new:BaseObject:private] => [_deleted:BaseObject:private] => [modifiedColumns:protected] => Array ( ) ) ) [language:protected] => Language Object ( [id:protected] => 1 [code:protected] => en [name:protected] => English [alreadyInSave:protected] => [alreadyInValidation:protected] => [validationFailures:protected] => Array ( ) [_new:BaseObject:private] => [_deleted:BaseObject:private] => [modifiedColumns:protected] => Array ( ) ) [old_record:protected] => [id:protected] => 3838 [old_id:protected] => [elcosh_id:protected] => d001307 [type:protected] => document [display_type:protected] => HTML w/ PDF [user_id:protected] => 25 [language_id:protected] => 1 [tagging_id:protected] => Bruce Lippy [priority_id:protected] => 1 [title:protected] => TBT3 Positioning [total_pages:protected] => 4 [billed_pages:protected] => 4 [publication_number:protected] => [part_of:protected] => [keywords:protected] => position, positioning, ergonomics, ergo, carpal tunnel, MSD, musculoskeletal disorder [comments:protected] => 7-28-2014 Jeff Nelson asked Bruce Lippy about what to do with a sentence included toward the top of the doc, "Fill them in on page 2 'Other Questions.'" -- Bruce said this sentence could be deleted from the HTML. [summary:protected] => This third in a series of 6 Tool Box Talks on construction ergonomics focuses on proper positioning to avoid injuries. The TBT recommends: 1)prop up a task off of the floor by using a raised surface, cart, baker scaffold, saw horses to prep materials near waist height, 2)move the lift or ladder in the best position for the work, 3)position the lift in front of the area you plan to work without trying to reach too far on either side of the lift. [transition_comments:protected] => [external_link:protected] => [consol_link:protected] => http://www.cpwrconstructionsolutions.org/hazard/959/lifting-and-carrying-manual-materials-handling.html [more_like_this:protected] => d001303,d001304,d001305,d001306,d001308,d001309 [permission_given_by:protected] => Lisa Jaegers, WU-St. Louis [published:protected] => T [billable:protected] => F [img_name:protected] => [img_ext:protected] => png [img_width:protected] => [img_height:protected] => [img_credit:protected] => [img_practice:protected] => [vid_source_id:protected] => [vid_running_time:protected] => [vid_intended_audience:protected] => [vid_acquisition_info:protected] => [vid_cost:protected] => [vid_producer:protected] => [vid_filename:protected] => [vid_filename_downloadable:protected] => [date_summary:protected] => 2014 [date_permission_requested:protected] => [date_permission_received:protected] => [date_review_needed:protected] => [date_received:protected] => 06/12/14 [date_completed:protected] => 07/28/14 [date_billed:protected] => [date_modified:protected] => 10/09/15 [collBokExports:protected] => [lastBokExportCriteria:BaseElcoshItem:private] => [alreadyInSave:protected] => [alreadyInValidation:protected] => [validationFailures:protected] => Array ( ) [_new:BaseObject:private] => [_deleted:BaseObject:private] => [modifiedColumns:protected] => Array ( ) ) [show_text] => [document_content] => ElcoshItemDocumentContent Object ( [id:protected] => 2906 [item_id:protected] => 3838 [type:protected] => main [title:protected] => [content:protected] =>
Facilitator / Leader Tasks Before the Tool Box Talk (TBT)
- Read through this TBT guide.
- Walk the job site to find ergonomics examples based on the TBT. If possible, take photos of “safe” and “unsafe” examples at the site to be used during the TBT.
- Write down discussion questions to ask the group.
Learning Goals
After discussing this training topic, workers will have gained a general understanding of:
- Unsafe work positions.
- Solutions to improve work positioning.
TRAINING CARD
The last page of this PDF has directions for printing and laminating the training cards.
TRAINER’S TALKING POINTS
Why should we talk about positioning?
Construction work requires working in high, low, and tight spaces which often forces you to work in an awkward or uncomfortable position. Working in awkward reaching and bent positions can lead to shoulder and back discomfort and possible injury over time.
Demonstration: The training card provides examples of the range of reaching and the point at which the reach is unsafe. Hold your arms straight out in front of you. Look at your hands and wrists while I discuss each of the reach zones on the training card.
The Green Zone shows the ideal location for working with your hands. When possible, try to keep your work tasks as far out as your wrists.
The Orange Zone is for occasional work since it involves more weight on your shoulders and low back since your hands are away from your body. If needed, keep the reach distance as far as your fingertips.
The Red Zone is away from your body so far that it places you at higher risk for falls when in the air and shoulder and back discomfort. Limit the time you work reaching beyond your fingertips.
End of Demonstration
Discussion Question: Can anyone describe to us an awkward position that they work in or have seen someone work in?
- What does it feel like in your neck, back or arms when working in that position?
- Other Questions:_____________________________________________
Training Note: Here are examples of hazards in different construction trades. Choose your trade or one that is similar to your group’s line of work that can be used as hazards and solutions examples.
| Trade | Awkward Posture Hazards | Potential Solution |
|---|---|---|
| Carpenter-Drywall | Leaning over the side of a scissor lift to reach and operating a screw gun with the arm fully extended (reaching in the red zone past the fingertips). | Before starting to install the line of screws to the side of the lift, move the lift to re-center it for the next 2 lines of screws to be installed. |
| Floor Layer | Spreading mortar overhead on a wall with the bakers scaffold one foot away from the wall due to buckets on the floor below (reach in the red zone, past the fingertips). | Pre-plan this task by removing all objects in the path of the bakers scaffold. Having an open path allows you to work closer to the task. |
| Sheet Metal Worker | Prepping duct parts on the floor while bending the back and reaching to work on them. | Pre-plan this task by setting up a waist-height workstation on extra materials, a cart, or saw horses. |
Now let’s put this information into practice. What are some tricks or techniques that you use to work in a comfortable position?
- Other Questions:_____________________________________________
Here are a few other ideas that are listed on your training card:
Prop up your tasks off of the floor by using a raised surface, cart, baker scaffold, saw horses to prep materials near waist height.
Move the lift or ladder in the best position for the work – close to the work tasks.
For safety & comfort, try to position the lift in front of the area you plan to work without trying to reach too far on either side of the lift.
In summary, it is important to work in a safe position when possible in order to reduce the risk of falls and discomfort due to awkward working positions. Consider ways that you can work in the green/comfort zone and orange zone and avoid the unsafe red zone.
References
[Images modified from Grandjean & Eastman Kodak Co.]
1. Grandjean, E. 1988. Fitting the task to the man: A textbook of occupational ergonomics. 4th ed. Taylor & Francis.
2. Eastman Kodak Co. 1983. Ergonomic Design for People at Work. Vol 1. Wiley, John & Sons, Incorporated.
Refer to the resources at our website: oshr.im.wustl.edu for more Tool Box TIPS.
TRAINING ATTENDANCE SHEET
Training Topic: Ergonomics -- Positioning
Date:
| ATTENDEES | |
|---|---|
Directions for Making Laminated Training Cards
The last page of this PDF has directions for printing and laminating the training cards.
[content_transformed:protected] =>Facilitator / Leader Tasks Before the Tool Box Talk (TBT)
- Read through this TBT guide.
- Walk the job site to find ergonomics examples based on the TBT. If possible, take photos of “safe” and “unsafe” examples at the site to be used during the TBT.
- Write down discussion questions to ask the group.
Learning Goals
After discussing this training topic, workers will have gained a general understanding of:
- Unsafe work positions.
- Solutions to improve work positioning.
TRAINING CARD
The last page of this PDF has directions for printing and laminating the training cards.
TRAINER’S TALKING POINTS
Why should we talk about positioning?
Construction work requires working in high, low, and tight spaces which often forces you to work in an awkward or uncomfortable position. Working in awkward reaching and bent positions can lead to shoulder and back discomfort and possible injury over time.
Demonstration: The training card provides examples of the range of reaching and the point at which the reach is unsafe. Hold your arms straight out in front of you. Look at your hands and wrists while I discuss each of the reach zones on the training card.
The Green Zone shows the ideal location for working with your hands. When possible, try to keep your work tasks as far out as your wrists.
The Orange Zone is for occasional work since it involves more weight on your shoulders and low back since your hands are away from your body. If needed, keep the reach distance as far as your fingertips.
The Red Zone is away from your body so far that it places you at higher risk for falls when in the air and shoulder and back discomfort. Limit the time you work reaching beyond your fingertips.
End of Demonstration
Discussion Question: Can anyone describe to us an awkward position that they work in or have seen someone work in?
- What does it feel like in your neck, back or arms when working in that position?
- Other Questions:_____________________________________________
Training Note: Here are examples of hazards in different construction trades. Choose your trade or one that is similar to your group’s line of work that can be used as hazards and solutions examples.
| Trade | Awkward Posture Hazards | Potential Solution |
|---|---|---|
| Carpenter-Drywall | Leaning over the side of a scissor lift to reach and operating a screw gun with the arm fully extended (reaching in the red zone past the fingertips). | Before starting to install the line of screws to the side of the lift, move the lift to re-center it for the next 2 lines of screws to be installed. |
| Floor Layer | Spreading mortar overhead on a wall with the bakers scaffold one foot away from the wall due to buckets on the floor below (reach in the red zone, past the fingertips). | Pre-plan this task by removing all objects in the path of the bakers scaffold. Having an open path allows you to work closer to the task. |
| Sheet Metal Worker | Prepping duct parts on the floor while bending the back and reaching to work on them. | Pre-plan this task by setting up a waist-height workstation on extra materials, a cart, or saw horses. |
Now let’s put this information into practice. What are some tricks or techniques that you use to work in a comfortable position?
- Other Questions:_____________________________________________
Here are a few other ideas that are listed on your training card:
Prop up your tasks off of the floor by using a raised surface, cart, baker scaffold, saw horses to prep materials near waist height.
Move the lift or ladder in the best position for the work – close to the work tasks.
For safety & comfort, try to position the lift in front of the area you plan to work without trying to reach too far on either side of the lift.
In summary, it is important to work in a safe position when possible in order to reduce the risk of falls and discomfort due to awkward working positions. Consider ways that you can work in the green/comfort zone and orange zone and avoid the unsafe red zone.
References
[Images modified from Grandjean & Eastman Kodak Co.]
1. Grandjean, E. 1988. Fitting the task to the man: A textbook of occupational ergonomics. 4th ed. Taylor & Francis.
2. Eastman Kodak Co. 1983. Ergonomic Design for People at Work. Vol 1. Wiley, John & Sons, Incorporated.
Refer to the resources at our website: oshr.im.wustl.edu for more Tool Box TIPS.
TRAINING ATTENDANCE SHEET
Training Topic: Ergonomics -- Positioning
Date:
| ATTENDEES | |
|---|---|
Directions for Making Laminated Training Cards
The last page of this PDF has directions for printing and laminating the training cards.
[disclaimer:protected] => [disclaimer_transformed:protected] => [alreadyInSave:protected] => [alreadyInValidation:protected] => [validationFailures:protected] => Array ( ) [_new:BaseObject:private] => [_deleted:BaseObject:private] => [modifiedColumns:protected] => Array ( ) ) [template] => record ) [_globalContext:PHPTAL_Context:private] => stdClass Object ( ) [_echoDeclarations:PHPTAL_Context:private] => [referer] => http://elcosh.org/document/3838/d001307/TBT3%2BPositioning.html [curr_module] => Record [styles] => Array ( ) [javascript] => Array ( [0] => jquery.min.js ) [metas] => Array ( [language] => en [robots] => index, follow ) [user] => [curr_url] => https://elcosh.org/index.php?module=Record&id=3838&type=document [base_url] => https://elcosh.org/index.php?module=Record [title] => eLCOSH : TBT3 Positioning [language] => en [search_query] => [module] => Record [new_records] => Array ( [0] => Search_Result Object ( [title] => Toolbox Talk: Fixed Ladder [image] => /record/images/notavailable-p.png [blurb] => The CPWR Toolbox Talk on Fixed Ladders addresses the potential risks associated with using fixed ladders. The resource includes a brief case example,... [category] => Array ( [0] => 15 [1] => 47 [2] => 49 [3] => 51 [4] => 53 [5] => 55 [6] => 60 [7] => 64 [8] => 73 [9] => 76 [10] => 78 [11] => 80 [12] => 86 [13] => 87 [14] => 90 [15] => 92 [16] => 93 [17] => 94 [18] => 100 ) [labels] => Array ( [0] => Falls [1] => Work Environment [2] => Hazards [3] => Bricklayer [4] => Trades [5] => Carpenter [7] => Cement Mason [9] => Concrete Polisher [11] => Electrical Worker [13] => HVAC [15] => Laborer [17] => PCC/Restoration [19] => Plumber/Pipefitter [21] => Roofer/Waterproofer [23] => Sheetmetal Worker [25] => Welder [27] => Commercial & Institutional [28] => Jobsites [29] => Industrial [31] => LEED/Green Construction [33] => Renovations [35] => Residential [37] => Toolbox Talks [38] => Documents [39] => Media & Documents ) [type] => Toolbox Talks [sub_category] => [url] => /document/4430/d001660/Toolbox%2BTalk%253A%2BFixed%2BLadder.html [item:protected] => DocumentRecord Object ( [records:protected] => Array ( ) [recordId:protected] => [searchWordClass:protected] => [searchWordPeerClass:protected] => [bok_record:protected] => [authors:protected] => [organizations:protected] => [collections:protected] => [categories:protected] => Array ( [15] => Category Object ( [languages:protected] => [bok_resources:protected] => [bok_topics:protected] => [bok_keywords:protected] => [id:protected] => 15 [type:protected] => category [parent:protected] => 7 [label:protected] => Falls [alreadyInSave:protected] => [alreadyInValidation:protected] => [validationFailures:protected] => Array ( ) [_new:BaseObject:private] => [_deleted:BaseObject:private] => [modifiedColumns:protected] => Array ( ) ) [47] => Category Object ( [languages:protected] => [bok_resources:protected] => [bok_topics:protected] => [bok_keywords:protected] => [id:protected] => 47 [type:protected] => category [parent:protected] => 2 [label:protected] => Bricklayer [alreadyInSave:protected] => [alreadyInValidation:protected] => [validationFailures:protected] => Array ( ) [_new:BaseObject:private] => [_deleted:BaseObject:private] => [modifiedColumns:protected] => Array ( ) ) [49] => Category Object ( [languages:protected] => [bok_resources:protected] => [bok_topics:protected] => [bok_keywords:protected] => [id:protected] => 49 [type:protected] => category [parent:protected] => 2 [label:protected] => Carpenter [alreadyInSave:protected] => [alreadyInValidation:protected] => [validationFailures:protected] => Array ( ) [_new:BaseObject:private] => [_deleted:BaseObject:private] => [modifiedColumns:protected] => Array ( ) ) [51] => Category Object ( [languages:protected] => [bok_resources:protected] => [bok_topics:protected] => [bok_keywords:protected] => [id:protected] => 51 [type:protected] => category [parent:protected] => 2 [label:protected] => Cement Mason [alreadyInSave:protected] => [alreadyInValidation:protected] => [validationFailures:protected] => Array ( ) [_new:BaseObject:private] => [_deleted:BaseObject:private] => [modifiedColumns:protected] => Array ( ) ) [53] => Category Object ( [languages:protected] => [bok_resources:protected] => [bok_topics:protected] => [bok_keywords:protected] => [id:protected] => 53 [type:protected] => category [parent:protected] => 2 [label:protected] => Concrete Polisher [alreadyInSave:protected] => [alreadyInValidation:protected] => [validationFailures:protected] => Array ( ) [_new:BaseObject:private] => [_deleted:BaseObject:private] => [modifiedColumns:protected] => Array ( ) ) [55] => Category Object ( [languages:protected] => [bok_resources:protected] => [bok_topics:protected] => [bok_keywords:protected] => [id:protected] => 55 [type:protected] => category [parent:protected] => 2 [label:protected] => Electrical Worker [alreadyInSave:protected] => [alreadyInValidation:protected] => [validationFailures:protected] => Array ( ) [_new:BaseObject:private] => [_deleted:BaseObject:private] => [modifiedColumns:protected] => Array ( ) ) [60] => Category Object ( [languages:protected] => [bok_resources:protected] => [bok_topics:protected] => [bok_keywords:protected] => [id:protected] => 60 [type:protected] => category [parent:protected] => 2 [label:protected] => HVAC [alreadyInSave:protected] => [alreadyInValidation:protected] => [validationFailures:protected] => Array ( ) [_new:BaseObject:private] => [_deleted:BaseObject:private] => [modifiedColumns:protected] => Array ( ) ) [64] => Category Object ( [languages:protected] => [bok_resources:protected] => [bok_topics:protected] => [bok_keywords:protected] => [id:protected] => 64 [type:protected] => category [parent:protected] => 2 [label:protected] => Laborer [alreadyInSave:protected] => [alreadyInValidation:protected] => [validationFailures:protected] => Array ( ) [_new:BaseObject:private] => [_deleted:BaseObject:private] => [modifiedColumns:protected] => Array ( ) ) [73] => Category Object ( [languages:protected] => [bok_resources:protected] => [bok_topics:protected] => [bok_keywords:protected] => [id:protected] => 73 [type:protected] => category [parent:protected] => 2 [label:protected] => PCC/Restoration [alreadyInSave:protected] => [alreadyInValidation:protected] => [validationFailures:protected] => Array ( ) [_new:BaseObject:private] => [_deleted:BaseObject:private] => [modifiedColumns:protected] => Array ( ) ) [76] => Category Object ( [languages:protected] => [bok_resources:protected] => [bok_topics:protected] => [bok_keywords:protected] => [id:protected] => 76 [type:protected] => category [parent:protected] => 2 [label:protected] => Plumber/Pipefitter [alreadyInSave:protected] => [alreadyInValidation:protected] => [validationFailures:protected] => Array ( ) [_new:BaseObject:private] => [_deleted:BaseObject:private] => [modifiedColumns:protected] => Array ( ) ) [78] => Category Object ( [languages:protected] => [bok_resources:protected] => [bok_topics:protected] => [bok_keywords:protected] => [id:protected] => 78 [type:protected] => category [parent:protected] => 2 [label:protected] => Roofer/Waterproofer [alreadyInSave:protected] => [alreadyInValidation:protected] => [validationFailures:protected] => Array ( ) [_new:BaseObject:private] => [_deleted:BaseObject:private] => [modifiedColumns:protected] => Array ( ) ) [80] => Category Object ( [languages:protected] => [bok_resources:protected] => [bok_topics:protected] => [bok_keywords:protected] => [id:protected] => 80 [type:protected] => category [parent:protected] => 2 [label:protected] => Sheetmetal Worker [alreadyInSave:protected] => [alreadyInValidation:protected] => [validationFailures:protected] => Array ( ) [_new:BaseObject:private] => [_deleted:BaseObject:private] => [modifiedColumns:protected] => Array ( ) ) [86] => Category Object ( [languages:protected] => [bok_resources:protected] => [bok_topics:protected] => [bok_keywords:protected] => [id:protected] => 86 [type:protected] => category [parent:protected] => 2 [label:protected] => Welder [alreadyInSave:protected] => [alreadyInValidation:protected] => [validationFailures:protected] => Array ( ) [_new:BaseObject:private] => [_deleted:BaseObject:private] => [modifiedColumns:protected] => Array ( ) ) [87] => Category Object ( [languages:protected] => [bok_resources:protected] => [bok_topics:protected] => [bok_keywords:protected] => [id:protected] => 87 [type:protected] => category [parent:protected] => 3 [label:protected] => Commercial & Institutional [alreadyInSave:protected] => [alreadyInValidation:protected] => [validationFailures:protected] => Array ( ) [_new:BaseObject:private] => [_deleted:BaseObject:private] => [modifiedColumns:protected] => Array ( ) ) [90] => Category Object ( [languages:protected] => [bok_resources:protected] => [bok_topics:protected] => [bok_keywords:protected] => [id:protected] => 90 [type:protected] => category [parent:protected] => 3 [label:protected] => Industrial [alreadyInSave:protected] => [alreadyInValidation:protected] => [validationFailures:protected] => Array ( ) [_new:BaseObject:private] => [_deleted:BaseObject:private] => [modifiedColumns:protected] => Array ( ) ) [92] => Category Object ( [languages:protected] => [bok_resources:protected] => [bok_topics:protected] => [bok_keywords:protected] => [id:protected] => 92 [type:protected] => category [parent:protected] => 3 [label:protected] => LEED/Green Construction [alreadyInSave:protected] => [alreadyInValidation:protected] => [validationFailures:protected] => Array ( ) [_new:BaseObject:private] => [_deleted:BaseObject:private] => [modifiedColumns:protected] => Array ( ) ) [93] => Category Object ( [languages:protected] => [bok_resources:protected] => [bok_topics:protected] => [bok_keywords:protected] => [id:protected] => 93 [type:protected] => category [parent:protected] => 3 [label:protected] => Renovations [alreadyInSave:protected] => [alreadyInValidation:protected] => [validationFailures:protected] => Array ( ) [_new:BaseObject:private] => [_deleted:BaseObject:private] => [modifiedColumns:protected] => Array ( ) ) [94] => Category Object ( [languages:protected] => [bok_resources:protected] => [bok_topics:protected] => [bok_keywords:protected] => [id:protected] => 94 [type:protected] => category [parent:protected] => 3 [label:protected] => Residential [alreadyInSave:protected] => [alreadyInValidation:protected] => [validationFailures:protected] => Array ( ) [_new:BaseObject:private] => [_deleted:BaseObject:private] => [modifiedColumns:protected] => Array ( ) ) [100] => Category Object ( [languages:protected] => [bok_resources:protected] => [bok_topics:protected] => [bok_keywords:protected] => [id:protected] => 100 [type:protected] => category [parent:protected] => 6 [label:protected] => Toolbox Talks [alreadyInSave:protected] => [alreadyInValidation:protected] => [validationFailures:protected] => Array ( ) [_new:BaseObject:private] => [_deleted:BaseObject:private] => [modifiedColumns:protected] => Array ( ) ) ) [categories_initialized:protected] => 1 [mapped_items:protected] => [content:protected] => [files:protected] => [language:protected] => Language Object ( [id:protected] => 1 [code:protected] => en [name:protected] => English [alreadyInSave:protected] => [alreadyInValidation:protected] => [validationFailures:protected] => Array ( ) [_new:BaseObject:private] => [_deleted:BaseObject:private] => [modifiedColumns:protected] => Array ( ) ) [old_record:protected] => [id:protected] => 4430 [old_id:protected] => [elcosh_id:protected] => d001660 [type:protected] => document [display_type:protected] => HTML only (and links) [user_id:protected] => 0 [language_id:protected] => 1 [tagging_id:protected] => Mike Aguilar [priority_id:protected] => 1 [title:protected] => Toolbox Talk: Fixed Ladder [total_pages:protected] => 0 [billed_pages:protected] => 0 [publication_number:protected] => [part_of:protected] => [keywords:protected] => Fixed Ladders, Fall Prevention, Falls [comments:protected] => [summary:protected] => The CPWR Toolbox Talk on Fixed Ladders addresses the potential risks associated with using fixed ladders. The resource includes a brief case example, steps to prevent a related injury and questions for discussion. It includes an image that illustrates the hazard, which can be posted in a central location as a reminder of steps to work safely. Available in English and Spanish. [transition_comments:protected] => [external_link:protected] => [consol_link:protected] => [more_like_this:protected] => d001257,d001254,d001255,d001256,d001258,d001262,d001279 [permission_given_by:protected] => [published:protected] => T [billable:protected] => F [img_name:protected] => [img_ext:protected] => [img_width:protected] => [img_height:protected] => [img_credit:protected] => [img_practice:protected] => [vid_source_id:protected] => [vid_running_time:protected] => [vid_intended_audience:protected] => [vid_acquisition_info:protected] => [vid_cost:protected] => [vid_producer:protected] => [vid_filename:protected] => [vid_filename_downloadable:protected] => [date_summary:protected] => [date_permission_requested:protected] => [date_permission_received:protected] => [date_review_needed:protected] => [date_received:protected] => 06/10/22 [date_completed:protected] => 06/10/22 [date_billed:protected] => [date_modified:protected] => 06/16/25 [collBokExports:protected] => [lastBokExportCriteria:BaseElcoshItem:private] => [alreadyInSave:protected] => [alreadyInValidation:protected] => [validationFailures:protected] => Array ( ) [_new:BaseObject:private] => [_deleted:BaseObject:private] => [modifiedColumns:protected] => Array ( ) ) ) [1] => Search_Result Object ( [title] => Toolbox Talk: Work Zone Safety: Working Around Vehicles [image] => /record/images/notavailable-p.png [blurb] => The CPWR Toolbox Talk on Working Around Vehicles in the Work Zone addresses methods to avoid being struck-by a vehicle on a construction site. The res... [category] => Array ( [0] => 12 [1] => 18 [2] => 52 [3] => 57 [4] => 70 [5] => 85 [6] => 87 [7] => 88 [8] => 89 [9] => 91 [10] => 90 [11] => 92 [12] => 93 [13] => 94 [14] => 95 [15] => 100 ) [labels] => Array ( [0] => Crushed/Struck By [1] => Work Environment [2] => Hazards [3] => Motor Vehicles/Heavy Equipment [6] => Commercial Diver [7] => Trades [8] => Flagger [10] => Operating Engineer [12] => Truck Driver [14] => Commercial & Institutional [15] => Jobsites [16] => Demolition [18] => Disasters [20] => Heavy & Highway [22] => Industrial [24] => LEED/Green Construction [26] => Renovations [28] => Residential [30] => Underground [32] => Toolbox Talks [33] => Documents [34] => Media & Documents ) [type] => Toolbox Talks [sub_category] => [url] => /document/4428/d001658/Toolbox%2BTalk%253A%2BWork%2BZone%2BSafety%253A%2BWorking%2BAround%2BVehicles.html [item:protected] => DocumentRecord Object ( [records:protected] => Array ( ) [recordId:protected] => [searchWordClass:protected] => [searchWordPeerClass:protected] => [bok_record:protected] => [authors:protected] => [organizations:protected] => [collections:protected] => [categories:protected] => Array ( [12] => Category Object ( [languages:protected] => [bok_resources:protected] => [bok_topics:protected] => [bok_keywords:protected] => [id:protected] => 12 [type:protected] => category [parent:protected] => 7 [label:protected] => Crushed/Struck By [alreadyInSave:protected] => [alreadyInValidation:protected] => [validationFailures:protected] => Array ( ) [_new:BaseObject:private] => [_deleted:BaseObject:private] => [modifiedColumns:protected] => Array ( ) ) [18] => Category Object ( [languages:protected] => [bok_resources:protected] => [bok_topics:protected] => [bok_keywords:protected] => [id:protected] => 18 [type:protected] => category [parent:protected] => 7 [label:protected] => Motor Vehicles/Heavy Equipment [alreadyInSave:protected] => [alreadyInValidation:protected] => [validationFailures:protected] => Array ( ) [_new:BaseObject:private] => [_deleted:BaseObject:private] => [modifiedColumns:protected] => Array ( ) ) [52] => Category Object ( [languages:protected] => [bok_resources:protected] => [bok_topics:protected] => [bok_keywords:protected] => [id:protected] => 52 [type:protected] => category [parent:protected] => 2 [label:protected] => Commercial Diver [alreadyInSave:protected] => [alreadyInValidation:protected] => [validationFailures:protected] => Array ( ) [_new:BaseObject:private] => [_deleted:BaseObject:private] => [modifiedColumns:protected] => Array ( ) ) [57] => Category Object ( [languages:protected] => [bok_resources:protected] => [bok_topics:protected] => [bok_keywords:protected] => [id:protected] => 57 [type:protected] => category [parent:protected] => 2 [label:protected] => Flagger [alreadyInSave:protected] => [alreadyInValidation:protected] => [validationFailures:protected] => Array ( ) [_new:BaseObject:private] => [_deleted:BaseObject:private] => [modifiedColumns:protected] => Array ( ) ) [70] => Category Object ( [languages:protected] => [bok_resources:protected] => [bok_topics:protected] => [bok_keywords:protected] => [id:protected] => 70 [type:protected] => category [parent:protected] => 2 [label:protected] => Operating Engineer [alreadyInSave:protected] => [alreadyInValidation:protected] => [validationFailures:protected] => Array ( ) [_new:BaseObject:private] => [_deleted:BaseObject:private] => [modifiedColumns:protected] => Array ( ) ) [85] => Category Object ( [languages:protected] => [bok_resources:protected] => [bok_topics:protected] => [bok_keywords:protected] => [id:protected] => 85 [type:protected] => category [parent:protected] => 2 [label:protected] => Truck Driver [alreadyInSave:protected] => [alreadyInValidation:protected] => [validationFailures:protected] => Array ( ) [_new:BaseObject:private] => [_deleted:BaseObject:private] => [modifiedColumns:protected] => Array ( ) ) [87] => Category Object ( [languages:protected] => [bok_resources:protected] => [bok_topics:protected] => [bok_keywords:protected] => [id:protected] => 87 [type:protected] => category [parent:protected] => 3 [label:protected] => Commercial & Institutional [alreadyInSave:protected] => [alreadyInValidation:protected] => [validationFailures:protected] => Array ( ) [_new:BaseObject:private] => [_deleted:BaseObject:private] => [modifiedColumns:protected] => Array ( ) ) [88] => Category Object ( [languages:protected] => [bok_resources:protected] => [bok_topics:protected] => [bok_keywords:protected] => [id:protected] => 88 [type:protected] => category [parent:protected] => 3 [label:protected] => Demolition [alreadyInSave:protected] => [alreadyInValidation:protected] => [validationFailures:protected] => Array ( ) [_new:BaseObject:private] => [_deleted:BaseObject:private] => [modifiedColumns:protected] => Array ( ) ) [89] => Category Object ( [languages:protected] => [bok_resources:protected] => [bok_topics:protected] => [bok_keywords:protected] => [id:protected] => 89 [type:protected] => category [parent:protected] => 3 [label:protected] => Disasters [alreadyInSave:protected] => [alreadyInValidation:protected] => [validationFailures:protected] => Array ( ) [_new:BaseObject:private] => [_deleted:BaseObject:private] => [modifiedColumns:protected] => Array ( ) ) [91] => Category Object ( [languages:protected] => [bok_resources:protected] => [bok_topics:protected] => [bok_keywords:protected] => [id:protected] => 91 [type:protected] => category [parent:protected] => 3 [label:protected] => Heavy & Highway [alreadyInSave:protected] => [alreadyInValidation:protected] => [validationFailures:protected] => Array ( ) [_new:BaseObject:private] => [_deleted:BaseObject:private] => [modifiedColumns:protected] => Array ( ) ) [90] => Category Object ( [languages:protected] => [bok_resources:protected] => [bok_topics:protected] => [bok_keywords:protected] => [id:protected] => 90 [type:protected] => category [parent:protected] => 3 [label:protected] => Industrial [alreadyInSave:protected] => [alreadyInValidation:protected] => [validationFailures:protected] => Array ( ) [_new:BaseObject:private] => [_deleted:BaseObject:private] => [modifiedColumns:protected] => Array ( ) ) [92] => Category Object ( [languages:protected] => [bok_resources:protected] => [bok_topics:protected] => [bok_keywords:protected] => [id:protected] => 92 [type:protected] => category [parent:protected] => 3 [label:protected] => LEED/Green Construction [alreadyInSave:protected] => [alreadyInValidation:protected] => [validationFailures:protected] => Array ( ) [_new:BaseObject:private] => [_deleted:BaseObject:private] => [modifiedColumns:protected] => Array ( ) ) [93] => Category Object ( [languages:protected] => [bok_resources:protected] => [bok_topics:protected] => [bok_keywords:protected] => [id:protected] => 93 [type:protected] => category [parent:protected] => 3 [label:protected] => Renovations [alreadyInSave:protected] => [alreadyInValidation:protected] => [validationFailures:protected] => Array ( ) [_new:BaseObject:private] => [_deleted:BaseObject:private] => [modifiedColumns:protected] => Array ( ) ) [94] => Category Object ( [languages:protected] => [bok_resources:protected] => [bok_topics:protected] => [bok_keywords:protected] => [id:protected] => 94 [type:protected] => category [parent:protected] => 3 [label:protected] => Residential [alreadyInSave:protected] => [alreadyInValidation:protected] => [validationFailures:protected] => Array ( ) [_new:BaseObject:private] => [_deleted:BaseObject:private] => [modifiedColumns:protected] => Array ( ) ) [95] => Category Object ( [languages:protected] => [bok_resources:protected] => [bok_topics:protected] => [bok_keywords:protected] => [id:protected] => 95 [type:protected] => category [parent:protected] => 3 [label:protected] => Underground [alreadyInSave:protected] => [alreadyInValidation:protected] => [validationFailures:protected] => Array ( ) [_new:BaseObject:private] => [_deleted:BaseObject:private] => [modifiedColumns:protected] => Array ( ) ) [100] => Category Object ( [languages:protected] => [bok_resources:protected] => [bok_topics:protected] => [bok_keywords:protected] => [id:protected] => 100 [type:protected] => category [parent:protected] => 6 [label:protected] => Toolbox Talks [alreadyInSave:protected] => [alreadyInValidation:protected] => [validationFailures:protected] => Array ( ) [_new:BaseObject:private] => [_deleted:BaseObject:private] => [modifiedColumns:protected] => Array ( ) ) ) [categories_initialized:protected] => 1 [mapped_items:protected] => [content:protected] => [files:protected] => [language:protected] => Language Object ( [id:protected] => 1 [code:protected] => en [name:protected] => English [alreadyInSave:protected] => [alreadyInValidation:protected] => [validationFailures:protected] => Array ( ) [_new:BaseObject:private] => [_deleted:BaseObject:private] => [modifiedColumns:protected] => Array ( ) ) [old_record:protected] => [id:protected] => 4428 [old_id:protected] => [elcosh_id:protected] => d001658 [type:protected] => document [display_type:protected] => HTML only (and links) [user_id:protected] => 0 [language_id:protected] => 1 [tagging_id:protected] => Daniela Caceres [priority_id:protected] => 1 [title:protected] => Toolbox Talk: Work Zone Safety: Working Around Vehicles [total_pages:protected] => 0 [billed_pages:protected] => 0 [publication_number:protected] => [part_of:protected] => [keywords:protected] => Struck, Struck by, Vehicle, Work Zone Safety, Truck, Operator, Driver, Mobile Equipment [comments:protected] => [summary:protected] => The CPWR Toolbox Talk on Working Around Vehicles in the Work Zone addresses methods to avoid being struck-by a vehicle on a construction site. The resource includes a case example, steps to prevent a related injury, and questions for discussion. It includes a graphic that illustrates the hazard, which can be posted in a central location as a reminder of steps to work safely. Available in English and Spanish. [transition_comments:protected] => [external_link:protected] => [consol_link:protected] => [more_like_this:protected] => d001640 [permission_given_by:protected] => [published:protected] => T [billable:protected] => F [img_name:protected] => [img_ext:protected] => [img_width:protected] => [img_height:protected] => [img_credit:protected] => [img_practice:protected] => [vid_source_id:protected] => [vid_running_time:protected] => [vid_intended_audience:protected] => [vid_acquisition_info:protected] => [vid_cost:protected] => [vid_producer:protected] => [vid_filename:protected] => [vid_filename_downloadable:protected] => [date_summary:protected] => [date_permission_requested:protected] => [date_permission_received:protected] => [date_review_needed:protected] => [date_received:protected] => 12/23/21 [date_completed:protected] => 12/23/21 [date_billed:protected] => [date_modified:protected] => 05/19/23 [collBokExports:protected] => [lastBokExportCriteria:BaseElcoshItem:private] => [alreadyInSave:protected] => [alreadyInValidation:protected] => [validationFailures:protected] => Array ( ) [_new:BaseObject:private] => [_deleted:BaseObject:private] => [modifiedColumns:protected] => Array ( ) ) ) [2] => Search_Result Object ( [title] => Construction Dive -- DeWalt's Jobsite Pro headphones recalled for fire hazards [image] => /record/images/notavailable-p.png [blurb] => A recall notice by the United States Consumer Product Safety Commission affects over 300,000 DeWalt Jobsite Pro Headphones. The recall is a result of... [category] => Array ( [0] => 16 [1] => 44 [2] => 45 [3] => 46 [4] => 47 [5] => 48 [6] => 49 [7] => 50 [8] => 51 [9] => 52 [10] => 53 [11] => 54 [12] => 55 [13] => 56 [14] => 57 [15] => 58 [16] => 59 [17] => 60 [18] => 61 [19] => 64 [20] => 65 [21] => 66 [22] => 67 [23] => 68 [24] => 69 [25] => 70 [26] => 71 [27] => 72 [28] => 73 [29] => 74 [30] => 75 [31] => 76 [32] => 77 [33] => 63 [34] => 78 [35] => 79 [36] => 80 [37] => 81 [38] => 82 [39] => 62 [40] => 83 [41] => 84 [42] => 85 [43] => 86 [44] => 87 [45] => 88 [46] => 89 [47] => 91 [48] => 90 [49] => 92 [50] => 93 [51] => 94 [52] => 95 ) [labels] => Array ( [0] => Fire & Explosions [1] => Work Environment [2] => Hazards [3] => Acoustical Ceiling Carpenter [4] => Trades [5] => Asbestos/Insulator [7] => Boilermaker [9] => Bricklayer [11] => Cabinetmaker [13] => Carpenter [15] => Carpet Layer [17] => Cement Mason [19] => Commercial Diver [21] => Concrete Polisher [23] => Drywall Applicator Specialist [25] => Electrical Worker [27] => Elevator Constructor [29] => Flagger [31] => Glazier [33] => Hazardous Waste Cleanup [35] => HVAC [37] => Interior Systems Carpenter [39] => Laborer [41] => Landscaper [43] => Lather [45] => Lead Abatement Worker [47] => Maintenance Worker [49] => Millwright [51] => Operating Engineer [53] => Painter [55] => Paper Hanger [57] => PCC/Restoration [59] => Pile Driver [61] => Plasterer [63] => Plumber/Pipefitter [65] => Refractory Worker [67] => Reinforcing Ironworker [69] => Roofer/Waterproofer [71] => Scaffold Erector [73] => Sheetmetal Worker [75] => Sprinkler Fitter [77] => Stonemason [79] => Structural Ironworker [81] => Terrazzo Worker [83] => Tile Setter [85] => Truck Driver [87] => Welder [89] => Commercial & Institutional [90] => Jobsites [91] => Demolition [93] => Disasters [95] => Heavy & Highway [97] => Industrial [99] => LEED/Green Construction [101] => Renovations [103] => Residential [105] => Underground ) [type] => [sub_category] => [url] => /document/4426/d001656/Construction%2BDive%2B--%2BDeWalt%2527s%2BJobsite%2BPro%2Bheadphones%2Brecalled%2Bfor%2Bfire%2Bhazards.html [item:protected] => DocumentRecord Object ( [records:protected] => Array ( ) [recordId:protected] => [searchWordClass:protected] => [searchWordPeerClass:protected] => [bok_record:protected] => [authors:protected] => [organizations:protected] => [collections:protected] => [categories:protected] => Array ( [16] => Category Object ( [languages:protected] => [bok_resources:protected] => [bok_topics:protected] => [bok_keywords:protected] => [id:protected] => 16 [type:protected] => category [parent:protected] => 7 [label:protected] => Fire & Explosions [alreadyInSave:protected] => [alreadyInValidation:protected] => [validationFailures:protected] => Array ( ) [_new:BaseObject:private] => [_deleted:BaseObject:private] => [modifiedColumns:protected] => Array ( ) ) [44] => Category Object ( [languages:protected] => [bok_resources:protected] => [bok_topics:protected] => [bok_keywords:protected] => [id:protected] => 44 [type:protected] => category [parent:protected] => 2 [label:protected] => Acoustical Ceiling Carpenter [alreadyInSave:protected] => [alreadyInValidation:protected] => [validationFailures:protected] => Array ( ) [_new:BaseObject:private] => [_deleted:BaseObject:private] => [modifiedColumns:protected] => Array ( ) ) [45] => Category Object ( [languages:protected] => [bok_resources:protected] => [bok_topics:protected] => [bok_keywords:protected] => [id:protected] => 45 [type:protected] => category [parent:protected] => 2 [label:protected] => Asbestos/Insulator [alreadyInSave:protected] => [alreadyInValidation:protected] => [validationFailures:protected] => Array ( ) [_new:BaseObject:private] => [_deleted:BaseObject:private] => [modifiedColumns:protected] => Array ( ) ) [46] => Category Object ( [languages:protected] => [bok_resources:protected] => [bok_topics:protected] => [bok_keywords:protected] => [id:protected] => 46 [type:protected] => category [parent:protected] => 2 [label:protected] => Boilermaker [alreadyInSave:protected] => [alreadyInValidation:protected] => [validationFailures:protected] => Array ( ) [_new:BaseObject:private] => [_deleted:BaseObject:private] => [modifiedColumns:protected] => Array ( ) ) [47] => Category Object ( [languages:protected] => [bok_resources:protected] => [bok_topics:protected] => [bok_keywords:protected] => [id:protected] => 47 [type:protected] => category [parent:protected] => 2 [label:protected] => Bricklayer [alreadyInSave:protected] => [alreadyInValidation:protected] => [validationFailures:protected] => Array ( ) [_new:BaseObject:private] => [_deleted:BaseObject:private] => [modifiedColumns:protected] => Array ( ) ) [48] => Category Object ( [languages:protected] => [bok_resources:protected] => [bok_topics:protected] => [bok_keywords:protected] => [id:protected] => 48 [type:protected] => category [parent:protected] => 2 [label:protected] => Cabinetmaker [alreadyInSave:protected] => [alreadyInValidation:protected] => [validationFailures:protected] => Array ( ) [_new:BaseObject:private] => [_deleted:BaseObject:private] => [modifiedColumns:protected] => Array ( ) ) [49] => Category Object ( [languages:protected] => [bok_resources:protected] => [bok_topics:protected] => [bok_keywords:protected] => [id:protected] => 49 [type:protected] => category [parent:protected] => 2 [label:protected] => Carpenter [alreadyInSave:protected] => [alreadyInValidation:protected] => [validationFailures:protected] => Array ( ) [_new:BaseObject:private] => [_deleted:BaseObject:private] => [modifiedColumns:protected] => Array ( ) ) [50] => Category Object ( [languages:protected] => [bok_resources:protected] => [bok_topics:protected] => [bok_keywords:protected] => [id:protected] => 50 [type:protected] => category [parent:protected] => 2 [label:protected] => Carpet Layer [alreadyInSave:protected] => [alreadyInValidation:protected] => [validationFailures:protected] => Array ( ) [_new:BaseObject:private] => [_deleted:BaseObject:private] => [modifiedColumns:protected] => Array ( ) ) [51] => Category Object ( [languages:protected] => [bok_resources:protected] => [bok_topics:protected] => [bok_keywords:protected] => [id:protected] => 51 [type:protected] => category [parent:protected] => 2 [label:protected] => Cement Mason [alreadyInSave:protected] => [alreadyInValidation:protected] => [validationFailures:protected] => Array ( ) [_new:BaseObject:private] => [_deleted:BaseObject:private] => [modifiedColumns:protected] => Array ( ) ) [52] => Category Object ( [languages:protected] => [bok_resources:protected] => [bok_topics:protected] => [bok_keywords:protected] => [id:protected] => 52 [type:protected] => category [parent:protected] => 2 [label:protected] => Commercial Diver [alreadyInSave:protected] => [alreadyInValidation:protected] => [validationFailures:protected] => Array ( ) [_new:BaseObject:private] => [_deleted:BaseObject:private] => [modifiedColumns:protected] => Array ( ) ) [53] => Category Object ( [languages:protected] => [bok_resources:protected] => [bok_topics:protected] => [bok_keywords:protected] => [id:protected] => 53 [type:protected] => category [parent:protected] => 2 [label:protected] => Concrete Polisher [alreadyInSave:protected] => [alreadyInValidation:protected] => [validationFailures:protected] => Array ( ) [_new:BaseObject:private] => [_deleted:BaseObject:private] => [modifiedColumns:protected] => Array ( ) ) [54] => Category Object ( [languages:protected] => [bok_resources:protected] => [bok_topics:protected] => [bok_keywords:protected] => [id:protected] => 54 [type:protected] => category [parent:protected] => 2 [label:protected] => Drywall Applicator Specialist [alreadyInSave:protected] => [alreadyInValidation:protected] => [validationFailures:protected] => Array ( ) [_new:BaseObject:private] => [_deleted:BaseObject:private] => [modifiedColumns:protected] => Array ( ) ) [55] => Category Object ( [languages:protected] => [bok_resources:protected] => [bok_topics:protected] => [bok_keywords:protected] => [id:protected] => 55 [type:protected] => category [parent:protected] => 2 [label:protected] => Electrical Worker [alreadyInSave:protected] => [alreadyInValidation:protected] => [validationFailures:protected] => Array ( ) [_new:BaseObject:private] => [_deleted:BaseObject:private] => [modifiedColumns:protected] => Array ( ) ) [56] => Category Object ( [languages:protected] => [bok_resources:protected] => [bok_topics:protected] => [bok_keywords:protected] => [id:protected] => 56 [type:protected] => category [parent:protected] => 2 [label:protected] => Elevator Constructor [alreadyInSave:protected] => [alreadyInValidation:protected] => [validationFailures:protected] => Array ( ) [_new:BaseObject:private] => [_deleted:BaseObject:private] => [modifiedColumns:protected] => Array ( ) ) [57] => Category Object ( [languages:protected] => [bok_resources:protected] => [bok_topics:protected] => [bok_keywords:protected] => [id:protected] => 57 [type:protected] => category [parent:protected] => 2 [label:protected] => Flagger [alreadyInSave:protected] => [alreadyInValidation:protected] => [validationFailures:protected] => Array ( ) [_new:BaseObject:private] => [_deleted:BaseObject:private] => [modifiedColumns:protected] => Array ( ) ) [58] => Category Object ( [languages:protected] => [bok_resources:protected] => [bok_topics:protected] => [bok_keywords:protected] => [id:protected] => 58 [type:protected] => category [parent:protected] => 2 [label:protected] => Glazier [alreadyInSave:protected] => [alreadyInValidation:protected] => [validationFailures:protected] => Array ( ) [_new:BaseObject:private] => [_deleted:BaseObject:private] => [modifiedColumns:protected] => Array ( ) ) [59] => Category Object ( [languages:protected] => [bok_resources:protected] => [bok_topics:protected] => [bok_keywords:protected] => [id:protected] => 59 [type:protected] => category [parent:protected] => 2 [label:protected] => Hazardous Waste Cleanup [alreadyInSave:protected] => [alreadyInValidation:protected] => [validationFailures:protected] => Array ( ) [_new:BaseObject:private] => [_deleted:BaseObject:private] => [modifiedColumns:protected] => Array ( ) ) [60] => Category Object ( [languages:protected] => [bok_resources:protected] => [bok_topics:protected] => [bok_keywords:protected] => [id:protected] => 60 [type:protected] => category [parent:protected] => 2 [label:protected] => HVAC [alreadyInSave:protected] => [alreadyInValidation:protected] => [validationFailures:protected] => Array ( ) [_new:BaseObject:private] => [_deleted:BaseObject:private] => [modifiedColumns:protected] => Array ( ) ) [61] => Category Object ( [languages:protected] => [bok_resources:protected] => [bok_topics:protected] => [bok_keywords:protected] => [id:protected] => 61 [type:protected] => category [parent:protected] => 2 [label:protected] => Interior Systems Carpenter [alreadyInSave:protected] => [alreadyInValidation:protected] => [validationFailures:protected] => Array ( ) [_new:BaseObject:private] => [_deleted:BaseObject:private] => [modifiedColumns:protected] => Array ( ) ) [64] => Category Object ( [languages:protected] => [bok_resources:protected] => [bok_topics:protected] => [bok_keywords:protected] => [id:protected] => 64 [type:protected] => category [parent:protected] => 2 [label:protected] => Laborer [alreadyInSave:protected] => [alreadyInValidation:protected] => [validationFailures:protected] => Array ( ) [_new:BaseObject:private] => [_deleted:BaseObject:private] => [modifiedColumns:protected] => Array ( ) ) [65] => Category Object ( [languages:protected] => [bok_resources:protected] => [bok_topics:protected] => [bok_keywords:protected] => [id:protected] => 65 [type:protected] => category [parent:protected] => 2 [label:protected] => Landscaper [alreadyInSave:protected] => [alreadyInValidation:protected] => [validationFailures:protected] => Array ( ) [_new:BaseObject:private] => [_deleted:BaseObject:private] => [modifiedColumns:protected] => Array ( ) ) [66] => Category Object ( [languages:protected] => [bok_resources:protected] => [bok_topics:protected] => [bok_keywords:protected] => [id:protected] => 66 [type:protected] => category [parent:protected] => 2 [label:protected] => Lather [alreadyInSave:protected] => [alreadyInValidation:protected] => [validationFailures:protected] => Array ( ) [_new:BaseObject:private] => [_deleted:BaseObject:private] => [modifiedColumns:protected] => Array ( ) ) [67] => Category Object ( [languages:protected] => [bok_resources:protected] => [bok_topics:protected] => [bok_keywords:protected] => [id:protected] => 67 [type:protected] => category [parent:protected] => 2 [label:protected] => Lead Abatement Worker [alreadyInSave:protected] => [alreadyInValidation:protected] => [validationFailures:protected] => Array ( ) [_new:BaseObject:private] => [_deleted:BaseObject:private] => [modifiedColumns:protected] => Array ( ) ) [68] => Category Object ( [languages:protected] => [bok_resources:protected] => [bok_topics:protected] => [bok_keywords:protected] => [id:protected] => 68 [type:protected] => category [parent:protected] => 2 [label:protected] => Maintenance Worker [alreadyInSave:protected] => [alreadyInValidation:protected] => [validationFailures:protected] => Array ( ) [_new:BaseObject:private] => [_deleted:BaseObject:private] => [modifiedColumns:protected] => Array ( ) ) [69] => Category Object ( [languages:protected] => [bok_resources:protected] => [bok_topics:protected] => [bok_keywords:protected] => [id:protected] => 69 [type:protected] => category [parent:protected] => 2 [label:protected] => Millwright [alreadyInSave:protected] => [alreadyInValidation:protected] => [validationFailures:protected] => Array ( ) [_new:BaseObject:private] => [_deleted:BaseObject:private] => [modifiedColumns:protected] => Array ( ) ) [70] => Category Object ( [languages:protected] => [bok_resources:protected] => [bok_topics:protected] => [bok_keywords:protected] => [id:protected] => 70 [type:protected] => category [parent:protected] => 2 [label:protected] => Operating Engineer [alreadyInSave:protected] => [alreadyInValidation:protected] => [validationFailures:protected] => Array ( ) [_new:BaseObject:private] => [_deleted:BaseObject:private] => [modifiedColumns:protected] => Array ( ) ) [71] => Category Object ( [languages:protected] => [bok_resources:protected] => [bok_topics:protected] => [bok_keywords:protected] => [id:protected] => 71 [type:protected] => category [parent:protected] => 2 [label:protected] => Painter [alreadyInSave:protected] => [alreadyInValidation:protected] => [validationFailures:protected] => Array ( ) [_new:BaseObject:private] => [_deleted:BaseObject:private] => [modifiedColumns:protected] => Array ( ) ) [72] => Category Object ( [languages:protected] => [bok_resources:protected] => [bok_topics:protected] => [bok_keywords:protected] => [id:protected] => 72 [type:protected] => category [parent:protected] => 2 [label:protected] => Paper Hanger [alreadyInSave:protected] => [alreadyInValidation:protected] => [validationFailures:protected] => Array ( ) [_new:BaseObject:private] => [_deleted:BaseObject:private] => [modifiedColumns:protected] => Array ( ) ) [73] => Category Object ( [languages:protected] => [bok_resources:protected] => [bok_topics:protected] => [bok_keywords:protected] => [id:protected] => 73 [type:protected] => category [parent:protected] => 2 [label:protected] => PCC/Restoration [alreadyInSave:protected] => [alreadyInValidation:protected] => [validationFailures:protected] => Array ( ) [_new:BaseObject:private] => [_deleted:BaseObject:private] => [modifiedColumns:protected] => Array ( ) ) [74] => Category Object ( [languages:protected] => [bok_resources:protected] => [bok_topics:protected] => [bok_keywords:protected] => [id:protected] => 74 [type:protected] => category [parent:protected] => 2 [label:protected] => Pile Driver [alreadyInSave:protected] => [alreadyInValidation:protected] => [validationFailures:protected] => Array ( ) [_new:BaseObject:private] => [_deleted:BaseObject:private] => [modifiedColumns:protected] => Array ( ) ) [75] => Category Object ( [languages:protected] => [bok_resources:protected] => [bok_topics:protected] => [bok_keywords:protected] => [id:protected] => 75 [type:protected] => category [parent:protected] => 2 [label:protected] => Plasterer [alreadyInSave:protected] => [alreadyInValidation:protected] => [validationFailures:protected] => Array ( ) [_new:BaseObject:private] => [_deleted:BaseObject:private] => [modifiedColumns:protected] => Array ( ) ) [76] => Category Object ( [languages:protected] => [bok_resources:protected] => [bok_topics:protected] => [bok_keywords:protected] => [id:protected] => 76 [type:protected] => category [parent:protected] => 2 [label:protected] => Plumber/Pipefitter [alreadyInSave:protected] => [alreadyInValidation:protected] => [validationFailures:protected] => Array ( ) [_new:BaseObject:private] => [_deleted:BaseObject:private] => [modifiedColumns:protected] => Array ( ) ) [77] => Category Object ( [languages:protected] => [bok_resources:protected] => [bok_topics:protected] => [bok_keywords:protected] => [id:protected] => 77 [type:protected] => category [parent:protected] => 2 [label:protected] => Refractory Worker [alreadyInSave:protected] => [alreadyInValidation:protected] => [validationFailures:protected] => Array ( ) [_new:BaseObject:private] => [_deleted:BaseObject:private] => [modifiedColumns:protected] => Array ( ) ) [63] => Category Object ( [languages:protected] => [bok_resources:protected] => [bok_topics:protected] => [bok_keywords:protected] => [id:protected] => 63 [type:protected] => category [parent:protected] => 2 [label:protected] => Reinforcing Ironworker [alreadyInSave:protected] => [alreadyInValidation:protected] => [validationFailures:protected] => Array ( ) [_new:BaseObject:private] => [_deleted:BaseObject:private] => [modifiedColumns:protected] => Array ( ) ) [78] => Category Object ( [languages:protected] => [bok_resources:protected] => [bok_topics:protected] => [bok_keywords:protected] => [id:protected] => 78 [type:protected] => category [parent:protected] => 2 [label:protected] => Roofer/Waterproofer [alreadyInSave:protected] => [alreadyInValidation:protected] => [validationFailures:protected] => Array ( ) [_new:BaseObject:private] => [_deleted:BaseObject:private] => [modifiedColumns:protected] => Array ( ) ) [79] => Category Object ( [languages:protected] => [bok_resources:protected] => [bok_topics:protected] => [bok_keywords:protected] => [id:protected] => 79 [type:protected] => category [parent:protected] => 2 [label:protected] => Scaffold Erector [alreadyInSave:protected] => [alreadyInValidation:protected] => [validationFailures:protected] => Array ( ) [_new:BaseObject:private] => [_deleted:BaseObject:private] => [modifiedColumns:protected] => Array ( ) ) [80] => Category Object ( [languages:protected] => [bok_resources:protected] => [bok_topics:protected] => [bok_keywords:protected] => [id:protected] => 80 [type:protected] => category [parent:protected] => 2 [label:protected] => Sheetmetal Worker [alreadyInSave:protected] => [alreadyInValidation:protected] => [validationFailures:protected] => Array ( ) [_new:BaseObject:private] => [_deleted:BaseObject:private] => [modifiedColumns:protected] => Array ( ) ) [81] => Category Object ( [languages:protected] => [bok_resources:protected] => [bok_topics:protected] => [bok_keywords:protected] => [id:protected] => 81 [type:protected] => category [parent:protected] => 2 [label:protected] => Sprinkler Fitter [alreadyInSave:protected] => [alreadyInValidation:protected] => [validationFailures:protected] => Array ( ) [_new:BaseObject:private] => [_deleted:BaseObject:private] => [modifiedColumns:protected] => Array ( ) ) [82] => Category Object ( [languages:protected] => [bok_resources:protected] => [bok_topics:protected] => [bok_keywords:protected] => [id:protected] => 82 [type:protected] => category [parent:protected] => 2 [label:protected] => Stonemason [alreadyInSave:protected] => [alreadyInValidation:protected] => [validationFailures:protected] => Array ( ) [_new:BaseObject:private] => [_deleted:BaseObject:private] => [modifiedColumns:protected] => Array ( ) ) [62] => Category Object ( [languages:protected] => [bok_resources:protected] => [bok_topics:protected] => [bok_keywords:protected] => [id:protected] => 62 [type:protected] => category [parent:protected] => 2 [label:protected] => Structural Ironworker [alreadyInSave:protected] => [alreadyInValidation:protected] => [validationFailures:protected] => Array ( ) [_new:BaseObject:private] => [_deleted:BaseObject:private] => [modifiedColumns:protected] => Array ( ) ) [83] => Category Object ( [languages:protected] => [bok_resources:protected] => [bok_topics:protected] => [bok_keywords:protected] => [id:protected] => 83 [type:protected] => category [parent:protected] => 2 [label:protected] => Terrazzo Worker [alreadyInSave:protected] => [alreadyInValidation:protected] => [validationFailures:protected] => Array ( ) [_new:BaseObject:private] => [_deleted:BaseObject:private] => [modifiedColumns:protected] => Array ( ) ) [84] => Category Object ( [languages:protected] => [bok_resources:protected] => [bok_topics:protected] => [bok_keywords:protected] => [id:protected] => 84 [type:protected] => category [parent:protected] => 2 [label:protected] => Tile Setter [alreadyInSave:protected] => [alreadyInValidation:protected] => [validationFailures:protected] => Array ( ) [_new:BaseObject:private] => [_deleted:BaseObject:private] => [modifiedColumns:protected] => Array ( ) ) [85] => Category Object ( [languages:protected] => [bok_resources:protected] => [bok_topics:protected] => [bok_keywords:protected] => [id:protected] => 85 [type:protected] => category [parent:protected] => 2 [label:protected] => Truck Driver [alreadyInSave:protected] => [alreadyInValidation:protected] => [validationFailures:protected] => Array ( ) [_new:BaseObject:private] => [_deleted:BaseObject:private] => [modifiedColumns:protected] => Array ( ) ) [86] => Category Object ( [languages:protected] => [bok_resources:protected] => [bok_topics:protected] => [bok_keywords:protected] => [id:protected] => 86 [type:protected] => category [parent:protected] => 2 [label:protected] => Welder [alreadyInSave:protected] => [alreadyInValidation:protected] => [validationFailures:protected] => Array ( ) [_new:BaseObject:private] => [_deleted:BaseObject:private] => [modifiedColumns:protected] => Array ( ) ) [87] => Category Object ( [languages:protected] => [bok_resources:protected] => [bok_topics:protected] => [bok_keywords:protected] => [id:protected] => 87 [type:protected] => category [parent:protected] => 3 [label:protected] => Commercial & Institutional [alreadyInSave:protected] => [alreadyInValidation:protected] => [validationFailures:protected] => Array ( ) [_new:BaseObject:private] => [_deleted:BaseObject:private] => [modifiedColumns:protected] => Array ( ) ) [88] => Category Object ( [languages:protected] => [bok_resources:protected] => [bok_topics:protected] => [bok_keywords:protected] => [id:protected] => 88 [type:protected] => category [parent:protected] => 3 [label:protected] => Demolition [alreadyInSave:protected] => [alreadyInValidation:protected] => [validationFailures:protected] => Array ( ) [_new:BaseObject:private] => [_deleted:BaseObject:private] => [modifiedColumns:protected] => Array ( ) ) [89] => Category Object ( [languages:protected] => [bok_resources:protected] => [bok_topics:protected] => [bok_keywords:protected] => [id:protected] => 89 [type:protected] => category [parent:protected] => 3 [label:protected] => Disasters [alreadyInSave:protected] => [alreadyInValidation:protected] => [validationFailures:protected] => Array ( ) [_new:BaseObject:private] => [_deleted:BaseObject:private] => [modifiedColumns:protected] => Array ( ) ) [91] => Category Object ( [languages:protected] => [bok_resources:protected] => [bok_topics:protected] => [bok_keywords:protected] => [id:protected] => 91 [type:protected] => category [parent:protected] => 3 [label:protected] => Heavy & Highway [alreadyInSave:protected] => [alreadyInValidation:protected] => [validationFailures:protected] => Array ( ) [_new:BaseObject:private] => [_deleted:BaseObject:private] => [modifiedColumns:protected] => Array ( ) ) [90] => Category Object ( [languages:protected] => [bok_resources:protected] => [bok_topics:protected] => [bok_keywords:protected] => [id:protected] => 90 [type:protected] => category [parent:protected] => 3 [label:protected] => Industrial [alreadyInSave:protected] => [alreadyInValidation:protected] => [validationFailures:protected] => Array ( ) [_new:BaseObject:private] => [_deleted:BaseObject:private] => [modifiedColumns:protected] => Array ( ) ) [92] => Category Object ( [languages:protected] => [bok_resources:protected] => [bok_topics:protected] => [bok_keywords:protected] => [id:protected] => 92 [type:protected] => category [parent:protected] => 3 [label:protected] => LEED/Green Construction [alreadyInSave:protected] => [alreadyInValidation:protected] => [validationFailures:protected] => Array ( ) [_new:BaseObject:private] => [_deleted:BaseObject:private] => [modifiedColumns:protected] => Array ( ) ) [93] => Category Object ( [languages:protected] => [bok_resources:protected] => [bok_topics:protected] => [bok_keywords:protected] => [id:protected] => 93 [type:protected] => category [parent:protected] => 3 [label:protected] => Renovations [alreadyInSave:protected] => [alreadyInValidation:protected] => [validationFailures:protected] => Array ( ) [_new:BaseObject:private] => [_deleted:BaseObject:private] => [modifiedColumns:protected] => Array ( ) ) [94] => Category Object ( [languages:protected] => [bok_resources:protected] => [bok_topics:protected] => [bok_keywords:protected] => [id:protected] => 94 [type:protected] => category [parent:protected] => 3 [label:protected] => Residential [alreadyInSave:protected] => [alreadyInValidation:protected] => [validationFailures:protected] => Array ( ) [_new:BaseObject:private] => [_deleted:BaseObject:private] => [modifiedColumns:protected] => Array ( ) ) [95] => Category Object ( [languages:protected] => [bok_resources:protected] => [bok_topics:protected] => [bok_keywords:protected] => [id:protected] => 95 [type:protected] => category [parent:protected] => 3 [label:protected] => Underground [alreadyInSave:protected] => [alreadyInValidation:protected] => [validationFailures:protected] => Array ( ) [_new:BaseObject:private] => [_deleted:BaseObject:private] => [modifiedColumns:protected] => Array ( ) ) ) [categories_initialized:protected] => 1 [mapped_items:protected] => [content:protected] => [files:protected] => [language:protected] => Language Object ( [id:protected] => 1 [code:protected] => en [name:protected] => English [alreadyInSave:protected] => [alreadyInValidation:protected] => [validationFailures:protected] => Array ( ) [_new:BaseObject:private] => [_deleted:BaseObject:private] => [modifiedColumns:protected] => Array ( ) ) [old_record:protected] => [id:protected] => 4426 [old_id:protected] => [elcosh_id:protected] => d001656 [type:protected] => document [display_type:protected] => HTML only (and links) [user_id:protected] => 0 [language_id:protected] => 1 [tagging_id:protected] => Mike Aguilar [priority_id:protected] => 1 [title:protected] => Construction Dive -- DeWalt's Jobsite Pro headphones recalled for fire hazards [total_pages:protected] => 1 [billed_pages:protected] => 1 [publication_number:protected] => [part_of:protected] => [keywords:protected] => DeWalt, Fire Hazards, recall, headphones [comments:protected] => [summary:protected] => A recall notice by the United States Consumer Product Safety Commission affects over 300,000 DeWalt Jobsite Pro Headphones. The recall is a result of a malfunction that can cause earbuds to overheat while charging or during use, leading to fire and burn hazards. [transition_comments:protected] => [external_link:protected] => https://www.constructiondive.com/news/dewalts-jobsite-pro-headphones-recalled-for-fire-hazards/611248/?utm_source=Sailthru&utm_medium=email&utm_campaign=Issue:%202021-12-10%20Construction%20Dive%20Newsletter%20%5Bissue:38532%5D&utm_term=Construction%20Dive [consol_link:protected] => [more_like_this:protected] => [permission_given_by:protected] => [published:protected] => T [billable:protected] => F [img_name:protected] => [img_ext:protected] => [img_width:protected] => [img_height:protected] => [img_credit:protected] => [img_practice:protected] => [vid_source_id:protected] => [vid_running_time:protected] => [vid_intended_audience:protected] => [vid_acquisition_info:protected] => [vid_cost:protected] => [vid_producer:protected] => [vid_filename:protected] => [vid_filename_downloadable:protected] => [date_summary:protected] => [date_permission_requested:protected] => [date_permission_received:protected] => [date_review_needed:protected] => [date_received:protected] => 12/13/21 [date_completed:protected] => 12/13/21 [date_billed:protected] => [date_modified:protected] => 12/13/21 [collBokExports:protected] => [lastBokExportCriteria:BaseElcoshItem:private] => [alreadyInSave:protected] => [alreadyInValidation:protected] => [validationFailures:protected] => Array ( ) [_new:BaseObject:private] => [_deleted:BaseObject:private] => [modifiedColumns:protected] => Array ( ) ) ) [3] => Search_Result Object ( [title] => Working in an Enclosed Cab [image] => /record/images/notavailable-p.png [blurb] => This CPWR Hazard Alert on Working in enclosed cabs provides information on protecting workers from silica dust, how to minimize exposures and the dang... [category] => Array ( [0] => 10 [1] => 16 [2] => 24 [3] => 37 [4] => 46 [5] => 48 [6] => 49 [7] => 51 [8] => 53 [9] => 54 [10] => 56 [11] => 58 [12] => 59 [13] => 60 [14] => 61 [15] => 64 [16] => 66 [17] => 68 [18] => 69 [19] => 71 [20] => 73 [21] => 74 [22] => 76 [23] => 77 [24] => 63 [25] => 80 [26] => 82 [27] => 62 [28] => 83 [29] => 84 [30] => 86 [31] => 88 [32] => 89 [33] => 95 [34] => 102 ) [labels] => Array ( [0] => Confined Spaces [1] => Work Environment [2] => Hazards [3] => Fire & Explosions [6] => Trenches & Excavations [9] => Silica /Construction Dust [10] => Inhalation/Skin Exposures [12] => Boilermaker [13] => Trades [14] => Cabinetmaker [16] => Carpenter [18] => Cement Mason [20] => Concrete Polisher [22] => Drywall Applicator Specialist [24] => Elevator Constructor [26] => Glazier [28] => Hazardous Waste Cleanup [30] => HVAC [32] => Interior Systems Carpenter [34] => Laborer [36] => Lather [38] => Maintenance Worker [40] => Millwright [42] => Painter [44] => PCC/Restoration [46] => Pile Driver [48] => Plumber/Pipefitter [50] => Refractory Worker [52] => Reinforcing Ironworker [54] => Sheetmetal Worker [56] => Stonemason [58] => Structural Ironworker [60] => Terrazzo Worker [62] => Tile Setter [64] => Welder [66] => Demolition [67] => Jobsites [68] => Disasters [70] => Underground [72] => Handouts [73] => Documents [74] => Media & Documents ) [type] => Handouts [sub_category] => [url] => /document/4415/d001651/Working%2Bin%2Ban%2BEnclosed%2BCab.html [item:protected] => DocumentRecord Object ( [records:protected] => Array ( ) [recordId:protected] => [searchWordClass:protected] => [searchWordPeerClass:protected] => [bok_record:protected] => [authors:protected] => [organizations:protected] => [collections:protected] => [categories:protected] => Array ( [10] => Category Object ( [languages:protected] => [bok_resources:protected] => [bok_topics:protected] => [bok_keywords:protected] => [id:protected] => 10 [type:protected] => category [parent:protected] => 7 [label:protected] => Confined Spaces [alreadyInSave:protected] => [alreadyInValidation:protected] => [validationFailures:protected] => Array ( ) [_new:BaseObject:private] => [_deleted:BaseObject:private] => [modifiedColumns:protected] => Array ( ) ) [16] => Category Object ( [languages:protected] => [bok_resources:protected] => [bok_topics:protected] => [bok_keywords:protected] => [id:protected] => 16 [type:protected] => category [parent:protected] => 7 [label:protected] => Fire & Explosions [alreadyInSave:protected] => [alreadyInValidation:protected] => [validationFailures:protected] => Array ( ) [_new:BaseObject:private] => [_deleted:BaseObject:private] => [modifiedColumns:protected] => Array ( ) ) [24] => Category Object ( [languages:protected] => [bok_resources:protected] => [bok_topics:protected] => [bok_keywords:protected] => [id:protected] => 24 [type:protected] => category [parent:protected] => 7 [label:protected] => Trenches & Excavations [alreadyInSave:protected] => [alreadyInValidation:protected] => [validationFailures:protected] => Array ( ) [_new:BaseObject:private] => [_deleted:BaseObject:private] => [modifiedColumns:protected] => Array ( ) ) [37] => Category Object ( [languages:protected] => [bok_resources:protected] => [bok_topics:protected] => [bok_keywords:protected] => [id:protected] => 37 [type:protected] => category [parent:protected] => 8 [label:protected] => Silica /Construction Dust [alreadyInSave:protected] => [alreadyInValidation:protected] => [validationFailures:protected] => Array ( ) [_new:BaseObject:private] => [_deleted:BaseObject:private] => [modifiedColumns:protected] => Array ( ) ) [46] => Category Object ( [languages:protected] => [bok_resources:protected] => [bok_topics:protected] => [bok_keywords:protected] => [id:protected] => 46 [type:protected] => category [parent:protected] => 2 [label:protected] => Boilermaker [alreadyInSave:protected] => [alreadyInValidation:protected] => [validationFailures:protected] => Array ( ) [_new:BaseObject:private] => [_deleted:BaseObject:private] => [modifiedColumns:protected] => Array ( ) ) [48] => Category Object ( [languages:protected] => [bok_resources:protected] => [bok_topics:protected] => [bok_keywords:protected] => [id:protected] => 48 [type:protected] => category [parent:protected] => 2 [label:protected] => Cabinetmaker [alreadyInSave:protected] => [alreadyInValidation:protected] => [validationFailures:protected] => Array ( ) [_new:BaseObject:private] => [_deleted:BaseObject:private] => [modifiedColumns:protected] => Array ( ) ) [49] => Category Object ( [languages:protected] => [bok_resources:protected] => [bok_topics:protected] => [bok_keywords:protected] => [id:protected] => 49 [type:protected] => category [parent:protected] => 2 [label:protected] => Carpenter [alreadyInSave:protected] => [alreadyInValidation:protected] => [validationFailures:protected] => Array ( ) [_new:BaseObject:private] => [_deleted:BaseObject:private] => [modifiedColumns:protected] => Array ( ) ) [51] => Category Object ( [languages:protected] => [bok_resources:protected] => [bok_topics:protected] => [bok_keywords:protected] => [id:protected] => 51 [type:protected] => category [parent:protected] => 2 [label:protected] => Cement Mason [alreadyInSave:protected] => [alreadyInValidation:protected] => [validationFailures:protected] => Array ( ) [_new:BaseObject:private] => [_deleted:BaseObject:private] => [modifiedColumns:protected] => Array ( ) ) [53] => Category Object ( [languages:protected] => [bok_resources:protected] => [bok_topics:protected] => [bok_keywords:protected] => [id:protected] => 53 [type:protected] => category [parent:protected] => 2 [label:protected] => Concrete Polisher [alreadyInSave:protected] => [alreadyInValidation:protected] => [validationFailures:protected] => Array ( ) [_new:BaseObject:private] => [_deleted:BaseObject:private] => [modifiedColumns:protected] => Array ( ) ) [54] => Category Object ( [languages:protected] => [bok_resources:protected] => [bok_topics:protected] => [bok_keywords:protected] => [id:protected] => 54 [type:protected] => category [parent:protected] => 2 [label:protected] => Drywall Applicator Specialist [alreadyInSave:protected] => [alreadyInValidation:protected] => [validationFailures:protected] => Array ( ) [_new:BaseObject:private] => [_deleted:BaseObject:private] => [modifiedColumns:protected] => Array ( ) ) [56] => Category Object ( [languages:protected] => [bok_resources:protected] => [bok_topics:protected] => [bok_keywords:protected] => [id:protected] => 56 [type:protected] => category [parent:protected] => 2 [label:protected] => Elevator Constructor [alreadyInSave:protected] => [alreadyInValidation:protected] => [validationFailures:protected] => Array ( ) [_new:BaseObject:private] => [_deleted:BaseObject:private] => [modifiedColumns:protected] => Array ( ) ) [58] => Category Object ( [languages:protected] => [bok_resources:protected] => [bok_topics:protected] => [bok_keywords:protected] => [id:protected] => 58 [type:protected] => category [parent:protected] => 2 [label:protected] => Glazier [alreadyInSave:protected] => [alreadyInValidation:protected] => [validationFailures:protected] => Array ( ) [_new:BaseObject:private] => [_deleted:BaseObject:private] => [modifiedColumns:protected] => Array ( ) ) [59] => Category Object ( [languages:protected] => [bok_resources:protected] => [bok_topics:protected] => [bok_keywords:protected] => [id:protected] => 59 [type:protected] => category [parent:protected] => 2 [label:protected] => Hazardous Waste Cleanup [alreadyInSave:protected] => [alreadyInValidation:protected] => [validationFailures:protected] => Array ( ) [_new:BaseObject:private] => [_deleted:BaseObject:private] => [modifiedColumns:protected] => Array ( ) ) [60] => Category Object ( [languages:protected] => [bok_resources:protected] => [bok_topics:protected] => [bok_keywords:protected] => [id:protected] => 60 [type:protected] => category [parent:protected] => 2 [label:protected] => HVAC [alreadyInSave:protected] => [alreadyInValidation:protected] => [validationFailures:protected] => Array ( ) [_new:BaseObject:private] => [_deleted:BaseObject:private] => [modifiedColumns:protected] => Array ( ) ) [61] => Category Object ( [languages:protected] => [bok_resources:protected] => [bok_topics:protected] => [bok_keywords:protected] => [id:protected] => 61 [type:protected] => category [parent:protected] => 2 [label:protected] => Interior Systems Carpenter [alreadyInSave:protected] => [alreadyInValidation:protected] => [validationFailures:protected] => Array ( ) [_new:BaseObject:private] => [_deleted:BaseObject:private] => [modifiedColumns:protected] => Array ( ) ) [64] => Category Object ( [languages:protected] => [bok_resources:protected] => [bok_topics:protected] => [bok_keywords:protected] => [id:protected] => 64 [type:protected] => category [parent:protected] => 2 [label:protected] => Laborer [alreadyInSave:protected] => [alreadyInValidation:protected] => [validationFailures:protected] => Array ( ) [_new:BaseObject:private] => [_deleted:BaseObject:private] => [modifiedColumns:protected] => Array ( ) ) [66] => Category Object ( [languages:protected] => [bok_resources:protected] => [bok_topics:protected] => [bok_keywords:protected] => [id:protected] => 66 [type:protected] => category [parent:protected] => 2 [label:protected] => Lather [alreadyInSave:protected] => [alreadyInValidation:protected] => [validationFailures:protected] => Array ( ) [_new:BaseObject:private] => [_deleted:BaseObject:private] => [modifiedColumns:protected] => Array ( ) ) [68] => Category Object ( [languages:protected] => [bok_resources:protected] => [bok_topics:protected] => [bok_keywords:protected] => [id:protected] => 68 [type:protected] => category [parent:protected] => 2 [label:protected] => Maintenance Worker [alreadyInSave:protected] => [alreadyInValidation:protected] => [validationFailures:protected] => Array ( ) [_new:BaseObject:private] => [_deleted:BaseObject:private] => [modifiedColumns:protected] => Array ( ) ) [69] => Category Object ( [languages:protected] => [bok_resources:protected] => [bok_topics:protected] => [bok_keywords:protected] => [id:protected] => 69 [type:protected] => category [parent:protected] => 2 [label:protected] => Millwright [alreadyInSave:protected] => [alreadyInValidation:protected] => [validationFailures:protected] => Array ( ) [_new:BaseObject:private] => [_deleted:BaseObject:private] => [modifiedColumns:protected] => Array ( ) ) [71] => Category Object ( [languages:protected] => [bok_resources:protected] => [bok_topics:protected] => [bok_keywords:protected] => [id:protected] => 71 [type:protected] => category [parent:protected] => 2 [label:protected] => Painter [alreadyInSave:protected] => [alreadyInValidation:protected] => [validationFailures:protected] => Array ( ) [_new:BaseObject:private] => [_deleted:BaseObject:private] => [modifiedColumns:protected] => Array ( ) ) [73] => Category Object ( [languages:protected] => [bok_resources:protected] => [bok_topics:protected] => [bok_keywords:protected] => [id:protected] => 73 [type:protected] => category [parent:protected] => 2 [label:protected] => PCC/Restoration [alreadyInSave:protected] => [alreadyInValidation:protected] => [validationFailures:protected] => Array ( ) [_new:BaseObject:private] => [_deleted:BaseObject:private] => [modifiedColumns:protected] => Array ( ) ) [74] => Category Object ( [languages:protected] => [bok_resources:protected] => [bok_topics:protected] => [bok_keywords:protected] => [id:protected] => 74 [type:protected] => category [parent:protected] => 2 [label:protected] => Pile Driver [alreadyInSave:protected] => [alreadyInValidation:protected] => [validationFailures:protected] => Array ( ) [_new:BaseObject:private] => [_deleted:BaseObject:private] => [modifiedColumns:protected] => Array ( ) ) [76] => Category Object ( [languages:protected] => [bok_resources:protected] => [bok_topics:protected] => [bok_keywords:protected] => [id:protected] => 76 [type:protected] => category [parent:protected] => 2 [label:protected] => Plumber/Pipefitter [alreadyInSave:protected] => [alreadyInValidation:protected] => [validationFailures:protected] => Array ( ) [_new:BaseObject:private] => [_deleted:BaseObject:private] => [modifiedColumns:protected] => Array ( ) ) [77] => Category Object ( [languages:protected] => [bok_resources:protected] => [bok_topics:protected] => [bok_keywords:protected] => [id:protected] => 77 [type:protected] => category [parent:protected] => 2 [label:protected] => Refractory Worker [alreadyInSave:protected] => [alreadyInValidation:protected] => [validationFailures:protected] => Array ( ) [_new:BaseObject:private] => [_deleted:BaseObject:private] => [modifiedColumns:protected] => Array ( ) ) [63] => Category Object ( [languages:protected] => [bok_resources:protected] => [bok_topics:protected] => [bok_keywords:protected] => [id:protected] => 63 [type:protected] => category [parent:protected] => 2 [label:protected] => Reinforcing Ironworker [alreadyInSave:protected] => [alreadyInValidation:protected] => [validationFailures:protected] => Array ( ) [_new:BaseObject:private] => [_deleted:BaseObject:private] => [modifiedColumns:protected] => Array ( ) ) [80] => Category Object ( [languages:protected] => [bok_resources:protected] => [bok_topics:protected] => [bok_keywords:protected] => [id:protected] => 80 [type:protected] => category [parent:protected] => 2 [label:protected] => Sheetmetal Worker [alreadyInSave:protected] => [alreadyInValidation:protected] => [validationFailures:protected] => Array ( ) [_new:BaseObject:private] => [_deleted:BaseObject:private] => [modifiedColumns:protected] => Array ( ) ) [82] => Category Object ( [languages:protected] => [bok_resources:protected] => [bok_topics:protected] => [bok_keywords:protected] => [id:protected] => 82 [type:protected] => category [parent:protected] => 2 [label:protected] => Stonemason [alreadyInSave:protected] => [alreadyInValidation:protected] => [validationFailures:protected] => Array ( ) [_new:BaseObject:private] => [_deleted:BaseObject:private] => [modifiedColumns:protected] => Array ( ) ) [62] => Category Object ( [languages:protected] => [bok_resources:protected] => [bok_topics:protected] => [bok_keywords:protected] => [id:protected] => 62 [type:protected] => category [parent:protected] => 2 [label:protected] => Structural Ironworker [alreadyInSave:protected] => [alreadyInValidation:protected] => [validationFailures:protected] => Array ( ) [_new:BaseObject:private] => [_deleted:BaseObject:private] => [modifiedColumns:protected] => Array ( ) ) [83] => Category Object ( [languages:protected] => [bok_resources:protected] => [bok_topics:protected] => [bok_keywords:protected] => [id:protected] => 83 [type:protected] => category [parent:protected] => 2 [label:protected] => Terrazzo Worker [alreadyInSave:protected] => [alreadyInValidation:protected] => [validationFailures:protected] => Array ( ) [_new:BaseObject:private] => [_deleted:BaseObject:private] => [modifiedColumns:protected] => Array ( ) ) [84] => Category Object ( [languages:protected] => [bok_resources:protected] => [bok_topics:protected] => [bok_keywords:protected] => [id:protected] => 84 [type:protected] => category [parent:protected] => 2 [label:protected] => Tile Setter [alreadyInSave:protected] => [alreadyInValidation:protected] => [validationFailures:protected] => Array ( ) [_new:BaseObject:private] => [_deleted:BaseObject:private] => [modifiedColumns:protected] => Array ( ) ) [86] => Category Object ( [languages:protected] => [bok_resources:protected] => [bok_topics:protected] => [bok_keywords:protected] => [id:protected] => 86 [type:protected] => category [parent:protected] => 2 [label:protected] => Welder [alreadyInSave:protected] => [alreadyInValidation:protected] => [validationFailures:protected] => Array ( ) [_new:BaseObject:private] => [_deleted:BaseObject:private] => [modifiedColumns:protected] => Array ( ) ) [88] => Category Object ( [languages:protected] => [bok_resources:protected] => [bok_topics:protected] => [bok_keywords:protected] => [id:protected] => 88 [type:protected] => category [parent:protected] => 3 [label:protected] => Demolition [alreadyInSave:protected] => [alreadyInValidation:protected] => [validationFailures:protected] => Array ( ) [_new:BaseObject:private] => [_deleted:BaseObject:private] => [modifiedColumns:protected] => Array ( ) ) [89] => Category Object ( [languages:protected] => [bok_resources:protected] => [bok_topics:protected] => [bok_keywords:protected] => [id:protected] => 89 [type:protected] => category [parent:protected] => 3 [label:protected] => Disasters [alreadyInSave:protected] => [alreadyInValidation:protected] => [validationFailures:protected] => Array ( ) [_new:BaseObject:private] => [_deleted:BaseObject:private] => [modifiedColumns:protected] => Array ( ) ) [95] => Category Object ( [languages:protected] => [bok_resources:protected] => [bok_topics:protected] => [bok_keywords:protected] => [id:protected] => 95 [type:protected] => category [parent:protected] => 3 [label:protected] => Underground [alreadyInSave:protected] => [alreadyInValidation:protected] => [validationFailures:protected] => Array ( ) [_new:BaseObject:private] => [_deleted:BaseObject:private] => [modifiedColumns:protected] => Array ( ) ) [102] => Category Object ( [languages:protected] => [bok_resources:protected] => [bok_topics:protected] => [bok_keywords:protected] => [id:protected] => 102 [type:protected] => category [parent:protected] => 6 [label:protected] => Handouts [alreadyInSave:protected] => [alreadyInValidation:protected] => [validationFailures:protected] => Array ( ) [_new:BaseObject:private] => [_deleted:BaseObject:private] => [modifiedColumns:protected] => Array ( ) ) ) [categories_initialized:protected] => 1 [mapped_items:protected] => [content:protected] => [files:protected] => [language:protected] => Language Object ( [id:protected] => 1 [code:protected] => en [name:protected] => English [alreadyInSave:protected] => [alreadyInValidation:protected] => [validationFailures:protected] => Array ( ) [_new:BaseObject:private] => [_deleted:BaseObject:private] => [modifiedColumns:protected] => Array ( ) ) [old_record:protected] => [id:protected] => 4415 [old_id:protected] => [elcosh_id:protected] => d001651 [type:protected] => document [display_type:protected] => HTML only (and links) [user_id:protected] => 0 [language_id:protected] => 1 [tagging_id:protected] => Valeria Contreras [priority_id:protected] => 1 [title:protected] => Working in an Enclosed Cab [total_pages:protected] => 1 [billed_pages:protected] => 1 [publication_number:protected] => [part_of:protected] => [keywords:protected] => Occupation, construction, safety, health, hazards, work, worker, workplace, OSHA, silicosis, mining, silica, DOE, EEOICPA, labor, lung, CBD, dust, cab, miner, mine [comments:protected] => [summary:protected] => This CPWR Hazard Alert on Working in enclosed cabs provides information on protecting workers from silica dust, how to minimize exposures and the dangers of silica dust. Click on the following links to access the English version and the Spanish version. [transition_comments:protected] => [external_link:protected] => [consol_link:protected] => [more_like_this:protected] => [permission_given_by:protected] => [published:protected] => T [billable:protected] => F [img_name:protected] => [img_ext:protected] => [img_width:protected] => [img_height:protected] => [img_credit:protected] => [img_practice:protected] => [vid_source_id:protected] => [vid_running_time:protected] => [vid_intended_audience:protected] => [vid_acquisition_info:protected] => [vid_cost:protected] => [vid_producer:protected] => [vid_filename:protected] => [vid_filename_downloadable:protected] => [date_summary:protected] => [date_permission_requested:protected] => [date_permission_received:protected] => [date_review_needed:protected] => [date_received:protected] => 10/08/20 [date_completed:protected] => 10/08/20 [date_billed:protected] => [date_modified:protected] => 10/08/20 [collBokExports:protected] => [lastBokExportCriteria:BaseElcoshItem:private] => [alreadyInSave:protected] => [alreadyInValidation:protected] => [validationFailures:protected] => Array ( ) [_new:BaseObject:private] => [_deleted:BaseObject:private] => [modifiedColumns:protected] => Array ( ) ) ) [4] => Search_Result Object ( [title] => Toolbox Talk: Suicide Prevention [image] => /record/images/notavailable-p.png [blurb] => The CPWR Toolbox Talk on Suicide Prevention addresses the prevalence of suicide among construction workers. The resource includes a brief case example... [category] => Array ( [0] => 13 [1] => 20 [2] => 23 [3] => 40 [4] => 44 [5] => 45 [6] => 46 [7] => 47 [8] => 48 [9] => 49 [10] => 50 [11] => 51 [12] => 52 [13] => 53 [14] => 54 [15] => 55 [16] => 56 [17] => 57 [18] => 58 [19] => 59 [20] => 60 [21] => 61 [22] => 64 [23] => 65 [24] => 66 [25] => 67 [26] => 68 [27] => 69 [28] => 70 [29] => 71 [30] => 72 [31] => 73 [32] => 74 [33] => 75 [34] => 76 [35] => 77 [36] => 63 [37] => 78 [38] => 79 [39] => 80 [40] => 81 [41] => 82 [42] => 62 [43] => 83 [44] => 84 [45] => 85 [46] => 86 [47] => 87 [48] => 88 [49] => 89 [50] => 91 [51] => 90 [52] => 92 [53] => 93 [54] => 94 [55] => 95 [56] => 100 ) [labels] => Array ( [0] => Drugs, Alcohol & Tobacco [1] => Work Environment [2] => Hazards [3] => Safety Culture [6] => Stress & Overtime [9] => Overexertion [10] => Ergonomic [12] => Acoustical Ceiling Carpenter [13] => Trades [14] => Asbestos/Insulator [16] => Boilermaker [18] => Bricklayer [20] => Cabinetmaker [22] => Carpenter [24] => Carpet Layer [26] => Cement Mason [28] => Commercial Diver [30] => Concrete Polisher [32] => Drywall Applicator Specialist [34] => Electrical Worker [36] => Elevator Constructor [38] => Flagger [40] => Glazier [42] => Hazardous Waste Cleanup [44] => HVAC [46] => Interior Systems Carpenter [48] => Laborer [50] => Landscaper [52] => Lather [54] => Lead Abatement Worker [56] => Maintenance Worker [58] => Millwright [60] => Operating Engineer [62] => Painter [64] => Paper Hanger [66] => PCC/Restoration [68] => Pile Driver [70] => Plasterer [72] => Plumber/Pipefitter [74] => Refractory Worker [76] => Reinforcing Ironworker [78] => Roofer/Waterproofer [80] => Scaffold Erector [82] => Sheetmetal Worker [84] => Sprinkler Fitter [86] => Stonemason [88] => Structural Ironworker [90] => Terrazzo Worker [92] => Tile Setter [94] => Truck Driver [96] => Welder [98] => Commercial & Institutional [99] => Jobsites [100] => Demolition [102] => Disasters [104] => Heavy & Highway [106] => Industrial [108] => LEED/Green Construction [110] => Renovations [112] => Residential [114] => Underground [116] => Toolbox Talks [117] => Documents [118] => Media & Documents ) [type] => Toolbox Talks [sub_category] => [url] => /document/4419/d001652/Toolbox%2BTalk%253A%2BSuicide%2BPrevention.html [item:protected] => DocumentRecord Object ( [records:protected] => Array ( ) [recordId:protected] => [searchWordClass:protected] => [searchWordPeerClass:protected] => [bok_record:protected] => [authors:protected] => [organizations:protected] => [collections:protected] => [categories:protected] => Array ( [13] => Category Object ( [languages:protected] => [bok_resources:protected] => [bok_topics:protected] => [bok_keywords:protected] => [id:protected] => 13 [type:protected] => category [parent:protected] => 7 [label:protected] => Drugs, Alcohol & Tobacco [alreadyInSave:protected] => [alreadyInValidation:protected] => [validationFailures:protected] => Array ( ) [_new:BaseObject:private] => [_deleted:BaseObject:private] => [modifiedColumns:protected] => Array ( ) ) [20] => Category Object ( [languages:protected] => [bok_resources:protected] => [bok_topics:protected] => [bok_keywords:protected] => [id:protected] => 20 [type:protected] => category [parent:protected] => 7 [label:protected] => Safety Culture [alreadyInSave:protected] => [alreadyInValidation:protected] => [validationFailures:protected] => Array ( ) [_new:BaseObject:private] => [_deleted:BaseObject:private] => [modifiedColumns:protected] => Array ( ) ) [23] => Category Object ( [languages:protected] => [bok_resources:protected] => [bok_topics:protected] => [bok_keywords:protected] => [id:protected] => 23 [type:protected] => category [parent:protected] => 7 [label:protected] => Stress & Overtime [alreadyInSave:protected] => [alreadyInValidation:protected] => [validationFailures:protected] => Array ( ) [_new:BaseObject:private] => [_deleted:BaseObject:private] => [modifiedColumns:protected] => Array ( ) ) [40] => Category Object ( [languages:protected] => [bok_resources:protected] => [bok_topics:protected] => [bok_keywords:protected] => [id:protected] => 40 [type:protected] => category [parent:protected] => 9 [label:protected] => Overexertion [alreadyInSave:protected] => [alreadyInValidation:protected] => [validationFailures:protected] => Array ( ) [_new:BaseObject:private] => [_deleted:BaseObject:private] => [modifiedColumns:protected] => Array ( ) ) [44] => Category Object ( [languages:protected] => [bok_resources:protected] => [bok_topics:protected] => [bok_keywords:protected] => [id:protected] => 44 [type:protected] => category [parent:protected] => 2 [label:protected] => Acoustical Ceiling Carpenter [alreadyInSave:protected] => [alreadyInValidation:protected] => [validationFailures:protected] => Array ( ) [_new:BaseObject:private] => [_deleted:BaseObject:private] => [modifiedColumns:protected] => Array ( ) ) [45] => Category Object ( [languages:protected] => [bok_resources:protected] => [bok_topics:protected] => [bok_keywords:protected] => [id:protected] => 45 [type:protected] => category [parent:protected] => 2 [label:protected] => Asbestos/Insulator [alreadyInSave:protected] => [alreadyInValidation:protected] => [validationFailures:protected] => Array ( ) [_new:BaseObject:private] => [_deleted:BaseObject:private] => [modifiedColumns:protected] => Array ( ) ) [46] => Category Object ( [languages:protected] => [bok_resources:protected] => [bok_topics:protected] => [bok_keywords:protected] => [id:protected] => 46 [type:protected] => category [parent:protected] => 2 [label:protected] => Boilermaker [alreadyInSave:protected] => [alreadyInValidation:protected] => [validationFailures:protected] => Array ( ) [_new:BaseObject:private] => [_deleted:BaseObject:private] => [modifiedColumns:protected] => Array ( ) ) [47] => Category Object ( [languages:protected] => [bok_resources:protected] => [bok_topics:protected] => [bok_keywords:protected] => [id:protected] => 47 [type:protected] => category [parent:protected] => 2 [label:protected] => Bricklayer [alreadyInSave:protected] => [alreadyInValidation:protected] => [validationFailures:protected] => Array ( ) [_new:BaseObject:private] => [_deleted:BaseObject:private] => [modifiedColumns:protected] => Array ( ) ) [48] => Category Object ( [languages:protected] => [bok_resources:protected] => [bok_topics:protected] => [bok_keywords:protected] => [id:protected] => 48 [type:protected] => category [parent:protected] => 2 [label:protected] => Cabinetmaker [alreadyInSave:protected] => [alreadyInValidation:protected] => [validationFailures:protected] => Array ( ) [_new:BaseObject:private] => [_deleted:BaseObject:private] => [modifiedColumns:protected] => Array ( ) ) [49] => Category Object ( [languages:protected] => [bok_resources:protected] => [bok_topics:protected] => [bok_keywords:protected] => [id:protected] => 49 [type:protected] => category [parent:protected] => 2 [label:protected] => Carpenter [alreadyInSave:protected] => [alreadyInValidation:protected] => [validationFailures:protected] => Array ( ) [_new:BaseObject:private] => [_deleted:BaseObject:private] => [modifiedColumns:protected] => Array ( ) ) [50] => Category Object ( [languages:protected] => [bok_resources:protected] => [bok_topics:protected] => [bok_keywords:protected] => [id:protected] => 50 [type:protected] => category [parent:protected] => 2 [label:protected] => Carpet Layer [alreadyInSave:protected] => [alreadyInValidation:protected] => [validationFailures:protected] => Array ( ) [_new:BaseObject:private] => [_deleted:BaseObject:private] => [modifiedColumns:protected] => Array ( ) ) [51] => Category Object ( [languages:protected] => [bok_resources:protected] => [bok_topics:protected] => [bok_keywords:protected] => [id:protected] => 51 [type:protected] => category [parent:protected] => 2 [label:protected] => Cement Mason [alreadyInSave:protected] => [alreadyInValidation:protected] => [validationFailures:protected] => Array ( ) [_new:BaseObject:private] => [_deleted:BaseObject:private] => [modifiedColumns:protected] => Array ( ) ) [52] => Category Object ( [languages:protected] => [bok_resources:protected] => [bok_topics:protected] => [bok_keywords:protected] => [id:protected] => 52 [type:protected] => category [parent:protected] => 2 [label:protected] => Commercial Diver [alreadyInSave:protected] => [alreadyInValidation:protected] => [validationFailures:protected] => Array ( ) [_new:BaseObject:private] => [_deleted:BaseObject:private] => [modifiedColumns:protected] => Array ( ) ) [53] => Category Object ( [languages:protected] => [bok_resources:protected] => [bok_topics:protected] => [bok_keywords:protected] => [id:protected] => 53 [type:protected] => category [parent:protected] => 2 [label:protected] => Concrete Polisher [alreadyInSave:protected] => [alreadyInValidation:protected] => [validationFailures:protected] => Array ( ) [_new:BaseObject:private] => [_deleted:BaseObject:private] => [modifiedColumns:protected] => Array ( ) ) [54] => Category Object ( [languages:protected] => [bok_resources:protected] => [bok_topics:protected] => [bok_keywords:protected] => [id:protected] => 54 [type:protected] => category [parent:protected] => 2 [label:protected] => Drywall Applicator Specialist [alreadyInSave:protected] => [alreadyInValidation:protected] => [validationFailures:protected] => Array ( ) [_new:BaseObject:private] => [_deleted:BaseObject:private] => [modifiedColumns:protected] => Array ( ) ) [55] => Category Object ( [languages:protected] => [bok_resources:protected] => [bok_topics:protected] => [bok_keywords:protected] => [id:protected] => 55 [type:protected] => category [parent:protected] => 2 [label:protected] => Electrical Worker [alreadyInSave:protected] => [alreadyInValidation:protected] => [validationFailures:protected] => Array ( ) [_new:BaseObject:private] => [_deleted:BaseObject:private] => [modifiedColumns:protected] => Array ( ) ) [56] => Category Object ( [languages:protected] => [bok_resources:protected] => [bok_topics:protected] => [bok_keywords:protected] => [id:protected] => 56 [type:protected] => category [parent:protected] => 2 [label:protected] => Elevator Constructor [alreadyInSave:protected] => [alreadyInValidation:protected] => [validationFailures:protected] => Array ( ) [_new:BaseObject:private] => [_deleted:BaseObject:private] => [modifiedColumns:protected] => Array ( ) ) [57] => Category Object ( [languages:protected] => [bok_resources:protected] => [bok_topics:protected] => [bok_keywords:protected] => [id:protected] => 57 [type:protected] => category [parent:protected] => 2 [label:protected] => Flagger [alreadyInSave:protected] => [alreadyInValidation:protected] => [validationFailures:protected] => Array ( ) [_new:BaseObject:private] => [_deleted:BaseObject:private] => [modifiedColumns:protected] => Array ( ) ) [58] => Category Object ( [languages:protected] => [bok_resources:protected] => [bok_topics:protected] => [bok_keywords:protected] => [id:protected] => 58 [type:protected] => category [parent:protected] => 2 [label:protected] => Glazier [alreadyInSave:protected] => [alreadyInValidation:protected] => [validationFailures:protected] => Array ( ) [_new:BaseObject:private] => [_deleted:BaseObject:private] => [modifiedColumns:protected] => Array ( ) ) [59] => Category Object ( [languages:protected] => [bok_resources:protected] => [bok_topics:protected] => [bok_keywords:protected] => [id:protected] => 59 [type:protected] => category [parent:protected] => 2 [label:protected] => Hazardous Waste Cleanup [alreadyInSave:protected] => [alreadyInValidation:protected] => [validationFailures:protected] => Array ( ) [_new:BaseObject:private] => [_deleted:BaseObject:private] => [modifiedColumns:protected] => Array ( ) ) [60] => Category Object ( [languages:protected] => [bok_resources:protected] => [bok_topics:protected] => [bok_keywords:protected] => [id:protected] => 60 [type:protected] => category [parent:protected] => 2 [label:protected] => HVAC [alreadyInSave:protected] => [alreadyInValidation:protected] => [validationFailures:protected] => Array ( ) [_new:BaseObject:private] => [_deleted:BaseObject:private] => [modifiedColumns:protected] => Array ( ) ) [61] => Category Object ( [languages:protected] => [bok_resources:protected] => [bok_topics:protected] => [bok_keywords:protected] => [id:protected] => 61 [type:protected] => category [parent:protected] => 2 [label:protected] => Interior Systems Carpenter [alreadyInSave:protected] => [alreadyInValidation:protected] => [validationFailures:protected] => Array ( ) [_new:BaseObject:private] => [_deleted:BaseObject:private] => [modifiedColumns:protected] => Array ( ) ) [64] => Category Object ( [languages:protected] => [bok_resources:protected] => [bok_topics:protected] => [bok_keywords:protected] => [id:protected] => 64 [type:protected] => category [parent:protected] => 2 [label:protected] => Laborer [alreadyInSave:protected] => [alreadyInValidation:protected] => [validationFailures:protected] => Array ( ) [_new:BaseObject:private] => [_deleted:BaseObject:private] => [modifiedColumns:protected] => Array ( ) ) [65] => Category Object ( [languages:protected] => [bok_resources:protected] => [bok_topics:protected] => [bok_keywords:protected] => [id:protected] => 65 [type:protected] => category [parent:protected] => 2 [label:protected] => Landscaper [alreadyInSave:protected] => [alreadyInValidation:protected] => [validationFailures:protected] => Array ( ) [_new:BaseObject:private] => [_deleted:BaseObject:private] => [modifiedColumns:protected] => Array ( ) ) [66] => Category Object ( [languages:protected] => [bok_resources:protected] => [bok_topics:protected] => [bok_keywords:protected] => [id:protected] => 66 [type:protected] => category [parent:protected] => 2 [label:protected] => Lather [alreadyInSave:protected] => [alreadyInValidation:protected] => [validationFailures:protected] => Array ( ) [_new:BaseObject:private] => [_deleted:BaseObject:private] => [modifiedColumns:protected] => Array ( ) ) [67] => Category Object ( [languages:protected] => [bok_resources:protected] => [bok_topics:protected] => [bok_keywords:protected] => [id:protected] => 67 [type:protected] => category [parent:protected] => 2 [label:protected] => Lead Abatement Worker [alreadyInSave:protected] => [alreadyInValidation:protected] => [validationFailures:protected] => Array ( ) [_new:BaseObject:private] => [_deleted:BaseObject:private] => [modifiedColumns:protected] => Array ( ) ) [68] => Category Object ( [languages:protected] => [bok_resources:protected] => [bok_topics:protected] => [bok_keywords:protected] => [id:protected] => 68 [type:protected] => category [parent:protected] => 2 [label:protected] => Maintenance Worker [alreadyInSave:protected] => [alreadyInValidation:protected] => [validationFailures:protected] => Array ( ) [_new:BaseObject:private] => [_deleted:BaseObject:private] => [modifiedColumns:protected] => Array ( ) ) [69] => Category Object ( [languages:protected] => [bok_resources:protected] => [bok_topics:protected] => [bok_keywords:protected] => [id:protected] => 69 [type:protected] => category [parent:protected] => 2 [label:protected] => Millwright [alreadyInSave:protected] => [alreadyInValidation:protected] => [validationFailures:protected] => Array ( ) [_new:BaseObject:private] => [_deleted:BaseObject:private] => [modifiedColumns:protected] => Array ( ) ) [70] => Category Object ( [languages:protected] => [bok_resources:protected] => [bok_topics:protected] => [bok_keywords:protected] => [id:protected] => 70 [type:protected] => category [parent:protected] => 2 [label:protected] => Operating Engineer [alreadyInSave:protected] => [alreadyInValidation:protected] => [validationFailures:protected] => Array ( ) [_new:BaseObject:private] => [_deleted:BaseObject:private] => [modifiedColumns:protected] => Array ( ) ) [71] => Category Object ( [languages:protected] => [bok_resources:protected] => [bok_topics:protected] => [bok_keywords:protected] => [id:protected] => 71 [type:protected] => category [parent:protected] => 2 [label:protected] => Painter [alreadyInSave:protected] => [alreadyInValidation:protected] => [validationFailures:protected] => Array ( ) [_new:BaseObject:private] => [_deleted:BaseObject:private] => [modifiedColumns:protected] => Array ( ) ) [72] => Category Object ( [languages:protected] => [bok_resources:protected] => [bok_topics:protected] => [bok_keywords:protected] => [id:protected] => 72 [type:protected] => category [parent:protected] => 2 [label:protected] => Paper Hanger [alreadyInSave:protected] => [alreadyInValidation:protected] => [validationFailures:protected] => Array ( ) [_new:BaseObject:private] => [_deleted:BaseObject:private] => [modifiedColumns:protected] => Array ( ) ) [73] => Category Object ( [languages:protected] => [bok_resources:protected] => [bok_topics:protected] => [bok_keywords:protected] => [id:protected] => 73 [type:protected] => category [parent:protected] => 2 [label:protected] => PCC/Restoration [alreadyInSave:protected] => [alreadyInValidation:protected] => [validationFailures:protected] => Array ( ) [_new:BaseObject:private] => [_deleted:BaseObject:private] => [modifiedColumns:protected] => Array ( ) ) [74] => Category Object ( [languages:protected] => [bok_resources:protected] => [bok_topics:protected] => [bok_keywords:protected] => [id:protected] => 74 [type:protected] => category [parent:protected] => 2 [label:protected] => Pile Driver [alreadyInSave:protected] => [alreadyInValidation:protected] => [validationFailures:protected] => Array ( ) [_new:BaseObject:private] => [_deleted:BaseObject:private] => [modifiedColumns:protected] => Array ( ) ) [75] => Category Object ( [languages:protected] => [bok_resources:protected] => [bok_topics:protected] => [bok_keywords:protected] => [id:protected] => 75 [type:protected] => category [parent:protected] => 2 [label:protected] => Plasterer [alreadyInSave:protected] => [alreadyInValidation:protected] => [validationFailures:protected] => Array ( ) [_new:BaseObject:private] => [_deleted:BaseObject:private] => [modifiedColumns:protected] => Array ( ) ) [76] => Category Object ( [languages:protected] => [bok_resources:protected] => [bok_topics:protected] => [bok_keywords:protected] => [id:protected] => 76 [type:protected] => category [parent:protected] => 2 [label:protected] => Plumber/Pipefitter [alreadyInSave:protected] => [alreadyInValidation:protected] => [validationFailures:protected] => Array ( ) [_new:BaseObject:private] => [_deleted:BaseObject:private] => [modifiedColumns:protected] => Array ( ) ) [77] => Category Object ( [languages:protected] => [bok_resources:protected] => [bok_topics:protected] => [bok_keywords:protected] => [id:protected] => 77 [type:protected] => category [parent:protected] => 2 [label:protected] => Refractory Worker [alreadyInSave:protected] => [alreadyInValidation:protected] => [validationFailures:protected] => Array ( ) [_new:BaseObject:private] => [_deleted:BaseObject:private] => [modifiedColumns:protected] => Array ( ) ) [63] => Category Object ( [languages:protected] => [bok_resources:protected] => [bok_topics:protected] => [bok_keywords:protected] => [id:protected] => 63 [type:protected] => category [parent:protected] => 2 [label:protected] => Reinforcing Ironworker [alreadyInSave:protected] => [alreadyInValidation:protected] => [validationFailures:protected] => Array ( ) [_new:BaseObject:private] => [_deleted:BaseObject:private] => [modifiedColumns:protected] => Array ( ) ) [78] => Category Object ( [languages:protected] => [bok_resources:protected] => [bok_topics:protected] => [bok_keywords:protected] => [id:protected] => 78 [type:protected] => category [parent:protected] => 2 [label:protected] => Roofer/Waterproofer [alreadyInSave:protected] => [alreadyInValidation:protected] => [validationFailures:protected] => Array ( ) [_new:BaseObject:private] => [_deleted:BaseObject:private] => [modifiedColumns:protected] => Array ( ) ) [79] => Category Object ( [languages:protected] => [bok_resources:protected] => [bok_topics:protected] => [bok_keywords:protected] => [id:protected] => 79 [type:protected] => category [parent:protected] => 2 [label:protected] => Scaffold Erector [alreadyInSave:protected] => [alreadyInValidation:protected] => [validationFailures:protected] => Array ( ) [_new:BaseObject:private] => [_deleted:BaseObject:private] => [modifiedColumns:protected] => Array ( ) ) [80] => Category Object ( [languages:protected] => [bok_resources:protected] => [bok_topics:protected] => [bok_keywords:protected] => [id:protected] => 80 [type:protected] => category [parent:protected] => 2 [label:protected] => Sheetmetal Worker [alreadyInSave:protected] => [alreadyInValidation:protected] => [validationFailures:protected] => Array ( ) [_new:BaseObject:private] => [_deleted:BaseObject:private] => [modifiedColumns:protected] => Array ( ) ) [81] => Category Object ( [languages:protected] => [bok_resources:protected] => [bok_topics:protected] => [bok_keywords:protected] => [id:protected] => 81 [type:protected] => category [parent:protected] => 2 [label:protected] => Sprinkler Fitter [alreadyInSave:protected] => [alreadyInValidation:protected] => [validationFailures:protected] => Array ( ) [_new:BaseObject:private] => [_deleted:BaseObject:private] => [modifiedColumns:protected] => Array ( ) ) [82] => Category Object ( [languages:protected] => [bok_resources:protected] => [bok_topics:protected] => [bok_keywords:protected] => [id:protected] => 82 [type:protected] => category [parent:protected] => 2 [label:protected] => Stonemason [alreadyInSave:protected] => [alreadyInValidation:protected] => [validationFailures:protected] => Array ( ) [_new:BaseObject:private] => [_deleted:BaseObject:private] => [modifiedColumns:protected] => Array ( ) ) [62] => Category Object ( [languages:protected] => [bok_resources:protected] => [bok_topics:protected] => [bok_keywords:protected] => [id:protected] => 62 [type:protected] => category [parent:protected] => 2 [label:protected] => Structural Ironworker [alreadyInSave:protected] => [alreadyInValidation:protected] => [validationFailures:protected] => Array ( ) [_new:BaseObject:private] => [_deleted:BaseObject:private] => [modifiedColumns:protected] => Array ( ) ) [83] => Category Object ( [languages:protected] => [bok_resources:protected] => [bok_topics:protected] => [bok_keywords:protected] => [id:protected] => 83 [type:protected] => category [parent:protected] => 2 [label:protected] => Terrazzo Worker [alreadyInSave:protected] => [alreadyInValidation:protected] => [validationFailures:protected] => Array ( ) [_new:BaseObject:private] => [_deleted:BaseObject:private] => [modifiedColumns:protected] => Array ( ) ) [84] => Category Object ( [languages:protected] => [bok_resources:protected] => [bok_topics:protected] => [bok_keywords:protected] => [id:protected] => 84 [type:protected] => category [parent:protected] => 2 [label:protected] => Tile Setter [alreadyInSave:protected] => [alreadyInValidation:protected] => [validationFailures:protected] => Array ( ) [_new:BaseObject:private] => [_deleted:BaseObject:private] => [modifiedColumns:protected] => Array ( ) ) [85] => Category Object ( [languages:protected] => [bok_resources:protected] => [bok_topics:protected] => [bok_keywords:protected] => [id:protected] => 85 [type:protected] => category [parent:protected] => 2 [label:protected] => Truck Driver [alreadyInSave:protected] => [alreadyInValidation:protected] => [validationFailures:protected] => Array ( ) [_new:BaseObject:private] => [_deleted:BaseObject:private] => [modifiedColumns:protected] => Array ( ) ) [86] => Category Object ( [languages:protected] => [bok_resources:protected] => [bok_topics:protected] => [bok_keywords:protected] => [id:protected] => 86 [type:protected] => category [parent:protected] => 2 [label:protected] => Welder [alreadyInSave:protected] => [alreadyInValidation:protected] => [validationFailures:protected] => Array ( ) [_new:BaseObject:private] => [_deleted:BaseObject:private] => [modifiedColumns:protected] => Array ( ) ) [87] => Category Object ( [languages:protected] => [bok_resources:protected] => [bok_topics:protected] => [bok_keywords:protected] => [id:protected] => 87 [type:protected] => category [parent:protected] => 3 [label:protected] => Commercial & Institutional [alreadyInSave:protected] => [alreadyInValidation:protected] => [validationFailures:protected] => Array ( ) [_new:BaseObject:private] => [_deleted:BaseObject:private] => [modifiedColumns:protected] => Array ( ) ) [88] => Category Object ( [languages:protected] => [bok_resources:protected] => [bok_topics:protected] => [bok_keywords:protected] => [id:protected] => 88 [type:protected] => category [parent:protected] => 3 [label:protected] => Demolition [alreadyInSave:protected] => [alreadyInValidation:protected] => [validationFailures:protected] => Array ( ) [_new:BaseObject:private] => [_deleted:BaseObject:private] => [modifiedColumns:protected] => Array ( ) ) [89] => Category Object ( [languages:protected] => [bok_resources:protected] => [bok_topics:protected] => [bok_keywords:protected] => [id:protected] => 89 [type:protected] => category [parent:protected] => 3 [label:protected] => Disasters [alreadyInSave:protected] => [alreadyInValidation:protected] => [validationFailures:protected] => Array ( ) [_new:BaseObject:private] => [_deleted:BaseObject:private] => [modifiedColumns:protected] => Array ( ) ) [91] => Category Object ( [languages:protected] => [bok_resources:protected] => [bok_topics:protected] => [bok_keywords:protected] => [id:protected] => 91 [type:protected] => category [parent:protected] => 3 [label:protected] => Heavy & Highway [alreadyInSave:protected] => [alreadyInValidation:protected] => [validationFailures:protected] => Array ( ) [_new:BaseObject:private] => [_deleted:BaseObject:private] => [modifiedColumns:protected] => Array ( ) ) [90] => Category Object ( [languages:protected] => [bok_resources:protected] => [bok_topics:protected] => [bok_keywords:protected] => [id:protected] => 90 [type:protected] => category [parent:protected] => 3 [label:protected] => Industrial [alreadyInSave:protected] => [alreadyInValidation:protected] => [validationFailures:protected] => Array ( ) [_new:BaseObject:private] => [_deleted:BaseObject:private] => [modifiedColumns:protected] => Array ( ) ) [92] => Category Object ( [languages:protected] => [bok_resources:protected] => [bok_topics:protected] => [bok_keywords:protected] => [id:protected] => 92 [type:protected] => category [parent:protected] => 3 [label:protected] => LEED/Green Construction [alreadyInSave:protected] => [alreadyInValidation:protected] => [validationFailures:protected] => Array ( ) [_new:BaseObject:private] => [_deleted:BaseObject:private] => [modifiedColumns:protected] => Array ( ) ) [93] => Category Object ( [languages:protected] => [bok_resources:protected] => [bok_topics:protected] => [bok_keywords:protected] => [id:protected] => 93 [type:protected] => category [parent:protected] => 3 [label:protected] => Renovations [alreadyInSave:protected] => [alreadyInValidation:protected] => [validationFailures:protected] => Array ( ) [_new:BaseObject:private] => [_deleted:BaseObject:private] => [modifiedColumns:protected] => Array ( ) ) [94] => Category Object ( [languages:protected] => [bok_resources:protected] => [bok_topics:protected] => [bok_keywords:protected] => [id:protected] => 94 [type:protected] => category [parent:protected] => 3 [label:protected] => Residential [alreadyInSave:protected] => [alreadyInValidation:protected] => [validationFailures:protected] => Array ( ) [_new:BaseObject:private] => [_deleted:BaseObject:private] => [modifiedColumns:protected] => Array ( ) ) [95] => Category Object ( [languages:protected] => [bok_resources:protected] => [bok_topics:protected] => [bok_keywords:protected] => [id:protected] => 95 [type:protected] => category [parent:protected] => 3 [label:protected] => Underground [alreadyInSave:protected] => [alreadyInValidation:protected] => [validationFailures:protected] => Array ( ) [_new:BaseObject:private] => [_deleted:BaseObject:private] => [modifiedColumns:protected] => Array ( ) ) [100] => Category Object ( [languages:protected] => [bok_resources:protected] => [bok_topics:protected] => [bok_keywords:protected] => [id:protected] => 100 [type:protected] => category [parent:protected] => 6 [label:protected] => Toolbox Talks [alreadyInSave:protected] => [alreadyInValidation:protected] => [validationFailures:protected] => Array ( ) [_new:BaseObject:private] => [_deleted:BaseObject:private] => [modifiedColumns:protected] => Array ( ) ) ) [categories_initialized:protected] => 1 [mapped_items:protected] => [content:protected] => [files:protected] => [language:protected] => Language Object ( [id:protected] => 1 [code:protected] => en [name:protected] => English [alreadyInSave:protected] => [alreadyInValidation:protected] => [validationFailures:protected] => Array ( ) [_new:BaseObject:private] => [_deleted:BaseObject:private] => [modifiedColumns:protected] => Array ( ) ) [old_record:protected] => [id:protected] => 4419 [old_id:protected] => [elcosh_id:protected] => d001652 [type:protected] => document [display_type:protected] => HTML only (and links) [user_id:protected] => 0 [language_id:protected] => 1 [tagging_id:protected] => Valeria Contreras [priority_id:protected] => 1 [title:protected] => Toolbox Talk: Suicide Prevention [total_pages:protected] => 1 [billed_pages:protected] => 1 [publication_number:protected] => [part_of:protected] => [keywords:protected] => suicide, suicide prevention, mental health, stress, depression, exhaustion, burnout, safety, support, emotional support, health [comments:protected] => [summary:protected] =>The CPWR Toolbox Talk on Suicide Prevention addresses the prevalence of suicide among construction workers. The resource includes a brief case example, steps to prevent a related injury or illness, and questions for discussion. It includes an image that illustrates the hazard, which can be posted in a central location as a reminder of steps to work safely.
Available in English and Spanish. [transition_comments:protected] => [external_link:protected] => [consol_link:protected] => [more_like_this:protected] => [permission_given_by:protected] => [published:protected] => T [billable:protected] => F [img_name:protected] => [img_ext:protected] => [img_width:protected] => [img_height:protected] => [img_credit:protected] => [img_practice:protected] => [vid_source_id:protected] => [vid_running_time:protected] => [vid_intended_audience:protected] => [vid_acquisition_info:protected] => [vid_cost:protected] => [vid_producer:protected] => [vid_filename:protected] => [vid_filename_downloadable:protected] => [date_summary:protected] => [date_permission_requested:protected] => [date_permission_received:protected] => [date_review_needed:protected] => [date_received:protected] => 10/08/20 [date_completed:protected] => 10/08/20 [date_billed:protected] => [date_modified:protected] => 05/19/23 [collBokExports:protected] => [lastBokExportCriteria:BaseElcoshItem:private] => [alreadyInSave:protected] => [alreadyInValidation:protected] => [validationFailures:protected] => Array ( ) [_new:BaseObject:private] => [_deleted:BaseObject:private] => [modifiedColumns:protected] => Array ( ) ) ) ) [new_images] => Array ( [0] => Search_Result Object ( [title] => Toolbox talk - crew view [image] => /record/images/4005-p.jpg [blurb] => Photo of crew listening to a toolbox safety talk before starting work.... [category] => Array ( [0] => 97 [1] => 20 [2] => 47 [3] => 49 [4] => 51 [5] => 55 [6] => 61 [7] => 64 [8] => 71 [9] => 75 [10] => 63 [11] => 79 [12] => 62 [13] => 87 [14] => 88 [15] => 91 [16] => 90 [17] => 93 [18] => 94 [19] => 95 ) [labels] => Array ( [0] => Images [1] => Media [2] => Media & Documents [3] => Safety Culture [4] => Work Environment [5] => Hazards [6] => Bricklayer [7] => Trades [8] => Carpenter [10] => Cement Mason [12] => Electrical Worker [14] => Interior Systems Carpenter [16] => Laborer [18] => Painter [20] => Plasterer [22] => Reinforcing Ironworker [24] => Scaffold Erector [26] => Structural Ironworker [28] => Commercial & Institutional [29] => Jobsites [30] => Demolition [32] => Heavy & Highway [34] => Industrial [36] => Renovations [38] => Residential [40] => Underground ) [type] => Images [sub_category] => [url] => /image/4005/i002692/Toolbox%2Btalk%2B-%2Bcrew%2Bview.html [item:protected] => ImageRecord Object ( [records:protected] => Array ( ) [recordId:protected] => [searchWordClass:protected] => [searchWordPeerClass:protected] => [bok_record:protected] => [authors:protected] => [organizations:protected] => [collections:protected] => [categories:protected] => Array ( [97] => Category Object ( [languages:protected] => [bok_resources:protected] => [bok_topics:protected] => [bok_keywords:protected] => [id:protected] => 97 [type:protected] => category [parent:protected] => 5 [label:protected] => Images [alreadyInSave:protected] => [alreadyInValidation:protected] => [validationFailures:protected] => Array ( ) [_new:BaseObject:private] => [_deleted:BaseObject:private] => [modifiedColumns:protected] => Array ( ) ) [20] => Category Object ( [languages:protected] => [bok_resources:protected] => [bok_topics:protected] => [bok_keywords:protected] => [id:protected] => 20 [type:protected] => category [parent:protected] => 7 [label:protected] => Safety Culture [alreadyInSave:protected] => [alreadyInValidation:protected] => [validationFailures:protected] => Array ( ) [_new:BaseObject:private] => [_deleted:BaseObject:private] => [modifiedColumns:protected] => Array ( ) ) [47] => Category Object ( [languages:protected] => [bok_resources:protected] => [bok_topics:protected] => [bok_keywords:protected] => [id:protected] => 47 [type:protected] => category [parent:protected] => 2 [label:protected] => Bricklayer [alreadyInSave:protected] => [alreadyInValidation:protected] => [validationFailures:protected] => Array ( ) [_new:BaseObject:private] => [_deleted:BaseObject:private] => [modifiedColumns:protected] => Array ( ) ) [49] => Category Object ( [languages:protected] => [bok_resources:protected] => [bok_topics:protected] => [bok_keywords:protected] => [id:protected] => 49 [type:protected] => category [parent:protected] => 2 [label:protected] => Carpenter [alreadyInSave:protected] => [alreadyInValidation:protected] => [validationFailures:protected] => Array ( ) [_new:BaseObject:private] => [_deleted:BaseObject:private] => [modifiedColumns:protected] => Array ( ) ) [51] => Category Object ( [languages:protected] => [bok_resources:protected] => [bok_topics:protected] => [bok_keywords:protected] => [id:protected] => 51 [type:protected] => category [parent:protected] => 2 [label:protected] => Cement Mason [alreadyInSave:protected] => [alreadyInValidation:protected] => [validationFailures:protected] => Array ( ) [_new:BaseObject:private] => [_deleted:BaseObject:private] => [modifiedColumns:protected] => Array ( ) ) [55] => Category Object ( [languages:protected] => [bok_resources:protected] => [bok_topics:protected] => [bok_keywords:protected] => [id:protected] => 55 [type:protected] => category [parent:protected] => 2 [label:protected] => Electrical Worker [alreadyInSave:protected] => [alreadyInValidation:protected] => [validationFailures:protected] => Array ( ) [_new:BaseObject:private] => [_deleted:BaseObject:private] => [modifiedColumns:protected] => Array ( ) ) [61] => Category Object ( [languages:protected] => [bok_resources:protected] => [bok_topics:protected] => [bok_keywords:protected] => [id:protected] => 61 [type:protected] => category [parent:protected] => 2 [label:protected] => Interior Systems Carpenter [alreadyInSave:protected] => [alreadyInValidation:protected] => [validationFailures:protected] => Array ( ) [_new:BaseObject:private] => [_deleted:BaseObject:private] => [modifiedColumns:protected] => Array ( ) ) [64] => Category Object ( [languages:protected] => [bok_resources:protected] => [bok_topics:protected] => [bok_keywords:protected] => [id:protected] => 64 [type:protected] => category [parent:protected] => 2 [label:protected] => Laborer [alreadyInSave:protected] => [alreadyInValidation:protected] => [validationFailures:protected] => Array ( ) [_new:BaseObject:private] => [_deleted:BaseObject:private] => [modifiedColumns:protected] => Array ( ) ) [71] => Category Object ( [languages:protected] => [bok_resources:protected] => [bok_topics:protected] => [bok_keywords:protected] => [id:protected] => 71 [type:protected] => category [parent:protected] => 2 [label:protected] => Painter [alreadyInSave:protected] => [alreadyInValidation:protected] => [validationFailures:protected] => Array ( ) [_new:BaseObject:private] => [_deleted:BaseObject:private] => [modifiedColumns:protected] => Array ( ) ) [75] => Category Object ( [languages:protected] => [bok_resources:protected] => [bok_topics:protected] => [bok_keywords:protected] => [id:protected] => 75 [type:protected] => category [parent:protected] => 2 [label:protected] => Plasterer [alreadyInSave:protected] => [alreadyInValidation:protected] => [validationFailures:protected] => Array ( ) [_new:BaseObject:private] => [_deleted:BaseObject:private] => [modifiedColumns:protected] => Array ( ) ) [63] => Category Object ( [languages:protected] => [bok_resources:protected] => [bok_topics:protected] => [bok_keywords:protected] => [id:protected] => 63 [type:protected] => category [parent:protected] => 2 [label:protected] => Reinforcing Ironworker [alreadyInSave:protected] => [alreadyInValidation:protected] => [validationFailures:protected] => Array ( ) [_new:BaseObject:private] => [_deleted:BaseObject:private] => [modifiedColumns:protected] => Array ( ) ) [79] => Category Object ( [languages:protected] => [bok_resources:protected] => [bok_topics:protected] => [bok_keywords:protected] => [id:protected] => 79 [type:protected] => category [parent:protected] => 2 [label:protected] => Scaffold Erector [alreadyInSave:protected] => [alreadyInValidation:protected] => [validationFailures:protected] => Array ( ) [_new:BaseObject:private] => [_deleted:BaseObject:private] => [modifiedColumns:protected] => Array ( ) ) [62] => Category Object ( [languages:protected] => [bok_resources:protected] => [bok_topics:protected] => [bok_keywords:protected] => [id:protected] => 62 [type:protected] => category [parent:protected] => 2 [label:protected] => Structural Ironworker [alreadyInSave:protected] => [alreadyInValidation:protected] => [validationFailures:protected] => Array ( ) [_new:BaseObject:private] => [_deleted:BaseObject:private] => [modifiedColumns:protected] => Array ( ) ) [87] => Category Object ( [languages:protected] => [bok_resources:protected] => [bok_topics:protected] => [bok_keywords:protected] => [id:protected] => 87 [type:protected] => category [parent:protected] => 3 [label:protected] => Commercial & Institutional [alreadyInSave:protected] => [alreadyInValidation:protected] => [validationFailures:protected] => Array ( ) [_new:BaseObject:private] => [_deleted:BaseObject:private] => [modifiedColumns:protected] => Array ( ) ) [88] => Category Object ( [languages:protected] => [bok_resources:protected] => [bok_topics:protected] => [bok_keywords:protected] => [id:protected] => 88 [type:protected] => category [parent:protected] => 3 [label:protected] => Demolition [alreadyInSave:protected] => [alreadyInValidation:protected] => [validationFailures:protected] => Array ( ) [_new:BaseObject:private] => [_deleted:BaseObject:private] => [modifiedColumns:protected] => Array ( ) ) [91] => Category Object ( [languages:protected] => [bok_resources:protected] => [bok_topics:protected] => [bok_keywords:protected] => [id:protected] => 91 [type:protected] => category [parent:protected] => 3 [label:protected] => Heavy & Highway [alreadyInSave:protected] => [alreadyInValidation:protected] => [validationFailures:protected] => Array ( ) [_new:BaseObject:private] => [_deleted:BaseObject:private] => [modifiedColumns:protected] => Array ( ) ) [90] => Category Object ( [languages:protected] => [bok_resources:protected] => [bok_topics:protected] => [bok_keywords:protected] => [id:protected] => 90 [type:protected] => category [parent:protected] => 3 [label:protected] => Industrial [alreadyInSave:protected] => [alreadyInValidation:protected] => [validationFailures:protected] => Array ( ) [_new:BaseObject:private] => [_deleted:BaseObject:private] => [modifiedColumns:protected] => Array ( ) ) [93] => Category Object ( [languages:protected] => [bok_resources:protected] => [bok_topics:protected] => [bok_keywords:protected] => [id:protected] => 93 [type:protected] => category [parent:protected] => 3 [label:protected] => Renovations [alreadyInSave:protected] => [alreadyInValidation:protected] => [validationFailures:protected] => Array ( ) [_new:BaseObject:private] => [_deleted:BaseObject:private] => [modifiedColumns:protected] => Array ( ) ) [94] => Category Object ( [languages:protected] => [bok_resources:protected] => [bok_topics:protected] => [bok_keywords:protected] => [id:protected] => 94 [type:protected] => category [parent:protected] => 3 [label:protected] => Residential [alreadyInSave:protected] => [alreadyInValidation:protected] => [validationFailures:protected] => Array ( ) [_new:BaseObject:private] => [_deleted:BaseObject:private] => [modifiedColumns:protected] => Array ( ) ) [95] => Category Object ( [languages:protected] => [bok_resources:protected] => [bok_topics:protected] => [bok_keywords:protected] => [id:protected] => 95 [type:protected] => category [parent:protected] => 3 [label:protected] => Underground [alreadyInSave:protected] => [alreadyInValidation:protected] => [validationFailures:protected] => Array ( ) [_new:BaseObject:private] => [_deleted:BaseObject:private] => [modifiedColumns:protected] => Array ( ) ) ) [categories_initialized:protected] => 1 [mapped_items:protected] => [content:protected] => [files:protected] => [language:protected] => Language Object ( [id:protected] => 1 [code:protected] => en [name:protected] => English [alreadyInSave:protected] => [alreadyInValidation:protected] => [validationFailures:protected] => Array ( ) [_new:BaseObject:private] => [_deleted:BaseObject:private] => [modifiedColumns:protected] => Array ( ) ) [old_record:protected] => [id:protected] => 4005 [old_id:protected] => [elcosh_id:protected] => i002692 [type:protected] => image [display_type:protected] => Image [user_id:protected] => 0 [language_id:protected] => 1 [tagging_id:protected] => Bruce Lippy [priority_id:protected] => 1 [title:protected] => Toolbox talk - crew view [total_pages:protected] => 0 [billed_pages:protected] => 0 [publication_number:protected] => [part_of:protected] => [keywords:protected] => toolbox talk, tailgate talk, safety talk, Spanish [comments:protected] => [summary:protected] => Photo of crew listening to a toolbox safety talk before starting work. [transition_comments:protected] => [external_link:protected] => [consol_link:protected] => http://www.cpwrconstructionsolutions.org/electrical/solution/662/worker-training.html [more_like_this:protected] => i002691,d001269, c000079, d001285 [permission_given_by:protected] => [published:protected] => T [billable:protected] => F [img_name:protected] => [img_ext:protected] => jpg [img_width:protected] => [img_height:protected] => [img_credit:protected] => Morgan Zavertnik and Hoar Construction [img_practice:protected] => good [vid_source_id:protected] => [vid_running_time:protected] => [vid_intended_audience:protected] => [vid_acquisition_info:protected] => [vid_cost:protected] => [vid_producer:protected] => [vid_filename:protected] => [vid_filename_downloadable:protected] => [date_summary:protected] => November 2015 [date_permission_requested:protected] => [date_permission_received:protected] => [date_review_needed:protected] => [date_received:protected] => 03/02/16 [date_completed:protected] => 03/02/16 [date_billed:protected] => [date_modified:protected] => 03/02/16 [collBokExports:protected] => [lastBokExportCriteria:BaseElcoshItem:private] => [alreadyInSave:protected] => [alreadyInValidation:protected] => [validationFailures:protected] => Array ( ) [_new:BaseObject:private] => [_deleted:BaseObject:private] => [modifiedColumns:protected] => Array ( ) ) ) [1] => Search_Result Object ( [title] => Toolbox talk - long shot [image] => /record/images/4006-p.jpg [blurb] => This crew gathered every morning before starting work to discuss a new safety topic.... [category] => Array ( [0] => 20 [1] => 47 [2] => 49 [3] => 51 [4] => 55 [5] => 64 [6] => 68 [7] => 75 [8] => 76 [9] => 63 [10] => 78 [11] => 79 [12] => 82 [13] => 62 [14] => 87 [15] => 88 [16] => 91 [17] => 90 [18] => 93 [19] => 94 [20] => 95 [21] => 97 ) [labels] => Array ( [0] => Safety Culture [1] => Work Environment [2] => Hazards [3] => Bricklayer [4] => Trades [5] => Carpenter [7] => Cement Mason [9] => Electrical Worker [11] => Laborer [13] => Maintenance Worker [15] => Plasterer [17] => Plumber/Pipefitter [19] => Reinforcing Ironworker [21] => Roofer/Waterproofer [23] => Scaffold Erector [25] => Stonemason [27] => Structural Ironworker [29] => Commercial & Institutional [30] => Jobsites [31] => Demolition [33] => Heavy & Highway [35] => Industrial [37] => Renovations [39] => Residential [41] => Underground [43] => Images [44] => Media [45] => Media & Documents ) [type] => Images [sub_category] => [url] => /image/4006/i002693/Toolbox%2Btalk%2B-%2Blong%2Bshot.html [item:protected] => ImageRecord Object ( [records:protected] => Array ( ) [recordId:protected] => [searchWordClass:protected] => [searchWordPeerClass:protected] => [bok_record:protected] => [authors:protected] => [organizations:protected] => [collections:protected] => [categories:protected] => Array ( [20] => Category Object ( [languages:protected] => [bok_resources:protected] => [bok_topics:protected] => [bok_keywords:protected] => [id:protected] => 20 [type:protected] => category [parent:protected] => 7 [label:protected] => Safety Culture [alreadyInSave:protected] => [alreadyInValidation:protected] => [validationFailures:protected] => Array ( ) [_new:BaseObject:private] => [_deleted:BaseObject:private] => [modifiedColumns:protected] => Array ( ) ) [47] => Category Object ( [languages:protected] => [bok_resources:protected] => [bok_topics:protected] => [bok_keywords:protected] => [id:protected] => 47 [type:protected] => category [parent:protected] => 2 [label:protected] => Bricklayer [alreadyInSave:protected] => [alreadyInValidation:protected] => [validationFailures:protected] => Array ( ) [_new:BaseObject:private] => [_deleted:BaseObject:private] => [modifiedColumns:protected] => Array ( ) ) [49] => Category Object ( [languages:protected] => [bok_resources:protected] => [bok_topics:protected] => [bok_keywords:protected] => [id:protected] => 49 [type:protected] => category [parent:protected] => 2 [label:protected] => Carpenter [alreadyInSave:protected] => [alreadyInValidation:protected] => [validationFailures:protected] => Array ( ) [_new:BaseObject:private] => [_deleted:BaseObject:private] => [modifiedColumns:protected] => Array ( ) ) [51] => Category Object ( [languages:protected] => [bok_resources:protected] => [bok_topics:protected] => [bok_keywords:protected] => [id:protected] => 51 [type:protected] => category [parent:protected] => 2 [label:protected] => Cement Mason [alreadyInSave:protected] => [alreadyInValidation:protected] => [validationFailures:protected] => Array ( ) [_new:BaseObject:private] => [_deleted:BaseObject:private] => [modifiedColumns:protected] => Array ( ) ) [55] => Category Object ( [languages:protected] => [bok_resources:protected] => [bok_topics:protected] => [bok_keywords:protected] => [id:protected] => 55 [type:protected] => category [parent:protected] => 2 [label:protected] => Electrical Worker [alreadyInSave:protected] => [alreadyInValidation:protected] => [validationFailures:protected] => Array ( ) [_new:BaseObject:private] => [_deleted:BaseObject:private] => [modifiedColumns:protected] => Array ( ) ) [64] => Category Object ( [languages:protected] => [bok_resources:protected] => [bok_topics:protected] => [bok_keywords:protected] => [id:protected] => 64 [type:protected] => category [parent:protected] => 2 [label:protected] => Laborer [alreadyInSave:protected] => [alreadyInValidation:protected] => [validationFailures:protected] => Array ( ) [_new:BaseObject:private] => [_deleted:BaseObject:private] => [modifiedColumns:protected] => Array ( ) ) [68] => Category Object ( [languages:protected] => [bok_resources:protected] => [bok_topics:protected] => [bok_keywords:protected] => [id:protected] => 68 [type:protected] => category [parent:protected] => 2 [label:protected] => Maintenance Worker [alreadyInSave:protected] => [alreadyInValidation:protected] => [validationFailures:protected] => Array ( ) [_new:BaseObject:private] => [_deleted:BaseObject:private] => [modifiedColumns:protected] => Array ( ) ) [75] => Category Object ( [languages:protected] => [bok_resources:protected] => [bok_topics:protected] => [bok_keywords:protected] => [id:protected] => 75 [type:protected] => category [parent:protected] => 2 [label:protected] => Plasterer [alreadyInSave:protected] => [alreadyInValidation:protected] => [validationFailures:protected] => Array ( ) [_new:BaseObject:private] => [_deleted:BaseObject:private] => [modifiedColumns:protected] => Array ( ) ) [76] => Category Object ( [languages:protected] => [bok_resources:protected] => [bok_topics:protected] => [bok_keywords:protected] => [id:protected] => 76 [type:protected] => category [parent:protected] => 2 [label:protected] => Plumber/Pipefitter [alreadyInSave:protected] => [alreadyInValidation:protected] => [validationFailures:protected] => Array ( ) [_new:BaseObject:private] => [_deleted:BaseObject:private] => [modifiedColumns:protected] => Array ( ) ) [63] => Category Object ( [languages:protected] => [bok_resources:protected] => [bok_topics:protected] => [bok_keywords:protected] => [id:protected] => 63 [type:protected] => category [parent:protected] => 2 [label:protected] => Reinforcing Ironworker [alreadyInSave:protected] => [alreadyInValidation:protected] => [validationFailures:protected] => Array ( ) [_new:BaseObject:private] => [_deleted:BaseObject:private] => [modifiedColumns:protected] => Array ( ) ) [78] => Category Object ( [languages:protected] => [bok_resources:protected] => [bok_topics:protected] => [bok_keywords:protected] => [id:protected] => 78 [type:protected] => category [parent:protected] => 2 [label:protected] => Roofer/Waterproofer [alreadyInSave:protected] => [alreadyInValidation:protected] => [validationFailures:protected] => Array ( ) [_new:BaseObject:private] => [_deleted:BaseObject:private] => [modifiedColumns:protected] => Array ( ) ) [79] => Category Object ( [languages:protected] => [bok_resources:protected] => [bok_topics:protected] => [bok_keywords:protected] => [id:protected] => 79 [type:protected] => category [parent:protected] => 2 [label:protected] => Scaffold Erector [alreadyInSave:protected] => [alreadyInValidation:protected] => [validationFailures:protected] => Array ( ) [_new:BaseObject:private] => [_deleted:BaseObject:private] => [modifiedColumns:protected] => Array ( ) ) [82] => Category Object ( [languages:protected] => [bok_resources:protected] => [bok_topics:protected] => [bok_keywords:protected] => [id:protected] => 82 [type:protected] => category [parent:protected] => 2 [label:protected] => Stonemason [alreadyInSave:protected] => [alreadyInValidation:protected] => [validationFailures:protected] => Array ( ) [_new:BaseObject:private] => [_deleted:BaseObject:private] => [modifiedColumns:protected] => Array ( ) ) [62] => Category Object ( [languages:protected] => [bok_resources:protected] => [bok_topics:protected] => [bok_keywords:protected] => [id:protected] => 62 [type:protected] => category [parent:protected] => 2 [label:protected] => Structural Ironworker [alreadyInSave:protected] => [alreadyInValidation:protected] => [validationFailures:protected] => Array ( ) [_new:BaseObject:private] => [_deleted:BaseObject:private] => [modifiedColumns:protected] => Array ( ) ) [87] => Category Object ( [languages:protected] => [bok_resources:protected] => [bok_topics:protected] => [bok_keywords:protected] => [id:protected] => 87 [type:protected] => category [parent:protected] => 3 [label:protected] => Commercial & Institutional [alreadyInSave:protected] => [alreadyInValidation:protected] => [validationFailures:protected] => Array ( ) [_new:BaseObject:private] => [_deleted:BaseObject:private] => [modifiedColumns:protected] => Array ( ) ) [88] => Category Object ( [languages:protected] => [bok_resources:protected] => [bok_topics:protected] => [bok_keywords:protected] => [id:protected] => 88 [type:protected] => category [parent:protected] => 3 [label:protected] => Demolition [alreadyInSave:protected] => [alreadyInValidation:protected] => [validationFailures:protected] => Array ( ) [_new:BaseObject:private] => [_deleted:BaseObject:private] => [modifiedColumns:protected] => Array ( ) ) [91] => Category Object ( [languages:protected] => [bok_resources:protected] => [bok_topics:protected] => [bok_keywords:protected] => [id:protected] => 91 [type:protected] => category [parent:protected] => 3 [label:protected] => Heavy & Highway [alreadyInSave:protected] => [alreadyInValidation:protected] => [validationFailures:protected] => Array ( ) [_new:BaseObject:private] => [_deleted:BaseObject:private] => [modifiedColumns:protected] => Array ( ) ) [90] => Category Object ( [languages:protected] => [bok_resources:protected] => [bok_topics:protected] => [bok_keywords:protected] => [id:protected] => 90 [type:protected] => category [parent:protected] => 3 [label:protected] => Industrial [alreadyInSave:protected] => [alreadyInValidation:protected] => [validationFailures:protected] => Array ( ) [_new:BaseObject:private] => [_deleted:BaseObject:private] => [modifiedColumns:protected] => Array ( ) ) [93] => Category Object ( [languages:protected] => [bok_resources:protected] => [bok_topics:protected] => [bok_keywords:protected] => [id:protected] => 93 [type:protected] => category [parent:protected] => 3 [label:protected] => Renovations [alreadyInSave:protected] => [alreadyInValidation:protected] => [validationFailures:protected] => Array ( ) [_new:BaseObject:private] => [_deleted:BaseObject:private] => [modifiedColumns:protected] => Array ( ) ) [94] => Category Object ( [languages:protected] => [bok_resources:protected] => [bok_topics:protected] => [bok_keywords:protected] => [id:protected] => 94 [type:protected] => category [parent:protected] => 3 [label:protected] => Residential [alreadyInSave:protected] => [alreadyInValidation:protected] => [validationFailures:protected] => Array ( ) [_new:BaseObject:private] => [_deleted:BaseObject:private] => [modifiedColumns:protected] => Array ( ) ) [95] => Category Object ( [languages:protected] => [bok_resources:protected] => [bok_topics:protected] => [bok_keywords:protected] => [id:protected] => 95 [type:protected] => category [parent:protected] => 3 [label:protected] => Underground [alreadyInSave:protected] => [alreadyInValidation:protected] => [validationFailures:protected] => Array ( ) [_new:BaseObject:private] => [_deleted:BaseObject:private] => [modifiedColumns:protected] => Array ( ) ) [97] => Category Object ( [languages:protected] => [bok_resources:protected] => [bok_topics:protected] => [bok_keywords:protected] => [id:protected] => 97 [type:protected] => category [parent:protected] => 5 [label:protected] => Images [alreadyInSave:protected] => [alreadyInValidation:protected] => [validationFailures:protected] => Array ( ) [_new:BaseObject:private] => [_deleted:BaseObject:private] => [modifiedColumns:protected] => Array ( ) ) ) [categories_initialized:protected] => 1 [mapped_items:protected] => [content:protected] => [files:protected] => [language:protected] => Language Object ( [id:protected] => 1 [code:protected] => en [name:protected] => English [alreadyInSave:protected] => [alreadyInValidation:protected] => [validationFailures:protected] => Array ( ) [_new:BaseObject:private] => [_deleted:BaseObject:private] => [modifiedColumns:protected] => Array ( ) ) [old_record:protected] => [id:protected] => 4006 [old_id:protected] => [elcosh_id:protected] => i002693 [type:protected] => image [display_type:protected] => Image [user_id:protected] => 0 [language_id:protected] => 1 [tagging_id:protected] => Bruce Lippy [priority_id:protected] => 1 [title:protected] => Toolbox talk - long shot [total_pages:protected] => 0 [billed_pages:protected] => 0 [publication_number:protected] => [part_of:protected] => [keywords:protected] => toolbox talk, tailgate talk, safety minute [comments:protected] => [summary:protected] => This crew gathered every morning before starting work to discuss a new safety topic. [transition_comments:protected] => [external_link:protected] => [consol_link:protected] => http://www.cpwrconstructionsolutions.org/electrical/solution/662/worker-training.html [more_like_this:protected] => i002691,i002692,d001269,d000527 [permission_given_by:protected] => [published:protected] => T [billable:protected] => F [img_name:protected] => [img_ext:protected] => jpg [img_width:protected] => [img_height:protected] => [img_credit:protected] => Morgan Zavertnik and Hoar Construction [img_practice:protected] => good [vid_source_id:protected] => [vid_running_time:protected] => [vid_intended_audience:protected] => [vid_acquisition_info:protected] => [vid_cost:protected] => [vid_producer:protected] => [vid_filename:protected] => [vid_filename_downloadable:protected] => [date_summary:protected] => November 2015 [date_permission_requested:protected] => [date_permission_received:protected] => [date_review_needed:protected] => [date_received:protected] => 03/02/16 [date_completed:protected] => 03/02/16 [date_billed:protected] => [date_modified:protected] => 03/02/16 [collBokExports:protected] => [lastBokExportCriteria:BaseElcoshItem:private] => [alreadyInSave:protected] => [alreadyInValidation:protected] => [validationFailures:protected] => Array ( ) [_new:BaseObject:private] => [_deleted:BaseObject:private] => [modifiedColumns:protected] => Array ( ) ) ) [2] => Search_Result Object ( [title] => Construction bracing [image] => /record/images/3995-p.jpg [blurb] => This shows structural support that prevents collapses during construction.... [category] => Array ( [0] => 12 [1] => 15 [2] => 21 [3] => 49 [4] => 51 [5] => 55 [6] => 56 [7] => 60 [8] => 64 [9] => 68 [10] => 74 [11] => 63 [12] => 78 [13] => 79 [14] => 80 [15] => 62 [16] => 87 [17] => 90 [18] => 97 ) [labels] => Array ( [0] => Crushed/Struck By [1] => Work Environment [2] => Hazards [3] => Falls [6] => Scaffolds [9] => Carpenter [10] => Trades [11] => Cement Mason [13] => Electrical Worker [15] => Elevator Constructor [17] => HVAC [19] => Laborer [21] => Maintenance Worker [23] => Pile Driver [25] => Reinforcing Ironworker [27] => Roofer/Waterproofer [29] => Scaffold Erector [31] => Sheetmetal Worker [33] => Structural Ironworker [35] => Commercial & Institutional [36] => Jobsites [37] => Industrial [39] => Images [40] => Media [41] => Media & Documents ) [type] => Images [sub_category] => [url] => /image/3995/i002690/Construction%2Bbracing.html [item:protected] => ImageRecord Object ( [records:protected] => Array ( ) [recordId:protected] => [searchWordClass:protected] => [searchWordPeerClass:protected] => [bok_record:protected] => [authors:protected] => [organizations:protected] => [collections:protected] => [categories:protected] => Array ( [12] => Category Object ( [languages:protected] => [bok_resources:protected] => [bok_topics:protected] => [bok_keywords:protected] => [id:protected] => 12 [type:protected] => category [parent:protected] => 7 [label:protected] => Crushed/Struck By [alreadyInSave:protected] => [alreadyInValidation:protected] => [validationFailures:protected] => Array ( ) [_new:BaseObject:private] => [_deleted:BaseObject:private] => [modifiedColumns:protected] => Array ( ) ) [15] => Category Object ( [languages:protected] => [bok_resources:protected] => [bok_topics:protected] => [bok_keywords:protected] => [id:protected] => 15 [type:protected] => category [parent:protected] => 7 [label:protected] => Falls [alreadyInSave:protected] => [alreadyInValidation:protected] => [validationFailures:protected] => Array ( ) [_new:BaseObject:private] => [_deleted:BaseObject:private] => [modifiedColumns:protected] => Array ( ) ) [21] => Category Object ( [languages:protected] => [bok_resources:protected] => [bok_topics:protected] => [bok_keywords:protected] => [id:protected] => 21 [type:protected] => category [parent:protected] => 7 [label:protected] => Scaffolds [alreadyInSave:protected] => [alreadyInValidation:protected] => [validationFailures:protected] => Array ( ) [_new:BaseObject:private] => [_deleted:BaseObject:private] => [modifiedColumns:protected] => Array ( ) ) [49] => Category Object ( [languages:protected] => [bok_resources:protected] => [bok_topics:protected] => [bok_keywords:protected] => [id:protected] => 49 [type:protected] => category [parent:protected] => 2 [label:protected] => Carpenter [alreadyInSave:protected] => [alreadyInValidation:protected] => [validationFailures:protected] => Array ( ) [_new:BaseObject:private] => [_deleted:BaseObject:private] => [modifiedColumns:protected] => Array ( ) ) [51] => Category Object ( [languages:protected] => [bok_resources:protected] => [bok_topics:protected] => [bok_keywords:protected] => [id:protected] => 51 [type:protected] => category [parent:protected] => 2 [label:protected] => Cement Mason [alreadyInSave:protected] => [alreadyInValidation:protected] => [validationFailures:protected] => Array ( ) [_new:BaseObject:private] => [_deleted:BaseObject:private] => [modifiedColumns:protected] => Array ( ) ) [55] => Category Object ( [languages:protected] => [bok_resources:protected] => [bok_topics:protected] => [bok_keywords:protected] => [id:protected] => 55 [type:protected] => category [parent:protected] => 2 [label:protected] => Electrical Worker [alreadyInSave:protected] => [alreadyInValidation:protected] => [validationFailures:protected] => Array ( ) [_new:BaseObject:private] => [_deleted:BaseObject:private] => [modifiedColumns:protected] => Array ( ) ) [56] => Category Object ( [languages:protected] => [bok_resources:protected] => [bok_topics:protected] => [bok_keywords:protected] => [id:protected] => 56 [type:protected] => category [parent:protected] => 2 [label:protected] => Elevator Constructor [alreadyInSave:protected] => [alreadyInValidation:protected] => [validationFailures:protected] => Array ( ) [_new:BaseObject:private] => [_deleted:BaseObject:private] => [modifiedColumns:protected] => Array ( ) ) [60] => Category Object ( [languages:protected] => [bok_resources:protected] => [bok_topics:protected] => [bok_keywords:protected] => [id:protected] => 60 [type:protected] => category [parent:protected] => 2 [label:protected] => HVAC [alreadyInSave:protected] => [alreadyInValidation:protected] => [validationFailures:protected] => Array ( ) [_new:BaseObject:private] => [_deleted:BaseObject:private] => [modifiedColumns:protected] => Array ( ) ) [64] => Category Object ( [languages:protected] => [bok_resources:protected] => [bok_topics:protected] => [bok_keywords:protected] => [id:protected] => 64 [type:protected] => category [parent:protected] => 2 [label:protected] => Laborer [alreadyInSave:protected] => [alreadyInValidation:protected] => [validationFailures:protected] => Array ( ) [_new:BaseObject:private] => [_deleted:BaseObject:private] => [modifiedColumns:protected] => Array ( ) ) [68] => Category Object ( [languages:protected] => [bok_resources:protected] => [bok_topics:protected] => [bok_keywords:protected] => [id:protected] => 68 [type:protected] => category [parent:protected] => 2 [label:protected] => Maintenance Worker [alreadyInSave:protected] => [alreadyInValidation:protected] => [validationFailures:protected] => Array ( ) [_new:BaseObject:private] => [_deleted:BaseObject:private] => [modifiedColumns:protected] => Array ( ) ) [74] => Category Object ( [languages:protected] => [bok_resources:protected] => [bok_topics:protected] => [bok_keywords:protected] => [id:protected] => 74 [type:protected] => category [parent:protected] => 2 [label:protected] => Pile Driver [alreadyInSave:protected] => [alreadyInValidation:protected] => [validationFailures:protected] => Array ( ) [_new:BaseObject:private] => [_deleted:BaseObject:private] => [modifiedColumns:protected] => Array ( ) ) [63] => Category Object ( [languages:protected] => [bok_resources:protected] => [bok_topics:protected] => [bok_keywords:protected] => [id:protected] => 63 [type:protected] => category [parent:protected] => 2 [label:protected] => Reinforcing Ironworker [alreadyInSave:protected] => [alreadyInValidation:protected] => [validationFailures:protected] => Array ( ) [_new:BaseObject:private] => [_deleted:BaseObject:private] => [modifiedColumns:protected] => Array ( ) ) [78] => Category Object ( [languages:protected] => [bok_resources:protected] => [bok_topics:protected] => [bok_keywords:protected] => [id:protected] => 78 [type:protected] => category [parent:protected] => 2 [label:protected] => Roofer/Waterproofer [alreadyInSave:protected] => [alreadyInValidation:protected] => [validationFailures:protected] => Array ( ) [_new:BaseObject:private] => [_deleted:BaseObject:private] => [modifiedColumns:protected] => Array ( ) ) [79] => Category Object ( [languages:protected] => [bok_resources:protected] => [bok_topics:protected] => [bok_keywords:protected] => [id:protected] => 79 [type:protected] => category [parent:protected] => 2 [label:protected] => Scaffold Erector [alreadyInSave:protected] => [alreadyInValidation:protected] => [validationFailures:protected] => Array ( ) [_new:BaseObject:private] => [_deleted:BaseObject:private] => [modifiedColumns:protected] => Array ( ) ) [80] => Category Object ( [languages:protected] => [bok_resources:protected] => [bok_topics:protected] => [bok_keywords:protected] => [id:protected] => 80 [type:protected] => category [parent:protected] => 2 [label:protected] => Sheetmetal Worker [alreadyInSave:protected] => [alreadyInValidation:protected] => [validationFailures:protected] => Array ( ) [_new:BaseObject:private] => [_deleted:BaseObject:private] => [modifiedColumns:protected] => Array ( ) ) [62] => Category Object ( [languages:protected] => [bok_resources:protected] => [bok_topics:protected] => [bok_keywords:protected] => [id:protected] => 62 [type:protected] => category [parent:protected] => 2 [label:protected] => Structural Ironworker [alreadyInSave:protected] => [alreadyInValidation:protected] => [validationFailures:protected] => Array ( ) [_new:BaseObject:private] => [_deleted:BaseObject:private] => [modifiedColumns:protected] => Array ( ) ) [87] => Category Object ( [languages:protected] => [bok_resources:protected] => [bok_topics:protected] => [bok_keywords:protected] => [id:protected] => 87 [type:protected] => category [parent:protected] => 3 [label:protected] => Commercial & Institutional [alreadyInSave:protected] => [alreadyInValidation:protected] => [validationFailures:protected] => Array ( ) [_new:BaseObject:private] => [_deleted:BaseObject:private] => [modifiedColumns:protected] => Array ( ) ) [90] => Category Object ( [languages:protected] => [bok_resources:protected] => [bok_topics:protected] => [bok_keywords:protected] => [id:protected] => 90 [type:protected] => category [parent:protected] => 3 [label:protected] => Industrial [alreadyInSave:protected] => [alreadyInValidation:protected] => [validationFailures:protected] => Array ( ) [_new:BaseObject:private] => [_deleted:BaseObject:private] => [modifiedColumns:protected] => Array ( ) ) [97] => Category Object ( [languages:protected] => [bok_resources:protected] => [bok_topics:protected] => [bok_keywords:protected] => [id:protected] => 97 [type:protected] => category [parent:protected] => 5 [label:protected] => Images [alreadyInSave:protected] => [alreadyInValidation:protected] => [validationFailures:protected] => Array ( ) [_new:BaseObject:private] => [_deleted:BaseObject:private] => [modifiedColumns:protected] => Array ( ) ) ) [categories_initialized:protected] => 1 [mapped_items:protected] => [content:protected] => [files:protected] => [language:protected] => Language Object ( [id:protected] => 1 [code:protected] => en [name:protected] => English [alreadyInSave:protected] => [alreadyInValidation:protected] => [validationFailures:protected] => Array ( ) [_new:BaseObject:private] => [_deleted:BaseObject:private] => [modifiedColumns:protected] => Array ( ) ) [old_record:protected] => [id:protected] => 3995 [old_id:protected] => [elcosh_id:protected] => i002690 [type:protected] => image [display_type:protected] => Image [user_id:protected] => 0 [language_id:protected] => 1 [tagging_id:protected] => Bruce Lippy [priority_id:protected] => 1 [title:protected] => Construction bracing [total_pages:protected] => 0 [billed_pages:protected] => 0 [publication_number:protected] => [part_of:protected] => [keywords:protected] => Bracing, support, scaffold [comments:protected] => [summary:protected] => This shows structural support that prevents collapses during construction. [transition_comments:protected] => [external_link:protected] => [consol_link:protected] => http://www.cpwrconstructionsolutions.org/masonry/solution/8/adjustable-tower-scaffold.html [more_like_this:protected] => i002660 [permission_given_by:protected] => [published:protected] => T [billable:protected] => F [img_name:protected] => [img_ext:protected] => jpg [img_width:protected] => [img_height:protected] => [img_credit:protected] => Photo by Pam Susi [img_practice:protected] => good [vid_source_id:protected] => [vid_running_time:protected] => [vid_intended_audience:protected] => [vid_acquisition_info:protected] => [vid_cost:protected] => [vid_producer:protected] => [vid_filename:protected] => [vid_filename_downloadable:protected] => [date_summary:protected] => January 2016 [date_permission_requested:protected] => [date_permission_received:protected] => [date_review_needed:protected] => [date_received:protected] => 02/01/16 [date_completed:protected] => 02/01/16 [date_billed:protected] => [date_modified:protected] => 02/01/16 [collBokExports:protected] => [lastBokExportCriteria:BaseElcoshItem:private] => [alreadyInSave:protected] => [alreadyInValidation:protected] => [validationFailures:protected] => Array ( ) [_new:BaseObject:private] => [_deleted:BaseObject:private] => [modifiedColumns:protected] => Array ( ) ) ) [3] => Search_Result Object ( [title] => Suspended Scaffold Outriggers [image] => /record/images/3975-p.jpg [blurb] => Suspended scaffolds systems must be designed by a qualified person and inspected daily by a competent person. The supports for the counterweight must... [category] => Array ( [0] => 97 [1] => 15 [2] => 47 [3] => 49 [4] => 79 [5] => 87 ) [labels] => Array ( [0] => Images [1] => Media [2] => Media & Documents [3] => Falls [4] => Work Environment [5] => Hazards [6] => Bricklayer [7] => Trades [8] => Carpenter [10] => Scaffold Erector [12] => Commercial & Institutional [13] => Jobsites ) [type] => Images [sub_category] => [url] => /image/3975/i002683/Suspended%2BScaffold%2BOutriggers.html [item:protected] => ImageRecord Object ( [records:protected] => Array ( ) [recordId:protected] => [searchWordClass:protected] => [searchWordPeerClass:protected] => [bok_record:protected] => [authors:protected] => [organizations:protected] => [collections:protected] => [categories:protected] => Array ( [97] => Category Object ( [languages:protected] => [bok_resources:protected] => [bok_topics:protected] => [bok_keywords:protected] => [id:protected] => 97 [type:protected] => category [parent:protected] => 5 [label:protected] => Images [alreadyInSave:protected] => [alreadyInValidation:protected] => [validationFailures:protected] => Array ( ) [_new:BaseObject:private] => [_deleted:BaseObject:private] => [modifiedColumns:protected] => Array ( ) ) [15] => Category Object ( [languages:protected] => [bok_resources:protected] => [bok_topics:protected] => [bok_keywords:protected] => [id:protected] => 15 [type:protected] => category [parent:protected] => 7 [label:protected] => Falls [alreadyInSave:protected] => [alreadyInValidation:protected] => [validationFailures:protected] => Array ( ) [_new:BaseObject:private] => [_deleted:BaseObject:private] => [modifiedColumns:protected] => Array ( ) ) [47] => Category Object ( [languages:protected] => [bok_resources:protected] => [bok_topics:protected] => [bok_keywords:protected] => [id:protected] => 47 [type:protected] => category [parent:protected] => 2 [label:protected] => Bricklayer [alreadyInSave:protected] => [alreadyInValidation:protected] => [validationFailures:protected] => Array ( ) [_new:BaseObject:private] => [_deleted:BaseObject:private] => [modifiedColumns:protected] => Array ( ) ) [49] => Category Object ( [languages:protected] => [bok_resources:protected] => [bok_topics:protected] => [bok_keywords:protected] => [id:protected] => 49 [type:protected] => category [parent:protected] => 2 [label:protected] => Carpenter [alreadyInSave:protected] => [alreadyInValidation:protected] => [validationFailures:protected] => Array ( ) [_new:BaseObject:private] => [_deleted:BaseObject:private] => [modifiedColumns:protected] => Array ( ) ) [79] => Category Object ( [languages:protected] => [bok_resources:protected] => [bok_topics:protected] => [bok_keywords:protected] => [id:protected] => 79 [type:protected] => category [parent:protected] => 2 [label:protected] => Scaffold Erector [alreadyInSave:protected] => [alreadyInValidation:protected] => [validationFailures:protected] => Array ( ) [_new:BaseObject:private] => [_deleted:BaseObject:private] => [modifiedColumns:protected] => Array ( ) ) [87] => Category Object ( [languages:protected] => [bok_resources:protected] => [bok_topics:protected] => [bok_keywords:protected] => [id:protected] => 87 [type:protected] => category [parent:protected] => 3 [label:protected] => Commercial & Institutional [alreadyInSave:protected] => [alreadyInValidation:protected] => [validationFailures:protected] => Array ( ) [_new:BaseObject:private] => [_deleted:BaseObject:private] => [modifiedColumns:protected] => Array ( ) ) ) [categories_initialized:protected] => 1 [mapped_items:protected] => [content:protected] => [files:protected] => [language:protected] => Language Object ( [id:protected] => 1 [code:protected] => en [name:protected] => English [alreadyInSave:protected] => [alreadyInValidation:protected] => [validationFailures:protected] => Array ( ) [_new:BaseObject:private] => [_deleted:BaseObject:private] => [modifiedColumns:protected] => Array ( ) ) [old_record:protected] => [id:protected] => 3975 [old_id:protected] => [elcosh_id:protected] => i002683 [type:protected] => image [display_type:protected] => Image [user_id:protected] => 0 [language_id:protected] => 1 [tagging_id:protected] => John Newquist [priority_id:protected] => 1 [title:protected] => Suspended Scaffold Outriggers [total_pages:protected] => 0 [billed_pages:protected] => 0 [publication_number:protected] => [part_of:protected] => [keywords:protected] => suspended, scaffold, swing, stage, fall, protection, counterweight, qualified, person [comments:protected] => [summary:protected] => Suspended scaffolds systems must be designed by a qualified person and inspected daily by a competent person. The supports for the counterweight must be designed with a safety factor of four. [transition_comments:protected] => [external_link:protected] => [consol_link:protected] => http://www.cpwrconstructionsolutions.org/task/Erect%2Band%2Bdismantle%2Bscaffolds/ [more_like_this:protected] => d000244,d000359,i000253,i000407 [permission_given_by:protected] => [published:protected] => T [billable:protected] => F [img_name:protected] => [img_ext:protected] => jpg [img_width:protected] => [img_height:protected] => [img_credit:protected] => MetroPark, Miller and Long [img_practice:protected] => not_applicable [vid_source_id:protected] => [vid_running_time:protected] => [vid_intended_audience:protected] => [vid_acquisition_info:protected] => [vid_cost:protected] => [vid_producer:protected] => [vid_filename:protected] => [vid_filename_downloadable:protected] => [date_summary:protected] => August 28 2015 [date_permission_requested:protected] => [date_permission_received:protected] => [date_review_needed:protected] => [date_received:protected] => 08/28/15 [date_completed:protected] => 08/28/15 [date_billed:protected] => [date_modified:protected] => 08/28/15 [collBokExports:protected] => [lastBokExportCriteria:BaseElcoshItem:private] => [alreadyInSave:protected] => [alreadyInValidation:protected] => [validationFailures:protected] => Array ( ) [_new:BaseObject:private] => [_deleted:BaseObject:private] => [modifiedColumns:protected] => Array ( ) ) ) [4] => Search_Result Object ( [title] => Suspended scaffold [image] => /record/images/3976-p.jpg [blurb] => Suspended scaffold outrigger beams must have stops to prevent the hangers from sliding of the end of the outriggers. Wire rope supported must be desig... [category] => Array ( [0] => 97 [1] => 15 [2] => 47 [3] => 50 [4] => 79 [5] => 87 ) [labels] => Array ( [0] => Images [1] => Media [2] => Media & Documents [3] => Falls [4] => Work Environment [5] => Hazards [6] => Bricklayer [7] => Trades [8] => Carpet Layer [10] => Scaffold Erector [12] => Commercial & Institutional [13] => Jobsites ) [type] => Images [sub_category] => [url] => /image/3976/i002684/Suspended%2Bscaffold.html [item:protected] => ImageRecord Object ( [records:protected] => Array ( ) [recordId:protected] => [searchWordClass:protected] => [searchWordPeerClass:protected] => [bok_record:protected] => [authors:protected] => [organizations:protected] => [collections:protected] => [categories:protected] => Array ( [97] => Category Object ( [languages:protected] => [bok_resources:protected] => [bok_topics:protected] => [bok_keywords:protected] => [id:protected] => 97 [type:protected] => category [parent:protected] => 5 [label:protected] => Images [alreadyInSave:protected] => [alreadyInValidation:protected] => [validationFailures:protected] => Array ( ) [_new:BaseObject:private] => [_deleted:BaseObject:private] => [modifiedColumns:protected] => Array ( ) ) [15] => Category Object ( [languages:protected] => [bok_resources:protected] => [bok_topics:protected] => [bok_keywords:protected] => [id:protected] => 15 [type:protected] => category [parent:protected] => 7 [label:protected] => Falls [alreadyInSave:protected] => [alreadyInValidation:protected] => [validationFailures:protected] => Array ( ) [_new:BaseObject:private] => [_deleted:BaseObject:private] => [modifiedColumns:protected] => Array ( ) ) [47] => Category Object ( [languages:protected] => [bok_resources:protected] => [bok_topics:protected] => [bok_keywords:protected] => [id:protected] => 47 [type:protected] => category [parent:protected] => 2 [label:protected] => Bricklayer [alreadyInSave:protected] => [alreadyInValidation:protected] => [validationFailures:protected] => Array ( ) [_new:BaseObject:private] => [_deleted:BaseObject:private] => [modifiedColumns:protected] => Array ( ) ) [50] => Category Object ( [languages:protected] => [bok_resources:protected] => [bok_topics:protected] => [bok_keywords:protected] => [id:protected] => 50 [type:protected] => category [parent:protected] => 2 [label:protected] => Carpet Layer [alreadyInSave:protected] => [alreadyInValidation:protected] => [validationFailures:protected] => Array ( ) [_new:BaseObject:private] => [_deleted:BaseObject:private] => [modifiedColumns:protected] => Array ( ) ) [79] => Category Object ( [languages:protected] => [bok_resources:protected] => [bok_topics:protected] => [bok_keywords:protected] => [id:protected] => 79 [type:protected] => category [parent:protected] => 2 [label:protected] => Scaffold Erector [alreadyInSave:protected] => [alreadyInValidation:protected] => [validationFailures:protected] => Array ( ) [_new:BaseObject:private] => [_deleted:BaseObject:private] => [modifiedColumns:protected] => Array ( ) ) [87] => Category Object ( [languages:protected] => [bok_resources:protected] => [bok_topics:protected] => [bok_keywords:protected] => [id:protected] => 87 [type:protected] => category [parent:protected] => 3 [label:protected] => Commercial & Institutional [alreadyInSave:protected] => [alreadyInValidation:protected] => [validationFailures:protected] => Array ( ) [_new:BaseObject:private] => [_deleted:BaseObject:private] => [modifiedColumns:protected] => Array ( ) ) ) [categories_initialized:protected] => 1 [mapped_items:protected] => [content:protected] => [files:protected] => [language:protected] => Language Object ( [id:protected] => 1 [code:protected] => en [name:protected] => English [alreadyInSave:protected] => [alreadyInValidation:protected] => [validationFailures:protected] => Array ( ) [_new:BaseObject:private] => [_deleted:BaseObject:private] => [modifiedColumns:protected] => Array ( ) ) [old_record:protected] => [id:protected] => 3976 [old_id:protected] => [elcosh_id:protected] => i002684 [type:protected] => image [display_type:protected] => Image [user_id:protected] => 0 [language_id:protected] => 1 [tagging_id:protected] => John Newquist [priority_id:protected] => 1 [title:protected] => Suspended scaffold [total_pages:protected] => 0 [billed_pages:protected] => 0 [publication_number:protected] => [part_of:protected] => [keywords:protected] => Suspended, scaffold, outrigger, beams, erection, wire, rope, inspection, swing, stage, [comments:protected] => [summary:protected] => Suspended scaffold outrigger beams must have stops to prevent the hangers from sliding of the end of the outriggers. Wire rope supported must be designed with a safety factor of 6. The scaffold must be inspected by a competent person daily. [transition_comments:protected] => [external_link:protected] => [consol_link:protected] => http://www.cpwrconstructionsolutions.org/task/Erect%2Band%2Bdismantle%2Bscaffolds/ [more_like_this:protected] => i002683, d000244, i000407, d000606 [permission_given_by:protected] => [published:protected] => T [billable:protected] => F [img_name:protected] => [img_ext:protected] => jpg [img_width:protected] => [img_height:protected] => [img_credit:protected] => Metropark, Miller and Long [img_practice:protected] => not_applicable [vid_source_id:protected] => [vid_running_time:protected] => [vid_intended_audience:protected] => [vid_acquisition_info:protected] => [vid_cost:protected] => [vid_producer:protected] => [vid_filename:protected] => [vid_filename_downloadable:protected] => [date_summary:protected] => [date_permission_requested:protected] => [date_permission_received:protected] => [date_review_needed:protected] => [date_received:protected] => 08/28/15 [date_completed:protected] => 08/28/15 [date_billed:protected] => [date_modified:protected] => 08/28/15 [collBokExports:protected] => [lastBokExportCriteria:BaseElcoshItem:private] => [alreadyInSave:protected] => [alreadyInValidation:protected] => [validationFailures:protected] => Array ( ) [_new:BaseObject:private] => [_deleted:BaseObject:private] => [modifiedColumns:protected] => Array ( ) ) ) [5] => Search_Result Object ( [title] => Three Tower Cranes [image] => /record/images/3979-p.jpg [blurb] => Whenever multiple tower cranes are used, there needs to be preplanning to ensure that the tower cranes cannot hit each other loads. This is accomplish... [category] => Array ( [0] => 97 [1] => 11 [2] => 64 [3] => 70 [4] => 62 [5] => 87 ) [labels] => Array ( [0] => Images [1] => Media [2] => Media & Documents [3] => Cranes & Hoists [4] => Work Environment [5] => Hazards [6] => Laborer [7] => Trades [8] => Operating Engineer [10] => Structural Ironworker [12] => Commercial & Institutional [13] => Jobsites ) [type] => Images [sub_category] => [url] => /image/3979/i002687/Three%2BTower%2BCranes.html [item:protected] => ImageRecord Object ( [records:protected] => Array ( ) [recordId:protected] => [searchWordClass:protected] => [searchWordPeerClass:protected] => [bok_record:protected] => [authors:protected] => [organizations:protected] => [collections:protected] => [categories:protected] => Array ( [97] => Category Object ( [languages:protected] => [bok_resources:protected] => [bok_topics:protected] => [bok_keywords:protected] => [id:protected] => 97 [type:protected] => category [parent:protected] => 5 [label:protected] => Images [alreadyInSave:protected] => [alreadyInValidation:protected] => [validationFailures:protected] => Array ( ) [_new:BaseObject:private] => [_deleted:BaseObject:private] => [modifiedColumns:protected] => Array ( ) ) [11] => Category Object ( [languages:protected] => [bok_resources:protected] => [bok_topics:protected] => [bok_keywords:protected] => [id:protected] => 11 [type:protected] => category [parent:protected] => 7 [label:protected] => Cranes & Hoists [alreadyInSave:protected] => [alreadyInValidation:protected] => [validationFailures:protected] => Array ( ) [_new:BaseObject:private] => [_deleted:BaseObject:private] => [modifiedColumns:protected] => Array ( ) ) [64] => Category Object ( [languages:protected] => [bok_resources:protected] => [bok_topics:protected] => [bok_keywords:protected] => [id:protected] => 64 [type:protected] => category [parent:protected] => 2 [label:protected] => Laborer [alreadyInSave:protected] => [alreadyInValidation:protected] => [validationFailures:protected] => Array ( ) [_new:BaseObject:private] => [_deleted:BaseObject:private] => [modifiedColumns:protected] => Array ( ) ) [70] => Category Object ( [languages:protected] => [bok_resources:protected] => [bok_topics:protected] => [bok_keywords:protected] => [id:protected] => 70 [type:protected] => category [parent:protected] => 2 [label:protected] => Operating Engineer [alreadyInSave:protected] => [alreadyInValidation:protected] => [validationFailures:protected] => Array ( ) [_new:BaseObject:private] => [_deleted:BaseObject:private] => [modifiedColumns:protected] => Array ( ) ) [62] => Category Object ( [languages:protected] => [bok_resources:protected] => [bok_topics:protected] => [bok_keywords:protected] => [id:protected] => 62 [type:protected] => category [parent:protected] => 2 [label:protected] => Structural Ironworker [alreadyInSave:protected] => [alreadyInValidation:protected] => [validationFailures:protected] => Array ( ) [_new:BaseObject:private] => [_deleted:BaseObject:private] => [modifiedColumns:protected] => Array ( ) ) [87] => Category Object ( [languages:protected] => [bok_resources:protected] => [bok_topics:protected] => [bok_keywords:protected] => [id:protected] => 87 [type:protected] => category [parent:protected] => 3 [label:protected] => Commercial & Institutional [alreadyInSave:protected] => [alreadyInValidation:protected] => [validationFailures:protected] => Array ( ) [_new:BaseObject:private] => [_deleted:BaseObject:private] => [modifiedColumns:protected] => Array ( ) ) ) [categories_initialized:protected] => 1 [mapped_items:protected] => [content:protected] => [files:protected] => [language:protected] => Language Object ( [id:protected] => 1 [code:protected] => en [name:protected] => English [alreadyInSave:protected] => [alreadyInValidation:protected] => [validationFailures:protected] => Array ( ) [_new:BaseObject:private] => [_deleted:BaseObject:private] => [modifiedColumns:protected] => Array ( ) ) [old_record:protected] => [id:protected] => 3979 [old_id:protected] => [elcosh_id:protected] => i002687 [type:protected] => image [display_type:protected] => Image [user_id:protected] => 0 [language_id:protected] => 1 [tagging_id:protected] => John Newquist [priority_id:protected] => 1 [title:protected] => Three Tower Cranes [total_pages:protected] => 0 [billed_pages:protected] => 0 [publication_number:protected] => [part_of:protected] => [keywords:protected] => [comments:protected] => [summary:protected] => Whenever multiple tower cranes are used, there needs to be preplanning to ensure that the tower cranes cannot hit each other loads. This is accomplished by setting swing restrictions, marking the ground for allowable crane travel and training of the crane signal persons. [transition_comments:protected] => [external_link:protected] => [consol_link:protected] => http://www.cpwrconstructionsolutions.org/work/6/184/ [more_like_this:protected] => d001029, d000010, i001280, i001221 [permission_given_by:protected] => [published:protected] => T [billable:protected] => F [img_name:protected] => [img_ext:protected] => jpg [img_width:protected] => [img_height:protected] => [img_credit:protected] => Metropark [img_practice:protected] => not_applicable [vid_source_id:protected] => [vid_running_time:protected] => [vid_intended_audience:protected] => [vid_acquisition_info:protected] => [vid_cost:protected] => [vid_producer:protected] => [vid_filename:protected] => [vid_filename_downloadable:protected] => [date_summary:protected] => August 28 2015 [date_permission_requested:protected] => [date_permission_received:protected] => [date_review_needed:protected] => [date_received:protected] => 08/28/15 [date_completed:protected] => 08/28/15 [date_billed:protected] => [date_modified:protected] => 08/28/15 [collBokExports:protected] => [lastBokExportCriteria:BaseElcoshItem:private] => [alreadyInSave:protected] => [alreadyInValidation:protected] => [validationFailures:protected] => Array ( ) [_new:BaseObject:private] => [_deleted:BaseObject:private] => [modifiedColumns:protected] => Array ( ) ) ) ) [preview_mode] => [description] => This third in a series of 6 Tool Box Talks on construction ergonomics focuses on proper positioning to avoid injuries. The TBT recommends: 1)prop up a task off of the floor by using a raised surface, cart, baker scaffold, saw horses to prep materials near waist height, 2)move the lift or ladder in the best position for the work, 3)position the lift in front of the area you plan to work without trying to reach too far on either side of the lift. [keywords] => position, positioning, ergonomics, ergo, carpal tunnel, MSD, musculoskeletal disorder [related_items] => Array ( [Handouts] => Array ( [0] => DocumentRecord Object ( [records:protected] => Array ( ) [recordId:protected] => [searchWordClass:protected] => [searchWordPeerClass:protected] => [bok_record:protected] => [authors:protected] => [organizations:protected] => [collections:protected] => [categories:protected] => [categories_initialized:protected] => [mapped_items:protected] => [content:protected] => [files:protected] => [language:protected] => Language Object ( [id:protected] => 1 [code:protected] => en [name:protected] => English [alreadyInSave:protected] => [alreadyInValidation:protected] => [validationFailures:protected] => Array ( ) [_new:BaseObject:private] => [_deleted:BaseObject:private] => [modifiedColumns:protected] => Array ( ) ) [old_record:protected] => [id:protected] => 3833 [old_id:protected] => [elcosh_id:protected] => d001303 [type:protected] => document [display_type:protected] => HTML w/ PDF [user_id:protected] => 25 [language_id:protected] => 1 [tagging_id:protected] => Bruce Lippy [priority_id:protected] => 1 [title:protected] => Overview of Toolbox Talks on Ergonomics Developed by Washington University in St. Louis [total_pages:protected] => 3 [billed_pages:protected] => 3 [publication_number:protected] => [part_of:protected] => [keywords:protected] => ergonomics, musculoskeletal disorders, MSDs [comments:protected] => 7-28-2014 - Originally submitted as "HTML w/ doc and PDF", Jeff Nelson asked Bruce Lippy for permission to switch it to "HTML w/ PDF" -- permission was given [summary:protected] => This overviews provides a background on how Washington University in St. Louis developed this series of six toolbox talks on ergonomics. It also describes how they tested the effectiveness of these communication tools, concluding that the guide was valuable for improving the delivery of ergonomics training and interaction between the safety representative and workers. The researchers recommend preparing site-specific information prior to the talk and interacting with workers to discuss problems and ergonomic solutions during the safety meetings. [transition_comments:protected] => [external_link:protected] => [consol_link:protected] => [more_like_this:protected] => [permission_given_by:protected] => Lisa Jaegers, Washington U. in St. Louis [published:protected] => T [billable:protected] => F [img_name:protected] => [img_ext:protected] => png [img_width:protected] => [img_height:protected] => [img_credit:protected] => [img_practice:protected] => [vid_source_id:protected] => [vid_running_time:protected] => [vid_intended_audience:protected] => [vid_acquisition_info:protected] => [vid_cost:protected] => [vid_producer:protected] => [vid_filename:protected] => [vid_filename_downloadable:protected] => [date_summary:protected] => 2014 [date_permission_requested:protected] => [date_permission_received:protected] => [date_review_needed:protected] => [date_received:protected] => 06/11/14 [date_completed:protected] => 07/29/14 [date_billed:protected] => [date_modified:protected] => 07/29/14 [collBokExports:protected] => [lastBokExportCriteria:BaseElcoshItem:private] => [alreadyInSave:protected] => [alreadyInValidation:protected] => [validationFailures:protected] => Array ( ) [_new:BaseObject:private] => [_deleted:BaseObject:private] => [modifiedColumns:protected] => Array ( ) ) ) [Toolbox Talks] => Array ( [0] => DocumentRecord Object ( [records:protected] => Array ( ) [recordId:protected] => [searchWordClass:protected] => [searchWordPeerClass:protected] => [bok_record:protected] => [authors:protected] => [organizations:protected] => [collections:protected] => [categories:protected] => [categories_initialized:protected] => [mapped_items:protected] => [content:protected] => [files:protected] => [language:protected] => Language Object ( [id:protected] => 1 [code:protected] => en [name:protected] => English [alreadyInSave:protected] => [alreadyInValidation:protected] => [validationFailures:protected] => Array ( ) [_new:BaseObject:private] => [_deleted:BaseObject:private] => [modifiedColumns:protected] => Array ( ) ) [old_record:protected] => [id:protected] => 3835 [old_id:protected] => [elcosh_id:protected] => d001304 [type:protected] => document [display_type:protected] => HTML w/ PDF [user_id:protected] => 25 [language_id:protected] => 1 [tagging_id:protected] => Bruce Lippy [priority_id:protected] => 1 [title:protected] => Ergonomics Tool Box Talks (TBT) Training Guide [total_pages:protected] => 2 [billed_pages:protected] => 2 [publication_number:protected] => [part_of:protected] => [keywords:protected] => Ergonomics, carpal tunnel, muscular skeletal disorders, msd [comments:protected] => [summary:protected] => CPWR-funded ergonomics research by Washington University at St. Louis led to the development of 6 tool box talks. This guide is an explanation of how to deliver the talks for maximum effectiveness. This guide should be reviewed before delivering any of the talks because it makes important recommendations like: • If possible, give the TBTs as a part of the crew’s regular safety meetings so that ergonomics is included in the safety discussion. • Try to locate an area with few distractions for gathering the crew. • For a team approach, invite the work crew, site superintendent, project manager and other general contractor and/or subcontractor reps who you feel may be helpful in supporting the training and ergonomics solutions. [transition_comments:protected] => [external_link:protected] => [consol_link:protected] => [more_like_this:protected] => d001303,d001305,d001306,d001307,d001308,d001309,d001310 [permission_given_by:protected] => [published:protected] => T [billable:protected] => F [img_name:protected] => [img_ext:protected] => png [img_width:protected] => [img_height:protected] => [img_credit:protected] => [img_practice:protected] => [vid_source_id:protected] => [vid_running_time:protected] => [vid_intended_audience:protected] => [vid_acquisition_info:protected] => [vid_cost:protected] => [vid_producer:protected] => [vid_filename:protected] => [vid_filename_downloadable:protected] => [date_summary:protected] => 2014 [date_permission_requested:protected] => [date_permission_received:protected] => [date_review_needed:protected] => [date_received:protected] => 06/12/14 [date_completed:protected] => 07/29/14 [date_billed:protected] => [date_modified:protected] => 07/29/14 [collBokExports:protected] => [lastBokExportCriteria:BaseElcoshItem:private] => [alreadyInSave:protected] => [alreadyInValidation:protected] => [validationFailures:protected] => Array ( ) [_new:BaseObject:private] => [_deleted:BaseObject:private] => [modifiedColumns:protected] => Array ( ) ) [1] => DocumentRecord Object ( [records:protected] => Array ( ) [recordId:protected] => [searchWordClass:protected] => [searchWordPeerClass:protected] => [bok_record:protected] => [authors:protected] => [organizations:protected] => [collections:protected] => [categories:protected] => [categories_initialized:protected] => [mapped_items:protected] => [content:protected] => [files:protected] => [language:protected] => Language Object ( [id:protected] => 1 [code:protected] => en [name:protected] => English [alreadyInSave:protected] => [alreadyInValidation:protected] => [validationFailures:protected] => Array ( ) [_new:BaseObject:private] => [_deleted:BaseObject:private] => [modifiedColumns:protected] => Array ( ) ) [old_record:protected] => [id:protected] => 3836 [old_id:protected] => [elcosh_id:protected] => d001305 [type:protected] => document [display_type:protected] => HTML w/ PDF [user_id:protected] => 25 [language_id:protected] => 1 [tagging_id:protected] => Bruce Lippy [priority_id:protected] => 1 [title:protected] => TBT1 Ergonomics in Construction [total_pages:protected] => 5 [billed_pages:protected] => 5 [publication_number:protected] => [part_of:protected] => [keywords:protected] => ergonomics, ergo, msd, musculoskeletal disorders, risk factors, lifting, carpal tunnel, repetition, awkward postures [comments:protected] => 7-28-2014 Jeff Nelson asked Bruce Lippy about what to do with a sentence included toward the top of the doc, "Fill them in on page 2 'Other Questions.'" -- Bruce said this sentence could be deleted from the HTML. [summary:protected] => This is the first in a series of 6 Tool Box Talks produced by Washington University in St. Louis on ergonomics in construction work. This one should be delivered first because it covers what ergonomics is, why construction workers need to talk about it, what the risk factors are for developing a health problem and how to prevent these problems. [transition_comments:protected] => [external_link:protected] => [consol_link:protected] => http://www.cpwrconstructionsolutions.org/pipes_vessels/solution/50/participatory-ergonomics-program.html [more_like_this:protected] => d001303,d001304,d001306,d001307,d001308,d001309 [permission_given_by:protected] => Lisa Jaegers, Washington U. in St. Louis [published:protected] => T [billable:protected] => F [img_name:protected] => [img_ext:protected] => png [img_width:protected] => [img_height:protected] => [img_credit:protected] => [img_practice:protected] => [vid_source_id:protected] => [vid_running_time:protected] => [vid_intended_audience:protected] => [vid_acquisition_info:protected] => [vid_cost:protected] => [vid_producer:protected] => [vid_filename:protected] => [vid_filename_downloadable:protected] => [date_summary:protected] => 2014 [date_permission_requested:protected] => [date_permission_received:protected] => [date_review_needed:protected] => [date_received:protected] => 06/12/14 [date_completed:protected] => 07/28/14 [date_billed:protected] => [date_modified:protected] => 10/09/15 [collBokExports:protected] => [lastBokExportCriteria:BaseElcoshItem:private] => [alreadyInSave:protected] => [alreadyInValidation:protected] => [validationFailures:protected] => Array ( ) [_new:BaseObject:private] => [_deleted:BaseObject:private] => [modifiedColumns:protected] => Array ( ) ) [2] => DocumentRecord Object ( [records:protected] => Array ( ) [recordId:protected] => [searchWordClass:protected] => [searchWordPeerClass:protected] => [bok_record:protected] => [authors:protected] => [organizations:protected] => [collections:protected] => [categories:protected] => [categories_initialized:protected] => [mapped_items:protected] => [content:protected] => [files:protected] => [language:protected] => Language Object ( [id:protected] => 1 [code:protected] => en [name:protected] => English [alreadyInSave:protected] => [alreadyInValidation:protected] => [validationFailures:protected] => Array ( ) [_new:BaseObject:private] => [_deleted:BaseObject:private] => [modifiedColumns:protected] => Array ( ) ) [old_record:protected] => [id:protected] => 3837 [old_id:protected] => [elcosh_id:protected] => d001306 [type:protected] => document [display_type:protected] => HTML w/ PDF [user_id:protected] => 25 [language_id:protected] => 1 [tagging_id:protected] => Bruce Lippy [priority_id:protected] => 1 [title:protected] => TBT2 Keep Reach Close [total_pages:protected] => 4 [billed_pages:protected] => 4 [publication_number:protected] => [part_of:protected] => [keywords:protected] => reach, ergonomic, ergo, MSD, carpal tunnel, repetition, awkward positions [comments:protected] => 7-28-2014 Jeff Nelson asked Bruce Lippy about what to do with a sentence included toward the top of the doc, "Fill them in on page 2 'Other Questions.'" -- Bruce said this sentence could be deleted from the HTML. [summary:protected] => This is the second of six Tool Box Talks created by Washington University in St. Louis on ergonomics in construction. There is a guide with the series that describes how to deliver these talks. This one deals with how to avoid awkward reaching during tasks to prevent injuries. try to work with your hands below your head and close to our body to reduce your risk of shoulder strains and back discomfort. This TBT recommends considering ways to move close to the task, keeping the work area free of obstacles, and talking with each other to provide constructive feedback about your working position. [transition_comments:protected] => [external_link:protected] => [consol_link:protected] => http://www.cpwrconstructionsolutions.org/hazard/959/lifting-and-carrying-manual-materials-handling.html [more_like_this:protected] => d001303,d001304,d001305,d001307,d001308,e001309 [permission_given_by:protected] => [published:protected] => T [billable:protected] => F [img_name:protected] => [img_ext:protected] => png [img_width:protected] => [img_height:protected] => [img_credit:protected] => [img_practice:protected] => [vid_source_id:protected] => [vid_running_time:protected] => [vid_intended_audience:protected] => [vid_acquisition_info:protected] => [vid_cost:protected] => [vid_producer:protected] => [vid_filename:protected] => [vid_filename_downloadable:protected] => [date_summary:protected] => 2014 [date_permission_requested:protected] => [date_permission_received:protected] => [date_review_needed:protected] => [date_received:protected] => 06/12/14 [date_completed:protected] => 07/28/14 [date_billed:protected] => [date_modified:protected] => 11/02/16 [collBokExports:protected] => [lastBokExportCriteria:BaseElcoshItem:private] => [alreadyInSave:protected] => [alreadyInValidation:protected] => [validationFailures:protected] => Array ( ) [_new:BaseObject:private] => [_deleted:BaseObject:private] => [modifiedColumns:protected] => Array ( ) ) [3] => DocumentRecord Object ( [records:protected] => Array ( ) [recordId:protected] => [searchWordClass:protected] => [searchWordPeerClass:protected] => [bok_record:protected] => [authors:protected] => [organizations:protected] => [collections:protected] => [categories:protected] => [categories_initialized:protected] => [mapped_items:protected] => [content:protected] => [files:protected] => [language:protected] => Language Object ( [id:protected] => 1 [code:protected] => en [name:protected] => English [alreadyInSave:protected] => [alreadyInValidation:protected] => [validationFailures:protected] => Array ( ) [_new:BaseObject:private] => [_deleted:BaseObject:private] => [modifiedColumns:protected] => Array ( ) ) [old_record:protected] => [id:protected] => 3839 [old_id:protected] => [elcosh_id:protected] => d001308 [type:protected] => document [display_type:protected] => HTML w/ PDF [user_id:protected] => 23 [language_id:protected] => 1 [tagging_id:protected] => Bruce Lippy [priority_id:protected] => 1 [title:protected] => TBT4 Move Materials With Assist [total_pages:protected] => 4 [billed_pages:protected] => 4 [publication_number:protected] => [part_of:protected] => [keywords:protected] => lifting, back injury, ergonomics, ergo, MSD, buddy system [comments:protected] => 7-28-2014 Jeff Nelson asked Bruce Lippy about what to do with a sentence included toward the top of the doc, "Fill them in on page 2 'Other Questions.'" -- Bruce said this sentence could be deleted from the HTML. [summary:protected] => This tool box talk is fourth in a series of 6 developed by Washington University in St. Louis on construction ergonomics. This one focuses on preventing back injuries by getting an assist when manually lifting. It recommends using a cart for transporting loads, taking less trips, avoiding carrying materials on the shoulder and helping each other to lift large or heavy materials when a cart or hoist is not available. [transition_comments:protected] => [external_link:protected] => [consol_link:protected] => http://www.cpwrconstructionsolutions.org/hazard/959/lifting-and-carrying-manual-materials-handling.html [more_like_this:protected] => d001303,d001304,d001305,d001306,d001307,d001309 [permission_given_by:protected] => Lisa Jaegers, Washington U. in St. Louis [published:protected] => T [billable:protected] => F [img_name:protected] => [img_ext:protected] => png [img_width:protected] => [img_height:protected] => [img_credit:protected] => [img_practice:protected] => [vid_source_id:protected] => [vid_running_time:protected] => [vid_intended_audience:protected] => [vid_acquisition_info:protected] => [vid_cost:protected] => [vid_producer:protected] => [vid_filename:protected] => [vid_filename_downloadable:protected] => [date_summary:protected] => 2014 [date_permission_requested:protected] => [date_permission_received:protected] => [date_review_needed:protected] => [date_received:protected] => 06/12/14 [date_completed:protected] => 07/29/14 [date_billed:protected] => [date_modified:protected] => 10/09/15 [collBokExports:protected] => [lastBokExportCriteria:BaseElcoshItem:private] => [alreadyInSave:protected] => [alreadyInValidation:protected] => [validationFailures:protected] => Array ( ) [_new:BaseObject:private] => [_deleted:BaseObject:private] => [modifiedColumns:protected] => Array ( ) ) [4] => DocumentRecord Object ( [records:protected] => Array ( ) [recordId:protected] => [searchWordClass:protected] => [searchWordPeerClass:protected] => [bok_record:protected] => [authors:protected] => [organizations:protected] => [collections:protected] => [categories:protected] => [categories_initialized:protected] => [mapped_items:protected] => [content:protected] => [files:protected] => [language:protected] => Language Object ( [id:protected] => 1 [code:protected] => en [name:protected] => English [alreadyInSave:protected] => [alreadyInValidation:protected] => [validationFailures:protected] => Array ( ) [_new:BaseObject:private] => [_deleted:BaseObject:private] => [modifiedColumns:protected] => Array ( ) ) [old_record:protected] => [id:protected] => 3840 [old_id:protected] => [elcosh_id:protected] => d001309 [type:protected] => document [display_type:protected] => HTML w/ PDF [user_id:protected] => 23 [language_id:protected] => 1 [tagging_id:protected] => Bruce Lippy [priority_id:protected] => 1 [title:protected] => TBT5 Manual Tools [total_pages:protected] => 4 [billed_pages:protected] => 4 [publication_number:protected] => [part_of:protected] => [keywords:protected] => ergonomic, hand tools, handles, MSD, musculoskeletal disorder, carpal tunnel [comments:protected] => 7-28-2014 Jeff Nelson asked Bruce Lippy about what to do with a sentence included toward the top of the doc, "Fill them in on page 2 'Other Questions.'" -- Bruce said this sentence could be deleted from the HTML. [summary:protected] => This is the fifth in a series of 6 tool box talks on construction ergonomics produced by the University of Washington in St. Louis. This one focuses on manual tools. It asks the following 6 key questions. Does the tool… 1. Fit the task? 2. Allow a good power grip? 3. Keep the wrist in a straight posture? 4. Feel comfortable? 5. Take less effort than other tools for the task? 6. Work effectively? [transition_comments:protected] => [external_link:protected] => [consol_link:protected] => http://www.cpwrconstructionsolutions.org/masonry/solution/383/ergonomic-hand-tools.html [more_like_this:protected] => d001303,d001304,d001305,d001306,d001307,d001308,d001310 [permission_given_by:protected] => Lisa Jaegers, U. Wash. St. Louis [published:protected] => T [billable:protected] => F [img_name:protected] => [img_ext:protected] => png [img_width:protected] => [img_height:protected] => [img_credit:protected] => [img_practice:protected] => [vid_source_id:protected] => [vid_running_time:protected] => [vid_intended_audience:protected] => [vid_acquisition_info:protected] => [vid_cost:protected] => [vid_producer:protected] => [vid_filename:protected] => [vid_filename_downloadable:protected] => [date_summary:protected] => 2014 [date_permission_requested:protected] => [date_permission_received:protected] => [date_review_needed:protected] => [date_received:protected] => 06/12/14 [date_completed:protected] => 07/29/14 [date_billed:protected] => [date_modified:protected] => 10/09/15 [collBokExports:protected] => [lastBokExportCriteria:BaseElcoshItem:private] => [alreadyInSave:protected] => [alreadyInValidation:protected] => [validationFailures:protected] => Array ( ) [_new:BaseObject:private] => [_deleted:BaseObject:private] => [modifiedColumns:protected] => Array ( ) ) ) ) [collections] => Array ( [3834] => ) [record] => DocumentRecord Object ( [records:protected] => Array ( ) [recordId:protected] => [searchWordClass:protected] => [searchWordPeerClass:protected] => [bok_record:protected] => [authors:protected] => Array ( ) [organizations:protected] => Array ( [182] => Organization Object ( [id:protected] => 182 [elcosh_id:protected] => o000205 [user_id:protected] => 14 [province_id:protected] => 0 [country_id:protected] => 0 [title:protected] => Washington University - St. Louis [address:protected] => [postal_code:protected] => [city:protected] => [department:protected] => [phone:protected] => [fax:protected] => [email:protected] => [website:protected] => [filename:protected] => [about:protected] => [comments:protected] => [logo_available:protected] => T [no_details:protected] => T [date_received:protected] => 2009-08-06 [date_completed:protected] => 2009-08-06 [date_billed:protected] => [alreadyInSave:protected] => [alreadyInValidation:protected] => [validationFailures:protected] => Array ( ) [_new:BaseObject:private] => [_deleted:BaseObject:private] => [modifiedColumns:protected] => Array ( ) ) ) [collections:protected] => Array ( [3834] => ) [categories:protected] => [categories_initialized:protected] => [mapped_items:protected] => Array ( [3833] => DocumentRecord Object ( [records:protected] => Array ( ) [recordId:protected] => [searchWordClass:protected] => [searchWordPeerClass:protected] => [bok_record:protected] => [authors:protected] => [organizations:protected] => [collections:protected] => [categories:protected] => [categories_initialized:protected] => [mapped_items:protected] => [content:protected] => [files:protected] => [language:protected] => [old_record:protected] => [id:protected] => 3833 [old_id:protected] => [elcosh_id:protected] => d001303 [type:protected] => document [display_type:protected] => HTML w/ PDF [user_id:protected] => 25 [language_id:protected] => 1 [tagging_id:protected] => Bruce Lippy [priority_id:protected] => 1 [title:protected] => Overview of Toolbox Talks on Ergonomics Developed by Washington University in St. Louis [total_pages:protected] => 3 [billed_pages:protected] => 3 [publication_number:protected] => [part_of:protected] => [keywords:protected] => ergonomics, musculoskeletal disorders, MSDs [comments:protected] => 7-28-2014 - Originally submitted as "HTML w/ doc and PDF", Jeff Nelson asked Bruce Lippy for permission to switch it to "HTML w/ PDF" -- permission was given [summary:protected] => This overviews provides a background on how Washington University in St. Louis developed this series of six toolbox talks on ergonomics. It also describes how they tested the effectiveness of these communication tools, concluding that the guide was valuable for improving the delivery of ergonomics training and interaction between the safety representative and workers. The researchers recommend preparing site-specific information prior to the talk and interacting with workers to discuss problems and ergonomic solutions during the safety meetings. [transition_comments:protected] => [external_link:protected] => [consol_link:protected] => [more_like_this:protected] => [permission_given_by:protected] => Lisa Jaegers, Washington U. in St. Louis [published:protected] => T [billable:protected] => F [img_name:protected] => [img_ext:protected] => png [img_width:protected] => [img_height:protected] => [img_credit:protected] => [img_practice:protected] => [vid_source_id:protected] => [vid_running_time:protected] => [vid_intended_audience:protected] => [vid_acquisition_info:protected] => [vid_cost:protected] => [vid_producer:protected] => [vid_filename:protected] => [vid_filename_downloadable:protected] => [date_summary:protected] => 2014 [date_permission_requested:protected] => [date_permission_received:protected] => [date_review_needed:protected] => [date_received:protected] => 06/11/14 [date_completed:protected] => 07/29/14 [date_billed:protected] => [date_modified:protected] => 07/29/14 [collBokExports:protected] => [lastBokExportCriteria:BaseElcoshItem:private] => [alreadyInSave:protected] => [alreadyInValidation:protected] => [validationFailures:protected] => Array ( ) [_new:BaseObject:private] => [_deleted:BaseObject:private] => [modifiedColumns:protected] => Array ( ) ) [3835] => DocumentRecord Object ( [records:protected] => Array ( ) [recordId:protected] => [searchWordClass:protected] => [searchWordPeerClass:protected] => [bok_record:protected] => [authors:protected] => [organizations:protected] => [collections:protected] => [categories:protected] => [categories_initialized:protected] => [mapped_items:protected] => [content:protected] => [files:protected] => [language:protected] => [old_record:protected] => [id:protected] => 3835 [old_id:protected] => [elcosh_id:protected] => d001304 [type:protected] => document [display_type:protected] => HTML w/ PDF [user_id:protected] => 25 [language_id:protected] => 1 [tagging_id:protected] => Bruce Lippy [priority_id:protected] => 1 [title:protected] => Ergonomics Tool Box Talks (TBT) Training Guide [total_pages:protected] => 2 [billed_pages:protected] => 2 [publication_number:protected] => [part_of:protected] => [keywords:protected] => Ergonomics, carpal tunnel, muscular skeletal disorders, msd [comments:protected] => [summary:protected] => CPWR-funded ergonomics research by Washington University at St. Louis led to the development of 6 tool box talks. This guide is an explanation of how to deliver the talks for maximum effectiveness. This guide should be reviewed before delivering any of the talks because it makes important recommendations like: • If possible, give the TBTs as a part of the crew’s regular safety meetings so that ergonomics is included in the safety discussion. • Try to locate an area with few distractions for gathering the crew. • For a team approach, invite the work crew, site superintendent, project manager and other general contractor and/or subcontractor reps who you feel may be helpful in supporting the training and ergonomics solutions. [transition_comments:protected] => [external_link:protected] => [consol_link:protected] => [more_like_this:protected] => d001303,d001305,d001306,d001307,d001308,d001309,d001310 [permission_given_by:protected] => [published:protected] => T [billable:protected] => F [img_name:protected] => [img_ext:protected] => png [img_width:protected] => [img_height:protected] => [img_credit:protected] => [img_practice:protected] => [vid_source_id:protected] => [vid_running_time:protected] => [vid_intended_audience:protected] => [vid_acquisition_info:protected] => [vid_cost:protected] => [vid_producer:protected] => [vid_filename:protected] => [vid_filename_downloadable:protected] => [date_summary:protected] => 2014 [date_permission_requested:protected] => [date_permission_received:protected] => [date_review_needed:protected] => [date_received:protected] => 06/12/14 [date_completed:protected] => 07/29/14 [date_billed:protected] => [date_modified:protected] => 07/29/14 [collBokExports:protected] => [lastBokExportCriteria:BaseElcoshItem:private] => [alreadyInSave:protected] => [alreadyInValidation:protected] => [validationFailures:protected] => Array ( ) [_new:BaseObject:private] => [_deleted:BaseObject:private] => [modifiedColumns:protected] => Array ( ) ) [3836] => DocumentRecord Object ( [records:protected] => Array ( ) [recordId:protected] => [searchWordClass:protected] => [searchWordPeerClass:protected] => [bok_record:protected] => [authors:protected] => [organizations:protected] => [collections:protected] => [categories:protected] => [categories_initialized:protected] => [mapped_items:protected] => [content:protected] => [files:protected] => [language:protected] => [old_record:protected] => [id:protected] => 3836 [old_id:protected] => [elcosh_id:protected] => d001305 [type:protected] => document [display_type:protected] => HTML w/ PDF [user_id:protected] => 25 [language_id:protected] => 1 [tagging_id:protected] => Bruce Lippy [priority_id:protected] => 1 [title:protected] => TBT1 Ergonomics in Construction [total_pages:protected] => 5 [billed_pages:protected] => 5 [publication_number:protected] => [part_of:protected] => [keywords:protected] => ergonomics, ergo, msd, musculoskeletal disorders, risk factors, lifting, carpal tunnel, repetition, awkward postures [comments:protected] => 7-28-2014 Jeff Nelson asked Bruce Lippy about what to do with a sentence included toward the top of the doc, "Fill them in on page 2 'Other Questions.'" -- Bruce said this sentence could be deleted from the HTML. [summary:protected] => This is the first in a series of 6 Tool Box Talks produced by Washington University in St. Louis on ergonomics in construction work. This one should be delivered first because it covers what ergonomics is, why construction workers need to talk about it, what the risk factors are for developing a health problem and how to prevent these problems. [transition_comments:protected] => [external_link:protected] => [consol_link:protected] => http://www.cpwrconstructionsolutions.org/pipes_vessels/solution/50/participatory-ergonomics-program.html [more_like_this:protected] => d001303,d001304,d001306,d001307,d001308,d001309 [permission_given_by:protected] => Lisa Jaegers, Washington U. in St. Louis [published:protected] => T [billable:protected] => F [img_name:protected] => [img_ext:protected] => png [img_width:protected] => [img_height:protected] => [img_credit:protected] => [img_practice:protected] => [vid_source_id:protected] => [vid_running_time:protected] => [vid_intended_audience:protected] => [vid_acquisition_info:protected] => [vid_cost:protected] => [vid_producer:protected] => [vid_filename:protected] => [vid_filename_downloadable:protected] => [date_summary:protected] => 2014 [date_permission_requested:protected] => [date_permission_received:protected] => [date_review_needed:protected] => [date_received:protected] => 06/12/14 [date_completed:protected] => 07/28/14 [date_billed:protected] => [date_modified:protected] => 10/09/15 [collBokExports:protected] => [lastBokExportCriteria:BaseElcoshItem:private] => [alreadyInSave:protected] => [alreadyInValidation:protected] => [validationFailures:protected] => Array ( ) [_new:BaseObject:private] => [_deleted:BaseObject:private] => [modifiedColumns:protected] => Array ( ) ) [3837] => DocumentRecord Object ( [records:protected] => Array ( ) [recordId:protected] => [searchWordClass:protected] => [searchWordPeerClass:protected] => [bok_record:protected] => [authors:protected] => [organizations:protected] => [collections:protected] => [categories:protected] => [categories_initialized:protected] => [mapped_items:protected] => [content:protected] => [files:protected] => [language:protected] => [old_record:protected] => [id:protected] => 3837 [old_id:protected] => [elcosh_id:protected] => d001306 [type:protected] => document [display_type:protected] => HTML w/ PDF [user_id:protected] => 25 [language_id:protected] => 1 [tagging_id:protected] => Bruce Lippy [priority_id:protected] => 1 [title:protected] => TBT2 Keep Reach Close [total_pages:protected] => 4 [billed_pages:protected] => 4 [publication_number:protected] => [part_of:protected] => [keywords:protected] => reach, ergonomic, ergo, MSD, carpal tunnel, repetition, awkward positions [comments:protected] => 7-28-2014 Jeff Nelson asked Bruce Lippy about what to do with a sentence included toward the top of the doc, "Fill them in on page 2 'Other Questions.'" -- Bruce said this sentence could be deleted from the HTML. [summary:protected] => This is the second of six Tool Box Talks created by Washington University in St. Louis on ergonomics in construction. There is a guide with the series that describes how to deliver these talks. This one deals with how to avoid awkward reaching during tasks to prevent injuries. try to work with your hands below your head and close to our body to reduce your risk of shoulder strains and back discomfort. This TBT recommends considering ways to move close to the task, keeping the work area free of obstacles, and talking with each other to provide constructive feedback about your working position. [transition_comments:protected] => [external_link:protected] => [consol_link:protected] => http://www.cpwrconstructionsolutions.org/hazard/959/lifting-and-carrying-manual-materials-handling.html [more_like_this:protected] => d001303,d001304,d001305,d001307,d001308,e001309 [permission_given_by:protected] => [published:protected] => T [billable:protected] => F [img_name:protected] => [img_ext:protected] => png [img_width:protected] => [img_height:protected] => [img_credit:protected] => [img_practice:protected] => [vid_source_id:protected] => [vid_running_time:protected] => [vid_intended_audience:protected] => [vid_acquisition_info:protected] => [vid_cost:protected] => [vid_producer:protected] => [vid_filename:protected] => [vid_filename_downloadable:protected] => [date_summary:protected] => 2014 [date_permission_requested:protected] => [date_permission_received:protected] => [date_review_needed:protected] => [date_received:protected] => 06/12/14 [date_completed:protected] => 07/28/14 [date_billed:protected] => [date_modified:protected] => 11/02/16 [collBokExports:protected] => [lastBokExportCriteria:BaseElcoshItem:private] => [alreadyInSave:protected] => [alreadyInValidation:protected] => [validationFailures:protected] => Array ( ) [_new:BaseObject:private] => [_deleted:BaseObject:private] => [modifiedColumns:protected] => Array ( ) ) [3839] => DocumentRecord Object ( [records:protected] => Array ( ) [recordId:protected] => [searchWordClass:protected] => [searchWordPeerClass:protected] => [bok_record:protected] => [authors:protected] => [organizations:protected] => [collections:protected] => [categories:protected] => [categories_initialized:protected] => [mapped_items:protected] => [content:protected] => [files:protected] => [language:protected] => [old_record:protected] => [id:protected] => 3839 [old_id:protected] => [elcosh_id:protected] => d001308 [type:protected] => document [display_type:protected] => HTML w/ PDF [user_id:protected] => 23 [language_id:protected] => 1 [tagging_id:protected] => Bruce Lippy [priority_id:protected] => 1 [title:protected] => TBT4 Move Materials With Assist [total_pages:protected] => 4 [billed_pages:protected] => 4 [publication_number:protected] => [part_of:protected] => [keywords:protected] => lifting, back injury, ergonomics, ergo, MSD, buddy system [comments:protected] => 7-28-2014 Jeff Nelson asked Bruce Lippy about what to do with a sentence included toward the top of the doc, "Fill them in on page 2 'Other Questions.'" -- Bruce said this sentence could be deleted from the HTML. [summary:protected] => This tool box talk is fourth in a series of 6 developed by Washington University in St. Louis on construction ergonomics. This one focuses on preventing back injuries by getting an assist when manually lifting. It recommends using a cart for transporting loads, taking less trips, avoiding carrying materials on the shoulder and helping each other to lift large or heavy materials when a cart or hoist is not available. [transition_comments:protected] => [external_link:protected] => [consol_link:protected] => http://www.cpwrconstructionsolutions.org/hazard/959/lifting-and-carrying-manual-materials-handling.html [more_like_this:protected] => d001303,d001304,d001305,d001306,d001307,d001309 [permission_given_by:protected] => Lisa Jaegers, Washington U. in St. Louis [published:protected] => T [billable:protected] => F [img_name:protected] => [img_ext:protected] => png [img_width:protected] => [img_height:protected] => [img_credit:protected] => [img_practice:protected] => [vid_source_id:protected] => [vid_running_time:protected] => [vid_intended_audience:protected] => [vid_acquisition_info:protected] => [vid_cost:protected] => [vid_producer:protected] => [vid_filename:protected] => [vid_filename_downloadable:protected] => [date_summary:protected] => 2014 [date_permission_requested:protected] => [date_permission_received:protected] => [date_review_needed:protected] => [date_received:protected] => 06/12/14 [date_completed:protected] => 07/29/14 [date_billed:protected] => [date_modified:protected] => 10/09/15 [collBokExports:protected] => [lastBokExportCriteria:BaseElcoshItem:private] => [alreadyInSave:protected] => [alreadyInValidation:protected] => [validationFailures:protected] => Array ( ) [_new:BaseObject:private] => [_deleted:BaseObject:private] => [modifiedColumns:protected] => Array ( ) ) [3840] => DocumentRecord Object ( [records:protected] => Array ( ) [recordId:protected] => [searchWordClass:protected] => [searchWordPeerClass:protected] => [bok_record:protected] => [authors:protected] => [organizations:protected] => [collections:protected] => [categories:protected] => [categories_initialized:protected] => [mapped_items:protected] => [content:protected] => [files:protected] => [language:protected] => [old_record:protected] => [id:protected] => 3840 [old_id:protected] => [elcosh_id:protected] => d001309 [type:protected] => document [display_type:protected] => HTML w/ PDF [user_id:protected] => 23 [language_id:protected] => 1 [tagging_id:protected] => Bruce Lippy [priority_id:protected] => 1 [title:protected] => TBT5 Manual Tools [total_pages:protected] => 4 [billed_pages:protected] => 4 [publication_number:protected] => [part_of:protected] => [keywords:protected] => ergonomic, hand tools, handles, MSD, musculoskeletal disorder, carpal tunnel [comments:protected] => 7-28-2014 Jeff Nelson asked Bruce Lippy about what to do with a sentence included toward the top of the doc, "Fill them in on page 2 'Other Questions.'" -- Bruce said this sentence could be deleted from the HTML. [summary:protected] => This is the fifth in a series of 6 tool box talks on construction ergonomics produced by the University of Washington in St. Louis. This one focuses on manual tools. It asks the following 6 key questions. Does the tool… 1. Fit the task? 2. Allow a good power grip? 3. Keep the wrist in a straight posture? 4. Feel comfortable? 5. Take less effort than other tools for the task? 6. Work effectively? [transition_comments:protected] => [external_link:protected] => [consol_link:protected] => http://www.cpwrconstructionsolutions.org/masonry/solution/383/ergonomic-hand-tools.html [more_like_this:protected] => d001303,d001304,d001305,d001306,d001307,d001308,d001310 [permission_given_by:protected] => Lisa Jaegers, U. Wash. St. Louis [published:protected] => T [billable:protected] => F [img_name:protected] => [img_ext:protected] => png [img_width:protected] => [img_height:protected] => [img_credit:protected] => [img_practice:protected] => [vid_source_id:protected] => [vid_running_time:protected] => [vid_intended_audience:protected] => [vid_acquisition_info:protected] => [vid_cost:protected] => [vid_producer:protected] => [vid_filename:protected] => [vid_filename_downloadable:protected] => [date_summary:protected] => 2014 [date_permission_requested:protected] => [date_permission_received:protected] => [date_review_needed:protected] => [date_received:protected] => 06/12/14 [date_completed:protected] => 07/29/14 [date_billed:protected] => [date_modified:protected] => 10/09/15 [collBokExports:protected] => [lastBokExportCriteria:BaseElcoshItem:private] => [alreadyInSave:protected] => [alreadyInValidation:protected] => [validationFailures:protected] => Array ( ) [_new:BaseObject:private] => [_deleted:BaseObject:private] => [modifiedColumns:protected] => Array ( ) ) ) [content:protected] => [files:protected] => Array ( [559] => [560] => [546] => File Object ( [id:protected] => 546 [filename:protected] => 3.jpg [downloadable:protected] => F [timestamp:protected] => 2009-07-03 12:54:22 [alreadyInSave:protected] => [alreadyInValidation:protected] => [validationFailures:protected] => Array ( ) [_new:BaseObject:private] => [_deleted:BaseObject:private] => [modifiedColumns:protected] => Array ( ) ) [9643] => File Object ( [id:protected] => 9643 [filename:protected] => d001307.pdf [downloadable:protected] => T [timestamp:protected] => 2014-07-27 19:09:19 [alreadyInSave:protected] => [alreadyInValidation:protected] => [validationFailures:protected] => Array ( ) [_new:BaseObject:private] => [_deleted:BaseObject:private] => [modifiedColumns:protected] => Array ( ) ) [566] => File Object ( [id:protected] => 566 [filename:protected] => 4.jpg [downloadable:protected] => F [timestamp:protected] => 2009-07-03 12:54:23 [alreadyInSave:protected] => [alreadyInValidation:protected] => [validationFailures:protected] => Array ( ) [_new:BaseObject:private] => [_deleted:BaseObject:private] => [modifiedColumns:protected] => Array ( ) ) ) [language:protected] => Language Object ( [id:protected] => 1 [code:protected] => en [name:protected] => English [alreadyInSave:protected] => [alreadyInValidation:protected] => [validationFailures:protected] => Array ( ) [_new:BaseObject:private] => [_deleted:BaseObject:private] => [modifiedColumns:protected] => Array ( ) ) [old_record:protected] => [id:protected] => 3838 [old_id:protected] => [elcosh_id:protected] => d001307 [type:protected] => document [display_type:protected] => HTML w/ PDF [user_id:protected] => 25 [language_id:protected] => 1 [tagging_id:protected] => Bruce Lippy [priority_id:protected] => 1 [title:protected] => TBT3 Positioning [total_pages:protected] => 4 [billed_pages:protected] => 4 [publication_number:protected] => [part_of:protected] => [keywords:protected] => position, positioning, ergonomics, ergo, carpal tunnel, MSD, musculoskeletal disorder [comments:protected] => 7-28-2014 Jeff Nelson asked Bruce Lippy about what to do with a sentence included toward the top of the doc, "Fill them in on page 2 'Other Questions.'" -- Bruce said this sentence could be deleted from the HTML. [summary:protected] => This third in a series of 6 Tool Box Talks on construction ergonomics focuses on proper positioning to avoid injuries. The TBT recommends: 1)prop up a task off of the floor by using a raised surface, cart, baker scaffold, saw horses to prep materials near waist height, 2)move the lift or ladder in the best position for the work, 3)position the lift in front of the area you plan to work without trying to reach too far on either side of the lift. [transition_comments:protected] => [external_link:protected] => [consol_link:protected] => http://www.cpwrconstructionsolutions.org/hazard/959/lifting-and-carrying-manual-materials-handling.html [more_like_this:protected] => d001303,d001304,d001305,d001306,d001308,d001309 [permission_given_by:protected] => Lisa Jaegers, WU-St. Louis [published:protected] => T [billable:protected] => F [img_name:protected] => [img_ext:protected] => png [img_width:protected] => [img_height:protected] => [img_credit:protected] => [img_practice:protected] => [vid_source_id:protected] => [vid_running_time:protected] => [vid_intended_audience:protected] => [vid_acquisition_info:protected] => [vid_cost:protected] => [vid_producer:protected] => [vid_filename:protected] => [vid_filename_downloadable:protected] => [date_summary:protected] => 2014 [date_permission_requested:protected] => [date_permission_received:protected] => [date_review_needed:protected] => [date_received:protected] => 06/12/14 [date_completed:protected] => 07/28/14 [date_billed:protected] => [date_modified:protected] => 10/09/15 [collBokExports:protected] => [lastBokExportCriteria:BaseElcoshItem:private] => [alreadyInSave:protected] => [alreadyInValidation:protected] => [validationFailures:protected] => Array ( ) [_new:BaseObject:private] => [_deleted:BaseObject:private] => [modifiedColumns:protected] => Array ( ) ) [show_text] => [document_content] => ElcoshItemDocumentContent Object ( [id:protected] => 2906 [item_id:protected] => 3838 [type:protected] => main [title:protected] => [content:protected] =>
Facilitator / Leader Tasks Before the Tool Box Talk (TBT)
- Read through this TBT guide.
- Walk the job site to find ergonomics examples based on the TBT. If possible, take photos of “safe” and “unsafe” examples at the site to be used during the TBT.
- Write down discussion questions to ask the group.
Learning Goals
After discussing this training topic, workers will have gained a general understanding of:
- Unsafe work positions.
- Solutions to improve work positioning.
TRAINING CARD
The last page of this PDF has directions for printing and laminating the training cards.
TRAINER’S TALKING POINTS
Why should we talk about positioning?
Construction work requires working in high, low, and tight spaces which often forces you to work in an awkward or uncomfortable position. Working in awkward reaching and bent positions can lead to shoulder and back discomfort and possible injury over time.
Demonstration: The training card provides examples of the range of reaching and the point at which the reach is unsafe. Hold your arms straight out in front of you. Look at your hands and wrists while I discuss each of the reach zones on the training card.
The Green Zone shows the ideal location for working with your hands. When possible, try to keep your work tasks as far out as your wrists.
The Orange Zone is for occasional work since it involves more weight on your shoulders and low back since your hands are away from your body. If needed, keep the reach distance as far as your fingertips.
The Red Zone is away from your body so far that it places you at higher risk for falls when in the air and shoulder and back discomfort. Limit the time you work reaching beyond your fingertips.
End of Demonstration
Discussion Question: Can anyone describe to us an awkward position that they work in or have seen someone work in?
- What does it feel like in your neck, back or arms when working in that position?
- Other Questions:_____________________________________________
Training Note: Here are examples of hazards in different construction trades. Choose your trade or one that is similar to your group’s line of work that can be used as hazards and solutions examples.
| Trade | Awkward Posture Hazards | Potential Solution |
|---|---|---|
| Carpenter-Drywall | Leaning over the side of a scissor lift to reach and operating a screw gun with the arm fully extended (reaching in the red zone past the fingertips). | Before starting to install the line of screws to the side of the lift, move the lift to re-center it for the next 2 lines of screws to be installed. |
| Floor Layer | Spreading mortar overhead on a wall with the bakers scaffold one foot away from the wall due to buckets on the floor below (reach in the red zone, past the fingertips). | Pre-plan this task by removing all objects in the path of the bakers scaffold. Having an open path allows you to work closer to the task. |
| Sheet Metal Worker | Prepping duct parts on the floor while bending the back and reaching to work on them. | Pre-plan this task by setting up a waist-height workstation on extra materials, a cart, or saw horses. |
Now let’s put this information into practice. What are some tricks or techniques that you use to work in a comfortable position?
- Other Questions:_____________________________________________
Here are a few other ideas that are listed on your training card:
Prop up your tasks off of the floor by using a raised surface, cart, baker scaffold, saw horses to prep materials near waist height.
Move the lift or ladder in the best position for the work – close to the work tasks.
For safety & comfort, try to position the lift in front of the area you plan to work without trying to reach too far on either side of the lift.
In summary, it is important to work in a safe position when possible in order to reduce the risk of falls and discomfort due to awkward working positions. Consider ways that you can work in the green/comfort zone and orange zone and avoid the unsafe red zone.
References
[Images modified from Grandjean & Eastman Kodak Co.]
1. Grandjean, E. 1988. Fitting the task to the man: A textbook of occupational ergonomics. 4th ed. Taylor & Francis.
2. Eastman Kodak Co. 1983. Ergonomic Design for People at Work. Vol 1. Wiley, John & Sons, Incorporated.
Refer to the resources at our website: oshr.im.wustl.edu for more Tool Box TIPS.
TRAINING ATTENDANCE SHEET
Training Topic: Ergonomics -- Positioning
Date:
| ATTENDEES | |
|---|---|
Directions for Making Laminated Training Cards
The last page of this PDF has directions for printing and laminating the training cards.
[content_transformed:protected] =>Facilitator / Leader Tasks Before the Tool Box Talk (TBT)
- Read through this TBT guide.
- Walk the job site to find ergonomics examples based on the TBT. If possible, take photos of “safe” and “unsafe” examples at the site to be used during the TBT.
- Write down discussion questions to ask the group.
Learning Goals
After discussing this training topic, workers will have gained a general understanding of:
- Unsafe work positions.
- Solutions to improve work positioning.
TRAINING CARD
The last page of this PDF has directions for printing and laminating the training cards.
TRAINER’S TALKING POINTS
Why should we talk about positioning?
Construction work requires working in high, low, and tight spaces which often forces you to work in an awkward or uncomfortable position. Working in awkward reaching and bent positions can lead to shoulder and back discomfort and possible injury over time.
Demonstration: The training card provides examples of the range of reaching and the point at which the reach is unsafe. Hold your arms straight out in front of you. Look at your hands and wrists while I discuss each of the reach zones on the training card.
The Green Zone shows the ideal location for working with your hands. When possible, try to keep your work tasks as far out as your wrists.
The Orange Zone is for occasional work since it involves more weight on your shoulders and low back since your hands are away from your body. If needed, keep the reach distance as far as your fingertips.
The Red Zone is away from your body so far that it places you at higher risk for falls when in the air and shoulder and back discomfort. Limit the time you work reaching beyond your fingertips.
End of Demonstration
Discussion Question: Can anyone describe to us an awkward position that they work in or have seen someone work in?
- What does it feel like in your neck, back or arms when working in that position?
- Other Questions:_____________________________________________
Training Note: Here are examples of hazards in different construction trades. Choose your trade or one that is similar to your group’s line of work that can be used as hazards and solutions examples.
| Trade | Awkward Posture Hazards | Potential Solution |
|---|---|---|
| Carpenter-Drywall | Leaning over the side of a scissor lift to reach and operating a screw gun with the arm fully extended (reaching in the red zone past the fingertips). | Before starting to install the line of screws to the side of the lift, move the lift to re-center it for the next 2 lines of screws to be installed. |
| Floor Layer | Spreading mortar overhead on a wall with the bakers scaffold one foot away from the wall due to buckets on the floor below (reach in the red zone, past the fingertips). | Pre-plan this task by removing all objects in the path of the bakers scaffold. Having an open path allows you to work closer to the task. |
| Sheet Metal Worker | Prepping duct parts on the floor while bending the back and reaching to work on them. | Pre-plan this task by setting up a waist-height workstation on extra materials, a cart, or saw horses. |
Now let’s put this information into practice. What are some tricks or techniques that you use to work in a comfortable position?
- Other Questions:_____________________________________________
Here are a few other ideas that are listed on your training card:
Prop up your tasks off of the floor by using a raised surface, cart, baker scaffold, saw horses to prep materials near waist height.
Move the lift or ladder in the best position for the work – close to the work tasks.
For safety & comfort, try to position the lift in front of the area you plan to work without trying to reach too far on either side of the lift.
In summary, it is important to work in a safe position when possible in order to reduce the risk of falls and discomfort due to awkward working positions. Consider ways that you can work in the green/comfort zone and orange zone and avoid the unsafe red zone.
References
[Images modified from Grandjean & Eastman Kodak Co.]
1. Grandjean, E. 1988. Fitting the task to the man: A textbook of occupational ergonomics. 4th ed. Taylor & Francis.
2. Eastman Kodak Co. 1983. Ergonomic Design for People at Work. Vol 1. Wiley, John & Sons, Incorporated.
Refer to the resources at our website: oshr.im.wustl.edu for more Tool Box TIPS.
TRAINING ATTENDANCE SHEET
Training Topic: Ergonomics -- Positioning
Date:
| ATTENDEES | |
|---|---|
Directions for Making Laminated Training Cards
The last page of this PDF has directions for printing and laminating the training cards.
[disclaimer:protected] => [disclaimer_transformed:protected] => [alreadyInSave:protected] => [alreadyInValidation:protected] => [validationFailures:protected] => Array ( ) [_new:BaseObject:private] => [_deleted:BaseObject:private] => [modifiedColumns:protected] => Array ( ) ) [template] => record ) [_file] => /home/agsafe5/repositories/elcosh/live/templates/elcosh/record_macros.html [_errors:protected] => Array ( ) [_encoding:protected] => UTF-8 [_outputMode:protected] => 11 [_forceReparse:protected] => [_phpCodeDestination:protected] => /tmp/ [_phpCodeExtension:protected] => php [_cacheLifetime:protected] => 30 [_cachePurgeFrequency:protected] => 30 [externalMacroTemplatesCache:PHPTAL:private] => Array ( ) ) ) ) ) ) [3] => Array ( [file] => /tmp/tpl_61515a6c_record__uvBJJSo8xT_sgOY5gjP7ug.php [line] => 44 [function] => _executeMacroOfTemplate [class] => PHPTAL [type] => -> [args] => Array ( [0] => record_macros.html/collections [1] => PHPTAL Object ( [_prefilters:protected] => Array ( ) [_prefilter:PHPTAL:private] => REMOVED: DO NOT USE [_postfilter:protected] => [_repositories:protected] => Array ( ) [_path:protected] => /home/agsafe5/repositories/elcosh/live/templates/elcosh/record.html [_resolvers:protected] => Array ( ) [_source:protected] => PHPTAL_FileSource Object ( [_path:PHPTAL_FileSource:private] => /home/agsafe5/repositories/elcosh/live/templates/elcosh/record.html ) [_codeFile:protected] => /tmp/tpl_61515a6c_record__uvBJJSo8xT_sgOY5gjP7ug.php [_functionName:protected] => tpl_61515a6c_record__uvBJJSo8xT_sgOY5gjP7ug [_prepared:protected] => 1 [_triggers:protected] => Array ( ) [_translator:protected] => [_globalContext:protected] => stdClass Object ( ) [_context:protected] => PHPTAL_Context Object ( [_line] => [_file] => /home/agsafe5/repositories/elcosh/live/templates/elcosh/record.html [repeat] => stdClass Object ( ) [_xmlDeclaration] => [_docType] => [_nothrow:PHPTAL_Context:private] => [_slots:PHPTAL_Context:private] => Array ( ) [_slotsStack:PHPTAL_Context:private] => Array ( [0] => Array ( ) [1] => Array ( ) ) [_parentContext:PHPTAL_Context:private] => [_globalContext:PHPTAL_Context:private] => stdClass Object ( ) [_echoDeclarations:PHPTAL_Context:private] => [referer] => http://elcosh.org/document/3838/d001307/TBT3%2BPositioning.html [curr_module] => Record [styles] => Array ( ) [javascript] => Array ( [0] => jquery.min.js ) [metas] => Array ( [language] => en [robots] => index, follow ) [user] => [curr_url] => https://elcosh.org/index.php?module=Record&id=3838&type=document [base_url] => https://elcosh.org/index.php?module=Record [title] => eLCOSH : TBT3 Positioning [language] => en [search_query] => [module] => Record [new_records] => Array ( [0] => Search_Result Object ( [title] => Toolbox Talk: Fixed Ladder [image] => /record/images/notavailable-p.png [blurb] => The CPWR Toolbox Talk on Fixed Ladders addresses the potential risks associated with using fixed ladders. The resource includes a brief case example,... [category] => Array ( [0] => 15 [1] => 47 [2] => 49 [3] => 51 [4] => 53 [5] => 55 [6] => 60 [7] => 64 [8] => 73 [9] => 76 [10] => 78 [11] => 80 [12] => 86 [13] => 87 [14] => 90 [15] => 92 [16] => 93 [17] => 94 [18] => 100 ) [labels] => Array ( [0] => Falls [1] => Work Environment [2] => Hazards [3] => Bricklayer [4] => Trades [5] => Carpenter [7] => Cement Mason [9] => Concrete Polisher [11] => Electrical Worker [13] => HVAC [15] => Laborer [17] => PCC/Restoration [19] => Plumber/Pipefitter [21] => Roofer/Waterproofer [23] => Sheetmetal Worker [25] => Welder [27] => Commercial & Institutional [28] => Jobsites [29] => Industrial [31] => LEED/Green Construction [33] => Renovations [35] => Residential [37] => Toolbox Talks [38] => Documents [39] => Media & Documents ) [type] => Toolbox Talks [sub_category] => [url] => /document/4430/d001660/Toolbox%2BTalk%253A%2BFixed%2BLadder.html [item:protected] => DocumentRecord Object ( [records:protected] => Array ( ) [recordId:protected] => [searchWordClass:protected] => [searchWordPeerClass:protected] => [bok_record:protected] => [authors:protected] => [organizations:protected] => [collections:protected] => [categories:protected] => Array ( [15] => Category Object ( [languages:protected] => [bok_resources:protected] => [bok_topics:protected] => [bok_keywords:protected] => [id:protected] => 15 [type:protected] => category [parent:protected] => 7 [label:protected] => Falls [alreadyInSave:protected] => [alreadyInValidation:protected] => [validationFailures:protected] => Array ( ) [_new:BaseObject:private] => [_deleted:BaseObject:private] => [modifiedColumns:protected] => Array ( ) ) [47] => Category Object ( [languages:protected] => [bok_resources:protected] => [bok_topics:protected] => [bok_keywords:protected] => [id:protected] => 47 [type:protected] => category [parent:protected] => 2 [label:protected] => Bricklayer [alreadyInSave:protected] => [alreadyInValidation:protected] => [validationFailures:protected] => Array ( ) [_new:BaseObject:private] => [_deleted:BaseObject:private] => [modifiedColumns:protected] => Array ( ) ) [49] => Category Object ( [languages:protected] => [bok_resources:protected] => [bok_topics:protected] => [bok_keywords:protected] => [id:protected] => 49 [type:protected] => category [parent:protected] => 2 [label:protected] => Carpenter [alreadyInSave:protected] => [alreadyInValidation:protected] => [validationFailures:protected] => Array ( ) [_new:BaseObject:private] => [_deleted:BaseObject:private] => [modifiedColumns:protected] => Array ( ) ) [51] => Category Object ( [languages:protected] => [bok_resources:protected] => [bok_topics:protected] => [bok_keywords:protected] => [id:protected] => 51 [type:protected] => category [parent:protected] => 2 [label:protected] => Cement Mason [alreadyInSave:protected] => [alreadyInValidation:protected] => [validationFailures:protected] => Array ( ) [_new:BaseObject:private] => [_deleted:BaseObject:private] => [modifiedColumns:protected] => Array ( ) ) [53] => Category Object ( [languages:protected] => [bok_resources:protected] => [bok_topics:protected] => [bok_keywords:protected] => [id:protected] => 53 [type:protected] => category [parent:protected] => 2 [label:protected] => Concrete Polisher [alreadyInSave:protected] => [alreadyInValidation:protected] => [validationFailures:protected] => Array ( ) [_new:BaseObject:private] => [_deleted:BaseObject:private] => [modifiedColumns:protected] => Array ( ) ) [55] => Category Object ( [languages:protected] => [bok_resources:protected] => [bok_topics:protected] => [bok_keywords:protected] => [id:protected] => 55 [type:protected] => category [parent:protected] => 2 [label:protected] => Electrical Worker [alreadyInSave:protected] => [alreadyInValidation:protected] => [validationFailures:protected] => Array ( ) [_new:BaseObject:private] => [_deleted:BaseObject:private] => [modifiedColumns:protected] => Array ( ) ) [60] => Category Object ( [languages:protected] => [bok_resources:protected] => [bok_topics:protected] => [bok_keywords:protected] => [id:protected] => 60 [type:protected] => category [parent:protected] => 2 [label:protected] => HVAC [alreadyInSave:protected] => [alreadyInValidation:protected] => [validationFailures:protected] => Array ( ) [_new:BaseObject:private] => [_deleted:BaseObject:private] => [modifiedColumns:protected] => Array ( ) ) [64] => Category Object ( [languages:protected] => [bok_resources:protected] => [bok_topics:protected] => [bok_keywords:protected] => [id:protected] => 64 [type:protected] => category [parent:protected] => 2 [label:protected] => Laborer [alreadyInSave:protected] => [alreadyInValidation:protected] => [validationFailures:protected] => Array ( ) [_new:BaseObject:private] => [_deleted:BaseObject:private] => [modifiedColumns:protected] => Array ( ) ) [73] => Category Object ( [languages:protected] => [bok_resources:protected] => [bok_topics:protected] => [bok_keywords:protected] => [id:protected] => 73 [type:protected] => category [parent:protected] => 2 [label:protected] => PCC/Restoration [alreadyInSave:protected] => [alreadyInValidation:protected] => [validationFailures:protected] => Array ( ) [_new:BaseObject:private] => [_deleted:BaseObject:private] => [modifiedColumns:protected] => Array ( ) ) [76] => Category Object ( [languages:protected] => [bok_resources:protected] => [bok_topics:protected] => [bok_keywords:protected] => [id:protected] => 76 [type:protected] => category [parent:protected] => 2 [label:protected] => Plumber/Pipefitter [alreadyInSave:protected] => [alreadyInValidation:protected] => [validationFailures:protected] => Array ( ) [_new:BaseObject:private] => [_deleted:BaseObject:private] => [modifiedColumns:protected] => Array ( ) ) [78] => Category Object ( [languages:protected] => [bok_resources:protected] => [bok_topics:protected] => [bok_keywords:protected] => [id:protected] => 78 [type:protected] => category [parent:protected] => 2 [label:protected] => Roofer/Waterproofer [alreadyInSave:protected] => [alreadyInValidation:protected] => [validationFailures:protected] => Array ( ) [_new:BaseObject:private] => [_deleted:BaseObject:private] => [modifiedColumns:protected] => Array ( ) ) [80] => Category Object ( [languages:protected] => [bok_resources:protected] => [bok_topics:protected] => [bok_keywords:protected] => [id:protected] => 80 [type:protected] => category [parent:protected] => 2 [label:protected] => Sheetmetal Worker [alreadyInSave:protected] => [alreadyInValidation:protected] => [validationFailures:protected] => Array ( ) [_new:BaseObject:private] => [_deleted:BaseObject:private] => [modifiedColumns:protected] => Array ( ) ) [86] => Category Object ( [languages:protected] => [bok_resources:protected] => [bok_topics:protected] => [bok_keywords:protected] => [id:protected] => 86 [type:protected] => category [parent:protected] => 2 [label:protected] => Welder [alreadyInSave:protected] => [alreadyInValidation:protected] => [validationFailures:protected] => Array ( ) [_new:BaseObject:private] => [_deleted:BaseObject:private] => [modifiedColumns:protected] => Array ( ) ) [87] => Category Object ( [languages:protected] => [bok_resources:protected] => [bok_topics:protected] => [bok_keywords:protected] => [id:protected] => 87 [type:protected] => category [parent:protected] => 3 [label:protected] => Commercial & Institutional [alreadyInSave:protected] => [alreadyInValidation:protected] => [validationFailures:protected] => Array ( ) [_new:BaseObject:private] => [_deleted:BaseObject:private] => [modifiedColumns:protected] => Array ( ) ) [90] => Category Object ( [languages:protected] => [bok_resources:protected] => [bok_topics:protected] => [bok_keywords:protected] => [id:protected] => 90 [type:protected] => category [parent:protected] => 3 [label:protected] => Industrial [alreadyInSave:protected] => [alreadyInValidation:protected] => [validationFailures:protected] => Array ( ) [_new:BaseObject:private] => [_deleted:BaseObject:private] => [modifiedColumns:protected] => Array ( ) ) [92] => Category Object ( [languages:protected] => [bok_resources:protected] => [bok_topics:protected] => [bok_keywords:protected] => [id:protected] => 92 [type:protected] => category [parent:protected] => 3 [label:protected] => LEED/Green Construction [alreadyInSave:protected] => [alreadyInValidation:protected] => [validationFailures:protected] => Array ( ) [_new:BaseObject:private] => [_deleted:BaseObject:private] => [modifiedColumns:protected] => Array ( ) ) [93] => Category Object ( [languages:protected] => [bok_resources:protected] => [bok_topics:protected] => [bok_keywords:protected] => [id:protected] => 93 [type:protected] => category [parent:protected] => 3 [label:protected] => Renovations [alreadyInSave:protected] => [alreadyInValidation:protected] => [validationFailures:protected] => Array ( ) [_new:BaseObject:private] => [_deleted:BaseObject:private] => [modifiedColumns:protected] => Array ( ) ) [94] => Category Object ( [languages:protected] => [bok_resources:protected] => [bok_topics:protected] => [bok_keywords:protected] => [id:protected] => 94 [type:protected] => category [parent:protected] => 3 [label:protected] => Residential [alreadyInSave:protected] => [alreadyInValidation:protected] => [validationFailures:protected] => Array ( ) [_new:BaseObject:private] => [_deleted:BaseObject:private] => [modifiedColumns:protected] => Array ( ) ) [100] => Category Object ( [languages:protected] => [bok_resources:protected] => [bok_topics:protected] => [bok_keywords:protected] => [id:protected] => 100 [type:protected] => category [parent:protected] => 6 [label:protected] => Toolbox Talks [alreadyInSave:protected] => [alreadyInValidation:protected] => [validationFailures:protected] => Array ( ) [_new:BaseObject:private] => [_deleted:BaseObject:private] => [modifiedColumns:protected] => Array ( ) ) ) [categories_initialized:protected] => 1 [mapped_items:protected] => [content:protected] => [files:protected] => [language:protected] => Language Object ( [id:protected] => 1 [code:protected] => en [name:protected] => English [alreadyInSave:protected] => [alreadyInValidation:protected] => [validationFailures:protected] => Array ( ) [_new:BaseObject:private] => [_deleted:BaseObject:private] => [modifiedColumns:protected] => Array ( ) ) [old_record:protected] => [id:protected] => 4430 [old_id:protected] => [elcosh_id:protected] => d001660 [type:protected] => document [display_type:protected] => HTML only (and links) [user_id:protected] => 0 [language_id:protected] => 1 [tagging_id:protected] => Mike Aguilar [priority_id:protected] => 1 [title:protected] => Toolbox Talk: Fixed Ladder [total_pages:protected] => 0 [billed_pages:protected] => 0 [publication_number:protected] => [part_of:protected] => [keywords:protected] => Fixed Ladders, Fall Prevention, Falls [comments:protected] => [summary:protected] => The CPWR Toolbox Talk on Fixed Ladders addresses the potential risks associated with using fixed ladders. The resource includes a brief case example, steps to prevent a related injury and questions for discussion. It includes an image that illustrates the hazard, which can be posted in a central location as a reminder of steps to work safely. Available in English and Spanish. [transition_comments:protected] => [external_link:protected] => [consol_link:protected] => [more_like_this:protected] => d001257,d001254,d001255,d001256,d001258,d001262,d001279 [permission_given_by:protected] => [published:protected] => T [billable:protected] => F [img_name:protected] => [img_ext:protected] => [img_width:protected] => [img_height:protected] => [img_credit:protected] => [img_practice:protected] => [vid_source_id:protected] => [vid_running_time:protected] => [vid_intended_audience:protected] => [vid_acquisition_info:protected] => [vid_cost:protected] => [vid_producer:protected] => [vid_filename:protected] => [vid_filename_downloadable:protected] => [date_summary:protected] => [date_permission_requested:protected] => [date_permission_received:protected] => [date_review_needed:protected] => [date_received:protected] => 06/10/22 [date_completed:protected] => 06/10/22 [date_billed:protected] => [date_modified:protected] => 06/16/25 [collBokExports:protected] => [lastBokExportCriteria:BaseElcoshItem:private] => [alreadyInSave:protected] => [alreadyInValidation:protected] => [validationFailures:protected] => Array ( ) [_new:BaseObject:private] => [_deleted:BaseObject:private] => [modifiedColumns:protected] => Array ( ) ) ) [1] => Search_Result Object ( [title] => Toolbox Talk: Work Zone Safety: Working Around Vehicles [image] => /record/images/notavailable-p.png [blurb] => The CPWR Toolbox Talk on Working Around Vehicles in the Work Zone addresses methods to avoid being struck-by a vehicle on a construction site. The res... [category] => Array ( [0] => 12 [1] => 18 [2] => 52 [3] => 57 [4] => 70 [5] => 85 [6] => 87 [7] => 88 [8] => 89 [9] => 91 [10] => 90 [11] => 92 [12] => 93 [13] => 94 [14] => 95 [15] => 100 ) [labels] => Array ( [0] => Crushed/Struck By [1] => Work Environment [2] => Hazards [3] => Motor Vehicles/Heavy Equipment [6] => Commercial Diver [7] => Trades [8] => Flagger [10] => Operating Engineer [12] => Truck Driver [14] => Commercial & Institutional [15] => Jobsites [16] => Demolition [18] => Disasters [20] => Heavy & Highway [22] => Industrial [24] => LEED/Green Construction [26] => Renovations [28] => Residential [30] => Underground [32] => Toolbox Talks [33] => Documents [34] => Media & Documents ) [type] => Toolbox Talks [sub_category] => [url] => /document/4428/d001658/Toolbox%2BTalk%253A%2BWork%2BZone%2BSafety%253A%2BWorking%2BAround%2BVehicles.html [item:protected] => DocumentRecord Object ( [records:protected] => Array ( ) [recordId:protected] => [searchWordClass:protected] => [searchWordPeerClass:protected] => [bok_record:protected] => [authors:protected] => [organizations:protected] => [collections:protected] => [categories:protected] => Array ( [12] => Category Object ( [languages:protected] => [bok_resources:protected] => [bok_topics:protected] => [bok_keywords:protected] => [id:protected] => 12 [type:protected] => category [parent:protected] => 7 [label:protected] => Crushed/Struck By [alreadyInSave:protected] => [alreadyInValidation:protected] => [validationFailures:protected] => Array ( ) [_new:BaseObject:private] => [_deleted:BaseObject:private] => [modifiedColumns:protected] => Array ( ) ) [18] => Category Object ( [languages:protected] => [bok_resources:protected] => [bok_topics:protected] => [bok_keywords:protected] => [id:protected] => 18 [type:protected] => category [parent:protected] => 7 [label:protected] => Motor Vehicles/Heavy Equipment [alreadyInSave:protected] => [alreadyInValidation:protected] => [validationFailures:protected] => Array ( ) [_new:BaseObject:private] => [_deleted:BaseObject:private] => [modifiedColumns:protected] => Array ( ) ) [52] => Category Object ( [languages:protected] => [bok_resources:protected] => [bok_topics:protected] => [bok_keywords:protected] => [id:protected] => 52 [type:protected] => category [parent:protected] => 2 [label:protected] => Commercial Diver [alreadyInSave:protected] => [alreadyInValidation:protected] => [validationFailures:protected] => Array ( ) [_new:BaseObject:private] => [_deleted:BaseObject:private] => [modifiedColumns:protected] => Array ( ) ) [57] => Category Object ( [languages:protected] => [bok_resources:protected] => [bok_topics:protected] => [bok_keywords:protected] => [id:protected] => 57 [type:protected] => category [parent:protected] => 2 [label:protected] => Flagger [alreadyInSave:protected] => [alreadyInValidation:protected] => [validationFailures:protected] => Array ( ) [_new:BaseObject:private] => [_deleted:BaseObject:private] => [modifiedColumns:protected] => Array ( ) ) [70] => Category Object ( [languages:protected] => [bok_resources:protected] => [bok_topics:protected] => [bok_keywords:protected] => [id:protected] => 70 [type:protected] => category [parent:protected] => 2 [label:protected] => Operating Engineer [alreadyInSave:protected] => [alreadyInValidation:protected] => [validationFailures:protected] => Array ( ) [_new:BaseObject:private] => [_deleted:BaseObject:private] => [modifiedColumns:protected] => Array ( ) ) [85] => Category Object ( [languages:protected] => [bok_resources:protected] => [bok_topics:protected] => [bok_keywords:protected] => [id:protected] => 85 [type:protected] => category [parent:protected] => 2 [label:protected] => Truck Driver [alreadyInSave:protected] => [alreadyInValidation:protected] => [validationFailures:protected] => Array ( ) [_new:BaseObject:private] => [_deleted:BaseObject:private] => [modifiedColumns:protected] => Array ( ) ) [87] => Category Object ( [languages:protected] => [bok_resources:protected] => [bok_topics:protected] => [bok_keywords:protected] => [id:protected] => 87 [type:protected] => category [parent:protected] => 3 [label:protected] => Commercial & Institutional [alreadyInSave:protected] => [alreadyInValidation:protected] => [validationFailures:protected] => Array ( ) [_new:BaseObject:private] => [_deleted:BaseObject:private] => [modifiedColumns:protected] => Array ( ) ) [88] => Category Object ( [languages:protected] => [bok_resources:protected] => [bok_topics:protected] => [bok_keywords:protected] => [id:protected] => 88 [type:protected] => category [parent:protected] => 3 [label:protected] => Demolition [alreadyInSave:protected] => [alreadyInValidation:protected] => [validationFailures:protected] => Array ( ) [_new:BaseObject:private] => [_deleted:BaseObject:private] => [modifiedColumns:protected] => Array ( ) ) [89] => Category Object ( [languages:protected] => [bok_resources:protected] => [bok_topics:protected] => [bok_keywords:protected] => [id:protected] => 89 [type:protected] => category [parent:protected] => 3 [label:protected] => Disasters [alreadyInSave:protected] => [alreadyInValidation:protected] => [validationFailures:protected] => Array ( ) [_new:BaseObject:private] => [_deleted:BaseObject:private] => [modifiedColumns:protected] => Array ( ) ) [91] => Category Object ( [languages:protected] => [bok_resources:protected] => [bok_topics:protected] => [bok_keywords:protected] => [id:protected] => 91 [type:protected] => category [parent:protected] => 3 [label:protected] => Heavy & Highway [alreadyInSave:protected] => [alreadyInValidation:protected] => [validationFailures:protected] => Array ( ) [_new:BaseObject:private] => [_deleted:BaseObject:private] => [modifiedColumns:protected] => Array ( ) ) [90] => Category Object ( [languages:protected] => [bok_resources:protected] => [bok_topics:protected] => [bok_keywords:protected] => [id:protected] => 90 [type:protected] => category [parent:protected] => 3 [label:protected] => Industrial [alreadyInSave:protected] => [alreadyInValidation:protected] => [validationFailures:protected] => Array ( ) [_new:BaseObject:private] => [_deleted:BaseObject:private] => [modifiedColumns:protected] => Array ( ) ) [92] => Category Object ( [languages:protected] => [bok_resources:protected] => [bok_topics:protected] => [bok_keywords:protected] => [id:protected] => 92 [type:protected] => category [parent:protected] => 3 [label:protected] => LEED/Green Construction [alreadyInSave:protected] => [alreadyInValidation:protected] => [validationFailures:protected] => Array ( ) [_new:BaseObject:private] => [_deleted:BaseObject:private] => [modifiedColumns:protected] => Array ( ) ) [93] => Category Object ( [languages:protected] => [bok_resources:protected] => [bok_topics:protected] => [bok_keywords:protected] => [id:protected] => 93 [type:protected] => category [parent:protected] => 3 [label:protected] => Renovations [alreadyInSave:protected] => [alreadyInValidation:protected] => [validationFailures:protected] => Array ( ) [_new:BaseObject:private] => [_deleted:BaseObject:private] => [modifiedColumns:protected] => Array ( ) ) [94] => Category Object ( [languages:protected] => [bok_resources:protected] => [bok_topics:protected] => [bok_keywords:protected] => [id:protected] => 94 [type:protected] => category [parent:protected] => 3 [label:protected] => Residential [alreadyInSave:protected] => [alreadyInValidation:protected] => [validationFailures:protected] => Array ( ) [_new:BaseObject:private] => [_deleted:BaseObject:private] => [modifiedColumns:protected] => Array ( ) ) [95] => Category Object ( [languages:protected] => [bok_resources:protected] => [bok_topics:protected] => [bok_keywords:protected] => [id:protected] => 95 [type:protected] => category [parent:protected] => 3 [label:protected] => Underground [alreadyInSave:protected] => [alreadyInValidation:protected] => [validationFailures:protected] => Array ( ) [_new:BaseObject:private] => [_deleted:BaseObject:private] => [modifiedColumns:protected] => Array ( ) ) [100] => Category Object ( [languages:protected] => [bok_resources:protected] => [bok_topics:protected] => [bok_keywords:protected] => [id:protected] => 100 [type:protected] => category [parent:protected] => 6 [label:protected] => Toolbox Talks [alreadyInSave:protected] => [alreadyInValidation:protected] => [validationFailures:protected] => Array ( ) [_new:BaseObject:private] => [_deleted:BaseObject:private] => [modifiedColumns:protected] => Array ( ) ) ) [categories_initialized:protected] => 1 [mapped_items:protected] => [content:protected] => [files:protected] => [language:protected] => Language Object ( [id:protected] => 1 [code:protected] => en [name:protected] => English [alreadyInSave:protected] => [alreadyInValidation:protected] => [validationFailures:protected] => Array ( ) [_new:BaseObject:private] => [_deleted:BaseObject:private] => [modifiedColumns:protected] => Array ( ) ) [old_record:protected] => [id:protected] => 4428 [old_id:protected] => [elcosh_id:protected] => d001658 [type:protected] => document [display_type:protected] => HTML only (and links) [user_id:protected] => 0 [language_id:protected] => 1 [tagging_id:protected] => Daniela Caceres [priority_id:protected] => 1 [title:protected] => Toolbox Talk: Work Zone Safety: Working Around Vehicles [total_pages:protected] => 0 [billed_pages:protected] => 0 [publication_number:protected] => [part_of:protected] => [keywords:protected] => Struck, Struck by, Vehicle, Work Zone Safety, Truck, Operator, Driver, Mobile Equipment [comments:protected] => [summary:protected] => The CPWR Toolbox Talk on Working Around Vehicles in the Work Zone addresses methods to avoid being struck-by a vehicle on a construction site. The resource includes a case example, steps to prevent a related injury, and questions for discussion. It includes a graphic that illustrates the hazard, which can be posted in a central location as a reminder of steps to work safely. Available in English and Spanish. [transition_comments:protected] => [external_link:protected] => [consol_link:protected] => [more_like_this:protected] => d001640 [permission_given_by:protected] => [published:protected] => T [billable:protected] => F [img_name:protected] => [img_ext:protected] => [img_width:protected] => [img_height:protected] => [img_credit:protected] => [img_practice:protected] => [vid_source_id:protected] => [vid_running_time:protected] => [vid_intended_audience:protected] => [vid_acquisition_info:protected] => [vid_cost:protected] => [vid_producer:protected] => [vid_filename:protected] => [vid_filename_downloadable:protected] => [date_summary:protected] => [date_permission_requested:protected] => [date_permission_received:protected] => [date_review_needed:protected] => [date_received:protected] => 12/23/21 [date_completed:protected] => 12/23/21 [date_billed:protected] => [date_modified:protected] => 05/19/23 [collBokExports:protected] => [lastBokExportCriteria:BaseElcoshItem:private] => [alreadyInSave:protected] => [alreadyInValidation:protected] => [validationFailures:protected] => Array ( ) [_new:BaseObject:private] => [_deleted:BaseObject:private] => [modifiedColumns:protected] => Array ( ) ) ) [2] => Search_Result Object ( [title] => Construction Dive -- DeWalt's Jobsite Pro headphones recalled for fire hazards [image] => /record/images/notavailable-p.png [blurb] => A recall notice by the United States Consumer Product Safety Commission affects over 300,000 DeWalt Jobsite Pro Headphones. The recall is a result of... [category] => Array ( [0] => 16 [1] => 44 [2] => 45 [3] => 46 [4] => 47 [5] => 48 [6] => 49 [7] => 50 [8] => 51 [9] => 52 [10] => 53 [11] => 54 [12] => 55 [13] => 56 [14] => 57 [15] => 58 [16] => 59 [17] => 60 [18] => 61 [19] => 64 [20] => 65 [21] => 66 [22] => 67 [23] => 68 [24] => 69 [25] => 70 [26] => 71 [27] => 72 [28] => 73 [29] => 74 [30] => 75 [31] => 76 [32] => 77 [33] => 63 [34] => 78 [35] => 79 [36] => 80 [37] => 81 [38] => 82 [39] => 62 [40] => 83 [41] => 84 [42] => 85 [43] => 86 [44] => 87 [45] => 88 [46] => 89 [47] => 91 [48] => 90 [49] => 92 [50] => 93 [51] => 94 [52] => 95 ) [labels] => Array ( [0] => Fire & Explosions [1] => Work Environment [2] => Hazards [3] => Acoustical Ceiling Carpenter [4] => Trades [5] => Asbestos/Insulator [7] => Boilermaker [9] => Bricklayer [11] => Cabinetmaker [13] => Carpenter [15] => Carpet Layer [17] => Cement Mason [19] => Commercial Diver [21] => Concrete Polisher [23] => Drywall Applicator Specialist [25] => Electrical Worker [27] => Elevator Constructor [29] => Flagger [31] => Glazier [33] => Hazardous Waste Cleanup [35] => HVAC [37] => Interior Systems Carpenter [39] => Laborer [41] => Landscaper [43] => Lather [45] => Lead Abatement Worker [47] => Maintenance Worker [49] => Millwright [51] => Operating Engineer [53] => Painter [55] => Paper Hanger [57] => PCC/Restoration [59] => Pile Driver [61] => Plasterer [63] => Plumber/Pipefitter [65] => Refractory Worker [67] => Reinforcing Ironworker [69] => Roofer/Waterproofer [71] => Scaffold Erector [73] => Sheetmetal Worker [75] => Sprinkler Fitter [77] => Stonemason [79] => Structural Ironworker [81] => Terrazzo Worker [83] => Tile Setter [85] => Truck Driver [87] => Welder [89] => Commercial & Institutional [90] => Jobsites [91] => Demolition [93] => Disasters [95] => Heavy & Highway [97] => Industrial [99] => LEED/Green Construction [101] => Renovations [103] => Residential [105] => Underground ) [type] => [sub_category] => [url] => /document/4426/d001656/Construction%2BDive%2B--%2BDeWalt%2527s%2BJobsite%2BPro%2Bheadphones%2Brecalled%2Bfor%2Bfire%2Bhazards.html [item:protected] => DocumentRecord Object ( [records:protected] => Array ( ) [recordId:protected] => [searchWordClass:protected] => [searchWordPeerClass:protected] => [bok_record:protected] => [authors:protected] => [organizations:protected] => [collections:protected] => [categories:protected] => Array ( [16] => Category Object ( [languages:protected] => [bok_resources:protected] => [bok_topics:protected] => [bok_keywords:protected] => [id:protected] => 16 [type:protected] => category [parent:protected] => 7 [label:protected] => Fire & Explosions [alreadyInSave:protected] => [alreadyInValidation:protected] => [validationFailures:protected] => Array ( ) [_new:BaseObject:private] => [_deleted:BaseObject:private] => [modifiedColumns:protected] => Array ( ) ) [44] => Category Object ( [languages:protected] => [bok_resources:protected] => [bok_topics:protected] => [bok_keywords:protected] => [id:protected] => 44 [type:protected] => category [parent:protected] => 2 [label:protected] => Acoustical Ceiling Carpenter [alreadyInSave:protected] => [alreadyInValidation:protected] => [validationFailures:protected] => Array ( ) [_new:BaseObject:private] => [_deleted:BaseObject:private] => [modifiedColumns:protected] => Array ( ) ) [45] => Category Object ( [languages:protected] => [bok_resources:protected] => [bok_topics:protected] => [bok_keywords:protected] => [id:protected] => 45 [type:protected] => category [parent:protected] => 2 [label:protected] => Asbestos/Insulator [alreadyInSave:protected] => [alreadyInValidation:protected] => [validationFailures:protected] => Array ( ) [_new:BaseObject:private] => [_deleted:BaseObject:private] => [modifiedColumns:protected] => Array ( ) ) [46] => Category Object ( [languages:protected] => [bok_resources:protected] => [bok_topics:protected] => [bok_keywords:protected] => [id:protected] => 46 [type:protected] => category [parent:protected] => 2 [label:protected] => Boilermaker [alreadyInSave:protected] => [alreadyInValidation:protected] => [validationFailures:protected] => Array ( ) [_new:BaseObject:private] => [_deleted:BaseObject:private] => [modifiedColumns:protected] => Array ( ) ) [47] => Category Object ( [languages:protected] => [bok_resources:protected] => [bok_topics:protected] => [bok_keywords:protected] => [id:protected] => 47 [type:protected] => category [parent:protected] => 2 [label:protected] => Bricklayer [alreadyInSave:protected] => [alreadyInValidation:protected] => [validationFailures:protected] => Array ( ) [_new:BaseObject:private] => [_deleted:BaseObject:private] => [modifiedColumns:protected] => Array ( ) ) [48] => Category Object ( [languages:protected] => [bok_resources:protected] => [bok_topics:protected] => [bok_keywords:protected] => [id:protected] => 48 [type:protected] => category [parent:protected] => 2 [label:protected] => Cabinetmaker [alreadyInSave:protected] => [alreadyInValidation:protected] => [validationFailures:protected] => Array ( ) [_new:BaseObject:private] => [_deleted:BaseObject:private] => [modifiedColumns:protected] => Array ( ) ) [49] => Category Object ( [languages:protected] => [bok_resources:protected] => [bok_topics:protected] => [bok_keywords:protected] => [id:protected] => 49 [type:protected] => category [parent:protected] => 2 [label:protected] => Carpenter [alreadyInSave:protected] => [alreadyInValidation:protected] => [validationFailures:protected] => Array ( ) [_new:BaseObject:private] => [_deleted:BaseObject:private] => [modifiedColumns:protected] => Array ( ) ) [50] => Category Object ( [languages:protected] => [bok_resources:protected] => [bok_topics:protected] => [bok_keywords:protected] => [id:protected] => 50 [type:protected] => category [parent:protected] => 2 [label:protected] => Carpet Layer [alreadyInSave:protected] => [alreadyInValidation:protected] => [validationFailures:protected] => Array ( ) [_new:BaseObject:private] => [_deleted:BaseObject:private] => [modifiedColumns:protected] => Array ( ) ) [51] => Category Object ( [languages:protected] => [bok_resources:protected] => [bok_topics:protected] => [bok_keywords:protected] => [id:protected] => 51 [type:protected] => category [parent:protected] => 2 [label:protected] => Cement Mason [alreadyInSave:protected] => [alreadyInValidation:protected] => [validationFailures:protected] => Array ( ) [_new:BaseObject:private] => [_deleted:BaseObject:private] => [modifiedColumns:protected] => Array ( ) ) [52] => Category Object ( [languages:protected] => [bok_resources:protected] => [bok_topics:protected] => [bok_keywords:protected] => [id:protected] => 52 [type:protected] => category [parent:protected] => 2 [label:protected] => Commercial Diver [alreadyInSave:protected] => [alreadyInValidation:protected] => [validationFailures:protected] => Array ( ) [_new:BaseObject:private] => [_deleted:BaseObject:private] => [modifiedColumns:protected] => Array ( ) ) [53] => Category Object ( [languages:protected] => [bok_resources:protected] => [bok_topics:protected] => [bok_keywords:protected] => [id:protected] => 53 [type:protected] => category [parent:protected] => 2 [label:protected] => Concrete Polisher [alreadyInSave:protected] => [alreadyInValidation:protected] => [validationFailures:protected] => Array ( ) [_new:BaseObject:private] => [_deleted:BaseObject:private] => [modifiedColumns:protected] => Array ( ) ) [54] => Category Object ( [languages:protected] => [bok_resources:protected] => [bok_topics:protected] => [bok_keywords:protected] => [id:protected] => 54 [type:protected] => category [parent:protected] => 2 [label:protected] => Drywall Applicator Specialist [alreadyInSave:protected] => [alreadyInValidation:protected] => [validationFailures:protected] => Array ( ) [_new:BaseObject:private] => [_deleted:BaseObject:private] => [modifiedColumns:protected] => Array ( ) ) [55] => Category Object ( [languages:protected] => [bok_resources:protected] => [bok_topics:protected] => [bok_keywords:protected] => [id:protected] => 55 [type:protected] => category [parent:protected] => 2 [label:protected] => Electrical Worker [alreadyInSave:protected] => [alreadyInValidation:protected] => [validationFailures:protected] => Array ( ) [_new:BaseObject:private] => [_deleted:BaseObject:private] => [modifiedColumns:protected] => Array ( ) ) [56] => Category Object ( [languages:protected] => [bok_resources:protected] => [bok_topics:protected] => [bok_keywords:protected] => [id:protected] => 56 [type:protected] => category [parent:protected] => 2 [label:protected] => Elevator Constructor [alreadyInSave:protected] => [alreadyInValidation:protected] => [validationFailures:protected] => Array ( ) [_new:BaseObject:private] => [_deleted:BaseObject:private] => [modifiedColumns:protected] => Array ( ) ) [57] => Category Object ( [languages:protected] => [bok_resources:protected] => [bok_topics:protected] => [bok_keywords:protected] => [id:protected] => 57 [type:protected] => category [parent:protected] => 2 [label:protected] => Flagger [alreadyInSave:protected] => [alreadyInValidation:protected] => [validationFailures:protected] => Array ( ) [_new:BaseObject:private] => [_deleted:BaseObject:private] => [modifiedColumns:protected] => Array ( ) ) [58] => Category Object ( [languages:protected] => [bok_resources:protected] => [bok_topics:protected] => [bok_keywords:protected] => [id:protected] => 58 [type:protected] => category [parent:protected] => 2 [label:protected] => Glazier [alreadyInSave:protected] => [alreadyInValidation:protected] => [validationFailures:protected] => Array ( ) [_new:BaseObject:private] => [_deleted:BaseObject:private] => [modifiedColumns:protected] => Array ( ) ) [59] => Category Object ( [languages:protected] => [bok_resources:protected] => [bok_topics:protected] => [bok_keywords:protected] => [id:protected] => 59 [type:protected] => category [parent:protected] => 2 [label:protected] => Hazardous Waste Cleanup [alreadyInSave:protected] => [alreadyInValidation:protected] => [validationFailures:protected] => Array ( ) [_new:BaseObject:private] => [_deleted:BaseObject:private] => [modifiedColumns:protected] => Array ( ) ) [60] => Category Object ( [languages:protected] => [bok_resources:protected] => [bok_topics:protected] => [bok_keywords:protected] => [id:protected] => 60 [type:protected] => category [parent:protected] => 2 [label:protected] => HVAC [alreadyInSave:protected] => [alreadyInValidation:protected] => [validationFailures:protected] => Array ( ) [_new:BaseObject:private] => [_deleted:BaseObject:private] => [modifiedColumns:protected] => Array ( ) ) [61] => Category Object ( [languages:protected] => [bok_resources:protected] => [bok_topics:protected] => [bok_keywords:protected] => [id:protected] => 61 [type:protected] => category [parent:protected] => 2 [label:protected] => Interior Systems Carpenter [alreadyInSave:protected] => [alreadyInValidation:protected] => [validationFailures:protected] => Array ( ) [_new:BaseObject:private] => [_deleted:BaseObject:private] => [modifiedColumns:protected] => Array ( ) ) [64] => Category Object ( [languages:protected] => [bok_resources:protected] => [bok_topics:protected] => [bok_keywords:protected] => [id:protected] => 64 [type:protected] => category [parent:protected] => 2 [label:protected] => Laborer [alreadyInSave:protected] => [alreadyInValidation:protected] => [validationFailures:protected] => Array ( ) [_new:BaseObject:private] => [_deleted:BaseObject:private] => [modifiedColumns:protected] => Array ( ) ) [65] => Category Object ( [languages:protected] => [bok_resources:protected] => [bok_topics:protected] => [bok_keywords:protected] => [id:protected] => 65 [type:protected] => category [parent:protected] => 2 [label:protected] => Landscaper [alreadyInSave:protected] => [alreadyInValidation:protected] => [validationFailures:protected] => Array ( ) [_new:BaseObject:private] => [_deleted:BaseObject:private] => [modifiedColumns:protected] => Array ( ) ) [66] => Category Object ( [languages:protected] => [bok_resources:protected] => [bok_topics:protected] => [bok_keywords:protected] => [id:protected] => 66 [type:protected] => category [parent:protected] => 2 [label:protected] => Lather [alreadyInSave:protected] => [alreadyInValidation:protected] => [validationFailures:protected] => Array ( ) [_new:BaseObject:private] => [_deleted:BaseObject:private] => [modifiedColumns:protected] => Array ( ) ) [67] => Category Object ( [languages:protected] => [bok_resources:protected] => [bok_topics:protected] => [bok_keywords:protected] => [id:protected] => 67 [type:protected] => category [parent:protected] => 2 [label:protected] => Lead Abatement Worker [alreadyInSave:protected] => [alreadyInValidation:protected] => [validationFailures:protected] => Array ( ) [_new:BaseObject:private] => [_deleted:BaseObject:private] => [modifiedColumns:protected] => Array ( ) ) [68] => Category Object ( [languages:protected] => [bok_resources:protected] => [bok_topics:protected] => [bok_keywords:protected] => [id:protected] => 68 [type:protected] => category [parent:protected] => 2 [label:protected] => Maintenance Worker [alreadyInSave:protected] => [alreadyInValidation:protected] => [validationFailures:protected] => Array ( ) [_new:BaseObject:private] => [_deleted:BaseObject:private] => [modifiedColumns:protected] => Array ( ) ) [69] => Category Object ( [languages:protected] => [bok_resources:protected] => [bok_topics:protected] => [bok_keywords:protected] => [id:protected] => 69 [type:protected] => category [parent:protected] => 2 [label:protected] => Millwright [alreadyInSave:protected] => [alreadyInValidation:protected] => [validationFailures:protected] => Array ( ) [_new:BaseObject:private] => [_deleted:BaseObject:private] => [modifiedColumns:protected] => Array ( ) ) [70] => Category Object ( [languages:protected] => [bok_resources:protected] => [bok_topics:protected] => [bok_keywords:protected] => [id:protected] => 70 [type:protected] => category [parent:protected] => 2 [label:protected] => Operating Engineer [alreadyInSave:protected] => [alreadyInValidation:protected] => [validationFailures:protected] => Array ( ) [_new:BaseObject:private] => [_deleted:BaseObject:private] => [modifiedColumns:protected] => Array ( ) ) [71] => Category Object ( [languages:protected] => [bok_resources:protected] => [bok_topics:protected] => [bok_keywords:protected] => [id:protected] => 71 [type:protected] => category [parent:protected] => 2 [label:protected] => Painter [alreadyInSave:protected] => [alreadyInValidation:protected] => [validationFailures:protected] => Array ( ) [_new:BaseObject:private] => [_deleted:BaseObject:private] => [modifiedColumns:protected] => Array ( ) ) [72] => Category Object ( [languages:protected] => [bok_resources:protected] => [bok_topics:protected] => [bok_keywords:protected] => [id:protected] => 72 [type:protected] => category [parent:protected] => 2 [label:protected] => Paper Hanger [alreadyInSave:protected] => [alreadyInValidation:protected] => [validationFailures:protected] => Array ( ) [_new:BaseObject:private] => [_deleted:BaseObject:private] => [modifiedColumns:protected] => Array ( ) ) [73] => Category Object ( [languages:protected] => [bok_resources:protected] => [bok_topics:protected] => [bok_keywords:protected] => [id:protected] => 73 [type:protected] => category [parent:protected] => 2 [label:protected] => PCC/Restoration [alreadyInSave:protected] => [alreadyInValidation:protected] => [validationFailures:protected] => Array ( ) [_new:BaseObject:private] => [_deleted:BaseObject:private] => [modifiedColumns:protected] => Array ( ) ) [74] => Category Object ( [languages:protected] => [bok_resources:protected] => [bok_topics:protected] => [bok_keywords:protected] => [id:protected] => 74 [type:protected] => category [parent:protected] => 2 [label:protected] => Pile Driver [alreadyInSave:protected] => [alreadyInValidation:protected] => [validationFailures:protected] => Array ( ) [_new:BaseObject:private] => [_deleted:BaseObject:private] => [modifiedColumns:protected] => Array ( ) ) [75] => Category Object ( [languages:protected] => [bok_resources:protected] => [bok_topics:protected] => [bok_keywords:protected] => [id:protected] => 75 [type:protected] => category [parent:protected] => 2 [label:protected] => Plasterer [alreadyInSave:protected] => [alreadyInValidation:protected] => [validationFailures:protected] => Array ( ) [_new:BaseObject:private] => [_deleted:BaseObject:private] => [modifiedColumns:protected] => Array ( ) ) [76] => Category Object ( [languages:protected] => [bok_resources:protected] => [bok_topics:protected] => [bok_keywords:protected] => [id:protected] => 76 [type:protected] => category [parent:protected] => 2 [label:protected] => Plumber/Pipefitter [alreadyInSave:protected] => [alreadyInValidation:protected] => [validationFailures:protected] => Array ( ) [_new:BaseObject:private] => [_deleted:BaseObject:private] => [modifiedColumns:protected] => Array ( ) ) [77] => Category Object ( [languages:protected] => [bok_resources:protected] => [bok_topics:protected] => [bok_keywords:protected] => [id:protected] => 77 [type:protected] => category [parent:protected] => 2 [label:protected] => Refractory Worker [alreadyInSave:protected] => [alreadyInValidation:protected] => [validationFailures:protected] => Array ( ) [_new:BaseObject:private] => [_deleted:BaseObject:private] => [modifiedColumns:protected] => Array ( ) ) [63] => Category Object ( [languages:protected] => [bok_resources:protected] => [bok_topics:protected] => [bok_keywords:protected] => [id:protected] => 63 [type:protected] => category [parent:protected] => 2 [label:protected] => Reinforcing Ironworker [alreadyInSave:protected] => [alreadyInValidation:protected] => [validationFailures:protected] => Array ( ) [_new:BaseObject:private] => [_deleted:BaseObject:private] => [modifiedColumns:protected] => Array ( ) ) [78] => Category Object ( [languages:protected] => [bok_resources:protected] => [bok_topics:protected] => [bok_keywords:protected] => [id:protected] => 78 [type:protected] => category [parent:protected] => 2 [label:protected] => Roofer/Waterproofer [alreadyInSave:protected] => [alreadyInValidation:protected] => [validationFailures:protected] => Array ( ) [_new:BaseObject:private] => [_deleted:BaseObject:private] => [modifiedColumns:protected] => Array ( ) ) [79] => Category Object ( [languages:protected] => [bok_resources:protected] => [bok_topics:protected] => [bok_keywords:protected] => [id:protected] => 79 [type:protected] => category [parent:protected] => 2 [label:protected] => Scaffold Erector [alreadyInSave:protected] => [alreadyInValidation:protected] => [validationFailures:protected] => Array ( ) [_new:BaseObject:private] => [_deleted:BaseObject:private] => [modifiedColumns:protected] => Array ( ) ) [80] => Category Object ( [languages:protected] => [bok_resources:protected] => [bok_topics:protected] => [bok_keywords:protected] => [id:protected] => 80 [type:protected] => category [parent:protected] => 2 [label:protected] => Sheetmetal Worker [alreadyInSave:protected] => [alreadyInValidation:protected] => [validationFailures:protected] => Array ( ) [_new:BaseObject:private] => [_deleted:BaseObject:private] => [modifiedColumns:protected] => Array ( ) ) [81] => Category Object ( [languages:protected] => [bok_resources:protected] => [bok_topics:protected] => [bok_keywords:protected] => [id:protected] => 81 [type:protected] => category [parent:protected] => 2 [label:protected] => Sprinkler Fitter [alreadyInSave:protected] => [alreadyInValidation:protected] => [validationFailures:protected] => Array ( ) [_new:BaseObject:private] => [_deleted:BaseObject:private] => [modifiedColumns:protected] => Array ( ) ) [82] => Category Object ( [languages:protected] => [bok_resources:protected] => [bok_topics:protected] => [bok_keywords:protected] => [id:protected] => 82 [type:protected] => category [parent:protected] => 2 [label:protected] => Stonemason [alreadyInSave:protected] => [alreadyInValidation:protected] => [validationFailures:protected] => Array ( ) [_new:BaseObject:private] => [_deleted:BaseObject:private] => [modifiedColumns:protected] => Array ( ) ) [62] => Category Object ( [languages:protected] => [bok_resources:protected] => [bok_topics:protected] => [bok_keywords:protected] => [id:protected] => 62 [type:protected] => category [parent:protected] => 2 [label:protected] => Structural Ironworker [alreadyInSave:protected] => [alreadyInValidation:protected] => [validationFailures:protected] => Array ( ) [_new:BaseObject:private] => [_deleted:BaseObject:private] => [modifiedColumns:protected] => Array ( ) ) [83] => Category Object ( [languages:protected] => [bok_resources:protected] => [bok_topics:protected] => [bok_keywords:protected] => [id:protected] => 83 [type:protected] => category [parent:protected] => 2 [label:protected] => Terrazzo Worker [alreadyInSave:protected] => [alreadyInValidation:protected] => [validationFailures:protected] => Array ( ) [_new:BaseObject:private] => [_deleted:BaseObject:private] => [modifiedColumns:protected] => Array ( ) ) [84] => Category Object ( [languages:protected] => [bok_resources:protected] => [bok_topics:protected] => [bok_keywords:protected] => [id:protected] => 84 [type:protected] => category [parent:protected] => 2 [label:protected] => Tile Setter [alreadyInSave:protected] => [alreadyInValidation:protected] => [validationFailures:protected] => Array ( ) [_new:BaseObject:private] => [_deleted:BaseObject:private] => [modifiedColumns:protected] => Array ( ) ) [85] => Category Object ( [languages:protected] => [bok_resources:protected] => [bok_topics:protected] => [bok_keywords:protected] => [id:protected] => 85 [type:protected] => category [parent:protected] => 2 [label:protected] => Truck Driver [alreadyInSave:protected] => [alreadyInValidation:protected] => [validationFailures:protected] => Array ( ) [_new:BaseObject:private] => [_deleted:BaseObject:private] => [modifiedColumns:protected] => Array ( ) ) [86] => Category Object ( [languages:protected] => [bok_resources:protected] => [bok_topics:protected] => [bok_keywords:protected] => [id:protected] => 86 [type:protected] => category [parent:protected] => 2 [label:protected] => Welder [alreadyInSave:protected] => [alreadyInValidation:protected] => [validationFailures:protected] => Array ( ) [_new:BaseObject:private] => [_deleted:BaseObject:private] => [modifiedColumns:protected] => Array ( ) ) [87] => Category Object ( [languages:protected] => [bok_resources:protected] => [bok_topics:protected] => [bok_keywords:protected] => [id:protected] => 87 [type:protected] => category [parent:protected] => 3 [label:protected] => Commercial & Institutional [alreadyInSave:protected] => [alreadyInValidation:protected] => [validationFailures:protected] => Array ( ) [_new:BaseObject:private] => [_deleted:BaseObject:private] => [modifiedColumns:protected] => Array ( ) ) [88] => Category Object ( [languages:protected] => [bok_resources:protected] => [bok_topics:protected] => [bok_keywords:protected] => [id:protected] => 88 [type:protected] => category [parent:protected] => 3 [label:protected] => Demolition [alreadyInSave:protected] => [alreadyInValidation:protected] => [validationFailures:protected] => Array ( ) [_new:BaseObject:private] => [_deleted:BaseObject:private] => [modifiedColumns:protected] => Array ( ) ) [89] => Category Object ( [languages:protected] => [bok_resources:protected] => [bok_topics:protected] => [bok_keywords:protected] => [id:protected] => 89 [type:protected] => category [parent:protected] => 3 [label:protected] => Disasters [alreadyInSave:protected] => [alreadyInValidation:protected] => [validationFailures:protected] => Array ( ) [_new:BaseObject:private] => [_deleted:BaseObject:private] => [modifiedColumns:protected] => Array ( ) ) [91] => Category Object ( [languages:protected] => [bok_resources:protected] => [bok_topics:protected] => [bok_keywords:protected] => [id:protected] => 91 [type:protected] => category [parent:protected] => 3 [label:protected] => Heavy & Highway [alreadyInSave:protected] => [alreadyInValidation:protected] => [validationFailures:protected] => Array ( ) [_new:BaseObject:private] => [_deleted:BaseObject:private] => [modifiedColumns:protected] => Array ( ) ) [90] => Category Object ( [languages:protected] => [bok_resources:protected] => [bok_topics:protected] => [bok_keywords:protected] => [id:protected] => 90 [type:protected] => category [parent:protected] => 3 [label:protected] => Industrial [alreadyInSave:protected] => [alreadyInValidation:protected] => [validationFailures:protected] => Array ( ) [_new:BaseObject:private] => [_deleted:BaseObject:private] => [modifiedColumns:protected] => Array ( ) ) [92] => Category Object ( [languages:protected] => [bok_resources:protected] => [bok_topics:protected] => [bok_keywords:protected] => [id:protected] => 92 [type:protected] => category [parent:protected] => 3 [label:protected] => LEED/Green Construction [alreadyInSave:protected] => [alreadyInValidation:protected] => [validationFailures:protected] => Array ( ) [_new:BaseObject:private] => [_deleted:BaseObject:private] => [modifiedColumns:protected] => Array ( ) ) [93] => Category Object ( [languages:protected] => [bok_resources:protected] => [bok_topics:protected] => [bok_keywords:protected] => [id:protected] => 93 [type:protected] => category [parent:protected] => 3 [label:protected] => Renovations [alreadyInSave:protected] => [alreadyInValidation:protected] => [validationFailures:protected] => Array ( ) [_new:BaseObject:private] => [_deleted:BaseObject:private] => [modifiedColumns:protected] => Array ( ) ) [94] => Category Object ( [languages:protected] => [bok_resources:protected] => [bok_topics:protected] => [bok_keywords:protected] => [id:protected] => 94 [type:protected] => category [parent:protected] => 3 [label:protected] => Residential [alreadyInSave:protected] => [alreadyInValidation:protected] => [validationFailures:protected] => Array ( ) [_new:BaseObject:private] => [_deleted:BaseObject:private] => [modifiedColumns:protected] => Array ( ) ) [95] => Category Object ( [languages:protected] => [bok_resources:protected] => [bok_topics:protected] => [bok_keywords:protected] => [id:protected] => 95 [type:protected] => category [parent:protected] => 3 [label:protected] => Underground [alreadyInSave:protected] => [alreadyInValidation:protected] => [validationFailures:protected] => Array ( ) [_new:BaseObject:private] => [_deleted:BaseObject:private] => [modifiedColumns:protected] => Array ( ) ) ) [categories_initialized:protected] => 1 [mapped_items:protected] => [content:protected] => [files:protected] => [language:protected] => Language Object ( [id:protected] => 1 [code:protected] => en [name:protected] => English [alreadyInSave:protected] => [alreadyInValidation:protected] => [validationFailures:protected] => Array ( ) [_new:BaseObject:private] => [_deleted:BaseObject:private] => [modifiedColumns:protected] => Array ( ) ) [old_record:protected] => [id:protected] => 4426 [old_id:protected] => [elcosh_id:protected] => d001656 [type:protected] => document [display_type:protected] => HTML only (and links) [user_id:protected] => 0 [language_id:protected] => 1 [tagging_id:protected] => Mike Aguilar [priority_id:protected] => 1 [title:protected] => Construction Dive -- DeWalt's Jobsite Pro headphones recalled for fire hazards [total_pages:protected] => 1 [billed_pages:protected] => 1 [publication_number:protected] => [part_of:protected] => [keywords:protected] => DeWalt, Fire Hazards, recall, headphones [comments:protected] => [summary:protected] => A recall notice by the United States Consumer Product Safety Commission affects over 300,000 DeWalt Jobsite Pro Headphones. The recall is a result of a malfunction that can cause earbuds to overheat while charging or during use, leading to fire and burn hazards. [transition_comments:protected] => [external_link:protected] => https://www.constructiondive.com/news/dewalts-jobsite-pro-headphones-recalled-for-fire-hazards/611248/?utm_source=Sailthru&utm_medium=email&utm_campaign=Issue:%202021-12-10%20Construction%20Dive%20Newsletter%20%5Bissue:38532%5D&utm_term=Construction%20Dive [consol_link:protected] => [more_like_this:protected] => [permission_given_by:protected] => [published:protected] => T [billable:protected] => F [img_name:protected] => [img_ext:protected] => [img_width:protected] => [img_height:protected] => [img_credit:protected] => [img_practice:protected] => [vid_source_id:protected] => [vid_running_time:protected] => [vid_intended_audience:protected] => [vid_acquisition_info:protected] => [vid_cost:protected] => [vid_producer:protected] => [vid_filename:protected] => [vid_filename_downloadable:protected] => [date_summary:protected] => [date_permission_requested:protected] => [date_permission_received:protected] => [date_review_needed:protected] => [date_received:protected] => 12/13/21 [date_completed:protected] => 12/13/21 [date_billed:protected] => [date_modified:protected] => 12/13/21 [collBokExports:protected] => [lastBokExportCriteria:BaseElcoshItem:private] => [alreadyInSave:protected] => [alreadyInValidation:protected] => [validationFailures:protected] => Array ( ) [_new:BaseObject:private] => [_deleted:BaseObject:private] => [modifiedColumns:protected] => Array ( ) ) ) [3] => Search_Result Object ( [title] => Working in an Enclosed Cab [image] => /record/images/notavailable-p.png [blurb] => This CPWR Hazard Alert on Working in enclosed cabs provides information on protecting workers from silica dust, how to minimize exposures and the dang... [category] => Array ( [0] => 10 [1] => 16 [2] => 24 [3] => 37 [4] => 46 [5] => 48 [6] => 49 [7] => 51 [8] => 53 [9] => 54 [10] => 56 [11] => 58 [12] => 59 [13] => 60 [14] => 61 [15] => 64 [16] => 66 [17] => 68 [18] => 69 [19] => 71 [20] => 73 [21] => 74 [22] => 76 [23] => 77 [24] => 63 [25] => 80 [26] => 82 [27] => 62 [28] => 83 [29] => 84 [30] => 86 [31] => 88 [32] => 89 [33] => 95 [34] => 102 ) [labels] => Array ( [0] => Confined Spaces [1] => Work Environment [2] => Hazards [3] => Fire & Explosions [6] => Trenches & Excavations [9] => Silica /Construction Dust [10] => Inhalation/Skin Exposures [12] => Boilermaker [13] => Trades [14] => Cabinetmaker [16] => Carpenter [18] => Cement Mason [20] => Concrete Polisher [22] => Drywall Applicator Specialist [24] => Elevator Constructor [26] => Glazier [28] => Hazardous Waste Cleanup [30] => HVAC [32] => Interior Systems Carpenter [34] => Laborer [36] => Lather [38] => Maintenance Worker [40] => Millwright [42] => Painter [44] => PCC/Restoration [46] => Pile Driver [48] => Plumber/Pipefitter [50] => Refractory Worker [52] => Reinforcing Ironworker [54] => Sheetmetal Worker [56] => Stonemason [58] => Structural Ironworker [60] => Terrazzo Worker [62] => Tile Setter [64] => Welder [66] => Demolition [67] => Jobsites [68] => Disasters [70] => Underground [72] => Handouts [73] => Documents [74] => Media & Documents ) [type] => Handouts [sub_category] => [url] => /document/4415/d001651/Working%2Bin%2Ban%2BEnclosed%2BCab.html [item:protected] => DocumentRecord Object ( [records:protected] => Array ( ) [recordId:protected] => [searchWordClass:protected] => [searchWordPeerClass:protected] => [bok_record:protected] => [authors:protected] => [organizations:protected] => [collections:protected] => [categories:protected] => Array ( [10] => Category Object ( [languages:protected] => [bok_resources:protected] => [bok_topics:protected] => [bok_keywords:protected] => [id:protected] => 10 [type:protected] => category [parent:protected] => 7 [label:protected] => Confined Spaces [alreadyInSave:protected] => [alreadyInValidation:protected] => [validationFailures:protected] => Array ( ) [_new:BaseObject:private] => [_deleted:BaseObject:private] => [modifiedColumns:protected] => Array ( ) ) [16] => Category Object ( [languages:protected] => [bok_resources:protected] => [bok_topics:protected] => [bok_keywords:protected] => [id:protected] => 16 [type:protected] => category [parent:protected] => 7 [label:protected] => Fire & Explosions [alreadyInSave:protected] => [alreadyInValidation:protected] => [validationFailures:protected] => Array ( ) [_new:BaseObject:private] => [_deleted:BaseObject:private] => [modifiedColumns:protected] => Array ( ) ) [24] => Category Object ( [languages:protected] => [bok_resources:protected] => [bok_topics:protected] => [bok_keywords:protected] => [id:protected] => 24 [type:protected] => category [parent:protected] => 7 [label:protected] => Trenches & Excavations [alreadyInSave:protected] => [alreadyInValidation:protected] => [validationFailures:protected] => Array ( ) [_new:BaseObject:private] => [_deleted:BaseObject:private] => [modifiedColumns:protected] => Array ( ) ) [37] => Category Object ( [languages:protected] => [bok_resources:protected] => [bok_topics:protected] => [bok_keywords:protected] => [id:protected] => 37 [type:protected] => category [parent:protected] => 8 [label:protected] => Silica /Construction Dust [alreadyInSave:protected] => [alreadyInValidation:protected] => [validationFailures:protected] => Array ( ) [_new:BaseObject:private] => [_deleted:BaseObject:private] => [modifiedColumns:protected] => Array ( ) ) [46] => Category Object ( [languages:protected] => [bok_resources:protected] => [bok_topics:protected] => [bok_keywords:protected] => [id:protected] => 46 [type:protected] => category [parent:protected] => 2 [label:protected] => Boilermaker [alreadyInSave:protected] => [alreadyInValidation:protected] => [validationFailures:protected] => Array ( ) [_new:BaseObject:private] => [_deleted:BaseObject:private] => [modifiedColumns:protected] => Array ( ) ) [48] => Category Object ( [languages:protected] => [bok_resources:protected] => [bok_topics:protected] => [bok_keywords:protected] => [id:protected] => 48 [type:protected] => category [parent:protected] => 2 [label:protected] => Cabinetmaker [alreadyInSave:protected] => [alreadyInValidation:protected] => [validationFailures:protected] => Array ( ) [_new:BaseObject:private] => [_deleted:BaseObject:private] => [modifiedColumns:protected] => Array ( ) ) [49] => Category Object ( [languages:protected] => [bok_resources:protected] => [bok_topics:protected] => [bok_keywords:protected] => [id:protected] => 49 [type:protected] => category [parent:protected] => 2 [label:protected] => Carpenter [alreadyInSave:protected] => [alreadyInValidation:protected] => [validationFailures:protected] => Array ( ) [_new:BaseObject:private] => [_deleted:BaseObject:private] => [modifiedColumns:protected] => Array ( ) ) [51] => Category Object ( [languages:protected] => [bok_resources:protected] => [bok_topics:protected] => [bok_keywords:protected] => [id:protected] => 51 [type:protected] => category [parent:protected] => 2 [label:protected] => Cement Mason [alreadyInSave:protected] => [alreadyInValidation:protected] => [validationFailures:protected] => Array ( ) [_new:BaseObject:private] => [_deleted:BaseObject:private] => [modifiedColumns:protected] => Array ( ) ) [53] => Category Object ( [languages:protected] => [bok_resources:protected] => [bok_topics:protected] => [bok_keywords:protected] => [id:protected] => 53 [type:protected] => category [parent:protected] => 2 [label:protected] => Concrete Polisher [alreadyInSave:protected] => [alreadyInValidation:protected] => [validationFailures:protected] => Array ( ) [_new:BaseObject:private] => [_deleted:BaseObject:private] => [modifiedColumns:protected] => Array ( ) ) [54] => Category Object ( [languages:protected] => [bok_resources:protected] => [bok_topics:protected] => [bok_keywords:protected] => [id:protected] => 54 [type:protected] => category [parent:protected] => 2 [label:protected] => Drywall Applicator Specialist [alreadyInSave:protected] => [alreadyInValidation:protected] => [validationFailures:protected] => Array ( ) [_new:BaseObject:private] => [_deleted:BaseObject:private] => [modifiedColumns:protected] => Array ( ) ) [56] => Category Object ( [languages:protected] => [bok_resources:protected] => [bok_topics:protected] => [bok_keywords:protected] => [id:protected] => 56 [type:protected] => category [parent:protected] => 2 [label:protected] => Elevator Constructor [alreadyInSave:protected] => [alreadyInValidation:protected] => [validationFailures:protected] => Array ( ) [_new:BaseObject:private] => [_deleted:BaseObject:private] => [modifiedColumns:protected] => Array ( ) ) [58] => Category Object ( [languages:protected] => [bok_resources:protected] => [bok_topics:protected] => [bok_keywords:protected] => [id:protected] => 58 [type:protected] => category [parent:protected] => 2 [label:protected] => Glazier [alreadyInSave:protected] => [alreadyInValidation:protected] => [validationFailures:protected] => Array ( ) [_new:BaseObject:private] => [_deleted:BaseObject:private] => [modifiedColumns:protected] => Array ( ) ) [59] => Category Object ( [languages:protected] => [bok_resources:protected] => [bok_topics:protected] => [bok_keywords:protected] => [id:protected] => 59 [type:protected] => category [parent:protected] => 2 [label:protected] => Hazardous Waste Cleanup [alreadyInSave:protected] => [alreadyInValidation:protected] => [validationFailures:protected] => Array ( ) [_new:BaseObject:private] => [_deleted:BaseObject:private] => [modifiedColumns:protected] => Array ( ) ) [60] => Category Object ( [languages:protected] => [bok_resources:protected] => [bok_topics:protected] => [bok_keywords:protected] => [id:protected] => 60 [type:protected] => category [parent:protected] => 2 [label:protected] => HVAC [alreadyInSave:protected] => [alreadyInValidation:protected] => [validationFailures:protected] => Array ( ) [_new:BaseObject:private] => [_deleted:BaseObject:private] => [modifiedColumns:protected] => Array ( ) ) [61] => Category Object ( [languages:protected] => [bok_resources:protected] => [bok_topics:protected] => [bok_keywords:protected] => [id:protected] => 61 [type:protected] => category [parent:protected] => 2 [label:protected] => Interior Systems Carpenter [alreadyInSave:protected] => [alreadyInValidation:protected] => [validationFailures:protected] => Array ( ) [_new:BaseObject:private] => [_deleted:BaseObject:private] => [modifiedColumns:protected] => Array ( ) ) [64] => Category Object ( [languages:protected] => [bok_resources:protected] => [bok_topics:protected] => [bok_keywords:protected] => [id:protected] => 64 [type:protected] => category [parent:protected] => 2 [label:protected] => Laborer [alreadyInSave:protected] => [alreadyInValidation:protected] => [validationFailures:protected] => Array ( ) [_new:BaseObject:private] => [_deleted:BaseObject:private] => [modifiedColumns:protected] => Array ( ) ) [66] => Category Object ( [languages:protected] => [bok_resources:protected] => [bok_topics:protected] => [bok_keywords:protected] => [id:protected] => 66 [type:protected] => category [parent:protected] => 2 [label:protected] => Lather [alreadyInSave:protected] => [alreadyInValidation:protected] => [validationFailures:protected] => Array ( ) [_new:BaseObject:private] => [_deleted:BaseObject:private] => [modifiedColumns:protected] => Array ( ) ) [68] => Category Object ( [languages:protected] => [bok_resources:protected] => [bok_topics:protected] => [bok_keywords:protected] => [id:protected] => 68 [type:protected] => category [parent:protected] => 2 [label:protected] => Maintenance Worker [alreadyInSave:protected] => [alreadyInValidation:protected] => [validationFailures:protected] => Array ( ) [_new:BaseObject:private] => [_deleted:BaseObject:private] => [modifiedColumns:protected] => Array ( ) ) [69] => Category Object ( [languages:protected] => [bok_resources:protected] => [bok_topics:protected] => [bok_keywords:protected] => [id:protected] => 69 [type:protected] => category [parent:protected] => 2 [label:protected] => Millwright [alreadyInSave:protected] => [alreadyInValidation:protected] => [validationFailures:protected] => Array ( ) [_new:BaseObject:private] => [_deleted:BaseObject:private] => [modifiedColumns:protected] => Array ( ) ) [71] => Category Object ( [languages:protected] => [bok_resources:protected] => [bok_topics:protected] => [bok_keywords:protected] => [id:protected] => 71 [type:protected] => category [parent:protected] => 2 [label:protected] => Painter [alreadyInSave:protected] => [alreadyInValidation:protected] => [validationFailures:protected] => Array ( ) [_new:BaseObject:private] => [_deleted:BaseObject:private] => [modifiedColumns:protected] => Array ( ) ) [73] => Category Object ( [languages:protected] => [bok_resources:protected] => [bok_topics:protected] => [bok_keywords:protected] => [id:protected] => 73 [type:protected] => category [parent:protected] => 2 [label:protected] => PCC/Restoration [alreadyInSave:protected] => [alreadyInValidation:protected] => [validationFailures:protected] => Array ( ) [_new:BaseObject:private] => [_deleted:BaseObject:private] => [modifiedColumns:protected] => Array ( ) ) [74] => Category Object ( [languages:protected] => [bok_resources:protected] => [bok_topics:protected] => [bok_keywords:protected] => [id:protected] => 74 [type:protected] => category [parent:protected] => 2 [label:protected] => Pile Driver [alreadyInSave:protected] => [alreadyInValidation:protected] => [validationFailures:protected] => Array ( ) [_new:BaseObject:private] => [_deleted:BaseObject:private] => [modifiedColumns:protected] => Array ( ) ) [76] => Category Object ( [languages:protected] => [bok_resources:protected] => [bok_topics:protected] => [bok_keywords:protected] => [id:protected] => 76 [type:protected] => category [parent:protected] => 2 [label:protected] => Plumber/Pipefitter [alreadyInSave:protected] => [alreadyInValidation:protected] => [validationFailures:protected] => Array ( ) [_new:BaseObject:private] => [_deleted:BaseObject:private] => [modifiedColumns:protected] => Array ( ) ) [77] => Category Object ( [languages:protected] => [bok_resources:protected] => [bok_topics:protected] => [bok_keywords:protected] => [id:protected] => 77 [type:protected] => category [parent:protected] => 2 [label:protected] => Refractory Worker [alreadyInSave:protected] => [alreadyInValidation:protected] => [validationFailures:protected] => Array ( ) [_new:BaseObject:private] => [_deleted:BaseObject:private] => [modifiedColumns:protected] => Array ( ) ) [63] => Category Object ( [languages:protected] => [bok_resources:protected] => [bok_topics:protected] => [bok_keywords:protected] => [id:protected] => 63 [type:protected] => category [parent:protected] => 2 [label:protected] => Reinforcing Ironworker [alreadyInSave:protected] => [alreadyInValidation:protected] => [validationFailures:protected] => Array ( ) [_new:BaseObject:private] => [_deleted:BaseObject:private] => [modifiedColumns:protected] => Array ( ) ) [80] => Category Object ( [languages:protected] => [bok_resources:protected] => [bok_topics:protected] => [bok_keywords:protected] => [id:protected] => 80 [type:protected] => category [parent:protected] => 2 [label:protected] => Sheetmetal Worker [alreadyInSave:protected] => [alreadyInValidation:protected] => [validationFailures:protected] => Array ( ) [_new:BaseObject:private] => [_deleted:BaseObject:private] => [modifiedColumns:protected] => Array ( ) ) [82] => Category Object ( [languages:protected] => [bok_resources:protected] => [bok_topics:protected] => [bok_keywords:protected] => [id:protected] => 82 [type:protected] => category [parent:protected] => 2 [label:protected] => Stonemason [alreadyInSave:protected] => [alreadyInValidation:protected] => [validationFailures:protected] => Array ( ) [_new:BaseObject:private] => [_deleted:BaseObject:private] => [modifiedColumns:protected] => Array ( ) ) [62] => Category Object ( [languages:protected] => [bok_resources:protected] => [bok_topics:protected] => [bok_keywords:protected] => [id:protected] => 62 [type:protected] => category [parent:protected] => 2 [label:protected] => Structural Ironworker [alreadyInSave:protected] => [alreadyInValidation:protected] => [validationFailures:protected] => Array ( ) [_new:BaseObject:private] => [_deleted:BaseObject:private] => [modifiedColumns:protected] => Array ( ) ) [83] => Category Object ( [languages:protected] => [bok_resources:protected] => [bok_topics:protected] => [bok_keywords:protected] => [id:protected] => 83 [type:protected] => category [parent:protected] => 2 [label:protected] => Terrazzo Worker [alreadyInSave:protected] => [alreadyInValidation:protected] => [validationFailures:protected] => Array ( ) [_new:BaseObject:private] => [_deleted:BaseObject:private] => [modifiedColumns:protected] => Array ( ) ) [84] => Category Object ( [languages:protected] => [bok_resources:protected] => [bok_topics:protected] => [bok_keywords:protected] => [id:protected] => 84 [type:protected] => category [parent:protected] => 2 [label:protected] => Tile Setter [alreadyInSave:protected] => [alreadyInValidation:protected] => [validationFailures:protected] => Array ( ) [_new:BaseObject:private] => [_deleted:BaseObject:private] => [modifiedColumns:protected] => Array ( ) ) [86] => Category Object ( [languages:protected] => [bok_resources:protected] => [bok_topics:protected] => [bok_keywords:protected] => [id:protected] => 86 [type:protected] => category [parent:protected] => 2 [label:protected] => Welder [alreadyInSave:protected] => [alreadyInValidation:protected] => [validationFailures:protected] => Array ( ) [_new:BaseObject:private] => [_deleted:BaseObject:private] => [modifiedColumns:protected] => Array ( ) ) [88] => Category Object ( [languages:protected] => [bok_resources:protected] => [bok_topics:protected] => [bok_keywords:protected] => [id:protected] => 88 [type:protected] => category [parent:protected] => 3 [label:protected] => Demolition [alreadyInSave:protected] => [alreadyInValidation:protected] => [validationFailures:protected] => Array ( ) [_new:BaseObject:private] => [_deleted:BaseObject:private] => [modifiedColumns:protected] => Array ( ) ) [89] => Category Object ( [languages:protected] => [bok_resources:protected] => [bok_topics:protected] => [bok_keywords:protected] => [id:protected] => 89 [type:protected] => category [parent:protected] => 3 [label:protected] => Disasters [alreadyInSave:protected] => [alreadyInValidation:protected] => [validationFailures:protected] => Array ( ) [_new:BaseObject:private] => [_deleted:BaseObject:private] => [modifiedColumns:protected] => Array ( ) ) [95] => Category Object ( [languages:protected] => [bok_resources:protected] => [bok_topics:protected] => [bok_keywords:protected] => [id:protected] => 95 [type:protected] => category [parent:protected] => 3 [label:protected] => Underground [alreadyInSave:protected] => [alreadyInValidation:protected] => [validationFailures:protected] => Array ( ) [_new:BaseObject:private] => [_deleted:BaseObject:private] => [modifiedColumns:protected] => Array ( ) ) [102] => Category Object ( [languages:protected] => [bok_resources:protected] => [bok_topics:protected] => [bok_keywords:protected] => [id:protected] => 102 [type:protected] => category [parent:protected] => 6 [label:protected] => Handouts [alreadyInSave:protected] => [alreadyInValidation:protected] => [validationFailures:protected] => Array ( ) [_new:BaseObject:private] => [_deleted:BaseObject:private] => [modifiedColumns:protected] => Array ( ) ) ) [categories_initialized:protected] => 1 [mapped_items:protected] => [content:protected] => [files:protected] => [language:protected] => Language Object ( [id:protected] => 1 [code:protected] => en [name:protected] => English [alreadyInSave:protected] => [alreadyInValidation:protected] => [validationFailures:protected] => Array ( ) [_new:BaseObject:private] => [_deleted:BaseObject:private] => [modifiedColumns:protected] => Array ( ) ) [old_record:protected] => [id:protected] => 4415 [old_id:protected] => [elcosh_id:protected] => d001651 [type:protected] => document [display_type:protected] => HTML only (and links) [user_id:protected] => 0 [language_id:protected] => 1 [tagging_id:protected] => Valeria Contreras [priority_id:protected] => 1 [title:protected] => Working in an Enclosed Cab [total_pages:protected] => 1 [billed_pages:protected] => 1 [publication_number:protected] => [part_of:protected] => [keywords:protected] => Occupation, construction, safety, health, hazards, work, worker, workplace, OSHA, silicosis, mining, silica, DOE, EEOICPA, labor, lung, CBD, dust, cab, miner, mine [comments:protected] => [summary:protected] => This CPWR Hazard Alert on Working in enclosed cabs provides information on protecting workers from silica dust, how to minimize exposures and the dangers of silica dust. Click on the following links to access the English version and the Spanish version. [transition_comments:protected] => [external_link:protected] => [consol_link:protected] => [more_like_this:protected] => [permission_given_by:protected] => [published:protected] => T [billable:protected] => F [img_name:protected] => [img_ext:protected] => [img_width:protected] => [img_height:protected] => [img_credit:protected] => [img_practice:protected] => [vid_source_id:protected] => [vid_running_time:protected] => [vid_intended_audience:protected] => [vid_acquisition_info:protected] => [vid_cost:protected] => [vid_producer:protected] => [vid_filename:protected] => [vid_filename_downloadable:protected] => [date_summary:protected] => [date_permission_requested:protected] => [date_permission_received:protected] => [date_review_needed:protected] => [date_received:protected] => 10/08/20 [date_completed:protected] => 10/08/20 [date_billed:protected] => [date_modified:protected] => 10/08/20 [collBokExports:protected] => [lastBokExportCriteria:BaseElcoshItem:private] => [alreadyInSave:protected] => [alreadyInValidation:protected] => [validationFailures:protected] => Array ( ) [_new:BaseObject:private] => [_deleted:BaseObject:private] => [modifiedColumns:protected] => Array ( ) ) ) [4] => Search_Result Object ( [title] => Toolbox Talk: Suicide Prevention [image] => /record/images/notavailable-p.png [blurb] => The CPWR Toolbox Talk on Suicide Prevention addresses the prevalence of suicide among construction workers. The resource includes a brief case example... [category] => Array ( [0] => 13 [1] => 20 [2] => 23 [3] => 40 [4] => 44 [5] => 45 [6] => 46 [7] => 47 [8] => 48 [9] => 49 [10] => 50 [11] => 51 [12] => 52 [13] => 53 [14] => 54 [15] => 55 [16] => 56 [17] => 57 [18] => 58 [19] => 59 [20] => 60 [21] => 61 [22] => 64 [23] => 65 [24] => 66 [25] => 67 [26] => 68 [27] => 69 [28] => 70 [29] => 71 [30] => 72 [31] => 73 [32] => 74 [33] => 75 [34] => 76 [35] => 77 [36] => 63 [37] => 78 [38] => 79 [39] => 80 [40] => 81 [41] => 82 [42] => 62 [43] => 83 [44] => 84 [45] => 85 [46] => 86 [47] => 87 [48] => 88 [49] => 89 [50] => 91 [51] => 90 [52] => 92 [53] => 93 [54] => 94 [55] => 95 [56] => 100 ) [labels] => Array ( [0] => Drugs, Alcohol & Tobacco [1] => Work Environment [2] => Hazards [3] => Safety Culture [6] => Stress & Overtime [9] => Overexertion [10] => Ergonomic [12] => Acoustical Ceiling Carpenter [13] => Trades [14] => Asbestos/Insulator [16] => Boilermaker [18] => Bricklayer [20] => Cabinetmaker [22] => Carpenter [24] => Carpet Layer [26] => Cement Mason [28] => Commercial Diver [30] => Concrete Polisher [32] => Drywall Applicator Specialist [34] => Electrical Worker [36] => Elevator Constructor [38] => Flagger [40] => Glazier [42] => Hazardous Waste Cleanup [44] => HVAC [46] => Interior Systems Carpenter [48] => Laborer [50] => Landscaper [52] => Lather [54] => Lead Abatement Worker [56] => Maintenance Worker [58] => Millwright [60] => Operating Engineer [62] => Painter [64] => Paper Hanger [66] => PCC/Restoration [68] => Pile Driver [70] => Plasterer [72] => Plumber/Pipefitter [74] => Refractory Worker [76] => Reinforcing Ironworker [78] => Roofer/Waterproofer [80] => Scaffold Erector [82] => Sheetmetal Worker [84] => Sprinkler Fitter [86] => Stonemason [88] => Structural Ironworker [90] => Terrazzo Worker [92] => Tile Setter [94] => Truck Driver [96] => Welder [98] => Commercial & Institutional [99] => Jobsites [100] => Demolition [102] => Disasters [104] => Heavy & Highway [106] => Industrial [108] => LEED/Green Construction [110] => Renovations [112] => Residential [114] => Underground [116] => Toolbox Talks [117] => Documents [118] => Media & Documents ) [type] => Toolbox Talks [sub_category] => [url] => /document/4419/d001652/Toolbox%2BTalk%253A%2BSuicide%2BPrevention.html [item:protected] => DocumentRecord Object ( [records:protected] => Array ( ) [recordId:protected] => [searchWordClass:protected] => [searchWordPeerClass:protected] => [bok_record:protected] => [authors:protected] => [organizations:protected] => [collections:protected] => [categories:protected] => Array ( [13] => Category Object ( [languages:protected] => [bok_resources:protected] => [bok_topics:protected] => [bok_keywords:protected] => [id:protected] => 13 [type:protected] => category [parent:protected] => 7 [label:protected] => Drugs, Alcohol & Tobacco [alreadyInSave:protected] => [alreadyInValidation:protected] => [validationFailures:protected] => Array ( ) [_new:BaseObject:private] => [_deleted:BaseObject:private] => [modifiedColumns:protected] => Array ( ) ) [20] => Category Object ( [languages:protected] => [bok_resources:protected] => [bok_topics:protected] => [bok_keywords:protected] => [id:protected] => 20 [type:protected] => category [parent:protected] => 7 [label:protected] => Safety Culture [alreadyInSave:protected] => [alreadyInValidation:protected] => [validationFailures:protected] => Array ( ) [_new:BaseObject:private] => [_deleted:BaseObject:private] => [modifiedColumns:protected] => Array ( ) ) [23] => Category Object ( [languages:protected] => [bok_resources:protected] => [bok_topics:protected] => [bok_keywords:protected] => [id:protected] => 23 [type:protected] => category [parent:protected] => 7 [label:protected] => Stress & Overtime [alreadyInSave:protected] => [alreadyInValidation:protected] => [validationFailures:protected] => Array ( ) [_new:BaseObject:private] => [_deleted:BaseObject:private] => [modifiedColumns:protected] => Array ( ) ) [40] => Category Object ( [languages:protected] => [bok_resources:protected] => [bok_topics:protected] => [bok_keywords:protected] => [id:protected] => 40 [type:protected] => category [parent:protected] => 9 [label:protected] => Overexertion [alreadyInSave:protected] => [alreadyInValidation:protected] => [validationFailures:protected] => Array ( ) [_new:BaseObject:private] => [_deleted:BaseObject:private] => [modifiedColumns:protected] => Array ( ) ) [44] => Category Object ( [languages:protected] => [bok_resources:protected] => [bok_topics:protected] => [bok_keywords:protected] => [id:protected] => 44 [type:protected] => category [parent:protected] => 2 [label:protected] => Acoustical Ceiling Carpenter [alreadyInSave:protected] => [alreadyInValidation:protected] => [validationFailures:protected] => Array ( ) [_new:BaseObject:private] => [_deleted:BaseObject:private] => [modifiedColumns:protected] => Array ( ) ) [45] => Category Object ( [languages:protected] => [bok_resources:protected] => [bok_topics:protected] => [bok_keywords:protected] => [id:protected] => 45 [type:protected] => category [parent:protected] => 2 [label:protected] => Asbestos/Insulator [alreadyInSave:protected] => [alreadyInValidation:protected] => [validationFailures:protected] => Array ( ) [_new:BaseObject:private] => [_deleted:BaseObject:private] => [modifiedColumns:protected] => Array ( ) ) [46] => Category Object ( [languages:protected] => [bok_resources:protected] => [bok_topics:protected] => [bok_keywords:protected] => [id:protected] => 46 [type:protected] => category [parent:protected] => 2 [label:protected] => Boilermaker [alreadyInSave:protected] => [alreadyInValidation:protected] => [validationFailures:protected] => Array ( ) [_new:BaseObject:private] => [_deleted:BaseObject:private] => [modifiedColumns:protected] => Array ( ) ) [47] => Category Object ( [languages:protected] => [bok_resources:protected] => [bok_topics:protected] => [bok_keywords:protected] => [id:protected] => 47 [type:protected] => category [parent:protected] => 2 [label:protected] => Bricklayer [alreadyInSave:protected] => [alreadyInValidation:protected] => [validationFailures:protected] => Array ( ) [_new:BaseObject:private] => [_deleted:BaseObject:private] => [modifiedColumns:protected] => Array ( ) ) [48] => Category Object ( [languages:protected] => [bok_resources:protected] => [bok_topics:protected] => [bok_keywords:protected] => [id:protected] => 48 [type:protected] => category [parent:protected] => 2 [label:protected] => Cabinetmaker [alreadyInSave:protected] => [alreadyInValidation:protected] => [validationFailures:protected] => Array ( ) [_new:BaseObject:private] => [_deleted:BaseObject:private] => [modifiedColumns:protected] => Array ( ) ) [49] => Category Object ( [languages:protected] => [bok_resources:protected] => [bok_topics:protected] => [bok_keywords:protected] => [id:protected] => 49 [type:protected] => category [parent:protected] => 2 [label:protected] => Carpenter [alreadyInSave:protected] => [alreadyInValidation:protected] => [validationFailures:protected] => Array ( ) [_new:BaseObject:private] => [_deleted:BaseObject:private] => [modifiedColumns:protected] => Array ( ) ) [50] => Category Object ( [languages:protected] => [bok_resources:protected] => [bok_topics:protected] => [bok_keywords:protected] => [id:protected] => 50 [type:protected] => category [parent:protected] => 2 [label:protected] => Carpet Layer [alreadyInSave:protected] => [alreadyInValidation:protected] => [validationFailures:protected] => Array ( ) [_new:BaseObject:private] => [_deleted:BaseObject:private] => [modifiedColumns:protected] => Array ( ) ) [51] => Category Object ( [languages:protected] => [bok_resources:protected] => [bok_topics:protected] => [bok_keywords:protected] => [id:protected] => 51 [type:protected] => category [parent:protected] => 2 [label:protected] => Cement Mason [alreadyInSave:protected] => [alreadyInValidation:protected] => [validationFailures:protected] => Array ( ) [_new:BaseObject:private] => [_deleted:BaseObject:private] => [modifiedColumns:protected] => Array ( ) ) [52] => Category Object ( [languages:protected] => [bok_resources:protected] => [bok_topics:protected] => [bok_keywords:protected] => [id:protected] => 52 [type:protected] => category [parent:protected] => 2 [label:protected] => Commercial Diver [alreadyInSave:protected] => [alreadyInValidation:protected] => [validationFailures:protected] => Array ( ) [_new:BaseObject:private] => [_deleted:BaseObject:private] => [modifiedColumns:protected] => Array ( ) ) [53] => Category Object ( [languages:protected] => [bok_resources:protected] => [bok_topics:protected] => [bok_keywords:protected] => [id:protected] => 53 [type:protected] => category [parent:protected] => 2 [label:protected] => Concrete Polisher [alreadyInSave:protected] => [alreadyInValidation:protected] => [validationFailures:protected] => Array ( ) [_new:BaseObject:private] => [_deleted:BaseObject:private] => [modifiedColumns:protected] => Array ( ) ) [54] => Category Object ( [languages:protected] => [bok_resources:protected] => [bok_topics:protected] => [bok_keywords:protected] => [id:protected] => 54 [type:protected] => category [parent:protected] => 2 [label:protected] => Drywall Applicator Specialist [alreadyInSave:protected] => [alreadyInValidation:protected] => [validationFailures:protected] => Array ( ) [_new:BaseObject:private] => [_deleted:BaseObject:private] => [modifiedColumns:protected] => Array ( ) ) [55] => Category Object ( [languages:protected] => [bok_resources:protected] => [bok_topics:protected] => [bok_keywords:protected] => [id:protected] => 55 [type:protected] => category [parent:protected] => 2 [label:protected] => Electrical Worker [alreadyInSave:protected] => [alreadyInValidation:protected] => [validationFailures:protected] => Array ( ) [_new:BaseObject:private] => [_deleted:BaseObject:private] => [modifiedColumns:protected] => Array ( ) ) [56] => Category Object ( [languages:protected] => [bok_resources:protected] => [bok_topics:protected] => [bok_keywords:protected] => [id:protected] => 56 [type:protected] => category [parent:protected] => 2 [label:protected] => Elevator Constructor [alreadyInSave:protected] => [alreadyInValidation:protected] => [validationFailures:protected] => Array ( ) [_new:BaseObject:private] => [_deleted:BaseObject:private] => [modifiedColumns:protected] => Array ( ) ) [57] => Category Object ( [languages:protected] => [bok_resources:protected] => [bok_topics:protected] => [bok_keywords:protected] => [id:protected] => 57 [type:protected] => category [parent:protected] => 2 [label:protected] => Flagger [alreadyInSave:protected] => [alreadyInValidation:protected] => [validationFailures:protected] => Array ( ) [_new:BaseObject:private] => [_deleted:BaseObject:private] => [modifiedColumns:protected] => Array ( ) ) [58] => Category Object ( [languages:protected] => [bok_resources:protected] => [bok_topics:protected] => [bok_keywords:protected] => [id:protected] => 58 [type:protected] => category [parent:protected] => 2 [label:protected] => Glazier [alreadyInSave:protected] => [alreadyInValidation:protected] => [validationFailures:protected] => Array ( ) [_new:BaseObject:private] => [_deleted:BaseObject:private] => [modifiedColumns:protected] => Array ( ) ) [59] => Category Object ( [languages:protected] => [bok_resources:protected] => [bok_topics:protected] => [bok_keywords:protected] => [id:protected] => 59 [type:protected] => category [parent:protected] => 2 [label:protected] => Hazardous Waste Cleanup [alreadyInSave:protected] => [alreadyInValidation:protected] => [validationFailures:protected] => Array ( ) [_new:BaseObject:private] => [_deleted:BaseObject:private] => [modifiedColumns:protected] => Array ( ) ) [60] => Category Object ( [languages:protected] => [bok_resources:protected] => [bok_topics:protected] => [bok_keywords:protected] => [id:protected] => 60 [type:protected] => category [parent:protected] => 2 [label:protected] => HVAC [alreadyInSave:protected] => [alreadyInValidation:protected] => [validationFailures:protected] => Array ( ) [_new:BaseObject:private] => [_deleted:BaseObject:private] => [modifiedColumns:protected] => Array ( ) ) [61] => Category Object ( [languages:protected] => [bok_resources:protected] => [bok_topics:protected] => [bok_keywords:protected] => [id:protected] => 61 [type:protected] => category [parent:protected] => 2 [label:protected] => Interior Systems Carpenter [alreadyInSave:protected] => [alreadyInValidation:protected] => [validationFailures:protected] => Array ( ) [_new:BaseObject:private] => [_deleted:BaseObject:private] => [modifiedColumns:protected] => Array ( ) ) [64] => Category Object ( [languages:protected] => [bok_resources:protected] => [bok_topics:protected] => [bok_keywords:protected] => [id:protected] => 64 [type:protected] => category [parent:protected] => 2 [label:protected] => Laborer [alreadyInSave:protected] => [alreadyInValidation:protected] => [validationFailures:protected] => Array ( ) [_new:BaseObject:private] => [_deleted:BaseObject:private] => [modifiedColumns:protected] => Array ( ) ) [65] => Category Object ( [languages:protected] => [bok_resources:protected] => [bok_topics:protected] => [bok_keywords:protected] => [id:protected] => 65 [type:protected] => category [parent:protected] => 2 [label:protected] => Landscaper [alreadyInSave:protected] => [alreadyInValidation:protected] => [validationFailures:protected] => Array ( ) [_new:BaseObject:private] => [_deleted:BaseObject:private] => [modifiedColumns:protected] => Array ( ) ) [66] => Category Object ( [languages:protected] => [bok_resources:protected] => [bok_topics:protected] => [bok_keywords:protected] => [id:protected] => 66 [type:protected] => category [parent:protected] => 2 [label:protected] => Lather [alreadyInSave:protected] => [alreadyInValidation:protected] => [validationFailures:protected] => Array ( ) [_new:BaseObject:private] => [_deleted:BaseObject:private] => [modifiedColumns:protected] => Array ( ) ) [67] => Category Object ( [languages:protected] => [bok_resources:protected] => [bok_topics:protected] => [bok_keywords:protected] => [id:protected] => 67 [type:protected] => category [parent:protected] => 2 [label:protected] => Lead Abatement Worker [alreadyInSave:protected] => [alreadyInValidation:protected] => [validationFailures:protected] => Array ( ) [_new:BaseObject:private] => [_deleted:BaseObject:private] => [modifiedColumns:protected] => Array ( ) ) [68] => Category Object ( [languages:protected] => [bok_resources:protected] => [bok_topics:protected] => [bok_keywords:protected] => [id:protected] => 68 [type:protected] => category [parent:protected] => 2 [label:protected] => Maintenance Worker [alreadyInSave:protected] => [alreadyInValidation:protected] => [validationFailures:protected] => Array ( ) [_new:BaseObject:private] => [_deleted:BaseObject:private] => [modifiedColumns:protected] => Array ( ) ) [69] => Category Object ( [languages:protected] => [bok_resources:protected] => [bok_topics:protected] => [bok_keywords:protected] => [id:protected] => 69 [type:protected] => category [parent:protected] => 2 [label:protected] => Millwright [alreadyInSave:protected] => [alreadyInValidation:protected] => [validationFailures:protected] => Array ( ) [_new:BaseObject:private] => [_deleted:BaseObject:private] => [modifiedColumns:protected] => Array ( ) ) [70] => Category Object ( [languages:protected] => [bok_resources:protected] => [bok_topics:protected] => [bok_keywords:protected] => [id:protected] => 70 [type:protected] => category [parent:protected] => 2 [label:protected] => Operating Engineer [alreadyInSave:protected] => [alreadyInValidation:protected] => [validationFailures:protected] => Array ( ) [_new:BaseObject:private] => [_deleted:BaseObject:private] => [modifiedColumns:protected] => Array ( ) ) [71] => Category Object ( [languages:protected] => [bok_resources:protected] => [bok_topics:protected] => [bok_keywords:protected] => [id:protected] => 71 [type:protected] => category [parent:protected] => 2 [label:protected] => Painter [alreadyInSave:protected] => [alreadyInValidation:protected] => [validationFailures:protected] => Array ( ) [_new:BaseObject:private] => [_deleted:BaseObject:private] => [modifiedColumns:protected] => Array ( ) ) [72] => Category Object ( [languages:protected] => [bok_resources:protected] => [bok_topics:protected] => [bok_keywords:protected] => [id:protected] => 72 [type:protected] => category [parent:protected] => 2 [label:protected] => Paper Hanger [alreadyInSave:protected] => [alreadyInValidation:protected] => [validationFailures:protected] => Array ( ) [_new:BaseObject:private] => [_deleted:BaseObject:private] => [modifiedColumns:protected] => Array ( ) ) [73] => Category Object ( [languages:protected] => [bok_resources:protected] => [bok_topics:protected] => [bok_keywords:protected] => [id:protected] => 73 [type:protected] => category [parent:protected] => 2 [label:protected] => PCC/Restoration [alreadyInSave:protected] => [alreadyInValidation:protected] => [validationFailures:protected] => Array ( ) [_new:BaseObject:private] => [_deleted:BaseObject:private] => [modifiedColumns:protected] => Array ( ) ) [74] => Category Object ( [languages:protected] => [bok_resources:protected] => [bok_topics:protected] => [bok_keywords:protected] => [id:protected] => 74 [type:protected] => category [parent:protected] => 2 [label:protected] => Pile Driver [alreadyInSave:protected] => [alreadyInValidation:protected] => [validationFailures:protected] => Array ( ) [_new:BaseObject:private] => [_deleted:BaseObject:private] => [modifiedColumns:protected] => Array ( ) ) [75] => Category Object ( [languages:protected] => [bok_resources:protected] => [bok_topics:protected] => [bok_keywords:protected] => [id:protected] => 75 [type:protected] => category [parent:protected] => 2 [label:protected] => Plasterer [alreadyInSave:protected] => [alreadyInValidation:protected] => [validationFailures:protected] => Array ( ) [_new:BaseObject:private] => [_deleted:BaseObject:private] => [modifiedColumns:protected] => Array ( ) ) [76] => Category Object ( [languages:protected] => [bok_resources:protected] => [bok_topics:protected] => [bok_keywords:protected] => [id:protected] => 76 [type:protected] => category [parent:protected] => 2 [label:protected] => Plumber/Pipefitter [alreadyInSave:protected] => [alreadyInValidation:protected] => [validationFailures:protected] => Array ( ) [_new:BaseObject:private] => [_deleted:BaseObject:private] => [modifiedColumns:protected] => Array ( ) ) [77] => Category Object ( [languages:protected] => [bok_resources:protected] => [bok_topics:protected] => [bok_keywords:protected] => [id:protected] => 77 [type:protected] => category [parent:protected] => 2 [label:protected] => Refractory Worker [alreadyInSave:protected] => [alreadyInValidation:protected] => [validationFailures:protected] => Array ( ) [_new:BaseObject:private] => [_deleted:BaseObject:private] => [modifiedColumns:protected] => Array ( ) ) [63] => Category Object ( [languages:protected] => [bok_resources:protected] => [bok_topics:protected] => [bok_keywords:protected] => [id:protected] => 63 [type:protected] => category [parent:protected] => 2 [label:protected] => Reinforcing Ironworker [alreadyInSave:protected] => [alreadyInValidation:protected] => [validationFailures:protected] => Array ( ) [_new:BaseObject:private] => [_deleted:BaseObject:private] => [modifiedColumns:protected] => Array ( ) ) [78] => Category Object ( [languages:protected] => [bok_resources:protected] => [bok_topics:protected] => [bok_keywords:protected] => [id:protected] => 78 [type:protected] => category [parent:protected] => 2 [label:protected] => Roofer/Waterproofer [alreadyInSave:protected] => [alreadyInValidation:protected] => [validationFailures:protected] => Array ( ) [_new:BaseObject:private] => [_deleted:BaseObject:private] => [modifiedColumns:protected] => Array ( ) ) [79] => Category Object ( [languages:protected] => [bok_resources:protected] => [bok_topics:protected] => [bok_keywords:protected] => [id:protected] => 79 [type:protected] => category [parent:protected] => 2 [label:protected] => Scaffold Erector [alreadyInSave:protected] => [alreadyInValidation:protected] => [validationFailures:protected] => Array ( ) [_new:BaseObject:private] => [_deleted:BaseObject:private] => [modifiedColumns:protected] => Array ( ) ) [80] => Category Object ( [languages:protected] => [bok_resources:protected] => [bok_topics:protected] => [bok_keywords:protected] => [id:protected] => 80 [type:protected] => category [parent:protected] => 2 [label:protected] => Sheetmetal Worker [alreadyInSave:protected] => [alreadyInValidation:protected] => [validationFailures:protected] => Array ( ) [_new:BaseObject:private] => [_deleted:BaseObject:private] => [modifiedColumns:protected] => Array ( ) ) [81] => Category Object ( [languages:protected] => [bok_resources:protected] => [bok_topics:protected] => [bok_keywords:protected] => [id:protected] => 81 [type:protected] => category [parent:protected] => 2 [label:protected] => Sprinkler Fitter [alreadyInSave:protected] => [alreadyInValidation:protected] => [validationFailures:protected] => Array ( ) [_new:BaseObject:private] => [_deleted:BaseObject:private] => [modifiedColumns:protected] => Array ( ) ) [82] => Category Object ( [languages:protected] => [bok_resources:protected] => [bok_topics:protected] => [bok_keywords:protected] => [id:protected] => 82 [type:protected] => category [parent:protected] => 2 [label:protected] => Stonemason [alreadyInSave:protected] => [alreadyInValidation:protected] => [validationFailures:protected] => Array ( ) [_new:BaseObject:private] => [_deleted:BaseObject:private] => [modifiedColumns:protected] => Array ( ) ) [62] => Category Object ( [languages:protected] => [bok_resources:protected] => [bok_topics:protected] => [bok_keywords:protected] => [id:protected] => 62 [type:protected] => category [parent:protected] => 2 [label:protected] => Structural Ironworker [alreadyInSave:protected] => [alreadyInValidation:protected] => [validationFailures:protected] => Array ( ) [_new:BaseObject:private] => [_deleted:BaseObject:private] => [modifiedColumns:protected] => Array ( ) ) [83] => Category Object ( [languages:protected] => [bok_resources:protected] => [bok_topics:protected] => [bok_keywords:protected] => [id:protected] => 83 [type:protected] => category [parent:protected] => 2 [label:protected] => Terrazzo Worker [alreadyInSave:protected] => [alreadyInValidation:protected] => [validationFailures:protected] => Array ( ) [_new:BaseObject:private] => [_deleted:BaseObject:private] => [modifiedColumns:protected] => Array ( ) ) [84] => Category Object ( [languages:protected] => [bok_resources:protected] => [bok_topics:protected] => [bok_keywords:protected] => [id:protected] => 84 [type:protected] => category [parent:protected] => 2 [label:protected] => Tile Setter [alreadyInSave:protected] => [alreadyInValidation:protected] => [validationFailures:protected] => Array ( ) [_new:BaseObject:private] => [_deleted:BaseObject:private] => [modifiedColumns:protected] => Array ( ) ) [85] => Category Object ( [languages:protected] => [bok_resources:protected] => [bok_topics:protected] => [bok_keywords:protected] => [id:protected] => 85 [type:protected] => category [parent:protected] => 2 [label:protected] => Truck Driver [alreadyInSave:protected] => [alreadyInValidation:protected] => [validationFailures:protected] => Array ( ) [_new:BaseObject:private] => [_deleted:BaseObject:private] => [modifiedColumns:protected] => Array ( ) ) [86] => Category Object ( [languages:protected] => [bok_resources:protected] => [bok_topics:protected] => [bok_keywords:protected] => [id:protected] => 86 [type:protected] => category [parent:protected] => 2 [label:protected] => Welder [alreadyInSave:protected] => [alreadyInValidation:protected] => [validationFailures:protected] => Array ( ) [_new:BaseObject:private] => [_deleted:BaseObject:private] => [modifiedColumns:protected] => Array ( ) ) [87] => Category Object ( [languages:protected] => [bok_resources:protected] => [bok_topics:protected] => [bok_keywords:protected] => [id:protected] => 87 [type:protected] => category [parent:protected] => 3 [label:protected] => Commercial & Institutional [alreadyInSave:protected] => [alreadyInValidation:protected] => [validationFailures:protected] => Array ( ) [_new:BaseObject:private] => [_deleted:BaseObject:private] => [modifiedColumns:protected] => Array ( ) ) [88] => Category Object ( [languages:protected] => [bok_resources:protected] => [bok_topics:protected] => [bok_keywords:protected] => [id:protected] => 88 [type:protected] => category [parent:protected] => 3 [label:protected] => Demolition [alreadyInSave:protected] => [alreadyInValidation:protected] => [validationFailures:protected] => Array ( ) [_new:BaseObject:private] => [_deleted:BaseObject:private] => [modifiedColumns:protected] => Array ( ) ) [89] => Category Object ( [languages:protected] => [bok_resources:protected] => [bok_topics:protected] => [bok_keywords:protected] => [id:protected] => 89 [type:protected] => category [parent:protected] => 3 [label:protected] => Disasters [alreadyInSave:protected] => [alreadyInValidation:protected] => [validationFailures:protected] => Array ( ) [_new:BaseObject:private] => [_deleted:BaseObject:private] => [modifiedColumns:protected] => Array ( ) ) [91] => Category Object ( [languages:protected] => [bok_resources:protected] => [bok_topics:protected] => [bok_keywords:protected] => [id:protected] => 91 [type:protected] => category [parent:protected] => 3 [label:protected] => Heavy & Highway [alreadyInSave:protected] => [alreadyInValidation:protected] => [validationFailures:protected] => Array ( ) [_new:BaseObject:private] => [_deleted:BaseObject:private] => [modifiedColumns:protected] => Array ( ) ) [90] => Category Object ( [languages:protected] => [bok_resources:protected] => [bok_topics:protected] => [bok_keywords:protected] => [id:protected] => 90 [type:protected] => category [parent:protected] => 3 [label:protected] => Industrial [alreadyInSave:protected] => [alreadyInValidation:protected] => [validationFailures:protected] => Array ( ) [_new:BaseObject:private] => [_deleted:BaseObject:private] => [modifiedColumns:protected] => Array ( ) ) [92] => Category Object ( [languages:protected] => [bok_resources:protected] => [bok_topics:protected] => [bok_keywords:protected] => [id:protected] => 92 [type:protected] => category [parent:protected] => 3 [label:protected] => LEED/Green Construction [alreadyInSave:protected] => [alreadyInValidation:protected] => [validationFailures:protected] => Array ( ) [_new:BaseObject:private] => [_deleted:BaseObject:private] => [modifiedColumns:protected] => Array ( ) ) [93] => Category Object ( [languages:protected] => [bok_resources:protected] => [bok_topics:protected] => [bok_keywords:protected] => [id:protected] => 93 [type:protected] => category [parent:protected] => 3 [label:protected] => Renovations [alreadyInSave:protected] => [alreadyInValidation:protected] => [validationFailures:protected] => Array ( ) [_new:BaseObject:private] => [_deleted:BaseObject:private] => [modifiedColumns:protected] => Array ( ) ) [94] => Category Object ( [languages:protected] => [bok_resources:protected] => [bok_topics:protected] => [bok_keywords:protected] => [id:protected] => 94 [type:protected] => category [parent:protected] => 3 [label:protected] => Residential [alreadyInSave:protected] => [alreadyInValidation:protected] => [validationFailures:protected] => Array ( ) [_new:BaseObject:private] => [_deleted:BaseObject:private] => [modifiedColumns:protected] => Array ( ) ) [95] => Category Object ( [languages:protected] => [bok_resources:protected] => [bok_topics:protected] => [bok_keywords:protected] => [id:protected] => 95 [type:protected] => category [parent:protected] => 3 [label:protected] => Underground [alreadyInSave:protected] => [alreadyInValidation:protected] => [validationFailures:protected] => Array ( ) [_new:BaseObject:private] => [_deleted:BaseObject:private] => [modifiedColumns:protected] => Array ( ) ) [100] => Category Object ( [languages:protected] => [bok_resources:protected] => [bok_topics:protected] => [bok_keywords:protected] => [id:protected] => 100 [type:protected] => category [parent:protected] => 6 [label:protected] => Toolbox Talks [alreadyInSave:protected] => [alreadyInValidation:protected] => [validationFailures:protected] => Array ( ) [_new:BaseObject:private] => [_deleted:BaseObject:private] => [modifiedColumns:protected] => Array ( ) ) ) [categories_initialized:protected] => 1 [mapped_items:protected] => [content:protected] => [files:protected] => [language:protected] => Language Object ( [id:protected] => 1 [code:protected] => en [name:protected] => English [alreadyInSave:protected] => [alreadyInValidation:protected] => [validationFailures:protected] => Array ( ) [_new:BaseObject:private] => [_deleted:BaseObject:private] => [modifiedColumns:protected] => Array ( ) ) [old_record:protected] => [id:protected] => 4419 [old_id:protected] => [elcosh_id:protected] => d001652 [type:protected] => document [display_type:protected] => HTML only (and links) [user_id:protected] => 0 [language_id:protected] => 1 [tagging_id:protected] => Valeria Contreras [priority_id:protected] => 1 [title:protected] => Toolbox Talk: Suicide Prevention [total_pages:protected] => 1 [billed_pages:protected] => 1 [publication_number:protected] => [part_of:protected] => [keywords:protected] => suicide, suicide prevention, mental health, stress, depression, exhaustion, burnout, safety, support, emotional support, health [comments:protected] => [summary:protected] =>The CPWR Toolbox Talk on Suicide Prevention addresses the prevalence of suicide among construction workers. The resource includes a brief case example, steps to prevent a related injury or illness, and questions for discussion. It includes an image that illustrates the hazard, which can be posted in a central location as a reminder of steps to work safely.
Available in English and Spanish. [transition_comments:protected] => [external_link:protected] => [consol_link:protected] => [more_like_this:protected] => [permission_given_by:protected] => [published:protected] => T [billable:protected] => F [img_name:protected] => [img_ext:protected] => [img_width:protected] => [img_height:protected] => [img_credit:protected] => [img_practice:protected] => [vid_source_id:protected] => [vid_running_time:protected] => [vid_intended_audience:protected] => [vid_acquisition_info:protected] => [vid_cost:protected] => [vid_producer:protected] => [vid_filename:protected] => [vid_filename_downloadable:protected] => [date_summary:protected] => [date_permission_requested:protected] => [date_permission_received:protected] => [date_review_needed:protected] => [date_received:protected] => 10/08/20 [date_completed:protected] => 10/08/20 [date_billed:protected] => [date_modified:protected] => 05/19/23 [collBokExports:protected] => [lastBokExportCriteria:BaseElcoshItem:private] => [alreadyInSave:protected] => [alreadyInValidation:protected] => [validationFailures:protected] => Array ( ) [_new:BaseObject:private] => [_deleted:BaseObject:private] => [modifiedColumns:protected] => Array ( ) ) ) ) [new_images] => Array ( [0] => Search_Result Object ( [title] => Toolbox talk - crew view [image] => /record/images/4005-p.jpg [blurb] => Photo of crew listening to a toolbox safety talk before starting work.... [category] => Array ( [0] => 97 [1] => 20 [2] => 47 [3] => 49 [4] => 51 [5] => 55 [6] => 61 [7] => 64 [8] => 71 [9] => 75 [10] => 63 [11] => 79 [12] => 62 [13] => 87 [14] => 88 [15] => 91 [16] => 90 [17] => 93 [18] => 94 [19] => 95 ) [labels] => Array ( [0] => Images [1] => Media [2] => Media & Documents [3] => Safety Culture [4] => Work Environment [5] => Hazards [6] => Bricklayer [7] => Trades [8] => Carpenter [10] => Cement Mason [12] => Electrical Worker [14] => Interior Systems Carpenter [16] => Laborer [18] => Painter [20] => Plasterer [22] => Reinforcing Ironworker [24] => Scaffold Erector [26] => Structural Ironworker [28] => Commercial & Institutional [29] => Jobsites [30] => Demolition [32] => Heavy & Highway [34] => Industrial [36] => Renovations [38] => Residential [40] => Underground ) [type] => Images [sub_category] => [url] => /image/4005/i002692/Toolbox%2Btalk%2B-%2Bcrew%2Bview.html [item:protected] => ImageRecord Object ( [records:protected] => Array ( ) [recordId:protected] => [searchWordClass:protected] => [searchWordPeerClass:protected] => [bok_record:protected] => [authors:protected] => [organizations:protected] => [collections:protected] => [categories:protected] => Array ( [97] => Category Object ( [languages:protected] => [bok_resources:protected] => [bok_topics:protected] => [bok_keywords:protected] => [id:protected] => 97 [type:protected] => category [parent:protected] => 5 [label:protected] => Images [alreadyInSave:protected] => [alreadyInValidation:protected] => [validationFailures:protected] => Array ( ) [_new:BaseObject:private] => [_deleted:BaseObject:private] => [modifiedColumns:protected] => Array ( ) ) [20] => Category Object ( [languages:protected] => [bok_resources:protected] => [bok_topics:protected] => [bok_keywords:protected] => [id:protected] => 20 [type:protected] => category [parent:protected] => 7 [label:protected] => Safety Culture [alreadyInSave:protected] => [alreadyInValidation:protected] => [validationFailures:protected] => Array ( ) [_new:BaseObject:private] => [_deleted:BaseObject:private] => [modifiedColumns:protected] => Array ( ) ) [47] => Category Object ( [languages:protected] => [bok_resources:protected] => [bok_topics:protected] => [bok_keywords:protected] => [id:protected] => 47 [type:protected] => category [parent:protected] => 2 [label:protected] => Bricklayer [alreadyInSave:protected] => [alreadyInValidation:protected] => [validationFailures:protected] => Array ( ) [_new:BaseObject:private] => [_deleted:BaseObject:private] => [modifiedColumns:protected] => Array ( ) ) [49] => Category Object ( [languages:protected] => [bok_resources:protected] => [bok_topics:protected] => [bok_keywords:protected] => [id:protected] => 49 [type:protected] => category [parent:protected] => 2 [label:protected] => Carpenter [alreadyInSave:protected] => [alreadyInValidation:protected] => [validationFailures:protected] => Array ( ) [_new:BaseObject:private] => [_deleted:BaseObject:private] => [modifiedColumns:protected] => Array ( ) ) [51] => Category Object ( [languages:protected] => [bok_resources:protected] => [bok_topics:protected] => [bok_keywords:protected] => [id:protected] => 51 [type:protected] => category [parent:protected] => 2 [label:protected] => Cement Mason [alreadyInSave:protected] => [alreadyInValidation:protected] => [validationFailures:protected] => Array ( ) [_new:BaseObject:private] => [_deleted:BaseObject:private] => [modifiedColumns:protected] => Array ( ) ) [55] => Category Object ( [languages:protected] => [bok_resources:protected] => [bok_topics:protected] => [bok_keywords:protected] => [id:protected] => 55 [type:protected] => category [parent:protected] => 2 [label:protected] => Electrical Worker [alreadyInSave:protected] => [alreadyInValidation:protected] => [validationFailures:protected] => Array ( ) [_new:BaseObject:private] => [_deleted:BaseObject:private] => [modifiedColumns:protected] => Array ( ) ) [61] => Category Object ( [languages:protected] => [bok_resources:protected] => [bok_topics:protected] => [bok_keywords:protected] => [id:protected] => 61 [type:protected] => category [parent:protected] => 2 [label:protected] => Interior Systems Carpenter [alreadyInSave:protected] => [alreadyInValidation:protected] => [validationFailures:protected] => Array ( ) [_new:BaseObject:private] => [_deleted:BaseObject:private] => [modifiedColumns:protected] => Array ( ) ) [64] => Category Object ( [languages:protected] => [bok_resources:protected] => [bok_topics:protected] => [bok_keywords:protected] => [id:protected] => 64 [type:protected] => category [parent:protected] => 2 [label:protected] => Laborer [alreadyInSave:protected] => [alreadyInValidation:protected] => [validationFailures:protected] => Array ( ) [_new:BaseObject:private] => [_deleted:BaseObject:private] => [modifiedColumns:protected] => Array ( ) ) [71] => Category Object ( [languages:protected] => [bok_resources:protected] => [bok_topics:protected] => [bok_keywords:protected] => [id:protected] => 71 [type:protected] => category [parent:protected] => 2 [label:protected] => Painter [alreadyInSave:protected] => [alreadyInValidation:protected] => [validationFailures:protected] => Array ( ) [_new:BaseObject:private] => [_deleted:BaseObject:private] => [modifiedColumns:protected] => Array ( ) ) [75] => Category Object ( [languages:protected] => [bok_resources:protected] => [bok_topics:protected] => [bok_keywords:protected] => [id:protected] => 75 [type:protected] => category [parent:protected] => 2 [label:protected] => Plasterer [alreadyInSave:protected] => [alreadyInValidation:protected] => [validationFailures:protected] => Array ( ) [_new:BaseObject:private] => [_deleted:BaseObject:private] => [modifiedColumns:protected] => Array ( ) ) [63] => Category Object ( [languages:protected] => [bok_resources:protected] => [bok_topics:protected] => [bok_keywords:protected] => [id:protected] => 63 [type:protected] => category [parent:protected] => 2 [label:protected] => Reinforcing Ironworker [alreadyInSave:protected] => [alreadyInValidation:protected] => [validationFailures:protected] => Array ( ) [_new:BaseObject:private] => [_deleted:BaseObject:private] => [modifiedColumns:protected] => Array ( ) ) [79] => Category Object ( [languages:protected] => [bok_resources:protected] => [bok_topics:protected] => [bok_keywords:protected] => [id:protected] => 79 [type:protected] => category [parent:protected] => 2 [label:protected] => Scaffold Erector [alreadyInSave:protected] => [alreadyInValidation:protected] => [validationFailures:protected] => Array ( ) [_new:BaseObject:private] => [_deleted:BaseObject:private] => [modifiedColumns:protected] => Array ( ) ) [62] => Category Object ( [languages:protected] => [bok_resources:protected] => [bok_topics:protected] => [bok_keywords:protected] => [id:protected] => 62 [type:protected] => category [parent:protected] => 2 [label:protected] => Structural Ironworker [alreadyInSave:protected] => [alreadyInValidation:protected] => [validationFailures:protected] => Array ( ) [_new:BaseObject:private] => [_deleted:BaseObject:private] => [modifiedColumns:protected] => Array ( ) ) [87] => Category Object ( [languages:protected] => [bok_resources:protected] => [bok_topics:protected] => [bok_keywords:protected] => [id:protected] => 87 [type:protected] => category [parent:protected] => 3 [label:protected] => Commercial & Institutional [alreadyInSave:protected] => [alreadyInValidation:protected] => [validationFailures:protected] => Array ( ) [_new:BaseObject:private] => [_deleted:BaseObject:private] => [modifiedColumns:protected] => Array ( ) ) [88] => Category Object ( [languages:protected] => [bok_resources:protected] => [bok_topics:protected] => [bok_keywords:protected] => [id:protected] => 88 [type:protected] => category [parent:protected] => 3 [label:protected] => Demolition [alreadyInSave:protected] => [alreadyInValidation:protected] => [validationFailures:protected] => Array ( ) [_new:BaseObject:private] => [_deleted:BaseObject:private] => [modifiedColumns:protected] => Array ( ) ) [91] => Category Object ( [languages:protected] => [bok_resources:protected] => [bok_topics:protected] => [bok_keywords:protected] => [id:protected] => 91 [type:protected] => category [parent:protected] => 3 [label:protected] => Heavy & Highway [alreadyInSave:protected] => [alreadyInValidation:protected] => [validationFailures:protected] => Array ( ) [_new:BaseObject:private] => [_deleted:BaseObject:private] => [modifiedColumns:protected] => Array ( ) ) [90] => Category Object ( [languages:protected] => [bok_resources:protected] => [bok_topics:protected] => [bok_keywords:protected] => [id:protected] => 90 [type:protected] => category [parent:protected] => 3 [label:protected] => Industrial [alreadyInSave:protected] => [alreadyInValidation:protected] => [validationFailures:protected] => Array ( ) [_new:BaseObject:private] => [_deleted:BaseObject:private] => [modifiedColumns:protected] => Array ( ) ) [93] => Category Object ( [languages:protected] => [bok_resources:protected] => [bok_topics:protected] => [bok_keywords:protected] => [id:protected] => 93 [type:protected] => category [parent:protected] => 3 [label:protected] => Renovations [alreadyInSave:protected] => [alreadyInValidation:protected] => [validationFailures:protected] => Array ( ) [_new:BaseObject:private] => [_deleted:BaseObject:private] => [modifiedColumns:protected] => Array ( ) ) [94] => Category Object ( [languages:protected] => [bok_resources:protected] => [bok_topics:protected] => [bok_keywords:protected] => [id:protected] => 94 [type:protected] => category [parent:protected] => 3 [label:protected] => Residential [alreadyInSave:protected] => [alreadyInValidation:protected] => [validationFailures:protected] => Array ( ) [_new:BaseObject:private] => [_deleted:BaseObject:private] => [modifiedColumns:protected] => Array ( ) ) [95] => Category Object ( [languages:protected] => [bok_resources:protected] => [bok_topics:protected] => [bok_keywords:protected] => [id:protected] => 95 [type:protected] => category [parent:protected] => 3 [label:protected] => Underground [alreadyInSave:protected] => [alreadyInValidation:protected] => [validationFailures:protected] => Array ( ) [_new:BaseObject:private] => [_deleted:BaseObject:private] => [modifiedColumns:protected] => Array ( ) ) ) [categories_initialized:protected] => 1 [mapped_items:protected] => [content:protected] => [files:protected] => [language:protected] => Language Object ( [id:protected] => 1 [code:protected] => en [name:protected] => English [alreadyInSave:protected] => [alreadyInValidation:protected] => [validationFailures:protected] => Array ( ) [_new:BaseObject:private] => [_deleted:BaseObject:private] => [modifiedColumns:protected] => Array ( ) ) [old_record:protected] => [id:protected] => 4005 [old_id:protected] => [elcosh_id:protected] => i002692 [type:protected] => image [display_type:protected] => Image [user_id:protected] => 0 [language_id:protected] => 1 [tagging_id:protected] => Bruce Lippy [priority_id:protected] => 1 [title:protected] => Toolbox talk - crew view [total_pages:protected] => 0 [billed_pages:protected] => 0 [publication_number:protected] => [part_of:protected] => [keywords:protected] => toolbox talk, tailgate talk, safety talk, Spanish [comments:protected] => [summary:protected] => Photo of crew listening to a toolbox safety talk before starting work. [transition_comments:protected] => [external_link:protected] => [consol_link:protected] => http://www.cpwrconstructionsolutions.org/electrical/solution/662/worker-training.html [more_like_this:protected] => i002691,d001269, c000079, d001285 [permission_given_by:protected] => [published:protected] => T [billable:protected] => F [img_name:protected] => [img_ext:protected] => jpg [img_width:protected] => [img_height:protected] => [img_credit:protected] => Morgan Zavertnik and Hoar Construction [img_practice:protected] => good [vid_source_id:protected] => [vid_running_time:protected] => [vid_intended_audience:protected] => [vid_acquisition_info:protected] => [vid_cost:protected] => [vid_producer:protected] => [vid_filename:protected] => [vid_filename_downloadable:protected] => [date_summary:protected] => November 2015 [date_permission_requested:protected] => [date_permission_received:protected] => [date_review_needed:protected] => [date_received:protected] => 03/02/16 [date_completed:protected] => 03/02/16 [date_billed:protected] => [date_modified:protected] => 03/02/16 [collBokExports:protected] => [lastBokExportCriteria:BaseElcoshItem:private] => [alreadyInSave:protected] => [alreadyInValidation:protected] => [validationFailures:protected] => Array ( ) [_new:BaseObject:private] => [_deleted:BaseObject:private] => [modifiedColumns:protected] => Array ( ) ) ) [1] => Search_Result Object ( [title] => Toolbox talk - long shot [image] => /record/images/4006-p.jpg [blurb] => This crew gathered every morning before starting work to discuss a new safety topic.... [category] => Array ( [0] => 20 [1] => 47 [2] => 49 [3] => 51 [4] => 55 [5] => 64 [6] => 68 [7] => 75 [8] => 76 [9] => 63 [10] => 78 [11] => 79 [12] => 82 [13] => 62 [14] => 87 [15] => 88 [16] => 91 [17] => 90 [18] => 93 [19] => 94 [20] => 95 [21] => 97 ) [labels] => Array ( [0] => Safety Culture [1] => Work Environment [2] => Hazards [3] => Bricklayer [4] => Trades [5] => Carpenter [7] => Cement Mason [9] => Electrical Worker [11] => Laborer [13] => Maintenance Worker [15] => Plasterer [17] => Plumber/Pipefitter [19] => Reinforcing Ironworker [21] => Roofer/Waterproofer [23] => Scaffold Erector [25] => Stonemason [27] => Structural Ironworker [29] => Commercial & Institutional [30] => Jobsites [31] => Demolition [33] => Heavy & Highway [35] => Industrial [37] => Renovations [39] => Residential [41] => Underground [43] => Images [44] => Media [45] => Media & Documents ) [type] => Images [sub_category] => [url] => /image/4006/i002693/Toolbox%2Btalk%2B-%2Blong%2Bshot.html [item:protected] => ImageRecord Object ( [records:protected] => Array ( ) [recordId:protected] => [searchWordClass:protected] => [searchWordPeerClass:protected] => [bok_record:protected] => [authors:protected] => [organizations:protected] => [collections:protected] => [categories:protected] => Array ( [20] => Category Object ( [languages:protected] => [bok_resources:protected] => [bok_topics:protected] => [bok_keywords:protected] => [id:protected] => 20 [type:protected] => category [parent:protected] => 7 [label:protected] => Safety Culture [alreadyInSave:protected] => [alreadyInValidation:protected] => [validationFailures:protected] => Array ( ) [_new:BaseObject:private] => [_deleted:BaseObject:private] => [modifiedColumns:protected] => Array ( ) ) [47] => Category Object ( [languages:protected] => [bok_resources:protected] => [bok_topics:protected] => [bok_keywords:protected] => [id:protected] => 47 [type:protected] => category [parent:protected] => 2 [label:protected] => Bricklayer [alreadyInSave:protected] => [alreadyInValidation:protected] => [validationFailures:protected] => Array ( ) [_new:BaseObject:private] => [_deleted:BaseObject:private] => [modifiedColumns:protected] => Array ( ) ) [49] => Category Object ( [languages:protected] => [bok_resources:protected] => [bok_topics:protected] => [bok_keywords:protected] => [id:protected] => 49 [type:protected] => category [parent:protected] => 2 [label:protected] => Carpenter [alreadyInSave:protected] => [alreadyInValidation:protected] => [validationFailures:protected] => Array ( ) [_new:BaseObject:private] => [_deleted:BaseObject:private] => [modifiedColumns:protected] => Array ( ) ) [51] => Category Object ( [languages:protected] => [bok_resources:protected] => [bok_topics:protected] => [bok_keywords:protected] => [id:protected] => 51 [type:protected] => category [parent:protected] => 2 [label:protected] => Cement Mason [alreadyInSave:protected] => [alreadyInValidation:protected] => [validationFailures:protected] => Array ( ) [_new:BaseObject:private] => [_deleted:BaseObject:private] => [modifiedColumns:protected] => Array ( ) ) [55] => Category Object ( [languages:protected] => [bok_resources:protected] => [bok_topics:protected] => [bok_keywords:protected] => [id:protected] => 55 [type:protected] => category [parent:protected] => 2 [label:protected] => Electrical Worker [alreadyInSave:protected] => [alreadyInValidation:protected] => [validationFailures:protected] => Array ( ) [_new:BaseObject:private] => [_deleted:BaseObject:private] => [modifiedColumns:protected] => Array ( ) ) [64] => Category Object ( [languages:protected] => [bok_resources:protected] => [bok_topics:protected] => [bok_keywords:protected] => [id:protected] => 64 [type:protected] => category [parent:protected] => 2 [label:protected] => Laborer [alreadyInSave:protected] => [alreadyInValidation:protected] => [validationFailures:protected] => Array ( ) [_new:BaseObject:private] => [_deleted:BaseObject:private] => [modifiedColumns:protected] => Array ( ) ) [68] => Category Object ( [languages:protected] => [bok_resources:protected] => [bok_topics:protected] => [bok_keywords:protected] => [id:protected] => 68 [type:protected] => category [parent:protected] => 2 [label:protected] => Maintenance Worker [alreadyInSave:protected] => [alreadyInValidation:protected] => [validationFailures:protected] => Array ( ) [_new:BaseObject:private] => [_deleted:BaseObject:private] => [modifiedColumns:protected] => Array ( ) ) [75] => Category Object ( [languages:protected] => [bok_resources:protected] => [bok_topics:protected] => [bok_keywords:protected] => [id:protected] => 75 [type:protected] => category [parent:protected] => 2 [label:protected] => Plasterer [alreadyInSave:protected] => [alreadyInValidation:protected] => [validationFailures:protected] => Array ( ) [_new:BaseObject:private] => [_deleted:BaseObject:private] => [modifiedColumns:protected] => Array ( ) ) [76] => Category Object ( [languages:protected] => [bok_resources:protected] => [bok_topics:protected] => [bok_keywords:protected] => [id:protected] => 76 [type:protected] => category [parent:protected] => 2 [label:protected] => Plumber/Pipefitter [alreadyInSave:protected] => [alreadyInValidation:protected] => [validationFailures:protected] => Array ( ) [_new:BaseObject:private] => [_deleted:BaseObject:private] => [modifiedColumns:protected] => Array ( ) ) [63] => Category Object ( [languages:protected] => [bok_resources:protected] => [bok_topics:protected] => [bok_keywords:protected] => [id:protected] => 63 [type:protected] => category [parent:protected] => 2 [label:protected] => Reinforcing Ironworker [alreadyInSave:protected] => [alreadyInValidation:protected] => [validationFailures:protected] => Array ( ) [_new:BaseObject:private] => [_deleted:BaseObject:private] => [modifiedColumns:protected] => Array ( ) ) [78] => Category Object ( [languages:protected] => [bok_resources:protected] => [bok_topics:protected] => [bok_keywords:protected] => [id:protected] => 78 [type:protected] => category [parent:protected] => 2 [label:protected] => Roofer/Waterproofer [alreadyInSave:protected] => [alreadyInValidation:protected] => [validationFailures:protected] => Array ( ) [_new:BaseObject:private] => [_deleted:BaseObject:private] => [modifiedColumns:protected] => Array ( ) ) [79] => Category Object ( [languages:protected] => [bok_resources:protected] => [bok_topics:protected] => [bok_keywords:protected] => [id:protected] => 79 [type:protected] => category [parent:protected] => 2 [label:protected] => Scaffold Erector [alreadyInSave:protected] => [alreadyInValidation:protected] => [validationFailures:protected] => Array ( ) [_new:BaseObject:private] => [_deleted:BaseObject:private] => [modifiedColumns:protected] => Array ( ) ) [82] => Category Object ( [languages:protected] => [bok_resources:protected] => [bok_topics:protected] => [bok_keywords:protected] => [id:protected] => 82 [type:protected] => category [parent:protected] => 2 [label:protected] => Stonemason [alreadyInSave:protected] => [alreadyInValidation:protected] => [validationFailures:protected] => Array ( ) [_new:BaseObject:private] => [_deleted:BaseObject:private] => [modifiedColumns:protected] => Array ( ) ) [62] => Category Object ( [languages:protected] => [bok_resources:protected] => [bok_topics:protected] => [bok_keywords:protected] => [id:protected] => 62 [type:protected] => category [parent:protected] => 2 [label:protected] => Structural Ironworker [alreadyInSave:protected] => [alreadyInValidation:protected] => [validationFailures:protected] => Array ( ) [_new:BaseObject:private] => [_deleted:BaseObject:private] => [modifiedColumns:protected] => Array ( ) ) [87] => Category Object ( [languages:protected] => [bok_resources:protected] => [bok_topics:protected] => [bok_keywords:protected] => [id:protected] => 87 [type:protected] => category [parent:protected] => 3 [label:protected] => Commercial & Institutional [alreadyInSave:protected] => [alreadyInValidation:protected] => [validationFailures:protected] => Array ( ) [_new:BaseObject:private] => [_deleted:BaseObject:private] => [modifiedColumns:protected] => Array ( ) ) [88] => Category Object ( [languages:protected] => [bok_resources:protected] => [bok_topics:protected] => [bok_keywords:protected] => [id:protected] => 88 [type:protected] => category [parent:protected] => 3 [label:protected] => Demolition [alreadyInSave:protected] => [alreadyInValidation:protected] => [validationFailures:protected] => Array ( ) [_new:BaseObject:private] => [_deleted:BaseObject:private] => [modifiedColumns:protected] => Array ( ) ) [91] => Category Object ( [languages:protected] => [bok_resources:protected] => [bok_topics:protected] => [bok_keywords:protected] => [id:protected] => 91 [type:protected] => category [parent:protected] => 3 [label:protected] => Heavy & Highway [alreadyInSave:protected] => [alreadyInValidation:protected] => [validationFailures:protected] => Array ( ) [_new:BaseObject:private] => [_deleted:BaseObject:private] => [modifiedColumns:protected] => Array ( ) ) [90] => Category Object ( [languages:protected] => [bok_resources:protected] => [bok_topics:protected] => [bok_keywords:protected] => [id:protected] => 90 [type:protected] => category [parent:protected] => 3 [label:protected] => Industrial [alreadyInSave:protected] => [alreadyInValidation:protected] => [validationFailures:protected] => Array ( ) [_new:BaseObject:private] => [_deleted:BaseObject:private] => [modifiedColumns:protected] => Array ( ) ) [93] => Category Object ( [languages:protected] => [bok_resources:protected] => [bok_topics:protected] => [bok_keywords:protected] => [id:protected] => 93 [type:protected] => category [parent:protected] => 3 [label:protected] => Renovations [alreadyInSave:protected] => [alreadyInValidation:protected] => [validationFailures:protected] => Array ( ) [_new:BaseObject:private] => [_deleted:BaseObject:private] => [modifiedColumns:protected] => Array ( ) ) [94] => Category Object ( [languages:protected] => [bok_resources:protected] => [bok_topics:protected] => [bok_keywords:protected] => [id:protected] => 94 [type:protected] => category [parent:protected] => 3 [label:protected] => Residential [alreadyInSave:protected] => [alreadyInValidation:protected] => [validationFailures:protected] => Array ( ) [_new:BaseObject:private] => [_deleted:BaseObject:private] => [modifiedColumns:protected] => Array ( ) ) [95] => Category Object ( [languages:protected] => [bok_resources:protected] => [bok_topics:protected] => [bok_keywords:protected] => [id:protected] => 95 [type:protected] => category [parent:protected] => 3 [label:protected] => Underground [alreadyInSave:protected] => [alreadyInValidation:protected] => [validationFailures:protected] => Array ( ) [_new:BaseObject:private] => [_deleted:BaseObject:private] => [modifiedColumns:protected] => Array ( ) ) [97] => Category Object ( [languages:protected] => [bok_resources:protected] => [bok_topics:protected] => [bok_keywords:protected] => [id:protected] => 97 [type:protected] => category [parent:protected] => 5 [label:protected] => Images [alreadyInSave:protected] => [alreadyInValidation:protected] => [validationFailures:protected] => Array ( ) [_new:BaseObject:private] => [_deleted:BaseObject:private] => [modifiedColumns:protected] => Array ( ) ) ) [categories_initialized:protected] => 1 [mapped_items:protected] => [content:protected] => [files:protected] => [language:protected] => Language Object ( [id:protected] => 1 [code:protected] => en [name:protected] => English [alreadyInSave:protected] => [alreadyInValidation:protected] => [validationFailures:protected] => Array ( ) [_new:BaseObject:private] => [_deleted:BaseObject:private] => [modifiedColumns:protected] => Array ( ) ) [old_record:protected] => [id:protected] => 4006 [old_id:protected] => [elcosh_id:protected] => i002693 [type:protected] => image [display_type:protected] => Image [user_id:protected] => 0 [language_id:protected] => 1 [tagging_id:protected] => Bruce Lippy [priority_id:protected] => 1 [title:protected] => Toolbox talk - long shot [total_pages:protected] => 0 [billed_pages:protected] => 0 [publication_number:protected] => [part_of:protected] => [keywords:protected] => toolbox talk, tailgate talk, safety minute [comments:protected] => [summary:protected] => This crew gathered every morning before starting work to discuss a new safety topic. [transition_comments:protected] => [external_link:protected] => [consol_link:protected] => http://www.cpwrconstructionsolutions.org/electrical/solution/662/worker-training.html [more_like_this:protected] => i002691,i002692,d001269,d000527 [permission_given_by:protected] => [published:protected] => T [billable:protected] => F [img_name:protected] => [img_ext:protected] => jpg [img_width:protected] => [img_height:protected] => [img_credit:protected] => Morgan Zavertnik and Hoar Construction [img_practice:protected] => good [vid_source_id:protected] => [vid_running_time:protected] => [vid_intended_audience:protected] => [vid_acquisition_info:protected] => [vid_cost:protected] => [vid_producer:protected] => [vid_filename:protected] => [vid_filename_downloadable:protected] => [date_summary:protected] => November 2015 [date_permission_requested:protected] => [date_permission_received:protected] => [date_review_needed:protected] => [date_received:protected] => 03/02/16 [date_completed:protected] => 03/02/16 [date_billed:protected] => [date_modified:protected] => 03/02/16 [collBokExports:protected] => [lastBokExportCriteria:BaseElcoshItem:private] => [alreadyInSave:protected] => [alreadyInValidation:protected] => [validationFailures:protected] => Array ( ) [_new:BaseObject:private] => [_deleted:BaseObject:private] => [modifiedColumns:protected] => Array ( ) ) ) [2] => Search_Result Object ( [title] => Construction bracing [image] => /record/images/3995-p.jpg [blurb] => This shows structural support that prevents collapses during construction.... [category] => Array ( [0] => 12 [1] => 15 [2] => 21 [3] => 49 [4] => 51 [5] => 55 [6] => 56 [7] => 60 [8] => 64 [9] => 68 [10] => 74 [11] => 63 [12] => 78 [13] => 79 [14] => 80 [15] => 62 [16] => 87 [17] => 90 [18] => 97 ) [labels] => Array ( [0] => Crushed/Struck By [1] => Work Environment [2] => Hazards [3] => Falls [6] => Scaffolds [9] => Carpenter [10] => Trades [11] => Cement Mason [13] => Electrical Worker [15] => Elevator Constructor [17] => HVAC [19] => Laborer [21] => Maintenance Worker [23] => Pile Driver [25] => Reinforcing Ironworker [27] => Roofer/Waterproofer [29] => Scaffold Erector [31] => Sheetmetal Worker [33] => Structural Ironworker [35] => Commercial & Institutional [36] => Jobsites [37] => Industrial [39] => Images [40] => Media [41] => Media & Documents ) [type] => Images [sub_category] => [url] => /image/3995/i002690/Construction%2Bbracing.html [item:protected] => ImageRecord Object ( [records:protected] => Array ( ) [recordId:protected] => [searchWordClass:protected] => [searchWordPeerClass:protected] => [bok_record:protected] => [authors:protected] => [organizations:protected] => [collections:protected] => [categories:protected] => Array ( [12] => Category Object ( [languages:protected] => [bok_resources:protected] => [bok_topics:protected] => [bok_keywords:protected] => [id:protected] => 12 [type:protected] => category [parent:protected] => 7 [label:protected] => Crushed/Struck By [alreadyInSave:protected] => [alreadyInValidation:protected] => [validationFailures:protected] => Array ( ) [_new:BaseObject:private] => [_deleted:BaseObject:private] => [modifiedColumns:protected] => Array ( ) ) [15] => Category Object ( [languages:protected] => [bok_resources:protected] => [bok_topics:protected] => [bok_keywords:protected] => [id:protected] => 15 [type:protected] => category [parent:protected] => 7 [label:protected] => Falls [alreadyInSave:protected] => [alreadyInValidation:protected] => [validationFailures:protected] => Array ( ) [_new:BaseObject:private] => [_deleted:BaseObject:private] => [modifiedColumns:protected] => Array ( ) ) [21] => Category Object ( [languages:protected] => [bok_resources:protected] => [bok_topics:protected] => [bok_keywords:protected] => [id:protected] => 21 [type:protected] => category [parent:protected] => 7 [label:protected] => Scaffolds [alreadyInSave:protected] => [alreadyInValidation:protected] => [validationFailures:protected] => Array ( ) [_new:BaseObject:private] => [_deleted:BaseObject:private] => [modifiedColumns:protected] => Array ( ) ) [49] => Category Object ( [languages:protected] => [bok_resources:protected] => [bok_topics:protected] => [bok_keywords:protected] => [id:protected] => 49 [type:protected] => category [parent:protected] => 2 [label:protected] => Carpenter [alreadyInSave:protected] => [alreadyInValidation:protected] => [validationFailures:protected] => Array ( ) [_new:BaseObject:private] => [_deleted:BaseObject:private] => [modifiedColumns:protected] => Array ( ) ) [51] => Category Object ( [languages:protected] => [bok_resources:protected] => [bok_topics:protected] => [bok_keywords:protected] => [id:protected] => 51 [type:protected] => category [parent:protected] => 2 [label:protected] => Cement Mason [alreadyInSave:protected] => [alreadyInValidation:protected] => [validationFailures:protected] => Array ( ) [_new:BaseObject:private] => [_deleted:BaseObject:private] => [modifiedColumns:protected] => Array ( ) ) [55] => Category Object ( [languages:protected] => [bok_resources:protected] => [bok_topics:protected] => [bok_keywords:protected] => [id:protected] => 55 [type:protected] => category [parent:protected] => 2 [label:protected] => Electrical Worker [alreadyInSave:protected] => [alreadyInValidation:protected] => [validationFailures:protected] => Array ( ) [_new:BaseObject:private] => [_deleted:BaseObject:private] => [modifiedColumns:protected] => Array ( ) ) [56] => Category Object ( [languages:protected] => [bok_resources:protected] => [bok_topics:protected] => [bok_keywords:protected] => [id:protected] => 56 [type:protected] => category [parent:protected] => 2 [label:protected] => Elevator Constructor [alreadyInSave:protected] => [alreadyInValidation:protected] => [validationFailures:protected] => Array ( ) [_new:BaseObject:private] => [_deleted:BaseObject:private] => [modifiedColumns:protected] => Array ( ) ) [60] => Category Object ( [languages:protected] => [bok_resources:protected] => [bok_topics:protected] => [bok_keywords:protected] => [id:protected] => 60 [type:protected] => category [parent:protected] => 2 [label:protected] => HVAC [alreadyInSave:protected] => [alreadyInValidation:protected] => [validationFailures:protected] => Array ( ) [_new:BaseObject:private] => [_deleted:BaseObject:private] => [modifiedColumns:protected] => Array ( ) ) [64] => Category Object ( [languages:protected] => [bok_resources:protected] => [bok_topics:protected] => [bok_keywords:protected] => [id:protected] => 64 [type:protected] => category [parent:protected] => 2 [label:protected] => Laborer [alreadyInSave:protected] => [alreadyInValidation:protected] => [validationFailures:protected] => Array ( ) [_new:BaseObject:private] => [_deleted:BaseObject:private] => [modifiedColumns:protected] => Array ( ) ) [68] => Category Object ( [languages:protected] => [bok_resources:protected] => [bok_topics:protected] => [bok_keywords:protected] => [id:protected] => 68 [type:protected] => category [parent:protected] => 2 [label:protected] => Maintenance Worker [alreadyInSave:protected] => [alreadyInValidation:protected] => [validationFailures:protected] => Array ( ) [_new:BaseObject:private] => [_deleted:BaseObject:private] => [modifiedColumns:protected] => Array ( ) ) [74] => Category Object ( [languages:protected] => [bok_resources:protected] => [bok_topics:protected] => [bok_keywords:protected] => [id:protected] => 74 [type:protected] => category [parent:protected] => 2 [label:protected] => Pile Driver [alreadyInSave:protected] => [alreadyInValidation:protected] => [validationFailures:protected] => Array ( ) [_new:BaseObject:private] => [_deleted:BaseObject:private] => [modifiedColumns:protected] => Array ( ) ) [63] => Category Object ( [languages:protected] => [bok_resources:protected] => [bok_topics:protected] => [bok_keywords:protected] => [id:protected] => 63 [type:protected] => category [parent:protected] => 2 [label:protected] => Reinforcing Ironworker [alreadyInSave:protected] => [alreadyInValidation:protected] => [validationFailures:protected] => Array ( ) [_new:BaseObject:private] => [_deleted:BaseObject:private] => [modifiedColumns:protected] => Array ( ) ) [78] => Category Object ( [languages:protected] => [bok_resources:protected] => [bok_topics:protected] => [bok_keywords:protected] => [id:protected] => 78 [type:protected] => category [parent:protected] => 2 [label:protected] => Roofer/Waterproofer [alreadyInSave:protected] => [alreadyInValidation:protected] => [validationFailures:protected] => Array ( ) [_new:BaseObject:private] => [_deleted:BaseObject:private] => [modifiedColumns:protected] => Array ( ) ) [79] => Category Object ( [languages:protected] => [bok_resources:protected] => [bok_topics:protected] => [bok_keywords:protected] => [id:protected] => 79 [type:protected] => category [parent:protected] => 2 [label:protected] => Scaffold Erector [alreadyInSave:protected] => [alreadyInValidation:protected] => [validationFailures:protected] => Array ( ) [_new:BaseObject:private] => [_deleted:BaseObject:private] => [modifiedColumns:protected] => Array ( ) ) [80] => Category Object ( [languages:protected] => [bok_resources:protected] => [bok_topics:protected] => [bok_keywords:protected] => [id:protected] => 80 [type:protected] => category [parent:protected] => 2 [label:protected] => Sheetmetal Worker [alreadyInSave:protected] => [alreadyInValidation:protected] => [validationFailures:protected] => Array ( ) [_new:BaseObject:private] => [_deleted:BaseObject:private] => [modifiedColumns:protected] => Array ( ) ) [62] => Category Object ( [languages:protected] => [bok_resources:protected] => [bok_topics:protected] => [bok_keywords:protected] => [id:protected] => 62 [type:protected] => category [parent:protected] => 2 [label:protected] => Structural Ironworker [alreadyInSave:protected] => [alreadyInValidation:protected] => [validationFailures:protected] => Array ( ) [_new:BaseObject:private] => [_deleted:BaseObject:private] => [modifiedColumns:protected] => Array ( ) ) [87] => Category Object ( [languages:protected] => [bok_resources:protected] => [bok_topics:protected] => [bok_keywords:protected] => [id:protected] => 87 [type:protected] => category [parent:protected] => 3 [label:protected] => Commercial & Institutional [alreadyInSave:protected] => [alreadyInValidation:protected] => [validationFailures:protected] => Array ( ) [_new:BaseObject:private] => [_deleted:BaseObject:private] => [modifiedColumns:protected] => Array ( ) ) [90] => Category Object ( [languages:protected] => [bok_resources:protected] => [bok_topics:protected] => [bok_keywords:protected] => [id:protected] => 90 [type:protected] => category [parent:protected] => 3 [label:protected] => Industrial [alreadyInSave:protected] => [alreadyInValidation:protected] => [validationFailures:protected] => Array ( ) [_new:BaseObject:private] => [_deleted:BaseObject:private] => [modifiedColumns:protected] => Array ( ) ) [97] => Category Object ( [languages:protected] => [bok_resources:protected] => [bok_topics:protected] => [bok_keywords:protected] => [id:protected] => 97 [type:protected] => category [parent:protected] => 5 [label:protected] => Images [alreadyInSave:protected] => [alreadyInValidation:protected] => [validationFailures:protected] => Array ( ) [_new:BaseObject:private] => [_deleted:BaseObject:private] => [modifiedColumns:protected] => Array ( ) ) ) [categories_initialized:protected] => 1 [mapped_items:protected] => [content:protected] => [files:protected] => [language:protected] => Language Object ( [id:protected] => 1 [code:protected] => en [name:protected] => English [alreadyInSave:protected] => [alreadyInValidation:protected] => [validationFailures:protected] => Array ( ) [_new:BaseObject:private] => [_deleted:BaseObject:private] => [modifiedColumns:protected] => Array ( ) ) [old_record:protected] => [id:protected] => 3995 [old_id:protected] => [elcosh_id:protected] => i002690 [type:protected] => image [display_type:protected] => Image [user_id:protected] => 0 [language_id:protected] => 1 [tagging_id:protected] => Bruce Lippy [priority_id:protected] => 1 [title:protected] => Construction bracing [total_pages:protected] => 0 [billed_pages:protected] => 0 [publication_number:protected] => [part_of:protected] => [keywords:protected] => Bracing, support, scaffold [comments:protected] => [summary:protected] => This shows structural support that prevents collapses during construction. [transition_comments:protected] => [external_link:protected] => [consol_link:protected] => http://www.cpwrconstructionsolutions.org/masonry/solution/8/adjustable-tower-scaffold.html [more_like_this:protected] => i002660 [permission_given_by:protected] => [published:protected] => T [billable:protected] => F [img_name:protected] => [img_ext:protected] => jpg [img_width:protected] => [img_height:protected] => [img_credit:protected] => Photo by Pam Susi [img_practice:protected] => good [vid_source_id:protected] => [vid_running_time:protected] => [vid_intended_audience:protected] => [vid_acquisition_info:protected] => [vid_cost:protected] => [vid_producer:protected] => [vid_filename:protected] => [vid_filename_downloadable:protected] => [date_summary:protected] => January 2016 [date_permission_requested:protected] => [date_permission_received:protected] => [date_review_needed:protected] => [date_received:protected] => 02/01/16 [date_completed:protected] => 02/01/16 [date_billed:protected] => [date_modified:protected] => 02/01/16 [collBokExports:protected] => [lastBokExportCriteria:BaseElcoshItem:private] => [alreadyInSave:protected] => [alreadyInValidation:protected] => [validationFailures:protected] => Array ( ) [_new:BaseObject:private] => [_deleted:BaseObject:private] => [modifiedColumns:protected] => Array ( ) ) ) [3] => Search_Result Object ( [title] => Suspended Scaffold Outriggers [image] => /record/images/3975-p.jpg [blurb] => Suspended scaffolds systems must be designed by a qualified person and inspected daily by a competent person. The supports for the counterweight must... [category] => Array ( [0] => 97 [1] => 15 [2] => 47 [3] => 49 [4] => 79 [5] => 87 ) [labels] => Array ( [0] => Images [1] => Media [2] => Media & Documents [3] => Falls [4] => Work Environment [5] => Hazards [6] => Bricklayer [7] => Trades [8] => Carpenter [10] => Scaffold Erector [12] => Commercial & Institutional [13] => Jobsites ) [type] => Images [sub_category] => [url] => /image/3975/i002683/Suspended%2BScaffold%2BOutriggers.html [item:protected] => ImageRecord Object ( [records:protected] => Array ( ) [recordId:protected] => [searchWordClass:protected] => [searchWordPeerClass:protected] => [bok_record:protected] => [authors:protected] => [organizations:protected] => [collections:protected] => [categories:protected] => Array ( [97] => Category Object ( [languages:protected] => [bok_resources:protected] => [bok_topics:protected] => [bok_keywords:protected] => [id:protected] => 97 [type:protected] => category [parent:protected] => 5 [label:protected] => Images [alreadyInSave:protected] => [alreadyInValidation:protected] => [validationFailures:protected] => Array ( ) [_new:BaseObject:private] => [_deleted:BaseObject:private] => [modifiedColumns:protected] => Array ( ) ) [15] => Category Object ( [languages:protected] => [bok_resources:protected] => [bok_topics:protected] => [bok_keywords:protected] => [id:protected] => 15 [type:protected] => category [parent:protected] => 7 [label:protected] => Falls [alreadyInSave:protected] => [alreadyInValidation:protected] => [validationFailures:protected] => Array ( ) [_new:BaseObject:private] => [_deleted:BaseObject:private] => [modifiedColumns:protected] => Array ( ) ) [47] => Category Object ( [languages:protected] => [bok_resources:protected] => [bok_topics:protected] => [bok_keywords:protected] => [id:protected] => 47 [type:protected] => category [parent:protected] => 2 [label:protected] => Bricklayer [alreadyInSave:protected] => [alreadyInValidation:protected] => [validationFailures:protected] => Array ( ) [_new:BaseObject:private] => [_deleted:BaseObject:private] => [modifiedColumns:protected] => Array ( ) ) [49] => Category Object ( [languages:protected] => [bok_resources:protected] => [bok_topics:protected] => [bok_keywords:protected] => [id:protected] => 49 [type:protected] => category [parent:protected] => 2 [label:protected] => Carpenter [alreadyInSave:protected] => [alreadyInValidation:protected] => [validationFailures:protected] => Array ( ) [_new:BaseObject:private] => [_deleted:BaseObject:private] => [modifiedColumns:protected] => Array ( ) ) [79] => Category Object ( [languages:protected] => [bok_resources:protected] => [bok_topics:protected] => [bok_keywords:protected] => [id:protected] => 79 [type:protected] => category [parent:protected] => 2 [label:protected] => Scaffold Erector [alreadyInSave:protected] => [alreadyInValidation:protected] => [validationFailures:protected] => Array ( ) [_new:BaseObject:private] => [_deleted:BaseObject:private] => [modifiedColumns:protected] => Array ( ) ) [87] => Category Object ( [languages:protected] => [bok_resources:protected] => [bok_topics:protected] => [bok_keywords:protected] => [id:protected] => 87 [type:protected] => category [parent:protected] => 3 [label:protected] => Commercial & Institutional [alreadyInSave:protected] => [alreadyInValidation:protected] => [validationFailures:protected] => Array ( ) [_new:BaseObject:private] => [_deleted:BaseObject:private] => [modifiedColumns:protected] => Array ( ) ) ) [categories_initialized:protected] => 1 [mapped_items:protected] => [content:protected] => [files:protected] => [language:protected] => Language Object ( [id:protected] => 1 [code:protected] => en [name:protected] => English [alreadyInSave:protected] => [alreadyInValidation:protected] => [validationFailures:protected] => Array ( ) [_new:BaseObject:private] => [_deleted:BaseObject:private] => [modifiedColumns:protected] => Array ( ) ) [old_record:protected] => [id:protected] => 3975 [old_id:protected] => [elcosh_id:protected] => i002683 [type:protected] => image [display_type:protected] => Image [user_id:protected] => 0 [language_id:protected] => 1 [tagging_id:protected] => John Newquist [priority_id:protected] => 1 [title:protected] => Suspended Scaffold Outriggers [total_pages:protected] => 0 [billed_pages:protected] => 0 [publication_number:protected] => [part_of:protected] => [keywords:protected] => suspended, scaffold, swing, stage, fall, protection, counterweight, qualified, person [comments:protected] => [summary:protected] => Suspended scaffolds systems must be designed by a qualified person and inspected daily by a competent person. The supports for the counterweight must be designed with a safety factor of four. [transition_comments:protected] => [external_link:protected] => [consol_link:protected] => http://www.cpwrconstructionsolutions.org/task/Erect%2Band%2Bdismantle%2Bscaffolds/ [more_like_this:protected] => d000244,d000359,i000253,i000407 [permission_given_by:protected] => [published:protected] => T [billable:protected] => F [img_name:protected] => [img_ext:protected] => jpg [img_width:protected] => [img_height:protected] => [img_credit:protected] => MetroPark, Miller and Long [img_practice:protected] => not_applicable [vid_source_id:protected] => [vid_running_time:protected] => [vid_intended_audience:protected] => [vid_acquisition_info:protected] => [vid_cost:protected] => [vid_producer:protected] => [vid_filename:protected] => [vid_filename_downloadable:protected] => [date_summary:protected] => August 28 2015 [date_permission_requested:protected] => [date_permission_received:protected] => [date_review_needed:protected] => [date_received:protected] => 08/28/15 [date_completed:protected] => 08/28/15 [date_billed:protected] => [date_modified:protected] => 08/28/15 [collBokExports:protected] => [lastBokExportCriteria:BaseElcoshItem:private] => [alreadyInSave:protected] => [alreadyInValidation:protected] => [validationFailures:protected] => Array ( ) [_new:BaseObject:private] => [_deleted:BaseObject:private] => [modifiedColumns:protected] => Array ( ) ) ) [4] => Search_Result Object ( [title] => Suspended scaffold [image] => /record/images/3976-p.jpg [blurb] => Suspended scaffold outrigger beams must have stops to prevent the hangers from sliding of the end of the outriggers. Wire rope supported must be desig... [category] => Array ( [0] => 97 [1] => 15 [2] => 47 [3] => 50 [4] => 79 [5] => 87 ) [labels] => Array ( [0] => Images [1] => Media [2] => Media & Documents [3] => Falls [4] => Work Environment [5] => Hazards [6] => Bricklayer [7] => Trades [8] => Carpet Layer [10] => Scaffold Erector [12] => Commercial & Institutional [13] => Jobsites ) [type] => Images [sub_category] => [url] => /image/3976/i002684/Suspended%2Bscaffold.html [item:protected] => ImageRecord Object ( [records:protected] => Array ( ) [recordId:protected] => [searchWordClass:protected] => [searchWordPeerClass:protected] => [bok_record:protected] => [authors:protected] => [organizations:protected] => [collections:protected] => [categories:protected] => Array ( [97] => Category Object ( [languages:protected] => [bok_resources:protected] => [bok_topics:protected] => [bok_keywords:protected] => [id:protected] => 97 [type:protected] => category [parent:protected] => 5 [label:protected] => Images [alreadyInSave:protected] => [alreadyInValidation:protected] => [validationFailures:protected] => Array ( ) [_new:BaseObject:private] => [_deleted:BaseObject:private] => [modifiedColumns:protected] => Array ( ) ) [15] => Category Object ( [languages:protected] => [bok_resources:protected] => [bok_topics:protected] => [bok_keywords:protected] => [id:protected] => 15 [type:protected] => category [parent:protected] => 7 [label:protected] => Falls [alreadyInSave:protected] => [alreadyInValidation:protected] => [validationFailures:protected] => Array ( ) [_new:BaseObject:private] => [_deleted:BaseObject:private] => [modifiedColumns:protected] => Array ( ) ) [47] => Category Object ( [languages:protected] => [bok_resources:protected] => [bok_topics:protected] => [bok_keywords:protected] => [id:protected] => 47 [type:protected] => category [parent:protected] => 2 [label:protected] => Bricklayer [alreadyInSave:protected] => [alreadyInValidation:protected] => [validationFailures:protected] => Array ( ) [_new:BaseObject:private] => [_deleted:BaseObject:private] => [modifiedColumns:protected] => Array ( ) ) [50] => Category Object ( [languages:protected] => [bok_resources:protected] => [bok_topics:protected] => [bok_keywords:protected] => [id:protected] => 50 [type:protected] => category [parent:protected] => 2 [label:protected] => Carpet Layer [alreadyInSave:protected] => [alreadyInValidation:protected] => [validationFailures:protected] => Array ( ) [_new:BaseObject:private] => [_deleted:BaseObject:private] => [modifiedColumns:protected] => Array ( ) ) [79] => Category Object ( [languages:protected] => [bok_resources:protected] => [bok_topics:protected] => [bok_keywords:protected] => [id:protected] => 79 [type:protected] => category [parent:protected] => 2 [label:protected] => Scaffold Erector [alreadyInSave:protected] => [alreadyInValidation:protected] => [validationFailures:protected] => Array ( ) [_new:BaseObject:private] => [_deleted:BaseObject:private] => [modifiedColumns:protected] => Array ( ) ) [87] => Category Object ( [languages:protected] => [bok_resources:protected] => [bok_topics:protected] => [bok_keywords:protected] => [id:protected] => 87 [type:protected] => category [parent:protected] => 3 [label:protected] => Commercial & Institutional [alreadyInSave:protected] => [alreadyInValidation:protected] => [validationFailures:protected] => Array ( ) [_new:BaseObject:private] => [_deleted:BaseObject:private] => [modifiedColumns:protected] => Array ( ) ) ) [categories_initialized:protected] => 1 [mapped_items:protected] => [content:protected] => [files:protected] => [language:protected] => Language Object ( [id:protected] => 1 [code:protected] => en [name:protected] => English [alreadyInSave:protected] => [alreadyInValidation:protected] => [validationFailures:protected] => Array ( ) [_new:BaseObject:private] => [_deleted:BaseObject:private] => [modifiedColumns:protected] => Array ( ) ) [old_record:protected] => [id:protected] => 3976 [old_id:protected] => [elcosh_id:protected] => i002684 [type:protected] => image [display_type:protected] => Image [user_id:protected] => 0 [language_id:protected] => 1 [tagging_id:protected] => John Newquist [priority_id:protected] => 1 [title:protected] => Suspended scaffold [total_pages:protected] => 0 [billed_pages:protected] => 0 [publication_number:protected] => [part_of:protected] => [keywords:protected] => Suspended, scaffold, outrigger, beams, erection, wire, rope, inspection, swing, stage, [comments:protected] => [summary:protected] => Suspended scaffold outrigger beams must have stops to prevent the hangers from sliding of the end of the outriggers. Wire rope supported must be designed with a safety factor of 6. The scaffold must be inspected by a competent person daily. [transition_comments:protected] => [external_link:protected] => [consol_link:protected] => http://www.cpwrconstructionsolutions.org/task/Erect%2Band%2Bdismantle%2Bscaffolds/ [more_like_this:protected] => i002683, d000244, i000407, d000606 [permission_given_by:protected] => [published:protected] => T [billable:protected] => F [img_name:protected] => [img_ext:protected] => jpg [img_width:protected] => [img_height:protected] => [img_credit:protected] => Metropark, Miller and Long [img_practice:protected] => not_applicable [vid_source_id:protected] => [vid_running_time:protected] => [vid_intended_audience:protected] => [vid_acquisition_info:protected] => [vid_cost:protected] => [vid_producer:protected] => [vid_filename:protected] => [vid_filename_downloadable:protected] => [date_summary:protected] => [date_permission_requested:protected] => [date_permission_received:protected] => [date_review_needed:protected] => [date_received:protected] => 08/28/15 [date_completed:protected] => 08/28/15 [date_billed:protected] => [date_modified:protected] => 08/28/15 [collBokExports:protected] => [lastBokExportCriteria:BaseElcoshItem:private] => [alreadyInSave:protected] => [alreadyInValidation:protected] => [validationFailures:protected] => Array ( ) [_new:BaseObject:private] => [_deleted:BaseObject:private] => [modifiedColumns:protected] => Array ( ) ) ) [5] => Search_Result Object ( [title] => Three Tower Cranes [image] => /record/images/3979-p.jpg [blurb] => Whenever multiple tower cranes are used, there needs to be preplanning to ensure that the tower cranes cannot hit each other loads. This is accomplish... [category] => Array ( [0] => 97 [1] => 11 [2] => 64 [3] => 70 [4] => 62 [5] => 87 ) [labels] => Array ( [0] => Images [1] => Media [2] => Media & Documents [3] => Cranes & Hoists [4] => Work Environment [5] => Hazards [6] => Laborer [7] => Trades [8] => Operating Engineer [10] => Structural Ironworker [12] => Commercial & Institutional [13] => Jobsites ) [type] => Images [sub_category] => [url] => /image/3979/i002687/Three%2BTower%2BCranes.html [item:protected] => ImageRecord Object ( [records:protected] => Array ( ) [recordId:protected] => [searchWordClass:protected] => [searchWordPeerClass:protected] => [bok_record:protected] => [authors:protected] => [organizations:protected] => [collections:protected] => [categories:protected] => Array ( [97] => Category Object ( [languages:protected] => [bok_resources:protected] => [bok_topics:protected] => [bok_keywords:protected] => [id:protected] => 97 [type:protected] => category [parent:protected] => 5 [label:protected] => Images [alreadyInSave:protected] => [alreadyInValidation:protected] => [validationFailures:protected] => Array ( ) [_new:BaseObject:private] => [_deleted:BaseObject:private] => [modifiedColumns:protected] => Array ( ) ) [11] => Category Object ( [languages:protected] => [bok_resources:protected] => [bok_topics:protected] => [bok_keywords:protected] => [id:protected] => 11 [type:protected] => category [parent:protected] => 7 [label:protected] => Cranes & Hoists [alreadyInSave:protected] => [alreadyInValidation:protected] => [validationFailures:protected] => Array ( ) [_new:BaseObject:private] => [_deleted:BaseObject:private] => [modifiedColumns:protected] => Array ( ) ) [64] => Category Object ( [languages:protected] => [bok_resources:protected] => [bok_topics:protected] => [bok_keywords:protected] => [id:protected] => 64 [type:protected] => category [parent:protected] => 2 [label:protected] => Laborer [alreadyInSave:protected] => [alreadyInValidation:protected] => [validationFailures:protected] => Array ( ) [_new:BaseObject:private] => [_deleted:BaseObject:private] => [modifiedColumns:protected] => Array ( ) ) [70] => Category Object ( [languages:protected] => [bok_resources:protected] => [bok_topics:protected] => [bok_keywords:protected] => [id:protected] => 70 [type:protected] => category [parent:protected] => 2 [label:protected] => Operating Engineer [alreadyInSave:protected] => [alreadyInValidation:protected] => [validationFailures:protected] => Array ( ) [_new:BaseObject:private] => [_deleted:BaseObject:private] => [modifiedColumns:protected] => Array ( ) ) [62] => Category Object ( [languages:protected] => [bok_resources:protected] => [bok_topics:protected] => [bok_keywords:protected] => [id:protected] => 62 [type:protected] => category [parent:protected] => 2 [label:protected] => Structural Ironworker [alreadyInSave:protected] => [alreadyInValidation:protected] => [validationFailures:protected] => Array ( ) [_new:BaseObject:private] => [_deleted:BaseObject:private] => [modifiedColumns:protected] => Array ( ) ) [87] => Category Object ( [languages:protected] => [bok_resources:protected] => [bok_topics:protected] => [bok_keywords:protected] => [id:protected] => 87 [type:protected] => category [parent:protected] => 3 [label:protected] => Commercial & Institutional [alreadyInSave:protected] => [alreadyInValidation:protected] => [validationFailures:protected] => Array ( ) [_new:BaseObject:private] => [_deleted:BaseObject:private] => [modifiedColumns:protected] => Array ( ) ) ) [categories_initialized:protected] => 1 [mapped_items:protected] => [content:protected] => [files:protected] => [language:protected] => Language Object ( [id:protected] => 1 [code:protected] => en [name:protected] => English [alreadyInSave:protected] => [alreadyInValidation:protected] => [validationFailures:protected] => Array ( ) [_new:BaseObject:private] => [_deleted:BaseObject:private] => [modifiedColumns:protected] => Array ( ) ) [old_record:protected] => [id:protected] => 3979 [old_id:protected] => [elcosh_id:protected] => i002687 [type:protected] => image [display_type:protected] => Image [user_id:protected] => 0 [language_id:protected] => 1 [tagging_id:protected] => John Newquist [priority_id:protected] => 1 [title:protected] => Three Tower Cranes [total_pages:protected] => 0 [billed_pages:protected] => 0 [publication_number:protected] => [part_of:protected] => [keywords:protected] => [comments:protected] => [summary:protected] => Whenever multiple tower cranes are used, there needs to be preplanning to ensure that the tower cranes cannot hit each other loads. This is accomplished by setting swing restrictions, marking the ground for allowable crane travel and training of the crane signal persons. [transition_comments:protected] => [external_link:protected] => [consol_link:protected] => http://www.cpwrconstructionsolutions.org/work/6/184/ [more_like_this:protected] => d001029, d000010, i001280, i001221 [permission_given_by:protected] => [published:protected] => T [billable:protected] => F [img_name:protected] => [img_ext:protected] => jpg [img_width:protected] => [img_height:protected] => [img_credit:protected] => Metropark [img_practice:protected] => not_applicable [vid_source_id:protected] => [vid_running_time:protected] => [vid_intended_audience:protected] => [vid_acquisition_info:protected] => [vid_cost:protected] => [vid_producer:protected] => [vid_filename:protected] => [vid_filename_downloadable:protected] => [date_summary:protected] => August 28 2015 [date_permission_requested:protected] => [date_permission_received:protected] => [date_review_needed:protected] => [date_received:protected] => 08/28/15 [date_completed:protected] => 08/28/15 [date_billed:protected] => [date_modified:protected] => 08/28/15 [collBokExports:protected] => [lastBokExportCriteria:BaseElcoshItem:private] => [alreadyInSave:protected] => [alreadyInValidation:protected] => [validationFailures:protected] => Array ( ) [_new:BaseObject:private] => [_deleted:BaseObject:private] => [modifiedColumns:protected] => Array ( ) ) ) ) [preview_mode] => [description] => This third in a series of 6 Tool Box Talks on construction ergonomics focuses on proper positioning to avoid injuries. The TBT recommends: 1)prop up a task off of the floor by using a raised surface, cart, baker scaffold, saw horses to prep materials near waist height, 2)move the lift or ladder in the best position for the work, 3)position the lift in front of the area you plan to work without trying to reach too far on either side of the lift. [keywords] => position, positioning, ergonomics, ergo, carpal tunnel, MSD, musculoskeletal disorder [related_items] => Array ( [Handouts] => Array ( [0] => DocumentRecord Object ( [records:protected] => Array ( ) [recordId:protected] => [searchWordClass:protected] => [searchWordPeerClass:protected] => [bok_record:protected] => [authors:protected] => [organizations:protected] => [collections:protected] => [categories:protected] => [categories_initialized:protected] => [mapped_items:protected] => [content:protected] => [files:protected] => [language:protected] => Language Object ( [id:protected] => 1 [code:protected] => en [name:protected] => English [alreadyInSave:protected] => [alreadyInValidation:protected] => [validationFailures:protected] => Array ( ) [_new:BaseObject:private] => [_deleted:BaseObject:private] => [modifiedColumns:protected] => Array ( ) ) [old_record:protected] => [id:protected] => 3833 [old_id:protected] => [elcosh_id:protected] => d001303 [type:protected] => document [display_type:protected] => HTML w/ PDF [user_id:protected] => 25 [language_id:protected] => 1 [tagging_id:protected] => Bruce Lippy [priority_id:protected] => 1 [title:protected] => Overview of Toolbox Talks on Ergonomics Developed by Washington University in St. Louis [total_pages:protected] => 3 [billed_pages:protected] => 3 [publication_number:protected] => [part_of:protected] => [keywords:protected] => ergonomics, musculoskeletal disorders, MSDs [comments:protected] => 7-28-2014 - Originally submitted as "HTML w/ doc and PDF", Jeff Nelson asked Bruce Lippy for permission to switch it to "HTML w/ PDF" -- permission was given [summary:protected] => This overviews provides a background on how Washington University in St. Louis developed this series of six toolbox talks on ergonomics. It also describes how they tested the effectiveness of these communication tools, concluding that the guide was valuable for improving the delivery of ergonomics training and interaction between the safety representative and workers. The researchers recommend preparing site-specific information prior to the talk and interacting with workers to discuss problems and ergonomic solutions during the safety meetings. [transition_comments:protected] => [external_link:protected] => [consol_link:protected] => [more_like_this:protected] => [permission_given_by:protected] => Lisa Jaegers, Washington U. in St. Louis [published:protected] => T [billable:protected] => F [img_name:protected] => [img_ext:protected] => png [img_width:protected] => [img_height:protected] => [img_credit:protected] => [img_practice:protected] => [vid_source_id:protected] => [vid_running_time:protected] => [vid_intended_audience:protected] => [vid_acquisition_info:protected] => [vid_cost:protected] => [vid_producer:protected] => [vid_filename:protected] => [vid_filename_downloadable:protected] => [date_summary:protected] => 2014 [date_permission_requested:protected] => [date_permission_received:protected] => [date_review_needed:protected] => [date_received:protected] => 06/11/14 [date_completed:protected] => 07/29/14 [date_billed:protected] => [date_modified:protected] => 07/29/14 [collBokExports:protected] => [lastBokExportCriteria:BaseElcoshItem:private] => [alreadyInSave:protected] => [alreadyInValidation:protected] => [validationFailures:protected] => Array ( ) [_new:BaseObject:private] => [_deleted:BaseObject:private] => [modifiedColumns:protected] => Array ( ) ) ) [Toolbox Talks] => Array ( [0] => DocumentRecord Object ( [records:protected] => Array ( ) [recordId:protected] => [searchWordClass:protected] => [searchWordPeerClass:protected] => [bok_record:protected] => [authors:protected] => [organizations:protected] => [collections:protected] => [categories:protected] => [categories_initialized:protected] => [mapped_items:protected] => [content:protected] => [files:protected] => [language:protected] => Language Object ( [id:protected] => 1 [code:protected] => en [name:protected] => English [alreadyInSave:protected] => [alreadyInValidation:protected] => [validationFailures:protected] => Array ( ) [_new:BaseObject:private] => [_deleted:BaseObject:private] => [modifiedColumns:protected] => Array ( ) ) [old_record:protected] => [id:protected] => 3835 [old_id:protected] => [elcosh_id:protected] => d001304 [type:protected] => document [display_type:protected] => HTML w/ PDF [user_id:protected] => 25 [language_id:protected] => 1 [tagging_id:protected] => Bruce Lippy [priority_id:protected] => 1 [title:protected] => Ergonomics Tool Box Talks (TBT) Training Guide [total_pages:protected] => 2 [billed_pages:protected] => 2 [publication_number:protected] => [part_of:protected] => [keywords:protected] => Ergonomics, carpal tunnel, muscular skeletal disorders, msd [comments:protected] => [summary:protected] => CPWR-funded ergonomics research by Washington University at St. Louis led to the development of 6 tool box talks. This guide is an explanation of how to deliver the talks for maximum effectiveness. This guide should be reviewed before delivering any of the talks because it makes important recommendations like: • If possible, give the TBTs as a part of the crew’s regular safety meetings so that ergonomics is included in the safety discussion. • Try to locate an area with few distractions for gathering the crew. • For a team approach, invite the work crew, site superintendent, project manager and other general contractor and/or subcontractor reps who you feel may be helpful in supporting the training and ergonomics solutions. [transition_comments:protected] => [external_link:protected] => [consol_link:protected] => [more_like_this:protected] => d001303,d001305,d001306,d001307,d001308,d001309,d001310 [permission_given_by:protected] => [published:protected] => T [billable:protected] => F [img_name:protected] => [img_ext:protected] => png [img_width:protected] => [img_height:protected] => [img_credit:protected] => [img_practice:protected] => [vid_source_id:protected] => [vid_running_time:protected] => [vid_intended_audience:protected] => [vid_acquisition_info:protected] => [vid_cost:protected] => [vid_producer:protected] => [vid_filename:protected] => [vid_filename_downloadable:protected] => [date_summary:protected] => 2014 [date_permission_requested:protected] => [date_permission_received:protected] => [date_review_needed:protected] => [date_received:protected] => 06/12/14 [date_completed:protected] => 07/29/14 [date_billed:protected] => [date_modified:protected] => 07/29/14 [collBokExports:protected] => [lastBokExportCriteria:BaseElcoshItem:private] => [alreadyInSave:protected] => [alreadyInValidation:protected] => [validationFailures:protected] => Array ( ) [_new:BaseObject:private] => [_deleted:BaseObject:private] => [modifiedColumns:protected] => Array ( ) ) [1] => DocumentRecord Object ( [records:protected] => Array ( ) [recordId:protected] => [searchWordClass:protected] => [searchWordPeerClass:protected] => [bok_record:protected] => [authors:protected] => [organizations:protected] => [collections:protected] => [categories:protected] => [categories_initialized:protected] => [mapped_items:protected] => [content:protected] => [files:protected] => [language:protected] => Language Object ( [id:protected] => 1 [code:protected] => en [name:protected] => English [alreadyInSave:protected] => [alreadyInValidation:protected] => [validationFailures:protected] => Array ( ) [_new:BaseObject:private] => [_deleted:BaseObject:private] => [modifiedColumns:protected] => Array ( ) ) [old_record:protected] => [id:protected] => 3836 [old_id:protected] => [elcosh_id:protected] => d001305 [type:protected] => document [display_type:protected] => HTML w/ PDF [user_id:protected] => 25 [language_id:protected] => 1 [tagging_id:protected] => Bruce Lippy [priority_id:protected] => 1 [title:protected] => TBT1 Ergonomics in Construction [total_pages:protected] => 5 [billed_pages:protected] => 5 [publication_number:protected] => [part_of:protected] => [keywords:protected] => ergonomics, ergo, msd, musculoskeletal disorders, risk factors, lifting, carpal tunnel, repetition, awkward postures [comments:protected] => 7-28-2014 Jeff Nelson asked Bruce Lippy about what to do with a sentence included toward the top of the doc, "Fill them in on page 2 'Other Questions.'" -- Bruce said this sentence could be deleted from the HTML. [summary:protected] => This is the first in a series of 6 Tool Box Talks produced by Washington University in St. Louis on ergonomics in construction work. This one should be delivered first because it covers what ergonomics is, why construction workers need to talk about it, what the risk factors are for developing a health problem and how to prevent these problems. [transition_comments:protected] => [external_link:protected] => [consol_link:protected] => http://www.cpwrconstructionsolutions.org/pipes_vessels/solution/50/participatory-ergonomics-program.html [more_like_this:protected] => d001303,d001304,d001306,d001307,d001308,d001309 [permission_given_by:protected] => Lisa Jaegers, Washington U. in St. Louis [published:protected] => T [billable:protected] => F [img_name:protected] => [img_ext:protected] => png [img_width:protected] => [img_height:protected] => [img_credit:protected] => [img_practice:protected] => [vid_source_id:protected] => [vid_running_time:protected] => [vid_intended_audience:protected] => [vid_acquisition_info:protected] => [vid_cost:protected] => [vid_producer:protected] => [vid_filename:protected] => [vid_filename_downloadable:protected] => [date_summary:protected] => 2014 [date_permission_requested:protected] => [date_permission_received:protected] => [date_review_needed:protected] => [date_received:protected] => 06/12/14 [date_completed:protected] => 07/28/14 [date_billed:protected] => [date_modified:protected] => 10/09/15 [collBokExports:protected] => [lastBokExportCriteria:BaseElcoshItem:private] => [alreadyInSave:protected] => [alreadyInValidation:protected] => [validationFailures:protected] => Array ( ) [_new:BaseObject:private] => [_deleted:BaseObject:private] => [modifiedColumns:protected] => Array ( ) ) [2] => DocumentRecord Object ( [records:protected] => Array ( ) [recordId:protected] => [searchWordClass:protected] => [searchWordPeerClass:protected] => [bok_record:protected] => [authors:protected] => [organizations:protected] => [collections:protected] => [categories:protected] => [categories_initialized:protected] => [mapped_items:protected] => [content:protected] => [files:protected] => [language:protected] => Language Object ( [id:protected] => 1 [code:protected] => en [name:protected] => English [alreadyInSave:protected] => [alreadyInValidation:protected] => [validationFailures:protected] => Array ( ) [_new:BaseObject:private] => [_deleted:BaseObject:private] => [modifiedColumns:protected] => Array ( ) ) [old_record:protected] => [id:protected] => 3837 [old_id:protected] => [elcosh_id:protected] => d001306 [type:protected] => document [display_type:protected] => HTML w/ PDF [user_id:protected] => 25 [language_id:protected] => 1 [tagging_id:protected] => Bruce Lippy [priority_id:protected] => 1 [title:protected] => TBT2 Keep Reach Close [total_pages:protected] => 4 [billed_pages:protected] => 4 [publication_number:protected] => [part_of:protected] => [keywords:protected] => reach, ergonomic, ergo, MSD, carpal tunnel, repetition, awkward positions [comments:protected] => 7-28-2014 Jeff Nelson asked Bruce Lippy about what to do with a sentence included toward the top of the doc, "Fill them in on page 2 'Other Questions.'" -- Bruce said this sentence could be deleted from the HTML. [summary:protected] => This is the second of six Tool Box Talks created by Washington University in St. Louis on ergonomics in construction. There is a guide with the series that describes how to deliver these talks. This one deals with how to avoid awkward reaching during tasks to prevent injuries. try to work with your hands below your head and close to our body to reduce your risk of shoulder strains and back discomfort. This TBT recommends considering ways to move close to the task, keeping the work area free of obstacles, and talking with each other to provide constructive feedback about your working position. [transition_comments:protected] => [external_link:protected] => [consol_link:protected] => http://www.cpwrconstructionsolutions.org/hazard/959/lifting-and-carrying-manual-materials-handling.html [more_like_this:protected] => d001303,d001304,d001305,d001307,d001308,e001309 [permission_given_by:protected] => [published:protected] => T [billable:protected] => F [img_name:protected] => [img_ext:protected] => png [img_width:protected] => [img_height:protected] => [img_credit:protected] => [img_practice:protected] => [vid_source_id:protected] => [vid_running_time:protected] => [vid_intended_audience:protected] => [vid_acquisition_info:protected] => [vid_cost:protected] => [vid_producer:protected] => [vid_filename:protected] => [vid_filename_downloadable:protected] => [date_summary:protected] => 2014 [date_permission_requested:protected] => [date_permission_received:protected] => [date_review_needed:protected] => [date_received:protected] => 06/12/14 [date_completed:protected] => 07/28/14 [date_billed:protected] => [date_modified:protected] => 11/02/16 [collBokExports:protected] => [lastBokExportCriteria:BaseElcoshItem:private] => [alreadyInSave:protected] => [alreadyInValidation:protected] => [validationFailures:protected] => Array ( ) [_new:BaseObject:private] => [_deleted:BaseObject:private] => [modifiedColumns:protected] => Array ( ) ) [3] => DocumentRecord Object ( [records:protected] => Array ( ) [recordId:protected] => [searchWordClass:protected] => [searchWordPeerClass:protected] => [bok_record:protected] => [authors:protected] => [organizations:protected] => [collections:protected] => [categories:protected] => [categories_initialized:protected] => [mapped_items:protected] => [content:protected] => [files:protected] => [language:protected] => Language Object ( [id:protected] => 1 [code:protected] => en [name:protected] => English [alreadyInSave:protected] => [alreadyInValidation:protected] => [validationFailures:protected] => Array ( ) [_new:BaseObject:private] => [_deleted:BaseObject:private] => [modifiedColumns:protected] => Array ( ) ) [old_record:protected] => [id:protected] => 3839 [old_id:protected] => [elcosh_id:protected] => d001308 [type:protected] => document [display_type:protected] => HTML w/ PDF [user_id:protected] => 23 [language_id:protected] => 1 [tagging_id:protected] => Bruce Lippy [priority_id:protected] => 1 [title:protected] => TBT4 Move Materials With Assist [total_pages:protected] => 4 [billed_pages:protected] => 4 [publication_number:protected] => [part_of:protected] => [keywords:protected] => lifting, back injury, ergonomics, ergo, MSD, buddy system [comments:protected] => 7-28-2014 Jeff Nelson asked Bruce Lippy about what to do with a sentence included toward the top of the doc, "Fill them in on page 2 'Other Questions.'" -- Bruce said this sentence could be deleted from the HTML. [summary:protected] => This tool box talk is fourth in a series of 6 developed by Washington University in St. Louis on construction ergonomics. This one focuses on preventing back injuries by getting an assist when manually lifting. It recommends using a cart for transporting loads, taking less trips, avoiding carrying materials on the shoulder and helping each other to lift large or heavy materials when a cart or hoist is not available. [transition_comments:protected] => [external_link:protected] => [consol_link:protected] => http://www.cpwrconstructionsolutions.org/hazard/959/lifting-and-carrying-manual-materials-handling.html [more_like_this:protected] => d001303,d001304,d001305,d001306,d001307,d001309 [permission_given_by:protected] => Lisa Jaegers, Washington U. in St. Louis [published:protected] => T [billable:protected] => F [img_name:protected] => [img_ext:protected] => png [img_width:protected] => [img_height:protected] => [img_credit:protected] => [img_practice:protected] => [vid_source_id:protected] => [vid_running_time:protected] => [vid_intended_audience:protected] => [vid_acquisition_info:protected] => [vid_cost:protected] => [vid_producer:protected] => [vid_filename:protected] => [vid_filename_downloadable:protected] => [date_summary:protected] => 2014 [date_permission_requested:protected] => [date_permission_received:protected] => [date_review_needed:protected] => [date_received:protected] => 06/12/14 [date_completed:protected] => 07/29/14 [date_billed:protected] => [date_modified:protected] => 10/09/15 [collBokExports:protected] => [lastBokExportCriteria:BaseElcoshItem:private] => [alreadyInSave:protected] => [alreadyInValidation:protected] => [validationFailures:protected] => Array ( ) [_new:BaseObject:private] => [_deleted:BaseObject:private] => [modifiedColumns:protected] => Array ( ) ) [4] => DocumentRecord Object ( [records:protected] => Array ( ) [recordId:protected] => [searchWordClass:protected] => [searchWordPeerClass:protected] => [bok_record:protected] => [authors:protected] => [organizations:protected] => [collections:protected] => [categories:protected] => [categories_initialized:protected] => [mapped_items:protected] => [content:protected] => [files:protected] => [language:protected] => Language Object ( [id:protected] => 1 [code:protected] => en [name:protected] => English [alreadyInSave:protected] => [alreadyInValidation:protected] => [validationFailures:protected] => Array ( ) [_new:BaseObject:private] => [_deleted:BaseObject:private] => [modifiedColumns:protected] => Array ( ) ) [old_record:protected] => [id:protected] => 3840 [old_id:protected] => [elcosh_id:protected] => d001309 [type:protected] => document [display_type:protected] => HTML w/ PDF [user_id:protected] => 23 [language_id:protected] => 1 [tagging_id:protected] => Bruce Lippy [priority_id:protected] => 1 [title:protected] => TBT5 Manual Tools [total_pages:protected] => 4 [billed_pages:protected] => 4 [publication_number:protected] => [part_of:protected] => [keywords:protected] => ergonomic, hand tools, handles, MSD, musculoskeletal disorder, carpal tunnel [comments:protected] => 7-28-2014 Jeff Nelson asked Bruce Lippy about what to do with a sentence included toward the top of the doc, "Fill them in on page 2 'Other Questions.'" -- Bruce said this sentence could be deleted from the HTML. [summary:protected] => This is the fifth in a series of 6 tool box talks on construction ergonomics produced by the University of Washington in St. Louis. This one focuses on manual tools. It asks the following 6 key questions. Does the tool… 1. Fit the task? 2. Allow a good power grip? 3. Keep the wrist in a straight posture? 4. Feel comfortable? 5. Take less effort than other tools for the task? 6. Work effectively? [transition_comments:protected] => [external_link:protected] => [consol_link:protected] => http://www.cpwrconstructionsolutions.org/masonry/solution/383/ergonomic-hand-tools.html [more_like_this:protected] => d001303,d001304,d001305,d001306,d001307,d001308,d001310 [permission_given_by:protected] => Lisa Jaegers, U. Wash. St. Louis [published:protected] => T [billable:protected] => F [img_name:protected] => [img_ext:protected] => png [img_width:protected] => [img_height:protected] => [img_credit:protected] => [img_practice:protected] => [vid_source_id:protected] => [vid_running_time:protected] => [vid_intended_audience:protected] => [vid_acquisition_info:protected] => [vid_cost:protected] => [vid_producer:protected] => [vid_filename:protected] => [vid_filename_downloadable:protected] => [date_summary:protected] => 2014 [date_permission_requested:protected] => [date_permission_received:protected] => [date_review_needed:protected] => [date_received:protected] => 06/12/14 [date_completed:protected] => 07/29/14 [date_billed:protected] => [date_modified:protected] => 10/09/15 [collBokExports:protected] => [lastBokExportCriteria:BaseElcoshItem:private] => [alreadyInSave:protected] => [alreadyInValidation:protected] => [validationFailures:protected] => Array ( ) [_new:BaseObject:private] => [_deleted:BaseObject:private] => [modifiedColumns:protected] => Array ( ) ) ) ) [collections] => Array ( [3834] => ) [record] => DocumentRecord Object ( [records:protected] => Array ( ) [recordId:protected] => [searchWordClass:protected] => [searchWordPeerClass:protected] => [bok_record:protected] => [authors:protected] => Array ( ) [organizations:protected] => Array ( [182] => Organization Object ( [id:protected] => 182 [elcosh_id:protected] => o000205 [user_id:protected] => 14 [province_id:protected] => 0 [country_id:protected] => 0 [title:protected] => Washington University - St. Louis [address:protected] => [postal_code:protected] => [city:protected] => [department:protected] => [phone:protected] => [fax:protected] => [email:protected] => [website:protected] => [filename:protected] => [about:protected] => [comments:protected] => [logo_available:protected] => T [no_details:protected] => T [date_received:protected] => 2009-08-06 [date_completed:protected] => 2009-08-06 [date_billed:protected] => [alreadyInSave:protected] => [alreadyInValidation:protected] => [validationFailures:protected] => Array ( ) [_new:BaseObject:private] => [_deleted:BaseObject:private] => [modifiedColumns:protected] => Array ( ) ) ) [collections:protected] => Array ( [3834] => ) [categories:protected] => [categories_initialized:protected] => [mapped_items:protected] => Array ( [3833] => DocumentRecord Object ( [records:protected] => Array ( ) [recordId:protected] => [searchWordClass:protected] => [searchWordPeerClass:protected] => [bok_record:protected] => [authors:protected] => [organizations:protected] => [collections:protected] => [categories:protected] => [categories_initialized:protected] => [mapped_items:protected] => [content:protected] => [files:protected] => [language:protected] => [old_record:protected] => [id:protected] => 3833 [old_id:protected] => [elcosh_id:protected] => d001303 [type:protected] => document [display_type:protected] => HTML w/ PDF [user_id:protected] => 25 [language_id:protected] => 1 [tagging_id:protected] => Bruce Lippy [priority_id:protected] => 1 [title:protected] => Overview of Toolbox Talks on Ergonomics Developed by Washington University in St. Louis [total_pages:protected] => 3 [billed_pages:protected] => 3 [publication_number:protected] => [part_of:protected] => [keywords:protected] => ergonomics, musculoskeletal disorders, MSDs [comments:protected] => 7-28-2014 - Originally submitted as "HTML w/ doc and PDF", Jeff Nelson asked Bruce Lippy for permission to switch it to "HTML w/ PDF" -- permission was given [summary:protected] => This overviews provides a background on how Washington University in St. Louis developed this series of six toolbox talks on ergonomics. It also describes how they tested the effectiveness of these communication tools, concluding that the guide was valuable for improving the delivery of ergonomics training and interaction between the safety representative and workers. The researchers recommend preparing site-specific information prior to the talk and interacting with workers to discuss problems and ergonomic solutions during the safety meetings. [transition_comments:protected] => [external_link:protected] => [consol_link:protected] => [more_like_this:protected] => [permission_given_by:protected] => Lisa Jaegers, Washington U. in St. Louis [published:protected] => T [billable:protected] => F [img_name:protected] => [img_ext:protected] => png [img_width:protected] => [img_height:protected] => [img_credit:protected] => [img_practice:protected] => [vid_source_id:protected] => [vid_running_time:protected] => [vid_intended_audience:protected] => [vid_acquisition_info:protected] => [vid_cost:protected] => [vid_producer:protected] => [vid_filename:protected] => [vid_filename_downloadable:protected] => [date_summary:protected] => 2014 [date_permission_requested:protected] => [date_permission_received:protected] => [date_review_needed:protected] => [date_received:protected] => 06/11/14 [date_completed:protected] => 07/29/14 [date_billed:protected] => [date_modified:protected] => 07/29/14 [collBokExports:protected] => [lastBokExportCriteria:BaseElcoshItem:private] => [alreadyInSave:protected] => [alreadyInValidation:protected] => [validationFailures:protected] => Array ( ) [_new:BaseObject:private] => [_deleted:BaseObject:private] => [modifiedColumns:protected] => Array ( ) ) [3835] => DocumentRecord Object ( [records:protected] => Array ( ) [recordId:protected] => [searchWordClass:protected] => [searchWordPeerClass:protected] => [bok_record:protected] => [authors:protected] => [organizations:protected] => [collections:protected] => [categories:protected] => [categories_initialized:protected] => [mapped_items:protected] => [content:protected] => [files:protected] => [language:protected] => [old_record:protected] => [id:protected] => 3835 [old_id:protected] => [elcosh_id:protected] => d001304 [type:protected] => document [display_type:protected] => HTML w/ PDF [user_id:protected] => 25 [language_id:protected] => 1 [tagging_id:protected] => Bruce Lippy [priority_id:protected] => 1 [title:protected] => Ergonomics Tool Box Talks (TBT) Training Guide [total_pages:protected] => 2 [billed_pages:protected] => 2 [publication_number:protected] => [part_of:protected] => [keywords:protected] => Ergonomics, carpal tunnel, muscular skeletal disorders, msd [comments:protected] => [summary:protected] => CPWR-funded ergonomics research by Washington University at St. Louis led to the development of 6 tool box talks. This guide is an explanation of how to deliver the talks for maximum effectiveness. This guide should be reviewed before delivering any of the talks because it makes important recommendations like: • If possible, give the TBTs as a part of the crew’s regular safety meetings so that ergonomics is included in the safety discussion. • Try to locate an area with few distractions for gathering the crew. • For a team approach, invite the work crew, site superintendent, project manager and other general contractor and/or subcontractor reps who you feel may be helpful in supporting the training and ergonomics solutions. [transition_comments:protected] => [external_link:protected] => [consol_link:protected] => [more_like_this:protected] => d001303,d001305,d001306,d001307,d001308,d001309,d001310 [permission_given_by:protected] => [published:protected] => T [billable:protected] => F [img_name:protected] => [img_ext:protected] => png [img_width:protected] => [img_height:protected] => [img_credit:protected] => [img_practice:protected] => [vid_source_id:protected] => [vid_running_time:protected] => [vid_intended_audience:protected] => [vid_acquisition_info:protected] => [vid_cost:protected] => [vid_producer:protected] => [vid_filename:protected] => [vid_filename_downloadable:protected] => [date_summary:protected] => 2014 [date_permission_requested:protected] => [date_permission_received:protected] => [date_review_needed:protected] => [date_received:protected] => 06/12/14 [date_completed:protected] => 07/29/14 [date_billed:protected] => [date_modified:protected] => 07/29/14 [collBokExports:protected] => [lastBokExportCriteria:BaseElcoshItem:private] => [alreadyInSave:protected] => [alreadyInValidation:protected] => [validationFailures:protected] => Array ( ) [_new:BaseObject:private] => [_deleted:BaseObject:private] => [modifiedColumns:protected] => Array ( ) ) [3836] => DocumentRecord Object ( [records:protected] => Array ( ) [recordId:protected] => [searchWordClass:protected] => [searchWordPeerClass:protected] => [bok_record:protected] => [authors:protected] => [organizations:protected] => [collections:protected] => [categories:protected] => [categories_initialized:protected] => [mapped_items:protected] => [content:protected] => [files:protected] => [language:protected] => [old_record:protected] => [id:protected] => 3836 [old_id:protected] => [elcosh_id:protected] => d001305 [type:protected] => document [display_type:protected] => HTML w/ PDF [user_id:protected] => 25 [language_id:protected] => 1 [tagging_id:protected] => Bruce Lippy [priority_id:protected] => 1 [title:protected] => TBT1 Ergonomics in Construction [total_pages:protected] => 5 [billed_pages:protected] => 5 [publication_number:protected] => [part_of:protected] => [keywords:protected] => ergonomics, ergo, msd, musculoskeletal disorders, risk factors, lifting, carpal tunnel, repetition, awkward postures [comments:protected] => 7-28-2014 Jeff Nelson asked Bruce Lippy about what to do with a sentence included toward the top of the doc, "Fill them in on page 2 'Other Questions.'" -- Bruce said this sentence could be deleted from the HTML. [summary:protected] => This is the first in a series of 6 Tool Box Talks produced by Washington University in St. Louis on ergonomics in construction work. This one should be delivered first because it covers what ergonomics is, why construction workers need to talk about it, what the risk factors are for developing a health problem and how to prevent these problems. [transition_comments:protected] => [external_link:protected] => [consol_link:protected] => http://www.cpwrconstructionsolutions.org/pipes_vessels/solution/50/participatory-ergonomics-program.html [more_like_this:protected] => d001303,d001304,d001306,d001307,d001308,d001309 [permission_given_by:protected] => Lisa Jaegers, Washington U. in St. Louis [published:protected] => T [billable:protected] => F [img_name:protected] => [img_ext:protected] => png [img_width:protected] => [img_height:protected] => [img_credit:protected] => [img_practice:protected] => [vid_source_id:protected] => [vid_running_time:protected] => [vid_intended_audience:protected] => [vid_acquisition_info:protected] => [vid_cost:protected] => [vid_producer:protected] => [vid_filename:protected] => [vid_filename_downloadable:protected] => [date_summary:protected] => 2014 [date_permission_requested:protected] => [date_permission_received:protected] => [date_review_needed:protected] => [date_received:protected] => 06/12/14 [date_completed:protected] => 07/28/14 [date_billed:protected] => [date_modified:protected] => 10/09/15 [collBokExports:protected] => [lastBokExportCriteria:BaseElcoshItem:private] => [alreadyInSave:protected] => [alreadyInValidation:protected] => [validationFailures:protected] => Array ( ) [_new:BaseObject:private] => [_deleted:BaseObject:private] => [modifiedColumns:protected] => Array ( ) ) [3837] => DocumentRecord Object ( [records:protected] => Array ( ) [recordId:protected] => [searchWordClass:protected] => [searchWordPeerClass:protected] => [bok_record:protected] => [authors:protected] => [organizations:protected] => [collections:protected] => [categories:protected] => [categories_initialized:protected] => [mapped_items:protected] => [content:protected] => [files:protected] => [language:protected] => [old_record:protected] => [id:protected] => 3837 [old_id:protected] => [elcosh_id:protected] => d001306 [type:protected] => document [display_type:protected] => HTML w/ PDF [user_id:protected] => 25 [language_id:protected] => 1 [tagging_id:protected] => Bruce Lippy [priority_id:protected] => 1 [title:protected] => TBT2 Keep Reach Close [total_pages:protected] => 4 [billed_pages:protected] => 4 [publication_number:protected] => [part_of:protected] => [keywords:protected] => reach, ergonomic, ergo, MSD, carpal tunnel, repetition, awkward positions [comments:protected] => 7-28-2014 Jeff Nelson asked Bruce Lippy about what to do with a sentence included toward the top of the doc, "Fill them in on page 2 'Other Questions.'" -- Bruce said this sentence could be deleted from the HTML. [summary:protected] => This is the second of six Tool Box Talks created by Washington University in St. Louis on ergonomics in construction. There is a guide with the series that describes how to deliver these talks. This one deals with how to avoid awkward reaching during tasks to prevent injuries. try to work with your hands below your head and close to our body to reduce your risk of shoulder strains and back discomfort. This TBT recommends considering ways to move close to the task, keeping the work area free of obstacles, and talking with each other to provide constructive feedback about your working position. [transition_comments:protected] => [external_link:protected] => [consol_link:protected] => http://www.cpwrconstructionsolutions.org/hazard/959/lifting-and-carrying-manual-materials-handling.html [more_like_this:protected] => d001303,d001304,d001305,d001307,d001308,e001309 [permission_given_by:protected] => [published:protected] => T [billable:protected] => F [img_name:protected] => [img_ext:protected] => png [img_width:protected] => [img_height:protected] => [img_credit:protected] => [img_practice:protected] => [vid_source_id:protected] => [vid_running_time:protected] => [vid_intended_audience:protected] => [vid_acquisition_info:protected] => [vid_cost:protected] => [vid_producer:protected] => [vid_filename:protected] => [vid_filename_downloadable:protected] => [date_summary:protected] => 2014 [date_permission_requested:protected] => [date_permission_received:protected] => [date_review_needed:protected] => [date_received:protected] => 06/12/14 [date_completed:protected] => 07/28/14 [date_billed:protected] => [date_modified:protected] => 11/02/16 [collBokExports:protected] => [lastBokExportCriteria:BaseElcoshItem:private] => [alreadyInSave:protected] => [alreadyInValidation:protected] => [validationFailures:protected] => Array ( ) [_new:BaseObject:private] => [_deleted:BaseObject:private] => [modifiedColumns:protected] => Array ( ) ) [3839] => DocumentRecord Object ( [records:protected] => Array ( ) [recordId:protected] => [searchWordClass:protected] => [searchWordPeerClass:protected] => [bok_record:protected] => [authors:protected] => [organizations:protected] => [collections:protected] => [categories:protected] => [categories_initialized:protected] => [mapped_items:protected] => [content:protected] => [files:protected] => [language:protected] => [old_record:protected] => [id:protected] => 3839 [old_id:protected] => [elcosh_id:protected] => d001308 [type:protected] => document [display_type:protected] => HTML w/ PDF [user_id:protected] => 23 [language_id:protected] => 1 [tagging_id:protected] => Bruce Lippy [priority_id:protected] => 1 [title:protected] => TBT4 Move Materials With Assist [total_pages:protected] => 4 [billed_pages:protected] => 4 [publication_number:protected] => [part_of:protected] => [keywords:protected] => lifting, back injury, ergonomics, ergo, MSD, buddy system [comments:protected] => 7-28-2014 Jeff Nelson asked Bruce Lippy about what to do with a sentence included toward the top of the doc, "Fill them in on page 2 'Other Questions.'" -- Bruce said this sentence could be deleted from the HTML. [summary:protected] => This tool box talk is fourth in a series of 6 developed by Washington University in St. Louis on construction ergonomics. This one focuses on preventing back injuries by getting an assist when manually lifting. It recommends using a cart for transporting loads, taking less trips, avoiding carrying materials on the shoulder and helping each other to lift large or heavy materials when a cart or hoist is not available. [transition_comments:protected] => [external_link:protected] => [consol_link:protected] => http://www.cpwrconstructionsolutions.org/hazard/959/lifting-and-carrying-manual-materials-handling.html [more_like_this:protected] => d001303,d001304,d001305,d001306,d001307,d001309 [permission_given_by:protected] => Lisa Jaegers, Washington U. in St. Louis [published:protected] => T [billable:protected] => F [img_name:protected] => [img_ext:protected] => png [img_width:protected] => [img_height:protected] => [img_credit:protected] => [img_practice:protected] => [vid_source_id:protected] => [vid_running_time:protected] => [vid_intended_audience:protected] => [vid_acquisition_info:protected] => [vid_cost:protected] => [vid_producer:protected] => [vid_filename:protected] => [vid_filename_downloadable:protected] => [date_summary:protected] => 2014 [date_permission_requested:protected] => [date_permission_received:protected] => [date_review_needed:protected] => [date_received:protected] => 06/12/14 [date_completed:protected] => 07/29/14 [date_billed:protected] => [date_modified:protected] => 10/09/15 [collBokExports:protected] => [lastBokExportCriteria:BaseElcoshItem:private] => [alreadyInSave:protected] => [alreadyInValidation:protected] => [validationFailures:protected] => Array ( ) [_new:BaseObject:private] => [_deleted:BaseObject:private] => [modifiedColumns:protected] => Array ( ) ) [3840] => DocumentRecord Object ( [records:protected] => Array ( ) [recordId:protected] => [searchWordClass:protected] => [searchWordPeerClass:protected] => [bok_record:protected] => [authors:protected] => [organizations:protected] => [collections:protected] => [categories:protected] => [categories_initialized:protected] => [mapped_items:protected] => [content:protected] => [files:protected] => [language:protected] => [old_record:protected] => [id:protected] => 3840 [old_id:protected] => [elcosh_id:protected] => d001309 [type:protected] => document [display_type:protected] => HTML w/ PDF [user_id:protected] => 23 [language_id:protected] => 1 [tagging_id:protected] => Bruce Lippy [priority_id:protected] => 1 [title:protected] => TBT5 Manual Tools [total_pages:protected] => 4 [billed_pages:protected] => 4 [publication_number:protected] => [part_of:protected] => [keywords:protected] => ergonomic, hand tools, handles, MSD, musculoskeletal disorder, carpal tunnel [comments:protected] => 7-28-2014 Jeff Nelson asked Bruce Lippy about what to do with a sentence included toward the top of the doc, "Fill them in on page 2 'Other Questions.'" -- Bruce said this sentence could be deleted from the HTML. [summary:protected] => This is the fifth in a series of 6 tool box talks on construction ergonomics produced by the University of Washington in St. Louis. This one focuses on manual tools. It asks the following 6 key questions. Does the tool… 1. Fit the task? 2. Allow a good power grip? 3. Keep the wrist in a straight posture? 4. Feel comfortable? 5. Take less effort than other tools for the task? 6. Work effectively? [transition_comments:protected] => [external_link:protected] => [consol_link:protected] => http://www.cpwrconstructionsolutions.org/masonry/solution/383/ergonomic-hand-tools.html [more_like_this:protected] => d001303,d001304,d001305,d001306,d001307,d001308,d001310 [permission_given_by:protected] => Lisa Jaegers, U. Wash. St. Louis [published:protected] => T [billable:protected] => F [img_name:protected] => [img_ext:protected] => png [img_width:protected] => [img_height:protected] => [img_credit:protected] => [img_practice:protected] => [vid_source_id:protected] => [vid_running_time:protected] => [vid_intended_audience:protected] => [vid_acquisition_info:protected] => [vid_cost:protected] => [vid_producer:protected] => [vid_filename:protected] => [vid_filename_downloadable:protected] => [date_summary:protected] => 2014 [date_permission_requested:protected] => [date_permission_received:protected] => [date_review_needed:protected] => [date_received:protected] => 06/12/14 [date_completed:protected] => 07/29/14 [date_billed:protected] => [date_modified:protected] => 10/09/15 [collBokExports:protected] => [lastBokExportCriteria:BaseElcoshItem:private] => [alreadyInSave:protected] => [alreadyInValidation:protected] => [validationFailures:protected] => Array ( ) [_new:BaseObject:private] => [_deleted:BaseObject:private] => [modifiedColumns:protected] => Array ( ) ) ) [content:protected] => [files:protected] => Array ( [559] => [560] => [546] => File Object ( [id:protected] => 546 [filename:protected] => 3.jpg [downloadable:protected] => F [timestamp:protected] => 2009-07-03 12:54:22 [alreadyInSave:protected] => [alreadyInValidation:protected] => [validationFailures:protected] => Array ( ) [_new:BaseObject:private] => [_deleted:BaseObject:private] => [modifiedColumns:protected] => Array ( ) ) [9643] => File Object ( [id:protected] => 9643 [filename:protected] => d001307.pdf [downloadable:protected] => T [timestamp:protected] => 2014-07-27 19:09:19 [alreadyInSave:protected] => [alreadyInValidation:protected] => [validationFailures:protected] => Array ( ) [_new:BaseObject:private] => [_deleted:BaseObject:private] => [modifiedColumns:protected] => Array ( ) ) [566] => File Object ( [id:protected] => 566 [filename:protected] => 4.jpg [downloadable:protected] => F [timestamp:protected] => 2009-07-03 12:54:23 [alreadyInSave:protected] => [alreadyInValidation:protected] => [validationFailures:protected] => Array ( ) [_new:BaseObject:private] => [_deleted:BaseObject:private] => [modifiedColumns:protected] => Array ( ) ) ) [language:protected] => Language Object ( [id:protected] => 1 [code:protected] => en [name:protected] => English [alreadyInSave:protected] => [alreadyInValidation:protected] => [validationFailures:protected] => Array ( ) [_new:BaseObject:private] => [_deleted:BaseObject:private] => [modifiedColumns:protected] => Array ( ) ) [old_record:protected] => [id:protected] => 3838 [old_id:protected] => [elcosh_id:protected] => d001307 [type:protected] => document [display_type:protected] => HTML w/ PDF [user_id:protected] => 25 [language_id:protected] => 1 [tagging_id:protected] => Bruce Lippy [priority_id:protected] => 1 [title:protected] => TBT3 Positioning [total_pages:protected] => 4 [billed_pages:protected] => 4 [publication_number:protected] => [part_of:protected] => [keywords:protected] => position, positioning, ergonomics, ergo, carpal tunnel, MSD, musculoskeletal disorder [comments:protected] => 7-28-2014 Jeff Nelson asked Bruce Lippy about what to do with a sentence included toward the top of the doc, "Fill them in on page 2 'Other Questions.'" -- Bruce said this sentence could be deleted from the HTML. [summary:protected] => This third in a series of 6 Tool Box Talks on construction ergonomics focuses on proper positioning to avoid injuries. The TBT recommends: 1)prop up a task off of the floor by using a raised surface, cart, baker scaffold, saw horses to prep materials near waist height, 2)move the lift or ladder in the best position for the work, 3)position the lift in front of the area you plan to work without trying to reach too far on either side of the lift. [transition_comments:protected] => [external_link:protected] => [consol_link:protected] => http://www.cpwrconstructionsolutions.org/hazard/959/lifting-and-carrying-manual-materials-handling.html [more_like_this:protected] => d001303,d001304,d001305,d001306,d001308,d001309 [permission_given_by:protected] => Lisa Jaegers, WU-St. Louis [published:protected] => T [billable:protected] => F [img_name:protected] => [img_ext:protected] => png [img_width:protected] => [img_height:protected] => [img_credit:protected] => [img_practice:protected] => [vid_source_id:protected] => [vid_running_time:protected] => [vid_intended_audience:protected] => [vid_acquisition_info:protected] => [vid_cost:protected] => [vid_producer:protected] => [vid_filename:protected] => [vid_filename_downloadable:protected] => [date_summary:protected] => 2014 [date_permission_requested:protected] => [date_permission_received:protected] => [date_review_needed:protected] => [date_received:protected] => 06/12/14 [date_completed:protected] => 07/28/14 [date_billed:protected] => [date_modified:protected] => 10/09/15 [collBokExports:protected] => [lastBokExportCriteria:BaseElcoshItem:private] => [alreadyInSave:protected] => [alreadyInValidation:protected] => [validationFailures:protected] => Array ( ) [_new:BaseObject:private] => [_deleted:BaseObject:private] => [modifiedColumns:protected] => Array ( ) ) [show_text] => [document_content] => ElcoshItemDocumentContent Object ( [id:protected] => 2906 [item_id:protected] => 3838 [type:protected] => main [title:protected] => [content:protected] =>
Facilitator / Leader Tasks Before the Tool Box Talk (TBT)
- Read through this TBT guide.
- Walk the job site to find ergonomics examples based on the TBT. If possible, take photos of “safe” and “unsafe” examples at the site to be used during the TBT.
- Write down discussion questions to ask the group.
Learning Goals
After discussing this training topic, workers will have gained a general understanding of:
- Unsafe work positions.
- Solutions to improve work positioning.
TRAINING CARD
The last page of this PDF has directions for printing and laminating the training cards.
TRAINER’S TALKING POINTS
Why should we talk about positioning?
Construction work requires working in high, low, and tight spaces which often forces you to work in an awkward or uncomfortable position. Working in awkward reaching and bent positions can lead to shoulder and back discomfort and possible injury over time.
Demonstration: The training card provides examples of the range of reaching and the point at which the reach is unsafe. Hold your arms straight out in front of you. Look at your hands and wrists while I discuss each of the reach zones on the training card.
The Green Zone shows the ideal location for working with your hands. When possible, try to keep your work tasks as far out as your wrists.
The Orange Zone is for occasional work since it involves more weight on your shoulders and low back since your hands are away from your body. If needed, keep the reach distance as far as your fingertips.
The Red Zone is away from your body so far that it places you at higher risk for falls when in the air and shoulder and back discomfort. Limit the time you work reaching beyond your fingertips.
End of Demonstration
Discussion Question: Can anyone describe to us an awkward position that they work in or have seen someone work in?
- What does it feel like in your neck, back or arms when working in that position?
- Other Questions:_____________________________________________
Training Note: Here are examples of hazards in different construction trades. Choose your trade or one that is similar to your group’s line of work that can be used as hazards and solutions examples.
| Trade | Awkward Posture Hazards | Potential Solution |
|---|---|---|
| Carpenter-Drywall | Leaning over the side of a scissor lift to reach and operating a screw gun with the arm fully extended (reaching in the red zone past the fingertips). | Before starting to install the line of screws to the side of the lift, move the lift to re-center it for the next 2 lines of screws to be installed. |
| Floor Layer | Spreading mortar overhead on a wall with the bakers scaffold one foot away from the wall due to buckets on the floor below (reach in the red zone, past the fingertips). | Pre-plan this task by removing all objects in the path of the bakers scaffold. Having an open path allows you to work closer to the task. |
| Sheet Metal Worker | Prepping duct parts on the floor while bending the back and reaching to work on them. | Pre-plan this task by setting up a waist-height workstation on extra materials, a cart, or saw horses. |
Now let’s put this information into practice. What are some tricks or techniques that you use to work in a comfortable position?
- Other Questions:_____________________________________________
Here are a few other ideas that are listed on your training card:
Prop up your tasks off of the floor by using a raised surface, cart, baker scaffold, saw horses to prep materials near waist height.
Move the lift or ladder in the best position for the work – close to the work tasks.
For safety & comfort, try to position the lift in front of the area you plan to work without trying to reach too far on either side of the lift.
In summary, it is important to work in a safe position when possible in order to reduce the risk of falls and discomfort due to awkward working positions. Consider ways that you can work in the green/comfort zone and orange zone and avoid the unsafe red zone.
References
[Images modified from Grandjean & Eastman Kodak Co.]
1. Grandjean, E. 1988. Fitting the task to the man: A textbook of occupational ergonomics. 4th ed. Taylor & Francis.
2. Eastman Kodak Co. 1983. Ergonomic Design for People at Work. Vol 1. Wiley, John & Sons, Incorporated.
Refer to the resources at our website: oshr.im.wustl.edu for more Tool Box TIPS.
TRAINING ATTENDANCE SHEET
Training Topic: Ergonomics -- Positioning
Date:
| ATTENDEES | |
|---|---|
Directions for Making Laminated Training Cards
The last page of this PDF has directions for printing and laminating the training cards.
[content_transformed:protected] =>Facilitator / Leader Tasks Before the Tool Box Talk (TBT)
- Read through this TBT guide.
- Walk the job site to find ergonomics examples based on the TBT. If possible, take photos of “safe” and “unsafe” examples at the site to be used during the TBT.
- Write down discussion questions to ask the group.
Learning Goals
After discussing this training topic, workers will have gained a general understanding of:
- Unsafe work positions.
- Solutions to improve work positioning.
TRAINING CARD
The last page of this PDF has directions for printing and laminating the training cards.
TRAINER’S TALKING POINTS
Why should we talk about positioning?
Construction work requires working in high, low, and tight spaces which often forces you to work in an awkward or uncomfortable position. Working in awkward reaching and bent positions can lead to shoulder and back discomfort and possible injury over time.
Demonstration: The training card provides examples of the range of reaching and the point at which the reach is unsafe. Hold your arms straight out in front of you. Look at your hands and wrists while I discuss each of the reach zones on the training card.
The Green Zone shows the ideal location for working with your hands. When possible, try to keep your work tasks as far out as your wrists.
The Orange Zone is for occasional work since it involves more weight on your shoulders and low back since your hands are away from your body. If needed, keep the reach distance as far as your fingertips.
The Red Zone is away from your body so far that it places you at higher risk for falls when in the air and shoulder and back discomfort. Limit the time you work reaching beyond your fingertips.
End of Demonstration
Discussion Question: Can anyone describe to us an awkward position that they work in or have seen someone work in?
- What does it feel like in your neck, back or arms when working in that position?
- Other Questions:_____________________________________________
Training Note: Here are examples of hazards in different construction trades. Choose your trade or one that is similar to your group’s line of work that can be used as hazards and solutions examples.
| Trade | Awkward Posture Hazards | Potential Solution |
|---|---|---|
| Carpenter-Drywall | Leaning over the side of a scissor lift to reach and operating a screw gun with the arm fully extended (reaching in the red zone past the fingertips). | Before starting to install the line of screws to the side of the lift, move the lift to re-center it for the next 2 lines of screws to be installed. |
| Floor Layer | Spreading mortar overhead on a wall with the bakers scaffold one foot away from the wall due to buckets on the floor below (reach in the red zone, past the fingertips). | Pre-plan this task by removing all objects in the path of the bakers scaffold. Having an open path allows you to work closer to the task. |
| Sheet Metal Worker | Prepping duct parts on the floor while bending the back and reaching to work on them. | Pre-plan this task by setting up a waist-height workstation on extra materials, a cart, or saw horses. |
Now let’s put this information into practice. What are some tricks or techniques that you use to work in a comfortable position?
- Other Questions:_____________________________________________
Here are a few other ideas that are listed on your training card:
Prop up your tasks off of the floor by using a raised surface, cart, baker scaffold, saw horses to prep materials near waist height.
Move the lift or ladder in the best position for the work – close to the work tasks.
For safety & comfort, try to position the lift in front of the area you plan to work without trying to reach too far on either side of the lift.
In summary, it is important to work in a safe position when possible in order to reduce the risk of falls and discomfort due to awkward working positions. Consider ways that you can work in the green/comfort zone and orange zone and avoid the unsafe red zone.
References
[Images modified from Grandjean & Eastman Kodak Co.]
1. Grandjean, E. 1988. Fitting the task to the man: A textbook of occupational ergonomics. 4th ed. Taylor & Francis.
2. Eastman Kodak Co. 1983. Ergonomic Design for People at Work. Vol 1. Wiley, John & Sons, Incorporated.
Refer to the resources at our website: oshr.im.wustl.edu for more Tool Box TIPS.
TRAINING ATTENDANCE SHEET
Training Topic: Ergonomics -- Positioning
Date:
| ATTENDEES | |
|---|---|
Directions for Making Laminated Training Cards
The last page of this PDF has directions for printing and laminating the training cards.
[disclaimer:protected] => [disclaimer_transformed:protected] => [alreadyInSave:protected] => [alreadyInValidation:protected] => [validationFailures:protected] => Array ( ) [_new:BaseObject:private] => [_deleted:BaseObject:private] => [modifiedColumns:protected] => Array ( ) ) [template] => record ) [_file] => /home/agsafe5/repositories/elcosh/live/templates/elcosh/record.html [_errors:protected] => Array ( ) [_encoding:protected] => UTF-8 [_outputMode:protected] => 11 [_forceReparse:protected] => [_phpCodeDestination:protected] => /tmp/ [_phpCodeExtension:protected] => php [_cacheLifetime:protected] => 30 [_cachePurgeFrequency:protected] => 30 [externalMacroTemplatesCache:PHPTAL:private] => Array ( [macros.html] => PHPTAL Object ( [_prefilters:protected] => Array ( ) [_prefilter:PHPTAL:private] => REMOVED: DO NOT USE [_postfilter:protected] => [_repositories:protected] => Array ( [0] => /home/agsafe5/repositories/elcosh/live/templates/elcosh ) [_path:protected] => macros.html [_resolvers:protected] => Array ( ) [_source:protected] => PHPTAL_FileSource Object ( [_path:PHPTAL_FileSource:private] => /home/agsafe5/repositories/elcosh/live/templates/elcosh/macros.html ) [_codeFile:protected] => /tmp/tpl_61515a6c_macros__EnKHR8AWVA3oW7OmomvoZw.php [_functionName:protected] => tpl_61515a6c_macros__EnKHR8AWVA3oW7OmomvoZw [_prepared:protected] => 1 [_triggers:protected] => Array ( ) [_translator:protected] => [_globalContext:protected] => stdClass Object ( ) [_context:protected] => PHPTAL_Context Object ( [_line] => [_file] => /home/agsafe5/repositories/elcosh/live/templates/elcosh/record.html [repeat] => stdClass Object ( ) [_xmlDeclaration] => [_docType] => [_nothrow:PHPTAL_Context:private] => [_slots:PHPTAL_Context:private] => Array ( ) [_slotsStack:PHPTAL_Context:private] => Array ( [0] => Array ( ) [1] => Array ( ) ) [_parentContext:PHPTAL_Context:private] => PHPTAL_Context Object ( [_line] => [_file] => /home/agsafe5/repositories/elcosh/live/templates/elcosh/record.html [repeat] => stdClass Object ( ) [_xmlDeclaration] => [_docType] => [_nothrow:PHPTAL_Context:private] => [_slots:PHPTAL_Context:private] => Array ( ) [_slotsStack:PHPTAL_Context:private] => Array ( [0] => Array ( ) [1] => Array ( ) ) [_parentContext:PHPTAL_Context:private] => [_globalContext:PHPTAL_Context:private] => stdClass Object ( ) [_echoDeclarations:PHPTAL_Context:private] => [referer] => http://elcosh.org/document/3838/d001307/TBT3%2BPositioning.html [curr_module] => Record [styles] => Array ( ) [javascript] => Array ( [0] => jquery.min.js ) [metas] => Array ( [language] => en [robots] => index, follow ) [user] => [curr_url] => https://elcosh.org/index.php?module=Record&id=3838&type=document [base_url] => https://elcosh.org/index.php?module=Record [title] => eLCOSH : TBT3 Positioning [language] => en [search_query] => [module] => Record [new_records] => Array ( [0] => Search_Result Object ( [title] => Toolbox Talk: Fixed Ladder [image] => /record/images/notavailable-p.png [blurb] => The CPWR Toolbox Talk on Fixed Ladders addresses the potential risks associated with using fixed ladders. The resource includes a brief case example,... [category] => Array ( [0] => 15 [1] => 47 [2] => 49 [3] => 51 [4] => 53 [5] => 55 [6] => 60 [7] => 64 [8] => 73 [9] => 76 [10] => 78 [11] => 80 [12] => 86 [13] => 87 [14] => 90 [15] => 92 [16] => 93 [17] => 94 [18] => 100 ) [labels] => Array ( [0] => Falls [1] => Work Environment [2] => Hazards [3] => Bricklayer [4] => Trades [5] => Carpenter [7] => Cement Mason [9] => Concrete Polisher [11] => Electrical Worker [13] => HVAC [15] => Laborer [17] => PCC/Restoration [19] => Plumber/Pipefitter [21] => Roofer/Waterproofer [23] => Sheetmetal Worker [25] => Welder [27] => Commercial & Institutional [28] => Jobsites [29] => Industrial [31] => LEED/Green Construction [33] => Renovations [35] => Residential [37] => Toolbox Talks [38] => Documents [39] => Media & Documents ) [type] => Toolbox Talks [sub_category] => [url] => /document/4430/d001660/Toolbox%2BTalk%253A%2BFixed%2BLadder.html [item:protected] => DocumentRecord Object ( [records:protected] => Array ( ) [recordId:protected] => [searchWordClass:protected] => [searchWordPeerClass:protected] => [bok_record:protected] => [authors:protected] => [organizations:protected] => [collections:protected] => [categories:protected] => Array ( [15] => Category Object ( [languages:protected] => [bok_resources:protected] => [bok_topics:protected] => [bok_keywords:protected] => [id:protected] => 15 [type:protected] => category [parent:protected] => 7 [label:protected] => Falls [alreadyInSave:protected] => [alreadyInValidation:protected] => [validationFailures:protected] => Array ( ) [_new:BaseObject:private] => [_deleted:BaseObject:private] => [modifiedColumns:protected] => Array ( ) ) [47] => Category Object ( [languages:protected] => [bok_resources:protected] => [bok_topics:protected] => [bok_keywords:protected] => [id:protected] => 47 [type:protected] => category [parent:protected] => 2 [label:protected] => Bricklayer [alreadyInSave:protected] => [alreadyInValidation:protected] => [validationFailures:protected] => Array ( ) [_new:BaseObject:private] => [_deleted:BaseObject:private] => [modifiedColumns:protected] => Array ( ) ) [49] => Category Object ( [languages:protected] => [bok_resources:protected] => [bok_topics:protected] => [bok_keywords:protected] => [id:protected] => 49 [type:protected] => category [parent:protected] => 2 [label:protected] => Carpenter [alreadyInSave:protected] => [alreadyInValidation:protected] => [validationFailures:protected] => Array ( ) [_new:BaseObject:private] => [_deleted:BaseObject:private] => [modifiedColumns:protected] => Array ( ) ) [51] => Category Object ( [languages:protected] => [bok_resources:protected] => [bok_topics:protected] => [bok_keywords:protected] => [id:protected] => 51 [type:protected] => category [parent:protected] => 2 [label:protected] => Cement Mason [alreadyInSave:protected] => [alreadyInValidation:protected] => [validationFailures:protected] => Array ( ) [_new:BaseObject:private] => [_deleted:BaseObject:private] => [modifiedColumns:protected] => Array ( ) ) [53] => Category Object ( [languages:protected] => [bok_resources:protected] => [bok_topics:protected] => [bok_keywords:protected] => [id:protected] => 53 [type:protected] => category [parent:protected] => 2 [label:protected] => Concrete Polisher [alreadyInSave:protected] => [alreadyInValidation:protected] => [validationFailures:protected] => Array ( ) [_new:BaseObject:private] => [_deleted:BaseObject:private] => [modifiedColumns:protected] => Array ( ) ) [55] => Category Object ( [languages:protected] => [bok_resources:protected] => [bok_topics:protected] => [bok_keywords:protected] => [id:protected] => 55 [type:protected] => category [parent:protected] => 2 [label:protected] => Electrical Worker [alreadyInSave:protected] => [alreadyInValidation:protected] => [validationFailures:protected] => Array ( ) [_new:BaseObject:private] => [_deleted:BaseObject:private] => [modifiedColumns:protected] => Array ( ) ) [60] => Category Object ( [languages:protected] => [bok_resources:protected] => [bok_topics:protected] => [bok_keywords:protected] => [id:protected] => 60 [type:protected] => category [parent:protected] => 2 [label:protected] => HVAC [alreadyInSave:protected] => [alreadyInValidation:protected] => [validationFailures:protected] => Array ( ) [_new:BaseObject:private] => [_deleted:BaseObject:private] => [modifiedColumns:protected] => Array ( ) ) [64] => Category Object ( [languages:protected] => [bok_resources:protected] => [bok_topics:protected] => [bok_keywords:protected] => [id:protected] => 64 [type:protected] => category [parent:protected] => 2 [label:protected] => Laborer [alreadyInSave:protected] => [alreadyInValidation:protected] => [validationFailures:protected] => Array ( ) [_new:BaseObject:private] => [_deleted:BaseObject:private] => [modifiedColumns:protected] => Array ( ) ) [73] => Category Object ( [languages:protected] => [bok_resources:protected] => [bok_topics:protected] => [bok_keywords:protected] => [id:protected] => 73 [type:protected] => category [parent:protected] => 2 [label:protected] => PCC/Restoration [alreadyInSave:protected] => [alreadyInValidation:protected] => [validationFailures:protected] => Array ( ) [_new:BaseObject:private] => [_deleted:BaseObject:private] => [modifiedColumns:protected] => Array ( ) ) [76] => Category Object ( [languages:protected] => [bok_resources:protected] => [bok_topics:protected] => [bok_keywords:protected] => [id:protected] => 76 [type:protected] => category [parent:protected] => 2 [label:protected] => Plumber/Pipefitter [alreadyInSave:protected] => [alreadyInValidation:protected] => [validationFailures:protected] => Array ( ) [_new:BaseObject:private] => [_deleted:BaseObject:private] => [modifiedColumns:protected] => Array ( ) ) [78] => Category Object ( [languages:protected] => [bok_resources:protected] => [bok_topics:protected] => [bok_keywords:protected] => [id:protected] => 78 [type:protected] => category [parent:protected] => 2 [label:protected] => Roofer/Waterproofer [alreadyInSave:protected] => [alreadyInValidation:protected] => [validationFailures:protected] => Array ( ) [_new:BaseObject:private] => [_deleted:BaseObject:private] => [modifiedColumns:protected] => Array ( ) ) [80] => Category Object ( [languages:protected] => [bok_resources:protected] => [bok_topics:protected] => [bok_keywords:protected] => [id:protected] => 80 [type:protected] => category [parent:protected] => 2 [label:protected] => Sheetmetal Worker [alreadyInSave:protected] => [alreadyInValidation:protected] => [validationFailures:protected] => Array ( ) [_new:BaseObject:private] => [_deleted:BaseObject:private] => [modifiedColumns:protected] => Array ( ) ) [86] => Category Object ( [languages:protected] => [bok_resources:protected] => [bok_topics:protected] => [bok_keywords:protected] => [id:protected] => 86 [type:protected] => category [parent:protected] => 2 [label:protected] => Welder [alreadyInSave:protected] => [alreadyInValidation:protected] => [validationFailures:protected] => Array ( ) [_new:BaseObject:private] => [_deleted:BaseObject:private] => [modifiedColumns:protected] => Array ( ) ) [87] => Category Object ( [languages:protected] => [bok_resources:protected] => [bok_topics:protected] => [bok_keywords:protected] => [id:protected] => 87 [type:protected] => category [parent:protected] => 3 [label:protected] => Commercial & Institutional [alreadyInSave:protected] => [alreadyInValidation:protected] => [validationFailures:protected] => Array ( ) [_new:BaseObject:private] => [_deleted:BaseObject:private] => [modifiedColumns:protected] => Array ( ) ) [90] => Category Object ( [languages:protected] => [bok_resources:protected] => [bok_topics:protected] => [bok_keywords:protected] => [id:protected] => 90 [type:protected] => category [parent:protected] => 3 [label:protected] => Industrial [alreadyInSave:protected] => [alreadyInValidation:protected] => [validationFailures:protected] => Array ( ) [_new:BaseObject:private] => [_deleted:BaseObject:private] => [modifiedColumns:protected] => Array ( ) ) [92] => Category Object ( [languages:protected] => [bok_resources:protected] => [bok_topics:protected] => [bok_keywords:protected] => [id:protected] => 92 [type:protected] => category [parent:protected] => 3 [label:protected] => LEED/Green Construction [alreadyInSave:protected] => [alreadyInValidation:protected] => [validationFailures:protected] => Array ( ) [_new:BaseObject:private] => [_deleted:BaseObject:private] => [modifiedColumns:protected] => Array ( ) ) [93] => Category Object ( [languages:protected] => [bok_resources:protected] => [bok_topics:protected] => [bok_keywords:protected] => [id:protected] => 93 [type:protected] => category [parent:protected] => 3 [label:protected] => Renovations [alreadyInSave:protected] => [alreadyInValidation:protected] => [validationFailures:protected] => Array ( ) [_new:BaseObject:private] => [_deleted:BaseObject:private] => [modifiedColumns:protected] => Array ( ) ) [94] => Category Object ( [languages:protected] => [bok_resources:protected] => [bok_topics:protected] => [bok_keywords:protected] => [id:protected] => 94 [type:protected] => category [parent:protected] => 3 [label:protected] => Residential [alreadyInSave:protected] => [alreadyInValidation:protected] => [validationFailures:protected] => Array ( ) [_new:BaseObject:private] => [_deleted:BaseObject:private] => [modifiedColumns:protected] => Array ( ) ) [100] => Category Object ( [languages:protected] => [bok_resources:protected] => [bok_topics:protected] => [bok_keywords:protected] => [id:protected] => 100 [type:protected] => category [parent:protected] => 6 [label:protected] => Toolbox Talks [alreadyInSave:protected] => [alreadyInValidation:protected] => [validationFailures:protected] => Array ( ) [_new:BaseObject:private] => [_deleted:BaseObject:private] => [modifiedColumns:protected] => Array ( ) ) ) [categories_initialized:protected] => 1 [mapped_items:protected] => [content:protected] => [files:protected] => [language:protected] => Language Object ( [id:protected] => 1 [code:protected] => en [name:protected] => English [alreadyInSave:protected] => [alreadyInValidation:protected] => [validationFailures:protected] => Array ( ) [_new:BaseObject:private] => [_deleted:BaseObject:private] => [modifiedColumns:protected] => Array ( ) ) [old_record:protected] => [id:protected] => 4430 [old_id:protected] => [elcosh_id:protected] => d001660 [type:protected] => document [display_type:protected] => HTML only (and links) [user_id:protected] => 0 [language_id:protected] => 1 [tagging_id:protected] => Mike Aguilar [priority_id:protected] => 1 [title:protected] => Toolbox Talk: Fixed Ladder [total_pages:protected] => 0 [billed_pages:protected] => 0 [publication_number:protected] => [part_of:protected] => [keywords:protected] => Fixed Ladders, Fall Prevention, Falls [comments:protected] => [summary:protected] => The CPWR Toolbox Talk on Fixed Ladders addresses the potential risks associated with using fixed ladders. The resource includes a brief case example, steps to prevent a related injury and questions for discussion. It includes an image that illustrates the hazard, which can be posted in a central location as a reminder of steps to work safely. Available in English and Spanish. [transition_comments:protected] => [external_link:protected] => [consol_link:protected] => [more_like_this:protected] => d001257,d001254,d001255,d001256,d001258,d001262,d001279 [permission_given_by:protected] => [published:protected] => T [billable:protected] => F [img_name:protected] => [img_ext:protected] => [img_width:protected] => [img_height:protected] => [img_credit:protected] => [img_practice:protected] => [vid_source_id:protected] => [vid_running_time:protected] => [vid_intended_audience:protected] => [vid_acquisition_info:protected] => [vid_cost:protected] => [vid_producer:protected] => [vid_filename:protected] => [vid_filename_downloadable:protected] => [date_summary:protected] => [date_permission_requested:protected] => [date_permission_received:protected] => [date_review_needed:protected] => [date_received:protected] => 06/10/22 [date_completed:protected] => 06/10/22 [date_billed:protected] => [date_modified:protected] => 06/16/25 [collBokExports:protected] => [lastBokExportCriteria:BaseElcoshItem:private] => [alreadyInSave:protected] => [alreadyInValidation:protected] => [validationFailures:protected] => Array ( ) [_new:BaseObject:private] => [_deleted:BaseObject:private] => [modifiedColumns:protected] => Array ( ) ) ) [1] => Search_Result Object ( [title] => Toolbox Talk: Work Zone Safety: Working Around Vehicles [image] => /record/images/notavailable-p.png [blurb] => The CPWR Toolbox Talk on Working Around Vehicles in the Work Zone addresses methods to avoid being struck-by a vehicle on a construction site. The res... [category] => Array ( [0] => 12 [1] => 18 [2] => 52 [3] => 57 [4] => 70 [5] => 85 [6] => 87 [7] => 88 [8] => 89 [9] => 91 [10] => 90 [11] => 92 [12] => 93 [13] => 94 [14] => 95 [15] => 100 ) [labels] => Array ( [0] => Crushed/Struck By [1] => Work Environment [2] => Hazards [3] => Motor Vehicles/Heavy Equipment [6] => Commercial Diver [7] => Trades [8] => Flagger [10] => Operating Engineer [12] => Truck Driver [14] => Commercial & Institutional [15] => Jobsites [16] => Demolition [18] => Disasters [20] => Heavy & Highway [22] => Industrial [24] => LEED/Green Construction [26] => Renovations [28] => Residential [30] => Underground [32] => Toolbox Talks [33] => Documents [34] => Media & Documents ) [type] => Toolbox Talks [sub_category] => [url] => /document/4428/d001658/Toolbox%2BTalk%253A%2BWork%2BZone%2BSafety%253A%2BWorking%2BAround%2BVehicles.html [item:protected] => DocumentRecord Object ( [records:protected] => Array ( ) [recordId:protected] => [searchWordClass:protected] => [searchWordPeerClass:protected] => [bok_record:protected] => [authors:protected] => [organizations:protected] => [collections:protected] => [categories:protected] => Array ( [12] => Category Object ( [languages:protected] => [bok_resources:protected] => [bok_topics:protected] => [bok_keywords:protected] => [id:protected] => 12 [type:protected] => category [parent:protected] => 7 [label:protected] => Crushed/Struck By [alreadyInSave:protected] => [alreadyInValidation:protected] => [validationFailures:protected] => Array ( ) [_new:BaseObject:private] => [_deleted:BaseObject:private] => [modifiedColumns:protected] => Array ( ) ) [18] => Category Object ( [languages:protected] => [bok_resources:protected] => [bok_topics:protected] => [bok_keywords:protected] => [id:protected] => 18 [type:protected] => category [parent:protected] => 7 [label:protected] => Motor Vehicles/Heavy Equipment [alreadyInSave:protected] => [alreadyInValidation:protected] => [validationFailures:protected] => Array ( ) [_new:BaseObject:private] => [_deleted:BaseObject:private] => [modifiedColumns:protected] => Array ( ) ) [52] => Category Object ( [languages:protected] => [bok_resources:protected] => [bok_topics:protected] => [bok_keywords:protected] => [id:protected] => 52 [type:protected] => category [parent:protected] => 2 [label:protected] => Commercial Diver [alreadyInSave:protected] => [alreadyInValidation:protected] => [validationFailures:protected] => Array ( ) [_new:BaseObject:private] => [_deleted:BaseObject:private] => [modifiedColumns:protected] => Array ( ) ) [57] => Category Object ( [languages:protected] => [bok_resources:protected] => [bok_topics:protected] => [bok_keywords:protected] => [id:protected] => 57 [type:protected] => category [parent:protected] => 2 [label:protected] => Flagger [alreadyInSave:protected] => [alreadyInValidation:protected] => [validationFailures:protected] => Array ( ) [_new:BaseObject:private] => [_deleted:BaseObject:private] => [modifiedColumns:protected] => Array ( ) ) [70] => Category Object ( [languages:protected] => [bok_resources:protected] => [bok_topics:protected] => [bok_keywords:protected] => [id:protected] => 70 [type:protected] => category [parent:protected] => 2 [label:protected] => Operating Engineer [alreadyInSave:protected] => [alreadyInValidation:protected] => [validationFailures:protected] => Array ( ) [_new:BaseObject:private] => [_deleted:BaseObject:private] => [modifiedColumns:protected] => Array ( ) ) [85] => Category Object ( [languages:protected] => [bok_resources:protected] => [bok_topics:protected] => [bok_keywords:protected] => [id:protected] => 85 [type:protected] => category [parent:protected] => 2 [label:protected] => Truck Driver [alreadyInSave:protected] => [alreadyInValidation:protected] => [validationFailures:protected] => Array ( ) [_new:BaseObject:private] => [_deleted:BaseObject:private] => [modifiedColumns:protected] => Array ( ) ) [87] => Category Object ( [languages:protected] => [bok_resources:protected] => [bok_topics:protected] => [bok_keywords:protected] => [id:protected] => 87 [type:protected] => category [parent:protected] => 3 [label:protected] => Commercial & Institutional [alreadyInSave:protected] => [alreadyInValidation:protected] => [validationFailures:protected] => Array ( ) [_new:BaseObject:private] => [_deleted:BaseObject:private] => [modifiedColumns:protected] => Array ( ) ) [88] => Category Object ( [languages:protected] => [bok_resources:protected] => [bok_topics:protected] => [bok_keywords:protected] => [id:protected] => 88 [type:protected] => category [parent:protected] => 3 [label:protected] => Demolition [alreadyInSave:protected] => [alreadyInValidation:protected] => [validationFailures:protected] => Array ( ) [_new:BaseObject:private] => [_deleted:BaseObject:private] => [modifiedColumns:protected] => Array ( ) ) [89] => Category Object ( [languages:protected] => [bok_resources:protected] => [bok_topics:protected] => [bok_keywords:protected] => [id:protected] => 89 [type:protected] => category [parent:protected] => 3 [label:protected] => Disasters [alreadyInSave:protected] => [alreadyInValidation:protected] => [validationFailures:protected] => Array ( ) [_new:BaseObject:private] => [_deleted:BaseObject:private] => [modifiedColumns:protected] => Array ( ) ) [91] => Category Object ( [languages:protected] => [bok_resources:protected] => [bok_topics:protected] => [bok_keywords:protected] => [id:protected] => 91 [type:protected] => category [parent:protected] => 3 [label:protected] => Heavy & Highway [alreadyInSave:protected] => [alreadyInValidation:protected] => [validationFailures:protected] => Array ( ) [_new:BaseObject:private] => [_deleted:BaseObject:private] => [modifiedColumns:protected] => Array ( ) ) [90] => Category Object ( [languages:protected] => [bok_resources:protected] => [bok_topics:protected] => [bok_keywords:protected] => [id:protected] => 90 [type:protected] => category [parent:protected] => 3 [label:protected] => Industrial [alreadyInSave:protected] => [alreadyInValidation:protected] => [validationFailures:protected] => Array ( ) [_new:BaseObject:private] => [_deleted:BaseObject:private] => [modifiedColumns:protected] => Array ( ) ) [92] => Category Object ( [languages:protected] => [bok_resources:protected] => [bok_topics:protected] => [bok_keywords:protected] => [id:protected] => 92 [type:protected] => category [parent:protected] => 3 [label:protected] => LEED/Green Construction [alreadyInSave:protected] => [alreadyInValidation:protected] => [validationFailures:protected] => Array ( ) [_new:BaseObject:private] => [_deleted:BaseObject:private] => [modifiedColumns:protected] => Array ( ) ) [93] => Category Object ( [languages:protected] => [bok_resources:protected] => [bok_topics:protected] => [bok_keywords:protected] => [id:protected] => 93 [type:protected] => category [parent:protected] => 3 [label:protected] => Renovations [alreadyInSave:protected] => [alreadyInValidation:protected] => [validationFailures:protected] => Array ( ) [_new:BaseObject:private] => [_deleted:BaseObject:private] => [modifiedColumns:protected] => Array ( ) ) [94] => Category Object ( [languages:protected] => [bok_resources:protected] => [bok_topics:protected] => [bok_keywords:protected] => [id:protected] => 94 [type:protected] => category [parent:protected] => 3 [label:protected] => Residential [alreadyInSave:protected] => [alreadyInValidation:protected] => [validationFailures:protected] => Array ( ) [_new:BaseObject:private] => [_deleted:BaseObject:private] => [modifiedColumns:protected] => Array ( ) ) [95] => Category Object ( [languages:protected] => [bok_resources:protected] => [bok_topics:protected] => [bok_keywords:protected] => [id:protected] => 95 [type:protected] => category [parent:protected] => 3 [label:protected] => Underground [alreadyInSave:protected] => [alreadyInValidation:protected] => [validationFailures:protected] => Array ( ) [_new:BaseObject:private] => [_deleted:BaseObject:private] => [modifiedColumns:protected] => Array ( ) ) [100] => Category Object ( [languages:protected] => [bok_resources:protected] => [bok_topics:protected] => [bok_keywords:protected] => [id:protected] => 100 [type:protected] => category [parent:protected] => 6 [label:protected] => Toolbox Talks [alreadyInSave:protected] => [alreadyInValidation:protected] => [validationFailures:protected] => Array ( ) [_new:BaseObject:private] => [_deleted:BaseObject:private] => [modifiedColumns:protected] => Array ( ) ) ) [categories_initialized:protected] => 1 [mapped_items:protected] => [content:protected] => [files:protected] => [language:protected] => Language Object ( [id:protected] => 1 [code:protected] => en [name:protected] => English [alreadyInSave:protected] => [alreadyInValidation:protected] => [validationFailures:protected] => Array ( ) [_new:BaseObject:private] => [_deleted:BaseObject:private] => [modifiedColumns:protected] => Array ( ) ) [old_record:protected] => [id:protected] => 4428 [old_id:protected] => [elcosh_id:protected] => d001658 [type:protected] => document [display_type:protected] => HTML only (and links) [user_id:protected] => 0 [language_id:protected] => 1 [tagging_id:protected] => Daniela Caceres [priority_id:protected] => 1 [title:protected] => Toolbox Talk: Work Zone Safety: Working Around Vehicles [total_pages:protected] => 0 [billed_pages:protected] => 0 [publication_number:protected] => [part_of:protected] => [keywords:protected] => Struck, Struck by, Vehicle, Work Zone Safety, Truck, Operator, Driver, Mobile Equipment [comments:protected] => [summary:protected] => The CPWR Toolbox Talk on Working Around Vehicles in the Work Zone addresses methods to avoid being struck-by a vehicle on a construction site. The resource includes a case example, steps to prevent a related injury, and questions for discussion. It includes a graphic that illustrates the hazard, which can be posted in a central location as a reminder of steps to work safely. Available in English and Spanish. [transition_comments:protected] => [external_link:protected] => [consol_link:protected] => [more_like_this:protected] => d001640 [permission_given_by:protected] => [published:protected] => T [billable:protected] => F [img_name:protected] => [img_ext:protected] => [img_width:protected] => [img_height:protected] => [img_credit:protected] => [img_practice:protected] => [vid_source_id:protected] => [vid_running_time:protected] => [vid_intended_audience:protected] => [vid_acquisition_info:protected] => [vid_cost:protected] => [vid_producer:protected] => [vid_filename:protected] => [vid_filename_downloadable:protected] => [date_summary:protected] => [date_permission_requested:protected] => [date_permission_received:protected] => [date_review_needed:protected] => [date_received:protected] => 12/23/21 [date_completed:protected] => 12/23/21 [date_billed:protected] => [date_modified:protected] => 05/19/23 [collBokExports:protected] => [lastBokExportCriteria:BaseElcoshItem:private] => [alreadyInSave:protected] => [alreadyInValidation:protected] => [validationFailures:protected] => Array ( ) [_new:BaseObject:private] => [_deleted:BaseObject:private] => [modifiedColumns:protected] => Array ( ) ) ) [2] => Search_Result Object ( [title] => Construction Dive -- DeWalt's Jobsite Pro headphones recalled for fire hazards [image] => /record/images/notavailable-p.png [blurb] => A recall notice by the United States Consumer Product Safety Commission affects over 300,000 DeWalt Jobsite Pro Headphones. The recall is a result of... [category] => Array ( [0] => 16 [1] => 44 [2] => 45 [3] => 46 [4] => 47 [5] => 48 [6] => 49 [7] => 50 [8] => 51 [9] => 52 [10] => 53 [11] => 54 [12] => 55 [13] => 56 [14] => 57 [15] => 58 [16] => 59 [17] => 60 [18] => 61 [19] => 64 [20] => 65 [21] => 66 [22] => 67 [23] => 68 [24] => 69 [25] => 70 [26] => 71 [27] => 72 [28] => 73 [29] => 74 [30] => 75 [31] => 76 [32] => 77 [33] => 63 [34] => 78 [35] => 79 [36] => 80 [37] => 81 [38] => 82 [39] => 62 [40] => 83 [41] => 84 [42] => 85 [43] => 86 [44] => 87 [45] => 88 [46] => 89 [47] => 91 [48] => 90 [49] => 92 [50] => 93 [51] => 94 [52] => 95 ) [labels] => Array ( [0] => Fire & Explosions [1] => Work Environment [2] => Hazards [3] => Acoustical Ceiling Carpenter [4] => Trades [5] => Asbestos/Insulator [7] => Boilermaker [9] => Bricklayer [11] => Cabinetmaker [13] => Carpenter [15] => Carpet Layer [17] => Cement Mason [19] => Commercial Diver [21] => Concrete Polisher [23] => Drywall Applicator Specialist [25] => Electrical Worker [27] => Elevator Constructor [29] => Flagger [31] => Glazier [33] => Hazardous Waste Cleanup [35] => HVAC [37] => Interior Systems Carpenter [39] => Laborer [41] => Landscaper [43] => Lather [45] => Lead Abatement Worker [47] => Maintenance Worker [49] => Millwright [51] => Operating Engineer [53] => Painter [55] => Paper Hanger [57] => PCC/Restoration [59] => Pile Driver [61] => Plasterer [63] => Plumber/Pipefitter [65] => Refractory Worker [67] => Reinforcing Ironworker [69] => Roofer/Waterproofer [71] => Scaffold Erector [73] => Sheetmetal Worker [75] => Sprinkler Fitter [77] => Stonemason [79] => Structural Ironworker [81] => Terrazzo Worker [83] => Tile Setter [85] => Truck Driver [87] => Welder [89] => Commercial & Institutional [90] => Jobsites [91] => Demolition [93] => Disasters [95] => Heavy & Highway [97] => Industrial [99] => LEED/Green Construction [101] => Renovations [103] => Residential [105] => Underground ) [type] => [sub_category] => [url] => /document/4426/d001656/Construction%2BDive%2B--%2BDeWalt%2527s%2BJobsite%2BPro%2Bheadphones%2Brecalled%2Bfor%2Bfire%2Bhazards.html [item:protected] => DocumentRecord Object ( [records:protected] => Array ( ) [recordId:protected] => [searchWordClass:protected] => [searchWordPeerClass:protected] => [bok_record:protected] => [authors:protected] => [organizations:protected] => [collections:protected] => [categories:protected] => Array ( [16] => Category Object ( [languages:protected] => [bok_resources:protected] => [bok_topics:protected] => [bok_keywords:protected] => [id:protected] => 16 [type:protected] => category [parent:protected] => 7 [label:protected] => Fire & Explosions [alreadyInSave:protected] => [alreadyInValidation:protected] => [validationFailures:protected] => Array ( ) [_new:BaseObject:private] => [_deleted:BaseObject:private] => [modifiedColumns:protected] => Array ( ) ) [44] => Category Object ( [languages:protected] => [bok_resources:protected] => [bok_topics:protected] => [bok_keywords:protected] => [id:protected] => 44 [type:protected] => category [parent:protected] => 2 [label:protected] => Acoustical Ceiling Carpenter [alreadyInSave:protected] => [alreadyInValidation:protected] => [validationFailures:protected] => Array ( ) [_new:BaseObject:private] => [_deleted:BaseObject:private] => [modifiedColumns:protected] => Array ( ) ) [45] => Category Object ( [languages:protected] => [bok_resources:protected] => [bok_topics:protected] => [bok_keywords:protected] => [id:protected] => 45 [type:protected] => category [parent:protected] => 2 [label:protected] => Asbestos/Insulator [alreadyInSave:protected] => [alreadyInValidation:protected] => [validationFailures:protected] => Array ( ) [_new:BaseObject:private] => [_deleted:BaseObject:private] => [modifiedColumns:protected] => Array ( ) ) [46] => Category Object ( [languages:protected] => [bok_resources:protected] => [bok_topics:protected] => [bok_keywords:protected] => [id:protected] => 46 [type:protected] => category [parent:protected] => 2 [label:protected] => Boilermaker [alreadyInSave:protected] => [alreadyInValidation:protected] => [validationFailures:protected] => Array ( ) [_new:BaseObject:private] => [_deleted:BaseObject:private] => [modifiedColumns:protected] => Array ( ) ) [47] => Category Object ( [languages:protected] => [bok_resources:protected] => [bok_topics:protected] => [bok_keywords:protected] => [id:protected] => 47 [type:protected] => category [parent:protected] => 2 [label:protected] => Bricklayer [alreadyInSave:protected] => [alreadyInValidation:protected] => [validationFailures:protected] => Array ( ) [_new:BaseObject:private] => [_deleted:BaseObject:private] => [modifiedColumns:protected] => Array ( ) ) [48] => Category Object ( [languages:protected] => [bok_resources:protected] => [bok_topics:protected] => [bok_keywords:protected] => [id:protected] => 48 [type:protected] => category [parent:protected] => 2 [label:protected] => Cabinetmaker [alreadyInSave:protected] => [alreadyInValidation:protected] => [validationFailures:protected] => Array ( ) [_new:BaseObject:private] => [_deleted:BaseObject:private] => [modifiedColumns:protected] => Array ( ) ) [49] => Category Object ( [languages:protected] => [bok_resources:protected] => [bok_topics:protected] => [bok_keywords:protected] => [id:protected] => 49 [type:protected] => category [parent:protected] => 2 [label:protected] => Carpenter [alreadyInSave:protected] => [alreadyInValidation:protected] => [validationFailures:protected] => Array ( ) [_new:BaseObject:private] => [_deleted:BaseObject:private] => [modifiedColumns:protected] => Array ( ) ) [50] => Category Object ( [languages:protected] => [bok_resources:protected] => [bok_topics:protected] => [bok_keywords:protected] => [id:protected] => 50 [type:protected] => category [parent:protected] => 2 [label:protected] => Carpet Layer [alreadyInSave:protected] => [alreadyInValidation:protected] => [validationFailures:protected] => Array ( ) [_new:BaseObject:private] => [_deleted:BaseObject:private] => [modifiedColumns:protected] => Array ( ) ) [51] => Category Object ( [languages:protected] => [bok_resources:protected] => [bok_topics:protected] => [bok_keywords:protected] => [id:protected] => 51 [type:protected] => category [parent:protected] => 2 [label:protected] => Cement Mason [alreadyInSave:protected] => [alreadyInValidation:protected] => [validationFailures:protected] => Array ( ) [_new:BaseObject:private] => [_deleted:BaseObject:private] => [modifiedColumns:protected] => Array ( ) ) [52] => Category Object ( [languages:protected] => [bok_resources:protected] => [bok_topics:protected] => [bok_keywords:protected] => [id:protected] => 52 [type:protected] => category [parent:protected] => 2 [label:protected] => Commercial Diver [alreadyInSave:protected] => [alreadyInValidation:protected] => [validationFailures:protected] => Array ( ) [_new:BaseObject:private] => [_deleted:BaseObject:private] => [modifiedColumns:protected] => Array ( ) ) [53] => Category Object ( [languages:protected] => [bok_resources:protected] => [bok_topics:protected] => [bok_keywords:protected] => [id:protected] => 53 [type:protected] => category [parent:protected] => 2 [label:protected] => Concrete Polisher [alreadyInSave:protected] => [alreadyInValidation:protected] => [validationFailures:protected] => Array ( ) [_new:BaseObject:private] => [_deleted:BaseObject:private] => [modifiedColumns:protected] => Array ( ) ) [54] => Category Object ( [languages:protected] => [bok_resources:protected] => [bok_topics:protected] => [bok_keywords:protected] => [id:protected] => 54 [type:protected] => category [parent:protected] => 2 [label:protected] => Drywall Applicator Specialist [alreadyInSave:protected] => [alreadyInValidation:protected] => [validationFailures:protected] => Array ( ) [_new:BaseObject:private] => [_deleted:BaseObject:private] => [modifiedColumns:protected] => Array ( ) ) [55] => Category Object ( [languages:protected] => [bok_resources:protected] => [bok_topics:protected] => [bok_keywords:protected] => [id:protected] => 55 [type:protected] => category [parent:protected] => 2 [label:protected] => Electrical Worker [alreadyInSave:protected] => [alreadyInValidation:protected] => [validationFailures:protected] => Array ( ) [_new:BaseObject:private] => [_deleted:BaseObject:private] => [modifiedColumns:protected] => Array ( ) ) [56] => Category Object ( [languages:protected] => [bok_resources:protected] => [bok_topics:protected] => [bok_keywords:protected] => [id:protected] => 56 [type:protected] => category [parent:protected] => 2 [label:protected] => Elevator Constructor [alreadyInSave:protected] => [alreadyInValidation:protected] => [validationFailures:protected] => Array ( ) [_new:BaseObject:private] => [_deleted:BaseObject:private] => [modifiedColumns:protected] => Array ( ) ) [57] => Category Object ( [languages:protected] => [bok_resources:protected] => [bok_topics:protected] => [bok_keywords:protected] => [id:protected] => 57 [type:protected] => category [parent:protected] => 2 [label:protected] => Flagger [alreadyInSave:protected] => [alreadyInValidation:protected] => [validationFailures:protected] => Array ( ) [_new:BaseObject:private] => [_deleted:BaseObject:private] => [modifiedColumns:protected] => Array ( ) ) [58] => Category Object ( [languages:protected] => [bok_resources:protected] => [bok_topics:protected] => [bok_keywords:protected] => [id:protected] => 58 [type:protected] => category [parent:protected] => 2 [label:protected] => Glazier [alreadyInSave:protected] => [alreadyInValidation:protected] => [validationFailures:protected] => Array ( ) [_new:BaseObject:private] => [_deleted:BaseObject:private] => [modifiedColumns:protected] => Array ( ) ) [59] => Category Object ( [languages:protected] => [bok_resources:protected] => [bok_topics:protected] => [bok_keywords:protected] => [id:protected] => 59 [type:protected] => category [parent:protected] => 2 [label:protected] => Hazardous Waste Cleanup [alreadyInSave:protected] => [alreadyInValidation:protected] => [validationFailures:protected] => Array ( ) [_new:BaseObject:private] => [_deleted:BaseObject:private] => [modifiedColumns:protected] => Array ( ) ) [60] => Category Object ( [languages:protected] => [bok_resources:protected] => [bok_topics:protected] => [bok_keywords:protected] => [id:protected] => 60 [type:protected] => category [parent:protected] => 2 [label:protected] => HVAC [alreadyInSave:protected] => [alreadyInValidation:protected] => [validationFailures:protected] => Array ( ) [_new:BaseObject:private] => [_deleted:BaseObject:private] => [modifiedColumns:protected] => Array ( ) ) [61] => Category Object ( [languages:protected] => [bok_resources:protected] => [bok_topics:protected] => [bok_keywords:protected] => [id:protected] => 61 [type:protected] => category [parent:protected] => 2 [label:protected] => Interior Systems Carpenter [alreadyInSave:protected] => [alreadyInValidation:protected] => [validationFailures:protected] => Array ( ) [_new:BaseObject:private] => [_deleted:BaseObject:private] => [modifiedColumns:protected] => Array ( ) ) [64] => Category Object ( [languages:protected] => [bok_resources:protected] => [bok_topics:protected] => [bok_keywords:protected] => [id:protected] => 64 [type:protected] => category [parent:protected] => 2 [label:protected] => Laborer [alreadyInSave:protected] => [alreadyInValidation:protected] => [validationFailures:protected] => Array ( ) [_new:BaseObject:private] => [_deleted:BaseObject:private] => [modifiedColumns:protected] => Array ( ) ) [65] => Category Object ( [languages:protected] => [bok_resources:protected] => [bok_topics:protected] => [bok_keywords:protected] => [id:protected] => 65 [type:protected] => category [parent:protected] => 2 [label:protected] => Landscaper [alreadyInSave:protected] => [alreadyInValidation:protected] => [validationFailures:protected] => Array ( ) [_new:BaseObject:private] => [_deleted:BaseObject:private] => [modifiedColumns:protected] => Array ( ) ) [66] => Category Object ( [languages:protected] => [bok_resources:protected] => [bok_topics:protected] => [bok_keywords:protected] => [id:protected] => 66 [type:protected] => category [parent:protected] => 2 [label:protected] => Lather [alreadyInSave:protected] => [alreadyInValidation:protected] => [validationFailures:protected] => Array ( ) [_new:BaseObject:private] => [_deleted:BaseObject:private] => [modifiedColumns:protected] => Array ( ) ) [67] => Category Object ( [languages:protected] => [bok_resources:protected] => [bok_topics:protected] => [bok_keywords:protected] => [id:protected] => 67 [type:protected] => category [parent:protected] => 2 [label:protected] => Lead Abatement Worker [alreadyInSave:protected] => [alreadyInValidation:protected] => [validationFailures:protected] => Array ( ) [_new:BaseObject:private] => [_deleted:BaseObject:private] => [modifiedColumns:protected] => Array ( ) ) [68] => Category Object ( [languages:protected] => [bok_resources:protected] => [bok_topics:protected] => [bok_keywords:protected] => [id:protected] => 68 [type:protected] => category [parent:protected] => 2 [label:protected] => Maintenance Worker [alreadyInSave:protected] => [alreadyInValidation:protected] => [validationFailures:protected] => Array ( ) [_new:BaseObject:private] => [_deleted:BaseObject:private] => [modifiedColumns:protected] => Array ( ) ) [69] => Category Object ( [languages:protected] => [bok_resources:protected] => [bok_topics:protected] => [bok_keywords:protected] => [id:protected] => 69 [type:protected] => category [parent:protected] => 2 [label:protected] => Millwright [alreadyInSave:protected] => [alreadyInValidation:protected] => [validationFailures:protected] => Array ( ) [_new:BaseObject:private] => [_deleted:BaseObject:private] => [modifiedColumns:protected] => Array ( ) ) [70] => Category Object ( [languages:protected] => [bok_resources:protected] => [bok_topics:protected] => [bok_keywords:protected] => [id:protected] => 70 [type:protected] => category [parent:protected] => 2 [label:protected] => Operating Engineer [alreadyInSave:protected] => [alreadyInValidation:protected] => [validationFailures:protected] => Array ( ) [_new:BaseObject:private] => [_deleted:BaseObject:private] => [modifiedColumns:protected] => Array ( ) ) [71] => Category Object ( [languages:protected] => [bok_resources:protected] => [bok_topics:protected] => [bok_keywords:protected] => [id:protected] => 71 [type:protected] => category [parent:protected] => 2 [label:protected] => Painter [alreadyInSave:protected] => [alreadyInValidation:protected] => [validationFailures:protected] => Array ( ) [_new:BaseObject:private] => [_deleted:BaseObject:private] => [modifiedColumns:protected] => Array ( ) ) [72] => Category Object ( [languages:protected] => [bok_resources:protected] => [bok_topics:protected] => [bok_keywords:protected] => [id:protected] => 72 [type:protected] => category [parent:protected] => 2 [label:protected] => Paper Hanger [alreadyInSave:protected] => [alreadyInValidation:protected] => [validationFailures:protected] => Array ( ) [_new:BaseObject:private] => [_deleted:BaseObject:private] => [modifiedColumns:protected] => Array ( ) ) [73] => Category Object ( [languages:protected] => [bok_resources:protected] => [bok_topics:protected] => [bok_keywords:protected] => [id:protected] => 73 [type:protected] => category [parent:protected] => 2 [label:protected] => PCC/Restoration [alreadyInSave:protected] => [alreadyInValidation:protected] => [validationFailures:protected] => Array ( ) [_new:BaseObject:private] => [_deleted:BaseObject:private] => [modifiedColumns:protected] => Array ( ) ) [74] => Category Object ( [languages:protected] => [bok_resources:protected] => [bok_topics:protected] => [bok_keywords:protected] => [id:protected] => 74 [type:protected] => category [parent:protected] => 2 [label:protected] => Pile Driver [alreadyInSave:protected] => [alreadyInValidation:protected] => [validationFailures:protected] => Array ( ) [_new:BaseObject:private] => [_deleted:BaseObject:private] => [modifiedColumns:protected] => Array ( ) ) [75] => Category Object ( [languages:protected] => [bok_resources:protected] => [bok_topics:protected] => [bok_keywords:protected] => [id:protected] => 75 [type:protected] => category [parent:protected] => 2 [label:protected] => Plasterer [alreadyInSave:protected] => [alreadyInValidation:protected] => [validationFailures:protected] => Array ( ) [_new:BaseObject:private] => [_deleted:BaseObject:private] => [modifiedColumns:protected] => Array ( ) ) [76] => Category Object ( [languages:protected] => [bok_resources:protected] => [bok_topics:protected] => [bok_keywords:protected] => [id:protected] => 76 [type:protected] => category [parent:protected] => 2 [label:protected] => Plumber/Pipefitter [alreadyInSave:protected] => [alreadyInValidation:protected] => [validationFailures:protected] => Array ( ) [_new:BaseObject:private] => [_deleted:BaseObject:private] => [modifiedColumns:protected] => Array ( ) ) [77] => Category Object ( [languages:protected] => [bok_resources:protected] => [bok_topics:protected] => [bok_keywords:protected] => [id:protected] => 77 [type:protected] => category [parent:protected] => 2 [label:protected] => Refractory Worker [alreadyInSave:protected] => [alreadyInValidation:protected] => [validationFailures:protected] => Array ( ) [_new:BaseObject:private] => [_deleted:BaseObject:private] => [modifiedColumns:protected] => Array ( ) ) [63] => Category Object ( [languages:protected] => [bok_resources:protected] => [bok_topics:protected] => [bok_keywords:protected] => [id:protected] => 63 [type:protected] => category [parent:protected] => 2 [label:protected] => Reinforcing Ironworker [alreadyInSave:protected] => [alreadyInValidation:protected] => [validationFailures:protected] => Array ( ) [_new:BaseObject:private] => [_deleted:BaseObject:private] => [modifiedColumns:protected] => Array ( ) ) [78] => Category Object ( [languages:protected] => [bok_resources:protected] => [bok_topics:protected] => [bok_keywords:protected] => [id:protected] => 78 [type:protected] => category [parent:protected] => 2 [label:protected] => Roofer/Waterproofer [alreadyInSave:protected] => [alreadyInValidation:protected] => [validationFailures:protected] => Array ( ) [_new:BaseObject:private] => [_deleted:BaseObject:private] => [modifiedColumns:protected] => Array ( ) ) [79] => Category Object ( [languages:protected] => [bok_resources:protected] => [bok_topics:protected] => [bok_keywords:protected] => [id:protected] => 79 [type:protected] => category [parent:protected] => 2 [label:protected] => Scaffold Erector [alreadyInSave:protected] => [alreadyInValidation:protected] => [validationFailures:protected] => Array ( ) [_new:BaseObject:private] => [_deleted:BaseObject:private] => [modifiedColumns:protected] => Array ( ) ) [80] => Category Object ( [languages:protected] => [bok_resources:protected] => [bok_topics:protected] => [bok_keywords:protected] => [id:protected] => 80 [type:protected] => category [parent:protected] => 2 [label:protected] => Sheetmetal Worker [alreadyInSave:protected] => [alreadyInValidation:protected] => [validationFailures:protected] => Array ( ) [_new:BaseObject:private] => [_deleted:BaseObject:private] => [modifiedColumns:protected] => Array ( ) ) [81] => Category Object ( [languages:protected] => [bok_resources:protected] => [bok_topics:protected] => [bok_keywords:protected] => [id:protected] => 81 [type:protected] => category [parent:protected] => 2 [label:protected] => Sprinkler Fitter [alreadyInSave:protected] => [alreadyInValidation:protected] => [validationFailures:protected] => Array ( ) [_new:BaseObject:private] => [_deleted:BaseObject:private] => [modifiedColumns:protected] => Array ( ) ) [82] => Category Object ( [languages:protected] => [bok_resources:protected] => [bok_topics:protected] => [bok_keywords:protected] => [id:protected] => 82 [type:protected] => category [parent:protected] => 2 [label:protected] => Stonemason [alreadyInSave:protected] => [alreadyInValidation:protected] => [validationFailures:protected] => Array ( ) [_new:BaseObject:private] => [_deleted:BaseObject:private] => [modifiedColumns:protected] => Array ( ) ) [62] => Category Object ( [languages:protected] => [bok_resources:protected] => [bok_topics:protected] => [bok_keywords:protected] => [id:protected] => 62 [type:protected] => category [parent:protected] => 2 [label:protected] => Structural Ironworker [alreadyInSave:protected] => [alreadyInValidation:protected] => [validationFailures:protected] => Array ( ) [_new:BaseObject:private] => [_deleted:BaseObject:private] => [modifiedColumns:protected] => Array ( ) ) [83] => Category Object ( [languages:protected] => [bok_resources:protected] => [bok_topics:protected] => [bok_keywords:protected] => [id:protected] => 83 [type:protected] => category [parent:protected] => 2 [label:protected] => Terrazzo Worker [alreadyInSave:protected] => [alreadyInValidation:protected] => [validationFailures:protected] => Array ( ) [_new:BaseObject:private] => [_deleted:BaseObject:private] => [modifiedColumns:protected] => Array ( ) ) [84] => Category Object ( [languages:protected] => [bok_resources:protected] => [bok_topics:protected] => [bok_keywords:protected] => [id:protected] => 84 [type:protected] => category [parent:protected] => 2 [label:protected] => Tile Setter [alreadyInSave:protected] => [alreadyInValidation:protected] => [validationFailures:protected] => Array ( ) [_new:BaseObject:private] => [_deleted:BaseObject:private] => [modifiedColumns:protected] => Array ( ) ) [85] => Category Object ( [languages:protected] => [bok_resources:protected] => [bok_topics:protected] => [bok_keywords:protected] => [id:protected] => 85 [type:protected] => category [parent:protected] => 2 [label:protected] => Truck Driver [alreadyInSave:protected] => [alreadyInValidation:protected] => [validationFailures:protected] => Array ( ) [_new:BaseObject:private] => [_deleted:BaseObject:private] => [modifiedColumns:protected] => Array ( ) ) [86] => Category Object ( [languages:protected] => [bok_resources:protected] => [bok_topics:protected] => [bok_keywords:protected] => [id:protected] => 86 [type:protected] => category [parent:protected] => 2 [label:protected] => Welder [alreadyInSave:protected] => [alreadyInValidation:protected] => [validationFailures:protected] => Array ( ) [_new:BaseObject:private] => [_deleted:BaseObject:private] => [modifiedColumns:protected] => Array ( ) ) [87] => Category Object ( [languages:protected] => [bok_resources:protected] => [bok_topics:protected] => [bok_keywords:protected] => [id:protected] => 87 [type:protected] => category [parent:protected] => 3 [label:protected] => Commercial & Institutional [alreadyInSave:protected] => [alreadyInValidation:protected] => [validationFailures:protected] => Array ( ) [_new:BaseObject:private] => [_deleted:BaseObject:private] => [modifiedColumns:protected] => Array ( ) ) [88] => Category Object ( [languages:protected] => [bok_resources:protected] => [bok_topics:protected] => [bok_keywords:protected] => [id:protected] => 88 [type:protected] => category [parent:protected] => 3 [label:protected] => Demolition [alreadyInSave:protected] => [alreadyInValidation:protected] => [validationFailures:protected] => Array ( ) [_new:BaseObject:private] => [_deleted:BaseObject:private] => [modifiedColumns:protected] => Array ( ) ) [89] => Category Object ( [languages:protected] => [bok_resources:protected] => [bok_topics:protected] => [bok_keywords:protected] => [id:protected] => 89 [type:protected] => category [parent:protected] => 3 [label:protected] => Disasters [alreadyInSave:protected] => [alreadyInValidation:protected] => [validationFailures:protected] => Array ( ) [_new:BaseObject:private] => [_deleted:BaseObject:private] => [modifiedColumns:protected] => Array ( ) ) [91] => Category Object ( [languages:protected] => [bok_resources:protected] => [bok_topics:protected] => [bok_keywords:protected] => [id:protected] => 91 [type:protected] => category [parent:protected] => 3 [label:protected] => Heavy & Highway [alreadyInSave:protected] => [alreadyInValidation:protected] => [validationFailures:protected] => Array ( ) [_new:BaseObject:private] => [_deleted:BaseObject:private] => [modifiedColumns:protected] => Array ( ) ) [90] => Category Object ( [languages:protected] => [bok_resources:protected] => [bok_topics:protected] => [bok_keywords:protected] => [id:protected] => 90 [type:protected] => category [parent:protected] => 3 [label:protected] => Industrial [alreadyInSave:protected] => [alreadyInValidation:protected] => [validationFailures:protected] => Array ( ) [_new:BaseObject:private] => [_deleted:BaseObject:private] => [modifiedColumns:protected] => Array ( ) ) [92] => Category Object ( [languages:protected] => [bok_resources:protected] => [bok_topics:protected] => [bok_keywords:protected] => [id:protected] => 92 [type:protected] => category [parent:protected] => 3 [label:protected] => LEED/Green Construction [alreadyInSave:protected] => [alreadyInValidation:protected] => [validationFailures:protected] => Array ( ) [_new:BaseObject:private] => [_deleted:BaseObject:private] => [modifiedColumns:protected] => Array ( ) ) [93] => Category Object ( [languages:protected] => [bok_resources:protected] => [bok_topics:protected] => [bok_keywords:protected] => [id:protected] => 93 [type:protected] => category [parent:protected] => 3 [label:protected] => Renovations [alreadyInSave:protected] => [alreadyInValidation:protected] => [validationFailures:protected] => Array ( ) [_new:BaseObject:private] => [_deleted:BaseObject:private] => [modifiedColumns:protected] => Array ( ) ) [94] => Category Object ( [languages:protected] => [bok_resources:protected] => [bok_topics:protected] => [bok_keywords:protected] => [id:protected] => 94 [type:protected] => category [parent:protected] => 3 [label:protected] => Residential [alreadyInSave:protected] => [alreadyInValidation:protected] => [validationFailures:protected] => Array ( ) [_new:BaseObject:private] => [_deleted:BaseObject:private] => [modifiedColumns:protected] => Array ( ) ) [95] => Category Object ( [languages:protected] => [bok_resources:protected] => [bok_topics:protected] => [bok_keywords:protected] => [id:protected] => 95 [type:protected] => category [parent:protected] => 3 [label:protected] => Underground [alreadyInSave:protected] => [alreadyInValidation:protected] => [validationFailures:protected] => Array ( ) [_new:BaseObject:private] => [_deleted:BaseObject:private] => [modifiedColumns:protected] => Array ( ) ) ) [categories_initialized:protected] => 1 [mapped_items:protected] => [content:protected] => [files:protected] => [language:protected] => Language Object ( [id:protected] => 1 [code:protected] => en [name:protected] => English [alreadyInSave:protected] => [alreadyInValidation:protected] => [validationFailures:protected] => Array ( ) [_new:BaseObject:private] => [_deleted:BaseObject:private] => [modifiedColumns:protected] => Array ( ) ) [old_record:protected] => [id:protected] => 4426 [old_id:protected] => [elcosh_id:protected] => d001656 [type:protected] => document [display_type:protected] => HTML only (and links) [user_id:protected] => 0 [language_id:protected] => 1 [tagging_id:protected] => Mike Aguilar [priority_id:protected] => 1 [title:protected] => Construction Dive -- DeWalt's Jobsite Pro headphones recalled for fire hazards [total_pages:protected] => 1 [billed_pages:protected] => 1 [publication_number:protected] => [part_of:protected] => [keywords:protected] => DeWalt, Fire Hazards, recall, headphones [comments:protected] => [summary:protected] => A recall notice by the United States Consumer Product Safety Commission affects over 300,000 DeWalt Jobsite Pro Headphones. The recall is a result of a malfunction that can cause earbuds to overheat while charging or during use, leading to fire and burn hazards. [transition_comments:protected] => [external_link:protected] => https://www.constructiondive.com/news/dewalts-jobsite-pro-headphones-recalled-for-fire-hazards/611248/?utm_source=Sailthru&utm_medium=email&utm_campaign=Issue:%202021-12-10%20Construction%20Dive%20Newsletter%20%5Bissue:38532%5D&utm_term=Construction%20Dive [consol_link:protected] => [more_like_this:protected] => [permission_given_by:protected] => [published:protected] => T [billable:protected] => F [img_name:protected] => [img_ext:protected] => [img_width:protected] => [img_height:protected] => [img_credit:protected] => [img_practice:protected] => [vid_source_id:protected] => [vid_running_time:protected] => [vid_intended_audience:protected] => [vid_acquisition_info:protected] => [vid_cost:protected] => [vid_producer:protected] => [vid_filename:protected] => [vid_filename_downloadable:protected] => [date_summary:protected] => [date_permission_requested:protected] => [date_permission_received:protected] => [date_review_needed:protected] => [date_received:protected] => 12/13/21 [date_completed:protected] => 12/13/21 [date_billed:protected] => [date_modified:protected] => 12/13/21 [collBokExports:protected] => [lastBokExportCriteria:BaseElcoshItem:private] => [alreadyInSave:protected] => [alreadyInValidation:protected] => [validationFailures:protected] => Array ( ) [_new:BaseObject:private] => [_deleted:BaseObject:private] => [modifiedColumns:protected] => Array ( ) ) ) [3] => Search_Result Object ( [title] => Working in an Enclosed Cab [image] => /record/images/notavailable-p.png [blurb] => This CPWR Hazard Alert on Working in enclosed cabs provides information on protecting workers from silica dust, how to minimize exposures and the dang... [category] => Array ( [0] => 10 [1] => 16 [2] => 24 [3] => 37 [4] => 46 [5] => 48 [6] => 49 [7] => 51 [8] => 53 [9] => 54 [10] => 56 [11] => 58 [12] => 59 [13] => 60 [14] => 61 [15] => 64 [16] => 66 [17] => 68 [18] => 69 [19] => 71 [20] => 73 [21] => 74 [22] => 76 [23] => 77 [24] => 63 [25] => 80 [26] => 82 [27] => 62 [28] => 83 [29] => 84 [30] => 86 [31] => 88 [32] => 89 [33] => 95 [34] => 102 ) [labels] => Array ( [0] => Confined Spaces [1] => Work Environment [2] => Hazards [3] => Fire & Explosions [6] => Trenches & Excavations [9] => Silica /Construction Dust [10] => Inhalation/Skin Exposures [12] => Boilermaker [13] => Trades [14] => Cabinetmaker [16] => Carpenter [18] => Cement Mason [20] => Concrete Polisher [22] => Drywall Applicator Specialist [24] => Elevator Constructor [26] => Glazier [28] => Hazardous Waste Cleanup [30] => HVAC [32] => Interior Systems Carpenter [34] => Laborer [36] => Lather [38] => Maintenance Worker [40] => Millwright [42] => Painter [44] => PCC/Restoration [46] => Pile Driver [48] => Plumber/Pipefitter [50] => Refractory Worker [52] => Reinforcing Ironworker [54] => Sheetmetal Worker [56] => Stonemason [58] => Structural Ironworker [60] => Terrazzo Worker [62] => Tile Setter [64] => Welder [66] => Demolition [67] => Jobsites [68] => Disasters [70] => Underground [72] => Handouts [73] => Documents [74] => Media & Documents ) [type] => Handouts [sub_category] => [url] => /document/4415/d001651/Working%2Bin%2Ban%2BEnclosed%2BCab.html [item:protected] => DocumentRecord Object ( [records:protected] => Array ( ) [recordId:protected] => [searchWordClass:protected] => [searchWordPeerClass:protected] => [bok_record:protected] => [authors:protected] => [organizations:protected] => [collections:protected] => [categories:protected] => Array ( [10] => Category Object ( [languages:protected] => [bok_resources:protected] => [bok_topics:protected] => [bok_keywords:protected] => [id:protected] => 10 [type:protected] => category [parent:protected] => 7 [label:protected] => Confined Spaces [alreadyInSave:protected] => [alreadyInValidation:protected] => [validationFailures:protected] => Array ( ) [_new:BaseObject:private] => [_deleted:BaseObject:private] => [modifiedColumns:protected] => Array ( ) ) [16] => Category Object ( [languages:protected] => [bok_resources:protected] => [bok_topics:protected] => [bok_keywords:protected] => [id:protected] => 16 [type:protected] => category [parent:protected] => 7 [label:protected] => Fire & Explosions [alreadyInSave:protected] => [alreadyInValidation:protected] => [validationFailures:protected] => Array ( ) [_new:BaseObject:private] => [_deleted:BaseObject:private] => [modifiedColumns:protected] => Array ( ) ) [24] => Category Object ( [languages:protected] => [bok_resources:protected] => [bok_topics:protected] => [bok_keywords:protected] => [id:protected] => 24 [type:protected] => category [parent:protected] => 7 [label:protected] => Trenches & Excavations [alreadyInSave:protected] => [alreadyInValidation:protected] => [validationFailures:protected] => Array ( ) [_new:BaseObject:private] => [_deleted:BaseObject:private] => [modifiedColumns:protected] => Array ( ) ) [37] => Category Object ( [languages:protected] => [bok_resources:protected] => [bok_topics:protected] => [bok_keywords:protected] => [id:protected] => 37 [type:protected] => category [parent:protected] => 8 [label:protected] => Silica /Construction Dust [alreadyInSave:protected] => [alreadyInValidation:protected] => [validationFailures:protected] => Array ( ) [_new:BaseObject:private] => [_deleted:BaseObject:private] => [modifiedColumns:protected] => Array ( ) ) [46] => Category Object ( [languages:protected] => [bok_resources:protected] => [bok_topics:protected] => [bok_keywords:protected] => [id:protected] => 46 [type:protected] => category [parent:protected] => 2 [label:protected] => Boilermaker [alreadyInSave:protected] => [alreadyInValidation:protected] => [validationFailures:protected] => Array ( ) [_new:BaseObject:private] => [_deleted:BaseObject:private] => [modifiedColumns:protected] => Array ( ) ) [48] => Category Object ( [languages:protected] => [bok_resources:protected] => [bok_topics:protected] => [bok_keywords:protected] => [id:protected] => 48 [type:protected] => category [parent:protected] => 2 [label:protected] => Cabinetmaker [alreadyInSave:protected] => [alreadyInValidation:protected] => [validationFailures:protected] => Array ( ) [_new:BaseObject:private] => [_deleted:BaseObject:private] => [modifiedColumns:protected] => Array ( ) ) [49] => Category Object ( [languages:protected] => [bok_resources:protected] => [bok_topics:protected] => [bok_keywords:protected] => [id:protected] => 49 [type:protected] => category [parent:protected] => 2 [label:protected] => Carpenter [alreadyInSave:protected] => [alreadyInValidation:protected] => [validationFailures:protected] => Array ( ) [_new:BaseObject:private] => [_deleted:BaseObject:private] => [modifiedColumns:protected] => Array ( ) ) [51] => Category Object ( [languages:protected] => [bok_resources:protected] => [bok_topics:protected] => [bok_keywords:protected] => [id:protected] => 51 [type:protected] => category [parent:protected] => 2 [label:protected] => Cement Mason [alreadyInSave:protected] => [alreadyInValidation:protected] => [validationFailures:protected] => Array ( ) [_new:BaseObject:private] => [_deleted:BaseObject:private] => [modifiedColumns:protected] => Array ( ) ) [53] => Category Object ( [languages:protected] => [bok_resources:protected] => [bok_topics:protected] => [bok_keywords:protected] => [id:protected] => 53 [type:protected] => category [parent:protected] => 2 [label:protected] => Concrete Polisher [alreadyInSave:protected] => [alreadyInValidation:protected] => [validationFailures:protected] => Array ( ) [_new:BaseObject:private] => [_deleted:BaseObject:private] => [modifiedColumns:protected] => Array ( ) ) [54] => Category Object ( [languages:protected] => [bok_resources:protected] => [bok_topics:protected] => [bok_keywords:protected] => [id:protected] => 54 [type:protected] => category [parent:protected] => 2 [label:protected] => Drywall Applicator Specialist [alreadyInSave:protected] => [alreadyInValidation:protected] => [validationFailures:protected] => Array ( ) [_new:BaseObject:private] => [_deleted:BaseObject:private] => [modifiedColumns:protected] => Array ( ) ) [56] => Category Object ( [languages:protected] => [bok_resources:protected] => [bok_topics:protected] => [bok_keywords:protected] => [id:protected] => 56 [type:protected] => category [parent:protected] => 2 [label:protected] => Elevator Constructor [alreadyInSave:protected] => [alreadyInValidation:protected] => [validationFailures:protected] => Array ( ) [_new:BaseObject:private] => [_deleted:BaseObject:private] => [modifiedColumns:protected] => Array ( ) ) [58] => Category Object ( [languages:protected] => [bok_resources:protected] => [bok_topics:protected] => [bok_keywords:protected] => [id:protected] => 58 [type:protected] => category [parent:protected] => 2 [label:protected] => Glazier [alreadyInSave:protected] => [alreadyInValidation:protected] => [validationFailures:protected] => Array ( ) [_new:BaseObject:private] => [_deleted:BaseObject:private] => [modifiedColumns:protected] => Array ( ) ) [59] => Category Object ( [languages:protected] => [bok_resources:protected] => [bok_topics:protected] => [bok_keywords:protected] => [id:protected] => 59 [type:protected] => category [parent:protected] => 2 [label:protected] => Hazardous Waste Cleanup [alreadyInSave:protected] => [alreadyInValidation:protected] => [validationFailures:protected] => Array ( ) [_new:BaseObject:private] => [_deleted:BaseObject:private] => [modifiedColumns:protected] => Array ( ) ) [60] => Category Object ( [languages:protected] => [bok_resources:protected] => [bok_topics:protected] => [bok_keywords:protected] => [id:protected] => 60 [type:protected] => category [parent:protected] => 2 [label:protected] => HVAC [alreadyInSave:protected] => [alreadyInValidation:protected] => [validationFailures:protected] => Array ( ) [_new:BaseObject:private] => [_deleted:BaseObject:private] => [modifiedColumns:protected] => Array ( ) ) [61] => Category Object ( [languages:protected] => [bok_resources:protected] => [bok_topics:protected] => [bok_keywords:protected] => [id:protected] => 61 [type:protected] => category [parent:protected] => 2 [label:protected] => Interior Systems Carpenter [alreadyInSave:protected] => [alreadyInValidation:protected] => [validationFailures:protected] => Array ( ) [_new:BaseObject:private] => [_deleted:BaseObject:private] => [modifiedColumns:protected] => Array ( ) ) [64] => Category Object ( [languages:protected] => [bok_resources:protected] => [bok_topics:protected] => [bok_keywords:protected] => [id:protected] => 64 [type:protected] => category [parent:protected] => 2 [label:protected] => Laborer [alreadyInSave:protected] => [alreadyInValidation:protected] => [validationFailures:protected] => Array ( ) [_new:BaseObject:private] => [_deleted:BaseObject:private] => [modifiedColumns:protected] => Array ( ) ) [66] => Category Object ( [languages:protected] => [bok_resources:protected] => [bok_topics:protected] => [bok_keywords:protected] => [id:protected] => 66 [type:protected] => category [parent:protected] => 2 [label:protected] => Lather [alreadyInSave:protected] => [alreadyInValidation:protected] => [validationFailures:protected] => Array ( ) [_new:BaseObject:private] => [_deleted:BaseObject:private] => [modifiedColumns:protected] => Array ( ) ) [68] => Category Object ( [languages:protected] => [bok_resources:protected] => [bok_topics:protected] => [bok_keywords:protected] => [id:protected] => 68 [type:protected] => category [parent:protected] => 2 [label:protected] => Maintenance Worker [alreadyInSave:protected] => [alreadyInValidation:protected] => [validationFailures:protected] => Array ( ) [_new:BaseObject:private] => [_deleted:BaseObject:private] => [modifiedColumns:protected] => Array ( ) ) [69] => Category Object ( [languages:protected] => [bok_resources:protected] => [bok_topics:protected] => [bok_keywords:protected] => [id:protected] => 69 [type:protected] => category [parent:protected] => 2 [label:protected] => Millwright [alreadyInSave:protected] => [alreadyInValidation:protected] => [validationFailures:protected] => Array ( ) [_new:BaseObject:private] => [_deleted:BaseObject:private] => [modifiedColumns:protected] => Array ( ) ) [71] => Category Object ( [languages:protected] => [bok_resources:protected] => [bok_topics:protected] => [bok_keywords:protected] => [id:protected] => 71 [type:protected] => category [parent:protected] => 2 [label:protected] => Painter [alreadyInSave:protected] => [alreadyInValidation:protected] => [validationFailures:protected] => Array ( ) [_new:BaseObject:private] => [_deleted:BaseObject:private] => [modifiedColumns:protected] => Array ( ) ) [73] => Category Object ( [languages:protected] => [bok_resources:protected] => [bok_topics:protected] => [bok_keywords:protected] => [id:protected] => 73 [type:protected] => category [parent:protected] => 2 [label:protected] => PCC/Restoration [alreadyInSave:protected] => [alreadyInValidation:protected] => [validationFailures:protected] => Array ( ) [_new:BaseObject:private] => [_deleted:BaseObject:private] => [modifiedColumns:protected] => Array ( ) ) [74] => Category Object ( [languages:protected] => [bok_resources:protected] => [bok_topics:protected] => [bok_keywords:protected] => [id:protected] => 74 [type:protected] => category [parent:protected] => 2 [label:protected] => Pile Driver [alreadyInSave:protected] => [alreadyInValidation:protected] => [validationFailures:protected] => Array ( ) [_new:BaseObject:private] => [_deleted:BaseObject:private] => [modifiedColumns:protected] => Array ( ) ) [76] => Category Object ( [languages:protected] => [bok_resources:protected] => [bok_topics:protected] => [bok_keywords:protected] => [id:protected] => 76 [type:protected] => category [parent:protected] => 2 [label:protected] => Plumber/Pipefitter [alreadyInSave:protected] => [alreadyInValidation:protected] => [validationFailures:protected] => Array ( ) [_new:BaseObject:private] => [_deleted:BaseObject:private] => [modifiedColumns:protected] => Array ( ) ) [77] => Category Object ( [languages:protected] => [bok_resources:protected] => [bok_topics:protected] => [bok_keywords:protected] => [id:protected] => 77 [type:protected] => category [parent:protected] => 2 [label:protected] => Refractory Worker [alreadyInSave:protected] => [alreadyInValidation:protected] => [validationFailures:protected] => Array ( ) [_new:BaseObject:private] => [_deleted:BaseObject:private] => [modifiedColumns:protected] => Array ( ) ) [63] => Category Object ( [languages:protected] => [bok_resources:protected] => [bok_topics:protected] => [bok_keywords:protected] => [id:protected] => 63 [type:protected] => category [parent:protected] => 2 [label:protected] => Reinforcing Ironworker [alreadyInSave:protected] => [alreadyInValidation:protected] => [validationFailures:protected] => Array ( ) [_new:BaseObject:private] => [_deleted:BaseObject:private] => [modifiedColumns:protected] => Array ( ) ) [80] => Category Object ( [languages:protected] => [bok_resources:protected] => [bok_topics:protected] => [bok_keywords:protected] => [id:protected] => 80 [type:protected] => category [parent:protected] => 2 [label:protected] => Sheetmetal Worker [alreadyInSave:protected] => [alreadyInValidation:protected] => [validationFailures:protected] => Array ( ) [_new:BaseObject:private] => [_deleted:BaseObject:private] => [modifiedColumns:protected] => Array ( ) ) [82] => Category Object ( [languages:protected] => [bok_resources:protected] => [bok_topics:protected] => [bok_keywords:protected] => [id:protected] => 82 [type:protected] => category [parent:protected] => 2 [label:protected] => Stonemason [alreadyInSave:protected] => [alreadyInValidation:protected] => [validationFailures:protected] => Array ( ) [_new:BaseObject:private] => [_deleted:BaseObject:private] => [modifiedColumns:protected] => Array ( ) ) [62] => Category Object ( [languages:protected] => [bok_resources:protected] => [bok_topics:protected] => [bok_keywords:protected] => [id:protected] => 62 [type:protected] => category [parent:protected] => 2 [label:protected] => Structural Ironworker [alreadyInSave:protected] => [alreadyInValidation:protected] => [validationFailures:protected] => Array ( ) [_new:BaseObject:private] => [_deleted:BaseObject:private] => [modifiedColumns:protected] => Array ( ) ) [83] => Category Object ( [languages:protected] => [bok_resources:protected] => [bok_topics:protected] => [bok_keywords:protected] => [id:protected] => 83 [type:protected] => category [parent:protected] => 2 [label:protected] => Terrazzo Worker [alreadyInSave:protected] => [alreadyInValidation:protected] => [validationFailures:protected] => Array ( ) [_new:BaseObject:private] => [_deleted:BaseObject:private] => [modifiedColumns:protected] => Array ( ) ) [84] => Category Object ( [languages:protected] => [bok_resources:protected] => [bok_topics:protected] => [bok_keywords:protected] => [id:protected] => 84 [type:protected] => category [parent:protected] => 2 [label:protected] => Tile Setter [alreadyInSave:protected] => [alreadyInValidation:protected] => [validationFailures:protected] => Array ( ) [_new:BaseObject:private] => [_deleted:BaseObject:private] => [modifiedColumns:protected] => Array ( ) ) [86] => Category Object ( [languages:protected] => [bok_resources:protected] => [bok_topics:protected] => [bok_keywords:protected] => [id:protected] => 86 [type:protected] => category [parent:protected] => 2 [label:protected] => Welder [alreadyInSave:protected] => [alreadyInValidation:protected] => [validationFailures:protected] => Array ( ) [_new:BaseObject:private] => [_deleted:BaseObject:private] => [modifiedColumns:protected] => Array ( ) ) [88] => Category Object ( [languages:protected] => [bok_resources:protected] => [bok_topics:protected] => [bok_keywords:protected] => [id:protected] => 88 [type:protected] => category [parent:protected] => 3 [label:protected] => Demolition [alreadyInSave:protected] => [alreadyInValidation:protected] => [validationFailures:protected] => Array ( ) [_new:BaseObject:private] => [_deleted:BaseObject:private] => [modifiedColumns:protected] => Array ( ) ) [89] => Category Object ( [languages:protected] => [bok_resources:protected] => [bok_topics:protected] => [bok_keywords:protected] => [id:protected] => 89 [type:protected] => category [parent:protected] => 3 [label:protected] => Disasters [alreadyInSave:protected] => [alreadyInValidation:protected] => [validationFailures:protected] => Array ( ) [_new:BaseObject:private] => [_deleted:BaseObject:private] => [modifiedColumns:protected] => Array ( ) ) [95] => Category Object ( [languages:protected] => [bok_resources:protected] => [bok_topics:protected] => [bok_keywords:protected] => [id:protected] => 95 [type:protected] => category [parent:protected] => 3 [label:protected] => Underground [alreadyInSave:protected] => [alreadyInValidation:protected] => [validationFailures:protected] => Array ( ) [_new:BaseObject:private] => [_deleted:BaseObject:private] => [modifiedColumns:protected] => Array ( ) ) [102] => Category Object ( [languages:protected] => [bok_resources:protected] => [bok_topics:protected] => [bok_keywords:protected] => [id:protected] => 102 [type:protected] => category [parent:protected] => 6 [label:protected] => Handouts [alreadyInSave:protected] => [alreadyInValidation:protected] => [validationFailures:protected] => Array ( ) [_new:BaseObject:private] => [_deleted:BaseObject:private] => [modifiedColumns:protected] => Array ( ) ) ) [categories_initialized:protected] => 1 [mapped_items:protected] => [content:protected] => [files:protected] => [language:protected] => Language Object ( [id:protected] => 1 [code:protected] => en [name:protected] => English [alreadyInSave:protected] => [alreadyInValidation:protected] => [validationFailures:protected] => Array ( ) [_new:BaseObject:private] => [_deleted:BaseObject:private] => [modifiedColumns:protected] => Array ( ) ) [old_record:protected] => [id:protected] => 4415 [old_id:protected] => [elcosh_id:protected] => d001651 [type:protected] => document [display_type:protected] => HTML only (and links) [user_id:protected] => 0 [language_id:protected] => 1 [tagging_id:protected] => Valeria Contreras [priority_id:protected] => 1 [title:protected] => Working in an Enclosed Cab [total_pages:protected] => 1 [billed_pages:protected] => 1 [publication_number:protected] => [part_of:protected] => [keywords:protected] => Occupation, construction, safety, health, hazards, work, worker, workplace, OSHA, silicosis, mining, silica, DOE, EEOICPA, labor, lung, CBD, dust, cab, miner, mine [comments:protected] => [summary:protected] => This CPWR Hazard Alert on Working in enclosed cabs provides information on protecting workers from silica dust, how to minimize exposures and the dangers of silica dust. Click on the following links to access the English version and the Spanish version. [transition_comments:protected] => [external_link:protected] => [consol_link:protected] => [more_like_this:protected] => [permission_given_by:protected] => [published:protected] => T [billable:protected] => F [img_name:protected] => [img_ext:protected] => [img_width:protected] => [img_height:protected] => [img_credit:protected] => [img_practice:protected] => [vid_source_id:protected] => [vid_running_time:protected] => [vid_intended_audience:protected] => [vid_acquisition_info:protected] => [vid_cost:protected] => [vid_producer:protected] => [vid_filename:protected] => [vid_filename_downloadable:protected] => [date_summary:protected] => [date_permission_requested:protected] => [date_permission_received:protected] => [date_review_needed:protected] => [date_received:protected] => 10/08/20 [date_completed:protected] => 10/08/20 [date_billed:protected] => [date_modified:protected] => 10/08/20 [collBokExports:protected] => [lastBokExportCriteria:BaseElcoshItem:private] => [alreadyInSave:protected] => [alreadyInValidation:protected] => [validationFailures:protected] => Array ( ) [_new:BaseObject:private] => [_deleted:BaseObject:private] => [modifiedColumns:protected] => Array ( ) ) ) [4] => Search_Result Object ( [title] => Toolbox Talk: Suicide Prevention [image] => /record/images/notavailable-p.png [blurb] => The CPWR Toolbox Talk on Suicide Prevention addresses the prevalence of suicide among construction workers. The resource includes a brief case example... [category] => Array ( [0] => 13 [1] => 20 [2] => 23 [3] => 40 [4] => 44 [5] => 45 [6] => 46 [7] => 47 [8] => 48 [9] => 49 [10] => 50 [11] => 51 [12] => 52 [13] => 53 [14] => 54 [15] => 55 [16] => 56 [17] => 57 [18] => 58 [19] => 59 [20] => 60 [21] => 61 [22] => 64 [23] => 65 [24] => 66 [25] => 67 [26] => 68 [27] => 69 [28] => 70 [29] => 71 [30] => 72 [31] => 73 [32] => 74 [33] => 75 [34] => 76 [35] => 77 [36] => 63 [37] => 78 [38] => 79 [39] => 80 [40] => 81 [41] => 82 [42] => 62 [43] => 83 [44] => 84 [45] => 85 [46] => 86 [47] => 87 [48] => 88 [49] => 89 [50] => 91 [51] => 90 [52] => 92 [53] => 93 [54] => 94 [55] => 95 [56] => 100 ) [labels] => Array ( [0] => Drugs, Alcohol & Tobacco [1] => Work Environment [2] => Hazards [3] => Safety Culture [6] => Stress & Overtime [9] => Overexertion [10] => Ergonomic [12] => Acoustical Ceiling Carpenter [13] => Trades [14] => Asbestos/Insulator [16] => Boilermaker [18] => Bricklayer [20] => Cabinetmaker [22] => Carpenter [24] => Carpet Layer [26] => Cement Mason [28] => Commercial Diver [30] => Concrete Polisher [32] => Drywall Applicator Specialist [34] => Electrical Worker [36] => Elevator Constructor [38] => Flagger [40] => Glazier [42] => Hazardous Waste Cleanup [44] => HVAC [46] => Interior Systems Carpenter [48] => Laborer [50] => Landscaper [52] => Lather [54] => Lead Abatement Worker [56] => Maintenance Worker [58] => Millwright [60] => Operating Engineer [62] => Painter [64] => Paper Hanger [66] => PCC/Restoration [68] => Pile Driver [70] => Plasterer [72] => Plumber/Pipefitter [74] => Refractory Worker [76] => Reinforcing Ironworker [78] => Roofer/Waterproofer [80] => Scaffold Erector [82] => Sheetmetal Worker [84] => Sprinkler Fitter [86] => Stonemason [88] => Structural Ironworker [90] => Terrazzo Worker [92] => Tile Setter [94] => Truck Driver [96] => Welder [98] => Commercial & Institutional [99] => Jobsites [100] => Demolition [102] => Disasters [104] => Heavy & Highway [106] => Industrial [108] => LEED/Green Construction [110] => Renovations [112] => Residential [114] => Underground [116] => Toolbox Talks [117] => Documents [118] => Media & Documents ) [type] => Toolbox Talks [sub_category] => [url] => /document/4419/d001652/Toolbox%2BTalk%253A%2BSuicide%2BPrevention.html [item:protected] => DocumentRecord Object ( [records:protected] => Array ( ) [recordId:protected] => [searchWordClass:protected] => [searchWordPeerClass:protected] => [bok_record:protected] => [authors:protected] => [organizations:protected] => [collections:protected] => [categories:protected] => Array ( [13] => Category Object ( [languages:protected] => [bok_resources:protected] => [bok_topics:protected] => [bok_keywords:protected] => [id:protected] => 13 [type:protected] => category [parent:protected] => 7 [label:protected] => Drugs, Alcohol & Tobacco [alreadyInSave:protected] => [alreadyInValidation:protected] => [validationFailures:protected] => Array ( ) [_new:BaseObject:private] => [_deleted:BaseObject:private] => [modifiedColumns:protected] => Array ( ) ) [20] => Category Object ( [languages:protected] => [bok_resources:protected] => [bok_topics:protected] => [bok_keywords:protected] => [id:protected] => 20 [type:protected] => category [parent:protected] => 7 [label:protected] => Safety Culture [alreadyInSave:protected] => [alreadyInValidation:protected] => [validationFailures:protected] => Array ( ) [_new:BaseObject:private] => [_deleted:BaseObject:private] => [modifiedColumns:protected] => Array ( ) ) [23] => Category Object ( [languages:protected] => [bok_resources:protected] => [bok_topics:protected] => [bok_keywords:protected] => [id:protected] => 23 [type:protected] => category [parent:protected] => 7 [label:protected] => Stress & Overtime [alreadyInSave:protected] => [alreadyInValidation:protected] => [validationFailures:protected] => Array ( ) [_new:BaseObject:private] => [_deleted:BaseObject:private] => [modifiedColumns:protected] => Array ( ) ) [40] => Category Object ( [languages:protected] => [bok_resources:protected] => [bok_topics:protected] => [bok_keywords:protected] => [id:protected] => 40 [type:protected] => category [parent:protected] => 9 [label:protected] => Overexertion [alreadyInSave:protected] => [alreadyInValidation:protected] => [validationFailures:protected] => Array ( ) [_new:BaseObject:private] => [_deleted:BaseObject:private] => [modifiedColumns:protected] => Array ( ) ) [44] => Category Object ( [languages:protected] => [bok_resources:protected] => [bok_topics:protected] => [bok_keywords:protected] => [id:protected] => 44 [type:protected] => category [parent:protected] => 2 [label:protected] => Acoustical Ceiling Carpenter [alreadyInSave:protected] => [alreadyInValidation:protected] => [validationFailures:protected] => Array ( ) [_new:BaseObject:private] => [_deleted:BaseObject:private] => [modifiedColumns:protected] => Array ( ) ) [45] => Category Object ( [languages:protected] => [bok_resources:protected] => [bok_topics:protected] => [bok_keywords:protected] => [id:protected] => 45 [type:protected] => category [parent:protected] => 2 [label:protected] => Asbestos/Insulator [alreadyInSave:protected] => [alreadyInValidation:protected] => [validationFailures:protected] => Array ( ) [_new:BaseObject:private] => [_deleted:BaseObject:private] => [modifiedColumns:protected] => Array ( ) ) [46] => Category Object ( [languages:protected] => [bok_resources:protected] => [bok_topics:protected] => [bok_keywords:protected] => [id:protected] => 46 [type:protected] => category [parent:protected] => 2 [label:protected] => Boilermaker [alreadyInSave:protected] => [alreadyInValidation:protected] => [validationFailures:protected] => Array ( ) [_new:BaseObject:private] => [_deleted:BaseObject:private] => [modifiedColumns:protected] => Array ( ) ) [47] => Category Object ( [languages:protected] => [bok_resources:protected] => [bok_topics:protected] => [bok_keywords:protected] => [id:protected] => 47 [type:protected] => category [parent:protected] => 2 [label:protected] => Bricklayer [alreadyInSave:protected] => [alreadyInValidation:protected] => [validationFailures:protected] => Array ( ) [_new:BaseObject:private] => [_deleted:BaseObject:private] => [modifiedColumns:protected] => Array ( ) ) [48] => Category Object ( [languages:protected] => [bok_resources:protected] => [bok_topics:protected] => [bok_keywords:protected] => [id:protected] => 48 [type:protected] => category [parent:protected] => 2 [label:protected] => Cabinetmaker [alreadyInSave:protected] => [alreadyInValidation:protected] => [validationFailures:protected] => Array ( ) [_new:BaseObject:private] => [_deleted:BaseObject:private] => [modifiedColumns:protected] => Array ( ) ) [49] => Category Object ( [languages:protected] => [bok_resources:protected] => [bok_topics:protected] => [bok_keywords:protected] => [id:protected] => 49 [type:protected] => category [parent:protected] => 2 [label:protected] => Carpenter [alreadyInSave:protected] => [alreadyInValidation:protected] => [validationFailures:protected] => Array ( ) [_new:BaseObject:private] => [_deleted:BaseObject:private] => [modifiedColumns:protected] => Array ( ) ) [50] => Category Object ( [languages:protected] => [bok_resources:protected] => [bok_topics:protected] => [bok_keywords:protected] => [id:protected] => 50 [type:protected] => category [parent:protected] => 2 [label:protected] => Carpet Layer [alreadyInSave:protected] => [alreadyInValidation:protected] => [validationFailures:protected] => Array ( ) [_new:BaseObject:private] => [_deleted:BaseObject:private] => [modifiedColumns:protected] => Array ( ) ) [51] => Category Object ( [languages:protected] => [bok_resources:protected] => [bok_topics:protected] => [bok_keywords:protected] => [id:protected] => 51 [type:protected] => category [parent:protected] => 2 [label:protected] => Cement Mason [alreadyInSave:protected] => [alreadyInValidation:protected] => [validationFailures:protected] => Array ( ) [_new:BaseObject:private] => [_deleted:BaseObject:private] => [modifiedColumns:protected] => Array ( ) ) [52] => Category Object ( [languages:protected] => [bok_resources:protected] => [bok_topics:protected] => [bok_keywords:protected] => [id:protected] => 52 [type:protected] => category [parent:protected] => 2 [label:protected] => Commercial Diver [alreadyInSave:protected] => [alreadyInValidation:protected] => [validationFailures:protected] => Array ( ) [_new:BaseObject:private] => [_deleted:BaseObject:private] => [modifiedColumns:protected] => Array ( ) ) [53] => Category Object ( [languages:protected] => [bok_resources:protected] => [bok_topics:protected] => [bok_keywords:protected] => [id:protected] => 53 [type:protected] => category [parent:protected] => 2 [label:protected] => Concrete Polisher [alreadyInSave:protected] => [alreadyInValidation:protected] => [validationFailures:protected] => Array ( ) [_new:BaseObject:private] => [_deleted:BaseObject:private] => [modifiedColumns:protected] => Array ( ) ) [54] => Category Object ( [languages:protected] => [bok_resources:protected] => [bok_topics:protected] => [bok_keywords:protected] => [id:protected] => 54 [type:protected] => category [parent:protected] => 2 [label:protected] => Drywall Applicator Specialist [alreadyInSave:protected] => [alreadyInValidation:protected] => [validationFailures:protected] => Array ( ) [_new:BaseObject:private] => [_deleted:BaseObject:private] => [modifiedColumns:protected] => Array ( ) ) [55] => Category Object ( [languages:protected] => [bok_resources:protected] => [bok_topics:protected] => [bok_keywords:protected] => [id:protected] => 55 [type:protected] => category [parent:protected] => 2 [label:protected] => Electrical Worker [alreadyInSave:protected] => [alreadyInValidation:protected] => [validationFailures:protected] => Array ( ) [_new:BaseObject:private] => [_deleted:BaseObject:private] => [modifiedColumns:protected] => Array ( ) ) [56] => Category Object ( [languages:protected] => [bok_resources:protected] => [bok_topics:protected] => [bok_keywords:protected] => [id:protected] => 56 [type:protected] => category [parent:protected] => 2 [label:protected] => Elevator Constructor [alreadyInSave:protected] => [alreadyInValidation:protected] => [validationFailures:protected] => Array ( ) [_new:BaseObject:private] => [_deleted:BaseObject:private] => [modifiedColumns:protected] => Array ( ) ) [57] => Category Object ( [languages:protected] => [bok_resources:protected] => [bok_topics:protected] => [bok_keywords:protected] => [id:protected] => 57 [type:protected] => category [parent:protected] => 2 [label:protected] => Flagger [alreadyInSave:protected] => [alreadyInValidation:protected] => [validationFailures:protected] => Array ( ) [_new:BaseObject:private] => [_deleted:BaseObject:private] => [modifiedColumns:protected] => Array ( ) ) [58] => Category Object ( [languages:protected] => [bok_resources:protected] => [bok_topics:protected] => [bok_keywords:protected] => [id:protected] => 58 [type:protected] => category [parent:protected] => 2 [label:protected] => Glazier [alreadyInSave:protected] => [alreadyInValidation:protected] => [validationFailures:protected] => Array ( ) [_new:BaseObject:private] => [_deleted:BaseObject:private] => [modifiedColumns:protected] => Array ( ) ) [59] => Category Object ( [languages:protected] => [bok_resources:protected] => [bok_topics:protected] => [bok_keywords:protected] => [id:protected] => 59 [type:protected] => category [parent:protected] => 2 [label:protected] => Hazardous Waste Cleanup [alreadyInSave:protected] => [alreadyInValidation:protected] => [validationFailures:protected] => Array ( ) [_new:BaseObject:private] => [_deleted:BaseObject:private] => [modifiedColumns:protected] => Array ( ) ) [60] => Category Object ( [languages:protected] => [bok_resources:protected] => [bok_topics:protected] => [bok_keywords:protected] => [id:protected] => 60 [type:protected] => category [parent:protected] => 2 [label:protected] => HVAC [alreadyInSave:protected] => [alreadyInValidation:protected] => [validationFailures:protected] => Array ( ) [_new:BaseObject:private] => [_deleted:BaseObject:private] => [modifiedColumns:protected] => Array ( ) ) [61] => Category Object ( [languages:protected] => [bok_resources:protected] => [bok_topics:protected] => [bok_keywords:protected] => [id:protected] => 61 [type:protected] => category [parent:protected] => 2 [label:protected] => Interior Systems Carpenter [alreadyInSave:protected] => [alreadyInValidation:protected] => [validationFailures:protected] => Array ( ) [_new:BaseObject:private] => [_deleted:BaseObject:private] => [modifiedColumns:protected] => Array ( ) ) [64] => Category Object ( [languages:protected] => [bok_resources:protected] => [bok_topics:protected] => [bok_keywords:protected] => [id:protected] => 64 [type:protected] => category [parent:protected] => 2 [label:protected] => Laborer [alreadyInSave:protected] => [alreadyInValidation:protected] => [validationFailures:protected] => Array ( ) [_new:BaseObject:private] => [_deleted:BaseObject:private] => [modifiedColumns:protected] => Array ( ) ) [65] => Category Object ( [languages:protected] => [bok_resources:protected] => [bok_topics:protected] => [bok_keywords:protected] => [id:protected] => 65 [type:protected] => category [parent:protected] => 2 [label:protected] => Landscaper [alreadyInSave:protected] => [alreadyInValidation:protected] => [validationFailures:protected] => Array ( ) [_new:BaseObject:private] => [_deleted:BaseObject:private] => [modifiedColumns:protected] => Array ( ) ) [66] => Category Object ( [languages:protected] => [bok_resources:protected] => [bok_topics:protected] => [bok_keywords:protected] => [id:protected] => 66 [type:protected] => category [parent:protected] => 2 [label:protected] => Lather [alreadyInSave:protected] => [alreadyInValidation:protected] => [validationFailures:protected] => Array ( ) [_new:BaseObject:private] => [_deleted:BaseObject:private] => [modifiedColumns:protected] => Array ( ) ) [67] => Category Object ( [languages:protected] => [bok_resources:protected] => [bok_topics:protected] => [bok_keywords:protected] => [id:protected] => 67 [type:protected] => category [parent:protected] => 2 [label:protected] => Lead Abatement Worker [alreadyInSave:protected] => [alreadyInValidation:protected] => [validationFailures:protected] => Array ( ) [_new:BaseObject:private] => [_deleted:BaseObject:private] => [modifiedColumns:protected] => Array ( ) ) [68] => Category Object ( [languages:protected] => [bok_resources:protected] => [bok_topics:protected] => [bok_keywords:protected] => [id:protected] => 68 [type:protected] => category [parent:protected] => 2 [label:protected] => Maintenance Worker [alreadyInSave:protected] => [alreadyInValidation:protected] => [validationFailures:protected] => Array ( ) [_new:BaseObject:private] => [_deleted:BaseObject:private] => [modifiedColumns:protected] => Array ( ) ) [69] => Category Object ( [languages:protected] => [bok_resources:protected] => [bok_topics:protected] => [bok_keywords:protected] => [id:protected] => 69 [type:protected] => category [parent:protected] => 2 [label:protected] => Millwright [alreadyInSave:protected] => [alreadyInValidation:protected] => [validationFailures:protected] => Array ( ) [_new:BaseObject:private] => [_deleted:BaseObject:private] => [modifiedColumns:protected] => Array ( ) ) [70] => Category Object ( [languages:protected] => [bok_resources:protected] => [bok_topics:protected] => [bok_keywords:protected] => [id:protected] => 70 [type:protected] => category [parent:protected] => 2 [label:protected] => Operating Engineer [alreadyInSave:protected] => [alreadyInValidation:protected] => [validationFailures:protected] => Array ( ) [_new:BaseObject:private] => [_deleted:BaseObject:private] => [modifiedColumns:protected] => Array ( ) ) [71] => Category Object ( [languages:protected] => [bok_resources:protected] => [bok_topics:protected] => [bok_keywords:protected] => [id:protected] => 71 [type:protected] => category [parent:protected] => 2 [label:protected] => Painter [alreadyInSave:protected] => [alreadyInValidation:protected] => [validationFailures:protected] => Array ( ) [_new:BaseObject:private] => [_deleted:BaseObject:private] => [modifiedColumns:protected] => Array ( ) ) [72] => Category Object ( [languages:protected] => [bok_resources:protected] => [bok_topics:protected] => [bok_keywords:protected] => [id:protected] => 72 [type:protected] => category [parent:protected] => 2 [label:protected] => Paper Hanger [alreadyInSave:protected] => [alreadyInValidation:protected] => [validationFailures:protected] => Array ( ) [_new:BaseObject:private] => [_deleted:BaseObject:private] => [modifiedColumns:protected] => Array ( ) ) [73] => Category Object ( [languages:protected] => [bok_resources:protected] => [bok_topics:protected] => [bok_keywords:protected] => [id:protected] => 73 [type:protected] => category [parent:protected] => 2 [label:protected] => PCC/Restoration [alreadyInSave:protected] => [alreadyInValidation:protected] => [validationFailures:protected] => Array ( ) [_new:BaseObject:private] => [_deleted:BaseObject:private] => [modifiedColumns:protected] => Array ( ) ) [74] => Category Object ( [languages:protected] => [bok_resources:protected] => [bok_topics:protected] => [bok_keywords:protected] => [id:protected] => 74 [type:protected] => category [parent:protected] => 2 [label:protected] => Pile Driver [alreadyInSave:protected] => [alreadyInValidation:protected] => [validationFailures:protected] => Array ( ) [_new:BaseObject:private] => [_deleted:BaseObject:private] => [modifiedColumns:protected] => Array ( ) ) [75] => Category Object ( [languages:protected] => [bok_resources:protected] => [bok_topics:protected] => [bok_keywords:protected] => [id:protected] => 75 [type:protected] => category [parent:protected] => 2 [label:protected] => Plasterer [alreadyInSave:protected] => [alreadyInValidation:protected] => [validationFailures:protected] => Array ( ) [_new:BaseObject:private] => [_deleted:BaseObject:private] => [modifiedColumns:protected] => Array ( ) ) [76] => Category Object ( [languages:protected] => [bok_resources:protected] => [bok_topics:protected] => [bok_keywords:protected] => [id:protected] => 76 [type:protected] => category [parent:protected] => 2 [label:protected] => Plumber/Pipefitter [alreadyInSave:protected] => [alreadyInValidation:protected] => [validationFailures:protected] => Array ( ) [_new:BaseObject:private] => [_deleted:BaseObject:private] => [modifiedColumns:protected] => Array ( ) ) [77] => Category Object ( [languages:protected] => [bok_resources:protected] => [bok_topics:protected] => [bok_keywords:protected] => [id:protected] => 77 [type:protected] => category [parent:protected] => 2 [label:protected] => Refractory Worker [alreadyInSave:protected] => [alreadyInValidation:protected] => [validationFailures:protected] => Array ( ) [_new:BaseObject:private] => [_deleted:BaseObject:private] => [modifiedColumns:protected] => Array ( ) ) [63] => Category Object ( [languages:protected] => [bok_resources:protected] => [bok_topics:protected] => [bok_keywords:protected] => [id:protected] => 63 [type:protected] => category [parent:protected] => 2 [label:protected] => Reinforcing Ironworker [alreadyInSave:protected] => [alreadyInValidation:protected] => [validationFailures:protected] => Array ( ) [_new:BaseObject:private] => [_deleted:BaseObject:private] => [modifiedColumns:protected] => Array ( ) ) [78] => Category Object ( [languages:protected] => [bok_resources:protected] => [bok_topics:protected] => [bok_keywords:protected] => [id:protected] => 78 [type:protected] => category [parent:protected] => 2 [label:protected] => Roofer/Waterproofer [alreadyInSave:protected] => [alreadyInValidation:protected] => [validationFailures:protected] => Array ( ) [_new:BaseObject:private] => [_deleted:BaseObject:private] => [modifiedColumns:protected] => Array ( ) ) [79] => Category Object ( [languages:protected] => [bok_resources:protected] => [bok_topics:protected] => [bok_keywords:protected] => [id:protected] => 79 [type:protected] => category [parent:protected] => 2 [label:protected] => Scaffold Erector [alreadyInSave:protected] => [alreadyInValidation:protected] => [validationFailures:protected] => Array ( ) [_new:BaseObject:private] => [_deleted:BaseObject:private] => [modifiedColumns:protected] => Array ( ) ) [80] => Category Object ( [languages:protected] => [bok_resources:protected] => [bok_topics:protected] => [bok_keywords:protected] => [id:protected] => 80 [type:protected] => category [parent:protected] => 2 [label:protected] => Sheetmetal Worker [alreadyInSave:protected] => [alreadyInValidation:protected] => [validationFailures:protected] => Array ( ) [_new:BaseObject:private] => [_deleted:BaseObject:private] => [modifiedColumns:protected] => Array ( ) ) [81] => Category Object ( [languages:protected] => [bok_resources:protected] => [bok_topics:protected] => [bok_keywords:protected] => [id:protected] => 81 [type:protected] => category [parent:protected] => 2 [label:protected] => Sprinkler Fitter [alreadyInSave:protected] => [alreadyInValidation:protected] => [validationFailures:protected] => Array ( ) [_new:BaseObject:private] => [_deleted:BaseObject:private] => [modifiedColumns:protected] => Array ( ) ) [82] => Category Object ( [languages:protected] => [bok_resources:protected] => [bok_topics:protected] => [bok_keywords:protected] => [id:protected] => 82 [type:protected] => category [parent:protected] => 2 [label:protected] => Stonemason [alreadyInSave:protected] => [alreadyInValidation:protected] => [validationFailures:protected] => Array ( ) [_new:BaseObject:private] => [_deleted:BaseObject:private] => [modifiedColumns:protected] => Array ( ) ) [62] => Category Object ( [languages:protected] => [bok_resources:protected] => [bok_topics:protected] => [bok_keywords:protected] => [id:protected] => 62 [type:protected] => category [parent:protected] => 2 [label:protected] => Structural Ironworker [alreadyInSave:protected] => [alreadyInValidation:protected] => [validationFailures:protected] => Array ( ) [_new:BaseObject:private] => [_deleted:BaseObject:private] => [modifiedColumns:protected] => Array ( ) ) [83] => Category Object ( [languages:protected] => [bok_resources:protected] => [bok_topics:protected] => [bok_keywords:protected] => [id:protected] => 83 [type:protected] => category [parent:protected] => 2 [label:protected] => Terrazzo Worker [alreadyInSave:protected] => [alreadyInValidation:protected] => [validationFailures:protected] => Array ( ) [_new:BaseObject:private] => [_deleted:BaseObject:private] => [modifiedColumns:protected] => Array ( ) ) [84] => Category Object ( [languages:protected] => [bok_resources:protected] => [bok_topics:protected] => [bok_keywords:protected] => [id:protected] => 84 [type:protected] => category [parent:protected] => 2 [label:protected] => Tile Setter [alreadyInSave:protected] => [alreadyInValidation:protected] => [validationFailures:protected] => Array ( ) [_new:BaseObject:private] => [_deleted:BaseObject:private] => [modifiedColumns:protected] => Array ( ) ) [85] => Category Object ( [languages:protected] => [bok_resources:protected] => [bok_topics:protected] => [bok_keywords:protected] => [id:protected] => 85 [type:protected] => category [parent:protected] => 2 [label:protected] => Truck Driver [alreadyInSave:protected] => [alreadyInValidation:protected] => [validationFailures:protected] => Array ( ) [_new:BaseObject:private] => [_deleted:BaseObject:private] => [modifiedColumns:protected] => Array ( ) ) [86] => Category Object ( [languages:protected] => [bok_resources:protected] => [bok_topics:protected] => [bok_keywords:protected] => [id:protected] => 86 [type:protected] => category [parent:protected] => 2 [label:protected] => Welder [alreadyInSave:protected] => [alreadyInValidation:protected] => [validationFailures:protected] => Array ( ) [_new:BaseObject:private] => [_deleted:BaseObject:private] => [modifiedColumns:protected] => Array ( ) ) [87] => Category Object ( [languages:protected] => [bok_resources:protected] => [bok_topics:protected] => [bok_keywords:protected] => [id:protected] => 87 [type:protected] => category [parent:protected] => 3 [label:protected] => Commercial & Institutional [alreadyInSave:protected] => [alreadyInValidation:protected] => [validationFailures:protected] => Array ( ) [_new:BaseObject:private] => [_deleted:BaseObject:private] => [modifiedColumns:protected] => Array ( ) ) [88] => Category Object ( [languages:protected] => [bok_resources:protected] => [bok_topics:protected] => [bok_keywords:protected] => [id:protected] => 88 [type:protected] => category [parent:protected] => 3 [label:protected] => Demolition [alreadyInSave:protected] => [alreadyInValidation:protected] => [validationFailures:protected] => Array ( ) [_new:BaseObject:private] => [_deleted:BaseObject:private] => [modifiedColumns:protected] => Array ( ) ) [89] => Category Object ( [languages:protected] => [bok_resources:protected] => [bok_topics:protected] => [bok_keywords:protected] => [id:protected] => 89 [type:protected] => category [parent:protected] => 3 [label:protected] => Disasters [alreadyInSave:protected] => [alreadyInValidation:protected] => [validationFailures:protected] => Array ( ) [_new:BaseObject:private] => [_deleted:BaseObject:private] => [modifiedColumns:protected] => Array ( ) ) [91] => Category Object ( [languages:protected] => [bok_resources:protected] => [bok_topics:protected] => [bok_keywords:protected] => [id:protected] => 91 [type:protected] => category [parent:protected] => 3 [label:protected] => Heavy & Highway [alreadyInSave:protected] => [alreadyInValidation:protected] => [validationFailures:protected] => Array ( ) [_new:BaseObject:private] => [_deleted:BaseObject:private] => [modifiedColumns:protected] => Array ( ) ) [90] => Category Object ( [languages:protected] => [bok_resources:protected] => [bok_topics:protected] => [bok_keywords:protected] => [id:protected] => 90 [type:protected] => category [parent:protected] => 3 [label:protected] => Industrial [alreadyInSave:protected] => [alreadyInValidation:protected] => [validationFailures:protected] => Array ( ) [_new:BaseObject:private] => [_deleted:BaseObject:private] => [modifiedColumns:protected] => Array ( ) ) [92] => Category Object ( [languages:protected] => [bok_resources:protected] => [bok_topics:protected] => [bok_keywords:protected] => [id:protected] => 92 [type:protected] => category [parent:protected] => 3 [label:protected] => LEED/Green Construction [alreadyInSave:protected] => [alreadyInValidation:protected] => [validationFailures:protected] => Array ( ) [_new:BaseObject:private] => [_deleted:BaseObject:private] => [modifiedColumns:protected] => Array ( ) ) [93] => Category Object ( [languages:protected] => [bok_resources:protected] => [bok_topics:protected] => [bok_keywords:protected] => [id:protected] => 93 [type:protected] => category [parent:protected] => 3 [label:protected] => Renovations [alreadyInSave:protected] => [alreadyInValidation:protected] => [validationFailures:protected] => Array ( ) [_new:BaseObject:private] => [_deleted:BaseObject:private] => [modifiedColumns:protected] => Array ( ) ) [94] => Category Object ( [languages:protected] => [bok_resources:protected] => [bok_topics:protected] => [bok_keywords:protected] => [id:protected] => 94 [type:protected] => category [parent:protected] => 3 [label:protected] => Residential [alreadyInSave:protected] => [alreadyInValidation:protected] => [validationFailures:protected] => Array ( ) [_new:BaseObject:private] => [_deleted:BaseObject:private] => [modifiedColumns:protected] => Array ( ) ) [95] => Category Object ( [languages:protected] => [bok_resources:protected] => [bok_topics:protected] => [bok_keywords:protected] => [id:protected] => 95 [type:protected] => category [parent:protected] => 3 [label:protected] => Underground [alreadyInSave:protected] => [alreadyInValidation:protected] => [validationFailures:protected] => Array ( ) [_new:BaseObject:private] => [_deleted:BaseObject:private] => [modifiedColumns:protected] => Array ( ) ) [100] => Category Object ( [languages:protected] => [bok_resources:protected] => [bok_topics:protected] => [bok_keywords:protected] => [id:protected] => 100 [type:protected] => category [parent:protected] => 6 [label:protected] => Toolbox Talks [alreadyInSave:protected] => [alreadyInValidation:protected] => [validationFailures:protected] => Array ( ) [_new:BaseObject:private] => [_deleted:BaseObject:private] => [modifiedColumns:protected] => Array ( ) ) ) [categories_initialized:protected] => 1 [mapped_items:protected] => [content:protected] => [files:protected] => [language:protected] => Language Object ( [id:protected] => 1 [code:protected] => en [name:protected] => English [alreadyInSave:protected] => [alreadyInValidation:protected] => [validationFailures:protected] => Array ( ) [_new:BaseObject:private] => [_deleted:BaseObject:private] => [modifiedColumns:protected] => Array ( ) ) [old_record:protected] => [id:protected] => 4419 [old_id:protected] => [elcosh_id:protected] => d001652 [type:protected] => document [display_type:protected] => HTML only (and links) [user_id:protected] => 0 [language_id:protected] => 1 [tagging_id:protected] => Valeria Contreras [priority_id:protected] => 1 [title:protected] => Toolbox Talk: Suicide Prevention [total_pages:protected] => 1 [billed_pages:protected] => 1 [publication_number:protected] => [part_of:protected] => [keywords:protected] => suicide, suicide prevention, mental health, stress, depression, exhaustion, burnout, safety, support, emotional support, health [comments:protected] => [summary:protected] =>The CPWR Toolbox Talk on Suicide Prevention addresses the prevalence of suicide among construction workers. The resource includes a brief case example, steps to prevent a related injury or illness, and questions for discussion. It includes an image that illustrates the hazard, which can be posted in a central location as a reminder of steps to work safely.
Available in English and Spanish. [transition_comments:protected] => [external_link:protected] => [consol_link:protected] => [more_like_this:protected] => [permission_given_by:protected] => [published:protected] => T [billable:protected] => F [img_name:protected] => [img_ext:protected] => [img_width:protected] => [img_height:protected] => [img_credit:protected] => [img_practice:protected] => [vid_source_id:protected] => [vid_running_time:protected] => [vid_intended_audience:protected] => [vid_acquisition_info:protected] => [vid_cost:protected] => [vid_producer:protected] => [vid_filename:protected] => [vid_filename_downloadable:protected] => [date_summary:protected] => [date_permission_requested:protected] => [date_permission_received:protected] => [date_review_needed:protected] => [date_received:protected] => 10/08/20 [date_completed:protected] => 10/08/20 [date_billed:protected] => [date_modified:protected] => 05/19/23 [collBokExports:protected] => [lastBokExportCriteria:BaseElcoshItem:private] => [alreadyInSave:protected] => [alreadyInValidation:protected] => [validationFailures:protected] => Array ( ) [_new:BaseObject:private] => [_deleted:BaseObject:private] => [modifiedColumns:protected] => Array ( ) ) ) ) [new_images] => Array ( [0] => Search_Result Object ( [title] => Toolbox talk - crew view [image] => /record/images/4005-p.jpg [blurb] => Photo of crew listening to a toolbox safety talk before starting work.... [category] => Array ( [0] => 97 [1] => 20 [2] => 47 [3] => 49 [4] => 51 [5] => 55 [6] => 61 [7] => 64 [8] => 71 [9] => 75 [10] => 63 [11] => 79 [12] => 62 [13] => 87 [14] => 88 [15] => 91 [16] => 90 [17] => 93 [18] => 94 [19] => 95 ) [labels] => Array ( [0] => Images [1] => Media [2] => Media & Documents [3] => Safety Culture [4] => Work Environment [5] => Hazards [6] => Bricklayer [7] => Trades [8] => Carpenter [10] => Cement Mason [12] => Electrical Worker [14] => Interior Systems Carpenter [16] => Laborer [18] => Painter [20] => Plasterer [22] => Reinforcing Ironworker [24] => Scaffold Erector [26] => Structural Ironworker [28] => Commercial & Institutional [29] => Jobsites [30] => Demolition [32] => Heavy & Highway [34] => Industrial [36] => Renovations [38] => Residential [40] => Underground ) [type] => Images [sub_category] => [url] => /image/4005/i002692/Toolbox%2Btalk%2B-%2Bcrew%2Bview.html [item:protected] => ImageRecord Object ( [records:protected] => Array ( ) [recordId:protected] => [searchWordClass:protected] => [searchWordPeerClass:protected] => [bok_record:protected] => [authors:protected] => [organizations:protected] => [collections:protected] => [categories:protected] => Array ( [97] => Category Object ( [languages:protected] => [bok_resources:protected] => [bok_topics:protected] => [bok_keywords:protected] => [id:protected] => 97 [type:protected] => category [parent:protected] => 5 [label:protected] => Images [alreadyInSave:protected] => [alreadyInValidation:protected] => [validationFailures:protected] => Array ( ) [_new:BaseObject:private] => [_deleted:BaseObject:private] => [modifiedColumns:protected] => Array ( ) ) [20] => Category Object ( [languages:protected] => [bok_resources:protected] => [bok_topics:protected] => [bok_keywords:protected] => [id:protected] => 20 [type:protected] => category [parent:protected] => 7 [label:protected] => Safety Culture [alreadyInSave:protected] => [alreadyInValidation:protected] => [validationFailures:protected] => Array ( ) [_new:BaseObject:private] => [_deleted:BaseObject:private] => [modifiedColumns:protected] => Array ( ) ) [47] => Category Object ( [languages:protected] => [bok_resources:protected] => [bok_topics:protected] => [bok_keywords:protected] => [id:protected] => 47 [type:protected] => category [parent:protected] => 2 [label:protected] => Bricklayer [alreadyInSave:protected] => [alreadyInValidation:protected] => [validationFailures:protected] => Array ( ) [_new:BaseObject:private] => [_deleted:BaseObject:private] => [modifiedColumns:protected] => Array ( ) ) [49] => Category Object ( [languages:protected] => [bok_resources:protected] => [bok_topics:protected] => [bok_keywords:protected] => [id:protected] => 49 [type:protected] => category [parent:protected] => 2 [label:protected] => Carpenter [alreadyInSave:protected] => [alreadyInValidation:protected] => [validationFailures:protected] => Array ( ) [_new:BaseObject:private] => [_deleted:BaseObject:private] => [modifiedColumns:protected] => Array ( ) ) [51] => Category Object ( [languages:protected] => [bok_resources:protected] => [bok_topics:protected] => [bok_keywords:protected] => [id:protected] => 51 [type:protected] => category [parent:protected] => 2 [label:protected] => Cement Mason [alreadyInSave:protected] => [alreadyInValidation:protected] => [validationFailures:protected] => Array ( ) [_new:BaseObject:private] => [_deleted:BaseObject:private] => [modifiedColumns:protected] => Array ( ) ) [55] => Category Object ( [languages:protected] => [bok_resources:protected] => [bok_topics:protected] => [bok_keywords:protected] => [id:protected] => 55 [type:protected] => category [parent:protected] => 2 [label:protected] => Electrical Worker [alreadyInSave:protected] => [alreadyInValidation:protected] => [validationFailures:protected] => Array ( ) [_new:BaseObject:private] => [_deleted:BaseObject:private] => [modifiedColumns:protected] => Array ( ) ) [61] => Category Object ( [languages:protected] => [bok_resources:protected] => [bok_topics:protected] => [bok_keywords:protected] => [id:protected] => 61 [type:protected] => category [parent:protected] => 2 [label:protected] => Interior Systems Carpenter [alreadyInSave:protected] => [alreadyInValidation:protected] => [validationFailures:protected] => Array ( ) [_new:BaseObject:private] => [_deleted:BaseObject:private] => [modifiedColumns:protected] => Array ( ) ) [64] => Category Object ( [languages:protected] => [bok_resources:protected] => [bok_topics:protected] => [bok_keywords:protected] => [id:protected] => 64 [type:protected] => category [parent:protected] => 2 [label:protected] => Laborer [alreadyInSave:protected] => [alreadyInValidation:protected] => [validationFailures:protected] => Array ( ) [_new:BaseObject:private] => [_deleted:BaseObject:private] => [modifiedColumns:protected] => Array ( ) ) [71] => Category Object ( [languages:protected] => [bok_resources:protected] => [bok_topics:protected] => [bok_keywords:protected] => [id:protected] => 71 [type:protected] => category [parent:protected] => 2 [label:protected] => Painter [alreadyInSave:protected] => [alreadyInValidation:protected] => [validationFailures:protected] => Array ( ) [_new:BaseObject:private] => [_deleted:BaseObject:private] => [modifiedColumns:protected] => Array ( ) ) [75] => Category Object ( [languages:protected] => [bok_resources:protected] => [bok_topics:protected] => [bok_keywords:protected] => [id:protected] => 75 [type:protected] => category [parent:protected] => 2 [label:protected] => Plasterer [alreadyInSave:protected] => [alreadyInValidation:protected] => [validationFailures:protected] => Array ( ) [_new:BaseObject:private] => [_deleted:BaseObject:private] => [modifiedColumns:protected] => Array ( ) ) [63] => Category Object ( [languages:protected] => [bok_resources:protected] => [bok_topics:protected] => [bok_keywords:protected] => [id:protected] => 63 [type:protected] => category [parent:protected] => 2 [label:protected] => Reinforcing Ironworker [alreadyInSave:protected] => [alreadyInValidation:protected] => [validationFailures:protected] => Array ( ) [_new:BaseObject:private] => [_deleted:BaseObject:private] => [modifiedColumns:protected] => Array ( ) ) [79] => Category Object ( [languages:protected] => [bok_resources:protected] => [bok_topics:protected] => [bok_keywords:protected] => [id:protected] => 79 [type:protected] => category [parent:protected] => 2 [label:protected] => Scaffold Erector [alreadyInSave:protected] => [alreadyInValidation:protected] => [validationFailures:protected] => Array ( ) [_new:BaseObject:private] => [_deleted:BaseObject:private] => [modifiedColumns:protected] => Array ( ) ) [62] => Category Object ( [languages:protected] => [bok_resources:protected] => [bok_topics:protected] => [bok_keywords:protected] => [id:protected] => 62 [type:protected] => category [parent:protected] => 2 [label:protected] => Structural Ironworker [alreadyInSave:protected] => [alreadyInValidation:protected] => [validationFailures:protected] => Array ( ) [_new:BaseObject:private] => [_deleted:BaseObject:private] => [modifiedColumns:protected] => Array ( ) ) [87] => Category Object ( [languages:protected] => [bok_resources:protected] => [bok_topics:protected] => [bok_keywords:protected] => [id:protected] => 87 [type:protected] => category [parent:protected] => 3 [label:protected] => Commercial & Institutional [alreadyInSave:protected] => [alreadyInValidation:protected] => [validationFailures:protected] => Array ( ) [_new:BaseObject:private] => [_deleted:BaseObject:private] => [modifiedColumns:protected] => Array ( ) ) [88] => Category Object ( [languages:protected] => [bok_resources:protected] => [bok_topics:protected] => [bok_keywords:protected] => [id:protected] => 88 [type:protected] => category [parent:protected] => 3 [label:protected] => Demolition [alreadyInSave:protected] => [alreadyInValidation:protected] => [validationFailures:protected] => Array ( ) [_new:BaseObject:private] => [_deleted:BaseObject:private] => [modifiedColumns:protected] => Array ( ) ) [91] => Category Object ( [languages:protected] => [bok_resources:protected] => [bok_topics:protected] => [bok_keywords:protected] => [id:protected] => 91 [type:protected] => category [parent:protected] => 3 [label:protected] => Heavy & Highway [alreadyInSave:protected] => [alreadyInValidation:protected] => [validationFailures:protected] => Array ( ) [_new:BaseObject:private] => [_deleted:BaseObject:private] => [modifiedColumns:protected] => Array ( ) ) [90] => Category Object ( [languages:protected] => [bok_resources:protected] => [bok_topics:protected] => [bok_keywords:protected] => [id:protected] => 90 [type:protected] => category [parent:protected] => 3 [label:protected] => Industrial [alreadyInSave:protected] => [alreadyInValidation:protected] => [validationFailures:protected] => Array ( ) [_new:BaseObject:private] => [_deleted:BaseObject:private] => [modifiedColumns:protected] => Array ( ) ) [93] => Category Object ( [languages:protected] => [bok_resources:protected] => [bok_topics:protected] => [bok_keywords:protected] => [id:protected] => 93 [type:protected] => category [parent:protected] => 3 [label:protected] => Renovations [alreadyInSave:protected] => [alreadyInValidation:protected] => [validationFailures:protected] => Array ( ) [_new:BaseObject:private] => [_deleted:BaseObject:private] => [modifiedColumns:protected] => Array ( ) ) [94] => Category Object ( [languages:protected] => [bok_resources:protected] => [bok_topics:protected] => [bok_keywords:protected] => [id:protected] => 94 [type:protected] => category [parent:protected] => 3 [label:protected] => Residential [alreadyInSave:protected] => [alreadyInValidation:protected] => [validationFailures:protected] => Array ( ) [_new:BaseObject:private] => [_deleted:BaseObject:private] => [modifiedColumns:protected] => Array ( ) ) [95] => Category Object ( [languages:protected] => [bok_resources:protected] => [bok_topics:protected] => [bok_keywords:protected] => [id:protected] => 95 [type:protected] => category [parent:protected] => 3 [label:protected] => Underground [alreadyInSave:protected] => [alreadyInValidation:protected] => [validationFailures:protected] => Array ( ) [_new:BaseObject:private] => [_deleted:BaseObject:private] => [modifiedColumns:protected] => Array ( ) ) ) [categories_initialized:protected] => 1 [mapped_items:protected] => [content:protected] => [files:protected] => [language:protected] => Language Object ( [id:protected] => 1 [code:protected] => en [name:protected] => English [alreadyInSave:protected] => [alreadyInValidation:protected] => [validationFailures:protected] => Array ( ) [_new:BaseObject:private] => [_deleted:BaseObject:private] => [modifiedColumns:protected] => Array ( ) ) [old_record:protected] => [id:protected] => 4005 [old_id:protected] => [elcosh_id:protected] => i002692 [type:protected] => image [display_type:protected] => Image [user_id:protected] => 0 [language_id:protected] => 1 [tagging_id:protected] => Bruce Lippy [priority_id:protected] => 1 [title:protected] => Toolbox talk - crew view [total_pages:protected] => 0 [billed_pages:protected] => 0 [publication_number:protected] => [part_of:protected] => [keywords:protected] => toolbox talk, tailgate talk, safety talk, Spanish [comments:protected] => [summary:protected] => Photo of crew listening to a toolbox safety talk before starting work. [transition_comments:protected] => [external_link:protected] => [consol_link:protected] => http://www.cpwrconstructionsolutions.org/electrical/solution/662/worker-training.html [more_like_this:protected] => i002691,d001269, c000079, d001285 [permission_given_by:protected] => [published:protected] => T [billable:protected] => F [img_name:protected] => [img_ext:protected] => jpg [img_width:protected] => [img_height:protected] => [img_credit:protected] => Morgan Zavertnik and Hoar Construction [img_practice:protected] => good [vid_source_id:protected] => [vid_running_time:protected] => [vid_intended_audience:protected] => [vid_acquisition_info:protected] => [vid_cost:protected] => [vid_producer:protected] => [vid_filename:protected] => [vid_filename_downloadable:protected] => [date_summary:protected] => November 2015 [date_permission_requested:protected] => [date_permission_received:protected] => [date_review_needed:protected] => [date_received:protected] => 03/02/16 [date_completed:protected] => 03/02/16 [date_billed:protected] => [date_modified:protected] => 03/02/16 [collBokExports:protected] => [lastBokExportCriteria:BaseElcoshItem:private] => [alreadyInSave:protected] => [alreadyInValidation:protected] => [validationFailures:protected] => Array ( ) [_new:BaseObject:private] => [_deleted:BaseObject:private] => [modifiedColumns:protected] => Array ( ) ) ) [1] => Search_Result Object ( [title] => Toolbox talk - long shot [image] => /record/images/4006-p.jpg [blurb] => This crew gathered every morning before starting work to discuss a new safety topic.... [category] => Array ( [0] => 20 [1] => 47 [2] => 49 [3] => 51 [4] => 55 [5] => 64 [6] => 68 [7] => 75 [8] => 76 [9] => 63 [10] => 78 [11] => 79 [12] => 82 [13] => 62 [14] => 87 [15] => 88 [16] => 91 [17] => 90 [18] => 93 [19] => 94 [20] => 95 [21] => 97 ) [labels] => Array ( [0] => Safety Culture [1] => Work Environment [2] => Hazards [3] => Bricklayer [4] => Trades [5] => Carpenter [7] => Cement Mason [9] => Electrical Worker [11] => Laborer [13] => Maintenance Worker [15] => Plasterer [17] => Plumber/Pipefitter [19] => Reinforcing Ironworker [21] => Roofer/Waterproofer [23] => Scaffold Erector [25] => Stonemason [27] => Structural Ironworker [29] => Commercial & Institutional [30] => Jobsites [31] => Demolition [33] => Heavy & Highway [35] => Industrial [37] => Renovations [39] => Residential [41] => Underground [43] => Images [44] => Media [45] => Media & Documents ) [type] => Images [sub_category] => [url] => /image/4006/i002693/Toolbox%2Btalk%2B-%2Blong%2Bshot.html [item:protected] => ImageRecord Object ( [records:protected] => Array ( ) [recordId:protected] => [searchWordClass:protected] => [searchWordPeerClass:protected] => [bok_record:protected] => [authors:protected] => [organizations:protected] => [collections:protected] => [categories:protected] => Array ( [20] => Category Object ( [languages:protected] => [bok_resources:protected] => [bok_topics:protected] => [bok_keywords:protected] => [id:protected] => 20 [type:protected] => category [parent:protected] => 7 [label:protected] => Safety Culture [alreadyInSave:protected] => [alreadyInValidation:protected] => [validationFailures:protected] => Array ( ) [_new:BaseObject:private] => [_deleted:BaseObject:private] => [modifiedColumns:protected] => Array ( ) ) [47] => Category Object ( [languages:protected] => [bok_resources:protected] => [bok_topics:protected] => [bok_keywords:protected] => [id:protected] => 47 [type:protected] => category [parent:protected] => 2 [label:protected] => Bricklayer [alreadyInSave:protected] => [alreadyInValidation:protected] => [validationFailures:protected] => Array ( ) [_new:BaseObject:private] => [_deleted:BaseObject:private] => [modifiedColumns:protected] => Array ( ) ) [49] => Category Object ( [languages:protected] => [bok_resources:protected] => [bok_topics:protected] => [bok_keywords:protected] => [id:protected] => 49 [type:protected] => category [parent:protected] => 2 [label:protected] => Carpenter [alreadyInSave:protected] => [alreadyInValidation:protected] => [validationFailures:protected] => Array ( ) [_new:BaseObject:private] => [_deleted:BaseObject:private] => [modifiedColumns:protected] => Array ( ) ) [51] => Category Object ( [languages:protected] => [bok_resources:protected] => [bok_topics:protected] => [bok_keywords:protected] => [id:protected] => 51 [type:protected] => category [parent:protected] => 2 [label:protected] => Cement Mason [alreadyInSave:protected] => [alreadyInValidation:protected] => [validationFailures:protected] => Array ( ) [_new:BaseObject:private] => [_deleted:BaseObject:private] => [modifiedColumns:protected] => Array ( ) ) [55] => Category Object ( [languages:protected] => [bok_resources:protected] => [bok_topics:protected] => [bok_keywords:protected] => [id:protected] => 55 [type:protected] => category [parent:protected] => 2 [label:protected] => Electrical Worker [alreadyInSave:protected] => [alreadyInValidation:protected] => [validationFailures:protected] => Array ( ) [_new:BaseObject:private] => [_deleted:BaseObject:private] => [modifiedColumns:protected] => Array ( ) ) [64] => Category Object ( [languages:protected] => [bok_resources:protected] => [bok_topics:protected] => [bok_keywords:protected] => [id:protected] => 64 [type:protected] => category [parent:protected] => 2 [label:protected] => Laborer [alreadyInSave:protected] => [alreadyInValidation:protected] => [validationFailures:protected] => Array ( ) [_new:BaseObject:private] => [_deleted:BaseObject:private] => [modifiedColumns:protected] => Array ( ) ) [68] => Category Object ( [languages:protected] => [bok_resources:protected] => [bok_topics:protected] => [bok_keywords:protected] => [id:protected] => 68 [type:protected] => category [parent:protected] => 2 [label:protected] => Maintenance Worker [alreadyInSave:protected] => [alreadyInValidation:protected] => [validationFailures:protected] => Array ( ) [_new:BaseObject:private] => [_deleted:BaseObject:private] => [modifiedColumns:protected] => Array ( ) ) [75] => Category Object ( [languages:protected] => [bok_resources:protected] => [bok_topics:protected] => [bok_keywords:protected] => [id:protected] => 75 [type:protected] => category [parent:protected] => 2 [label:protected] => Plasterer [alreadyInSave:protected] => [alreadyInValidation:protected] => [validationFailures:protected] => Array ( ) [_new:BaseObject:private] => [_deleted:BaseObject:private] => [modifiedColumns:protected] => Array ( ) ) [76] => Category Object ( [languages:protected] => [bok_resources:protected] => [bok_topics:protected] => [bok_keywords:protected] => [id:protected] => 76 [type:protected] => category [parent:protected] => 2 [label:protected] => Plumber/Pipefitter [alreadyInSave:protected] => [alreadyInValidation:protected] => [validationFailures:protected] => Array ( ) [_new:BaseObject:private] => [_deleted:BaseObject:private] => [modifiedColumns:protected] => Array ( ) ) [63] => Category Object ( [languages:protected] => [bok_resources:protected] => [bok_topics:protected] => [bok_keywords:protected] => [id:protected] => 63 [type:protected] => category [parent:protected] => 2 [label:protected] => Reinforcing Ironworker [alreadyInSave:protected] => [alreadyInValidation:protected] => [validationFailures:protected] => Array ( ) [_new:BaseObject:private] => [_deleted:BaseObject:private] => [modifiedColumns:protected] => Array ( ) ) [78] => Category Object ( [languages:protected] => [bok_resources:protected] => [bok_topics:protected] => [bok_keywords:protected] => [id:protected] => 78 [type:protected] => category [parent:protected] => 2 [label:protected] => Roofer/Waterproofer [alreadyInSave:protected] => [alreadyInValidation:protected] => [validationFailures:protected] => Array ( ) [_new:BaseObject:private] => [_deleted:BaseObject:private] => [modifiedColumns:protected] => Array ( ) ) [79] => Category Object ( [languages:protected] => [bok_resources:protected] => [bok_topics:protected] => [bok_keywords:protected] => [id:protected] => 79 [type:protected] => category [parent:protected] => 2 [label:protected] => Scaffold Erector [alreadyInSave:protected] => [alreadyInValidation:protected] => [validationFailures:protected] => Array ( ) [_new:BaseObject:private] => [_deleted:BaseObject:private] => [modifiedColumns:protected] => Array ( ) ) [82] => Category Object ( [languages:protected] => [bok_resources:protected] => [bok_topics:protected] => [bok_keywords:protected] => [id:protected] => 82 [type:protected] => category [parent:protected] => 2 [label:protected] => Stonemason [alreadyInSave:protected] => [alreadyInValidation:protected] => [validationFailures:protected] => Array ( ) [_new:BaseObject:private] => [_deleted:BaseObject:private] => [modifiedColumns:protected] => Array ( ) ) [62] => Category Object ( [languages:protected] => [bok_resources:protected] => [bok_topics:protected] => [bok_keywords:protected] => [id:protected] => 62 [type:protected] => category [parent:protected] => 2 [label:protected] => Structural Ironworker [alreadyInSave:protected] => [alreadyInValidation:protected] => [validationFailures:protected] => Array ( ) [_new:BaseObject:private] => [_deleted:BaseObject:private] => [modifiedColumns:protected] => Array ( ) ) [87] => Category Object ( [languages:protected] => [bok_resources:protected] => [bok_topics:protected] => [bok_keywords:protected] => [id:protected] => 87 [type:protected] => category [parent:protected] => 3 [label:protected] => Commercial & Institutional [alreadyInSave:protected] => [alreadyInValidation:protected] => [validationFailures:protected] => Array ( ) [_new:BaseObject:private] => [_deleted:BaseObject:private] => [modifiedColumns:protected] => Array ( ) ) [88] => Category Object ( [languages:protected] => [bok_resources:protected] => [bok_topics:protected] => [bok_keywords:protected] => [id:protected] => 88 [type:protected] => category [parent:protected] => 3 [label:protected] => Demolition [alreadyInSave:protected] => [alreadyInValidation:protected] => [validationFailures:protected] => Array ( ) [_new:BaseObject:private] => [_deleted:BaseObject:private] => [modifiedColumns:protected] => Array ( ) ) [91] => Category Object ( [languages:protected] => [bok_resources:protected] => [bok_topics:protected] => [bok_keywords:protected] => [id:protected] => 91 [type:protected] => category [parent:protected] => 3 [label:protected] => Heavy & Highway [alreadyInSave:protected] => [alreadyInValidation:protected] => [validationFailures:protected] => Array ( ) [_new:BaseObject:private] => [_deleted:BaseObject:private] => [modifiedColumns:protected] => Array ( ) ) [90] => Category Object ( [languages:protected] => [bok_resources:protected] => [bok_topics:protected] => [bok_keywords:protected] => [id:protected] => 90 [type:protected] => category [parent:protected] => 3 [label:protected] => Industrial [alreadyInSave:protected] => [alreadyInValidation:protected] => [validationFailures:protected] => Array ( ) [_new:BaseObject:private] => [_deleted:BaseObject:private] => [modifiedColumns:protected] => Array ( ) ) [93] => Category Object ( [languages:protected] => [bok_resources:protected] => [bok_topics:protected] => [bok_keywords:protected] => [id:protected] => 93 [type:protected] => category [parent:protected] => 3 [label:protected] => Renovations [alreadyInSave:protected] => [alreadyInValidation:protected] => [validationFailures:protected] => Array ( ) [_new:BaseObject:private] => [_deleted:BaseObject:private] => [modifiedColumns:protected] => Array ( ) ) [94] => Category Object ( [languages:protected] => [bok_resources:protected] => [bok_topics:protected] => [bok_keywords:protected] => [id:protected] => 94 [type:protected] => category [parent:protected] => 3 [label:protected] => Residential [alreadyInSave:protected] => [alreadyInValidation:protected] => [validationFailures:protected] => Array ( ) [_new:BaseObject:private] => [_deleted:BaseObject:private] => [modifiedColumns:protected] => Array ( ) ) [95] => Category Object ( [languages:protected] => [bok_resources:protected] => [bok_topics:protected] => [bok_keywords:protected] => [id:protected] => 95 [type:protected] => category [parent:protected] => 3 [label:protected] => Underground [alreadyInSave:protected] => [alreadyInValidation:protected] => [validationFailures:protected] => Array ( ) [_new:BaseObject:private] => [_deleted:BaseObject:private] => [modifiedColumns:protected] => Array ( ) ) [97] => Category Object ( [languages:protected] => [bok_resources:protected] => [bok_topics:protected] => [bok_keywords:protected] => [id:protected] => 97 [type:protected] => category [parent:protected] => 5 [label:protected] => Images [alreadyInSave:protected] => [alreadyInValidation:protected] => [validationFailures:protected] => Array ( ) [_new:BaseObject:private] => [_deleted:BaseObject:private] => [modifiedColumns:protected] => Array ( ) ) ) [categories_initialized:protected] => 1 [mapped_items:protected] => [content:protected] => [files:protected] => [language:protected] => Language Object ( [id:protected] => 1 [code:protected] => en [name:protected] => English [alreadyInSave:protected] => [alreadyInValidation:protected] => [validationFailures:protected] => Array ( ) [_new:BaseObject:private] => [_deleted:BaseObject:private] => [modifiedColumns:protected] => Array ( ) ) [old_record:protected] => [id:protected] => 4006 [old_id:protected] => [elcosh_id:protected] => i002693 [type:protected] => image [display_type:protected] => Image [user_id:protected] => 0 [language_id:protected] => 1 [tagging_id:protected] => Bruce Lippy [priority_id:protected] => 1 [title:protected] => Toolbox talk - long shot [total_pages:protected] => 0 [billed_pages:protected] => 0 [publication_number:protected] => [part_of:protected] => [keywords:protected] => toolbox talk, tailgate talk, safety minute [comments:protected] => [summary:protected] => This crew gathered every morning before starting work to discuss a new safety topic. [transition_comments:protected] => [external_link:protected] => [consol_link:protected] => http://www.cpwrconstructionsolutions.org/electrical/solution/662/worker-training.html [more_like_this:protected] => i002691,i002692,d001269,d000527 [permission_given_by:protected] => [published:protected] => T [billable:protected] => F [img_name:protected] => [img_ext:protected] => jpg [img_width:protected] => [img_height:protected] => [img_credit:protected] => Morgan Zavertnik and Hoar Construction [img_practice:protected] => good [vid_source_id:protected] => [vid_running_time:protected] => [vid_intended_audience:protected] => [vid_acquisition_info:protected] => [vid_cost:protected] => [vid_producer:protected] => [vid_filename:protected] => [vid_filename_downloadable:protected] => [date_summary:protected] => November 2015 [date_permission_requested:protected] => [date_permission_received:protected] => [date_review_needed:protected] => [date_received:protected] => 03/02/16 [date_completed:protected] => 03/02/16 [date_billed:protected] => [date_modified:protected] => 03/02/16 [collBokExports:protected] => [lastBokExportCriteria:BaseElcoshItem:private] => [alreadyInSave:protected] => [alreadyInValidation:protected] => [validationFailures:protected] => Array ( ) [_new:BaseObject:private] => [_deleted:BaseObject:private] => [modifiedColumns:protected] => Array ( ) ) ) [2] => Search_Result Object ( [title] => Construction bracing [image] => /record/images/3995-p.jpg [blurb] => This shows structural support that prevents collapses during construction.... [category] => Array ( [0] => 12 [1] => 15 [2] => 21 [3] => 49 [4] => 51 [5] => 55 [6] => 56 [7] => 60 [8] => 64 [9] => 68 [10] => 74 [11] => 63 [12] => 78 [13] => 79 [14] => 80 [15] => 62 [16] => 87 [17] => 90 [18] => 97 ) [labels] => Array ( [0] => Crushed/Struck By [1] => Work Environment [2] => Hazards [3] => Falls [6] => Scaffolds [9] => Carpenter [10] => Trades [11] => Cement Mason [13] => Electrical Worker [15] => Elevator Constructor [17] => HVAC [19] => Laborer [21] => Maintenance Worker [23] => Pile Driver [25] => Reinforcing Ironworker [27] => Roofer/Waterproofer [29] => Scaffold Erector [31] => Sheetmetal Worker [33] => Structural Ironworker [35] => Commercial & Institutional [36] => Jobsites [37] => Industrial [39] => Images [40] => Media [41] => Media & Documents ) [type] => Images [sub_category] => [url] => /image/3995/i002690/Construction%2Bbracing.html [item:protected] => ImageRecord Object ( [records:protected] => Array ( ) [recordId:protected] => [searchWordClass:protected] => [searchWordPeerClass:protected] => [bok_record:protected] => [authors:protected] => [organizations:protected] => [collections:protected] => [categories:protected] => Array ( [12] => Category Object ( [languages:protected] => [bok_resources:protected] => [bok_topics:protected] => [bok_keywords:protected] => [id:protected] => 12 [type:protected] => category [parent:protected] => 7 [label:protected] => Crushed/Struck By [alreadyInSave:protected] => [alreadyInValidation:protected] => [validationFailures:protected] => Array ( ) [_new:BaseObject:private] => [_deleted:BaseObject:private] => [modifiedColumns:protected] => Array ( ) ) [15] => Category Object ( [languages:protected] => [bok_resources:protected] => [bok_topics:protected] => [bok_keywords:protected] => [id:protected] => 15 [type:protected] => category [parent:protected] => 7 [label:protected] => Falls [alreadyInSave:protected] => [alreadyInValidation:protected] => [validationFailures:protected] => Array ( ) [_new:BaseObject:private] => [_deleted:BaseObject:private] => [modifiedColumns:protected] => Array ( ) ) [21] => Category Object ( [languages:protected] => [bok_resources:protected] => [bok_topics:protected] => [bok_keywords:protected] => [id:protected] => 21 [type:protected] => category [parent:protected] => 7 [label:protected] => Scaffolds [alreadyInSave:protected] => [alreadyInValidation:protected] => [validationFailures:protected] => Array ( ) [_new:BaseObject:private] => [_deleted:BaseObject:private] => [modifiedColumns:protected] => Array ( ) ) [49] => Category Object ( [languages:protected] => [bok_resources:protected] => [bok_topics:protected] => [bok_keywords:protected] => [id:protected] => 49 [type:protected] => category [parent:protected] => 2 [label:protected] => Carpenter [alreadyInSave:protected] => [alreadyInValidation:protected] => [validationFailures:protected] => Array ( ) [_new:BaseObject:private] => [_deleted:BaseObject:private] => [modifiedColumns:protected] => Array ( ) ) [51] => Category Object ( [languages:protected] => [bok_resources:protected] => [bok_topics:protected] => [bok_keywords:protected] => [id:protected] => 51 [type:protected] => category [parent:protected] => 2 [label:protected] => Cement Mason [alreadyInSave:protected] => [alreadyInValidation:protected] => [validationFailures:protected] => Array ( ) [_new:BaseObject:private] => [_deleted:BaseObject:private] => [modifiedColumns:protected] => Array ( ) ) [55] => Category Object ( [languages:protected] => [bok_resources:protected] => [bok_topics:protected] => [bok_keywords:protected] => [id:protected] => 55 [type:protected] => category [parent:protected] => 2 [label:protected] => Electrical Worker [alreadyInSave:protected] => [alreadyInValidation:protected] => [validationFailures:protected] => Array ( ) [_new:BaseObject:private] => [_deleted:BaseObject:private] => [modifiedColumns:protected] => Array ( ) ) [56] => Category Object ( [languages:protected] => [bok_resources:protected] => [bok_topics:protected] => [bok_keywords:protected] => [id:protected] => 56 [type:protected] => category [parent:protected] => 2 [label:protected] => Elevator Constructor [alreadyInSave:protected] => [alreadyInValidation:protected] => [validationFailures:protected] => Array ( ) [_new:BaseObject:private] => [_deleted:BaseObject:private] => [modifiedColumns:protected] => Array ( ) ) [60] => Category Object ( [languages:protected] => [bok_resources:protected] => [bok_topics:protected] => [bok_keywords:protected] => [id:protected] => 60 [type:protected] => category [parent:protected] => 2 [label:protected] => HVAC [alreadyInSave:protected] => [alreadyInValidation:protected] => [validationFailures:protected] => Array ( ) [_new:BaseObject:private] => [_deleted:BaseObject:private] => [modifiedColumns:protected] => Array ( ) ) [64] => Category Object ( [languages:protected] => [bok_resources:protected] => [bok_topics:protected] => [bok_keywords:protected] => [id:protected] => 64 [type:protected] => category [parent:protected] => 2 [label:protected] => Laborer [alreadyInSave:protected] => [alreadyInValidation:protected] => [validationFailures:protected] => Array ( ) [_new:BaseObject:private] => [_deleted:BaseObject:private] => [modifiedColumns:protected] => Array ( ) ) [68] => Category Object ( [languages:protected] => [bok_resources:protected] => [bok_topics:protected] => [bok_keywords:protected] => [id:protected] => 68 [type:protected] => category [parent:protected] => 2 [label:protected] => Maintenance Worker [alreadyInSave:protected] => [alreadyInValidation:protected] => [validationFailures:protected] => Array ( ) [_new:BaseObject:private] => [_deleted:BaseObject:private] => [modifiedColumns:protected] => Array ( ) ) [74] => Category Object ( [languages:protected] => [bok_resources:protected] => [bok_topics:protected] => [bok_keywords:protected] => [id:protected] => 74 [type:protected] => category [parent:protected] => 2 [label:protected] => Pile Driver [alreadyInSave:protected] => [alreadyInValidation:protected] => [validationFailures:protected] => Array ( ) [_new:BaseObject:private] => [_deleted:BaseObject:private] => [modifiedColumns:protected] => Array ( ) ) [63] => Category Object ( [languages:protected] => [bok_resources:protected] => [bok_topics:protected] => [bok_keywords:protected] => [id:protected] => 63 [type:protected] => category [parent:protected] => 2 [label:protected] => Reinforcing Ironworker [alreadyInSave:protected] => [alreadyInValidation:protected] => [validationFailures:protected] => Array ( ) [_new:BaseObject:private] => [_deleted:BaseObject:private] => [modifiedColumns:protected] => Array ( ) ) [78] => Category Object ( [languages:protected] => [bok_resources:protected] => [bok_topics:protected] => [bok_keywords:protected] => [id:protected] => 78 [type:protected] => category [parent:protected] => 2 [label:protected] => Roofer/Waterproofer [alreadyInSave:protected] => [alreadyInValidation:protected] => [validationFailures:protected] => Array ( ) [_new:BaseObject:private] => [_deleted:BaseObject:private] => [modifiedColumns:protected] => Array ( ) ) [79] => Category Object ( [languages:protected] => [bok_resources:protected] => [bok_topics:protected] => [bok_keywords:protected] => [id:protected] => 79 [type:protected] => category [parent:protected] => 2 [label:protected] => Scaffold Erector [alreadyInSave:protected] => [alreadyInValidation:protected] => [validationFailures:protected] => Array ( ) [_new:BaseObject:private] => [_deleted:BaseObject:private] => [modifiedColumns:protected] => Array ( ) ) [80] => Category Object ( [languages:protected] => [bok_resources:protected] => [bok_topics:protected] => [bok_keywords:protected] => [id:protected] => 80 [type:protected] => category [parent:protected] => 2 [label:protected] => Sheetmetal Worker [alreadyInSave:protected] => [alreadyInValidation:protected] => [validationFailures:protected] => Array ( ) [_new:BaseObject:private] => [_deleted:BaseObject:private] => [modifiedColumns:protected] => Array ( ) ) [62] => Category Object ( [languages:protected] => [bok_resources:protected] => [bok_topics:protected] => [bok_keywords:protected] => [id:protected] => 62 [type:protected] => category [parent:protected] => 2 [label:protected] => Structural Ironworker [alreadyInSave:protected] => [alreadyInValidation:protected] => [validationFailures:protected] => Array ( ) [_new:BaseObject:private] => [_deleted:BaseObject:private] => [modifiedColumns:protected] => Array ( ) ) [87] => Category Object ( [languages:protected] => [bok_resources:protected] => [bok_topics:protected] => [bok_keywords:protected] => [id:protected] => 87 [type:protected] => category [parent:protected] => 3 [label:protected] => Commercial & Institutional [alreadyInSave:protected] => [alreadyInValidation:protected] => [validationFailures:protected] => Array ( ) [_new:BaseObject:private] => [_deleted:BaseObject:private] => [modifiedColumns:protected] => Array ( ) ) [90] => Category Object ( [languages:protected] => [bok_resources:protected] => [bok_topics:protected] => [bok_keywords:protected] => [id:protected] => 90 [type:protected] => category [parent:protected] => 3 [label:protected] => Industrial [alreadyInSave:protected] => [alreadyInValidation:protected] => [validationFailures:protected] => Array ( ) [_new:BaseObject:private] => [_deleted:BaseObject:private] => [modifiedColumns:protected] => Array ( ) ) [97] => Category Object ( [languages:protected] => [bok_resources:protected] => [bok_topics:protected] => [bok_keywords:protected] => [id:protected] => 97 [type:protected] => category [parent:protected] => 5 [label:protected] => Images [alreadyInSave:protected] => [alreadyInValidation:protected] => [validationFailures:protected] => Array ( ) [_new:BaseObject:private] => [_deleted:BaseObject:private] => [modifiedColumns:protected] => Array ( ) ) ) [categories_initialized:protected] => 1 [mapped_items:protected] => [content:protected] => [files:protected] => [language:protected] => Language Object ( [id:protected] => 1 [code:protected] => en [name:protected] => English [alreadyInSave:protected] => [alreadyInValidation:protected] => [validationFailures:protected] => Array ( ) [_new:BaseObject:private] => [_deleted:BaseObject:private] => [modifiedColumns:protected] => Array ( ) ) [old_record:protected] => [id:protected] => 3995 [old_id:protected] => [elcosh_id:protected] => i002690 [type:protected] => image [display_type:protected] => Image [user_id:protected] => 0 [language_id:protected] => 1 [tagging_id:protected] => Bruce Lippy [priority_id:protected] => 1 [title:protected] => Construction bracing [total_pages:protected] => 0 [billed_pages:protected] => 0 [publication_number:protected] => [part_of:protected] => [keywords:protected] => Bracing, support, scaffold [comments:protected] => [summary:protected] => This shows structural support that prevents collapses during construction. [transition_comments:protected] => [external_link:protected] => [consol_link:protected] => http://www.cpwrconstructionsolutions.org/masonry/solution/8/adjustable-tower-scaffold.html [more_like_this:protected] => i002660 [permission_given_by:protected] => [published:protected] => T [billable:protected] => F [img_name:protected] => [img_ext:protected] => jpg [img_width:protected] => [img_height:protected] => [img_credit:protected] => Photo by Pam Susi [img_practice:protected] => good [vid_source_id:protected] => [vid_running_time:protected] => [vid_intended_audience:protected] => [vid_acquisition_info:protected] => [vid_cost:protected] => [vid_producer:protected] => [vid_filename:protected] => [vid_filename_downloadable:protected] => [date_summary:protected] => January 2016 [date_permission_requested:protected] => [date_permission_received:protected] => [date_review_needed:protected] => [date_received:protected] => 02/01/16 [date_completed:protected] => 02/01/16 [date_billed:protected] => [date_modified:protected] => 02/01/16 [collBokExports:protected] => [lastBokExportCriteria:BaseElcoshItem:private] => [alreadyInSave:protected] => [alreadyInValidation:protected] => [validationFailures:protected] => Array ( ) [_new:BaseObject:private] => [_deleted:BaseObject:private] => [modifiedColumns:protected] => Array ( ) ) ) [3] => Search_Result Object ( [title] => Suspended Scaffold Outriggers [image] => /record/images/3975-p.jpg [blurb] => Suspended scaffolds systems must be designed by a qualified person and inspected daily by a competent person. The supports for the counterweight must... [category] => Array ( [0] => 97 [1] => 15 [2] => 47 [3] => 49 [4] => 79 [5] => 87 ) [labels] => Array ( [0] => Images [1] => Media [2] => Media & Documents [3] => Falls [4] => Work Environment [5] => Hazards [6] => Bricklayer [7] => Trades [8] => Carpenter [10] => Scaffold Erector [12] => Commercial & Institutional [13] => Jobsites ) [type] => Images [sub_category] => [url] => /image/3975/i002683/Suspended%2BScaffold%2BOutriggers.html [item:protected] => ImageRecord Object ( [records:protected] => Array ( ) [recordId:protected] => [searchWordClass:protected] => [searchWordPeerClass:protected] => [bok_record:protected] => [authors:protected] => [organizations:protected] => [collections:protected] => [categories:protected] => Array ( [97] => Category Object ( [languages:protected] => [bok_resources:protected] => [bok_topics:protected] => [bok_keywords:protected] => [id:protected] => 97 [type:protected] => category [parent:protected] => 5 [label:protected] => Images [alreadyInSave:protected] => [alreadyInValidation:protected] => [validationFailures:protected] => Array ( ) [_new:BaseObject:private] => [_deleted:BaseObject:private] => [modifiedColumns:protected] => Array ( ) ) [15] => Category Object ( [languages:protected] => [bok_resources:protected] => [bok_topics:protected] => [bok_keywords:protected] => [id:protected] => 15 [type:protected] => category [parent:protected] => 7 [label:protected] => Falls [alreadyInSave:protected] => [alreadyInValidation:protected] => [validationFailures:protected] => Array ( ) [_new:BaseObject:private] => [_deleted:BaseObject:private] => [modifiedColumns:protected] => Array ( ) ) [47] => Category Object ( [languages:protected] => [bok_resources:protected] => [bok_topics:protected] => [bok_keywords:protected] => [id:protected] => 47 [type:protected] => category [parent:protected] => 2 [label:protected] => Bricklayer [alreadyInSave:protected] => [alreadyInValidation:protected] => [validationFailures:protected] => Array ( ) [_new:BaseObject:private] => [_deleted:BaseObject:private] => [modifiedColumns:protected] => Array ( ) ) [49] => Category Object ( [languages:protected] => [bok_resources:protected] => [bok_topics:protected] => [bok_keywords:protected] => [id:protected] => 49 [type:protected] => category [parent:protected] => 2 [label:protected] => Carpenter [alreadyInSave:protected] => [alreadyInValidation:protected] => [validationFailures:protected] => Array ( ) [_new:BaseObject:private] => [_deleted:BaseObject:private] => [modifiedColumns:protected] => Array ( ) ) [79] => Category Object ( [languages:protected] => [bok_resources:protected] => [bok_topics:protected] => [bok_keywords:protected] => [id:protected] => 79 [type:protected] => category [parent:protected] => 2 [label:protected] => Scaffold Erector [alreadyInSave:protected] => [alreadyInValidation:protected] => [validationFailures:protected] => Array ( ) [_new:BaseObject:private] => [_deleted:BaseObject:private] => [modifiedColumns:protected] => Array ( ) ) [87] => Category Object ( [languages:protected] => [bok_resources:protected] => [bok_topics:protected] => [bok_keywords:protected] => [id:protected] => 87 [type:protected] => category [parent:protected] => 3 [label:protected] => Commercial & Institutional [alreadyInSave:protected] => [alreadyInValidation:protected] => [validationFailures:protected] => Array ( ) [_new:BaseObject:private] => [_deleted:BaseObject:private] => [modifiedColumns:protected] => Array ( ) ) ) [categories_initialized:protected] => 1 [mapped_items:protected] => [content:protected] => [files:protected] => [language:protected] => Language Object ( [id:protected] => 1 [code:protected] => en [name:protected] => English [alreadyInSave:protected] => [alreadyInValidation:protected] => [validationFailures:protected] => Array ( ) [_new:BaseObject:private] => [_deleted:BaseObject:private] => [modifiedColumns:protected] => Array ( ) ) [old_record:protected] => [id:protected] => 3975 [old_id:protected] => [elcosh_id:protected] => i002683 [type:protected] => image [display_type:protected] => Image [user_id:protected] => 0 [language_id:protected] => 1 [tagging_id:protected] => John Newquist [priority_id:protected] => 1 [title:protected] => Suspended Scaffold Outriggers [total_pages:protected] => 0 [billed_pages:protected] => 0 [publication_number:protected] => [part_of:protected] => [keywords:protected] => suspended, scaffold, swing, stage, fall, protection, counterweight, qualified, person [comments:protected] => [summary:protected] => Suspended scaffolds systems must be designed by a qualified person and inspected daily by a competent person. The supports for the counterweight must be designed with a safety factor of four. [transition_comments:protected] => [external_link:protected] => [consol_link:protected] => http://www.cpwrconstructionsolutions.org/task/Erect%2Band%2Bdismantle%2Bscaffolds/ [more_like_this:protected] => d000244,d000359,i000253,i000407 [permission_given_by:protected] => [published:protected] => T [billable:protected] => F [img_name:protected] => [img_ext:protected] => jpg [img_width:protected] => [img_height:protected] => [img_credit:protected] => MetroPark, Miller and Long [img_practice:protected] => not_applicable [vid_source_id:protected] => [vid_running_time:protected] => [vid_intended_audience:protected] => [vid_acquisition_info:protected] => [vid_cost:protected] => [vid_producer:protected] => [vid_filename:protected] => [vid_filename_downloadable:protected] => [date_summary:protected] => August 28 2015 [date_permission_requested:protected] => [date_permission_received:protected] => [date_review_needed:protected] => [date_received:protected] => 08/28/15 [date_completed:protected] => 08/28/15 [date_billed:protected] => [date_modified:protected] => 08/28/15 [collBokExports:protected] => [lastBokExportCriteria:BaseElcoshItem:private] => [alreadyInSave:protected] => [alreadyInValidation:protected] => [validationFailures:protected] => Array ( ) [_new:BaseObject:private] => [_deleted:BaseObject:private] => [modifiedColumns:protected] => Array ( ) ) ) [4] => Search_Result Object ( [title] => Suspended scaffold [image] => /record/images/3976-p.jpg [blurb] => Suspended scaffold outrigger beams must have stops to prevent the hangers from sliding of the end of the outriggers. Wire rope supported must be desig... [category] => Array ( [0] => 97 [1] => 15 [2] => 47 [3] => 50 [4] => 79 [5] => 87 ) [labels] => Array ( [0] => Images [1] => Media [2] => Media & Documents [3] => Falls [4] => Work Environment [5] => Hazards [6] => Bricklayer [7] => Trades [8] => Carpet Layer [10] => Scaffold Erector [12] => Commercial & Institutional [13] => Jobsites ) [type] => Images [sub_category] => [url] => /image/3976/i002684/Suspended%2Bscaffold.html [item:protected] => ImageRecord Object ( [records:protected] => Array ( ) [recordId:protected] => [searchWordClass:protected] => [searchWordPeerClass:protected] => [bok_record:protected] => [authors:protected] => [organizations:protected] => [collections:protected] => [categories:protected] => Array ( [97] => Category Object ( [languages:protected] => [bok_resources:protected] => [bok_topics:protected] => [bok_keywords:protected] => [id:protected] => 97 [type:protected] => category [parent:protected] => 5 [label:protected] => Images [alreadyInSave:protected] => [alreadyInValidation:protected] => [validationFailures:protected] => Array ( ) [_new:BaseObject:private] => [_deleted:BaseObject:private] => [modifiedColumns:protected] => Array ( ) ) [15] => Category Object ( [languages:protected] => [bok_resources:protected] => [bok_topics:protected] => [bok_keywords:protected] => [id:protected] => 15 [type:protected] => category [parent:protected] => 7 [label:protected] => Falls [alreadyInSave:protected] => [alreadyInValidation:protected] => [validationFailures:protected] => Array ( ) [_new:BaseObject:private] => [_deleted:BaseObject:private] => [modifiedColumns:protected] => Array ( ) ) [47] => Category Object ( [languages:protected] => [bok_resources:protected] => [bok_topics:protected] => [bok_keywords:protected] => [id:protected] => 47 [type:protected] => category [parent:protected] => 2 [label:protected] => Bricklayer [alreadyInSave:protected] => [alreadyInValidation:protected] => [validationFailures:protected] => Array ( ) [_new:BaseObject:private] => [_deleted:BaseObject:private] => [modifiedColumns:protected] => Array ( ) ) [50] => Category Object ( [languages:protected] => [bok_resources:protected] => [bok_topics:protected] => [bok_keywords:protected] => [id:protected] => 50 [type:protected] => category [parent:protected] => 2 [label:protected] => Carpet Layer [alreadyInSave:protected] => [alreadyInValidation:protected] => [validationFailures:protected] => Array ( ) [_new:BaseObject:private] => [_deleted:BaseObject:private] => [modifiedColumns:protected] => Array ( ) ) [79] => Category Object ( [languages:protected] => [bok_resources:protected] => [bok_topics:protected] => [bok_keywords:protected] => [id:protected] => 79 [type:protected] => category [parent:protected] => 2 [label:protected] => Scaffold Erector [alreadyInSave:protected] => [alreadyInValidation:protected] => [validationFailures:protected] => Array ( ) [_new:BaseObject:private] => [_deleted:BaseObject:private] => [modifiedColumns:protected] => Array ( ) ) [87] => Category Object ( [languages:protected] => [bok_resources:protected] => [bok_topics:protected] => [bok_keywords:protected] => [id:protected] => 87 [type:protected] => category [parent:protected] => 3 [label:protected] => Commercial & Institutional [alreadyInSave:protected] => [alreadyInValidation:protected] => [validationFailures:protected] => Array ( ) [_new:BaseObject:private] => [_deleted:BaseObject:private] => [modifiedColumns:protected] => Array ( ) ) ) [categories_initialized:protected] => 1 [mapped_items:protected] => [content:protected] => [files:protected] => [language:protected] => Language Object ( [id:protected] => 1 [code:protected] => en [name:protected] => English [alreadyInSave:protected] => [alreadyInValidation:protected] => [validationFailures:protected] => Array ( ) [_new:BaseObject:private] => [_deleted:BaseObject:private] => [modifiedColumns:protected] => Array ( ) ) [old_record:protected] => [id:protected] => 3976 [old_id:protected] => [elcosh_id:protected] => i002684 [type:protected] => image [display_type:protected] => Image [user_id:protected] => 0 [language_id:protected] => 1 [tagging_id:protected] => John Newquist [priority_id:protected] => 1 [title:protected] => Suspended scaffold [total_pages:protected] => 0 [billed_pages:protected] => 0 [publication_number:protected] => [part_of:protected] => [keywords:protected] => Suspended, scaffold, outrigger, beams, erection, wire, rope, inspection, swing, stage, [comments:protected] => [summary:protected] => Suspended scaffold outrigger beams must have stops to prevent the hangers from sliding of the end of the outriggers. Wire rope supported must be designed with a safety factor of 6. The scaffold must be inspected by a competent person daily. [transition_comments:protected] => [external_link:protected] => [consol_link:protected] => http://www.cpwrconstructionsolutions.org/task/Erect%2Band%2Bdismantle%2Bscaffolds/ [more_like_this:protected] => i002683, d000244, i000407, d000606 [permission_given_by:protected] => [published:protected] => T [billable:protected] => F [img_name:protected] => [img_ext:protected] => jpg [img_width:protected] => [img_height:protected] => [img_credit:protected] => Metropark, Miller and Long [img_practice:protected] => not_applicable [vid_source_id:protected] => [vid_running_time:protected] => [vid_intended_audience:protected] => [vid_acquisition_info:protected] => [vid_cost:protected] => [vid_producer:protected] => [vid_filename:protected] => [vid_filename_downloadable:protected] => [date_summary:protected] => [date_permission_requested:protected] => [date_permission_received:protected] => [date_review_needed:protected] => [date_received:protected] => 08/28/15 [date_completed:protected] => 08/28/15 [date_billed:protected] => [date_modified:protected] => 08/28/15 [collBokExports:protected] => [lastBokExportCriteria:BaseElcoshItem:private] => [alreadyInSave:protected] => [alreadyInValidation:protected] => [validationFailures:protected] => Array ( ) [_new:BaseObject:private] => [_deleted:BaseObject:private] => [modifiedColumns:protected] => Array ( ) ) ) [5] => Search_Result Object ( [title] => Three Tower Cranes [image] => /record/images/3979-p.jpg [blurb] => Whenever multiple tower cranes are used, there needs to be preplanning to ensure that the tower cranes cannot hit each other loads. This is accomplish... [category] => Array ( [0] => 97 [1] => 11 [2] => 64 [3] => 70 [4] => 62 [5] => 87 ) [labels] => Array ( [0] => Images [1] => Media [2] => Media & Documents [3] => Cranes & Hoists [4] => Work Environment [5] => Hazards [6] => Laborer [7] => Trades [8] => Operating Engineer [10] => Structural Ironworker [12] => Commercial & Institutional [13] => Jobsites ) [type] => Images [sub_category] => [url] => /image/3979/i002687/Three%2BTower%2BCranes.html [item:protected] => ImageRecord Object ( [records:protected] => Array ( ) [recordId:protected] => [searchWordClass:protected] => [searchWordPeerClass:protected] => [bok_record:protected] => [authors:protected] => [organizations:protected] => [collections:protected] => [categories:protected] => Array ( [97] => Category Object ( [languages:protected] => [bok_resources:protected] => [bok_topics:protected] => [bok_keywords:protected] => [id:protected] => 97 [type:protected] => category [parent:protected] => 5 [label:protected] => Images [alreadyInSave:protected] => [alreadyInValidation:protected] => [validationFailures:protected] => Array ( ) [_new:BaseObject:private] => [_deleted:BaseObject:private] => [modifiedColumns:protected] => Array ( ) ) [11] => Category Object ( [languages:protected] => [bok_resources:protected] => [bok_topics:protected] => [bok_keywords:protected] => [id:protected] => 11 [type:protected] => category [parent:protected] => 7 [label:protected] => Cranes & Hoists [alreadyInSave:protected] => [alreadyInValidation:protected] => [validationFailures:protected] => Array ( ) [_new:BaseObject:private] => [_deleted:BaseObject:private] => [modifiedColumns:protected] => Array ( ) ) [64] => Category Object ( [languages:protected] => [bok_resources:protected] => [bok_topics:protected] => [bok_keywords:protected] => [id:protected] => 64 [type:protected] => category [parent:protected] => 2 [label:protected] => Laborer [alreadyInSave:protected] => [alreadyInValidation:protected] => [validationFailures:protected] => Array ( ) [_new:BaseObject:private] => [_deleted:BaseObject:private] => [modifiedColumns:protected] => Array ( ) ) [70] => Category Object ( [languages:protected] => [bok_resources:protected] => [bok_topics:protected] => [bok_keywords:protected] => [id:protected] => 70 [type:protected] => category [parent:protected] => 2 [label:protected] => Operating Engineer [alreadyInSave:protected] => [alreadyInValidation:protected] => [validationFailures:protected] => Array ( ) [_new:BaseObject:private] => [_deleted:BaseObject:private] => [modifiedColumns:protected] => Array ( ) ) [62] => Category Object ( [languages:protected] => [bok_resources:protected] => [bok_topics:protected] => [bok_keywords:protected] => [id:protected] => 62 [type:protected] => category [parent:protected] => 2 [label:protected] => Structural Ironworker [alreadyInSave:protected] => [alreadyInValidation:protected] => [validationFailures:protected] => Array ( ) [_new:BaseObject:private] => [_deleted:BaseObject:private] => [modifiedColumns:protected] => Array ( ) ) [87] => Category Object ( [languages:protected] => [bok_resources:protected] => [bok_topics:protected] => [bok_keywords:protected] => [id:protected] => 87 [type:protected] => category [parent:protected] => 3 [label:protected] => Commercial & Institutional [alreadyInSave:protected] => [alreadyInValidation:protected] => [validationFailures:protected] => Array ( ) [_new:BaseObject:private] => [_deleted:BaseObject:private] => [modifiedColumns:protected] => Array ( ) ) ) [categories_initialized:protected] => 1 [mapped_items:protected] => [content:protected] => [files:protected] => [language:protected] => Language Object ( [id:protected] => 1 [code:protected] => en [name:protected] => English [alreadyInSave:protected] => [alreadyInValidation:protected] => [validationFailures:protected] => Array ( ) [_new:BaseObject:private] => [_deleted:BaseObject:private] => [modifiedColumns:protected] => Array ( ) ) [old_record:protected] => [id:protected] => 3979 [old_id:protected] => [elcosh_id:protected] => i002687 [type:protected] => image [display_type:protected] => Image [user_id:protected] => 0 [language_id:protected] => 1 [tagging_id:protected] => John Newquist [priority_id:protected] => 1 [title:protected] => Three Tower Cranes [total_pages:protected] => 0 [billed_pages:protected] => 0 [publication_number:protected] => [part_of:protected] => [keywords:protected] => [comments:protected] => [summary:protected] => Whenever multiple tower cranes are used, there needs to be preplanning to ensure that the tower cranes cannot hit each other loads. This is accomplished by setting swing restrictions, marking the ground for allowable crane travel and training of the crane signal persons. [transition_comments:protected] => [external_link:protected] => [consol_link:protected] => http://www.cpwrconstructionsolutions.org/work/6/184/ [more_like_this:protected] => d001029, d000010, i001280, i001221 [permission_given_by:protected] => [published:protected] => T [billable:protected] => F [img_name:protected] => [img_ext:protected] => jpg [img_width:protected] => [img_height:protected] => [img_credit:protected] => Metropark [img_practice:protected] => not_applicable [vid_source_id:protected] => [vid_running_time:protected] => [vid_intended_audience:protected] => [vid_acquisition_info:protected] => [vid_cost:protected] => [vid_producer:protected] => [vid_filename:protected] => [vid_filename_downloadable:protected] => [date_summary:protected] => August 28 2015 [date_permission_requested:protected] => [date_permission_received:protected] => [date_review_needed:protected] => [date_received:protected] => 08/28/15 [date_completed:protected] => 08/28/15 [date_billed:protected] => [date_modified:protected] => 08/28/15 [collBokExports:protected] => [lastBokExportCriteria:BaseElcoshItem:private] => [alreadyInSave:protected] => [alreadyInValidation:protected] => [validationFailures:protected] => Array ( ) [_new:BaseObject:private] => [_deleted:BaseObject:private] => [modifiedColumns:protected] => Array ( ) ) ) ) [preview_mode] => [description] => This third in a series of 6 Tool Box Talks on construction ergonomics focuses on proper positioning to avoid injuries. The TBT recommends: 1)prop up a task off of the floor by using a raised surface, cart, baker scaffold, saw horses to prep materials near waist height, 2)move the lift or ladder in the best position for the work, 3)position the lift in front of the area you plan to work without trying to reach too far on either side of the lift. [keywords] => position, positioning, ergonomics, ergo, carpal tunnel, MSD, musculoskeletal disorder [related_items] => Array ( [Handouts] => Array ( [0] => DocumentRecord Object ( [records:protected] => Array ( ) [recordId:protected] => [searchWordClass:protected] => [searchWordPeerClass:protected] => [bok_record:protected] => [authors:protected] => [organizations:protected] => [collections:protected] => [categories:protected] => [categories_initialized:protected] => [mapped_items:protected] => [content:protected] => [files:protected] => [language:protected] => Language Object ( [id:protected] => 1 [code:protected] => en [name:protected] => English [alreadyInSave:protected] => [alreadyInValidation:protected] => [validationFailures:protected] => Array ( ) [_new:BaseObject:private] => [_deleted:BaseObject:private] => [modifiedColumns:protected] => Array ( ) ) [old_record:protected] => [id:protected] => 3833 [old_id:protected] => [elcosh_id:protected] => d001303 [type:protected] => document [display_type:protected] => HTML w/ PDF [user_id:protected] => 25 [language_id:protected] => 1 [tagging_id:protected] => Bruce Lippy [priority_id:protected] => 1 [title:protected] => Overview of Toolbox Talks on Ergonomics Developed by Washington University in St. Louis [total_pages:protected] => 3 [billed_pages:protected] => 3 [publication_number:protected] => [part_of:protected] => [keywords:protected] => ergonomics, musculoskeletal disorders, MSDs [comments:protected] => 7-28-2014 - Originally submitted as "HTML w/ doc and PDF", Jeff Nelson asked Bruce Lippy for permission to switch it to "HTML w/ PDF" -- permission was given [summary:protected] => This overviews provides a background on how Washington University in St. Louis developed this series of six toolbox talks on ergonomics. It also describes how they tested the effectiveness of these communication tools, concluding that the guide was valuable for improving the delivery of ergonomics training and interaction between the safety representative and workers. The researchers recommend preparing site-specific information prior to the talk and interacting with workers to discuss problems and ergonomic solutions during the safety meetings. [transition_comments:protected] => [external_link:protected] => [consol_link:protected] => [more_like_this:protected] => [permission_given_by:protected] => Lisa Jaegers, Washington U. in St. Louis [published:protected] => T [billable:protected] => F [img_name:protected] => [img_ext:protected] => png [img_width:protected] => [img_height:protected] => [img_credit:protected] => [img_practice:protected] => [vid_source_id:protected] => [vid_running_time:protected] => [vid_intended_audience:protected] => [vid_acquisition_info:protected] => [vid_cost:protected] => [vid_producer:protected] => [vid_filename:protected] => [vid_filename_downloadable:protected] => [date_summary:protected] => 2014 [date_permission_requested:protected] => [date_permission_received:protected] => [date_review_needed:protected] => [date_received:protected] => 06/11/14 [date_completed:protected] => 07/29/14 [date_billed:protected] => [date_modified:protected] => 07/29/14 [collBokExports:protected] => [lastBokExportCriteria:BaseElcoshItem:private] => [alreadyInSave:protected] => [alreadyInValidation:protected] => [validationFailures:protected] => Array ( ) [_new:BaseObject:private] => [_deleted:BaseObject:private] => [modifiedColumns:protected] => Array ( ) ) ) [Toolbox Talks] => Array ( [0] => DocumentRecord Object ( [records:protected] => Array ( ) [recordId:protected] => [searchWordClass:protected] => [searchWordPeerClass:protected] => [bok_record:protected] => [authors:protected] => [organizations:protected] => [collections:protected] => [categories:protected] => [categories_initialized:protected] => [mapped_items:protected] => [content:protected] => [files:protected] => [language:protected] => Language Object ( [id:protected] => 1 [code:protected] => en [name:protected] => English [alreadyInSave:protected] => [alreadyInValidation:protected] => [validationFailures:protected] => Array ( ) [_new:BaseObject:private] => [_deleted:BaseObject:private] => [modifiedColumns:protected] => Array ( ) ) [old_record:protected] => [id:protected] => 3835 [old_id:protected] => [elcosh_id:protected] => d001304 [type:protected] => document [display_type:protected] => HTML w/ PDF [user_id:protected] => 25 [language_id:protected] => 1 [tagging_id:protected] => Bruce Lippy [priority_id:protected] => 1 [title:protected] => Ergonomics Tool Box Talks (TBT) Training Guide [total_pages:protected] => 2 [billed_pages:protected] => 2 [publication_number:protected] => [part_of:protected] => [keywords:protected] => Ergonomics, carpal tunnel, muscular skeletal disorders, msd [comments:protected] => [summary:protected] => CPWR-funded ergonomics research by Washington University at St. Louis led to the development of 6 tool box talks. This guide is an explanation of how to deliver the talks for maximum effectiveness. This guide should be reviewed before delivering any of the talks because it makes important recommendations like: • If possible, give the TBTs as a part of the crew’s regular safety meetings so that ergonomics is included in the safety discussion. • Try to locate an area with few distractions for gathering the crew. • For a team approach, invite the work crew, site superintendent, project manager and other general contractor and/or subcontractor reps who you feel may be helpful in supporting the training and ergonomics solutions. [transition_comments:protected] => [external_link:protected] => [consol_link:protected] => [more_like_this:protected] => d001303,d001305,d001306,d001307,d001308,d001309,d001310 [permission_given_by:protected] => [published:protected] => T [billable:protected] => F [img_name:protected] => [img_ext:protected] => png [img_width:protected] => [img_height:protected] => [img_credit:protected] => [img_practice:protected] => [vid_source_id:protected] => [vid_running_time:protected] => [vid_intended_audience:protected] => [vid_acquisition_info:protected] => [vid_cost:protected] => [vid_producer:protected] => [vid_filename:protected] => [vid_filename_downloadable:protected] => [date_summary:protected] => 2014 [date_permission_requested:protected] => [date_permission_received:protected] => [date_review_needed:protected] => [date_received:protected] => 06/12/14 [date_completed:protected] => 07/29/14 [date_billed:protected] => [date_modified:protected] => 07/29/14 [collBokExports:protected] => [lastBokExportCriteria:BaseElcoshItem:private] => [alreadyInSave:protected] => [alreadyInValidation:protected] => [validationFailures:protected] => Array ( ) [_new:BaseObject:private] => [_deleted:BaseObject:private] => [modifiedColumns:protected] => Array ( ) ) [1] => DocumentRecord Object ( [records:protected] => Array ( ) [recordId:protected] => [searchWordClass:protected] => [searchWordPeerClass:protected] => [bok_record:protected] => [authors:protected] => [organizations:protected] => [collections:protected] => [categories:protected] => [categories_initialized:protected] => [mapped_items:protected] => [content:protected] => [files:protected] => [language:protected] => Language Object ( [id:protected] => 1 [code:protected] => en [name:protected] => English [alreadyInSave:protected] => [alreadyInValidation:protected] => [validationFailures:protected] => Array ( ) [_new:BaseObject:private] => [_deleted:BaseObject:private] => [modifiedColumns:protected] => Array ( ) ) [old_record:protected] => [id:protected] => 3836 [old_id:protected] => [elcosh_id:protected] => d001305 [type:protected] => document [display_type:protected] => HTML w/ PDF [user_id:protected] => 25 [language_id:protected] => 1 [tagging_id:protected] => Bruce Lippy [priority_id:protected] => 1 [title:protected] => TBT1 Ergonomics in Construction [total_pages:protected] => 5 [billed_pages:protected] => 5 [publication_number:protected] => [part_of:protected] => [keywords:protected] => ergonomics, ergo, msd, musculoskeletal disorders, risk factors, lifting, carpal tunnel, repetition, awkward postures [comments:protected] => 7-28-2014 Jeff Nelson asked Bruce Lippy about what to do with a sentence included toward the top of the doc, "Fill them in on page 2 'Other Questions.'" -- Bruce said this sentence could be deleted from the HTML. [summary:protected] => This is the first in a series of 6 Tool Box Talks produced by Washington University in St. Louis on ergonomics in construction work. This one should be delivered first because it covers what ergonomics is, why construction workers need to talk about it, what the risk factors are for developing a health problem and how to prevent these problems. [transition_comments:protected] => [external_link:protected] => [consol_link:protected] => http://www.cpwrconstructionsolutions.org/pipes_vessels/solution/50/participatory-ergonomics-program.html [more_like_this:protected] => d001303,d001304,d001306,d001307,d001308,d001309 [permission_given_by:protected] => Lisa Jaegers, Washington U. in St. Louis [published:protected] => T [billable:protected] => F [img_name:protected] => [img_ext:protected] => png [img_width:protected] => [img_height:protected] => [img_credit:protected] => [img_practice:protected] => [vid_source_id:protected] => [vid_running_time:protected] => [vid_intended_audience:protected] => [vid_acquisition_info:protected] => [vid_cost:protected] => [vid_producer:protected] => [vid_filename:protected] => [vid_filename_downloadable:protected] => [date_summary:protected] => 2014 [date_permission_requested:protected] => [date_permission_received:protected] => [date_review_needed:protected] => [date_received:protected] => 06/12/14 [date_completed:protected] => 07/28/14 [date_billed:protected] => [date_modified:protected] => 10/09/15 [collBokExports:protected] => [lastBokExportCriteria:BaseElcoshItem:private] => [alreadyInSave:protected] => [alreadyInValidation:protected] => [validationFailures:protected] => Array ( ) [_new:BaseObject:private] => [_deleted:BaseObject:private] => [modifiedColumns:protected] => Array ( ) ) [2] => DocumentRecord Object ( [records:protected] => Array ( ) [recordId:protected] => [searchWordClass:protected] => [searchWordPeerClass:protected] => [bok_record:protected] => [authors:protected] => [organizations:protected] => [collections:protected] => [categories:protected] => [categories_initialized:protected] => [mapped_items:protected] => [content:protected] => [files:protected] => [language:protected] => Language Object ( [id:protected] => 1 [code:protected] => en [name:protected] => English [alreadyInSave:protected] => [alreadyInValidation:protected] => [validationFailures:protected] => Array ( ) [_new:BaseObject:private] => [_deleted:BaseObject:private] => [modifiedColumns:protected] => Array ( ) ) [old_record:protected] => [id:protected] => 3837 [old_id:protected] => [elcosh_id:protected] => d001306 [type:protected] => document [display_type:protected] => HTML w/ PDF [user_id:protected] => 25 [language_id:protected] => 1 [tagging_id:protected] => Bruce Lippy [priority_id:protected] => 1 [title:protected] => TBT2 Keep Reach Close [total_pages:protected] => 4 [billed_pages:protected] => 4 [publication_number:protected] => [part_of:protected] => [keywords:protected] => reach, ergonomic, ergo, MSD, carpal tunnel, repetition, awkward positions [comments:protected] => 7-28-2014 Jeff Nelson asked Bruce Lippy about what to do with a sentence included toward the top of the doc, "Fill them in on page 2 'Other Questions.'" -- Bruce said this sentence could be deleted from the HTML. [summary:protected] => This is the second of six Tool Box Talks created by Washington University in St. Louis on ergonomics in construction. There is a guide with the series that describes how to deliver these talks. This one deals with how to avoid awkward reaching during tasks to prevent injuries. try to work with your hands below your head and close to our body to reduce your risk of shoulder strains and back discomfort. This TBT recommends considering ways to move close to the task, keeping the work area free of obstacles, and talking with each other to provide constructive feedback about your working position. [transition_comments:protected] => [external_link:protected] => [consol_link:protected] => http://www.cpwrconstructionsolutions.org/hazard/959/lifting-and-carrying-manual-materials-handling.html [more_like_this:protected] => d001303,d001304,d001305,d001307,d001308,e001309 [permission_given_by:protected] => [published:protected] => T [billable:protected] => F [img_name:protected] => [img_ext:protected] => png [img_width:protected] => [img_height:protected] => [img_credit:protected] => [img_practice:protected] => [vid_source_id:protected] => [vid_running_time:protected] => [vid_intended_audience:protected] => [vid_acquisition_info:protected] => [vid_cost:protected] => [vid_producer:protected] => [vid_filename:protected] => [vid_filename_downloadable:protected] => [date_summary:protected] => 2014 [date_permission_requested:protected] => [date_permission_received:protected] => [date_review_needed:protected] => [date_received:protected] => 06/12/14 [date_completed:protected] => 07/28/14 [date_billed:protected] => [date_modified:protected] => 11/02/16 [collBokExports:protected] => [lastBokExportCriteria:BaseElcoshItem:private] => [alreadyInSave:protected] => [alreadyInValidation:protected] => [validationFailures:protected] => Array ( ) [_new:BaseObject:private] => [_deleted:BaseObject:private] => [modifiedColumns:protected] => Array ( ) ) [3] => DocumentRecord Object ( [records:protected] => Array ( ) [recordId:protected] => [searchWordClass:protected] => [searchWordPeerClass:protected] => [bok_record:protected] => [authors:protected] => [organizations:protected] => [collections:protected] => [categories:protected] => [categories_initialized:protected] => [mapped_items:protected] => [content:protected] => [files:protected] => [language:protected] => Language Object ( [id:protected] => 1 [code:protected] => en [name:protected] => English [alreadyInSave:protected] => [alreadyInValidation:protected] => [validationFailures:protected] => Array ( ) [_new:BaseObject:private] => [_deleted:BaseObject:private] => [modifiedColumns:protected] => Array ( ) ) [old_record:protected] => [id:protected] => 3839 [old_id:protected] => [elcosh_id:protected] => d001308 [type:protected] => document [display_type:protected] => HTML w/ PDF [user_id:protected] => 23 [language_id:protected] => 1 [tagging_id:protected] => Bruce Lippy [priority_id:protected] => 1 [title:protected] => TBT4 Move Materials With Assist [total_pages:protected] => 4 [billed_pages:protected] => 4 [publication_number:protected] => [part_of:protected] => [keywords:protected] => lifting, back injury, ergonomics, ergo, MSD, buddy system [comments:protected] => 7-28-2014 Jeff Nelson asked Bruce Lippy about what to do with a sentence included toward the top of the doc, "Fill them in on page 2 'Other Questions.'" -- Bruce said this sentence could be deleted from the HTML. [summary:protected] => This tool box talk is fourth in a series of 6 developed by Washington University in St. Louis on construction ergonomics. This one focuses on preventing back injuries by getting an assist when manually lifting. It recommends using a cart for transporting loads, taking less trips, avoiding carrying materials on the shoulder and helping each other to lift large or heavy materials when a cart or hoist is not available. [transition_comments:protected] => [external_link:protected] => [consol_link:protected] => http://www.cpwrconstructionsolutions.org/hazard/959/lifting-and-carrying-manual-materials-handling.html [more_like_this:protected] => d001303,d001304,d001305,d001306,d001307,d001309 [permission_given_by:protected] => Lisa Jaegers, Washington U. in St. Louis [published:protected] => T [billable:protected] => F [img_name:protected] => [img_ext:protected] => png [img_width:protected] => [img_height:protected] => [img_credit:protected] => [img_practice:protected] => [vid_source_id:protected] => [vid_running_time:protected] => [vid_intended_audience:protected] => [vid_acquisition_info:protected] => [vid_cost:protected] => [vid_producer:protected] => [vid_filename:protected] => [vid_filename_downloadable:protected] => [date_summary:protected] => 2014 [date_permission_requested:protected] => [date_permission_received:protected] => [date_review_needed:protected] => [date_received:protected] => 06/12/14 [date_completed:protected] => 07/29/14 [date_billed:protected] => [date_modified:protected] => 10/09/15 [collBokExports:protected] => [lastBokExportCriteria:BaseElcoshItem:private] => [alreadyInSave:protected] => [alreadyInValidation:protected] => [validationFailures:protected] => Array ( ) [_new:BaseObject:private] => [_deleted:BaseObject:private] => [modifiedColumns:protected] => Array ( ) ) [4] => DocumentRecord Object ( [records:protected] => Array ( ) [recordId:protected] => [searchWordClass:protected] => [searchWordPeerClass:protected] => [bok_record:protected] => [authors:protected] => [organizations:protected] => [collections:protected] => [categories:protected] => [categories_initialized:protected] => [mapped_items:protected] => [content:protected] => [files:protected] => [language:protected] => Language Object ( [id:protected] => 1 [code:protected] => en [name:protected] => English [alreadyInSave:protected] => [alreadyInValidation:protected] => [validationFailures:protected] => Array ( ) [_new:BaseObject:private] => [_deleted:BaseObject:private] => [modifiedColumns:protected] => Array ( ) ) [old_record:protected] => [id:protected] => 3840 [old_id:protected] => [elcosh_id:protected] => d001309 [type:protected] => document [display_type:protected] => HTML w/ PDF [user_id:protected] => 23 [language_id:protected] => 1 [tagging_id:protected] => Bruce Lippy [priority_id:protected] => 1 [title:protected] => TBT5 Manual Tools [total_pages:protected] => 4 [billed_pages:protected] => 4 [publication_number:protected] => [part_of:protected] => [keywords:protected] => ergonomic, hand tools, handles, MSD, musculoskeletal disorder, carpal tunnel [comments:protected] => 7-28-2014 Jeff Nelson asked Bruce Lippy about what to do with a sentence included toward the top of the doc, "Fill them in on page 2 'Other Questions.'" -- Bruce said this sentence could be deleted from the HTML. [summary:protected] => This is the fifth in a series of 6 tool box talks on construction ergonomics produced by the University of Washington in St. Louis. This one focuses on manual tools. It asks the following 6 key questions. Does the tool… 1. Fit the task? 2. Allow a good power grip? 3. Keep the wrist in a straight posture? 4. Feel comfortable? 5. Take less effort than other tools for the task? 6. Work effectively? [transition_comments:protected] => [external_link:protected] => [consol_link:protected] => http://www.cpwrconstructionsolutions.org/masonry/solution/383/ergonomic-hand-tools.html [more_like_this:protected] => d001303,d001304,d001305,d001306,d001307,d001308,d001310 [permission_given_by:protected] => Lisa Jaegers, U. Wash. St. Louis [published:protected] => T [billable:protected] => F [img_name:protected] => [img_ext:protected] => png [img_width:protected] => [img_height:protected] => [img_credit:protected] => [img_practice:protected] => [vid_source_id:protected] => [vid_running_time:protected] => [vid_intended_audience:protected] => [vid_acquisition_info:protected] => [vid_cost:protected] => [vid_producer:protected] => [vid_filename:protected] => [vid_filename_downloadable:protected] => [date_summary:protected] => 2014 [date_permission_requested:protected] => [date_permission_received:protected] => [date_review_needed:protected] => [date_received:protected] => 06/12/14 [date_completed:protected] => 07/29/14 [date_billed:protected] => [date_modified:protected] => 10/09/15 [collBokExports:protected] => [lastBokExportCriteria:BaseElcoshItem:private] => [alreadyInSave:protected] => [alreadyInValidation:protected] => [validationFailures:protected] => Array ( ) [_new:BaseObject:private] => [_deleted:BaseObject:private] => [modifiedColumns:protected] => Array ( ) ) ) ) [collections] => Array ( [3834] => ) [record] => DocumentRecord Object ( [records:protected] => Array ( ) [recordId:protected] => [searchWordClass:protected] => [searchWordPeerClass:protected] => [bok_record:protected] => [authors:protected] => Array ( ) [organizations:protected] => Array ( [182] => Organization Object ( [id:protected] => 182 [elcosh_id:protected] => o000205 [user_id:protected] => 14 [province_id:protected] => 0 [country_id:protected] => 0 [title:protected] => Washington University - St. Louis [address:protected] => [postal_code:protected] => [city:protected] => [department:protected] => [phone:protected] => [fax:protected] => [email:protected] => [website:protected] => [filename:protected] => [about:protected] => [comments:protected] => [logo_available:protected] => T [no_details:protected] => T [date_received:protected] => 2009-08-06 [date_completed:protected] => 2009-08-06 [date_billed:protected] => [alreadyInSave:protected] => [alreadyInValidation:protected] => [validationFailures:protected] => Array ( ) [_new:BaseObject:private] => [_deleted:BaseObject:private] => [modifiedColumns:protected] => Array ( ) ) ) [collections:protected] => Array ( [3834] => ) [categories:protected] => [categories_initialized:protected] => [mapped_items:protected] => Array ( [3833] => DocumentRecord Object ( [records:protected] => Array ( ) [recordId:protected] => [searchWordClass:protected] => [searchWordPeerClass:protected] => [bok_record:protected] => [authors:protected] => [organizations:protected] => [collections:protected] => [categories:protected] => [categories_initialized:protected] => [mapped_items:protected] => [content:protected] => [files:protected] => [language:protected] => [old_record:protected] => [id:protected] => 3833 [old_id:protected] => [elcosh_id:protected] => d001303 [type:protected] => document [display_type:protected] => HTML w/ PDF [user_id:protected] => 25 [language_id:protected] => 1 [tagging_id:protected] => Bruce Lippy [priority_id:protected] => 1 [title:protected] => Overview of Toolbox Talks on Ergonomics Developed by Washington University in St. Louis [total_pages:protected] => 3 [billed_pages:protected] => 3 [publication_number:protected] => [part_of:protected] => [keywords:protected] => ergonomics, musculoskeletal disorders, MSDs [comments:protected] => 7-28-2014 - Originally submitted as "HTML w/ doc and PDF", Jeff Nelson asked Bruce Lippy for permission to switch it to "HTML w/ PDF" -- permission was given [summary:protected] => This overviews provides a background on how Washington University in St. Louis developed this series of six toolbox talks on ergonomics. It also describes how they tested the effectiveness of these communication tools, concluding that the guide was valuable for improving the delivery of ergonomics training and interaction between the safety representative and workers. The researchers recommend preparing site-specific information prior to the talk and interacting with workers to discuss problems and ergonomic solutions during the safety meetings. [transition_comments:protected] => [external_link:protected] => [consol_link:protected] => [more_like_this:protected] => [permission_given_by:protected] => Lisa Jaegers, Washington U. in St. Louis [published:protected] => T [billable:protected] => F [img_name:protected] => [img_ext:protected] => png [img_width:protected] => [img_height:protected] => [img_credit:protected] => [img_practice:protected] => [vid_source_id:protected] => [vid_running_time:protected] => [vid_intended_audience:protected] => [vid_acquisition_info:protected] => [vid_cost:protected] => [vid_producer:protected] => [vid_filename:protected] => [vid_filename_downloadable:protected] => [date_summary:protected] => 2014 [date_permission_requested:protected] => [date_permission_received:protected] => [date_review_needed:protected] => [date_received:protected] => 06/11/14 [date_completed:protected] => 07/29/14 [date_billed:protected] => [date_modified:protected] => 07/29/14 [collBokExports:protected] => [lastBokExportCriteria:BaseElcoshItem:private] => [alreadyInSave:protected] => [alreadyInValidation:protected] => [validationFailures:protected] => Array ( ) [_new:BaseObject:private] => [_deleted:BaseObject:private] => [modifiedColumns:protected] => Array ( ) ) [3835] => DocumentRecord Object ( [records:protected] => Array ( ) [recordId:protected] => [searchWordClass:protected] => [searchWordPeerClass:protected] => [bok_record:protected] => [authors:protected] => [organizations:protected] => [collections:protected] => [categories:protected] => [categories_initialized:protected] => [mapped_items:protected] => [content:protected] => [files:protected] => [language:protected] => [old_record:protected] => [id:protected] => 3835 [old_id:protected] => [elcosh_id:protected] => d001304 [type:protected] => document [display_type:protected] => HTML w/ PDF [user_id:protected] => 25 [language_id:protected] => 1 [tagging_id:protected] => Bruce Lippy [priority_id:protected] => 1 [title:protected] => Ergonomics Tool Box Talks (TBT) Training Guide [total_pages:protected] => 2 [billed_pages:protected] => 2 [publication_number:protected] => [part_of:protected] => [keywords:protected] => Ergonomics, carpal tunnel, muscular skeletal disorders, msd [comments:protected] => [summary:protected] => CPWR-funded ergonomics research by Washington University at St. Louis led to the development of 6 tool box talks. This guide is an explanation of how to deliver the talks for maximum effectiveness. This guide should be reviewed before delivering any of the talks because it makes important recommendations like: • If possible, give the TBTs as a part of the crew’s regular safety meetings so that ergonomics is included in the safety discussion. • Try to locate an area with few distractions for gathering the crew. • For a team approach, invite the work crew, site superintendent, project manager and other general contractor and/or subcontractor reps who you feel may be helpful in supporting the training and ergonomics solutions. [transition_comments:protected] => [external_link:protected] => [consol_link:protected] => [more_like_this:protected] => d001303,d001305,d001306,d001307,d001308,d001309,d001310 [permission_given_by:protected] => [published:protected] => T [billable:protected] => F [img_name:protected] => [img_ext:protected] => png [img_width:protected] => [img_height:protected] => [img_credit:protected] => [img_practice:protected] => [vid_source_id:protected] => [vid_running_time:protected] => [vid_intended_audience:protected] => [vid_acquisition_info:protected] => [vid_cost:protected] => [vid_producer:protected] => [vid_filename:protected] => [vid_filename_downloadable:protected] => [date_summary:protected] => 2014 [date_permission_requested:protected] => [date_permission_received:protected] => [date_review_needed:protected] => [date_received:protected] => 06/12/14 [date_completed:protected] => 07/29/14 [date_billed:protected] => [date_modified:protected] => 07/29/14 [collBokExports:protected] => [lastBokExportCriteria:BaseElcoshItem:private] => [alreadyInSave:protected] => [alreadyInValidation:protected] => [validationFailures:protected] => Array ( ) [_new:BaseObject:private] => [_deleted:BaseObject:private] => [modifiedColumns:protected] => Array ( ) ) [3836] => DocumentRecord Object ( [records:protected] => Array ( ) [recordId:protected] => [searchWordClass:protected] => [searchWordPeerClass:protected] => [bok_record:protected] => [authors:protected] => [organizations:protected] => [collections:protected] => [categories:protected] => [categories_initialized:protected] => [mapped_items:protected] => [content:protected] => [files:protected] => [language:protected] => [old_record:protected] => [id:protected] => 3836 [old_id:protected] => [elcosh_id:protected] => d001305 [type:protected] => document [display_type:protected] => HTML w/ PDF [user_id:protected] => 25 [language_id:protected] => 1 [tagging_id:protected] => Bruce Lippy [priority_id:protected] => 1 [title:protected] => TBT1 Ergonomics in Construction [total_pages:protected] => 5 [billed_pages:protected] => 5 [publication_number:protected] => [part_of:protected] => [keywords:protected] => ergonomics, ergo, msd, musculoskeletal disorders, risk factors, lifting, carpal tunnel, repetition, awkward postures [comments:protected] => 7-28-2014 Jeff Nelson asked Bruce Lippy about what to do with a sentence included toward the top of the doc, "Fill them in on page 2 'Other Questions.'" -- Bruce said this sentence could be deleted from the HTML. [summary:protected] => This is the first in a series of 6 Tool Box Talks produced by Washington University in St. Louis on ergonomics in construction work. This one should be delivered first because it covers what ergonomics is, why construction workers need to talk about it, what the risk factors are for developing a health problem and how to prevent these problems. [transition_comments:protected] => [external_link:protected] => [consol_link:protected] => http://www.cpwrconstructionsolutions.org/pipes_vessels/solution/50/participatory-ergonomics-program.html [more_like_this:protected] => d001303,d001304,d001306,d001307,d001308,d001309 [permission_given_by:protected] => Lisa Jaegers, Washington U. in St. Louis [published:protected] => T [billable:protected] => F [img_name:protected] => [img_ext:protected] => png [img_width:protected] => [img_height:protected] => [img_credit:protected] => [img_practice:protected] => [vid_source_id:protected] => [vid_running_time:protected] => [vid_intended_audience:protected] => [vid_acquisition_info:protected] => [vid_cost:protected] => [vid_producer:protected] => [vid_filename:protected] => [vid_filename_downloadable:protected] => [date_summary:protected] => 2014 [date_permission_requested:protected] => [date_permission_received:protected] => [date_review_needed:protected] => [date_received:protected] => 06/12/14 [date_completed:protected] => 07/28/14 [date_billed:protected] => [date_modified:protected] => 10/09/15 [collBokExports:protected] => [lastBokExportCriteria:BaseElcoshItem:private] => [alreadyInSave:protected] => [alreadyInValidation:protected] => [validationFailures:protected] => Array ( ) [_new:BaseObject:private] => [_deleted:BaseObject:private] => [modifiedColumns:protected] => Array ( ) ) [3837] => DocumentRecord Object ( [records:protected] => Array ( ) [recordId:protected] => [searchWordClass:protected] => [searchWordPeerClass:protected] => [bok_record:protected] => [authors:protected] => [organizations:protected] => [collections:protected] => [categories:protected] => [categories_initialized:protected] => [mapped_items:protected] => [content:protected] => [files:protected] => [language:protected] => [old_record:protected] => [id:protected] => 3837 [old_id:protected] => [elcosh_id:protected] => d001306 [type:protected] => document [display_type:protected] => HTML w/ PDF [user_id:protected] => 25 [language_id:protected] => 1 [tagging_id:protected] => Bruce Lippy [priority_id:protected] => 1 [title:protected] => TBT2 Keep Reach Close [total_pages:protected] => 4 [billed_pages:protected] => 4 [publication_number:protected] => [part_of:protected] => [keywords:protected] => reach, ergonomic, ergo, MSD, carpal tunnel, repetition, awkward positions [comments:protected] => 7-28-2014 Jeff Nelson asked Bruce Lippy about what to do with a sentence included toward the top of the doc, "Fill them in on page 2 'Other Questions.'" -- Bruce said this sentence could be deleted from the HTML. [summary:protected] => This is the second of six Tool Box Talks created by Washington University in St. Louis on ergonomics in construction. There is a guide with the series that describes how to deliver these talks. This one deals with how to avoid awkward reaching during tasks to prevent injuries. try to work with your hands below your head and close to our body to reduce your risk of shoulder strains and back discomfort. This TBT recommends considering ways to move close to the task, keeping the work area free of obstacles, and talking with each other to provide constructive feedback about your working position. [transition_comments:protected] => [external_link:protected] => [consol_link:protected] => http://www.cpwrconstructionsolutions.org/hazard/959/lifting-and-carrying-manual-materials-handling.html [more_like_this:protected] => d001303,d001304,d001305,d001307,d001308,e001309 [permission_given_by:protected] => [published:protected] => T [billable:protected] => F [img_name:protected] => [img_ext:protected] => png [img_width:protected] => [img_height:protected] => [img_credit:protected] => [img_practice:protected] => [vid_source_id:protected] => [vid_running_time:protected] => [vid_intended_audience:protected] => [vid_acquisition_info:protected] => [vid_cost:protected] => [vid_producer:protected] => [vid_filename:protected] => [vid_filename_downloadable:protected] => [date_summary:protected] => 2014 [date_permission_requested:protected] => [date_permission_received:protected] => [date_review_needed:protected] => [date_received:protected] => 06/12/14 [date_completed:protected] => 07/28/14 [date_billed:protected] => [date_modified:protected] => 11/02/16 [collBokExports:protected] => [lastBokExportCriteria:BaseElcoshItem:private] => [alreadyInSave:protected] => [alreadyInValidation:protected] => [validationFailures:protected] => Array ( ) [_new:BaseObject:private] => [_deleted:BaseObject:private] => [modifiedColumns:protected] => Array ( ) ) [3839] => DocumentRecord Object ( [records:protected] => Array ( ) [recordId:protected] => [searchWordClass:protected] => [searchWordPeerClass:protected] => [bok_record:protected] => [authors:protected] => [organizations:protected] => [collections:protected] => [categories:protected] => [categories_initialized:protected] => [mapped_items:protected] => [content:protected] => [files:protected] => [language:protected] => [old_record:protected] => [id:protected] => 3839 [old_id:protected] => [elcosh_id:protected] => d001308 [type:protected] => document [display_type:protected] => HTML w/ PDF [user_id:protected] => 23 [language_id:protected] => 1 [tagging_id:protected] => Bruce Lippy [priority_id:protected] => 1 [title:protected] => TBT4 Move Materials With Assist [total_pages:protected] => 4 [billed_pages:protected] => 4 [publication_number:protected] => [part_of:protected] => [keywords:protected] => lifting, back injury, ergonomics, ergo, MSD, buddy system [comments:protected] => 7-28-2014 Jeff Nelson asked Bruce Lippy about what to do with a sentence included toward the top of the doc, "Fill them in on page 2 'Other Questions.'" -- Bruce said this sentence could be deleted from the HTML. [summary:protected] => This tool box talk is fourth in a series of 6 developed by Washington University in St. Louis on construction ergonomics. This one focuses on preventing back injuries by getting an assist when manually lifting. It recommends using a cart for transporting loads, taking less trips, avoiding carrying materials on the shoulder and helping each other to lift large or heavy materials when a cart or hoist is not available. [transition_comments:protected] => [external_link:protected] => [consol_link:protected] => http://www.cpwrconstructionsolutions.org/hazard/959/lifting-and-carrying-manual-materials-handling.html [more_like_this:protected] => d001303,d001304,d001305,d001306,d001307,d001309 [permission_given_by:protected] => Lisa Jaegers, Washington U. in St. Louis [published:protected] => T [billable:protected] => F [img_name:protected] => [img_ext:protected] => png [img_width:protected] => [img_height:protected] => [img_credit:protected] => [img_practice:protected] => [vid_source_id:protected] => [vid_running_time:protected] => [vid_intended_audience:protected] => [vid_acquisition_info:protected] => [vid_cost:protected] => [vid_producer:protected] => [vid_filename:protected] => [vid_filename_downloadable:protected] => [date_summary:protected] => 2014 [date_permission_requested:protected] => [date_permission_received:protected] => [date_review_needed:protected] => [date_received:protected] => 06/12/14 [date_completed:protected] => 07/29/14 [date_billed:protected] => [date_modified:protected] => 10/09/15 [collBokExports:protected] => [lastBokExportCriteria:BaseElcoshItem:private] => [alreadyInSave:protected] => [alreadyInValidation:protected] => [validationFailures:protected] => Array ( ) [_new:BaseObject:private] => [_deleted:BaseObject:private] => [modifiedColumns:protected] => Array ( ) ) [3840] => DocumentRecord Object ( [records:protected] => Array ( ) [recordId:protected] => [searchWordClass:protected] => [searchWordPeerClass:protected] => [bok_record:protected] => [authors:protected] => [organizations:protected] => [collections:protected] => [categories:protected] => [categories_initialized:protected] => [mapped_items:protected] => [content:protected] => [files:protected] => [language:protected] => [old_record:protected] => [id:protected] => 3840 [old_id:protected] => [elcosh_id:protected] => d001309 [type:protected] => document [display_type:protected] => HTML w/ PDF [user_id:protected] => 23 [language_id:protected] => 1 [tagging_id:protected] => Bruce Lippy [priority_id:protected] => 1 [title:protected] => TBT5 Manual Tools [total_pages:protected] => 4 [billed_pages:protected] => 4 [publication_number:protected] => [part_of:protected] => [keywords:protected] => ergonomic, hand tools, handles, MSD, musculoskeletal disorder, carpal tunnel [comments:protected] => 7-28-2014 Jeff Nelson asked Bruce Lippy about what to do with a sentence included toward the top of the doc, "Fill them in on page 2 'Other Questions.'" -- Bruce said this sentence could be deleted from the HTML. [summary:protected] => This is the fifth in a series of 6 tool box talks on construction ergonomics produced by the University of Washington in St. Louis. This one focuses on manual tools. It asks the following 6 key questions. Does the tool… 1. Fit the task? 2. Allow a good power grip? 3. Keep the wrist in a straight posture? 4. Feel comfortable? 5. Take less effort than other tools for the task? 6. Work effectively? [transition_comments:protected] => [external_link:protected] => [consol_link:protected] => http://www.cpwrconstructionsolutions.org/masonry/solution/383/ergonomic-hand-tools.html [more_like_this:protected] => d001303,d001304,d001305,d001306,d001307,d001308,d001310 [permission_given_by:protected] => Lisa Jaegers, U. Wash. St. Louis [published:protected] => T [billable:protected] => F [img_name:protected] => [img_ext:protected] => png [img_width:protected] => [img_height:protected] => [img_credit:protected] => [img_practice:protected] => [vid_source_id:protected] => [vid_running_time:protected] => [vid_intended_audience:protected] => [vid_acquisition_info:protected] => [vid_cost:protected] => [vid_producer:protected] => [vid_filename:protected] => [vid_filename_downloadable:protected] => [date_summary:protected] => 2014 [date_permission_requested:protected] => [date_permission_received:protected] => [date_review_needed:protected] => [date_received:protected] => 06/12/14 [date_completed:protected] => 07/29/14 [date_billed:protected] => [date_modified:protected] => 10/09/15 [collBokExports:protected] => [lastBokExportCriteria:BaseElcoshItem:private] => [alreadyInSave:protected] => [alreadyInValidation:protected] => [validationFailures:protected] => Array ( ) [_new:BaseObject:private] => [_deleted:BaseObject:private] => [modifiedColumns:protected] => Array ( ) ) ) [content:protected] => [files:protected] => Array ( [559] => [560] => [546] => File Object ( [id:protected] => 546 [filename:protected] => 3.jpg [downloadable:protected] => F [timestamp:protected] => 2009-07-03 12:54:22 [alreadyInSave:protected] => [alreadyInValidation:protected] => [validationFailures:protected] => Array ( ) [_new:BaseObject:private] => [_deleted:BaseObject:private] => [modifiedColumns:protected] => Array ( ) ) [9643] => File Object ( [id:protected] => 9643 [filename:protected] => d001307.pdf [downloadable:protected] => T [timestamp:protected] => 2014-07-27 19:09:19 [alreadyInSave:protected] => [alreadyInValidation:protected] => [validationFailures:protected] => Array ( ) [_new:BaseObject:private] => [_deleted:BaseObject:private] => [modifiedColumns:protected] => Array ( ) ) [566] => File Object ( [id:protected] => 566 [filename:protected] => 4.jpg [downloadable:protected] => F [timestamp:protected] => 2009-07-03 12:54:23 [alreadyInSave:protected] => [alreadyInValidation:protected] => [validationFailures:protected] => Array ( ) [_new:BaseObject:private] => [_deleted:BaseObject:private] => [modifiedColumns:protected] => Array ( ) ) ) [language:protected] => Language Object ( [id:protected] => 1 [code:protected] => en [name:protected] => English [alreadyInSave:protected] => [alreadyInValidation:protected] => [validationFailures:protected] => Array ( ) [_new:BaseObject:private] => [_deleted:BaseObject:private] => [modifiedColumns:protected] => Array ( ) ) [old_record:protected] => [id:protected] => 3838 [old_id:protected] => [elcosh_id:protected] => d001307 [type:protected] => document [display_type:protected] => HTML w/ PDF [user_id:protected] => 25 [language_id:protected] => 1 [tagging_id:protected] => Bruce Lippy [priority_id:protected] => 1 [title:protected] => TBT3 Positioning [total_pages:protected] => 4 [billed_pages:protected] => 4 [publication_number:protected] => [part_of:protected] => [keywords:protected] => position, positioning, ergonomics, ergo, carpal tunnel, MSD, musculoskeletal disorder [comments:protected] => 7-28-2014 Jeff Nelson asked Bruce Lippy about what to do with a sentence included toward the top of the doc, "Fill them in on page 2 'Other Questions.'" -- Bruce said this sentence could be deleted from the HTML. [summary:protected] => This third in a series of 6 Tool Box Talks on construction ergonomics focuses on proper positioning to avoid injuries. The TBT recommends: 1)prop up a task off of the floor by using a raised surface, cart, baker scaffold, saw horses to prep materials near waist height, 2)move the lift or ladder in the best position for the work, 3)position the lift in front of the area you plan to work without trying to reach too far on either side of the lift. [transition_comments:protected] => [external_link:protected] => [consol_link:protected] => http://www.cpwrconstructionsolutions.org/hazard/959/lifting-and-carrying-manual-materials-handling.html [more_like_this:protected] => d001303,d001304,d001305,d001306,d001308,d001309 [permission_given_by:protected] => Lisa Jaegers, WU-St. Louis [published:protected] => T [billable:protected] => F [img_name:protected] => [img_ext:protected] => png [img_width:protected] => [img_height:protected] => [img_credit:protected] => [img_practice:protected] => [vid_source_id:protected] => [vid_running_time:protected] => [vid_intended_audience:protected] => [vid_acquisition_info:protected] => [vid_cost:protected] => [vid_producer:protected] => [vid_filename:protected] => [vid_filename_downloadable:protected] => [date_summary:protected] => 2014 [date_permission_requested:protected] => [date_permission_received:protected] => [date_review_needed:protected] => [date_received:protected] => 06/12/14 [date_completed:protected] => 07/28/14 [date_billed:protected] => [date_modified:protected] => 10/09/15 [collBokExports:protected] => [lastBokExportCriteria:BaseElcoshItem:private] => [alreadyInSave:protected] => [alreadyInValidation:protected] => [validationFailures:protected] => Array ( ) [_new:BaseObject:private] => [_deleted:BaseObject:private] => [modifiedColumns:protected] => Array ( ) ) [show_text] => [document_content] => ElcoshItemDocumentContent Object ( [id:protected] => 2906 [item_id:protected] => 3838 [type:protected] => main [title:protected] => [content:protected] =>
Facilitator / Leader Tasks Before the Tool Box Talk (TBT)
- Read through this TBT guide.
- Walk the job site to find ergonomics examples based on the TBT. If possible, take photos of “safe” and “unsafe” examples at the site to be used during the TBT.
- Write down discussion questions to ask the group.
Learning Goals
After discussing this training topic, workers will have gained a general understanding of:
- Unsafe work positions.
- Solutions to improve work positioning.
TRAINING CARD
The last page of this PDF has directions for printing and laminating the training cards.
TRAINER’S TALKING POINTS
Why should we talk about positioning?
Construction work requires working in high, low, and tight spaces which often forces you to work in an awkward or uncomfortable position. Working in awkward reaching and bent positions can lead to shoulder and back discomfort and possible injury over time.
Demonstration: The training card provides examples of the range of reaching and the point at which the reach is unsafe. Hold your arms straight out in front of you. Look at your hands and wrists while I discuss each of the reach zones on the training card.
The Green Zone shows the ideal location for working with your hands. When possible, try to keep your work tasks as far out as your wrists.
The Orange Zone is for occasional work since it involves more weight on your shoulders and low back since your hands are away from your body. If needed, keep the reach distance as far as your fingertips.
The Red Zone is away from your body so far that it places you at higher risk for falls when in the air and shoulder and back discomfort. Limit the time you work reaching beyond your fingertips.
End of Demonstration
Discussion Question: Can anyone describe to us an awkward position that they work in or have seen someone work in?
- What does it feel like in your neck, back or arms when working in that position?
- Other Questions:_____________________________________________
Training Note: Here are examples of hazards in different construction trades. Choose your trade or one that is similar to your group’s line of work that can be used as hazards and solutions examples.
| Trade | Awkward Posture Hazards | Potential Solution |
|---|---|---|
| Carpenter-Drywall | Leaning over the side of a scissor lift to reach and operating a screw gun with the arm fully extended (reaching in the red zone past the fingertips). | Before starting to install the line of screws to the side of the lift, move the lift to re-center it for the next 2 lines of screws to be installed. |
| Floor Layer | Spreading mortar overhead on a wall with the bakers scaffold one foot away from the wall due to buckets on the floor below (reach in the red zone, past the fingertips). | Pre-plan this task by removing all objects in the path of the bakers scaffold. Having an open path allows you to work closer to the task. |
| Sheet Metal Worker | Prepping duct parts on the floor while bending the back and reaching to work on them. | Pre-plan this task by setting up a waist-height workstation on extra materials, a cart, or saw horses. |
Now let’s put this information into practice. What are some tricks or techniques that you use to work in a comfortable position?
- Other Questions:_____________________________________________
Here are a few other ideas that are listed on your training card:
Prop up your tasks off of the floor by using a raised surface, cart, baker scaffold, saw horses to prep materials near waist height.
Move the lift or ladder in the best position for the work – close to the work tasks.
For safety & comfort, try to position the lift in front of the area you plan to work without trying to reach too far on either side of the lift.
In summary, it is important to work in a safe position when possible in order to reduce the risk of falls and discomfort due to awkward working positions. Consider ways that you can work in the green/comfort zone and orange zone and avoid the unsafe red zone.
References
[Images modified from Grandjean & Eastman Kodak Co.]
1. Grandjean, E. 1988. Fitting the task to the man: A textbook of occupational ergonomics. 4th ed. Taylor & Francis.
2. Eastman Kodak Co. 1983. Ergonomic Design for People at Work. Vol 1. Wiley, John & Sons, Incorporated.
Refer to the resources at our website: oshr.im.wustl.edu for more Tool Box TIPS.
TRAINING ATTENDANCE SHEET
Training Topic: Ergonomics -- Positioning
Date:
| ATTENDEES | |
|---|---|
Directions for Making Laminated Training Cards
The last page of this PDF has directions for printing and laminating the training cards.
[content_transformed:protected] =>Facilitator / Leader Tasks Before the Tool Box Talk (TBT)
- Read through this TBT guide.
- Walk the job site to find ergonomics examples based on the TBT. If possible, take photos of “safe” and “unsafe” examples at the site to be used during the TBT.
- Write down discussion questions to ask the group.
Learning Goals
After discussing this training topic, workers will have gained a general understanding of:
- Unsafe work positions.
- Solutions to improve work positioning.
TRAINING CARD
The last page of this PDF has directions for printing and laminating the training cards.
TRAINER’S TALKING POINTS
Why should we talk about positioning?
Construction work requires working in high, low, and tight spaces which often forces you to work in an awkward or uncomfortable position. Working in awkward reaching and bent positions can lead to shoulder and back discomfort and possible injury over time.
Demonstration: The training card provides examples of the range of reaching and the point at which the reach is unsafe. Hold your arms straight out in front of you. Look at your hands and wrists while I discuss each of the reach zones on the training card.
The Green Zone shows the ideal location for working with your hands. When possible, try to keep your work tasks as far out as your wrists.
The Orange Zone is for occasional work since it involves more weight on your shoulders and low back since your hands are away from your body. If needed, keep the reach distance as far as your fingertips.
The Red Zone is away from your body so far that it places you at higher risk for falls when in the air and shoulder and back discomfort. Limit the time you work reaching beyond your fingertips.
End of Demonstration
Discussion Question: Can anyone describe to us an awkward position that they work in or have seen someone work in?
- What does it feel like in your neck, back or arms when working in that position?
- Other Questions:_____________________________________________
Training Note: Here are examples of hazards in different construction trades. Choose your trade or one that is similar to your group’s line of work that can be used as hazards and solutions examples.
| Trade | Awkward Posture Hazards | Potential Solution |
|---|---|---|
| Carpenter-Drywall | Leaning over the side of a scissor lift to reach and operating a screw gun with the arm fully extended (reaching in the red zone past the fingertips). | Before starting to install the line of screws to the side of the lift, move the lift to re-center it for the next 2 lines of screws to be installed. |
| Floor Layer | Spreading mortar overhead on a wall with the bakers scaffold one foot away from the wall due to buckets on the floor below (reach in the red zone, past the fingertips). | Pre-plan this task by removing all objects in the path of the bakers scaffold. Having an open path allows you to work closer to the task. |
| Sheet Metal Worker | Prepping duct parts on the floor while bending the back and reaching to work on them. | Pre-plan this task by setting up a waist-height workstation on extra materials, a cart, or saw horses. |
Now let’s put this information into practice. What are some tricks or techniques that you use to work in a comfortable position?
- Other Questions:_____________________________________________
Here are a few other ideas that are listed on your training card:
Prop up your tasks off of the floor by using a raised surface, cart, baker scaffold, saw horses to prep materials near waist height.
Move the lift or ladder in the best position for the work – close to the work tasks.
For safety & comfort, try to position the lift in front of the area you plan to work without trying to reach too far on either side of the lift.
In summary, it is important to work in a safe position when possible in order to reduce the risk of falls and discomfort due to awkward working positions. Consider ways that you can work in the green/comfort zone and orange zone and avoid the unsafe red zone.
References
[Images modified from Grandjean & Eastman Kodak Co.]
1. Grandjean, E. 1988. Fitting the task to the man: A textbook of occupational ergonomics. 4th ed. Taylor & Francis.
2. Eastman Kodak Co. 1983. Ergonomic Design for People at Work. Vol 1. Wiley, John & Sons, Incorporated.
Refer to the resources at our website: oshr.im.wustl.edu for more Tool Box TIPS.
TRAINING ATTENDANCE SHEET
Training Topic: Ergonomics -- Positioning
Date:
| ATTENDEES | |
|---|---|
Directions for Making Laminated Training Cards
The last page of this PDF has directions for printing and laminating the training cards.
[disclaimer:protected] => [disclaimer_transformed:protected] => [alreadyInSave:protected] => [alreadyInValidation:protected] => [validationFailures:protected] => Array ( ) [_new:BaseObject:private] => [_deleted:BaseObject:private] => [modifiedColumns:protected] => Array ( ) ) [template] => record ) [_globalContext:PHPTAL_Context:private] => stdClass Object ( ) [_echoDeclarations:PHPTAL_Context:private] => [referer] => http://elcosh.org/document/3838/d001307/TBT3%2BPositioning.html [curr_module] => Record [styles] => Array ( ) [javascript] => Array ( [0] => jquery.min.js ) [metas] => Array ( [language] => en [robots] => index, follow ) [user] => [curr_url] => https://elcosh.org/index.php?module=Record&id=3838&type=document [base_url] => https://elcosh.org/index.php?module=Record [title] => eLCOSH : TBT3 Positioning [language] => en [search_query] => [module] => Record [new_records] => Array ( [0] => Search_Result Object ( [title] => Toolbox Talk: Fixed Ladder [image] => /record/images/notavailable-p.png [blurb] => The CPWR Toolbox Talk on Fixed Ladders addresses the potential risks associated with using fixed ladders. The resource includes a brief case example,... [category] => Array ( [0] => 15 [1] => 47 [2] => 49 [3] => 51 [4] => 53 [5] => 55 [6] => 60 [7] => 64 [8] => 73 [9] => 76 [10] => 78 [11] => 80 [12] => 86 [13] => 87 [14] => 90 [15] => 92 [16] => 93 [17] => 94 [18] => 100 ) [labels] => Array ( [0] => Falls [1] => Work Environment [2] => Hazards [3] => Bricklayer [4] => Trades [5] => Carpenter [7] => Cement Mason [9] => Concrete Polisher [11] => Electrical Worker [13] => HVAC [15] => Laborer [17] => PCC/Restoration [19] => Plumber/Pipefitter [21] => Roofer/Waterproofer [23] => Sheetmetal Worker [25] => Welder [27] => Commercial & Institutional [28] => Jobsites [29] => Industrial [31] => LEED/Green Construction [33] => Renovations [35] => Residential [37] => Toolbox Talks [38] => Documents [39] => Media & Documents ) [type] => Toolbox Talks [sub_category] => [url] => /document/4430/d001660/Toolbox%2BTalk%253A%2BFixed%2BLadder.html [item:protected] => DocumentRecord Object ( [records:protected] => Array ( ) [recordId:protected] => [searchWordClass:protected] => [searchWordPeerClass:protected] => [bok_record:protected] => [authors:protected] => [organizations:protected] => [collections:protected] => [categories:protected] => Array ( [15] => Category Object ( [languages:protected] => [bok_resources:protected] => [bok_topics:protected] => [bok_keywords:protected] => [id:protected] => 15 [type:protected] => category [parent:protected] => 7 [label:protected] => Falls [alreadyInSave:protected] => [alreadyInValidation:protected] => [validationFailures:protected] => Array ( ) [_new:BaseObject:private] => [_deleted:BaseObject:private] => [modifiedColumns:protected] => Array ( ) ) [47] => Category Object ( [languages:protected] => [bok_resources:protected] => [bok_topics:protected] => [bok_keywords:protected] => [id:protected] => 47 [type:protected] => category [parent:protected] => 2 [label:protected] => Bricklayer [alreadyInSave:protected] => [alreadyInValidation:protected] => [validationFailures:protected] => Array ( ) [_new:BaseObject:private] => [_deleted:BaseObject:private] => [modifiedColumns:protected] => Array ( ) ) [49] => Category Object ( [languages:protected] => [bok_resources:protected] => [bok_topics:protected] => [bok_keywords:protected] => [id:protected] => 49 [type:protected] => category [parent:protected] => 2 [label:protected] => Carpenter [alreadyInSave:protected] => [alreadyInValidation:protected] => [validationFailures:protected] => Array ( ) [_new:BaseObject:private] => [_deleted:BaseObject:private] => [modifiedColumns:protected] => Array ( ) ) [51] => Category Object ( [languages:protected] => [bok_resources:protected] => [bok_topics:protected] => [bok_keywords:protected] => [id:protected] => 51 [type:protected] => category [parent:protected] => 2 [label:protected] => Cement Mason [alreadyInSave:protected] => [alreadyInValidation:protected] => [validationFailures:protected] => Array ( ) [_new:BaseObject:private] => [_deleted:BaseObject:private] => [modifiedColumns:protected] => Array ( ) ) [53] => Category Object ( [languages:protected] => [bok_resources:protected] => [bok_topics:protected] => [bok_keywords:protected] => [id:protected] => 53 [type:protected] => category [parent:protected] => 2 [label:protected] => Concrete Polisher [alreadyInSave:protected] => [alreadyInValidation:protected] => [validationFailures:protected] => Array ( ) [_new:BaseObject:private] => [_deleted:BaseObject:private] => [modifiedColumns:protected] => Array ( ) ) [55] => Category Object ( [languages:protected] => [bok_resources:protected] => [bok_topics:protected] => [bok_keywords:protected] => [id:protected] => 55 [type:protected] => category [parent:protected] => 2 [label:protected] => Electrical Worker [alreadyInSave:protected] => [alreadyInValidation:protected] => [validationFailures:protected] => Array ( ) [_new:BaseObject:private] => [_deleted:BaseObject:private] => [modifiedColumns:protected] => Array ( ) ) [60] => Category Object ( [languages:protected] => [bok_resources:protected] => [bok_topics:protected] => [bok_keywords:protected] => [id:protected] => 60 [type:protected] => category [parent:protected] => 2 [label:protected] => HVAC [alreadyInSave:protected] => [alreadyInValidation:protected] => [validationFailures:protected] => Array ( ) [_new:BaseObject:private] => [_deleted:BaseObject:private] => [modifiedColumns:protected] => Array ( ) ) [64] => Category Object ( [languages:protected] => [bok_resources:protected] => [bok_topics:protected] => [bok_keywords:protected] => [id:protected] => 64 [type:protected] => category [parent:protected] => 2 [label:protected] => Laborer [alreadyInSave:protected] => [alreadyInValidation:protected] => [validationFailures:protected] => Array ( ) [_new:BaseObject:private] => [_deleted:BaseObject:private] => [modifiedColumns:protected] => Array ( ) ) [73] => Category Object ( [languages:protected] => [bok_resources:protected] => [bok_topics:protected] => [bok_keywords:protected] => [id:protected] => 73 [type:protected] => category [parent:protected] => 2 [label:protected] => PCC/Restoration [alreadyInSave:protected] => [alreadyInValidation:protected] => [validationFailures:protected] => Array ( ) [_new:BaseObject:private] => [_deleted:BaseObject:private] => [modifiedColumns:protected] => Array ( ) ) [76] => Category Object ( [languages:protected] => [bok_resources:protected] => [bok_topics:protected] => [bok_keywords:protected] => [id:protected] => 76 [type:protected] => category [parent:protected] => 2 [label:protected] => Plumber/Pipefitter [alreadyInSave:protected] => [alreadyInValidation:protected] => [validationFailures:protected] => Array ( ) [_new:BaseObject:private] => [_deleted:BaseObject:private] => [modifiedColumns:protected] => Array ( ) ) [78] => Category Object ( [languages:protected] => [bok_resources:protected] => [bok_topics:protected] => [bok_keywords:protected] => [id:protected] => 78 [type:protected] => category [parent:protected] => 2 [label:protected] => Roofer/Waterproofer [alreadyInSave:protected] => [alreadyInValidation:protected] => [validationFailures:protected] => Array ( ) [_new:BaseObject:private] => [_deleted:BaseObject:private] => [modifiedColumns:protected] => Array ( ) ) [80] => Category Object ( [languages:protected] => [bok_resources:protected] => [bok_topics:protected] => [bok_keywords:protected] => [id:protected] => 80 [type:protected] => category [parent:protected] => 2 [label:protected] => Sheetmetal Worker [alreadyInSave:protected] => [alreadyInValidation:protected] => [validationFailures:protected] => Array ( ) [_new:BaseObject:private] => [_deleted:BaseObject:private] => [modifiedColumns:protected] => Array ( ) ) [86] => Category Object ( [languages:protected] => [bok_resources:protected] => [bok_topics:protected] => [bok_keywords:protected] => [id:protected] => 86 [type:protected] => category [parent:protected] => 2 [label:protected] => Welder [alreadyInSave:protected] => [alreadyInValidation:protected] => [validationFailures:protected] => Array ( ) [_new:BaseObject:private] => [_deleted:BaseObject:private] => [modifiedColumns:protected] => Array ( ) ) [87] => Category Object ( [languages:protected] => [bok_resources:protected] => [bok_topics:protected] => [bok_keywords:protected] => [id:protected] => 87 [type:protected] => category [parent:protected] => 3 [label:protected] => Commercial & Institutional [alreadyInSave:protected] => [alreadyInValidation:protected] => [validationFailures:protected] => Array ( ) [_new:BaseObject:private] => [_deleted:BaseObject:private] => [modifiedColumns:protected] => Array ( ) ) [90] => Category Object ( [languages:protected] => [bok_resources:protected] => [bok_topics:protected] => [bok_keywords:protected] => [id:protected] => 90 [type:protected] => category [parent:protected] => 3 [label:protected] => Industrial [alreadyInSave:protected] => [alreadyInValidation:protected] => [validationFailures:protected] => Array ( ) [_new:BaseObject:private] => [_deleted:BaseObject:private] => [modifiedColumns:protected] => Array ( ) ) [92] => Category Object ( [languages:protected] => [bok_resources:protected] => [bok_topics:protected] => [bok_keywords:protected] => [id:protected] => 92 [type:protected] => category [parent:protected] => 3 [label:protected] => LEED/Green Construction [alreadyInSave:protected] => [alreadyInValidation:protected] => [validationFailures:protected] => Array ( ) [_new:BaseObject:private] => [_deleted:BaseObject:private] => [modifiedColumns:protected] => Array ( ) ) [93] => Category Object ( [languages:protected] => [bok_resources:protected] => [bok_topics:protected] => [bok_keywords:protected] => [id:protected] => 93 [type:protected] => category [parent:protected] => 3 [label:protected] => Renovations [alreadyInSave:protected] => [alreadyInValidation:protected] => [validationFailures:protected] => Array ( ) [_new:BaseObject:private] => [_deleted:BaseObject:private] => [modifiedColumns:protected] => Array ( ) ) [94] => Category Object ( [languages:protected] => [bok_resources:protected] => [bok_topics:protected] => [bok_keywords:protected] => [id:protected] => 94 [type:protected] => category [parent:protected] => 3 [label:protected] => Residential [alreadyInSave:protected] => [alreadyInValidation:protected] => [validationFailures:protected] => Array ( ) [_new:BaseObject:private] => [_deleted:BaseObject:private] => [modifiedColumns:protected] => Array ( ) ) [100] => Category Object ( [languages:protected] => [bok_resources:protected] => [bok_topics:protected] => [bok_keywords:protected] => [id:protected] => 100 [type:protected] => category [parent:protected] => 6 [label:protected] => Toolbox Talks [alreadyInSave:protected] => [alreadyInValidation:protected] => [validationFailures:protected] => Array ( ) [_new:BaseObject:private] => [_deleted:BaseObject:private] => [modifiedColumns:protected] => Array ( ) ) ) [categories_initialized:protected] => 1 [mapped_items:protected] => [content:protected] => [files:protected] => [language:protected] => Language Object ( [id:protected] => 1 [code:protected] => en [name:protected] => English [alreadyInSave:protected] => [alreadyInValidation:protected] => [validationFailures:protected] => Array ( ) [_new:BaseObject:private] => [_deleted:BaseObject:private] => [modifiedColumns:protected] => Array ( ) ) [old_record:protected] => [id:protected] => 4430 [old_id:protected] => [elcosh_id:protected] => d001660 [type:protected] => document [display_type:protected] => HTML only (and links) [user_id:protected] => 0 [language_id:protected] => 1 [tagging_id:protected] => Mike Aguilar [priority_id:protected] => 1 [title:protected] => Toolbox Talk: Fixed Ladder [total_pages:protected] => 0 [billed_pages:protected] => 0 [publication_number:protected] => [part_of:protected] => [keywords:protected] => Fixed Ladders, Fall Prevention, Falls [comments:protected] => [summary:protected] => The CPWR Toolbox Talk on Fixed Ladders addresses the potential risks associated with using fixed ladders. The resource includes a brief case example, steps to prevent a related injury and questions for discussion. It includes an image that illustrates the hazard, which can be posted in a central location as a reminder of steps to work safely. Available in English and Spanish. [transition_comments:protected] => [external_link:protected] => [consol_link:protected] => [more_like_this:protected] => d001257,d001254,d001255,d001256,d001258,d001262,d001279 [permission_given_by:protected] => [published:protected] => T [billable:protected] => F [img_name:protected] => [img_ext:protected] => [img_width:protected] => [img_height:protected] => [img_credit:protected] => [img_practice:protected] => [vid_source_id:protected] => [vid_running_time:protected] => [vid_intended_audience:protected] => [vid_acquisition_info:protected] => [vid_cost:protected] => [vid_producer:protected] => [vid_filename:protected] => [vid_filename_downloadable:protected] => [date_summary:protected] => [date_permission_requested:protected] => [date_permission_received:protected] => [date_review_needed:protected] => [date_received:protected] => 06/10/22 [date_completed:protected] => 06/10/22 [date_billed:protected] => [date_modified:protected] => 06/16/25 [collBokExports:protected] => [lastBokExportCriteria:BaseElcoshItem:private] => [alreadyInSave:protected] => [alreadyInValidation:protected] => [validationFailures:protected] => Array ( ) [_new:BaseObject:private] => [_deleted:BaseObject:private] => [modifiedColumns:protected] => Array ( ) ) ) [1] => Search_Result Object ( [title] => Toolbox Talk: Work Zone Safety: Working Around Vehicles [image] => /record/images/notavailable-p.png [blurb] => The CPWR Toolbox Talk on Working Around Vehicles in the Work Zone addresses methods to avoid being struck-by a vehicle on a construction site. The res... [category] => Array ( [0] => 12 [1] => 18 [2] => 52 [3] => 57 [4] => 70 [5] => 85 [6] => 87 [7] => 88 [8] => 89 [9] => 91 [10] => 90 [11] => 92 [12] => 93 [13] => 94 [14] => 95 [15] => 100 ) [labels] => Array ( [0] => Crushed/Struck By [1] => Work Environment [2] => Hazards [3] => Motor Vehicles/Heavy Equipment [6] => Commercial Diver [7] => Trades [8] => Flagger [10] => Operating Engineer [12] => Truck Driver [14] => Commercial & Institutional [15] => Jobsites [16] => Demolition [18] => Disasters [20] => Heavy & Highway [22] => Industrial [24] => LEED/Green Construction [26] => Renovations [28] => Residential [30] => Underground [32] => Toolbox Talks [33] => Documents [34] => Media & Documents ) [type] => Toolbox Talks [sub_category] => [url] => /document/4428/d001658/Toolbox%2BTalk%253A%2BWork%2BZone%2BSafety%253A%2BWorking%2BAround%2BVehicles.html [item:protected] => DocumentRecord Object ( [records:protected] => Array ( ) [recordId:protected] => [searchWordClass:protected] => [searchWordPeerClass:protected] => [bok_record:protected] => [authors:protected] => [organizations:protected] => [collections:protected] => [categories:protected] => Array ( [12] => Category Object ( [languages:protected] => [bok_resources:protected] => [bok_topics:protected] => [bok_keywords:protected] => [id:protected] => 12 [type:protected] => category [parent:protected] => 7 [label:protected] => Crushed/Struck By [alreadyInSave:protected] => [alreadyInValidation:protected] => [validationFailures:protected] => Array ( ) [_new:BaseObject:private] => [_deleted:BaseObject:private] => [modifiedColumns:protected] => Array ( ) ) [18] => Category Object ( [languages:protected] => [bok_resources:protected] => [bok_topics:protected] => [bok_keywords:protected] => [id:protected] => 18 [type:protected] => category [parent:protected] => 7 [label:protected] => Motor Vehicles/Heavy Equipment [alreadyInSave:protected] => [alreadyInValidation:protected] => [validationFailures:protected] => Array ( ) [_new:BaseObject:private] => [_deleted:BaseObject:private] => [modifiedColumns:protected] => Array ( ) ) [52] => Category Object ( [languages:protected] => [bok_resources:protected] => [bok_topics:protected] => [bok_keywords:protected] => [id:protected] => 52 [type:protected] => category [parent:protected] => 2 [label:protected] => Commercial Diver [alreadyInSave:protected] => [alreadyInValidation:protected] => [validationFailures:protected] => Array ( ) [_new:BaseObject:private] => [_deleted:BaseObject:private] => [modifiedColumns:protected] => Array ( ) ) [57] => Category Object ( [languages:protected] => [bok_resources:protected] => [bok_topics:protected] => [bok_keywords:protected] => [id:protected] => 57 [type:protected] => category [parent:protected] => 2 [label:protected] => Flagger [alreadyInSave:protected] => [alreadyInValidation:protected] => [validationFailures:protected] => Array ( ) [_new:BaseObject:private] => [_deleted:BaseObject:private] => [modifiedColumns:protected] => Array ( ) ) [70] => Category Object ( [languages:protected] => [bok_resources:protected] => [bok_topics:protected] => [bok_keywords:protected] => [id:protected] => 70 [type:protected] => category [parent:protected] => 2 [label:protected] => Operating Engineer [alreadyInSave:protected] => [alreadyInValidation:protected] => [validationFailures:protected] => Array ( ) [_new:BaseObject:private] => [_deleted:BaseObject:private] => [modifiedColumns:protected] => Array ( ) ) [85] => Category Object ( [languages:protected] => [bok_resources:protected] => [bok_topics:protected] => [bok_keywords:protected] => [id:protected] => 85 [type:protected] => category [parent:protected] => 2 [label:protected] => Truck Driver [alreadyInSave:protected] => [alreadyInValidation:protected] => [validationFailures:protected] => Array ( ) [_new:BaseObject:private] => [_deleted:BaseObject:private] => [modifiedColumns:protected] => Array ( ) ) [87] => Category Object ( [languages:protected] => [bok_resources:protected] => [bok_topics:protected] => [bok_keywords:protected] => [id:protected] => 87 [type:protected] => category [parent:protected] => 3 [label:protected] => Commercial & Institutional [alreadyInSave:protected] => [alreadyInValidation:protected] => [validationFailures:protected] => Array ( ) [_new:BaseObject:private] => [_deleted:BaseObject:private] => [modifiedColumns:protected] => Array ( ) ) [88] => Category Object ( [languages:protected] => [bok_resources:protected] => [bok_topics:protected] => [bok_keywords:protected] => [id:protected] => 88 [type:protected] => category [parent:protected] => 3 [label:protected] => Demolition [alreadyInSave:protected] => [alreadyInValidation:protected] => [validationFailures:protected] => Array ( ) [_new:BaseObject:private] => [_deleted:BaseObject:private] => [modifiedColumns:protected] => Array ( ) ) [89] => Category Object ( [languages:protected] => [bok_resources:protected] => [bok_topics:protected] => [bok_keywords:protected] => [id:protected] => 89 [type:protected] => category [parent:protected] => 3 [label:protected] => Disasters [alreadyInSave:protected] => [alreadyInValidation:protected] => [validationFailures:protected] => Array ( ) [_new:BaseObject:private] => [_deleted:BaseObject:private] => [modifiedColumns:protected] => Array ( ) ) [91] => Category Object ( [languages:protected] => [bok_resources:protected] => [bok_topics:protected] => [bok_keywords:protected] => [id:protected] => 91 [type:protected] => category [parent:protected] => 3 [label:protected] => Heavy & Highway [alreadyInSave:protected] => [alreadyInValidation:protected] => [validationFailures:protected] => Array ( ) [_new:BaseObject:private] => [_deleted:BaseObject:private] => [modifiedColumns:protected] => Array ( ) ) [90] => Category Object ( [languages:protected] => [bok_resources:protected] => [bok_topics:protected] => [bok_keywords:protected] => [id:protected] => 90 [type:protected] => category [parent:protected] => 3 [label:protected] => Industrial [alreadyInSave:protected] => [alreadyInValidation:protected] => [validationFailures:protected] => Array ( ) [_new:BaseObject:private] => [_deleted:BaseObject:private] => [modifiedColumns:protected] => Array ( ) ) [92] => Category Object ( [languages:protected] => [bok_resources:protected] => [bok_topics:protected] => [bok_keywords:protected] => [id:protected] => 92 [type:protected] => category [parent:protected] => 3 [label:protected] => LEED/Green Construction [alreadyInSave:protected] => [alreadyInValidation:protected] => [validationFailures:protected] => Array ( ) [_new:BaseObject:private] => [_deleted:BaseObject:private] => [modifiedColumns:protected] => Array ( ) ) [93] => Category Object ( [languages:protected] => [bok_resources:protected] => [bok_topics:protected] => [bok_keywords:protected] => [id:protected] => 93 [type:protected] => category [parent:protected] => 3 [label:protected] => Renovations [alreadyInSave:protected] => [alreadyInValidation:protected] => [validationFailures:protected] => Array ( ) [_new:BaseObject:private] => [_deleted:BaseObject:private] => [modifiedColumns:protected] => Array ( ) ) [94] => Category Object ( [languages:protected] => [bok_resources:protected] => [bok_topics:protected] => [bok_keywords:protected] => [id:protected] => 94 [type:protected] => category [parent:protected] => 3 [label:protected] => Residential [alreadyInSave:protected] => [alreadyInValidation:protected] => [validationFailures:protected] => Array ( ) [_new:BaseObject:private] => [_deleted:BaseObject:private] => [modifiedColumns:protected] => Array ( ) ) [95] => Category Object ( [languages:protected] => [bok_resources:protected] => [bok_topics:protected] => [bok_keywords:protected] => [id:protected] => 95 [type:protected] => category [parent:protected] => 3 [label:protected] => Underground [alreadyInSave:protected] => [alreadyInValidation:protected] => [validationFailures:protected] => Array ( ) [_new:BaseObject:private] => [_deleted:BaseObject:private] => [modifiedColumns:protected] => Array ( ) ) [100] => Category Object ( [languages:protected] => [bok_resources:protected] => [bok_topics:protected] => [bok_keywords:protected] => [id:protected] => 100 [type:protected] => category [parent:protected] => 6 [label:protected] => Toolbox Talks [alreadyInSave:protected] => [alreadyInValidation:protected] => [validationFailures:protected] => Array ( ) [_new:BaseObject:private] => [_deleted:BaseObject:private] => [modifiedColumns:protected] => Array ( ) ) ) [categories_initialized:protected] => 1 [mapped_items:protected] => [content:protected] => [files:protected] => [language:protected] => Language Object ( [id:protected] => 1 [code:protected] => en [name:protected] => English [alreadyInSave:protected] => [alreadyInValidation:protected] => [validationFailures:protected] => Array ( ) [_new:BaseObject:private] => [_deleted:BaseObject:private] => [modifiedColumns:protected] => Array ( ) ) [old_record:protected] => [id:protected] => 4428 [old_id:protected] => [elcosh_id:protected] => d001658 [type:protected] => document [display_type:protected] => HTML only (and links) [user_id:protected] => 0 [language_id:protected] => 1 [tagging_id:protected] => Daniela Caceres [priority_id:protected] => 1 [title:protected] => Toolbox Talk: Work Zone Safety: Working Around Vehicles [total_pages:protected] => 0 [billed_pages:protected] => 0 [publication_number:protected] => [part_of:protected] => [keywords:protected] => Struck, Struck by, Vehicle, Work Zone Safety, Truck, Operator, Driver, Mobile Equipment [comments:protected] => [summary:protected] => The CPWR Toolbox Talk on Working Around Vehicles in the Work Zone addresses methods to avoid being struck-by a vehicle on a construction site. The resource includes a case example, steps to prevent a related injury, and questions for discussion. It includes a graphic that illustrates the hazard, which can be posted in a central location as a reminder of steps to work safely. Available in English and Spanish. [transition_comments:protected] => [external_link:protected] => [consol_link:protected] => [more_like_this:protected] => d001640 [permission_given_by:protected] => [published:protected] => T [billable:protected] => F [img_name:protected] => [img_ext:protected] => [img_width:protected] => [img_height:protected] => [img_credit:protected] => [img_practice:protected] => [vid_source_id:protected] => [vid_running_time:protected] => [vid_intended_audience:protected] => [vid_acquisition_info:protected] => [vid_cost:protected] => [vid_producer:protected] => [vid_filename:protected] => [vid_filename_downloadable:protected] => [date_summary:protected] => [date_permission_requested:protected] => [date_permission_received:protected] => [date_review_needed:protected] => [date_received:protected] => 12/23/21 [date_completed:protected] => 12/23/21 [date_billed:protected] => [date_modified:protected] => 05/19/23 [collBokExports:protected] => [lastBokExportCriteria:BaseElcoshItem:private] => [alreadyInSave:protected] => [alreadyInValidation:protected] => [validationFailures:protected] => Array ( ) [_new:BaseObject:private] => [_deleted:BaseObject:private] => [modifiedColumns:protected] => Array ( ) ) ) [2] => Search_Result Object ( [title] => Construction Dive -- DeWalt's Jobsite Pro headphones recalled for fire hazards [image] => /record/images/notavailable-p.png [blurb] => A recall notice by the United States Consumer Product Safety Commission affects over 300,000 DeWalt Jobsite Pro Headphones. The recall is a result of... [category] => Array ( [0] => 16 [1] => 44 [2] => 45 [3] => 46 [4] => 47 [5] => 48 [6] => 49 [7] => 50 [8] => 51 [9] => 52 [10] => 53 [11] => 54 [12] => 55 [13] => 56 [14] => 57 [15] => 58 [16] => 59 [17] => 60 [18] => 61 [19] => 64 [20] => 65 [21] => 66 [22] => 67 [23] => 68 [24] => 69 [25] => 70 [26] => 71 [27] => 72 [28] => 73 [29] => 74 [30] => 75 [31] => 76 [32] => 77 [33] => 63 [34] => 78 [35] => 79 [36] => 80 [37] => 81 [38] => 82 [39] => 62 [40] => 83 [41] => 84 [42] => 85 [43] => 86 [44] => 87 [45] => 88 [46] => 89 [47] => 91 [48] => 90 [49] => 92 [50] => 93 [51] => 94 [52] => 95 ) [labels] => Array ( [0] => Fire & Explosions [1] => Work Environment [2] => Hazards [3] => Acoustical Ceiling Carpenter [4] => Trades [5] => Asbestos/Insulator [7] => Boilermaker [9] => Bricklayer [11] => Cabinetmaker [13] => Carpenter [15] => Carpet Layer [17] => Cement Mason [19] => Commercial Diver [21] => Concrete Polisher [23] => Drywall Applicator Specialist [25] => Electrical Worker [27] => Elevator Constructor [29] => Flagger [31] => Glazier [33] => Hazardous Waste Cleanup [35] => HVAC [37] => Interior Systems Carpenter [39] => Laborer [41] => Landscaper [43] => Lather [45] => Lead Abatement Worker [47] => Maintenance Worker [49] => Millwright [51] => Operating Engineer [53] => Painter [55] => Paper Hanger [57] => PCC/Restoration [59] => Pile Driver [61] => Plasterer [63] => Plumber/Pipefitter [65] => Refractory Worker [67] => Reinforcing Ironworker [69] => Roofer/Waterproofer [71] => Scaffold Erector [73] => Sheetmetal Worker [75] => Sprinkler Fitter [77] => Stonemason [79] => Structural Ironworker [81] => Terrazzo Worker [83] => Tile Setter [85] => Truck Driver [87] => Welder [89] => Commercial & Institutional [90] => Jobsites [91] => Demolition [93] => Disasters [95] => Heavy & Highway [97] => Industrial [99] => LEED/Green Construction [101] => Renovations [103] => Residential [105] => Underground ) [type] => [sub_category] => [url] => /document/4426/d001656/Construction%2BDive%2B--%2BDeWalt%2527s%2BJobsite%2BPro%2Bheadphones%2Brecalled%2Bfor%2Bfire%2Bhazards.html [item:protected] => DocumentRecord Object ( [records:protected] => Array ( ) [recordId:protected] => [searchWordClass:protected] => [searchWordPeerClass:protected] => [bok_record:protected] => [authors:protected] => [organizations:protected] => [collections:protected] => [categories:protected] => Array ( [16] => Category Object ( [languages:protected] => [bok_resources:protected] => [bok_topics:protected] => [bok_keywords:protected] => [id:protected] => 16 [type:protected] => category [parent:protected] => 7 [label:protected] => Fire & Explosions [alreadyInSave:protected] => [alreadyInValidation:protected] => [validationFailures:protected] => Array ( ) [_new:BaseObject:private] => [_deleted:BaseObject:private] => [modifiedColumns:protected] => Array ( ) ) [44] => Category Object ( [languages:protected] => [bok_resources:protected] => [bok_topics:protected] => [bok_keywords:protected] => [id:protected] => 44 [type:protected] => category [parent:protected] => 2 [label:protected] => Acoustical Ceiling Carpenter [alreadyInSave:protected] => [alreadyInValidation:protected] => [validationFailures:protected] => Array ( ) [_new:BaseObject:private] => [_deleted:BaseObject:private] => [modifiedColumns:protected] => Array ( ) ) [45] => Category Object ( [languages:protected] => [bok_resources:protected] => [bok_topics:protected] => [bok_keywords:protected] => [id:protected] => 45 [type:protected] => category [parent:protected] => 2 [label:protected] => Asbestos/Insulator [alreadyInSave:protected] => [alreadyInValidation:protected] => [validationFailures:protected] => Array ( ) [_new:BaseObject:private] => [_deleted:BaseObject:private] => [modifiedColumns:protected] => Array ( ) ) [46] => Category Object ( [languages:protected] => [bok_resources:protected] => [bok_topics:protected] => [bok_keywords:protected] => [id:protected] => 46 [type:protected] => category [parent:protected] => 2 [label:protected] => Boilermaker [alreadyInSave:protected] => [alreadyInValidation:protected] => [validationFailures:protected] => Array ( ) [_new:BaseObject:private] => [_deleted:BaseObject:private] => [modifiedColumns:protected] => Array ( ) ) [47] => Category Object ( [languages:protected] => [bok_resources:protected] => [bok_topics:protected] => [bok_keywords:protected] => [id:protected] => 47 [type:protected] => category [parent:protected] => 2 [label:protected] => Bricklayer [alreadyInSave:protected] => [alreadyInValidation:protected] => [validationFailures:protected] => Array ( ) [_new:BaseObject:private] => [_deleted:BaseObject:private] => [modifiedColumns:protected] => Array ( ) ) [48] => Category Object ( [languages:protected] => [bok_resources:protected] => [bok_topics:protected] => [bok_keywords:protected] => [id:protected] => 48 [type:protected] => category [parent:protected] => 2 [label:protected] => Cabinetmaker [alreadyInSave:protected] => [alreadyInValidation:protected] => [validationFailures:protected] => Array ( ) [_new:BaseObject:private] => [_deleted:BaseObject:private] => [modifiedColumns:protected] => Array ( ) ) [49] => Category Object ( [languages:protected] => [bok_resources:protected] => [bok_topics:protected] => [bok_keywords:protected] => [id:protected] => 49 [type:protected] => category [parent:protected] => 2 [label:protected] => Carpenter [alreadyInSave:protected] => [alreadyInValidation:protected] => [validationFailures:protected] => Array ( ) [_new:BaseObject:private] => [_deleted:BaseObject:private] => [modifiedColumns:protected] => Array ( ) ) [50] => Category Object ( [languages:protected] => [bok_resources:protected] => [bok_topics:protected] => [bok_keywords:protected] => [id:protected] => 50 [type:protected] => category [parent:protected] => 2 [label:protected] => Carpet Layer [alreadyInSave:protected] => [alreadyInValidation:protected] => [validationFailures:protected] => Array ( ) [_new:BaseObject:private] => [_deleted:BaseObject:private] => [modifiedColumns:protected] => Array ( ) ) [51] => Category Object ( [languages:protected] => [bok_resources:protected] => [bok_topics:protected] => [bok_keywords:protected] => [id:protected] => 51 [type:protected] => category [parent:protected] => 2 [label:protected] => Cement Mason [alreadyInSave:protected] => [alreadyInValidation:protected] => [validationFailures:protected] => Array ( ) [_new:BaseObject:private] => [_deleted:BaseObject:private] => [modifiedColumns:protected] => Array ( ) ) [52] => Category Object ( [languages:protected] => [bok_resources:protected] => [bok_topics:protected] => [bok_keywords:protected] => [id:protected] => 52 [type:protected] => category [parent:protected] => 2 [label:protected] => Commercial Diver [alreadyInSave:protected] => [alreadyInValidation:protected] => [validationFailures:protected] => Array ( ) [_new:BaseObject:private] => [_deleted:BaseObject:private] => [modifiedColumns:protected] => Array ( ) ) [53] => Category Object ( [languages:protected] => [bok_resources:protected] => [bok_topics:protected] => [bok_keywords:protected] => [id:protected] => 53 [type:protected] => category [parent:protected] => 2 [label:protected] => Concrete Polisher [alreadyInSave:protected] => [alreadyInValidation:protected] => [validationFailures:protected] => Array ( ) [_new:BaseObject:private] => [_deleted:BaseObject:private] => [modifiedColumns:protected] => Array ( ) ) [54] => Category Object ( [languages:protected] => [bok_resources:protected] => [bok_topics:protected] => [bok_keywords:protected] => [id:protected] => 54 [type:protected] => category [parent:protected] => 2 [label:protected] => Drywall Applicator Specialist [alreadyInSave:protected] => [alreadyInValidation:protected] => [validationFailures:protected] => Array ( ) [_new:BaseObject:private] => [_deleted:BaseObject:private] => [modifiedColumns:protected] => Array ( ) ) [55] => Category Object ( [languages:protected] => [bok_resources:protected] => [bok_topics:protected] => [bok_keywords:protected] => [id:protected] => 55 [type:protected] => category [parent:protected] => 2 [label:protected] => Electrical Worker [alreadyInSave:protected] => [alreadyInValidation:protected] => [validationFailures:protected] => Array ( ) [_new:BaseObject:private] => [_deleted:BaseObject:private] => [modifiedColumns:protected] => Array ( ) ) [56] => Category Object ( [languages:protected] => [bok_resources:protected] => [bok_topics:protected] => [bok_keywords:protected] => [id:protected] => 56 [type:protected] => category [parent:protected] => 2 [label:protected] => Elevator Constructor [alreadyInSave:protected] => [alreadyInValidation:protected] => [validationFailures:protected] => Array ( ) [_new:BaseObject:private] => [_deleted:BaseObject:private] => [modifiedColumns:protected] => Array ( ) ) [57] => Category Object ( [languages:protected] => [bok_resources:protected] => [bok_topics:protected] => [bok_keywords:protected] => [id:protected] => 57 [type:protected] => category [parent:protected] => 2 [label:protected] => Flagger [alreadyInSave:protected] => [alreadyInValidation:protected] => [validationFailures:protected] => Array ( ) [_new:BaseObject:private] => [_deleted:BaseObject:private] => [modifiedColumns:protected] => Array ( ) ) [58] => Category Object ( [languages:protected] => [bok_resources:protected] => [bok_topics:protected] => [bok_keywords:protected] => [id:protected] => 58 [type:protected] => category [parent:protected] => 2 [label:protected] => Glazier [alreadyInSave:protected] => [alreadyInValidation:protected] => [validationFailures:protected] => Array ( ) [_new:BaseObject:private] => [_deleted:BaseObject:private] => [modifiedColumns:protected] => Array ( ) ) [59] => Category Object ( [languages:protected] => [bok_resources:protected] => [bok_topics:protected] => [bok_keywords:protected] => [id:protected] => 59 [type:protected] => category [parent:protected] => 2 [label:protected] => Hazardous Waste Cleanup [alreadyInSave:protected] => [alreadyInValidation:protected] => [validationFailures:protected] => Array ( ) [_new:BaseObject:private] => [_deleted:BaseObject:private] => [modifiedColumns:protected] => Array ( ) ) [60] => Category Object ( [languages:protected] => [bok_resources:protected] => [bok_topics:protected] => [bok_keywords:protected] => [id:protected] => 60 [type:protected] => category [parent:protected] => 2 [label:protected] => HVAC [alreadyInSave:protected] => [alreadyInValidation:protected] => [validationFailures:protected] => Array ( ) [_new:BaseObject:private] => [_deleted:BaseObject:private] => [modifiedColumns:protected] => Array ( ) ) [61] => Category Object ( [languages:protected] => [bok_resources:protected] => [bok_topics:protected] => [bok_keywords:protected] => [id:protected] => 61 [type:protected] => category [parent:protected] => 2 [label:protected] => Interior Systems Carpenter [alreadyInSave:protected] => [alreadyInValidation:protected] => [validationFailures:protected] => Array ( ) [_new:BaseObject:private] => [_deleted:BaseObject:private] => [modifiedColumns:protected] => Array ( ) ) [64] => Category Object ( [languages:protected] => [bok_resources:protected] => [bok_topics:protected] => [bok_keywords:protected] => [id:protected] => 64 [type:protected] => category [parent:protected] => 2 [label:protected] => Laborer [alreadyInSave:protected] => [alreadyInValidation:protected] => [validationFailures:protected] => Array ( ) [_new:BaseObject:private] => [_deleted:BaseObject:private] => [modifiedColumns:protected] => Array ( ) ) [65] => Category Object ( [languages:protected] => [bok_resources:protected] => [bok_topics:protected] => [bok_keywords:protected] => [id:protected] => 65 [type:protected] => category [parent:protected] => 2 [label:protected] => Landscaper [alreadyInSave:protected] => [alreadyInValidation:protected] => [validationFailures:protected] => Array ( ) [_new:BaseObject:private] => [_deleted:BaseObject:private] => [modifiedColumns:protected] => Array ( ) ) [66] => Category Object ( [languages:protected] => [bok_resources:protected] => [bok_topics:protected] => [bok_keywords:protected] => [id:protected] => 66 [type:protected] => category [parent:protected] => 2 [label:protected] => Lather [alreadyInSave:protected] => [alreadyInValidation:protected] => [validationFailures:protected] => Array ( ) [_new:BaseObject:private] => [_deleted:BaseObject:private] => [modifiedColumns:protected] => Array ( ) ) [67] => Category Object ( [languages:protected] => [bok_resources:protected] => [bok_topics:protected] => [bok_keywords:protected] => [id:protected] => 67 [type:protected] => category [parent:protected] => 2 [label:protected] => Lead Abatement Worker [alreadyInSave:protected] => [alreadyInValidation:protected] => [validationFailures:protected] => Array ( ) [_new:BaseObject:private] => [_deleted:BaseObject:private] => [modifiedColumns:protected] => Array ( ) ) [68] => Category Object ( [languages:protected] => [bok_resources:protected] => [bok_topics:protected] => [bok_keywords:protected] => [id:protected] => 68 [type:protected] => category [parent:protected] => 2 [label:protected] => Maintenance Worker [alreadyInSave:protected] => [alreadyInValidation:protected] => [validationFailures:protected] => Array ( ) [_new:BaseObject:private] => [_deleted:BaseObject:private] => [modifiedColumns:protected] => Array ( ) ) [69] => Category Object ( [languages:protected] => [bok_resources:protected] => [bok_topics:protected] => [bok_keywords:protected] => [id:protected] => 69 [type:protected] => category [parent:protected] => 2 [label:protected] => Millwright [alreadyInSave:protected] => [alreadyInValidation:protected] => [validationFailures:protected] => Array ( ) [_new:BaseObject:private] => [_deleted:BaseObject:private] => [modifiedColumns:protected] => Array ( ) ) [70] => Category Object ( [languages:protected] => [bok_resources:protected] => [bok_topics:protected] => [bok_keywords:protected] => [id:protected] => 70 [type:protected] => category [parent:protected] => 2 [label:protected] => Operating Engineer [alreadyInSave:protected] => [alreadyInValidation:protected] => [validationFailures:protected] => Array ( ) [_new:BaseObject:private] => [_deleted:BaseObject:private] => [modifiedColumns:protected] => Array ( ) ) [71] => Category Object ( [languages:protected] => [bok_resources:protected] => [bok_topics:protected] => [bok_keywords:protected] => [id:protected] => 71 [type:protected] => category [parent:protected] => 2 [label:protected] => Painter [alreadyInSave:protected] => [alreadyInValidation:protected] => [validationFailures:protected] => Array ( ) [_new:BaseObject:private] => [_deleted:BaseObject:private] => [modifiedColumns:protected] => Array ( ) ) [72] => Category Object ( [languages:protected] => [bok_resources:protected] => [bok_topics:protected] => [bok_keywords:protected] => [id:protected] => 72 [type:protected] => category [parent:protected] => 2 [label:protected] => Paper Hanger [alreadyInSave:protected] => [alreadyInValidation:protected] => [validationFailures:protected] => Array ( ) [_new:BaseObject:private] => [_deleted:BaseObject:private] => [modifiedColumns:protected] => Array ( ) ) [73] => Category Object ( [languages:protected] => [bok_resources:protected] => [bok_topics:protected] => [bok_keywords:protected] => [id:protected] => 73 [type:protected] => category [parent:protected] => 2 [label:protected] => PCC/Restoration [alreadyInSave:protected] => [alreadyInValidation:protected] => [validationFailures:protected] => Array ( ) [_new:BaseObject:private] => [_deleted:BaseObject:private] => [modifiedColumns:protected] => Array ( ) ) [74] => Category Object ( [languages:protected] => [bok_resources:protected] => [bok_topics:protected] => [bok_keywords:protected] => [id:protected] => 74 [type:protected] => category [parent:protected] => 2 [label:protected] => Pile Driver [alreadyInSave:protected] => [alreadyInValidation:protected] => [validationFailures:protected] => Array ( ) [_new:BaseObject:private] => [_deleted:BaseObject:private] => [modifiedColumns:protected] => Array ( ) ) [75] => Category Object ( [languages:protected] => [bok_resources:protected] => [bok_topics:protected] => [bok_keywords:protected] => [id:protected] => 75 [type:protected] => category [parent:protected] => 2 [label:protected] => Plasterer [alreadyInSave:protected] => [alreadyInValidation:protected] => [validationFailures:protected] => Array ( ) [_new:BaseObject:private] => [_deleted:BaseObject:private] => [modifiedColumns:protected] => Array ( ) ) [76] => Category Object ( [languages:protected] => [bok_resources:protected] => [bok_topics:protected] => [bok_keywords:protected] => [id:protected] => 76 [type:protected] => category [parent:protected] => 2 [label:protected] => Plumber/Pipefitter [alreadyInSave:protected] => [alreadyInValidation:protected] => [validationFailures:protected] => Array ( ) [_new:BaseObject:private] => [_deleted:BaseObject:private] => [modifiedColumns:protected] => Array ( ) ) [77] => Category Object ( [languages:protected] => [bok_resources:protected] => [bok_topics:protected] => [bok_keywords:protected] => [id:protected] => 77 [type:protected] => category [parent:protected] => 2 [label:protected] => Refractory Worker [alreadyInSave:protected] => [alreadyInValidation:protected] => [validationFailures:protected] => Array ( ) [_new:BaseObject:private] => [_deleted:BaseObject:private] => [modifiedColumns:protected] => Array ( ) ) [63] => Category Object ( [languages:protected] => [bok_resources:protected] => [bok_topics:protected] => [bok_keywords:protected] => [id:protected] => 63 [type:protected] => category [parent:protected] => 2 [label:protected] => Reinforcing Ironworker [alreadyInSave:protected] => [alreadyInValidation:protected] => [validationFailures:protected] => Array ( ) [_new:BaseObject:private] => [_deleted:BaseObject:private] => [modifiedColumns:protected] => Array ( ) ) [78] => Category Object ( [languages:protected] => [bok_resources:protected] => [bok_topics:protected] => [bok_keywords:protected] => [id:protected] => 78 [type:protected] => category [parent:protected] => 2 [label:protected] => Roofer/Waterproofer [alreadyInSave:protected] => [alreadyInValidation:protected] => [validationFailures:protected] => Array ( ) [_new:BaseObject:private] => [_deleted:BaseObject:private] => [modifiedColumns:protected] => Array ( ) ) [79] => Category Object ( [languages:protected] => [bok_resources:protected] => [bok_topics:protected] => [bok_keywords:protected] => [id:protected] => 79 [type:protected] => category [parent:protected] => 2 [label:protected] => Scaffold Erector [alreadyInSave:protected] => [alreadyInValidation:protected] => [validationFailures:protected] => Array ( ) [_new:BaseObject:private] => [_deleted:BaseObject:private] => [modifiedColumns:protected] => Array ( ) ) [80] => Category Object ( [languages:protected] => [bok_resources:protected] => [bok_topics:protected] => [bok_keywords:protected] => [id:protected] => 80 [type:protected] => category [parent:protected] => 2 [label:protected] => Sheetmetal Worker [alreadyInSave:protected] => [alreadyInValidation:protected] => [validationFailures:protected] => Array ( ) [_new:BaseObject:private] => [_deleted:BaseObject:private] => [modifiedColumns:protected] => Array ( ) ) [81] => Category Object ( [languages:protected] => [bok_resources:protected] => [bok_topics:protected] => [bok_keywords:protected] => [id:protected] => 81 [type:protected] => category [parent:protected] => 2 [label:protected] => Sprinkler Fitter [alreadyInSave:protected] => [alreadyInValidation:protected] => [validationFailures:protected] => Array ( ) [_new:BaseObject:private] => [_deleted:BaseObject:private] => [modifiedColumns:protected] => Array ( ) ) [82] => Category Object ( [languages:protected] => [bok_resources:protected] => [bok_topics:protected] => [bok_keywords:protected] => [id:protected] => 82 [type:protected] => category [parent:protected] => 2 [label:protected] => Stonemason [alreadyInSave:protected] => [alreadyInValidation:protected] => [validationFailures:protected] => Array ( ) [_new:BaseObject:private] => [_deleted:BaseObject:private] => [modifiedColumns:protected] => Array ( ) ) [62] => Category Object ( [languages:protected] => [bok_resources:protected] => [bok_topics:protected] => [bok_keywords:protected] => [id:protected] => 62 [type:protected] => category [parent:protected] => 2 [label:protected] => Structural Ironworker [alreadyInSave:protected] => [alreadyInValidation:protected] => [validationFailures:protected] => Array ( ) [_new:BaseObject:private] => [_deleted:BaseObject:private] => [modifiedColumns:protected] => Array ( ) ) [83] => Category Object ( [languages:protected] => [bok_resources:protected] => [bok_topics:protected] => [bok_keywords:protected] => [id:protected] => 83 [type:protected] => category [parent:protected] => 2 [label:protected] => Terrazzo Worker [alreadyInSave:protected] => [alreadyInValidation:protected] => [validationFailures:protected] => Array ( ) [_new:BaseObject:private] => [_deleted:BaseObject:private] => [modifiedColumns:protected] => Array ( ) ) [84] => Category Object ( [languages:protected] => [bok_resources:protected] => [bok_topics:protected] => [bok_keywords:protected] => [id:protected] => 84 [type:protected] => category [parent:protected] => 2 [label:protected] => Tile Setter [alreadyInSave:protected] => [alreadyInValidation:protected] => [validationFailures:protected] => Array ( ) [_new:BaseObject:private] => [_deleted:BaseObject:private] => [modifiedColumns:protected] => Array ( ) ) [85] => Category Object ( [languages:protected] => [bok_resources:protected] => [bok_topics:protected] => [bok_keywords:protected] => [id:protected] => 85 [type:protected] => category [parent:protected] => 2 [label:protected] => Truck Driver [alreadyInSave:protected] => [alreadyInValidation:protected] => [validationFailures:protected] => Array ( ) [_new:BaseObject:private] => [_deleted:BaseObject:private] => [modifiedColumns:protected] => Array ( ) ) [86] => Category Object ( [languages:protected] => [bok_resources:protected] => [bok_topics:protected] => [bok_keywords:protected] => [id:protected] => 86 [type:protected] => category [parent:protected] => 2 [label:protected] => Welder [alreadyInSave:protected] => [alreadyInValidation:protected] => [validationFailures:protected] => Array ( ) [_new:BaseObject:private] => [_deleted:BaseObject:private] => [modifiedColumns:protected] => Array ( ) ) [87] => Category Object ( [languages:protected] => [bok_resources:protected] => [bok_topics:protected] => [bok_keywords:protected] => [id:protected] => 87 [type:protected] => category [parent:protected] => 3 [label:protected] => Commercial & Institutional [alreadyInSave:protected] => [alreadyInValidation:protected] => [validationFailures:protected] => Array ( ) [_new:BaseObject:private] => [_deleted:BaseObject:private] => [modifiedColumns:protected] => Array ( ) ) [88] => Category Object ( [languages:protected] => [bok_resources:protected] => [bok_topics:protected] => [bok_keywords:protected] => [id:protected] => 88 [type:protected] => category [parent:protected] => 3 [label:protected] => Demolition [alreadyInSave:protected] => [alreadyInValidation:protected] => [validationFailures:protected] => Array ( ) [_new:BaseObject:private] => [_deleted:BaseObject:private] => [modifiedColumns:protected] => Array ( ) ) [89] => Category Object ( [languages:protected] => [bok_resources:protected] => [bok_topics:protected] => [bok_keywords:protected] => [id:protected] => 89 [type:protected] => category [parent:protected] => 3 [label:protected] => Disasters [alreadyInSave:protected] => [alreadyInValidation:protected] => [validationFailures:protected] => Array ( ) [_new:BaseObject:private] => [_deleted:BaseObject:private] => [modifiedColumns:protected] => Array ( ) ) [91] => Category Object ( [languages:protected] => [bok_resources:protected] => [bok_topics:protected] => [bok_keywords:protected] => [id:protected] => 91 [type:protected] => category [parent:protected] => 3 [label:protected] => Heavy & Highway [alreadyInSave:protected] => [alreadyInValidation:protected] => [validationFailures:protected] => Array ( ) [_new:BaseObject:private] => [_deleted:BaseObject:private] => [modifiedColumns:protected] => Array ( ) ) [90] => Category Object ( [languages:protected] => [bok_resources:protected] => [bok_topics:protected] => [bok_keywords:protected] => [id:protected] => 90 [type:protected] => category [parent:protected] => 3 [label:protected] => Industrial [alreadyInSave:protected] => [alreadyInValidation:protected] => [validationFailures:protected] => Array ( ) [_new:BaseObject:private] => [_deleted:BaseObject:private] => [modifiedColumns:protected] => Array ( ) ) [92] => Category Object ( [languages:protected] => [bok_resources:protected] => [bok_topics:protected] => [bok_keywords:protected] => [id:protected] => 92 [type:protected] => category [parent:protected] => 3 [label:protected] => LEED/Green Construction [alreadyInSave:protected] => [alreadyInValidation:protected] => [validationFailures:protected] => Array ( ) [_new:BaseObject:private] => [_deleted:BaseObject:private] => [modifiedColumns:protected] => Array ( ) ) [93] => Category Object ( [languages:protected] => [bok_resources:protected] => [bok_topics:protected] => [bok_keywords:protected] => [id:protected] => 93 [type:protected] => category [parent:protected] => 3 [label:protected] => Renovations [alreadyInSave:protected] => [alreadyInValidation:protected] => [validationFailures:protected] => Array ( ) [_new:BaseObject:private] => [_deleted:BaseObject:private] => [modifiedColumns:protected] => Array ( ) ) [94] => Category Object ( [languages:protected] => [bok_resources:protected] => [bok_topics:protected] => [bok_keywords:protected] => [id:protected] => 94 [type:protected] => category [parent:protected] => 3 [label:protected] => Residential [alreadyInSave:protected] => [alreadyInValidation:protected] => [validationFailures:protected] => Array ( ) [_new:BaseObject:private] => [_deleted:BaseObject:private] => [modifiedColumns:protected] => Array ( ) ) [95] => Category Object ( [languages:protected] => [bok_resources:protected] => [bok_topics:protected] => [bok_keywords:protected] => [id:protected] => 95 [type:protected] => category [parent:protected] => 3 [label:protected] => Underground [alreadyInSave:protected] => [alreadyInValidation:protected] => [validationFailures:protected] => Array ( ) [_new:BaseObject:private] => [_deleted:BaseObject:private] => [modifiedColumns:protected] => Array ( ) ) ) [categories_initialized:protected] => 1 [mapped_items:protected] => [content:protected] => [files:protected] => [language:protected] => Language Object ( [id:protected] => 1 [code:protected] => en [name:protected] => English [alreadyInSave:protected] => [alreadyInValidation:protected] => [validationFailures:protected] => Array ( ) [_new:BaseObject:private] => [_deleted:BaseObject:private] => [modifiedColumns:protected] => Array ( ) ) [old_record:protected] => [id:protected] => 4426 [old_id:protected] => [elcosh_id:protected] => d001656 [type:protected] => document [display_type:protected] => HTML only (and links) [user_id:protected] => 0 [language_id:protected] => 1 [tagging_id:protected] => Mike Aguilar [priority_id:protected] => 1 [title:protected] => Construction Dive -- DeWalt's Jobsite Pro headphones recalled for fire hazards [total_pages:protected] => 1 [billed_pages:protected] => 1 [publication_number:protected] => [part_of:protected] => [keywords:protected] => DeWalt, Fire Hazards, recall, headphones [comments:protected] => [summary:protected] => A recall notice by the United States Consumer Product Safety Commission affects over 300,000 DeWalt Jobsite Pro Headphones. The recall is a result of a malfunction that can cause earbuds to overheat while charging or during use, leading to fire and burn hazards. [transition_comments:protected] => [external_link:protected] => https://www.constructiondive.com/news/dewalts-jobsite-pro-headphones-recalled-for-fire-hazards/611248/?utm_source=Sailthru&utm_medium=email&utm_campaign=Issue:%202021-12-10%20Construction%20Dive%20Newsletter%20%5Bissue:38532%5D&utm_term=Construction%20Dive [consol_link:protected] => [more_like_this:protected] => [permission_given_by:protected] => [published:protected] => T [billable:protected] => F [img_name:protected] => [img_ext:protected] => [img_width:protected] => [img_height:protected] => [img_credit:protected] => [img_practice:protected] => [vid_source_id:protected] => [vid_running_time:protected] => [vid_intended_audience:protected] => [vid_acquisition_info:protected] => [vid_cost:protected] => [vid_producer:protected] => [vid_filename:protected] => [vid_filename_downloadable:protected] => [date_summary:protected] => [date_permission_requested:protected] => [date_permission_received:protected] => [date_review_needed:protected] => [date_received:protected] => 12/13/21 [date_completed:protected] => 12/13/21 [date_billed:protected] => [date_modified:protected] => 12/13/21 [collBokExports:protected] => [lastBokExportCriteria:BaseElcoshItem:private] => [alreadyInSave:protected] => [alreadyInValidation:protected] => [validationFailures:protected] => Array ( ) [_new:BaseObject:private] => [_deleted:BaseObject:private] => [modifiedColumns:protected] => Array ( ) ) ) [3] => Search_Result Object ( [title] => Working in an Enclosed Cab [image] => /record/images/notavailable-p.png [blurb] => This CPWR Hazard Alert on Working in enclosed cabs provides information on protecting workers from silica dust, how to minimize exposures and the dang... [category] => Array ( [0] => 10 [1] => 16 [2] => 24 [3] => 37 [4] => 46 [5] => 48 [6] => 49 [7] => 51 [8] => 53 [9] => 54 [10] => 56 [11] => 58 [12] => 59 [13] => 60 [14] => 61 [15] => 64 [16] => 66 [17] => 68 [18] => 69 [19] => 71 [20] => 73 [21] => 74 [22] => 76 [23] => 77 [24] => 63 [25] => 80 [26] => 82 [27] => 62 [28] => 83 [29] => 84 [30] => 86 [31] => 88 [32] => 89 [33] => 95 [34] => 102 ) [labels] => Array ( [0] => Confined Spaces [1] => Work Environment [2] => Hazards [3] => Fire & Explosions [6] => Trenches & Excavations [9] => Silica /Construction Dust [10] => Inhalation/Skin Exposures [12] => Boilermaker [13] => Trades [14] => Cabinetmaker [16] => Carpenter [18] => Cement Mason [20] => Concrete Polisher [22] => Drywall Applicator Specialist [24] => Elevator Constructor [26] => Glazier [28] => Hazardous Waste Cleanup [30] => HVAC [32] => Interior Systems Carpenter [34] => Laborer [36] => Lather [38] => Maintenance Worker [40] => Millwright [42] => Painter [44] => PCC/Restoration [46] => Pile Driver [48] => Plumber/Pipefitter [50] => Refractory Worker [52] => Reinforcing Ironworker [54] => Sheetmetal Worker [56] => Stonemason [58] => Structural Ironworker [60] => Terrazzo Worker [62] => Tile Setter [64] => Welder [66] => Demolition [67] => Jobsites [68] => Disasters [70] => Underground [72] => Handouts [73] => Documents [74] => Media & Documents ) [type] => Handouts [sub_category] => [url] => /document/4415/d001651/Working%2Bin%2Ban%2BEnclosed%2BCab.html [item:protected] => DocumentRecord Object ( [records:protected] => Array ( ) [recordId:protected] => [searchWordClass:protected] => [searchWordPeerClass:protected] => [bok_record:protected] => [authors:protected] => [organizations:protected] => [collections:protected] => [categories:protected] => Array ( [10] => Category Object ( [languages:protected] => [bok_resources:protected] => [bok_topics:protected] => [bok_keywords:protected] => [id:protected] => 10 [type:protected] => category [parent:protected] => 7 [label:protected] => Confined Spaces [alreadyInSave:protected] => [alreadyInValidation:protected] => [validationFailures:protected] => Array ( ) [_new:BaseObject:private] => [_deleted:BaseObject:private] => [modifiedColumns:protected] => Array ( ) ) [16] => Category Object ( [languages:protected] => [bok_resources:protected] => [bok_topics:protected] => [bok_keywords:protected] => [id:protected] => 16 [type:protected] => category [parent:protected] => 7 [label:protected] => Fire & Explosions [alreadyInSave:protected] => [alreadyInValidation:protected] => [validationFailures:protected] => Array ( ) [_new:BaseObject:private] => [_deleted:BaseObject:private] => [modifiedColumns:protected] => Array ( ) ) [24] => Category Object ( [languages:protected] => [bok_resources:protected] => [bok_topics:protected] => [bok_keywords:protected] => [id:protected] => 24 [type:protected] => category [parent:protected] => 7 [label:protected] => Trenches & Excavations [alreadyInSave:protected] => [alreadyInValidation:protected] => [validationFailures:protected] => Array ( ) [_new:BaseObject:private] => [_deleted:BaseObject:private] => [modifiedColumns:protected] => Array ( ) ) [37] => Category Object ( [languages:protected] => [bok_resources:protected] => [bok_topics:protected] => [bok_keywords:protected] => [id:protected] => 37 [type:protected] => category [parent:protected] => 8 [label:protected] => Silica /Construction Dust [alreadyInSave:protected] => [alreadyInValidation:protected] => [validationFailures:protected] => Array ( ) [_new:BaseObject:private] => [_deleted:BaseObject:private] => [modifiedColumns:protected] => Array ( ) ) [46] => Category Object ( [languages:protected] => [bok_resources:protected] => [bok_topics:protected] => [bok_keywords:protected] => [id:protected] => 46 [type:protected] => category [parent:protected] => 2 [label:protected] => Boilermaker [alreadyInSave:protected] => [alreadyInValidation:protected] => [validationFailures:protected] => Array ( ) [_new:BaseObject:private] => [_deleted:BaseObject:private] => [modifiedColumns:protected] => Array ( ) ) [48] => Category Object ( [languages:protected] => [bok_resources:protected] => [bok_topics:protected] => [bok_keywords:protected] => [id:protected] => 48 [type:protected] => category [parent:protected] => 2 [label:protected] => Cabinetmaker [alreadyInSave:protected] => [alreadyInValidation:protected] => [validationFailures:protected] => Array ( ) [_new:BaseObject:private] => [_deleted:BaseObject:private] => [modifiedColumns:protected] => Array ( ) ) [49] => Category Object ( [languages:protected] => [bok_resources:protected] => [bok_topics:protected] => [bok_keywords:protected] => [id:protected] => 49 [type:protected] => category [parent:protected] => 2 [label:protected] => Carpenter [alreadyInSave:protected] => [alreadyInValidation:protected] => [validationFailures:protected] => Array ( ) [_new:BaseObject:private] => [_deleted:BaseObject:private] => [modifiedColumns:protected] => Array ( ) ) [51] => Category Object ( [languages:protected] => [bok_resources:protected] => [bok_topics:protected] => [bok_keywords:protected] => [id:protected] => 51 [type:protected] => category [parent:protected] => 2 [label:protected] => Cement Mason [alreadyInSave:protected] => [alreadyInValidation:protected] => [validationFailures:protected] => Array ( ) [_new:BaseObject:private] => [_deleted:BaseObject:private] => [modifiedColumns:protected] => Array ( ) ) [53] => Category Object ( [languages:protected] => [bok_resources:protected] => [bok_topics:protected] => [bok_keywords:protected] => [id:protected] => 53 [type:protected] => category [parent:protected] => 2 [label:protected] => Concrete Polisher [alreadyInSave:protected] => [alreadyInValidation:protected] => [validationFailures:protected] => Array ( ) [_new:BaseObject:private] => [_deleted:BaseObject:private] => [modifiedColumns:protected] => Array ( ) ) [54] => Category Object ( [languages:protected] => [bok_resources:protected] => [bok_topics:protected] => [bok_keywords:protected] => [id:protected] => 54 [type:protected] => category [parent:protected] => 2 [label:protected] => Drywall Applicator Specialist [alreadyInSave:protected] => [alreadyInValidation:protected] => [validationFailures:protected] => Array ( ) [_new:BaseObject:private] => [_deleted:BaseObject:private] => [modifiedColumns:protected] => Array ( ) ) [56] => Category Object ( [languages:protected] => [bok_resources:protected] => [bok_topics:protected] => [bok_keywords:protected] => [id:protected] => 56 [type:protected] => category [parent:protected] => 2 [label:protected] => Elevator Constructor [alreadyInSave:protected] => [alreadyInValidation:protected] => [validationFailures:protected] => Array ( ) [_new:BaseObject:private] => [_deleted:BaseObject:private] => [modifiedColumns:protected] => Array ( ) ) [58] => Category Object ( [languages:protected] => [bok_resources:protected] => [bok_topics:protected] => [bok_keywords:protected] => [id:protected] => 58 [type:protected] => category [parent:protected] => 2 [label:protected] => Glazier [alreadyInSave:protected] => [alreadyInValidation:protected] => [validationFailures:protected] => Array ( ) [_new:BaseObject:private] => [_deleted:BaseObject:private] => [modifiedColumns:protected] => Array ( ) ) [59] => Category Object ( [languages:protected] => [bok_resources:protected] => [bok_topics:protected] => [bok_keywords:protected] => [id:protected] => 59 [type:protected] => category [parent:protected] => 2 [label:protected] => Hazardous Waste Cleanup [alreadyInSave:protected] => [alreadyInValidation:protected] => [validationFailures:protected] => Array ( ) [_new:BaseObject:private] => [_deleted:BaseObject:private] => [modifiedColumns:protected] => Array ( ) ) [60] => Category Object ( [languages:protected] => [bok_resources:protected] => [bok_topics:protected] => [bok_keywords:protected] => [id:protected] => 60 [type:protected] => category [parent:protected] => 2 [label:protected] => HVAC [alreadyInSave:protected] => [alreadyInValidation:protected] => [validationFailures:protected] => Array ( ) [_new:BaseObject:private] => [_deleted:BaseObject:private] => [modifiedColumns:protected] => Array ( ) ) [61] => Category Object ( [languages:protected] => [bok_resources:protected] => [bok_topics:protected] => [bok_keywords:protected] => [id:protected] => 61 [type:protected] => category [parent:protected] => 2 [label:protected] => Interior Systems Carpenter [alreadyInSave:protected] => [alreadyInValidation:protected] => [validationFailures:protected] => Array ( ) [_new:BaseObject:private] => [_deleted:BaseObject:private] => [modifiedColumns:protected] => Array ( ) ) [64] => Category Object ( [languages:protected] => [bok_resources:protected] => [bok_topics:protected] => [bok_keywords:protected] => [id:protected] => 64 [type:protected] => category [parent:protected] => 2 [label:protected] => Laborer [alreadyInSave:protected] => [alreadyInValidation:protected] => [validationFailures:protected] => Array ( ) [_new:BaseObject:private] => [_deleted:BaseObject:private] => [modifiedColumns:protected] => Array ( ) ) [66] => Category Object ( [languages:protected] => [bok_resources:protected] => [bok_topics:protected] => [bok_keywords:protected] => [id:protected] => 66 [type:protected] => category [parent:protected] => 2 [label:protected] => Lather [alreadyInSave:protected] => [alreadyInValidation:protected] => [validationFailures:protected] => Array ( ) [_new:BaseObject:private] => [_deleted:BaseObject:private] => [modifiedColumns:protected] => Array ( ) ) [68] => Category Object ( [languages:protected] => [bok_resources:protected] => [bok_topics:protected] => [bok_keywords:protected] => [id:protected] => 68 [type:protected] => category [parent:protected] => 2 [label:protected] => Maintenance Worker [alreadyInSave:protected] => [alreadyInValidation:protected] => [validationFailures:protected] => Array ( ) [_new:BaseObject:private] => [_deleted:BaseObject:private] => [modifiedColumns:protected] => Array ( ) ) [69] => Category Object ( [languages:protected] => [bok_resources:protected] => [bok_topics:protected] => [bok_keywords:protected] => [id:protected] => 69 [type:protected] => category [parent:protected] => 2 [label:protected] => Millwright [alreadyInSave:protected] => [alreadyInValidation:protected] => [validationFailures:protected] => Array ( ) [_new:BaseObject:private] => [_deleted:BaseObject:private] => [modifiedColumns:protected] => Array ( ) ) [71] => Category Object ( [languages:protected] => [bok_resources:protected] => [bok_topics:protected] => [bok_keywords:protected] => [id:protected] => 71 [type:protected] => category [parent:protected] => 2 [label:protected] => Painter [alreadyInSave:protected] => [alreadyInValidation:protected] => [validationFailures:protected] => Array ( ) [_new:BaseObject:private] => [_deleted:BaseObject:private] => [modifiedColumns:protected] => Array ( ) ) [73] => Category Object ( [languages:protected] => [bok_resources:protected] => [bok_topics:protected] => [bok_keywords:protected] => [id:protected] => 73 [type:protected] => category [parent:protected] => 2 [label:protected] => PCC/Restoration [alreadyInSave:protected] => [alreadyInValidation:protected] => [validationFailures:protected] => Array ( ) [_new:BaseObject:private] => [_deleted:BaseObject:private] => [modifiedColumns:protected] => Array ( ) ) [74] => Category Object ( [languages:protected] => [bok_resources:protected] => [bok_topics:protected] => [bok_keywords:protected] => [id:protected] => 74 [type:protected] => category [parent:protected] => 2 [label:protected] => Pile Driver [alreadyInSave:protected] => [alreadyInValidation:protected] => [validationFailures:protected] => Array ( ) [_new:BaseObject:private] => [_deleted:BaseObject:private] => [modifiedColumns:protected] => Array ( ) ) [76] => Category Object ( [languages:protected] => [bok_resources:protected] => [bok_topics:protected] => [bok_keywords:protected] => [id:protected] => 76 [type:protected] => category [parent:protected] => 2 [label:protected] => Plumber/Pipefitter [alreadyInSave:protected] => [alreadyInValidation:protected] => [validationFailures:protected] => Array ( ) [_new:BaseObject:private] => [_deleted:BaseObject:private] => [modifiedColumns:protected] => Array ( ) ) [77] => Category Object ( [languages:protected] => [bok_resources:protected] => [bok_topics:protected] => [bok_keywords:protected] => [id:protected] => 77 [type:protected] => category [parent:protected] => 2 [label:protected] => Refractory Worker [alreadyInSave:protected] => [alreadyInValidation:protected] => [validationFailures:protected] => Array ( ) [_new:BaseObject:private] => [_deleted:BaseObject:private] => [modifiedColumns:protected] => Array ( ) ) [63] => Category Object ( [languages:protected] => [bok_resources:protected] => [bok_topics:protected] => [bok_keywords:protected] => [id:protected] => 63 [type:protected] => category [parent:protected] => 2 [label:protected] => Reinforcing Ironworker [alreadyInSave:protected] => [alreadyInValidation:protected] => [validationFailures:protected] => Array ( ) [_new:BaseObject:private] => [_deleted:BaseObject:private] => [modifiedColumns:protected] => Array ( ) ) [80] => Category Object ( [languages:protected] => [bok_resources:protected] => [bok_topics:protected] => [bok_keywords:protected] => [id:protected] => 80 [type:protected] => category [parent:protected] => 2 [label:protected] => Sheetmetal Worker [alreadyInSave:protected] => [alreadyInValidation:protected] => [validationFailures:protected] => Array ( ) [_new:BaseObject:private] => [_deleted:BaseObject:private] => [modifiedColumns:protected] => Array ( ) ) [82] => Category Object ( [languages:protected] => [bok_resources:protected] => [bok_topics:protected] => [bok_keywords:protected] => [id:protected] => 82 [type:protected] => category [parent:protected] => 2 [label:protected] => Stonemason [alreadyInSave:protected] => [alreadyInValidation:protected] => [validationFailures:protected] => Array ( ) [_new:BaseObject:private] => [_deleted:BaseObject:private] => [modifiedColumns:protected] => Array ( ) ) [62] => Category Object ( [languages:protected] => [bok_resources:protected] => [bok_topics:protected] => [bok_keywords:protected] => [id:protected] => 62 [type:protected] => category [parent:protected] => 2 [label:protected] => Structural Ironworker [alreadyInSave:protected] => [alreadyInValidation:protected] => [validationFailures:protected] => Array ( ) [_new:BaseObject:private] => [_deleted:BaseObject:private] => [modifiedColumns:protected] => Array ( ) ) [83] => Category Object ( [languages:protected] => [bok_resources:protected] => [bok_topics:protected] => [bok_keywords:protected] => [id:protected] => 83 [type:protected] => category [parent:protected] => 2 [label:protected] => Terrazzo Worker [alreadyInSave:protected] => [alreadyInValidation:protected] => [validationFailures:protected] => Array ( ) [_new:BaseObject:private] => [_deleted:BaseObject:private] => [modifiedColumns:protected] => Array ( ) ) [84] => Category Object ( [languages:protected] => [bok_resources:protected] => [bok_topics:protected] => [bok_keywords:protected] => [id:protected] => 84 [type:protected] => category [parent:protected] => 2 [label:protected] => Tile Setter [alreadyInSave:protected] => [alreadyInValidation:protected] => [validationFailures:protected] => Array ( ) [_new:BaseObject:private] => [_deleted:BaseObject:private] => [modifiedColumns:protected] => Array ( ) ) [86] => Category Object ( [languages:protected] => [bok_resources:protected] => [bok_topics:protected] => [bok_keywords:protected] => [id:protected] => 86 [type:protected] => category [parent:protected] => 2 [label:protected] => Welder [alreadyInSave:protected] => [alreadyInValidation:protected] => [validationFailures:protected] => Array ( ) [_new:BaseObject:private] => [_deleted:BaseObject:private] => [modifiedColumns:protected] => Array ( ) ) [88] => Category Object ( [languages:protected] => [bok_resources:protected] => [bok_topics:protected] => [bok_keywords:protected] => [id:protected] => 88 [type:protected] => category [parent:protected] => 3 [label:protected] => Demolition [alreadyInSave:protected] => [alreadyInValidation:protected] => [validationFailures:protected] => Array ( ) [_new:BaseObject:private] => [_deleted:BaseObject:private] => [modifiedColumns:protected] => Array ( ) ) [89] => Category Object ( [languages:protected] => [bok_resources:protected] => [bok_topics:protected] => [bok_keywords:protected] => [id:protected] => 89 [type:protected] => category [parent:protected] => 3 [label:protected] => Disasters [alreadyInSave:protected] => [alreadyInValidation:protected] => [validationFailures:protected] => Array ( ) [_new:BaseObject:private] => [_deleted:BaseObject:private] => [modifiedColumns:protected] => Array ( ) ) [95] => Category Object ( [languages:protected] => [bok_resources:protected] => [bok_topics:protected] => [bok_keywords:protected] => [id:protected] => 95 [type:protected] => category [parent:protected] => 3 [label:protected] => Underground [alreadyInSave:protected] => [alreadyInValidation:protected] => [validationFailures:protected] => Array ( ) [_new:BaseObject:private] => [_deleted:BaseObject:private] => [modifiedColumns:protected] => Array ( ) ) [102] => Category Object ( [languages:protected] => [bok_resources:protected] => [bok_topics:protected] => [bok_keywords:protected] => [id:protected] => 102 [type:protected] => category [parent:protected] => 6 [label:protected] => Handouts [alreadyInSave:protected] => [alreadyInValidation:protected] => [validationFailures:protected] => Array ( ) [_new:BaseObject:private] => [_deleted:BaseObject:private] => [modifiedColumns:protected] => Array ( ) ) ) [categories_initialized:protected] => 1 [mapped_items:protected] => [content:protected] => [files:protected] => [language:protected] => Language Object ( [id:protected] => 1 [code:protected] => en [name:protected] => English [alreadyInSave:protected] => [alreadyInValidation:protected] => [validationFailures:protected] => Array ( ) [_new:BaseObject:private] => [_deleted:BaseObject:private] => [modifiedColumns:protected] => Array ( ) ) [old_record:protected] => [id:protected] => 4415 [old_id:protected] => [elcosh_id:protected] => d001651 [type:protected] => document [display_type:protected] => HTML only (and links) [user_id:protected] => 0 [language_id:protected] => 1 [tagging_id:protected] => Valeria Contreras [priority_id:protected] => 1 [title:protected] => Working in an Enclosed Cab [total_pages:protected] => 1 [billed_pages:protected] => 1 [publication_number:protected] => [part_of:protected] => [keywords:protected] => Occupation, construction, safety, health, hazards, work, worker, workplace, OSHA, silicosis, mining, silica, DOE, EEOICPA, labor, lung, CBD, dust, cab, miner, mine [comments:protected] => [summary:protected] => This CPWR Hazard Alert on Working in enclosed cabs provides information on protecting workers from silica dust, how to minimize exposures and the dangers of silica dust. Click on the following links to access the English version and the Spanish version. [transition_comments:protected] => [external_link:protected] => [consol_link:protected] => [more_like_this:protected] => [permission_given_by:protected] => [published:protected] => T [billable:protected] => F [img_name:protected] => [img_ext:protected] => [img_width:protected] => [img_height:protected] => [img_credit:protected] => [img_practice:protected] => [vid_source_id:protected] => [vid_running_time:protected] => [vid_intended_audience:protected] => [vid_acquisition_info:protected] => [vid_cost:protected] => [vid_producer:protected] => [vid_filename:protected] => [vid_filename_downloadable:protected] => [date_summary:protected] => [date_permission_requested:protected] => [date_permission_received:protected] => [date_review_needed:protected] => [date_received:protected] => 10/08/20 [date_completed:protected] => 10/08/20 [date_billed:protected] => [date_modified:protected] => 10/08/20 [collBokExports:protected] => [lastBokExportCriteria:BaseElcoshItem:private] => [alreadyInSave:protected] => [alreadyInValidation:protected] => [validationFailures:protected] => Array ( ) [_new:BaseObject:private] => [_deleted:BaseObject:private] => [modifiedColumns:protected] => Array ( ) ) ) [4] => Search_Result Object ( [title] => Toolbox Talk: Suicide Prevention [image] => /record/images/notavailable-p.png [blurb] => The CPWR Toolbox Talk on Suicide Prevention addresses the prevalence of suicide among construction workers. The resource includes a brief case example... [category] => Array ( [0] => 13 [1] => 20 [2] => 23 [3] => 40 [4] => 44 [5] => 45 [6] => 46 [7] => 47 [8] => 48 [9] => 49 [10] => 50 [11] => 51 [12] => 52 [13] => 53 [14] => 54 [15] => 55 [16] => 56 [17] => 57 [18] => 58 [19] => 59 [20] => 60 [21] => 61 [22] => 64 [23] => 65 [24] => 66 [25] => 67 [26] => 68 [27] => 69 [28] => 70 [29] => 71 [30] => 72 [31] => 73 [32] => 74 [33] => 75 [34] => 76 [35] => 77 [36] => 63 [37] => 78 [38] => 79 [39] => 80 [40] => 81 [41] => 82 [42] => 62 [43] => 83 [44] => 84 [45] => 85 [46] => 86 [47] => 87 [48] => 88 [49] => 89 [50] => 91 [51] => 90 [52] => 92 [53] => 93 [54] => 94 [55] => 95 [56] => 100 ) [labels] => Array ( [0] => Drugs, Alcohol & Tobacco [1] => Work Environment [2] => Hazards [3] => Safety Culture [6] => Stress & Overtime [9] => Overexertion [10] => Ergonomic [12] => Acoustical Ceiling Carpenter [13] => Trades [14] => Asbestos/Insulator [16] => Boilermaker [18] => Bricklayer [20] => Cabinetmaker [22] => Carpenter [24] => Carpet Layer [26] => Cement Mason [28] => Commercial Diver [30] => Concrete Polisher [32] => Drywall Applicator Specialist [34] => Electrical Worker [36] => Elevator Constructor [38] => Flagger [40] => Glazier [42] => Hazardous Waste Cleanup [44] => HVAC [46] => Interior Systems Carpenter [48] => Laborer [50] => Landscaper [52] => Lather [54] => Lead Abatement Worker [56] => Maintenance Worker [58] => Millwright [60] => Operating Engineer [62] => Painter [64] => Paper Hanger [66] => PCC/Restoration [68] => Pile Driver [70] => Plasterer [72] => Plumber/Pipefitter [74] => Refractory Worker [76] => Reinforcing Ironworker [78] => Roofer/Waterproofer [80] => Scaffold Erector [82] => Sheetmetal Worker [84] => Sprinkler Fitter [86] => Stonemason [88] => Structural Ironworker [90] => Terrazzo Worker [92] => Tile Setter [94] => Truck Driver [96] => Welder [98] => Commercial & Institutional [99] => Jobsites [100] => Demolition [102] => Disasters [104] => Heavy & Highway [106] => Industrial [108] => LEED/Green Construction [110] => Renovations [112] => Residential [114] => Underground [116] => Toolbox Talks [117] => Documents [118] => Media & Documents ) [type] => Toolbox Talks [sub_category] => [url] => /document/4419/d001652/Toolbox%2BTalk%253A%2BSuicide%2BPrevention.html [item:protected] => DocumentRecord Object ( [records:protected] => Array ( ) [recordId:protected] => [searchWordClass:protected] => [searchWordPeerClass:protected] => [bok_record:protected] => [authors:protected] => [organizations:protected] => [collections:protected] => [categories:protected] => Array ( [13] => Category Object ( [languages:protected] => [bok_resources:protected] => [bok_topics:protected] => [bok_keywords:protected] => [id:protected] => 13 [type:protected] => category [parent:protected] => 7 [label:protected] => Drugs, Alcohol & Tobacco [alreadyInSave:protected] => [alreadyInValidation:protected] => [validationFailures:protected] => Array ( ) [_new:BaseObject:private] => [_deleted:BaseObject:private] => [modifiedColumns:protected] => Array ( ) ) [20] => Category Object ( [languages:protected] => [bok_resources:protected] => [bok_topics:protected] => [bok_keywords:protected] => [id:protected] => 20 [type:protected] => category [parent:protected] => 7 [label:protected] => Safety Culture [alreadyInSave:protected] => [alreadyInValidation:protected] => [validationFailures:protected] => Array ( ) [_new:BaseObject:private] => [_deleted:BaseObject:private] => [modifiedColumns:protected] => Array ( ) ) [23] => Category Object ( [languages:protected] => [bok_resources:protected] => [bok_topics:protected] => [bok_keywords:protected] => [id:protected] => 23 [type:protected] => category [parent:protected] => 7 [label:protected] => Stress & Overtime [alreadyInSave:protected] => [alreadyInValidation:protected] => [validationFailures:protected] => Array ( ) [_new:BaseObject:private] => [_deleted:BaseObject:private] => [modifiedColumns:protected] => Array ( ) ) [40] => Category Object ( [languages:protected] => [bok_resources:protected] => [bok_topics:protected] => [bok_keywords:protected] => [id:protected] => 40 [type:protected] => category [parent:protected] => 9 [label:protected] => Overexertion [alreadyInSave:protected] => [alreadyInValidation:protected] => [validationFailures:protected] => Array ( ) [_new:BaseObject:private] => [_deleted:BaseObject:private] => [modifiedColumns:protected] => Array ( ) ) [44] => Category Object ( [languages:protected] => [bok_resources:protected] => [bok_topics:protected] => [bok_keywords:protected] => [id:protected] => 44 [type:protected] => category [parent:protected] => 2 [label:protected] => Acoustical Ceiling Carpenter [alreadyInSave:protected] => [alreadyInValidation:protected] => [validationFailures:protected] => Array ( ) [_new:BaseObject:private] => [_deleted:BaseObject:private] => [modifiedColumns:protected] => Array ( ) ) [45] => Category Object ( [languages:protected] => [bok_resources:protected] => [bok_topics:protected] => [bok_keywords:protected] => [id:protected] => 45 [type:protected] => category [parent:protected] => 2 [label:protected] => Asbestos/Insulator [alreadyInSave:protected] => [alreadyInValidation:protected] => [validationFailures:protected] => Array ( ) [_new:BaseObject:private] => [_deleted:BaseObject:private] => [modifiedColumns:protected] => Array ( ) ) [46] => Category Object ( [languages:protected] => [bok_resources:protected] => [bok_topics:protected] => [bok_keywords:protected] => [id:protected] => 46 [type:protected] => category [parent:protected] => 2 [label:protected] => Boilermaker [alreadyInSave:protected] => [alreadyInValidation:protected] => [validationFailures:protected] => Array ( ) [_new:BaseObject:private] => [_deleted:BaseObject:private] => [modifiedColumns:protected] => Array ( ) ) [47] => Category Object ( [languages:protected] => [bok_resources:protected] => [bok_topics:protected] => [bok_keywords:protected] => [id:protected] => 47 [type:protected] => category [parent:protected] => 2 [label:protected] => Bricklayer [alreadyInSave:protected] => [alreadyInValidation:protected] => [validationFailures:protected] => Array ( ) [_new:BaseObject:private] => [_deleted:BaseObject:private] => [modifiedColumns:protected] => Array ( ) ) [48] => Category Object ( [languages:protected] => [bok_resources:protected] => [bok_topics:protected] => [bok_keywords:protected] => [id:protected] => 48 [type:protected] => category [parent:protected] => 2 [label:protected] => Cabinetmaker [alreadyInSave:protected] => [alreadyInValidation:protected] => [validationFailures:protected] => Array ( ) [_new:BaseObject:private] => [_deleted:BaseObject:private] => [modifiedColumns:protected] => Array ( ) ) [49] => Category Object ( [languages:protected] => [bok_resources:protected] => [bok_topics:protected] => [bok_keywords:protected] => [id:protected] => 49 [type:protected] => category [parent:protected] => 2 [label:protected] => Carpenter [alreadyInSave:protected] => [alreadyInValidation:protected] => [validationFailures:protected] => Array ( ) [_new:BaseObject:private] => [_deleted:BaseObject:private] => [modifiedColumns:protected] => Array ( ) ) [50] => Category Object ( [languages:protected] => [bok_resources:protected] => [bok_topics:protected] => [bok_keywords:protected] => [id:protected] => 50 [type:protected] => category [parent:protected] => 2 [label:protected] => Carpet Layer [alreadyInSave:protected] => [alreadyInValidation:protected] => [validationFailures:protected] => Array ( ) [_new:BaseObject:private] => [_deleted:BaseObject:private] => [modifiedColumns:protected] => Array ( ) ) [51] => Category Object ( [languages:protected] => [bok_resources:protected] => [bok_topics:protected] => [bok_keywords:protected] => [id:protected] => 51 [type:protected] => category [parent:protected] => 2 [label:protected] => Cement Mason [alreadyInSave:protected] => [alreadyInValidation:protected] => [validationFailures:protected] => Array ( ) [_new:BaseObject:private] => [_deleted:BaseObject:private] => [modifiedColumns:protected] => Array ( ) ) [52] => Category Object ( [languages:protected] => [bok_resources:protected] => [bok_topics:protected] => [bok_keywords:protected] => [id:protected] => 52 [type:protected] => category [parent:protected] => 2 [label:protected] => Commercial Diver [alreadyInSave:protected] => [alreadyInValidation:protected] => [validationFailures:protected] => Array ( ) [_new:BaseObject:private] => [_deleted:BaseObject:private] => [modifiedColumns:protected] => Array ( ) ) [53] => Category Object ( [languages:protected] => [bok_resources:protected] => [bok_topics:protected] => [bok_keywords:protected] => [id:protected] => 53 [type:protected] => category [parent:protected] => 2 [label:protected] => Concrete Polisher [alreadyInSave:protected] => [alreadyInValidation:protected] => [validationFailures:protected] => Array ( ) [_new:BaseObject:private] => [_deleted:BaseObject:private] => [modifiedColumns:protected] => Array ( ) ) [54] => Category Object ( [languages:protected] => [bok_resources:protected] => [bok_topics:protected] => [bok_keywords:protected] => [id:protected] => 54 [type:protected] => category [parent:protected] => 2 [label:protected] => Drywall Applicator Specialist [alreadyInSave:protected] => [alreadyInValidation:protected] => [validationFailures:protected] => Array ( ) [_new:BaseObject:private] => [_deleted:BaseObject:private] => [modifiedColumns:protected] => Array ( ) ) [55] => Category Object ( [languages:protected] => [bok_resources:protected] => [bok_topics:protected] => [bok_keywords:protected] => [id:protected] => 55 [type:protected] => category [parent:protected] => 2 [label:protected] => Electrical Worker [alreadyInSave:protected] => [alreadyInValidation:protected] => [validationFailures:protected] => Array ( ) [_new:BaseObject:private] => [_deleted:BaseObject:private] => [modifiedColumns:protected] => Array ( ) ) [56] => Category Object ( [languages:protected] => [bok_resources:protected] => [bok_topics:protected] => [bok_keywords:protected] => [id:protected] => 56 [type:protected] => category [parent:protected] => 2 [label:protected] => Elevator Constructor [alreadyInSave:protected] => [alreadyInValidation:protected] => [validationFailures:protected] => Array ( ) [_new:BaseObject:private] => [_deleted:BaseObject:private] => [modifiedColumns:protected] => Array ( ) ) [57] => Category Object ( [languages:protected] => [bok_resources:protected] => [bok_topics:protected] => [bok_keywords:protected] => [id:protected] => 57 [type:protected] => category [parent:protected] => 2 [label:protected] => Flagger [alreadyInSave:protected] => [alreadyInValidation:protected] => [validationFailures:protected] => Array ( ) [_new:BaseObject:private] => [_deleted:BaseObject:private] => [modifiedColumns:protected] => Array ( ) ) [58] => Category Object ( [languages:protected] => [bok_resources:protected] => [bok_topics:protected] => [bok_keywords:protected] => [id:protected] => 58 [type:protected] => category [parent:protected] => 2 [label:protected] => Glazier [alreadyInSave:protected] => [alreadyInValidation:protected] => [validationFailures:protected] => Array ( ) [_new:BaseObject:private] => [_deleted:BaseObject:private] => [modifiedColumns:protected] => Array ( ) ) [59] => Category Object ( [languages:protected] => [bok_resources:protected] => [bok_topics:protected] => [bok_keywords:protected] => [id:protected] => 59 [type:protected] => category [parent:protected] => 2 [label:protected] => Hazardous Waste Cleanup [alreadyInSave:protected] => [alreadyInValidation:protected] => [validationFailures:protected] => Array ( ) [_new:BaseObject:private] => [_deleted:BaseObject:private] => [modifiedColumns:protected] => Array ( ) ) [60] => Category Object ( [languages:protected] => [bok_resources:protected] => [bok_topics:protected] => [bok_keywords:protected] => [id:protected] => 60 [type:protected] => category [parent:protected] => 2 [label:protected] => HVAC [alreadyInSave:protected] => [alreadyInValidation:protected] => [validationFailures:protected] => Array ( ) [_new:BaseObject:private] => [_deleted:BaseObject:private] => [modifiedColumns:protected] => Array ( ) ) [61] => Category Object ( [languages:protected] => [bok_resources:protected] => [bok_topics:protected] => [bok_keywords:protected] => [id:protected] => 61 [type:protected] => category [parent:protected] => 2 [label:protected] => Interior Systems Carpenter [alreadyInSave:protected] => [alreadyInValidation:protected] => [validationFailures:protected] => Array ( ) [_new:BaseObject:private] => [_deleted:BaseObject:private] => [modifiedColumns:protected] => Array ( ) ) [64] => Category Object ( [languages:protected] => [bok_resources:protected] => [bok_topics:protected] => [bok_keywords:protected] => [id:protected] => 64 [type:protected] => category [parent:protected] => 2 [label:protected] => Laborer [alreadyInSave:protected] => [alreadyInValidation:protected] => [validationFailures:protected] => Array ( ) [_new:BaseObject:private] => [_deleted:BaseObject:private] => [modifiedColumns:protected] => Array ( ) ) [65] => Category Object ( [languages:protected] => [bok_resources:protected] => [bok_topics:protected] => [bok_keywords:protected] => [id:protected] => 65 [type:protected] => category [parent:protected] => 2 [label:protected] => Landscaper [alreadyInSave:protected] => [alreadyInValidation:protected] => [validationFailures:protected] => Array ( ) [_new:BaseObject:private] => [_deleted:BaseObject:private] => [modifiedColumns:protected] => Array ( ) ) [66] => Category Object ( [languages:protected] => [bok_resources:protected] => [bok_topics:protected] => [bok_keywords:protected] => [id:protected] => 66 [type:protected] => category [parent:protected] => 2 [label:protected] => Lather [alreadyInSave:protected] => [alreadyInValidation:protected] => [validationFailures:protected] => Array ( ) [_new:BaseObject:private] => [_deleted:BaseObject:private] => [modifiedColumns:protected] => Array ( ) ) [67] => Category Object ( [languages:protected] => [bok_resources:protected] => [bok_topics:protected] => [bok_keywords:protected] => [id:protected] => 67 [type:protected] => category [parent:protected] => 2 [label:protected] => Lead Abatement Worker [alreadyInSave:protected] => [alreadyInValidation:protected] => [validationFailures:protected] => Array ( ) [_new:BaseObject:private] => [_deleted:BaseObject:private] => [modifiedColumns:protected] => Array ( ) ) [68] => Category Object ( [languages:protected] => [bok_resources:protected] => [bok_topics:protected] => [bok_keywords:protected] => [id:protected] => 68 [type:protected] => category [parent:protected] => 2 [label:protected] => Maintenance Worker [alreadyInSave:protected] => [alreadyInValidation:protected] => [validationFailures:protected] => Array ( ) [_new:BaseObject:private] => [_deleted:BaseObject:private] => [modifiedColumns:protected] => Array ( ) ) [69] => Category Object ( [languages:protected] => [bok_resources:protected] => [bok_topics:protected] => [bok_keywords:protected] => [id:protected] => 69 [type:protected] => category [parent:protected] => 2 [label:protected] => Millwright [alreadyInSave:protected] => [alreadyInValidation:protected] => [validationFailures:protected] => Array ( ) [_new:BaseObject:private] => [_deleted:BaseObject:private] => [modifiedColumns:protected] => Array ( ) ) [70] => Category Object ( [languages:protected] => [bok_resources:protected] => [bok_topics:protected] => [bok_keywords:protected] => [id:protected] => 70 [type:protected] => category [parent:protected] => 2 [label:protected] => Operating Engineer [alreadyInSave:protected] => [alreadyInValidation:protected] => [validationFailures:protected] => Array ( ) [_new:BaseObject:private] => [_deleted:BaseObject:private] => [modifiedColumns:protected] => Array ( ) ) [71] => Category Object ( [languages:protected] => [bok_resources:protected] => [bok_topics:protected] => [bok_keywords:protected] => [id:protected] => 71 [type:protected] => category [parent:protected] => 2 [label:protected] => Painter [alreadyInSave:protected] => [alreadyInValidation:protected] => [validationFailures:protected] => Array ( ) [_new:BaseObject:private] => [_deleted:BaseObject:private] => [modifiedColumns:protected] => Array ( ) ) [72] => Category Object ( [languages:protected] => [bok_resources:protected] => [bok_topics:protected] => [bok_keywords:protected] => [id:protected] => 72 [type:protected] => category [parent:protected] => 2 [label:protected] => Paper Hanger [alreadyInSave:protected] => [alreadyInValidation:protected] => [validationFailures:protected] => Array ( ) [_new:BaseObject:private] => [_deleted:BaseObject:private] => [modifiedColumns:protected] => Array ( ) ) [73] => Category Object ( [languages:protected] => [bok_resources:protected] => [bok_topics:protected] => [bok_keywords:protected] => [id:protected] => 73 [type:protected] => category [parent:protected] => 2 [label:protected] => PCC/Restoration [alreadyInSave:protected] => [alreadyInValidation:protected] => [validationFailures:protected] => Array ( ) [_new:BaseObject:private] => [_deleted:BaseObject:private] => [modifiedColumns:protected] => Array ( ) ) [74] => Category Object ( [languages:protected] => [bok_resources:protected] => [bok_topics:protected] => [bok_keywords:protected] => [id:protected] => 74 [type:protected] => category [parent:protected] => 2 [label:protected] => Pile Driver [alreadyInSave:protected] => [alreadyInValidation:protected] => [validationFailures:protected] => Array ( ) [_new:BaseObject:private] => [_deleted:BaseObject:private] => [modifiedColumns:protected] => Array ( ) ) [75] => Category Object ( [languages:protected] => [bok_resources:protected] => [bok_topics:protected] => [bok_keywords:protected] => [id:protected] => 75 [type:protected] => category [parent:protected] => 2 [label:protected] => Plasterer [alreadyInSave:protected] => [alreadyInValidation:protected] => [validationFailures:protected] => Array ( ) [_new:BaseObject:private] => [_deleted:BaseObject:private] => [modifiedColumns:protected] => Array ( ) ) [76] => Category Object ( [languages:protected] => [bok_resources:protected] => [bok_topics:protected] => [bok_keywords:protected] => [id:protected] => 76 [type:protected] => category [parent:protected] => 2 [label:protected] => Plumber/Pipefitter [alreadyInSave:protected] => [alreadyInValidation:protected] => [validationFailures:protected] => Array ( ) [_new:BaseObject:private] => [_deleted:BaseObject:private] => [modifiedColumns:protected] => Array ( ) ) [77] => Category Object ( [languages:protected] => [bok_resources:protected] => [bok_topics:protected] => [bok_keywords:protected] => [id:protected] => 77 [type:protected] => category [parent:protected] => 2 [label:protected] => Refractory Worker [alreadyInSave:protected] => [alreadyInValidation:protected] => [validationFailures:protected] => Array ( ) [_new:BaseObject:private] => [_deleted:BaseObject:private] => [modifiedColumns:protected] => Array ( ) ) [63] => Category Object ( [languages:protected] => [bok_resources:protected] => [bok_topics:protected] => [bok_keywords:protected] => [id:protected] => 63 [type:protected] => category [parent:protected] => 2 [label:protected] => Reinforcing Ironworker [alreadyInSave:protected] => [alreadyInValidation:protected] => [validationFailures:protected] => Array ( ) [_new:BaseObject:private] => [_deleted:BaseObject:private] => [modifiedColumns:protected] => Array ( ) ) [78] => Category Object ( [languages:protected] => [bok_resources:protected] => [bok_topics:protected] => [bok_keywords:protected] => [id:protected] => 78 [type:protected] => category [parent:protected] => 2 [label:protected] => Roofer/Waterproofer [alreadyInSave:protected] => [alreadyInValidation:protected] => [validationFailures:protected] => Array ( ) [_new:BaseObject:private] => [_deleted:BaseObject:private] => [modifiedColumns:protected] => Array ( ) ) [79] => Category Object ( [languages:protected] => [bok_resources:protected] => [bok_topics:protected] => [bok_keywords:protected] => [id:protected] => 79 [type:protected] => category [parent:protected] => 2 [label:protected] => Scaffold Erector [alreadyInSave:protected] => [alreadyInValidation:protected] => [validationFailures:protected] => Array ( ) [_new:BaseObject:private] => [_deleted:BaseObject:private] => [modifiedColumns:protected] => Array ( ) ) [80] => Category Object ( [languages:protected] => [bok_resources:protected] => [bok_topics:protected] => [bok_keywords:protected] => [id:protected] => 80 [type:protected] => category [parent:protected] => 2 [label:protected] => Sheetmetal Worker [alreadyInSave:protected] => [alreadyInValidation:protected] => [validationFailures:protected] => Array ( ) [_new:BaseObject:private] => [_deleted:BaseObject:private] => [modifiedColumns:protected] => Array ( ) ) [81] => Category Object ( [languages:protected] => [bok_resources:protected] => [bok_topics:protected] => [bok_keywords:protected] => [id:protected] => 81 [type:protected] => category [parent:protected] => 2 [label:protected] => Sprinkler Fitter [alreadyInSave:protected] => [alreadyInValidation:protected] => [validationFailures:protected] => Array ( ) [_new:BaseObject:private] => [_deleted:BaseObject:private] => [modifiedColumns:protected] => Array ( ) ) [82] => Category Object ( [languages:protected] => [bok_resources:protected] => [bok_topics:protected] => [bok_keywords:protected] => [id:protected] => 82 [type:protected] => category [parent:protected] => 2 [label:protected] => Stonemason [alreadyInSave:protected] => [alreadyInValidation:protected] => [validationFailures:protected] => Array ( ) [_new:BaseObject:private] => [_deleted:BaseObject:private] => [modifiedColumns:protected] => Array ( ) ) [62] => Category Object ( [languages:protected] => [bok_resources:protected] => [bok_topics:protected] => [bok_keywords:protected] => [id:protected] => 62 [type:protected] => category [parent:protected] => 2 [label:protected] => Structural Ironworker [alreadyInSave:protected] => [alreadyInValidation:protected] => [validationFailures:protected] => Array ( ) [_new:BaseObject:private] => [_deleted:BaseObject:private] => [modifiedColumns:protected] => Array ( ) ) [83] => Category Object ( [languages:protected] => [bok_resources:protected] => [bok_topics:protected] => [bok_keywords:protected] => [id:protected] => 83 [type:protected] => category [parent:protected] => 2 [label:protected] => Terrazzo Worker [alreadyInSave:protected] => [alreadyInValidation:protected] => [validationFailures:protected] => Array ( ) [_new:BaseObject:private] => [_deleted:BaseObject:private] => [modifiedColumns:protected] => Array ( ) ) [84] => Category Object ( [languages:protected] => [bok_resources:protected] => [bok_topics:protected] => [bok_keywords:protected] => [id:protected] => 84 [type:protected] => category [parent:protected] => 2 [label:protected] => Tile Setter [alreadyInSave:protected] => [alreadyInValidation:protected] => [validationFailures:protected] => Array ( ) [_new:BaseObject:private] => [_deleted:BaseObject:private] => [modifiedColumns:protected] => Array ( ) ) [85] => Category Object ( [languages:protected] => [bok_resources:protected] => [bok_topics:protected] => [bok_keywords:protected] => [id:protected] => 85 [type:protected] => category [parent:protected] => 2 [label:protected] => Truck Driver [alreadyInSave:protected] => [alreadyInValidation:protected] => [validationFailures:protected] => Array ( ) [_new:BaseObject:private] => [_deleted:BaseObject:private] => [modifiedColumns:protected] => Array ( ) ) [86] => Category Object ( [languages:protected] => [bok_resources:protected] => [bok_topics:protected] => [bok_keywords:protected] => [id:protected] => 86 [type:protected] => category [parent:protected] => 2 [label:protected] => Welder [alreadyInSave:protected] => [alreadyInValidation:protected] => [validationFailures:protected] => Array ( ) [_new:BaseObject:private] => [_deleted:BaseObject:private] => [modifiedColumns:protected] => Array ( ) ) [87] => Category Object ( [languages:protected] => [bok_resources:protected] => [bok_topics:protected] => [bok_keywords:protected] => [id:protected] => 87 [type:protected] => category [parent:protected] => 3 [label:protected] => Commercial & Institutional [alreadyInSave:protected] => [alreadyInValidation:protected] => [validationFailures:protected] => Array ( ) [_new:BaseObject:private] => [_deleted:BaseObject:private] => [modifiedColumns:protected] => Array ( ) ) [88] => Category Object ( [languages:protected] => [bok_resources:protected] => [bok_topics:protected] => [bok_keywords:protected] => [id:protected] => 88 [type:protected] => category [parent:protected] => 3 [label:protected] => Demolition [alreadyInSave:protected] => [alreadyInValidation:protected] => [validationFailures:protected] => Array ( ) [_new:BaseObject:private] => [_deleted:BaseObject:private] => [modifiedColumns:protected] => Array ( ) ) [89] => Category Object ( [languages:protected] => [bok_resources:protected] => [bok_topics:protected] => [bok_keywords:protected] => [id:protected] => 89 [type:protected] => category [parent:protected] => 3 [label:protected] => Disasters [alreadyInSave:protected] => [alreadyInValidation:protected] => [validationFailures:protected] => Array ( ) [_new:BaseObject:private] => [_deleted:BaseObject:private] => [modifiedColumns:protected] => Array ( ) ) [91] => Category Object ( [languages:protected] => [bok_resources:protected] => [bok_topics:protected] => [bok_keywords:protected] => [id:protected] => 91 [type:protected] => category [parent:protected] => 3 [label:protected] => Heavy & Highway [alreadyInSave:protected] => [alreadyInValidation:protected] => [validationFailures:protected] => Array ( ) [_new:BaseObject:private] => [_deleted:BaseObject:private] => [modifiedColumns:protected] => Array ( ) ) [90] => Category Object ( [languages:protected] => [bok_resources:protected] => [bok_topics:protected] => [bok_keywords:protected] => [id:protected] => 90 [type:protected] => category [parent:protected] => 3 [label:protected] => Industrial [alreadyInSave:protected] => [alreadyInValidation:protected] => [validationFailures:protected] => Array ( ) [_new:BaseObject:private] => [_deleted:BaseObject:private] => [modifiedColumns:protected] => Array ( ) ) [92] => Category Object ( [languages:protected] => [bok_resources:protected] => [bok_topics:protected] => [bok_keywords:protected] => [id:protected] => 92 [type:protected] => category [parent:protected] => 3 [label:protected] => LEED/Green Construction [alreadyInSave:protected] => [alreadyInValidation:protected] => [validationFailures:protected] => Array ( ) [_new:BaseObject:private] => [_deleted:BaseObject:private] => [modifiedColumns:protected] => Array ( ) ) [93] => Category Object ( [languages:protected] => [bok_resources:protected] => [bok_topics:protected] => [bok_keywords:protected] => [id:protected] => 93 [type:protected] => category [parent:protected] => 3 [label:protected] => Renovations [alreadyInSave:protected] => [alreadyInValidation:protected] => [validationFailures:protected] => Array ( ) [_new:BaseObject:private] => [_deleted:BaseObject:private] => [modifiedColumns:protected] => Array ( ) ) [94] => Category Object ( [languages:protected] => [bok_resources:protected] => [bok_topics:protected] => [bok_keywords:protected] => [id:protected] => 94 [type:protected] => category [parent:protected] => 3 [label:protected] => Residential [alreadyInSave:protected] => [alreadyInValidation:protected] => [validationFailures:protected] => Array ( ) [_new:BaseObject:private] => [_deleted:BaseObject:private] => [modifiedColumns:protected] => Array ( ) ) [95] => Category Object ( [languages:protected] => [bok_resources:protected] => [bok_topics:protected] => [bok_keywords:protected] => [id:protected] => 95 [type:protected] => category [parent:protected] => 3 [label:protected] => Underground [alreadyInSave:protected] => [alreadyInValidation:protected] => [validationFailures:protected] => Array ( ) [_new:BaseObject:private] => [_deleted:BaseObject:private] => [modifiedColumns:protected] => Array ( ) ) [100] => Category Object ( [languages:protected] => [bok_resources:protected] => [bok_topics:protected] => [bok_keywords:protected] => [id:protected] => 100 [type:protected] => category [parent:protected] => 6 [label:protected] => Toolbox Talks [alreadyInSave:protected] => [alreadyInValidation:protected] => [validationFailures:protected] => Array ( ) [_new:BaseObject:private] => [_deleted:BaseObject:private] => [modifiedColumns:protected] => Array ( ) ) ) [categories_initialized:protected] => 1 [mapped_items:protected] => [content:protected] => [files:protected] => [language:protected] => Language Object ( [id:protected] => 1 [code:protected] => en [name:protected] => English [alreadyInSave:protected] => [alreadyInValidation:protected] => [validationFailures:protected] => Array ( ) [_new:BaseObject:private] => [_deleted:BaseObject:private] => [modifiedColumns:protected] => Array ( ) ) [old_record:protected] => [id:protected] => 4419 [old_id:protected] => [elcosh_id:protected] => d001652 [type:protected] => document [display_type:protected] => HTML only (and links) [user_id:protected] => 0 [language_id:protected] => 1 [tagging_id:protected] => Valeria Contreras [priority_id:protected] => 1 [title:protected] => Toolbox Talk: Suicide Prevention [total_pages:protected] => 1 [billed_pages:protected] => 1 [publication_number:protected] => [part_of:protected] => [keywords:protected] => suicide, suicide prevention, mental health, stress, depression, exhaustion, burnout, safety, support, emotional support, health [comments:protected] => [summary:protected] =>The CPWR Toolbox Talk on Suicide Prevention addresses the prevalence of suicide among construction workers. The resource includes a brief case example, steps to prevent a related injury or illness, and questions for discussion. It includes an image that illustrates the hazard, which can be posted in a central location as a reminder of steps to work safely.
Available in English and Spanish. [transition_comments:protected] => [external_link:protected] => [consol_link:protected] => [more_like_this:protected] => [permission_given_by:protected] => [published:protected] => T [billable:protected] => F [img_name:protected] => [img_ext:protected] => [img_width:protected] => [img_height:protected] => [img_credit:protected] => [img_practice:protected] => [vid_source_id:protected] => [vid_running_time:protected] => [vid_intended_audience:protected] => [vid_acquisition_info:protected] => [vid_cost:protected] => [vid_producer:protected] => [vid_filename:protected] => [vid_filename_downloadable:protected] => [date_summary:protected] => [date_permission_requested:protected] => [date_permission_received:protected] => [date_review_needed:protected] => [date_received:protected] => 10/08/20 [date_completed:protected] => 10/08/20 [date_billed:protected] => [date_modified:protected] => 05/19/23 [collBokExports:protected] => [lastBokExportCriteria:BaseElcoshItem:private] => [alreadyInSave:protected] => [alreadyInValidation:protected] => [validationFailures:protected] => Array ( ) [_new:BaseObject:private] => [_deleted:BaseObject:private] => [modifiedColumns:protected] => Array ( ) ) ) ) [new_images] => Array ( [0] => Search_Result Object ( [title] => Toolbox talk - crew view [image] => /record/images/4005-p.jpg [blurb] => Photo of crew listening to a toolbox safety talk before starting work.... [category] => Array ( [0] => 97 [1] => 20 [2] => 47 [3] => 49 [4] => 51 [5] => 55 [6] => 61 [7] => 64 [8] => 71 [9] => 75 [10] => 63 [11] => 79 [12] => 62 [13] => 87 [14] => 88 [15] => 91 [16] => 90 [17] => 93 [18] => 94 [19] => 95 ) [labels] => Array ( [0] => Images [1] => Media [2] => Media & Documents [3] => Safety Culture [4] => Work Environment [5] => Hazards [6] => Bricklayer [7] => Trades [8] => Carpenter [10] => Cement Mason [12] => Electrical Worker [14] => Interior Systems Carpenter [16] => Laborer [18] => Painter [20] => Plasterer [22] => Reinforcing Ironworker [24] => Scaffold Erector [26] => Structural Ironworker [28] => Commercial & Institutional [29] => Jobsites [30] => Demolition [32] => Heavy & Highway [34] => Industrial [36] => Renovations [38] => Residential [40] => Underground ) [type] => Images [sub_category] => [url] => /image/4005/i002692/Toolbox%2Btalk%2B-%2Bcrew%2Bview.html [item:protected] => ImageRecord Object ( [records:protected] => Array ( ) [recordId:protected] => [searchWordClass:protected] => [searchWordPeerClass:protected] => [bok_record:protected] => [authors:protected] => [organizations:protected] => [collections:protected] => [categories:protected] => Array ( [97] => Category Object ( [languages:protected] => [bok_resources:protected] => [bok_topics:protected] => [bok_keywords:protected] => [id:protected] => 97 [type:protected] => category [parent:protected] => 5 [label:protected] => Images [alreadyInSave:protected] => [alreadyInValidation:protected] => [validationFailures:protected] => Array ( ) [_new:BaseObject:private] => [_deleted:BaseObject:private] => [modifiedColumns:protected] => Array ( ) ) [20] => Category Object ( [languages:protected] => [bok_resources:protected] => [bok_topics:protected] => [bok_keywords:protected] => [id:protected] => 20 [type:protected] => category [parent:protected] => 7 [label:protected] => Safety Culture [alreadyInSave:protected] => [alreadyInValidation:protected] => [validationFailures:protected] => Array ( ) [_new:BaseObject:private] => [_deleted:BaseObject:private] => [modifiedColumns:protected] => Array ( ) ) [47] => Category Object ( [languages:protected] => [bok_resources:protected] => [bok_topics:protected] => [bok_keywords:protected] => [id:protected] => 47 [type:protected] => category [parent:protected] => 2 [label:protected] => Bricklayer [alreadyInSave:protected] => [alreadyInValidation:protected] => [validationFailures:protected] => Array ( ) [_new:BaseObject:private] => [_deleted:BaseObject:private] => [modifiedColumns:protected] => Array ( ) ) [49] => Category Object ( [languages:protected] => [bok_resources:protected] => [bok_topics:protected] => [bok_keywords:protected] => [id:protected] => 49 [type:protected] => category [parent:protected] => 2 [label:protected] => Carpenter [alreadyInSave:protected] => [alreadyInValidation:protected] => [validationFailures:protected] => Array ( ) [_new:BaseObject:private] => [_deleted:BaseObject:private] => [modifiedColumns:protected] => Array ( ) ) [51] => Category Object ( [languages:protected] => [bok_resources:protected] => [bok_topics:protected] => [bok_keywords:protected] => [id:protected] => 51 [type:protected] => category [parent:protected] => 2 [label:protected] => Cement Mason [alreadyInSave:protected] => [alreadyInValidation:protected] => [validationFailures:protected] => Array ( ) [_new:BaseObject:private] => [_deleted:BaseObject:private] => [modifiedColumns:protected] => Array ( ) ) [55] => Category Object ( [languages:protected] => [bok_resources:protected] => [bok_topics:protected] => [bok_keywords:protected] => [id:protected] => 55 [type:protected] => category [parent:protected] => 2 [label:protected] => Electrical Worker [alreadyInSave:protected] => [alreadyInValidation:protected] => [validationFailures:protected] => Array ( ) [_new:BaseObject:private] => [_deleted:BaseObject:private] => [modifiedColumns:protected] => Array ( ) ) [61] => Category Object ( [languages:protected] => [bok_resources:protected] => [bok_topics:protected] => [bok_keywords:protected] => [id:protected] => 61 [type:protected] => category [parent:protected] => 2 [label:protected] => Interior Systems Carpenter [alreadyInSave:protected] => [alreadyInValidation:protected] => [validationFailures:protected] => Array ( ) [_new:BaseObject:private] => [_deleted:BaseObject:private] => [modifiedColumns:protected] => Array ( ) ) [64] => Category Object ( [languages:protected] => [bok_resources:protected] => [bok_topics:protected] => [bok_keywords:protected] => [id:protected] => 64 [type:protected] => category [parent:protected] => 2 [label:protected] => Laborer [alreadyInSave:protected] => [alreadyInValidation:protected] => [validationFailures:protected] => Array ( ) [_new:BaseObject:private] => [_deleted:BaseObject:private] => [modifiedColumns:protected] => Array ( ) ) [71] => Category Object ( [languages:protected] => [bok_resources:protected] => [bok_topics:protected] => [bok_keywords:protected] => [id:protected] => 71 [type:protected] => category [parent:protected] => 2 [label:protected] => Painter [alreadyInSave:protected] => [alreadyInValidation:protected] => [validationFailures:protected] => Array ( ) [_new:BaseObject:private] => [_deleted:BaseObject:private] => [modifiedColumns:protected] => Array ( ) ) [75] => Category Object ( [languages:protected] => [bok_resources:protected] => [bok_topics:protected] => [bok_keywords:protected] => [id:protected] => 75 [type:protected] => category [parent:protected] => 2 [label:protected] => Plasterer [alreadyInSave:protected] => [alreadyInValidation:protected] => [validationFailures:protected] => Array ( ) [_new:BaseObject:private] => [_deleted:BaseObject:private] => [modifiedColumns:protected] => Array ( ) ) [63] => Category Object ( [languages:protected] => [bok_resources:protected] => [bok_topics:protected] => [bok_keywords:protected] => [id:protected] => 63 [type:protected] => category [parent:protected] => 2 [label:protected] => Reinforcing Ironworker [alreadyInSave:protected] => [alreadyInValidation:protected] => [validationFailures:protected] => Array ( ) [_new:BaseObject:private] => [_deleted:BaseObject:private] => [modifiedColumns:protected] => Array ( ) ) [79] => Category Object ( [languages:protected] => [bok_resources:protected] => [bok_topics:protected] => [bok_keywords:protected] => [id:protected] => 79 [type:protected] => category [parent:protected] => 2 [label:protected] => Scaffold Erector [alreadyInSave:protected] => [alreadyInValidation:protected] => [validationFailures:protected] => Array ( ) [_new:BaseObject:private] => [_deleted:BaseObject:private] => [modifiedColumns:protected] => Array ( ) ) [62] => Category Object ( [languages:protected] => [bok_resources:protected] => [bok_topics:protected] => [bok_keywords:protected] => [id:protected] => 62 [type:protected] => category [parent:protected] => 2 [label:protected] => Structural Ironworker [alreadyInSave:protected] => [alreadyInValidation:protected] => [validationFailures:protected] => Array ( ) [_new:BaseObject:private] => [_deleted:BaseObject:private] => [modifiedColumns:protected] => Array ( ) ) [87] => Category Object ( [languages:protected] => [bok_resources:protected] => [bok_topics:protected] => [bok_keywords:protected] => [id:protected] => 87 [type:protected] => category [parent:protected] => 3 [label:protected] => Commercial & Institutional [alreadyInSave:protected] => [alreadyInValidation:protected] => [validationFailures:protected] => Array ( ) [_new:BaseObject:private] => [_deleted:BaseObject:private] => [modifiedColumns:protected] => Array ( ) ) [88] => Category Object ( [languages:protected] => [bok_resources:protected] => [bok_topics:protected] => [bok_keywords:protected] => [id:protected] => 88 [type:protected] => category [parent:protected] => 3 [label:protected] => Demolition [alreadyInSave:protected] => [alreadyInValidation:protected] => [validationFailures:protected] => Array ( ) [_new:BaseObject:private] => [_deleted:BaseObject:private] => [modifiedColumns:protected] => Array ( ) ) [91] => Category Object ( [languages:protected] => [bok_resources:protected] => [bok_topics:protected] => [bok_keywords:protected] => [id:protected] => 91 [type:protected] => category [parent:protected] => 3 [label:protected] => Heavy & Highway [alreadyInSave:protected] => [alreadyInValidation:protected] => [validationFailures:protected] => Array ( ) [_new:BaseObject:private] => [_deleted:BaseObject:private] => [modifiedColumns:protected] => Array ( ) ) [90] => Category Object ( [languages:protected] => [bok_resources:protected] => [bok_topics:protected] => [bok_keywords:protected] => [id:protected] => 90 [type:protected] => category [parent:protected] => 3 [label:protected] => Industrial [alreadyInSave:protected] => [alreadyInValidation:protected] => [validationFailures:protected] => Array ( ) [_new:BaseObject:private] => [_deleted:BaseObject:private] => [modifiedColumns:protected] => Array ( ) ) [93] => Category Object ( [languages:protected] => [bok_resources:protected] => [bok_topics:protected] => [bok_keywords:protected] => [id:protected] => 93 [type:protected] => category [parent:protected] => 3 [label:protected] => Renovations [alreadyInSave:protected] => [alreadyInValidation:protected] => [validationFailures:protected] => Array ( ) [_new:BaseObject:private] => [_deleted:BaseObject:private] => [modifiedColumns:protected] => Array ( ) ) [94] => Category Object ( [languages:protected] => [bok_resources:protected] => [bok_topics:protected] => [bok_keywords:protected] => [id:protected] => 94 [type:protected] => category [parent:protected] => 3 [label:protected] => Residential [alreadyInSave:protected] => [alreadyInValidation:protected] => [validationFailures:protected] => Array ( ) [_new:BaseObject:private] => [_deleted:BaseObject:private] => [modifiedColumns:protected] => Array ( ) ) [95] => Category Object ( [languages:protected] => [bok_resources:protected] => [bok_topics:protected] => [bok_keywords:protected] => [id:protected] => 95 [type:protected] => category [parent:protected] => 3 [label:protected] => Underground [alreadyInSave:protected] => [alreadyInValidation:protected] => [validationFailures:protected] => Array ( ) [_new:BaseObject:private] => [_deleted:BaseObject:private] => [modifiedColumns:protected] => Array ( ) ) ) [categories_initialized:protected] => 1 [mapped_items:protected] => [content:protected] => [files:protected] => [language:protected] => Language Object ( [id:protected] => 1 [code:protected] => en [name:protected] => English [alreadyInSave:protected] => [alreadyInValidation:protected] => [validationFailures:protected] => Array ( ) [_new:BaseObject:private] => [_deleted:BaseObject:private] => [modifiedColumns:protected] => Array ( ) ) [old_record:protected] => [id:protected] => 4005 [old_id:protected] => [elcosh_id:protected] => i002692 [type:protected] => image [display_type:protected] => Image [user_id:protected] => 0 [language_id:protected] => 1 [tagging_id:protected] => Bruce Lippy [priority_id:protected] => 1 [title:protected] => Toolbox talk - crew view [total_pages:protected] => 0 [billed_pages:protected] => 0 [publication_number:protected] => [part_of:protected] => [keywords:protected] => toolbox talk, tailgate talk, safety talk, Spanish [comments:protected] => [summary:protected] => Photo of crew listening to a toolbox safety talk before starting work. [transition_comments:protected] => [external_link:protected] => [consol_link:protected] => http://www.cpwrconstructionsolutions.org/electrical/solution/662/worker-training.html [more_like_this:protected] => i002691,d001269, c000079, d001285 [permission_given_by:protected] => [published:protected] => T [billable:protected] => F [img_name:protected] => [img_ext:protected] => jpg [img_width:protected] => [img_height:protected] => [img_credit:protected] => Morgan Zavertnik and Hoar Construction [img_practice:protected] => good [vid_source_id:protected] => [vid_running_time:protected] => [vid_intended_audience:protected] => [vid_acquisition_info:protected] => [vid_cost:protected] => [vid_producer:protected] => [vid_filename:protected] => [vid_filename_downloadable:protected] => [date_summary:protected] => November 2015 [date_permission_requested:protected] => [date_permission_received:protected] => [date_review_needed:protected] => [date_received:protected] => 03/02/16 [date_completed:protected] => 03/02/16 [date_billed:protected] => [date_modified:protected] => 03/02/16 [collBokExports:protected] => [lastBokExportCriteria:BaseElcoshItem:private] => [alreadyInSave:protected] => [alreadyInValidation:protected] => [validationFailures:protected] => Array ( ) [_new:BaseObject:private] => [_deleted:BaseObject:private] => [modifiedColumns:protected] => Array ( ) ) ) [1] => Search_Result Object ( [title] => Toolbox talk - long shot [image] => /record/images/4006-p.jpg [blurb] => This crew gathered every morning before starting work to discuss a new safety topic.... [category] => Array ( [0] => 20 [1] => 47 [2] => 49 [3] => 51 [4] => 55 [5] => 64 [6] => 68 [7] => 75 [8] => 76 [9] => 63 [10] => 78 [11] => 79 [12] => 82 [13] => 62 [14] => 87 [15] => 88 [16] => 91 [17] => 90 [18] => 93 [19] => 94 [20] => 95 [21] => 97 ) [labels] => Array ( [0] => Safety Culture [1] => Work Environment [2] => Hazards [3] => Bricklayer [4] => Trades [5] => Carpenter [7] => Cement Mason [9] => Electrical Worker [11] => Laborer [13] => Maintenance Worker [15] => Plasterer [17] => Plumber/Pipefitter [19] => Reinforcing Ironworker [21] => Roofer/Waterproofer [23] => Scaffold Erector [25] => Stonemason [27] => Structural Ironworker [29] => Commercial & Institutional [30] => Jobsites [31] => Demolition [33] => Heavy & Highway [35] => Industrial [37] => Renovations [39] => Residential [41] => Underground [43] => Images [44] => Media [45] => Media & Documents ) [type] => Images [sub_category] => [url] => /image/4006/i002693/Toolbox%2Btalk%2B-%2Blong%2Bshot.html [item:protected] => ImageRecord Object ( [records:protected] => Array ( ) [recordId:protected] => [searchWordClass:protected] => [searchWordPeerClass:protected] => [bok_record:protected] => [authors:protected] => [organizations:protected] => [collections:protected] => [categories:protected] => Array ( [20] => Category Object ( [languages:protected] => [bok_resources:protected] => [bok_topics:protected] => [bok_keywords:protected] => [id:protected] => 20 [type:protected] => category [parent:protected] => 7 [label:protected] => Safety Culture [alreadyInSave:protected] => [alreadyInValidation:protected] => [validationFailures:protected] => Array ( ) [_new:BaseObject:private] => [_deleted:BaseObject:private] => [modifiedColumns:protected] => Array ( ) ) [47] => Category Object ( [languages:protected] => [bok_resources:protected] => [bok_topics:protected] => [bok_keywords:protected] => [id:protected] => 47 [type:protected] => category [parent:protected] => 2 [label:protected] => Bricklayer [alreadyInSave:protected] => [alreadyInValidation:protected] => [validationFailures:protected] => Array ( ) [_new:BaseObject:private] => [_deleted:BaseObject:private] => [modifiedColumns:protected] => Array ( ) ) [49] => Category Object ( [languages:protected] => [bok_resources:protected] => [bok_topics:protected] => [bok_keywords:protected] => [id:protected] => 49 [type:protected] => category [parent:protected] => 2 [label:protected] => Carpenter [alreadyInSave:protected] => [alreadyInValidation:protected] => [validationFailures:protected] => Array ( ) [_new:BaseObject:private] => [_deleted:BaseObject:private] => [modifiedColumns:protected] => Array ( ) ) [51] => Category Object ( [languages:protected] => [bok_resources:protected] => [bok_topics:protected] => [bok_keywords:protected] => [id:protected] => 51 [type:protected] => category [parent:protected] => 2 [label:protected] => Cement Mason [alreadyInSave:protected] => [alreadyInValidation:protected] => [validationFailures:protected] => Array ( ) [_new:BaseObject:private] => [_deleted:BaseObject:private] => [modifiedColumns:protected] => Array ( ) ) [55] => Category Object ( [languages:protected] => [bok_resources:protected] => [bok_topics:protected] => [bok_keywords:protected] => [id:protected] => 55 [type:protected] => category [parent:protected] => 2 [label:protected] => Electrical Worker [alreadyInSave:protected] => [alreadyInValidation:protected] => [validationFailures:protected] => Array ( ) [_new:BaseObject:private] => [_deleted:BaseObject:private] => [modifiedColumns:protected] => Array ( ) ) [64] => Category Object ( [languages:protected] => [bok_resources:protected] => [bok_topics:protected] => [bok_keywords:protected] => [id:protected] => 64 [type:protected] => category [parent:protected] => 2 [label:protected] => Laborer [alreadyInSave:protected] => [alreadyInValidation:protected] => [validationFailures:protected] => Array ( ) [_new:BaseObject:private] => [_deleted:BaseObject:private] => [modifiedColumns:protected] => Array ( ) ) [68] => Category Object ( [languages:protected] => [bok_resources:protected] => [bok_topics:protected] => [bok_keywords:protected] => [id:protected] => 68 [type:protected] => category [parent:protected] => 2 [label:protected] => Maintenance Worker [alreadyInSave:protected] => [alreadyInValidation:protected] => [validationFailures:protected] => Array ( ) [_new:BaseObject:private] => [_deleted:BaseObject:private] => [modifiedColumns:protected] => Array ( ) ) [75] => Category Object ( [languages:protected] => [bok_resources:protected] => [bok_topics:protected] => [bok_keywords:protected] => [id:protected] => 75 [type:protected] => category [parent:protected] => 2 [label:protected] => Plasterer [alreadyInSave:protected] => [alreadyInValidation:protected] => [validationFailures:protected] => Array ( ) [_new:BaseObject:private] => [_deleted:BaseObject:private] => [modifiedColumns:protected] => Array ( ) ) [76] => Category Object ( [languages:protected] => [bok_resources:protected] => [bok_topics:protected] => [bok_keywords:protected] => [id:protected] => 76 [type:protected] => category [parent:protected] => 2 [label:protected] => Plumber/Pipefitter [alreadyInSave:protected] => [alreadyInValidation:protected] => [validationFailures:protected] => Array ( ) [_new:BaseObject:private] => [_deleted:BaseObject:private] => [modifiedColumns:protected] => Array ( ) ) [63] => Category Object ( [languages:protected] => [bok_resources:protected] => [bok_topics:protected] => [bok_keywords:protected] => [id:protected] => 63 [type:protected] => category [parent:protected] => 2 [label:protected] => Reinforcing Ironworker [alreadyInSave:protected] => [alreadyInValidation:protected] => [validationFailures:protected] => Array ( ) [_new:BaseObject:private] => [_deleted:BaseObject:private] => [modifiedColumns:protected] => Array ( ) ) [78] => Category Object ( [languages:protected] => [bok_resources:protected] => [bok_topics:protected] => [bok_keywords:protected] => [id:protected] => 78 [type:protected] => category [parent:protected] => 2 [label:protected] => Roofer/Waterproofer [alreadyInSave:protected] => [alreadyInValidation:protected] => [validationFailures:protected] => Array ( ) [_new:BaseObject:private] => [_deleted:BaseObject:private] => [modifiedColumns:protected] => Array ( ) ) [79] => Category Object ( [languages:protected] => [bok_resources:protected] => [bok_topics:protected] => [bok_keywords:protected] => [id:protected] => 79 [type:protected] => category [parent:protected] => 2 [label:protected] => Scaffold Erector [alreadyInSave:protected] => [alreadyInValidation:protected] => [validationFailures:protected] => Array ( ) [_new:BaseObject:private] => [_deleted:BaseObject:private] => [modifiedColumns:protected] => Array ( ) ) [82] => Category Object ( [languages:protected] => [bok_resources:protected] => [bok_topics:protected] => [bok_keywords:protected] => [id:protected] => 82 [type:protected] => category [parent:protected] => 2 [label:protected] => Stonemason [alreadyInSave:protected] => [alreadyInValidation:protected] => [validationFailures:protected] => Array ( ) [_new:BaseObject:private] => [_deleted:BaseObject:private] => [modifiedColumns:protected] => Array ( ) ) [62] => Category Object ( [languages:protected] => [bok_resources:protected] => [bok_topics:protected] => [bok_keywords:protected] => [id:protected] => 62 [type:protected] => category [parent:protected] => 2 [label:protected] => Structural Ironworker [alreadyInSave:protected] => [alreadyInValidation:protected] => [validationFailures:protected] => Array ( ) [_new:BaseObject:private] => [_deleted:BaseObject:private] => [modifiedColumns:protected] => Array ( ) ) [87] => Category Object ( [languages:protected] => [bok_resources:protected] => [bok_topics:protected] => [bok_keywords:protected] => [id:protected] => 87 [type:protected] => category [parent:protected] => 3 [label:protected] => Commercial & Institutional [alreadyInSave:protected] => [alreadyInValidation:protected] => [validationFailures:protected] => Array ( ) [_new:BaseObject:private] => [_deleted:BaseObject:private] => [modifiedColumns:protected] => Array ( ) ) [88] => Category Object ( [languages:protected] => [bok_resources:protected] => [bok_topics:protected] => [bok_keywords:protected] => [id:protected] => 88 [type:protected] => category [parent:protected] => 3 [label:protected] => Demolition [alreadyInSave:protected] => [alreadyInValidation:protected] => [validationFailures:protected] => Array ( ) [_new:BaseObject:private] => [_deleted:BaseObject:private] => [modifiedColumns:protected] => Array ( ) ) [91] => Category Object ( [languages:protected] => [bok_resources:protected] => [bok_topics:protected] => [bok_keywords:protected] => [id:protected] => 91 [type:protected] => category [parent:protected] => 3 [label:protected] => Heavy & Highway [alreadyInSave:protected] => [alreadyInValidation:protected] => [validationFailures:protected] => Array ( ) [_new:BaseObject:private] => [_deleted:BaseObject:private] => [modifiedColumns:protected] => Array ( ) ) [90] => Category Object ( [languages:protected] => [bok_resources:protected] => [bok_topics:protected] => [bok_keywords:protected] => [id:protected] => 90 [type:protected] => category [parent:protected] => 3 [label:protected] => Industrial [alreadyInSave:protected] => [alreadyInValidation:protected] => [validationFailures:protected] => Array ( ) [_new:BaseObject:private] => [_deleted:BaseObject:private] => [modifiedColumns:protected] => Array ( ) ) [93] => Category Object ( [languages:protected] => [bok_resources:protected] => [bok_topics:protected] => [bok_keywords:protected] => [id:protected] => 93 [type:protected] => category [parent:protected] => 3 [label:protected] => Renovations [alreadyInSave:protected] => [alreadyInValidation:protected] => [validationFailures:protected] => Array ( ) [_new:BaseObject:private] => [_deleted:BaseObject:private] => [modifiedColumns:protected] => Array ( ) ) [94] => Category Object ( [languages:protected] => [bok_resources:protected] => [bok_topics:protected] => [bok_keywords:protected] => [id:protected] => 94 [type:protected] => category [parent:protected] => 3 [label:protected] => Residential [alreadyInSave:protected] => [alreadyInValidation:protected] => [validationFailures:protected] => Array ( ) [_new:BaseObject:private] => [_deleted:BaseObject:private] => [modifiedColumns:protected] => Array ( ) ) [95] => Category Object ( [languages:protected] => [bok_resources:protected] => [bok_topics:protected] => [bok_keywords:protected] => [id:protected] => 95 [type:protected] => category [parent:protected] => 3 [label:protected] => Underground [alreadyInSave:protected] => [alreadyInValidation:protected] => [validationFailures:protected] => Array ( ) [_new:BaseObject:private] => [_deleted:BaseObject:private] => [modifiedColumns:protected] => Array ( ) ) [97] => Category Object ( [languages:protected] => [bok_resources:protected] => [bok_topics:protected] => [bok_keywords:protected] => [id:protected] => 97 [type:protected] => category [parent:protected] => 5 [label:protected] => Images [alreadyInSave:protected] => [alreadyInValidation:protected] => [validationFailures:protected] => Array ( ) [_new:BaseObject:private] => [_deleted:BaseObject:private] => [modifiedColumns:protected] => Array ( ) ) ) [categories_initialized:protected] => 1 [mapped_items:protected] => [content:protected] => [files:protected] => [language:protected] => Language Object ( [id:protected] => 1 [code:protected] => en [name:protected] => English [alreadyInSave:protected] => [alreadyInValidation:protected] => [validationFailures:protected] => Array ( ) [_new:BaseObject:private] => [_deleted:BaseObject:private] => [modifiedColumns:protected] => Array ( ) ) [old_record:protected] => [id:protected] => 4006 [old_id:protected] => [elcosh_id:protected] => i002693 [type:protected] => image [display_type:protected] => Image [user_id:protected] => 0 [language_id:protected] => 1 [tagging_id:protected] => Bruce Lippy [priority_id:protected] => 1 [title:protected] => Toolbox talk - long shot [total_pages:protected] => 0 [billed_pages:protected] => 0 [publication_number:protected] => [part_of:protected] => [keywords:protected] => toolbox talk, tailgate talk, safety minute [comments:protected] => [summary:protected] => This crew gathered every morning before starting work to discuss a new safety topic. [transition_comments:protected] => [external_link:protected] => [consol_link:protected] => http://www.cpwrconstructionsolutions.org/electrical/solution/662/worker-training.html [more_like_this:protected] => i002691,i002692,d001269,d000527 [permission_given_by:protected] => [published:protected] => T [billable:protected] => F [img_name:protected] => [img_ext:protected] => jpg [img_width:protected] => [img_height:protected] => [img_credit:protected] => Morgan Zavertnik and Hoar Construction [img_practice:protected] => good [vid_source_id:protected] => [vid_running_time:protected] => [vid_intended_audience:protected] => [vid_acquisition_info:protected] => [vid_cost:protected] => [vid_producer:protected] => [vid_filename:protected] => [vid_filename_downloadable:protected] => [date_summary:protected] => November 2015 [date_permission_requested:protected] => [date_permission_received:protected] => [date_review_needed:protected] => [date_received:protected] => 03/02/16 [date_completed:protected] => 03/02/16 [date_billed:protected] => [date_modified:protected] => 03/02/16 [collBokExports:protected] => [lastBokExportCriteria:BaseElcoshItem:private] => [alreadyInSave:protected] => [alreadyInValidation:protected] => [validationFailures:protected] => Array ( ) [_new:BaseObject:private] => [_deleted:BaseObject:private] => [modifiedColumns:protected] => Array ( ) ) ) [2] => Search_Result Object ( [title] => Construction bracing [image] => /record/images/3995-p.jpg [blurb] => This shows structural support that prevents collapses during construction.... [category] => Array ( [0] => 12 [1] => 15 [2] => 21 [3] => 49 [4] => 51 [5] => 55 [6] => 56 [7] => 60 [8] => 64 [9] => 68 [10] => 74 [11] => 63 [12] => 78 [13] => 79 [14] => 80 [15] => 62 [16] => 87 [17] => 90 [18] => 97 ) [labels] => Array ( [0] => Crushed/Struck By [1] => Work Environment [2] => Hazards [3] => Falls [6] => Scaffolds [9] => Carpenter [10] => Trades [11] => Cement Mason [13] => Electrical Worker [15] => Elevator Constructor [17] => HVAC [19] => Laborer [21] => Maintenance Worker [23] => Pile Driver [25] => Reinforcing Ironworker [27] => Roofer/Waterproofer [29] => Scaffold Erector [31] => Sheetmetal Worker [33] => Structural Ironworker [35] => Commercial & Institutional [36] => Jobsites [37] => Industrial [39] => Images [40] => Media [41] => Media & Documents ) [type] => Images [sub_category] => [url] => /image/3995/i002690/Construction%2Bbracing.html [item:protected] => ImageRecord Object ( [records:protected] => Array ( ) [recordId:protected] => [searchWordClass:protected] => [searchWordPeerClass:protected] => [bok_record:protected] => [authors:protected] => [organizations:protected] => [collections:protected] => [categories:protected] => Array ( [12] => Category Object ( [languages:protected] => [bok_resources:protected] => [bok_topics:protected] => [bok_keywords:protected] => [id:protected] => 12 [type:protected] => category [parent:protected] => 7 [label:protected] => Crushed/Struck By [alreadyInSave:protected] => [alreadyInValidation:protected] => [validationFailures:protected] => Array ( ) [_new:BaseObject:private] => [_deleted:BaseObject:private] => [modifiedColumns:protected] => Array ( ) ) [15] => Category Object ( [languages:protected] => [bok_resources:protected] => [bok_topics:protected] => [bok_keywords:protected] => [id:protected] => 15 [type:protected] => category [parent:protected] => 7 [label:protected] => Falls [alreadyInSave:protected] => [alreadyInValidation:protected] => [validationFailures:protected] => Array ( ) [_new:BaseObject:private] => [_deleted:BaseObject:private] => [modifiedColumns:protected] => Array ( ) ) [21] => Category Object ( [languages:protected] => [bok_resources:protected] => [bok_topics:protected] => [bok_keywords:protected] => [id:protected] => 21 [type:protected] => category [parent:protected] => 7 [label:protected] => Scaffolds [alreadyInSave:protected] => [alreadyInValidation:protected] => [validationFailures:protected] => Array ( ) [_new:BaseObject:private] => [_deleted:BaseObject:private] => [modifiedColumns:protected] => Array ( ) ) [49] => Category Object ( [languages:protected] => [bok_resources:protected] => [bok_topics:protected] => [bok_keywords:protected] => [id:protected] => 49 [type:protected] => category [parent:protected] => 2 [label:protected] => Carpenter [alreadyInSave:protected] => [alreadyInValidation:protected] => [validationFailures:protected] => Array ( ) [_new:BaseObject:private] => [_deleted:BaseObject:private] => [modifiedColumns:protected] => Array ( ) ) [51] => Category Object ( [languages:protected] => [bok_resources:protected] => [bok_topics:protected] => [bok_keywords:protected] => [id:protected] => 51 [type:protected] => category [parent:protected] => 2 [label:protected] => Cement Mason [alreadyInSave:protected] => [alreadyInValidation:protected] => [validationFailures:protected] => Array ( ) [_new:BaseObject:private] => [_deleted:BaseObject:private] => [modifiedColumns:protected] => Array ( ) ) [55] => Category Object ( [languages:protected] => [bok_resources:protected] => [bok_topics:protected] => [bok_keywords:protected] => [id:protected] => 55 [type:protected] => category [parent:protected] => 2 [label:protected] => Electrical Worker [alreadyInSave:protected] => [alreadyInValidation:protected] => [validationFailures:protected] => Array ( ) [_new:BaseObject:private] => [_deleted:BaseObject:private] => [modifiedColumns:protected] => Array ( ) ) [56] => Category Object ( [languages:protected] => [bok_resources:protected] => [bok_topics:protected] => [bok_keywords:protected] => [id:protected] => 56 [type:protected] => category [parent:protected] => 2 [label:protected] => Elevator Constructor [alreadyInSave:protected] => [alreadyInValidation:protected] => [validationFailures:protected] => Array ( ) [_new:BaseObject:private] => [_deleted:BaseObject:private] => [modifiedColumns:protected] => Array ( ) ) [60] => Category Object ( [languages:protected] => [bok_resources:protected] => [bok_topics:protected] => [bok_keywords:protected] => [id:protected] => 60 [type:protected] => category [parent:protected] => 2 [label:protected] => HVAC [alreadyInSave:protected] => [alreadyInValidation:protected] => [validationFailures:protected] => Array ( ) [_new:BaseObject:private] => [_deleted:BaseObject:private] => [modifiedColumns:protected] => Array ( ) ) [64] => Category Object ( [languages:protected] => [bok_resources:protected] => [bok_topics:protected] => [bok_keywords:protected] => [id:protected] => 64 [type:protected] => category [parent:protected] => 2 [label:protected] => Laborer [alreadyInSave:protected] => [alreadyInValidation:protected] => [validationFailures:protected] => Array ( ) [_new:BaseObject:private] => [_deleted:BaseObject:private] => [modifiedColumns:protected] => Array ( ) ) [68] => Category Object ( [languages:protected] => [bok_resources:protected] => [bok_topics:protected] => [bok_keywords:protected] => [id:protected] => 68 [type:protected] => category [parent:protected] => 2 [label:protected] => Maintenance Worker [alreadyInSave:protected] => [alreadyInValidation:protected] => [validationFailures:protected] => Array ( ) [_new:BaseObject:private] => [_deleted:BaseObject:private] => [modifiedColumns:protected] => Array ( ) ) [74] => Category Object ( [languages:protected] => [bok_resources:protected] => [bok_topics:protected] => [bok_keywords:protected] => [id:protected] => 74 [type:protected] => category [parent:protected] => 2 [label:protected] => Pile Driver [alreadyInSave:protected] => [alreadyInValidation:protected] => [validationFailures:protected] => Array ( ) [_new:BaseObject:private] => [_deleted:BaseObject:private] => [modifiedColumns:protected] => Array ( ) ) [63] => Category Object ( [languages:protected] => [bok_resources:protected] => [bok_topics:protected] => [bok_keywords:protected] => [id:protected] => 63 [type:protected] => category [parent:protected] => 2 [label:protected] => Reinforcing Ironworker [alreadyInSave:protected] => [alreadyInValidation:protected] => [validationFailures:protected] => Array ( ) [_new:BaseObject:private] => [_deleted:BaseObject:private] => [modifiedColumns:protected] => Array ( ) ) [78] => Category Object ( [languages:protected] => [bok_resources:protected] => [bok_topics:protected] => [bok_keywords:protected] => [id:protected] => 78 [type:protected] => category [parent:protected] => 2 [label:protected] => Roofer/Waterproofer [alreadyInSave:protected] => [alreadyInValidation:protected] => [validationFailures:protected] => Array ( ) [_new:BaseObject:private] => [_deleted:BaseObject:private] => [modifiedColumns:protected] => Array ( ) ) [79] => Category Object ( [languages:protected] => [bok_resources:protected] => [bok_topics:protected] => [bok_keywords:protected] => [id:protected] => 79 [type:protected] => category [parent:protected] => 2 [label:protected] => Scaffold Erector [alreadyInSave:protected] => [alreadyInValidation:protected] => [validationFailures:protected] => Array ( ) [_new:BaseObject:private] => [_deleted:BaseObject:private] => [modifiedColumns:protected] => Array ( ) ) [80] => Category Object ( [languages:protected] => [bok_resources:protected] => [bok_topics:protected] => [bok_keywords:protected] => [id:protected] => 80 [type:protected] => category [parent:protected] => 2 [label:protected] => Sheetmetal Worker [alreadyInSave:protected] => [alreadyInValidation:protected] => [validationFailures:protected] => Array ( ) [_new:BaseObject:private] => [_deleted:BaseObject:private] => [modifiedColumns:protected] => Array ( ) ) [62] => Category Object ( [languages:protected] => [bok_resources:protected] => [bok_topics:protected] => [bok_keywords:protected] => [id:protected] => 62 [type:protected] => category [parent:protected] => 2 [label:protected] => Structural Ironworker [alreadyInSave:protected] => [alreadyInValidation:protected] => [validationFailures:protected] => Array ( ) [_new:BaseObject:private] => [_deleted:BaseObject:private] => [modifiedColumns:protected] => Array ( ) ) [87] => Category Object ( [languages:protected] => [bok_resources:protected] => [bok_topics:protected] => [bok_keywords:protected] => [id:protected] => 87 [type:protected] => category [parent:protected] => 3 [label:protected] => Commercial & Institutional [alreadyInSave:protected] => [alreadyInValidation:protected] => [validationFailures:protected] => Array ( ) [_new:BaseObject:private] => [_deleted:BaseObject:private] => [modifiedColumns:protected] => Array ( ) ) [90] => Category Object ( [languages:protected] => [bok_resources:protected] => [bok_topics:protected] => [bok_keywords:protected] => [id:protected] => 90 [type:protected] => category [parent:protected] => 3 [label:protected] => Industrial [alreadyInSave:protected] => [alreadyInValidation:protected] => [validationFailures:protected] => Array ( ) [_new:BaseObject:private] => [_deleted:BaseObject:private] => [modifiedColumns:protected] => Array ( ) ) [97] => Category Object ( [languages:protected] => [bok_resources:protected] => [bok_topics:protected] => [bok_keywords:protected] => [id:protected] => 97 [type:protected] => category [parent:protected] => 5 [label:protected] => Images [alreadyInSave:protected] => [alreadyInValidation:protected] => [validationFailures:protected] => Array ( ) [_new:BaseObject:private] => [_deleted:BaseObject:private] => [modifiedColumns:protected] => Array ( ) ) ) [categories_initialized:protected] => 1 [mapped_items:protected] => [content:protected] => [files:protected] => [language:protected] => Language Object ( [id:protected] => 1 [code:protected] => en [name:protected] => English [alreadyInSave:protected] => [alreadyInValidation:protected] => [validationFailures:protected] => Array ( ) [_new:BaseObject:private] => [_deleted:BaseObject:private] => [modifiedColumns:protected] => Array ( ) ) [old_record:protected] => [id:protected] => 3995 [old_id:protected] => [elcosh_id:protected] => i002690 [type:protected] => image [display_type:protected] => Image [user_id:protected] => 0 [language_id:protected] => 1 [tagging_id:protected] => Bruce Lippy [priority_id:protected] => 1 [title:protected] => Construction bracing [total_pages:protected] => 0 [billed_pages:protected] => 0 [publication_number:protected] => [part_of:protected] => [keywords:protected] => Bracing, support, scaffold [comments:protected] => [summary:protected] => This shows structural support that prevents collapses during construction. [transition_comments:protected] => [external_link:protected] => [consol_link:protected] => http://www.cpwrconstructionsolutions.org/masonry/solution/8/adjustable-tower-scaffold.html [more_like_this:protected] => i002660 [permission_given_by:protected] => [published:protected] => T [billable:protected] => F [img_name:protected] => [img_ext:protected] => jpg [img_width:protected] => [img_height:protected] => [img_credit:protected] => Photo by Pam Susi [img_practice:protected] => good [vid_source_id:protected] => [vid_running_time:protected] => [vid_intended_audience:protected] => [vid_acquisition_info:protected] => [vid_cost:protected] => [vid_producer:protected] => [vid_filename:protected] => [vid_filename_downloadable:protected] => [date_summary:protected] => January 2016 [date_permission_requested:protected] => [date_permission_received:protected] => [date_review_needed:protected] => [date_received:protected] => 02/01/16 [date_completed:protected] => 02/01/16 [date_billed:protected] => [date_modified:protected] => 02/01/16 [collBokExports:protected] => [lastBokExportCriteria:BaseElcoshItem:private] => [alreadyInSave:protected] => [alreadyInValidation:protected] => [validationFailures:protected] => Array ( ) [_new:BaseObject:private] => [_deleted:BaseObject:private] => [modifiedColumns:protected] => Array ( ) ) ) [3] => Search_Result Object ( [title] => Suspended Scaffold Outriggers [image] => /record/images/3975-p.jpg [blurb] => Suspended scaffolds systems must be designed by a qualified person and inspected daily by a competent person. The supports for the counterweight must... [category] => Array ( [0] => 97 [1] => 15 [2] => 47 [3] => 49 [4] => 79 [5] => 87 ) [labels] => Array ( [0] => Images [1] => Media [2] => Media & Documents [3] => Falls [4] => Work Environment [5] => Hazards [6] => Bricklayer [7] => Trades [8] => Carpenter [10] => Scaffold Erector [12] => Commercial & Institutional [13] => Jobsites ) [type] => Images [sub_category] => [url] => /image/3975/i002683/Suspended%2BScaffold%2BOutriggers.html [item:protected] => ImageRecord Object ( [records:protected] => Array ( ) [recordId:protected] => [searchWordClass:protected] => [searchWordPeerClass:protected] => [bok_record:protected] => [authors:protected] => [organizations:protected] => [collections:protected] => [categories:protected] => Array ( [97] => Category Object ( [languages:protected] => [bok_resources:protected] => [bok_topics:protected] => [bok_keywords:protected] => [id:protected] => 97 [type:protected] => category [parent:protected] => 5 [label:protected] => Images [alreadyInSave:protected] => [alreadyInValidation:protected] => [validationFailures:protected] => Array ( ) [_new:BaseObject:private] => [_deleted:BaseObject:private] => [modifiedColumns:protected] => Array ( ) ) [15] => Category Object ( [languages:protected] => [bok_resources:protected] => [bok_topics:protected] => [bok_keywords:protected] => [id:protected] => 15 [type:protected] => category [parent:protected] => 7 [label:protected] => Falls [alreadyInSave:protected] => [alreadyInValidation:protected] => [validationFailures:protected] => Array ( ) [_new:BaseObject:private] => [_deleted:BaseObject:private] => [modifiedColumns:protected] => Array ( ) ) [47] => Category Object ( [languages:protected] => [bok_resources:protected] => [bok_topics:protected] => [bok_keywords:protected] => [id:protected] => 47 [type:protected] => category [parent:protected] => 2 [label:protected] => Bricklayer [alreadyInSave:protected] => [alreadyInValidation:protected] => [validationFailures:protected] => Array ( ) [_new:BaseObject:private] => [_deleted:BaseObject:private] => [modifiedColumns:protected] => Array ( ) ) [49] => Category Object ( [languages:protected] => [bok_resources:protected] => [bok_topics:protected] => [bok_keywords:protected] => [id:protected] => 49 [type:protected] => category [parent:protected] => 2 [label:protected] => Carpenter [alreadyInSave:protected] => [alreadyInValidation:protected] => [validationFailures:protected] => Array ( ) [_new:BaseObject:private] => [_deleted:BaseObject:private] => [modifiedColumns:protected] => Array ( ) ) [79] => Category Object ( [languages:protected] => [bok_resources:protected] => [bok_topics:protected] => [bok_keywords:protected] => [id:protected] => 79 [type:protected] => category [parent:protected] => 2 [label:protected] => Scaffold Erector [alreadyInSave:protected] => [alreadyInValidation:protected] => [validationFailures:protected] => Array ( ) [_new:BaseObject:private] => [_deleted:BaseObject:private] => [modifiedColumns:protected] => Array ( ) ) [87] => Category Object ( [languages:protected] => [bok_resources:protected] => [bok_topics:protected] => [bok_keywords:protected] => [id:protected] => 87 [type:protected] => category [parent:protected] => 3 [label:protected] => Commercial & Institutional [alreadyInSave:protected] => [alreadyInValidation:protected] => [validationFailures:protected] => Array ( ) [_new:BaseObject:private] => [_deleted:BaseObject:private] => [modifiedColumns:protected] => Array ( ) ) ) [categories_initialized:protected] => 1 [mapped_items:protected] => [content:protected] => [files:protected] => [language:protected] => Language Object ( [id:protected] => 1 [code:protected] => en [name:protected] => English [alreadyInSave:protected] => [alreadyInValidation:protected] => [validationFailures:protected] => Array ( ) [_new:BaseObject:private] => [_deleted:BaseObject:private] => [modifiedColumns:protected] => Array ( ) ) [old_record:protected] => [id:protected] => 3975 [old_id:protected] => [elcosh_id:protected] => i002683 [type:protected] => image [display_type:protected] => Image [user_id:protected] => 0 [language_id:protected] => 1 [tagging_id:protected] => John Newquist [priority_id:protected] => 1 [title:protected] => Suspended Scaffold Outriggers [total_pages:protected] => 0 [billed_pages:protected] => 0 [publication_number:protected] => [part_of:protected] => [keywords:protected] => suspended, scaffold, swing, stage, fall, protection, counterweight, qualified, person [comments:protected] => [summary:protected] => Suspended scaffolds systems must be designed by a qualified person and inspected daily by a competent person. The supports for the counterweight must be designed with a safety factor of four. [transition_comments:protected] => [external_link:protected] => [consol_link:protected] => http://www.cpwrconstructionsolutions.org/task/Erect%2Band%2Bdismantle%2Bscaffolds/ [more_like_this:protected] => d000244,d000359,i000253,i000407 [permission_given_by:protected] => [published:protected] => T [billable:protected] => F [img_name:protected] => [img_ext:protected] => jpg [img_width:protected] => [img_height:protected] => [img_credit:protected] => MetroPark, Miller and Long [img_practice:protected] => not_applicable [vid_source_id:protected] => [vid_running_time:protected] => [vid_intended_audience:protected] => [vid_acquisition_info:protected] => [vid_cost:protected] => [vid_producer:protected] => [vid_filename:protected] => [vid_filename_downloadable:protected] => [date_summary:protected] => August 28 2015 [date_permission_requested:protected] => [date_permission_received:protected] => [date_review_needed:protected] => [date_received:protected] => 08/28/15 [date_completed:protected] => 08/28/15 [date_billed:protected] => [date_modified:protected] => 08/28/15 [collBokExports:protected] => [lastBokExportCriteria:BaseElcoshItem:private] => [alreadyInSave:protected] => [alreadyInValidation:protected] => [validationFailures:protected] => Array ( ) [_new:BaseObject:private] => [_deleted:BaseObject:private] => [modifiedColumns:protected] => Array ( ) ) ) [4] => Search_Result Object ( [title] => Suspended scaffold [image] => /record/images/3976-p.jpg [blurb] => Suspended scaffold outrigger beams must have stops to prevent the hangers from sliding of the end of the outriggers. Wire rope supported must be desig... [category] => Array ( [0] => 97 [1] => 15 [2] => 47 [3] => 50 [4] => 79 [5] => 87 ) [labels] => Array ( [0] => Images [1] => Media [2] => Media & Documents [3] => Falls [4] => Work Environment [5] => Hazards [6] => Bricklayer [7] => Trades [8] => Carpet Layer [10] => Scaffold Erector [12] => Commercial & Institutional [13] => Jobsites ) [type] => Images [sub_category] => [url] => /image/3976/i002684/Suspended%2Bscaffold.html [item:protected] => ImageRecord Object ( [records:protected] => Array ( ) [recordId:protected] => [searchWordClass:protected] => [searchWordPeerClass:protected] => [bok_record:protected] => [authors:protected] => [organizations:protected] => [collections:protected] => [categories:protected] => Array ( [97] => Category Object ( [languages:protected] => [bok_resources:protected] => [bok_topics:protected] => [bok_keywords:protected] => [id:protected] => 97 [type:protected] => category [parent:protected] => 5 [label:protected] => Images [alreadyInSave:protected] => [alreadyInValidation:protected] => [validationFailures:protected] => Array ( ) [_new:BaseObject:private] => [_deleted:BaseObject:private] => [modifiedColumns:protected] => Array ( ) ) [15] => Category Object ( [languages:protected] => [bok_resources:protected] => [bok_topics:protected] => [bok_keywords:protected] => [id:protected] => 15 [type:protected] => category [parent:protected] => 7 [label:protected] => Falls [alreadyInSave:protected] => [alreadyInValidation:protected] => [validationFailures:protected] => Array ( ) [_new:BaseObject:private] => [_deleted:BaseObject:private] => [modifiedColumns:protected] => Array ( ) ) [47] => Category Object ( [languages:protected] => [bok_resources:protected] => [bok_topics:protected] => [bok_keywords:protected] => [id:protected] => 47 [type:protected] => category [parent:protected] => 2 [label:protected] => Bricklayer [alreadyInSave:protected] => [alreadyInValidation:protected] => [validationFailures:protected] => Array ( ) [_new:BaseObject:private] => [_deleted:BaseObject:private] => [modifiedColumns:protected] => Array ( ) ) [50] => Category Object ( [languages:protected] => [bok_resources:protected] => [bok_topics:protected] => [bok_keywords:protected] => [id:protected] => 50 [type:protected] => category [parent:protected] => 2 [label:protected] => Carpet Layer [alreadyInSave:protected] => [alreadyInValidation:protected] => [validationFailures:protected] => Array ( ) [_new:BaseObject:private] => [_deleted:BaseObject:private] => [modifiedColumns:protected] => Array ( ) ) [79] => Category Object ( [languages:protected] => [bok_resources:protected] => [bok_topics:protected] => [bok_keywords:protected] => [id:protected] => 79 [type:protected] => category [parent:protected] => 2 [label:protected] => Scaffold Erector [alreadyInSave:protected] => [alreadyInValidation:protected] => [validationFailures:protected] => Array ( ) [_new:BaseObject:private] => [_deleted:BaseObject:private] => [modifiedColumns:protected] => Array ( ) ) [87] => Category Object ( [languages:protected] => [bok_resources:protected] => [bok_topics:protected] => [bok_keywords:protected] => [id:protected] => 87 [type:protected] => category [parent:protected] => 3 [label:protected] => Commercial & Institutional [alreadyInSave:protected] => [alreadyInValidation:protected] => [validationFailures:protected] => Array ( ) [_new:BaseObject:private] => [_deleted:BaseObject:private] => [modifiedColumns:protected] => Array ( ) ) ) [categories_initialized:protected] => 1 [mapped_items:protected] => [content:protected] => [files:protected] => [language:protected] => Language Object ( [id:protected] => 1 [code:protected] => en [name:protected] => English [alreadyInSave:protected] => [alreadyInValidation:protected] => [validationFailures:protected] => Array ( ) [_new:BaseObject:private] => [_deleted:BaseObject:private] => [modifiedColumns:protected] => Array ( ) ) [old_record:protected] => [id:protected] => 3976 [old_id:protected] => [elcosh_id:protected] => i002684 [type:protected] => image [display_type:protected] => Image [user_id:protected] => 0 [language_id:protected] => 1 [tagging_id:protected] => John Newquist [priority_id:protected] => 1 [title:protected] => Suspended scaffold [total_pages:protected] => 0 [billed_pages:protected] => 0 [publication_number:protected] => [part_of:protected] => [keywords:protected] => Suspended, scaffold, outrigger, beams, erection, wire, rope, inspection, swing, stage, [comments:protected] => [summary:protected] => Suspended scaffold outrigger beams must have stops to prevent the hangers from sliding of the end of the outriggers. Wire rope supported must be designed with a safety factor of 6. The scaffold must be inspected by a competent person daily. [transition_comments:protected] => [external_link:protected] => [consol_link:protected] => http://www.cpwrconstructionsolutions.org/task/Erect%2Band%2Bdismantle%2Bscaffolds/ [more_like_this:protected] => i002683, d000244, i000407, d000606 [permission_given_by:protected] => [published:protected] => T [billable:protected] => F [img_name:protected] => [img_ext:protected] => jpg [img_width:protected] => [img_height:protected] => [img_credit:protected] => Metropark, Miller and Long [img_practice:protected] => not_applicable [vid_source_id:protected] => [vid_running_time:protected] => [vid_intended_audience:protected] => [vid_acquisition_info:protected] => [vid_cost:protected] => [vid_producer:protected] => [vid_filename:protected] => [vid_filename_downloadable:protected] => [date_summary:protected] => [date_permission_requested:protected] => [date_permission_received:protected] => [date_review_needed:protected] => [date_received:protected] => 08/28/15 [date_completed:protected] => 08/28/15 [date_billed:protected] => [date_modified:protected] => 08/28/15 [collBokExports:protected] => [lastBokExportCriteria:BaseElcoshItem:private] => [alreadyInSave:protected] => [alreadyInValidation:protected] => [validationFailures:protected] => Array ( ) [_new:BaseObject:private] => [_deleted:BaseObject:private] => [modifiedColumns:protected] => Array ( ) ) ) [5] => Search_Result Object ( [title] => Three Tower Cranes [image] => /record/images/3979-p.jpg [blurb] => Whenever multiple tower cranes are used, there needs to be preplanning to ensure that the tower cranes cannot hit each other loads. This is accomplish... [category] => Array ( [0] => 97 [1] => 11 [2] => 64 [3] => 70 [4] => 62 [5] => 87 ) [labels] => Array ( [0] => Images [1] => Media [2] => Media & Documents [3] => Cranes & Hoists [4] => Work Environment [5] => Hazards [6] => Laborer [7] => Trades [8] => Operating Engineer [10] => Structural Ironworker [12] => Commercial & Institutional [13] => Jobsites ) [type] => Images [sub_category] => [url] => /image/3979/i002687/Three%2BTower%2BCranes.html [item:protected] => ImageRecord Object ( [records:protected] => Array ( ) [recordId:protected] => [searchWordClass:protected] => [searchWordPeerClass:protected] => [bok_record:protected] => [authors:protected] => [organizations:protected] => [collections:protected] => [categories:protected] => Array ( [97] => Category Object ( [languages:protected] => [bok_resources:protected] => [bok_topics:protected] => [bok_keywords:protected] => [id:protected] => 97 [type:protected] => category [parent:protected] => 5 [label:protected] => Images [alreadyInSave:protected] => [alreadyInValidation:protected] => [validationFailures:protected] => Array ( ) [_new:BaseObject:private] => [_deleted:BaseObject:private] => [modifiedColumns:protected] => Array ( ) ) [11] => Category Object ( [languages:protected] => [bok_resources:protected] => [bok_topics:protected] => [bok_keywords:protected] => [id:protected] => 11 [type:protected] => category [parent:protected] => 7 [label:protected] => Cranes & Hoists [alreadyInSave:protected] => [alreadyInValidation:protected] => [validationFailures:protected] => Array ( ) [_new:BaseObject:private] => [_deleted:BaseObject:private] => [modifiedColumns:protected] => Array ( ) ) [64] => Category Object ( [languages:protected] => [bok_resources:protected] => [bok_topics:protected] => [bok_keywords:protected] => [id:protected] => 64 [type:protected] => category [parent:protected] => 2 [label:protected] => Laborer [alreadyInSave:protected] => [alreadyInValidation:protected] => [validationFailures:protected] => Array ( ) [_new:BaseObject:private] => [_deleted:BaseObject:private] => [modifiedColumns:protected] => Array ( ) ) [70] => Category Object ( [languages:protected] => [bok_resources:protected] => [bok_topics:protected] => [bok_keywords:protected] => [id:protected] => 70 [type:protected] => category [parent:protected] => 2 [label:protected] => Operating Engineer [alreadyInSave:protected] => [alreadyInValidation:protected] => [validationFailures:protected] => Array ( ) [_new:BaseObject:private] => [_deleted:BaseObject:private] => [modifiedColumns:protected] => Array ( ) ) [62] => Category Object ( [languages:protected] => [bok_resources:protected] => [bok_topics:protected] => [bok_keywords:protected] => [id:protected] => 62 [type:protected] => category [parent:protected] => 2 [label:protected] => Structural Ironworker [alreadyInSave:protected] => [alreadyInValidation:protected] => [validationFailures:protected] => Array ( ) [_new:BaseObject:private] => [_deleted:BaseObject:private] => [modifiedColumns:protected] => Array ( ) ) [87] => Category Object ( [languages:protected] => [bok_resources:protected] => [bok_topics:protected] => [bok_keywords:protected] => [id:protected] => 87 [type:protected] => category [parent:protected] => 3 [label:protected] => Commercial & Institutional [alreadyInSave:protected] => [alreadyInValidation:protected] => [validationFailures:protected] => Array ( ) [_new:BaseObject:private] => [_deleted:BaseObject:private] => [modifiedColumns:protected] => Array ( ) ) ) [categories_initialized:protected] => 1 [mapped_items:protected] => [content:protected] => [files:protected] => [language:protected] => Language Object ( [id:protected] => 1 [code:protected] => en [name:protected] => English [alreadyInSave:protected] => [alreadyInValidation:protected] => [validationFailures:protected] => Array ( ) [_new:BaseObject:private] => [_deleted:BaseObject:private] => [modifiedColumns:protected] => Array ( ) ) [old_record:protected] => [id:protected] => 3979 [old_id:protected] => [elcosh_id:protected] => i002687 [type:protected] => image [display_type:protected] => Image [user_id:protected] => 0 [language_id:protected] => 1 [tagging_id:protected] => John Newquist [priority_id:protected] => 1 [title:protected] => Three Tower Cranes [total_pages:protected] => 0 [billed_pages:protected] => 0 [publication_number:protected] => [part_of:protected] => [keywords:protected] => [comments:protected] => [summary:protected] => Whenever multiple tower cranes are used, there needs to be preplanning to ensure that the tower cranes cannot hit each other loads. This is accomplished by setting swing restrictions, marking the ground for allowable crane travel and training of the crane signal persons. [transition_comments:protected] => [external_link:protected] => [consol_link:protected] => http://www.cpwrconstructionsolutions.org/work/6/184/ [more_like_this:protected] => d001029, d000010, i001280, i001221 [permission_given_by:protected] => [published:protected] => T [billable:protected] => F [img_name:protected] => [img_ext:protected] => jpg [img_width:protected] => [img_height:protected] => [img_credit:protected] => Metropark [img_practice:protected] => not_applicable [vid_source_id:protected] => [vid_running_time:protected] => [vid_intended_audience:protected] => [vid_acquisition_info:protected] => [vid_cost:protected] => [vid_producer:protected] => [vid_filename:protected] => [vid_filename_downloadable:protected] => [date_summary:protected] => August 28 2015 [date_permission_requested:protected] => [date_permission_received:protected] => [date_review_needed:protected] => [date_received:protected] => 08/28/15 [date_completed:protected] => 08/28/15 [date_billed:protected] => [date_modified:protected] => 08/28/15 [collBokExports:protected] => [lastBokExportCriteria:BaseElcoshItem:private] => [alreadyInSave:protected] => [alreadyInValidation:protected] => [validationFailures:protected] => Array ( ) [_new:BaseObject:private] => [_deleted:BaseObject:private] => [modifiedColumns:protected] => Array ( ) ) ) ) [preview_mode] => [description] => This third in a series of 6 Tool Box Talks on construction ergonomics focuses on proper positioning to avoid injuries. The TBT recommends: 1)prop up a task off of the floor by using a raised surface, cart, baker scaffold, saw horses to prep materials near waist height, 2)move the lift or ladder in the best position for the work, 3)position the lift in front of the area you plan to work without trying to reach too far on either side of the lift. [keywords] => position, positioning, ergonomics, ergo, carpal tunnel, MSD, musculoskeletal disorder [related_items] => Array ( [Handouts] => Array ( [0] => DocumentRecord Object ( [records:protected] => Array ( ) [recordId:protected] => [searchWordClass:protected] => [searchWordPeerClass:protected] => [bok_record:protected] => [authors:protected] => [organizations:protected] => [collections:protected] => [categories:protected] => [categories_initialized:protected] => [mapped_items:protected] => [content:protected] => [files:protected] => [language:protected] => Language Object ( [id:protected] => 1 [code:protected] => en [name:protected] => English [alreadyInSave:protected] => [alreadyInValidation:protected] => [validationFailures:protected] => Array ( ) [_new:BaseObject:private] => [_deleted:BaseObject:private] => [modifiedColumns:protected] => Array ( ) ) [old_record:protected] => [id:protected] => 3833 [old_id:protected] => [elcosh_id:protected] => d001303 [type:protected] => document [display_type:protected] => HTML w/ PDF [user_id:protected] => 25 [language_id:protected] => 1 [tagging_id:protected] => Bruce Lippy [priority_id:protected] => 1 [title:protected] => Overview of Toolbox Talks on Ergonomics Developed by Washington University in St. Louis [total_pages:protected] => 3 [billed_pages:protected] => 3 [publication_number:protected] => [part_of:protected] => [keywords:protected] => ergonomics, musculoskeletal disorders, MSDs [comments:protected] => 7-28-2014 - Originally submitted as "HTML w/ doc and PDF", Jeff Nelson asked Bruce Lippy for permission to switch it to "HTML w/ PDF" -- permission was given [summary:protected] => This overviews provides a background on how Washington University in St. Louis developed this series of six toolbox talks on ergonomics. It also describes how they tested the effectiveness of these communication tools, concluding that the guide was valuable for improving the delivery of ergonomics training and interaction between the safety representative and workers. The researchers recommend preparing site-specific information prior to the talk and interacting with workers to discuss problems and ergonomic solutions during the safety meetings. [transition_comments:protected] => [external_link:protected] => [consol_link:protected] => [more_like_this:protected] => [permission_given_by:protected] => Lisa Jaegers, Washington U. in St. Louis [published:protected] => T [billable:protected] => F [img_name:protected] => [img_ext:protected] => png [img_width:protected] => [img_height:protected] => [img_credit:protected] => [img_practice:protected] => [vid_source_id:protected] => [vid_running_time:protected] => [vid_intended_audience:protected] => [vid_acquisition_info:protected] => [vid_cost:protected] => [vid_producer:protected] => [vid_filename:protected] => [vid_filename_downloadable:protected] => [date_summary:protected] => 2014 [date_permission_requested:protected] => [date_permission_received:protected] => [date_review_needed:protected] => [date_received:protected] => 06/11/14 [date_completed:protected] => 07/29/14 [date_billed:protected] => [date_modified:protected] => 07/29/14 [collBokExports:protected] => [lastBokExportCriteria:BaseElcoshItem:private] => [alreadyInSave:protected] => [alreadyInValidation:protected] => [validationFailures:protected] => Array ( ) [_new:BaseObject:private] => [_deleted:BaseObject:private] => [modifiedColumns:protected] => Array ( ) ) ) [Toolbox Talks] => Array ( [0] => DocumentRecord Object ( [records:protected] => Array ( ) [recordId:protected] => [searchWordClass:protected] => [searchWordPeerClass:protected] => [bok_record:protected] => [authors:protected] => [organizations:protected] => [collections:protected] => [categories:protected] => [categories_initialized:protected] => [mapped_items:protected] => [content:protected] => [files:protected] => [language:protected] => Language Object ( [id:protected] => 1 [code:protected] => en [name:protected] => English [alreadyInSave:protected] => [alreadyInValidation:protected] => [validationFailures:protected] => Array ( ) [_new:BaseObject:private] => [_deleted:BaseObject:private] => [modifiedColumns:protected] => Array ( ) ) [old_record:protected] => [id:protected] => 3835 [old_id:protected] => [elcosh_id:protected] => d001304 [type:protected] => document [display_type:protected] => HTML w/ PDF [user_id:protected] => 25 [language_id:protected] => 1 [tagging_id:protected] => Bruce Lippy [priority_id:protected] => 1 [title:protected] => Ergonomics Tool Box Talks (TBT) Training Guide [total_pages:protected] => 2 [billed_pages:protected] => 2 [publication_number:protected] => [part_of:protected] => [keywords:protected] => Ergonomics, carpal tunnel, muscular skeletal disorders, msd [comments:protected] => [summary:protected] => CPWR-funded ergonomics research by Washington University at St. Louis led to the development of 6 tool box talks. This guide is an explanation of how to deliver the talks for maximum effectiveness. This guide should be reviewed before delivering any of the talks because it makes important recommendations like: • If possible, give the TBTs as a part of the crew’s regular safety meetings so that ergonomics is included in the safety discussion. • Try to locate an area with few distractions for gathering the crew. • For a team approach, invite the work crew, site superintendent, project manager and other general contractor and/or subcontractor reps who you feel may be helpful in supporting the training and ergonomics solutions. [transition_comments:protected] => [external_link:protected] => [consol_link:protected] => [more_like_this:protected] => d001303,d001305,d001306,d001307,d001308,d001309,d001310 [permission_given_by:protected] => [published:protected] => T [billable:protected] => F [img_name:protected] => [img_ext:protected] => png [img_width:protected] => [img_height:protected] => [img_credit:protected] => [img_practice:protected] => [vid_source_id:protected] => [vid_running_time:protected] => [vid_intended_audience:protected] => [vid_acquisition_info:protected] => [vid_cost:protected] => [vid_producer:protected] => [vid_filename:protected] => [vid_filename_downloadable:protected] => [date_summary:protected] => 2014 [date_permission_requested:protected] => [date_permission_received:protected] => [date_review_needed:protected] => [date_received:protected] => 06/12/14 [date_completed:protected] => 07/29/14 [date_billed:protected] => [date_modified:protected] => 07/29/14 [collBokExports:protected] => [lastBokExportCriteria:BaseElcoshItem:private] => [alreadyInSave:protected] => [alreadyInValidation:protected] => [validationFailures:protected] => Array ( ) [_new:BaseObject:private] => [_deleted:BaseObject:private] => [modifiedColumns:protected] => Array ( ) ) [1] => DocumentRecord Object ( [records:protected] => Array ( ) [recordId:protected] => [searchWordClass:protected] => [searchWordPeerClass:protected] => [bok_record:protected] => [authors:protected] => [organizations:protected] => [collections:protected] => [categories:protected] => [categories_initialized:protected] => [mapped_items:protected] => [content:protected] => [files:protected] => [language:protected] => Language Object ( [id:protected] => 1 [code:protected] => en [name:protected] => English [alreadyInSave:protected] => [alreadyInValidation:protected] => [validationFailures:protected] => Array ( ) [_new:BaseObject:private] => [_deleted:BaseObject:private] => [modifiedColumns:protected] => Array ( ) ) [old_record:protected] => [id:protected] => 3836 [old_id:protected] => [elcosh_id:protected] => d001305 [type:protected] => document [display_type:protected] => HTML w/ PDF [user_id:protected] => 25 [language_id:protected] => 1 [tagging_id:protected] => Bruce Lippy [priority_id:protected] => 1 [title:protected] => TBT1 Ergonomics in Construction [total_pages:protected] => 5 [billed_pages:protected] => 5 [publication_number:protected] => [part_of:protected] => [keywords:protected] => ergonomics, ergo, msd, musculoskeletal disorders, risk factors, lifting, carpal tunnel, repetition, awkward postures [comments:protected] => 7-28-2014 Jeff Nelson asked Bruce Lippy about what to do with a sentence included toward the top of the doc, "Fill them in on page 2 'Other Questions.'" -- Bruce said this sentence could be deleted from the HTML. [summary:protected] => This is the first in a series of 6 Tool Box Talks produced by Washington University in St. Louis on ergonomics in construction work. This one should be delivered first because it covers what ergonomics is, why construction workers need to talk about it, what the risk factors are for developing a health problem and how to prevent these problems. [transition_comments:protected] => [external_link:protected] => [consol_link:protected] => http://www.cpwrconstructionsolutions.org/pipes_vessels/solution/50/participatory-ergonomics-program.html [more_like_this:protected] => d001303,d001304,d001306,d001307,d001308,d001309 [permission_given_by:protected] => Lisa Jaegers, Washington U. in St. Louis [published:protected] => T [billable:protected] => F [img_name:protected] => [img_ext:protected] => png [img_width:protected] => [img_height:protected] => [img_credit:protected] => [img_practice:protected] => [vid_source_id:protected] => [vid_running_time:protected] => [vid_intended_audience:protected] => [vid_acquisition_info:protected] => [vid_cost:protected] => [vid_producer:protected] => [vid_filename:protected] => [vid_filename_downloadable:protected] => [date_summary:protected] => 2014 [date_permission_requested:protected] => [date_permission_received:protected] => [date_review_needed:protected] => [date_received:protected] => 06/12/14 [date_completed:protected] => 07/28/14 [date_billed:protected] => [date_modified:protected] => 10/09/15 [collBokExports:protected] => [lastBokExportCriteria:BaseElcoshItem:private] => [alreadyInSave:protected] => [alreadyInValidation:protected] => [validationFailures:protected] => Array ( ) [_new:BaseObject:private] => [_deleted:BaseObject:private] => [modifiedColumns:protected] => Array ( ) ) [2] => DocumentRecord Object ( [records:protected] => Array ( ) [recordId:protected] => [searchWordClass:protected] => [searchWordPeerClass:protected] => [bok_record:protected] => [authors:protected] => [organizations:protected] => [collections:protected] => [categories:protected] => [categories_initialized:protected] => [mapped_items:protected] => [content:protected] => [files:protected] => [language:protected] => Language Object ( [id:protected] => 1 [code:protected] => en [name:protected] => English [alreadyInSave:protected] => [alreadyInValidation:protected] => [validationFailures:protected] => Array ( ) [_new:BaseObject:private] => [_deleted:BaseObject:private] => [modifiedColumns:protected] => Array ( ) ) [old_record:protected] => [id:protected] => 3837 [old_id:protected] => [elcosh_id:protected] => d001306 [type:protected] => document [display_type:protected] => HTML w/ PDF [user_id:protected] => 25 [language_id:protected] => 1 [tagging_id:protected] => Bruce Lippy [priority_id:protected] => 1 [title:protected] => TBT2 Keep Reach Close [total_pages:protected] => 4 [billed_pages:protected] => 4 [publication_number:protected] => [part_of:protected] => [keywords:protected] => reach, ergonomic, ergo, MSD, carpal tunnel, repetition, awkward positions [comments:protected] => 7-28-2014 Jeff Nelson asked Bruce Lippy about what to do with a sentence included toward the top of the doc, "Fill them in on page 2 'Other Questions.'" -- Bruce said this sentence could be deleted from the HTML. [summary:protected] => This is the second of six Tool Box Talks created by Washington University in St. Louis on ergonomics in construction. There is a guide with the series that describes how to deliver these talks. This one deals with how to avoid awkward reaching during tasks to prevent injuries. try to work with your hands below your head and close to our body to reduce your risk of shoulder strains and back discomfort. This TBT recommends considering ways to move close to the task, keeping the work area free of obstacles, and talking with each other to provide constructive feedback about your working position. [transition_comments:protected] => [external_link:protected] => [consol_link:protected] => http://www.cpwrconstructionsolutions.org/hazard/959/lifting-and-carrying-manual-materials-handling.html [more_like_this:protected] => d001303,d001304,d001305,d001307,d001308,e001309 [permission_given_by:protected] => [published:protected] => T [billable:protected] => F [img_name:protected] => [img_ext:protected] => png [img_width:protected] => [img_height:protected] => [img_credit:protected] => [img_practice:protected] => [vid_source_id:protected] => [vid_running_time:protected] => [vid_intended_audience:protected] => [vid_acquisition_info:protected] => [vid_cost:protected] => [vid_producer:protected] => [vid_filename:protected] => [vid_filename_downloadable:protected] => [date_summary:protected] => 2014 [date_permission_requested:protected] => [date_permission_received:protected] => [date_review_needed:protected] => [date_received:protected] => 06/12/14 [date_completed:protected] => 07/28/14 [date_billed:protected] => [date_modified:protected] => 11/02/16 [collBokExports:protected] => [lastBokExportCriteria:BaseElcoshItem:private] => [alreadyInSave:protected] => [alreadyInValidation:protected] => [validationFailures:protected] => Array ( ) [_new:BaseObject:private] => [_deleted:BaseObject:private] => [modifiedColumns:protected] => Array ( ) ) [3] => DocumentRecord Object ( [records:protected] => Array ( ) [recordId:protected] => [searchWordClass:protected] => [searchWordPeerClass:protected] => [bok_record:protected] => [authors:protected] => [organizations:protected] => [collections:protected] => [categories:protected] => [categories_initialized:protected] => [mapped_items:protected] => [content:protected] => [files:protected] => [language:protected] => Language Object ( [id:protected] => 1 [code:protected] => en [name:protected] => English [alreadyInSave:protected] => [alreadyInValidation:protected] => [validationFailures:protected] => Array ( ) [_new:BaseObject:private] => [_deleted:BaseObject:private] => [modifiedColumns:protected] => Array ( ) ) [old_record:protected] => [id:protected] => 3839 [old_id:protected] => [elcosh_id:protected] => d001308 [type:protected] => document [display_type:protected] => HTML w/ PDF [user_id:protected] => 23 [language_id:protected] => 1 [tagging_id:protected] => Bruce Lippy [priority_id:protected] => 1 [title:protected] => TBT4 Move Materials With Assist [total_pages:protected] => 4 [billed_pages:protected] => 4 [publication_number:protected] => [part_of:protected] => [keywords:protected] => lifting, back injury, ergonomics, ergo, MSD, buddy system [comments:protected] => 7-28-2014 Jeff Nelson asked Bruce Lippy about what to do with a sentence included toward the top of the doc, "Fill them in on page 2 'Other Questions.'" -- Bruce said this sentence could be deleted from the HTML. [summary:protected] => This tool box talk is fourth in a series of 6 developed by Washington University in St. Louis on construction ergonomics. This one focuses on preventing back injuries by getting an assist when manually lifting. It recommends using a cart for transporting loads, taking less trips, avoiding carrying materials on the shoulder and helping each other to lift large or heavy materials when a cart or hoist is not available. [transition_comments:protected] => [external_link:protected] => [consol_link:protected] => http://www.cpwrconstructionsolutions.org/hazard/959/lifting-and-carrying-manual-materials-handling.html [more_like_this:protected] => d001303,d001304,d001305,d001306,d001307,d001309 [permission_given_by:protected] => Lisa Jaegers, Washington U. in St. Louis [published:protected] => T [billable:protected] => F [img_name:protected] => [img_ext:protected] => png [img_width:protected] => [img_height:protected] => [img_credit:protected] => [img_practice:protected] => [vid_source_id:protected] => [vid_running_time:protected] => [vid_intended_audience:protected] => [vid_acquisition_info:protected] => [vid_cost:protected] => [vid_producer:protected] => [vid_filename:protected] => [vid_filename_downloadable:protected] => [date_summary:protected] => 2014 [date_permission_requested:protected] => [date_permission_received:protected] => [date_review_needed:protected] => [date_received:protected] => 06/12/14 [date_completed:protected] => 07/29/14 [date_billed:protected] => [date_modified:protected] => 10/09/15 [collBokExports:protected] => [lastBokExportCriteria:BaseElcoshItem:private] => [alreadyInSave:protected] => [alreadyInValidation:protected] => [validationFailures:protected] => Array ( ) [_new:BaseObject:private] => [_deleted:BaseObject:private] => [modifiedColumns:protected] => Array ( ) ) [4] => DocumentRecord Object ( [records:protected] => Array ( ) [recordId:protected] => [searchWordClass:protected] => [searchWordPeerClass:protected] => [bok_record:protected] => [authors:protected] => [organizations:protected] => [collections:protected] => [categories:protected] => [categories_initialized:protected] => [mapped_items:protected] => [content:protected] => [files:protected] => [language:protected] => Language Object ( [id:protected] => 1 [code:protected] => en [name:protected] => English [alreadyInSave:protected] => [alreadyInValidation:protected] => [validationFailures:protected] => Array ( ) [_new:BaseObject:private] => [_deleted:BaseObject:private] => [modifiedColumns:protected] => Array ( ) ) [old_record:protected] => [id:protected] => 3840 [old_id:protected] => [elcosh_id:protected] => d001309 [type:protected] => document [display_type:protected] => HTML w/ PDF [user_id:protected] => 23 [language_id:protected] => 1 [tagging_id:protected] => Bruce Lippy [priority_id:protected] => 1 [title:protected] => TBT5 Manual Tools [total_pages:protected] => 4 [billed_pages:protected] => 4 [publication_number:protected] => [part_of:protected] => [keywords:protected] => ergonomic, hand tools, handles, MSD, musculoskeletal disorder, carpal tunnel [comments:protected] => 7-28-2014 Jeff Nelson asked Bruce Lippy about what to do with a sentence included toward the top of the doc, "Fill them in on page 2 'Other Questions.'" -- Bruce said this sentence could be deleted from the HTML. [summary:protected] => This is the fifth in a series of 6 tool box talks on construction ergonomics produced by the University of Washington in St. Louis. This one focuses on manual tools. It asks the following 6 key questions. Does the tool… 1. Fit the task? 2. Allow a good power grip? 3. Keep the wrist in a straight posture? 4. Feel comfortable? 5. Take less effort than other tools for the task? 6. Work effectively? [transition_comments:protected] => [external_link:protected] => [consol_link:protected] => http://www.cpwrconstructionsolutions.org/masonry/solution/383/ergonomic-hand-tools.html [more_like_this:protected] => d001303,d001304,d001305,d001306,d001307,d001308,d001310 [permission_given_by:protected] => Lisa Jaegers, U. Wash. St. Louis [published:protected] => T [billable:protected] => F [img_name:protected] => [img_ext:protected] => png [img_width:protected] => [img_height:protected] => [img_credit:protected] => [img_practice:protected] => [vid_source_id:protected] => [vid_running_time:protected] => [vid_intended_audience:protected] => [vid_acquisition_info:protected] => [vid_cost:protected] => [vid_producer:protected] => [vid_filename:protected] => [vid_filename_downloadable:protected] => [date_summary:protected] => 2014 [date_permission_requested:protected] => [date_permission_received:protected] => [date_review_needed:protected] => [date_received:protected] => 06/12/14 [date_completed:protected] => 07/29/14 [date_billed:protected] => [date_modified:protected] => 10/09/15 [collBokExports:protected] => [lastBokExportCriteria:BaseElcoshItem:private] => [alreadyInSave:protected] => [alreadyInValidation:protected] => [validationFailures:protected] => Array ( ) [_new:BaseObject:private] => [_deleted:BaseObject:private] => [modifiedColumns:protected] => Array ( ) ) ) ) [collections] => Array ( [3834] => ) [record] => DocumentRecord Object ( [records:protected] => Array ( ) [recordId:protected] => [searchWordClass:protected] => [searchWordPeerClass:protected] => [bok_record:protected] => [authors:protected] => Array ( ) [organizations:protected] => Array ( [182] => Organization Object ( [id:protected] => 182 [elcosh_id:protected] => o000205 [user_id:protected] => 14 [province_id:protected] => 0 [country_id:protected] => 0 [title:protected] => Washington University - St. Louis [address:protected] => [postal_code:protected] => [city:protected] => [department:protected] => [phone:protected] => [fax:protected] => [email:protected] => [website:protected] => [filename:protected] => [about:protected] => [comments:protected] => [logo_available:protected] => T [no_details:protected] => T [date_received:protected] => 2009-08-06 [date_completed:protected] => 2009-08-06 [date_billed:protected] => [alreadyInSave:protected] => [alreadyInValidation:protected] => [validationFailures:protected] => Array ( ) [_new:BaseObject:private] => [_deleted:BaseObject:private] => [modifiedColumns:protected] => Array ( ) ) ) [collections:protected] => Array ( [3834] => ) [categories:protected] => [categories_initialized:protected] => [mapped_items:protected] => Array ( [3833] => DocumentRecord Object ( [records:protected] => Array ( ) [recordId:protected] => [searchWordClass:protected] => [searchWordPeerClass:protected] => [bok_record:protected] => [authors:protected] => [organizations:protected] => [collections:protected] => [categories:protected] => [categories_initialized:protected] => [mapped_items:protected] => [content:protected] => [files:protected] => [language:protected] => [old_record:protected] => [id:protected] => 3833 [old_id:protected] => [elcosh_id:protected] => d001303 [type:protected] => document [display_type:protected] => HTML w/ PDF [user_id:protected] => 25 [language_id:protected] => 1 [tagging_id:protected] => Bruce Lippy [priority_id:protected] => 1 [title:protected] => Overview of Toolbox Talks on Ergonomics Developed by Washington University in St. Louis [total_pages:protected] => 3 [billed_pages:protected] => 3 [publication_number:protected] => [part_of:protected] => [keywords:protected] => ergonomics, musculoskeletal disorders, MSDs [comments:protected] => 7-28-2014 - Originally submitted as "HTML w/ doc and PDF", Jeff Nelson asked Bruce Lippy for permission to switch it to "HTML w/ PDF" -- permission was given [summary:protected] => This overviews provides a background on how Washington University in St. Louis developed this series of six toolbox talks on ergonomics. It also describes how they tested the effectiveness of these communication tools, concluding that the guide was valuable for improving the delivery of ergonomics training and interaction between the safety representative and workers. The researchers recommend preparing site-specific information prior to the talk and interacting with workers to discuss problems and ergonomic solutions during the safety meetings. [transition_comments:protected] => [external_link:protected] => [consol_link:protected] => [more_like_this:protected] => [permission_given_by:protected] => Lisa Jaegers, Washington U. in St. Louis [published:protected] => T [billable:protected] => F [img_name:protected] => [img_ext:protected] => png [img_width:protected] => [img_height:protected] => [img_credit:protected] => [img_practice:protected] => [vid_source_id:protected] => [vid_running_time:protected] => [vid_intended_audience:protected] => [vid_acquisition_info:protected] => [vid_cost:protected] => [vid_producer:protected] => [vid_filename:protected] => [vid_filename_downloadable:protected] => [date_summary:protected] => 2014 [date_permission_requested:protected] => [date_permission_received:protected] => [date_review_needed:protected] => [date_received:protected] => 06/11/14 [date_completed:protected] => 07/29/14 [date_billed:protected] => [date_modified:protected] => 07/29/14 [collBokExports:protected] => [lastBokExportCriteria:BaseElcoshItem:private] => [alreadyInSave:protected] => [alreadyInValidation:protected] => [validationFailures:protected] => Array ( ) [_new:BaseObject:private] => [_deleted:BaseObject:private] => [modifiedColumns:protected] => Array ( ) ) [3835] => DocumentRecord Object ( [records:protected] => Array ( ) [recordId:protected] => [searchWordClass:protected] => [searchWordPeerClass:protected] => [bok_record:protected] => [authors:protected] => [organizations:protected] => [collections:protected] => [categories:protected] => [categories_initialized:protected] => [mapped_items:protected] => [content:protected] => [files:protected] => [language:protected] => [old_record:protected] => [id:protected] => 3835 [old_id:protected] => [elcosh_id:protected] => d001304 [type:protected] => document [display_type:protected] => HTML w/ PDF [user_id:protected] => 25 [language_id:protected] => 1 [tagging_id:protected] => Bruce Lippy [priority_id:protected] => 1 [title:protected] => Ergonomics Tool Box Talks (TBT) Training Guide [total_pages:protected] => 2 [billed_pages:protected] => 2 [publication_number:protected] => [part_of:protected] => [keywords:protected] => Ergonomics, carpal tunnel, muscular skeletal disorders, msd [comments:protected] => [summary:protected] => CPWR-funded ergonomics research by Washington University at St. Louis led to the development of 6 tool box talks. This guide is an explanation of how to deliver the talks for maximum effectiveness. This guide should be reviewed before delivering any of the talks because it makes important recommendations like: • If possible, give the TBTs as a part of the crew’s regular safety meetings so that ergonomics is included in the safety discussion. • Try to locate an area with few distractions for gathering the crew. • For a team approach, invite the work crew, site superintendent, project manager and other general contractor and/or subcontractor reps who you feel may be helpful in supporting the training and ergonomics solutions. [transition_comments:protected] => [external_link:protected] => [consol_link:protected] => [more_like_this:protected] => d001303,d001305,d001306,d001307,d001308,d001309,d001310 [permission_given_by:protected] => [published:protected] => T [billable:protected] => F [img_name:protected] => [img_ext:protected] => png [img_width:protected] => [img_height:protected] => [img_credit:protected] => [img_practice:protected] => [vid_source_id:protected] => [vid_running_time:protected] => [vid_intended_audience:protected] => [vid_acquisition_info:protected] => [vid_cost:protected] => [vid_producer:protected] => [vid_filename:protected] => [vid_filename_downloadable:protected] => [date_summary:protected] => 2014 [date_permission_requested:protected] => [date_permission_received:protected] => [date_review_needed:protected] => [date_received:protected] => 06/12/14 [date_completed:protected] => 07/29/14 [date_billed:protected] => [date_modified:protected] => 07/29/14 [collBokExports:protected] => [lastBokExportCriteria:BaseElcoshItem:private] => [alreadyInSave:protected] => [alreadyInValidation:protected] => [validationFailures:protected] => Array ( ) [_new:BaseObject:private] => [_deleted:BaseObject:private] => [modifiedColumns:protected] => Array ( ) ) [3836] => DocumentRecord Object ( [records:protected] => Array ( ) [recordId:protected] => [searchWordClass:protected] => [searchWordPeerClass:protected] => [bok_record:protected] => [authors:protected] => [organizations:protected] => [collections:protected] => [categories:protected] => [categories_initialized:protected] => [mapped_items:protected] => [content:protected] => [files:protected] => [language:protected] => [old_record:protected] => [id:protected] => 3836 [old_id:protected] => [elcosh_id:protected] => d001305 [type:protected] => document [display_type:protected] => HTML w/ PDF [user_id:protected] => 25 [language_id:protected] => 1 [tagging_id:protected] => Bruce Lippy [priority_id:protected] => 1 [title:protected] => TBT1 Ergonomics in Construction [total_pages:protected] => 5 [billed_pages:protected] => 5 [publication_number:protected] => [part_of:protected] => [keywords:protected] => ergonomics, ergo, msd, musculoskeletal disorders, risk factors, lifting, carpal tunnel, repetition, awkward postures [comments:protected] => 7-28-2014 Jeff Nelson asked Bruce Lippy about what to do with a sentence included toward the top of the doc, "Fill them in on page 2 'Other Questions.'" -- Bruce said this sentence could be deleted from the HTML. [summary:protected] => This is the first in a series of 6 Tool Box Talks produced by Washington University in St. Louis on ergonomics in construction work. This one should be delivered first because it covers what ergonomics is, why construction workers need to talk about it, what the risk factors are for developing a health problem and how to prevent these problems. [transition_comments:protected] => [external_link:protected] => [consol_link:protected] => http://www.cpwrconstructionsolutions.org/pipes_vessels/solution/50/participatory-ergonomics-program.html [more_like_this:protected] => d001303,d001304,d001306,d001307,d001308,d001309 [permission_given_by:protected] => Lisa Jaegers, Washington U. in St. Louis [published:protected] => T [billable:protected] => F [img_name:protected] => [img_ext:protected] => png [img_width:protected] => [img_height:protected] => [img_credit:protected] => [img_practice:protected] => [vid_source_id:protected] => [vid_running_time:protected] => [vid_intended_audience:protected] => [vid_acquisition_info:protected] => [vid_cost:protected] => [vid_producer:protected] => [vid_filename:protected] => [vid_filename_downloadable:protected] => [date_summary:protected] => 2014 [date_permission_requested:protected] => [date_permission_received:protected] => [date_review_needed:protected] => [date_received:protected] => 06/12/14 [date_completed:protected] => 07/28/14 [date_billed:protected] => [date_modified:protected] => 10/09/15 [collBokExports:protected] => [lastBokExportCriteria:BaseElcoshItem:private] => [alreadyInSave:protected] => [alreadyInValidation:protected] => [validationFailures:protected] => Array ( ) [_new:BaseObject:private] => [_deleted:BaseObject:private] => [modifiedColumns:protected] => Array ( ) ) [3837] => DocumentRecord Object ( [records:protected] => Array ( ) [recordId:protected] => [searchWordClass:protected] => [searchWordPeerClass:protected] => [bok_record:protected] => [authors:protected] => [organizations:protected] => [collections:protected] => [categories:protected] => [categories_initialized:protected] => [mapped_items:protected] => [content:protected] => [files:protected] => [language:protected] => [old_record:protected] => [id:protected] => 3837 [old_id:protected] => [elcosh_id:protected] => d001306 [type:protected] => document [display_type:protected] => HTML w/ PDF [user_id:protected] => 25 [language_id:protected] => 1 [tagging_id:protected] => Bruce Lippy [priority_id:protected] => 1 [title:protected] => TBT2 Keep Reach Close [total_pages:protected] => 4 [billed_pages:protected] => 4 [publication_number:protected] => [part_of:protected] => [keywords:protected] => reach, ergonomic, ergo, MSD, carpal tunnel, repetition, awkward positions [comments:protected] => 7-28-2014 Jeff Nelson asked Bruce Lippy about what to do with a sentence included toward the top of the doc, "Fill them in on page 2 'Other Questions.'" -- Bruce said this sentence could be deleted from the HTML. [summary:protected] => This is the second of six Tool Box Talks created by Washington University in St. Louis on ergonomics in construction. There is a guide with the series that describes how to deliver these talks. This one deals with how to avoid awkward reaching during tasks to prevent injuries. try to work with your hands below your head and close to our body to reduce your risk of shoulder strains and back discomfort. This TBT recommends considering ways to move close to the task, keeping the work area free of obstacles, and talking with each other to provide constructive feedback about your working position. [transition_comments:protected] => [external_link:protected] => [consol_link:protected] => http://www.cpwrconstructionsolutions.org/hazard/959/lifting-and-carrying-manual-materials-handling.html [more_like_this:protected] => d001303,d001304,d001305,d001307,d001308,e001309 [permission_given_by:protected] => [published:protected] => T [billable:protected] => F [img_name:protected] => [img_ext:protected] => png [img_width:protected] => [img_height:protected] => [img_credit:protected] => [img_practice:protected] => [vid_source_id:protected] => [vid_running_time:protected] => [vid_intended_audience:protected] => [vid_acquisition_info:protected] => [vid_cost:protected] => [vid_producer:protected] => [vid_filename:protected] => [vid_filename_downloadable:protected] => [date_summary:protected] => 2014 [date_permission_requested:protected] => [date_permission_received:protected] => [date_review_needed:protected] => [date_received:protected] => 06/12/14 [date_completed:protected] => 07/28/14 [date_billed:protected] => [date_modified:protected] => 11/02/16 [collBokExports:protected] => [lastBokExportCriteria:BaseElcoshItem:private] => [alreadyInSave:protected] => [alreadyInValidation:protected] => [validationFailures:protected] => Array ( ) [_new:BaseObject:private] => [_deleted:BaseObject:private] => [modifiedColumns:protected] => Array ( ) ) [3839] => DocumentRecord Object ( [records:protected] => Array ( ) [recordId:protected] => [searchWordClass:protected] => [searchWordPeerClass:protected] => [bok_record:protected] => [authors:protected] => [organizations:protected] => [collections:protected] => [categories:protected] => [categories_initialized:protected] => [mapped_items:protected] => [content:protected] => [files:protected] => [language:protected] => [old_record:protected] => [id:protected] => 3839 [old_id:protected] => [elcosh_id:protected] => d001308 [type:protected] => document [display_type:protected] => HTML w/ PDF [user_id:protected] => 23 [language_id:protected] => 1 [tagging_id:protected] => Bruce Lippy [priority_id:protected] => 1 [title:protected] => TBT4 Move Materials With Assist [total_pages:protected] => 4 [billed_pages:protected] => 4 [publication_number:protected] => [part_of:protected] => [keywords:protected] => lifting, back injury, ergonomics, ergo, MSD, buddy system [comments:protected] => 7-28-2014 Jeff Nelson asked Bruce Lippy about what to do with a sentence included toward the top of the doc, "Fill them in on page 2 'Other Questions.'" -- Bruce said this sentence could be deleted from the HTML. [summary:protected] => This tool box talk is fourth in a series of 6 developed by Washington University in St. Louis on construction ergonomics. This one focuses on preventing back injuries by getting an assist when manually lifting. It recommends using a cart for transporting loads, taking less trips, avoiding carrying materials on the shoulder and helping each other to lift large or heavy materials when a cart or hoist is not available. [transition_comments:protected] => [external_link:protected] => [consol_link:protected] => http://www.cpwrconstructionsolutions.org/hazard/959/lifting-and-carrying-manual-materials-handling.html [more_like_this:protected] => d001303,d001304,d001305,d001306,d001307,d001309 [permission_given_by:protected] => Lisa Jaegers, Washington U. in St. Louis [published:protected] => T [billable:protected] => F [img_name:protected] => [img_ext:protected] => png [img_width:protected] => [img_height:protected] => [img_credit:protected] => [img_practice:protected] => [vid_source_id:protected] => [vid_running_time:protected] => [vid_intended_audience:protected] => [vid_acquisition_info:protected] => [vid_cost:protected] => [vid_producer:protected] => [vid_filename:protected] => [vid_filename_downloadable:protected] => [date_summary:protected] => 2014 [date_permission_requested:protected] => [date_permission_received:protected] => [date_review_needed:protected] => [date_received:protected] => 06/12/14 [date_completed:protected] => 07/29/14 [date_billed:protected] => [date_modified:protected] => 10/09/15 [collBokExports:protected] => [lastBokExportCriteria:BaseElcoshItem:private] => [alreadyInSave:protected] => [alreadyInValidation:protected] => [validationFailures:protected] => Array ( ) [_new:BaseObject:private] => [_deleted:BaseObject:private] => [modifiedColumns:protected] => Array ( ) ) [3840] => DocumentRecord Object ( [records:protected] => Array ( ) [recordId:protected] => [searchWordClass:protected] => [searchWordPeerClass:protected] => [bok_record:protected] => [authors:protected] => [organizations:protected] => [collections:protected] => [categories:protected] => [categories_initialized:protected] => [mapped_items:protected] => [content:protected] => [files:protected] => [language:protected] => [old_record:protected] => [id:protected] => 3840 [old_id:protected] => [elcosh_id:protected] => d001309 [type:protected] => document [display_type:protected] => HTML w/ PDF [user_id:protected] => 23 [language_id:protected] => 1 [tagging_id:protected] => Bruce Lippy [priority_id:protected] => 1 [title:protected] => TBT5 Manual Tools [total_pages:protected] => 4 [billed_pages:protected] => 4 [publication_number:protected] => [part_of:protected] => [keywords:protected] => ergonomic, hand tools, handles, MSD, musculoskeletal disorder, carpal tunnel [comments:protected] => 7-28-2014 Jeff Nelson asked Bruce Lippy about what to do with a sentence included toward the top of the doc, "Fill them in on page 2 'Other Questions.'" -- Bruce said this sentence could be deleted from the HTML. [summary:protected] => This is the fifth in a series of 6 tool box talks on construction ergonomics produced by the University of Washington in St. Louis. This one focuses on manual tools. It asks the following 6 key questions. Does the tool… 1. Fit the task? 2. Allow a good power grip? 3. Keep the wrist in a straight posture? 4. Feel comfortable? 5. Take less effort than other tools for the task? 6. Work effectively? [transition_comments:protected] => [external_link:protected] => [consol_link:protected] => http://www.cpwrconstructionsolutions.org/masonry/solution/383/ergonomic-hand-tools.html [more_like_this:protected] => d001303,d001304,d001305,d001306,d001307,d001308,d001310 [permission_given_by:protected] => Lisa Jaegers, U. Wash. St. Louis [published:protected] => T [billable:protected] => F [img_name:protected] => [img_ext:protected] => png [img_width:protected] => [img_height:protected] => [img_credit:protected] => [img_practice:protected] => [vid_source_id:protected] => [vid_running_time:protected] => [vid_intended_audience:protected] => [vid_acquisition_info:protected] => [vid_cost:protected] => [vid_producer:protected] => [vid_filename:protected] => [vid_filename_downloadable:protected] => [date_summary:protected] => 2014 [date_permission_requested:protected] => [date_permission_received:protected] => [date_review_needed:protected] => [date_received:protected] => 06/12/14 [date_completed:protected] => 07/29/14 [date_billed:protected] => [date_modified:protected] => 10/09/15 [collBokExports:protected] => [lastBokExportCriteria:BaseElcoshItem:private] => [alreadyInSave:protected] => [alreadyInValidation:protected] => [validationFailures:protected] => Array ( ) [_new:BaseObject:private] => [_deleted:BaseObject:private] => [modifiedColumns:protected] => Array ( ) ) ) [content:protected] => [files:protected] => Array ( [559] => [560] => [546] => File Object ( [id:protected] => 546 [filename:protected] => 3.jpg [downloadable:protected] => F [timestamp:protected] => 2009-07-03 12:54:22 [alreadyInSave:protected] => [alreadyInValidation:protected] => [validationFailures:protected] => Array ( ) [_new:BaseObject:private] => [_deleted:BaseObject:private] => [modifiedColumns:protected] => Array ( ) ) [9643] => File Object ( [id:protected] => 9643 [filename:protected] => d001307.pdf [downloadable:protected] => T [timestamp:protected] => 2014-07-27 19:09:19 [alreadyInSave:protected] => [alreadyInValidation:protected] => [validationFailures:protected] => Array ( ) [_new:BaseObject:private] => [_deleted:BaseObject:private] => [modifiedColumns:protected] => Array ( ) ) [566] => File Object ( [id:protected] => 566 [filename:protected] => 4.jpg [downloadable:protected] => F [timestamp:protected] => 2009-07-03 12:54:23 [alreadyInSave:protected] => [alreadyInValidation:protected] => [validationFailures:protected] => Array ( ) [_new:BaseObject:private] => [_deleted:BaseObject:private] => [modifiedColumns:protected] => Array ( ) ) ) [language:protected] => Language Object ( [id:protected] => 1 [code:protected] => en [name:protected] => English [alreadyInSave:protected] => [alreadyInValidation:protected] => [validationFailures:protected] => Array ( ) [_new:BaseObject:private] => [_deleted:BaseObject:private] => [modifiedColumns:protected] => Array ( ) ) [old_record:protected] => [id:protected] => 3838 [old_id:protected] => [elcosh_id:protected] => d001307 [type:protected] => document [display_type:protected] => HTML w/ PDF [user_id:protected] => 25 [language_id:protected] => 1 [tagging_id:protected] => Bruce Lippy [priority_id:protected] => 1 [title:protected] => TBT3 Positioning [total_pages:protected] => 4 [billed_pages:protected] => 4 [publication_number:protected] => [part_of:protected] => [keywords:protected] => position, positioning, ergonomics, ergo, carpal tunnel, MSD, musculoskeletal disorder [comments:protected] => 7-28-2014 Jeff Nelson asked Bruce Lippy about what to do with a sentence included toward the top of the doc, "Fill them in on page 2 'Other Questions.'" -- Bruce said this sentence could be deleted from the HTML. [summary:protected] => This third in a series of 6 Tool Box Talks on construction ergonomics focuses on proper positioning to avoid injuries. The TBT recommends: 1)prop up a task off of the floor by using a raised surface, cart, baker scaffold, saw horses to prep materials near waist height, 2)move the lift or ladder in the best position for the work, 3)position the lift in front of the area you plan to work without trying to reach too far on either side of the lift. [transition_comments:protected] => [external_link:protected] => [consol_link:protected] => http://www.cpwrconstructionsolutions.org/hazard/959/lifting-and-carrying-manual-materials-handling.html [more_like_this:protected] => d001303,d001304,d001305,d001306,d001308,d001309 [permission_given_by:protected] => Lisa Jaegers, WU-St. Louis [published:protected] => T [billable:protected] => F [img_name:protected] => [img_ext:protected] => png [img_width:protected] => [img_height:protected] => [img_credit:protected] => [img_practice:protected] => [vid_source_id:protected] => [vid_running_time:protected] => [vid_intended_audience:protected] => [vid_acquisition_info:protected] => [vid_cost:protected] => [vid_producer:protected] => [vid_filename:protected] => [vid_filename_downloadable:protected] => [date_summary:protected] => 2014 [date_permission_requested:protected] => [date_permission_received:protected] => [date_review_needed:protected] => [date_received:protected] => 06/12/14 [date_completed:protected] => 07/28/14 [date_billed:protected] => [date_modified:protected] => 10/09/15 [collBokExports:protected] => [lastBokExportCriteria:BaseElcoshItem:private] => [alreadyInSave:protected] => [alreadyInValidation:protected] => [validationFailures:protected] => Array ( ) [_new:BaseObject:private] => [_deleted:BaseObject:private] => [modifiedColumns:protected] => Array ( ) ) [show_text] => [document_content] => ElcoshItemDocumentContent Object ( [id:protected] => 2906 [item_id:protected] => 3838 [type:protected] => main [title:protected] => [content:protected] =>
Facilitator / Leader Tasks Before the Tool Box Talk (TBT)
- Read through this TBT guide.
- Walk the job site to find ergonomics examples based on the TBT. If possible, take photos of “safe” and “unsafe” examples at the site to be used during the TBT.
- Write down discussion questions to ask the group.
Learning Goals
After discussing this training topic, workers will have gained a general understanding of:
- Unsafe work positions.
- Solutions to improve work positioning.
TRAINING CARD
The last page of this PDF has directions for printing and laminating the training cards.
TRAINER’S TALKING POINTS
Why should we talk about positioning?
Construction work requires working in high, low, and tight spaces which often forces you to work in an awkward or uncomfortable position. Working in awkward reaching and bent positions can lead to shoulder and back discomfort and possible injury over time.
Demonstration: The training card provides examples of the range of reaching and the point at which the reach is unsafe. Hold your arms straight out in front of you. Look at your hands and wrists while I discuss each of the reach zones on the training card.
The Green Zone shows the ideal location for working with your hands. When possible, try to keep your work tasks as far out as your wrists.
The Orange Zone is for occasional work since it involves more weight on your shoulders and low back since your hands are away from your body. If needed, keep the reach distance as far as your fingertips.
The Red Zone is away from your body so far that it places you at higher risk for falls when in the air and shoulder and back discomfort. Limit the time you work reaching beyond your fingertips.
End of Demonstration
Discussion Question: Can anyone describe to us an awkward position that they work in or have seen someone work in?
- What does it feel like in your neck, back or arms when working in that position?
- Other Questions:_____________________________________________
Training Note: Here are examples of hazards in different construction trades. Choose your trade or one that is similar to your group’s line of work that can be used as hazards and solutions examples.
| Trade | Awkward Posture Hazards | Potential Solution |
|---|---|---|
| Carpenter-Drywall | Leaning over the side of a scissor lift to reach and operating a screw gun with the arm fully extended (reaching in the red zone past the fingertips). | Before starting to install the line of screws to the side of the lift, move the lift to re-center it for the next 2 lines of screws to be installed. |
| Floor Layer | Spreading mortar overhead on a wall with the bakers scaffold one foot away from the wall due to buckets on the floor below (reach in the red zone, past the fingertips). | Pre-plan this task by removing all objects in the path of the bakers scaffold. Having an open path allows you to work closer to the task. |
| Sheet Metal Worker | Prepping duct parts on the floor while bending the back and reaching to work on them. | Pre-plan this task by setting up a waist-height workstation on extra materials, a cart, or saw horses. |
Now let’s put this information into practice. What are some tricks or techniques that you use to work in a comfortable position?
- Other Questions:_____________________________________________
Here are a few other ideas that are listed on your training card:
Prop up your tasks off of the floor by using a raised surface, cart, baker scaffold, saw horses to prep materials near waist height.
Move the lift or ladder in the best position for the work – close to the work tasks.
For safety & comfort, try to position the lift in front of the area you plan to work without trying to reach too far on either side of the lift.
In summary, it is important to work in a safe position when possible in order to reduce the risk of falls and discomfort due to awkward working positions. Consider ways that you can work in the green/comfort zone and orange zone and avoid the unsafe red zone.
References
[Images modified from Grandjean & Eastman Kodak Co.]
1. Grandjean, E. 1988. Fitting the task to the man: A textbook of occupational ergonomics. 4th ed. Taylor & Francis.
2. Eastman Kodak Co. 1983. Ergonomic Design for People at Work. Vol 1. Wiley, John & Sons, Incorporated.
Refer to the resources at our website: oshr.im.wustl.edu for more Tool Box TIPS.
TRAINING ATTENDANCE SHEET
Training Topic: Ergonomics -- Positioning
Date:
| ATTENDEES | |
|---|---|
Directions for Making Laminated Training Cards
The last page of this PDF has directions for printing and laminating the training cards.
[content_transformed:protected] =>Facilitator / Leader Tasks Before the Tool Box Talk (TBT)
- Read through this TBT guide.
- Walk the job site to find ergonomics examples based on the TBT. If possible, take photos of “safe” and “unsafe” examples at the site to be used during the TBT.
- Write down discussion questions to ask the group.
Learning Goals
After discussing this training topic, workers will have gained a general understanding of:
- Unsafe work positions.
- Solutions to improve work positioning.
TRAINING CARD
The last page of this PDF has directions for printing and laminating the training cards.
TRAINER’S TALKING POINTS
Why should we talk about positioning?
Construction work requires working in high, low, and tight spaces which often forces you to work in an awkward or uncomfortable position. Working in awkward reaching and bent positions can lead to shoulder and back discomfort and possible injury over time.
Demonstration: The training card provides examples of the range of reaching and the point at which the reach is unsafe. Hold your arms straight out in front of you. Look at your hands and wrists while I discuss each of the reach zones on the training card.
The Green Zone shows the ideal location for working with your hands. When possible, try to keep your work tasks as far out as your wrists.
The Orange Zone is for occasional work since it involves more weight on your shoulders and low back since your hands are away from your body. If needed, keep the reach distance as far as your fingertips.
The Red Zone is away from your body so far that it places you at higher risk for falls when in the air and shoulder and back discomfort. Limit the time you work reaching beyond your fingertips.
End of Demonstration
Discussion Question: Can anyone describe to us an awkward position that they work in or have seen someone work in?
- What does it feel like in your neck, back or arms when working in that position?
- Other Questions:_____________________________________________
Training Note: Here are examples of hazards in different construction trades. Choose your trade or one that is similar to your group’s line of work that can be used as hazards and solutions examples.
| Trade | Awkward Posture Hazards | Potential Solution |
|---|---|---|
| Carpenter-Drywall | Leaning over the side of a scissor lift to reach and operating a screw gun with the arm fully extended (reaching in the red zone past the fingertips). | Before starting to install the line of screws to the side of the lift, move the lift to re-center it for the next 2 lines of screws to be installed. |
| Floor Layer | Spreading mortar overhead on a wall with the bakers scaffold one foot away from the wall due to buckets on the floor below (reach in the red zone, past the fingertips). | Pre-plan this task by removing all objects in the path of the bakers scaffold. Having an open path allows you to work closer to the task. |
| Sheet Metal Worker | Prepping duct parts on the floor while bending the back and reaching to work on them. | Pre-plan this task by setting up a waist-height workstation on extra materials, a cart, or saw horses. |
Now let’s put this information into practice. What are some tricks or techniques that you use to work in a comfortable position?
- Other Questions:_____________________________________________
Here are a few other ideas that are listed on your training card:
Prop up your tasks off of the floor by using a raised surface, cart, baker scaffold, saw horses to prep materials near waist height.
Move the lift or ladder in the best position for the work – close to the work tasks.
For safety & comfort, try to position the lift in front of the area you plan to work without trying to reach too far on either side of the lift.
In summary, it is important to work in a safe position when possible in order to reduce the risk of falls and discomfort due to awkward working positions. Consider ways that you can work in the green/comfort zone and orange zone and avoid the unsafe red zone.
References
[Images modified from Grandjean & Eastman Kodak Co.]
1. Grandjean, E. 1988. Fitting the task to the man: A textbook of occupational ergonomics. 4th ed. Taylor & Francis.
2. Eastman Kodak Co. 1983. Ergonomic Design for People at Work. Vol 1. Wiley, John & Sons, Incorporated.
Refer to the resources at our website: oshr.im.wustl.edu for more Tool Box TIPS.
TRAINING ATTENDANCE SHEET
Training Topic: Ergonomics -- Positioning
Date:
| ATTENDEES | |
|---|---|
Directions for Making Laminated Training Cards
The last page of this PDF has directions for printing and laminating the training cards.
[disclaimer:protected] => [disclaimer_transformed:protected] => [alreadyInSave:protected] => [alreadyInValidation:protected] => [validationFailures:protected] => Array ( ) [_new:BaseObject:private] => [_deleted:BaseObject:private] => [modifiedColumns:protected] => Array ( ) ) [template] => record ) [_file] => /home/agsafe5/repositories/elcosh/live/templates/elcosh/macros.html [_errors:protected] => Array ( ) [_encoding:protected] => UTF-8 [_outputMode:protected] => 11 [_forceReparse:protected] => [_phpCodeDestination:protected] => /tmp/ [_phpCodeExtension:protected] => php [_cacheLifetime:protected] => 30 [_cachePurgeFrequency:protected] => 30 [externalMacroTemplatesCache:PHPTAL:private] => Array ( ) ) [record_macros.html] => PHPTAL Object ( [_prefilters:protected] => Array ( ) [_prefilter:PHPTAL:private] => REMOVED: DO NOT USE [_postfilter:protected] => [_repositories:protected] => Array ( [0] => /home/agsafe5/repositories/elcosh/live/templates/elcosh ) [_path:protected] => record_macros.html [_resolvers:protected] => Array ( ) [_source:protected] => PHPTAL_FileSource Object ( [_path:PHPTAL_FileSource:private] => /home/agsafe5/repositories/elcosh/live/templates/elcosh/record_macros.html ) [_codeFile:protected] => /tmp/tpl_61515a6c_record_macros__gMFg5NvPLybiFfYjAv9Aag.php [_functionName:protected] => tpl_61515a6c_record_macros__gMFg5NvPLybiFfYjAv9Aag [_prepared:protected] => 1 [_triggers:protected] => Array ( ) [_translator:protected] => [_globalContext:protected] => stdClass Object ( ) [_context:protected] => PHPTAL_Context Object ( [_line] => [_file] => /home/agsafe5/repositories/elcosh/live/templates/elcosh/record.html [repeat] => stdClass Object ( ) [_xmlDeclaration] => [_docType] => [_nothrow:PHPTAL_Context:private] => [_slots:PHPTAL_Context:private] => Array ( ) [_slotsStack:PHPTAL_Context:private] => Array ( [0] => Array ( ) [1] => Array ( ) ) [_parentContext:PHPTAL_Context:private] => PHPTAL_Context Object ( [_line] => [_file] => /home/agsafe5/repositories/elcosh/live/templates/elcosh/record.html [repeat] => stdClass Object ( ) [_xmlDeclaration] => [_docType] => [_nothrow:PHPTAL_Context:private] => [_slots:PHPTAL_Context:private] => Array ( ) [_slotsStack:PHPTAL_Context:private] => Array ( [0] => Array ( ) [1] => Array ( ) ) [_parentContext:PHPTAL_Context:private] => [_globalContext:PHPTAL_Context:private] => stdClass Object ( ) [_echoDeclarations:PHPTAL_Context:private] => [referer] => http://elcosh.org/document/3838/d001307/TBT3%2BPositioning.html [curr_module] => Record [styles] => Array ( ) [javascript] => Array ( [0] => jquery.min.js ) [metas] => Array ( [language] => en [robots] => index, follow ) [user] => [curr_url] => https://elcosh.org/index.php?module=Record&id=3838&type=document [base_url] => https://elcosh.org/index.php?module=Record [title] => eLCOSH : TBT3 Positioning [language] => en [search_query] => [module] => Record [new_records] => Array ( [0] => Search_Result Object ( [title] => Toolbox Talk: Fixed Ladder [image] => /record/images/notavailable-p.png [blurb] => The CPWR Toolbox Talk on Fixed Ladders addresses the potential risks associated with using fixed ladders. The resource includes a brief case example,... [category] => Array ( [0] => 15 [1] => 47 [2] => 49 [3] => 51 [4] => 53 [5] => 55 [6] => 60 [7] => 64 [8] => 73 [9] => 76 [10] => 78 [11] => 80 [12] => 86 [13] => 87 [14] => 90 [15] => 92 [16] => 93 [17] => 94 [18] => 100 ) [labels] => Array ( [0] => Falls [1] => Work Environment [2] => Hazards [3] => Bricklayer [4] => Trades [5] => Carpenter [7] => Cement Mason [9] => Concrete Polisher [11] => Electrical Worker [13] => HVAC [15] => Laborer [17] => PCC/Restoration [19] => Plumber/Pipefitter [21] => Roofer/Waterproofer [23] => Sheetmetal Worker [25] => Welder [27] => Commercial & Institutional [28] => Jobsites [29] => Industrial [31] => LEED/Green Construction [33] => Renovations [35] => Residential [37] => Toolbox Talks [38] => Documents [39] => Media & Documents ) [type] => Toolbox Talks [sub_category] => [url] => /document/4430/d001660/Toolbox%2BTalk%253A%2BFixed%2BLadder.html [item:protected] => DocumentRecord Object ( [records:protected] => Array ( ) [recordId:protected] => [searchWordClass:protected] => [searchWordPeerClass:protected] => [bok_record:protected] => [authors:protected] => [organizations:protected] => [collections:protected] => [categories:protected] => Array ( [15] => Category Object ( [languages:protected] => [bok_resources:protected] => [bok_topics:protected] => [bok_keywords:protected] => [id:protected] => 15 [type:protected] => category [parent:protected] => 7 [label:protected] => Falls [alreadyInSave:protected] => [alreadyInValidation:protected] => [validationFailures:protected] => Array ( ) [_new:BaseObject:private] => [_deleted:BaseObject:private] => [modifiedColumns:protected] => Array ( ) ) [47] => Category Object ( [languages:protected] => [bok_resources:protected] => [bok_topics:protected] => [bok_keywords:protected] => [id:protected] => 47 [type:protected] => category [parent:protected] => 2 [label:protected] => Bricklayer [alreadyInSave:protected] => [alreadyInValidation:protected] => [validationFailures:protected] => Array ( ) [_new:BaseObject:private] => [_deleted:BaseObject:private] => [modifiedColumns:protected] => Array ( ) ) [49] => Category Object ( [languages:protected] => [bok_resources:protected] => [bok_topics:protected] => [bok_keywords:protected] => [id:protected] => 49 [type:protected] => category [parent:protected] => 2 [label:protected] => Carpenter [alreadyInSave:protected] => [alreadyInValidation:protected] => [validationFailures:protected] => Array ( ) [_new:BaseObject:private] => [_deleted:BaseObject:private] => [modifiedColumns:protected] => Array ( ) ) [51] => Category Object ( [languages:protected] => [bok_resources:protected] => [bok_topics:protected] => [bok_keywords:protected] => [id:protected] => 51 [type:protected] => category [parent:protected] => 2 [label:protected] => Cement Mason [alreadyInSave:protected] => [alreadyInValidation:protected] => [validationFailures:protected] => Array ( ) [_new:BaseObject:private] => [_deleted:BaseObject:private] => [modifiedColumns:protected] => Array ( ) ) [53] => Category Object ( [languages:protected] => [bok_resources:protected] => [bok_topics:protected] => [bok_keywords:protected] => [id:protected] => 53 [type:protected] => category [parent:protected] => 2 [label:protected] => Concrete Polisher [alreadyInSave:protected] => [alreadyInValidation:protected] => [validationFailures:protected] => Array ( ) [_new:BaseObject:private] => [_deleted:BaseObject:private] => [modifiedColumns:protected] => Array ( ) ) [55] => Category Object ( [languages:protected] => [bok_resources:protected] => [bok_topics:protected] => [bok_keywords:protected] => [id:protected] => 55 [type:protected] => category [parent:protected] => 2 [label:protected] => Electrical Worker [alreadyInSave:protected] => [alreadyInValidation:protected] => [validationFailures:protected] => Array ( ) [_new:BaseObject:private] => [_deleted:BaseObject:private] => [modifiedColumns:protected] => Array ( ) ) [60] => Category Object ( [languages:protected] => [bok_resources:protected] => [bok_topics:protected] => [bok_keywords:protected] => [id:protected] => 60 [type:protected] => category [parent:protected] => 2 [label:protected] => HVAC [alreadyInSave:protected] => [alreadyInValidation:protected] => [validationFailures:protected] => Array ( ) [_new:BaseObject:private] => [_deleted:BaseObject:private] => [modifiedColumns:protected] => Array ( ) ) [64] => Category Object ( [languages:protected] => [bok_resources:protected] => [bok_topics:protected] => [bok_keywords:protected] => [id:protected] => 64 [type:protected] => category [parent:protected] => 2 [label:protected] => Laborer [alreadyInSave:protected] => [alreadyInValidation:protected] => [validationFailures:protected] => Array ( ) [_new:BaseObject:private] => [_deleted:BaseObject:private] => [modifiedColumns:protected] => Array ( ) ) [73] => Category Object ( [languages:protected] => [bok_resources:protected] => [bok_topics:protected] => [bok_keywords:protected] => [id:protected] => 73 [type:protected] => category [parent:protected] => 2 [label:protected] => PCC/Restoration [alreadyInSave:protected] => [alreadyInValidation:protected] => [validationFailures:protected] => Array ( ) [_new:BaseObject:private] => [_deleted:BaseObject:private] => [modifiedColumns:protected] => Array ( ) ) [76] => Category Object ( [languages:protected] => [bok_resources:protected] => [bok_topics:protected] => [bok_keywords:protected] => [id:protected] => 76 [type:protected] => category [parent:protected] => 2 [label:protected] => Plumber/Pipefitter [alreadyInSave:protected] => [alreadyInValidation:protected] => [validationFailures:protected] => Array ( ) [_new:BaseObject:private] => [_deleted:BaseObject:private] => [modifiedColumns:protected] => Array ( ) ) [78] => Category Object ( [languages:protected] => [bok_resources:protected] => [bok_topics:protected] => [bok_keywords:protected] => [id:protected] => 78 [type:protected] => category [parent:protected] => 2 [label:protected] => Roofer/Waterproofer [alreadyInSave:protected] => [alreadyInValidation:protected] => [validationFailures:protected] => Array ( ) [_new:BaseObject:private] => [_deleted:BaseObject:private] => [modifiedColumns:protected] => Array ( ) ) [80] => Category Object ( [languages:protected] => [bok_resources:protected] => [bok_topics:protected] => [bok_keywords:protected] => [id:protected] => 80 [type:protected] => category [parent:protected] => 2 [label:protected] => Sheetmetal Worker [alreadyInSave:protected] => [alreadyInValidation:protected] => [validationFailures:protected] => Array ( ) [_new:BaseObject:private] => [_deleted:BaseObject:private] => [modifiedColumns:protected] => Array ( ) ) [86] => Category Object ( [languages:protected] => [bok_resources:protected] => [bok_topics:protected] => [bok_keywords:protected] => [id:protected] => 86 [type:protected] => category [parent:protected] => 2 [label:protected] => Welder [alreadyInSave:protected] => [alreadyInValidation:protected] => [validationFailures:protected] => Array ( ) [_new:BaseObject:private] => [_deleted:BaseObject:private] => [modifiedColumns:protected] => Array ( ) ) [87] => Category Object ( [languages:protected] => [bok_resources:protected] => [bok_topics:protected] => [bok_keywords:protected] => [id:protected] => 87 [type:protected] => category [parent:protected] => 3 [label:protected] => Commercial & Institutional [alreadyInSave:protected] => [alreadyInValidation:protected] => [validationFailures:protected] => Array ( ) [_new:BaseObject:private] => [_deleted:BaseObject:private] => [modifiedColumns:protected] => Array ( ) ) [90] => Category Object ( [languages:protected] => [bok_resources:protected] => [bok_topics:protected] => [bok_keywords:protected] => [id:protected] => 90 [type:protected] => category [parent:protected] => 3 [label:protected] => Industrial [alreadyInSave:protected] => [alreadyInValidation:protected] => [validationFailures:protected] => Array ( ) [_new:BaseObject:private] => [_deleted:BaseObject:private] => [modifiedColumns:protected] => Array ( ) ) [92] => Category Object ( [languages:protected] => [bok_resources:protected] => [bok_topics:protected] => [bok_keywords:protected] => [id:protected] => 92 [type:protected] => category [parent:protected] => 3 [label:protected] => LEED/Green Construction [alreadyInSave:protected] => [alreadyInValidation:protected] => [validationFailures:protected] => Array ( ) [_new:BaseObject:private] => [_deleted:BaseObject:private] => [modifiedColumns:protected] => Array ( ) ) [93] => Category Object ( [languages:protected] => [bok_resources:protected] => [bok_topics:protected] => [bok_keywords:protected] => [id:protected] => 93 [type:protected] => category [parent:protected] => 3 [label:protected] => Renovations [alreadyInSave:protected] => [alreadyInValidation:protected] => [validationFailures:protected] => Array ( ) [_new:BaseObject:private] => [_deleted:BaseObject:private] => [modifiedColumns:protected] => Array ( ) ) [94] => Category Object ( [languages:protected] => [bok_resources:protected] => [bok_topics:protected] => [bok_keywords:protected] => [id:protected] => 94 [type:protected] => category [parent:protected] => 3 [label:protected] => Residential [alreadyInSave:protected] => [alreadyInValidation:protected] => [validationFailures:protected] => Array ( ) [_new:BaseObject:private] => [_deleted:BaseObject:private] => [modifiedColumns:protected] => Array ( ) ) [100] => Category Object ( [languages:protected] => [bok_resources:protected] => [bok_topics:protected] => [bok_keywords:protected] => [id:protected] => 100 [type:protected] => category [parent:protected] => 6 [label:protected] => Toolbox Talks [alreadyInSave:protected] => [alreadyInValidation:protected] => [validationFailures:protected] => Array ( ) [_new:BaseObject:private] => [_deleted:BaseObject:private] => [modifiedColumns:protected] => Array ( ) ) ) [categories_initialized:protected] => 1 [mapped_items:protected] => [content:protected] => [files:protected] => [language:protected] => Language Object ( [id:protected] => 1 [code:protected] => en [name:protected] => English [alreadyInSave:protected] => [alreadyInValidation:protected] => [validationFailures:protected] => Array ( ) [_new:BaseObject:private] => [_deleted:BaseObject:private] => [modifiedColumns:protected] => Array ( ) ) [old_record:protected] => [id:protected] => 4430 [old_id:protected] => [elcosh_id:protected] => d001660 [type:protected] => document [display_type:protected] => HTML only (and links) [user_id:protected] => 0 [language_id:protected] => 1 [tagging_id:protected] => Mike Aguilar [priority_id:protected] => 1 [title:protected] => Toolbox Talk: Fixed Ladder [total_pages:protected] => 0 [billed_pages:protected] => 0 [publication_number:protected] => [part_of:protected] => [keywords:protected] => Fixed Ladders, Fall Prevention, Falls [comments:protected] => [summary:protected] => The CPWR Toolbox Talk on Fixed Ladders addresses the potential risks associated with using fixed ladders. The resource includes a brief case example, steps to prevent a related injury and questions for discussion. It includes an image that illustrates the hazard, which can be posted in a central location as a reminder of steps to work safely. Available in English and Spanish. [transition_comments:protected] => [external_link:protected] => [consol_link:protected] => [more_like_this:protected] => d001257,d001254,d001255,d001256,d001258,d001262,d001279 [permission_given_by:protected] => [published:protected] => T [billable:protected] => F [img_name:protected] => [img_ext:protected] => [img_width:protected] => [img_height:protected] => [img_credit:protected] => [img_practice:protected] => [vid_source_id:protected] => [vid_running_time:protected] => [vid_intended_audience:protected] => [vid_acquisition_info:protected] => [vid_cost:protected] => [vid_producer:protected] => [vid_filename:protected] => [vid_filename_downloadable:protected] => [date_summary:protected] => [date_permission_requested:protected] => [date_permission_received:protected] => [date_review_needed:protected] => [date_received:protected] => 06/10/22 [date_completed:protected] => 06/10/22 [date_billed:protected] => [date_modified:protected] => 06/16/25 [collBokExports:protected] => [lastBokExportCriteria:BaseElcoshItem:private] => [alreadyInSave:protected] => [alreadyInValidation:protected] => [validationFailures:protected] => Array ( ) [_new:BaseObject:private] => [_deleted:BaseObject:private] => [modifiedColumns:protected] => Array ( ) ) ) [1] => Search_Result Object ( [title] => Toolbox Talk: Work Zone Safety: Working Around Vehicles [image] => /record/images/notavailable-p.png [blurb] => The CPWR Toolbox Talk on Working Around Vehicles in the Work Zone addresses methods to avoid being struck-by a vehicle on a construction site. The res... [category] => Array ( [0] => 12 [1] => 18 [2] => 52 [3] => 57 [4] => 70 [5] => 85 [6] => 87 [7] => 88 [8] => 89 [9] => 91 [10] => 90 [11] => 92 [12] => 93 [13] => 94 [14] => 95 [15] => 100 ) [labels] => Array ( [0] => Crushed/Struck By [1] => Work Environment [2] => Hazards [3] => Motor Vehicles/Heavy Equipment [6] => Commercial Diver [7] => Trades [8] => Flagger [10] => Operating Engineer [12] => Truck Driver [14] => Commercial & Institutional [15] => Jobsites [16] => Demolition [18] => Disasters [20] => Heavy & Highway [22] => Industrial [24] => LEED/Green Construction [26] => Renovations [28] => Residential [30] => Underground [32] => Toolbox Talks [33] => Documents [34] => Media & Documents ) [type] => Toolbox Talks [sub_category] => [url] => /document/4428/d001658/Toolbox%2BTalk%253A%2BWork%2BZone%2BSafety%253A%2BWorking%2BAround%2BVehicles.html [item:protected] => DocumentRecord Object ( [records:protected] => Array ( ) [recordId:protected] => [searchWordClass:protected] => [searchWordPeerClass:protected] => [bok_record:protected] => [authors:protected] => [organizations:protected] => [collections:protected] => [categories:protected] => Array ( [12] => Category Object ( [languages:protected] => [bok_resources:protected] => [bok_topics:protected] => [bok_keywords:protected] => [id:protected] => 12 [type:protected] => category [parent:protected] => 7 [label:protected] => Crushed/Struck By [alreadyInSave:protected] => [alreadyInValidation:protected] => [validationFailures:protected] => Array ( ) [_new:BaseObject:private] => [_deleted:BaseObject:private] => [modifiedColumns:protected] => Array ( ) ) [18] => Category Object ( [languages:protected] => [bok_resources:protected] => [bok_topics:protected] => [bok_keywords:protected] => [id:protected] => 18 [type:protected] => category [parent:protected] => 7 [label:protected] => Motor Vehicles/Heavy Equipment [alreadyInSave:protected] => [alreadyInValidation:protected] => [validationFailures:protected] => Array ( ) [_new:BaseObject:private] => [_deleted:BaseObject:private] => [modifiedColumns:protected] => Array ( ) ) [52] => Category Object ( [languages:protected] => [bok_resources:protected] => [bok_topics:protected] => [bok_keywords:protected] => [id:protected] => 52 [type:protected] => category [parent:protected] => 2 [label:protected] => Commercial Diver [alreadyInSave:protected] => [alreadyInValidation:protected] => [validationFailures:protected] => Array ( ) [_new:BaseObject:private] => [_deleted:BaseObject:private] => [modifiedColumns:protected] => Array ( ) ) [57] => Category Object ( [languages:protected] => [bok_resources:protected] => [bok_topics:protected] => [bok_keywords:protected] => [id:protected] => 57 [type:protected] => category [parent:protected] => 2 [label:protected] => Flagger [alreadyInSave:protected] => [alreadyInValidation:protected] => [validationFailures:protected] => Array ( ) [_new:BaseObject:private] => [_deleted:BaseObject:private] => [modifiedColumns:protected] => Array ( ) ) [70] => Category Object ( [languages:protected] => [bok_resources:protected] => [bok_topics:protected] => [bok_keywords:protected] => [id:protected] => 70 [type:protected] => category [parent:protected] => 2 [label:protected] => Operating Engineer [alreadyInSave:protected] => [alreadyInValidation:protected] => [validationFailures:protected] => Array ( ) [_new:BaseObject:private] => [_deleted:BaseObject:private] => [modifiedColumns:protected] => Array ( ) ) [85] => Category Object ( [languages:protected] => [bok_resources:protected] => [bok_topics:protected] => [bok_keywords:protected] => [id:protected] => 85 [type:protected] => category [parent:protected] => 2 [label:protected] => Truck Driver [alreadyInSave:protected] => [alreadyInValidation:protected] => [validationFailures:protected] => Array ( ) [_new:BaseObject:private] => [_deleted:BaseObject:private] => [modifiedColumns:protected] => Array ( ) ) [87] => Category Object ( [languages:protected] => [bok_resources:protected] => [bok_topics:protected] => [bok_keywords:protected] => [id:protected] => 87 [type:protected] => category [parent:protected] => 3 [label:protected] => Commercial & Institutional [alreadyInSave:protected] => [alreadyInValidation:protected] => [validationFailures:protected] => Array ( ) [_new:BaseObject:private] => [_deleted:BaseObject:private] => [modifiedColumns:protected] => Array ( ) ) [88] => Category Object ( [languages:protected] => [bok_resources:protected] => [bok_topics:protected] => [bok_keywords:protected] => [id:protected] => 88 [type:protected] => category [parent:protected] => 3 [label:protected] => Demolition [alreadyInSave:protected] => [alreadyInValidation:protected] => [validationFailures:protected] => Array ( ) [_new:BaseObject:private] => [_deleted:BaseObject:private] => [modifiedColumns:protected] => Array ( ) ) [89] => Category Object ( [languages:protected] => [bok_resources:protected] => [bok_topics:protected] => [bok_keywords:protected] => [id:protected] => 89 [type:protected] => category [parent:protected] => 3 [label:protected] => Disasters [alreadyInSave:protected] => [alreadyInValidation:protected] => [validationFailures:protected] => Array ( ) [_new:BaseObject:private] => [_deleted:BaseObject:private] => [modifiedColumns:protected] => Array ( ) ) [91] => Category Object ( [languages:protected] => [bok_resources:protected] => [bok_topics:protected] => [bok_keywords:protected] => [id:protected] => 91 [type:protected] => category [parent:protected] => 3 [label:protected] => Heavy & Highway [alreadyInSave:protected] => [alreadyInValidation:protected] => [validationFailures:protected] => Array ( ) [_new:BaseObject:private] => [_deleted:BaseObject:private] => [modifiedColumns:protected] => Array ( ) ) [90] => Category Object ( [languages:protected] => [bok_resources:protected] => [bok_topics:protected] => [bok_keywords:protected] => [id:protected] => 90 [type:protected] => category [parent:protected] => 3 [label:protected] => Industrial [alreadyInSave:protected] => [alreadyInValidation:protected] => [validationFailures:protected] => Array ( ) [_new:BaseObject:private] => [_deleted:BaseObject:private] => [modifiedColumns:protected] => Array ( ) ) [92] => Category Object ( [languages:protected] => [bok_resources:protected] => [bok_topics:protected] => [bok_keywords:protected] => [id:protected] => 92 [type:protected] => category [parent:protected] => 3 [label:protected] => LEED/Green Construction [alreadyInSave:protected] => [alreadyInValidation:protected] => [validationFailures:protected] => Array ( ) [_new:BaseObject:private] => [_deleted:BaseObject:private] => [modifiedColumns:protected] => Array ( ) ) [93] => Category Object ( [languages:protected] => [bok_resources:protected] => [bok_topics:protected] => [bok_keywords:protected] => [id:protected] => 93 [type:protected] => category [parent:protected] => 3 [label:protected] => Renovations [alreadyInSave:protected] => [alreadyInValidation:protected] => [validationFailures:protected] => Array ( ) [_new:BaseObject:private] => [_deleted:BaseObject:private] => [modifiedColumns:protected] => Array ( ) ) [94] => Category Object ( [languages:protected] => [bok_resources:protected] => [bok_topics:protected] => [bok_keywords:protected] => [id:protected] => 94 [type:protected] => category [parent:protected] => 3 [label:protected] => Residential [alreadyInSave:protected] => [alreadyInValidation:protected] => [validationFailures:protected] => Array ( ) [_new:BaseObject:private] => [_deleted:BaseObject:private] => [modifiedColumns:protected] => Array ( ) ) [95] => Category Object ( [languages:protected] => [bok_resources:protected] => [bok_topics:protected] => [bok_keywords:protected] => [id:protected] => 95 [type:protected] => category [parent:protected] => 3 [label:protected] => Underground [alreadyInSave:protected] => [alreadyInValidation:protected] => [validationFailures:protected] => Array ( ) [_new:BaseObject:private] => [_deleted:BaseObject:private] => [modifiedColumns:protected] => Array ( ) ) [100] => Category Object ( [languages:protected] => [bok_resources:protected] => [bok_topics:protected] => [bok_keywords:protected] => [id:protected] => 100 [type:protected] => category [parent:protected] => 6 [label:protected] => Toolbox Talks [alreadyInSave:protected] => [alreadyInValidation:protected] => [validationFailures:protected] => Array ( ) [_new:BaseObject:private] => [_deleted:BaseObject:private] => [modifiedColumns:protected] => Array ( ) ) ) [categories_initialized:protected] => 1 [mapped_items:protected] => [content:protected] => [files:protected] => [language:protected] => Language Object ( [id:protected] => 1 [code:protected] => en [name:protected] => English [alreadyInSave:protected] => [alreadyInValidation:protected] => [validationFailures:protected] => Array ( ) [_new:BaseObject:private] => [_deleted:BaseObject:private] => [modifiedColumns:protected] => Array ( ) ) [old_record:protected] => [id:protected] => 4428 [old_id:protected] => [elcosh_id:protected] => d001658 [type:protected] => document [display_type:protected] => HTML only (and links) [user_id:protected] => 0 [language_id:protected] => 1 [tagging_id:protected] => Daniela Caceres [priority_id:protected] => 1 [title:protected] => Toolbox Talk: Work Zone Safety: Working Around Vehicles [total_pages:protected] => 0 [billed_pages:protected] => 0 [publication_number:protected] => [part_of:protected] => [keywords:protected] => Struck, Struck by, Vehicle, Work Zone Safety, Truck, Operator, Driver, Mobile Equipment [comments:protected] => [summary:protected] => The CPWR Toolbox Talk on Working Around Vehicles in the Work Zone addresses methods to avoid being struck-by a vehicle on a construction site. The resource includes a case example, steps to prevent a related injury, and questions for discussion. It includes a graphic that illustrates the hazard, which can be posted in a central location as a reminder of steps to work safely. Available in English and Spanish. [transition_comments:protected] => [external_link:protected] => [consol_link:protected] => [more_like_this:protected] => d001640 [permission_given_by:protected] => [published:protected] => T [billable:protected] => F [img_name:protected] => [img_ext:protected] => [img_width:protected] => [img_height:protected] => [img_credit:protected] => [img_practice:protected] => [vid_source_id:protected] => [vid_running_time:protected] => [vid_intended_audience:protected] => [vid_acquisition_info:protected] => [vid_cost:protected] => [vid_producer:protected] => [vid_filename:protected] => [vid_filename_downloadable:protected] => [date_summary:protected] => [date_permission_requested:protected] => [date_permission_received:protected] => [date_review_needed:protected] => [date_received:protected] => 12/23/21 [date_completed:protected] => 12/23/21 [date_billed:protected] => [date_modified:protected] => 05/19/23 [collBokExports:protected] => [lastBokExportCriteria:BaseElcoshItem:private] => [alreadyInSave:protected] => [alreadyInValidation:protected] => [validationFailures:protected] => Array ( ) [_new:BaseObject:private] => [_deleted:BaseObject:private] => [modifiedColumns:protected] => Array ( ) ) ) [2] => Search_Result Object ( [title] => Construction Dive -- DeWalt's Jobsite Pro headphones recalled for fire hazards [image] => /record/images/notavailable-p.png [blurb] => A recall notice by the United States Consumer Product Safety Commission affects over 300,000 DeWalt Jobsite Pro Headphones. The recall is a result of... [category] => Array ( [0] => 16 [1] => 44 [2] => 45 [3] => 46 [4] => 47 [5] => 48 [6] => 49 [7] => 50 [8] => 51 [9] => 52 [10] => 53 [11] => 54 [12] => 55 [13] => 56 [14] => 57 [15] => 58 [16] => 59 [17] => 60 [18] => 61 [19] => 64 [20] => 65 [21] => 66 [22] => 67 [23] => 68 [24] => 69 [25] => 70 [26] => 71 [27] => 72 [28] => 73 [29] => 74 [30] => 75 [31] => 76 [32] => 77 [33] => 63 [34] => 78 [35] => 79 [36] => 80 [37] => 81 [38] => 82 [39] => 62 [40] => 83 [41] => 84 [42] => 85 [43] => 86 [44] => 87 [45] => 88 [46] => 89 [47] => 91 [48] => 90 [49] => 92 [50] => 93 [51] => 94 [52] => 95 ) [labels] => Array ( [0] => Fire & Explosions [1] => Work Environment [2] => Hazards [3] => Acoustical Ceiling Carpenter [4] => Trades [5] => Asbestos/Insulator [7] => Boilermaker [9] => Bricklayer [11] => Cabinetmaker [13] => Carpenter [15] => Carpet Layer [17] => Cement Mason [19] => Commercial Diver [21] => Concrete Polisher [23] => Drywall Applicator Specialist [25] => Electrical Worker [27] => Elevator Constructor [29] => Flagger [31] => Glazier [33] => Hazardous Waste Cleanup [35] => HVAC [37] => Interior Systems Carpenter [39] => Laborer [41] => Landscaper [43] => Lather [45] => Lead Abatement Worker [47] => Maintenance Worker [49] => Millwright [51] => Operating Engineer [53] => Painter [55] => Paper Hanger [57] => PCC/Restoration [59] => Pile Driver [61] => Plasterer [63] => Plumber/Pipefitter [65] => Refractory Worker [67] => Reinforcing Ironworker [69] => Roofer/Waterproofer [71] => Scaffold Erector [73] => Sheetmetal Worker [75] => Sprinkler Fitter [77] => Stonemason [79] => Structural Ironworker [81] => Terrazzo Worker [83] => Tile Setter [85] => Truck Driver [87] => Welder [89] => Commercial & Institutional [90] => Jobsites [91] => Demolition [93] => Disasters [95] => Heavy & Highway [97] => Industrial [99] => LEED/Green Construction [101] => Renovations [103] => Residential [105] => Underground ) [type] => [sub_category] => [url] => /document/4426/d001656/Construction%2BDive%2B--%2BDeWalt%2527s%2BJobsite%2BPro%2Bheadphones%2Brecalled%2Bfor%2Bfire%2Bhazards.html [item:protected] => DocumentRecord Object ( [records:protected] => Array ( ) [recordId:protected] => [searchWordClass:protected] => [searchWordPeerClass:protected] => [bok_record:protected] => [authors:protected] => [organizations:protected] => [collections:protected] => [categories:protected] => Array ( [16] => Category Object ( [languages:protected] => [bok_resources:protected] => [bok_topics:protected] => [bok_keywords:protected] => [id:protected] => 16 [type:protected] => category [parent:protected] => 7 [label:protected] => Fire & Explosions [alreadyInSave:protected] => [alreadyInValidation:protected] => [validationFailures:protected] => Array ( ) [_new:BaseObject:private] => [_deleted:BaseObject:private] => [modifiedColumns:protected] => Array ( ) ) [44] => Category Object ( [languages:protected] => [bok_resources:protected] => [bok_topics:protected] => [bok_keywords:protected] => [id:protected] => 44 [type:protected] => category [parent:protected] => 2 [label:protected] => Acoustical Ceiling Carpenter [alreadyInSave:protected] => [alreadyInValidation:protected] => [validationFailures:protected] => Array ( ) [_new:BaseObject:private] => [_deleted:BaseObject:private] => [modifiedColumns:protected] => Array ( ) ) [45] => Category Object ( [languages:protected] => [bok_resources:protected] => [bok_topics:protected] => [bok_keywords:protected] => [id:protected] => 45 [type:protected] => category [parent:protected] => 2 [label:protected] => Asbestos/Insulator [alreadyInSave:protected] => [alreadyInValidation:protected] => [validationFailures:protected] => Array ( ) [_new:BaseObject:private] => [_deleted:BaseObject:private] => [modifiedColumns:protected] => Array ( ) ) [46] => Category Object ( [languages:protected] => [bok_resources:protected] => [bok_topics:protected] => [bok_keywords:protected] => [id:protected] => 46 [type:protected] => category [parent:protected] => 2 [label:protected] => Boilermaker [alreadyInSave:protected] => [alreadyInValidation:protected] => [validationFailures:protected] => Array ( ) [_new:BaseObject:private] => [_deleted:BaseObject:private] => [modifiedColumns:protected] => Array ( ) ) [47] => Category Object ( [languages:protected] => [bok_resources:protected] => [bok_topics:protected] => [bok_keywords:protected] => [id:protected] => 47 [type:protected] => category [parent:protected] => 2 [label:protected] => Bricklayer [alreadyInSave:protected] => [alreadyInValidation:protected] => [validationFailures:protected] => Array ( ) [_new:BaseObject:private] => [_deleted:BaseObject:private] => [modifiedColumns:protected] => Array ( ) ) [48] => Category Object ( [languages:protected] => [bok_resources:protected] => [bok_topics:protected] => [bok_keywords:protected] => [id:protected] => 48 [type:protected] => category [parent:protected] => 2 [label:protected] => Cabinetmaker [alreadyInSave:protected] => [alreadyInValidation:protected] => [validationFailures:protected] => Array ( ) [_new:BaseObject:private] => [_deleted:BaseObject:private] => [modifiedColumns:protected] => Array ( ) ) [49] => Category Object ( [languages:protected] => [bok_resources:protected] => [bok_topics:protected] => [bok_keywords:protected] => [id:protected] => 49 [type:protected] => category [parent:protected] => 2 [label:protected] => Carpenter [alreadyInSave:protected] => [alreadyInValidation:protected] => [validationFailures:protected] => Array ( ) [_new:BaseObject:private] => [_deleted:BaseObject:private] => [modifiedColumns:protected] => Array ( ) ) [50] => Category Object ( [languages:protected] => [bok_resources:protected] => [bok_topics:protected] => [bok_keywords:protected] => [id:protected] => 50 [type:protected] => category [parent:protected] => 2 [label:protected] => Carpet Layer [alreadyInSave:protected] => [alreadyInValidation:protected] => [validationFailures:protected] => Array ( ) [_new:BaseObject:private] => [_deleted:BaseObject:private] => [modifiedColumns:protected] => Array ( ) ) [51] => Category Object ( [languages:protected] => [bok_resources:protected] => [bok_topics:protected] => [bok_keywords:protected] => [id:protected] => 51 [type:protected] => category [parent:protected] => 2 [label:protected] => Cement Mason [alreadyInSave:protected] => [alreadyInValidation:protected] => [validationFailures:protected] => Array ( ) [_new:BaseObject:private] => [_deleted:BaseObject:private] => [modifiedColumns:protected] => Array ( ) ) [52] => Category Object ( [languages:protected] => [bok_resources:protected] => [bok_topics:protected] => [bok_keywords:protected] => [id:protected] => 52 [type:protected] => category [parent:protected] => 2 [label:protected] => Commercial Diver [alreadyInSave:protected] => [alreadyInValidation:protected] => [validationFailures:protected] => Array ( ) [_new:BaseObject:private] => [_deleted:BaseObject:private] => [modifiedColumns:protected] => Array ( ) ) [53] => Category Object ( [languages:protected] => [bok_resources:protected] => [bok_topics:protected] => [bok_keywords:protected] => [id:protected] => 53 [type:protected] => category [parent:protected] => 2 [label:protected] => Concrete Polisher [alreadyInSave:protected] => [alreadyInValidation:protected] => [validationFailures:protected] => Array ( ) [_new:BaseObject:private] => [_deleted:BaseObject:private] => [modifiedColumns:protected] => Array ( ) ) [54] => Category Object ( [languages:protected] => [bok_resources:protected] => [bok_topics:protected] => [bok_keywords:protected] => [id:protected] => 54 [type:protected] => category [parent:protected] => 2 [label:protected] => Drywall Applicator Specialist [alreadyInSave:protected] => [alreadyInValidation:protected] => [validationFailures:protected] => Array ( ) [_new:BaseObject:private] => [_deleted:BaseObject:private] => [modifiedColumns:protected] => Array ( ) ) [55] => Category Object ( [languages:protected] => [bok_resources:protected] => [bok_topics:protected] => [bok_keywords:protected] => [id:protected] => 55 [type:protected] => category [parent:protected] => 2 [label:protected] => Electrical Worker [alreadyInSave:protected] => [alreadyInValidation:protected] => [validationFailures:protected] => Array ( ) [_new:BaseObject:private] => [_deleted:BaseObject:private] => [modifiedColumns:protected] => Array ( ) ) [56] => Category Object ( [languages:protected] => [bok_resources:protected] => [bok_topics:protected] => [bok_keywords:protected] => [id:protected] => 56 [type:protected] => category [parent:protected] => 2 [label:protected] => Elevator Constructor [alreadyInSave:protected] => [alreadyInValidation:protected] => [validationFailures:protected] => Array ( ) [_new:BaseObject:private] => [_deleted:BaseObject:private] => [modifiedColumns:protected] => Array ( ) ) [57] => Category Object ( [languages:protected] => [bok_resources:protected] => [bok_topics:protected] => [bok_keywords:protected] => [id:protected] => 57 [type:protected] => category [parent:protected] => 2 [label:protected] => Flagger [alreadyInSave:protected] => [alreadyInValidation:protected] => [validationFailures:protected] => Array ( ) [_new:BaseObject:private] => [_deleted:BaseObject:private] => [modifiedColumns:protected] => Array ( ) ) [58] => Category Object ( [languages:protected] => [bok_resources:protected] => [bok_topics:protected] => [bok_keywords:protected] => [id:protected] => 58 [type:protected] => category [parent:protected] => 2 [label:protected] => Glazier [alreadyInSave:protected] => [alreadyInValidation:protected] => [validationFailures:protected] => Array ( ) [_new:BaseObject:private] => [_deleted:BaseObject:private] => [modifiedColumns:protected] => Array ( ) ) [59] => Category Object ( [languages:protected] => [bok_resources:protected] => [bok_topics:protected] => [bok_keywords:protected] => [id:protected] => 59 [type:protected] => category [parent:protected] => 2 [label:protected] => Hazardous Waste Cleanup [alreadyInSave:protected] => [alreadyInValidation:protected] => [validationFailures:protected] => Array ( ) [_new:BaseObject:private] => [_deleted:BaseObject:private] => [modifiedColumns:protected] => Array ( ) ) [60] => Category Object ( [languages:protected] => [bok_resources:protected] => [bok_topics:protected] => [bok_keywords:protected] => [id:protected] => 60 [type:protected] => category [parent:protected] => 2 [label:protected] => HVAC [alreadyInSave:protected] => [alreadyInValidation:protected] => [validationFailures:protected] => Array ( ) [_new:BaseObject:private] => [_deleted:BaseObject:private] => [modifiedColumns:protected] => Array ( ) ) [61] => Category Object ( [languages:protected] => [bok_resources:protected] => [bok_topics:protected] => [bok_keywords:protected] => [id:protected] => 61 [type:protected] => category [parent:protected] => 2 [label:protected] => Interior Systems Carpenter [alreadyInSave:protected] => [alreadyInValidation:protected] => [validationFailures:protected] => Array ( ) [_new:BaseObject:private] => [_deleted:BaseObject:private] => [modifiedColumns:protected] => Array ( ) ) [64] => Category Object ( [languages:protected] => [bok_resources:protected] => [bok_topics:protected] => [bok_keywords:protected] => [id:protected] => 64 [type:protected] => category [parent:protected] => 2 [label:protected] => Laborer [alreadyInSave:protected] => [alreadyInValidation:protected] => [validationFailures:protected] => Array ( ) [_new:BaseObject:private] => [_deleted:BaseObject:private] => [modifiedColumns:protected] => Array ( ) ) [65] => Category Object ( [languages:protected] => [bok_resources:protected] => [bok_topics:protected] => [bok_keywords:protected] => [id:protected] => 65 [type:protected] => category [parent:protected] => 2 [label:protected] => Landscaper [alreadyInSave:protected] => [alreadyInValidation:protected] => [validationFailures:protected] => Array ( ) [_new:BaseObject:private] => [_deleted:BaseObject:private] => [modifiedColumns:protected] => Array ( ) ) [66] => Category Object ( [languages:protected] => [bok_resources:protected] => [bok_topics:protected] => [bok_keywords:protected] => [id:protected] => 66 [type:protected] => category [parent:protected] => 2 [label:protected] => Lather [alreadyInSave:protected] => [alreadyInValidation:protected] => [validationFailures:protected] => Array ( ) [_new:BaseObject:private] => [_deleted:BaseObject:private] => [modifiedColumns:protected] => Array ( ) ) [67] => Category Object ( [languages:protected] => [bok_resources:protected] => [bok_topics:protected] => [bok_keywords:protected] => [id:protected] => 67 [type:protected] => category [parent:protected] => 2 [label:protected] => Lead Abatement Worker [alreadyInSave:protected] => [alreadyInValidation:protected] => [validationFailures:protected] => Array ( ) [_new:BaseObject:private] => [_deleted:BaseObject:private] => [modifiedColumns:protected] => Array ( ) ) [68] => Category Object ( [languages:protected] => [bok_resources:protected] => [bok_topics:protected] => [bok_keywords:protected] => [id:protected] => 68 [type:protected] => category [parent:protected] => 2 [label:protected] => Maintenance Worker [alreadyInSave:protected] => [alreadyInValidation:protected] => [validationFailures:protected] => Array ( ) [_new:BaseObject:private] => [_deleted:BaseObject:private] => [modifiedColumns:protected] => Array ( ) ) [69] => Category Object ( [languages:protected] => [bok_resources:protected] => [bok_topics:protected] => [bok_keywords:protected] => [id:protected] => 69 [type:protected] => category [parent:protected] => 2 [label:protected] => Millwright [alreadyInSave:protected] => [alreadyInValidation:protected] => [validationFailures:protected] => Array ( ) [_new:BaseObject:private] => [_deleted:BaseObject:private] => [modifiedColumns:protected] => Array ( ) ) [70] => Category Object ( [languages:protected] => [bok_resources:protected] => [bok_topics:protected] => [bok_keywords:protected] => [id:protected] => 70 [type:protected] => category [parent:protected] => 2 [label:protected] => Operating Engineer [alreadyInSave:protected] => [alreadyInValidation:protected] => [validationFailures:protected] => Array ( ) [_new:BaseObject:private] => [_deleted:BaseObject:private] => [modifiedColumns:protected] => Array ( ) ) [71] => Category Object ( [languages:protected] => [bok_resources:protected] => [bok_topics:protected] => [bok_keywords:protected] => [id:protected] => 71 [type:protected] => category [parent:protected] => 2 [label:protected] => Painter [alreadyInSave:protected] => [alreadyInValidation:protected] => [validationFailures:protected] => Array ( ) [_new:BaseObject:private] => [_deleted:BaseObject:private] => [modifiedColumns:protected] => Array ( ) ) [72] => Category Object ( [languages:protected] => [bok_resources:protected] => [bok_topics:protected] => [bok_keywords:protected] => [id:protected] => 72 [type:protected] => category [parent:protected] => 2 [label:protected] => Paper Hanger [alreadyInSave:protected] => [alreadyInValidation:protected] => [validationFailures:protected] => Array ( ) [_new:BaseObject:private] => [_deleted:BaseObject:private] => [modifiedColumns:protected] => Array ( ) ) [73] => Category Object ( [languages:protected] => [bok_resources:protected] => [bok_topics:protected] => [bok_keywords:protected] => [id:protected] => 73 [type:protected] => category [parent:protected] => 2 [label:protected] => PCC/Restoration [alreadyInSave:protected] => [alreadyInValidation:protected] => [validationFailures:protected] => Array ( ) [_new:BaseObject:private] => [_deleted:BaseObject:private] => [modifiedColumns:protected] => Array ( ) ) [74] => Category Object ( [languages:protected] => [bok_resources:protected] => [bok_topics:protected] => [bok_keywords:protected] => [id:protected] => 74 [type:protected] => category [parent:protected] => 2 [label:protected] => Pile Driver [alreadyInSave:protected] => [alreadyInValidation:protected] => [validationFailures:protected] => Array ( ) [_new:BaseObject:private] => [_deleted:BaseObject:private] => [modifiedColumns:protected] => Array ( ) ) [75] => Category Object ( [languages:protected] => [bok_resources:protected] => [bok_topics:protected] => [bok_keywords:protected] => [id:protected] => 75 [type:protected] => category [parent:protected] => 2 [label:protected] => Plasterer [alreadyInSave:protected] => [alreadyInValidation:protected] => [validationFailures:protected] => Array ( ) [_new:BaseObject:private] => [_deleted:BaseObject:private] => [modifiedColumns:protected] => Array ( ) ) [76] => Category Object ( [languages:protected] => [bok_resources:protected] => [bok_topics:protected] => [bok_keywords:protected] => [id:protected] => 76 [type:protected] => category [parent:protected] => 2 [label:protected] => Plumber/Pipefitter [alreadyInSave:protected] => [alreadyInValidation:protected] => [validationFailures:protected] => Array ( ) [_new:BaseObject:private] => [_deleted:BaseObject:private] => [modifiedColumns:protected] => Array ( ) ) [77] => Category Object ( [languages:protected] => [bok_resources:protected] => [bok_topics:protected] => [bok_keywords:protected] => [id:protected] => 77 [type:protected] => category [parent:protected] => 2 [label:protected] => Refractory Worker [alreadyInSave:protected] => [alreadyInValidation:protected] => [validationFailures:protected] => Array ( ) [_new:BaseObject:private] => [_deleted:BaseObject:private] => [modifiedColumns:protected] => Array ( ) ) [63] => Category Object ( [languages:protected] => [bok_resources:protected] => [bok_topics:protected] => [bok_keywords:protected] => [id:protected] => 63 [type:protected] => category [parent:protected] => 2 [label:protected] => Reinforcing Ironworker [alreadyInSave:protected] => [alreadyInValidation:protected] => [validationFailures:protected] => Array ( ) [_new:BaseObject:private] => [_deleted:BaseObject:private] => [modifiedColumns:protected] => Array ( ) ) [78] => Category Object ( [languages:protected] => [bok_resources:protected] => [bok_topics:protected] => [bok_keywords:protected] => [id:protected] => 78 [type:protected] => category [parent:protected] => 2 [label:protected] => Roofer/Waterproofer [alreadyInSave:protected] => [alreadyInValidation:protected] => [validationFailures:protected] => Array ( ) [_new:BaseObject:private] => [_deleted:BaseObject:private] => [modifiedColumns:protected] => Array ( ) ) [79] => Category Object ( [languages:protected] => [bok_resources:protected] => [bok_topics:protected] => [bok_keywords:protected] => [id:protected] => 79 [type:protected] => category [parent:protected] => 2 [label:protected] => Scaffold Erector [alreadyInSave:protected] => [alreadyInValidation:protected] => [validationFailures:protected] => Array ( ) [_new:BaseObject:private] => [_deleted:BaseObject:private] => [modifiedColumns:protected] => Array ( ) ) [80] => Category Object ( [languages:protected] => [bok_resources:protected] => [bok_topics:protected] => [bok_keywords:protected] => [id:protected] => 80 [type:protected] => category [parent:protected] => 2 [label:protected] => Sheetmetal Worker [alreadyInSave:protected] => [alreadyInValidation:protected] => [validationFailures:protected] => Array ( ) [_new:BaseObject:private] => [_deleted:BaseObject:private] => [modifiedColumns:protected] => Array ( ) ) [81] => Category Object ( [languages:protected] => [bok_resources:protected] => [bok_topics:protected] => [bok_keywords:protected] => [id:protected] => 81 [type:protected] => category [parent:protected] => 2 [label:protected] => Sprinkler Fitter [alreadyInSave:protected] => [alreadyInValidation:protected] => [validationFailures:protected] => Array ( ) [_new:BaseObject:private] => [_deleted:BaseObject:private] => [modifiedColumns:protected] => Array ( ) ) [82] => Category Object ( [languages:protected] => [bok_resources:protected] => [bok_topics:protected] => [bok_keywords:protected] => [id:protected] => 82 [type:protected] => category [parent:protected] => 2 [label:protected] => Stonemason [alreadyInSave:protected] => [alreadyInValidation:protected] => [validationFailures:protected] => Array ( ) [_new:BaseObject:private] => [_deleted:BaseObject:private] => [modifiedColumns:protected] => Array ( ) ) [62] => Category Object ( [languages:protected] => [bok_resources:protected] => [bok_topics:protected] => [bok_keywords:protected] => [id:protected] => 62 [type:protected] => category [parent:protected] => 2 [label:protected] => Structural Ironworker [alreadyInSave:protected] => [alreadyInValidation:protected] => [validationFailures:protected] => Array ( ) [_new:BaseObject:private] => [_deleted:BaseObject:private] => [modifiedColumns:protected] => Array ( ) ) [83] => Category Object ( [languages:protected] => [bok_resources:protected] => [bok_topics:protected] => [bok_keywords:protected] => [id:protected] => 83 [type:protected] => category [parent:protected] => 2 [label:protected] => Terrazzo Worker [alreadyInSave:protected] => [alreadyInValidation:protected] => [validationFailures:protected] => Array ( ) [_new:BaseObject:private] => [_deleted:BaseObject:private] => [modifiedColumns:protected] => Array ( ) ) [84] => Category Object ( [languages:protected] => [bok_resources:protected] => [bok_topics:protected] => [bok_keywords:protected] => [id:protected] => 84 [type:protected] => category [parent:protected] => 2 [label:protected] => Tile Setter [alreadyInSave:protected] => [alreadyInValidation:protected] => [validationFailures:protected] => Array ( ) [_new:BaseObject:private] => [_deleted:BaseObject:private] => [modifiedColumns:protected] => Array ( ) ) [85] => Category Object ( [languages:protected] => [bok_resources:protected] => [bok_topics:protected] => [bok_keywords:protected] => [id:protected] => 85 [type:protected] => category [parent:protected] => 2 [label:protected] => Truck Driver [alreadyInSave:protected] => [alreadyInValidation:protected] => [validationFailures:protected] => Array ( ) [_new:BaseObject:private] => [_deleted:BaseObject:private] => [modifiedColumns:protected] => Array ( ) ) [86] => Category Object ( [languages:protected] => [bok_resources:protected] => [bok_topics:protected] => [bok_keywords:protected] => [id:protected] => 86 [type:protected] => category [parent:protected] => 2 [label:protected] => Welder [alreadyInSave:protected] => [alreadyInValidation:protected] => [validationFailures:protected] => Array ( ) [_new:BaseObject:private] => [_deleted:BaseObject:private] => [modifiedColumns:protected] => Array ( ) ) [87] => Category Object ( [languages:protected] => [bok_resources:protected] => [bok_topics:protected] => [bok_keywords:protected] => [id:protected] => 87 [type:protected] => category [parent:protected] => 3 [label:protected] => Commercial & Institutional [alreadyInSave:protected] => [alreadyInValidation:protected] => [validationFailures:protected] => Array ( ) [_new:BaseObject:private] => [_deleted:BaseObject:private] => [modifiedColumns:protected] => Array ( ) ) [88] => Category Object ( [languages:protected] => [bok_resources:protected] => [bok_topics:protected] => [bok_keywords:protected] => [id:protected] => 88 [type:protected] => category [parent:protected] => 3 [label:protected] => Demolition [alreadyInSave:protected] => [alreadyInValidation:protected] => [validationFailures:protected] => Array ( ) [_new:BaseObject:private] => [_deleted:BaseObject:private] => [modifiedColumns:protected] => Array ( ) ) [89] => Category Object ( [languages:protected] => [bok_resources:protected] => [bok_topics:protected] => [bok_keywords:protected] => [id:protected] => 89 [type:protected] => category [parent:protected] => 3 [label:protected] => Disasters [alreadyInSave:protected] => [alreadyInValidation:protected] => [validationFailures:protected] => Array ( ) [_new:BaseObject:private] => [_deleted:BaseObject:private] => [modifiedColumns:protected] => Array ( ) ) [91] => Category Object ( [languages:protected] => [bok_resources:protected] => [bok_topics:protected] => [bok_keywords:protected] => [id:protected] => 91 [type:protected] => category [parent:protected] => 3 [label:protected] => Heavy & Highway [alreadyInSave:protected] => [alreadyInValidation:protected] => [validationFailures:protected] => Array ( ) [_new:BaseObject:private] => [_deleted:BaseObject:private] => [modifiedColumns:protected] => Array ( ) ) [90] => Category Object ( [languages:protected] => [bok_resources:protected] => [bok_topics:protected] => [bok_keywords:protected] => [id:protected] => 90 [type:protected] => category [parent:protected] => 3 [label:protected] => Industrial [alreadyInSave:protected] => [alreadyInValidation:protected] => [validationFailures:protected] => Array ( ) [_new:BaseObject:private] => [_deleted:BaseObject:private] => [modifiedColumns:protected] => Array ( ) ) [92] => Category Object ( [languages:protected] => [bok_resources:protected] => [bok_topics:protected] => [bok_keywords:protected] => [id:protected] => 92 [type:protected] => category [parent:protected] => 3 [label:protected] => LEED/Green Construction [alreadyInSave:protected] => [alreadyInValidation:protected] => [validationFailures:protected] => Array ( ) [_new:BaseObject:private] => [_deleted:BaseObject:private] => [modifiedColumns:protected] => Array ( ) ) [93] => Category Object ( [languages:protected] => [bok_resources:protected] => [bok_topics:protected] => [bok_keywords:protected] => [id:protected] => 93 [type:protected] => category [parent:protected] => 3 [label:protected] => Renovations [alreadyInSave:protected] => [alreadyInValidation:protected] => [validationFailures:protected] => Array ( ) [_new:BaseObject:private] => [_deleted:BaseObject:private] => [modifiedColumns:protected] => Array ( ) ) [94] => Category Object ( [languages:protected] => [bok_resources:protected] => [bok_topics:protected] => [bok_keywords:protected] => [id:protected] => 94 [type:protected] => category [parent:protected] => 3 [label:protected] => Residential [alreadyInSave:protected] => [alreadyInValidation:protected] => [validationFailures:protected] => Array ( ) [_new:BaseObject:private] => [_deleted:BaseObject:private] => [modifiedColumns:protected] => Array ( ) ) [95] => Category Object ( [languages:protected] => [bok_resources:protected] => [bok_topics:protected] => [bok_keywords:protected] => [id:protected] => 95 [type:protected] => category [parent:protected] => 3 [label:protected] => Underground [alreadyInSave:protected] => [alreadyInValidation:protected] => [validationFailures:protected] => Array ( ) [_new:BaseObject:private] => [_deleted:BaseObject:private] => [modifiedColumns:protected] => Array ( ) ) ) [categories_initialized:protected] => 1 [mapped_items:protected] => [content:protected] => [files:protected] => [language:protected] => Language Object ( [id:protected] => 1 [code:protected] => en [name:protected] => English [alreadyInSave:protected] => [alreadyInValidation:protected] => [validationFailures:protected] => Array ( ) [_new:BaseObject:private] => [_deleted:BaseObject:private] => [modifiedColumns:protected] => Array ( ) ) [old_record:protected] => [id:protected] => 4426 [old_id:protected] => [elcosh_id:protected] => d001656 [type:protected] => document [display_type:protected] => HTML only (and links) [user_id:protected] => 0 [language_id:protected] => 1 [tagging_id:protected] => Mike Aguilar [priority_id:protected] => 1 [title:protected] => Construction Dive -- DeWalt's Jobsite Pro headphones recalled for fire hazards [total_pages:protected] => 1 [billed_pages:protected] => 1 [publication_number:protected] => [part_of:protected] => [keywords:protected] => DeWalt, Fire Hazards, recall, headphones [comments:protected] => [summary:protected] => A recall notice by the United States Consumer Product Safety Commission affects over 300,000 DeWalt Jobsite Pro Headphones. The recall is a result of a malfunction that can cause earbuds to overheat while charging or during use, leading to fire and burn hazards. [transition_comments:protected] => [external_link:protected] => https://www.constructiondive.com/news/dewalts-jobsite-pro-headphones-recalled-for-fire-hazards/611248/?utm_source=Sailthru&utm_medium=email&utm_campaign=Issue:%202021-12-10%20Construction%20Dive%20Newsletter%20%5Bissue:38532%5D&utm_term=Construction%20Dive [consol_link:protected] => [more_like_this:protected] => [permission_given_by:protected] => [published:protected] => T [billable:protected] => F [img_name:protected] => [img_ext:protected] => [img_width:protected] => [img_height:protected] => [img_credit:protected] => [img_practice:protected] => [vid_source_id:protected] => [vid_running_time:protected] => [vid_intended_audience:protected] => [vid_acquisition_info:protected] => [vid_cost:protected] => [vid_producer:protected] => [vid_filename:protected] => [vid_filename_downloadable:protected] => [date_summary:protected] => [date_permission_requested:protected] => [date_permission_received:protected] => [date_review_needed:protected] => [date_received:protected] => 12/13/21 [date_completed:protected] => 12/13/21 [date_billed:protected] => [date_modified:protected] => 12/13/21 [collBokExports:protected] => [lastBokExportCriteria:BaseElcoshItem:private] => [alreadyInSave:protected] => [alreadyInValidation:protected] => [validationFailures:protected] => Array ( ) [_new:BaseObject:private] => [_deleted:BaseObject:private] => [modifiedColumns:protected] => Array ( ) ) ) [3] => Search_Result Object ( [title] => Working in an Enclosed Cab [image] => /record/images/notavailable-p.png [blurb] => This CPWR Hazard Alert on Working in enclosed cabs provides information on protecting workers from silica dust, how to minimize exposures and the dang... [category] => Array ( [0] => 10 [1] => 16 [2] => 24 [3] => 37 [4] => 46 [5] => 48 [6] => 49 [7] => 51 [8] => 53 [9] => 54 [10] => 56 [11] => 58 [12] => 59 [13] => 60 [14] => 61 [15] => 64 [16] => 66 [17] => 68 [18] => 69 [19] => 71 [20] => 73 [21] => 74 [22] => 76 [23] => 77 [24] => 63 [25] => 80 [26] => 82 [27] => 62 [28] => 83 [29] => 84 [30] => 86 [31] => 88 [32] => 89 [33] => 95 [34] => 102 ) [labels] => Array ( [0] => Confined Spaces [1] => Work Environment [2] => Hazards [3] => Fire & Explosions [6] => Trenches & Excavations [9] => Silica /Construction Dust [10] => Inhalation/Skin Exposures [12] => Boilermaker [13] => Trades [14] => Cabinetmaker [16] => Carpenter [18] => Cement Mason [20] => Concrete Polisher [22] => Drywall Applicator Specialist [24] => Elevator Constructor [26] => Glazier [28] => Hazardous Waste Cleanup [30] => HVAC [32] => Interior Systems Carpenter [34] => Laborer [36] => Lather [38] => Maintenance Worker [40] => Millwright [42] => Painter [44] => PCC/Restoration [46] => Pile Driver [48] => Plumber/Pipefitter [50] => Refractory Worker [52] => Reinforcing Ironworker [54] => Sheetmetal Worker [56] => Stonemason [58] => Structural Ironworker [60] => Terrazzo Worker [62] => Tile Setter [64] => Welder [66] => Demolition [67] => Jobsites [68] => Disasters [70] => Underground [72] => Handouts [73] => Documents [74] => Media & Documents ) [type] => Handouts [sub_category] => [url] => /document/4415/d001651/Working%2Bin%2Ban%2BEnclosed%2BCab.html [item:protected] => DocumentRecord Object ( [records:protected] => Array ( ) [recordId:protected] => [searchWordClass:protected] => [searchWordPeerClass:protected] => [bok_record:protected] => [authors:protected] => [organizations:protected] => [collections:protected] => [categories:protected] => Array ( [10] => Category Object ( [languages:protected] => [bok_resources:protected] => [bok_topics:protected] => [bok_keywords:protected] => [id:protected] => 10 [type:protected] => category [parent:protected] => 7 [label:protected] => Confined Spaces [alreadyInSave:protected] => [alreadyInValidation:protected] => [validationFailures:protected] => Array ( ) [_new:BaseObject:private] => [_deleted:BaseObject:private] => [modifiedColumns:protected] => Array ( ) ) [16] => Category Object ( [languages:protected] => [bok_resources:protected] => [bok_topics:protected] => [bok_keywords:protected] => [id:protected] => 16 [type:protected] => category [parent:protected] => 7 [label:protected] => Fire & Explosions [alreadyInSave:protected] => [alreadyInValidation:protected] => [validationFailures:protected] => Array ( ) [_new:BaseObject:private] => [_deleted:BaseObject:private] => [modifiedColumns:protected] => Array ( ) ) [24] => Category Object ( [languages:protected] => [bok_resources:protected] => [bok_topics:protected] => [bok_keywords:protected] => [id:protected] => 24 [type:protected] => category [parent:protected] => 7 [label:protected] => Trenches & Excavations [alreadyInSave:protected] => [alreadyInValidation:protected] => [validationFailures:protected] => Array ( ) [_new:BaseObject:private] => [_deleted:BaseObject:private] => [modifiedColumns:protected] => Array ( ) ) [37] => Category Object ( [languages:protected] => [bok_resources:protected] => [bok_topics:protected] => [bok_keywords:protected] => [id:protected] => 37 [type:protected] => category [parent:protected] => 8 [label:protected] => Silica /Construction Dust [alreadyInSave:protected] => [alreadyInValidation:protected] => [validationFailures:protected] => Array ( ) [_new:BaseObject:private] => [_deleted:BaseObject:private] => [modifiedColumns:protected] => Array ( ) ) [46] => Category Object ( [languages:protected] => [bok_resources:protected] => [bok_topics:protected] => [bok_keywords:protected] => [id:protected] => 46 [type:protected] => category [parent:protected] => 2 [label:protected] => Boilermaker [alreadyInSave:protected] => [alreadyInValidation:protected] => [validationFailures:protected] => Array ( ) [_new:BaseObject:private] => [_deleted:BaseObject:private] => [modifiedColumns:protected] => Array ( ) ) [48] => Category Object ( [languages:protected] => [bok_resources:protected] => [bok_topics:protected] => [bok_keywords:protected] => [id:protected] => 48 [type:protected] => category [parent:protected] => 2 [label:protected] => Cabinetmaker [alreadyInSave:protected] => [alreadyInValidation:protected] => [validationFailures:protected] => Array ( ) [_new:BaseObject:private] => [_deleted:BaseObject:private] => [modifiedColumns:protected] => Array ( ) ) [49] => Category Object ( [languages:protected] => [bok_resources:protected] => [bok_topics:protected] => [bok_keywords:protected] => [id:protected] => 49 [type:protected] => category [parent:protected] => 2 [label:protected] => Carpenter [alreadyInSave:protected] => [alreadyInValidation:protected] => [validationFailures:protected] => Array ( ) [_new:BaseObject:private] => [_deleted:BaseObject:private] => [modifiedColumns:protected] => Array ( ) ) [51] => Category Object ( [languages:protected] => [bok_resources:protected] => [bok_topics:protected] => [bok_keywords:protected] => [id:protected] => 51 [type:protected] => category [parent:protected] => 2 [label:protected] => Cement Mason [alreadyInSave:protected] => [alreadyInValidation:protected] => [validationFailures:protected] => Array ( ) [_new:BaseObject:private] => [_deleted:BaseObject:private] => [modifiedColumns:protected] => Array ( ) ) [53] => Category Object ( [languages:protected] => [bok_resources:protected] => [bok_topics:protected] => [bok_keywords:protected] => [id:protected] => 53 [type:protected] => category [parent:protected] => 2 [label:protected] => Concrete Polisher [alreadyInSave:protected] => [alreadyInValidation:protected] => [validationFailures:protected] => Array ( ) [_new:BaseObject:private] => [_deleted:BaseObject:private] => [modifiedColumns:protected] => Array ( ) ) [54] => Category Object ( [languages:protected] => [bok_resources:protected] => [bok_topics:protected] => [bok_keywords:protected] => [id:protected] => 54 [type:protected] => category [parent:protected] => 2 [label:protected] => Drywall Applicator Specialist [alreadyInSave:protected] => [alreadyInValidation:protected] => [validationFailures:protected] => Array ( ) [_new:BaseObject:private] => [_deleted:BaseObject:private] => [modifiedColumns:protected] => Array ( ) ) [56] => Category Object ( [languages:protected] => [bok_resources:protected] => [bok_topics:protected] => [bok_keywords:protected] => [id:protected] => 56 [type:protected] => category [parent:protected] => 2 [label:protected] => Elevator Constructor [alreadyInSave:protected] => [alreadyInValidation:protected] => [validationFailures:protected] => Array ( ) [_new:BaseObject:private] => [_deleted:BaseObject:private] => [modifiedColumns:protected] => Array ( ) ) [58] => Category Object ( [languages:protected] => [bok_resources:protected] => [bok_topics:protected] => [bok_keywords:protected] => [id:protected] => 58 [type:protected] => category [parent:protected] => 2 [label:protected] => Glazier [alreadyInSave:protected] => [alreadyInValidation:protected] => [validationFailures:protected] => Array ( ) [_new:BaseObject:private] => [_deleted:BaseObject:private] => [modifiedColumns:protected] => Array ( ) ) [59] => Category Object ( [languages:protected] => [bok_resources:protected] => [bok_topics:protected] => [bok_keywords:protected] => [id:protected] => 59 [type:protected] => category [parent:protected] => 2 [label:protected] => Hazardous Waste Cleanup [alreadyInSave:protected] => [alreadyInValidation:protected] => [validationFailures:protected] => Array ( ) [_new:BaseObject:private] => [_deleted:BaseObject:private] => [modifiedColumns:protected] => Array ( ) ) [60] => Category Object ( [languages:protected] => [bok_resources:protected] => [bok_topics:protected] => [bok_keywords:protected] => [id:protected] => 60 [type:protected] => category [parent:protected] => 2 [label:protected] => HVAC [alreadyInSave:protected] => [alreadyInValidation:protected] => [validationFailures:protected] => Array ( ) [_new:BaseObject:private] => [_deleted:BaseObject:private] => [modifiedColumns:protected] => Array ( ) ) [61] => Category Object ( [languages:protected] => [bok_resources:protected] => [bok_topics:protected] => [bok_keywords:protected] => [id:protected] => 61 [type:protected] => category [parent:protected] => 2 [label:protected] => Interior Systems Carpenter [alreadyInSave:protected] => [alreadyInValidation:protected] => [validationFailures:protected] => Array ( ) [_new:BaseObject:private] => [_deleted:BaseObject:private] => [modifiedColumns:protected] => Array ( ) ) [64] => Category Object ( [languages:protected] => [bok_resources:protected] => [bok_topics:protected] => [bok_keywords:protected] => [id:protected] => 64 [type:protected] => category [parent:protected] => 2 [label:protected] => Laborer [alreadyInSave:protected] => [alreadyInValidation:protected] => [validationFailures:protected] => Array ( ) [_new:BaseObject:private] => [_deleted:BaseObject:private] => [modifiedColumns:protected] => Array ( ) ) [66] => Category Object ( [languages:protected] => [bok_resources:protected] => [bok_topics:protected] => [bok_keywords:protected] => [id:protected] => 66 [type:protected] => category [parent:protected] => 2 [label:protected] => Lather [alreadyInSave:protected] => [alreadyInValidation:protected] => [validationFailures:protected] => Array ( ) [_new:BaseObject:private] => [_deleted:BaseObject:private] => [modifiedColumns:protected] => Array ( ) ) [68] => Category Object ( [languages:protected] => [bok_resources:protected] => [bok_topics:protected] => [bok_keywords:protected] => [id:protected] => 68 [type:protected] => category [parent:protected] => 2 [label:protected] => Maintenance Worker [alreadyInSave:protected] => [alreadyInValidation:protected] => [validationFailures:protected] => Array ( ) [_new:BaseObject:private] => [_deleted:BaseObject:private] => [modifiedColumns:protected] => Array ( ) ) [69] => Category Object ( [languages:protected] => [bok_resources:protected] => [bok_topics:protected] => [bok_keywords:protected] => [id:protected] => 69 [type:protected] => category [parent:protected] => 2 [label:protected] => Millwright [alreadyInSave:protected] => [alreadyInValidation:protected] => [validationFailures:protected] => Array ( ) [_new:BaseObject:private] => [_deleted:BaseObject:private] => [modifiedColumns:protected] => Array ( ) ) [71] => Category Object ( [languages:protected] => [bok_resources:protected] => [bok_topics:protected] => [bok_keywords:protected] => [id:protected] => 71 [type:protected] => category [parent:protected] => 2 [label:protected] => Painter [alreadyInSave:protected] => [alreadyInValidation:protected] => [validationFailures:protected] => Array ( ) [_new:BaseObject:private] => [_deleted:BaseObject:private] => [modifiedColumns:protected] => Array ( ) ) [73] => Category Object ( [languages:protected] => [bok_resources:protected] => [bok_topics:protected] => [bok_keywords:protected] => [id:protected] => 73 [type:protected] => category [parent:protected] => 2 [label:protected] => PCC/Restoration [alreadyInSave:protected] => [alreadyInValidation:protected] => [validationFailures:protected] => Array ( ) [_new:BaseObject:private] => [_deleted:BaseObject:private] => [modifiedColumns:protected] => Array ( ) ) [74] => Category Object ( [languages:protected] => [bok_resources:protected] => [bok_topics:protected] => [bok_keywords:protected] => [id:protected] => 74 [type:protected] => category [parent:protected] => 2 [label:protected] => Pile Driver [alreadyInSave:protected] => [alreadyInValidation:protected] => [validationFailures:protected] => Array ( ) [_new:BaseObject:private] => [_deleted:BaseObject:private] => [modifiedColumns:protected] => Array ( ) ) [76] => Category Object ( [languages:protected] => [bok_resources:protected] => [bok_topics:protected] => [bok_keywords:protected] => [id:protected] => 76 [type:protected] => category [parent:protected] => 2 [label:protected] => Plumber/Pipefitter [alreadyInSave:protected] => [alreadyInValidation:protected] => [validationFailures:protected] => Array ( ) [_new:BaseObject:private] => [_deleted:BaseObject:private] => [modifiedColumns:protected] => Array ( ) ) [77] => Category Object ( [languages:protected] => [bok_resources:protected] => [bok_topics:protected] => [bok_keywords:protected] => [id:protected] => 77 [type:protected] => category [parent:protected] => 2 [label:protected] => Refractory Worker [alreadyInSave:protected] => [alreadyInValidation:protected] => [validationFailures:protected] => Array ( ) [_new:BaseObject:private] => [_deleted:BaseObject:private] => [modifiedColumns:protected] => Array ( ) ) [63] => Category Object ( [languages:protected] => [bok_resources:protected] => [bok_topics:protected] => [bok_keywords:protected] => [id:protected] => 63 [type:protected] => category [parent:protected] => 2 [label:protected] => Reinforcing Ironworker [alreadyInSave:protected] => [alreadyInValidation:protected] => [validationFailures:protected] => Array ( ) [_new:BaseObject:private] => [_deleted:BaseObject:private] => [modifiedColumns:protected] => Array ( ) ) [80] => Category Object ( [languages:protected] => [bok_resources:protected] => [bok_topics:protected] => [bok_keywords:protected] => [id:protected] => 80 [type:protected] => category [parent:protected] => 2 [label:protected] => Sheetmetal Worker [alreadyInSave:protected] => [alreadyInValidation:protected] => [validationFailures:protected] => Array ( ) [_new:BaseObject:private] => [_deleted:BaseObject:private] => [modifiedColumns:protected] => Array ( ) ) [82] => Category Object ( [languages:protected] => [bok_resources:protected] => [bok_topics:protected] => [bok_keywords:protected] => [id:protected] => 82 [type:protected] => category [parent:protected] => 2 [label:protected] => Stonemason [alreadyInSave:protected] => [alreadyInValidation:protected] => [validationFailures:protected] => Array ( ) [_new:BaseObject:private] => [_deleted:BaseObject:private] => [modifiedColumns:protected] => Array ( ) ) [62] => Category Object ( [languages:protected] => [bok_resources:protected] => [bok_topics:protected] => [bok_keywords:protected] => [id:protected] => 62 [type:protected] => category [parent:protected] => 2 [label:protected] => Structural Ironworker [alreadyInSave:protected] => [alreadyInValidation:protected] => [validationFailures:protected] => Array ( ) [_new:BaseObject:private] => [_deleted:BaseObject:private] => [modifiedColumns:protected] => Array ( ) ) [83] => Category Object ( [languages:protected] => [bok_resources:protected] => [bok_topics:protected] => [bok_keywords:protected] => [id:protected] => 83 [type:protected] => category [parent:protected] => 2 [label:protected] => Terrazzo Worker [alreadyInSave:protected] => [alreadyInValidation:protected] => [validationFailures:protected] => Array ( ) [_new:BaseObject:private] => [_deleted:BaseObject:private] => [modifiedColumns:protected] => Array ( ) ) [84] => Category Object ( [languages:protected] => [bok_resources:protected] => [bok_topics:protected] => [bok_keywords:protected] => [id:protected] => 84 [type:protected] => category [parent:protected] => 2 [label:protected] => Tile Setter [alreadyInSave:protected] => [alreadyInValidation:protected] => [validationFailures:protected] => Array ( ) [_new:BaseObject:private] => [_deleted:BaseObject:private] => [modifiedColumns:protected] => Array ( ) ) [86] => Category Object ( [languages:protected] => [bok_resources:protected] => [bok_topics:protected] => [bok_keywords:protected] => [id:protected] => 86 [type:protected] => category [parent:protected] => 2 [label:protected] => Welder [alreadyInSave:protected] => [alreadyInValidation:protected] => [validationFailures:protected] => Array ( ) [_new:BaseObject:private] => [_deleted:BaseObject:private] => [modifiedColumns:protected] => Array ( ) ) [88] => Category Object ( [languages:protected] => [bok_resources:protected] => [bok_topics:protected] => [bok_keywords:protected] => [id:protected] => 88 [type:protected] => category [parent:protected] => 3 [label:protected] => Demolition [alreadyInSave:protected] => [alreadyInValidation:protected] => [validationFailures:protected] => Array ( ) [_new:BaseObject:private] => [_deleted:BaseObject:private] => [modifiedColumns:protected] => Array ( ) ) [89] => Category Object ( [languages:protected] => [bok_resources:protected] => [bok_topics:protected] => [bok_keywords:protected] => [id:protected] => 89 [type:protected] => category [parent:protected] => 3 [label:protected] => Disasters [alreadyInSave:protected] => [alreadyInValidation:protected] => [validationFailures:protected] => Array ( ) [_new:BaseObject:private] => [_deleted:BaseObject:private] => [modifiedColumns:protected] => Array ( ) ) [95] => Category Object ( [languages:protected] => [bok_resources:protected] => [bok_topics:protected] => [bok_keywords:protected] => [id:protected] => 95 [type:protected] => category [parent:protected] => 3 [label:protected] => Underground [alreadyInSave:protected] => [alreadyInValidation:protected] => [validationFailures:protected] => Array ( ) [_new:BaseObject:private] => [_deleted:BaseObject:private] => [modifiedColumns:protected] => Array ( ) ) [102] => Category Object ( [languages:protected] => [bok_resources:protected] => [bok_topics:protected] => [bok_keywords:protected] => [id:protected] => 102 [type:protected] => category [parent:protected] => 6 [label:protected] => Handouts [alreadyInSave:protected] => [alreadyInValidation:protected] => [validationFailures:protected] => Array ( ) [_new:BaseObject:private] => [_deleted:BaseObject:private] => [modifiedColumns:protected] => Array ( ) ) ) [categories_initialized:protected] => 1 [mapped_items:protected] => [content:protected] => [files:protected] => [language:protected] => Language Object ( [id:protected] => 1 [code:protected] => en [name:protected] => English [alreadyInSave:protected] => [alreadyInValidation:protected] => [validationFailures:protected] => Array ( ) [_new:BaseObject:private] => [_deleted:BaseObject:private] => [modifiedColumns:protected] => Array ( ) ) [old_record:protected] => [id:protected] => 4415 [old_id:protected] => [elcosh_id:protected] => d001651 [type:protected] => document [display_type:protected] => HTML only (and links) [user_id:protected] => 0 [language_id:protected] => 1 [tagging_id:protected] => Valeria Contreras [priority_id:protected] => 1 [title:protected] => Working in an Enclosed Cab [total_pages:protected] => 1 [billed_pages:protected] => 1 [publication_number:protected] => [part_of:protected] => [keywords:protected] => Occupation, construction, safety, health, hazards, work, worker, workplace, OSHA, silicosis, mining, silica, DOE, EEOICPA, labor, lung, CBD, dust, cab, miner, mine [comments:protected] => [summary:protected] => This CPWR Hazard Alert on Working in enclosed cabs provides information on protecting workers from silica dust, how to minimize exposures and the dangers of silica dust. Click on the following links to access the English version and the Spanish version. [transition_comments:protected] => [external_link:protected] => [consol_link:protected] => [more_like_this:protected] => [permission_given_by:protected] => [published:protected] => T [billable:protected] => F [img_name:protected] => [img_ext:protected] => [img_width:protected] => [img_height:protected] => [img_credit:protected] => [img_practice:protected] => [vid_source_id:protected] => [vid_running_time:protected] => [vid_intended_audience:protected] => [vid_acquisition_info:protected] => [vid_cost:protected] => [vid_producer:protected] => [vid_filename:protected] => [vid_filename_downloadable:protected] => [date_summary:protected] => [date_permission_requested:protected] => [date_permission_received:protected] => [date_review_needed:protected] => [date_received:protected] => 10/08/20 [date_completed:protected] => 10/08/20 [date_billed:protected] => [date_modified:protected] => 10/08/20 [collBokExports:protected] => [lastBokExportCriteria:BaseElcoshItem:private] => [alreadyInSave:protected] => [alreadyInValidation:protected] => [validationFailures:protected] => Array ( ) [_new:BaseObject:private] => [_deleted:BaseObject:private] => [modifiedColumns:protected] => Array ( ) ) ) [4] => Search_Result Object ( [title] => Toolbox Talk: Suicide Prevention [image] => /record/images/notavailable-p.png [blurb] => The CPWR Toolbox Talk on Suicide Prevention addresses the prevalence of suicide among construction workers. The resource includes a brief case example... [category] => Array ( [0] => 13 [1] => 20 [2] => 23 [3] => 40 [4] => 44 [5] => 45 [6] => 46 [7] => 47 [8] => 48 [9] => 49 [10] => 50 [11] => 51 [12] => 52 [13] => 53 [14] => 54 [15] => 55 [16] => 56 [17] => 57 [18] => 58 [19] => 59 [20] => 60 [21] => 61 [22] => 64 [23] => 65 [24] => 66 [25] => 67 [26] => 68 [27] => 69 [28] => 70 [29] => 71 [30] => 72 [31] => 73 [32] => 74 [33] => 75 [34] => 76 [35] => 77 [36] => 63 [37] => 78 [38] => 79 [39] => 80 [40] => 81 [41] => 82 [42] => 62 [43] => 83 [44] => 84 [45] => 85 [46] => 86 [47] => 87 [48] => 88 [49] => 89 [50] => 91 [51] => 90 [52] => 92 [53] => 93 [54] => 94 [55] => 95 [56] => 100 ) [labels] => Array ( [0] => Drugs, Alcohol & Tobacco [1] => Work Environment [2] => Hazards [3] => Safety Culture [6] => Stress & Overtime [9] => Overexertion [10] => Ergonomic [12] => Acoustical Ceiling Carpenter [13] => Trades [14] => Asbestos/Insulator [16] => Boilermaker [18] => Bricklayer [20] => Cabinetmaker [22] => Carpenter [24] => Carpet Layer [26] => Cement Mason [28] => Commercial Diver [30] => Concrete Polisher [32] => Drywall Applicator Specialist [34] => Electrical Worker [36] => Elevator Constructor [38] => Flagger [40] => Glazier [42] => Hazardous Waste Cleanup [44] => HVAC [46] => Interior Systems Carpenter [48] => Laborer [50] => Landscaper [52] => Lather [54] => Lead Abatement Worker [56] => Maintenance Worker [58] => Millwright [60] => Operating Engineer [62] => Painter [64] => Paper Hanger [66] => PCC/Restoration [68] => Pile Driver [70] => Plasterer [72] => Plumber/Pipefitter [74] => Refractory Worker [76] => Reinforcing Ironworker [78] => Roofer/Waterproofer [80] => Scaffold Erector [82] => Sheetmetal Worker [84] => Sprinkler Fitter [86] => Stonemason [88] => Structural Ironworker [90] => Terrazzo Worker [92] => Tile Setter [94] => Truck Driver [96] => Welder [98] => Commercial & Institutional [99] => Jobsites [100] => Demolition [102] => Disasters [104] => Heavy & Highway [106] => Industrial [108] => LEED/Green Construction [110] => Renovations [112] => Residential [114] => Underground [116] => Toolbox Talks [117] => Documents [118] => Media & Documents ) [type] => Toolbox Talks [sub_category] => [url] => /document/4419/d001652/Toolbox%2BTalk%253A%2BSuicide%2BPrevention.html [item:protected] => DocumentRecord Object ( [records:protected] => Array ( ) [recordId:protected] => [searchWordClass:protected] => [searchWordPeerClass:protected] => [bok_record:protected] => [authors:protected] => [organizations:protected] => [collections:protected] => [categories:protected] => Array ( [13] => Category Object ( [languages:protected] => [bok_resources:protected] => [bok_topics:protected] => [bok_keywords:protected] => [id:protected] => 13 [type:protected] => category [parent:protected] => 7 [label:protected] => Drugs, Alcohol & Tobacco [alreadyInSave:protected] => [alreadyInValidation:protected] => [validationFailures:protected] => Array ( ) [_new:BaseObject:private] => [_deleted:BaseObject:private] => [modifiedColumns:protected] => Array ( ) ) [20] => Category Object ( [languages:protected] => [bok_resources:protected] => [bok_topics:protected] => [bok_keywords:protected] => [id:protected] => 20 [type:protected] => category [parent:protected] => 7 [label:protected] => Safety Culture [alreadyInSave:protected] => [alreadyInValidation:protected] => [validationFailures:protected] => Array ( ) [_new:BaseObject:private] => [_deleted:BaseObject:private] => [modifiedColumns:protected] => Array ( ) ) [23] => Category Object ( [languages:protected] => [bok_resources:protected] => [bok_topics:protected] => [bok_keywords:protected] => [id:protected] => 23 [type:protected] => category [parent:protected] => 7 [label:protected] => Stress & Overtime [alreadyInSave:protected] => [alreadyInValidation:protected] => [validationFailures:protected] => Array ( ) [_new:BaseObject:private] => [_deleted:BaseObject:private] => [modifiedColumns:protected] => Array ( ) ) [40] => Category Object ( [languages:protected] => [bok_resources:protected] => [bok_topics:protected] => [bok_keywords:protected] => [id:protected] => 40 [type:protected] => category [parent:protected] => 9 [label:protected] => Overexertion [alreadyInSave:protected] => [alreadyInValidation:protected] => [validationFailures:protected] => Array ( ) [_new:BaseObject:private] => [_deleted:BaseObject:private] => [modifiedColumns:protected] => Array ( ) ) [44] => Category Object ( [languages:protected] => [bok_resources:protected] => [bok_topics:protected] => [bok_keywords:protected] => [id:protected] => 44 [type:protected] => category [parent:protected] => 2 [label:protected] => Acoustical Ceiling Carpenter [alreadyInSave:protected] => [alreadyInValidation:protected] => [validationFailures:protected] => Array ( ) [_new:BaseObject:private] => [_deleted:BaseObject:private] => [modifiedColumns:protected] => Array ( ) ) [45] => Category Object ( [languages:protected] => [bok_resources:protected] => [bok_topics:protected] => [bok_keywords:protected] => [id:protected] => 45 [type:protected] => category [parent:protected] => 2 [label:protected] => Asbestos/Insulator [alreadyInSave:protected] => [alreadyInValidation:protected] => [validationFailures:protected] => Array ( ) [_new:BaseObject:private] => [_deleted:BaseObject:private] => [modifiedColumns:protected] => Array ( ) ) [46] => Category Object ( [languages:protected] => [bok_resources:protected] => [bok_topics:protected] => [bok_keywords:protected] => [id:protected] => 46 [type:protected] => category [parent:protected] => 2 [label:protected] => Boilermaker [alreadyInSave:protected] => [alreadyInValidation:protected] => [validationFailures:protected] => Array ( ) [_new:BaseObject:private] => [_deleted:BaseObject:private] => [modifiedColumns:protected] => Array ( ) ) [47] => Category Object ( [languages:protected] => [bok_resources:protected] => [bok_topics:protected] => [bok_keywords:protected] => [id:protected] => 47 [type:protected] => category [parent:protected] => 2 [label:protected] => Bricklayer [alreadyInSave:protected] => [alreadyInValidation:protected] => [validationFailures:protected] => Array ( ) [_new:BaseObject:private] => [_deleted:BaseObject:private] => [modifiedColumns:protected] => Array ( ) ) [48] => Category Object ( [languages:protected] => [bok_resources:protected] => [bok_topics:protected] => [bok_keywords:protected] => [id:protected] => 48 [type:protected] => category [parent:protected] => 2 [label:protected] => Cabinetmaker [alreadyInSave:protected] => [alreadyInValidation:protected] => [validationFailures:protected] => Array ( ) [_new:BaseObject:private] => [_deleted:BaseObject:private] => [modifiedColumns:protected] => Array ( ) ) [49] => Category Object ( [languages:protected] => [bok_resources:protected] => [bok_topics:protected] => [bok_keywords:protected] => [id:protected] => 49 [type:protected] => category [parent:protected] => 2 [label:protected] => Carpenter [alreadyInSave:protected] => [alreadyInValidation:protected] => [validationFailures:protected] => Array ( ) [_new:BaseObject:private] => [_deleted:BaseObject:private] => [modifiedColumns:protected] => Array ( ) ) [50] => Category Object ( [languages:protected] => [bok_resources:protected] => [bok_topics:protected] => [bok_keywords:protected] => [id:protected] => 50 [type:protected] => category [parent:protected] => 2 [label:protected] => Carpet Layer [alreadyInSave:protected] => [alreadyInValidation:protected] => [validationFailures:protected] => Array ( ) [_new:BaseObject:private] => [_deleted:BaseObject:private] => [modifiedColumns:protected] => Array ( ) ) [51] => Category Object ( [languages:protected] => [bok_resources:protected] => [bok_topics:protected] => [bok_keywords:protected] => [id:protected] => 51 [type:protected] => category [parent:protected] => 2 [label:protected] => Cement Mason [alreadyInSave:protected] => [alreadyInValidation:protected] => [validationFailures:protected] => Array ( ) [_new:BaseObject:private] => [_deleted:BaseObject:private] => [modifiedColumns:protected] => Array ( ) ) [52] => Category Object ( [languages:protected] => [bok_resources:protected] => [bok_topics:protected] => [bok_keywords:protected] => [id:protected] => 52 [type:protected] => category [parent:protected] => 2 [label:protected] => Commercial Diver [alreadyInSave:protected] => [alreadyInValidation:protected] => [validationFailures:protected] => Array ( ) [_new:BaseObject:private] => [_deleted:BaseObject:private] => [modifiedColumns:protected] => Array ( ) ) [53] => Category Object ( [languages:protected] => [bok_resources:protected] => [bok_topics:protected] => [bok_keywords:protected] => [id:protected] => 53 [type:protected] => category [parent:protected] => 2 [label:protected] => Concrete Polisher [alreadyInSave:protected] => [alreadyInValidation:protected] => [validationFailures:protected] => Array ( ) [_new:BaseObject:private] => [_deleted:BaseObject:private] => [modifiedColumns:protected] => Array ( ) ) [54] => Category Object ( [languages:protected] => [bok_resources:protected] => [bok_topics:protected] => [bok_keywords:protected] => [id:protected] => 54 [type:protected] => category [parent:protected] => 2 [label:protected] => Drywall Applicator Specialist [alreadyInSave:protected] => [alreadyInValidation:protected] => [validationFailures:protected] => Array ( ) [_new:BaseObject:private] => [_deleted:BaseObject:private] => [modifiedColumns:protected] => Array ( ) ) [55] => Category Object ( [languages:protected] => [bok_resources:protected] => [bok_topics:protected] => [bok_keywords:protected] => [id:protected] => 55 [type:protected] => category [parent:protected] => 2 [label:protected] => Electrical Worker [alreadyInSave:protected] => [alreadyInValidation:protected] => [validationFailures:protected] => Array ( ) [_new:BaseObject:private] => [_deleted:BaseObject:private] => [modifiedColumns:protected] => Array ( ) ) [56] => Category Object ( [languages:protected] => [bok_resources:protected] => [bok_topics:protected] => [bok_keywords:protected] => [id:protected] => 56 [type:protected] => category [parent:protected] => 2 [label:protected] => Elevator Constructor [alreadyInSave:protected] => [alreadyInValidation:protected] => [validationFailures:protected] => Array ( ) [_new:BaseObject:private] => [_deleted:BaseObject:private] => [modifiedColumns:protected] => Array ( ) ) [57] => Category Object ( [languages:protected] => [bok_resources:protected] => [bok_topics:protected] => [bok_keywords:protected] => [id:protected] => 57 [type:protected] => category [parent:protected] => 2 [label:protected] => Flagger [alreadyInSave:protected] => [alreadyInValidation:protected] => [validationFailures:protected] => Array ( ) [_new:BaseObject:private] => [_deleted:BaseObject:private] => [modifiedColumns:protected] => Array ( ) ) [58] => Category Object ( [languages:protected] => [bok_resources:protected] => [bok_topics:protected] => [bok_keywords:protected] => [id:protected] => 58 [type:protected] => category [parent:protected] => 2 [label:protected] => Glazier [alreadyInSave:protected] => [alreadyInValidation:protected] => [validationFailures:protected] => Array ( ) [_new:BaseObject:private] => [_deleted:BaseObject:private] => [modifiedColumns:protected] => Array ( ) ) [59] => Category Object ( [languages:protected] => [bok_resources:protected] => [bok_topics:protected] => [bok_keywords:protected] => [id:protected] => 59 [type:protected] => category [parent:protected] => 2 [label:protected] => Hazardous Waste Cleanup [alreadyInSave:protected] => [alreadyInValidation:protected] => [validationFailures:protected] => Array ( ) [_new:BaseObject:private] => [_deleted:BaseObject:private] => [modifiedColumns:protected] => Array ( ) ) [60] => Category Object ( [languages:protected] => [bok_resources:protected] => [bok_topics:protected] => [bok_keywords:protected] => [id:protected] => 60 [type:protected] => category [parent:protected] => 2 [label:protected] => HVAC [alreadyInSave:protected] => [alreadyInValidation:protected] => [validationFailures:protected] => Array ( ) [_new:BaseObject:private] => [_deleted:BaseObject:private] => [modifiedColumns:protected] => Array ( ) ) [61] => Category Object ( [languages:protected] => [bok_resources:protected] => [bok_topics:protected] => [bok_keywords:protected] => [id:protected] => 61 [type:protected] => category [parent:protected] => 2 [label:protected] => Interior Systems Carpenter [alreadyInSave:protected] => [alreadyInValidation:protected] => [validationFailures:protected] => Array ( ) [_new:BaseObject:private] => [_deleted:BaseObject:private] => [modifiedColumns:protected] => Array ( ) ) [64] => Category Object ( [languages:protected] => [bok_resources:protected] => [bok_topics:protected] => [bok_keywords:protected] => [id:protected] => 64 [type:protected] => category [parent:protected] => 2 [label:protected] => Laborer [alreadyInSave:protected] => [alreadyInValidation:protected] => [validationFailures:protected] => Array ( ) [_new:BaseObject:private] => [_deleted:BaseObject:private] => [modifiedColumns:protected] => Array ( ) ) [65] => Category Object ( [languages:protected] => [bok_resources:protected] => [bok_topics:protected] => [bok_keywords:protected] => [id:protected] => 65 [type:protected] => category [parent:protected] => 2 [label:protected] => Landscaper [alreadyInSave:protected] => [alreadyInValidation:protected] => [validationFailures:protected] => Array ( ) [_new:BaseObject:private] => [_deleted:BaseObject:private] => [modifiedColumns:protected] => Array ( ) ) [66] => Category Object ( [languages:protected] => [bok_resources:protected] => [bok_topics:protected] => [bok_keywords:protected] => [id:protected] => 66 [type:protected] => category [parent:protected] => 2 [label:protected] => Lather [alreadyInSave:protected] => [alreadyInValidation:protected] => [validationFailures:protected] => Array ( ) [_new:BaseObject:private] => [_deleted:BaseObject:private] => [modifiedColumns:protected] => Array ( ) ) [67] => Category Object ( [languages:protected] => [bok_resources:protected] => [bok_topics:protected] => [bok_keywords:protected] => [id:protected] => 67 [type:protected] => category [parent:protected] => 2 [label:protected] => Lead Abatement Worker [alreadyInSave:protected] => [alreadyInValidation:protected] => [validationFailures:protected] => Array ( ) [_new:BaseObject:private] => [_deleted:BaseObject:private] => [modifiedColumns:protected] => Array ( ) ) [68] => Category Object ( [languages:protected] => [bok_resources:protected] => [bok_topics:protected] => [bok_keywords:protected] => [id:protected] => 68 [type:protected] => category [parent:protected] => 2 [label:protected] => Maintenance Worker [alreadyInSave:protected] => [alreadyInValidation:protected] => [validationFailures:protected] => Array ( ) [_new:BaseObject:private] => [_deleted:BaseObject:private] => [modifiedColumns:protected] => Array ( ) ) [69] => Category Object ( [languages:protected] => [bok_resources:protected] => [bok_topics:protected] => [bok_keywords:protected] => [id:protected] => 69 [type:protected] => category [parent:protected] => 2 [label:protected] => Millwright [alreadyInSave:protected] => [alreadyInValidation:protected] => [validationFailures:protected] => Array ( ) [_new:BaseObject:private] => [_deleted:BaseObject:private] => [modifiedColumns:protected] => Array ( ) ) [70] => Category Object ( [languages:protected] => [bok_resources:protected] => [bok_topics:protected] => [bok_keywords:protected] => [id:protected] => 70 [type:protected] => category [parent:protected] => 2 [label:protected] => Operating Engineer [alreadyInSave:protected] => [alreadyInValidation:protected] => [validationFailures:protected] => Array ( ) [_new:BaseObject:private] => [_deleted:BaseObject:private] => [modifiedColumns:protected] => Array ( ) ) [71] => Category Object ( [languages:protected] => [bok_resources:protected] => [bok_topics:protected] => [bok_keywords:protected] => [id:protected] => 71 [type:protected] => category [parent:protected] => 2 [label:protected] => Painter [alreadyInSave:protected] => [alreadyInValidation:protected] => [validationFailures:protected] => Array ( ) [_new:BaseObject:private] => [_deleted:BaseObject:private] => [modifiedColumns:protected] => Array ( ) ) [72] => Category Object ( [languages:protected] => [bok_resources:protected] => [bok_topics:protected] => [bok_keywords:protected] => [id:protected] => 72 [type:protected] => category [parent:protected] => 2 [label:protected] => Paper Hanger [alreadyInSave:protected] => [alreadyInValidation:protected] => [validationFailures:protected] => Array ( ) [_new:BaseObject:private] => [_deleted:BaseObject:private] => [modifiedColumns:protected] => Array ( ) ) [73] => Category Object ( [languages:protected] => [bok_resources:protected] => [bok_topics:protected] => [bok_keywords:protected] => [id:protected] => 73 [type:protected] => category [parent:protected] => 2 [label:protected] => PCC/Restoration [alreadyInSave:protected] => [alreadyInValidation:protected] => [validationFailures:protected] => Array ( ) [_new:BaseObject:private] => [_deleted:BaseObject:private] => [modifiedColumns:protected] => Array ( ) ) [74] => Category Object ( [languages:protected] => [bok_resources:protected] => [bok_topics:protected] => [bok_keywords:protected] => [id:protected] => 74 [type:protected] => category [parent:protected] => 2 [label:protected] => Pile Driver [alreadyInSave:protected] => [alreadyInValidation:protected] => [validationFailures:protected] => Array ( ) [_new:BaseObject:private] => [_deleted:BaseObject:private] => [modifiedColumns:protected] => Array ( ) ) [75] => Category Object ( [languages:protected] => [bok_resources:protected] => [bok_topics:protected] => [bok_keywords:protected] => [id:protected] => 75 [type:protected] => category [parent:protected] => 2 [label:protected] => Plasterer [alreadyInSave:protected] => [alreadyInValidation:protected] => [validationFailures:protected] => Array ( ) [_new:BaseObject:private] => [_deleted:BaseObject:private] => [modifiedColumns:protected] => Array ( ) ) [76] => Category Object ( [languages:protected] => [bok_resources:protected] => [bok_topics:protected] => [bok_keywords:protected] => [id:protected] => 76 [type:protected] => category [parent:protected] => 2 [label:protected] => Plumber/Pipefitter [alreadyInSave:protected] => [alreadyInValidation:protected] => [validationFailures:protected] => Array ( ) [_new:BaseObject:private] => [_deleted:BaseObject:private] => [modifiedColumns:protected] => Array ( ) ) [77] => Category Object ( [languages:protected] => [bok_resources:protected] => [bok_topics:protected] => [bok_keywords:protected] => [id:protected] => 77 [type:protected] => category [parent:protected] => 2 [label:protected] => Refractory Worker [alreadyInSave:protected] => [alreadyInValidation:protected] => [validationFailures:protected] => Array ( ) [_new:BaseObject:private] => [_deleted:BaseObject:private] => [modifiedColumns:protected] => Array ( ) ) [63] => Category Object ( [languages:protected] => [bok_resources:protected] => [bok_topics:protected] => [bok_keywords:protected] => [id:protected] => 63 [type:protected] => category [parent:protected] => 2 [label:protected] => Reinforcing Ironworker [alreadyInSave:protected] => [alreadyInValidation:protected] => [validationFailures:protected] => Array ( ) [_new:BaseObject:private] => [_deleted:BaseObject:private] => [modifiedColumns:protected] => Array ( ) ) [78] => Category Object ( [languages:protected] => [bok_resources:protected] => [bok_topics:protected] => [bok_keywords:protected] => [id:protected] => 78 [type:protected] => category [parent:protected] => 2 [label:protected] => Roofer/Waterproofer [alreadyInSave:protected] => [alreadyInValidation:protected] => [validationFailures:protected] => Array ( ) [_new:BaseObject:private] => [_deleted:BaseObject:private] => [modifiedColumns:protected] => Array ( ) ) [79] => Category Object ( [languages:protected] => [bok_resources:protected] => [bok_topics:protected] => [bok_keywords:protected] => [id:protected] => 79 [type:protected] => category [parent:protected] => 2 [label:protected] => Scaffold Erector [alreadyInSave:protected] => [alreadyInValidation:protected] => [validationFailures:protected] => Array ( ) [_new:BaseObject:private] => [_deleted:BaseObject:private] => [modifiedColumns:protected] => Array ( ) ) [80] => Category Object ( [languages:protected] => [bok_resources:protected] => [bok_topics:protected] => [bok_keywords:protected] => [id:protected] => 80 [type:protected] => category [parent:protected] => 2 [label:protected] => Sheetmetal Worker [alreadyInSave:protected] => [alreadyInValidation:protected] => [validationFailures:protected] => Array ( ) [_new:BaseObject:private] => [_deleted:BaseObject:private] => [modifiedColumns:protected] => Array ( ) ) [81] => Category Object ( [languages:protected] => [bok_resources:protected] => [bok_topics:protected] => [bok_keywords:protected] => [id:protected] => 81 [type:protected] => category [parent:protected] => 2 [label:protected] => Sprinkler Fitter [alreadyInSave:protected] => [alreadyInValidation:protected] => [validationFailures:protected] => Array ( ) [_new:BaseObject:private] => [_deleted:BaseObject:private] => [modifiedColumns:protected] => Array ( ) ) [82] => Category Object ( [languages:protected] => [bok_resources:protected] => [bok_topics:protected] => [bok_keywords:protected] => [id:protected] => 82 [type:protected] => category [parent:protected] => 2 [label:protected] => Stonemason [alreadyInSave:protected] => [alreadyInValidation:protected] => [validationFailures:protected] => Array ( ) [_new:BaseObject:private] => [_deleted:BaseObject:private] => [modifiedColumns:protected] => Array ( ) ) [62] => Category Object ( [languages:protected] => [bok_resources:protected] => [bok_topics:protected] => [bok_keywords:protected] => [id:protected] => 62 [type:protected] => category [parent:protected] => 2 [label:protected] => Structural Ironworker [alreadyInSave:protected] => [alreadyInValidation:protected] => [validationFailures:protected] => Array ( ) [_new:BaseObject:private] => [_deleted:BaseObject:private] => [modifiedColumns:protected] => Array ( ) ) [83] => Category Object ( [languages:protected] => [bok_resources:protected] => [bok_topics:protected] => [bok_keywords:protected] => [id:protected] => 83 [type:protected] => category [parent:protected] => 2 [label:protected] => Terrazzo Worker [alreadyInSave:protected] => [alreadyInValidation:protected] => [validationFailures:protected] => Array ( ) [_new:BaseObject:private] => [_deleted:BaseObject:private] => [modifiedColumns:protected] => Array ( ) ) [84] => Category Object ( [languages:protected] => [bok_resources:protected] => [bok_topics:protected] => [bok_keywords:protected] => [id:protected] => 84 [type:protected] => category [parent:protected] => 2 [label:protected] => Tile Setter [alreadyInSave:protected] => [alreadyInValidation:protected] => [validationFailures:protected] => Array ( ) [_new:BaseObject:private] => [_deleted:BaseObject:private] => [modifiedColumns:protected] => Array ( ) ) [85] => Category Object ( [languages:protected] => [bok_resources:protected] => [bok_topics:protected] => [bok_keywords:protected] => [id:protected] => 85 [type:protected] => category [parent:protected] => 2 [label:protected] => Truck Driver [alreadyInSave:protected] => [alreadyInValidation:protected] => [validationFailures:protected] => Array ( ) [_new:BaseObject:private] => [_deleted:BaseObject:private] => [modifiedColumns:protected] => Array ( ) ) [86] => Category Object ( [languages:protected] => [bok_resources:protected] => [bok_topics:protected] => [bok_keywords:protected] => [id:protected] => 86 [type:protected] => category [parent:protected] => 2 [label:protected] => Welder [alreadyInSave:protected] => [alreadyInValidation:protected] => [validationFailures:protected] => Array ( ) [_new:BaseObject:private] => [_deleted:BaseObject:private] => [modifiedColumns:protected] => Array ( ) ) [87] => Category Object ( [languages:protected] => [bok_resources:protected] => [bok_topics:protected] => [bok_keywords:protected] => [id:protected] => 87 [type:protected] => category [parent:protected] => 3 [label:protected] => Commercial & Institutional [alreadyInSave:protected] => [alreadyInValidation:protected] => [validationFailures:protected] => Array ( ) [_new:BaseObject:private] => [_deleted:BaseObject:private] => [modifiedColumns:protected] => Array ( ) ) [88] => Category Object ( [languages:protected] => [bok_resources:protected] => [bok_topics:protected] => [bok_keywords:protected] => [id:protected] => 88 [type:protected] => category [parent:protected] => 3 [label:protected] => Demolition [alreadyInSave:protected] => [alreadyInValidation:protected] => [validationFailures:protected] => Array ( ) [_new:BaseObject:private] => [_deleted:BaseObject:private] => [modifiedColumns:protected] => Array ( ) ) [89] => Category Object ( [languages:protected] => [bok_resources:protected] => [bok_topics:protected] => [bok_keywords:protected] => [id:protected] => 89 [type:protected] => category [parent:protected] => 3 [label:protected] => Disasters [alreadyInSave:protected] => [alreadyInValidation:protected] => [validationFailures:protected] => Array ( ) [_new:BaseObject:private] => [_deleted:BaseObject:private] => [modifiedColumns:protected] => Array ( ) ) [91] => Category Object ( [languages:protected] => [bok_resources:protected] => [bok_topics:protected] => [bok_keywords:protected] => [id:protected] => 91 [type:protected] => category [parent:protected] => 3 [label:protected] => Heavy & Highway [alreadyInSave:protected] => [alreadyInValidation:protected] => [validationFailures:protected] => Array ( ) [_new:BaseObject:private] => [_deleted:BaseObject:private] => [modifiedColumns:protected] => Array ( ) ) [90] => Category Object ( [languages:protected] => [bok_resources:protected] => [bok_topics:protected] => [bok_keywords:protected] => [id:protected] => 90 [type:protected] => category [parent:protected] => 3 [label:protected] => Industrial [alreadyInSave:protected] => [alreadyInValidation:protected] => [validationFailures:protected] => Array ( ) [_new:BaseObject:private] => [_deleted:BaseObject:private] => [modifiedColumns:protected] => Array ( ) ) [92] => Category Object ( [languages:protected] => [bok_resources:protected] => [bok_topics:protected] => [bok_keywords:protected] => [id:protected] => 92 [type:protected] => category [parent:protected] => 3 [label:protected] => LEED/Green Construction [alreadyInSave:protected] => [alreadyInValidation:protected] => [validationFailures:protected] => Array ( ) [_new:BaseObject:private] => [_deleted:BaseObject:private] => [modifiedColumns:protected] => Array ( ) ) [93] => Category Object ( [languages:protected] => [bok_resources:protected] => [bok_topics:protected] => [bok_keywords:protected] => [id:protected] => 93 [type:protected] => category [parent:protected] => 3 [label:protected] => Renovations [alreadyInSave:protected] => [alreadyInValidation:protected] => [validationFailures:protected] => Array ( ) [_new:BaseObject:private] => [_deleted:BaseObject:private] => [modifiedColumns:protected] => Array ( ) ) [94] => Category Object ( [languages:protected] => [bok_resources:protected] => [bok_topics:protected] => [bok_keywords:protected] => [id:protected] => 94 [type:protected] => category [parent:protected] => 3 [label:protected] => Residential [alreadyInSave:protected] => [alreadyInValidation:protected] => [validationFailures:protected] => Array ( ) [_new:BaseObject:private] => [_deleted:BaseObject:private] => [modifiedColumns:protected] => Array ( ) ) [95] => Category Object ( [languages:protected] => [bok_resources:protected] => [bok_topics:protected] => [bok_keywords:protected] => [id:protected] => 95 [type:protected] => category [parent:protected] => 3 [label:protected] => Underground [alreadyInSave:protected] => [alreadyInValidation:protected] => [validationFailures:protected] => Array ( ) [_new:BaseObject:private] => [_deleted:BaseObject:private] => [modifiedColumns:protected] => Array ( ) ) [100] => Category Object ( [languages:protected] => [bok_resources:protected] => [bok_topics:protected] => [bok_keywords:protected] => [id:protected] => 100 [type:protected] => category [parent:protected] => 6 [label:protected] => Toolbox Talks [alreadyInSave:protected] => [alreadyInValidation:protected] => [validationFailures:protected] => Array ( ) [_new:BaseObject:private] => [_deleted:BaseObject:private] => [modifiedColumns:protected] => Array ( ) ) ) [categories_initialized:protected] => 1 [mapped_items:protected] => [content:protected] => [files:protected] => [language:protected] => Language Object ( [id:protected] => 1 [code:protected] => en [name:protected] => English [alreadyInSave:protected] => [alreadyInValidation:protected] => [validationFailures:protected] => Array ( ) [_new:BaseObject:private] => [_deleted:BaseObject:private] => [modifiedColumns:protected] => Array ( ) ) [old_record:protected] => [id:protected] => 4419 [old_id:protected] => [elcosh_id:protected] => d001652 [type:protected] => document [display_type:protected] => HTML only (and links) [user_id:protected] => 0 [language_id:protected] => 1 [tagging_id:protected] => Valeria Contreras [priority_id:protected] => 1 [title:protected] => Toolbox Talk: Suicide Prevention [total_pages:protected] => 1 [billed_pages:protected] => 1 [publication_number:protected] => [part_of:protected] => [keywords:protected] => suicide, suicide prevention, mental health, stress, depression, exhaustion, burnout, safety, support, emotional support, health [comments:protected] => [summary:protected] =>The CPWR Toolbox Talk on Suicide Prevention addresses the prevalence of suicide among construction workers. The resource includes a brief case example, steps to prevent a related injury or illness, and questions for discussion. It includes an image that illustrates the hazard, which can be posted in a central location as a reminder of steps to work safely.
Available in English and Spanish. [transition_comments:protected] => [external_link:protected] => [consol_link:protected] => [more_like_this:protected] => [permission_given_by:protected] => [published:protected] => T [billable:protected] => F [img_name:protected] => [img_ext:protected] => [img_width:protected] => [img_height:protected] => [img_credit:protected] => [img_practice:protected] => [vid_source_id:protected] => [vid_running_time:protected] => [vid_intended_audience:protected] => [vid_acquisition_info:protected] => [vid_cost:protected] => [vid_producer:protected] => [vid_filename:protected] => [vid_filename_downloadable:protected] => [date_summary:protected] => [date_permission_requested:protected] => [date_permission_received:protected] => [date_review_needed:protected] => [date_received:protected] => 10/08/20 [date_completed:protected] => 10/08/20 [date_billed:protected] => [date_modified:protected] => 05/19/23 [collBokExports:protected] => [lastBokExportCriteria:BaseElcoshItem:private] => [alreadyInSave:protected] => [alreadyInValidation:protected] => [validationFailures:protected] => Array ( ) [_new:BaseObject:private] => [_deleted:BaseObject:private] => [modifiedColumns:protected] => Array ( ) ) ) ) [new_images] => Array ( [0] => Search_Result Object ( [title] => Toolbox talk - crew view [image] => /record/images/4005-p.jpg [blurb] => Photo of crew listening to a toolbox safety talk before starting work.... [category] => Array ( [0] => 97 [1] => 20 [2] => 47 [3] => 49 [4] => 51 [5] => 55 [6] => 61 [7] => 64 [8] => 71 [9] => 75 [10] => 63 [11] => 79 [12] => 62 [13] => 87 [14] => 88 [15] => 91 [16] => 90 [17] => 93 [18] => 94 [19] => 95 ) [labels] => Array ( [0] => Images [1] => Media [2] => Media & Documents [3] => Safety Culture [4] => Work Environment [5] => Hazards [6] => Bricklayer [7] => Trades [8] => Carpenter [10] => Cement Mason [12] => Electrical Worker [14] => Interior Systems Carpenter [16] => Laborer [18] => Painter [20] => Plasterer [22] => Reinforcing Ironworker [24] => Scaffold Erector [26] => Structural Ironworker [28] => Commercial & Institutional [29] => Jobsites [30] => Demolition [32] => Heavy & Highway [34] => Industrial [36] => Renovations [38] => Residential [40] => Underground ) [type] => Images [sub_category] => [url] => /image/4005/i002692/Toolbox%2Btalk%2B-%2Bcrew%2Bview.html [item:protected] => ImageRecord Object ( [records:protected] => Array ( ) [recordId:protected] => [searchWordClass:protected] => [searchWordPeerClass:protected] => [bok_record:protected] => [authors:protected] => [organizations:protected] => [collections:protected] => [categories:protected] => Array ( [97] => Category Object ( [languages:protected] => [bok_resources:protected] => [bok_topics:protected] => [bok_keywords:protected] => [id:protected] => 97 [type:protected] => category [parent:protected] => 5 [label:protected] => Images [alreadyInSave:protected] => [alreadyInValidation:protected] => [validationFailures:protected] => Array ( ) [_new:BaseObject:private] => [_deleted:BaseObject:private] => [modifiedColumns:protected] => Array ( ) ) [20] => Category Object ( [languages:protected] => [bok_resources:protected] => [bok_topics:protected] => [bok_keywords:protected] => [id:protected] => 20 [type:protected] => category [parent:protected] => 7 [label:protected] => Safety Culture [alreadyInSave:protected] => [alreadyInValidation:protected] => [validationFailures:protected] => Array ( ) [_new:BaseObject:private] => [_deleted:BaseObject:private] => [modifiedColumns:protected] => Array ( ) ) [47] => Category Object ( [languages:protected] => [bok_resources:protected] => [bok_topics:protected] => [bok_keywords:protected] => [id:protected] => 47 [type:protected] => category [parent:protected] => 2 [label:protected] => Bricklayer [alreadyInSave:protected] => [alreadyInValidation:protected] => [validationFailures:protected] => Array ( ) [_new:BaseObject:private] => [_deleted:BaseObject:private] => [modifiedColumns:protected] => Array ( ) ) [49] => Category Object ( [languages:protected] => [bok_resources:protected] => [bok_topics:protected] => [bok_keywords:protected] => [id:protected] => 49 [type:protected] => category [parent:protected] => 2 [label:protected] => Carpenter [alreadyInSave:protected] => [alreadyInValidation:protected] => [validationFailures:protected] => Array ( ) [_new:BaseObject:private] => [_deleted:BaseObject:private] => [modifiedColumns:protected] => Array ( ) ) [51] => Category Object ( [languages:protected] => [bok_resources:protected] => [bok_topics:protected] => [bok_keywords:protected] => [id:protected] => 51 [type:protected] => category [parent:protected] => 2 [label:protected] => Cement Mason [alreadyInSave:protected] => [alreadyInValidation:protected] => [validationFailures:protected] => Array ( ) [_new:BaseObject:private] => [_deleted:BaseObject:private] => [modifiedColumns:protected] => Array ( ) ) [55] => Category Object ( [languages:protected] => [bok_resources:protected] => [bok_topics:protected] => [bok_keywords:protected] => [id:protected] => 55 [type:protected] => category [parent:protected] => 2 [label:protected] => Electrical Worker [alreadyInSave:protected] => [alreadyInValidation:protected] => [validationFailures:protected] => Array ( ) [_new:BaseObject:private] => [_deleted:BaseObject:private] => [modifiedColumns:protected] => Array ( ) ) [61] => Category Object ( [languages:protected] => [bok_resources:protected] => [bok_topics:protected] => [bok_keywords:protected] => [id:protected] => 61 [type:protected] => category [parent:protected] => 2 [label:protected] => Interior Systems Carpenter [alreadyInSave:protected] => [alreadyInValidation:protected] => [validationFailures:protected] => Array ( ) [_new:BaseObject:private] => [_deleted:BaseObject:private] => [modifiedColumns:protected] => Array ( ) ) [64] => Category Object ( [languages:protected] => [bok_resources:protected] => [bok_topics:protected] => [bok_keywords:protected] => [id:protected] => 64 [type:protected] => category [parent:protected] => 2 [label:protected] => Laborer [alreadyInSave:protected] => [alreadyInValidation:protected] => [validationFailures:protected] => Array ( ) [_new:BaseObject:private] => [_deleted:BaseObject:private] => [modifiedColumns:protected] => Array ( ) ) [71] => Category Object ( [languages:protected] => [bok_resources:protected] => [bok_topics:protected] => [bok_keywords:protected] => [id:protected] => 71 [type:protected] => category [parent:protected] => 2 [label:protected] => Painter [alreadyInSave:protected] => [alreadyInValidation:protected] => [validationFailures:protected] => Array ( ) [_new:BaseObject:private] => [_deleted:BaseObject:private] => [modifiedColumns:protected] => Array ( ) ) [75] => Category Object ( [languages:protected] => [bok_resources:protected] => [bok_topics:protected] => [bok_keywords:protected] => [id:protected] => 75 [type:protected] => category [parent:protected] => 2 [label:protected] => Plasterer [alreadyInSave:protected] => [alreadyInValidation:protected] => [validationFailures:protected] => Array ( ) [_new:BaseObject:private] => [_deleted:BaseObject:private] => [modifiedColumns:protected] => Array ( ) ) [63] => Category Object ( [languages:protected] => [bok_resources:protected] => [bok_topics:protected] => [bok_keywords:protected] => [id:protected] => 63 [type:protected] => category [parent:protected] => 2 [label:protected] => Reinforcing Ironworker [alreadyInSave:protected] => [alreadyInValidation:protected] => [validationFailures:protected] => Array ( ) [_new:BaseObject:private] => [_deleted:BaseObject:private] => [modifiedColumns:protected] => Array ( ) ) [79] => Category Object ( [languages:protected] => [bok_resources:protected] => [bok_topics:protected] => [bok_keywords:protected] => [id:protected] => 79 [type:protected] => category [parent:protected] => 2 [label:protected] => Scaffold Erector [alreadyInSave:protected] => [alreadyInValidation:protected] => [validationFailures:protected] => Array ( ) [_new:BaseObject:private] => [_deleted:BaseObject:private] => [modifiedColumns:protected] => Array ( ) ) [62] => Category Object ( [languages:protected] => [bok_resources:protected] => [bok_topics:protected] => [bok_keywords:protected] => [id:protected] => 62 [type:protected] => category [parent:protected] => 2 [label:protected] => Structural Ironworker [alreadyInSave:protected] => [alreadyInValidation:protected] => [validationFailures:protected] => Array ( ) [_new:BaseObject:private] => [_deleted:BaseObject:private] => [modifiedColumns:protected] => Array ( ) ) [87] => Category Object ( [languages:protected] => [bok_resources:protected] => [bok_topics:protected] => [bok_keywords:protected] => [id:protected] => 87 [type:protected] => category [parent:protected] => 3 [label:protected] => Commercial & Institutional [alreadyInSave:protected] => [alreadyInValidation:protected] => [validationFailures:protected] => Array ( ) [_new:BaseObject:private] => [_deleted:BaseObject:private] => [modifiedColumns:protected] => Array ( ) ) [88] => Category Object ( [languages:protected] => [bok_resources:protected] => [bok_topics:protected] => [bok_keywords:protected] => [id:protected] => 88 [type:protected] => category [parent:protected] => 3 [label:protected] => Demolition [alreadyInSave:protected] => [alreadyInValidation:protected] => [validationFailures:protected] => Array ( ) [_new:BaseObject:private] => [_deleted:BaseObject:private] => [modifiedColumns:protected] => Array ( ) ) [91] => Category Object ( [languages:protected] => [bok_resources:protected] => [bok_topics:protected] => [bok_keywords:protected] => [id:protected] => 91 [type:protected] => category [parent:protected] => 3 [label:protected] => Heavy & Highway [alreadyInSave:protected] => [alreadyInValidation:protected] => [validationFailures:protected] => Array ( ) [_new:BaseObject:private] => [_deleted:BaseObject:private] => [modifiedColumns:protected] => Array ( ) ) [90] => Category Object ( [languages:protected] => [bok_resources:protected] => [bok_topics:protected] => [bok_keywords:protected] => [id:protected] => 90 [type:protected] => category [parent:protected] => 3 [label:protected] => Industrial [alreadyInSave:protected] => [alreadyInValidation:protected] => [validationFailures:protected] => Array ( ) [_new:BaseObject:private] => [_deleted:BaseObject:private] => [modifiedColumns:protected] => Array ( ) ) [93] => Category Object ( [languages:protected] => [bok_resources:protected] => [bok_topics:protected] => [bok_keywords:protected] => [id:protected] => 93 [type:protected] => category [parent:protected] => 3 [label:protected] => Renovations [alreadyInSave:protected] => [alreadyInValidation:protected] => [validationFailures:protected] => Array ( ) [_new:BaseObject:private] => [_deleted:BaseObject:private] => [modifiedColumns:protected] => Array ( ) ) [94] => Category Object ( [languages:protected] => [bok_resources:protected] => [bok_topics:protected] => [bok_keywords:protected] => [id:protected] => 94 [type:protected] => category [parent:protected] => 3 [label:protected] => Residential [alreadyInSave:protected] => [alreadyInValidation:protected] => [validationFailures:protected] => Array ( ) [_new:BaseObject:private] => [_deleted:BaseObject:private] => [modifiedColumns:protected] => Array ( ) ) [95] => Category Object ( [languages:protected] => [bok_resources:protected] => [bok_topics:protected] => [bok_keywords:protected] => [id:protected] => 95 [type:protected] => category [parent:protected] => 3 [label:protected] => Underground [alreadyInSave:protected] => [alreadyInValidation:protected] => [validationFailures:protected] => Array ( ) [_new:BaseObject:private] => [_deleted:BaseObject:private] => [modifiedColumns:protected] => Array ( ) ) ) [categories_initialized:protected] => 1 [mapped_items:protected] => [content:protected] => [files:protected] => [language:protected] => Language Object ( [id:protected] => 1 [code:protected] => en [name:protected] => English [alreadyInSave:protected] => [alreadyInValidation:protected] => [validationFailures:protected] => Array ( ) [_new:BaseObject:private] => [_deleted:BaseObject:private] => [modifiedColumns:protected] => Array ( ) ) [old_record:protected] => [id:protected] => 4005 [old_id:protected] => [elcosh_id:protected] => i002692 [type:protected] => image [display_type:protected] => Image [user_id:protected] => 0 [language_id:protected] => 1 [tagging_id:protected] => Bruce Lippy [priority_id:protected] => 1 [title:protected] => Toolbox talk - crew view [total_pages:protected] => 0 [billed_pages:protected] => 0 [publication_number:protected] => [part_of:protected] => [keywords:protected] => toolbox talk, tailgate talk, safety talk, Spanish [comments:protected] => [summary:protected] => Photo of crew listening to a toolbox safety talk before starting work. [transition_comments:protected] => [external_link:protected] => [consol_link:protected] => http://www.cpwrconstructionsolutions.org/electrical/solution/662/worker-training.html [more_like_this:protected] => i002691,d001269, c000079, d001285 [permission_given_by:protected] => [published:protected] => T [billable:protected] => F [img_name:protected] => [img_ext:protected] => jpg [img_width:protected] => [img_height:protected] => [img_credit:protected] => Morgan Zavertnik and Hoar Construction [img_practice:protected] => good [vid_source_id:protected] => [vid_running_time:protected] => [vid_intended_audience:protected] => [vid_acquisition_info:protected] => [vid_cost:protected] => [vid_producer:protected] => [vid_filename:protected] => [vid_filename_downloadable:protected] => [date_summary:protected] => November 2015 [date_permission_requested:protected] => [date_permission_received:protected] => [date_review_needed:protected] => [date_received:protected] => 03/02/16 [date_completed:protected] => 03/02/16 [date_billed:protected] => [date_modified:protected] => 03/02/16 [collBokExports:protected] => [lastBokExportCriteria:BaseElcoshItem:private] => [alreadyInSave:protected] => [alreadyInValidation:protected] => [validationFailures:protected] => Array ( ) [_new:BaseObject:private] => [_deleted:BaseObject:private] => [modifiedColumns:protected] => Array ( ) ) ) [1] => Search_Result Object ( [title] => Toolbox talk - long shot [image] => /record/images/4006-p.jpg [blurb] => This crew gathered every morning before starting work to discuss a new safety topic.... [category] => Array ( [0] => 20 [1] => 47 [2] => 49 [3] => 51 [4] => 55 [5] => 64 [6] => 68 [7] => 75 [8] => 76 [9] => 63 [10] => 78 [11] => 79 [12] => 82 [13] => 62 [14] => 87 [15] => 88 [16] => 91 [17] => 90 [18] => 93 [19] => 94 [20] => 95 [21] => 97 ) [labels] => Array ( [0] => Safety Culture [1] => Work Environment [2] => Hazards [3] => Bricklayer [4] => Trades [5] => Carpenter [7] => Cement Mason [9] => Electrical Worker [11] => Laborer [13] => Maintenance Worker [15] => Plasterer [17] => Plumber/Pipefitter [19] => Reinforcing Ironworker [21] => Roofer/Waterproofer [23] => Scaffold Erector [25] => Stonemason [27] => Structural Ironworker [29] => Commercial & Institutional [30] => Jobsites [31] => Demolition [33] => Heavy & Highway [35] => Industrial [37] => Renovations [39] => Residential [41] => Underground [43] => Images [44] => Media [45] => Media & Documents ) [type] => Images [sub_category] => [url] => /image/4006/i002693/Toolbox%2Btalk%2B-%2Blong%2Bshot.html [item:protected] => ImageRecord Object ( [records:protected] => Array ( ) [recordId:protected] => [searchWordClass:protected] => [searchWordPeerClass:protected] => [bok_record:protected] => [authors:protected] => [organizations:protected] => [collections:protected] => [categories:protected] => Array ( [20] => Category Object ( [languages:protected] => [bok_resources:protected] => [bok_topics:protected] => [bok_keywords:protected] => [id:protected] => 20 [type:protected] => category [parent:protected] => 7 [label:protected] => Safety Culture [alreadyInSave:protected] => [alreadyInValidation:protected] => [validationFailures:protected] => Array ( ) [_new:BaseObject:private] => [_deleted:BaseObject:private] => [modifiedColumns:protected] => Array ( ) ) [47] => Category Object ( [languages:protected] => [bok_resources:protected] => [bok_topics:protected] => [bok_keywords:protected] => [id:protected] => 47 [type:protected] => category [parent:protected] => 2 [label:protected] => Bricklayer [alreadyInSave:protected] => [alreadyInValidation:protected] => [validationFailures:protected] => Array ( ) [_new:BaseObject:private] => [_deleted:BaseObject:private] => [modifiedColumns:protected] => Array ( ) ) [49] => Category Object ( [languages:protected] => [bok_resources:protected] => [bok_topics:protected] => [bok_keywords:protected] => [id:protected] => 49 [type:protected] => category [parent:protected] => 2 [label:protected] => Carpenter [alreadyInSave:protected] => [alreadyInValidation:protected] => [validationFailures:protected] => Array ( ) [_new:BaseObject:private] => [_deleted:BaseObject:private] => [modifiedColumns:protected] => Array ( ) ) [51] => Category Object ( [languages:protected] => [bok_resources:protected] => [bok_topics:protected] => [bok_keywords:protected] => [id:protected] => 51 [type:protected] => category [parent:protected] => 2 [label:protected] => Cement Mason [alreadyInSave:protected] => [alreadyInValidation:protected] => [validationFailures:protected] => Array ( ) [_new:BaseObject:private] => [_deleted:BaseObject:private] => [modifiedColumns:protected] => Array ( ) ) [55] => Category Object ( [languages:protected] => [bok_resources:protected] => [bok_topics:protected] => [bok_keywords:protected] => [id:protected] => 55 [type:protected] => category [parent:protected] => 2 [label:protected] => Electrical Worker [alreadyInSave:protected] => [alreadyInValidation:protected] => [validationFailures:protected] => Array ( ) [_new:BaseObject:private] => [_deleted:BaseObject:private] => [modifiedColumns:protected] => Array ( ) ) [64] => Category Object ( [languages:protected] => [bok_resources:protected] => [bok_topics:protected] => [bok_keywords:protected] => [id:protected] => 64 [type:protected] => category [parent:protected] => 2 [label:protected] => Laborer [alreadyInSave:protected] => [alreadyInValidation:protected] => [validationFailures:protected] => Array ( ) [_new:BaseObject:private] => [_deleted:BaseObject:private] => [modifiedColumns:protected] => Array ( ) ) [68] => Category Object ( [languages:protected] => [bok_resources:protected] => [bok_topics:protected] => [bok_keywords:protected] => [id:protected] => 68 [type:protected] => category [parent:protected] => 2 [label:protected] => Maintenance Worker [alreadyInSave:protected] => [alreadyInValidation:protected] => [validationFailures:protected] => Array ( ) [_new:BaseObject:private] => [_deleted:BaseObject:private] => [modifiedColumns:protected] => Array ( ) ) [75] => Category Object ( [languages:protected] => [bok_resources:protected] => [bok_topics:protected] => [bok_keywords:protected] => [id:protected] => 75 [type:protected] => category [parent:protected] => 2 [label:protected] => Plasterer [alreadyInSave:protected] => [alreadyInValidation:protected] => [validationFailures:protected] => Array ( ) [_new:BaseObject:private] => [_deleted:BaseObject:private] => [modifiedColumns:protected] => Array ( ) ) [76] => Category Object ( [languages:protected] => [bok_resources:protected] => [bok_topics:protected] => [bok_keywords:protected] => [id:protected] => 76 [type:protected] => category [parent:protected] => 2 [label:protected] => Plumber/Pipefitter [alreadyInSave:protected] => [alreadyInValidation:protected] => [validationFailures:protected] => Array ( ) [_new:BaseObject:private] => [_deleted:BaseObject:private] => [modifiedColumns:protected] => Array ( ) ) [63] => Category Object ( [languages:protected] => [bok_resources:protected] => [bok_topics:protected] => [bok_keywords:protected] => [id:protected] => 63 [type:protected] => category [parent:protected] => 2 [label:protected] => Reinforcing Ironworker [alreadyInSave:protected] => [alreadyInValidation:protected] => [validationFailures:protected] => Array ( ) [_new:BaseObject:private] => [_deleted:BaseObject:private] => [modifiedColumns:protected] => Array ( ) ) [78] => Category Object ( [languages:protected] => [bok_resources:protected] => [bok_topics:protected] => [bok_keywords:protected] => [id:protected] => 78 [type:protected] => category [parent:protected] => 2 [label:protected] => Roofer/Waterproofer [alreadyInSave:protected] => [alreadyInValidation:protected] => [validationFailures:protected] => Array ( ) [_new:BaseObject:private] => [_deleted:BaseObject:private] => [modifiedColumns:protected] => Array ( ) ) [79] => Category Object ( [languages:protected] => [bok_resources:protected] => [bok_topics:protected] => [bok_keywords:protected] => [id:protected] => 79 [type:protected] => category [parent:protected] => 2 [label:protected] => Scaffold Erector [alreadyInSave:protected] => [alreadyInValidation:protected] => [validationFailures:protected] => Array ( ) [_new:BaseObject:private] => [_deleted:BaseObject:private] => [modifiedColumns:protected] => Array ( ) ) [82] => Category Object ( [languages:protected] => [bok_resources:protected] => [bok_topics:protected] => [bok_keywords:protected] => [id:protected] => 82 [type:protected] => category [parent:protected] => 2 [label:protected] => Stonemason [alreadyInSave:protected] => [alreadyInValidation:protected] => [validationFailures:protected] => Array ( ) [_new:BaseObject:private] => [_deleted:BaseObject:private] => [modifiedColumns:protected] => Array ( ) ) [62] => Category Object ( [languages:protected] => [bok_resources:protected] => [bok_topics:protected] => [bok_keywords:protected] => [id:protected] => 62 [type:protected] => category [parent:protected] => 2 [label:protected] => Structural Ironworker [alreadyInSave:protected] => [alreadyInValidation:protected] => [validationFailures:protected] => Array ( ) [_new:BaseObject:private] => [_deleted:BaseObject:private] => [modifiedColumns:protected] => Array ( ) ) [87] => Category Object ( [languages:protected] => [bok_resources:protected] => [bok_topics:protected] => [bok_keywords:protected] => [id:protected] => 87 [type:protected] => category [parent:protected] => 3 [label:protected] => Commercial & Institutional [alreadyInSave:protected] => [alreadyInValidation:protected] => [validationFailures:protected] => Array ( ) [_new:BaseObject:private] => [_deleted:BaseObject:private] => [modifiedColumns:protected] => Array ( ) ) [88] => Category Object ( [languages:protected] => [bok_resources:protected] => [bok_topics:protected] => [bok_keywords:protected] => [id:protected] => 88 [type:protected] => category [parent:protected] => 3 [label:protected] => Demolition [alreadyInSave:protected] => [alreadyInValidation:protected] => [validationFailures:protected] => Array ( ) [_new:BaseObject:private] => [_deleted:BaseObject:private] => [modifiedColumns:protected] => Array ( ) ) [91] => Category Object ( [languages:protected] => [bok_resources:protected] => [bok_topics:protected] => [bok_keywords:protected] => [id:protected] => 91 [type:protected] => category [parent:protected] => 3 [label:protected] => Heavy & Highway [alreadyInSave:protected] => [alreadyInValidation:protected] => [validationFailures:protected] => Array ( ) [_new:BaseObject:private] => [_deleted:BaseObject:private] => [modifiedColumns:protected] => Array ( ) ) [90] => Category Object ( [languages:protected] => [bok_resources:protected] => [bok_topics:protected] => [bok_keywords:protected] => [id:protected] => 90 [type:protected] => category [parent:protected] => 3 [label:protected] => Industrial [alreadyInSave:protected] => [alreadyInValidation:protected] => [validationFailures:protected] => Array ( ) [_new:BaseObject:private] => [_deleted:BaseObject:private] => [modifiedColumns:protected] => Array ( ) ) [93] => Category Object ( [languages:protected] => [bok_resources:protected] => [bok_topics:protected] => [bok_keywords:protected] => [id:protected] => 93 [type:protected] => category [parent:protected] => 3 [label:protected] => Renovations [alreadyInSave:protected] => [alreadyInValidation:protected] => [validationFailures:protected] => Array ( ) [_new:BaseObject:private] => [_deleted:BaseObject:private] => [modifiedColumns:protected] => Array ( ) ) [94] => Category Object ( [languages:protected] => [bok_resources:protected] => [bok_topics:protected] => [bok_keywords:protected] => [id:protected] => 94 [type:protected] => category [parent:protected] => 3 [label:protected] => Residential [alreadyInSave:protected] => [alreadyInValidation:protected] => [validationFailures:protected] => Array ( ) [_new:BaseObject:private] => [_deleted:BaseObject:private] => [modifiedColumns:protected] => Array ( ) ) [95] => Category Object ( [languages:protected] => [bok_resources:protected] => [bok_topics:protected] => [bok_keywords:protected] => [id:protected] => 95 [type:protected] => category [parent:protected] => 3 [label:protected] => Underground [alreadyInSave:protected] => [alreadyInValidation:protected] => [validationFailures:protected] => Array ( ) [_new:BaseObject:private] => [_deleted:BaseObject:private] => [modifiedColumns:protected] => Array ( ) ) [97] => Category Object ( [languages:protected] => [bok_resources:protected] => [bok_topics:protected] => [bok_keywords:protected] => [id:protected] => 97 [type:protected] => category [parent:protected] => 5 [label:protected] => Images [alreadyInSave:protected] => [alreadyInValidation:protected] => [validationFailures:protected] => Array ( ) [_new:BaseObject:private] => [_deleted:BaseObject:private] => [modifiedColumns:protected] => Array ( ) ) ) [categories_initialized:protected] => 1 [mapped_items:protected] => [content:protected] => [files:protected] => [language:protected] => Language Object ( [id:protected] => 1 [code:protected] => en [name:protected] => English [alreadyInSave:protected] => [alreadyInValidation:protected] => [validationFailures:protected] => Array ( ) [_new:BaseObject:private] => [_deleted:BaseObject:private] => [modifiedColumns:protected] => Array ( ) ) [old_record:protected] => [id:protected] => 4006 [old_id:protected] => [elcosh_id:protected] => i002693 [type:protected] => image [display_type:protected] => Image [user_id:protected] => 0 [language_id:protected] => 1 [tagging_id:protected] => Bruce Lippy [priority_id:protected] => 1 [title:protected] => Toolbox talk - long shot [total_pages:protected] => 0 [billed_pages:protected] => 0 [publication_number:protected] => [part_of:protected] => [keywords:protected] => toolbox talk, tailgate talk, safety minute [comments:protected] => [summary:protected] => This crew gathered every morning before starting work to discuss a new safety topic. [transition_comments:protected] => [external_link:protected] => [consol_link:protected] => http://www.cpwrconstructionsolutions.org/electrical/solution/662/worker-training.html [more_like_this:protected] => i002691,i002692,d001269,d000527 [permission_given_by:protected] => [published:protected] => T [billable:protected] => F [img_name:protected] => [img_ext:protected] => jpg [img_width:protected] => [img_height:protected] => [img_credit:protected] => Morgan Zavertnik and Hoar Construction [img_practice:protected] => good [vid_source_id:protected] => [vid_running_time:protected] => [vid_intended_audience:protected] => [vid_acquisition_info:protected] => [vid_cost:protected] => [vid_producer:protected] => [vid_filename:protected] => [vid_filename_downloadable:protected] => [date_summary:protected] => November 2015 [date_permission_requested:protected] => [date_permission_received:protected] => [date_review_needed:protected] => [date_received:protected] => 03/02/16 [date_completed:protected] => 03/02/16 [date_billed:protected] => [date_modified:protected] => 03/02/16 [collBokExports:protected] => [lastBokExportCriteria:BaseElcoshItem:private] => [alreadyInSave:protected] => [alreadyInValidation:protected] => [validationFailures:protected] => Array ( ) [_new:BaseObject:private] => [_deleted:BaseObject:private] => [modifiedColumns:protected] => Array ( ) ) ) [2] => Search_Result Object ( [title] => Construction bracing [image] => /record/images/3995-p.jpg [blurb] => This shows structural support that prevents collapses during construction.... [category] => Array ( [0] => 12 [1] => 15 [2] => 21 [3] => 49 [4] => 51 [5] => 55 [6] => 56 [7] => 60 [8] => 64 [9] => 68 [10] => 74 [11] => 63 [12] => 78 [13] => 79 [14] => 80 [15] => 62 [16] => 87 [17] => 90 [18] => 97 ) [labels] => Array ( [0] => Crushed/Struck By [1] => Work Environment [2] => Hazards [3] => Falls [6] => Scaffolds [9] => Carpenter [10] => Trades [11] => Cement Mason [13] => Electrical Worker [15] => Elevator Constructor [17] => HVAC [19] => Laborer [21] => Maintenance Worker [23] => Pile Driver [25] => Reinforcing Ironworker [27] => Roofer/Waterproofer [29] => Scaffold Erector [31] => Sheetmetal Worker [33] => Structural Ironworker [35] => Commercial & Institutional [36] => Jobsites [37] => Industrial [39] => Images [40] => Media [41] => Media & Documents ) [type] => Images [sub_category] => [url] => /image/3995/i002690/Construction%2Bbracing.html [item:protected] => ImageRecord Object ( [records:protected] => Array ( ) [recordId:protected] => [searchWordClass:protected] => [searchWordPeerClass:protected] => [bok_record:protected] => [authors:protected] => [organizations:protected] => [collections:protected] => [categories:protected] => Array ( [12] => Category Object ( [languages:protected] => [bok_resources:protected] => [bok_topics:protected] => [bok_keywords:protected] => [id:protected] => 12 [type:protected] => category [parent:protected] => 7 [label:protected] => Crushed/Struck By [alreadyInSave:protected] => [alreadyInValidation:protected] => [validationFailures:protected] => Array ( ) [_new:BaseObject:private] => [_deleted:BaseObject:private] => [modifiedColumns:protected] => Array ( ) ) [15] => Category Object ( [languages:protected] => [bok_resources:protected] => [bok_topics:protected] => [bok_keywords:protected] => [id:protected] => 15 [type:protected] => category [parent:protected] => 7 [label:protected] => Falls [alreadyInSave:protected] => [alreadyInValidation:protected] => [validationFailures:protected] => Array ( ) [_new:BaseObject:private] => [_deleted:BaseObject:private] => [modifiedColumns:protected] => Array ( ) ) [21] => Category Object ( [languages:protected] => [bok_resources:protected] => [bok_topics:protected] => [bok_keywords:protected] => [id:protected] => 21 [type:protected] => category [parent:protected] => 7 [label:protected] => Scaffolds [alreadyInSave:protected] => [alreadyInValidation:protected] => [validationFailures:protected] => Array ( ) [_new:BaseObject:private] => [_deleted:BaseObject:private] => [modifiedColumns:protected] => Array ( ) ) [49] => Category Object ( [languages:protected] => [bok_resources:protected] => [bok_topics:protected] => [bok_keywords:protected] => [id:protected] => 49 [type:protected] => category [parent:protected] => 2 [label:protected] => Carpenter [alreadyInSave:protected] => [alreadyInValidation:protected] => [validationFailures:protected] => Array ( ) [_new:BaseObject:private] => [_deleted:BaseObject:private] => [modifiedColumns:protected] => Array ( ) ) [51] => Category Object ( [languages:protected] => [bok_resources:protected] => [bok_topics:protected] => [bok_keywords:protected] => [id:protected] => 51 [type:protected] => category [parent:protected] => 2 [label:protected] => Cement Mason [alreadyInSave:protected] => [alreadyInValidation:protected] => [validationFailures:protected] => Array ( ) [_new:BaseObject:private] => [_deleted:BaseObject:private] => [modifiedColumns:protected] => Array ( ) ) [55] => Category Object ( [languages:protected] => [bok_resources:protected] => [bok_topics:protected] => [bok_keywords:protected] => [id:protected] => 55 [type:protected] => category [parent:protected] => 2 [label:protected] => Electrical Worker [alreadyInSave:protected] => [alreadyInValidation:protected] => [validationFailures:protected] => Array ( ) [_new:BaseObject:private] => [_deleted:BaseObject:private] => [modifiedColumns:protected] => Array ( ) ) [56] => Category Object ( [languages:protected] => [bok_resources:protected] => [bok_topics:protected] => [bok_keywords:protected] => [id:protected] => 56 [type:protected] => category [parent:protected] => 2 [label:protected] => Elevator Constructor [alreadyInSave:protected] => [alreadyInValidation:protected] => [validationFailures:protected] => Array ( ) [_new:BaseObject:private] => [_deleted:BaseObject:private] => [modifiedColumns:protected] => Array ( ) ) [60] => Category Object ( [languages:protected] => [bok_resources:protected] => [bok_topics:protected] => [bok_keywords:protected] => [id:protected] => 60 [type:protected] => category [parent:protected] => 2 [label:protected] => HVAC [alreadyInSave:protected] => [alreadyInValidation:protected] => [validationFailures:protected] => Array ( ) [_new:BaseObject:private] => [_deleted:BaseObject:private] => [modifiedColumns:protected] => Array ( ) ) [64] => Category Object ( [languages:protected] => [bok_resources:protected] => [bok_topics:protected] => [bok_keywords:protected] => [id:protected] => 64 [type:protected] => category [parent:protected] => 2 [label:protected] => Laborer [alreadyInSave:protected] => [alreadyInValidation:protected] => [validationFailures:protected] => Array ( ) [_new:BaseObject:private] => [_deleted:BaseObject:private] => [modifiedColumns:protected] => Array ( ) ) [68] => Category Object ( [languages:protected] => [bok_resources:protected] => [bok_topics:protected] => [bok_keywords:protected] => [id:protected] => 68 [type:protected] => category [parent:protected] => 2 [label:protected] => Maintenance Worker [alreadyInSave:protected] => [alreadyInValidation:protected] => [validationFailures:protected] => Array ( ) [_new:BaseObject:private] => [_deleted:BaseObject:private] => [modifiedColumns:protected] => Array ( ) ) [74] => Category Object ( [languages:protected] => [bok_resources:protected] => [bok_topics:protected] => [bok_keywords:protected] => [id:protected] => 74 [type:protected] => category [parent:protected] => 2 [label:protected] => Pile Driver [alreadyInSave:protected] => [alreadyInValidation:protected] => [validationFailures:protected] => Array ( ) [_new:BaseObject:private] => [_deleted:BaseObject:private] => [modifiedColumns:protected] => Array ( ) ) [63] => Category Object ( [languages:protected] => [bok_resources:protected] => [bok_topics:protected] => [bok_keywords:protected] => [id:protected] => 63 [type:protected] => category [parent:protected] => 2 [label:protected] => Reinforcing Ironworker [alreadyInSave:protected] => [alreadyInValidation:protected] => [validationFailures:protected] => Array ( ) [_new:BaseObject:private] => [_deleted:BaseObject:private] => [modifiedColumns:protected] => Array ( ) ) [78] => Category Object ( [languages:protected] => [bok_resources:protected] => [bok_topics:protected] => [bok_keywords:protected] => [id:protected] => 78 [type:protected] => category [parent:protected] => 2 [label:protected] => Roofer/Waterproofer [alreadyInSave:protected] => [alreadyInValidation:protected] => [validationFailures:protected] => Array ( ) [_new:BaseObject:private] => [_deleted:BaseObject:private] => [modifiedColumns:protected] => Array ( ) ) [79] => Category Object ( [languages:protected] => [bok_resources:protected] => [bok_topics:protected] => [bok_keywords:protected] => [id:protected] => 79 [type:protected] => category [parent:protected] => 2 [label:protected] => Scaffold Erector [alreadyInSave:protected] => [alreadyInValidation:protected] => [validationFailures:protected] => Array ( ) [_new:BaseObject:private] => [_deleted:BaseObject:private] => [modifiedColumns:protected] => Array ( ) ) [80] => Category Object ( [languages:protected] => [bok_resources:protected] => [bok_topics:protected] => [bok_keywords:protected] => [id:protected] => 80 [type:protected] => category [parent:protected] => 2 [label:protected] => Sheetmetal Worker [alreadyInSave:protected] => [alreadyInValidation:protected] => [validationFailures:protected] => Array ( ) [_new:BaseObject:private] => [_deleted:BaseObject:private] => [modifiedColumns:protected] => Array ( ) ) [62] => Category Object ( [languages:protected] => [bok_resources:protected] => [bok_topics:protected] => [bok_keywords:protected] => [id:protected] => 62 [type:protected] => category [parent:protected] => 2 [label:protected] => Structural Ironworker [alreadyInSave:protected] => [alreadyInValidation:protected] => [validationFailures:protected] => Array ( ) [_new:BaseObject:private] => [_deleted:BaseObject:private] => [modifiedColumns:protected] => Array ( ) ) [87] => Category Object ( [languages:protected] => [bok_resources:protected] => [bok_topics:protected] => [bok_keywords:protected] => [id:protected] => 87 [type:protected] => category [parent:protected] => 3 [label:protected] => Commercial & Institutional [alreadyInSave:protected] => [alreadyInValidation:protected] => [validationFailures:protected] => Array ( ) [_new:BaseObject:private] => [_deleted:BaseObject:private] => [modifiedColumns:protected] => Array ( ) ) [90] => Category Object ( [languages:protected] => [bok_resources:protected] => [bok_topics:protected] => [bok_keywords:protected] => [id:protected] => 90 [type:protected] => category [parent:protected] => 3 [label:protected] => Industrial [alreadyInSave:protected] => [alreadyInValidation:protected] => [validationFailures:protected] => Array ( ) [_new:BaseObject:private] => [_deleted:BaseObject:private] => [modifiedColumns:protected] => Array ( ) ) [97] => Category Object ( [languages:protected] => [bok_resources:protected] => [bok_topics:protected] => [bok_keywords:protected] => [id:protected] => 97 [type:protected] => category [parent:protected] => 5 [label:protected] => Images [alreadyInSave:protected] => [alreadyInValidation:protected] => [validationFailures:protected] => Array ( ) [_new:BaseObject:private] => [_deleted:BaseObject:private] => [modifiedColumns:protected] => Array ( ) ) ) [categories_initialized:protected] => 1 [mapped_items:protected] => [content:protected] => [files:protected] => [language:protected] => Language Object ( [id:protected] => 1 [code:protected] => en [name:protected] => English [alreadyInSave:protected] => [alreadyInValidation:protected] => [validationFailures:protected] => Array ( ) [_new:BaseObject:private] => [_deleted:BaseObject:private] => [modifiedColumns:protected] => Array ( ) ) [old_record:protected] => [id:protected] => 3995 [old_id:protected] => [elcosh_id:protected] => i002690 [type:protected] => image [display_type:protected] => Image [user_id:protected] => 0 [language_id:protected] => 1 [tagging_id:protected] => Bruce Lippy [priority_id:protected] => 1 [title:protected] => Construction bracing [total_pages:protected] => 0 [billed_pages:protected] => 0 [publication_number:protected] => [part_of:protected] => [keywords:protected] => Bracing, support, scaffold [comments:protected] => [summary:protected] => This shows structural support that prevents collapses during construction. [transition_comments:protected] => [external_link:protected] => [consol_link:protected] => http://www.cpwrconstructionsolutions.org/masonry/solution/8/adjustable-tower-scaffold.html [more_like_this:protected] => i002660 [permission_given_by:protected] => [published:protected] => T [billable:protected] => F [img_name:protected] => [img_ext:protected] => jpg [img_width:protected] => [img_height:protected] => [img_credit:protected] => Photo by Pam Susi [img_practice:protected] => good [vid_source_id:protected] => [vid_running_time:protected] => [vid_intended_audience:protected] => [vid_acquisition_info:protected] => [vid_cost:protected] => [vid_producer:protected] => [vid_filename:protected] => [vid_filename_downloadable:protected] => [date_summary:protected] => January 2016 [date_permission_requested:protected] => [date_permission_received:protected] => [date_review_needed:protected] => [date_received:protected] => 02/01/16 [date_completed:protected] => 02/01/16 [date_billed:protected] => [date_modified:protected] => 02/01/16 [collBokExports:protected] => [lastBokExportCriteria:BaseElcoshItem:private] => [alreadyInSave:protected] => [alreadyInValidation:protected] => [validationFailures:protected] => Array ( ) [_new:BaseObject:private] => [_deleted:BaseObject:private] => [modifiedColumns:protected] => Array ( ) ) ) [3] => Search_Result Object ( [title] => Suspended Scaffold Outriggers [image] => /record/images/3975-p.jpg [blurb] => Suspended scaffolds systems must be designed by a qualified person and inspected daily by a competent person. The supports for the counterweight must... [category] => Array ( [0] => 97 [1] => 15 [2] => 47 [3] => 49 [4] => 79 [5] => 87 ) [labels] => Array ( [0] => Images [1] => Media [2] => Media & Documents [3] => Falls [4] => Work Environment [5] => Hazards [6] => Bricklayer [7] => Trades [8] => Carpenter [10] => Scaffold Erector [12] => Commercial & Institutional [13] => Jobsites ) [type] => Images [sub_category] => [url] => /image/3975/i002683/Suspended%2BScaffold%2BOutriggers.html [item:protected] => ImageRecord Object ( [records:protected] => Array ( ) [recordId:protected] => [searchWordClass:protected] => [searchWordPeerClass:protected] => [bok_record:protected] => [authors:protected] => [organizations:protected] => [collections:protected] => [categories:protected] => Array ( [97] => Category Object ( [languages:protected] => [bok_resources:protected] => [bok_topics:protected] => [bok_keywords:protected] => [id:protected] => 97 [type:protected] => category [parent:protected] => 5 [label:protected] => Images [alreadyInSave:protected] => [alreadyInValidation:protected] => [validationFailures:protected] => Array ( ) [_new:BaseObject:private] => [_deleted:BaseObject:private] => [modifiedColumns:protected] => Array ( ) ) [15] => Category Object ( [languages:protected] => [bok_resources:protected] => [bok_topics:protected] => [bok_keywords:protected] => [id:protected] => 15 [type:protected] => category [parent:protected] => 7 [label:protected] => Falls [alreadyInSave:protected] => [alreadyInValidation:protected] => [validationFailures:protected] => Array ( ) [_new:BaseObject:private] => [_deleted:BaseObject:private] => [modifiedColumns:protected] => Array ( ) ) [47] => Category Object ( [languages:protected] => [bok_resources:protected] => [bok_topics:protected] => [bok_keywords:protected] => [id:protected] => 47 [type:protected] => category [parent:protected] => 2 [label:protected] => Bricklayer [alreadyInSave:protected] => [alreadyInValidation:protected] => [validationFailures:protected] => Array ( ) [_new:BaseObject:private] => [_deleted:BaseObject:private] => [modifiedColumns:protected] => Array ( ) ) [49] => Category Object ( [languages:protected] => [bok_resources:protected] => [bok_topics:protected] => [bok_keywords:protected] => [id:protected] => 49 [type:protected] => category [parent:protected] => 2 [label:protected] => Carpenter [alreadyInSave:protected] => [alreadyInValidation:protected] => [validationFailures:protected] => Array ( ) [_new:BaseObject:private] => [_deleted:BaseObject:private] => [modifiedColumns:protected] => Array ( ) ) [79] => Category Object ( [languages:protected] => [bok_resources:protected] => [bok_topics:protected] => [bok_keywords:protected] => [id:protected] => 79 [type:protected] => category [parent:protected] => 2 [label:protected] => Scaffold Erector [alreadyInSave:protected] => [alreadyInValidation:protected] => [validationFailures:protected] => Array ( ) [_new:BaseObject:private] => [_deleted:BaseObject:private] => [modifiedColumns:protected] => Array ( ) ) [87] => Category Object ( [languages:protected] => [bok_resources:protected] => [bok_topics:protected] => [bok_keywords:protected] => [id:protected] => 87 [type:protected] => category [parent:protected] => 3 [label:protected] => Commercial & Institutional [alreadyInSave:protected] => [alreadyInValidation:protected] => [validationFailures:protected] => Array ( ) [_new:BaseObject:private] => [_deleted:BaseObject:private] => [modifiedColumns:protected] => Array ( ) ) ) [categories_initialized:protected] => 1 [mapped_items:protected] => [content:protected] => [files:protected] => [language:protected] => Language Object ( [id:protected] => 1 [code:protected] => en [name:protected] => English [alreadyInSave:protected] => [alreadyInValidation:protected] => [validationFailures:protected] => Array ( ) [_new:BaseObject:private] => [_deleted:BaseObject:private] => [modifiedColumns:protected] => Array ( ) ) [old_record:protected] => [id:protected] => 3975 [old_id:protected] => [elcosh_id:protected] => i002683 [type:protected] => image [display_type:protected] => Image [user_id:protected] => 0 [language_id:protected] => 1 [tagging_id:protected] => John Newquist [priority_id:protected] => 1 [title:protected] => Suspended Scaffold Outriggers [total_pages:protected] => 0 [billed_pages:protected] => 0 [publication_number:protected] => [part_of:protected] => [keywords:protected] => suspended, scaffold, swing, stage, fall, protection, counterweight, qualified, person [comments:protected] => [summary:protected] => Suspended scaffolds systems must be designed by a qualified person and inspected daily by a competent person. The supports for the counterweight must be designed with a safety factor of four. [transition_comments:protected] => [external_link:protected] => [consol_link:protected] => http://www.cpwrconstructionsolutions.org/task/Erect%2Band%2Bdismantle%2Bscaffolds/ [more_like_this:protected] => d000244,d000359,i000253,i000407 [permission_given_by:protected] => [published:protected] => T [billable:protected] => F [img_name:protected] => [img_ext:protected] => jpg [img_width:protected] => [img_height:protected] => [img_credit:protected] => MetroPark, Miller and Long [img_practice:protected] => not_applicable [vid_source_id:protected] => [vid_running_time:protected] => [vid_intended_audience:protected] => [vid_acquisition_info:protected] => [vid_cost:protected] => [vid_producer:protected] => [vid_filename:protected] => [vid_filename_downloadable:protected] => [date_summary:protected] => August 28 2015 [date_permission_requested:protected] => [date_permission_received:protected] => [date_review_needed:protected] => [date_received:protected] => 08/28/15 [date_completed:protected] => 08/28/15 [date_billed:protected] => [date_modified:protected] => 08/28/15 [collBokExports:protected] => [lastBokExportCriteria:BaseElcoshItem:private] => [alreadyInSave:protected] => [alreadyInValidation:protected] => [validationFailures:protected] => Array ( ) [_new:BaseObject:private] => [_deleted:BaseObject:private] => [modifiedColumns:protected] => Array ( ) ) ) [4] => Search_Result Object ( [title] => Suspended scaffold [image] => /record/images/3976-p.jpg [blurb] => Suspended scaffold outrigger beams must have stops to prevent the hangers from sliding of the end of the outriggers. Wire rope supported must be desig... [category] => Array ( [0] => 97 [1] => 15 [2] => 47 [3] => 50 [4] => 79 [5] => 87 ) [labels] => Array ( [0] => Images [1] => Media [2] => Media & Documents [3] => Falls [4] => Work Environment [5] => Hazards [6] => Bricklayer [7] => Trades [8] => Carpet Layer [10] => Scaffold Erector [12] => Commercial & Institutional [13] => Jobsites ) [type] => Images [sub_category] => [url] => /image/3976/i002684/Suspended%2Bscaffold.html [item:protected] => ImageRecord Object ( [records:protected] => Array ( ) [recordId:protected] => [searchWordClass:protected] => [searchWordPeerClass:protected] => [bok_record:protected] => [authors:protected] => [organizations:protected] => [collections:protected] => [categories:protected] => Array ( [97] => Category Object ( [languages:protected] => [bok_resources:protected] => [bok_topics:protected] => [bok_keywords:protected] => [id:protected] => 97 [type:protected] => category [parent:protected] => 5 [label:protected] => Images [alreadyInSave:protected] => [alreadyInValidation:protected] => [validationFailures:protected] => Array ( ) [_new:BaseObject:private] => [_deleted:BaseObject:private] => [modifiedColumns:protected] => Array ( ) ) [15] => Category Object ( [languages:protected] => [bok_resources:protected] => [bok_topics:protected] => [bok_keywords:protected] => [id:protected] => 15 [type:protected] => category [parent:protected] => 7 [label:protected] => Falls [alreadyInSave:protected] => [alreadyInValidation:protected] => [validationFailures:protected] => Array ( ) [_new:BaseObject:private] => [_deleted:BaseObject:private] => [modifiedColumns:protected] => Array ( ) ) [47] => Category Object ( [languages:protected] => [bok_resources:protected] => [bok_topics:protected] => [bok_keywords:protected] => [id:protected] => 47 [type:protected] => category [parent:protected] => 2 [label:protected] => Bricklayer [alreadyInSave:protected] => [alreadyInValidation:protected] => [validationFailures:protected] => Array ( ) [_new:BaseObject:private] => [_deleted:BaseObject:private] => [modifiedColumns:protected] => Array ( ) ) [50] => Category Object ( [languages:protected] => [bok_resources:protected] => [bok_topics:protected] => [bok_keywords:protected] => [id:protected] => 50 [type:protected] => category [parent:protected] => 2 [label:protected] => Carpet Layer [alreadyInSave:protected] => [alreadyInValidation:protected] => [validationFailures:protected] => Array ( ) [_new:BaseObject:private] => [_deleted:BaseObject:private] => [modifiedColumns:protected] => Array ( ) ) [79] => Category Object ( [languages:protected] => [bok_resources:protected] => [bok_topics:protected] => [bok_keywords:protected] => [id:protected] => 79 [type:protected] => category [parent:protected] => 2 [label:protected] => Scaffold Erector [alreadyInSave:protected] => [alreadyInValidation:protected] => [validationFailures:protected] => Array ( ) [_new:BaseObject:private] => [_deleted:BaseObject:private] => [modifiedColumns:protected] => Array ( ) ) [87] => Category Object ( [languages:protected] => [bok_resources:protected] => [bok_topics:protected] => [bok_keywords:protected] => [id:protected] => 87 [type:protected] => category [parent:protected] => 3 [label:protected] => Commercial & Institutional [alreadyInSave:protected] => [alreadyInValidation:protected] => [validationFailures:protected] => Array ( ) [_new:BaseObject:private] => [_deleted:BaseObject:private] => [modifiedColumns:protected] => Array ( ) ) ) [categories_initialized:protected] => 1 [mapped_items:protected] => [content:protected] => [files:protected] => [language:protected] => Language Object ( [id:protected] => 1 [code:protected] => en [name:protected] => English [alreadyInSave:protected] => [alreadyInValidation:protected] => [validationFailures:protected] => Array ( ) [_new:BaseObject:private] => [_deleted:BaseObject:private] => [modifiedColumns:protected] => Array ( ) ) [old_record:protected] => [id:protected] => 3976 [old_id:protected] => [elcosh_id:protected] => i002684 [type:protected] => image [display_type:protected] => Image [user_id:protected] => 0 [language_id:protected] => 1 [tagging_id:protected] => John Newquist [priority_id:protected] => 1 [title:protected] => Suspended scaffold [total_pages:protected] => 0 [billed_pages:protected] => 0 [publication_number:protected] => [part_of:protected] => [keywords:protected] => Suspended, scaffold, outrigger, beams, erection, wire, rope, inspection, swing, stage, [comments:protected] => [summary:protected] => Suspended scaffold outrigger beams must have stops to prevent the hangers from sliding of the end of the outriggers. Wire rope supported must be designed with a safety factor of 6. The scaffold must be inspected by a competent person daily. [transition_comments:protected] => [external_link:protected] => [consol_link:protected] => http://www.cpwrconstructionsolutions.org/task/Erect%2Band%2Bdismantle%2Bscaffolds/ [more_like_this:protected] => i002683, d000244, i000407, d000606 [permission_given_by:protected] => [published:protected] => T [billable:protected] => F [img_name:protected] => [img_ext:protected] => jpg [img_width:protected] => [img_height:protected] => [img_credit:protected] => Metropark, Miller and Long [img_practice:protected] => not_applicable [vid_source_id:protected] => [vid_running_time:protected] => [vid_intended_audience:protected] => [vid_acquisition_info:protected] => [vid_cost:protected] => [vid_producer:protected] => [vid_filename:protected] => [vid_filename_downloadable:protected] => [date_summary:protected] => [date_permission_requested:protected] => [date_permission_received:protected] => [date_review_needed:protected] => [date_received:protected] => 08/28/15 [date_completed:protected] => 08/28/15 [date_billed:protected] => [date_modified:protected] => 08/28/15 [collBokExports:protected] => [lastBokExportCriteria:BaseElcoshItem:private] => [alreadyInSave:protected] => [alreadyInValidation:protected] => [validationFailures:protected] => Array ( ) [_new:BaseObject:private] => [_deleted:BaseObject:private] => [modifiedColumns:protected] => Array ( ) ) ) [5] => Search_Result Object ( [title] => Three Tower Cranes [image] => /record/images/3979-p.jpg [blurb] => Whenever multiple tower cranes are used, there needs to be preplanning to ensure that the tower cranes cannot hit each other loads. This is accomplish... [category] => Array ( [0] => 97 [1] => 11 [2] => 64 [3] => 70 [4] => 62 [5] => 87 ) [labels] => Array ( [0] => Images [1] => Media [2] => Media & Documents [3] => Cranes & Hoists [4] => Work Environment [5] => Hazards [6] => Laborer [7] => Trades [8] => Operating Engineer [10] => Structural Ironworker [12] => Commercial & Institutional [13] => Jobsites ) [type] => Images [sub_category] => [url] => /image/3979/i002687/Three%2BTower%2BCranes.html [item:protected] => ImageRecord Object ( [records:protected] => Array ( ) [recordId:protected] => [searchWordClass:protected] => [searchWordPeerClass:protected] => [bok_record:protected] => [authors:protected] => [organizations:protected] => [collections:protected] => [categories:protected] => Array ( [97] => Category Object ( [languages:protected] => [bok_resources:protected] => [bok_topics:protected] => [bok_keywords:protected] => [id:protected] => 97 [type:protected] => category [parent:protected] => 5 [label:protected] => Images [alreadyInSave:protected] => [alreadyInValidation:protected] => [validationFailures:protected] => Array ( ) [_new:BaseObject:private] => [_deleted:BaseObject:private] => [modifiedColumns:protected] => Array ( ) ) [11] => Category Object ( [languages:protected] => [bok_resources:protected] => [bok_topics:protected] => [bok_keywords:protected] => [id:protected] => 11 [type:protected] => category [parent:protected] => 7 [label:protected] => Cranes & Hoists [alreadyInSave:protected] => [alreadyInValidation:protected] => [validationFailures:protected] => Array ( ) [_new:BaseObject:private] => [_deleted:BaseObject:private] => [modifiedColumns:protected] => Array ( ) ) [64] => Category Object ( [languages:protected] => [bok_resources:protected] => [bok_topics:protected] => [bok_keywords:protected] => [id:protected] => 64 [type:protected] => category [parent:protected] => 2 [label:protected] => Laborer [alreadyInSave:protected] => [alreadyInValidation:protected] => [validationFailures:protected] => Array ( ) [_new:BaseObject:private] => [_deleted:BaseObject:private] => [modifiedColumns:protected] => Array ( ) ) [70] => Category Object ( [languages:protected] => [bok_resources:protected] => [bok_topics:protected] => [bok_keywords:protected] => [id:protected] => 70 [type:protected] => category [parent:protected] => 2 [label:protected] => Operating Engineer [alreadyInSave:protected] => [alreadyInValidation:protected] => [validationFailures:protected] => Array ( ) [_new:BaseObject:private] => [_deleted:BaseObject:private] => [modifiedColumns:protected] => Array ( ) ) [62] => Category Object ( [languages:protected] => [bok_resources:protected] => [bok_topics:protected] => [bok_keywords:protected] => [id:protected] => 62 [type:protected] => category [parent:protected] => 2 [label:protected] => Structural Ironworker [alreadyInSave:protected] => [alreadyInValidation:protected] => [validationFailures:protected] => Array ( ) [_new:BaseObject:private] => [_deleted:BaseObject:private] => [modifiedColumns:protected] => Array ( ) ) [87] => Category Object ( [languages:protected] => [bok_resources:protected] => [bok_topics:protected] => [bok_keywords:protected] => [id:protected] => 87 [type:protected] => category [parent:protected] => 3 [label:protected] => Commercial & Institutional [alreadyInSave:protected] => [alreadyInValidation:protected] => [validationFailures:protected] => Array ( ) [_new:BaseObject:private] => [_deleted:BaseObject:private] => [modifiedColumns:protected] => Array ( ) ) ) [categories_initialized:protected] => 1 [mapped_items:protected] => [content:protected] => [files:protected] => [language:protected] => Language Object ( [id:protected] => 1 [code:protected] => en [name:protected] => English [alreadyInSave:protected] => [alreadyInValidation:protected] => [validationFailures:protected] => Array ( ) [_new:BaseObject:private] => [_deleted:BaseObject:private] => [modifiedColumns:protected] => Array ( ) ) [old_record:protected] => [id:protected] => 3979 [old_id:protected] => [elcosh_id:protected] => i002687 [type:protected] => image [display_type:protected] => Image [user_id:protected] => 0 [language_id:protected] => 1 [tagging_id:protected] => John Newquist [priority_id:protected] => 1 [title:protected] => Three Tower Cranes [total_pages:protected] => 0 [billed_pages:protected] => 0 [publication_number:protected] => [part_of:protected] => [keywords:protected] => [comments:protected] => [summary:protected] => Whenever multiple tower cranes are used, there needs to be preplanning to ensure that the tower cranes cannot hit each other loads. This is accomplished by setting swing restrictions, marking the ground for allowable crane travel and training of the crane signal persons. [transition_comments:protected] => [external_link:protected] => [consol_link:protected] => http://www.cpwrconstructionsolutions.org/work/6/184/ [more_like_this:protected] => d001029, d000010, i001280, i001221 [permission_given_by:protected] => [published:protected] => T [billable:protected] => F [img_name:protected] => [img_ext:protected] => jpg [img_width:protected] => [img_height:protected] => [img_credit:protected] => Metropark [img_practice:protected] => not_applicable [vid_source_id:protected] => [vid_running_time:protected] => [vid_intended_audience:protected] => [vid_acquisition_info:protected] => [vid_cost:protected] => [vid_producer:protected] => [vid_filename:protected] => [vid_filename_downloadable:protected] => [date_summary:protected] => August 28 2015 [date_permission_requested:protected] => [date_permission_received:protected] => [date_review_needed:protected] => [date_received:protected] => 08/28/15 [date_completed:protected] => 08/28/15 [date_billed:protected] => [date_modified:protected] => 08/28/15 [collBokExports:protected] => [lastBokExportCriteria:BaseElcoshItem:private] => [alreadyInSave:protected] => [alreadyInValidation:protected] => [validationFailures:protected] => Array ( ) [_new:BaseObject:private] => [_deleted:BaseObject:private] => [modifiedColumns:protected] => Array ( ) ) ) ) [preview_mode] => [description] => This third in a series of 6 Tool Box Talks on construction ergonomics focuses on proper positioning to avoid injuries. The TBT recommends: 1)prop up a task off of the floor by using a raised surface, cart, baker scaffold, saw horses to prep materials near waist height, 2)move the lift or ladder in the best position for the work, 3)position the lift in front of the area you plan to work without trying to reach too far on either side of the lift. [keywords] => position, positioning, ergonomics, ergo, carpal tunnel, MSD, musculoskeletal disorder [related_items] => Array ( [Handouts] => Array ( [0] => DocumentRecord Object ( [records:protected] => Array ( ) [recordId:protected] => [searchWordClass:protected] => [searchWordPeerClass:protected] => [bok_record:protected] => [authors:protected] => [organizations:protected] => [collections:protected] => [categories:protected] => [categories_initialized:protected] => [mapped_items:protected] => [content:protected] => [files:protected] => [language:protected] => Language Object ( [id:protected] => 1 [code:protected] => en [name:protected] => English [alreadyInSave:protected] => [alreadyInValidation:protected] => [validationFailures:protected] => Array ( ) [_new:BaseObject:private] => [_deleted:BaseObject:private] => [modifiedColumns:protected] => Array ( ) ) [old_record:protected] => [id:protected] => 3833 [old_id:protected] => [elcosh_id:protected] => d001303 [type:protected] => document [display_type:protected] => HTML w/ PDF [user_id:protected] => 25 [language_id:protected] => 1 [tagging_id:protected] => Bruce Lippy [priority_id:protected] => 1 [title:protected] => Overview of Toolbox Talks on Ergonomics Developed by Washington University in St. Louis [total_pages:protected] => 3 [billed_pages:protected] => 3 [publication_number:protected] => [part_of:protected] => [keywords:protected] => ergonomics, musculoskeletal disorders, MSDs [comments:protected] => 7-28-2014 - Originally submitted as "HTML w/ doc and PDF", Jeff Nelson asked Bruce Lippy for permission to switch it to "HTML w/ PDF" -- permission was given [summary:protected] => This overviews provides a background on how Washington University in St. Louis developed this series of six toolbox talks on ergonomics. It also describes how they tested the effectiveness of these communication tools, concluding that the guide was valuable for improving the delivery of ergonomics training and interaction between the safety representative and workers. The researchers recommend preparing site-specific information prior to the talk and interacting with workers to discuss problems and ergonomic solutions during the safety meetings. [transition_comments:protected] => [external_link:protected] => [consol_link:protected] => [more_like_this:protected] => [permission_given_by:protected] => Lisa Jaegers, Washington U. in St. Louis [published:protected] => T [billable:protected] => F [img_name:protected] => [img_ext:protected] => png [img_width:protected] => [img_height:protected] => [img_credit:protected] => [img_practice:protected] => [vid_source_id:protected] => [vid_running_time:protected] => [vid_intended_audience:protected] => [vid_acquisition_info:protected] => [vid_cost:protected] => [vid_producer:protected] => [vid_filename:protected] => [vid_filename_downloadable:protected] => [date_summary:protected] => 2014 [date_permission_requested:protected] => [date_permission_received:protected] => [date_review_needed:protected] => [date_received:protected] => 06/11/14 [date_completed:protected] => 07/29/14 [date_billed:protected] => [date_modified:protected] => 07/29/14 [collBokExports:protected] => [lastBokExportCriteria:BaseElcoshItem:private] => [alreadyInSave:protected] => [alreadyInValidation:protected] => [validationFailures:protected] => Array ( ) [_new:BaseObject:private] => [_deleted:BaseObject:private] => [modifiedColumns:protected] => Array ( ) ) ) [Toolbox Talks] => Array ( [0] => DocumentRecord Object ( [records:protected] => Array ( ) [recordId:protected] => [searchWordClass:protected] => [searchWordPeerClass:protected] => [bok_record:protected] => [authors:protected] => [organizations:protected] => [collections:protected] => [categories:protected] => [categories_initialized:protected] => [mapped_items:protected] => [content:protected] => [files:protected] => [language:protected] => Language Object ( [id:protected] => 1 [code:protected] => en [name:protected] => English [alreadyInSave:protected] => [alreadyInValidation:protected] => [validationFailures:protected] => Array ( ) [_new:BaseObject:private] => [_deleted:BaseObject:private] => [modifiedColumns:protected] => Array ( ) ) [old_record:protected] => [id:protected] => 3835 [old_id:protected] => [elcosh_id:protected] => d001304 [type:protected] => document [display_type:protected] => HTML w/ PDF [user_id:protected] => 25 [language_id:protected] => 1 [tagging_id:protected] => Bruce Lippy [priority_id:protected] => 1 [title:protected] => Ergonomics Tool Box Talks (TBT) Training Guide [total_pages:protected] => 2 [billed_pages:protected] => 2 [publication_number:protected] => [part_of:protected] => [keywords:protected] => Ergonomics, carpal tunnel, muscular skeletal disorders, msd [comments:protected] => [summary:protected] => CPWR-funded ergonomics research by Washington University at St. Louis led to the development of 6 tool box talks. This guide is an explanation of how to deliver the talks for maximum effectiveness. This guide should be reviewed before delivering any of the talks because it makes important recommendations like: • If possible, give the TBTs as a part of the crew’s regular safety meetings so that ergonomics is included in the safety discussion. • Try to locate an area with few distractions for gathering the crew. • For a team approach, invite the work crew, site superintendent, project manager and other general contractor and/or subcontractor reps who you feel may be helpful in supporting the training and ergonomics solutions. [transition_comments:protected] => [external_link:protected] => [consol_link:protected] => [more_like_this:protected] => d001303,d001305,d001306,d001307,d001308,d001309,d001310 [permission_given_by:protected] => [published:protected] => T [billable:protected] => F [img_name:protected] => [img_ext:protected] => png [img_width:protected] => [img_height:protected] => [img_credit:protected] => [img_practice:protected] => [vid_source_id:protected] => [vid_running_time:protected] => [vid_intended_audience:protected] => [vid_acquisition_info:protected] => [vid_cost:protected] => [vid_producer:protected] => [vid_filename:protected] => [vid_filename_downloadable:protected] => [date_summary:protected] => 2014 [date_permission_requested:protected] => [date_permission_received:protected] => [date_review_needed:protected] => [date_received:protected] => 06/12/14 [date_completed:protected] => 07/29/14 [date_billed:protected] => [date_modified:protected] => 07/29/14 [collBokExports:protected] => [lastBokExportCriteria:BaseElcoshItem:private] => [alreadyInSave:protected] => [alreadyInValidation:protected] => [validationFailures:protected] => Array ( ) [_new:BaseObject:private] => [_deleted:BaseObject:private] => [modifiedColumns:protected] => Array ( ) ) [1] => DocumentRecord Object ( [records:protected] => Array ( ) [recordId:protected] => [searchWordClass:protected] => [searchWordPeerClass:protected] => [bok_record:protected] => [authors:protected] => [organizations:protected] => [collections:protected] => [categories:protected] => [categories_initialized:protected] => [mapped_items:protected] => [content:protected] => [files:protected] => [language:protected] => Language Object ( [id:protected] => 1 [code:protected] => en [name:protected] => English [alreadyInSave:protected] => [alreadyInValidation:protected] => [validationFailures:protected] => Array ( ) [_new:BaseObject:private] => [_deleted:BaseObject:private] => [modifiedColumns:protected] => Array ( ) ) [old_record:protected] => [id:protected] => 3836 [old_id:protected] => [elcosh_id:protected] => d001305 [type:protected] => document [display_type:protected] => HTML w/ PDF [user_id:protected] => 25 [language_id:protected] => 1 [tagging_id:protected] => Bruce Lippy [priority_id:protected] => 1 [title:protected] => TBT1 Ergonomics in Construction [total_pages:protected] => 5 [billed_pages:protected] => 5 [publication_number:protected] => [part_of:protected] => [keywords:protected] => ergonomics, ergo, msd, musculoskeletal disorders, risk factors, lifting, carpal tunnel, repetition, awkward postures [comments:protected] => 7-28-2014 Jeff Nelson asked Bruce Lippy about what to do with a sentence included toward the top of the doc, "Fill them in on page 2 'Other Questions.'" -- Bruce said this sentence could be deleted from the HTML. [summary:protected] => This is the first in a series of 6 Tool Box Talks produced by Washington University in St. Louis on ergonomics in construction work. This one should be delivered first because it covers what ergonomics is, why construction workers need to talk about it, what the risk factors are for developing a health problem and how to prevent these problems. [transition_comments:protected] => [external_link:protected] => [consol_link:protected] => http://www.cpwrconstructionsolutions.org/pipes_vessels/solution/50/participatory-ergonomics-program.html [more_like_this:protected] => d001303,d001304,d001306,d001307,d001308,d001309 [permission_given_by:protected] => Lisa Jaegers, Washington U. in St. Louis [published:protected] => T [billable:protected] => F [img_name:protected] => [img_ext:protected] => png [img_width:protected] => [img_height:protected] => [img_credit:protected] => [img_practice:protected] => [vid_source_id:protected] => [vid_running_time:protected] => [vid_intended_audience:protected] => [vid_acquisition_info:protected] => [vid_cost:protected] => [vid_producer:protected] => [vid_filename:protected] => [vid_filename_downloadable:protected] => [date_summary:protected] => 2014 [date_permission_requested:protected] => [date_permission_received:protected] => [date_review_needed:protected] => [date_received:protected] => 06/12/14 [date_completed:protected] => 07/28/14 [date_billed:protected] => [date_modified:protected] => 10/09/15 [collBokExports:protected] => [lastBokExportCriteria:BaseElcoshItem:private] => [alreadyInSave:protected] => [alreadyInValidation:protected] => [validationFailures:protected] => Array ( ) [_new:BaseObject:private] => [_deleted:BaseObject:private] => [modifiedColumns:protected] => Array ( ) ) [2] => DocumentRecord Object ( [records:protected] => Array ( ) [recordId:protected] => [searchWordClass:protected] => [searchWordPeerClass:protected] => [bok_record:protected] => [authors:protected] => [organizations:protected] => [collections:protected] => [categories:protected] => [categories_initialized:protected] => [mapped_items:protected] => [content:protected] => [files:protected] => [language:protected] => Language Object ( [id:protected] => 1 [code:protected] => en [name:protected] => English [alreadyInSave:protected] => [alreadyInValidation:protected] => [validationFailures:protected] => Array ( ) [_new:BaseObject:private] => [_deleted:BaseObject:private] => [modifiedColumns:protected] => Array ( ) ) [old_record:protected] => [id:protected] => 3837 [old_id:protected] => [elcosh_id:protected] => d001306 [type:protected] => document [display_type:protected] => HTML w/ PDF [user_id:protected] => 25 [language_id:protected] => 1 [tagging_id:protected] => Bruce Lippy [priority_id:protected] => 1 [title:protected] => TBT2 Keep Reach Close [total_pages:protected] => 4 [billed_pages:protected] => 4 [publication_number:protected] => [part_of:protected] => [keywords:protected] => reach, ergonomic, ergo, MSD, carpal tunnel, repetition, awkward positions [comments:protected] => 7-28-2014 Jeff Nelson asked Bruce Lippy about what to do with a sentence included toward the top of the doc, "Fill them in on page 2 'Other Questions.'" -- Bruce said this sentence could be deleted from the HTML. [summary:protected] => This is the second of six Tool Box Talks created by Washington University in St. Louis on ergonomics in construction. There is a guide with the series that describes how to deliver these talks. This one deals with how to avoid awkward reaching during tasks to prevent injuries. try to work with your hands below your head and close to our body to reduce your risk of shoulder strains and back discomfort. This TBT recommends considering ways to move close to the task, keeping the work area free of obstacles, and talking with each other to provide constructive feedback about your working position. [transition_comments:protected] => [external_link:protected] => [consol_link:protected] => http://www.cpwrconstructionsolutions.org/hazard/959/lifting-and-carrying-manual-materials-handling.html [more_like_this:protected] => d001303,d001304,d001305,d001307,d001308,e001309 [permission_given_by:protected] => [published:protected] => T [billable:protected] => F [img_name:protected] => [img_ext:protected] => png [img_width:protected] => [img_height:protected] => [img_credit:protected] => [img_practice:protected] => [vid_source_id:protected] => [vid_running_time:protected] => [vid_intended_audience:protected] => [vid_acquisition_info:protected] => [vid_cost:protected] => [vid_producer:protected] => [vid_filename:protected] => [vid_filename_downloadable:protected] => [date_summary:protected] => 2014 [date_permission_requested:protected] => [date_permission_received:protected] => [date_review_needed:protected] => [date_received:protected] => 06/12/14 [date_completed:protected] => 07/28/14 [date_billed:protected] => [date_modified:protected] => 11/02/16 [collBokExports:protected] => [lastBokExportCriteria:BaseElcoshItem:private] => [alreadyInSave:protected] => [alreadyInValidation:protected] => [validationFailures:protected] => Array ( ) [_new:BaseObject:private] => [_deleted:BaseObject:private] => [modifiedColumns:protected] => Array ( ) ) [3] => DocumentRecord Object ( [records:protected] => Array ( ) [recordId:protected] => [searchWordClass:protected] => [searchWordPeerClass:protected] => [bok_record:protected] => [authors:protected] => [organizations:protected] => [collections:protected] => [categories:protected] => [categories_initialized:protected] => [mapped_items:protected] => [content:protected] => [files:protected] => [language:protected] => Language Object ( [id:protected] => 1 [code:protected] => en [name:protected] => English [alreadyInSave:protected] => [alreadyInValidation:protected] => [validationFailures:protected] => Array ( ) [_new:BaseObject:private] => [_deleted:BaseObject:private] => [modifiedColumns:protected] => Array ( ) ) [old_record:protected] => [id:protected] => 3839 [old_id:protected] => [elcosh_id:protected] => d001308 [type:protected] => document [display_type:protected] => HTML w/ PDF [user_id:protected] => 23 [language_id:protected] => 1 [tagging_id:protected] => Bruce Lippy [priority_id:protected] => 1 [title:protected] => TBT4 Move Materials With Assist [total_pages:protected] => 4 [billed_pages:protected] => 4 [publication_number:protected] => [part_of:protected] => [keywords:protected] => lifting, back injury, ergonomics, ergo, MSD, buddy system [comments:protected] => 7-28-2014 Jeff Nelson asked Bruce Lippy about what to do with a sentence included toward the top of the doc, "Fill them in on page 2 'Other Questions.'" -- Bruce said this sentence could be deleted from the HTML. [summary:protected] => This tool box talk is fourth in a series of 6 developed by Washington University in St. Louis on construction ergonomics. This one focuses on preventing back injuries by getting an assist when manually lifting. It recommends using a cart for transporting loads, taking less trips, avoiding carrying materials on the shoulder and helping each other to lift large or heavy materials when a cart or hoist is not available. [transition_comments:protected] => [external_link:protected] => [consol_link:protected] => http://www.cpwrconstructionsolutions.org/hazard/959/lifting-and-carrying-manual-materials-handling.html [more_like_this:protected] => d001303,d001304,d001305,d001306,d001307,d001309 [permission_given_by:protected] => Lisa Jaegers, Washington U. in St. Louis [published:protected] => T [billable:protected] => F [img_name:protected] => [img_ext:protected] => png [img_width:protected] => [img_height:protected] => [img_credit:protected] => [img_practice:protected] => [vid_source_id:protected] => [vid_running_time:protected] => [vid_intended_audience:protected] => [vid_acquisition_info:protected] => [vid_cost:protected] => [vid_producer:protected] => [vid_filename:protected] => [vid_filename_downloadable:protected] => [date_summary:protected] => 2014 [date_permission_requested:protected] => [date_permission_received:protected] => [date_review_needed:protected] => [date_received:protected] => 06/12/14 [date_completed:protected] => 07/29/14 [date_billed:protected] => [date_modified:protected] => 10/09/15 [collBokExports:protected] => [lastBokExportCriteria:BaseElcoshItem:private] => [alreadyInSave:protected] => [alreadyInValidation:protected] => [validationFailures:protected] => Array ( ) [_new:BaseObject:private] => [_deleted:BaseObject:private] => [modifiedColumns:protected] => Array ( ) ) [4] => DocumentRecord Object ( [records:protected] => Array ( ) [recordId:protected] => [searchWordClass:protected] => [searchWordPeerClass:protected] => [bok_record:protected] => [authors:protected] => [organizations:protected] => [collections:protected] => [categories:protected] => [categories_initialized:protected] => [mapped_items:protected] => [content:protected] => [files:protected] => [language:protected] => Language Object ( [id:protected] => 1 [code:protected] => en [name:protected] => English [alreadyInSave:protected] => [alreadyInValidation:protected] => [validationFailures:protected] => Array ( ) [_new:BaseObject:private] => [_deleted:BaseObject:private] => [modifiedColumns:protected] => Array ( ) ) [old_record:protected] => [id:protected] => 3840 [old_id:protected] => [elcosh_id:protected] => d001309 [type:protected] => document [display_type:protected] => HTML w/ PDF [user_id:protected] => 23 [language_id:protected] => 1 [tagging_id:protected] => Bruce Lippy [priority_id:protected] => 1 [title:protected] => TBT5 Manual Tools [total_pages:protected] => 4 [billed_pages:protected] => 4 [publication_number:protected] => [part_of:protected] => [keywords:protected] => ergonomic, hand tools, handles, MSD, musculoskeletal disorder, carpal tunnel [comments:protected] => 7-28-2014 Jeff Nelson asked Bruce Lippy about what to do with a sentence included toward the top of the doc, "Fill them in on page 2 'Other Questions.'" -- Bruce said this sentence could be deleted from the HTML. [summary:protected] => This is the fifth in a series of 6 tool box talks on construction ergonomics produced by the University of Washington in St. Louis. This one focuses on manual tools. It asks the following 6 key questions. Does the tool… 1. Fit the task? 2. Allow a good power grip? 3. Keep the wrist in a straight posture? 4. Feel comfortable? 5. Take less effort than other tools for the task? 6. Work effectively? [transition_comments:protected] => [external_link:protected] => [consol_link:protected] => http://www.cpwrconstructionsolutions.org/masonry/solution/383/ergonomic-hand-tools.html [more_like_this:protected] => d001303,d001304,d001305,d001306,d001307,d001308,d001310 [permission_given_by:protected] => Lisa Jaegers, U. Wash. St. Louis [published:protected] => T [billable:protected] => F [img_name:protected] => [img_ext:protected] => png [img_width:protected] => [img_height:protected] => [img_credit:protected] => [img_practice:protected] => [vid_source_id:protected] => [vid_running_time:protected] => [vid_intended_audience:protected] => [vid_acquisition_info:protected] => [vid_cost:protected] => [vid_producer:protected] => [vid_filename:protected] => [vid_filename_downloadable:protected] => [date_summary:protected] => 2014 [date_permission_requested:protected] => [date_permission_received:protected] => [date_review_needed:protected] => [date_received:protected] => 06/12/14 [date_completed:protected] => 07/29/14 [date_billed:protected] => [date_modified:protected] => 10/09/15 [collBokExports:protected] => [lastBokExportCriteria:BaseElcoshItem:private] => [alreadyInSave:protected] => [alreadyInValidation:protected] => [validationFailures:protected] => Array ( ) [_new:BaseObject:private] => [_deleted:BaseObject:private] => [modifiedColumns:protected] => Array ( ) ) ) ) [collections] => Array ( [3834] => ) [record] => DocumentRecord Object ( [records:protected] => Array ( ) [recordId:protected] => [searchWordClass:protected] => [searchWordPeerClass:protected] => [bok_record:protected] => [authors:protected] => Array ( ) [organizations:protected] => Array ( [182] => Organization Object ( [id:protected] => 182 [elcosh_id:protected] => o000205 [user_id:protected] => 14 [province_id:protected] => 0 [country_id:protected] => 0 [title:protected] => Washington University - St. Louis [address:protected] => [postal_code:protected] => [city:protected] => [department:protected] => [phone:protected] => [fax:protected] => [email:protected] => [website:protected] => [filename:protected] => [about:protected] => [comments:protected] => [logo_available:protected] => T [no_details:protected] => T [date_received:protected] => 2009-08-06 [date_completed:protected] => 2009-08-06 [date_billed:protected] => [alreadyInSave:protected] => [alreadyInValidation:protected] => [validationFailures:protected] => Array ( ) [_new:BaseObject:private] => [_deleted:BaseObject:private] => [modifiedColumns:protected] => Array ( ) ) ) [collections:protected] => Array ( [3834] => ) [categories:protected] => [categories_initialized:protected] => [mapped_items:protected] => Array ( [3833] => DocumentRecord Object ( [records:protected] => Array ( ) [recordId:protected] => [searchWordClass:protected] => [searchWordPeerClass:protected] => [bok_record:protected] => [authors:protected] => [organizations:protected] => [collections:protected] => [categories:protected] => [categories_initialized:protected] => [mapped_items:protected] => [content:protected] => [files:protected] => [language:protected] => [old_record:protected] => [id:protected] => 3833 [old_id:protected] => [elcosh_id:protected] => d001303 [type:protected] => document [display_type:protected] => HTML w/ PDF [user_id:protected] => 25 [language_id:protected] => 1 [tagging_id:protected] => Bruce Lippy [priority_id:protected] => 1 [title:protected] => Overview of Toolbox Talks on Ergonomics Developed by Washington University in St. Louis [total_pages:protected] => 3 [billed_pages:protected] => 3 [publication_number:protected] => [part_of:protected] => [keywords:protected] => ergonomics, musculoskeletal disorders, MSDs [comments:protected] => 7-28-2014 - Originally submitted as "HTML w/ doc and PDF", Jeff Nelson asked Bruce Lippy for permission to switch it to "HTML w/ PDF" -- permission was given [summary:protected] => This overviews provides a background on how Washington University in St. Louis developed this series of six toolbox talks on ergonomics. It also describes how they tested the effectiveness of these communication tools, concluding that the guide was valuable for improving the delivery of ergonomics training and interaction between the safety representative and workers. The researchers recommend preparing site-specific information prior to the talk and interacting with workers to discuss problems and ergonomic solutions during the safety meetings. [transition_comments:protected] => [external_link:protected] => [consol_link:protected] => [more_like_this:protected] => [permission_given_by:protected] => Lisa Jaegers, Washington U. in St. Louis [published:protected] => T [billable:protected] => F [img_name:protected] => [img_ext:protected] => png [img_width:protected] => [img_height:protected] => [img_credit:protected] => [img_practice:protected] => [vid_source_id:protected] => [vid_running_time:protected] => [vid_intended_audience:protected] => [vid_acquisition_info:protected] => [vid_cost:protected] => [vid_producer:protected] => [vid_filename:protected] => [vid_filename_downloadable:protected] => [date_summary:protected] => 2014 [date_permission_requested:protected] => [date_permission_received:protected] => [date_review_needed:protected] => [date_received:protected] => 06/11/14 [date_completed:protected] => 07/29/14 [date_billed:protected] => [date_modified:protected] => 07/29/14 [collBokExports:protected] => [lastBokExportCriteria:BaseElcoshItem:private] => [alreadyInSave:protected] => [alreadyInValidation:protected] => [validationFailures:protected] => Array ( ) [_new:BaseObject:private] => [_deleted:BaseObject:private] => [modifiedColumns:protected] => Array ( ) ) [3835] => DocumentRecord Object ( [records:protected] => Array ( ) [recordId:protected] => [searchWordClass:protected] => [searchWordPeerClass:protected] => [bok_record:protected] => [authors:protected] => [organizations:protected] => [collections:protected] => [categories:protected] => [categories_initialized:protected] => [mapped_items:protected] => [content:protected] => [files:protected] => [language:protected] => [old_record:protected] => [id:protected] => 3835 [old_id:protected] => [elcosh_id:protected] => d001304 [type:protected] => document [display_type:protected] => HTML w/ PDF [user_id:protected] => 25 [language_id:protected] => 1 [tagging_id:protected] => Bruce Lippy [priority_id:protected] => 1 [title:protected] => Ergonomics Tool Box Talks (TBT) Training Guide [total_pages:protected] => 2 [billed_pages:protected] => 2 [publication_number:protected] => [part_of:protected] => [keywords:protected] => Ergonomics, carpal tunnel, muscular skeletal disorders, msd [comments:protected] => [summary:protected] => CPWR-funded ergonomics research by Washington University at St. Louis led to the development of 6 tool box talks. This guide is an explanation of how to deliver the talks for maximum effectiveness. This guide should be reviewed before delivering any of the talks because it makes important recommendations like: • If possible, give the TBTs as a part of the crew’s regular safety meetings so that ergonomics is included in the safety discussion. • Try to locate an area with few distractions for gathering the crew. • For a team approach, invite the work crew, site superintendent, project manager and other general contractor and/or subcontractor reps who you feel may be helpful in supporting the training and ergonomics solutions. [transition_comments:protected] => [external_link:protected] => [consol_link:protected] => [more_like_this:protected] => d001303,d001305,d001306,d001307,d001308,d001309,d001310 [permission_given_by:protected] => [published:protected] => T [billable:protected] => F [img_name:protected] => [img_ext:protected] => png [img_width:protected] => [img_height:protected] => [img_credit:protected] => [img_practice:protected] => [vid_source_id:protected] => [vid_running_time:protected] => [vid_intended_audience:protected] => [vid_acquisition_info:protected] => [vid_cost:protected] => [vid_producer:protected] => [vid_filename:protected] => [vid_filename_downloadable:protected] => [date_summary:protected] => 2014 [date_permission_requested:protected] => [date_permission_received:protected] => [date_review_needed:protected] => [date_received:protected] => 06/12/14 [date_completed:protected] => 07/29/14 [date_billed:protected] => [date_modified:protected] => 07/29/14 [collBokExports:protected] => [lastBokExportCriteria:BaseElcoshItem:private] => [alreadyInSave:protected] => [alreadyInValidation:protected] => [validationFailures:protected] => Array ( ) [_new:BaseObject:private] => [_deleted:BaseObject:private] => [modifiedColumns:protected] => Array ( ) ) [3836] => DocumentRecord Object ( [records:protected] => Array ( ) [recordId:protected] => [searchWordClass:protected] => [searchWordPeerClass:protected] => [bok_record:protected] => [authors:protected] => [organizations:protected] => [collections:protected] => [categories:protected] => [categories_initialized:protected] => [mapped_items:protected] => [content:protected] => [files:protected] => [language:protected] => [old_record:protected] => [id:protected] => 3836 [old_id:protected] => [elcosh_id:protected] => d001305 [type:protected] => document [display_type:protected] => HTML w/ PDF [user_id:protected] => 25 [language_id:protected] => 1 [tagging_id:protected] => Bruce Lippy [priority_id:protected] => 1 [title:protected] => TBT1 Ergonomics in Construction [total_pages:protected] => 5 [billed_pages:protected] => 5 [publication_number:protected] => [part_of:protected] => [keywords:protected] => ergonomics, ergo, msd, musculoskeletal disorders, risk factors, lifting, carpal tunnel, repetition, awkward postures [comments:protected] => 7-28-2014 Jeff Nelson asked Bruce Lippy about what to do with a sentence included toward the top of the doc, "Fill them in on page 2 'Other Questions.'" -- Bruce said this sentence could be deleted from the HTML. [summary:protected] => This is the first in a series of 6 Tool Box Talks produced by Washington University in St. Louis on ergonomics in construction work. This one should be delivered first because it covers what ergonomics is, why construction workers need to talk about it, what the risk factors are for developing a health problem and how to prevent these problems. [transition_comments:protected] => [external_link:protected] => [consol_link:protected] => http://www.cpwrconstructionsolutions.org/pipes_vessels/solution/50/participatory-ergonomics-program.html [more_like_this:protected] => d001303,d001304,d001306,d001307,d001308,d001309 [permission_given_by:protected] => Lisa Jaegers, Washington U. in St. Louis [published:protected] => T [billable:protected] => F [img_name:protected] => [img_ext:protected] => png [img_width:protected] => [img_height:protected] => [img_credit:protected] => [img_practice:protected] => [vid_source_id:protected] => [vid_running_time:protected] => [vid_intended_audience:protected] => [vid_acquisition_info:protected] => [vid_cost:protected] => [vid_producer:protected] => [vid_filename:protected] => [vid_filename_downloadable:protected] => [date_summary:protected] => 2014 [date_permission_requested:protected] => [date_permission_received:protected] => [date_review_needed:protected] => [date_received:protected] => 06/12/14 [date_completed:protected] => 07/28/14 [date_billed:protected] => [date_modified:protected] => 10/09/15 [collBokExports:protected] => [lastBokExportCriteria:BaseElcoshItem:private] => [alreadyInSave:protected] => [alreadyInValidation:protected] => [validationFailures:protected] => Array ( ) [_new:BaseObject:private] => [_deleted:BaseObject:private] => [modifiedColumns:protected] => Array ( ) ) [3837] => DocumentRecord Object ( [records:protected] => Array ( ) [recordId:protected] => [searchWordClass:protected] => [searchWordPeerClass:protected] => [bok_record:protected] => [authors:protected] => [organizations:protected] => [collections:protected] => [categories:protected] => [categories_initialized:protected] => [mapped_items:protected] => [content:protected] => [files:protected] => [language:protected] => [old_record:protected] => [id:protected] => 3837 [old_id:protected] => [elcosh_id:protected] => d001306 [type:protected] => document [display_type:protected] => HTML w/ PDF [user_id:protected] => 25 [language_id:protected] => 1 [tagging_id:protected] => Bruce Lippy [priority_id:protected] => 1 [title:protected] => TBT2 Keep Reach Close [total_pages:protected] => 4 [billed_pages:protected] => 4 [publication_number:protected] => [part_of:protected] => [keywords:protected] => reach, ergonomic, ergo, MSD, carpal tunnel, repetition, awkward positions [comments:protected] => 7-28-2014 Jeff Nelson asked Bruce Lippy about what to do with a sentence included toward the top of the doc, "Fill them in on page 2 'Other Questions.'" -- Bruce said this sentence could be deleted from the HTML. [summary:protected] => This is the second of six Tool Box Talks created by Washington University in St. Louis on ergonomics in construction. There is a guide with the series that describes how to deliver these talks. This one deals with how to avoid awkward reaching during tasks to prevent injuries. try to work with your hands below your head and close to our body to reduce your risk of shoulder strains and back discomfort. This TBT recommends considering ways to move close to the task, keeping the work area free of obstacles, and talking with each other to provide constructive feedback about your working position. [transition_comments:protected] => [external_link:protected] => [consol_link:protected] => http://www.cpwrconstructionsolutions.org/hazard/959/lifting-and-carrying-manual-materials-handling.html [more_like_this:protected] => d001303,d001304,d001305,d001307,d001308,e001309 [permission_given_by:protected] => [published:protected] => T [billable:protected] => F [img_name:protected] => [img_ext:protected] => png [img_width:protected] => [img_height:protected] => [img_credit:protected] => [img_practice:protected] => [vid_source_id:protected] => [vid_running_time:protected] => [vid_intended_audience:protected] => [vid_acquisition_info:protected] => [vid_cost:protected] => [vid_producer:protected] => [vid_filename:protected] => [vid_filename_downloadable:protected] => [date_summary:protected] => 2014 [date_permission_requested:protected] => [date_permission_received:protected] => [date_review_needed:protected] => [date_received:protected] => 06/12/14 [date_completed:protected] => 07/28/14 [date_billed:protected] => [date_modified:protected] => 11/02/16 [collBokExports:protected] => [lastBokExportCriteria:BaseElcoshItem:private] => [alreadyInSave:protected] => [alreadyInValidation:protected] => [validationFailures:protected] => Array ( ) [_new:BaseObject:private] => [_deleted:BaseObject:private] => [modifiedColumns:protected] => Array ( ) ) [3839] => DocumentRecord Object ( [records:protected] => Array ( ) [recordId:protected] => [searchWordClass:protected] => [searchWordPeerClass:protected] => [bok_record:protected] => [authors:protected] => [organizations:protected] => [collections:protected] => [categories:protected] => [categories_initialized:protected] => [mapped_items:protected] => [content:protected] => [files:protected] => [language:protected] => [old_record:protected] => [id:protected] => 3839 [old_id:protected] => [elcosh_id:protected] => d001308 [type:protected] => document [display_type:protected] => HTML w/ PDF [user_id:protected] => 23 [language_id:protected] => 1 [tagging_id:protected] => Bruce Lippy [priority_id:protected] => 1 [title:protected] => TBT4 Move Materials With Assist [total_pages:protected] => 4 [billed_pages:protected] => 4 [publication_number:protected] => [part_of:protected] => [keywords:protected] => lifting, back injury, ergonomics, ergo, MSD, buddy system [comments:protected] => 7-28-2014 Jeff Nelson asked Bruce Lippy about what to do with a sentence included toward the top of the doc, "Fill them in on page 2 'Other Questions.'" -- Bruce said this sentence could be deleted from the HTML. [summary:protected] => This tool box talk is fourth in a series of 6 developed by Washington University in St. Louis on construction ergonomics. This one focuses on preventing back injuries by getting an assist when manually lifting. It recommends using a cart for transporting loads, taking less trips, avoiding carrying materials on the shoulder and helping each other to lift large or heavy materials when a cart or hoist is not available. [transition_comments:protected] => [external_link:protected] => [consol_link:protected] => http://www.cpwrconstructionsolutions.org/hazard/959/lifting-and-carrying-manual-materials-handling.html [more_like_this:protected] => d001303,d001304,d001305,d001306,d001307,d001309 [permission_given_by:protected] => Lisa Jaegers, Washington U. in St. Louis [published:protected] => T [billable:protected] => F [img_name:protected] => [img_ext:protected] => png [img_width:protected] => [img_height:protected] => [img_credit:protected] => [img_practice:protected] => [vid_source_id:protected] => [vid_running_time:protected] => [vid_intended_audience:protected] => [vid_acquisition_info:protected] => [vid_cost:protected] => [vid_producer:protected] => [vid_filename:protected] => [vid_filename_downloadable:protected] => [date_summary:protected] => 2014 [date_permission_requested:protected] => [date_permission_received:protected] => [date_review_needed:protected] => [date_received:protected] => 06/12/14 [date_completed:protected] => 07/29/14 [date_billed:protected] => [date_modified:protected] => 10/09/15 [collBokExports:protected] => [lastBokExportCriteria:BaseElcoshItem:private] => [alreadyInSave:protected] => [alreadyInValidation:protected] => [validationFailures:protected] => Array ( ) [_new:BaseObject:private] => [_deleted:BaseObject:private] => [modifiedColumns:protected] => Array ( ) ) [3840] => DocumentRecord Object ( [records:protected] => Array ( ) [recordId:protected] => [searchWordClass:protected] => [searchWordPeerClass:protected] => [bok_record:protected] => [authors:protected] => [organizations:protected] => [collections:protected] => [categories:protected] => [categories_initialized:protected] => [mapped_items:protected] => [content:protected] => [files:protected] => [language:protected] => [old_record:protected] => [id:protected] => 3840 [old_id:protected] => [elcosh_id:protected] => d001309 [type:protected] => document [display_type:protected] => HTML w/ PDF [user_id:protected] => 23 [language_id:protected] => 1 [tagging_id:protected] => Bruce Lippy [priority_id:protected] => 1 [title:protected] => TBT5 Manual Tools [total_pages:protected] => 4 [billed_pages:protected] => 4 [publication_number:protected] => [part_of:protected] => [keywords:protected] => ergonomic, hand tools, handles, MSD, musculoskeletal disorder, carpal tunnel [comments:protected] => 7-28-2014 Jeff Nelson asked Bruce Lippy about what to do with a sentence included toward the top of the doc, "Fill them in on page 2 'Other Questions.'" -- Bruce said this sentence could be deleted from the HTML. [summary:protected] => This is the fifth in a series of 6 tool box talks on construction ergonomics produced by the University of Washington in St. Louis. This one focuses on manual tools. It asks the following 6 key questions. Does the tool… 1. Fit the task? 2. Allow a good power grip? 3. Keep the wrist in a straight posture? 4. Feel comfortable? 5. Take less effort than other tools for the task? 6. Work effectively? [transition_comments:protected] => [external_link:protected] => [consol_link:protected] => http://www.cpwrconstructionsolutions.org/masonry/solution/383/ergonomic-hand-tools.html [more_like_this:protected] => d001303,d001304,d001305,d001306,d001307,d001308,d001310 [permission_given_by:protected] => Lisa Jaegers, U. Wash. St. Louis [published:protected] => T [billable:protected] => F [img_name:protected] => [img_ext:protected] => png [img_width:protected] => [img_height:protected] => [img_credit:protected] => [img_practice:protected] => [vid_source_id:protected] => [vid_running_time:protected] => [vid_intended_audience:protected] => [vid_acquisition_info:protected] => [vid_cost:protected] => [vid_producer:protected] => [vid_filename:protected] => [vid_filename_downloadable:protected] => [date_summary:protected] => 2014 [date_permission_requested:protected] => [date_permission_received:protected] => [date_review_needed:protected] => [date_received:protected] => 06/12/14 [date_completed:protected] => 07/29/14 [date_billed:protected] => [date_modified:protected] => 10/09/15 [collBokExports:protected] => [lastBokExportCriteria:BaseElcoshItem:private] => [alreadyInSave:protected] => [alreadyInValidation:protected] => [validationFailures:protected] => Array ( ) [_new:BaseObject:private] => [_deleted:BaseObject:private] => [modifiedColumns:protected] => Array ( ) ) ) [content:protected] => [files:protected] => Array ( [559] => [560] => [546] => File Object ( [id:protected] => 546 [filename:protected] => 3.jpg [downloadable:protected] => F [timestamp:protected] => 2009-07-03 12:54:22 [alreadyInSave:protected] => [alreadyInValidation:protected] => [validationFailures:protected] => Array ( ) [_new:BaseObject:private] => [_deleted:BaseObject:private] => [modifiedColumns:protected] => Array ( ) ) [9643] => File Object ( [id:protected] => 9643 [filename:protected] => d001307.pdf [downloadable:protected] => T [timestamp:protected] => 2014-07-27 19:09:19 [alreadyInSave:protected] => [alreadyInValidation:protected] => [validationFailures:protected] => Array ( ) [_new:BaseObject:private] => [_deleted:BaseObject:private] => [modifiedColumns:protected] => Array ( ) ) [566] => File Object ( [id:protected] => 566 [filename:protected] => 4.jpg [downloadable:protected] => F [timestamp:protected] => 2009-07-03 12:54:23 [alreadyInSave:protected] => [alreadyInValidation:protected] => [validationFailures:protected] => Array ( ) [_new:BaseObject:private] => [_deleted:BaseObject:private] => [modifiedColumns:protected] => Array ( ) ) ) [language:protected] => Language Object ( [id:protected] => 1 [code:protected] => en [name:protected] => English [alreadyInSave:protected] => [alreadyInValidation:protected] => [validationFailures:protected] => Array ( ) [_new:BaseObject:private] => [_deleted:BaseObject:private] => [modifiedColumns:protected] => Array ( ) ) [old_record:protected] => [id:protected] => 3838 [old_id:protected] => [elcosh_id:protected] => d001307 [type:protected] => document [display_type:protected] => HTML w/ PDF [user_id:protected] => 25 [language_id:protected] => 1 [tagging_id:protected] => Bruce Lippy [priority_id:protected] => 1 [title:protected] => TBT3 Positioning [total_pages:protected] => 4 [billed_pages:protected] => 4 [publication_number:protected] => [part_of:protected] => [keywords:protected] => position, positioning, ergonomics, ergo, carpal tunnel, MSD, musculoskeletal disorder [comments:protected] => 7-28-2014 Jeff Nelson asked Bruce Lippy about what to do with a sentence included toward the top of the doc, "Fill them in on page 2 'Other Questions.'" -- Bruce said this sentence could be deleted from the HTML. [summary:protected] => This third in a series of 6 Tool Box Talks on construction ergonomics focuses on proper positioning to avoid injuries. The TBT recommends: 1)prop up a task off of the floor by using a raised surface, cart, baker scaffold, saw horses to prep materials near waist height, 2)move the lift or ladder in the best position for the work, 3)position the lift in front of the area you plan to work without trying to reach too far on either side of the lift. [transition_comments:protected] => [external_link:protected] => [consol_link:protected] => http://www.cpwrconstructionsolutions.org/hazard/959/lifting-and-carrying-manual-materials-handling.html [more_like_this:protected] => d001303,d001304,d001305,d001306,d001308,d001309 [permission_given_by:protected] => Lisa Jaegers, WU-St. Louis [published:protected] => T [billable:protected] => F [img_name:protected] => [img_ext:protected] => png [img_width:protected] => [img_height:protected] => [img_credit:protected] => [img_practice:protected] => [vid_source_id:protected] => [vid_running_time:protected] => [vid_intended_audience:protected] => [vid_acquisition_info:protected] => [vid_cost:protected] => [vid_producer:protected] => [vid_filename:protected] => [vid_filename_downloadable:protected] => [date_summary:protected] => 2014 [date_permission_requested:protected] => [date_permission_received:protected] => [date_review_needed:protected] => [date_received:protected] => 06/12/14 [date_completed:protected] => 07/28/14 [date_billed:protected] => [date_modified:protected] => 10/09/15 [collBokExports:protected] => [lastBokExportCriteria:BaseElcoshItem:private] => [alreadyInSave:protected] => [alreadyInValidation:protected] => [validationFailures:protected] => Array ( ) [_new:BaseObject:private] => [_deleted:BaseObject:private] => [modifiedColumns:protected] => Array ( ) ) [show_text] => [document_content] => ElcoshItemDocumentContent Object ( [id:protected] => 2906 [item_id:protected] => 3838 [type:protected] => main [title:protected] => [content:protected] =>
Facilitator / Leader Tasks Before the Tool Box Talk (TBT)
- Read through this TBT guide.
- Walk the job site to find ergonomics examples based on the TBT. If possible, take photos of “safe” and “unsafe” examples at the site to be used during the TBT.
- Write down discussion questions to ask the group.
Learning Goals
After discussing this training topic, workers will have gained a general understanding of:
- Unsafe work positions.
- Solutions to improve work positioning.
TRAINING CARD
The last page of this PDF has directions for printing and laminating the training cards.
TRAINER’S TALKING POINTS
Why should we talk about positioning?
Construction work requires working in high, low, and tight spaces which often forces you to work in an awkward or uncomfortable position. Working in awkward reaching and bent positions can lead to shoulder and back discomfort and possible injury over time.
Demonstration: The training card provides examples of the range of reaching and the point at which the reach is unsafe. Hold your arms straight out in front of you. Look at your hands and wrists while I discuss each of the reach zones on the training card.
The Green Zone shows the ideal location for working with your hands. When possible, try to keep your work tasks as far out as your wrists.
The Orange Zone is for occasional work since it involves more weight on your shoulders and low back since your hands are away from your body. If needed, keep the reach distance as far as your fingertips.
The Red Zone is away from your body so far that it places you at higher risk for falls when in the air and shoulder and back discomfort. Limit the time you work reaching beyond your fingertips.
End of Demonstration
Discussion Question: Can anyone describe to us an awkward position that they work in or have seen someone work in?
- What does it feel like in your neck, back or arms when working in that position?
- Other Questions:_____________________________________________
Training Note: Here are examples of hazards in different construction trades. Choose your trade or one that is similar to your group’s line of work that can be used as hazards and solutions examples.
| Trade | Awkward Posture Hazards | Potential Solution |
|---|---|---|
| Carpenter-Drywall | Leaning over the side of a scissor lift to reach and operating a screw gun with the arm fully extended (reaching in the red zone past the fingertips). | Before starting to install the line of screws to the side of the lift, move the lift to re-center it for the next 2 lines of screws to be installed. |
| Floor Layer | Spreading mortar overhead on a wall with the bakers scaffold one foot away from the wall due to buckets on the floor below (reach in the red zone, past the fingertips). | Pre-plan this task by removing all objects in the path of the bakers scaffold. Having an open path allows you to work closer to the task. |
| Sheet Metal Worker | Prepping duct parts on the floor while bending the back and reaching to work on them. | Pre-plan this task by setting up a waist-height workstation on extra materials, a cart, or saw horses. |
Now let’s put this information into practice. What are some tricks or techniques that you use to work in a comfortable position?
- Other Questions:_____________________________________________
Here are a few other ideas that are listed on your training card:
Prop up your tasks off of the floor by using a raised surface, cart, baker scaffold, saw horses to prep materials near waist height.
Move the lift or ladder in the best position for the work – close to the work tasks.
For safety & comfort, try to position the lift in front of the area you plan to work without trying to reach too far on either side of the lift.
In summary, it is important to work in a safe position when possible in order to reduce the risk of falls and discomfort due to awkward working positions. Consider ways that you can work in the green/comfort zone and orange zone and avoid the unsafe red zone.
References
[Images modified from Grandjean & Eastman Kodak Co.]
1. Grandjean, E. 1988. Fitting the task to the man: A textbook of occupational ergonomics. 4th ed. Taylor & Francis.
2. Eastman Kodak Co. 1983. Ergonomic Design for People at Work. Vol 1. Wiley, John & Sons, Incorporated.
Refer to the resources at our website: oshr.im.wustl.edu for more Tool Box TIPS.
TRAINING ATTENDANCE SHEET
Training Topic: Ergonomics -- Positioning
Date:
| ATTENDEES | |
|---|---|
Directions for Making Laminated Training Cards
The last page of this PDF has directions for printing and laminating the training cards.
[content_transformed:protected] =>Facilitator / Leader Tasks Before the Tool Box Talk (TBT)
- Read through this TBT guide.
- Walk the job site to find ergonomics examples based on the TBT. If possible, take photos of “safe” and “unsafe” examples at the site to be used during the TBT.
- Write down discussion questions to ask the group.
Learning Goals
After discussing this training topic, workers will have gained a general understanding of:
- Unsafe work positions.
- Solutions to improve work positioning.
TRAINING CARD
The last page of this PDF has directions for printing and laminating the training cards.
TRAINER’S TALKING POINTS
Why should we talk about positioning?
Construction work requires working in high, low, and tight spaces which often forces you to work in an awkward or uncomfortable position. Working in awkward reaching and bent positions can lead to shoulder and back discomfort and possible injury over time.
Demonstration: The training card provides examples of the range of reaching and the point at which the reach is unsafe. Hold your arms straight out in front of you. Look at your hands and wrists while I discuss each of the reach zones on the training card.
The Green Zone shows the ideal location for working with your hands. When possible, try to keep your work tasks as far out as your wrists.
The Orange Zone is for occasional work since it involves more weight on your shoulders and low back since your hands are away from your body. If needed, keep the reach distance as far as your fingertips.
The Red Zone is away from your body so far that it places you at higher risk for falls when in the air and shoulder and back discomfort. Limit the time you work reaching beyond your fingertips.
End of Demonstration
Discussion Question: Can anyone describe to us an awkward position that they work in or have seen someone work in?
- What does it feel like in your neck, back or arms when working in that position?
- Other Questions:_____________________________________________
Training Note: Here are examples of hazards in different construction trades. Choose your trade or one that is similar to your group’s line of work that can be used as hazards and solutions examples.
| Trade | Awkward Posture Hazards | Potential Solution |
|---|---|---|
| Carpenter-Drywall | Leaning over the side of a scissor lift to reach and operating a screw gun with the arm fully extended (reaching in the red zone past the fingertips). | Before starting to install the line of screws to the side of the lift, move the lift to re-center it for the next 2 lines of screws to be installed. |
| Floor Layer | Spreading mortar overhead on a wall with the bakers scaffold one foot away from the wall due to buckets on the floor below (reach in the red zone, past the fingertips). | Pre-plan this task by removing all objects in the path of the bakers scaffold. Having an open path allows you to work closer to the task. |
| Sheet Metal Worker | Prepping duct parts on the floor while bending the back and reaching to work on them. | Pre-plan this task by setting up a waist-height workstation on extra materials, a cart, or saw horses. |
Now let’s put this information into practice. What are some tricks or techniques that you use to work in a comfortable position?
- Other Questions:_____________________________________________
Here are a few other ideas that are listed on your training card:
Prop up your tasks off of the floor by using a raised surface, cart, baker scaffold, saw horses to prep materials near waist height.
Move the lift or ladder in the best position for the work – close to the work tasks.
For safety & comfort, try to position the lift in front of the area you plan to work without trying to reach too far on either side of the lift.
In summary, it is important to work in a safe position when possible in order to reduce the risk of falls and discomfort due to awkward working positions. Consider ways that you can work in the green/comfort zone and orange zone and avoid the unsafe red zone.
References
[Images modified from Grandjean & Eastman Kodak Co.]
1. Grandjean, E. 1988. Fitting the task to the man: A textbook of occupational ergonomics. 4th ed. Taylor & Francis.
2. Eastman Kodak Co. 1983. Ergonomic Design for People at Work. Vol 1. Wiley, John & Sons, Incorporated.
Refer to the resources at our website: oshr.im.wustl.edu for more Tool Box TIPS.
TRAINING ATTENDANCE SHEET
Training Topic: Ergonomics -- Positioning
Date:
| ATTENDEES | |
|---|---|
Directions for Making Laminated Training Cards
The last page of this PDF has directions for printing and laminating the training cards.
[disclaimer:protected] => [disclaimer_transformed:protected] => [alreadyInSave:protected] => [alreadyInValidation:protected] => [validationFailures:protected] => Array ( ) [_new:BaseObject:private] => [_deleted:BaseObject:private] => [modifiedColumns:protected] => Array ( ) ) [template] => record ) [_globalContext:PHPTAL_Context:private] => stdClass Object ( ) [_echoDeclarations:PHPTAL_Context:private] => [referer] => http://elcosh.org/document/3838/d001307/TBT3%2BPositioning.html [curr_module] => Record [styles] => Array ( ) [javascript] => Array ( [0] => jquery.min.js ) [metas] => Array ( [language] => en [robots] => index, follow ) [user] => [curr_url] => https://elcosh.org/index.php?module=Record&id=3838&type=document [base_url] => https://elcosh.org/index.php?module=Record [title] => eLCOSH : TBT3 Positioning [language] => en [search_query] => [module] => Record [new_records] => Array ( [0] => Search_Result Object ( [title] => Toolbox Talk: Fixed Ladder [image] => /record/images/notavailable-p.png [blurb] => The CPWR Toolbox Talk on Fixed Ladders addresses the potential risks associated with using fixed ladders. The resource includes a brief case example,... [category] => Array ( [0] => 15 [1] => 47 [2] => 49 [3] => 51 [4] => 53 [5] => 55 [6] => 60 [7] => 64 [8] => 73 [9] => 76 [10] => 78 [11] => 80 [12] => 86 [13] => 87 [14] => 90 [15] => 92 [16] => 93 [17] => 94 [18] => 100 ) [labels] => Array ( [0] => Falls [1] => Work Environment [2] => Hazards [3] => Bricklayer [4] => Trades [5] => Carpenter [7] => Cement Mason [9] => Concrete Polisher [11] => Electrical Worker [13] => HVAC [15] => Laborer [17] => PCC/Restoration [19] => Plumber/Pipefitter [21] => Roofer/Waterproofer [23] => Sheetmetal Worker [25] => Welder [27] => Commercial & Institutional [28] => Jobsites [29] => Industrial [31] => LEED/Green Construction [33] => Renovations [35] => Residential [37] => Toolbox Talks [38] => Documents [39] => Media & Documents ) [type] => Toolbox Talks [sub_category] => [url] => /document/4430/d001660/Toolbox%2BTalk%253A%2BFixed%2BLadder.html [item:protected] => DocumentRecord Object ( [records:protected] => Array ( ) [recordId:protected] => [searchWordClass:protected] => [searchWordPeerClass:protected] => [bok_record:protected] => [authors:protected] => [organizations:protected] => [collections:protected] => [categories:protected] => Array ( [15] => Category Object ( [languages:protected] => [bok_resources:protected] => [bok_topics:protected] => [bok_keywords:protected] => [id:protected] => 15 [type:protected] => category [parent:protected] => 7 [label:protected] => Falls [alreadyInSave:protected] => [alreadyInValidation:protected] => [validationFailures:protected] => Array ( ) [_new:BaseObject:private] => [_deleted:BaseObject:private] => [modifiedColumns:protected] => Array ( ) ) [47] => Category Object ( [languages:protected] => [bok_resources:protected] => [bok_topics:protected] => [bok_keywords:protected] => [id:protected] => 47 [type:protected] => category [parent:protected] => 2 [label:protected] => Bricklayer [alreadyInSave:protected] => [alreadyInValidation:protected] => [validationFailures:protected] => Array ( ) [_new:BaseObject:private] => [_deleted:BaseObject:private] => [modifiedColumns:protected] => Array ( ) ) [49] => Category Object ( [languages:protected] => [bok_resources:protected] => [bok_topics:protected] => [bok_keywords:protected] => [id:protected] => 49 [type:protected] => category [parent:protected] => 2 [label:protected] => Carpenter [alreadyInSave:protected] => [alreadyInValidation:protected] => [validationFailures:protected] => Array ( ) [_new:BaseObject:private] => [_deleted:BaseObject:private] => [modifiedColumns:protected] => Array ( ) ) [51] => Category Object ( [languages:protected] => [bok_resources:protected] => [bok_topics:protected] => [bok_keywords:protected] => [id:protected] => 51 [type:protected] => category [parent:protected] => 2 [label:protected] => Cement Mason [alreadyInSave:protected] => [alreadyInValidation:protected] => [validationFailures:protected] => Array ( ) [_new:BaseObject:private] => [_deleted:BaseObject:private] => [modifiedColumns:protected] => Array ( ) ) [53] => Category Object ( [languages:protected] => [bok_resources:protected] => [bok_topics:protected] => [bok_keywords:protected] => [id:protected] => 53 [type:protected] => category [parent:protected] => 2 [label:protected] => Concrete Polisher [alreadyInSave:protected] => [alreadyInValidation:protected] => [validationFailures:protected] => Array ( ) [_new:BaseObject:private] => [_deleted:BaseObject:private] => [modifiedColumns:protected] => Array ( ) ) [55] => Category Object ( [languages:protected] => [bok_resources:protected] => [bok_topics:protected] => [bok_keywords:protected] => [id:protected] => 55 [type:protected] => category [parent:protected] => 2 [label:protected] => Electrical Worker [alreadyInSave:protected] => [alreadyInValidation:protected] => [validationFailures:protected] => Array ( ) [_new:BaseObject:private] => [_deleted:BaseObject:private] => [modifiedColumns:protected] => Array ( ) ) [60] => Category Object ( [languages:protected] => [bok_resources:protected] => [bok_topics:protected] => [bok_keywords:protected] => [id:protected] => 60 [type:protected] => category [parent:protected] => 2 [label:protected] => HVAC [alreadyInSave:protected] => [alreadyInValidation:protected] => [validationFailures:protected] => Array ( ) [_new:BaseObject:private] => [_deleted:BaseObject:private] => [modifiedColumns:protected] => Array ( ) ) [64] => Category Object ( [languages:protected] => [bok_resources:protected] => [bok_topics:protected] => [bok_keywords:protected] => [id:protected] => 64 [type:protected] => category [parent:protected] => 2 [label:protected] => Laborer [alreadyInSave:protected] => [alreadyInValidation:protected] => [validationFailures:protected] => Array ( ) [_new:BaseObject:private] => [_deleted:BaseObject:private] => [modifiedColumns:protected] => Array ( ) ) [73] => Category Object ( [languages:protected] => [bok_resources:protected] => [bok_topics:protected] => [bok_keywords:protected] => [id:protected] => 73 [type:protected] => category [parent:protected] => 2 [label:protected] => PCC/Restoration [alreadyInSave:protected] => [alreadyInValidation:protected] => [validationFailures:protected] => Array ( ) [_new:BaseObject:private] => [_deleted:BaseObject:private] => [modifiedColumns:protected] => Array ( ) ) [76] => Category Object ( [languages:protected] => [bok_resources:protected] => [bok_topics:protected] => [bok_keywords:protected] => [id:protected] => 76 [type:protected] => category [parent:protected] => 2 [label:protected] => Plumber/Pipefitter [alreadyInSave:protected] => [alreadyInValidation:protected] => [validationFailures:protected] => Array ( ) [_new:BaseObject:private] => [_deleted:BaseObject:private] => [modifiedColumns:protected] => Array ( ) ) [78] => Category Object ( [languages:protected] => [bok_resources:protected] => [bok_topics:protected] => [bok_keywords:protected] => [id:protected] => 78 [type:protected] => category [parent:protected] => 2 [label:protected] => Roofer/Waterproofer [alreadyInSave:protected] => [alreadyInValidation:protected] => [validationFailures:protected] => Array ( ) [_new:BaseObject:private] => [_deleted:BaseObject:private] => [modifiedColumns:protected] => Array ( ) ) [80] => Category Object ( [languages:protected] => [bok_resources:protected] => [bok_topics:protected] => [bok_keywords:protected] => [id:protected] => 80 [type:protected] => category [parent:protected] => 2 [label:protected] => Sheetmetal Worker [alreadyInSave:protected] => [alreadyInValidation:protected] => [validationFailures:protected] => Array ( ) [_new:BaseObject:private] => [_deleted:BaseObject:private] => [modifiedColumns:protected] => Array ( ) ) [86] => Category Object ( [languages:protected] => [bok_resources:protected] => [bok_topics:protected] => [bok_keywords:protected] => [id:protected] => 86 [type:protected] => category [parent:protected] => 2 [label:protected] => Welder [alreadyInSave:protected] => [alreadyInValidation:protected] => [validationFailures:protected] => Array ( ) [_new:BaseObject:private] => [_deleted:BaseObject:private] => [modifiedColumns:protected] => Array ( ) ) [87] => Category Object ( [languages:protected] => [bok_resources:protected] => [bok_topics:protected] => [bok_keywords:protected] => [id:protected] => 87 [type:protected] => category [parent:protected] => 3 [label:protected] => Commercial & Institutional [alreadyInSave:protected] => [alreadyInValidation:protected] => [validationFailures:protected] => Array ( ) [_new:BaseObject:private] => [_deleted:BaseObject:private] => [modifiedColumns:protected] => Array ( ) ) [90] => Category Object ( [languages:protected] => [bok_resources:protected] => [bok_topics:protected] => [bok_keywords:protected] => [id:protected] => 90 [type:protected] => category [parent:protected] => 3 [label:protected] => Industrial [alreadyInSave:protected] => [alreadyInValidation:protected] => [validationFailures:protected] => Array ( ) [_new:BaseObject:private] => [_deleted:BaseObject:private] => [modifiedColumns:protected] => Array ( ) ) [92] => Category Object ( [languages:protected] => [bok_resources:protected] => [bok_topics:protected] => [bok_keywords:protected] => [id:protected] => 92 [type:protected] => category [parent:protected] => 3 [label:protected] => LEED/Green Construction [alreadyInSave:protected] => [alreadyInValidation:protected] => [validationFailures:protected] => Array ( ) [_new:BaseObject:private] => [_deleted:BaseObject:private] => [modifiedColumns:protected] => Array ( ) ) [93] => Category Object ( [languages:protected] => [bok_resources:protected] => [bok_topics:protected] => [bok_keywords:protected] => [id:protected] => 93 [type:protected] => category [parent:protected] => 3 [label:protected] => Renovations [alreadyInSave:protected] => [alreadyInValidation:protected] => [validationFailures:protected] => Array ( ) [_new:BaseObject:private] => [_deleted:BaseObject:private] => [modifiedColumns:protected] => Array ( ) ) [94] => Category Object ( [languages:protected] => [bok_resources:protected] => [bok_topics:protected] => [bok_keywords:protected] => [id:protected] => 94 [type:protected] => category [parent:protected] => 3 [label:protected] => Residential [alreadyInSave:protected] => [alreadyInValidation:protected] => [validationFailures:protected] => Array ( ) [_new:BaseObject:private] => [_deleted:BaseObject:private] => [modifiedColumns:protected] => Array ( ) ) [100] => Category Object ( [languages:protected] => [bok_resources:protected] => [bok_topics:protected] => [bok_keywords:protected] => [id:protected] => 100 [type:protected] => category [parent:protected] => 6 [label:protected] => Toolbox Talks [alreadyInSave:protected] => [alreadyInValidation:protected] => [validationFailures:protected] => Array ( ) [_new:BaseObject:private] => [_deleted:BaseObject:private] => [modifiedColumns:protected] => Array ( ) ) ) [categories_initialized:protected] => 1 [mapped_items:protected] => [content:protected] => [files:protected] => [language:protected] => Language Object ( [id:protected] => 1 [code:protected] => en [name:protected] => English [alreadyInSave:protected] => [alreadyInValidation:protected] => [validationFailures:protected] => Array ( ) [_new:BaseObject:private] => [_deleted:BaseObject:private] => [modifiedColumns:protected] => Array ( ) ) [old_record:protected] => [id:protected] => 4430 [old_id:protected] => [elcosh_id:protected] => d001660 [type:protected] => document [display_type:protected] => HTML only (and links) [user_id:protected] => 0 [language_id:protected] => 1 [tagging_id:protected] => Mike Aguilar [priority_id:protected] => 1 [title:protected] => Toolbox Talk: Fixed Ladder [total_pages:protected] => 0 [billed_pages:protected] => 0 [publication_number:protected] => [part_of:protected] => [keywords:protected] => Fixed Ladders, Fall Prevention, Falls [comments:protected] => [summary:protected] => The CPWR Toolbox Talk on Fixed Ladders addresses the potential risks associated with using fixed ladders. The resource includes a brief case example, steps to prevent a related injury and questions for discussion. It includes an image that illustrates the hazard, which can be posted in a central location as a reminder of steps to work safely. Available in English and Spanish. [transition_comments:protected] => [external_link:protected] => [consol_link:protected] => [more_like_this:protected] => d001257,d001254,d001255,d001256,d001258,d001262,d001279 [permission_given_by:protected] => [published:protected] => T [billable:protected] => F [img_name:protected] => [img_ext:protected] => [img_width:protected] => [img_height:protected] => [img_credit:protected] => [img_practice:protected] => [vid_source_id:protected] => [vid_running_time:protected] => [vid_intended_audience:protected] => [vid_acquisition_info:protected] => [vid_cost:protected] => [vid_producer:protected] => [vid_filename:protected] => [vid_filename_downloadable:protected] => [date_summary:protected] => [date_permission_requested:protected] => [date_permission_received:protected] => [date_review_needed:protected] => [date_received:protected] => 06/10/22 [date_completed:protected] => 06/10/22 [date_billed:protected] => [date_modified:protected] => 06/16/25 [collBokExports:protected] => [lastBokExportCriteria:BaseElcoshItem:private] => [alreadyInSave:protected] => [alreadyInValidation:protected] => [validationFailures:protected] => Array ( ) [_new:BaseObject:private] => [_deleted:BaseObject:private] => [modifiedColumns:protected] => Array ( ) ) ) [1] => Search_Result Object ( [title] => Toolbox Talk: Work Zone Safety: Working Around Vehicles [image] => /record/images/notavailable-p.png [blurb] => The CPWR Toolbox Talk on Working Around Vehicles in the Work Zone addresses methods to avoid being struck-by a vehicle on a construction site. The res... [category] => Array ( [0] => 12 [1] => 18 [2] => 52 [3] => 57 [4] => 70 [5] => 85 [6] => 87 [7] => 88 [8] => 89 [9] => 91 [10] => 90 [11] => 92 [12] => 93 [13] => 94 [14] => 95 [15] => 100 ) [labels] => Array ( [0] => Crushed/Struck By [1] => Work Environment [2] => Hazards [3] => Motor Vehicles/Heavy Equipment [6] => Commercial Diver [7] => Trades [8] => Flagger [10] => Operating Engineer [12] => Truck Driver [14] => Commercial & Institutional [15] => Jobsites [16] => Demolition [18] => Disasters [20] => Heavy & Highway [22] => Industrial [24] => LEED/Green Construction [26] => Renovations [28] => Residential [30] => Underground [32] => Toolbox Talks [33] => Documents [34] => Media & Documents ) [type] => Toolbox Talks [sub_category] => [url] => /document/4428/d001658/Toolbox%2BTalk%253A%2BWork%2BZone%2BSafety%253A%2BWorking%2BAround%2BVehicles.html [item:protected] => DocumentRecord Object ( [records:protected] => Array ( ) [recordId:protected] => [searchWordClass:protected] => [searchWordPeerClass:protected] => [bok_record:protected] => [authors:protected] => [organizations:protected] => [collections:protected] => [categories:protected] => Array ( [12] => Category Object ( [languages:protected] => [bok_resources:protected] => [bok_topics:protected] => [bok_keywords:protected] => [id:protected] => 12 [type:protected] => category [parent:protected] => 7 [label:protected] => Crushed/Struck By [alreadyInSave:protected] => [alreadyInValidation:protected] => [validationFailures:protected] => Array ( ) [_new:BaseObject:private] => [_deleted:BaseObject:private] => [modifiedColumns:protected] => Array ( ) ) [18] => Category Object ( [languages:protected] => [bok_resources:protected] => [bok_topics:protected] => [bok_keywords:protected] => [id:protected] => 18 [type:protected] => category [parent:protected] => 7 [label:protected] => Motor Vehicles/Heavy Equipment [alreadyInSave:protected] => [alreadyInValidation:protected] => [validationFailures:protected] => Array ( ) [_new:BaseObject:private] => [_deleted:BaseObject:private] => [modifiedColumns:protected] => Array ( ) ) [52] => Category Object ( [languages:protected] => [bok_resources:protected] => [bok_topics:protected] => [bok_keywords:protected] => [id:protected] => 52 [type:protected] => category [parent:protected] => 2 [label:protected] => Commercial Diver [alreadyInSave:protected] => [alreadyInValidation:protected] => [validationFailures:protected] => Array ( ) [_new:BaseObject:private] => [_deleted:BaseObject:private] => [modifiedColumns:protected] => Array ( ) ) [57] => Category Object ( [languages:protected] => [bok_resources:protected] => [bok_topics:protected] => [bok_keywords:protected] => [id:protected] => 57 [type:protected] => category [parent:protected] => 2 [label:protected] => Flagger [alreadyInSave:protected] => [alreadyInValidation:protected] => [validationFailures:protected] => Array ( ) [_new:BaseObject:private] => [_deleted:BaseObject:private] => [modifiedColumns:protected] => Array ( ) ) [70] => Category Object ( [languages:protected] => [bok_resources:protected] => [bok_topics:protected] => [bok_keywords:protected] => [id:protected] => 70 [type:protected] => category [parent:protected] => 2 [label:protected] => Operating Engineer [alreadyInSave:protected] => [alreadyInValidation:protected] => [validationFailures:protected] => Array ( ) [_new:BaseObject:private] => [_deleted:BaseObject:private] => [modifiedColumns:protected] => Array ( ) ) [85] => Category Object ( [languages:protected] => [bok_resources:protected] => [bok_topics:protected] => [bok_keywords:protected] => [id:protected] => 85 [type:protected] => category [parent:protected] => 2 [label:protected] => Truck Driver [alreadyInSave:protected] => [alreadyInValidation:protected] => [validationFailures:protected] => Array ( ) [_new:BaseObject:private] => [_deleted:BaseObject:private] => [modifiedColumns:protected] => Array ( ) ) [87] => Category Object ( [languages:protected] => [bok_resources:protected] => [bok_topics:protected] => [bok_keywords:protected] => [id:protected] => 87 [type:protected] => category [parent:protected] => 3 [label:protected] => Commercial & Institutional [alreadyInSave:protected] => [alreadyInValidation:protected] => [validationFailures:protected] => Array ( ) [_new:BaseObject:private] => [_deleted:BaseObject:private] => [modifiedColumns:protected] => Array ( ) ) [88] => Category Object ( [languages:protected] => [bok_resources:protected] => [bok_topics:protected] => [bok_keywords:protected] => [id:protected] => 88 [type:protected] => category [parent:protected] => 3 [label:protected] => Demolition [alreadyInSave:protected] => [alreadyInValidation:protected] => [validationFailures:protected] => Array ( ) [_new:BaseObject:private] => [_deleted:BaseObject:private] => [modifiedColumns:protected] => Array ( ) ) [89] => Category Object ( [languages:protected] => [bok_resources:protected] => [bok_topics:protected] => [bok_keywords:protected] => [id:protected] => 89 [type:protected] => category [parent:protected] => 3 [label:protected] => Disasters [alreadyInSave:protected] => [alreadyInValidation:protected] => [validationFailures:protected] => Array ( ) [_new:BaseObject:private] => [_deleted:BaseObject:private] => [modifiedColumns:protected] => Array ( ) ) [91] => Category Object ( [languages:protected] => [bok_resources:protected] => [bok_topics:protected] => [bok_keywords:protected] => [id:protected] => 91 [type:protected] => category [parent:protected] => 3 [label:protected] => Heavy & Highway [alreadyInSave:protected] => [alreadyInValidation:protected] => [validationFailures:protected] => Array ( ) [_new:BaseObject:private] => [_deleted:BaseObject:private] => [modifiedColumns:protected] => Array ( ) ) [90] => Category Object ( [languages:protected] => [bok_resources:protected] => [bok_topics:protected] => [bok_keywords:protected] => [id:protected] => 90 [type:protected] => category [parent:protected] => 3 [label:protected] => Industrial [alreadyInSave:protected] => [alreadyInValidation:protected] => [validationFailures:protected] => Array ( ) [_new:BaseObject:private] => [_deleted:BaseObject:private] => [modifiedColumns:protected] => Array ( ) ) [92] => Category Object ( [languages:protected] => [bok_resources:protected] => [bok_topics:protected] => [bok_keywords:protected] => [id:protected] => 92 [type:protected] => category [parent:protected] => 3 [label:protected] => LEED/Green Construction [alreadyInSave:protected] => [alreadyInValidation:protected] => [validationFailures:protected] => Array ( ) [_new:BaseObject:private] => [_deleted:BaseObject:private] => [modifiedColumns:protected] => Array ( ) ) [93] => Category Object ( [languages:protected] => [bok_resources:protected] => [bok_topics:protected] => [bok_keywords:protected] => [id:protected] => 93 [type:protected] => category [parent:protected] => 3 [label:protected] => Renovations [alreadyInSave:protected] => [alreadyInValidation:protected] => [validationFailures:protected] => Array ( ) [_new:BaseObject:private] => [_deleted:BaseObject:private] => [modifiedColumns:protected] => Array ( ) ) [94] => Category Object ( [languages:protected] => [bok_resources:protected] => [bok_topics:protected] => [bok_keywords:protected] => [id:protected] => 94 [type:protected] => category [parent:protected] => 3 [label:protected] => Residential [alreadyInSave:protected] => [alreadyInValidation:protected] => [validationFailures:protected] => Array ( ) [_new:BaseObject:private] => [_deleted:BaseObject:private] => [modifiedColumns:protected] => Array ( ) ) [95] => Category Object ( [languages:protected] => [bok_resources:protected] => [bok_topics:protected] => [bok_keywords:protected] => [id:protected] => 95 [type:protected] => category [parent:protected] => 3 [label:protected] => Underground [alreadyInSave:protected] => [alreadyInValidation:protected] => [validationFailures:protected] => Array ( ) [_new:BaseObject:private] => [_deleted:BaseObject:private] => [modifiedColumns:protected] => Array ( ) ) [100] => Category Object ( [languages:protected] => [bok_resources:protected] => [bok_topics:protected] => [bok_keywords:protected] => [id:protected] => 100 [type:protected] => category [parent:protected] => 6 [label:protected] => Toolbox Talks [alreadyInSave:protected] => [alreadyInValidation:protected] => [validationFailures:protected] => Array ( ) [_new:BaseObject:private] => [_deleted:BaseObject:private] => [modifiedColumns:protected] => Array ( ) ) ) [categories_initialized:protected] => 1 [mapped_items:protected] => [content:protected] => [files:protected] => [language:protected] => Language Object ( [id:protected] => 1 [code:protected] => en [name:protected] => English [alreadyInSave:protected] => [alreadyInValidation:protected] => [validationFailures:protected] => Array ( ) [_new:BaseObject:private] => [_deleted:BaseObject:private] => [modifiedColumns:protected] => Array ( ) ) [old_record:protected] => [id:protected] => 4428 [old_id:protected] => [elcosh_id:protected] => d001658 [type:protected] => document [display_type:protected] => HTML only (and links) [user_id:protected] => 0 [language_id:protected] => 1 [tagging_id:protected] => Daniela Caceres [priority_id:protected] => 1 [title:protected] => Toolbox Talk: Work Zone Safety: Working Around Vehicles [total_pages:protected] => 0 [billed_pages:protected] => 0 [publication_number:protected] => [part_of:protected] => [keywords:protected] => Struck, Struck by, Vehicle, Work Zone Safety, Truck, Operator, Driver, Mobile Equipment [comments:protected] => [summary:protected] => The CPWR Toolbox Talk on Working Around Vehicles in the Work Zone addresses methods to avoid being struck-by a vehicle on a construction site. The resource includes a case example, steps to prevent a related injury, and questions for discussion. It includes a graphic that illustrates the hazard, which can be posted in a central location as a reminder of steps to work safely. Available in English and Spanish. [transition_comments:protected] => [external_link:protected] => [consol_link:protected] => [more_like_this:protected] => d001640 [permission_given_by:protected] => [published:protected] => T [billable:protected] => F [img_name:protected] => [img_ext:protected] => [img_width:protected] => [img_height:protected] => [img_credit:protected] => [img_practice:protected] => [vid_source_id:protected] => [vid_running_time:protected] => [vid_intended_audience:protected] => [vid_acquisition_info:protected] => [vid_cost:protected] => [vid_producer:protected] => [vid_filename:protected] => [vid_filename_downloadable:protected] => [date_summary:protected] => [date_permission_requested:protected] => [date_permission_received:protected] => [date_review_needed:protected] => [date_received:protected] => 12/23/21 [date_completed:protected] => 12/23/21 [date_billed:protected] => [date_modified:protected] => 05/19/23 [collBokExports:protected] => [lastBokExportCriteria:BaseElcoshItem:private] => [alreadyInSave:protected] => [alreadyInValidation:protected] => [validationFailures:protected] => Array ( ) [_new:BaseObject:private] => [_deleted:BaseObject:private] => [modifiedColumns:protected] => Array ( ) ) ) [2] => Search_Result Object ( [title] => Construction Dive -- DeWalt's Jobsite Pro headphones recalled for fire hazards [image] => /record/images/notavailable-p.png [blurb] => A recall notice by the United States Consumer Product Safety Commission affects over 300,000 DeWalt Jobsite Pro Headphones. The recall is a result of... [category] => Array ( [0] => 16 [1] => 44 [2] => 45 [3] => 46 [4] => 47 [5] => 48 [6] => 49 [7] => 50 [8] => 51 [9] => 52 [10] => 53 [11] => 54 [12] => 55 [13] => 56 [14] => 57 [15] => 58 [16] => 59 [17] => 60 [18] => 61 [19] => 64 [20] => 65 [21] => 66 [22] => 67 [23] => 68 [24] => 69 [25] => 70 [26] => 71 [27] => 72 [28] => 73 [29] => 74 [30] => 75 [31] => 76 [32] => 77 [33] => 63 [34] => 78 [35] => 79 [36] => 80 [37] => 81 [38] => 82 [39] => 62 [40] => 83 [41] => 84 [42] => 85 [43] => 86 [44] => 87 [45] => 88 [46] => 89 [47] => 91 [48] => 90 [49] => 92 [50] => 93 [51] => 94 [52] => 95 ) [labels] => Array ( [0] => Fire & Explosions [1] => Work Environment [2] => Hazards [3] => Acoustical Ceiling Carpenter [4] => Trades [5] => Asbestos/Insulator [7] => Boilermaker [9] => Bricklayer [11] => Cabinetmaker [13] => Carpenter [15] => Carpet Layer [17] => Cement Mason [19] => Commercial Diver [21] => Concrete Polisher [23] => Drywall Applicator Specialist [25] => Electrical Worker [27] => Elevator Constructor [29] => Flagger [31] => Glazier [33] => Hazardous Waste Cleanup [35] => HVAC [37] => Interior Systems Carpenter [39] => Laborer [41] => Landscaper [43] => Lather [45] => Lead Abatement Worker [47] => Maintenance Worker [49] => Millwright [51] => Operating Engineer [53] => Painter [55] => Paper Hanger [57] => PCC/Restoration [59] => Pile Driver [61] => Plasterer [63] => Plumber/Pipefitter [65] => Refractory Worker [67] => Reinforcing Ironworker [69] => Roofer/Waterproofer [71] => Scaffold Erector [73] => Sheetmetal Worker [75] => Sprinkler Fitter [77] => Stonemason [79] => Structural Ironworker [81] => Terrazzo Worker [83] => Tile Setter [85] => Truck Driver [87] => Welder [89] => Commercial & Institutional [90] => Jobsites [91] => Demolition [93] => Disasters [95] => Heavy & Highway [97] => Industrial [99] => LEED/Green Construction [101] => Renovations [103] => Residential [105] => Underground ) [type] => [sub_category] => [url] => /document/4426/d001656/Construction%2BDive%2B--%2BDeWalt%2527s%2BJobsite%2BPro%2Bheadphones%2Brecalled%2Bfor%2Bfire%2Bhazards.html [item:protected] => DocumentRecord Object ( [records:protected] => Array ( ) [recordId:protected] => [searchWordClass:protected] => [searchWordPeerClass:protected] => [bok_record:protected] => [authors:protected] => [organizations:protected] => [collections:protected] => [categories:protected] => Array ( [16] => Category Object ( [languages:protected] => [bok_resources:protected] => [bok_topics:protected] => [bok_keywords:protected] => [id:protected] => 16 [type:protected] => category [parent:protected] => 7 [label:protected] => Fire & Explosions [alreadyInSave:protected] => [alreadyInValidation:protected] => [validationFailures:protected] => Array ( ) [_new:BaseObject:private] => [_deleted:BaseObject:private] => [modifiedColumns:protected] => Array ( ) ) [44] => Category Object ( [languages:protected] => [bok_resources:protected] => [bok_topics:protected] => [bok_keywords:protected] => [id:protected] => 44 [type:protected] => category [parent:protected] => 2 [label:protected] => Acoustical Ceiling Carpenter [alreadyInSave:protected] => [alreadyInValidation:protected] => [validationFailures:protected] => Array ( ) [_new:BaseObject:private] => [_deleted:BaseObject:private] => [modifiedColumns:protected] => Array ( ) ) [45] => Category Object ( [languages:protected] => [bok_resources:protected] => [bok_topics:protected] => [bok_keywords:protected] => [id:protected] => 45 [type:protected] => category [parent:protected] => 2 [label:protected] => Asbestos/Insulator [alreadyInSave:protected] => [alreadyInValidation:protected] => [validationFailures:protected] => Array ( ) [_new:BaseObject:private] => [_deleted:BaseObject:private] => [modifiedColumns:protected] => Array ( ) ) [46] => Category Object ( [languages:protected] => [bok_resources:protected] => [bok_topics:protected] => [bok_keywords:protected] => [id:protected] => 46 [type:protected] => category [parent:protected] => 2 [label:protected] => Boilermaker [alreadyInSave:protected] => [alreadyInValidation:protected] => [validationFailures:protected] => Array ( ) [_new:BaseObject:private] => [_deleted:BaseObject:private] => [modifiedColumns:protected] => Array ( ) ) [47] => Category Object ( [languages:protected] => [bok_resources:protected] => [bok_topics:protected] => [bok_keywords:protected] => [id:protected] => 47 [type:protected] => category [parent:protected] => 2 [label:protected] => Bricklayer [alreadyInSave:protected] => [alreadyInValidation:protected] => [validationFailures:protected] => Array ( ) [_new:BaseObject:private] => [_deleted:BaseObject:private] => [modifiedColumns:protected] => Array ( ) ) [48] => Category Object ( [languages:protected] => [bok_resources:protected] => [bok_topics:protected] => [bok_keywords:protected] => [id:protected] => 48 [type:protected] => category [parent:protected] => 2 [label:protected] => Cabinetmaker [alreadyInSave:protected] => [alreadyInValidation:protected] => [validationFailures:protected] => Array ( ) [_new:BaseObject:private] => [_deleted:BaseObject:private] => [modifiedColumns:protected] => Array ( ) ) [49] => Category Object ( [languages:protected] => [bok_resources:protected] => [bok_topics:protected] => [bok_keywords:protected] => [id:protected] => 49 [type:protected] => category [parent:protected] => 2 [label:protected] => Carpenter [alreadyInSave:protected] => [alreadyInValidation:protected] => [validationFailures:protected] => Array ( ) [_new:BaseObject:private] => [_deleted:BaseObject:private] => [modifiedColumns:protected] => Array ( ) ) [50] => Category Object ( [languages:protected] => [bok_resources:protected] => [bok_topics:protected] => [bok_keywords:protected] => [id:protected] => 50 [type:protected] => category [parent:protected] => 2 [label:protected] => Carpet Layer [alreadyInSave:protected] => [alreadyInValidation:protected] => [validationFailures:protected] => Array ( ) [_new:BaseObject:private] => [_deleted:BaseObject:private] => [modifiedColumns:protected] => Array ( ) ) [51] => Category Object ( [languages:protected] => [bok_resources:protected] => [bok_topics:protected] => [bok_keywords:protected] => [id:protected] => 51 [type:protected] => category [parent:protected] => 2 [label:protected] => Cement Mason [alreadyInSave:protected] => [alreadyInValidation:protected] => [validationFailures:protected] => Array ( ) [_new:BaseObject:private] => [_deleted:BaseObject:private] => [modifiedColumns:protected] => Array ( ) ) [52] => Category Object ( [languages:protected] => [bok_resources:protected] => [bok_topics:protected] => [bok_keywords:protected] => [id:protected] => 52 [type:protected] => category [parent:protected] => 2 [label:protected] => Commercial Diver [alreadyInSave:protected] => [alreadyInValidation:protected] => [validationFailures:protected] => Array ( ) [_new:BaseObject:private] => [_deleted:BaseObject:private] => [modifiedColumns:protected] => Array ( ) ) [53] => Category Object ( [languages:protected] => [bok_resources:protected] => [bok_topics:protected] => [bok_keywords:protected] => [id:protected] => 53 [type:protected] => category [parent:protected] => 2 [label:protected] => Concrete Polisher [alreadyInSave:protected] => [alreadyInValidation:protected] => [validationFailures:protected] => Array ( ) [_new:BaseObject:private] => [_deleted:BaseObject:private] => [modifiedColumns:protected] => Array ( ) ) [54] => Category Object ( [languages:protected] => [bok_resources:protected] => [bok_topics:protected] => [bok_keywords:protected] => [id:protected] => 54 [type:protected] => category [parent:protected] => 2 [label:protected] => Drywall Applicator Specialist [alreadyInSave:protected] => [alreadyInValidation:protected] => [validationFailures:protected] => Array ( ) [_new:BaseObject:private] => [_deleted:BaseObject:private] => [modifiedColumns:protected] => Array ( ) ) [55] => Category Object ( [languages:protected] => [bok_resources:protected] => [bok_topics:protected] => [bok_keywords:protected] => [id:protected] => 55 [type:protected] => category [parent:protected] => 2 [label:protected] => Electrical Worker [alreadyInSave:protected] => [alreadyInValidation:protected] => [validationFailures:protected] => Array ( ) [_new:BaseObject:private] => [_deleted:BaseObject:private] => [modifiedColumns:protected] => Array ( ) ) [56] => Category Object ( [languages:protected] => [bok_resources:protected] => [bok_topics:protected] => [bok_keywords:protected] => [id:protected] => 56 [type:protected] => category [parent:protected] => 2 [label:protected] => Elevator Constructor [alreadyInSave:protected] => [alreadyInValidation:protected] => [validationFailures:protected] => Array ( ) [_new:BaseObject:private] => [_deleted:BaseObject:private] => [modifiedColumns:protected] => Array ( ) ) [57] => Category Object ( [languages:protected] => [bok_resources:protected] => [bok_topics:protected] => [bok_keywords:protected] => [id:protected] => 57 [type:protected] => category [parent:protected] => 2 [label:protected] => Flagger [alreadyInSave:protected] => [alreadyInValidation:protected] => [validationFailures:protected] => Array ( ) [_new:BaseObject:private] => [_deleted:BaseObject:private] => [modifiedColumns:protected] => Array ( ) ) [58] => Category Object ( [languages:protected] => [bok_resources:protected] => [bok_topics:protected] => [bok_keywords:protected] => [id:protected] => 58 [type:protected] => category [parent:protected] => 2 [label:protected] => Glazier [alreadyInSave:protected] => [alreadyInValidation:protected] => [validationFailures:protected] => Array ( ) [_new:BaseObject:private] => [_deleted:BaseObject:private] => [modifiedColumns:protected] => Array ( ) ) [59] => Category Object ( [languages:protected] => [bok_resources:protected] => [bok_topics:protected] => [bok_keywords:protected] => [id:protected] => 59 [type:protected] => category [parent:protected] => 2 [label:protected] => Hazardous Waste Cleanup [alreadyInSave:protected] => [alreadyInValidation:protected] => [validationFailures:protected] => Array ( ) [_new:BaseObject:private] => [_deleted:BaseObject:private] => [modifiedColumns:protected] => Array ( ) ) [60] => Category Object ( [languages:protected] => [bok_resources:protected] => [bok_topics:protected] => [bok_keywords:protected] => [id:protected] => 60 [type:protected] => category [parent:protected] => 2 [label:protected] => HVAC [alreadyInSave:protected] => [alreadyInValidation:protected] => [validationFailures:protected] => Array ( ) [_new:BaseObject:private] => [_deleted:BaseObject:private] => [modifiedColumns:protected] => Array ( ) ) [61] => Category Object ( [languages:protected] => [bok_resources:protected] => [bok_topics:protected] => [bok_keywords:protected] => [id:protected] => 61 [type:protected] => category [parent:protected] => 2 [label:protected] => Interior Systems Carpenter [alreadyInSave:protected] => [alreadyInValidation:protected] => [validationFailures:protected] => Array ( ) [_new:BaseObject:private] => [_deleted:BaseObject:private] => [modifiedColumns:protected] => Array ( ) ) [64] => Category Object ( [languages:protected] => [bok_resources:protected] => [bok_topics:protected] => [bok_keywords:protected] => [id:protected] => 64 [type:protected] => category [parent:protected] => 2 [label:protected] => Laborer [alreadyInSave:protected] => [alreadyInValidation:protected] => [validationFailures:protected] => Array ( ) [_new:BaseObject:private] => [_deleted:BaseObject:private] => [modifiedColumns:protected] => Array ( ) ) [65] => Category Object ( [languages:protected] => [bok_resources:protected] => [bok_topics:protected] => [bok_keywords:protected] => [id:protected] => 65 [type:protected] => category [parent:protected] => 2 [label:protected] => Landscaper [alreadyInSave:protected] => [alreadyInValidation:protected] => [validationFailures:protected] => Array ( ) [_new:BaseObject:private] => [_deleted:BaseObject:private] => [modifiedColumns:protected] => Array ( ) ) [66] => Category Object ( [languages:protected] => [bok_resources:protected] => [bok_topics:protected] => [bok_keywords:protected] => [id:protected] => 66 [type:protected] => category [parent:protected] => 2 [label:protected] => Lather [alreadyInSave:protected] => [alreadyInValidation:protected] => [validationFailures:protected] => Array ( ) [_new:BaseObject:private] => [_deleted:BaseObject:private] => [modifiedColumns:protected] => Array ( ) ) [67] => Category Object ( [languages:protected] => [bok_resources:protected] => [bok_topics:protected] => [bok_keywords:protected] => [id:protected] => 67 [type:protected] => category [parent:protected] => 2 [label:protected] => Lead Abatement Worker [alreadyInSave:protected] => [alreadyInValidation:protected] => [validationFailures:protected] => Array ( ) [_new:BaseObject:private] => [_deleted:BaseObject:private] => [modifiedColumns:protected] => Array ( ) ) [68] => Category Object ( [languages:protected] => [bok_resources:protected] => [bok_topics:protected] => [bok_keywords:protected] => [id:protected] => 68 [type:protected] => category [parent:protected] => 2 [label:protected] => Maintenance Worker [alreadyInSave:protected] => [alreadyInValidation:protected] => [validationFailures:protected] => Array ( ) [_new:BaseObject:private] => [_deleted:BaseObject:private] => [modifiedColumns:protected] => Array ( ) ) [69] => Category Object ( [languages:protected] => [bok_resources:protected] => [bok_topics:protected] => [bok_keywords:protected] => [id:protected] => 69 [type:protected] => category [parent:protected] => 2 [label:protected] => Millwright [alreadyInSave:protected] => [alreadyInValidation:protected] => [validationFailures:protected] => Array ( ) [_new:BaseObject:private] => [_deleted:BaseObject:private] => [modifiedColumns:protected] => Array ( ) ) [70] => Category Object ( [languages:protected] => [bok_resources:protected] => [bok_topics:protected] => [bok_keywords:protected] => [id:protected] => 70 [type:protected] => category [parent:protected] => 2 [label:protected] => Operating Engineer [alreadyInSave:protected] => [alreadyInValidation:protected] => [validationFailures:protected] => Array ( ) [_new:BaseObject:private] => [_deleted:BaseObject:private] => [modifiedColumns:protected] => Array ( ) ) [71] => Category Object ( [languages:protected] => [bok_resources:protected] => [bok_topics:protected] => [bok_keywords:protected] => [id:protected] => 71 [type:protected] => category [parent:protected] => 2 [label:protected] => Painter [alreadyInSave:protected] => [alreadyInValidation:protected] => [validationFailures:protected] => Array ( ) [_new:BaseObject:private] => [_deleted:BaseObject:private] => [modifiedColumns:protected] => Array ( ) ) [72] => Category Object ( [languages:protected] => [bok_resources:protected] => [bok_topics:protected] => [bok_keywords:protected] => [id:protected] => 72 [type:protected] => category [parent:protected] => 2 [label:protected] => Paper Hanger [alreadyInSave:protected] => [alreadyInValidation:protected] => [validationFailures:protected] => Array ( ) [_new:BaseObject:private] => [_deleted:BaseObject:private] => [modifiedColumns:protected] => Array ( ) ) [73] => Category Object ( [languages:protected] => [bok_resources:protected] => [bok_topics:protected] => [bok_keywords:protected] => [id:protected] => 73 [type:protected] => category [parent:protected] => 2 [label:protected] => PCC/Restoration [alreadyInSave:protected] => [alreadyInValidation:protected] => [validationFailures:protected] => Array ( ) [_new:BaseObject:private] => [_deleted:BaseObject:private] => [modifiedColumns:protected] => Array ( ) ) [74] => Category Object ( [languages:protected] => [bok_resources:protected] => [bok_topics:protected] => [bok_keywords:protected] => [id:protected] => 74 [type:protected] => category [parent:protected] => 2 [label:protected] => Pile Driver [alreadyInSave:protected] => [alreadyInValidation:protected] => [validationFailures:protected] => Array ( ) [_new:BaseObject:private] => [_deleted:BaseObject:private] => [modifiedColumns:protected] => Array ( ) ) [75] => Category Object ( [languages:protected] => [bok_resources:protected] => [bok_topics:protected] => [bok_keywords:protected] => [id:protected] => 75 [type:protected] => category [parent:protected] => 2 [label:protected] => Plasterer [alreadyInSave:protected] => [alreadyInValidation:protected] => [validationFailures:protected] => Array ( ) [_new:BaseObject:private] => [_deleted:BaseObject:private] => [modifiedColumns:protected] => Array ( ) ) [76] => Category Object ( [languages:protected] => [bok_resources:protected] => [bok_topics:protected] => [bok_keywords:protected] => [id:protected] => 76 [type:protected] => category [parent:protected] => 2 [label:protected] => Plumber/Pipefitter [alreadyInSave:protected] => [alreadyInValidation:protected] => [validationFailures:protected] => Array ( ) [_new:BaseObject:private] => [_deleted:BaseObject:private] => [modifiedColumns:protected] => Array ( ) ) [77] => Category Object ( [languages:protected] => [bok_resources:protected] => [bok_topics:protected] => [bok_keywords:protected] => [id:protected] => 77 [type:protected] => category [parent:protected] => 2 [label:protected] => Refractory Worker [alreadyInSave:protected] => [alreadyInValidation:protected] => [validationFailures:protected] => Array ( ) [_new:BaseObject:private] => [_deleted:BaseObject:private] => [modifiedColumns:protected] => Array ( ) ) [63] => Category Object ( [languages:protected] => [bok_resources:protected] => [bok_topics:protected] => [bok_keywords:protected] => [id:protected] => 63 [type:protected] => category [parent:protected] => 2 [label:protected] => Reinforcing Ironworker [alreadyInSave:protected] => [alreadyInValidation:protected] => [validationFailures:protected] => Array ( ) [_new:BaseObject:private] => [_deleted:BaseObject:private] => [modifiedColumns:protected] => Array ( ) ) [78] => Category Object ( [languages:protected] => [bok_resources:protected] => [bok_topics:protected] => [bok_keywords:protected] => [id:protected] => 78 [type:protected] => category [parent:protected] => 2 [label:protected] => Roofer/Waterproofer [alreadyInSave:protected] => [alreadyInValidation:protected] => [validationFailures:protected] => Array ( ) [_new:BaseObject:private] => [_deleted:BaseObject:private] => [modifiedColumns:protected] => Array ( ) ) [79] => Category Object ( [languages:protected] => [bok_resources:protected] => [bok_topics:protected] => [bok_keywords:protected] => [id:protected] => 79 [type:protected] => category [parent:protected] => 2 [label:protected] => Scaffold Erector [alreadyInSave:protected] => [alreadyInValidation:protected] => [validationFailures:protected] => Array ( ) [_new:BaseObject:private] => [_deleted:BaseObject:private] => [modifiedColumns:protected] => Array ( ) ) [80] => Category Object ( [languages:protected] => [bok_resources:protected] => [bok_topics:protected] => [bok_keywords:protected] => [id:protected] => 80 [type:protected] => category [parent:protected] => 2 [label:protected] => Sheetmetal Worker [alreadyInSave:protected] => [alreadyInValidation:protected] => [validationFailures:protected] => Array ( ) [_new:BaseObject:private] => [_deleted:BaseObject:private] => [modifiedColumns:protected] => Array ( ) ) [81] => Category Object ( [languages:protected] => [bok_resources:protected] => [bok_topics:protected] => [bok_keywords:protected] => [id:protected] => 81 [type:protected] => category [parent:protected] => 2 [label:protected] => Sprinkler Fitter [alreadyInSave:protected] => [alreadyInValidation:protected] => [validationFailures:protected] => Array ( ) [_new:BaseObject:private] => [_deleted:BaseObject:private] => [modifiedColumns:protected] => Array ( ) ) [82] => Category Object ( [languages:protected] => [bok_resources:protected] => [bok_topics:protected] => [bok_keywords:protected] => [id:protected] => 82 [type:protected] => category [parent:protected] => 2 [label:protected] => Stonemason [alreadyInSave:protected] => [alreadyInValidation:protected] => [validationFailures:protected] => Array ( ) [_new:BaseObject:private] => [_deleted:BaseObject:private] => [modifiedColumns:protected] => Array ( ) ) [62] => Category Object ( [languages:protected] => [bok_resources:protected] => [bok_topics:protected] => [bok_keywords:protected] => [id:protected] => 62 [type:protected] => category [parent:protected] => 2 [label:protected] => Structural Ironworker [alreadyInSave:protected] => [alreadyInValidation:protected] => [validationFailures:protected] => Array ( ) [_new:BaseObject:private] => [_deleted:BaseObject:private] => [modifiedColumns:protected] => Array ( ) ) [83] => Category Object ( [languages:protected] => [bok_resources:protected] => [bok_topics:protected] => [bok_keywords:protected] => [id:protected] => 83 [type:protected] => category [parent:protected] => 2 [label:protected] => Terrazzo Worker [alreadyInSave:protected] => [alreadyInValidation:protected] => [validationFailures:protected] => Array ( ) [_new:BaseObject:private] => [_deleted:BaseObject:private] => [modifiedColumns:protected] => Array ( ) ) [84] => Category Object ( [languages:protected] => [bok_resources:protected] => [bok_topics:protected] => [bok_keywords:protected] => [id:protected] => 84 [type:protected] => category [parent:protected] => 2 [label:protected] => Tile Setter [alreadyInSave:protected] => [alreadyInValidation:protected] => [validationFailures:protected] => Array ( ) [_new:BaseObject:private] => [_deleted:BaseObject:private] => [modifiedColumns:protected] => Array ( ) ) [85] => Category Object ( [languages:protected] => [bok_resources:protected] => [bok_topics:protected] => [bok_keywords:protected] => [id:protected] => 85 [type:protected] => category [parent:protected] => 2 [label:protected] => Truck Driver [alreadyInSave:protected] => [alreadyInValidation:protected] => [validationFailures:protected] => Array ( ) [_new:BaseObject:private] => [_deleted:BaseObject:private] => [modifiedColumns:protected] => Array ( ) ) [86] => Category Object ( [languages:protected] => [bok_resources:protected] => [bok_topics:protected] => [bok_keywords:protected] => [id:protected] => 86 [type:protected] => category [parent:protected] => 2 [label:protected] => Welder [alreadyInSave:protected] => [alreadyInValidation:protected] => [validationFailures:protected] => Array ( ) [_new:BaseObject:private] => [_deleted:BaseObject:private] => [modifiedColumns:protected] => Array ( ) ) [87] => Category Object ( [languages:protected] => [bok_resources:protected] => [bok_topics:protected] => [bok_keywords:protected] => [id:protected] => 87 [type:protected] => category [parent:protected] => 3 [label:protected] => Commercial & Institutional [alreadyInSave:protected] => [alreadyInValidation:protected] => [validationFailures:protected] => Array ( ) [_new:BaseObject:private] => [_deleted:BaseObject:private] => [modifiedColumns:protected] => Array ( ) ) [88] => Category Object ( [languages:protected] => [bok_resources:protected] => [bok_topics:protected] => [bok_keywords:protected] => [id:protected] => 88 [type:protected] => category [parent:protected] => 3 [label:protected] => Demolition [alreadyInSave:protected] => [alreadyInValidation:protected] => [validationFailures:protected] => Array ( ) [_new:BaseObject:private] => [_deleted:BaseObject:private] => [modifiedColumns:protected] => Array ( ) ) [89] => Category Object ( [languages:protected] => [bok_resources:protected] => [bok_topics:protected] => [bok_keywords:protected] => [id:protected] => 89 [type:protected] => category [parent:protected] => 3 [label:protected] => Disasters [alreadyInSave:protected] => [alreadyInValidation:protected] => [validationFailures:protected] => Array ( ) [_new:BaseObject:private] => [_deleted:BaseObject:private] => [modifiedColumns:protected] => Array ( ) ) [91] => Category Object ( [languages:protected] => [bok_resources:protected] => [bok_topics:protected] => [bok_keywords:protected] => [id:protected] => 91 [type:protected] => category [parent:protected] => 3 [label:protected] => Heavy & Highway [alreadyInSave:protected] => [alreadyInValidation:protected] => [validationFailures:protected] => Array ( ) [_new:BaseObject:private] => [_deleted:BaseObject:private] => [modifiedColumns:protected] => Array ( ) ) [90] => Category Object ( [languages:protected] => [bok_resources:protected] => [bok_topics:protected] => [bok_keywords:protected] => [id:protected] => 90 [type:protected] => category [parent:protected] => 3 [label:protected] => Industrial [alreadyInSave:protected] => [alreadyInValidation:protected] => [validationFailures:protected] => Array ( ) [_new:BaseObject:private] => [_deleted:BaseObject:private] => [modifiedColumns:protected] => Array ( ) ) [92] => Category Object ( [languages:protected] => [bok_resources:protected] => [bok_topics:protected] => [bok_keywords:protected] => [id:protected] => 92 [type:protected] => category [parent:protected] => 3 [label:protected] => LEED/Green Construction [alreadyInSave:protected] => [alreadyInValidation:protected] => [validationFailures:protected] => Array ( ) [_new:BaseObject:private] => [_deleted:BaseObject:private] => [modifiedColumns:protected] => Array ( ) ) [93] => Category Object ( [languages:protected] => [bok_resources:protected] => [bok_topics:protected] => [bok_keywords:protected] => [id:protected] => 93 [type:protected] => category [parent:protected] => 3 [label:protected] => Renovations [alreadyInSave:protected] => [alreadyInValidation:protected] => [validationFailures:protected] => Array ( ) [_new:BaseObject:private] => [_deleted:BaseObject:private] => [modifiedColumns:protected] => Array ( ) ) [94] => Category Object ( [languages:protected] => [bok_resources:protected] => [bok_topics:protected] => [bok_keywords:protected] => [id:protected] => 94 [type:protected] => category [parent:protected] => 3 [label:protected] => Residential [alreadyInSave:protected] => [alreadyInValidation:protected] => [validationFailures:protected] => Array ( ) [_new:BaseObject:private] => [_deleted:BaseObject:private] => [modifiedColumns:protected] => Array ( ) ) [95] => Category Object ( [languages:protected] => [bok_resources:protected] => [bok_topics:protected] => [bok_keywords:protected] => [id:protected] => 95 [type:protected] => category [parent:protected] => 3 [label:protected] => Underground [alreadyInSave:protected] => [alreadyInValidation:protected] => [validationFailures:protected] => Array ( ) [_new:BaseObject:private] => [_deleted:BaseObject:private] => [modifiedColumns:protected] => Array ( ) ) ) [categories_initialized:protected] => 1 [mapped_items:protected] => [content:protected] => [files:protected] => [language:protected] => Language Object ( [id:protected] => 1 [code:protected] => en [name:protected] => English [alreadyInSave:protected] => [alreadyInValidation:protected] => [validationFailures:protected] => Array ( ) [_new:BaseObject:private] => [_deleted:BaseObject:private] => [modifiedColumns:protected] => Array ( ) ) [old_record:protected] => [id:protected] => 4426 [old_id:protected] => [elcosh_id:protected] => d001656 [type:protected] => document [display_type:protected] => HTML only (and links) [user_id:protected] => 0 [language_id:protected] => 1 [tagging_id:protected] => Mike Aguilar [priority_id:protected] => 1 [title:protected] => Construction Dive -- DeWalt's Jobsite Pro headphones recalled for fire hazards [total_pages:protected] => 1 [billed_pages:protected] => 1 [publication_number:protected] => [part_of:protected] => [keywords:protected] => DeWalt, Fire Hazards, recall, headphones [comments:protected] => [summary:protected] => A recall notice by the United States Consumer Product Safety Commission affects over 300,000 DeWalt Jobsite Pro Headphones. The recall is a result of a malfunction that can cause earbuds to overheat while charging or during use, leading to fire and burn hazards. [transition_comments:protected] => [external_link:protected] => https://www.constructiondive.com/news/dewalts-jobsite-pro-headphones-recalled-for-fire-hazards/611248/?utm_source=Sailthru&utm_medium=email&utm_campaign=Issue:%202021-12-10%20Construction%20Dive%20Newsletter%20%5Bissue:38532%5D&utm_term=Construction%20Dive [consol_link:protected] => [more_like_this:protected] => [permission_given_by:protected] => [published:protected] => T [billable:protected] => F [img_name:protected] => [img_ext:protected] => [img_width:protected] => [img_height:protected] => [img_credit:protected] => [img_practice:protected] => [vid_source_id:protected] => [vid_running_time:protected] => [vid_intended_audience:protected] => [vid_acquisition_info:protected] => [vid_cost:protected] => [vid_producer:protected] => [vid_filename:protected] => [vid_filename_downloadable:protected] => [date_summary:protected] => [date_permission_requested:protected] => [date_permission_received:protected] => [date_review_needed:protected] => [date_received:protected] => 12/13/21 [date_completed:protected] => 12/13/21 [date_billed:protected] => [date_modified:protected] => 12/13/21 [collBokExports:protected] => [lastBokExportCriteria:BaseElcoshItem:private] => [alreadyInSave:protected] => [alreadyInValidation:protected] => [validationFailures:protected] => Array ( ) [_new:BaseObject:private] => [_deleted:BaseObject:private] => [modifiedColumns:protected] => Array ( ) ) ) [3] => Search_Result Object ( [title] => Working in an Enclosed Cab [image] => /record/images/notavailable-p.png [blurb] => This CPWR Hazard Alert on Working in enclosed cabs provides information on protecting workers from silica dust, how to minimize exposures and the dang... [category] => Array ( [0] => 10 [1] => 16 [2] => 24 [3] => 37 [4] => 46 [5] => 48 [6] => 49 [7] => 51 [8] => 53 [9] => 54 [10] => 56 [11] => 58 [12] => 59 [13] => 60 [14] => 61 [15] => 64 [16] => 66 [17] => 68 [18] => 69 [19] => 71 [20] => 73 [21] => 74 [22] => 76 [23] => 77 [24] => 63 [25] => 80 [26] => 82 [27] => 62 [28] => 83 [29] => 84 [30] => 86 [31] => 88 [32] => 89 [33] => 95 [34] => 102 ) [labels] => Array ( [0] => Confined Spaces [1] => Work Environment [2] => Hazards [3] => Fire & Explosions [6] => Trenches & Excavations [9] => Silica /Construction Dust [10] => Inhalation/Skin Exposures [12] => Boilermaker [13] => Trades [14] => Cabinetmaker [16] => Carpenter [18] => Cement Mason [20] => Concrete Polisher [22] => Drywall Applicator Specialist [24] => Elevator Constructor [26] => Glazier [28] => Hazardous Waste Cleanup [30] => HVAC [32] => Interior Systems Carpenter [34] => Laborer [36] => Lather [38] => Maintenance Worker [40] => Millwright [42] => Painter [44] => PCC/Restoration [46] => Pile Driver [48] => Plumber/Pipefitter [50] => Refractory Worker [52] => Reinforcing Ironworker [54] => Sheetmetal Worker [56] => Stonemason [58] => Structural Ironworker [60] => Terrazzo Worker [62] => Tile Setter [64] => Welder [66] => Demolition [67] => Jobsites [68] => Disasters [70] => Underground [72] => Handouts [73] => Documents [74] => Media & Documents ) [type] => Handouts [sub_category] => [url] => /document/4415/d001651/Working%2Bin%2Ban%2BEnclosed%2BCab.html [item:protected] => DocumentRecord Object ( [records:protected] => Array ( ) [recordId:protected] => [searchWordClass:protected] => [searchWordPeerClass:protected] => [bok_record:protected] => [authors:protected] => [organizations:protected] => [collections:protected] => [categories:protected] => Array ( [10] => Category Object ( [languages:protected] => [bok_resources:protected] => [bok_topics:protected] => [bok_keywords:protected] => [id:protected] => 10 [type:protected] => category [parent:protected] => 7 [label:protected] => Confined Spaces [alreadyInSave:protected] => [alreadyInValidation:protected] => [validationFailures:protected] => Array ( ) [_new:BaseObject:private] => [_deleted:BaseObject:private] => [modifiedColumns:protected] => Array ( ) ) [16] => Category Object ( [languages:protected] => [bok_resources:protected] => [bok_topics:protected] => [bok_keywords:protected] => [id:protected] => 16 [type:protected] => category [parent:protected] => 7 [label:protected] => Fire & Explosions [alreadyInSave:protected] => [alreadyInValidation:protected] => [validationFailures:protected] => Array ( ) [_new:BaseObject:private] => [_deleted:BaseObject:private] => [modifiedColumns:protected] => Array ( ) ) [24] => Category Object ( [languages:protected] => [bok_resources:protected] => [bok_topics:protected] => [bok_keywords:protected] => [id:protected] => 24 [type:protected] => category [parent:protected] => 7 [label:protected] => Trenches & Excavations [alreadyInSave:protected] => [alreadyInValidation:protected] => [validationFailures:protected] => Array ( ) [_new:BaseObject:private] => [_deleted:BaseObject:private] => [modifiedColumns:protected] => Array ( ) ) [37] => Category Object ( [languages:protected] => [bok_resources:protected] => [bok_topics:protected] => [bok_keywords:protected] => [id:protected] => 37 [type:protected] => category [parent:protected] => 8 [label:protected] => Silica /Construction Dust [alreadyInSave:protected] => [alreadyInValidation:protected] => [validationFailures:protected] => Array ( ) [_new:BaseObject:private] => [_deleted:BaseObject:private] => [modifiedColumns:protected] => Array ( ) ) [46] => Category Object ( [languages:protected] => [bok_resources:protected] => [bok_topics:protected] => [bok_keywords:protected] => [id:protected] => 46 [type:protected] => category [parent:protected] => 2 [label:protected] => Boilermaker [alreadyInSave:protected] => [alreadyInValidation:protected] => [validationFailures:protected] => Array ( ) [_new:BaseObject:private] => [_deleted:BaseObject:private] => [modifiedColumns:protected] => Array ( ) ) [48] => Category Object ( [languages:protected] => [bok_resources:protected] => [bok_topics:protected] => [bok_keywords:protected] => [id:protected] => 48 [type:protected] => category [parent:protected] => 2 [label:protected] => Cabinetmaker [alreadyInSave:protected] => [alreadyInValidation:protected] => [validationFailures:protected] => Array ( ) [_new:BaseObject:private] => [_deleted:BaseObject:private] => [modifiedColumns:protected] => Array ( ) ) [49] => Category Object ( [languages:protected] => [bok_resources:protected] => [bok_topics:protected] => [bok_keywords:protected] => [id:protected] => 49 [type:protected] => category [parent:protected] => 2 [label:protected] => Carpenter [alreadyInSave:protected] => [alreadyInValidation:protected] => [validationFailures:protected] => Array ( ) [_new:BaseObject:private] => [_deleted:BaseObject:private] => [modifiedColumns:protected] => Array ( ) ) [51] => Category Object ( [languages:protected] => [bok_resources:protected] => [bok_topics:protected] => [bok_keywords:protected] => [id:protected] => 51 [type:protected] => category [parent:protected] => 2 [label:protected] => Cement Mason [alreadyInSave:protected] => [alreadyInValidation:protected] => [validationFailures:protected] => Array ( ) [_new:BaseObject:private] => [_deleted:BaseObject:private] => [modifiedColumns:protected] => Array ( ) ) [53] => Category Object ( [languages:protected] => [bok_resources:protected] => [bok_topics:protected] => [bok_keywords:protected] => [id:protected] => 53 [type:protected] => category [parent:protected] => 2 [label:protected] => Concrete Polisher [alreadyInSave:protected] => [alreadyInValidation:protected] => [validationFailures:protected] => Array ( ) [_new:BaseObject:private] => [_deleted:BaseObject:private] => [modifiedColumns:protected] => Array ( ) ) [54] => Category Object ( [languages:protected] => [bok_resources:protected] => [bok_topics:protected] => [bok_keywords:protected] => [id:protected] => 54 [type:protected] => category [parent:protected] => 2 [label:protected] => Drywall Applicator Specialist [alreadyInSave:protected] => [alreadyInValidation:protected] => [validationFailures:protected] => Array ( ) [_new:BaseObject:private] => [_deleted:BaseObject:private] => [modifiedColumns:protected] => Array ( ) ) [56] => Category Object ( [languages:protected] => [bok_resources:protected] => [bok_topics:protected] => [bok_keywords:protected] => [id:protected] => 56 [type:protected] => category [parent:protected] => 2 [label:protected] => Elevator Constructor [alreadyInSave:protected] => [alreadyInValidation:protected] => [validationFailures:protected] => Array ( ) [_new:BaseObject:private] => [_deleted:BaseObject:private] => [modifiedColumns:protected] => Array ( ) ) [58] => Category Object ( [languages:protected] => [bok_resources:protected] => [bok_topics:protected] => [bok_keywords:protected] => [id:protected] => 58 [type:protected] => category [parent:protected] => 2 [label:protected] => Glazier [alreadyInSave:protected] => [alreadyInValidation:protected] => [validationFailures:protected] => Array ( ) [_new:BaseObject:private] => [_deleted:BaseObject:private] => [modifiedColumns:protected] => Array ( ) ) [59] => Category Object ( [languages:protected] => [bok_resources:protected] => [bok_topics:protected] => [bok_keywords:protected] => [id:protected] => 59 [type:protected] => category [parent:protected] => 2 [label:protected] => Hazardous Waste Cleanup [alreadyInSave:protected] => [alreadyInValidation:protected] => [validationFailures:protected] => Array ( ) [_new:BaseObject:private] => [_deleted:BaseObject:private] => [modifiedColumns:protected] => Array ( ) ) [60] => Category Object ( [languages:protected] => [bok_resources:protected] => [bok_topics:protected] => [bok_keywords:protected] => [id:protected] => 60 [type:protected] => category [parent:protected] => 2 [label:protected] => HVAC [alreadyInSave:protected] => [alreadyInValidation:protected] => [validationFailures:protected] => Array ( ) [_new:BaseObject:private] => [_deleted:BaseObject:private] => [modifiedColumns:protected] => Array ( ) ) [61] => Category Object ( [languages:protected] => [bok_resources:protected] => [bok_topics:protected] => [bok_keywords:protected] => [id:protected] => 61 [type:protected] => category [parent:protected] => 2 [label:protected] => Interior Systems Carpenter [alreadyInSave:protected] => [alreadyInValidation:protected] => [validationFailures:protected] => Array ( ) [_new:BaseObject:private] => [_deleted:BaseObject:private] => [modifiedColumns:protected] => Array ( ) ) [64] => Category Object ( [languages:protected] => [bok_resources:protected] => [bok_topics:protected] => [bok_keywords:protected] => [id:protected] => 64 [type:protected] => category [parent:protected] => 2 [label:protected] => Laborer [alreadyInSave:protected] => [alreadyInValidation:protected] => [validationFailures:protected] => Array ( ) [_new:BaseObject:private] => [_deleted:BaseObject:private] => [modifiedColumns:protected] => Array ( ) ) [66] => Category Object ( [languages:protected] => [bok_resources:protected] => [bok_topics:protected] => [bok_keywords:protected] => [id:protected] => 66 [type:protected] => category [parent:protected] => 2 [label:protected] => Lather [alreadyInSave:protected] => [alreadyInValidation:protected] => [validationFailures:protected] => Array ( ) [_new:BaseObject:private] => [_deleted:BaseObject:private] => [modifiedColumns:protected] => Array ( ) ) [68] => Category Object ( [languages:protected] => [bok_resources:protected] => [bok_topics:protected] => [bok_keywords:protected] => [id:protected] => 68 [type:protected] => category [parent:protected] => 2 [label:protected] => Maintenance Worker [alreadyInSave:protected] => [alreadyInValidation:protected] => [validationFailures:protected] => Array ( ) [_new:BaseObject:private] => [_deleted:BaseObject:private] => [modifiedColumns:protected] => Array ( ) ) [69] => Category Object ( [languages:protected] => [bok_resources:protected] => [bok_topics:protected] => [bok_keywords:protected] => [id:protected] => 69 [type:protected] => category [parent:protected] => 2 [label:protected] => Millwright [alreadyInSave:protected] => [alreadyInValidation:protected] => [validationFailures:protected] => Array ( ) [_new:BaseObject:private] => [_deleted:BaseObject:private] => [modifiedColumns:protected] => Array ( ) ) [71] => Category Object ( [languages:protected] => [bok_resources:protected] => [bok_topics:protected] => [bok_keywords:protected] => [id:protected] => 71 [type:protected] => category [parent:protected] => 2 [label:protected] => Painter [alreadyInSave:protected] => [alreadyInValidation:protected] => [validationFailures:protected] => Array ( ) [_new:BaseObject:private] => [_deleted:BaseObject:private] => [modifiedColumns:protected] => Array ( ) ) [73] => Category Object ( [languages:protected] => [bok_resources:protected] => [bok_topics:protected] => [bok_keywords:protected] => [id:protected] => 73 [type:protected] => category [parent:protected] => 2 [label:protected] => PCC/Restoration [alreadyInSave:protected] => [alreadyInValidation:protected] => [validationFailures:protected] => Array ( ) [_new:BaseObject:private] => [_deleted:BaseObject:private] => [modifiedColumns:protected] => Array ( ) ) [74] => Category Object ( [languages:protected] => [bok_resources:protected] => [bok_topics:protected] => [bok_keywords:protected] => [id:protected] => 74 [type:protected] => category [parent:protected] => 2 [label:protected] => Pile Driver [alreadyInSave:protected] => [alreadyInValidation:protected] => [validationFailures:protected] => Array ( ) [_new:BaseObject:private] => [_deleted:BaseObject:private] => [modifiedColumns:protected] => Array ( ) ) [76] => Category Object ( [languages:protected] => [bok_resources:protected] => [bok_topics:protected] => [bok_keywords:protected] => [id:protected] => 76 [type:protected] => category [parent:protected] => 2 [label:protected] => Plumber/Pipefitter [alreadyInSave:protected] => [alreadyInValidation:protected] => [validationFailures:protected] => Array ( ) [_new:BaseObject:private] => [_deleted:BaseObject:private] => [modifiedColumns:protected] => Array ( ) ) [77] => Category Object ( [languages:protected] => [bok_resources:protected] => [bok_topics:protected] => [bok_keywords:protected] => [id:protected] => 77 [type:protected] => category [parent:protected] => 2 [label:protected] => Refractory Worker [alreadyInSave:protected] => [alreadyInValidation:protected] => [validationFailures:protected] => Array ( ) [_new:BaseObject:private] => [_deleted:BaseObject:private] => [modifiedColumns:protected] => Array ( ) ) [63] => Category Object ( [languages:protected] => [bok_resources:protected] => [bok_topics:protected] => [bok_keywords:protected] => [id:protected] => 63 [type:protected] => category [parent:protected] => 2 [label:protected] => Reinforcing Ironworker [alreadyInSave:protected] => [alreadyInValidation:protected] => [validationFailures:protected] => Array ( ) [_new:BaseObject:private] => [_deleted:BaseObject:private] => [modifiedColumns:protected] => Array ( ) ) [80] => Category Object ( [languages:protected] => [bok_resources:protected] => [bok_topics:protected] => [bok_keywords:protected] => [id:protected] => 80 [type:protected] => category [parent:protected] => 2 [label:protected] => Sheetmetal Worker [alreadyInSave:protected] => [alreadyInValidation:protected] => [validationFailures:protected] => Array ( ) [_new:BaseObject:private] => [_deleted:BaseObject:private] => [modifiedColumns:protected] => Array ( ) ) [82] => Category Object ( [languages:protected] => [bok_resources:protected] => [bok_topics:protected] => [bok_keywords:protected] => [id:protected] => 82 [type:protected] => category [parent:protected] => 2 [label:protected] => Stonemason [alreadyInSave:protected] => [alreadyInValidation:protected] => [validationFailures:protected] => Array ( ) [_new:BaseObject:private] => [_deleted:BaseObject:private] => [modifiedColumns:protected] => Array ( ) ) [62] => Category Object ( [languages:protected] => [bok_resources:protected] => [bok_topics:protected] => [bok_keywords:protected] => [id:protected] => 62 [type:protected] => category [parent:protected] => 2 [label:protected] => Structural Ironworker [alreadyInSave:protected] => [alreadyInValidation:protected] => [validationFailures:protected] => Array ( ) [_new:BaseObject:private] => [_deleted:BaseObject:private] => [modifiedColumns:protected] => Array ( ) ) [83] => Category Object ( [languages:protected] => [bok_resources:protected] => [bok_topics:protected] => [bok_keywords:protected] => [id:protected] => 83 [type:protected] => category [parent:protected] => 2 [label:protected] => Terrazzo Worker [alreadyInSave:protected] => [alreadyInValidation:protected] => [validationFailures:protected] => Array ( ) [_new:BaseObject:private] => [_deleted:BaseObject:private] => [modifiedColumns:protected] => Array ( ) ) [84] => Category Object ( [languages:protected] => [bok_resources:protected] => [bok_topics:protected] => [bok_keywords:protected] => [id:protected] => 84 [type:protected] => category [parent:protected] => 2 [label:protected] => Tile Setter [alreadyInSave:protected] => [alreadyInValidation:protected] => [validationFailures:protected] => Array ( ) [_new:BaseObject:private] => [_deleted:BaseObject:private] => [modifiedColumns:protected] => Array ( ) ) [86] => Category Object ( [languages:protected] => [bok_resources:protected] => [bok_topics:protected] => [bok_keywords:protected] => [id:protected] => 86 [type:protected] => category [parent:protected] => 2 [label:protected] => Welder [alreadyInSave:protected] => [alreadyInValidation:protected] => [validationFailures:protected] => Array ( ) [_new:BaseObject:private] => [_deleted:BaseObject:private] => [modifiedColumns:protected] => Array ( ) ) [88] => Category Object ( [languages:protected] => [bok_resources:protected] => [bok_topics:protected] => [bok_keywords:protected] => [id:protected] => 88 [type:protected] => category [parent:protected] => 3 [label:protected] => Demolition [alreadyInSave:protected] => [alreadyInValidation:protected] => [validationFailures:protected] => Array ( ) [_new:BaseObject:private] => [_deleted:BaseObject:private] => [modifiedColumns:protected] => Array ( ) ) [89] => Category Object ( [languages:protected] => [bok_resources:protected] => [bok_topics:protected] => [bok_keywords:protected] => [id:protected] => 89 [type:protected] => category [parent:protected] => 3 [label:protected] => Disasters [alreadyInSave:protected] => [alreadyInValidation:protected] => [validationFailures:protected] => Array ( ) [_new:BaseObject:private] => [_deleted:BaseObject:private] => [modifiedColumns:protected] => Array ( ) ) [95] => Category Object ( [languages:protected] => [bok_resources:protected] => [bok_topics:protected] => [bok_keywords:protected] => [id:protected] => 95 [type:protected] => category [parent:protected] => 3 [label:protected] => Underground [alreadyInSave:protected] => [alreadyInValidation:protected] => [validationFailures:protected] => Array ( ) [_new:BaseObject:private] => [_deleted:BaseObject:private] => [modifiedColumns:protected] => Array ( ) ) [102] => Category Object ( [languages:protected] => [bok_resources:protected] => [bok_topics:protected] => [bok_keywords:protected] => [id:protected] => 102 [type:protected] => category [parent:protected] => 6 [label:protected] => Handouts [alreadyInSave:protected] => [alreadyInValidation:protected] => [validationFailures:protected] => Array ( ) [_new:BaseObject:private] => [_deleted:BaseObject:private] => [modifiedColumns:protected] => Array ( ) ) ) [categories_initialized:protected] => 1 [mapped_items:protected] => [content:protected] => [files:protected] => [language:protected] => Language Object ( [id:protected] => 1 [code:protected] => en [name:protected] => English [alreadyInSave:protected] => [alreadyInValidation:protected] => [validationFailures:protected] => Array ( ) [_new:BaseObject:private] => [_deleted:BaseObject:private] => [modifiedColumns:protected] => Array ( ) ) [old_record:protected] => [id:protected] => 4415 [old_id:protected] => [elcosh_id:protected] => d001651 [type:protected] => document [display_type:protected] => HTML only (and links) [user_id:protected] => 0 [language_id:protected] => 1 [tagging_id:protected] => Valeria Contreras [priority_id:protected] => 1 [title:protected] => Working in an Enclosed Cab [total_pages:protected] => 1 [billed_pages:protected] => 1 [publication_number:protected] => [part_of:protected] => [keywords:protected] => Occupation, construction, safety, health, hazards, work, worker, workplace, OSHA, silicosis, mining, silica, DOE, EEOICPA, labor, lung, CBD, dust, cab, miner, mine [comments:protected] => [summary:protected] => This CPWR Hazard Alert on Working in enclosed cabs provides information on protecting workers from silica dust, how to minimize exposures and the dangers of silica dust. Click on the following links to access the English version and the Spanish version. [transition_comments:protected] => [external_link:protected] => [consol_link:protected] => [more_like_this:protected] => [permission_given_by:protected] => [published:protected] => T [billable:protected] => F [img_name:protected] => [img_ext:protected] => [img_width:protected] => [img_height:protected] => [img_credit:protected] => [img_practice:protected] => [vid_source_id:protected] => [vid_running_time:protected] => [vid_intended_audience:protected] => [vid_acquisition_info:protected] => [vid_cost:protected] => [vid_producer:protected] => [vid_filename:protected] => [vid_filename_downloadable:protected] => [date_summary:protected] => [date_permission_requested:protected] => [date_permission_received:protected] => [date_review_needed:protected] => [date_received:protected] => 10/08/20 [date_completed:protected] => 10/08/20 [date_billed:protected] => [date_modified:protected] => 10/08/20 [collBokExports:protected] => [lastBokExportCriteria:BaseElcoshItem:private] => [alreadyInSave:protected] => [alreadyInValidation:protected] => [validationFailures:protected] => Array ( ) [_new:BaseObject:private] => [_deleted:BaseObject:private] => [modifiedColumns:protected] => Array ( ) ) ) [4] => Search_Result Object ( [title] => Toolbox Talk: Suicide Prevention [image] => /record/images/notavailable-p.png [blurb] => The CPWR Toolbox Talk on Suicide Prevention addresses the prevalence of suicide among construction workers. The resource includes a brief case example... [category] => Array ( [0] => 13 [1] => 20 [2] => 23 [3] => 40 [4] => 44 [5] => 45 [6] => 46 [7] => 47 [8] => 48 [9] => 49 [10] => 50 [11] => 51 [12] => 52 [13] => 53 [14] => 54 [15] => 55 [16] => 56 [17] => 57 [18] => 58 [19] => 59 [20] => 60 [21] => 61 [22] => 64 [23] => 65 [24] => 66 [25] => 67 [26] => 68 [27] => 69 [28] => 70 [29] => 71 [30] => 72 [31] => 73 [32] => 74 [33] => 75 [34] => 76 [35] => 77 [36] => 63 [37] => 78 [38] => 79 [39] => 80 [40] => 81 [41] => 82 [42] => 62 [43] => 83 [44] => 84 [45] => 85 [46] => 86 [47] => 87 [48] => 88 [49] => 89 [50] => 91 [51] => 90 [52] => 92 [53] => 93 [54] => 94 [55] => 95 [56] => 100 ) [labels] => Array ( [0] => Drugs, Alcohol & Tobacco [1] => Work Environment [2] => Hazards [3] => Safety Culture [6] => Stress & Overtime [9] => Overexertion [10] => Ergonomic [12] => Acoustical Ceiling Carpenter [13] => Trades [14] => Asbestos/Insulator [16] => Boilermaker [18] => Bricklayer [20] => Cabinetmaker [22] => Carpenter [24] => Carpet Layer [26] => Cement Mason [28] => Commercial Diver [30] => Concrete Polisher [32] => Drywall Applicator Specialist [34] => Electrical Worker [36] => Elevator Constructor [38] => Flagger [40] => Glazier [42] => Hazardous Waste Cleanup [44] => HVAC [46] => Interior Systems Carpenter [48] => Laborer [50] => Landscaper [52] => Lather [54] => Lead Abatement Worker [56] => Maintenance Worker [58] => Millwright [60] => Operating Engineer [62] => Painter [64] => Paper Hanger [66] => PCC/Restoration [68] => Pile Driver [70] => Plasterer [72] => Plumber/Pipefitter [74] => Refractory Worker [76] => Reinforcing Ironworker [78] => Roofer/Waterproofer [80] => Scaffold Erector [82] => Sheetmetal Worker [84] => Sprinkler Fitter [86] => Stonemason [88] => Structural Ironworker [90] => Terrazzo Worker [92] => Tile Setter [94] => Truck Driver [96] => Welder [98] => Commercial & Institutional [99] => Jobsites [100] => Demolition [102] => Disasters [104] => Heavy & Highway [106] => Industrial [108] => LEED/Green Construction [110] => Renovations [112] => Residential [114] => Underground [116] => Toolbox Talks [117] => Documents [118] => Media & Documents ) [type] => Toolbox Talks [sub_category] => [url] => /document/4419/d001652/Toolbox%2BTalk%253A%2BSuicide%2BPrevention.html [item:protected] => DocumentRecord Object ( [records:protected] => Array ( ) [recordId:protected] => [searchWordClass:protected] => [searchWordPeerClass:protected] => [bok_record:protected] => [authors:protected] => [organizations:protected] => [collections:protected] => [categories:protected] => Array ( [13] => Category Object ( [languages:protected] => [bok_resources:protected] => [bok_topics:protected] => [bok_keywords:protected] => [id:protected] => 13 [type:protected] => category [parent:protected] => 7 [label:protected] => Drugs, Alcohol & Tobacco [alreadyInSave:protected] => [alreadyInValidation:protected] => [validationFailures:protected] => Array ( ) [_new:BaseObject:private] => [_deleted:BaseObject:private] => [modifiedColumns:protected] => Array ( ) ) [20] => Category Object ( [languages:protected] => [bok_resources:protected] => [bok_topics:protected] => [bok_keywords:protected] => [id:protected] => 20 [type:protected] => category [parent:protected] => 7 [label:protected] => Safety Culture [alreadyInSave:protected] => [alreadyInValidation:protected] => [validationFailures:protected] => Array ( ) [_new:BaseObject:private] => [_deleted:BaseObject:private] => [modifiedColumns:protected] => Array ( ) ) [23] => Category Object ( [languages:protected] => [bok_resources:protected] => [bok_topics:protected] => [bok_keywords:protected] => [id:protected] => 23 [type:protected] => category [parent:protected] => 7 [label:protected] => Stress & Overtime [alreadyInSave:protected] => [alreadyInValidation:protected] => [validationFailures:protected] => Array ( ) [_new:BaseObject:private] => [_deleted:BaseObject:private] => [modifiedColumns:protected] => Array ( ) ) [40] => Category Object ( [languages:protected] => [bok_resources:protected] => [bok_topics:protected] => [bok_keywords:protected] => [id:protected] => 40 [type:protected] => category [parent:protected] => 9 [label:protected] => Overexertion [alreadyInSave:protected] => [alreadyInValidation:protected] => [validationFailures:protected] => Array ( ) [_new:BaseObject:private] => [_deleted:BaseObject:private] => [modifiedColumns:protected] => Array ( ) ) [44] => Category Object ( [languages:protected] => [bok_resources:protected] => [bok_topics:protected] => [bok_keywords:protected] => [id:protected] => 44 [type:protected] => category [parent:protected] => 2 [label:protected] => Acoustical Ceiling Carpenter [alreadyInSave:protected] => [alreadyInValidation:protected] => [validationFailures:protected] => Array ( ) [_new:BaseObject:private] => [_deleted:BaseObject:private] => [modifiedColumns:protected] => Array ( ) ) [45] => Category Object ( [languages:protected] => [bok_resources:protected] => [bok_topics:protected] => [bok_keywords:protected] => [id:protected] => 45 [type:protected] => category [parent:protected] => 2 [label:protected] => Asbestos/Insulator [alreadyInSave:protected] => [alreadyInValidation:protected] => [validationFailures:protected] => Array ( ) [_new:BaseObject:private] => [_deleted:BaseObject:private] => [modifiedColumns:protected] => Array ( ) ) [46] => Category Object ( [languages:protected] => [bok_resources:protected] => [bok_topics:protected] => [bok_keywords:protected] => [id:protected] => 46 [type:protected] => category [parent:protected] => 2 [label:protected] => Boilermaker [alreadyInSave:protected] => [alreadyInValidation:protected] => [validationFailures:protected] => Array ( ) [_new:BaseObject:private] => [_deleted:BaseObject:private] => [modifiedColumns:protected] => Array ( ) ) [47] => Category Object ( [languages:protected] => [bok_resources:protected] => [bok_topics:protected] => [bok_keywords:protected] => [id:protected] => 47 [type:protected] => category [parent:protected] => 2 [label:protected] => Bricklayer [alreadyInSave:protected] => [alreadyInValidation:protected] => [validationFailures:protected] => Array ( ) [_new:BaseObject:private] => [_deleted:BaseObject:private] => [modifiedColumns:protected] => Array ( ) ) [48] => Category Object ( [languages:protected] => [bok_resources:protected] => [bok_topics:protected] => [bok_keywords:protected] => [id:protected] => 48 [type:protected] => category [parent:protected] => 2 [label:protected] => Cabinetmaker [alreadyInSave:protected] => [alreadyInValidation:protected] => [validationFailures:protected] => Array ( ) [_new:BaseObject:private] => [_deleted:BaseObject:private] => [modifiedColumns:protected] => Array ( ) ) [49] => Category Object ( [languages:protected] => [bok_resources:protected] => [bok_topics:protected] => [bok_keywords:protected] => [id:protected] => 49 [type:protected] => category [parent:protected] => 2 [label:protected] => Carpenter [alreadyInSave:protected] => [alreadyInValidation:protected] => [validationFailures:protected] => Array ( ) [_new:BaseObject:private] => [_deleted:BaseObject:private] => [modifiedColumns:protected] => Array ( ) ) [50] => Category Object ( [languages:protected] => [bok_resources:protected] => [bok_topics:protected] => [bok_keywords:protected] => [id:protected] => 50 [type:protected] => category [parent:protected] => 2 [label:protected] => Carpet Layer [alreadyInSave:protected] => [alreadyInValidation:protected] => [validationFailures:protected] => Array ( ) [_new:BaseObject:private] => [_deleted:BaseObject:private] => [modifiedColumns:protected] => Array ( ) ) [51] => Category Object ( [languages:protected] => [bok_resources:protected] => [bok_topics:protected] => [bok_keywords:protected] => [id:protected] => 51 [type:protected] => category [parent:protected] => 2 [label:protected] => Cement Mason [alreadyInSave:protected] => [alreadyInValidation:protected] => [validationFailures:protected] => Array ( ) [_new:BaseObject:private] => [_deleted:BaseObject:private] => [modifiedColumns:protected] => Array ( ) ) [52] => Category Object ( [languages:protected] => [bok_resources:protected] => [bok_topics:protected] => [bok_keywords:protected] => [id:protected] => 52 [type:protected] => category [parent:protected] => 2 [label:protected] => Commercial Diver [alreadyInSave:protected] => [alreadyInValidation:protected] => [validationFailures:protected] => Array ( ) [_new:BaseObject:private] => [_deleted:BaseObject:private] => [modifiedColumns:protected] => Array ( ) ) [53] => Category Object ( [languages:protected] => [bok_resources:protected] => [bok_topics:protected] => [bok_keywords:protected] => [id:protected] => 53 [type:protected] => category [parent:protected] => 2 [label:protected] => Concrete Polisher [alreadyInSave:protected] => [alreadyInValidation:protected] => [validationFailures:protected] => Array ( ) [_new:BaseObject:private] => [_deleted:BaseObject:private] => [modifiedColumns:protected] => Array ( ) ) [54] => Category Object ( [languages:protected] => [bok_resources:protected] => [bok_topics:protected] => [bok_keywords:protected] => [id:protected] => 54 [type:protected] => category [parent:protected] => 2 [label:protected] => Drywall Applicator Specialist [alreadyInSave:protected] => [alreadyInValidation:protected] => [validationFailures:protected] => Array ( ) [_new:BaseObject:private] => [_deleted:BaseObject:private] => [modifiedColumns:protected] => Array ( ) ) [55] => Category Object ( [languages:protected] => [bok_resources:protected] => [bok_topics:protected] => [bok_keywords:protected] => [id:protected] => 55 [type:protected] => category [parent:protected] => 2 [label:protected] => Electrical Worker [alreadyInSave:protected] => [alreadyInValidation:protected] => [validationFailures:protected] => Array ( ) [_new:BaseObject:private] => [_deleted:BaseObject:private] => [modifiedColumns:protected] => Array ( ) ) [56] => Category Object ( [languages:protected] => [bok_resources:protected] => [bok_topics:protected] => [bok_keywords:protected] => [id:protected] => 56 [type:protected] => category [parent:protected] => 2 [label:protected] => Elevator Constructor [alreadyInSave:protected] => [alreadyInValidation:protected] => [validationFailures:protected] => Array ( ) [_new:BaseObject:private] => [_deleted:BaseObject:private] => [modifiedColumns:protected] => Array ( ) ) [57] => Category Object ( [languages:protected] => [bok_resources:protected] => [bok_topics:protected] => [bok_keywords:protected] => [id:protected] => 57 [type:protected] => category [parent:protected] => 2 [label:protected] => Flagger [alreadyInSave:protected] => [alreadyInValidation:protected] => [validationFailures:protected] => Array ( ) [_new:BaseObject:private] => [_deleted:BaseObject:private] => [modifiedColumns:protected] => Array ( ) ) [58] => Category Object ( [languages:protected] => [bok_resources:protected] => [bok_topics:protected] => [bok_keywords:protected] => [id:protected] => 58 [type:protected] => category [parent:protected] => 2 [label:protected] => Glazier [alreadyInSave:protected] => [alreadyInValidation:protected] => [validationFailures:protected] => Array ( ) [_new:BaseObject:private] => [_deleted:BaseObject:private] => [modifiedColumns:protected] => Array ( ) ) [59] => Category Object ( [languages:protected] => [bok_resources:protected] => [bok_topics:protected] => [bok_keywords:protected] => [id:protected] => 59 [type:protected] => category [parent:protected] => 2 [label:protected] => Hazardous Waste Cleanup [alreadyInSave:protected] => [alreadyInValidation:protected] => [validationFailures:protected] => Array ( ) [_new:BaseObject:private] => [_deleted:BaseObject:private] => [modifiedColumns:protected] => Array ( ) ) [60] => Category Object ( [languages:protected] => [bok_resources:protected] => [bok_topics:protected] => [bok_keywords:protected] => [id:protected] => 60 [type:protected] => category [parent:protected] => 2 [label:protected] => HVAC [alreadyInSave:protected] => [alreadyInValidation:protected] => [validationFailures:protected] => Array ( ) [_new:BaseObject:private] => [_deleted:BaseObject:private] => [modifiedColumns:protected] => Array ( ) ) [61] => Category Object ( [languages:protected] => [bok_resources:protected] => [bok_topics:protected] => [bok_keywords:protected] => [id:protected] => 61 [type:protected] => category [parent:protected] => 2 [label:protected] => Interior Systems Carpenter [alreadyInSave:protected] => [alreadyInValidation:protected] => [validationFailures:protected] => Array ( ) [_new:BaseObject:private] => [_deleted:BaseObject:private] => [modifiedColumns:protected] => Array ( ) ) [64] => Category Object ( [languages:protected] => [bok_resources:protected] => [bok_topics:protected] => [bok_keywords:protected] => [id:protected] => 64 [type:protected] => category [parent:protected] => 2 [label:protected] => Laborer [alreadyInSave:protected] => [alreadyInValidation:protected] => [validationFailures:protected] => Array ( ) [_new:BaseObject:private] => [_deleted:BaseObject:private] => [modifiedColumns:protected] => Array ( ) ) [65] => Category Object ( [languages:protected] => [bok_resources:protected] => [bok_topics:protected] => [bok_keywords:protected] => [id:protected] => 65 [type:protected] => category [parent:protected] => 2 [label:protected] => Landscaper [alreadyInSave:protected] => [alreadyInValidation:protected] => [validationFailures:protected] => Array ( ) [_new:BaseObject:private] => [_deleted:BaseObject:private] => [modifiedColumns:protected] => Array ( ) ) [66] => Category Object ( [languages:protected] => [bok_resources:protected] => [bok_topics:protected] => [bok_keywords:protected] => [id:protected] => 66 [type:protected] => category [parent:protected] => 2 [label:protected] => Lather [alreadyInSave:protected] => [alreadyInValidation:protected] => [validationFailures:protected] => Array ( ) [_new:BaseObject:private] => [_deleted:BaseObject:private] => [modifiedColumns:protected] => Array ( ) ) [67] => Category Object ( [languages:protected] => [bok_resources:protected] => [bok_topics:protected] => [bok_keywords:protected] => [id:protected] => 67 [type:protected] => category [parent:protected] => 2 [label:protected] => Lead Abatement Worker [alreadyInSave:protected] => [alreadyInValidation:protected] => [validationFailures:protected] => Array ( ) [_new:BaseObject:private] => [_deleted:BaseObject:private] => [modifiedColumns:protected] => Array ( ) ) [68] => Category Object ( [languages:protected] => [bok_resources:protected] => [bok_topics:protected] => [bok_keywords:protected] => [id:protected] => 68 [type:protected] => category [parent:protected] => 2 [label:protected] => Maintenance Worker [alreadyInSave:protected] => [alreadyInValidation:protected] => [validationFailures:protected] => Array ( ) [_new:BaseObject:private] => [_deleted:BaseObject:private] => [modifiedColumns:protected] => Array ( ) ) [69] => Category Object ( [languages:protected] => [bok_resources:protected] => [bok_topics:protected] => [bok_keywords:protected] => [id:protected] => 69 [type:protected] => category [parent:protected] => 2 [label:protected] => Millwright [alreadyInSave:protected] => [alreadyInValidation:protected] => [validationFailures:protected] => Array ( ) [_new:BaseObject:private] => [_deleted:BaseObject:private] => [modifiedColumns:protected] => Array ( ) ) [70] => Category Object ( [languages:protected] => [bok_resources:protected] => [bok_topics:protected] => [bok_keywords:protected] => [id:protected] => 70 [type:protected] => category [parent:protected] => 2 [label:protected] => Operating Engineer [alreadyInSave:protected] => [alreadyInValidation:protected] => [validationFailures:protected] => Array ( ) [_new:BaseObject:private] => [_deleted:BaseObject:private] => [modifiedColumns:protected] => Array ( ) ) [71] => Category Object ( [languages:protected] => [bok_resources:protected] => [bok_topics:protected] => [bok_keywords:protected] => [id:protected] => 71 [type:protected] => category [parent:protected] => 2 [label:protected] => Painter [alreadyInSave:protected] => [alreadyInValidation:protected] => [validationFailures:protected] => Array ( ) [_new:BaseObject:private] => [_deleted:BaseObject:private] => [modifiedColumns:protected] => Array ( ) ) [72] => Category Object ( [languages:protected] => [bok_resources:protected] => [bok_topics:protected] => [bok_keywords:protected] => [id:protected] => 72 [type:protected] => category [parent:protected] => 2 [label:protected] => Paper Hanger [alreadyInSave:protected] => [alreadyInValidation:protected] => [validationFailures:protected] => Array ( ) [_new:BaseObject:private] => [_deleted:BaseObject:private] => [modifiedColumns:protected] => Array ( ) ) [73] => Category Object ( [languages:protected] => [bok_resources:protected] => [bok_topics:protected] => [bok_keywords:protected] => [id:protected] => 73 [type:protected] => category [parent:protected] => 2 [label:protected] => PCC/Restoration [alreadyInSave:protected] => [alreadyInValidation:protected] => [validationFailures:protected] => Array ( ) [_new:BaseObject:private] => [_deleted:BaseObject:private] => [modifiedColumns:protected] => Array ( ) ) [74] => Category Object ( [languages:protected] => [bok_resources:protected] => [bok_topics:protected] => [bok_keywords:protected] => [id:protected] => 74 [type:protected] => category [parent:protected] => 2 [label:protected] => Pile Driver [alreadyInSave:protected] => [alreadyInValidation:protected] => [validationFailures:protected] => Array ( ) [_new:BaseObject:private] => [_deleted:BaseObject:private] => [modifiedColumns:protected] => Array ( ) ) [75] => Category Object ( [languages:protected] => [bok_resources:protected] => [bok_topics:protected] => [bok_keywords:protected] => [id:protected] => 75 [type:protected] => category [parent:protected] => 2 [label:protected] => Plasterer [alreadyInSave:protected] => [alreadyInValidation:protected] => [validationFailures:protected] => Array ( ) [_new:BaseObject:private] => [_deleted:BaseObject:private] => [modifiedColumns:protected] => Array ( ) ) [76] => Category Object ( [languages:protected] => [bok_resources:protected] => [bok_topics:protected] => [bok_keywords:protected] => [id:protected] => 76 [type:protected] => category [parent:protected] => 2 [label:protected] => Plumber/Pipefitter [alreadyInSave:protected] => [alreadyInValidation:protected] => [validationFailures:protected] => Array ( ) [_new:BaseObject:private] => [_deleted:BaseObject:private] => [modifiedColumns:protected] => Array ( ) ) [77] => Category Object ( [languages:protected] => [bok_resources:protected] => [bok_topics:protected] => [bok_keywords:protected] => [id:protected] => 77 [type:protected] => category [parent:protected] => 2 [label:protected] => Refractory Worker [alreadyInSave:protected] => [alreadyInValidation:protected] => [validationFailures:protected] => Array ( ) [_new:BaseObject:private] => [_deleted:BaseObject:private] => [modifiedColumns:protected] => Array ( ) ) [63] => Category Object ( [languages:protected] => [bok_resources:protected] => [bok_topics:protected] => [bok_keywords:protected] => [id:protected] => 63 [type:protected] => category [parent:protected] => 2 [label:protected] => Reinforcing Ironworker [alreadyInSave:protected] => [alreadyInValidation:protected] => [validationFailures:protected] => Array ( ) [_new:BaseObject:private] => [_deleted:BaseObject:private] => [modifiedColumns:protected] => Array ( ) ) [78] => Category Object ( [languages:protected] => [bok_resources:protected] => [bok_topics:protected] => [bok_keywords:protected] => [id:protected] => 78 [type:protected] => category [parent:protected] => 2 [label:protected] => Roofer/Waterproofer [alreadyInSave:protected] => [alreadyInValidation:protected] => [validationFailures:protected] => Array ( ) [_new:BaseObject:private] => [_deleted:BaseObject:private] => [modifiedColumns:protected] => Array ( ) ) [79] => Category Object ( [languages:protected] => [bok_resources:protected] => [bok_topics:protected] => [bok_keywords:protected] => [id:protected] => 79 [type:protected] => category [parent:protected] => 2 [label:protected] => Scaffold Erector [alreadyInSave:protected] => [alreadyInValidation:protected] => [validationFailures:protected] => Array ( ) [_new:BaseObject:private] => [_deleted:BaseObject:private] => [modifiedColumns:protected] => Array ( ) ) [80] => Category Object ( [languages:protected] => [bok_resources:protected] => [bok_topics:protected] => [bok_keywords:protected] => [id:protected] => 80 [type:protected] => category [parent:protected] => 2 [label:protected] => Sheetmetal Worker [alreadyInSave:protected] => [alreadyInValidation:protected] => [validationFailures:protected] => Array ( ) [_new:BaseObject:private] => [_deleted:BaseObject:private] => [modifiedColumns:protected] => Array ( ) ) [81] => Category Object ( [languages:protected] => [bok_resources:protected] => [bok_topics:protected] => [bok_keywords:protected] => [id:protected] => 81 [type:protected] => category [parent:protected] => 2 [label:protected] => Sprinkler Fitter [alreadyInSave:protected] => [alreadyInValidation:protected] => [validationFailures:protected] => Array ( ) [_new:BaseObject:private] => [_deleted:BaseObject:private] => [modifiedColumns:protected] => Array ( ) ) [82] => Category Object ( [languages:protected] => [bok_resources:protected] => [bok_topics:protected] => [bok_keywords:protected] => [id:protected] => 82 [type:protected] => category [parent:protected] => 2 [label:protected] => Stonemason [alreadyInSave:protected] => [alreadyInValidation:protected] => [validationFailures:protected] => Array ( ) [_new:BaseObject:private] => [_deleted:BaseObject:private] => [modifiedColumns:protected] => Array ( ) ) [62] => Category Object ( [languages:protected] => [bok_resources:protected] => [bok_topics:protected] => [bok_keywords:protected] => [id:protected] => 62 [type:protected] => category [parent:protected] => 2 [label:protected] => Structural Ironworker [alreadyInSave:protected] => [alreadyInValidation:protected] => [validationFailures:protected] => Array ( ) [_new:BaseObject:private] => [_deleted:BaseObject:private] => [modifiedColumns:protected] => Array ( ) ) [83] => Category Object ( [languages:protected] => [bok_resources:protected] => [bok_topics:protected] => [bok_keywords:protected] => [id:protected] => 83 [type:protected] => category [parent:protected] => 2 [label:protected] => Terrazzo Worker [alreadyInSave:protected] => [alreadyInValidation:protected] => [validationFailures:protected] => Array ( ) [_new:BaseObject:private] => [_deleted:BaseObject:private] => [modifiedColumns:protected] => Array ( ) ) [84] => Category Object ( [languages:protected] => [bok_resources:protected] => [bok_topics:protected] => [bok_keywords:protected] => [id:protected] => 84 [type:protected] => category [parent:protected] => 2 [label:protected] => Tile Setter [alreadyInSave:protected] => [alreadyInValidation:protected] => [validationFailures:protected] => Array ( ) [_new:BaseObject:private] => [_deleted:BaseObject:private] => [modifiedColumns:protected] => Array ( ) ) [85] => Category Object ( [languages:protected] => [bok_resources:protected] => [bok_topics:protected] => [bok_keywords:protected] => [id:protected] => 85 [type:protected] => category [parent:protected] => 2 [label:protected] => Truck Driver [alreadyInSave:protected] => [alreadyInValidation:protected] => [validationFailures:protected] => Array ( ) [_new:BaseObject:private] => [_deleted:BaseObject:private] => [modifiedColumns:protected] => Array ( ) ) [86] => Category Object ( [languages:protected] => [bok_resources:protected] => [bok_topics:protected] => [bok_keywords:protected] => [id:protected] => 86 [type:protected] => category [parent:protected] => 2 [label:protected] => Welder [alreadyInSave:protected] => [alreadyInValidation:protected] => [validationFailures:protected] => Array ( ) [_new:BaseObject:private] => [_deleted:BaseObject:private] => [modifiedColumns:protected] => Array ( ) ) [87] => Category Object ( [languages:protected] => [bok_resources:protected] => [bok_topics:protected] => [bok_keywords:protected] => [id:protected] => 87 [type:protected] => category [parent:protected] => 3 [label:protected] => Commercial & Institutional [alreadyInSave:protected] => [alreadyInValidation:protected] => [validationFailures:protected] => Array ( ) [_new:BaseObject:private] => [_deleted:BaseObject:private] => [modifiedColumns:protected] => Array ( ) ) [88] => Category Object ( [languages:protected] => [bok_resources:protected] => [bok_topics:protected] => [bok_keywords:protected] => [id:protected] => 88 [type:protected] => category [parent:protected] => 3 [label:protected] => Demolition [alreadyInSave:protected] => [alreadyInValidation:protected] => [validationFailures:protected] => Array ( ) [_new:BaseObject:private] => [_deleted:BaseObject:private] => [modifiedColumns:protected] => Array ( ) ) [89] => Category Object ( [languages:protected] => [bok_resources:protected] => [bok_topics:protected] => [bok_keywords:protected] => [id:protected] => 89 [type:protected] => category [parent:protected] => 3 [label:protected] => Disasters [alreadyInSave:protected] => [alreadyInValidation:protected] => [validationFailures:protected] => Array ( ) [_new:BaseObject:private] => [_deleted:BaseObject:private] => [modifiedColumns:protected] => Array ( ) ) [91] => Category Object ( [languages:protected] => [bok_resources:protected] => [bok_topics:protected] => [bok_keywords:protected] => [id:protected] => 91 [type:protected] => category [parent:protected] => 3 [label:protected] => Heavy & Highway [alreadyInSave:protected] => [alreadyInValidation:protected] => [validationFailures:protected] => Array ( ) [_new:BaseObject:private] => [_deleted:BaseObject:private] => [modifiedColumns:protected] => Array ( ) ) [90] => Category Object ( [languages:protected] => [bok_resources:protected] => [bok_topics:protected] => [bok_keywords:protected] => [id:protected] => 90 [type:protected] => category [parent:protected] => 3 [label:protected] => Industrial [alreadyInSave:protected] => [alreadyInValidation:protected] => [validationFailures:protected] => Array ( ) [_new:BaseObject:private] => [_deleted:BaseObject:private] => [modifiedColumns:protected] => Array ( ) ) [92] => Category Object ( [languages:protected] => [bok_resources:protected] => [bok_topics:protected] => [bok_keywords:protected] => [id:protected] => 92 [type:protected] => category [parent:protected] => 3 [label:protected] => LEED/Green Construction [alreadyInSave:protected] => [alreadyInValidation:protected] => [validationFailures:protected] => Array ( ) [_new:BaseObject:private] => [_deleted:BaseObject:private] => [modifiedColumns:protected] => Array ( ) ) [93] => Category Object ( [languages:protected] => [bok_resources:protected] => [bok_topics:protected] => [bok_keywords:protected] => [id:protected] => 93 [type:protected] => category [parent:protected] => 3 [label:protected] => Renovations [alreadyInSave:protected] => [alreadyInValidation:protected] => [validationFailures:protected] => Array ( ) [_new:BaseObject:private] => [_deleted:BaseObject:private] => [modifiedColumns:protected] => Array ( ) ) [94] => Category Object ( [languages:protected] => [bok_resources:protected] => [bok_topics:protected] => [bok_keywords:protected] => [id:protected] => 94 [type:protected] => category [parent:protected] => 3 [label:protected] => Residential [alreadyInSave:protected] => [alreadyInValidation:protected] => [validationFailures:protected] => Array ( ) [_new:BaseObject:private] => [_deleted:BaseObject:private] => [modifiedColumns:protected] => Array ( ) ) [95] => Category Object ( [languages:protected] => [bok_resources:protected] => [bok_topics:protected] => [bok_keywords:protected] => [id:protected] => 95 [type:protected] => category [parent:protected] => 3 [label:protected] => Underground [alreadyInSave:protected] => [alreadyInValidation:protected] => [validationFailures:protected] => Array ( ) [_new:BaseObject:private] => [_deleted:BaseObject:private] => [modifiedColumns:protected] => Array ( ) ) [100] => Category Object ( [languages:protected] => [bok_resources:protected] => [bok_topics:protected] => [bok_keywords:protected] => [id:protected] => 100 [type:protected] => category [parent:protected] => 6 [label:protected] => Toolbox Talks [alreadyInSave:protected] => [alreadyInValidation:protected] => [validationFailures:protected] => Array ( ) [_new:BaseObject:private] => [_deleted:BaseObject:private] => [modifiedColumns:protected] => Array ( ) ) ) [categories_initialized:protected] => 1 [mapped_items:protected] => [content:protected] => [files:protected] => [language:protected] => Language Object ( [id:protected] => 1 [code:protected] => en [name:protected] => English [alreadyInSave:protected] => [alreadyInValidation:protected] => [validationFailures:protected] => Array ( ) [_new:BaseObject:private] => [_deleted:BaseObject:private] => [modifiedColumns:protected] => Array ( ) ) [old_record:protected] => [id:protected] => 4419 [old_id:protected] => [elcosh_id:protected] => d001652 [type:protected] => document [display_type:protected] => HTML only (and links) [user_id:protected] => 0 [language_id:protected] => 1 [tagging_id:protected] => Valeria Contreras [priority_id:protected] => 1 [title:protected] => Toolbox Talk: Suicide Prevention [total_pages:protected] => 1 [billed_pages:protected] => 1 [publication_number:protected] => [part_of:protected] => [keywords:protected] => suicide, suicide prevention, mental health, stress, depression, exhaustion, burnout, safety, support, emotional support, health [comments:protected] => [summary:protected] =>The CPWR Toolbox Talk on Suicide Prevention addresses the prevalence of suicide among construction workers. The resource includes a brief case example, steps to prevent a related injury or illness, and questions for discussion. It includes an image that illustrates the hazard, which can be posted in a central location as a reminder of steps to work safely.
Available in English and Spanish. [transition_comments:protected] => [external_link:protected] => [consol_link:protected] => [more_like_this:protected] => [permission_given_by:protected] => [published:protected] => T [billable:protected] => F [img_name:protected] => [img_ext:protected] => [img_width:protected] => [img_height:protected] => [img_credit:protected] => [img_practice:protected] => [vid_source_id:protected] => [vid_running_time:protected] => [vid_intended_audience:protected] => [vid_acquisition_info:protected] => [vid_cost:protected] => [vid_producer:protected] => [vid_filename:protected] => [vid_filename_downloadable:protected] => [date_summary:protected] => [date_permission_requested:protected] => [date_permission_received:protected] => [date_review_needed:protected] => [date_received:protected] => 10/08/20 [date_completed:protected] => 10/08/20 [date_billed:protected] => [date_modified:protected] => 05/19/23 [collBokExports:protected] => [lastBokExportCriteria:BaseElcoshItem:private] => [alreadyInSave:protected] => [alreadyInValidation:protected] => [validationFailures:protected] => Array ( ) [_new:BaseObject:private] => [_deleted:BaseObject:private] => [modifiedColumns:protected] => Array ( ) ) ) ) [new_images] => Array ( [0] => Search_Result Object ( [title] => Toolbox talk - crew view [image] => /record/images/4005-p.jpg [blurb] => Photo of crew listening to a toolbox safety talk before starting work.... [category] => Array ( [0] => 97 [1] => 20 [2] => 47 [3] => 49 [4] => 51 [5] => 55 [6] => 61 [7] => 64 [8] => 71 [9] => 75 [10] => 63 [11] => 79 [12] => 62 [13] => 87 [14] => 88 [15] => 91 [16] => 90 [17] => 93 [18] => 94 [19] => 95 ) [labels] => Array ( [0] => Images [1] => Media [2] => Media & Documents [3] => Safety Culture [4] => Work Environment [5] => Hazards [6] => Bricklayer [7] => Trades [8] => Carpenter [10] => Cement Mason [12] => Electrical Worker [14] => Interior Systems Carpenter [16] => Laborer [18] => Painter [20] => Plasterer [22] => Reinforcing Ironworker [24] => Scaffold Erector [26] => Structural Ironworker [28] => Commercial & Institutional [29] => Jobsites [30] => Demolition [32] => Heavy & Highway [34] => Industrial [36] => Renovations [38] => Residential [40] => Underground ) [type] => Images [sub_category] => [url] => /image/4005/i002692/Toolbox%2Btalk%2B-%2Bcrew%2Bview.html [item:protected] => ImageRecord Object ( [records:protected] => Array ( ) [recordId:protected] => [searchWordClass:protected] => [searchWordPeerClass:protected] => [bok_record:protected] => [authors:protected] => [organizations:protected] => [collections:protected] => [categories:protected] => Array ( [97] => Category Object ( [languages:protected] => [bok_resources:protected] => [bok_topics:protected] => [bok_keywords:protected] => [id:protected] => 97 [type:protected] => category [parent:protected] => 5 [label:protected] => Images [alreadyInSave:protected] => [alreadyInValidation:protected] => [validationFailures:protected] => Array ( ) [_new:BaseObject:private] => [_deleted:BaseObject:private] => [modifiedColumns:protected] => Array ( ) ) [20] => Category Object ( [languages:protected] => [bok_resources:protected] => [bok_topics:protected] => [bok_keywords:protected] => [id:protected] => 20 [type:protected] => category [parent:protected] => 7 [label:protected] => Safety Culture [alreadyInSave:protected] => [alreadyInValidation:protected] => [validationFailures:protected] => Array ( ) [_new:BaseObject:private] => [_deleted:BaseObject:private] => [modifiedColumns:protected] => Array ( ) ) [47] => Category Object ( [languages:protected] => [bok_resources:protected] => [bok_topics:protected] => [bok_keywords:protected] => [id:protected] => 47 [type:protected] => category [parent:protected] => 2 [label:protected] => Bricklayer [alreadyInSave:protected] => [alreadyInValidation:protected] => [validationFailures:protected] => Array ( ) [_new:BaseObject:private] => [_deleted:BaseObject:private] => [modifiedColumns:protected] => Array ( ) ) [49] => Category Object ( [languages:protected] => [bok_resources:protected] => [bok_topics:protected] => [bok_keywords:protected] => [id:protected] => 49 [type:protected] => category [parent:protected] => 2 [label:protected] => Carpenter [alreadyInSave:protected] => [alreadyInValidation:protected] => [validationFailures:protected] => Array ( ) [_new:BaseObject:private] => [_deleted:BaseObject:private] => [modifiedColumns:protected] => Array ( ) ) [51] => Category Object ( [languages:protected] => [bok_resources:protected] => [bok_topics:protected] => [bok_keywords:protected] => [id:protected] => 51 [type:protected] => category [parent:protected] => 2 [label:protected] => Cement Mason [alreadyInSave:protected] => [alreadyInValidation:protected] => [validationFailures:protected] => Array ( ) [_new:BaseObject:private] => [_deleted:BaseObject:private] => [modifiedColumns:protected] => Array ( ) ) [55] => Category Object ( [languages:protected] => [bok_resources:protected] => [bok_topics:protected] => [bok_keywords:protected] => [id:protected] => 55 [type:protected] => category [parent:protected] => 2 [label:protected] => Electrical Worker [alreadyInSave:protected] => [alreadyInValidation:protected] => [validationFailures:protected] => Array ( ) [_new:BaseObject:private] => [_deleted:BaseObject:private] => [modifiedColumns:protected] => Array ( ) ) [61] => Category Object ( [languages:protected] => [bok_resources:protected] => [bok_topics:protected] => [bok_keywords:protected] => [id:protected] => 61 [type:protected] => category [parent:protected] => 2 [label:protected] => Interior Systems Carpenter [alreadyInSave:protected] => [alreadyInValidation:protected] => [validationFailures:protected] => Array ( ) [_new:BaseObject:private] => [_deleted:BaseObject:private] => [modifiedColumns:protected] => Array ( ) ) [64] => Category Object ( [languages:protected] => [bok_resources:protected] => [bok_topics:protected] => [bok_keywords:protected] => [id:protected] => 64 [type:protected] => category [parent:protected] => 2 [label:protected] => Laborer [alreadyInSave:protected] => [alreadyInValidation:protected] => [validationFailures:protected] => Array ( ) [_new:BaseObject:private] => [_deleted:BaseObject:private] => [modifiedColumns:protected] => Array ( ) ) [71] => Category Object ( [languages:protected] => [bok_resources:protected] => [bok_topics:protected] => [bok_keywords:protected] => [id:protected] => 71 [type:protected] => category [parent:protected] => 2 [label:protected] => Painter [alreadyInSave:protected] => [alreadyInValidation:protected] => [validationFailures:protected] => Array ( ) [_new:BaseObject:private] => [_deleted:BaseObject:private] => [modifiedColumns:protected] => Array ( ) ) [75] => Category Object ( [languages:protected] => [bok_resources:protected] => [bok_topics:protected] => [bok_keywords:protected] => [id:protected] => 75 [type:protected] => category [parent:protected] => 2 [label:protected] => Plasterer [alreadyInSave:protected] => [alreadyInValidation:protected] => [validationFailures:protected] => Array ( ) [_new:BaseObject:private] => [_deleted:BaseObject:private] => [modifiedColumns:protected] => Array ( ) ) [63] => Category Object ( [languages:protected] => [bok_resources:protected] => [bok_topics:protected] => [bok_keywords:protected] => [id:protected] => 63 [type:protected] => category [parent:protected] => 2 [label:protected] => Reinforcing Ironworker [alreadyInSave:protected] => [alreadyInValidation:protected] => [validationFailures:protected] => Array ( ) [_new:BaseObject:private] => [_deleted:BaseObject:private] => [modifiedColumns:protected] => Array ( ) ) [79] => Category Object ( [languages:protected] => [bok_resources:protected] => [bok_topics:protected] => [bok_keywords:protected] => [id:protected] => 79 [type:protected] => category [parent:protected] => 2 [label:protected] => Scaffold Erector [alreadyInSave:protected] => [alreadyInValidation:protected] => [validationFailures:protected] => Array ( ) [_new:BaseObject:private] => [_deleted:BaseObject:private] => [modifiedColumns:protected] => Array ( ) ) [62] => Category Object ( [languages:protected] => [bok_resources:protected] => [bok_topics:protected] => [bok_keywords:protected] => [id:protected] => 62 [type:protected] => category [parent:protected] => 2 [label:protected] => Structural Ironworker [alreadyInSave:protected] => [alreadyInValidation:protected] => [validationFailures:protected] => Array ( ) [_new:BaseObject:private] => [_deleted:BaseObject:private] => [modifiedColumns:protected] => Array ( ) ) [87] => Category Object ( [languages:protected] => [bok_resources:protected] => [bok_topics:protected] => [bok_keywords:protected] => [id:protected] => 87 [type:protected] => category [parent:protected] => 3 [label:protected] => Commercial & Institutional [alreadyInSave:protected] => [alreadyInValidation:protected] => [validationFailures:protected] => Array ( ) [_new:BaseObject:private] => [_deleted:BaseObject:private] => [modifiedColumns:protected] => Array ( ) ) [88] => Category Object ( [languages:protected] => [bok_resources:protected] => [bok_topics:protected] => [bok_keywords:protected] => [id:protected] => 88 [type:protected] => category [parent:protected] => 3 [label:protected] => Demolition [alreadyInSave:protected] => [alreadyInValidation:protected] => [validationFailures:protected] => Array ( ) [_new:BaseObject:private] => [_deleted:BaseObject:private] => [modifiedColumns:protected] => Array ( ) ) [91] => Category Object ( [languages:protected] => [bok_resources:protected] => [bok_topics:protected] => [bok_keywords:protected] => [id:protected] => 91 [type:protected] => category [parent:protected] => 3 [label:protected] => Heavy & Highway [alreadyInSave:protected] => [alreadyInValidation:protected] => [validationFailures:protected] => Array ( ) [_new:BaseObject:private] => [_deleted:BaseObject:private] => [modifiedColumns:protected] => Array ( ) ) [90] => Category Object ( [languages:protected] => [bok_resources:protected] => [bok_topics:protected] => [bok_keywords:protected] => [id:protected] => 90 [type:protected] => category [parent:protected] => 3 [label:protected] => Industrial [alreadyInSave:protected] => [alreadyInValidation:protected] => [validationFailures:protected] => Array ( ) [_new:BaseObject:private] => [_deleted:BaseObject:private] => [modifiedColumns:protected] => Array ( ) ) [93] => Category Object ( [languages:protected] => [bok_resources:protected] => [bok_topics:protected] => [bok_keywords:protected] => [id:protected] => 93 [type:protected] => category [parent:protected] => 3 [label:protected] => Renovations [alreadyInSave:protected] => [alreadyInValidation:protected] => [validationFailures:protected] => Array ( ) [_new:BaseObject:private] => [_deleted:BaseObject:private] => [modifiedColumns:protected] => Array ( ) ) [94] => Category Object ( [languages:protected] => [bok_resources:protected] => [bok_topics:protected] => [bok_keywords:protected] => [id:protected] => 94 [type:protected] => category [parent:protected] => 3 [label:protected] => Residential [alreadyInSave:protected] => [alreadyInValidation:protected] => [validationFailures:protected] => Array ( ) [_new:BaseObject:private] => [_deleted:BaseObject:private] => [modifiedColumns:protected] => Array ( ) ) [95] => Category Object ( [languages:protected] => [bok_resources:protected] => [bok_topics:protected] => [bok_keywords:protected] => [id:protected] => 95 [type:protected] => category [parent:protected] => 3 [label:protected] => Underground [alreadyInSave:protected] => [alreadyInValidation:protected] => [validationFailures:protected] => Array ( ) [_new:BaseObject:private] => [_deleted:BaseObject:private] => [modifiedColumns:protected] => Array ( ) ) ) [categories_initialized:protected] => 1 [mapped_items:protected] => [content:protected] => [files:protected] => [language:protected] => Language Object ( [id:protected] => 1 [code:protected] => en [name:protected] => English [alreadyInSave:protected] => [alreadyInValidation:protected] => [validationFailures:protected] => Array ( ) [_new:BaseObject:private] => [_deleted:BaseObject:private] => [modifiedColumns:protected] => Array ( ) ) [old_record:protected] => [id:protected] => 4005 [old_id:protected] => [elcosh_id:protected] => i002692 [type:protected] => image [display_type:protected] => Image [user_id:protected] => 0 [language_id:protected] => 1 [tagging_id:protected] => Bruce Lippy [priority_id:protected] => 1 [title:protected] => Toolbox talk - crew view [total_pages:protected] => 0 [billed_pages:protected] => 0 [publication_number:protected] => [part_of:protected] => [keywords:protected] => toolbox talk, tailgate talk, safety talk, Spanish [comments:protected] => [summary:protected] => Photo of crew listening to a toolbox safety talk before starting work. [transition_comments:protected] => [external_link:protected] => [consol_link:protected] => http://www.cpwrconstructionsolutions.org/electrical/solution/662/worker-training.html [more_like_this:protected] => i002691,d001269, c000079, d001285 [permission_given_by:protected] => [published:protected] => T [billable:protected] => F [img_name:protected] => [img_ext:protected] => jpg [img_width:protected] => [img_height:protected] => [img_credit:protected] => Morgan Zavertnik and Hoar Construction [img_practice:protected] => good [vid_source_id:protected] => [vid_running_time:protected] => [vid_intended_audience:protected] => [vid_acquisition_info:protected] => [vid_cost:protected] => [vid_producer:protected] => [vid_filename:protected] => [vid_filename_downloadable:protected] => [date_summary:protected] => November 2015 [date_permission_requested:protected] => [date_permission_received:protected] => [date_review_needed:protected] => [date_received:protected] => 03/02/16 [date_completed:protected] => 03/02/16 [date_billed:protected] => [date_modified:protected] => 03/02/16 [collBokExports:protected] => [lastBokExportCriteria:BaseElcoshItem:private] => [alreadyInSave:protected] => [alreadyInValidation:protected] => [validationFailures:protected] => Array ( ) [_new:BaseObject:private] => [_deleted:BaseObject:private] => [modifiedColumns:protected] => Array ( ) ) ) [1] => Search_Result Object ( [title] => Toolbox talk - long shot [image] => /record/images/4006-p.jpg [blurb] => This crew gathered every morning before starting work to discuss a new safety topic.... [category] => Array ( [0] => 20 [1] => 47 [2] => 49 [3] => 51 [4] => 55 [5] => 64 [6] => 68 [7] => 75 [8] => 76 [9] => 63 [10] => 78 [11] => 79 [12] => 82 [13] => 62 [14] => 87 [15] => 88 [16] => 91 [17] => 90 [18] => 93 [19] => 94 [20] => 95 [21] => 97 ) [labels] => Array ( [0] => Safety Culture [1] => Work Environment [2] => Hazards [3] => Bricklayer [4] => Trades [5] => Carpenter [7] => Cement Mason [9] => Electrical Worker [11] => Laborer [13] => Maintenance Worker [15] => Plasterer [17] => Plumber/Pipefitter [19] => Reinforcing Ironworker [21] => Roofer/Waterproofer [23] => Scaffold Erector [25] => Stonemason [27] => Structural Ironworker [29] => Commercial & Institutional [30] => Jobsites [31] => Demolition [33] => Heavy & Highway [35] => Industrial [37] => Renovations [39] => Residential [41] => Underground [43] => Images [44] => Media [45] => Media & Documents ) [type] => Images [sub_category] => [url] => /image/4006/i002693/Toolbox%2Btalk%2B-%2Blong%2Bshot.html [item:protected] => ImageRecord Object ( [records:protected] => Array ( ) [recordId:protected] => [searchWordClass:protected] => [searchWordPeerClass:protected] => [bok_record:protected] => [authors:protected] => [organizations:protected] => [collections:protected] => [categories:protected] => Array ( [20] => Category Object ( [languages:protected] => [bok_resources:protected] => [bok_topics:protected] => [bok_keywords:protected] => [id:protected] => 20 [type:protected] => category [parent:protected] => 7 [label:protected] => Safety Culture [alreadyInSave:protected] => [alreadyInValidation:protected] => [validationFailures:protected] => Array ( ) [_new:BaseObject:private] => [_deleted:BaseObject:private] => [modifiedColumns:protected] => Array ( ) ) [47] => Category Object ( [languages:protected] => [bok_resources:protected] => [bok_topics:protected] => [bok_keywords:protected] => [id:protected] => 47 [type:protected] => category [parent:protected] => 2 [label:protected] => Bricklayer [alreadyInSave:protected] => [alreadyInValidation:protected] => [validationFailures:protected] => Array ( ) [_new:BaseObject:private] => [_deleted:BaseObject:private] => [modifiedColumns:protected] => Array ( ) ) [49] => Category Object ( [languages:protected] => [bok_resources:protected] => [bok_topics:protected] => [bok_keywords:protected] => [id:protected] => 49 [type:protected] => category [parent:protected] => 2 [label:protected] => Carpenter [alreadyInSave:protected] => [alreadyInValidation:protected] => [validationFailures:protected] => Array ( ) [_new:BaseObject:private] => [_deleted:BaseObject:private] => [modifiedColumns:protected] => Array ( ) ) [51] => Category Object ( [languages:protected] => [bok_resources:protected] => [bok_topics:protected] => [bok_keywords:protected] => [id:protected] => 51 [type:protected] => category [parent:protected] => 2 [label:protected] => Cement Mason [alreadyInSave:protected] => [alreadyInValidation:protected] => [validationFailures:protected] => Array ( ) [_new:BaseObject:private] => [_deleted:BaseObject:private] => [modifiedColumns:protected] => Array ( ) ) [55] => Category Object ( [languages:protected] => [bok_resources:protected] => [bok_topics:protected] => [bok_keywords:protected] => [id:protected] => 55 [type:protected] => category [parent:protected] => 2 [label:protected] => Electrical Worker [alreadyInSave:protected] => [alreadyInValidation:protected] => [validationFailures:protected] => Array ( ) [_new:BaseObject:private] => [_deleted:BaseObject:private] => [modifiedColumns:protected] => Array ( ) ) [64] => Category Object ( [languages:protected] => [bok_resources:protected] => [bok_topics:protected] => [bok_keywords:protected] => [id:protected] => 64 [type:protected] => category [parent:protected] => 2 [label:protected] => Laborer [alreadyInSave:protected] => [alreadyInValidation:protected] => [validationFailures:protected] => Array ( ) [_new:BaseObject:private] => [_deleted:BaseObject:private] => [modifiedColumns:protected] => Array ( ) ) [68] => Category Object ( [languages:protected] => [bok_resources:protected] => [bok_topics:protected] => [bok_keywords:protected] => [id:protected] => 68 [type:protected] => category [parent:protected] => 2 [label:protected] => Maintenance Worker [alreadyInSave:protected] => [alreadyInValidation:protected] => [validationFailures:protected] => Array ( ) [_new:BaseObject:private] => [_deleted:BaseObject:private] => [modifiedColumns:protected] => Array ( ) ) [75] => Category Object ( [languages:protected] => [bok_resources:protected] => [bok_topics:protected] => [bok_keywords:protected] => [id:protected] => 75 [type:protected] => category [parent:protected] => 2 [label:protected] => Plasterer [alreadyInSave:protected] => [alreadyInValidation:protected] => [validationFailures:protected] => Array ( ) [_new:BaseObject:private] => [_deleted:BaseObject:private] => [modifiedColumns:protected] => Array ( ) ) [76] => Category Object ( [languages:protected] => [bok_resources:protected] => [bok_topics:protected] => [bok_keywords:protected] => [id:protected] => 76 [type:protected] => category [parent:protected] => 2 [label:protected] => Plumber/Pipefitter [alreadyInSave:protected] => [alreadyInValidation:protected] => [validationFailures:protected] => Array ( ) [_new:BaseObject:private] => [_deleted:BaseObject:private] => [modifiedColumns:protected] => Array ( ) ) [63] => Category Object ( [languages:protected] => [bok_resources:protected] => [bok_topics:protected] => [bok_keywords:protected] => [id:protected] => 63 [type:protected] => category [parent:protected] => 2 [label:protected] => Reinforcing Ironworker [alreadyInSave:protected] => [alreadyInValidation:protected] => [validationFailures:protected] => Array ( ) [_new:BaseObject:private] => [_deleted:BaseObject:private] => [modifiedColumns:protected] => Array ( ) ) [78] => Category Object ( [languages:protected] => [bok_resources:protected] => [bok_topics:protected] => [bok_keywords:protected] => [id:protected] => 78 [type:protected] => category [parent:protected] => 2 [label:protected] => Roofer/Waterproofer [alreadyInSave:protected] => [alreadyInValidation:protected] => [validationFailures:protected] => Array ( ) [_new:BaseObject:private] => [_deleted:BaseObject:private] => [modifiedColumns:protected] => Array ( ) ) [79] => Category Object ( [languages:protected] => [bok_resources:protected] => [bok_topics:protected] => [bok_keywords:protected] => [id:protected] => 79 [type:protected] => category [parent:protected] => 2 [label:protected] => Scaffold Erector [alreadyInSave:protected] => [alreadyInValidation:protected] => [validationFailures:protected] => Array ( ) [_new:BaseObject:private] => [_deleted:BaseObject:private] => [modifiedColumns:protected] => Array ( ) ) [82] => Category Object ( [languages:protected] => [bok_resources:protected] => [bok_topics:protected] => [bok_keywords:protected] => [id:protected] => 82 [type:protected] => category [parent:protected] => 2 [label:protected] => Stonemason [alreadyInSave:protected] => [alreadyInValidation:protected] => [validationFailures:protected] => Array ( ) [_new:BaseObject:private] => [_deleted:BaseObject:private] => [modifiedColumns:protected] => Array ( ) ) [62] => Category Object ( [languages:protected] => [bok_resources:protected] => [bok_topics:protected] => [bok_keywords:protected] => [id:protected] => 62 [type:protected] => category [parent:protected] => 2 [label:protected] => Structural Ironworker [alreadyInSave:protected] => [alreadyInValidation:protected] => [validationFailures:protected] => Array ( ) [_new:BaseObject:private] => [_deleted:BaseObject:private] => [modifiedColumns:protected] => Array ( ) ) [87] => Category Object ( [languages:protected] => [bok_resources:protected] => [bok_topics:protected] => [bok_keywords:protected] => [id:protected] => 87 [type:protected] => category [parent:protected] => 3 [label:protected] => Commercial & Institutional [alreadyInSave:protected] => [alreadyInValidation:protected] => [validationFailures:protected] => Array ( ) [_new:BaseObject:private] => [_deleted:BaseObject:private] => [modifiedColumns:protected] => Array ( ) ) [88] => Category Object ( [languages:protected] => [bok_resources:protected] => [bok_topics:protected] => [bok_keywords:protected] => [id:protected] => 88 [type:protected] => category [parent:protected] => 3 [label:protected] => Demolition [alreadyInSave:protected] => [alreadyInValidation:protected] => [validationFailures:protected] => Array ( ) [_new:BaseObject:private] => [_deleted:BaseObject:private] => [modifiedColumns:protected] => Array ( ) ) [91] => Category Object ( [languages:protected] => [bok_resources:protected] => [bok_topics:protected] => [bok_keywords:protected] => [id:protected] => 91 [type:protected] => category [parent:protected] => 3 [label:protected] => Heavy & Highway [alreadyInSave:protected] => [alreadyInValidation:protected] => [validationFailures:protected] => Array ( ) [_new:BaseObject:private] => [_deleted:BaseObject:private] => [modifiedColumns:protected] => Array ( ) ) [90] => Category Object ( [languages:protected] => [bok_resources:protected] => [bok_topics:protected] => [bok_keywords:protected] => [id:protected] => 90 [type:protected] => category [parent:protected] => 3 [label:protected] => Industrial [alreadyInSave:protected] => [alreadyInValidation:protected] => [validationFailures:protected] => Array ( ) [_new:BaseObject:private] => [_deleted:BaseObject:private] => [modifiedColumns:protected] => Array ( ) ) [93] => Category Object ( [languages:protected] => [bok_resources:protected] => [bok_topics:protected] => [bok_keywords:protected] => [id:protected] => 93 [type:protected] => category [parent:protected] => 3 [label:protected] => Renovations [alreadyInSave:protected] => [alreadyInValidation:protected] => [validationFailures:protected] => Array ( ) [_new:BaseObject:private] => [_deleted:BaseObject:private] => [modifiedColumns:protected] => Array ( ) ) [94] => Category Object ( [languages:protected] => [bok_resources:protected] => [bok_topics:protected] => [bok_keywords:protected] => [id:protected] => 94 [type:protected] => category [parent:protected] => 3 [label:protected] => Residential [alreadyInSave:protected] => [alreadyInValidation:protected] => [validationFailures:protected] => Array ( ) [_new:BaseObject:private] => [_deleted:BaseObject:private] => [modifiedColumns:protected] => Array ( ) ) [95] => Category Object ( [languages:protected] => [bok_resources:protected] => [bok_topics:protected] => [bok_keywords:protected] => [id:protected] => 95 [type:protected] => category [parent:protected] => 3 [label:protected] => Underground [alreadyInSave:protected] => [alreadyInValidation:protected] => [validationFailures:protected] => Array ( ) [_new:BaseObject:private] => [_deleted:BaseObject:private] => [modifiedColumns:protected] => Array ( ) ) [97] => Category Object ( [languages:protected] => [bok_resources:protected] => [bok_topics:protected] => [bok_keywords:protected] => [id:protected] => 97 [type:protected] => category [parent:protected] => 5 [label:protected] => Images [alreadyInSave:protected] => [alreadyInValidation:protected] => [validationFailures:protected] => Array ( ) [_new:BaseObject:private] => [_deleted:BaseObject:private] => [modifiedColumns:protected] => Array ( ) ) ) [categories_initialized:protected] => 1 [mapped_items:protected] => [content:protected] => [files:protected] => [language:protected] => Language Object ( [id:protected] => 1 [code:protected] => en [name:protected] => English [alreadyInSave:protected] => [alreadyInValidation:protected] => [validationFailures:protected] => Array ( ) [_new:BaseObject:private] => [_deleted:BaseObject:private] => [modifiedColumns:protected] => Array ( ) ) [old_record:protected] => [id:protected] => 4006 [old_id:protected] => [elcosh_id:protected] => i002693 [type:protected] => image [display_type:protected] => Image [user_id:protected] => 0 [language_id:protected] => 1 [tagging_id:protected] => Bruce Lippy [priority_id:protected] => 1 [title:protected] => Toolbox talk - long shot [total_pages:protected] => 0 [billed_pages:protected] => 0 [publication_number:protected] => [part_of:protected] => [keywords:protected] => toolbox talk, tailgate talk, safety minute [comments:protected] => [summary:protected] => This crew gathered every morning before starting work to discuss a new safety topic. [transition_comments:protected] => [external_link:protected] => [consol_link:protected] => http://www.cpwrconstructionsolutions.org/electrical/solution/662/worker-training.html [more_like_this:protected] => i002691,i002692,d001269,d000527 [permission_given_by:protected] => [published:protected] => T [billable:protected] => F [img_name:protected] => [img_ext:protected] => jpg [img_width:protected] => [img_height:protected] => [img_credit:protected] => Morgan Zavertnik and Hoar Construction [img_practice:protected] => good [vid_source_id:protected] => [vid_running_time:protected] => [vid_intended_audience:protected] => [vid_acquisition_info:protected] => [vid_cost:protected] => [vid_producer:protected] => [vid_filename:protected] => [vid_filename_downloadable:protected] => [date_summary:protected] => November 2015 [date_permission_requested:protected] => [date_permission_received:protected] => [date_review_needed:protected] => [date_received:protected] => 03/02/16 [date_completed:protected] => 03/02/16 [date_billed:protected] => [date_modified:protected] => 03/02/16 [collBokExports:protected] => [lastBokExportCriteria:BaseElcoshItem:private] => [alreadyInSave:protected] => [alreadyInValidation:protected] => [validationFailures:protected] => Array ( ) [_new:BaseObject:private] => [_deleted:BaseObject:private] => [modifiedColumns:protected] => Array ( ) ) ) [2] => Search_Result Object ( [title] => Construction bracing [image] => /record/images/3995-p.jpg [blurb] => This shows structural support that prevents collapses during construction.... [category] => Array ( [0] => 12 [1] => 15 [2] => 21 [3] => 49 [4] => 51 [5] => 55 [6] => 56 [7] => 60 [8] => 64 [9] => 68 [10] => 74 [11] => 63 [12] => 78 [13] => 79 [14] => 80 [15] => 62 [16] => 87 [17] => 90 [18] => 97 ) [labels] => Array ( [0] => Crushed/Struck By [1] => Work Environment [2] => Hazards [3] => Falls [6] => Scaffolds [9] => Carpenter [10] => Trades [11] => Cement Mason [13] => Electrical Worker [15] => Elevator Constructor [17] => HVAC [19] => Laborer [21] => Maintenance Worker [23] => Pile Driver [25] => Reinforcing Ironworker [27] => Roofer/Waterproofer [29] => Scaffold Erector [31] => Sheetmetal Worker [33] => Structural Ironworker [35] => Commercial & Institutional [36] => Jobsites [37] => Industrial [39] => Images [40] => Media [41] => Media & Documents ) [type] => Images [sub_category] => [url] => /image/3995/i002690/Construction%2Bbracing.html [item:protected] => ImageRecord Object ( [records:protected] => Array ( ) [recordId:protected] => [searchWordClass:protected] => [searchWordPeerClass:protected] => [bok_record:protected] => [authors:protected] => [organizations:protected] => [collections:protected] => [categories:protected] => Array ( [12] => Category Object ( [languages:protected] => [bok_resources:protected] => [bok_topics:protected] => [bok_keywords:protected] => [id:protected] => 12 [type:protected] => category [parent:protected] => 7 [label:protected] => Crushed/Struck By [alreadyInSave:protected] => [alreadyInValidation:protected] => [validationFailures:protected] => Array ( ) [_new:BaseObject:private] => [_deleted:BaseObject:private] => [modifiedColumns:protected] => Array ( ) ) [15] => Category Object ( [languages:protected] => [bok_resources:protected] => [bok_topics:protected] => [bok_keywords:protected] => [id:protected] => 15 [type:protected] => category [parent:protected] => 7 [label:protected] => Falls [alreadyInSave:protected] => [alreadyInValidation:protected] => [validationFailures:protected] => Array ( ) [_new:BaseObject:private] => [_deleted:BaseObject:private] => [modifiedColumns:protected] => Array ( ) ) [21] => Category Object ( [languages:protected] => [bok_resources:protected] => [bok_topics:protected] => [bok_keywords:protected] => [id:protected] => 21 [type:protected] => category [parent:protected] => 7 [label:protected] => Scaffolds [alreadyInSave:protected] => [alreadyInValidation:protected] => [validationFailures:protected] => Array ( ) [_new:BaseObject:private] => [_deleted:BaseObject:private] => [modifiedColumns:protected] => Array ( ) ) [49] => Category Object ( [languages:protected] => [bok_resources:protected] => [bok_topics:protected] => [bok_keywords:protected] => [id:protected] => 49 [type:protected] => category [parent:protected] => 2 [label:protected] => Carpenter [alreadyInSave:protected] => [alreadyInValidation:protected] => [validationFailures:protected] => Array ( ) [_new:BaseObject:private] => [_deleted:BaseObject:private] => [modifiedColumns:protected] => Array ( ) ) [51] => Category Object ( [languages:protected] => [bok_resources:protected] => [bok_topics:protected] => [bok_keywords:protected] => [id:protected] => 51 [type:protected] => category [parent:protected] => 2 [label:protected] => Cement Mason [alreadyInSave:protected] => [alreadyInValidation:protected] => [validationFailures:protected] => Array ( ) [_new:BaseObject:private] => [_deleted:BaseObject:private] => [modifiedColumns:protected] => Array ( ) ) [55] => Category Object ( [languages:protected] => [bok_resources:protected] => [bok_topics:protected] => [bok_keywords:protected] => [id:protected] => 55 [type:protected] => category [parent:protected] => 2 [label:protected] => Electrical Worker [alreadyInSave:protected] => [alreadyInValidation:protected] => [validationFailures:protected] => Array ( ) [_new:BaseObject:private] => [_deleted:BaseObject:private] => [modifiedColumns:protected] => Array ( ) ) [56] => Category Object ( [languages:protected] => [bok_resources:protected] => [bok_topics:protected] => [bok_keywords:protected] => [id:protected] => 56 [type:protected] => category [parent:protected] => 2 [label:protected] => Elevator Constructor [alreadyInSave:protected] => [alreadyInValidation:protected] => [validationFailures:protected] => Array ( ) [_new:BaseObject:private] => [_deleted:BaseObject:private] => [modifiedColumns:protected] => Array ( ) ) [60] => Category Object ( [languages:protected] => [bok_resources:protected] => [bok_topics:protected] => [bok_keywords:protected] => [id:protected] => 60 [type:protected] => category [parent:protected] => 2 [label:protected] => HVAC [alreadyInSave:protected] => [alreadyInValidation:protected] => [validationFailures:protected] => Array ( ) [_new:BaseObject:private] => [_deleted:BaseObject:private] => [modifiedColumns:protected] => Array ( ) ) [64] => Category Object ( [languages:protected] => [bok_resources:protected] => [bok_topics:protected] => [bok_keywords:protected] => [id:protected] => 64 [type:protected] => category [parent:protected] => 2 [label:protected] => Laborer [alreadyInSave:protected] => [alreadyInValidation:protected] => [validationFailures:protected] => Array ( ) [_new:BaseObject:private] => [_deleted:BaseObject:private] => [modifiedColumns:protected] => Array ( ) ) [68] => Category Object ( [languages:protected] => [bok_resources:protected] => [bok_topics:protected] => [bok_keywords:protected] => [id:protected] => 68 [type:protected] => category [parent:protected] => 2 [label:protected] => Maintenance Worker [alreadyInSave:protected] => [alreadyInValidation:protected] => [validationFailures:protected] => Array ( ) [_new:BaseObject:private] => [_deleted:BaseObject:private] => [modifiedColumns:protected] => Array ( ) ) [74] => Category Object ( [languages:protected] => [bok_resources:protected] => [bok_topics:protected] => [bok_keywords:protected] => [id:protected] => 74 [type:protected] => category [parent:protected] => 2 [label:protected] => Pile Driver [alreadyInSave:protected] => [alreadyInValidation:protected] => [validationFailures:protected] => Array ( ) [_new:BaseObject:private] => [_deleted:BaseObject:private] => [modifiedColumns:protected] => Array ( ) ) [63] => Category Object ( [languages:protected] => [bok_resources:protected] => [bok_topics:protected] => [bok_keywords:protected] => [id:protected] => 63 [type:protected] => category [parent:protected] => 2 [label:protected] => Reinforcing Ironworker [alreadyInSave:protected] => [alreadyInValidation:protected] => [validationFailures:protected] => Array ( ) [_new:BaseObject:private] => [_deleted:BaseObject:private] => [modifiedColumns:protected] => Array ( ) ) [78] => Category Object ( [languages:protected] => [bok_resources:protected] => [bok_topics:protected] => [bok_keywords:protected] => [id:protected] => 78 [type:protected] => category [parent:protected] => 2 [label:protected] => Roofer/Waterproofer [alreadyInSave:protected] => [alreadyInValidation:protected] => [validationFailures:protected] => Array ( ) [_new:BaseObject:private] => [_deleted:BaseObject:private] => [modifiedColumns:protected] => Array ( ) ) [79] => Category Object ( [languages:protected] => [bok_resources:protected] => [bok_topics:protected] => [bok_keywords:protected] => [id:protected] => 79 [type:protected] => category [parent:protected] => 2 [label:protected] => Scaffold Erector [alreadyInSave:protected] => [alreadyInValidation:protected] => [validationFailures:protected] => Array ( ) [_new:BaseObject:private] => [_deleted:BaseObject:private] => [modifiedColumns:protected] => Array ( ) ) [80] => Category Object ( [languages:protected] => [bok_resources:protected] => [bok_topics:protected] => [bok_keywords:protected] => [id:protected] => 80 [type:protected] => category [parent:protected] => 2 [label:protected] => Sheetmetal Worker [alreadyInSave:protected] => [alreadyInValidation:protected] => [validationFailures:protected] => Array ( ) [_new:BaseObject:private] => [_deleted:BaseObject:private] => [modifiedColumns:protected] => Array ( ) ) [62] => Category Object ( [languages:protected] => [bok_resources:protected] => [bok_topics:protected] => [bok_keywords:protected] => [id:protected] => 62 [type:protected] => category [parent:protected] => 2 [label:protected] => Structural Ironworker [alreadyInSave:protected] => [alreadyInValidation:protected] => [validationFailures:protected] => Array ( ) [_new:BaseObject:private] => [_deleted:BaseObject:private] => [modifiedColumns:protected] => Array ( ) ) [87] => Category Object ( [languages:protected] => [bok_resources:protected] => [bok_topics:protected] => [bok_keywords:protected] => [id:protected] => 87 [type:protected] => category [parent:protected] => 3 [label:protected] => Commercial & Institutional [alreadyInSave:protected] => [alreadyInValidation:protected] => [validationFailures:protected] => Array ( ) [_new:BaseObject:private] => [_deleted:BaseObject:private] => [modifiedColumns:protected] => Array ( ) ) [90] => Category Object ( [languages:protected] => [bok_resources:protected] => [bok_topics:protected] => [bok_keywords:protected] => [id:protected] => 90 [type:protected] => category [parent:protected] => 3 [label:protected] => Industrial [alreadyInSave:protected] => [alreadyInValidation:protected] => [validationFailures:protected] => Array ( ) [_new:BaseObject:private] => [_deleted:BaseObject:private] => [modifiedColumns:protected] => Array ( ) ) [97] => Category Object ( [languages:protected] => [bok_resources:protected] => [bok_topics:protected] => [bok_keywords:protected] => [id:protected] => 97 [type:protected] => category [parent:protected] => 5 [label:protected] => Images [alreadyInSave:protected] => [alreadyInValidation:protected] => [validationFailures:protected] => Array ( ) [_new:BaseObject:private] => [_deleted:BaseObject:private] => [modifiedColumns:protected] => Array ( ) ) ) [categories_initialized:protected] => 1 [mapped_items:protected] => [content:protected] => [files:protected] => [language:protected] => Language Object ( [id:protected] => 1 [code:protected] => en [name:protected] => English [alreadyInSave:protected] => [alreadyInValidation:protected] => [validationFailures:protected] => Array ( ) [_new:BaseObject:private] => [_deleted:BaseObject:private] => [modifiedColumns:protected] => Array ( ) ) [old_record:protected] => [id:protected] => 3995 [old_id:protected] => [elcosh_id:protected] => i002690 [type:protected] => image [display_type:protected] => Image [user_id:protected] => 0 [language_id:protected] => 1 [tagging_id:protected] => Bruce Lippy [priority_id:protected] => 1 [title:protected] => Construction bracing [total_pages:protected] => 0 [billed_pages:protected] => 0 [publication_number:protected] => [part_of:protected] => [keywords:protected] => Bracing, support, scaffold [comments:protected] => [summary:protected] => This shows structural support that prevents collapses during construction. [transition_comments:protected] => [external_link:protected] => [consol_link:protected] => http://www.cpwrconstructionsolutions.org/masonry/solution/8/adjustable-tower-scaffold.html [more_like_this:protected] => i002660 [permission_given_by:protected] => [published:protected] => T [billable:protected] => F [img_name:protected] => [img_ext:protected] => jpg [img_width:protected] => [img_height:protected] => [img_credit:protected] => Photo by Pam Susi [img_practice:protected] => good [vid_source_id:protected] => [vid_running_time:protected] => [vid_intended_audience:protected] => [vid_acquisition_info:protected] => [vid_cost:protected] => [vid_producer:protected] => [vid_filename:protected] => [vid_filename_downloadable:protected] => [date_summary:protected] => January 2016 [date_permission_requested:protected] => [date_permission_received:protected] => [date_review_needed:protected] => [date_received:protected] => 02/01/16 [date_completed:protected] => 02/01/16 [date_billed:protected] => [date_modified:protected] => 02/01/16 [collBokExports:protected] => [lastBokExportCriteria:BaseElcoshItem:private] => [alreadyInSave:protected] => [alreadyInValidation:protected] => [validationFailures:protected] => Array ( ) [_new:BaseObject:private] => [_deleted:BaseObject:private] => [modifiedColumns:protected] => Array ( ) ) ) [3] => Search_Result Object ( [title] => Suspended Scaffold Outriggers [image] => /record/images/3975-p.jpg [blurb] => Suspended scaffolds systems must be designed by a qualified person and inspected daily by a competent person. The supports for the counterweight must... [category] => Array ( [0] => 97 [1] => 15 [2] => 47 [3] => 49 [4] => 79 [5] => 87 ) [labels] => Array ( [0] => Images [1] => Media [2] => Media & Documents [3] => Falls [4] => Work Environment [5] => Hazards [6] => Bricklayer [7] => Trades [8] => Carpenter [10] => Scaffold Erector [12] => Commercial & Institutional [13] => Jobsites ) [type] => Images [sub_category] => [url] => /image/3975/i002683/Suspended%2BScaffold%2BOutriggers.html [item:protected] => ImageRecord Object ( [records:protected] => Array ( ) [recordId:protected] => [searchWordClass:protected] => [searchWordPeerClass:protected] => [bok_record:protected] => [authors:protected] => [organizations:protected] => [collections:protected] => [categories:protected] => Array ( [97] => Category Object ( [languages:protected] => [bok_resources:protected] => [bok_topics:protected] => [bok_keywords:protected] => [id:protected] => 97 [type:protected] => category [parent:protected] => 5 [label:protected] => Images [alreadyInSave:protected] => [alreadyInValidation:protected] => [validationFailures:protected] => Array ( ) [_new:BaseObject:private] => [_deleted:BaseObject:private] => [modifiedColumns:protected] => Array ( ) ) [15] => Category Object ( [languages:protected] => [bok_resources:protected] => [bok_topics:protected] => [bok_keywords:protected] => [id:protected] => 15 [type:protected] => category [parent:protected] => 7 [label:protected] => Falls [alreadyInSave:protected] => [alreadyInValidation:protected] => [validationFailures:protected] => Array ( ) [_new:BaseObject:private] => [_deleted:BaseObject:private] => [modifiedColumns:protected] => Array ( ) ) [47] => Category Object ( [languages:protected] => [bok_resources:protected] => [bok_topics:protected] => [bok_keywords:protected] => [id:protected] => 47 [type:protected] => category [parent:protected] => 2 [label:protected] => Bricklayer [alreadyInSave:protected] => [alreadyInValidation:protected] => [validationFailures:protected] => Array ( ) [_new:BaseObject:private] => [_deleted:BaseObject:private] => [modifiedColumns:protected] => Array ( ) ) [49] => Category Object ( [languages:protected] => [bok_resources:protected] => [bok_topics:protected] => [bok_keywords:protected] => [id:protected] => 49 [type:protected] => category [parent:protected] => 2 [label:protected] => Carpenter [alreadyInSave:protected] => [alreadyInValidation:protected] => [validationFailures:protected] => Array ( ) [_new:BaseObject:private] => [_deleted:BaseObject:private] => [modifiedColumns:protected] => Array ( ) ) [79] => Category Object ( [languages:protected] => [bok_resources:protected] => [bok_topics:protected] => [bok_keywords:protected] => [id:protected] => 79 [type:protected] => category [parent:protected] => 2 [label:protected] => Scaffold Erector [alreadyInSave:protected] => [alreadyInValidation:protected] => [validationFailures:protected] => Array ( ) [_new:BaseObject:private] => [_deleted:BaseObject:private] => [modifiedColumns:protected] => Array ( ) ) [87] => Category Object ( [languages:protected] => [bok_resources:protected] => [bok_topics:protected] => [bok_keywords:protected] => [id:protected] => 87 [type:protected] => category [parent:protected] => 3 [label:protected] => Commercial & Institutional [alreadyInSave:protected] => [alreadyInValidation:protected] => [validationFailures:protected] => Array ( ) [_new:BaseObject:private] => [_deleted:BaseObject:private] => [modifiedColumns:protected] => Array ( ) ) ) [categories_initialized:protected] => 1 [mapped_items:protected] => [content:protected] => [files:protected] => [language:protected] => Language Object ( [id:protected] => 1 [code:protected] => en [name:protected] => English [alreadyInSave:protected] => [alreadyInValidation:protected] => [validationFailures:protected] => Array ( ) [_new:BaseObject:private] => [_deleted:BaseObject:private] => [modifiedColumns:protected] => Array ( ) ) [old_record:protected] => [id:protected] => 3975 [old_id:protected] => [elcosh_id:protected] => i002683 [type:protected] => image [display_type:protected] => Image [user_id:protected] => 0 [language_id:protected] => 1 [tagging_id:protected] => John Newquist [priority_id:protected] => 1 [title:protected] => Suspended Scaffold Outriggers [total_pages:protected] => 0 [billed_pages:protected] => 0 [publication_number:protected] => [part_of:protected] => [keywords:protected] => suspended, scaffold, swing, stage, fall, protection, counterweight, qualified, person [comments:protected] => [summary:protected] => Suspended scaffolds systems must be designed by a qualified person and inspected daily by a competent person. The supports for the counterweight must be designed with a safety factor of four. [transition_comments:protected] => [external_link:protected] => [consol_link:protected] => http://www.cpwrconstructionsolutions.org/task/Erect%2Band%2Bdismantle%2Bscaffolds/ [more_like_this:protected] => d000244,d000359,i000253,i000407 [permission_given_by:protected] => [published:protected] => T [billable:protected] => F [img_name:protected] => [img_ext:protected] => jpg [img_width:protected] => [img_height:protected] => [img_credit:protected] => MetroPark, Miller and Long [img_practice:protected] => not_applicable [vid_source_id:protected] => [vid_running_time:protected] => [vid_intended_audience:protected] => [vid_acquisition_info:protected] => [vid_cost:protected] => [vid_producer:protected] => [vid_filename:protected] => [vid_filename_downloadable:protected] => [date_summary:protected] => August 28 2015 [date_permission_requested:protected] => [date_permission_received:protected] => [date_review_needed:protected] => [date_received:protected] => 08/28/15 [date_completed:protected] => 08/28/15 [date_billed:protected] => [date_modified:protected] => 08/28/15 [collBokExports:protected] => [lastBokExportCriteria:BaseElcoshItem:private] => [alreadyInSave:protected] => [alreadyInValidation:protected] => [validationFailures:protected] => Array ( ) [_new:BaseObject:private] => [_deleted:BaseObject:private] => [modifiedColumns:protected] => Array ( ) ) ) [4] => Search_Result Object ( [title] => Suspended scaffold [image] => /record/images/3976-p.jpg [blurb] => Suspended scaffold outrigger beams must have stops to prevent the hangers from sliding of the end of the outriggers. Wire rope supported must be desig... [category] => Array ( [0] => 97 [1] => 15 [2] => 47 [3] => 50 [4] => 79 [5] => 87 ) [labels] => Array ( [0] => Images [1] => Media [2] => Media & Documents [3] => Falls [4] => Work Environment [5] => Hazards [6] => Bricklayer [7] => Trades [8] => Carpet Layer [10] => Scaffold Erector [12] => Commercial & Institutional [13] => Jobsites ) [type] => Images [sub_category] => [url] => /image/3976/i002684/Suspended%2Bscaffold.html [item:protected] => ImageRecord Object ( [records:protected] => Array ( ) [recordId:protected] => [searchWordClass:protected] => [searchWordPeerClass:protected] => [bok_record:protected] => [authors:protected] => [organizations:protected] => [collections:protected] => [categories:protected] => Array ( [97] => Category Object ( [languages:protected] => [bok_resources:protected] => [bok_topics:protected] => [bok_keywords:protected] => [id:protected] => 97 [type:protected] => category [parent:protected] => 5 [label:protected] => Images [alreadyInSave:protected] => [alreadyInValidation:protected] => [validationFailures:protected] => Array ( ) [_new:BaseObject:private] => [_deleted:BaseObject:private] => [modifiedColumns:protected] => Array ( ) ) [15] => Category Object ( [languages:protected] => [bok_resources:protected] => [bok_topics:protected] => [bok_keywords:protected] => [id:protected] => 15 [type:protected] => category [parent:protected] => 7 [label:protected] => Falls [alreadyInSave:protected] => [alreadyInValidation:protected] => [validationFailures:protected] => Array ( ) [_new:BaseObject:private] => [_deleted:BaseObject:private] => [modifiedColumns:protected] => Array ( ) ) [47] => Category Object ( [languages:protected] => [bok_resources:protected] => [bok_topics:protected] => [bok_keywords:protected] => [id:protected] => 47 [type:protected] => category [parent:protected] => 2 [label:protected] => Bricklayer [alreadyInSave:protected] => [alreadyInValidation:protected] => [validationFailures:protected] => Array ( ) [_new:BaseObject:private] => [_deleted:BaseObject:private] => [modifiedColumns:protected] => Array ( ) ) [50] => Category Object ( [languages:protected] => [bok_resources:protected] => [bok_topics:protected] => [bok_keywords:protected] => [id:protected] => 50 [type:protected] => category [parent:protected] => 2 [label:protected] => Carpet Layer [alreadyInSave:protected] => [alreadyInValidation:protected] => [validationFailures:protected] => Array ( ) [_new:BaseObject:private] => [_deleted:BaseObject:private] => [modifiedColumns:protected] => Array ( ) ) [79] => Category Object ( [languages:protected] => [bok_resources:protected] => [bok_topics:protected] => [bok_keywords:protected] => [id:protected] => 79 [type:protected] => category [parent:protected] => 2 [label:protected] => Scaffold Erector [alreadyInSave:protected] => [alreadyInValidation:protected] => [validationFailures:protected] => Array ( ) [_new:BaseObject:private] => [_deleted:BaseObject:private] => [modifiedColumns:protected] => Array ( ) ) [87] => Category Object ( [languages:protected] => [bok_resources:protected] => [bok_topics:protected] => [bok_keywords:protected] => [id:protected] => 87 [type:protected] => category [parent:protected] => 3 [label:protected] => Commercial & Institutional [alreadyInSave:protected] => [alreadyInValidation:protected] => [validationFailures:protected] => Array ( ) [_new:BaseObject:private] => [_deleted:BaseObject:private] => [modifiedColumns:protected] => Array ( ) ) ) [categories_initialized:protected] => 1 [mapped_items:protected] => [content:protected] => [files:protected] => [language:protected] => Language Object ( [id:protected] => 1 [code:protected] => en [name:protected] => English [alreadyInSave:protected] => [alreadyInValidation:protected] => [validationFailures:protected] => Array ( ) [_new:BaseObject:private] => [_deleted:BaseObject:private] => [modifiedColumns:protected] => Array ( ) ) [old_record:protected] => [id:protected] => 3976 [old_id:protected] => [elcosh_id:protected] => i002684 [type:protected] => image [display_type:protected] => Image [user_id:protected] => 0 [language_id:protected] => 1 [tagging_id:protected] => John Newquist [priority_id:protected] => 1 [title:protected] => Suspended scaffold [total_pages:protected] => 0 [billed_pages:protected] => 0 [publication_number:protected] => [part_of:protected] => [keywords:protected] => Suspended, scaffold, outrigger, beams, erection, wire, rope, inspection, swing, stage, [comments:protected] => [summary:protected] => Suspended scaffold outrigger beams must have stops to prevent the hangers from sliding of the end of the outriggers. Wire rope supported must be designed with a safety factor of 6. The scaffold must be inspected by a competent person daily. [transition_comments:protected] => [external_link:protected] => [consol_link:protected] => http://www.cpwrconstructionsolutions.org/task/Erect%2Band%2Bdismantle%2Bscaffolds/ [more_like_this:protected] => i002683, d000244, i000407, d000606 [permission_given_by:protected] => [published:protected] => T [billable:protected] => F [img_name:protected] => [img_ext:protected] => jpg [img_width:protected] => [img_height:protected] => [img_credit:protected] => Metropark, Miller and Long [img_practice:protected] => not_applicable [vid_source_id:protected] => [vid_running_time:protected] => [vid_intended_audience:protected] => [vid_acquisition_info:protected] => [vid_cost:protected] => [vid_producer:protected] => [vid_filename:protected] => [vid_filename_downloadable:protected] => [date_summary:protected] => [date_permission_requested:protected] => [date_permission_received:protected] => [date_review_needed:protected] => [date_received:protected] => 08/28/15 [date_completed:protected] => 08/28/15 [date_billed:protected] => [date_modified:protected] => 08/28/15 [collBokExports:protected] => [lastBokExportCriteria:BaseElcoshItem:private] => [alreadyInSave:protected] => [alreadyInValidation:protected] => [validationFailures:protected] => Array ( ) [_new:BaseObject:private] => [_deleted:BaseObject:private] => [modifiedColumns:protected] => Array ( ) ) ) [5] => Search_Result Object ( [title] => Three Tower Cranes [image] => /record/images/3979-p.jpg [blurb] => Whenever multiple tower cranes are used, there needs to be preplanning to ensure that the tower cranes cannot hit each other loads. This is accomplish... [category] => Array ( [0] => 97 [1] => 11 [2] => 64 [3] => 70 [4] => 62 [5] => 87 ) [labels] => Array ( [0] => Images [1] => Media [2] => Media & Documents [3] => Cranes & Hoists [4] => Work Environment [5] => Hazards [6] => Laborer [7] => Trades [8] => Operating Engineer [10] => Structural Ironworker [12] => Commercial & Institutional [13] => Jobsites ) [type] => Images [sub_category] => [url] => /image/3979/i002687/Three%2BTower%2BCranes.html [item:protected] => ImageRecord Object ( [records:protected] => Array ( ) [recordId:protected] => [searchWordClass:protected] => [searchWordPeerClass:protected] => [bok_record:protected] => [authors:protected] => [organizations:protected] => [collections:protected] => [categories:protected] => Array ( [97] => Category Object ( [languages:protected] => [bok_resources:protected] => [bok_topics:protected] => [bok_keywords:protected] => [id:protected] => 97 [type:protected] => category [parent:protected] => 5 [label:protected] => Images [alreadyInSave:protected] => [alreadyInValidation:protected] => [validationFailures:protected] => Array ( ) [_new:BaseObject:private] => [_deleted:BaseObject:private] => [modifiedColumns:protected] => Array ( ) ) [11] => Category Object ( [languages:protected] => [bok_resources:protected] => [bok_topics:protected] => [bok_keywords:protected] => [id:protected] => 11 [type:protected] => category [parent:protected] => 7 [label:protected] => Cranes & Hoists [alreadyInSave:protected] => [alreadyInValidation:protected] => [validationFailures:protected] => Array ( ) [_new:BaseObject:private] => [_deleted:BaseObject:private] => [modifiedColumns:protected] => Array ( ) ) [64] => Category Object ( [languages:protected] => [bok_resources:protected] => [bok_topics:protected] => [bok_keywords:protected] => [id:protected] => 64 [type:protected] => category [parent:protected] => 2 [label:protected] => Laborer [alreadyInSave:protected] => [alreadyInValidation:protected] => [validationFailures:protected] => Array ( ) [_new:BaseObject:private] => [_deleted:BaseObject:private] => [modifiedColumns:protected] => Array ( ) ) [70] => Category Object ( [languages:protected] => [bok_resources:protected] => [bok_topics:protected] => [bok_keywords:protected] => [id:protected] => 70 [type:protected] => category [parent:protected] => 2 [label:protected] => Operating Engineer [alreadyInSave:protected] => [alreadyInValidation:protected] => [validationFailures:protected] => Array ( ) [_new:BaseObject:private] => [_deleted:BaseObject:private] => [modifiedColumns:protected] => Array ( ) ) [62] => Category Object ( [languages:protected] => [bok_resources:protected] => [bok_topics:protected] => [bok_keywords:protected] => [id:protected] => 62 [type:protected] => category [parent:protected] => 2 [label:protected] => Structural Ironworker [alreadyInSave:protected] => [alreadyInValidation:protected] => [validationFailures:protected] => Array ( ) [_new:BaseObject:private] => [_deleted:BaseObject:private] => [modifiedColumns:protected] => Array ( ) ) [87] => Category Object ( [languages:protected] => [bok_resources:protected] => [bok_topics:protected] => [bok_keywords:protected] => [id:protected] => 87 [type:protected] => category [parent:protected] => 3 [label:protected] => Commercial & Institutional [alreadyInSave:protected] => [alreadyInValidation:protected] => [validationFailures:protected] => Array ( ) [_new:BaseObject:private] => [_deleted:BaseObject:private] => [modifiedColumns:protected] => Array ( ) ) ) [categories_initialized:protected] => 1 [mapped_items:protected] => [content:protected] => [files:protected] => [language:protected] => Language Object ( [id:protected] => 1 [code:protected] => en [name:protected] => English [alreadyInSave:protected] => [alreadyInValidation:protected] => [validationFailures:protected] => Array ( ) [_new:BaseObject:private] => [_deleted:BaseObject:private] => [modifiedColumns:protected] => Array ( ) ) [old_record:protected] => [id:protected] => 3979 [old_id:protected] => [elcosh_id:protected] => i002687 [type:protected] => image [display_type:protected] => Image [user_id:protected] => 0 [language_id:protected] => 1 [tagging_id:protected] => John Newquist [priority_id:protected] => 1 [title:protected] => Three Tower Cranes [total_pages:protected] => 0 [billed_pages:protected] => 0 [publication_number:protected] => [part_of:protected] => [keywords:protected] => [comments:protected] => [summary:protected] => Whenever multiple tower cranes are used, there needs to be preplanning to ensure that the tower cranes cannot hit each other loads. This is accomplished by setting swing restrictions, marking the ground for allowable crane travel and training of the crane signal persons. [transition_comments:protected] => [external_link:protected] => [consol_link:protected] => http://www.cpwrconstructionsolutions.org/work/6/184/ [more_like_this:protected] => d001029, d000010, i001280, i001221 [permission_given_by:protected] => [published:protected] => T [billable:protected] => F [img_name:protected] => [img_ext:protected] => jpg [img_width:protected] => [img_height:protected] => [img_credit:protected] => Metropark [img_practice:protected] => not_applicable [vid_source_id:protected] => [vid_running_time:protected] => [vid_intended_audience:protected] => [vid_acquisition_info:protected] => [vid_cost:protected] => [vid_producer:protected] => [vid_filename:protected] => [vid_filename_downloadable:protected] => [date_summary:protected] => August 28 2015 [date_permission_requested:protected] => [date_permission_received:protected] => [date_review_needed:protected] => [date_received:protected] => 08/28/15 [date_completed:protected] => 08/28/15 [date_billed:protected] => [date_modified:protected] => 08/28/15 [collBokExports:protected] => [lastBokExportCriteria:BaseElcoshItem:private] => [alreadyInSave:protected] => [alreadyInValidation:protected] => [validationFailures:protected] => Array ( ) [_new:BaseObject:private] => [_deleted:BaseObject:private] => [modifiedColumns:protected] => Array ( ) ) ) ) [preview_mode] => [description] => This third in a series of 6 Tool Box Talks on construction ergonomics focuses on proper positioning to avoid injuries. The TBT recommends: 1)prop up a task off of the floor by using a raised surface, cart, baker scaffold, saw horses to prep materials near waist height, 2)move the lift or ladder in the best position for the work, 3)position the lift in front of the area you plan to work without trying to reach too far on either side of the lift. [keywords] => position, positioning, ergonomics, ergo, carpal tunnel, MSD, musculoskeletal disorder [related_items] => Array ( [Handouts] => Array ( [0] => DocumentRecord Object ( [records:protected] => Array ( ) [recordId:protected] => [searchWordClass:protected] => [searchWordPeerClass:protected] => [bok_record:protected] => [authors:protected] => [organizations:protected] => [collections:protected] => [categories:protected] => [categories_initialized:protected] => [mapped_items:protected] => [content:protected] => [files:protected] => [language:protected] => Language Object ( [id:protected] => 1 [code:protected] => en [name:protected] => English [alreadyInSave:protected] => [alreadyInValidation:protected] => [validationFailures:protected] => Array ( ) [_new:BaseObject:private] => [_deleted:BaseObject:private] => [modifiedColumns:protected] => Array ( ) ) [old_record:protected] => [id:protected] => 3833 [old_id:protected] => [elcosh_id:protected] => d001303 [type:protected] => document [display_type:protected] => HTML w/ PDF [user_id:protected] => 25 [language_id:protected] => 1 [tagging_id:protected] => Bruce Lippy [priority_id:protected] => 1 [title:protected] => Overview of Toolbox Talks on Ergonomics Developed by Washington University in St. Louis [total_pages:protected] => 3 [billed_pages:protected] => 3 [publication_number:protected] => [part_of:protected] => [keywords:protected] => ergonomics, musculoskeletal disorders, MSDs [comments:protected] => 7-28-2014 - Originally submitted as "HTML w/ doc and PDF", Jeff Nelson asked Bruce Lippy for permission to switch it to "HTML w/ PDF" -- permission was given [summary:protected] => This overviews provides a background on how Washington University in St. Louis developed this series of six toolbox talks on ergonomics. It also describes how they tested the effectiveness of these communication tools, concluding that the guide was valuable for improving the delivery of ergonomics training and interaction between the safety representative and workers. The researchers recommend preparing site-specific information prior to the talk and interacting with workers to discuss problems and ergonomic solutions during the safety meetings. [transition_comments:protected] => [external_link:protected] => [consol_link:protected] => [more_like_this:protected] => [permission_given_by:protected] => Lisa Jaegers, Washington U. in St. Louis [published:protected] => T [billable:protected] => F [img_name:protected] => [img_ext:protected] => png [img_width:protected] => [img_height:protected] => [img_credit:protected] => [img_practice:protected] => [vid_source_id:protected] => [vid_running_time:protected] => [vid_intended_audience:protected] => [vid_acquisition_info:protected] => [vid_cost:protected] => [vid_producer:protected] => [vid_filename:protected] => [vid_filename_downloadable:protected] => [date_summary:protected] => 2014 [date_permission_requested:protected] => [date_permission_received:protected] => [date_review_needed:protected] => [date_received:protected] => 06/11/14 [date_completed:protected] => 07/29/14 [date_billed:protected] => [date_modified:protected] => 07/29/14 [collBokExports:protected] => [lastBokExportCriteria:BaseElcoshItem:private] => [alreadyInSave:protected] => [alreadyInValidation:protected] => [validationFailures:protected] => Array ( ) [_new:BaseObject:private] => [_deleted:BaseObject:private] => [modifiedColumns:protected] => Array ( ) ) ) [Toolbox Talks] => Array ( [0] => DocumentRecord Object ( [records:protected] => Array ( ) [recordId:protected] => [searchWordClass:protected] => [searchWordPeerClass:protected] => [bok_record:protected] => [authors:protected] => [organizations:protected] => [collections:protected] => [categories:protected] => [categories_initialized:protected] => [mapped_items:protected] => [content:protected] => [files:protected] => [language:protected] => Language Object ( [id:protected] => 1 [code:protected] => en [name:protected] => English [alreadyInSave:protected] => [alreadyInValidation:protected] => [validationFailures:protected] => Array ( ) [_new:BaseObject:private] => [_deleted:BaseObject:private] => [modifiedColumns:protected] => Array ( ) ) [old_record:protected] => [id:protected] => 3835 [old_id:protected] => [elcosh_id:protected] => d001304 [type:protected] => document [display_type:protected] => HTML w/ PDF [user_id:protected] => 25 [language_id:protected] => 1 [tagging_id:protected] => Bruce Lippy [priority_id:protected] => 1 [title:protected] => Ergonomics Tool Box Talks (TBT) Training Guide [total_pages:protected] => 2 [billed_pages:protected] => 2 [publication_number:protected] => [part_of:protected] => [keywords:protected] => Ergonomics, carpal tunnel, muscular skeletal disorders, msd [comments:protected] => [summary:protected] => CPWR-funded ergonomics research by Washington University at St. Louis led to the development of 6 tool box talks. This guide is an explanation of how to deliver the talks for maximum effectiveness. This guide should be reviewed before delivering any of the talks because it makes important recommendations like: • If possible, give the TBTs as a part of the crew’s regular safety meetings so that ergonomics is included in the safety discussion. • Try to locate an area with few distractions for gathering the crew. • For a team approach, invite the work crew, site superintendent, project manager and other general contractor and/or subcontractor reps who you feel may be helpful in supporting the training and ergonomics solutions. [transition_comments:protected] => [external_link:protected] => [consol_link:protected] => [more_like_this:protected] => d001303,d001305,d001306,d001307,d001308,d001309,d001310 [permission_given_by:protected] => [published:protected] => T [billable:protected] => F [img_name:protected] => [img_ext:protected] => png [img_width:protected] => [img_height:protected] => [img_credit:protected] => [img_practice:protected] => [vid_source_id:protected] => [vid_running_time:protected] => [vid_intended_audience:protected] => [vid_acquisition_info:protected] => [vid_cost:protected] => [vid_producer:protected] => [vid_filename:protected] => [vid_filename_downloadable:protected] => [date_summary:protected] => 2014 [date_permission_requested:protected] => [date_permission_received:protected] => [date_review_needed:protected] => [date_received:protected] => 06/12/14 [date_completed:protected] => 07/29/14 [date_billed:protected] => [date_modified:protected] => 07/29/14 [collBokExports:protected] => [lastBokExportCriteria:BaseElcoshItem:private] => [alreadyInSave:protected] => [alreadyInValidation:protected] => [validationFailures:protected] => Array ( ) [_new:BaseObject:private] => [_deleted:BaseObject:private] => [modifiedColumns:protected] => Array ( ) ) [1] => DocumentRecord Object ( [records:protected] => Array ( ) [recordId:protected] => [searchWordClass:protected] => [searchWordPeerClass:protected] => [bok_record:protected] => [authors:protected] => [organizations:protected] => [collections:protected] => [categories:protected] => [categories_initialized:protected] => [mapped_items:protected] => [content:protected] => [files:protected] => [language:protected] => Language Object ( [id:protected] => 1 [code:protected] => en [name:protected] => English [alreadyInSave:protected] => [alreadyInValidation:protected] => [validationFailures:protected] => Array ( ) [_new:BaseObject:private] => [_deleted:BaseObject:private] => [modifiedColumns:protected] => Array ( ) ) [old_record:protected] => [id:protected] => 3836 [old_id:protected] => [elcosh_id:protected] => d001305 [type:protected] => document [display_type:protected] => HTML w/ PDF [user_id:protected] => 25 [language_id:protected] => 1 [tagging_id:protected] => Bruce Lippy [priority_id:protected] => 1 [title:protected] => TBT1 Ergonomics in Construction [total_pages:protected] => 5 [billed_pages:protected] => 5 [publication_number:protected] => [part_of:protected] => [keywords:protected] => ergonomics, ergo, msd, musculoskeletal disorders, risk factors, lifting, carpal tunnel, repetition, awkward postures [comments:protected] => 7-28-2014 Jeff Nelson asked Bruce Lippy about what to do with a sentence included toward the top of the doc, "Fill them in on page 2 'Other Questions.'" -- Bruce said this sentence could be deleted from the HTML. [summary:protected] => This is the first in a series of 6 Tool Box Talks produced by Washington University in St. Louis on ergonomics in construction work. This one should be delivered first because it covers what ergonomics is, why construction workers need to talk about it, what the risk factors are for developing a health problem and how to prevent these problems. [transition_comments:protected] => [external_link:protected] => [consol_link:protected] => http://www.cpwrconstructionsolutions.org/pipes_vessels/solution/50/participatory-ergonomics-program.html [more_like_this:protected] => d001303,d001304,d001306,d001307,d001308,d001309 [permission_given_by:protected] => Lisa Jaegers, Washington U. in St. Louis [published:protected] => T [billable:protected] => F [img_name:protected] => [img_ext:protected] => png [img_width:protected] => [img_height:protected] => [img_credit:protected] => [img_practice:protected] => [vid_source_id:protected] => [vid_running_time:protected] => [vid_intended_audience:protected] => [vid_acquisition_info:protected] => [vid_cost:protected] => [vid_producer:protected] => [vid_filename:protected] => [vid_filename_downloadable:protected] => [date_summary:protected] => 2014 [date_permission_requested:protected] => [date_permission_received:protected] => [date_review_needed:protected] => [date_received:protected] => 06/12/14 [date_completed:protected] => 07/28/14 [date_billed:protected] => [date_modified:protected] => 10/09/15 [collBokExports:protected] => [lastBokExportCriteria:BaseElcoshItem:private] => [alreadyInSave:protected] => [alreadyInValidation:protected] => [validationFailures:protected] => Array ( ) [_new:BaseObject:private] => [_deleted:BaseObject:private] => [modifiedColumns:protected] => Array ( ) ) [2] => DocumentRecord Object ( [records:protected] => Array ( ) [recordId:protected] => [searchWordClass:protected] => [searchWordPeerClass:protected] => [bok_record:protected] => [authors:protected] => [organizations:protected] => [collections:protected] => [categories:protected] => [categories_initialized:protected] => [mapped_items:protected] => [content:protected] => [files:protected] => [language:protected] => Language Object ( [id:protected] => 1 [code:protected] => en [name:protected] => English [alreadyInSave:protected] => [alreadyInValidation:protected] => [validationFailures:protected] => Array ( ) [_new:BaseObject:private] => [_deleted:BaseObject:private] => [modifiedColumns:protected] => Array ( ) ) [old_record:protected] => [id:protected] => 3837 [old_id:protected] => [elcosh_id:protected] => d001306 [type:protected] => document [display_type:protected] => HTML w/ PDF [user_id:protected] => 25 [language_id:protected] => 1 [tagging_id:protected] => Bruce Lippy [priority_id:protected] => 1 [title:protected] => TBT2 Keep Reach Close [total_pages:protected] => 4 [billed_pages:protected] => 4 [publication_number:protected] => [part_of:protected] => [keywords:protected] => reach, ergonomic, ergo, MSD, carpal tunnel, repetition, awkward positions [comments:protected] => 7-28-2014 Jeff Nelson asked Bruce Lippy about what to do with a sentence included toward the top of the doc, "Fill them in on page 2 'Other Questions.'" -- Bruce said this sentence could be deleted from the HTML. [summary:protected] => This is the second of six Tool Box Talks created by Washington University in St. Louis on ergonomics in construction. There is a guide with the series that describes how to deliver these talks. This one deals with how to avoid awkward reaching during tasks to prevent injuries. try to work with your hands below your head and close to our body to reduce your risk of shoulder strains and back discomfort. This TBT recommends considering ways to move close to the task, keeping the work area free of obstacles, and talking with each other to provide constructive feedback about your working position. [transition_comments:protected] => [external_link:protected] => [consol_link:protected] => http://www.cpwrconstructionsolutions.org/hazard/959/lifting-and-carrying-manual-materials-handling.html [more_like_this:protected] => d001303,d001304,d001305,d001307,d001308,e001309 [permission_given_by:protected] => [published:protected] => T [billable:protected] => F [img_name:protected] => [img_ext:protected] => png [img_width:protected] => [img_height:protected] => [img_credit:protected] => [img_practice:protected] => [vid_source_id:protected] => [vid_running_time:protected] => [vid_intended_audience:protected] => [vid_acquisition_info:protected] => [vid_cost:protected] => [vid_producer:protected] => [vid_filename:protected] => [vid_filename_downloadable:protected] => [date_summary:protected] => 2014 [date_permission_requested:protected] => [date_permission_received:protected] => [date_review_needed:protected] => [date_received:protected] => 06/12/14 [date_completed:protected] => 07/28/14 [date_billed:protected] => [date_modified:protected] => 11/02/16 [collBokExports:protected] => [lastBokExportCriteria:BaseElcoshItem:private] => [alreadyInSave:protected] => [alreadyInValidation:protected] => [validationFailures:protected] => Array ( ) [_new:BaseObject:private] => [_deleted:BaseObject:private] => [modifiedColumns:protected] => Array ( ) ) [3] => DocumentRecord Object ( [records:protected] => Array ( ) [recordId:protected] => [searchWordClass:protected] => [searchWordPeerClass:protected] => [bok_record:protected] => [authors:protected] => [organizations:protected] => [collections:protected] => [categories:protected] => [categories_initialized:protected] => [mapped_items:protected] => [content:protected] => [files:protected] => [language:protected] => Language Object ( [id:protected] => 1 [code:protected] => en [name:protected] => English [alreadyInSave:protected] => [alreadyInValidation:protected] => [validationFailures:protected] => Array ( ) [_new:BaseObject:private] => [_deleted:BaseObject:private] => [modifiedColumns:protected] => Array ( ) ) [old_record:protected] => [id:protected] => 3839 [old_id:protected] => [elcosh_id:protected] => d001308 [type:protected] => document [display_type:protected] => HTML w/ PDF [user_id:protected] => 23 [language_id:protected] => 1 [tagging_id:protected] => Bruce Lippy [priority_id:protected] => 1 [title:protected] => TBT4 Move Materials With Assist [total_pages:protected] => 4 [billed_pages:protected] => 4 [publication_number:protected] => [part_of:protected] => [keywords:protected] => lifting, back injury, ergonomics, ergo, MSD, buddy system [comments:protected] => 7-28-2014 Jeff Nelson asked Bruce Lippy about what to do with a sentence included toward the top of the doc, "Fill them in on page 2 'Other Questions.'" -- Bruce said this sentence could be deleted from the HTML. [summary:protected] => This tool box talk is fourth in a series of 6 developed by Washington University in St. Louis on construction ergonomics. This one focuses on preventing back injuries by getting an assist when manually lifting. It recommends using a cart for transporting loads, taking less trips, avoiding carrying materials on the shoulder and helping each other to lift large or heavy materials when a cart or hoist is not available. [transition_comments:protected] => [external_link:protected] => [consol_link:protected] => http://www.cpwrconstructionsolutions.org/hazard/959/lifting-and-carrying-manual-materials-handling.html [more_like_this:protected] => d001303,d001304,d001305,d001306,d001307,d001309 [permission_given_by:protected] => Lisa Jaegers, Washington U. in St. Louis [published:protected] => T [billable:protected] => F [img_name:protected] => [img_ext:protected] => png [img_width:protected] => [img_height:protected] => [img_credit:protected] => [img_practice:protected] => [vid_source_id:protected] => [vid_running_time:protected] => [vid_intended_audience:protected] => [vid_acquisition_info:protected] => [vid_cost:protected] => [vid_producer:protected] => [vid_filename:protected] => [vid_filename_downloadable:protected] => [date_summary:protected] => 2014 [date_permission_requested:protected] => [date_permission_received:protected] => [date_review_needed:protected] => [date_received:protected] => 06/12/14 [date_completed:protected] => 07/29/14 [date_billed:protected] => [date_modified:protected] => 10/09/15 [collBokExports:protected] => [lastBokExportCriteria:BaseElcoshItem:private] => [alreadyInSave:protected] => [alreadyInValidation:protected] => [validationFailures:protected] => Array ( ) [_new:BaseObject:private] => [_deleted:BaseObject:private] => [modifiedColumns:protected] => Array ( ) ) [4] => DocumentRecord Object ( [records:protected] => Array ( ) [recordId:protected] => [searchWordClass:protected] => [searchWordPeerClass:protected] => [bok_record:protected] => [authors:protected] => [organizations:protected] => [collections:protected] => [categories:protected] => [categories_initialized:protected] => [mapped_items:protected] => [content:protected] => [files:protected] => [language:protected] => Language Object ( [id:protected] => 1 [code:protected] => en [name:protected] => English [alreadyInSave:protected] => [alreadyInValidation:protected] => [validationFailures:protected] => Array ( ) [_new:BaseObject:private] => [_deleted:BaseObject:private] => [modifiedColumns:protected] => Array ( ) ) [old_record:protected] => [id:protected] => 3840 [old_id:protected] => [elcosh_id:protected] => d001309 [type:protected] => document [display_type:protected] => HTML w/ PDF [user_id:protected] => 23 [language_id:protected] => 1 [tagging_id:protected] => Bruce Lippy [priority_id:protected] => 1 [title:protected] => TBT5 Manual Tools [total_pages:protected] => 4 [billed_pages:protected] => 4 [publication_number:protected] => [part_of:protected] => [keywords:protected] => ergonomic, hand tools, handles, MSD, musculoskeletal disorder, carpal tunnel [comments:protected] => 7-28-2014 Jeff Nelson asked Bruce Lippy about what to do with a sentence included toward the top of the doc, "Fill them in on page 2 'Other Questions.'" -- Bruce said this sentence could be deleted from the HTML. [summary:protected] => This is the fifth in a series of 6 tool box talks on construction ergonomics produced by the University of Washington in St. Louis. This one focuses on manual tools. It asks the following 6 key questions. Does the tool… 1. Fit the task? 2. Allow a good power grip? 3. Keep the wrist in a straight posture? 4. Feel comfortable? 5. Take less effort than other tools for the task? 6. Work effectively? [transition_comments:protected] => [external_link:protected] => [consol_link:protected] => http://www.cpwrconstructionsolutions.org/masonry/solution/383/ergonomic-hand-tools.html [more_like_this:protected] => d001303,d001304,d001305,d001306,d001307,d001308,d001310 [permission_given_by:protected] => Lisa Jaegers, U. Wash. St. Louis [published:protected] => T [billable:protected] => F [img_name:protected] => [img_ext:protected] => png [img_width:protected] => [img_height:protected] => [img_credit:protected] => [img_practice:protected] => [vid_source_id:protected] => [vid_running_time:protected] => [vid_intended_audience:protected] => [vid_acquisition_info:protected] => [vid_cost:protected] => [vid_producer:protected] => [vid_filename:protected] => [vid_filename_downloadable:protected] => [date_summary:protected] => 2014 [date_permission_requested:protected] => [date_permission_received:protected] => [date_review_needed:protected] => [date_received:protected] => 06/12/14 [date_completed:protected] => 07/29/14 [date_billed:protected] => [date_modified:protected] => 10/09/15 [collBokExports:protected] => [lastBokExportCriteria:BaseElcoshItem:private] => [alreadyInSave:protected] => [alreadyInValidation:protected] => [validationFailures:protected] => Array ( ) [_new:BaseObject:private] => [_deleted:BaseObject:private] => [modifiedColumns:protected] => Array ( ) ) ) ) [collections] => Array ( [3834] => ) [record] => DocumentRecord Object ( [records:protected] => Array ( ) [recordId:protected] => [searchWordClass:protected] => [searchWordPeerClass:protected] => [bok_record:protected] => [authors:protected] => Array ( ) [organizations:protected] => Array ( [182] => Organization Object ( [id:protected] => 182 [elcosh_id:protected] => o000205 [user_id:protected] => 14 [province_id:protected] => 0 [country_id:protected] => 0 [title:protected] => Washington University - St. Louis [address:protected] => [postal_code:protected] => [city:protected] => [department:protected] => [phone:protected] => [fax:protected] => [email:protected] => [website:protected] => [filename:protected] => [about:protected] => [comments:protected] => [logo_available:protected] => T [no_details:protected] => T [date_received:protected] => 2009-08-06 [date_completed:protected] => 2009-08-06 [date_billed:protected] => [alreadyInSave:protected] => [alreadyInValidation:protected] => [validationFailures:protected] => Array ( ) [_new:BaseObject:private] => [_deleted:BaseObject:private] => [modifiedColumns:protected] => Array ( ) ) ) [collections:protected] => Array ( [3834] => ) [categories:protected] => [categories_initialized:protected] => [mapped_items:protected] => Array ( [3833] => DocumentRecord Object ( [records:protected] => Array ( ) [recordId:protected] => [searchWordClass:protected] => [searchWordPeerClass:protected] => [bok_record:protected] => [authors:protected] => [organizations:protected] => [collections:protected] => [categories:protected] => [categories_initialized:protected] => [mapped_items:protected] => [content:protected] => [files:protected] => [language:protected] => [old_record:protected] => [id:protected] => 3833 [old_id:protected] => [elcosh_id:protected] => d001303 [type:protected] => document [display_type:protected] => HTML w/ PDF [user_id:protected] => 25 [language_id:protected] => 1 [tagging_id:protected] => Bruce Lippy [priority_id:protected] => 1 [title:protected] => Overview of Toolbox Talks on Ergonomics Developed by Washington University in St. Louis [total_pages:protected] => 3 [billed_pages:protected] => 3 [publication_number:protected] => [part_of:protected] => [keywords:protected] => ergonomics, musculoskeletal disorders, MSDs [comments:protected] => 7-28-2014 - Originally submitted as "HTML w/ doc and PDF", Jeff Nelson asked Bruce Lippy for permission to switch it to "HTML w/ PDF" -- permission was given [summary:protected] => This overviews provides a background on how Washington University in St. Louis developed this series of six toolbox talks on ergonomics. It also describes how they tested the effectiveness of these communication tools, concluding that the guide was valuable for improving the delivery of ergonomics training and interaction between the safety representative and workers. The researchers recommend preparing site-specific information prior to the talk and interacting with workers to discuss problems and ergonomic solutions during the safety meetings. [transition_comments:protected] => [external_link:protected] => [consol_link:protected] => [more_like_this:protected] => [permission_given_by:protected] => Lisa Jaegers, Washington U. in St. Louis [published:protected] => T [billable:protected] => F [img_name:protected] => [img_ext:protected] => png [img_width:protected] => [img_height:protected] => [img_credit:protected] => [img_practice:protected] => [vid_source_id:protected] => [vid_running_time:protected] => [vid_intended_audience:protected] => [vid_acquisition_info:protected] => [vid_cost:protected] => [vid_producer:protected] => [vid_filename:protected] => [vid_filename_downloadable:protected] => [date_summary:protected] => 2014 [date_permission_requested:protected] => [date_permission_received:protected] => [date_review_needed:protected] => [date_received:protected] => 06/11/14 [date_completed:protected] => 07/29/14 [date_billed:protected] => [date_modified:protected] => 07/29/14 [collBokExports:protected] => [lastBokExportCriteria:BaseElcoshItem:private] => [alreadyInSave:protected] => [alreadyInValidation:protected] => [validationFailures:protected] => Array ( ) [_new:BaseObject:private] => [_deleted:BaseObject:private] => [modifiedColumns:protected] => Array ( ) ) [3835] => DocumentRecord Object ( [records:protected] => Array ( ) [recordId:protected] => [searchWordClass:protected] => [searchWordPeerClass:protected] => [bok_record:protected] => [authors:protected] => [organizations:protected] => [collections:protected] => [categories:protected] => [categories_initialized:protected] => [mapped_items:protected] => [content:protected] => [files:protected] => [language:protected] => [old_record:protected] => [id:protected] => 3835 [old_id:protected] => [elcosh_id:protected] => d001304 [type:protected] => document [display_type:protected] => HTML w/ PDF [user_id:protected] => 25 [language_id:protected] => 1 [tagging_id:protected] => Bruce Lippy [priority_id:protected] => 1 [title:protected] => Ergonomics Tool Box Talks (TBT) Training Guide [total_pages:protected] => 2 [billed_pages:protected] => 2 [publication_number:protected] => [part_of:protected] => [keywords:protected] => Ergonomics, carpal tunnel, muscular skeletal disorders, msd [comments:protected] => [summary:protected] => CPWR-funded ergonomics research by Washington University at St. Louis led to the development of 6 tool box talks. This guide is an explanation of how to deliver the talks for maximum effectiveness. This guide should be reviewed before delivering any of the talks because it makes important recommendations like: • If possible, give the TBTs as a part of the crew’s regular safety meetings so that ergonomics is included in the safety discussion. • Try to locate an area with few distractions for gathering the crew. • For a team approach, invite the work crew, site superintendent, project manager and other general contractor and/or subcontractor reps who you feel may be helpful in supporting the training and ergonomics solutions. [transition_comments:protected] => [external_link:protected] => [consol_link:protected] => [more_like_this:protected] => d001303,d001305,d001306,d001307,d001308,d001309,d001310 [permission_given_by:protected] => [published:protected] => T [billable:protected] => F [img_name:protected] => [img_ext:protected] => png [img_width:protected] => [img_height:protected] => [img_credit:protected] => [img_practice:protected] => [vid_source_id:protected] => [vid_running_time:protected] => [vid_intended_audience:protected] => [vid_acquisition_info:protected] => [vid_cost:protected] => [vid_producer:protected] => [vid_filename:protected] => [vid_filename_downloadable:protected] => [date_summary:protected] => 2014 [date_permission_requested:protected] => [date_permission_received:protected] => [date_review_needed:protected] => [date_received:protected] => 06/12/14 [date_completed:protected] => 07/29/14 [date_billed:protected] => [date_modified:protected] => 07/29/14 [collBokExports:protected] => [lastBokExportCriteria:BaseElcoshItem:private] => [alreadyInSave:protected] => [alreadyInValidation:protected] => [validationFailures:protected] => Array ( ) [_new:BaseObject:private] => [_deleted:BaseObject:private] => [modifiedColumns:protected] => Array ( ) ) [3836] => DocumentRecord Object ( [records:protected] => Array ( ) [recordId:protected] => [searchWordClass:protected] => [searchWordPeerClass:protected] => [bok_record:protected] => [authors:protected] => [organizations:protected] => [collections:protected] => [categories:protected] => [categories_initialized:protected] => [mapped_items:protected] => [content:protected] => [files:protected] => [language:protected] => [old_record:protected] => [id:protected] => 3836 [old_id:protected] => [elcosh_id:protected] => d001305 [type:protected] => document [display_type:protected] => HTML w/ PDF [user_id:protected] => 25 [language_id:protected] => 1 [tagging_id:protected] => Bruce Lippy [priority_id:protected] => 1 [title:protected] => TBT1 Ergonomics in Construction [total_pages:protected] => 5 [billed_pages:protected] => 5 [publication_number:protected] => [part_of:protected] => [keywords:protected] => ergonomics, ergo, msd, musculoskeletal disorders, risk factors, lifting, carpal tunnel, repetition, awkward postures [comments:protected] => 7-28-2014 Jeff Nelson asked Bruce Lippy about what to do with a sentence included toward the top of the doc, "Fill them in on page 2 'Other Questions.'" -- Bruce said this sentence could be deleted from the HTML. [summary:protected] => This is the first in a series of 6 Tool Box Talks produced by Washington University in St. Louis on ergonomics in construction work. This one should be delivered first because it covers what ergonomics is, why construction workers need to talk about it, what the risk factors are for developing a health problem and how to prevent these problems. [transition_comments:protected] => [external_link:protected] => [consol_link:protected] => http://www.cpwrconstructionsolutions.org/pipes_vessels/solution/50/participatory-ergonomics-program.html [more_like_this:protected] => d001303,d001304,d001306,d001307,d001308,d001309 [permission_given_by:protected] => Lisa Jaegers, Washington U. in St. Louis [published:protected] => T [billable:protected] => F [img_name:protected] => [img_ext:protected] => png [img_width:protected] => [img_height:protected] => [img_credit:protected] => [img_practice:protected] => [vid_source_id:protected] => [vid_running_time:protected] => [vid_intended_audience:protected] => [vid_acquisition_info:protected] => [vid_cost:protected] => [vid_producer:protected] => [vid_filename:protected] => [vid_filename_downloadable:protected] => [date_summary:protected] => 2014 [date_permission_requested:protected] => [date_permission_received:protected] => [date_review_needed:protected] => [date_received:protected] => 06/12/14 [date_completed:protected] => 07/28/14 [date_billed:protected] => [date_modified:protected] => 10/09/15 [collBokExports:protected] => [lastBokExportCriteria:BaseElcoshItem:private] => [alreadyInSave:protected] => [alreadyInValidation:protected] => [validationFailures:protected] => Array ( ) [_new:BaseObject:private] => [_deleted:BaseObject:private] => [modifiedColumns:protected] => Array ( ) ) [3837] => DocumentRecord Object ( [records:protected] => Array ( ) [recordId:protected] => [searchWordClass:protected] => [searchWordPeerClass:protected] => [bok_record:protected] => [authors:protected] => [organizations:protected] => [collections:protected] => [categories:protected] => [categories_initialized:protected] => [mapped_items:protected] => [content:protected] => [files:protected] => [language:protected] => [old_record:protected] => [id:protected] => 3837 [old_id:protected] => [elcosh_id:protected] => d001306 [type:protected] => document [display_type:protected] => HTML w/ PDF [user_id:protected] => 25 [language_id:protected] => 1 [tagging_id:protected] => Bruce Lippy [priority_id:protected] => 1 [title:protected] => TBT2 Keep Reach Close [total_pages:protected] => 4 [billed_pages:protected] => 4 [publication_number:protected] => [part_of:protected] => [keywords:protected] => reach, ergonomic, ergo, MSD, carpal tunnel, repetition, awkward positions [comments:protected] => 7-28-2014 Jeff Nelson asked Bruce Lippy about what to do with a sentence included toward the top of the doc, "Fill them in on page 2 'Other Questions.'" -- Bruce said this sentence could be deleted from the HTML. [summary:protected] => This is the second of six Tool Box Talks created by Washington University in St. Louis on ergonomics in construction. There is a guide with the series that describes how to deliver these talks. This one deals with how to avoid awkward reaching during tasks to prevent injuries. try to work with your hands below your head and close to our body to reduce your risk of shoulder strains and back discomfort. This TBT recommends considering ways to move close to the task, keeping the work area free of obstacles, and talking with each other to provide constructive feedback about your working position. [transition_comments:protected] => [external_link:protected] => [consol_link:protected] => http://www.cpwrconstructionsolutions.org/hazard/959/lifting-and-carrying-manual-materials-handling.html [more_like_this:protected] => d001303,d001304,d001305,d001307,d001308,e001309 [permission_given_by:protected] => [published:protected] => T [billable:protected] => F [img_name:protected] => [img_ext:protected] => png [img_width:protected] => [img_height:protected] => [img_credit:protected] => [img_practice:protected] => [vid_source_id:protected] => [vid_running_time:protected] => [vid_intended_audience:protected] => [vid_acquisition_info:protected] => [vid_cost:protected] => [vid_producer:protected] => [vid_filename:protected] => [vid_filename_downloadable:protected] => [date_summary:protected] => 2014 [date_permission_requested:protected] => [date_permission_received:protected] => [date_review_needed:protected] => [date_received:protected] => 06/12/14 [date_completed:protected] => 07/28/14 [date_billed:protected] => [date_modified:protected] => 11/02/16 [collBokExports:protected] => [lastBokExportCriteria:BaseElcoshItem:private] => [alreadyInSave:protected] => [alreadyInValidation:protected] => [validationFailures:protected] => Array ( ) [_new:BaseObject:private] => [_deleted:BaseObject:private] => [modifiedColumns:protected] => Array ( ) ) [3839] => DocumentRecord Object ( [records:protected] => Array ( ) [recordId:protected] => [searchWordClass:protected] => [searchWordPeerClass:protected] => [bok_record:protected] => [authors:protected] => [organizations:protected] => [collections:protected] => [categories:protected] => [categories_initialized:protected] => [mapped_items:protected] => [content:protected] => [files:protected] => [language:protected] => [old_record:protected] => [id:protected] => 3839 [old_id:protected] => [elcosh_id:protected] => d001308 [type:protected] => document [display_type:protected] => HTML w/ PDF [user_id:protected] => 23 [language_id:protected] => 1 [tagging_id:protected] => Bruce Lippy [priority_id:protected] => 1 [title:protected] => TBT4 Move Materials With Assist [total_pages:protected] => 4 [billed_pages:protected] => 4 [publication_number:protected] => [part_of:protected] => [keywords:protected] => lifting, back injury, ergonomics, ergo, MSD, buddy system [comments:protected] => 7-28-2014 Jeff Nelson asked Bruce Lippy about what to do with a sentence included toward the top of the doc, "Fill them in on page 2 'Other Questions.'" -- Bruce said this sentence could be deleted from the HTML. [summary:protected] => This tool box talk is fourth in a series of 6 developed by Washington University in St. Louis on construction ergonomics. This one focuses on preventing back injuries by getting an assist when manually lifting. It recommends using a cart for transporting loads, taking less trips, avoiding carrying materials on the shoulder and helping each other to lift large or heavy materials when a cart or hoist is not available. [transition_comments:protected] => [external_link:protected] => [consol_link:protected] => http://www.cpwrconstructionsolutions.org/hazard/959/lifting-and-carrying-manual-materials-handling.html [more_like_this:protected] => d001303,d001304,d001305,d001306,d001307,d001309 [permission_given_by:protected] => Lisa Jaegers, Washington U. in St. Louis [published:protected] => T [billable:protected] => F [img_name:protected] => [img_ext:protected] => png [img_width:protected] => [img_height:protected] => [img_credit:protected] => [img_practice:protected] => [vid_source_id:protected] => [vid_running_time:protected] => [vid_intended_audience:protected] => [vid_acquisition_info:protected] => [vid_cost:protected] => [vid_producer:protected] => [vid_filename:protected] => [vid_filename_downloadable:protected] => [date_summary:protected] => 2014 [date_permission_requested:protected] => [date_permission_received:protected] => [date_review_needed:protected] => [date_received:protected] => 06/12/14 [date_completed:protected] => 07/29/14 [date_billed:protected] => [date_modified:protected] => 10/09/15 [collBokExports:protected] => [lastBokExportCriteria:BaseElcoshItem:private] => [alreadyInSave:protected] => [alreadyInValidation:protected] => [validationFailures:protected] => Array ( ) [_new:BaseObject:private] => [_deleted:BaseObject:private] => [modifiedColumns:protected] => Array ( ) ) [3840] => DocumentRecord Object ( [records:protected] => Array ( ) [recordId:protected] => [searchWordClass:protected] => [searchWordPeerClass:protected] => [bok_record:protected] => [authors:protected] => [organizations:protected] => [collections:protected] => [categories:protected] => [categories_initialized:protected] => [mapped_items:protected] => [content:protected] => [files:protected] => [language:protected] => [old_record:protected] => [id:protected] => 3840 [old_id:protected] => [elcosh_id:protected] => d001309 [type:protected] => document [display_type:protected] => HTML w/ PDF [user_id:protected] => 23 [language_id:protected] => 1 [tagging_id:protected] => Bruce Lippy [priority_id:protected] => 1 [title:protected] => TBT5 Manual Tools [total_pages:protected] => 4 [billed_pages:protected] => 4 [publication_number:protected] => [part_of:protected] => [keywords:protected] => ergonomic, hand tools, handles, MSD, musculoskeletal disorder, carpal tunnel [comments:protected] => 7-28-2014 Jeff Nelson asked Bruce Lippy about what to do with a sentence included toward the top of the doc, "Fill them in on page 2 'Other Questions.'" -- Bruce said this sentence could be deleted from the HTML. [summary:protected] => This is the fifth in a series of 6 tool box talks on construction ergonomics produced by the University of Washington in St. Louis. This one focuses on manual tools. It asks the following 6 key questions. Does the tool… 1. Fit the task? 2. Allow a good power grip? 3. Keep the wrist in a straight posture? 4. Feel comfortable? 5. Take less effort than other tools for the task? 6. Work effectively? [transition_comments:protected] => [external_link:protected] => [consol_link:protected] => http://www.cpwrconstructionsolutions.org/masonry/solution/383/ergonomic-hand-tools.html [more_like_this:protected] => d001303,d001304,d001305,d001306,d001307,d001308,d001310 [permission_given_by:protected] => Lisa Jaegers, U. Wash. St. Louis [published:protected] => T [billable:protected] => F [img_name:protected] => [img_ext:protected] => png [img_width:protected] => [img_height:protected] => [img_credit:protected] => [img_practice:protected] => [vid_source_id:protected] => [vid_running_time:protected] => [vid_intended_audience:protected] => [vid_acquisition_info:protected] => [vid_cost:protected] => [vid_producer:protected] => [vid_filename:protected] => [vid_filename_downloadable:protected] => [date_summary:protected] => 2014 [date_permission_requested:protected] => [date_permission_received:protected] => [date_review_needed:protected] => [date_received:protected] => 06/12/14 [date_completed:protected] => 07/29/14 [date_billed:protected] => [date_modified:protected] => 10/09/15 [collBokExports:protected] => [lastBokExportCriteria:BaseElcoshItem:private] => [alreadyInSave:protected] => [alreadyInValidation:protected] => [validationFailures:protected] => Array ( ) [_new:BaseObject:private] => [_deleted:BaseObject:private] => [modifiedColumns:protected] => Array ( ) ) ) [content:protected] => [files:protected] => Array ( [559] => [560] => [546] => File Object ( [id:protected] => 546 [filename:protected] => 3.jpg [downloadable:protected] => F [timestamp:protected] => 2009-07-03 12:54:22 [alreadyInSave:protected] => [alreadyInValidation:protected] => [validationFailures:protected] => Array ( ) [_new:BaseObject:private] => [_deleted:BaseObject:private] => [modifiedColumns:protected] => Array ( ) ) [9643] => File Object ( [id:protected] => 9643 [filename:protected] => d001307.pdf [downloadable:protected] => T [timestamp:protected] => 2014-07-27 19:09:19 [alreadyInSave:protected] => [alreadyInValidation:protected] => [validationFailures:protected] => Array ( ) [_new:BaseObject:private] => [_deleted:BaseObject:private] => [modifiedColumns:protected] => Array ( ) ) [566] => File Object ( [id:protected] => 566 [filename:protected] => 4.jpg [downloadable:protected] => F [timestamp:protected] => 2009-07-03 12:54:23 [alreadyInSave:protected] => [alreadyInValidation:protected] => [validationFailures:protected] => Array ( ) [_new:BaseObject:private] => [_deleted:BaseObject:private] => [modifiedColumns:protected] => Array ( ) ) ) [language:protected] => Language Object ( [id:protected] => 1 [code:protected] => en [name:protected] => English [alreadyInSave:protected] => [alreadyInValidation:protected] => [validationFailures:protected] => Array ( ) [_new:BaseObject:private] => [_deleted:BaseObject:private] => [modifiedColumns:protected] => Array ( ) ) [old_record:protected] => [id:protected] => 3838 [old_id:protected] => [elcosh_id:protected] => d001307 [type:protected] => document [display_type:protected] => HTML w/ PDF [user_id:protected] => 25 [language_id:protected] => 1 [tagging_id:protected] => Bruce Lippy [priority_id:protected] => 1 [title:protected] => TBT3 Positioning [total_pages:protected] => 4 [billed_pages:protected] => 4 [publication_number:protected] => [part_of:protected] => [keywords:protected] => position, positioning, ergonomics, ergo, carpal tunnel, MSD, musculoskeletal disorder [comments:protected] => 7-28-2014 Jeff Nelson asked Bruce Lippy about what to do with a sentence included toward the top of the doc, "Fill them in on page 2 'Other Questions.'" -- Bruce said this sentence could be deleted from the HTML. [summary:protected] => This third in a series of 6 Tool Box Talks on construction ergonomics focuses on proper positioning to avoid injuries. The TBT recommends: 1)prop up a task off of the floor by using a raised surface, cart, baker scaffold, saw horses to prep materials near waist height, 2)move the lift or ladder in the best position for the work, 3)position the lift in front of the area you plan to work without trying to reach too far on either side of the lift. [transition_comments:protected] => [external_link:protected] => [consol_link:protected] => http://www.cpwrconstructionsolutions.org/hazard/959/lifting-and-carrying-manual-materials-handling.html [more_like_this:protected] => d001303,d001304,d001305,d001306,d001308,d001309 [permission_given_by:protected] => Lisa Jaegers, WU-St. Louis [published:protected] => T [billable:protected] => F [img_name:protected] => [img_ext:protected] => png [img_width:protected] => [img_height:protected] => [img_credit:protected] => [img_practice:protected] => [vid_source_id:protected] => [vid_running_time:protected] => [vid_intended_audience:protected] => [vid_acquisition_info:protected] => [vid_cost:protected] => [vid_producer:protected] => [vid_filename:protected] => [vid_filename_downloadable:protected] => [date_summary:protected] => 2014 [date_permission_requested:protected] => [date_permission_received:protected] => [date_review_needed:protected] => [date_received:protected] => 06/12/14 [date_completed:protected] => 07/28/14 [date_billed:protected] => [date_modified:protected] => 10/09/15 [collBokExports:protected] => [lastBokExportCriteria:BaseElcoshItem:private] => [alreadyInSave:protected] => [alreadyInValidation:protected] => [validationFailures:protected] => Array ( ) [_new:BaseObject:private] => [_deleted:BaseObject:private] => [modifiedColumns:protected] => Array ( ) ) [show_text] => [document_content] => ElcoshItemDocumentContent Object ( [id:protected] => 2906 [item_id:protected] => 3838 [type:protected] => main [title:protected] => [content:protected] =>
Facilitator / Leader Tasks Before the Tool Box Talk (TBT)
- Read through this TBT guide.
- Walk the job site to find ergonomics examples based on the TBT. If possible, take photos of “safe” and “unsafe” examples at the site to be used during the TBT.
- Write down discussion questions to ask the group.
Learning Goals
After discussing this training topic, workers will have gained a general understanding of:
- Unsafe work positions.
- Solutions to improve work positioning.
TRAINING CARD
The last page of this PDF has directions for printing and laminating the training cards.
TRAINER’S TALKING POINTS
Why should we talk about positioning?
Construction work requires working in high, low, and tight spaces which often forces you to work in an awkward or uncomfortable position. Working in awkward reaching and bent positions can lead to shoulder and back discomfort and possible injury over time.
Demonstration: The training card provides examples of the range of reaching and the point at which the reach is unsafe. Hold your arms straight out in front of you. Look at your hands and wrists while I discuss each of the reach zones on the training card.
The Green Zone shows the ideal location for working with your hands. When possible, try to keep your work tasks as far out as your wrists.
The Orange Zone is for occasional work since it involves more weight on your shoulders and low back since your hands are away from your body. If needed, keep the reach distance as far as your fingertips.
The Red Zone is away from your body so far that it places you at higher risk for falls when in the air and shoulder and back discomfort. Limit the time you work reaching beyond your fingertips.
End of Demonstration
Discussion Question: Can anyone describe to us an awkward position that they work in or have seen someone work in?
- What does it feel like in your neck, back or arms when working in that position?
- Other Questions:_____________________________________________
Training Note: Here are examples of hazards in different construction trades. Choose your trade or one that is similar to your group’s line of work that can be used as hazards and solutions examples.
| Trade | Awkward Posture Hazards | Potential Solution |
|---|---|---|
| Carpenter-Drywall | Leaning over the side of a scissor lift to reach and operating a screw gun with the arm fully extended (reaching in the red zone past the fingertips). | Before starting to install the line of screws to the side of the lift, move the lift to re-center it for the next 2 lines of screws to be installed. |
| Floor Layer | Spreading mortar overhead on a wall with the bakers scaffold one foot away from the wall due to buckets on the floor below (reach in the red zone, past the fingertips). | Pre-plan this task by removing all objects in the path of the bakers scaffold. Having an open path allows you to work closer to the task. |
| Sheet Metal Worker | Prepping duct parts on the floor while bending the back and reaching to work on them. | Pre-plan this task by setting up a waist-height workstation on extra materials, a cart, or saw horses. |
Now let’s put this information into practice. What are some tricks or techniques that you use to work in a comfortable position?
- Other Questions:_____________________________________________
Here are a few other ideas that are listed on your training card:
Prop up your tasks off of the floor by using a raised surface, cart, baker scaffold, saw horses to prep materials near waist height.
Move the lift or ladder in the best position for the work – close to the work tasks.
For safety & comfort, try to position the lift in front of the area you plan to work without trying to reach too far on either side of the lift.
In summary, it is important to work in a safe position when possible in order to reduce the risk of falls and discomfort due to awkward working positions. Consider ways that you can work in the green/comfort zone and orange zone and avoid the unsafe red zone.
References
[Images modified from Grandjean & Eastman Kodak Co.]
1. Grandjean, E. 1988. Fitting the task to the man: A textbook of occupational ergonomics. 4th ed. Taylor & Francis.
2. Eastman Kodak Co. 1983. Ergonomic Design for People at Work. Vol 1. Wiley, John & Sons, Incorporated.
Refer to the resources at our website: oshr.im.wustl.edu for more Tool Box TIPS.
TRAINING ATTENDANCE SHEET
Training Topic: Ergonomics -- Positioning
Date:
| ATTENDEES | |
|---|---|
Directions for Making Laminated Training Cards
The last page of this PDF has directions for printing and laminating the training cards.
[content_transformed:protected] =>Facilitator / Leader Tasks Before the Tool Box Talk (TBT)
- Read through this TBT guide.
- Walk the job site to find ergonomics examples based on the TBT. If possible, take photos of “safe” and “unsafe” examples at the site to be used during the TBT.
- Write down discussion questions to ask the group.
Learning Goals
After discussing this training topic, workers will have gained a general understanding of:
- Unsafe work positions.
- Solutions to improve work positioning.
TRAINING CARD
The last page of this PDF has directions for printing and laminating the training cards.
TRAINER’S TALKING POINTS
Why should we talk about positioning?
Construction work requires working in high, low, and tight spaces which often forces you to work in an awkward or uncomfortable position. Working in awkward reaching and bent positions can lead to shoulder and back discomfort and possible injury over time.
Demonstration: The training card provides examples of the range of reaching and the point at which the reach is unsafe. Hold your arms straight out in front of you. Look at your hands and wrists while I discuss each of the reach zones on the training card.
The Green Zone shows the ideal location for working with your hands. When possible, try to keep your work tasks as far out as your wrists.
The Orange Zone is for occasional work since it involves more weight on your shoulders and low back since your hands are away from your body. If needed, keep the reach distance as far as your fingertips.
The Red Zone is away from your body so far that it places you at higher risk for falls when in the air and shoulder and back discomfort. Limit the time you work reaching beyond your fingertips.
End of Demonstration
Discussion Question: Can anyone describe to us an awkward position that they work in or have seen someone work in?
- What does it feel like in your neck, back or arms when working in that position?
- Other Questions:_____________________________________________
Training Note: Here are examples of hazards in different construction trades. Choose your trade or one that is similar to your group’s line of work that can be used as hazards and solutions examples.
| Trade | Awkward Posture Hazards | Potential Solution |
|---|---|---|
| Carpenter-Drywall | Leaning over the side of a scissor lift to reach and operating a screw gun with the arm fully extended (reaching in the red zone past the fingertips). | Before starting to install the line of screws to the side of the lift, move the lift to re-center it for the next 2 lines of screws to be installed. |
| Floor Layer | Spreading mortar overhead on a wall with the bakers scaffold one foot away from the wall due to buckets on the floor below (reach in the red zone, past the fingertips). | Pre-plan this task by removing all objects in the path of the bakers scaffold. Having an open path allows you to work closer to the task. |
| Sheet Metal Worker | Prepping duct parts on the floor while bending the back and reaching to work on them. | Pre-plan this task by setting up a waist-height workstation on extra materials, a cart, or saw horses. |
Now let’s put this information into practice. What are some tricks or techniques that you use to work in a comfortable position?
- Other Questions:_____________________________________________
Here are a few other ideas that are listed on your training card:
Prop up your tasks off of the floor by using a raised surface, cart, baker scaffold, saw horses to prep materials near waist height.
Move the lift or ladder in the best position for the work – close to the work tasks.
For safety & comfort, try to position the lift in front of the area you plan to work without trying to reach too far on either side of the lift.
In summary, it is important to work in a safe position when possible in order to reduce the risk of falls and discomfort due to awkward working positions. Consider ways that you can work in the green/comfort zone and orange zone and avoid the unsafe red zone.
References
[Images modified from Grandjean & Eastman Kodak Co.]
1. Grandjean, E. 1988. Fitting the task to the man: A textbook of occupational ergonomics. 4th ed. Taylor & Francis.
2. Eastman Kodak Co. 1983. Ergonomic Design for People at Work. Vol 1. Wiley, John & Sons, Incorporated.
Refer to the resources at our website: oshr.im.wustl.edu for more Tool Box TIPS.
TRAINING ATTENDANCE SHEET
Training Topic: Ergonomics -- Positioning
Date:
| ATTENDEES | |
|---|---|
Directions for Making Laminated Training Cards
The last page of this PDF has directions for printing and laminating the training cards.
[disclaimer:protected] => [disclaimer_transformed:protected] => [alreadyInSave:protected] => [alreadyInValidation:protected] => [validationFailures:protected] => Array ( ) [_new:BaseObject:private] => [_deleted:BaseObject:private] => [modifiedColumns:protected] => Array ( ) ) [template] => record ) [_file] => /home/agsafe5/repositories/elcosh/live/templates/elcosh/record_macros.html [_errors:protected] => Array ( ) [_encoding:protected] => UTF-8 [_outputMode:protected] => 11 [_forceReparse:protected] => [_phpCodeDestination:protected] => /tmp/ [_phpCodeExtension:protected] => php [_cacheLifetime:protected] => 30 [_cachePurgeFrequency:protected] => 30 [externalMacroTemplatesCache:PHPTAL:private] => Array ( ) ) ) ) ) ) [4] => Array ( [file] => /home/agsafe5/repositories/elcosh/live/sblib/core/SB_PHPTAL/PHPTAL/PHPTAL.php [line] => 659 [function] => tpl_61515a6c_record__uvBJJSo8xT_sgOY5gjP7ug [args] => Array ( [0] => PHPTAL Object ( [_prefilters:protected] => Array ( ) [_prefilter:PHPTAL:private] => REMOVED: DO NOT USE [_postfilter:protected] => [_repositories:protected] => Array ( ) [_path:protected] => /home/agsafe5/repositories/elcosh/live/templates/elcosh/record.html [_resolvers:protected] => Array ( ) [_source:protected] => PHPTAL_FileSource Object ( [_path:PHPTAL_FileSource:private] => /home/agsafe5/repositories/elcosh/live/templates/elcosh/record.html ) [_codeFile:protected] => /tmp/tpl_61515a6c_record__uvBJJSo8xT_sgOY5gjP7ug.php [_functionName:protected] => tpl_61515a6c_record__uvBJJSo8xT_sgOY5gjP7ug [_prepared:protected] => 1 [_triggers:protected] => Array ( ) [_translator:protected] => [_globalContext:protected] => stdClass Object ( ) [_context:protected] => PHPTAL_Context Object ( [_line] => [_file] => /home/agsafe5/repositories/elcosh/live/templates/elcosh/record.html [repeat] => stdClass Object ( ) [_xmlDeclaration] => [_docType] => [_nothrow:PHPTAL_Context:private] => [_slots:PHPTAL_Context:private] => Array ( ) [_slotsStack:PHPTAL_Context:private] => Array ( [0] => Array ( ) [1] => Array ( ) ) [_parentContext:PHPTAL_Context:private] => [_globalContext:PHPTAL_Context:private] => stdClass Object ( ) [_echoDeclarations:PHPTAL_Context:private] => [referer] => http://elcosh.org/document/3838/d001307/TBT3%2BPositioning.html [curr_module] => Record [styles] => Array ( ) [javascript] => Array ( [0] => jquery.min.js ) [metas] => Array ( [language] => en [robots] => index, follow ) [user] => [curr_url] => https://elcosh.org/index.php?module=Record&id=3838&type=document [base_url] => https://elcosh.org/index.php?module=Record [title] => eLCOSH : TBT3 Positioning [language] => en [search_query] => [module] => Record [new_records] => Array ( [0] => Search_Result Object ( [title] => Toolbox Talk: Fixed Ladder [image] => /record/images/notavailable-p.png [blurb] => The CPWR Toolbox Talk on Fixed Ladders addresses the potential risks associated with using fixed ladders. The resource includes a brief case example,... [category] => Array ( [0] => 15 [1] => 47 [2] => 49 [3] => 51 [4] => 53 [5] => 55 [6] => 60 [7] => 64 [8] => 73 [9] => 76 [10] => 78 [11] => 80 [12] => 86 [13] => 87 [14] => 90 [15] => 92 [16] => 93 [17] => 94 [18] => 100 ) [labels] => Array ( [0] => Falls [1] => Work Environment [2] => Hazards [3] => Bricklayer [4] => Trades [5] => Carpenter [7] => Cement Mason [9] => Concrete Polisher [11] => Electrical Worker [13] => HVAC [15] => Laborer [17] => PCC/Restoration [19] => Plumber/Pipefitter [21] => Roofer/Waterproofer [23] => Sheetmetal Worker [25] => Welder [27] => Commercial & Institutional [28] => Jobsites [29] => Industrial [31] => LEED/Green Construction [33] => Renovations [35] => Residential [37] => Toolbox Talks [38] => Documents [39] => Media & Documents ) [type] => Toolbox Talks [sub_category] => [url] => /document/4430/d001660/Toolbox%2BTalk%253A%2BFixed%2BLadder.html [item:protected] => DocumentRecord Object ( [records:protected] => Array ( ) [recordId:protected] => [searchWordClass:protected] => [searchWordPeerClass:protected] => [bok_record:protected] => [authors:protected] => [organizations:protected] => [collections:protected] => [categories:protected] => Array ( [15] => Category Object ( [languages:protected] => [bok_resources:protected] => [bok_topics:protected] => [bok_keywords:protected] => [id:protected] => 15 [type:protected] => category [parent:protected] => 7 [label:protected] => Falls [alreadyInSave:protected] => [alreadyInValidation:protected] => [validationFailures:protected] => Array ( ) [_new:BaseObject:private] => [_deleted:BaseObject:private] => [modifiedColumns:protected] => Array ( ) ) [47] => Category Object ( [languages:protected] => [bok_resources:protected] => [bok_topics:protected] => [bok_keywords:protected] => [id:protected] => 47 [type:protected] => category [parent:protected] => 2 [label:protected] => Bricklayer [alreadyInSave:protected] => [alreadyInValidation:protected] => [validationFailures:protected] => Array ( ) [_new:BaseObject:private] => [_deleted:BaseObject:private] => [modifiedColumns:protected] => Array ( ) ) [49] => Category Object ( [languages:protected] => [bok_resources:protected] => [bok_topics:protected] => [bok_keywords:protected] => [id:protected] => 49 [type:protected] => category [parent:protected] => 2 [label:protected] => Carpenter [alreadyInSave:protected] => [alreadyInValidation:protected] => [validationFailures:protected] => Array ( ) [_new:BaseObject:private] => [_deleted:BaseObject:private] => [modifiedColumns:protected] => Array ( ) ) [51] => Category Object ( [languages:protected] => [bok_resources:protected] => [bok_topics:protected] => [bok_keywords:protected] => [id:protected] => 51 [type:protected] => category [parent:protected] => 2 [label:protected] => Cement Mason [alreadyInSave:protected] => [alreadyInValidation:protected] => [validationFailures:protected] => Array ( ) [_new:BaseObject:private] => [_deleted:BaseObject:private] => [modifiedColumns:protected] => Array ( ) ) [53] => Category Object ( [languages:protected] => [bok_resources:protected] => [bok_topics:protected] => [bok_keywords:protected] => [id:protected] => 53 [type:protected] => category [parent:protected] => 2 [label:protected] => Concrete Polisher [alreadyInSave:protected] => [alreadyInValidation:protected] => [validationFailures:protected] => Array ( ) [_new:BaseObject:private] => [_deleted:BaseObject:private] => [modifiedColumns:protected] => Array ( ) ) [55] => Category Object ( [languages:protected] => [bok_resources:protected] => [bok_topics:protected] => [bok_keywords:protected] => [id:protected] => 55 [type:protected] => category [parent:protected] => 2 [label:protected] => Electrical Worker [alreadyInSave:protected] => [alreadyInValidation:protected] => [validationFailures:protected] => Array ( ) [_new:BaseObject:private] => [_deleted:BaseObject:private] => [modifiedColumns:protected] => Array ( ) ) [60] => Category Object ( [languages:protected] => [bok_resources:protected] => [bok_topics:protected] => [bok_keywords:protected] => [id:protected] => 60 [type:protected] => category [parent:protected] => 2 [label:protected] => HVAC [alreadyInSave:protected] => [alreadyInValidation:protected] => [validationFailures:protected] => Array ( ) [_new:BaseObject:private] => [_deleted:BaseObject:private] => [modifiedColumns:protected] => Array ( ) ) [64] => Category Object ( [languages:protected] => [bok_resources:protected] => [bok_topics:protected] => [bok_keywords:protected] => [id:protected] => 64 [type:protected] => category [parent:protected] => 2 [label:protected] => Laborer [alreadyInSave:protected] => [alreadyInValidation:protected] => [validationFailures:protected] => Array ( ) [_new:BaseObject:private] => [_deleted:BaseObject:private] => [modifiedColumns:protected] => Array ( ) ) [73] => Category Object ( [languages:protected] => [bok_resources:protected] => [bok_topics:protected] => [bok_keywords:protected] => [id:protected] => 73 [type:protected] => category [parent:protected] => 2 [label:protected] => PCC/Restoration [alreadyInSave:protected] => [alreadyInValidation:protected] => [validationFailures:protected] => Array ( ) [_new:BaseObject:private] => [_deleted:BaseObject:private] => [modifiedColumns:protected] => Array ( ) ) [76] => Category Object ( [languages:protected] => [bok_resources:protected] => [bok_topics:protected] => [bok_keywords:protected] => [id:protected] => 76 [type:protected] => category [parent:protected] => 2 [label:protected] => Plumber/Pipefitter [alreadyInSave:protected] => [alreadyInValidation:protected] => [validationFailures:protected] => Array ( ) [_new:BaseObject:private] => [_deleted:BaseObject:private] => [modifiedColumns:protected] => Array ( ) ) [78] => Category Object ( [languages:protected] => [bok_resources:protected] => [bok_topics:protected] => [bok_keywords:protected] => [id:protected] => 78 [type:protected] => category [parent:protected] => 2 [label:protected] => Roofer/Waterproofer [alreadyInSave:protected] => [alreadyInValidation:protected] => [validationFailures:protected] => Array ( ) [_new:BaseObject:private] => [_deleted:BaseObject:private] => [modifiedColumns:protected] => Array ( ) ) [80] => Category Object ( [languages:protected] => [bok_resources:protected] => [bok_topics:protected] => [bok_keywords:protected] => [id:protected] => 80 [type:protected] => category [parent:protected] => 2 [label:protected] => Sheetmetal Worker [alreadyInSave:protected] => [alreadyInValidation:protected] => [validationFailures:protected] => Array ( ) [_new:BaseObject:private] => [_deleted:BaseObject:private] => [modifiedColumns:protected] => Array ( ) ) [86] => Category Object ( [languages:protected] => [bok_resources:protected] => [bok_topics:protected] => [bok_keywords:protected] => [id:protected] => 86 [type:protected] => category [parent:protected] => 2 [label:protected] => Welder [alreadyInSave:protected] => [alreadyInValidation:protected] => [validationFailures:protected] => Array ( ) [_new:BaseObject:private] => [_deleted:BaseObject:private] => [modifiedColumns:protected] => Array ( ) ) [87] => Category Object ( [languages:protected] => [bok_resources:protected] => [bok_topics:protected] => [bok_keywords:protected] => [id:protected] => 87 [type:protected] => category [parent:protected] => 3 [label:protected] => Commercial & Institutional [alreadyInSave:protected] => [alreadyInValidation:protected] => [validationFailures:protected] => Array ( ) [_new:BaseObject:private] => [_deleted:BaseObject:private] => [modifiedColumns:protected] => Array ( ) ) [90] => Category Object ( [languages:protected] => [bok_resources:protected] => [bok_topics:protected] => [bok_keywords:protected] => [id:protected] => 90 [type:protected] => category [parent:protected] => 3 [label:protected] => Industrial [alreadyInSave:protected] => [alreadyInValidation:protected] => [validationFailures:protected] => Array ( ) [_new:BaseObject:private] => [_deleted:BaseObject:private] => [modifiedColumns:protected] => Array ( ) ) [92] => Category Object ( [languages:protected] => [bok_resources:protected] => [bok_topics:protected] => [bok_keywords:protected] => [id:protected] => 92 [type:protected] => category [parent:protected] => 3 [label:protected] => LEED/Green Construction [alreadyInSave:protected] => [alreadyInValidation:protected] => [validationFailures:protected] => Array ( ) [_new:BaseObject:private] => [_deleted:BaseObject:private] => [modifiedColumns:protected] => Array ( ) ) [93] => Category Object ( [languages:protected] => [bok_resources:protected] => [bok_topics:protected] => [bok_keywords:protected] => [id:protected] => 93 [type:protected] => category [parent:protected] => 3 [label:protected] => Renovations [alreadyInSave:protected] => [alreadyInValidation:protected] => [validationFailures:protected] => Array ( ) [_new:BaseObject:private] => [_deleted:BaseObject:private] => [modifiedColumns:protected] => Array ( ) ) [94] => Category Object ( [languages:protected] => [bok_resources:protected] => [bok_topics:protected] => [bok_keywords:protected] => [id:protected] => 94 [type:protected] => category [parent:protected] => 3 [label:protected] => Residential [alreadyInSave:protected] => [alreadyInValidation:protected] => [validationFailures:protected] => Array ( ) [_new:BaseObject:private] => [_deleted:BaseObject:private] => [modifiedColumns:protected] => Array ( ) ) [100] => Category Object ( [languages:protected] => [bok_resources:protected] => [bok_topics:protected] => [bok_keywords:protected] => [id:protected] => 100 [type:protected] => category [parent:protected] => 6 [label:protected] => Toolbox Talks [alreadyInSave:protected] => [alreadyInValidation:protected] => [validationFailures:protected] => Array ( ) [_new:BaseObject:private] => [_deleted:BaseObject:private] => [modifiedColumns:protected] => Array ( ) ) ) [categories_initialized:protected] => 1 [mapped_items:protected] => [content:protected] => [files:protected] => [language:protected] => Language Object ( [id:protected] => 1 [code:protected] => en [name:protected] => English [alreadyInSave:protected] => [alreadyInValidation:protected] => [validationFailures:protected] => Array ( ) [_new:BaseObject:private] => [_deleted:BaseObject:private] => [modifiedColumns:protected] => Array ( ) ) [old_record:protected] => [id:protected] => 4430 [old_id:protected] => [elcosh_id:protected] => d001660 [type:protected] => document [display_type:protected] => HTML only (and links) [user_id:protected] => 0 [language_id:protected] => 1 [tagging_id:protected] => Mike Aguilar [priority_id:protected] => 1 [title:protected] => Toolbox Talk: Fixed Ladder [total_pages:protected] => 0 [billed_pages:protected] => 0 [publication_number:protected] => [part_of:protected] => [keywords:protected] => Fixed Ladders, Fall Prevention, Falls [comments:protected] => [summary:protected] => The CPWR Toolbox Talk on Fixed Ladders addresses the potential risks associated with using fixed ladders. The resource includes a brief case example, steps to prevent a related injury and questions for discussion. It includes an image that illustrates the hazard, which can be posted in a central location as a reminder of steps to work safely. Available in English and Spanish. [transition_comments:protected] => [external_link:protected] => [consol_link:protected] => [more_like_this:protected] => d001257,d001254,d001255,d001256,d001258,d001262,d001279 [permission_given_by:protected] => [published:protected] => T [billable:protected] => F [img_name:protected] => [img_ext:protected] => [img_width:protected] => [img_height:protected] => [img_credit:protected] => [img_practice:protected] => [vid_source_id:protected] => [vid_running_time:protected] => [vid_intended_audience:protected] => [vid_acquisition_info:protected] => [vid_cost:protected] => [vid_producer:protected] => [vid_filename:protected] => [vid_filename_downloadable:protected] => [date_summary:protected] => [date_permission_requested:protected] => [date_permission_received:protected] => [date_review_needed:protected] => [date_received:protected] => 06/10/22 [date_completed:protected] => 06/10/22 [date_billed:protected] => [date_modified:protected] => 06/16/25 [collBokExports:protected] => [lastBokExportCriteria:BaseElcoshItem:private] => [alreadyInSave:protected] => [alreadyInValidation:protected] => [validationFailures:protected] => Array ( ) [_new:BaseObject:private] => [_deleted:BaseObject:private] => [modifiedColumns:protected] => Array ( ) ) ) [1] => Search_Result Object ( [title] => Toolbox Talk: Work Zone Safety: Working Around Vehicles [image] => /record/images/notavailable-p.png [blurb] => The CPWR Toolbox Talk on Working Around Vehicles in the Work Zone addresses methods to avoid being struck-by a vehicle on a construction site. The res... [category] => Array ( [0] => 12 [1] => 18 [2] => 52 [3] => 57 [4] => 70 [5] => 85 [6] => 87 [7] => 88 [8] => 89 [9] => 91 [10] => 90 [11] => 92 [12] => 93 [13] => 94 [14] => 95 [15] => 100 ) [labels] => Array ( [0] => Crushed/Struck By [1] => Work Environment [2] => Hazards [3] => Motor Vehicles/Heavy Equipment [6] => Commercial Diver [7] => Trades [8] => Flagger [10] => Operating Engineer [12] => Truck Driver [14] => Commercial & Institutional [15] => Jobsites [16] => Demolition [18] => Disasters [20] => Heavy & Highway [22] => Industrial [24] => LEED/Green Construction [26] => Renovations [28] => Residential [30] => Underground [32] => Toolbox Talks [33] => Documents [34] => Media & Documents ) [type] => Toolbox Talks [sub_category] => [url] => /document/4428/d001658/Toolbox%2BTalk%253A%2BWork%2BZone%2BSafety%253A%2BWorking%2BAround%2BVehicles.html [item:protected] => DocumentRecord Object ( [records:protected] => Array ( ) [recordId:protected] => [searchWordClass:protected] => [searchWordPeerClass:protected] => [bok_record:protected] => [authors:protected] => [organizations:protected] => [collections:protected] => [categories:protected] => Array ( [12] => Category Object ( [languages:protected] => [bok_resources:protected] => [bok_topics:protected] => [bok_keywords:protected] => [id:protected] => 12 [type:protected] => category [parent:protected] => 7 [label:protected] => Crushed/Struck By [alreadyInSave:protected] => [alreadyInValidation:protected] => [validationFailures:protected] => Array ( ) [_new:BaseObject:private] => [_deleted:BaseObject:private] => [modifiedColumns:protected] => Array ( ) ) [18] => Category Object ( [languages:protected] => [bok_resources:protected] => [bok_topics:protected] => [bok_keywords:protected] => [id:protected] => 18 [type:protected] => category [parent:protected] => 7 [label:protected] => Motor Vehicles/Heavy Equipment [alreadyInSave:protected] => [alreadyInValidation:protected] => [validationFailures:protected] => Array ( ) [_new:BaseObject:private] => [_deleted:BaseObject:private] => [modifiedColumns:protected] => Array ( ) ) [52] => Category Object ( [languages:protected] => [bok_resources:protected] => [bok_topics:protected] => [bok_keywords:protected] => [id:protected] => 52 [type:protected] => category [parent:protected] => 2 [label:protected] => Commercial Diver [alreadyInSave:protected] => [alreadyInValidation:protected] => [validationFailures:protected] => Array ( ) [_new:BaseObject:private] => [_deleted:BaseObject:private] => [modifiedColumns:protected] => Array ( ) ) [57] => Category Object ( [languages:protected] => [bok_resources:protected] => [bok_topics:protected] => [bok_keywords:protected] => [id:protected] => 57 [type:protected] => category [parent:protected] => 2 [label:protected] => Flagger [alreadyInSave:protected] => [alreadyInValidation:protected] => [validationFailures:protected] => Array ( ) [_new:BaseObject:private] => [_deleted:BaseObject:private] => [modifiedColumns:protected] => Array ( ) ) [70] => Category Object ( [languages:protected] => [bok_resources:protected] => [bok_topics:protected] => [bok_keywords:protected] => [id:protected] => 70 [type:protected] => category [parent:protected] => 2 [label:protected] => Operating Engineer [alreadyInSave:protected] => [alreadyInValidation:protected] => [validationFailures:protected] => Array ( ) [_new:BaseObject:private] => [_deleted:BaseObject:private] => [modifiedColumns:protected] => Array ( ) ) [85] => Category Object ( [languages:protected] => [bok_resources:protected] => [bok_topics:protected] => [bok_keywords:protected] => [id:protected] => 85 [type:protected] => category [parent:protected] => 2 [label:protected] => Truck Driver [alreadyInSave:protected] => [alreadyInValidation:protected] => [validationFailures:protected] => Array ( ) [_new:BaseObject:private] => [_deleted:BaseObject:private] => [modifiedColumns:protected] => Array ( ) ) [87] => Category Object ( [languages:protected] => [bok_resources:protected] => [bok_topics:protected] => [bok_keywords:protected] => [id:protected] => 87 [type:protected] => category [parent:protected] => 3 [label:protected] => Commercial & Institutional [alreadyInSave:protected] => [alreadyInValidation:protected] => [validationFailures:protected] => Array ( ) [_new:BaseObject:private] => [_deleted:BaseObject:private] => [modifiedColumns:protected] => Array ( ) ) [88] => Category Object ( [languages:protected] => [bok_resources:protected] => [bok_topics:protected] => [bok_keywords:protected] => [id:protected] => 88 [type:protected] => category [parent:protected] => 3 [label:protected] => Demolition [alreadyInSave:protected] => [alreadyInValidation:protected] => [validationFailures:protected] => Array ( ) [_new:BaseObject:private] => [_deleted:BaseObject:private] => [modifiedColumns:protected] => Array ( ) ) [89] => Category Object ( [languages:protected] => [bok_resources:protected] => [bok_topics:protected] => [bok_keywords:protected] => [id:protected] => 89 [type:protected] => category [parent:protected] => 3 [label:protected] => Disasters [alreadyInSave:protected] => [alreadyInValidation:protected] => [validationFailures:protected] => Array ( ) [_new:BaseObject:private] => [_deleted:BaseObject:private] => [modifiedColumns:protected] => Array ( ) ) [91] => Category Object ( [languages:protected] => [bok_resources:protected] => [bok_topics:protected] => [bok_keywords:protected] => [id:protected] => 91 [type:protected] => category [parent:protected] => 3 [label:protected] => Heavy & Highway [alreadyInSave:protected] => [alreadyInValidation:protected] => [validationFailures:protected] => Array ( ) [_new:BaseObject:private] => [_deleted:BaseObject:private] => [modifiedColumns:protected] => Array ( ) ) [90] => Category Object ( [languages:protected] => [bok_resources:protected] => [bok_topics:protected] => [bok_keywords:protected] => [id:protected] => 90 [type:protected] => category [parent:protected] => 3 [label:protected] => Industrial [alreadyInSave:protected] => [alreadyInValidation:protected] => [validationFailures:protected] => Array ( ) [_new:BaseObject:private] => [_deleted:BaseObject:private] => [modifiedColumns:protected] => Array ( ) ) [92] => Category Object ( [languages:protected] => [bok_resources:protected] => [bok_topics:protected] => [bok_keywords:protected] => [id:protected] => 92 [type:protected] => category [parent:protected] => 3 [label:protected] => LEED/Green Construction [alreadyInSave:protected] => [alreadyInValidation:protected] => [validationFailures:protected] => Array ( ) [_new:BaseObject:private] => [_deleted:BaseObject:private] => [modifiedColumns:protected] => Array ( ) ) [93] => Category Object ( [languages:protected] => [bok_resources:protected] => [bok_topics:protected] => [bok_keywords:protected] => [id:protected] => 93 [type:protected] => category [parent:protected] => 3 [label:protected] => Renovations [alreadyInSave:protected] => [alreadyInValidation:protected] => [validationFailures:protected] => Array ( ) [_new:BaseObject:private] => [_deleted:BaseObject:private] => [modifiedColumns:protected] => Array ( ) ) [94] => Category Object ( [languages:protected] => [bok_resources:protected] => [bok_topics:protected] => [bok_keywords:protected] => [id:protected] => 94 [type:protected] => category [parent:protected] => 3 [label:protected] => Residential [alreadyInSave:protected] => [alreadyInValidation:protected] => [validationFailures:protected] => Array ( ) [_new:BaseObject:private] => [_deleted:BaseObject:private] => [modifiedColumns:protected] => Array ( ) ) [95] => Category Object ( [languages:protected] => [bok_resources:protected] => [bok_topics:protected] => [bok_keywords:protected] => [id:protected] => 95 [type:protected] => category [parent:protected] => 3 [label:protected] => Underground [alreadyInSave:protected] => [alreadyInValidation:protected] => [validationFailures:protected] => Array ( ) [_new:BaseObject:private] => [_deleted:BaseObject:private] => [modifiedColumns:protected] => Array ( ) ) [100] => Category Object ( [languages:protected] => [bok_resources:protected] => [bok_topics:protected] => [bok_keywords:protected] => [id:protected] => 100 [type:protected] => category [parent:protected] => 6 [label:protected] => Toolbox Talks [alreadyInSave:protected] => [alreadyInValidation:protected] => [validationFailures:protected] => Array ( ) [_new:BaseObject:private] => [_deleted:BaseObject:private] => [modifiedColumns:protected] => Array ( ) ) ) [categories_initialized:protected] => 1 [mapped_items:protected] => [content:protected] => [files:protected] => [language:protected] => Language Object ( [id:protected] => 1 [code:protected] => en [name:protected] => English [alreadyInSave:protected] => [alreadyInValidation:protected] => [validationFailures:protected] => Array ( ) [_new:BaseObject:private] => [_deleted:BaseObject:private] => [modifiedColumns:protected] => Array ( ) ) [old_record:protected] => [id:protected] => 4428 [old_id:protected] => [elcosh_id:protected] => d001658 [type:protected] => document [display_type:protected] => HTML only (and links) [user_id:protected] => 0 [language_id:protected] => 1 [tagging_id:protected] => Daniela Caceres [priority_id:protected] => 1 [title:protected] => Toolbox Talk: Work Zone Safety: Working Around Vehicles [total_pages:protected] => 0 [billed_pages:protected] => 0 [publication_number:protected] => [part_of:protected] => [keywords:protected] => Struck, Struck by, Vehicle, Work Zone Safety, Truck, Operator, Driver, Mobile Equipment [comments:protected] => [summary:protected] => The CPWR Toolbox Talk on Working Around Vehicles in the Work Zone addresses methods to avoid being struck-by a vehicle on a construction site. The resource includes a case example, steps to prevent a related injury, and questions for discussion. It includes a graphic that illustrates the hazard, which can be posted in a central location as a reminder of steps to work safely. Available in English and Spanish. [transition_comments:protected] => [external_link:protected] => [consol_link:protected] => [more_like_this:protected] => d001640 [permission_given_by:protected] => [published:protected] => T [billable:protected] => F [img_name:protected] => [img_ext:protected] => [img_width:protected] => [img_height:protected] => [img_credit:protected] => [img_practice:protected] => [vid_source_id:protected] => [vid_running_time:protected] => [vid_intended_audience:protected] => [vid_acquisition_info:protected] => [vid_cost:protected] => [vid_producer:protected] => [vid_filename:protected] => [vid_filename_downloadable:protected] => [date_summary:protected] => [date_permission_requested:protected] => [date_permission_received:protected] => [date_review_needed:protected] => [date_received:protected] => 12/23/21 [date_completed:protected] => 12/23/21 [date_billed:protected] => [date_modified:protected] => 05/19/23 [collBokExports:protected] => [lastBokExportCriteria:BaseElcoshItem:private] => [alreadyInSave:protected] => [alreadyInValidation:protected] => [validationFailures:protected] => Array ( ) [_new:BaseObject:private] => [_deleted:BaseObject:private] => [modifiedColumns:protected] => Array ( ) ) ) [2] => Search_Result Object ( [title] => Construction Dive -- DeWalt's Jobsite Pro headphones recalled for fire hazards [image] => /record/images/notavailable-p.png [blurb] => A recall notice by the United States Consumer Product Safety Commission affects over 300,000 DeWalt Jobsite Pro Headphones. The recall is a result of... [category] => Array ( [0] => 16 [1] => 44 [2] => 45 [3] => 46 [4] => 47 [5] => 48 [6] => 49 [7] => 50 [8] => 51 [9] => 52 [10] => 53 [11] => 54 [12] => 55 [13] => 56 [14] => 57 [15] => 58 [16] => 59 [17] => 60 [18] => 61 [19] => 64 [20] => 65 [21] => 66 [22] => 67 [23] => 68 [24] => 69 [25] => 70 [26] => 71 [27] => 72 [28] => 73 [29] => 74 [30] => 75 [31] => 76 [32] => 77 [33] => 63 [34] => 78 [35] => 79 [36] => 80 [37] => 81 [38] => 82 [39] => 62 [40] => 83 [41] => 84 [42] => 85 [43] => 86 [44] => 87 [45] => 88 [46] => 89 [47] => 91 [48] => 90 [49] => 92 [50] => 93 [51] => 94 [52] => 95 ) [labels] => Array ( [0] => Fire & Explosions [1] => Work Environment [2] => Hazards [3] => Acoustical Ceiling Carpenter [4] => Trades [5] => Asbestos/Insulator [7] => Boilermaker [9] => Bricklayer [11] => Cabinetmaker [13] => Carpenter [15] => Carpet Layer [17] => Cement Mason [19] => Commercial Diver [21] => Concrete Polisher [23] => Drywall Applicator Specialist [25] => Electrical Worker [27] => Elevator Constructor [29] => Flagger [31] => Glazier [33] => Hazardous Waste Cleanup [35] => HVAC [37] => Interior Systems Carpenter [39] => Laborer [41] => Landscaper [43] => Lather [45] => Lead Abatement Worker [47] => Maintenance Worker [49] => Millwright [51] => Operating Engineer [53] => Painter [55] => Paper Hanger [57] => PCC/Restoration [59] => Pile Driver [61] => Plasterer [63] => Plumber/Pipefitter [65] => Refractory Worker [67] => Reinforcing Ironworker [69] => Roofer/Waterproofer [71] => Scaffold Erector [73] => Sheetmetal Worker [75] => Sprinkler Fitter [77] => Stonemason [79] => Structural Ironworker [81] => Terrazzo Worker [83] => Tile Setter [85] => Truck Driver [87] => Welder [89] => Commercial & Institutional [90] => Jobsites [91] => Demolition [93] => Disasters [95] => Heavy & Highway [97] => Industrial [99] => LEED/Green Construction [101] => Renovations [103] => Residential [105] => Underground ) [type] => [sub_category] => [url] => /document/4426/d001656/Construction%2BDive%2B--%2BDeWalt%2527s%2BJobsite%2BPro%2Bheadphones%2Brecalled%2Bfor%2Bfire%2Bhazards.html [item:protected] => DocumentRecord Object ( [records:protected] => Array ( ) [recordId:protected] => [searchWordClass:protected] => [searchWordPeerClass:protected] => [bok_record:protected] => [authors:protected] => [organizations:protected] => [collections:protected] => [categories:protected] => Array ( [16] => Category Object ( [languages:protected] => [bok_resources:protected] => [bok_topics:protected] => [bok_keywords:protected] => [id:protected] => 16 [type:protected] => category [parent:protected] => 7 [label:protected] => Fire & Explosions [alreadyInSave:protected] => [alreadyInValidation:protected] => [validationFailures:protected] => Array ( ) [_new:BaseObject:private] => [_deleted:BaseObject:private] => [modifiedColumns:protected] => Array ( ) ) [44] => Category Object ( [languages:protected] => [bok_resources:protected] => [bok_topics:protected] => [bok_keywords:protected] => [id:protected] => 44 [type:protected] => category [parent:protected] => 2 [label:protected] => Acoustical Ceiling Carpenter [alreadyInSave:protected] => [alreadyInValidation:protected] => [validationFailures:protected] => Array ( ) [_new:BaseObject:private] => [_deleted:BaseObject:private] => [modifiedColumns:protected] => Array ( ) ) [45] => Category Object ( [languages:protected] => [bok_resources:protected] => [bok_topics:protected] => [bok_keywords:protected] => [id:protected] => 45 [type:protected] => category [parent:protected] => 2 [label:protected] => Asbestos/Insulator [alreadyInSave:protected] => [alreadyInValidation:protected] => [validationFailures:protected] => Array ( ) [_new:BaseObject:private] => [_deleted:BaseObject:private] => [modifiedColumns:protected] => Array ( ) ) [46] => Category Object ( [languages:protected] => [bok_resources:protected] => [bok_topics:protected] => [bok_keywords:protected] => [id:protected] => 46 [type:protected] => category [parent:protected] => 2 [label:protected] => Boilermaker [alreadyInSave:protected] => [alreadyInValidation:protected] => [validationFailures:protected] => Array ( ) [_new:BaseObject:private] => [_deleted:BaseObject:private] => [modifiedColumns:protected] => Array ( ) ) [47] => Category Object ( [languages:protected] => [bok_resources:protected] => [bok_topics:protected] => [bok_keywords:protected] => [id:protected] => 47 [type:protected] => category [parent:protected] => 2 [label:protected] => Bricklayer [alreadyInSave:protected] => [alreadyInValidation:protected] => [validationFailures:protected] => Array ( ) [_new:BaseObject:private] => [_deleted:BaseObject:private] => [modifiedColumns:protected] => Array ( ) ) [48] => Category Object ( [languages:protected] => [bok_resources:protected] => [bok_topics:protected] => [bok_keywords:protected] => [id:protected] => 48 [type:protected] => category [parent:protected] => 2 [label:protected] => Cabinetmaker [alreadyInSave:protected] => [alreadyInValidation:protected] => [validationFailures:protected] => Array ( ) [_new:BaseObject:private] => [_deleted:BaseObject:private] => [modifiedColumns:protected] => Array ( ) ) [49] => Category Object ( [languages:protected] => [bok_resources:protected] => [bok_topics:protected] => [bok_keywords:protected] => [id:protected] => 49 [type:protected] => category [parent:protected] => 2 [label:protected] => Carpenter [alreadyInSave:protected] => [alreadyInValidation:protected] => [validationFailures:protected] => Array ( ) [_new:BaseObject:private] => [_deleted:BaseObject:private] => [modifiedColumns:protected] => Array ( ) ) [50] => Category Object ( [languages:protected] => [bok_resources:protected] => [bok_topics:protected] => [bok_keywords:protected] => [id:protected] => 50 [type:protected] => category [parent:protected] => 2 [label:protected] => Carpet Layer [alreadyInSave:protected] => [alreadyInValidation:protected] => [validationFailures:protected] => Array ( ) [_new:BaseObject:private] => [_deleted:BaseObject:private] => [modifiedColumns:protected] => Array ( ) ) [51] => Category Object ( [languages:protected] => [bok_resources:protected] => [bok_topics:protected] => [bok_keywords:protected] => [id:protected] => 51 [type:protected] => category [parent:protected] => 2 [label:protected] => Cement Mason [alreadyInSave:protected] => [alreadyInValidation:protected] => [validationFailures:protected] => Array ( ) [_new:BaseObject:private] => [_deleted:BaseObject:private] => [modifiedColumns:protected] => Array ( ) ) [52] => Category Object ( [languages:protected] => [bok_resources:protected] => [bok_topics:protected] => [bok_keywords:protected] => [id:protected] => 52 [type:protected] => category [parent:protected] => 2 [label:protected] => Commercial Diver [alreadyInSave:protected] => [alreadyInValidation:protected] => [validationFailures:protected] => Array ( ) [_new:BaseObject:private] => [_deleted:BaseObject:private] => [modifiedColumns:protected] => Array ( ) ) [53] => Category Object ( [languages:protected] => [bok_resources:protected] => [bok_topics:protected] => [bok_keywords:protected] => [id:protected] => 53 [type:protected] => category [parent:protected] => 2 [label:protected] => Concrete Polisher [alreadyInSave:protected] => [alreadyInValidation:protected] => [validationFailures:protected] => Array ( ) [_new:BaseObject:private] => [_deleted:BaseObject:private] => [modifiedColumns:protected] => Array ( ) ) [54] => Category Object ( [languages:protected] => [bok_resources:protected] => [bok_topics:protected] => [bok_keywords:protected] => [id:protected] => 54 [type:protected] => category [parent:protected] => 2 [label:protected] => Drywall Applicator Specialist [alreadyInSave:protected] => [alreadyInValidation:protected] => [validationFailures:protected] => Array ( ) [_new:BaseObject:private] => [_deleted:BaseObject:private] => [modifiedColumns:protected] => Array ( ) ) [55] => Category Object ( [languages:protected] => [bok_resources:protected] => [bok_topics:protected] => [bok_keywords:protected] => [id:protected] => 55 [type:protected] => category [parent:protected] => 2 [label:protected] => Electrical Worker [alreadyInSave:protected] => [alreadyInValidation:protected] => [validationFailures:protected] => Array ( ) [_new:BaseObject:private] => [_deleted:BaseObject:private] => [modifiedColumns:protected] => Array ( ) ) [56] => Category Object ( [languages:protected] => [bok_resources:protected] => [bok_topics:protected] => [bok_keywords:protected] => [id:protected] => 56 [type:protected] => category [parent:protected] => 2 [label:protected] => Elevator Constructor [alreadyInSave:protected] => [alreadyInValidation:protected] => [validationFailures:protected] => Array ( ) [_new:BaseObject:private] => [_deleted:BaseObject:private] => [modifiedColumns:protected] => Array ( ) ) [57] => Category Object ( [languages:protected] => [bok_resources:protected] => [bok_topics:protected] => [bok_keywords:protected] => [id:protected] => 57 [type:protected] => category [parent:protected] => 2 [label:protected] => Flagger [alreadyInSave:protected] => [alreadyInValidation:protected] => [validationFailures:protected] => Array ( ) [_new:BaseObject:private] => [_deleted:BaseObject:private] => [modifiedColumns:protected] => Array ( ) ) [58] => Category Object ( [languages:protected] => [bok_resources:protected] => [bok_topics:protected] => [bok_keywords:protected] => [id:protected] => 58 [type:protected] => category [parent:protected] => 2 [label:protected] => Glazier [alreadyInSave:protected] => [alreadyInValidation:protected] => [validationFailures:protected] => Array ( ) [_new:BaseObject:private] => [_deleted:BaseObject:private] => [modifiedColumns:protected] => Array ( ) ) [59] => Category Object ( [languages:protected] => [bok_resources:protected] => [bok_topics:protected] => [bok_keywords:protected] => [id:protected] => 59 [type:protected] => category [parent:protected] => 2 [label:protected] => Hazardous Waste Cleanup [alreadyInSave:protected] => [alreadyInValidation:protected] => [validationFailures:protected] => Array ( ) [_new:BaseObject:private] => [_deleted:BaseObject:private] => [modifiedColumns:protected] => Array ( ) ) [60] => Category Object ( [languages:protected] => [bok_resources:protected] => [bok_topics:protected] => [bok_keywords:protected] => [id:protected] => 60 [type:protected] => category [parent:protected] => 2 [label:protected] => HVAC [alreadyInSave:protected] => [alreadyInValidation:protected] => [validationFailures:protected] => Array ( ) [_new:BaseObject:private] => [_deleted:BaseObject:private] => [modifiedColumns:protected] => Array ( ) ) [61] => Category Object ( [languages:protected] => [bok_resources:protected] => [bok_topics:protected] => [bok_keywords:protected] => [id:protected] => 61 [type:protected] => category [parent:protected] => 2 [label:protected] => Interior Systems Carpenter [alreadyInSave:protected] => [alreadyInValidation:protected] => [validationFailures:protected] => Array ( ) [_new:BaseObject:private] => [_deleted:BaseObject:private] => [modifiedColumns:protected] => Array ( ) ) [64] => Category Object ( [languages:protected] => [bok_resources:protected] => [bok_topics:protected] => [bok_keywords:protected] => [id:protected] => 64 [type:protected] => category [parent:protected] => 2 [label:protected] => Laborer [alreadyInSave:protected] => [alreadyInValidation:protected] => [validationFailures:protected] => Array ( ) [_new:BaseObject:private] => [_deleted:BaseObject:private] => [modifiedColumns:protected] => Array ( ) ) [65] => Category Object ( [languages:protected] => [bok_resources:protected] => [bok_topics:protected] => [bok_keywords:protected] => [id:protected] => 65 [type:protected] => category [parent:protected] => 2 [label:protected] => Landscaper [alreadyInSave:protected] => [alreadyInValidation:protected] => [validationFailures:protected] => Array ( ) [_new:BaseObject:private] => [_deleted:BaseObject:private] => [modifiedColumns:protected] => Array ( ) ) [66] => Category Object ( [languages:protected] => [bok_resources:protected] => [bok_topics:protected] => [bok_keywords:protected] => [id:protected] => 66 [type:protected] => category [parent:protected] => 2 [label:protected] => Lather [alreadyInSave:protected] => [alreadyInValidation:protected] => [validationFailures:protected] => Array ( ) [_new:BaseObject:private] => [_deleted:BaseObject:private] => [modifiedColumns:protected] => Array ( ) ) [67] => Category Object ( [languages:protected] => [bok_resources:protected] => [bok_topics:protected] => [bok_keywords:protected] => [id:protected] => 67 [type:protected] => category [parent:protected] => 2 [label:protected] => Lead Abatement Worker [alreadyInSave:protected] => [alreadyInValidation:protected] => [validationFailures:protected] => Array ( ) [_new:BaseObject:private] => [_deleted:BaseObject:private] => [modifiedColumns:protected] => Array ( ) ) [68] => Category Object ( [languages:protected] => [bok_resources:protected] => [bok_topics:protected] => [bok_keywords:protected] => [id:protected] => 68 [type:protected] => category [parent:protected] => 2 [label:protected] => Maintenance Worker [alreadyInSave:protected] => [alreadyInValidation:protected] => [validationFailures:protected] => Array ( ) [_new:BaseObject:private] => [_deleted:BaseObject:private] => [modifiedColumns:protected] => Array ( ) ) [69] => Category Object ( [languages:protected] => [bok_resources:protected] => [bok_topics:protected] => [bok_keywords:protected] => [id:protected] => 69 [type:protected] => category [parent:protected] => 2 [label:protected] => Millwright [alreadyInSave:protected] => [alreadyInValidation:protected] => [validationFailures:protected] => Array ( ) [_new:BaseObject:private] => [_deleted:BaseObject:private] => [modifiedColumns:protected] => Array ( ) ) [70] => Category Object ( [languages:protected] => [bok_resources:protected] => [bok_topics:protected] => [bok_keywords:protected] => [id:protected] => 70 [type:protected] => category [parent:protected] => 2 [label:protected] => Operating Engineer [alreadyInSave:protected] => [alreadyInValidation:protected] => [validationFailures:protected] => Array ( ) [_new:BaseObject:private] => [_deleted:BaseObject:private] => [modifiedColumns:protected] => Array ( ) ) [71] => Category Object ( [languages:protected] => [bok_resources:protected] => [bok_topics:protected] => [bok_keywords:protected] => [id:protected] => 71 [type:protected] => category [parent:protected] => 2 [label:protected] => Painter [alreadyInSave:protected] => [alreadyInValidation:protected] => [validationFailures:protected] => Array ( ) [_new:BaseObject:private] => [_deleted:BaseObject:private] => [modifiedColumns:protected] => Array ( ) ) [72] => Category Object ( [languages:protected] => [bok_resources:protected] => [bok_topics:protected] => [bok_keywords:protected] => [id:protected] => 72 [type:protected] => category [parent:protected] => 2 [label:protected] => Paper Hanger [alreadyInSave:protected] => [alreadyInValidation:protected] => [validationFailures:protected] => Array ( ) [_new:BaseObject:private] => [_deleted:BaseObject:private] => [modifiedColumns:protected] => Array ( ) ) [73] => Category Object ( [languages:protected] => [bok_resources:protected] => [bok_topics:protected] => [bok_keywords:protected] => [id:protected] => 73 [type:protected] => category [parent:protected] => 2 [label:protected] => PCC/Restoration [alreadyInSave:protected] => [alreadyInValidation:protected] => [validationFailures:protected] => Array ( ) [_new:BaseObject:private] => [_deleted:BaseObject:private] => [modifiedColumns:protected] => Array ( ) ) [74] => Category Object ( [languages:protected] => [bok_resources:protected] => [bok_topics:protected] => [bok_keywords:protected] => [id:protected] => 74 [type:protected] => category [parent:protected] => 2 [label:protected] => Pile Driver [alreadyInSave:protected] => [alreadyInValidation:protected] => [validationFailures:protected] => Array ( ) [_new:BaseObject:private] => [_deleted:BaseObject:private] => [modifiedColumns:protected] => Array ( ) ) [75] => Category Object ( [languages:protected] => [bok_resources:protected] => [bok_topics:protected] => [bok_keywords:protected] => [id:protected] => 75 [type:protected] => category [parent:protected] => 2 [label:protected] => Plasterer [alreadyInSave:protected] => [alreadyInValidation:protected] => [validationFailures:protected] => Array ( ) [_new:BaseObject:private] => [_deleted:BaseObject:private] => [modifiedColumns:protected] => Array ( ) ) [76] => Category Object ( [languages:protected] => [bok_resources:protected] => [bok_topics:protected] => [bok_keywords:protected] => [id:protected] => 76 [type:protected] => category [parent:protected] => 2 [label:protected] => Plumber/Pipefitter [alreadyInSave:protected] => [alreadyInValidation:protected] => [validationFailures:protected] => Array ( ) [_new:BaseObject:private] => [_deleted:BaseObject:private] => [modifiedColumns:protected] => Array ( ) ) [77] => Category Object ( [languages:protected] => [bok_resources:protected] => [bok_topics:protected] => [bok_keywords:protected] => [id:protected] => 77 [type:protected] => category [parent:protected] => 2 [label:protected] => Refractory Worker [alreadyInSave:protected] => [alreadyInValidation:protected] => [validationFailures:protected] => Array ( ) [_new:BaseObject:private] => [_deleted:BaseObject:private] => [modifiedColumns:protected] => Array ( ) ) [63] => Category Object ( [languages:protected] => [bok_resources:protected] => [bok_topics:protected] => [bok_keywords:protected] => [id:protected] => 63 [type:protected] => category [parent:protected] => 2 [label:protected] => Reinforcing Ironworker [alreadyInSave:protected] => [alreadyInValidation:protected] => [validationFailures:protected] => Array ( ) [_new:BaseObject:private] => [_deleted:BaseObject:private] => [modifiedColumns:protected] => Array ( ) ) [78] => Category Object ( [languages:protected] => [bok_resources:protected] => [bok_topics:protected] => [bok_keywords:protected] => [id:protected] => 78 [type:protected] => category [parent:protected] => 2 [label:protected] => Roofer/Waterproofer [alreadyInSave:protected] => [alreadyInValidation:protected] => [validationFailures:protected] => Array ( ) [_new:BaseObject:private] => [_deleted:BaseObject:private] => [modifiedColumns:protected] => Array ( ) ) [79] => Category Object ( [languages:protected] => [bok_resources:protected] => [bok_topics:protected] => [bok_keywords:protected] => [id:protected] => 79 [type:protected] => category [parent:protected] => 2 [label:protected] => Scaffold Erector [alreadyInSave:protected] => [alreadyInValidation:protected] => [validationFailures:protected] => Array ( ) [_new:BaseObject:private] => [_deleted:BaseObject:private] => [modifiedColumns:protected] => Array ( ) ) [80] => Category Object ( [languages:protected] => [bok_resources:protected] => [bok_topics:protected] => [bok_keywords:protected] => [id:protected] => 80 [type:protected] => category [parent:protected] => 2 [label:protected] => Sheetmetal Worker [alreadyInSave:protected] => [alreadyInValidation:protected] => [validationFailures:protected] => Array ( ) [_new:BaseObject:private] => [_deleted:BaseObject:private] => [modifiedColumns:protected] => Array ( ) ) [81] => Category Object ( [languages:protected] => [bok_resources:protected] => [bok_topics:protected] => [bok_keywords:protected] => [id:protected] => 81 [type:protected] => category [parent:protected] => 2 [label:protected] => Sprinkler Fitter [alreadyInSave:protected] => [alreadyInValidation:protected] => [validationFailures:protected] => Array ( ) [_new:BaseObject:private] => [_deleted:BaseObject:private] => [modifiedColumns:protected] => Array ( ) ) [82] => Category Object ( [languages:protected] => [bok_resources:protected] => [bok_topics:protected] => [bok_keywords:protected] => [id:protected] => 82 [type:protected] => category [parent:protected] => 2 [label:protected] => Stonemason [alreadyInSave:protected] => [alreadyInValidation:protected] => [validationFailures:protected] => Array ( ) [_new:BaseObject:private] => [_deleted:BaseObject:private] => [modifiedColumns:protected] => Array ( ) ) [62] => Category Object ( [languages:protected] => [bok_resources:protected] => [bok_topics:protected] => [bok_keywords:protected] => [id:protected] => 62 [type:protected] => category [parent:protected] => 2 [label:protected] => Structural Ironworker [alreadyInSave:protected] => [alreadyInValidation:protected] => [validationFailures:protected] => Array ( ) [_new:BaseObject:private] => [_deleted:BaseObject:private] => [modifiedColumns:protected] => Array ( ) ) [83] => Category Object ( [languages:protected] => [bok_resources:protected] => [bok_topics:protected] => [bok_keywords:protected] => [id:protected] => 83 [type:protected] => category [parent:protected] => 2 [label:protected] => Terrazzo Worker [alreadyInSave:protected] => [alreadyInValidation:protected] => [validationFailures:protected] => Array ( ) [_new:BaseObject:private] => [_deleted:BaseObject:private] => [modifiedColumns:protected] => Array ( ) ) [84] => Category Object ( [languages:protected] => [bok_resources:protected] => [bok_topics:protected] => [bok_keywords:protected] => [id:protected] => 84 [type:protected] => category [parent:protected] => 2 [label:protected] => Tile Setter [alreadyInSave:protected] => [alreadyInValidation:protected] => [validationFailures:protected] => Array ( ) [_new:BaseObject:private] => [_deleted:BaseObject:private] => [modifiedColumns:protected] => Array ( ) ) [85] => Category Object ( [languages:protected] => [bok_resources:protected] => [bok_topics:protected] => [bok_keywords:protected] => [id:protected] => 85 [type:protected] => category [parent:protected] => 2 [label:protected] => Truck Driver [alreadyInSave:protected] => [alreadyInValidation:protected] => [validationFailures:protected] => Array ( ) [_new:BaseObject:private] => [_deleted:BaseObject:private] => [modifiedColumns:protected] => Array ( ) ) [86] => Category Object ( [languages:protected] => [bok_resources:protected] => [bok_topics:protected] => [bok_keywords:protected] => [id:protected] => 86 [type:protected] => category [parent:protected] => 2 [label:protected] => Welder [alreadyInSave:protected] => [alreadyInValidation:protected] => [validationFailures:protected] => Array ( ) [_new:BaseObject:private] => [_deleted:BaseObject:private] => [modifiedColumns:protected] => Array ( ) ) [87] => Category Object ( [languages:protected] => [bok_resources:protected] => [bok_topics:protected] => [bok_keywords:protected] => [id:protected] => 87 [type:protected] => category [parent:protected] => 3 [label:protected] => Commercial & Institutional [alreadyInSave:protected] => [alreadyInValidation:protected] => [validationFailures:protected] => Array ( ) [_new:BaseObject:private] => [_deleted:BaseObject:private] => [modifiedColumns:protected] => Array ( ) ) [88] => Category Object ( [languages:protected] => [bok_resources:protected] => [bok_topics:protected] => [bok_keywords:protected] => [id:protected] => 88 [type:protected] => category [parent:protected] => 3 [label:protected] => Demolition [alreadyInSave:protected] => [alreadyInValidation:protected] => [validationFailures:protected] => Array ( ) [_new:BaseObject:private] => [_deleted:BaseObject:private] => [modifiedColumns:protected] => Array ( ) ) [89] => Category Object ( [languages:protected] => [bok_resources:protected] => [bok_topics:protected] => [bok_keywords:protected] => [id:protected] => 89 [type:protected] => category [parent:protected] => 3 [label:protected] => Disasters [alreadyInSave:protected] => [alreadyInValidation:protected] => [validationFailures:protected] => Array ( ) [_new:BaseObject:private] => [_deleted:BaseObject:private] => [modifiedColumns:protected] => Array ( ) ) [91] => Category Object ( [languages:protected] => [bok_resources:protected] => [bok_topics:protected] => [bok_keywords:protected] => [id:protected] => 91 [type:protected] => category [parent:protected] => 3 [label:protected] => Heavy & Highway [alreadyInSave:protected] => [alreadyInValidation:protected] => [validationFailures:protected] => Array ( ) [_new:BaseObject:private] => [_deleted:BaseObject:private] => [modifiedColumns:protected] => Array ( ) ) [90] => Category Object ( [languages:protected] => [bok_resources:protected] => [bok_topics:protected] => [bok_keywords:protected] => [id:protected] => 90 [type:protected] => category [parent:protected] => 3 [label:protected] => Industrial [alreadyInSave:protected] => [alreadyInValidation:protected] => [validationFailures:protected] => Array ( ) [_new:BaseObject:private] => [_deleted:BaseObject:private] => [modifiedColumns:protected] => Array ( ) ) [92] => Category Object ( [languages:protected] => [bok_resources:protected] => [bok_topics:protected] => [bok_keywords:protected] => [id:protected] => 92 [type:protected] => category [parent:protected] => 3 [label:protected] => LEED/Green Construction [alreadyInSave:protected] => [alreadyInValidation:protected] => [validationFailures:protected] => Array ( ) [_new:BaseObject:private] => [_deleted:BaseObject:private] => [modifiedColumns:protected] => Array ( ) ) [93] => Category Object ( [languages:protected] => [bok_resources:protected] => [bok_topics:protected] => [bok_keywords:protected] => [id:protected] => 93 [type:protected] => category [parent:protected] => 3 [label:protected] => Renovations [alreadyInSave:protected] => [alreadyInValidation:protected] => [validationFailures:protected] => Array ( ) [_new:BaseObject:private] => [_deleted:BaseObject:private] => [modifiedColumns:protected] => Array ( ) ) [94] => Category Object ( [languages:protected] => [bok_resources:protected] => [bok_topics:protected] => [bok_keywords:protected] => [id:protected] => 94 [type:protected] => category [parent:protected] => 3 [label:protected] => Residential [alreadyInSave:protected] => [alreadyInValidation:protected] => [validationFailures:protected] => Array ( ) [_new:BaseObject:private] => [_deleted:BaseObject:private] => [modifiedColumns:protected] => Array ( ) ) [95] => Category Object ( [languages:protected] => [bok_resources:protected] => [bok_topics:protected] => [bok_keywords:protected] => [id:protected] => 95 [type:protected] => category [parent:protected] => 3 [label:protected] => Underground [alreadyInSave:protected] => [alreadyInValidation:protected] => [validationFailures:protected] => Array ( ) [_new:BaseObject:private] => [_deleted:BaseObject:private] => [modifiedColumns:protected] => Array ( ) ) ) [categories_initialized:protected] => 1 [mapped_items:protected] => [content:protected] => [files:protected] => [language:protected] => Language Object ( [id:protected] => 1 [code:protected] => en [name:protected] => English [alreadyInSave:protected] => [alreadyInValidation:protected] => [validationFailures:protected] => Array ( ) [_new:BaseObject:private] => [_deleted:BaseObject:private] => [modifiedColumns:protected] => Array ( ) ) [old_record:protected] => [id:protected] => 4426 [old_id:protected] => [elcosh_id:protected] => d001656 [type:protected] => document [display_type:protected] => HTML only (and links) [user_id:protected] => 0 [language_id:protected] => 1 [tagging_id:protected] => Mike Aguilar [priority_id:protected] => 1 [title:protected] => Construction Dive -- DeWalt's Jobsite Pro headphones recalled for fire hazards [total_pages:protected] => 1 [billed_pages:protected] => 1 [publication_number:protected] => [part_of:protected] => [keywords:protected] => DeWalt, Fire Hazards, recall, headphones [comments:protected] => [summary:protected] => A recall notice by the United States Consumer Product Safety Commission affects over 300,000 DeWalt Jobsite Pro Headphones. The recall is a result of a malfunction that can cause earbuds to overheat while charging or during use, leading to fire and burn hazards. [transition_comments:protected] => [external_link:protected] => https://www.constructiondive.com/news/dewalts-jobsite-pro-headphones-recalled-for-fire-hazards/611248/?utm_source=Sailthru&utm_medium=email&utm_campaign=Issue:%202021-12-10%20Construction%20Dive%20Newsletter%20%5Bissue:38532%5D&utm_term=Construction%20Dive [consol_link:protected] => [more_like_this:protected] => [permission_given_by:protected] => [published:protected] => T [billable:protected] => F [img_name:protected] => [img_ext:protected] => [img_width:protected] => [img_height:protected] => [img_credit:protected] => [img_practice:protected] => [vid_source_id:protected] => [vid_running_time:protected] => [vid_intended_audience:protected] => [vid_acquisition_info:protected] => [vid_cost:protected] => [vid_producer:protected] => [vid_filename:protected] => [vid_filename_downloadable:protected] => [date_summary:protected] => [date_permission_requested:protected] => [date_permission_received:protected] => [date_review_needed:protected] => [date_received:protected] => 12/13/21 [date_completed:protected] => 12/13/21 [date_billed:protected] => [date_modified:protected] => 12/13/21 [collBokExports:protected] => [lastBokExportCriteria:BaseElcoshItem:private] => [alreadyInSave:protected] => [alreadyInValidation:protected] => [validationFailures:protected] => Array ( ) [_new:BaseObject:private] => [_deleted:BaseObject:private] => [modifiedColumns:protected] => Array ( ) ) ) [3] => Search_Result Object ( [title] => Working in an Enclosed Cab [image] => /record/images/notavailable-p.png [blurb] => This CPWR Hazard Alert on Working in enclosed cabs provides information on protecting workers from silica dust, how to minimize exposures and the dang... [category] => Array ( [0] => 10 [1] => 16 [2] => 24 [3] => 37 [4] => 46 [5] => 48 [6] => 49 [7] => 51 [8] => 53 [9] => 54 [10] => 56 [11] => 58 [12] => 59 [13] => 60 [14] => 61 [15] => 64 [16] => 66 [17] => 68 [18] => 69 [19] => 71 [20] => 73 [21] => 74 [22] => 76 [23] => 77 [24] => 63 [25] => 80 [26] => 82 [27] => 62 [28] => 83 [29] => 84 [30] => 86 [31] => 88 [32] => 89 [33] => 95 [34] => 102 ) [labels] => Array ( [0] => Confined Spaces [1] => Work Environment [2] => Hazards [3] => Fire & Explosions [6] => Trenches & Excavations [9] => Silica /Construction Dust [10] => Inhalation/Skin Exposures [12] => Boilermaker [13] => Trades [14] => Cabinetmaker [16] => Carpenter [18] => Cement Mason [20] => Concrete Polisher [22] => Drywall Applicator Specialist [24] => Elevator Constructor [26] => Glazier [28] => Hazardous Waste Cleanup [30] => HVAC [32] => Interior Systems Carpenter [34] => Laborer [36] => Lather [38] => Maintenance Worker [40] => Millwright [42] => Painter [44] => PCC/Restoration [46] => Pile Driver [48] => Plumber/Pipefitter [50] => Refractory Worker [52] => Reinforcing Ironworker [54] => Sheetmetal Worker [56] => Stonemason [58] => Structural Ironworker [60] => Terrazzo Worker [62] => Tile Setter [64] => Welder [66] => Demolition [67] => Jobsites [68] => Disasters [70] => Underground [72] => Handouts [73] => Documents [74] => Media & Documents ) [type] => Handouts [sub_category] => [url] => /document/4415/d001651/Working%2Bin%2Ban%2BEnclosed%2BCab.html [item:protected] => DocumentRecord Object ( [records:protected] => Array ( ) [recordId:protected] => [searchWordClass:protected] => [searchWordPeerClass:protected] => [bok_record:protected] => [authors:protected] => [organizations:protected] => [collections:protected] => [categories:protected] => Array ( [10] => Category Object ( [languages:protected] => [bok_resources:protected] => [bok_topics:protected] => [bok_keywords:protected] => [id:protected] => 10 [type:protected] => category [parent:protected] => 7 [label:protected] => Confined Spaces [alreadyInSave:protected] => [alreadyInValidation:protected] => [validationFailures:protected] => Array ( ) [_new:BaseObject:private] => [_deleted:BaseObject:private] => [modifiedColumns:protected] => Array ( ) ) [16] => Category Object ( [languages:protected] => [bok_resources:protected] => [bok_topics:protected] => [bok_keywords:protected] => [id:protected] => 16 [type:protected] => category [parent:protected] => 7 [label:protected] => Fire & Explosions [alreadyInSave:protected] => [alreadyInValidation:protected] => [validationFailures:protected] => Array ( ) [_new:BaseObject:private] => [_deleted:BaseObject:private] => [modifiedColumns:protected] => Array ( ) ) [24] => Category Object ( [languages:protected] => [bok_resources:protected] => [bok_topics:protected] => [bok_keywords:protected] => [id:protected] => 24 [type:protected] => category [parent:protected] => 7 [label:protected] => Trenches & Excavations [alreadyInSave:protected] => [alreadyInValidation:protected] => [validationFailures:protected] => Array ( ) [_new:BaseObject:private] => [_deleted:BaseObject:private] => [modifiedColumns:protected] => Array ( ) ) [37] => Category Object ( [languages:protected] => [bok_resources:protected] => [bok_topics:protected] => [bok_keywords:protected] => [id:protected] => 37 [type:protected] => category [parent:protected] => 8 [label:protected] => Silica /Construction Dust [alreadyInSave:protected] => [alreadyInValidation:protected] => [validationFailures:protected] => Array ( ) [_new:BaseObject:private] => [_deleted:BaseObject:private] => [modifiedColumns:protected] => Array ( ) ) [46] => Category Object ( [languages:protected] => [bok_resources:protected] => [bok_topics:protected] => [bok_keywords:protected] => [id:protected] => 46 [type:protected] => category [parent:protected] => 2 [label:protected] => Boilermaker [alreadyInSave:protected] => [alreadyInValidation:protected] => [validationFailures:protected] => Array ( ) [_new:BaseObject:private] => [_deleted:BaseObject:private] => [modifiedColumns:protected] => Array ( ) ) [48] => Category Object ( [languages:protected] => [bok_resources:protected] => [bok_topics:protected] => [bok_keywords:protected] => [id:protected] => 48 [type:protected] => category [parent:protected] => 2 [label:protected] => Cabinetmaker [alreadyInSave:protected] => [alreadyInValidation:protected] => [validationFailures:protected] => Array ( ) [_new:BaseObject:private] => [_deleted:BaseObject:private] => [modifiedColumns:protected] => Array ( ) ) [49] => Category Object ( [languages:protected] => [bok_resources:protected] => [bok_topics:protected] => [bok_keywords:protected] => [id:protected] => 49 [type:protected] => category [parent:protected] => 2 [label:protected] => Carpenter [alreadyInSave:protected] => [alreadyInValidation:protected] => [validationFailures:protected] => Array ( ) [_new:BaseObject:private] => [_deleted:BaseObject:private] => [modifiedColumns:protected] => Array ( ) ) [51] => Category Object ( [languages:protected] => [bok_resources:protected] => [bok_topics:protected] => [bok_keywords:protected] => [id:protected] => 51 [type:protected] => category [parent:protected] => 2 [label:protected] => Cement Mason [alreadyInSave:protected] => [alreadyInValidation:protected] => [validationFailures:protected] => Array ( ) [_new:BaseObject:private] => [_deleted:BaseObject:private] => [modifiedColumns:protected] => Array ( ) ) [53] => Category Object ( [languages:protected] => [bok_resources:protected] => [bok_topics:protected] => [bok_keywords:protected] => [id:protected] => 53 [type:protected] => category [parent:protected] => 2 [label:protected] => Concrete Polisher [alreadyInSave:protected] => [alreadyInValidation:protected] => [validationFailures:protected] => Array ( ) [_new:BaseObject:private] => [_deleted:BaseObject:private] => [modifiedColumns:protected] => Array ( ) ) [54] => Category Object ( [languages:protected] => [bok_resources:protected] => [bok_topics:protected] => [bok_keywords:protected] => [id:protected] => 54 [type:protected] => category [parent:protected] => 2 [label:protected] => Drywall Applicator Specialist [alreadyInSave:protected] => [alreadyInValidation:protected] => [validationFailures:protected] => Array ( ) [_new:BaseObject:private] => [_deleted:BaseObject:private] => [modifiedColumns:protected] => Array ( ) ) [56] => Category Object ( [languages:protected] => [bok_resources:protected] => [bok_topics:protected] => [bok_keywords:protected] => [id:protected] => 56 [type:protected] => category [parent:protected] => 2 [label:protected] => Elevator Constructor [alreadyInSave:protected] => [alreadyInValidation:protected] => [validationFailures:protected] => Array ( ) [_new:BaseObject:private] => [_deleted:BaseObject:private] => [modifiedColumns:protected] => Array ( ) ) [58] => Category Object ( [languages:protected] => [bok_resources:protected] => [bok_topics:protected] => [bok_keywords:protected] => [id:protected] => 58 [type:protected] => category [parent:protected] => 2 [label:protected] => Glazier [alreadyInSave:protected] => [alreadyInValidation:protected] => [validationFailures:protected] => Array ( ) [_new:BaseObject:private] => [_deleted:BaseObject:private] => [modifiedColumns:protected] => Array ( ) ) [59] => Category Object ( [languages:protected] => [bok_resources:protected] => [bok_topics:protected] => [bok_keywords:protected] => [id:protected] => 59 [type:protected] => category [parent:protected] => 2 [label:protected] => Hazardous Waste Cleanup [alreadyInSave:protected] => [alreadyInValidation:protected] => [validationFailures:protected] => Array ( ) [_new:BaseObject:private] => [_deleted:BaseObject:private] => [modifiedColumns:protected] => Array ( ) ) [60] => Category Object ( [languages:protected] => [bok_resources:protected] => [bok_topics:protected] => [bok_keywords:protected] => [id:protected] => 60 [type:protected] => category [parent:protected] => 2 [label:protected] => HVAC [alreadyInSave:protected] => [alreadyInValidation:protected] => [validationFailures:protected] => Array ( ) [_new:BaseObject:private] => [_deleted:BaseObject:private] => [modifiedColumns:protected] => Array ( ) ) [61] => Category Object ( [languages:protected] => [bok_resources:protected] => [bok_topics:protected] => [bok_keywords:protected] => [id:protected] => 61 [type:protected] => category [parent:protected] => 2 [label:protected] => Interior Systems Carpenter [alreadyInSave:protected] => [alreadyInValidation:protected] => [validationFailures:protected] => Array ( ) [_new:BaseObject:private] => [_deleted:BaseObject:private] => [modifiedColumns:protected] => Array ( ) ) [64] => Category Object ( [languages:protected] => [bok_resources:protected] => [bok_topics:protected] => [bok_keywords:protected] => [id:protected] => 64 [type:protected] => category [parent:protected] => 2 [label:protected] => Laborer [alreadyInSave:protected] => [alreadyInValidation:protected] => [validationFailures:protected] => Array ( ) [_new:BaseObject:private] => [_deleted:BaseObject:private] => [modifiedColumns:protected] => Array ( ) ) [66] => Category Object ( [languages:protected] => [bok_resources:protected] => [bok_topics:protected] => [bok_keywords:protected] => [id:protected] => 66 [type:protected] => category [parent:protected] => 2 [label:protected] => Lather [alreadyInSave:protected] => [alreadyInValidation:protected] => [validationFailures:protected] => Array ( ) [_new:BaseObject:private] => [_deleted:BaseObject:private] => [modifiedColumns:protected] => Array ( ) ) [68] => Category Object ( [languages:protected] => [bok_resources:protected] => [bok_topics:protected] => [bok_keywords:protected] => [id:protected] => 68 [type:protected] => category [parent:protected] => 2 [label:protected] => Maintenance Worker [alreadyInSave:protected] => [alreadyInValidation:protected] => [validationFailures:protected] => Array ( ) [_new:BaseObject:private] => [_deleted:BaseObject:private] => [modifiedColumns:protected] => Array ( ) ) [69] => Category Object ( [languages:protected] => [bok_resources:protected] => [bok_topics:protected] => [bok_keywords:protected] => [id:protected] => 69 [type:protected] => category [parent:protected] => 2 [label:protected] => Millwright [alreadyInSave:protected] => [alreadyInValidation:protected] => [validationFailures:protected] => Array ( ) [_new:BaseObject:private] => [_deleted:BaseObject:private] => [modifiedColumns:protected] => Array ( ) ) [71] => Category Object ( [languages:protected] => [bok_resources:protected] => [bok_topics:protected] => [bok_keywords:protected] => [id:protected] => 71 [type:protected] => category [parent:protected] => 2 [label:protected] => Painter [alreadyInSave:protected] => [alreadyInValidation:protected] => [validationFailures:protected] => Array ( ) [_new:BaseObject:private] => [_deleted:BaseObject:private] => [modifiedColumns:protected] => Array ( ) ) [73] => Category Object ( [languages:protected] => [bok_resources:protected] => [bok_topics:protected] => [bok_keywords:protected] => [id:protected] => 73 [type:protected] => category [parent:protected] => 2 [label:protected] => PCC/Restoration [alreadyInSave:protected] => [alreadyInValidation:protected] => [validationFailures:protected] => Array ( ) [_new:BaseObject:private] => [_deleted:BaseObject:private] => [modifiedColumns:protected] => Array ( ) ) [74] => Category Object ( [languages:protected] => [bok_resources:protected] => [bok_topics:protected] => [bok_keywords:protected] => [id:protected] => 74 [type:protected] => category [parent:protected] => 2 [label:protected] => Pile Driver [alreadyInSave:protected] => [alreadyInValidation:protected] => [validationFailures:protected] => Array ( ) [_new:BaseObject:private] => [_deleted:BaseObject:private] => [modifiedColumns:protected] => Array ( ) ) [76] => Category Object ( [languages:protected] => [bok_resources:protected] => [bok_topics:protected] => [bok_keywords:protected] => [id:protected] => 76 [type:protected] => category [parent:protected] => 2 [label:protected] => Plumber/Pipefitter [alreadyInSave:protected] => [alreadyInValidation:protected] => [validationFailures:protected] => Array ( ) [_new:BaseObject:private] => [_deleted:BaseObject:private] => [modifiedColumns:protected] => Array ( ) ) [77] => Category Object ( [languages:protected] => [bok_resources:protected] => [bok_topics:protected] => [bok_keywords:protected] => [id:protected] => 77 [type:protected] => category [parent:protected] => 2 [label:protected] => Refractory Worker [alreadyInSave:protected] => [alreadyInValidation:protected] => [validationFailures:protected] => Array ( ) [_new:BaseObject:private] => [_deleted:BaseObject:private] => [modifiedColumns:protected] => Array ( ) ) [63] => Category Object ( [languages:protected] => [bok_resources:protected] => [bok_topics:protected] => [bok_keywords:protected] => [id:protected] => 63 [type:protected] => category [parent:protected] => 2 [label:protected] => Reinforcing Ironworker [alreadyInSave:protected] => [alreadyInValidation:protected] => [validationFailures:protected] => Array ( ) [_new:BaseObject:private] => [_deleted:BaseObject:private] => [modifiedColumns:protected] => Array ( ) ) [80] => Category Object ( [languages:protected] => [bok_resources:protected] => [bok_topics:protected] => [bok_keywords:protected] => [id:protected] => 80 [type:protected] => category [parent:protected] => 2 [label:protected] => Sheetmetal Worker [alreadyInSave:protected] => [alreadyInValidation:protected] => [validationFailures:protected] => Array ( ) [_new:BaseObject:private] => [_deleted:BaseObject:private] => [modifiedColumns:protected] => Array ( ) ) [82] => Category Object ( [languages:protected] => [bok_resources:protected] => [bok_topics:protected] => [bok_keywords:protected] => [id:protected] => 82 [type:protected] => category [parent:protected] => 2 [label:protected] => Stonemason [alreadyInSave:protected] => [alreadyInValidation:protected] => [validationFailures:protected] => Array ( ) [_new:BaseObject:private] => [_deleted:BaseObject:private] => [modifiedColumns:protected] => Array ( ) ) [62] => Category Object ( [languages:protected] => [bok_resources:protected] => [bok_topics:protected] => [bok_keywords:protected] => [id:protected] => 62 [type:protected] => category [parent:protected] => 2 [label:protected] => Structural Ironworker [alreadyInSave:protected] => [alreadyInValidation:protected] => [validationFailures:protected] => Array ( ) [_new:BaseObject:private] => [_deleted:BaseObject:private] => [modifiedColumns:protected] => Array ( ) ) [83] => Category Object ( [languages:protected] => [bok_resources:protected] => [bok_topics:protected] => [bok_keywords:protected] => [id:protected] => 83 [type:protected] => category [parent:protected] => 2 [label:protected] => Terrazzo Worker [alreadyInSave:protected] => [alreadyInValidation:protected] => [validationFailures:protected] => Array ( ) [_new:BaseObject:private] => [_deleted:BaseObject:private] => [modifiedColumns:protected] => Array ( ) ) [84] => Category Object ( [languages:protected] => [bok_resources:protected] => [bok_topics:protected] => [bok_keywords:protected] => [id:protected] => 84 [type:protected] => category [parent:protected] => 2 [label:protected] => Tile Setter [alreadyInSave:protected] => [alreadyInValidation:protected] => [validationFailures:protected] => Array ( ) [_new:BaseObject:private] => [_deleted:BaseObject:private] => [modifiedColumns:protected] => Array ( ) ) [86] => Category Object ( [languages:protected] => [bok_resources:protected] => [bok_topics:protected] => [bok_keywords:protected] => [id:protected] => 86 [type:protected] => category [parent:protected] => 2 [label:protected] => Welder [alreadyInSave:protected] => [alreadyInValidation:protected] => [validationFailures:protected] => Array ( ) [_new:BaseObject:private] => [_deleted:BaseObject:private] => [modifiedColumns:protected] => Array ( ) ) [88] => Category Object ( [languages:protected] => [bok_resources:protected] => [bok_topics:protected] => [bok_keywords:protected] => [id:protected] => 88 [type:protected] => category [parent:protected] => 3 [label:protected] => Demolition [alreadyInSave:protected] => [alreadyInValidation:protected] => [validationFailures:protected] => Array ( ) [_new:BaseObject:private] => [_deleted:BaseObject:private] => [modifiedColumns:protected] => Array ( ) ) [89] => Category Object ( [languages:protected] => [bok_resources:protected] => [bok_topics:protected] => [bok_keywords:protected] => [id:protected] => 89 [type:protected] => category [parent:protected] => 3 [label:protected] => Disasters [alreadyInSave:protected] => [alreadyInValidation:protected] => [validationFailures:protected] => Array ( ) [_new:BaseObject:private] => [_deleted:BaseObject:private] => [modifiedColumns:protected] => Array ( ) ) [95] => Category Object ( [languages:protected] => [bok_resources:protected] => [bok_topics:protected] => [bok_keywords:protected] => [id:protected] => 95 [type:protected] => category [parent:protected] => 3 [label:protected] => Underground [alreadyInSave:protected] => [alreadyInValidation:protected] => [validationFailures:protected] => Array ( ) [_new:BaseObject:private] => [_deleted:BaseObject:private] => [modifiedColumns:protected] => Array ( ) ) [102] => Category Object ( [languages:protected] => [bok_resources:protected] => [bok_topics:protected] => [bok_keywords:protected] => [id:protected] => 102 [type:protected] => category [parent:protected] => 6 [label:protected] => Handouts [alreadyInSave:protected] => [alreadyInValidation:protected] => [validationFailures:protected] => Array ( ) [_new:BaseObject:private] => [_deleted:BaseObject:private] => [modifiedColumns:protected] => Array ( ) ) ) [categories_initialized:protected] => 1 [mapped_items:protected] => [content:protected] => [files:protected] => [language:protected] => Language Object ( [id:protected] => 1 [code:protected] => en [name:protected] => English [alreadyInSave:protected] => [alreadyInValidation:protected] => [validationFailures:protected] => Array ( ) [_new:BaseObject:private] => [_deleted:BaseObject:private] => [modifiedColumns:protected] => Array ( ) ) [old_record:protected] => [id:protected] => 4415 [old_id:protected] => [elcosh_id:protected] => d001651 [type:protected] => document [display_type:protected] => HTML only (and links) [user_id:protected] => 0 [language_id:protected] => 1 [tagging_id:protected] => Valeria Contreras [priority_id:protected] => 1 [title:protected] => Working in an Enclosed Cab [total_pages:protected] => 1 [billed_pages:protected] => 1 [publication_number:protected] => [part_of:protected] => [keywords:protected] => Occupation, construction, safety, health, hazards, work, worker, workplace, OSHA, silicosis, mining, silica, DOE, EEOICPA, labor, lung, CBD, dust, cab, miner, mine [comments:protected] => [summary:protected] => This CPWR Hazard Alert on Working in enclosed cabs provides information on protecting workers from silica dust, how to minimize exposures and the dangers of silica dust. Click on the following links to access the English version and the Spanish version. [transition_comments:protected] => [external_link:protected] => [consol_link:protected] => [more_like_this:protected] => [permission_given_by:protected] => [published:protected] => T [billable:protected] => F [img_name:protected] => [img_ext:protected] => [img_width:protected] => [img_height:protected] => [img_credit:protected] => [img_practice:protected] => [vid_source_id:protected] => [vid_running_time:protected] => [vid_intended_audience:protected] => [vid_acquisition_info:protected] => [vid_cost:protected] => [vid_producer:protected] => [vid_filename:protected] => [vid_filename_downloadable:protected] => [date_summary:protected] => [date_permission_requested:protected] => [date_permission_received:protected] => [date_review_needed:protected] => [date_received:protected] => 10/08/20 [date_completed:protected] => 10/08/20 [date_billed:protected] => [date_modified:protected] => 10/08/20 [collBokExports:protected] => [lastBokExportCriteria:BaseElcoshItem:private] => [alreadyInSave:protected] => [alreadyInValidation:protected] => [validationFailures:protected] => Array ( ) [_new:BaseObject:private] => [_deleted:BaseObject:private] => [modifiedColumns:protected] => Array ( ) ) ) [4] => Search_Result Object ( [title] => Toolbox Talk: Suicide Prevention [image] => /record/images/notavailable-p.png [blurb] => The CPWR Toolbox Talk on Suicide Prevention addresses the prevalence of suicide among construction workers. The resource includes a brief case example... [category] => Array ( [0] => 13 [1] => 20 [2] => 23 [3] => 40 [4] => 44 [5] => 45 [6] => 46 [7] => 47 [8] => 48 [9] => 49 [10] => 50 [11] => 51 [12] => 52 [13] => 53 [14] => 54 [15] => 55 [16] => 56 [17] => 57 [18] => 58 [19] => 59 [20] => 60 [21] => 61 [22] => 64 [23] => 65 [24] => 66 [25] => 67 [26] => 68 [27] => 69 [28] => 70 [29] => 71 [30] => 72 [31] => 73 [32] => 74 [33] => 75 [34] => 76 [35] => 77 [36] => 63 [37] => 78 [38] => 79 [39] => 80 [40] => 81 [41] => 82 [42] => 62 [43] => 83 [44] => 84 [45] => 85 [46] => 86 [47] => 87 [48] => 88 [49] => 89 [50] => 91 [51] => 90 [52] => 92 [53] => 93 [54] => 94 [55] => 95 [56] => 100 ) [labels] => Array ( [0] => Drugs, Alcohol & Tobacco [1] => Work Environment [2] => Hazards [3] => Safety Culture [6] => Stress & Overtime [9] => Overexertion [10] => Ergonomic [12] => Acoustical Ceiling Carpenter [13] => Trades [14] => Asbestos/Insulator [16] => Boilermaker [18] => Bricklayer [20] => Cabinetmaker [22] => Carpenter [24] => Carpet Layer [26] => Cement Mason [28] => Commercial Diver [30] => Concrete Polisher [32] => Drywall Applicator Specialist [34] => Electrical Worker [36] => Elevator Constructor [38] => Flagger [40] => Glazier [42] => Hazardous Waste Cleanup [44] => HVAC [46] => Interior Systems Carpenter [48] => Laborer [50] => Landscaper [52] => Lather [54] => Lead Abatement Worker [56] => Maintenance Worker [58] => Millwright [60] => Operating Engineer [62] => Painter [64] => Paper Hanger [66] => PCC/Restoration [68] => Pile Driver [70] => Plasterer [72] => Plumber/Pipefitter [74] => Refractory Worker [76] => Reinforcing Ironworker [78] => Roofer/Waterproofer [80] => Scaffold Erector [82] => Sheetmetal Worker [84] => Sprinkler Fitter [86] => Stonemason [88] => Structural Ironworker [90] => Terrazzo Worker [92] => Tile Setter [94] => Truck Driver [96] => Welder [98] => Commercial & Institutional [99] => Jobsites [100] => Demolition [102] => Disasters [104] => Heavy & Highway [106] => Industrial [108] => LEED/Green Construction [110] => Renovations [112] => Residential [114] => Underground [116] => Toolbox Talks [117] => Documents [118] => Media & Documents ) [type] => Toolbox Talks [sub_category] => [url] => /document/4419/d001652/Toolbox%2BTalk%253A%2BSuicide%2BPrevention.html [item:protected] => DocumentRecord Object ( [records:protected] => Array ( ) [recordId:protected] => [searchWordClass:protected] => [searchWordPeerClass:protected] => [bok_record:protected] => [authors:protected] => [organizations:protected] => [collections:protected] => [categories:protected] => Array ( [13] => Category Object ( [languages:protected] => [bok_resources:protected] => [bok_topics:protected] => [bok_keywords:protected] => [id:protected] => 13 [type:protected] => category [parent:protected] => 7 [label:protected] => Drugs, Alcohol & Tobacco [alreadyInSave:protected] => [alreadyInValidation:protected] => [validationFailures:protected] => Array ( ) [_new:BaseObject:private] => [_deleted:BaseObject:private] => [modifiedColumns:protected] => Array ( ) ) [20] => Category Object ( [languages:protected] => [bok_resources:protected] => [bok_topics:protected] => [bok_keywords:protected] => [id:protected] => 20 [type:protected] => category [parent:protected] => 7 [label:protected] => Safety Culture [alreadyInSave:protected] => [alreadyInValidation:protected] => [validationFailures:protected] => Array ( ) [_new:BaseObject:private] => [_deleted:BaseObject:private] => [modifiedColumns:protected] => Array ( ) ) [23] => Category Object ( [languages:protected] => [bok_resources:protected] => [bok_topics:protected] => [bok_keywords:protected] => [id:protected] => 23 [type:protected] => category [parent:protected] => 7 [label:protected] => Stress & Overtime [alreadyInSave:protected] => [alreadyInValidation:protected] => [validationFailures:protected] => Array ( ) [_new:BaseObject:private] => [_deleted:BaseObject:private] => [modifiedColumns:protected] => Array ( ) ) [40] => Category Object ( [languages:protected] => [bok_resources:protected] => [bok_topics:protected] => [bok_keywords:protected] => [id:protected] => 40 [type:protected] => category [parent:protected] => 9 [label:protected] => Overexertion [alreadyInSave:protected] => [alreadyInValidation:protected] => [validationFailures:protected] => Array ( ) [_new:BaseObject:private] => [_deleted:BaseObject:private] => [modifiedColumns:protected] => Array ( ) ) [44] => Category Object ( [languages:protected] => [bok_resources:protected] => [bok_topics:protected] => [bok_keywords:protected] => [id:protected] => 44 [type:protected] => category [parent:protected] => 2 [label:protected] => Acoustical Ceiling Carpenter [alreadyInSave:protected] => [alreadyInValidation:protected] => [validationFailures:protected] => Array ( ) [_new:BaseObject:private] => [_deleted:BaseObject:private] => [modifiedColumns:protected] => Array ( ) ) [45] => Category Object ( [languages:protected] => [bok_resources:protected] => [bok_topics:protected] => [bok_keywords:protected] => [id:protected] => 45 [type:protected] => category [parent:protected] => 2 [label:protected] => Asbestos/Insulator [alreadyInSave:protected] => [alreadyInValidation:protected] => [validationFailures:protected] => Array ( ) [_new:BaseObject:private] => [_deleted:BaseObject:private] => [modifiedColumns:protected] => Array ( ) ) [46] => Category Object ( [languages:protected] => [bok_resources:protected] => [bok_topics:protected] => [bok_keywords:protected] => [id:protected] => 46 [type:protected] => category [parent:protected] => 2 [label:protected] => Boilermaker [alreadyInSave:protected] => [alreadyInValidation:protected] => [validationFailures:protected] => Array ( ) [_new:BaseObject:private] => [_deleted:BaseObject:private] => [modifiedColumns:protected] => Array ( ) ) [47] => Category Object ( [languages:protected] => [bok_resources:protected] => [bok_topics:protected] => [bok_keywords:protected] => [id:protected] => 47 [type:protected] => category [parent:protected] => 2 [label:protected] => Bricklayer [alreadyInSave:protected] => [alreadyInValidation:protected] => [validationFailures:protected] => Array ( ) [_new:BaseObject:private] => [_deleted:BaseObject:private] => [modifiedColumns:protected] => Array ( ) ) [48] => Category Object ( [languages:protected] => [bok_resources:protected] => [bok_topics:protected] => [bok_keywords:protected] => [id:protected] => 48 [type:protected] => category [parent:protected] => 2 [label:protected] => Cabinetmaker [alreadyInSave:protected] => [alreadyInValidation:protected] => [validationFailures:protected] => Array ( ) [_new:BaseObject:private] => [_deleted:BaseObject:private] => [modifiedColumns:protected] => Array ( ) ) [49] => Category Object ( [languages:protected] => [bok_resources:protected] => [bok_topics:protected] => [bok_keywords:protected] => [id:protected] => 49 [type:protected] => category [parent:protected] => 2 [label:protected] => Carpenter [alreadyInSave:protected] => [alreadyInValidation:protected] => [validationFailures:protected] => Array ( ) [_new:BaseObject:private] => [_deleted:BaseObject:private] => [modifiedColumns:protected] => Array ( ) ) [50] => Category Object ( [languages:protected] => [bok_resources:protected] => [bok_topics:protected] => [bok_keywords:protected] => [id:protected] => 50 [type:protected] => category [parent:protected] => 2 [label:protected] => Carpet Layer [alreadyInSave:protected] => [alreadyInValidation:protected] => [validationFailures:protected] => Array ( ) [_new:BaseObject:private] => [_deleted:BaseObject:private] => [modifiedColumns:protected] => Array ( ) ) [51] => Category Object ( [languages:protected] => [bok_resources:protected] => [bok_topics:protected] => [bok_keywords:protected] => [id:protected] => 51 [type:protected] => category [parent:protected] => 2 [label:protected] => Cement Mason [alreadyInSave:protected] => [alreadyInValidation:protected] => [validationFailures:protected] => Array ( ) [_new:BaseObject:private] => [_deleted:BaseObject:private] => [modifiedColumns:protected] => Array ( ) ) [52] => Category Object ( [languages:protected] => [bok_resources:protected] => [bok_topics:protected] => [bok_keywords:protected] => [id:protected] => 52 [type:protected] => category [parent:protected] => 2 [label:protected] => Commercial Diver [alreadyInSave:protected] => [alreadyInValidation:protected] => [validationFailures:protected] => Array ( ) [_new:BaseObject:private] => [_deleted:BaseObject:private] => [modifiedColumns:protected] => Array ( ) ) [53] => Category Object ( [languages:protected] => [bok_resources:protected] => [bok_topics:protected] => [bok_keywords:protected] => [id:protected] => 53 [type:protected] => category [parent:protected] => 2 [label:protected] => Concrete Polisher [alreadyInSave:protected] => [alreadyInValidation:protected] => [validationFailures:protected] => Array ( ) [_new:BaseObject:private] => [_deleted:BaseObject:private] => [modifiedColumns:protected] => Array ( ) ) [54] => Category Object ( [languages:protected] => [bok_resources:protected] => [bok_topics:protected] => [bok_keywords:protected] => [id:protected] => 54 [type:protected] => category [parent:protected] => 2 [label:protected] => Drywall Applicator Specialist [alreadyInSave:protected] => [alreadyInValidation:protected] => [validationFailures:protected] => Array ( ) [_new:BaseObject:private] => [_deleted:BaseObject:private] => [modifiedColumns:protected] => Array ( ) ) [55] => Category Object ( [languages:protected] => [bok_resources:protected] => [bok_topics:protected] => [bok_keywords:protected] => [id:protected] => 55 [type:protected] => category [parent:protected] => 2 [label:protected] => Electrical Worker [alreadyInSave:protected] => [alreadyInValidation:protected] => [validationFailures:protected] => Array ( ) [_new:BaseObject:private] => [_deleted:BaseObject:private] => [modifiedColumns:protected] => Array ( ) ) [56] => Category Object ( [languages:protected] => [bok_resources:protected] => [bok_topics:protected] => [bok_keywords:protected] => [id:protected] => 56 [type:protected] => category [parent:protected] => 2 [label:protected] => Elevator Constructor [alreadyInSave:protected] => [alreadyInValidation:protected] => [validationFailures:protected] => Array ( ) [_new:BaseObject:private] => [_deleted:BaseObject:private] => [modifiedColumns:protected] => Array ( ) ) [57] => Category Object ( [languages:protected] => [bok_resources:protected] => [bok_topics:protected] => [bok_keywords:protected] => [id:protected] => 57 [type:protected] => category [parent:protected] => 2 [label:protected] => Flagger [alreadyInSave:protected] => [alreadyInValidation:protected] => [validationFailures:protected] => Array ( ) [_new:BaseObject:private] => [_deleted:BaseObject:private] => [modifiedColumns:protected] => Array ( ) ) [58] => Category Object ( [languages:protected] => [bok_resources:protected] => [bok_topics:protected] => [bok_keywords:protected] => [id:protected] => 58 [type:protected] => category [parent:protected] => 2 [label:protected] => Glazier [alreadyInSave:protected] => [alreadyInValidation:protected] => [validationFailures:protected] => Array ( ) [_new:BaseObject:private] => [_deleted:BaseObject:private] => [modifiedColumns:protected] => Array ( ) ) [59] => Category Object ( [languages:protected] => [bok_resources:protected] => [bok_topics:protected] => [bok_keywords:protected] => [id:protected] => 59 [type:protected] => category [parent:protected] => 2 [label:protected] => Hazardous Waste Cleanup [alreadyInSave:protected] => [alreadyInValidation:protected] => [validationFailures:protected] => Array ( ) [_new:BaseObject:private] => [_deleted:BaseObject:private] => [modifiedColumns:protected] => Array ( ) ) [60] => Category Object ( [languages:protected] => [bok_resources:protected] => [bok_topics:protected] => [bok_keywords:protected] => [id:protected] => 60 [type:protected] => category [parent:protected] => 2 [label:protected] => HVAC [alreadyInSave:protected] => [alreadyInValidation:protected] => [validationFailures:protected] => Array ( ) [_new:BaseObject:private] => [_deleted:BaseObject:private] => [modifiedColumns:protected] => Array ( ) ) [61] => Category Object ( [languages:protected] => [bok_resources:protected] => [bok_topics:protected] => [bok_keywords:protected] => [id:protected] => 61 [type:protected] => category [parent:protected] => 2 [label:protected] => Interior Systems Carpenter [alreadyInSave:protected] => [alreadyInValidation:protected] => [validationFailures:protected] => Array ( ) [_new:BaseObject:private] => [_deleted:BaseObject:private] => [modifiedColumns:protected] => Array ( ) ) [64] => Category Object ( [languages:protected] => [bok_resources:protected] => [bok_topics:protected] => [bok_keywords:protected] => [id:protected] => 64 [type:protected] => category [parent:protected] => 2 [label:protected] => Laborer [alreadyInSave:protected] => [alreadyInValidation:protected] => [validationFailures:protected] => Array ( ) [_new:BaseObject:private] => [_deleted:BaseObject:private] => [modifiedColumns:protected] => Array ( ) ) [65] => Category Object ( [languages:protected] => [bok_resources:protected] => [bok_topics:protected] => [bok_keywords:protected] => [id:protected] => 65 [type:protected] => category [parent:protected] => 2 [label:protected] => Landscaper [alreadyInSave:protected] => [alreadyInValidation:protected] => [validationFailures:protected] => Array ( ) [_new:BaseObject:private] => [_deleted:BaseObject:private] => [modifiedColumns:protected] => Array ( ) ) [66] => Category Object ( [languages:protected] => [bok_resources:protected] => [bok_topics:protected] => [bok_keywords:protected] => [id:protected] => 66 [type:protected] => category [parent:protected] => 2 [label:protected] => Lather [alreadyInSave:protected] => [alreadyInValidation:protected] => [validationFailures:protected] => Array ( ) [_new:BaseObject:private] => [_deleted:BaseObject:private] => [modifiedColumns:protected] => Array ( ) ) [67] => Category Object ( [languages:protected] => [bok_resources:protected] => [bok_topics:protected] => [bok_keywords:protected] => [id:protected] => 67 [type:protected] => category [parent:protected] => 2 [label:protected] => Lead Abatement Worker [alreadyInSave:protected] => [alreadyInValidation:protected] => [validationFailures:protected] => Array ( ) [_new:BaseObject:private] => [_deleted:BaseObject:private] => [modifiedColumns:protected] => Array ( ) ) [68] => Category Object ( [languages:protected] => [bok_resources:protected] => [bok_topics:protected] => [bok_keywords:protected] => [id:protected] => 68 [type:protected] => category [parent:protected] => 2 [label:protected] => Maintenance Worker [alreadyInSave:protected] => [alreadyInValidation:protected] => [validationFailures:protected] => Array ( ) [_new:BaseObject:private] => [_deleted:BaseObject:private] => [modifiedColumns:protected] => Array ( ) ) [69] => Category Object ( [languages:protected] => [bok_resources:protected] => [bok_topics:protected] => [bok_keywords:protected] => [id:protected] => 69 [type:protected] => category [parent:protected] => 2 [label:protected] => Millwright [alreadyInSave:protected] => [alreadyInValidation:protected] => [validationFailures:protected] => Array ( ) [_new:BaseObject:private] => [_deleted:BaseObject:private] => [modifiedColumns:protected] => Array ( ) ) [70] => Category Object ( [languages:protected] => [bok_resources:protected] => [bok_topics:protected] => [bok_keywords:protected] => [id:protected] => 70 [type:protected] => category [parent:protected] => 2 [label:protected] => Operating Engineer [alreadyInSave:protected] => [alreadyInValidation:protected] => [validationFailures:protected] => Array ( ) [_new:BaseObject:private] => [_deleted:BaseObject:private] => [modifiedColumns:protected] => Array ( ) ) [71] => Category Object ( [languages:protected] => [bok_resources:protected] => [bok_topics:protected] => [bok_keywords:protected] => [id:protected] => 71 [type:protected] => category [parent:protected] => 2 [label:protected] => Painter [alreadyInSave:protected] => [alreadyInValidation:protected] => [validationFailures:protected] => Array ( ) [_new:BaseObject:private] => [_deleted:BaseObject:private] => [modifiedColumns:protected] => Array ( ) ) [72] => Category Object ( [languages:protected] => [bok_resources:protected] => [bok_topics:protected] => [bok_keywords:protected] => [id:protected] => 72 [type:protected] => category [parent:protected] => 2 [label:protected] => Paper Hanger [alreadyInSave:protected] => [alreadyInValidation:protected] => [validationFailures:protected] => Array ( ) [_new:BaseObject:private] => [_deleted:BaseObject:private] => [modifiedColumns:protected] => Array ( ) ) [73] => Category Object ( [languages:protected] => [bok_resources:protected] => [bok_topics:protected] => [bok_keywords:protected] => [id:protected] => 73 [type:protected] => category [parent:protected] => 2 [label:protected] => PCC/Restoration [alreadyInSave:protected] => [alreadyInValidation:protected] => [validationFailures:protected] => Array ( ) [_new:BaseObject:private] => [_deleted:BaseObject:private] => [modifiedColumns:protected] => Array ( ) ) [74] => Category Object ( [languages:protected] => [bok_resources:protected] => [bok_topics:protected] => [bok_keywords:protected] => [id:protected] => 74 [type:protected] => category [parent:protected] => 2 [label:protected] => Pile Driver [alreadyInSave:protected] => [alreadyInValidation:protected] => [validationFailures:protected] => Array ( ) [_new:BaseObject:private] => [_deleted:BaseObject:private] => [modifiedColumns:protected] => Array ( ) ) [75] => Category Object ( [languages:protected] => [bok_resources:protected] => [bok_topics:protected] => [bok_keywords:protected] => [id:protected] => 75 [type:protected] => category [parent:protected] => 2 [label:protected] => Plasterer [alreadyInSave:protected] => [alreadyInValidation:protected] => [validationFailures:protected] => Array ( ) [_new:BaseObject:private] => [_deleted:BaseObject:private] => [modifiedColumns:protected] => Array ( ) ) [76] => Category Object ( [languages:protected] => [bok_resources:protected] => [bok_topics:protected] => [bok_keywords:protected] => [id:protected] => 76 [type:protected] => category [parent:protected] => 2 [label:protected] => Plumber/Pipefitter [alreadyInSave:protected] => [alreadyInValidation:protected] => [validationFailures:protected] => Array ( ) [_new:BaseObject:private] => [_deleted:BaseObject:private] => [modifiedColumns:protected] => Array ( ) ) [77] => Category Object ( [languages:protected] => [bok_resources:protected] => [bok_topics:protected] => [bok_keywords:protected] => [id:protected] => 77 [type:protected] => category [parent:protected] => 2 [label:protected] => Refractory Worker [alreadyInSave:protected] => [alreadyInValidation:protected] => [validationFailures:protected] => Array ( ) [_new:BaseObject:private] => [_deleted:BaseObject:private] => [modifiedColumns:protected] => Array ( ) ) [63] => Category Object ( [languages:protected] => [bok_resources:protected] => [bok_topics:protected] => [bok_keywords:protected] => [id:protected] => 63 [type:protected] => category [parent:protected] => 2 [label:protected] => Reinforcing Ironworker [alreadyInSave:protected] => [alreadyInValidation:protected] => [validationFailures:protected] => Array ( ) [_new:BaseObject:private] => [_deleted:BaseObject:private] => [modifiedColumns:protected] => Array ( ) ) [78] => Category Object ( [languages:protected] => [bok_resources:protected] => [bok_topics:protected] => [bok_keywords:protected] => [id:protected] => 78 [type:protected] => category [parent:protected] => 2 [label:protected] => Roofer/Waterproofer [alreadyInSave:protected] => [alreadyInValidation:protected] => [validationFailures:protected] => Array ( ) [_new:BaseObject:private] => [_deleted:BaseObject:private] => [modifiedColumns:protected] => Array ( ) ) [79] => Category Object ( [languages:protected] => [bok_resources:protected] => [bok_topics:protected] => [bok_keywords:protected] => [id:protected] => 79 [type:protected] => category [parent:protected] => 2 [label:protected] => Scaffold Erector [alreadyInSave:protected] => [alreadyInValidation:protected] => [validationFailures:protected] => Array ( ) [_new:BaseObject:private] => [_deleted:BaseObject:private] => [modifiedColumns:protected] => Array ( ) ) [80] => Category Object ( [languages:protected] => [bok_resources:protected] => [bok_topics:protected] => [bok_keywords:protected] => [id:protected] => 80 [type:protected] => category [parent:protected] => 2 [label:protected] => Sheetmetal Worker [alreadyInSave:protected] => [alreadyInValidation:protected] => [validationFailures:protected] => Array ( ) [_new:BaseObject:private] => [_deleted:BaseObject:private] => [modifiedColumns:protected] => Array ( ) ) [81] => Category Object ( [languages:protected] => [bok_resources:protected] => [bok_topics:protected] => [bok_keywords:protected] => [id:protected] => 81 [type:protected] => category [parent:protected] => 2 [label:protected] => Sprinkler Fitter [alreadyInSave:protected] => [alreadyInValidation:protected] => [validationFailures:protected] => Array ( ) [_new:BaseObject:private] => [_deleted:BaseObject:private] => [modifiedColumns:protected] => Array ( ) ) [82] => Category Object ( [languages:protected] => [bok_resources:protected] => [bok_topics:protected] => [bok_keywords:protected] => [id:protected] => 82 [type:protected] => category [parent:protected] => 2 [label:protected] => Stonemason [alreadyInSave:protected] => [alreadyInValidation:protected] => [validationFailures:protected] => Array ( ) [_new:BaseObject:private] => [_deleted:BaseObject:private] => [modifiedColumns:protected] => Array ( ) ) [62] => Category Object ( [languages:protected] => [bok_resources:protected] => [bok_topics:protected] => [bok_keywords:protected] => [id:protected] => 62 [type:protected] => category [parent:protected] => 2 [label:protected] => Structural Ironworker [alreadyInSave:protected] => [alreadyInValidation:protected] => [validationFailures:protected] => Array ( ) [_new:BaseObject:private] => [_deleted:BaseObject:private] => [modifiedColumns:protected] => Array ( ) ) [83] => Category Object ( [languages:protected] => [bok_resources:protected] => [bok_topics:protected] => [bok_keywords:protected] => [id:protected] => 83 [type:protected] => category [parent:protected] => 2 [label:protected] => Terrazzo Worker [alreadyInSave:protected] => [alreadyInValidation:protected] => [validationFailures:protected] => Array ( ) [_new:BaseObject:private] => [_deleted:BaseObject:private] => [modifiedColumns:protected] => Array ( ) ) [84] => Category Object ( [languages:protected] => [bok_resources:protected] => [bok_topics:protected] => [bok_keywords:protected] => [id:protected] => 84 [type:protected] => category [parent:protected] => 2 [label:protected] => Tile Setter [alreadyInSave:protected] => [alreadyInValidation:protected] => [validationFailures:protected] => Array ( ) [_new:BaseObject:private] => [_deleted:BaseObject:private] => [modifiedColumns:protected] => Array ( ) ) [85] => Category Object ( [languages:protected] => [bok_resources:protected] => [bok_topics:protected] => [bok_keywords:protected] => [id:protected] => 85 [type:protected] => category [parent:protected] => 2 [label:protected] => Truck Driver [alreadyInSave:protected] => [alreadyInValidation:protected] => [validationFailures:protected] => Array ( ) [_new:BaseObject:private] => [_deleted:BaseObject:private] => [modifiedColumns:protected] => Array ( ) ) [86] => Category Object ( [languages:protected] => [bok_resources:protected] => [bok_topics:protected] => [bok_keywords:protected] => [id:protected] => 86 [type:protected] => category [parent:protected] => 2 [label:protected] => Welder [alreadyInSave:protected] => [alreadyInValidation:protected] => [validationFailures:protected] => Array ( ) [_new:BaseObject:private] => [_deleted:BaseObject:private] => [modifiedColumns:protected] => Array ( ) ) [87] => Category Object ( [languages:protected] => [bok_resources:protected] => [bok_topics:protected] => [bok_keywords:protected] => [id:protected] => 87 [type:protected] => category [parent:protected] => 3 [label:protected] => Commercial & Institutional [alreadyInSave:protected] => [alreadyInValidation:protected] => [validationFailures:protected] => Array ( ) [_new:BaseObject:private] => [_deleted:BaseObject:private] => [modifiedColumns:protected] => Array ( ) ) [88] => Category Object ( [languages:protected] => [bok_resources:protected] => [bok_topics:protected] => [bok_keywords:protected] => [id:protected] => 88 [type:protected] => category [parent:protected] => 3 [label:protected] => Demolition [alreadyInSave:protected] => [alreadyInValidation:protected] => [validationFailures:protected] => Array ( ) [_new:BaseObject:private] => [_deleted:BaseObject:private] => [modifiedColumns:protected] => Array ( ) ) [89] => Category Object ( [languages:protected] => [bok_resources:protected] => [bok_topics:protected] => [bok_keywords:protected] => [id:protected] => 89 [type:protected] => category [parent:protected] => 3 [label:protected] => Disasters [alreadyInSave:protected] => [alreadyInValidation:protected] => [validationFailures:protected] => Array ( ) [_new:BaseObject:private] => [_deleted:BaseObject:private] => [modifiedColumns:protected] => Array ( ) ) [91] => Category Object ( [languages:protected] => [bok_resources:protected] => [bok_topics:protected] => [bok_keywords:protected] => [id:protected] => 91 [type:protected] => category [parent:protected] => 3 [label:protected] => Heavy & Highway [alreadyInSave:protected] => [alreadyInValidation:protected] => [validationFailures:protected] => Array ( ) [_new:BaseObject:private] => [_deleted:BaseObject:private] => [modifiedColumns:protected] => Array ( ) ) [90] => Category Object ( [languages:protected] => [bok_resources:protected] => [bok_topics:protected] => [bok_keywords:protected] => [id:protected] => 90 [type:protected] => category [parent:protected] => 3 [label:protected] => Industrial [alreadyInSave:protected] => [alreadyInValidation:protected] => [validationFailures:protected] => Array ( ) [_new:BaseObject:private] => [_deleted:BaseObject:private] => [modifiedColumns:protected] => Array ( ) ) [92] => Category Object ( [languages:protected] => [bok_resources:protected] => [bok_topics:protected] => [bok_keywords:protected] => [id:protected] => 92 [type:protected] => category [parent:protected] => 3 [label:protected] => LEED/Green Construction [alreadyInSave:protected] => [alreadyInValidation:protected] => [validationFailures:protected] => Array ( ) [_new:BaseObject:private] => [_deleted:BaseObject:private] => [modifiedColumns:protected] => Array ( ) ) [93] => Category Object ( [languages:protected] => [bok_resources:protected] => [bok_topics:protected] => [bok_keywords:protected] => [id:protected] => 93 [type:protected] => category [parent:protected] => 3 [label:protected] => Renovations [alreadyInSave:protected] => [alreadyInValidation:protected] => [validationFailures:protected] => Array ( ) [_new:BaseObject:private] => [_deleted:BaseObject:private] => [modifiedColumns:protected] => Array ( ) ) [94] => Category Object ( [languages:protected] => [bok_resources:protected] => [bok_topics:protected] => [bok_keywords:protected] => [id:protected] => 94 [type:protected] => category [parent:protected] => 3 [label:protected] => Residential [alreadyInSave:protected] => [alreadyInValidation:protected] => [validationFailures:protected] => Array ( ) [_new:BaseObject:private] => [_deleted:BaseObject:private] => [modifiedColumns:protected] => Array ( ) ) [95] => Category Object ( [languages:protected] => [bok_resources:protected] => [bok_topics:protected] => [bok_keywords:protected] => [id:protected] => 95 [type:protected] => category [parent:protected] => 3 [label:protected] => Underground [alreadyInSave:protected] => [alreadyInValidation:protected] => [validationFailures:protected] => Array ( ) [_new:BaseObject:private] => [_deleted:BaseObject:private] => [modifiedColumns:protected] => Array ( ) ) [100] => Category Object ( [languages:protected] => [bok_resources:protected] => [bok_topics:protected] => [bok_keywords:protected] => [id:protected] => 100 [type:protected] => category [parent:protected] => 6 [label:protected] => Toolbox Talks [alreadyInSave:protected] => [alreadyInValidation:protected] => [validationFailures:protected] => Array ( ) [_new:BaseObject:private] => [_deleted:BaseObject:private] => [modifiedColumns:protected] => Array ( ) ) ) [categories_initialized:protected] => 1 [mapped_items:protected] => [content:protected] => [files:protected] => [language:protected] => Language Object ( [id:protected] => 1 [code:protected] => en [name:protected] => English [alreadyInSave:protected] => [alreadyInValidation:protected] => [validationFailures:protected] => Array ( ) [_new:BaseObject:private] => [_deleted:BaseObject:private] => [modifiedColumns:protected] => Array ( ) ) [old_record:protected] => [id:protected] => 4419 [old_id:protected] => [elcosh_id:protected] => d001652 [type:protected] => document [display_type:protected] => HTML only (and links) [user_id:protected] => 0 [language_id:protected] => 1 [tagging_id:protected] => Valeria Contreras [priority_id:protected] => 1 [title:protected] => Toolbox Talk: Suicide Prevention [total_pages:protected] => 1 [billed_pages:protected] => 1 [publication_number:protected] => [part_of:protected] => [keywords:protected] => suicide, suicide prevention, mental health, stress, depression, exhaustion, burnout, safety, support, emotional support, health [comments:protected] => [summary:protected] =>The CPWR Toolbox Talk on Suicide Prevention addresses the prevalence of suicide among construction workers. The resource includes a brief case example, steps to prevent a related injury or illness, and questions for discussion. It includes an image that illustrates the hazard, which can be posted in a central location as a reminder of steps to work safely.
Available in English and Spanish. [transition_comments:protected] => [external_link:protected] => [consol_link:protected] => [more_like_this:protected] => [permission_given_by:protected] => [published:protected] => T [billable:protected] => F [img_name:protected] => [img_ext:protected] => [img_width:protected] => [img_height:protected] => [img_credit:protected] => [img_practice:protected] => [vid_source_id:protected] => [vid_running_time:protected] => [vid_intended_audience:protected] => [vid_acquisition_info:protected] => [vid_cost:protected] => [vid_producer:protected] => [vid_filename:protected] => [vid_filename_downloadable:protected] => [date_summary:protected] => [date_permission_requested:protected] => [date_permission_received:protected] => [date_review_needed:protected] => [date_received:protected] => 10/08/20 [date_completed:protected] => 10/08/20 [date_billed:protected] => [date_modified:protected] => 05/19/23 [collBokExports:protected] => [lastBokExportCriteria:BaseElcoshItem:private] => [alreadyInSave:protected] => [alreadyInValidation:protected] => [validationFailures:protected] => Array ( ) [_new:BaseObject:private] => [_deleted:BaseObject:private] => [modifiedColumns:protected] => Array ( ) ) ) ) [new_images] => Array ( [0] => Search_Result Object ( [title] => Toolbox talk - crew view [image] => /record/images/4005-p.jpg [blurb] => Photo of crew listening to a toolbox safety talk before starting work.... [category] => Array ( [0] => 97 [1] => 20 [2] => 47 [3] => 49 [4] => 51 [5] => 55 [6] => 61 [7] => 64 [8] => 71 [9] => 75 [10] => 63 [11] => 79 [12] => 62 [13] => 87 [14] => 88 [15] => 91 [16] => 90 [17] => 93 [18] => 94 [19] => 95 ) [labels] => Array ( [0] => Images [1] => Media [2] => Media & Documents [3] => Safety Culture [4] => Work Environment [5] => Hazards [6] => Bricklayer [7] => Trades [8] => Carpenter [10] => Cement Mason [12] => Electrical Worker [14] => Interior Systems Carpenter [16] => Laborer [18] => Painter [20] => Plasterer [22] => Reinforcing Ironworker [24] => Scaffold Erector [26] => Structural Ironworker [28] => Commercial & Institutional [29] => Jobsites [30] => Demolition [32] => Heavy & Highway [34] => Industrial [36] => Renovations [38] => Residential [40] => Underground ) [type] => Images [sub_category] => [url] => /image/4005/i002692/Toolbox%2Btalk%2B-%2Bcrew%2Bview.html [item:protected] => ImageRecord Object ( [records:protected] => Array ( ) [recordId:protected] => [searchWordClass:protected] => [searchWordPeerClass:protected] => [bok_record:protected] => [authors:protected] => [organizations:protected] => [collections:protected] => [categories:protected] => Array ( [97] => Category Object ( [languages:protected] => [bok_resources:protected] => [bok_topics:protected] => [bok_keywords:protected] => [id:protected] => 97 [type:protected] => category [parent:protected] => 5 [label:protected] => Images [alreadyInSave:protected] => [alreadyInValidation:protected] => [validationFailures:protected] => Array ( ) [_new:BaseObject:private] => [_deleted:BaseObject:private] => [modifiedColumns:protected] => Array ( ) ) [20] => Category Object ( [languages:protected] => [bok_resources:protected] => [bok_topics:protected] => [bok_keywords:protected] => [id:protected] => 20 [type:protected] => category [parent:protected] => 7 [label:protected] => Safety Culture [alreadyInSave:protected] => [alreadyInValidation:protected] => [validationFailures:protected] => Array ( ) [_new:BaseObject:private] => [_deleted:BaseObject:private] => [modifiedColumns:protected] => Array ( ) ) [47] => Category Object ( [languages:protected] => [bok_resources:protected] => [bok_topics:protected] => [bok_keywords:protected] => [id:protected] => 47 [type:protected] => category [parent:protected] => 2 [label:protected] => Bricklayer [alreadyInSave:protected] => [alreadyInValidation:protected] => [validationFailures:protected] => Array ( ) [_new:BaseObject:private] => [_deleted:BaseObject:private] => [modifiedColumns:protected] => Array ( ) ) [49] => Category Object ( [languages:protected] => [bok_resources:protected] => [bok_topics:protected] => [bok_keywords:protected] => [id:protected] => 49 [type:protected] => category [parent:protected] => 2 [label:protected] => Carpenter [alreadyInSave:protected] => [alreadyInValidation:protected] => [validationFailures:protected] => Array ( ) [_new:BaseObject:private] => [_deleted:BaseObject:private] => [modifiedColumns:protected] => Array ( ) ) [51] => Category Object ( [languages:protected] => [bok_resources:protected] => [bok_topics:protected] => [bok_keywords:protected] => [id:protected] => 51 [type:protected] => category [parent:protected] => 2 [label:protected] => Cement Mason [alreadyInSave:protected] => [alreadyInValidation:protected] => [validationFailures:protected] => Array ( ) [_new:BaseObject:private] => [_deleted:BaseObject:private] => [modifiedColumns:protected] => Array ( ) ) [55] => Category Object ( [languages:protected] => [bok_resources:protected] => [bok_topics:protected] => [bok_keywords:protected] => [id:protected] => 55 [type:protected] => category [parent:protected] => 2 [label:protected] => Electrical Worker [alreadyInSave:protected] => [alreadyInValidation:protected] => [validationFailures:protected] => Array ( ) [_new:BaseObject:private] => [_deleted:BaseObject:private] => [modifiedColumns:protected] => Array ( ) ) [61] => Category Object ( [languages:protected] => [bok_resources:protected] => [bok_topics:protected] => [bok_keywords:protected] => [id:protected] => 61 [type:protected] => category [parent:protected] => 2 [label:protected] => Interior Systems Carpenter [alreadyInSave:protected] => [alreadyInValidation:protected] => [validationFailures:protected] => Array ( ) [_new:BaseObject:private] => [_deleted:BaseObject:private] => [modifiedColumns:protected] => Array ( ) ) [64] => Category Object ( [languages:protected] => [bok_resources:protected] => [bok_topics:protected] => [bok_keywords:protected] => [id:protected] => 64 [type:protected] => category [parent:protected] => 2 [label:protected] => Laborer [alreadyInSave:protected] => [alreadyInValidation:protected] => [validationFailures:protected] => Array ( ) [_new:BaseObject:private] => [_deleted:BaseObject:private] => [modifiedColumns:protected] => Array ( ) ) [71] => Category Object ( [languages:protected] => [bok_resources:protected] => [bok_topics:protected] => [bok_keywords:protected] => [id:protected] => 71 [type:protected] => category [parent:protected] => 2 [label:protected] => Painter [alreadyInSave:protected] => [alreadyInValidation:protected] => [validationFailures:protected] => Array ( ) [_new:BaseObject:private] => [_deleted:BaseObject:private] => [modifiedColumns:protected] => Array ( ) ) [75] => Category Object ( [languages:protected] => [bok_resources:protected] => [bok_topics:protected] => [bok_keywords:protected] => [id:protected] => 75 [type:protected] => category [parent:protected] => 2 [label:protected] => Plasterer [alreadyInSave:protected] => [alreadyInValidation:protected] => [validationFailures:protected] => Array ( ) [_new:BaseObject:private] => [_deleted:BaseObject:private] => [modifiedColumns:protected] => Array ( ) ) [63] => Category Object ( [languages:protected] => [bok_resources:protected] => [bok_topics:protected] => [bok_keywords:protected] => [id:protected] => 63 [type:protected] => category [parent:protected] => 2 [label:protected] => Reinforcing Ironworker [alreadyInSave:protected] => [alreadyInValidation:protected] => [validationFailures:protected] => Array ( ) [_new:BaseObject:private] => [_deleted:BaseObject:private] => [modifiedColumns:protected] => Array ( ) ) [79] => Category Object ( [languages:protected] => [bok_resources:protected] => [bok_topics:protected] => [bok_keywords:protected] => [id:protected] => 79 [type:protected] => category [parent:protected] => 2 [label:protected] => Scaffold Erector [alreadyInSave:protected] => [alreadyInValidation:protected] => [validationFailures:protected] => Array ( ) [_new:BaseObject:private] => [_deleted:BaseObject:private] => [modifiedColumns:protected] => Array ( ) ) [62] => Category Object ( [languages:protected] => [bok_resources:protected] => [bok_topics:protected] => [bok_keywords:protected] => [id:protected] => 62 [type:protected] => category [parent:protected] => 2 [label:protected] => Structural Ironworker [alreadyInSave:protected] => [alreadyInValidation:protected] => [validationFailures:protected] => Array ( ) [_new:BaseObject:private] => [_deleted:BaseObject:private] => [modifiedColumns:protected] => Array ( ) ) [87] => Category Object ( [languages:protected] => [bok_resources:protected] => [bok_topics:protected] => [bok_keywords:protected] => [id:protected] => 87 [type:protected] => category [parent:protected] => 3 [label:protected] => Commercial & Institutional [alreadyInSave:protected] => [alreadyInValidation:protected] => [validationFailures:protected] => Array ( ) [_new:BaseObject:private] => [_deleted:BaseObject:private] => [modifiedColumns:protected] => Array ( ) ) [88] => Category Object ( [languages:protected] => [bok_resources:protected] => [bok_topics:protected] => [bok_keywords:protected] => [id:protected] => 88 [type:protected] => category [parent:protected] => 3 [label:protected] => Demolition [alreadyInSave:protected] => [alreadyInValidation:protected] => [validationFailures:protected] => Array ( ) [_new:BaseObject:private] => [_deleted:BaseObject:private] => [modifiedColumns:protected] => Array ( ) ) [91] => Category Object ( [languages:protected] => [bok_resources:protected] => [bok_topics:protected] => [bok_keywords:protected] => [id:protected] => 91 [type:protected] => category [parent:protected] => 3 [label:protected] => Heavy & Highway [alreadyInSave:protected] => [alreadyInValidation:protected] => [validationFailures:protected] => Array ( ) [_new:BaseObject:private] => [_deleted:BaseObject:private] => [modifiedColumns:protected] => Array ( ) ) [90] => Category Object ( [languages:protected] => [bok_resources:protected] => [bok_topics:protected] => [bok_keywords:protected] => [id:protected] => 90 [type:protected] => category [parent:protected] => 3 [label:protected] => Industrial [alreadyInSave:protected] => [alreadyInValidation:protected] => [validationFailures:protected] => Array ( ) [_new:BaseObject:private] => [_deleted:BaseObject:private] => [modifiedColumns:protected] => Array ( ) ) [93] => Category Object ( [languages:protected] => [bok_resources:protected] => [bok_topics:protected] => [bok_keywords:protected] => [id:protected] => 93 [type:protected] => category [parent:protected] => 3 [label:protected] => Renovations [alreadyInSave:protected] => [alreadyInValidation:protected] => [validationFailures:protected] => Array ( ) [_new:BaseObject:private] => [_deleted:BaseObject:private] => [modifiedColumns:protected] => Array ( ) ) [94] => Category Object ( [languages:protected] => [bok_resources:protected] => [bok_topics:protected] => [bok_keywords:protected] => [id:protected] => 94 [type:protected] => category [parent:protected] => 3 [label:protected] => Residential [alreadyInSave:protected] => [alreadyInValidation:protected] => [validationFailures:protected] => Array ( ) [_new:BaseObject:private] => [_deleted:BaseObject:private] => [modifiedColumns:protected] => Array ( ) ) [95] => Category Object ( [languages:protected] => [bok_resources:protected] => [bok_topics:protected] => [bok_keywords:protected] => [id:protected] => 95 [type:protected] => category [parent:protected] => 3 [label:protected] => Underground [alreadyInSave:protected] => [alreadyInValidation:protected] => [validationFailures:protected] => Array ( ) [_new:BaseObject:private] => [_deleted:BaseObject:private] => [modifiedColumns:protected] => Array ( ) ) ) [categories_initialized:protected] => 1 [mapped_items:protected] => [content:protected] => [files:protected] => [language:protected] => Language Object ( [id:protected] => 1 [code:protected] => en [name:protected] => English [alreadyInSave:protected] => [alreadyInValidation:protected] => [validationFailures:protected] => Array ( ) [_new:BaseObject:private] => [_deleted:BaseObject:private] => [modifiedColumns:protected] => Array ( ) ) [old_record:protected] => [id:protected] => 4005 [old_id:protected] => [elcosh_id:protected] => i002692 [type:protected] => image [display_type:protected] => Image [user_id:protected] => 0 [language_id:protected] => 1 [tagging_id:protected] => Bruce Lippy [priority_id:protected] => 1 [title:protected] => Toolbox talk - crew view [total_pages:protected] => 0 [billed_pages:protected] => 0 [publication_number:protected] => [part_of:protected] => [keywords:protected] => toolbox talk, tailgate talk, safety talk, Spanish [comments:protected] => [summary:protected] => Photo of crew listening to a toolbox safety talk before starting work. [transition_comments:protected] => [external_link:protected] => [consol_link:protected] => http://www.cpwrconstructionsolutions.org/electrical/solution/662/worker-training.html [more_like_this:protected] => i002691,d001269, c000079, d001285 [permission_given_by:protected] => [published:protected] => T [billable:protected] => F [img_name:protected] => [img_ext:protected] => jpg [img_width:protected] => [img_height:protected] => [img_credit:protected] => Morgan Zavertnik and Hoar Construction [img_practice:protected] => good [vid_source_id:protected] => [vid_running_time:protected] => [vid_intended_audience:protected] => [vid_acquisition_info:protected] => [vid_cost:protected] => [vid_producer:protected] => [vid_filename:protected] => [vid_filename_downloadable:protected] => [date_summary:protected] => November 2015 [date_permission_requested:protected] => [date_permission_received:protected] => [date_review_needed:protected] => [date_received:protected] => 03/02/16 [date_completed:protected] => 03/02/16 [date_billed:protected] => [date_modified:protected] => 03/02/16 [collBokExports:protected] => [lastBokExportCriteria:BaseElcoshItem:private] => [alreadyInSave:protected] => [alreadyInValidation:protected] => [validationFailures:protected] => Array ( ) [_new:BaseObject:private] => [_deleted:BaseObject:private] => [modifiedColumns:protected] => Array ( ) ) ) [1] => Search_Result Object ( [title] => Toolbox talk - long shot [image] => /record/images/4006-p.jpg [blurb] => This crew gathered every morning before starting work to discuss a new safety topic.... [category] => Array ( [0] => 20 [1] => 47 [2] => 49 [3] => 51 [4] => 55 [5] => 64 [6] => 68 [7] => 75 [8] => 76 [9] => 63 [10] => 78 [11] => 79 [12] => 82 [13] => 62 [14] => 87 [15] => 88 [16] => 91 [17] => 90 [18] => 93 [19] => 94 [20] => 95 [21] => 97 ) [labels] => Array ( [0] => Safety Culture [1] => Work Environment [2] => Hazards [3] => Bricklayer [4] => Trades [5] => Carpenter [7] => Cement Mason [9] => Electrical Worker [11] => Laborer [13] => Maintenance Worker [15] => Plasterer [17] => Plumber/Pipefitter [19] => Reinforcing Ironworker [21] => Roofer/Waterproofer [23] => Scaffold Erector [25] => Stonemason [27] => Structural Ironworker [29] => Commercial & Institutional [30] => Jobsites [31] => Demolition [33] => Heavy & Highway [35] => Industrial [37] => Renovations [39] => Residential [41] => Underground [43] => Images [44] => Media [45] => Media & Documents ) [type] => Images [sub_category] => [url] => /image/4006/i002693/Toolbox%2Btalk%2B-%2Blong%2Bshot.html [item:protected] => ImageRecord Object ( [records:protected] => Array ( ) [recordId:protected] => [searchWordClass:protected] => [searchWordPeerClass:protected] => [bok_record:protected] => [authors:protected] => [organizations:protected] => [collections:protected] => [categories:protected] => Array ( [20] => Category Object ( [languages:protected] => [bok_resources:protected] => [bok_topics:protected] => [bok_keywords:protected] => [id:protected] => 20 [type:protected] => category [parent:protected] => 7 [label:protected] => Safety Culture [alreadyInSave:protected] => [alreadyInValidation:protected] => [validationFailures:protected] => Array ( ) [_new:BaseObject:private] => [_deleted:BaseObject:private] => [modifiedColumns:protected] => Array ( ) ) [47] => Category Object ( [languages:protected] => [bok_resources:protected] => [bok_topics:protected] => [bok_keywords:protected] => [id:protected] => 47 [type:protected] => category [parent:protected] => 2 [label:protected] => Bricklayer [alreadyInSave:protected] => [alreadyInValidation:protected] => [validationFailures:protected] => Array ( ) [_new:BaseObject:private] => [_deleted:BaseObject:private] => [modifiedColumns:protected] => Array ( ) ) [49] => Category Object ( [languages:protected] => [bok_resources:protected] => [bok_topics:protected] => [bok_keywords:protected] => [id:protected] => 49 [type:protected] => category [parent:protected] => 2 [label:protected] => Carpenter [alreadyInSave:protected] => [alreadyInValidation:protected] => [validationFailures:protected] => Array ( ) [_new:BaseObject:private] => [_deleted:BaseObject:private] => [modifiedColumns:protected] => Array ( ) ) [51] => Category Object ( [languages:protected] => [bok_resources:protected] => [bok_topics:protected] => [bok_keywords:protected] => [id:protected] => 51 [type:protected] => category [parent:protected] => 2 [label:protected] => Cement Mason [alreadyInSave:protected] => [alreadyInValidation:protected] => [validationFailures:protected] => Array ( ) [_new:BaseObject:private] => [_deleted:BaseObject:private] => [modifiedColumns:protected] => Array ( ) ) [55] => Category Object ( [languages:protected] => [bok_resources:protected] => [bok_topics:protected] => [bok_keywords:protected] => [id:protected] => 55 [type:protected] => category [parent:protected] => 2 [label:protected] => Electrical Worker [alreadyInSave:protected] => [alreadyInValidation:protected] => [validationFailures:protected] => Array ( ) [_new:BaseObject:private] => [_deleted:BaseObject:private] => [modifiedColumns:protected] => Array ( ) ) [64] => Category Object ( [languages:protected] => [bok_resources:protected] => [bok_topics:protected] => [bok_keywords:protected] => [id:protected] => 64 [type:protected] => category [parent:protected] => 2 [label:protected] => Laborer [alreadyInSave:protected] => [alreadyInValidation:protected] => [validationFailures:protected] => Array ( ) [_new:BaseObject:private] => [_deleted:BaseObject:private] => [modifiedColumns:protected] => Array ( ) ) [68] => Category Object ( [languages:protected] => [bok_resources:protected] => [bok_topics:protected] => [bok_keywords:protected] => [id:protected] => 68 [type:protected] => category [parent:protected] => 2 [label:protected] => Maintenance Worker [alreadyInSave:protected] => [alreadyInValidation:protected] => [validationFailures:protected] => Array ( ) [_new:BaseObject:private] => [_deleted:BaseObject:private] => [modifiedColumns:protected] => Array ( ) ) [75] => Category Object ( [languages:protected] => [bok_resources:protected] => [bok_topics:protected] => [bok_keywords:protected] => [id:protected] => 75 [type:protected] => category [parent:protected] => 2 [label:protected] => Plasterer [alreadyInSave:protected] => [alreadyInValidation:protected] => [validationFailures:protected] => Array ( ) [_new:BaseObject:private] => [_deleted:BaseObject:private] => [modifiedColumns:protected] => Array ( ) ) [76] => Category Object ( [languages:protected] => [bok_resources:protected] => [bok_topics:protected] => [bok_keywords:protected] => [id:protected] => 76 [type:protected] => category [parent:protected] => 2 [label:protected] => Plumber/Pipefitter [alreadyInSave:protected] => [alreadyInValidation:protected] => [validationFailures:protected] => Array ( ) [_new:BaseObject:private] => [_deleted:BaseObject:private] => [modifiedColumns:protected] => Array ( ) ) [63] => Category Object ( [languages:protected] => [bok_resources:protected] => [bok_topics:protected] => [bok_keywords:protected] => [id:protected] => 63 [type:protected] => category [parent:protected] => 2 [label:protected] => Reinforcing Ironworker [alreadyInSave:protected] => [alreadyInValidation:protected] => [validationFailures:protected] => Array ( ) [_new:BaseObject:private] => [_deleted:BaseObject:private] => [modifiedColumns:protected] => Array ( ) ) [78] => Category Object ( [languages:protected] => [bok_resources:protected] => [bok_topics:protected] => [bok_keywords:protected] => [id:protected] => 78 [type:protected] => category [parent:protected] => 2 [label:protected] => Roofer/Waterproofer [alreadyInSave:protected] => [alreadyInValidation:protected] => [validationFailures:protected] => Array ( ) [_new:BaseObject:private] => [_deleted:BaseObject:private] => [modifiedColumns:protected] => Array ( ) ) [79] => Category Object ( [languages:protected] => [bok_resources:protected] => [bok_topics:protected] => [bok_keywords:protected] => [id:protected] => 79 [type:protected] => category [parent:protected] => 2 [label:protected] => Scaffold Erector [alreadyInSave:protected] => [alreadyInValidation:protected] => [validationFailures:protected] => Array ( ) [_new:BaseObject:private] => [_deleted:BaseObject:private] => [modifiedColumns:protected] => Array ( ) ) [82] => Category Object ( [languages:protected] => [bok_resources:protected] => [bok_topics:protected] => [bok_keywords:protected] => [id:protected] => 82 [type:protected] => category [parent:protected] => 2 [label:protected] => Stonemason [alreadyInSave:protected] => [alreadyInValidation:protected] => [validationFailures:protected] => Array ( ) [_new:BaseObject:private] => [_deleted:BaseObject:private] => [modifiedColumns:protected] => Array ( ) ) [62] => Category Object ( [languages:protected] => [bok_resources:protected] => [bok_topics:protected] => [bok_keywords:protected] => [id:protected] => 62 [type:protected] => category [parent:protected] => 2 [label:protected] => Structural Ironworker [alreadyInSave:protected] => [alreadyInValidation:protected] => [validationFailures:protected] => Array ( ) [_new:BaseObject:private] => [_deleted:BaseObject:private] => [modifiedColumns:protected] => Array ( ) ) [87] => Category Object ( [languages:protected] => [bok_resources:protected] => [bok_topics:protected] => [bok_keywords:protected] => [id:protected] => 87 [type:protected] => category [parent:protected] => 3 [label:protected] => Commercial & Institutional [alreadyInSave:protected] => [alreadyInValidation:protected] => [validationFailures:protected] => Array ( ) [_new:BaseObject:private] => [_deleted:BaseObject:private] => [modifiedColumns:protected] => Array ( ) ) [88] => Category Object ( [languages:protected] => [bok_resources:protected] => [bok_topics:protected] => [bok_keywords:protected] => [id:protected] => 88 [type:protected] => category [parent:protected] => 3 [label:protected] => Demolition [alreadyInSave:protected] => [alreadyInValidation:protected] => [validationFailures:protected] => Array ( ) [_new:BaseObject:private] => [_deleted:BaseObject:private] => [modifiedColumns:protected] => Array ( ) ) [91] => Category Object ( [languages:protected] => [bok_resources:protected] => [bok_topics:protected] => [bok_keywords:protected] => [id:protected] => 91 [type:protected] => category [parent:protected] => 3 [label:protected] => Heavy & Highway [alreadyInSave:protected] => [alreadyInValidation:protected] => [validationFailures:protected] => Array ( ) [_new:BaseObject:private] => [_deleted:BaseObject:private] => [modifiedColumns:protected] => Array ( ) ) [90] => Category Object ( [languages:protected] => [bok_resources:protected] => [bok_topics:protected] => [bok_keywords:protected] => [id:protected] => 90 [type:protected] => category [parent:protected] => 3 [label:protected] => Industrial [alreadyInSave:protected] => [alreadyInValidation:protected] => [validationFailures:protected] => Array ( ) [_new:BaseObject:private] => [_deleted:BaseObject:private] => [modifiedColumns:protected] => Array ( ) ) [93] => Category Object ( [languages:protected] => [bok_resources:protected] => [bok_topics:protected] => [bok_keywords:protected] => [id:protected] => 93 [type:protected] => category [parent:protected] => 3 [label:protected] => Renovations [alreadyInSave:protected] => [alreadyInValidation:protected] => [validationFailures:protected] => Array ( ) [_new:BaseObject:private] => [_deleted:BaseObject:private] => [modifiedColumns:protected] => Array ( ) ) [94] => Category Object ( [languages:protected] => [bok_resources:protected] => [bok_topics:protected] => [bok_keywords:protected] => [id:protected] => 94 [type:protected] => category [parent:protected] => 3 [label:protected] => Residential [alreadyInSave:protected] => [alreadyInValidation:protected] => [validationFailures:protected] => Array ( ) [_new:BaseObject:private] => [_deleted:BaseObject:private] => [modifiedColumns:protected] => Array ( ) ) [95] => Category Object ( [languages:protected] => [bok_resources:protected] => [bok_topics:protected] => [bok_keywords:protected] => [id:protected] => 95 [type:protected] => category [parent:protected] => 3 [label:protected] => Underground [alreadyInSave:protected] => [alreadyInValidation:protected] => [validationFailures:protected] => Array ( ) [_new:BaseObject:private] => [_deleted:BaseObject:private] => [modifiedColumns:protected] => Array ( ) ) [97] => Category Object ( [languages:protected] => [bok_resources:protected] => [bok_topics:protected] => [bok_keywords:protected] => [id:protected] => 97 [type:protected] => category [parent:protected] => 5 [label:protected] => Images [alreadyInSave:protected] => [alreadyInValidation:protected] => [validationFailures:protected] => Array ( ) [_new:BaseObject:private] => [_deleted:BaseObject:private] => [modifiedColumns:protected] => Array ( ) ) ) [categories_initialized:protected] => 1 [mapped_items:protected] => [content:protected] => [files:protected] => [language:protected] => Language Object ( [id:protected] => 1 [code:protected] => en [name:protected] => English [alreadyInSave:protected] => [alreadyInValidation:protected] => [validationFailures:protected] => Array ( ) [_new:BaseObject:private] => [_deleted:BaseObject:private] => [modifiedColumns:protected] => Array ( ) ) [old_record:protected] => [id:protected] => 4006 [old_id:protected] => [elcosh_id:protected] => i002693 [type:protected] => image [display_type:protected] => Image [user_id:protected] => 0 [language_id:protected] => 1 [tagging_id:protected] => Bruce Lippy [priority_id:protected] => 1 [title:protected] => Toolbox talk - long shot [total_pages:protected] => 0 [billed_pages:protected] => 0 [publication_number:protected] => [part_of:protected] => [keywords:protected] => toolbox talk, tailgate talk, safety minute [comments:protected] => [summary:protected] => This crew gathered every morning before starting work to discuss a new safety topic. [transition_comments:protected] => [external_link:protected] => [consol_link:protected] => http://www.cpwrconstructionsolutions.org/electrical/solution/662/worker-training.html [more_like_this:protected] => i002691,i002692,d001269,d000527 [permission_given_by:protected] => [published:protected] => T [billable:protected] => F [img_name:protected] => [img_ext:protected] => jpg [img_width:protected] => [img_height:protected] => [img_credit:protected] => Morgan Zavertnik and Hoar Construction [img_practice:protected] => good [vid_source_id:protected] => [vid_running_time:protected] => [vid_intended_audience:protected] => [vid_acquisition_info:protected] => [vid_cost:protected] => [vid_producer:protected] => [vid_filename:protected] => [vid_filename_downloadable:protected] => [date_summary:protected] => November 2015 [date_permission_requested:protected] => [date_permission_received:protected] => [date_review_needed:protected] => [date_received:protected] => 03/02/16 [date_completed:protected] => 03/02/16 [date_billed:protected] => [date_modified:protected] => 03/02/16 [collBokExports:protected] => [lastBokExportCriteria:BaseElcoshItem:private] => [alreadyInSave:protected] => [alreadyInValidation:protected] => [validationFailures:protected] => Array ( ) [_new:BaseObject:private] => [_deleted:BaseObject:private] => [modifiedColumns:protected] => Array ( ) ) ) [2] => Search_Result Object ( [title] => Construction bracing [image] => /record/images/3995-p.jpg [blurb] => This shows structural support that prevents collapses during construction.... [category] => Array ( [0] => 12 [1] => 15 [2] => 21 [3] => 49 [4] => 51 [5] => 55 [6] => 56 [7] => 60 [8] => 64 [9] => 68 [10] => 74 [11] => 63 [12] => 78 [13] => 79 [14] => 80 [15] => 62 [16] => 87 [17] => 90 [18] => 97 ) [labels] => Array ( [0] => Crushed/Struck By [1] => Work Environment [2] => Hazards [3] => Falls [6] => Scaffolds [9] => Carpenter [10] => Trades [11] => Cement Mason [13] => Electrical Worker [15] => Elevator Constructor [17] => HVAC [19] => Laborer [21] => Maintenance Worker [23] => Pile Driver [25] => Reinforcing Ironworker [27] => Roofer/Waterproofer [29] => Scaffold Erector [31] => Sheetmetal Worker [33] => Structural Ironworker [35] => Commercial & Institutional [36] => Jobsites [37] => Industrial [39] => Images [40] => Media [41] => Media & Documents ) [type] => Images [sub_category] => [url] => /image/3995/i002690/Construction%2Bbracing.html [item:protected] => ImageRecord Object ( [records:protected] => Array ( ) [recordId:protected] => [searchWordClass:protected] => [searchWordPeerClass:protected] => [bok_record:protected] => [authors:protected] => [organizations:protected] => [collections:protected] => [categories:protected] => Array ( [12] => Category Object ( [languages:protected] => [bok_resources:protected] => [bok_topics:protected] => [bok_keywords:protected] => [id:protected] => 12 [type:protected] => category [parent:protected] => 7 [label:protected] => Crushed/Struck By [alreadyInSave:protected] => [alreadyInValidation:protected] => [validationFailures:protected] => Array ( ) [_new:BaseObject:private] => [_deleted:BaseObject:private] => [modifiedColumns:protected] => Array ( ) ) [15] => Category Object ( [languages:protected] => [bok_resources:protected] => [bok_topics:protected] => [bok_keywords:protected] => [id:protected] => 15 [type:protected] => category [parent:protected] => 7 [label:protected] => Falls [alreadyInSave:protected] => [alreadyInValidation:protected] => [validationFailures:protected] => Array ( ) [_new:BaseObject:private] => [_deleted:BaseObject:private] => [modifiedColumns:protected] => Array ( ) ) [21] => Category Object ( [languages:protected] => [bok_resources:protected] => [bok_topics:protected] => [bok_keywords:protected] => [id:protected] => 21 [type:protected] => category [parent:protected] => 7 [label:protected] => Scaffolds [alreadyInSave:protected] => [alreadyInValidation:protected] => [validationFailures:protected] => Array ( ) [_new:BaseObject:private] => [_deleted:BaseObject:private] => [modifiedColumns:protected] => Array ( ) ) [49] => Category Object ( [languages:protected] => [bok_resources:protected] => [bok_topics:protected] => [bok_keywords:protected] => [id:protected] => 49 [type:protected] => category [parent:protected] => 2 [label:protected] => Carpenter [alreadyInSave:protected] => [alreadyInValidation:protected] => [validationFailures:protected] => Array ( ) [_new:BaseObject:private] => [_deleted:BaseObject:private] => [modifiedColumns:protected] => Array ( ) ) [51] => Category Object ( [languages:protected] => [bok_resources:protected] => [bok_topics:protected] => [bok_keywords:protected] => [id:protected] => 51 [type:protected] => category [parent:protected] => 2 [label:protected] => Cement Mason [alreadyInSave:protected] => [alreadyInValidation:protected] => [validationFailures:protected] => Array ( ) [_new:BaseObject:private] => [_deleted:BaseObject:private] => [modifiedColumns:protected] => Array ( ) ) [55] => Category Object ( [languages:protected] => [bok_resources:protected] => [bok_topics:protected] => [bok_keywords:protected] => [id:protected] => 55 [type:protected] => category [parent:protected] => 2 [label:protected] => Electrical Worker [alreadyInSave:protected] => [alreadyInValidation:protected] => [validationFailures:protected] => Array ( ) [_new:BaseObject:private] => [_deleted:BaseObject:private] => [modifiedColumns:protected] => Array ( ) ) [56] => Category Object ( [languages:protected] => [bok_resources:protected] => [bok_topics:protected] => [bok_keywords:protected] => [id:protected] => 56 [type:protected] => category [parent:protected] => 2 [label:protected] => Elevator Constructor [alreadyInSave:protected] => [alreadyInValidation:protected] => [validationFailures:protected] => Array ( ) [_new:BaseObject:private] => [_deleted:BaseObject:private] => [modifiedColumns:protected] => Array ( ) ) [60] => Category Object ( [languages:protected] => [bok_resources:protected] => [bok_topics:protected] => [bok_keywords:protected] => [id:protected] => 60 [type:protected] => category [parent:protected] => 2 [label:protected] => HVAC [alreadyInSave:protected] => [alreadyInValidation:protected] => [validationFailures:protected] => Array ( ) [_new:BaseObject:private] => [_deleted:BaseObject:private] => [modifiedColumns:protected] => Array ( ) ) [64] => Category Object ( [languages:protected] => [bok_resources:protected] => [bok_topics:protected] => [bok_keywords:protected] => [id:protected] => 64 [type:protected] => category [parent:protected] => 2 [label:protected] => Laborer [alreadyInSave:protected] => [alreadyInValidation:protected] => [validationFailures:protected] => Array ( ) [_new:BaseObject:private] => [_deleted:BaseObject:private] => [modifiedColumns:protected] => Array ( ) ) [68] => Category Object ( [languages:protected] => [bok_resources:protected] => [bok_topics:protected] => [bok_keywords:protected] => [id:protected] => 68 [type:protected] => category [parent:protected] => 2 [label:protected] => Maintenance Worker [alreadyInSave:protected] => [alreadyInValidation:protected] => [validationFailures:protected] => Array ( ) [_new:BaseObject:private] => [_deleted:BaseObject:private] => [modifiedColumns:protected] => Array ( ) ) [74] => Category Object ( [languages:protected] => [bok_resources:protected] => [bok_topics:protected] => [bok_keywords:protected] => [id:protected] => 74 [type:protected] => category [parent:protected] => 2 [label:protected] => Pile Driver [alreadyInSave:protected] => [alreadyInValidation:protected] => [validationFailures:protected] => Array ( ) [_new:BaseObject:private] => [_deleted:BaseObject:private] => [modifiedColumns:protected] => Array ( ) ) [63] => Category Object ( [languages:protected] => [bok_resources:protected] => [bok_topics:protected] => [bok_keywords:protected] => [id:protected] => 63 [type:protected] => category [parent:protected] => 2 [label:protected] => Reinforcing Ironworker [alreadyInSave:protected] => [alreadyInValidation:protected] => [validationFailures:protected] => Array ( ) [_new:BaseObject:private] => [_deleted:BaseObject:private] => [modifiedColumns:protected] => Array ( ) ) [78] => Category Object ( [languages:protected] => [bok_resources:protected] => [bok_topics:protected] => [bok_keywords:protected] => [id:protected] => 78 [type:protected] => category [parent:protected] => 2 [label:protected] => Roofer/Waterproofer [alreadyInSave:protected] => [alreadyInValidation:protected] => [validationFailures:protected] => Array ( ) [_new:BaseObject:private] => [_deleted:BaseObject:private] => [modifiedColumns:protected] => Array ( ) ) [79] => Category Object ( [languages:protected] => [bok_resources:protected] => [bok_topics:protected] => [bok_keywords:protected] => [id:protected] => 79 [type:protected] => category [parent:protected] => 2 [label:protected] => Scaffold Erector [alreadyInSave:protected] => [alreadyInValidation:protected] => [validationFailures:protected] => Array ( ) [_new:BaseObject:private] => [_deleted:BaseObject:private] => [modifiedColumns:protected] => Array ( ) ) [80] => Category Object ( [languages:protected] => [bok_resources:protected] => [bok_topics:protected] => [bok_keywords:protected] => [id:protected] => 80 [type:protected] => category [parent:protected] => 2 [label:protected] => Sheetmetal Worker [alreadyInSave:protected] => [alreadyInValidation:protected] => [validationFailures:protected] => Array ( ) [_new:BaseObject:private] => [_deleted:BaseObject:private] => [modifiedColumns:protected] => Array ( ) ) [62] => Category Object ( [languages:protected] => [bok_resources:protected] => [bok_topics:protected] => [bok_keywords:protected] => [id:protected] => 62 [type:protected] => category [parent:protected] => 2 [label:protected] => Structural Ironworker [alreadyInSave:protected] => [alreadyInValidation:protected] => [validationFailures:protected] => Array ( ) [_new:BaseObject:private] => [_deleted:BaseObject:private] => [modifiedColumns:protected] => Array ( ) ) [87] => Category Object ( [languages:protected] => [bok_resources:protected] => [bok_topics:protected] => [bok_keywords:protected] => [id:protected] => 87 [type:protected] => category [parent:protected] => 3 [label:protected] => Commercial & Institutional [alreadyInSave:protected] => [alreadyInValidation:protected] => [validationFailures:protected] => Array ( ) [_new:BaseObject:private] => [_deleted:BaseObject:private] => [modifiedColumns:protected] => Array ( ) ) [90] => Category Object ( [languages:protected] => [bok_resources:protected] => [bok_topics:protected] => [bok_keywords:protected] => [id:protected] => 90 [type:protected] => category [parent:protected] => 3 [label:protected] => Industrial [alreadyInSave:protected] => [alreadyInValidation:protected] => [validationFailures:protected] => Array ( ) [_new:BaseObject:private] => [_deleted:BaseObject:private] => [modifiedColumns:protected] => Array ( ) ) [97] => Category Object ( [languages:protected] => [bok_resources:protected] => [bok_topics:protected] => [bok_keywords:protected] => [id:protected] => 97 [type:protected] => category [parent:protected] => 5 [label:protected] => Images [alreadyInSave:protected] => [alreadyInValidation:protected] => [validationFailures:protected] => Array ( ) [_new:BaseObject:private] => [_deleted:BaseObject:private] => [modifiedColumns:protected] => Array ( ) ) ) [categories_initialized:protected] => 1 [mapped_items:protected] => [content:protected] => [files:protected] => [language:protected] => Language Object ( [id:protected] => 1 [code:protected] => en [name:protected] => English [alreadyInSave:protected] => [alreadyInValidation:protected] => [validationFailures:protected] => Array ( ) [_new:BaseObject:private] => [_deleted:BaseObject:private] => [modifiedColumns:protected] => Array ( ) ) [old_record:protected] => [id:protected] => 3995 [old_id:protected] => [elcosh_id:protected] => i002690 [type:protected] => image [display_type:protected] => Image [user_id:protected] => 0 [language_id:protected] => 1 [tagging_id:protected] => Bruce Lippy [priority_id:protected] => 1 [title:protected] => Construction bracing [total_pages:protected] => 0 [billed_pages:protected] => 0 [publication_number:protected] => [part_of:protected] => [keywords:protected] => Bracing, support, scaffold [comments:protected] => [summary:protected] => This shows structural support that prevents collapses during construction. [transition_comments:protected] => [external_link:protected] => [consol_link:protected] => http://www.cpwrconstructionsolutions.org/masonry/solution/8/adjustable-tower-scaffold.html [more_like_this:protected] => i002660 [permission_given_by:protected] => [published:protected] => T [billable:protected] => F [img_name:protected] => [img_ext:protected] => jpg [img_width:protected] => [img_height:protected] => [img_credit:protected] => Photo by Pam Susi [img_practice:protected] => good [vid_source_id:protected] => [vid_running_time:protected] => [vid_intended_audience:protected] => [vid_acquisition_info:protected] => [vid_cost:protected] => [vid_producer:protected] => [vid_filename:protected] => [vid_filename_downloadable:protected] => [date_summary:protected] => January 2016 [date_permission_requested:protected] => [date_permission_received:protected] => [date_review_needed:protected] => [date_received:protected] => 02/01/16 [date_completed:protected] => 02/01/16 [date_billed:protected] => [date_modified:protected] => 02/01/16 [collBokExports:protected] => [lastBokExportCriteria:BaseElcoshItem:private] => [alreadyInSave:protected] => [alreadyInValidation:protected] => [validationFailures:protected] => Array ( ) [_new:BaseObject:private] => [_deleted:BaseObject:private] => [modifiedColumns:protected] => Array ( ) ) ) [3] => Search_Result Object ( [title] => Suspended Scaffold Outriggers [image] => /record/images/3975-p.jpg [blurb] => Suspended scaffolds systems must be designed by a qualified person and inspected daily by a competent person. The supports for the counterweight must... [category] => Array ( [0] => 97 [1] => 15 [2] => 47 [3] => 49 [4] => 79 [5] => 87 ) [labels] => Array ( [0] => Images [1] => Media [2] => Media & Documents [3] => Falls [4] => Work Environment [5] => Hazards [6] => Bricklayer [7] => Trades [8] => Carpenter [10] => Scaffold Erector [12] => Commercial & Institutional [13] => Jobsites ) [type] => Images [sub_category] => [url] => /image/3975/i002683/Suspended%2BScaffold%2BOutriggers.html [item:protected] => ImageRecord Object ( [records:protected] => Array ( ) [recordId:protected] => [searchWordClass:protected] => [searchWordPeerClass:protected] => [bok_record:protected] => [authors:protected] => [organizations:protected] => [collections:protected] => [categories:protected] => Array ( [97] => Category Object ( [languages:protected] => [bok_resources:protected] => [bok_topics:protected] => [bok_keywords:protected] => [id:protected] => 97 [type:protected] => category [parent:protected] => 5 [label:protected] => Images [alreadyInSave:protected] => [alreadyInValidation:protected] => [validationFailures:protected] => Array ( ) [_new:BaseObject:private] => [_deleted:BaseObject:private] => [modifiedColumns:protected] => Array ( ) ) [15] => Category Object ( [languages:protected] => [bok_resources:protected] => [bok_topics:protected] => [bok_keywords:protected] => [id:protected] => 15 [type:protected] => category [parent:protected] => 7 [label:protected] => Falls [alreadyInSave:protected] => [alreadyInValidation:protected] => [validationFailures:protected] => Array ( ) [_new:BaseObject:private] => [_deleted:BaseObject:private] => [modifiedColumns:protected] => Array ( ) ) [47] => Category Object ( [languages:protected] => [bok_resources:protected] => [bok_topics:protected] => [bok_keywords:protected] => [id:protected] => 47 [type:protected] => category [parent:protected] => 2 [label:protected] => Bricklayer [alreadyInSave:protected] => [alreadyInValidation:protected] => [validationFailures:protected] => Array ( ) [_new:BaseObject:private] => [_deleted:BaseObject:private] => [modifiedColumns:protected] => Array ( ) ) [49] => Category Object ( [languages:protected] => [bok_resources:protected] => [bok_topics:protected] => [bok_keywords:protected] => [id:protected] => 49 [type:protected] => category [parent:protected] => 2 [label:protected] => Carpenter [alreadyInSave:protected] => [alreadyInValidation:protected] => [validationFailures:protected] => Array ( ) [_new:BaseObject:private] => [_deleted:BaseObject:private] => [modifiedColumns:protected] => Array ( ) ) [79] => Category Object ( [languages:protected] => [bok_resources:protected] => [bok_topics:protected] => [bok_keywords:protected] => [id:protected] => 79 [type:protected] => category [parent:protected] => 2 [label:protected] => Scaffold Erector [alreadyInSave:protected] => [alreadyInValidation:protected] => [validationFailures:protected] => Array ( ) [_new:BaseObject:private] => [_deleted:BaseObject:private] => [modifiedColumns:protected] => Array ( ) ) [87] => Category Object ( [languages:protected] => [bok_resources:protected] => [bok_topics:protected] => [bok_keywords:protected] => [id:protected] => 87 [type:protected] => category [parent:protected] => 3 [label:protected] => Commercial & Institutional [alreadyInSave:protected] => [alreadyInValidation:protected] => [validationFailures:protected] => Array ( ) [_new:BaseObject:private] => [_deleted:BaseObject:private] => [modifiedColumns:protected] => Array ( ) ) ) [categories_initialized:protected] => 1 [mapped_items:protected] => [content:protected] => [files:protected] => [language:protected] => Language Object ( [id:protected] => 1 [code:protected] => en [name:protected] => English [alreadyInSave:protected] => [alreadyInValidation:protected] => [validationFailures:protected] => Array ( ) [_new:BaseObject:private] => [_deleted:BaseObject:private] => [modifiedColumns:protected] => Array ( ) ) [old_record:protected] => [id:protected] => 3975 [old_id:protected] => [elcosh_id:protected] => i002683 [type:protected] => image [display_type:protected] => Image [user_id:protected] => 0 [language_id:protected] => 1 [tagging_id:protected] => John Newquist [priority_id:protected] => 1 [title:protected] => Suspended Scaffold Outriggers [total_pages:protected] => 0 [billed_pages:protected] => 0 [publication_number:protected] => [part_of:protected] => [keywords:protected] => suspended, scaffold, swing, stage, fall, protection, counterweight, qualified, person [comments:protected] => [summary:protected] => Suspended scaffolds systems must be designed by a qualified person and inspected daily by a competent person. The supports for the counterweight must be designed with a safety factor of four. [transition_comments:protected] => [external_link:protected] => [consol_link:protected] => http://www.cpwrconstructionsolutions.org/task/Erect%2Band%2Bdismantle%2Bscaffolds/ [more_like_this:protected] => d000244,d000359,i000253,i000407 [permission_given_by:protected] => [published:protected] => T [billable:protected] => F [img_name:protected] => [img_ext:protected] => jpg [img_width:protected] => [img_height:protected] => [img_credit:protected] => MetroPark, Miller and Long [img_practice:protected] => not_applicable [vid_source_id:protected] => [vid_running_time:protected] => [vid_intended_audience:protected] => [vid_acquisition_info:protected] => [vid_cost:protected] => [vid_producer:protected] => [vid_filename:protected] => [vid_filename_downloadable:protected] => [date_summary:protected] => August 28 2015 [date_permission_requested:protected] => [date_permission_received:protected] => [date_review_needed:protected] => [date_received:protected] => 08/28/15 [date_completed:protected] => 08/28/15 [date_billed:protected] => [date_modified:protected] => 08/28/15 [collBokExports:protected] => [lastBokExportCriteria:BaseElcoshItem:private] => [alreadyInSave:protected] => [alreadyInValidation:protected] => [validationFailures:protected] => Array ( ) [_new:BaseObject:private] => [_deleted:BaseObject:private] => [modifiedColumns:protected] => Array ( ) ) ) [4] => Search_Result Object ( [title] => Suspended scaffold [image] => /record/images/3976-p.jpg [blurb] => Suspended scaffold outrigger beams must have stops to prevent the hangers from sliding of the end of the outriggers. Wire rope supported must be desig... [category] => Array ( [0] => 97 [1] => 15 [2] => 47 [3] => 50 [4] => 79 [5] => 87 ) [labels] => Array ( [0] => Images [1] => Media [2] => Media & Documents [3] => Falls [4] => Work Environment [5] => Hazards [6] => Bricklayer [7] => Trades [8] => Carpet Layer [10] => Scaffold Erector [12] => Commercial & Institutional [13] => Jobsites ) [type] => Images [sub_category] => [url] => /image/3976/i002684/Suspended%2Bscaffold.html [item:protected] => ImageRecord Object ( [records:protected] => Array ( ) [recordId:protected] => [searchWordClass:protected] => [searchWordPeerClass:protected] => [bok_record:protected] => [authors:protected] => [organizations:protected] => [collections:protected] => [categories:protected] => Array ( [97] => Category Object ( [languages:protected] => [bok_resources:protected] => [bok_topics:protected] => [bok_keywords:protected] => [id:protected] => 97 [type:protected] => category [parent:protected] => 5 [label:protected] => Images [alreadyInSave:protected] => [alreadyInValidation:protected] => [validationFailures:protected] => Array ( ) [_new:BaseObject:private] => [_deleted:BaseObject:private] => [modifiedColumns:protected] => Array ( ) ) [15] => Category Object ( [languages:protected] => [bok_resources:protected] => [bok_topics:protected] => [bok_keywords:protected] => [id:protected] => 15 [type:protected] => category [parent:protected] => 7 [label:protected] => Falls [alreadyInSave:protected] => [alreadyInValidation:protected] => [validationFailures:protected] => Array ( ) [_new:BaseObject:private] => [_deleted:BaseObject:private] => [modifiedColumns:protected] => Array ( ) ) [47] => Category Object ( [languages:protected] => [bok_resources:protected] => [bok_topics:protected] => [bok_keywords:protected] => [id:protected] => 47 [type:protected] => category [parent:protected] => 2 [label:protected] => Bricklayer [alreadyInSave:protected] => [alreadyInValidation:protected] => [validationFailures:protected] => Array ( ) [_new:BaseObject:private] => [_deleted:BaseObject:private] => [modifiedColumns:protected] => Array ( ) ) [50] => Category Object ( [languages:protected] => [bok_resources:protected] => [bok_topics:protected] => [bok_keywords:protected] => [id:protected] => 50 [type:protected] => category [parent:protected] => 2 [label:protected] => Carpet Layer [alreadyInSave:protected] => [alreadyInValidation:protected] => [validationFailures:protected] => Array ( ) [_new:BaseObject:private] => [_deleted:BaseObject:private] => [modifiedColumns:protected] => Array ( ) ) [79] => Category Object ( [languages:protected] => [bok_resources:protected] => [bok_topics:protected] => [bok_keywords:protected] => [id:protected] => 79 [type:protected] => category [parent:protected] => 2 [label:protected] => Scaffold Erector [alreadyInSave:protected] => [alreadyInValidation:protected] => [validationFailures:protected] => Array ( ) [_new:BaseObject:private] => [_deleted:BaseObject:private] => [modifiedColumns:protected] => Array ( ) ) [87] => Category Object ( [languages:protected] => [bok_resources:protected] => [bok_topics:protected] => [bok_keywords:protected] => [id:protected] => 87 [type:protected] => category [parent:protected] => 3 [label:protected] => Commercial & Institutional [alreadyInSave:protected] => [alreadyInValidation:protected] => [validationFailures:protected] => Array ( ) [_new:BaseObject:private] => [_deleted:BaseObject:private] => [modifiedColumns:protected] => Array ( ) ) ) [categories_initialized:protected] => 1 [mapped_items:protected] => [content:protected] => [files:protected] => [language:protected] => Language Object ( [id:protected] => 1 [code:protected] => en [name:protected] => English [alreadyInSave:protected] => [alreadyInValidation:protected] => [validationFailures:protected] => Array ( ) [_new:BaseObject:private] => [_deleted:BaseObject:private] => [modifiedColumns:protected] => Array ( ) ) [old_record:protected] => [id:protected] => 3976 [old_id:protected] => [elcosh_id:protected] => i002684 [type:protected] => image [display_type:protected] => Image [user_id:protected] => 0 [language_id:protected] => 1 [tagging_id:protected] => John Newquist [priority_id:protected] => 1 [title:protected] => Suspended scaffold [total_pages:protected] => 0 [billed_pages:protected] => 0 [publication_number:protected] => [part_of:protected] => [keywords:protected] => Suspended, scaffold, outrigger, beams, erection, wire, rope, inspection, swing, stage, [comments:protected] => [summary:protected] => Suspended scaffold outrigger beams must have stops to prevent the hangers from sliding of the end of the outriggers. Wire rope supported must be designed with a safety factor of 6. The scaffold must be inspected by a competent person daily. [transition_comments:protected] => [external_link:protected] => [consol_link:protected] => http://www.cpwrconstructionsolutions.org/task/Erect%2Band%2Bdismantle%2Bscaffolds/ [more_like_this:protected] => i002683, d000244, i000407, d000606 [permission_given_by:protected] => [published:protected] => T [billable:protected] => F [img_name:protected] => [img_ext:protected] => jpg [img_width:protected] => [img_height:protected] => [img_credit:protected] => Metropark, Miller and Long [img_practice:protected] => not_applicable [vid_source_id:protected] => [vid_running_time:protected] => [vid_intended_audience:protected] => [vid_acquisition_info:protected] => [vid_cost:protected] => [vid_producer:protected] => [vid_filename:protected] => [vid_filename_downloadable:protected] => [date_summary:protected] => [date_permission_requested:protected] => [date_permission_received:protected] => [date_review_needed:protected] => [date_received:protected] => 08/28/15 [date_completed:protected] => 08/28/15 [date_billed:protected] => [date_modified:protected] => 08/28/15 [collBokExports:protected] => [lastBokExportCriteria:BaseElcoshItem:private] => [alreadyInSave:protected] => [alreadyInValidation:protected] => [validationFailures:protected] => Array ( ) [_new:BaseObject:private] => [_deleted:BaseObject:private] => [modifiedColumns:protected] => Array ( ) ) ) [5] => Search_Result Object ( [title] => Three Tower Cranes [image] => /record/images/3979-p.jpg [blurb] => Whenever multiple tower cranes are used, there needs to be preplanning to ensure that the tower cranes cannot hit each other loads. This is accomplish... [category] => Array ( [0] => 97 [1] => 11 [2] => 64 [3] => 70 [4] => 62 [5] => 87 ) [labels] => Array ( [0] => Images [1] => Media [2] => Media & Documents [3] => Cranes & Hoists [4] => Work Environment [5] => Hazards [6] => Laborer [7] => Trades [8] => Operating Engineer [10] => Structural Ironworker [12] => Commercial & Institutional [13] => Jobsites ) [type] => Images [sub_category] => [url] => /image/3979/i002687/Three%2BTower%2BCranes.html [item:protected] => ImageRecord Object ( [records:protected] => Array ( ) [recordId:protected] => [searchWordClass:protected] => [searchWordPeerClass:protected] => [bok_record:protected] => [authors:protected] => [organizations:protected] => [collections:protected] => [categories:protected] => Array ( [97] => Category Object ( [languages:protected] => [bok_resources:protected] => [bok_topics:protected] => [bok_keywords:protected] => [id:protected] => 97 [type:protected] => category [parent:protected] => 5 [label:protected] => Images [alreadyInSave:protected] => [alreadyInValidation:protected] => [validationFailures:protected] => Array ( ) [_new:BaseObject:private] => [_deleted:BaseObject:private] => [modifiedColumns:protected] => Array ( ) ) [11] => Category Object ( [languages:protected] => [bok_resources:protected] => [bok_topics:protected] => [bok_keywords:protected] => [id:protected] => 11 [type:protected] => category [parent:protected] => 7 [label:protected] => Cranes & Hoists [alreadyInSave:protected] => [alreadyInValidation:protected] => [validationFailures:protected] => Array ( ) [_new:BaseObject:private] => [_deleted:BaseObject:private] => [modifiedColumns:protected] => Array ( ) ) [64] => Category Object ( [languages:protected] => [bok_resources:protected] => [bok_topics:protected] => [bok_keywords:protected] => [id:protected] => 64 [type:protected] => category [parent:protected] => 2 [label:protected] => Laborer [alreadyInSave:protected] => [alreadyInValidation:protected] => [validationFailures:protected] => Array ( ) [_new:BaseObject:private] => [_deleted:BaseObject:private] => [modifiedColumns:protected] => Array ( ) ) [70] => Category Object ( [languages:protected] => [bok_resources:protected] => [bok_topics:protected] => [bok_keywords:protected] => [id:protected] => 70 [type:protected] => category [parent:protected] => 2 [label:protected] => Operating Engineer [alreadyInSave:protected] => [alreadyInValidation:protected] => [validationFailures:protected] => Array ( ) [_new:BaseObject:private] => [_deleted:BaseObject:private] => [modifiedColumns:protected] => Array ( ) ) [62] => Category Object ( [languages:protected] => [bok_resources:protected] => [bok_topics:protected] => [bok_keywords:protected] => [id:protected] => 62 [type:protected] => category [parent:protected] => 2 [label:protected] => Structural Ironworker [alreadyInSave:protected] => [alreadyInValidation:protected] => [validationFailures:protected] => Array ( ) [_new:BaseObject:private] => [_deleted:BaseObject:private] => [modifiedColumns:protected] => Array ( ) ) [87] => Category Object ( [languages:protected] => [bok_resources:protected] => [bok_topics:protected] => [bok_keywords:protected] => [id:protected] => 87 [type:protected] => category [parent:protected] => 3 [label:protected] => Commercial & Institutional [alreadyInSave:protected] => [alreadyInValidation:protected] => [validationFailures:protected] => Array ( ) [_new:BaseObject:private] => [_deleted:BaseObject:private] => [modifiedColumns:protected] => Array ( ) ) ) [categories_initialized:protected] => 1 [mapped_items:protected] => [content:protected] => [files:protected] => [language:protected] => Language Object ( [id:protected] => 1 [code:protected] => en [name:protected] => English [alreadyInSave:protected] => [alreadyInValidation:protected] => [validationFailures:protected] => Array ( ) [_new:BaseObject:private] => [_deleted:BaseObject:private] => [modifiedColumns:protected] => Array ( ) ) [old_record:protected] => [id:protected] => 3979 [old_id:protected] => [elcosh_id:protected] => i002687 [type:protected] => image [display_type:protected] => Image [user_id:protected] => 0 [language_id:protected] => 1 [tagging_id:protected] => John Newquist [priority_id:protected] => 1 [title:protected] => Three Tower Cranes [total_pages:protected] => 0 [billed_pages:protected] => 0 [publication_number:protected] => [part_of:protected] => [keywords:protected] => [comments:protected] => [summary:protected] => Whenever multiple tower cranes are used, there needs to be preplanning to ensure that the tower cranes cannot hit each other loads. This is accomplished by setting swing restrictions, marking the ground for allowable crane travel and training of the crane signal persons. [transition_comments:protected] => [external_link:protected] => [consol_link:protected] => http://www.cpwrconstructionsolutions.org/work/6/184/ [more_like_this:protected] => d001029, d000010, i001280, i001221 [permission_given_by:protected] => [published:protected] => T [billable:protected] => F [img_name:protected] => [img_ext:protected] => jpg [img_width:protected] => [img_height:protected] => [img_credit:protected] => Metropark [img_practice:protected] => not_applicable [vid_source_id:protected] => [vid_running_time:protected] => [vid_intended_audience:protected] => [vid_acquisition_info:protected] => [vid_cost:protected] => [vid_producer:protected] => [vid_filename:protected] => [vid_filename_downloadable:protected] => [date_summary:protected] => August 28 2015 [date_permission_requested:protected] => [date_permission_received:protected] => [date_review_needed:protected] => [date_received:protected] => 08/28/15 [date_completed:protected] => 08/28/15 [date_billed:protected] => [date_modified:protected] => 08/28/15 [collBokExports:protected] => [lastBokExportCriteria:BaseElcoshItem:private] => [alreadyInSave:protected] => [alreadyInValidation:protected] => [validationFailures:protected] => Array ( ) [_new:BaseObject:private] => [_deleted:BaseObject:private] => [modifiedColumns:protected] => Array ( ) ) ) ) [preview_mode] => [description] => This third in a series of 6 Tool Box Talks on construction ergonomics focuses on proper positioning to avoid injuries. The TBT recommends: 1)prop up a task off of the floor by using a raised surface, cart, baker scaffold, saw horses to prep materials near waist height, 2)move the lift or ladder in the best position for the work, 3)position the lift in front of the area you plan to work without trying to reach too far on either side of the lift. [keywords] => position, positioning, ergonomics, ergo, carpal tunnel, MSD, musculoskeletal disorder [related_items] => Array ( [Handouts] => Array ( [0] => DocumentRecord Object ( [records:protected] => Array ( ) [recordId:protected] => [searchWordClass:protected] => [searchWordPeerClass:protected] => [bok_record:protected] => [authors:protected] => [organizations:protected] => [collections:protected] => [categories:protected] => [categories_initialized:protected] => [mapped_items:protected] => [content:protected] => [files:protected] => [language:protected] => Language Object ( [id:protected] => 1 [code:protected] => en [name:protected] => English [alreadyInSave:protected] => [alreadyInValidation:protected] => [validationFailures:protected] => Array ( ) [_new:BaseObject:private] => [_deleted:BaseObject:private] => [modifiedColumns:protected] => Array ( ) ) [old_record:protected] => [id:protected] => 3833 [old_id:protected] => [elcosh_id:protected] => d001303 [type:protected] => document [display_type:protected] => HTML w/ PDF [user_id:protected] => 25 [language_id:protected] => 1 [tagging_id:protected] => Bruce Lippy [priority_id:protected] => 1 [title:protected] => Overview of Toolbox Talks on Ergonomics Developed by Washington University in St. Louis [total_pages:protected] => 3 [billed_pages:protected] => 3 [publication_number:protected] => [part_of:protected] => [keywords:protected] => ergonomics, musculoskeletal disorders, MSDs [comments:protected] => 7-28-2014 - Originally submitted as "HTML w/ doc and PDF", Jeff Nelson asked Bruce Lippy for permission to switch it to "HTML w/ PDF" -- permission was given [summary:protected] => This overviews provides a background on how Washington University in St. Louis developed this series of six toolbox talks on ergonomics. It also describes how they tested the effectiveness of these communication tools, concluding that the guide was valuable for improving the delivery of ergonomics training and interaction between the safety representative and workers. The researchers recommend preparing site-specific information prior to the talk and interacting with workers to discuss problems and ergonomic solutions during the safety meetings. [transition_comments:protected] => [external_link:protected] => [consol_link:protected] => [more_like_this:protected] => [permission_given_by:protected] => Lisa Jaegers, Washington U. in St. Louis [published:protected] => T [billable:protected] => F [img_name:protected] => [img_ext:protected] => png [img_width:protected] => [img_height:protected] => [img_credit:protected] => [img_practice:protected] => [vid_source_id:protected] => [vid_running_time:protected] => [vid_intended_audience:protected] => [vid_acquisition_info:protected] => [vid_cost:protected] => [vid_producer:protected] => [vid_filename:protected] => [vid_filename_downloadable:protected] => [date_summary:protected] => 2014 [date_permission_requested:protected] => [date_permission_received:protected] => [date_review_needed:protected] => [date_received:protected] => 06/11/14 [date_completed:protected] => 07/29/14 [date_billed:protected] => [date_modified:protected] => 07/29/14 [collBokExports:protected] => [lastBokExportCriteria:BaseElcoshItem:private] => [alreadyInSave:protected] => [alreadyInValidation:protected] => [validationFailures:protected] => Array ( ) [_new:BaseObject:private] => [_deleted:BaseObject:private] => [modifiedColumns:protected] => Array ( ) ) ) [Toolbox Talks] => Array ( [0] => DocumentRecord Object ( [records:protected] => Array ( ) [recordId:protected] => [searchWordClass:protected] => [searchWordPeerClass:protected] => [bok_record:protected] => [authors:protected] => [organizations:protected] => [collections:protected] => [categories:protected] => [categories_initialized:protected] => [mapped_items:protected] => [content:protected] => [files:protected] => [language:protected] => Language Object ( [id:protected] => 1 [code:protected] => en [name:protected] => English [alreadyInSave:protected] => [alreadyInValidation:protected] => [validationFailures:protected] => Array ( ) [_new:BaseObject:private] => [_deleted:BaseObject:private] => [modifiedColumns:protected] => Array ( ) ) [old_record:protected] => [id:protected] => 3835 [old_id:protected] => [elcosh_id:protected] => d001304 [type:protected] => document [display_type:protected] => HTML w/ PDF [user_id:protected] => 25 [language_id:protected] => 1 [tagging_id:protected] => Bruce Lippy [priority_id:protected] => 1 [title:protected] => Ergonomics Tool Box Talks (TBT) Training Guide [total_pages:protected] => 2 [billed_pages:protected] => 2 [publication_number:protected] => [part_of:protected] => [keywords:protected] => Ergonomics, carpal tunnel, muscular skeletal disorders, msd [comments:protected] => [summary:protected] => CPWR-funded ergonomics research by Washington University at St. Louis led to the development of 6 tool box talks. This guide is an explanation of how to deliver the talks for maximum effectiveness. This guide should be reviewed before delivering any of the talks because it makes important recommendations like: • If possible, give the TBTs as a part of the crew’s regular safety meetings so that ergonomics is included in the safety discussion. • Try to locate an area with few distractions for gathering the crew. • For a team approach, invite the work crew, site superintendent, project manager and other general contractor and/or subcontractor reps who you feel may be helpful in supporting the training and ergonomics solutions. [transition_comments:protected] => [external_link:protected] => [consol_link:protected] => [more_like_this:protected] => d001303,d001305,d001306,d001307,d001308,d001309,d001310 [permission_given_by:protected] => [published:protected] => T [billable:protected] => F [img_name:protected] => [img_ext:protected] => png [img_width:protected] => [img_height:protected] => [img_credit:protected] => [img_practice:protected] => [vid_source_id:protected] => [vid_running_time:protected] => [vid_intended_audience:protected] => [vid_acquisition_info:protected] => [vid_cost:protected] => [vid_producer:protected] => [vid_filename:protected] => [vid_filename_downloadable:protected] => [date_summary:protected] => 2014 [date_permission_requested:protected] => [date_permission_received:protected] => [date_review_needed:protected] => [date_received:protected] => 06/12/14 [date_completed:protected] => 07/29/14 [date_billed:protected] => [date_modified:protected] => 07/29/14 [collBokExports:protected] => [lastBokExportCriteria:BaseElcoshItem:private] => [alreadyInSave:protected] => [alreadyInValidation:protected] => [validationFailures:protected] => Array ( ) [_new:BaseObject:private] => [_deleted:BaseObject:private] => [modifiedColumns:protected] => Array ( ) ) [1] => DocumentRecord Object ( [records:protected] => Array ( ) [recordId:protected] => [searchWordClass:protected] => [searchWordPeerClass:protected] => [bok_record:protected] => [authors:protected] => [organizations:protected] => [collections:protected] => [categories:protected] => [categories_initialized:protected] => [mapped_items:protected] => [content:protected] => [files:protected] => [language:protected] => Language Object ( [id:protected] => 1 [code:protected] => en [name:protected] => English [alreadyInSave:protected] => [alreadyInValidation:protected] => [validationFailures:protected] => Array ( ) [_new:BaseObject:private] => [_deleted:BaseObject:private] => [modifiedColumns:protected] => Array ( ) ) [old_record:protected] => [id:protected] => 3836 [old_id:protected] => [elcosh_id:protected] => d001305 [type:protected] => document [display_type:protected] => HTML w/ PDF [user_id:protected] => 25 [language_id:protected] => 1 [tagging_id:protected] => Bruce Lippy [priority_id:protected] => 1 [title:protected] => TBT1 Ergonomics in Construction [total_pages:protected] => 5 [billed_pages:protected] => 5 [publication_number:protected] => [part_of:protected] => [keywords:protected] => ergonomics, ergo, msd, musculoskeletal disorders, risk factors, lifting, carpal tunnel, repetition, awkward postures [comments:protected] => 7-28-2014 Jeff Nelson asked Bruce Lippy about what to do with a sentence included toward the top of the doc, "Fill them in on page 2 'Other Questions.'" -- Bruce said this sentence could be deleted from the HTML. [summary:protected] => This is the first in a series of 6 Tool Box Talks produced by Washington University in St. Louis on ergonomics in construction work. This one should be delivered first because it covers what ergonomics is, why construction workers need to talk about it, what the risk factors are for developing a health problem and how to prevent these problems. [transition_comments:protected] => [external_link:protected] => [consol_link:protected] => http://www.cpwrconstructionsolutions.org/pipes_vessels/solution/50/participatory-ergonomics-program.html [more_like_this:protected] => d001303,d001304,d001306,d001307,d001308,d001309 [permission_given_by:protected] => Lisa Jaegers, Washington U. in St. Louis [published:protected] => T [billable:protected] => F [img_name:protected] => [img_ext:protected] => png [img_width:protected] => [img_height:protected] => [img_credit:protected] => [img_practice:protected] => [vid_source_id:protected] => [vid_running_time:protected] => [vid_intended_audience:protected] => [vid_acquisition_info:protected] => [vid_cost:protected] => [vid_producer:protected] => [vid_filename:protected] => [vid_filename_downloadable:protected] => [date_summary:protected] => 2014 [date_permission_requested:protected] => [date_permission_received:protected] => [date_review_needed:protected] => [date_received:protected] => 06/12/14 [date_completed:protected] => 07/28/14 [date_billed:protected] => [date_modified:protected] => 10/09/15 [collBokExports:protected] => [lastBokExportCriteria:BaseElcoshItem:private] => [alreadyInSave:protected] => [alreadyInValidation:protected] => [validationFailures:protected] => Array ( ) [_new:BaseObject:private] => [_deleted:BaseObject:private] => [modifiedColumns:protected] => Array ( ) ) [2] => DocumentRecord Object ( [records:protected] => Array ( ) [recordId:protected] => [searchWordClass:protected] => [searchWordPeerClass:protected] => [bok_record:protected] => [authors:protected] => [organizations:protected] => [collections:protected] => [categories:protected] => [categories_initialized:protected] => [mapped_items:protected] => [content:protected] => [files:protected] => [language:protected] => Language Object ( [id:protected] => 1 [code:protected] => en [name:protected] => English [alreadyInSave:protected] => [alreadyInValidation:protected] => [validationFailures:protected] => Array ( ) [_new:BaseObject:private] => [_deleted:BaseObject:private] => [modifiedColumns:protected] => Array ( ) ) [old_record:protected] => [id:protected] => 3837 [old_id:protected] => [elcosh_id:protected] => d001306 [type:protected] => document [display_type:protected] => HTML w/ PDF [user_id:protected] => 25 [language_id:protected] => 1 [tagging_id:protected] => Bruce Lippy [priority_id:protected] => 1 [title:protected] => TBT2 Keep Reach Close [total_pages:protected] => 4 [billed_pages:protected] => 4 [publication_number:protected] => [part_of:protected] => [keywords:protected] => reach, ergonomic, ergo, MSD, carpal tunnel, repetition, awkward positions [comments:protected] => 7-28-2014 Jeff Nelson asked Bruce Lippy about what to do with a sentence included toward the top of the doc, "Fill them in on page 2 'Other Questions.'" -- Bruce said this sentence could be deleted from the HTML. [summary:protected] => This is the second of six Tool Box Talks created by Washington University in St. Louis on ergonomics in construction. There is a guide with the series that describes how to deliver these talks. This one deals with how to avoid awkward reaching during tasks to prevent injuries. try to work with your hands below your head and close to our body to reduce your risk of shoulder strains and back discomfort. This TBT recommends considering ways to move close to the task, keeping the work area free of obstacles, and talking with each other to provide constructive feedback about your working position. [transition_comments:protected] => [external_link:protected] => [consol_link:protected] => http://www.cpwrconstructionsolutions.org/hazard/959/lifting-and-carrying-manual-materials-handling.html [more_like_this:protected] => d001303,d001304,d001305,d001307,d001308,e001309 [permission_given_by:protected] => [published:protected] => T [billable:protected] => F [img_name:protected] => [img_ext:protected] => png [img_width:protected] => [img_height:protected] => [img_credit:protected] => [img_practice:protected] => [vid_source_id:protected] => [vid_running_time:protected] => [vid_intended_audience:protected] => [vid_acquisition_info:protected] => [vid_cost:protected] => [vid_producer:protected] => [vid_filename:protected] => [vid_filename_downloadable:protected] => [date_summary:protected] => 2014 [date_permission_requested:protected] => [date_permission_received:protected] => [date_review_needed:protected] => [date_received:protected] => 06/12/14 [date_completed:protected] => 07/28/14 [date_billed:protected] => [date_modified:protected] => 11/02/16 [collBokExports:protected] => [lastBokExportCriteria:BaseElcoshItem:private] => [alreadyInSave:protected] => [alreadyInValidation:protected] => [validationFailures:protected] => Array ( ) [_new:BaseObject:private] => [_deleted:BaseObject:private] => [modifiedColumns:protected] => Array ( ) ) [3] => DocumentRecord Object ( [records:protected] => Array ( ) [recordId:protected] => [searchWordClass:protected] => [searchWordPeerClass:protected] => [bok_record:protected] => [authors:protected] => [organizations:protected] => [collections:protected] => [categories:protected] => [categories_initialized:protected] => [mapped_items:protected] => [content:protected] => [files:protected] => [language:protected] => Language Object ( [id:protected] => 1 [code:protected] => en [name:protected] => English [alreadyInSave:protected] => [alreadyInValidation:protected] => [validationFailures:protected] => Array ( ) [_new:BaseObject:private] => [_deleted:BaseObject:private] => [modifiedColumns:protected] => Array ( ) ) [old_record:protected] => [id:protected] => 3839 [old_id:protected] => [elcosh_id:protected] => d001308 [type:protected] => document [display_type:protected] => HTML w/ PDF [user_id:protected] => 23 [language_id:protected] => 1 [tagging_id:protected] => Bruce Lippy [priority_id:protected] => 1 [title:protected] => TBT4 Move Materials With Assist [total_pages:protected] => 4 [billed_pages:protected] => 4 [publication_number:protected] => [part_of:protected] => [keywords:protected] => lifting, back injury, ergonomics, ergo, MSD, buddy system [comments:protected] => 7-28-2014 Jeff Nelson asked Bruce Lippy about what to do with a sentence included toward the top of the doc, "Fill them in on page 2 'Other Questions.'" -- Bruce said this sentence could be deleted from the HTML. [summary:protected] => This tool box talk is fourth in a series of 6 developed by Washington University in St. Louis on construction ergonomics. This one focuses on preventing back injuries by getting an assist when manually lifting. It recommends using a cart for transporting loads, taking less trips, avoiding carrying materials on the shoulder and helping each other to lift large or heavy materials when a cart or hoist is not available. [transition_comments:protected] => [external_link:protected] => [consol_link:protected] => http://www.cpwrconstructionsolutions.org/hazard/959/lifting-and-carrying-manual-materials-handling.html [more_like_this:protected] => d001303,d001304,d001305,d001306,d001307,d001309 [permission_given_by:protected] => Lisa Jaegers, Washington U. in St. Louis [published:protected] => T [billable:protected] => F [img_name:protected] => [img_ext:protected] => png [img_width:protected] => [img_height:protected] => [img_credit:protected] => [img_practice:protected] => [vid_source_id:protected] => [vid_running_time:protected] => [vid_intended_audience:protected] => [vid_acquisition_info:protected] => [vid_cost:protected] => [vid_producer:protected] => [vid_filename:protected] => [vid_filename_downloadable:protected] => [date_summary:protected] => 2014 [date_permission_requested:protected] => [date_permission_received:protected] => [date_review_needed:protected] => [date_received:protected] => 06/12/14 [date_completed:protected] => 07/29/14 [date_billed:protected] => [date_modified:protected] => 10/09/15 [collBokExports:protected] => [lastBokExportCriteria:BaseElcoshItem:private] => [alreadyInSave:protected] => [alreadyInValidation:protected] => [validationFailures:protected] => Array ( ) [_new:BaseObject:private] => [_deleted:BaseObject:private] => [modifiedColumns:protected] => Array ( ) ) [4] => DocumentRecord Object ( [records:protected] => Array ( ) [recordId:protected] => [searchWordClass:protected] => [searchWordPeerClass:protected] => [bok_record:protected] => [authors:protected] => [organizations:protected] => [collections:protected] => [categories:protected] => [categories_initialized:protected] => [mapped_items:protected] => [content:protected] => [files:protected] => [language:protected] => Language Object ( [id:protected] => 1 [code:protected] => en [name:protected] => English [alreadyInSave:protected] => [alreadyInValidation:protected] => [validationFailures:protected] => Array ( ) [_new:BaseObject:private] => [_deleted:BaseObject:private] => [modifiedColumns:protected] => Array ( ) ) [old_record:protected] => [id:protected] => 3840 [old_id:protected] => [elcosh_id:protected] => d001309 [type:protected] => document [display_type:protected] => HTML w/ PDF [user_id:protected] => 23 [language_id:protected] => 1 [tagging_id:protected] => Bruce Lippy [priority_id:protected] => 1 [title:protected] => TBT5 Manual Tools [total_pages:protected] => 4 [billed_pages:protected] => 4 [publication_number:protected] => [part_of:protected] => [keywords:protected] => ergonomic, hand tools, handles, MSD, musculoskeletal disorder, carpal tunnel [comments:protected] => 7-28-2014 Jeff Nelson asked Bruce Lippy about what to do with a sentence included toward the top of the doc, "Fill them in on page 2 'Other Questions.'" -- Bruce said this sentence could be deleted from the HTML. [summary:protected] => This is the fifth in a series of 6 tool box talks on construction ergonomics produced by the University of Washington in St. Louis. This one focuses on manual tools. It asks the following 6 key questions. Does the tool… 1. Fit the task? 2. Allow a good power grip? 3. Keep the wrist in a straight posture? 4. Feel comfortable? 5. Take less effort than other tools for the task? 6. Work effectively? [transition_comments:protected] => [external_link:protected] => [consol_link:protected] => http://www.cpwrconstructionsolutions.org/masonry/solution/383/ergonomic-hand-tools.html [more_like_this:protected] => d001303,d001304,d001305,d001306,d001307,d001308,d001310 [permission_given_by:protected] => Lisa Jaegers, U. Wash. St. Louis [published:protected] => T [billable:protected] => F [img_name:protected] => [img_ext:protected] => png [img_width:protected] => [img_height:protected] => [img_credit:protected] => [img_practice:protected] => [vid_source_id:protected] => [vid_running_time:protected] => [vid_intended_audience:protected] => [vid_acquisition_info:protected] => [vid_cost:protected] => [vid_producer:protected] => [vid_filename:protected] => [vid_filename_downloadable:protected] => [date_summary:protected] => 2014 [date_permission_requested:protected] => [date_permission_received:protected] => [date_review_needed:protected] => [date_received:protected] => 06/12/14 [date_completed:protected] => 07/29/14 [date_billed:protected] => [date_modified:protected] => 10/09/15 [collBokExports:protected] => [lastBokExportCriteria:BaseElcoshItem:private] => [alreadyInSave:protected] => [alreadyInValidation:protected] => [validationFailures:protected] => Array ( ) [_new:BaseObject:private] => [_deleted:BaseObject:private] => [modifiedColumns:protected] => Array ( ) ) ) ) [collections] => Array ( [3834] => ) [record] => DocumentRecord Object ( [records:protected] => Array ( ) [recordId:protected] => [searchWordClass:protected] => [searchWordPeerClass:protected] => [bok_record:protected] => [authors:protected] => Array ( ) [organizations:protected] => Array ( [182] => Organization Object ( [id:protected] => 182 [elcosh_id:protected] => o000205 [user_id:protected] => 14 [province_id:protected] => 0 [country_id:protected] => 0 [title:protected] => Washington University - St. Louis [address:protected] => [postal_code:protected] => [city:protected] => [department:protected] => [phone:protected] => [fax:protected] => [email:protected] => [website:protected] => [filename:protected] => [about:protected] => [comments:protected] => [logo_available:protected] => T [no_details:protected] => T [date_received:protected] => 2009-08-06 [date_completed:protected] => 2009-08-06 [date_billed:protected] => [alreadyInSave:protected] => [alreadyInValidation:protected] => [validationFailures:protected] => Array ( ) [_new:BaseObject:private] => [_deleted:BaseObject:private] => [modifiedColumns:protected] => Array ( ) ) ) [collections:protected] => Array ( [3834] => ) [categories:protected] => [categories_initialized:protected] => [mapped_items:protected] => Array ( [3833] => DocumentRecord Object ( [records:protected] => Array ( ) [recordId:protected] => [searchWordClass:protected] => [searchWordPeerClass:protected] => [bok_record:protected] => [authors:protected] => [organizations:protected] => [collections:protected] => [categories:protected] => [categories_initialized:protected] => [mapped_items:protected] => [content:protected] => [files:protected] => [language:protected] => [old_record:protected] => [id:protected] => 3833 [old_id:protected] => [elcosh_id:protected] => d001303 [type:protected] => document [display_type:protected] => HTML w/ PDF [user_id:protected] => 25 [language_id:protected] => 1 [tagging_id:protected] => Bruce Lippy [priority_id:protected] => 1 [title:protected] => Overview of Toolbox Talks on Ergonomics Developed by Washington University in St. Louis [total_pages:protected] => 3 [billed_pages:protected] => 3 [publication_number:protected] => [part_of:protected] => [keywords:protected] => ergonomics, musculoskeletal disorders, MSDs [comments:protected] => 7-28-2014 - Originally submitted as "HTML w/ doc and PDF", Jeff Nelson asked Bruce Lippy for permission to switch it to "HTML w/ PDF" -- permission was given [summary:protected] => This overviews provides a background on how Washington University in St. Louis developed this series of six toolbox talks on ergonomics. It also describes how they tested the effectiveness of these communication tools, concluding that the guide was valuable for improving the delivery of ergonomics training and interaction between the safety representative and workers. The researchers recommend preparing site-specific information prior to the talk and interacting with workers to discuss problems and ergonomic solutions during the safety meetings. [transition_comments:protected] => [external_link:protected] => [consol_link:protected] => [more_like_this:protected] => [permission_given_by:protected] => Lisa Jaegers, Washington U. in St. Louis [published:protected] => T [billable:protected] => F [img_name:protected] => [img_ext:protected] => png [img_width:protected] => [img_height:protected] => [img_credit:protected] => [img_practice:protected] => [vid_source_id:protected] => [vid_running_time:protected] => [vid_intended_audience:protected] => [vid_acquisition_info:protected] => [vid_cost:protected] => [vid_producer:protected] => [vid_filename:protected] => [vid_filename_downloadable:protected] => [date_summary:protected] => 2014 [date_permission_requested:protected] => [date_permission_received:protected] => [date_review_needed:protected] => [date_received:protected] => 06/11/14 [date_completed:protected] => 07/29/14 [date_billed:protected] => [date_modified:protected] => 07/29/14 [collBokExports:protected] => [lastBokExportCriteria:BaseElcoshItem:private] => [alreadyInSave:protected] => [alreadyInValidation:protected] => [validationFailures:protected] => Array ( ) [_new:BaseObject:private] => [_deleted:BaseObject:private] => [modifiedColumns:protected] => Array ( ) ) [3835] => DocumentRecord Object ( [records:protected] => Array ( ) [recordId:protected] => [searchWordClass:protected] => [searchWordPeerClass:protected] => [bok_record:protected] => [authors:protected] => [organizations:protected] => [collections:protected] => [categories:protected] => [categories_initialized:protected] => [mapped_items:protected] => [content:protected] => [files:protected] => [language:protected] => [old_record:protected] => [id:protected] => 3835 [old_id:protected] => [elcosh_id:protected] => d001304 [type:protected] => document [display_type:protected] => HTML w/ PDF [user_id:protected] => 25 [language_id:protected] => 1 [tagging_id:protected] => Bruce Lippy [priority_id:protected] => 1 [title:protected] => Ergonomics Tool Box Talks (TBT) Training Guide [total_pages:protected] => 2 [billed_pages:protected] => 2 [publication_number:protected] => [part_of:protected] => [keywords:protected] => Ergonomics, carpal tunnel, muscular skeletal disorders, msd [comments:protected] => [summary:protected] => CPWR-funded ergonomics research by Washington University at St. Louis led to the development of 6 tool box talks. This guide is an explanation of how to deliver the talks for maximum effectiveness. This guide should be reviewed before delivering any of the talks because it makes important recommendations like: • If possible, give the TBTs as a part of the crew’s regular safety meetings so that ergonomics is included in the safety discussion. • Try to locate an area with few distractions for gathering the crew. • For a team approach, invite the work crew, site superintendent, project manager and other general contractor and/or subcontractor reps who you feel may be helpful in supporting the training and ergonomics solutions. [transition_comments:protected] => [external_link:protected] => [consol_link:protected] => [more_like_this:protected] => d001303,d001305,d001306,d001307,d001308,d001309,d001310 [permission_given_by:protected] => [published:protected] => T [billable:protected] => F [img_name:protected] => [img_ext:protected] => png [img_width:protected] => [img_height:protected] => [img_credit:protected] => [img_practice:protected] => [vid_source_id:protected] => [vid_running_time:protected] => [vid_intended_audience:protected] => [vid_acquisition_info:protected] => [vid_cost:protected] => [vid_producer:protected] => [vid_filename:protected] => [vid_filename_downloadable:protected] => [date_summary:protected] => 2014 [date_permission_requested:protected] => [date_permission_received:protected] => [date_review_needed:protected] => [date_received:protected] => 06/12/14 [date_completed:protected] => 07/29/14 [date_billed:protected] => [date_modified:protected] => 07/29/14 [collBokExports:protected] => [lastBokExportCriteria:BaseElcoshItem:private] => [alreadyInSave:protected] => [alreadyInValidation:protected] => [validationFailures:protected] => Array ( ) [_new:BaseObject:private] => [_deleted:BaseObject:private] => [modifiedColumns:protected] => Array ( ) ) [3836] => DocumentRecord Object ( [records:protected] => Array ( ) [recordId:protected] => [searchWordClass:protected] => [searchWordPeerClass:protected] => [bok_record:protected] => [authors:protected] => [organizations:protected] => [collections:protected] => [categories:protected] => [categories_initialized:protected] => [mapped_items:protected] => [content:protected] => [files:protected] => [language:protected] => [old_record:protected] => [id:protected] => 3836 [old_id:protected] => [elcosh_id:protected] => d001305 [type:protected] => document [display_type:protected] => HTML w/ PDF [user_id:protected] => 25 [language_id:protected] => 1 [tagging_id:protected] => Bruce Lippy [priority_id:protected] => 1 [title:protected] => TBT1 Ergonomics in Construction [total_pages:protected] => 5 [billed_pages:protected] => 5 [publication_number:protected] => [part_of:protected] => [keywords:protected] => ergonomics, ergo, msd, musculoskeletal disorders, risk factors, lifting, carpal tunnel, repetition, awkward postures [comments:protected] => 7-28-2014 Jeff Nelson asked Bruce Lippy about what to do with a sentence included toward the top of the doc, "Fill them in on page 2 'Other Questions.'" -- Bruce said this sentence could be deleted from the HTML. [summary:protected] => This is the first in a series of 6 Tool Box Talks produced by Washington University in St. Louis on ergonomics in construction work. This one should be delivered first because it covers what ergonomics is, why construction workers need to talk about it, what the risk factors are for developing a health problem and how to prevent these problems. [transition_comments:protected] => [external_link:protected] => [consol_link:protected] => http://www.cpwrconstructionsolutions.org/pipes_vessels/solution/50/participatory-ergonomics-program.html [more_like_this:protected] => d001303,d001304,d001306,d001307,d001308,d001309 [permission_given_by:protected] => Lisa Jaegers, Washington U. in St. Louis [published:protected] => T [billable:protected] => F [img_name:protected] => [img_ext:protected] => png [img_width:protected] => [img_height:protected] => [img_credit:protected] => [img_practice:protected] => [vid_source_id:protected] => [vid_running_time:protected] => [vid_intended_audience:protected] => [vid_acquisition_info:protected] => [vid_cost:protected] => [vid_producer:protected] => [vid_filename:protected] => [vid_filename_downloadable:protected] => [date_summary:protected] => 2014 [date_permission_requested:protected] => [date_permission_received:protected] => [date_review_needed:protected] => [date_received:protected] => 06/12/14 [date_completed:protected] => 07/28/14 [date_billed:protected] => [date_modified:protected] => 10/09/15 [collBokExports:protected] => [lastBokExportCriteria:BaseElcoshItem:private] => [alreadyInSave:protected] => [alreadyInValidation:protected] => [validationFailures:protected] => Array ( ) [_new:BaseObject:private] => [_deleted:BaseObject:private] => [modifiedColumns:protected] => Array ( ) ) [3837] => DocumentRecord Object ( [records:protected] => Array ( ) [recordId:protected] => [searchWordClass:protected] => [searchWordPeerClass:protected] => [bok_record:protected] => [authors:protected] => [organizations:protected] => [collections:protected] => [categories:protected] => [categories_initialized:protected] => [mapped_items:protected] => [content:protected] => [files:protected] => [language:protected] => [old_record:protected] => [id:protected] => 3837 [old_id:protected] => [elcosh_id:protected] => d001306 [type:protected] => document [display_type:protected] => HTML w/ PDF [user_id:protected] => 25 [language_id:protected] => 1 [tagging_id:protected] => Bruce Lippy [priority_id:protected] => 1 [title:protected] => TBT2 Keep Reach Close [total_pages:protected] => 4 [billed_pages:protected] => 4 [publication_number:protected] => [part_of:protected] => [keywords:protected] => reach, ergonomic, ergo, MSD, carpal tunnel, repetition, awkward positions [comments:protected] => 7-28-2014 Jeff Nelson asked Bruce Lippy about what to do with a sentence included toward the top of the doc, "Fill them in on page 2 'Other Questions.'" -- Bruce said this sentence could be deleted from the HTML. [summary:protected] => This is the second of six Tool Box Talks created by Washington University in St. Louis on ergonomics in construction. There is a guide with the series that describes how to deliver these talks. This one deals with how to avoid awkward reaching during tasks to prevent injuries. try to work with your hands below your head and close to our body to reduce your risk of shoulder strains and back discomfort. This TBT recommends considering ways to move close to the task, keeping the work area free of obstacles, and talking with each other to provide constructive feedback about your working position. [transition_comments:protected] => [external_link:protected] => [consol_link:protected] => http://www.cpwrconstructionsolutions.org/hazard/959/lifting-and-carrying-manual-materials-handling.html [more_like_this:protected] => d001303,d001304,d001305,d001307,d001308,e001309 [permission_given_by:protected] => [published:protected] => T [billable:protected] => F [img_name:protected] => [img_ext:protected] => png [img_width:protected] => [img_height:protected] => [img_credit:protected] => [img_practice:protected] => [vid_source_id:protected] => [vid_running_time:protected] => [vid_intended_audience:protected] => [vid_acquisition_info:protected] => [vid_cost:protected] => [vid_producer:protected] => [vid_filename:protected] => [vid_filename_downloadable:protected] => [date_summary:protected] => 2014 [date_permission_requested:protected] => [date_permission_received:protected] => [date_review_needed:protected] => [date_received:protected] => 06/12/14 [date_completed:protected] => 07/28/14 [date_billed:protected] => [date_modified:protected] => 11/02/16 [collBokExports:protected] => [lastBokExportCriteria:BaseElcoshItem:private] => [alreadyInSave:protected] => [alreadyInValidation:protected] => [validationFailures:protected] => Array ( ) [_new:BaseObject:private] => [_deleted:BaseObject:private] => [modifiedColumns:protected] => Array ( ) ) [3839] => DocumentRecord Object ( [records:protected] => Array ( ) [recordId:protected] => [searchWordClass:protected] => [searchWordPeerClass:protected] => [bok_record:protected] => [authors:protected] => [organizations:protected] => [collections:protected] => [categories:protected] => [categories_initialized:protected] => [mapped_items:protected] => [content:protected] => [files:protected] => [language:protected] => [old_record:protected] => [id:protected] => 3839 [old_id:protected] => [elcosh_id:protected] => d001308 [type:protected] => document [display_type:protected] => HTML w/ PDF [user_id:protected] => 23 [language_id:protected] => 1 [tagging_id:protected] => Bruce Lippy [priority_id:protected] => 1 [title:protected] => TBT4 Move Materials With Assist [total_pages:protected] => 4 [billed_pages:protected] => 4 [publication_number:protected] => [part_of:protected] => [keywords:protected] => lifting, back injury, ergonomics, ergo, MSD, buddy system [comments:protected] => 7-28-2014 Jeff Nelson asked Bruce Lippy about what to do with a sentence included toward the top of the doc, "Fill them in on page 2 'Other Questions.'" -- Bruce said this sentence could be deleted from the HTML. [summary:protected] => This tool box talk is fourth in a series of 6 developed by Washington University in St. Louis on construction ergonomics. This one focuses on preventing back injuries by getting an assist when manually lifting. It recommends using a cart for transporting loads, taking less trips, avoiding carrying materials on the shoulder and helping each other to lift large or heavy materials when a cart or hoist is not available. [transition_comments:protected] => [external_link:protected] => [consol_link:protected] => http://www.cpwrconstructionsolutions.org/hazard/959/lifting-and-carrying-manual-materials-handling.html [more_like_this:protected] => d001303,d001304,d001305,d001306,d001307,d001309 [permission_given_by:protected] => Lisa Jaegers, Washington U. in St. Louis [published:protected] => T [billable:protected] => F [img_name:protected] => [img_ext:protected] => png [img_width:protected] => [img_height:protected] => [img_credit:protected] => [img_practice:protected] => [vid_source_id:protected] => [vid_running_time:protected] => [vid_intended_audience:protected] => [vid_acquisition_info:protected] => [vid_cost:protected] => [vid_producer:protected] => [vid_filename:protected] => [vid_filename_downloadable:protected] => [date_summary:protected] => 2014 [date_permission_requested:protected] => [date_permission_received:protected] => [date_review_needed:protected] => [date_received:protected] => 06/12/14 [date_completed:protected] => 07/29/14 [date_billed:protected] => [date_modified:protected] => 10/09/15 [collBokExports:protected] => [lastBokExportCriteria:BaseElcoshItem:private] => [alreadyInSave:protected] => [alreadyInValidation:protected] => [validationFailures:protected] => Array ( ) [_new:BaseObject:private] => [_deleted:BaseObject:private] => [modifiedColumns:protected] => Array ( ) ) [3840] => DocumentRecord Object ( [records:protected] => Array ( ) [recordId:protected] => [searchWordClass:protected] => [searchWordPeerClass:protected] => [bok_record:protected] => [authors:protected] => [organizations:protected] => [collections:protected] => [categories:protected] => [categories_initialized:protected] => [mapped_items:protected] => [content:protected] => [files:protected] => [language:protected] => [old_record:protected] => [id:protected] => 3840 [old_id:protected] => [elcosh_id:protected] => d001309 [type:protected] => document [display_type:protected] => HTML w/ PDF [user_id:protected] => 23 [language_id:protected] => 1 [tagging_id:protected] => Bruce Lippy [priority_id:protected] => 1 [title:protected] => TBT5 Manual Tools [total_pages:protected] => 4 [billed_pages:protected] => 4 [publication_number:protected] => [part_of:protected] => [keywords:protected] => ergonomic, hand tools, handles, MSD, musculoskeletal disorder, carpal tunnel [comments:protected] => 7-28-2014 Jeff Nelson asked Bruce Lippy about what to do with a sentence included toward the top of the doc, "Fill them in on page 2 'Other Questions.'" -- Bruce said this sentence could be deleted from the HTML. [summary:protected] => This is the fifth in a series of 6 tool box talks on construction ergonomics produced by the University of Washington in St. Louis. This one focuses on manual tools. It asks the following 6 key questions. Does the tool… 1. Fit the task? 2. Allow a good power grip? 3. Keep the wrist in a straight posture? 4. Feel comfortable? 5. Take less effort than other tools for the task? 6. Work effectively? [transition_comments:protected] => [external_link:protected] => [consol_link:protected] => http://www.cpwrconstructionsolutions.org/masonry/solution/383/ergonomic-hand-tools.html [more_like_this:protected] => d001303,d001304,d001305,d001306,d001307,d001308,d001310 [permission_given_by:protected] => Lisa Jaegers, U. Wash. St. Louis [published:protected] => T [billable:protected] => F [img_name:protected] => [img_ext:protected] => png [img_width:protected] => [img_height:protected] => [img_credit:protected] => [img_practice:protected] => [vid_source_id:protected] => [vid_running_time:protected] => [vid_intended_audience:protected] => [vid_acquisition_info:protected] => [vid_cost:protected] => [vid_producer:protected] => [vid_filename:protected] => [vid_filename_downloadable:protected] => [date_summary:protected] => 2014 [date_permission_requested:protected] => [date_permission_received:protected] => [date_review_needed:protected] => [date_received:protected] => 06/12/14 [date_completed:protected] => 07/29/14 [date_billed:protected] => [date_modified:protected] => 10/09/15 [collBokExports:protected] => [lastBokExportCriteria:BaseElcoshItem:private] => [alreadyInSave:protected] => [alreadyInValidation:protected] => [validationFailures:protected] => Array ( ) [_new:BaseObject:private] => [_deleted:BaseObject:private] => [modifiedColumns:protected] => Array ( ) ) ) [content:protected] => [files:protected] => Array ( [559] => [560] => [546] => File Object ( [id:protected] => 546 [filename:protected] => 3.jpg [downloadable:protected] => F [timestamp:protected] => 2009-07-03 12:54:22 [alreadyInSave:protected] => [alreadyInValidation:protected] => [validationFailures:protected] => Array ( ) [_new:BaseObject:private] => [_deleted:BaseObject:private] => [modifiedColumns:protected] => Array ( ) ) [9643] => File Object ( [id:protected] => 9643 [filename:protected] => d001307.pdf [downloadable:protected] => T [timestamp:protected] => 2014-07-27 19:09:19 [alreadyInSave:protected] => [alreadyInValidation:protected] => [validationFailures:protected] => Array ( ) [_new:BaseObject:private] => [_deleted:BaseObject:private] => [modifiedColumns:protected] => Array ( ) ) [566] => File Object ( [id:protected] => 566 [filename:protected] => 4.jpg [downloadable:protected] => F [timestamp:protected] => 2009-07-03 12:54:23 [alreadyInSave:protected] => [alreadyInValidation:protected] => [validationFailures:protected] => Array ( ) [_new:BaseObject:private] => [_deleted:BaseObject:private] => [modifiedColumns:protected] => Array ( ) ) ) [language:protected] => Language Object ( [id:protected] => 1 [code:protected] => en [name:protected] => English [alreadyInSave:protected] => [alreadyInValidation:protected] => [validationFailures:protected] => Array ( ) [_new:BaseObject:private] => [_deleted:BaseObject:private] => [modifiedColumns:protected] => Array ( ) ) [old_record:protected] => [id:protected] => 3838 [old_id:protected] => [elcosh_id:protected] => d001307 [type:protected] => document [display_type:protected] => HTML w/ PDF [user_id:protected] => 25 [language_id:protected] => 1 [tagging_id:protected] => Bruce Lippy [priority_id:protected] => 1 [title:protected] => TBT3 Positioning [total_pages:protected] => 4 [billed_pages:protected] => 4 [publication_number:protected] => [part_of:protected] => [keywords:protected] => position, positioning, ergonomics, ergo, carpal tunnel, MSD, musculoskeletal disorder [comments:protected] => 7-28-2014 Jeff Nelson asked Bruce Lippy about what to do with a sentence included toward the top of the doc, "Fill them in on page 2 'Other Questions.'" -- Bruce said this sentence could be deleted from the HTML. [summary:protected] => This third in a series of 6 Tool Box Talks on construction ergonomics focuses on proper positioning to avoid injuries. The TBT recommends: 1)prop up a task off of the floor by using a raised surface, cart, baker scaffold, saw horses to prep materials near waist height, 2)move the lift or ladder in the best position for the work, 3)position the lift in front of the area you plan to work without trying to reach too far on either side of the lift. [transition_comments:protected] => [external_link:protected] => [consol_link:protected] => http://www.cpwrconstructionsolutions.org/hazard/959/lifting-and-carrying-manual-materials-handling.html [more_like_this:protected] => d001303,d001304,d001305,d001306,d001308,d001309 [permission_given_by:protected] => Lisa Jaegers, WU-St. Louis [published:protected] => T [billable:protected] => F [img_name:protected] => [img_ext:protected] => png [img_width:protected] => [img_height:protected] => [img_credit:protected] => [img_practice:protected] => [vid_source_id:protected] => [vid_running_time:protected] => [vid_intended_audience:protected] => [vid_acquisition_info:protected] => [vid_cost:protected] => [vid_producer:protected] => [vid_filename:protected] => [vid_filename_downloadable:protected] => [date_summary:protected] => 2014 [date_permission_requested:protected] => [date_permission_received:protected] => [date_review_needed:protected] => [date_received:protected] => 06/12/14 [date_completed:protected] => 07/28/14 [date_billed:protected] => [date_modified:protected] => 10/09/15 [collBokExports:protected] => [lastBokExportCriteria:BaseElcoshItem:private] => [alreadyInSave:protected] => [alreadyInValidation:protected] => [validationFailures:protected] => Array ( ) [_new:BaseObject:private] => [_deleted:BaseObject:private] => [modifiedColumns:protected] => Array ( ) ) [show_text] => [document_content] => ElcoshItemDocumentContent Object ( [id:protected] => 2906 [item_id:protected] => 3838 [type:protected] => main [title:protected] => [content:protected] =>
Facilitator / Leader Tasks Before the Tool Box Talk (TBT)
- Read through this TBT guide.
- Walk the job site to find ergonomics examples based on the TBT. If possible, take photos of “safe” and “unsafe” examples at the site to be used during the TBT.
- Write down discussion questions to ask the group.
Learning Goals
After discussing this training topic, workers will have gained a general understanding of:
- Unsafe work positions.
- Solutions to improve work positioning.
TRAINING CARD
The last page of this PDF has directions for printing and laminating the training cards.
TRAINER’S TALKING POINTS
Why should we talk about positioning?
Construction work requires working in high, low, and tight spaces which often forces you to work in an awkward or uncomfortable position. Working in awkward reaching and bent positions can lead to shoulder and back discomfort and possible injury over time.
Demonstration: The training card provides examples of the range of reaching and the point at which the reach is unsafe. Hold your arms straight out in front of you. Look at your hands and wrists while I discuss each of the reach zones on the training card.
The Green Zone shows the ideal location for working with your hands. When possible, try to keep your work tasks as far out as your wrists.
The Orange Zone is for occasional work since it involves more weight on your shoulders and low back since your hands are away from your body. If needed, keep the reach distance as far as your fingertips.
The Red Zone is away from your body so far that it places you at higher risk for falls when in the air and shoulder and back discomfort. Limit the time you work reaching beyond your fingertips.
End of Demonstration
Discussion Question: Can anyone describe to us an awkward position that they work in or have seen someone work in?
- What does it feel like in your neck, back or arms when working in that position?
- Other Questions:_____________________________________________
Training Note: Here are examples of hazards in different construction trades. Choose your trade or one that is similar to your group’s line of work that can be used as hazards and solutions examples.
| Trade | Awkward Posture Hazards | Potential Solution |
|---|---|---|
| Carpenter-Drywall | Leaning over the side of a scissor lift to reach and operating a screw gun with the arm fully extended (reaching in the red zone past the fingertips). | Before starting to install the line of screws to the side of the lift, move the lift to re-center it for the next 2 lines of screws to be installed. |
| Floor Layer | Spreading mortar overhead on a wall with the bakers scaffold one foot away from the wall due to buckets on the floor below (reach in the red zone, past the fingertips). | Pre-plan this task by removing all objects in the path of the bakers scaffold. Having an open path allows you to work closer to the task. |
| Sheet Metal Worker | Prepping duct parts on the floor while bending the back and reaching to work on them. | Pre-plan this task by setting up a waist-height workstation on extra materials, a cart, or saw horses. |
Now let’s put this information into practice. What are some tricks or techniques that you use to work in a comfortable position?
- Other Questions:_____________________________________________
Here are a few other ideas that are listed on your training card:
Prop up your tasks off of the floor by using a raised surface, cart, baker scaffold, saw horses to prep materials near waist height.
Move the lift or ladder in the best position for the work – close to the work tasks.
For safety & comfort, try to position the lift in front of the area you plan to work without trying to reach too far on either side of the lift.
In summary, it is important to work in a safe position when possible in order to reduce the risk of falls and discomfort due to awkward working positions. Consider ways that you can work in the green/comfort zone and orange zone and avoid the unsafe red zone.
References
[Images modified from Grandjean & Eastman Kodak Co.]
1. Grandjean, E. 1988. Fitting the task to the man: A textbook of occupational ergonomics. 4th ed. Taylor & Francis.
2. Eastman Kodak Co. 1983. Ergonomic Design for People at Work. Vol 1. Wiley, John & Sons, Incorporated.
Refer to the resources at our website: oshr.im.wustl.edu for more Tool Box TIPS.
TRAINING ATTENDANCE SHEET
Training Topic: Ergonomics -- Positioning
Date:
| ATTENDEES | |
|---|---|
Directions for Making Laminated Training Cards
The last page of this PDF has directions for printing and laminating the training cards.
[content_transformed:protected] =>Facilitator / Leader Tasks Before the Tool Box Talk (TBT)
- Read through this TBT guide.
- Walk the job site to find ergonomics examples based on the TBT. If possible, take photos of “safe” and “unsafe” examples at the site to be used during the TBT.
- Write down discussion questions to ask the group.
Learning Goals
After discussing this training topic, workers will have gained a general understanding of:
- Unsafe work positions.
- Solutions to improve work positioning.
TRAINING CARD
The last page of this PDF has directions for printing and laminating the training cards.
TRAINER’S TALKING POINTS
Why should we talk about positioning?
Construction work requires working in high, low, and tight spaces which often forces you to work in an awkward or uncomfortable position. Working in awkward reaching and bent positions can lead to shoulder and back discomfort and possible injury over time.
Demonstration: The training card provides examples of the range of reaching and the point at which the reach is unsafe. Hold your arms straight out in front of you. Look at your hands and wrists while I discuss each of the reach zones on the training card.
The Green Zone shows the ideal location for working with your hands. When possible, try to keep your work tasks as far out as your wrists.
The Orange Zone is for occasional work since it involves more weight on your shoulders and low back since your hands are away from your body. If needed, keep the reach distance as far as your fingertips.
The Red Zone is away from your body so far that it places you at higher risk for falls when in the air and shoulder and back discomfort. Limit the time you work reaching beyond your fingertips.
End of Demonstration
Discussion Question: Can anyone describe to us an awkward position that they work in or have seen someone work in?
- What does it feel like in your neck, back or arms when working in that position?
- Other Questions:_____________________________________________
Training Note: Here are examples of hazards in different construction trades. Choose your trade or one that is similar to your group’s line of work that can be used as hazards and solutions examples.
| Trade | Awkward Posture Hazards | Potential Solution |
|---|---|---|
| Carpenter-Drywall | Leaning over the side of a scissor lift to reach and operating a screw gun with the arm fully extended (reaching in the red zone past the fingertips). | Before starting to install the line of screws to the side of the lift, move the lift to re-center it for the next 2 lines of screws to be installed. |
| Floor Layer | Spreading mortar overhead on a wall with the bakers scaffold one foot away from the wall due to buckets on the floor below (reach in the red zone, past the fingertips). | Pre-plan this task by removing all objects in the path of the bakers scaffold. Having an open path allows you to work closer to the task. |
| Sheet Metal Worker | Prepping duct parts on the floor while bending the back and reaching to work on them. | Pre-plan this task by setting up a waist-height workstation on extra materials, a cart, or saw horses. |
Now let’s put this information into practice. What are some tricks or techniques that you use to work in a comfortable position?
- Other Questions:_____________________________________________
Here are a few other ideas that are listed on your training card:
Prop up your tasks off of the floor by using a raised surface, cart, baker scaffold, saw horses to prep materials near waist height.
Move the lift or ladder in the best position for the work – close to the work tasks.
For safety & comfort, try to position the lift in front of the area you plan to work without trying to reach too far on either side of the lift.
In summary, it is important to work in a safe position when possible in order to reduce the risk of falls and discomfort due to awkward working positions. Consider ways that you can work in the green/comfort zone and orange zone and avoid the unsafe red zone.
References
[Images modified from Grandjean & Eastman Kodak Co.]
1. Grandjean, E. 1988. Fitting the task to the man: A textbook of occupational ergonomics. 4th ed. Taylor & Francis.
2. Eastman Kodak Co. 1983. Ergonomic Design for People at Work. Vol 1. Wiley, John & Sons, Incorporated.
Refer to the resources at our website: oshr.im.wustl.edu for more Tool Box TIPS.
TRAINING ATTENDANCE SHEET
Training Topic: Ergonomics -- Positioning
Date:
| ATTENDEES | |
|---|---|
Directions for Making Laminated Training Cards
The last page of this PDF has directions for printing and laminating the training cards.
[disclaimer:protected] => [disclaimer_transformed:protected] => [alreadyInSave:protected] => [alreadyInValidation:protected] => [validationFailures:protected] => Array ( ) [_new:BaseObject:private] => [_deleted:BaseObject:private] => [modifiedColumns:protected] => Array ( ) ) [template] => record ) [_file] => /home/agsafe5/repositories/elcosh/live/templates/elcosh/record.html [_errors:protected] => Array ( ) [_encoding:protected] => UTF-8 [_outputMode:protected] => 11 [_forceReparse:protected] => [_phpCodeDestination:protected] => /tmp/ [_phpCodeExtension:protected] => php [_cacheLifetime:protected] => 30 [_cachePurgeFrequency:protected] => 30 [externalMacroTemplatesCache:PHPTAL:private] => Array ( [macros.html] => PHPTAL Object ( [_prefilters:protected] => Array ( ) [_prefilter:PHPTAL:private] => REMOVED: DO NOT USE [_postfilter:protected] => [_repositories:protected] => Array ( [0] => /home/agsafe5/repositories/elcosh/live/templates/elcosh ) [_path:protected] => macros.html [_resolvers:protected] => Array ( ) [_source:protected] => PHPTAL_FileSource Object ( [_path:PHPTAL_FileSource:private] => /home/agsafe5/repositories/elcosh/live/templates/elcosh/macros.html ) [_codeFile:protected] => /tmp/tpl_61515a6c_macros__EnKHR8AWVA3oW7OmomvoZw.php [_functionName:protected] => tpl_61515a6c_macros__EnKHR8AWVA3oW7OmomvoZw [_prepared:protected] => 1 [_triggers:protected] => Array ( ) [_translator:protected] => [_globalContext:protected] => stdClass Object ( ) [_context:protected] => PHPTAL_Context Object ( [_line] => [_file] => /home/agsafe5/repositories/elcosh/live/templates/elcosh/record.html [repeat] => stdClass Object ( ) [_xmlDeclaration] => [_docType] => [_nothrow:PHPTAL_Context:private] => [_slots:PHPTAL_Context:private] => Array ( ) [_slotsStack:PHPTAL_Context:private] => Array ( [0] => Array ( ) [1] => Array ( ) ) [_parentContext:PHPTAL_Context:private] => PHPTAL_Context Object ( [_line] => [_file] => /home/agsafe5/repositories/elcosh/live/templates/elcosh/record.html [repeat] => stdClass Object ( ) [_xmlDeclaration] => [_docType] => [_nothrow:PHPTAL_Context:private] => [_slots:PHPTAL_Context:private] => Array ( ) [_slotsStack:PHPTAL_Context:private] => Array ( [0] => Array ( ) [1] => Array ( ) ) [_parentContext:PHPTAL_Context:private] => [_globalContext:PHPTAL_Context:private] => stdClass Object ( ) [_echoDeclarations:PHPTAL_Context:private] => [referer] => http://elcosh.org/document/3838/d001307/TBT3%2BPositioning.html [curr_module] => Record [styles] => Array ( ) [javascript] => Array ( [0] => jquery.min.js ) [metas] => Array ( [language] => en [robots] => index, follow ) [user] => [curr_url] => https://elcosh.org/index.php?module=Record&id=3838&type=document [base_url] => https://elcosh.org/index.php?module=Record [title] => eLCOSH : TBT3 Positioning [language] => en [search_query] => [module] => Record [new_records] => Array ( [0] => Search_Result Object ( [title] => Toolbox Talk: Fixed Ladder [image] => /record/images/notavailable-p.png [blurb] => The CPWR Toolbox Talk on Fixed Ladders addresses the potential risks associated with using fixed ladders. The resource includes a brief case example,... [category] => Array ( [0] => 15 [1] => 47 [2] => 49 [3] => 51 [4] => 53 [5] => 55 [6] => 60 [7] => 64 [8] => 73 [9] => 76 [10] => 78 [11] => 80 [12] => 86 [13] => 87 [14] => 90 [15] => 92 [16] => 93 [17] => 94 [18] => 100 ) [labels] => Array ( [0] => Falls [1] => Work Environment [2] => Hazards [3] => Bricklayer [4] => Trades [5] => Carpenter [7] => Cement Mason [9] => Concrete Polisher [11] => Electrical Worker [13] => HVAC [15] => Laborer [17] => PCC/Restoration [19] => Plumber/Pipefitter [21] => Roofer/Waterproofer [23] => Sheetmetal Worker [25] => Welder [27] => Commercial & Institutional [28] => Jobsites [29] => Industrial [31] => LEED/Green Construction [33] => Renovations [35] => Residential [37] => Toolbox Talks [38] => Documents [39] => Media & Documents ) [type] => Toolbox Talks [sub_category] => [url] => /document/4430/d001660/Toolbox%2BTalk%253A%2BFixed%2BLadder.html [item:protected] => DocumentRecord Object ( [records:protected] => Array ( ) [recordId:protected] => [searchWordClass:protected] => [searchWordPeerClass:protected] => [bok_record:protected] => [authors:protected] => [organizations:protected] => [collections:protected] => [categories:protected] => Array ( [15] => Category Object ( [languages:protected] => [bok_resources:protected] => [bok_topics:protected] => [bok_keywords:protected] => [id:protected] => 15 [type:protected] => category [parent:protected] => 7 [label:protected] => Falls [alreadyInSave:protected] => [alreadyInValidation:protected] => [validationFailures:protected] => Array ( ) [_new:BaseObject:private] => [_deleted:BaseObject:private] => [modifiedColumns:protected] => Array ( ) ) [47] => Category Object ( [languages:protected] => [bok_resources:protected] => [bok_topics:protected] => [bok_keywords:protected] => [id:protected] => 47 [type:protected] => category [parent:protected] => 2 [label:protected] => Bricklayer [alreadyInSave:protected] => [alreadyInValidation:protected] => [validationFailures:protected] => Array ( ) [_new:BaseObject:private] => [_deleted:BaseObject:private] => [modifiedColumns:protected] => Array ( ) ) [49] => Category Object ( [languages:protected] => [bok_resources:protected] => [bok_topics:protected] => [bok_keywords:protected] => [id:protected] => 49 [type:protected] => category [parent:protected] => 2 [label:protected] => Carpenter [alreadyInSave:protected] => [alreadyInValidation:protected] => [validationFailures:protected] => Array ( ) [_new:BaseObject:private] => [_deleted:BaseObject:private] => [modifiedColumns:protected] => Array ( ) ) [51] => Category Object ( [languages:protected] => [bok_resources:protected] => [bok_topics:protected] => [bok_keywords:protected] => [id:protected] => 51 [type:protected] => category [parent:protected] => 2 [label:protected] => Cement Mason [alreadyInSave:protected] => [alreadyInValidation:protected] => [validationFailures:protected] => Array ( ) [_new:BaseObject:private] => [_deleted:BaseObject:private] => [modifiedColumns:protected] => Array ( ) ) [53] => Category Object ( [languages:protected] => [bok_resources:protected] => [bok_topics:protected] => [bok_keywords:protected] => [id:protected] => 53 [type:protected] => category [parent:protected] => 2 [label:protected] => Concrete Polisher [alreadyInSave:protected] => [alreadyInValidation:protected] => [validationFailures:protected] => Array ( ) [_new:BaseObject:private] => [_deleted:BaseObject:private] => [modifiedColumns:protected] => Array ( ) ) [55] => Category Object ( [languages:protected] => [bok_resources:protected] => [bok_topics:protected] => [bok_keywords:protected] => [id:protected] => 55 [type:protected] => category [parent:protected] => 2 [label:protected] => Electrical Worker [alreadyInSave:protected] => [alreadyInValidation:protected] => [validationFailures:protected] => Array ( ) [_new:BaseObject:private] => [_deleted:BaseObject:private] => [modifiedColumns:protected] => Array ( ) ) [60] => Category Object ( [languages:protected] => [bok_resources:protected] => [bok_topics:protected] => [bok_keywords:protected] => [id:protected] => 60 [type:protected] => category [parent:protected] => 2 [label:protected] => HVAC [alreadyInSave:protected] => [alreadyInValidation:protected] => [validationFailures:protected] => Array ( ) [_new:BaseObject:private] => [_deleted:BaseObject:private] => [modifiedColumns:protected] => Array ( ) ) [64] => Category Object ( [languages:protected] => [bok_resources:protected] => [bok_topics:protected] => [bok_keywords:protected] => [id:protected] => 64 [type:protected] => category [parent:protected] => 2 [label:protected] => Laborer [alreadyInSave:protected] => [alreadyInValidation:protected] => [validationFailures:protected] => Array ( ) [_new:BaseObject:private] => [_deleted:BaseObject:private] => [modifiedColumns:protected] => Array ( ) ) [73] => Category Object ( [languages:protected] => [bok_resources:protected] => [bok_topics:protected] => [bok_keywords:protected] => [id:protected] => 73 [type:protected] => category [parent:protected] => 2 [label:protected] => PCC/Restoration [alreadyInSave:protected] => [alreadyInValidation:protected] => [validationFailures:protected] => Array ( ) [_new:BaseObject:private] => [_deleted:BaseObject:private] => [modifiedColumns:protected] => Array ( ) ) [76] => Category Object ( [languages:protected] => [bok_resources:protected] => [bok_topics:protected] => [bok_keywords:protected] => [id:protected] => 76 [type:protected] => category [parent:protected] => 2 [label:protected] => Plumber/Pipefitter [alreadyInSave:protected] => [alreadyInValidation:protected] => [validationFailures:protected] => Array ( ) [_new:BaseObject:private] => [_deleted:BaseObject:private] => [modifiedColumns:protected] => Array ( ) ) [78] => Category Object ( [languages:protected] => [bok_resources:protected] => [bok_topics:protected] => [bok_keywords:protected] => [id:protected] => 78 [type:protected] => category [parent:protected] => 2 [label:protected] => Roofer/Waterproofer [alreadyInSave:protected] => [alreadyInValidation:protected] => [validationFailures:protected] => Array ( ) [_new:BaseObject:private] => [_deleted:BaseObject:private] => [modifiedColumns:protected] => Array ( ) ) [80] => Category Object ( [languages:protected] => [bok_resources:protected] => [bok_topics:protected] => [bok_keywords:protected] => [id:protected] => 80 [type:protected] => category [parent:protected] => 2 [label:protected] => Sheetmetal Worker [alreadyInSave:protected] => [alreadyInValidation:protected] => [validationFailures:protected] => Array ( ) [_new:BaseObject:private] => [_deleted:BaseObject:private] => [modifiedColumns:protected] => Array ( ) ) [86] => Category Object ( [languages:protected] => [bok_resources:protected] => [bok_topics:protected] => [bok_keywords:protected] => [id:protected] => 86 [type:protected] => category [parent:protected] => 2 [label:protected] => Welder [alreadyInSave:protected] => [alreadyInValidation:protected] => [validationFailures:protected] => Array ( ) [_new:BaseObject:private] => [_deleted:BaseObject:private] => [modifiedColumns:protected] => Array ( ) ) [87] => Category Object ( [languages:protected] => [bok_resources:protected] => [bok_topics:protected] => [bok_keywords:protected] => [id:protected] => 87 [type:protected] => category [parent:protected] => 3 [label:protected] => Commercial & Institutional [alreadyInSave:protected] => [alreadyInValidation:protected] => [validationFailures:protected] => Array ( ) [_new:BaseObject:private] => [_deleted:BaseObject:private] => [modifiedColumns:protected] => Array ( ) ) [90] => Category Object ( [languages:protected] => [bok_resources:protected] => [bok_topics:protected] => [bok_keywords:protected] => [id:protected] => 90 [type:protected] => category [parent:protected] => 3 [label:protected] => Industrial [alreadyInSave:protected] => [alreadyInValidation:protected] => [validationFailures:protected] => Array ( ) [_new:BaseObject:private] => [_deleted:BaseObject:private] => [modifiedColumns:protected] => Array ( ) ) [92] => Category Object ( [languages:protected] => [bok_resources:protected] => [bok_topics:protected] => [bok_keywords:protected] => [id:protected] => 92 [type:protected] => category [parent:protected] => 3 [label:protected] => LEED/Green Construction [alreadyInSave:protected] => [alreadyInValidation:protected] => [validationFailures:protected] => Array ( ) [_new:BaseObject:private] => [_deleted:BaseObject:private] => [modifiedColumns:protected] => Array ( ) ) [93] => Category Object ( [languages:protected] => [bok_resources:protected] => [bok_topics:protected] => [bok_keywords:protected] => [id:protected] => 93 [type:protected] => category [parent:protected] => 3 [label:protected] => Renovations [alreadyInSave:protected] => [alreadyInValidation:protected] => [validationFailures:protected] => Array ( ) [_new:BaseObject:private] => [_deleted:BaseObject:private] => [modifiedColumns:protected] => Array ( ) ) [94] => Category Object ( [languages:protected] => [bok_resources:protected] => [bok_topics:protected] => [bok_keywords:protected] => [id:protected] => 94 [type:protected] => category [parent:protected] => 3 [label:protected] => Residential [alreadyInSave:protected] => [alreadyInValidation:protected] => [validationFailures:protected] => Array ( ) [_new:BaseObject:private] => [_deleted:BaseObject:private] => [modifiedColumns:protected] => Array ( ) ) [100] => Category Object ( [languages:protected] => [bok_resources:protected] => [bok_topics:protected] => [bok_keywords:protected] => [id:protected] => 100 [type:protected] => category [parent:protected] => 6 [label:protected] => Toolbox Talks [alreadyInSave:protected] => [alreadyInValidation:protected] => [validationFailures:protected] => Array ( ) [_new:BaseObject:private] => [_deleted:BaseObject:private] => [modifiedColumns:protected] => Array ( ) ) ) [categories_initialized:protected] => 1 [mapped_items:protected] => [content:protected] => [files:protected] => [language:protected] => Language Object ( [id:protected] => 1 [code:protected] => en [name:protected] => English [alreadyInSave:protected] => [alreadyInValidation:protected] => [validationFailures:protected] => Array ( ) [_new:BaseObject:private] => [_deleted:BaseObject:private] => [modifiedColumns:protected] => Array ( ) ) [old_record:protected] => [id:protected] => 4430 [old_id:protected] => [elcosh_id:protected] => d001660 [type:protected] => document [display_type:protected] => HTML only (and links) [user_id:protected] => 0 [language_id:protected] => 1 [tagging_id:protected] => Mike Aguilar [priority_id:protected] => 1 [title:protected] => Toolbox Talk: Fixed Ladder [total_pages:protected] => 0 [billed_pages:protected] => 0 [publication_number:protected] => [part_of:protected] => [keywords:protected] => Fixed Ladders, Fall Prevention, Falls [comments:protected] => [summary:protected] => The CPWR Toolbox Talk on Fixed Ladders addresses the potential risks associated with using fixed ladders. The resource includes a brief case example, steps to prevent a related injury and questions for discussion. It includes an image that illustrates the hazard, which can be posted in a central location as a reminder of steps to work safely. Available in English and Spanish. [transition_comments:protected] => [external_link:protected] => [consol_link:protected] => [more_like_this:protected] => d001257,d001254,d001255,d001256,d001258,d001262,d001279 [permission_given_by:protected] => [published:protected] => T [billable:protected] => F [img_name:protected] => [img_ext:protected] => [img_width:protected] => [img_height:protected] => [img_credit:protected] => [img_practice:protected] => [vid_source_id:protected] => [vid_running_time:protected] => [vid_intended_audience:protected] => [vid_acquisition_info:protected] => [vid_cost:protected] => [vid_producer:protected] => [vid_filename:protected] => [vid_filename_downloadable:protected] => [date_summary:protected] => [date_permission_requested:protected] => [date_permission_received:protected] => [date_review_needed:protected] => [date_received:protected] => 06/10/22 [date_completed:protected] => 06/10/22 [date_billed:protected] => [date_modified:protected] => 06/16/25 [collBokExports:protected] => [lastBokExportCriteria:BaseElcoshItem:private] => [alreadyInSave:protected] => [alreadyInValidation:protected] => [validationFailures:protected] => Array ( ) [_new:BaseObject:private] => [_deleted:BaseObject:private] => [modifiedColumns:protected] => Array ( ) ) ) [1] => Search_Result Object ( [title] => Toolbox Talk: Work Zone Safety: Working Around Vehicles [image] => /record/images/notavailable-p.png [blurb] => The CPWR Toolbox Talk on Working Around Vehicles in the Work Zone addresses methods to avoid being struck-by a vehicle on a construction site. The res... [category] => Array ( [0] => 12 [1] => 18 [2] => 52 [3] => 57 [4] => 70 [5] => 85 [6] => 87 [7] => 88 [8] => 89 [9] => 91 [10] => 90 [11] => 92 [12] => 93 [13] => 94 [14] => 95 [15] => 100 ) [labels] => Array ( [0] => Crushed/Struck By [1] => Work Environment [2] => Hazards [3] => Motor Vehicles/Heavy Equipment [6] => Commercial Diver [7] => Trades [8] => Flagger [10] => Operating Engineer [12] => Truck Driver [14] => Commercial & Institutional [15] => Jobsites [16] => Demolition [18] => Disasters [20] => Heavy & Highway [22] => Industrial [24] => LEED/Green Construction [26] => Renovations [28] => Residential [30] => Underground [32] => Toolbox Talks [33] => Documents [34] => Media & Documents ) [type] => Toolbox Talks [sub_category] => [url] => /document/4428/d001658/Toolbox%2BTalk%253A%2BWork%2BZone%2BSafety%253A%2BWorking%2BAround%2BVehicles.html [item:protected] => DocumentRecord Object ( [records:protected] => Array ( ) [recordId:protected] => [searchWordClass:protected] => [searchWordPeerClass:protected] => [bok_record:protected] => [authors:protected] => [organizations:protected] => [collections:protected] => [categories:protected] => Array ( [12] => Category Object ( [languages:protected] => [bok_resources:protected] => [bok_topics:protected] => [bok_keywords:protected] => [id:protected] => 12 [type:protected] => category [parent:protected] => 7 [label:protected] => Crushed/Struck By [alreadyInSave:protected] => [alreadyInValidation:protected] => [validationFailures:protected] => Array ( ) [_new:BaseObject:private] => [_deleted:BaseObject:private] => [modifiedColumns:protected] => Array ( ) ) [18] => Category Object ( [languages:protected] => [bok_resources:protected] => [bok_topics:protected] => [bok_keywords:protected] => [id:protected] => 18 [type:protected] => category [parent:protected] => 7 [label:protected] => Motor Vehicles/Heavy Equipment [alreadyInSave:protected] => [alreadyInValidation:protected] => [validationFailures:protected] => Array ( ) [_new:BaseObject:private] => [_deleted:BaseObject:private] => [modifiedColumns:protected] => Array ( ) ) [52] => Category Object ( [languages:protected] => [bok_resources:protected] => [bok_topics:protected] => [bok_keywords:protected] => [id:protected] => 52 [type:protected] => category [parent:protected] => 2 [label:protected] => Commercial Diver [alreadyInSave:protected] => [alreadyInValidation:protected] => [validationFailures:protected] => Array ( ) [_new:BaseObject:private] => [_deleted:BaseObject:private] => [modifiedColumns:protected] => Array ( ) ) [57] => Category Object ( [languages:protected] => [bok_resources:protected] => [bok_topics:protected] => [bok_keywords:protected] => [id:protected] => 57 [type:protected] => category [parent:protected] => 2 [label:protected] => Flagger [alreadyInSave:protected] => [alreadyInValidation:protected] => [validationFailures:protected] => Array ( ) [_new:BaseObject:private] => [_deleted:BaseObject:private] => [modifiedColumns:protected] => Array ( ) ) [70] => Category Object ( [languages:protected] => [bok_resources:protected] => [bok_topics:protected] => [bok_keywords:protected] => [id:protected] => 70 [type:protected] => category [parent:protected] => 2 [label:protected] => Operating Engineer [alreadyInSave:protected] => [alreadyInValidation:protected] => [validationFailures:protected] => Array ( ) [_new:BaseObject:private] => [_deleted:BaseObject:private] => [modifiedColumns:protected] => Array ( ) ) [85] => Category Object ( [languages:protected] => [bok_resources:protected] => [bok_topics:protected] => [bok_keywords:protected] => [id:protected] => 85 [type:protected] => category [parent:protected] => 2 [label:protected] => Truck Driver [alreadyInSave:protected] => [alreadyInValidation:protected] => [validationFailures:protected] => Array ( ) [_new:BaseObject:private] => [_deleted:BaseObject:private] => [modifiedColumns:protected] => Array ( ) ) [87] => Category Object ( [languages:protected] => [bok_resources:protected] => [bok_topics:protected] => [bok_keywords:protected] => [id:protected] => 87 [type:protected] => category [parent:protected] => 3 [label:protected] => Commercial & Institutional [alreadyInSave:protected] => [alreadyInValidation:protected] => [validationFailures:protected] => Array ( ) [_new:BaseObject:private] => [_deleted:BaseObject:private] => [modifiedColumns:protected] => Array ( ) ) [88] => Category Object ( [languages:protected] => [bok_resources:protected] => [bok_topics:protected] => [bok_keywords:protected] => [id:protected] => 88 [type:protected] => category [parent:protected] => 3 [label:protected] => Demolition [alreadyInSave:protected] => [alreadyInValidation:protected] => [validationFailures:protected] => Array ( ) [_new:BaseObject:private] => [_deleted:BaseObject:private] => [modifiedColumns:protected] => Array ( ) ) [89] => Category Object ( [languages:protected] => [bok_resources:protected] => [bok_topics:protected] => [bok_keywords:protected] => [id:protected] => 89 [type:protected] => category [parent:protected] => 3 [label:protected] => Disasters [alreadyInSave:protected] => [alreadyInValidation:protected] => [validationFailures:protected] => Array ( ) [_new:BaseObject:private] => [_deleted:BaseObject:private] => [modifiedColumns:protected] => Array ( ) ) [91] => Category Object ( [languages:protected] => [bok_resources:protected] => [bok_topics:protected] => [bok_keywords:protected] => [id:protected] => 91 [type:protected] => category [parent:protected] => 3 [label:protected] => Heavy & Highway [alreadyInSave:protected] => [alreadyInValidation:protected] => [validationFailures:protected] => Array ( ) [_new:BaseObject:private] => [_deleted:BaseObject:private] => [modifiedColumns:protected] => Array ( ) ) [90] => Category Object ( [languages:protected] => [bok_resources:protected] => [bok_topics:protected] => [bok_keywords:protected] => [id:protected] => 90 [type:protected] => category [parent:protected] => 3 [label:protected] => Industrial [alreadyInSave:protected] => [alreadyInValidation:protected] => [validationFailures:protected] => Array ( ) [_new:BaseObject:private] => [_deleted:BaseObject:private] => [modifiedColumns:protected] => Array ( ) ) [92] => Category Object ( [languages:protected] => [bok_resources:protected] => [bok_topics:protected] => [bok_keywords:protected] => [id:protected] => 92 [type:protected] => category [parent:protected] => 3 [label:protected] => LEED/Green Construction [alreadyInSave:protected] => [alreadyInValidation:protected] => [validationFailures:protected] => Array ( ) [_new:BaseObject:private] => [_deleted:BaseObject:private] => [modifiedColumns:protected] => Array ( ) ) [93] => Category Object ( [languages:protected] => [bok_resources:protected] => [bok_topics:protected] => [bok_keywords:protected] => [id:protected] => 93 [type:protected] => category [parent:protected] => 3 [label:protected] => Renovations [alreadyInSave:protected] => [alreadyInValidation:protected] => [validationFailures:protected] => Array ( ) [_new:BaseObject:private] => [_deleted:BaseObject:private] => [modifiedColumns:protected] => Array ( ) ) [94] => Category Object ( [languages:protected] => [bok_resources:protected] => [bok_topics:protected] => [bok_keywords:protected] => [id:protected] => 94 [type:protected] => category [parent:protected] => 3 [label:protected] => Residential [alreadyInSave:protected] => [alreadyInValidation:protected] => [validationFailures:protected] => Array ( ) [_new:BaseObject:private] => [_deleted:BaseObject:private] => [modifiedColumns:protected] => Array ( ) ) [95] => Category Object ( [languages:protected] => [bok_resources:protected] => [bok_topics:protected] => [bok_keywords:protected] => [id:protected] => 95 [type:protected] => category [parent:protected] => 3 [label:protected] => Underground [alreadyInSave:protected] => [alreadyInValidation:protected] => [validationFailures:protected] => Array ( ) [_new:BaseObject:private] => [_deleted:BaseObject:private] => [modifiedColumns:protected] => Array ( ) ) [100] => Category Object ( [languages:protected] => [bok_resources:protected] => [bok_topics:protected] => [bok_keywords:protected] => [id:protected] => 100 [type:protected] => category [parent:protected] => 6 [label:protected] => Toolbox Talks [alreadyInSave:protected] => [alreadyInValidation:protected] => [validationFailures:protected] => Array ( ) [_new:BaseObject:private] => [_deleted:BaseObject:private] => [modifiedColumns:protected] => Array ( ) ) ) [categories_initialized:protected] => 1 [mapped_items:protected] => [content:protected] => [files:protected] => [language:protected] => Language Object ( [id:protected] => 1 [code:protected] => en [name:protected] => English [alreadyInSave:protected] => [alreadyInValidation:protected] => [validationFailures:protected] => Array ( ) [_new:BaseObject:private] => [_deleted:BaseObject:private] => [modifiedColumns:protected] => Array ( ) ) [old_record:protected] => [id:protected] => 4428 [old_id:protected] => [elcosh_id:protected] => d001658 [type:protected] => document [display_type:protected] => HTML only (and links) [user_id:protected] => 0 [language_id:protected] => 1 [tagging_id:protected] => Daniela Caceres [priority_id:protected] => 1 [title:protected] => Toolbox Talk: Work Zone Safety: Working Around Vehicles [total_pages:protected] => 0 [billed_pages:protected] => 0 [publication_number:protected] => [part_of:protected] => [keywords:protected] => Struck, Struck by, Vehicle, Work Zone Safety, Truck, Operator, Driver, Mobile Equipment [comments:protected] => [summary:protected] => The CPWR Toolbox Talk on Working Around Vehicles in the Work Zone addresses methods to avoid being struck-by a vehicle on a construction site. The resource includes a case example, steps to prevent a related injury, and questions for discussion. It includes a graphic that illustrates the hazard, which can be posted in a central location as a reminder of steps to work safely. Available in English and Spanish. [transition_comments:protected] => [external_link:protected] => [consol_link:protected] => [more_like_this:protected] => d001640 [permission_given_by:protected] => [published:protected] => T [billable:protected] => F [img_name:protected] => [img_ext:protected] => [img_width:protected] => [img_height:protected] => [img_credit:protected] => [img_practice:protected] => [vid_source_id:protected] => [vid_running_time:protected] => [vid_intended_audience:protected] => [vid_acquisition_info:protected] => [vid_cost:protected] => [vid_producer:protected] => [vid_filename:protected] => [vid_filename_downloadable:protected] => [date_summary:protected] => [date_permission_requested:protected] => [date_permission_received:protected] => [date_review_needed:protected] => [date_received:protected] => 12/23/21 [date_completed:protected] => 12/23/21 [date_billed:protected] => [date_modified:protected] => 05/19/23 [collBokExports:protected] => [lastBokExportCriteria:BaseElcoshItem:private] => [alreadyInSave:protected] => [alreadyInValidation:protected] => [validationFailures:protected] => Array ( ) [_new:BaseObject:private] => [_deleted:BaseObject:private] => [modifiedColumns:protected] => Array ( ) ) ) [2] => Search_Result Object ( [title] => Construction Dive -- DeWalt's Jobsite Pro headphones recalled for fire hazards [image] => /record/images/notavailable-p.png [blurb] => A recall notice by the United States Consumer Product Safety Commission affects over 300,000 DeWalt Jobsite Pro Headphones. The recall is a result of... [category] => Array ( [0] => 16 [1] => 44 [2] => 45 [3] => 46 [4] => 47 [5] => 48 [6] => 49 [7] => 50 [8] => 51 [9] => 52 [10] => 53 [11] => 54 [12] => 55 [13] => 56 [14] => 57 [15] => 58 [16] => 59 [17] => 60 [18] => 61 [19] => 64 [20] => 65 [21] => 66 [22] => 67 [23] => 68 [24] => 69 [25] => 70 [26] => 71 [27] => 72 [28] => 73 [29] => 74 [30] => 75 [31] => 76 [32] => 77 [33] => 63 [34] => 78 [35] => 79 [36] => 80 [37] => 81 [38] => 82 [39] => 62 [40] => 83 [41] => 84 [42] => 85 [43] => 86 [44] => 87 [45] => 88 [46] => 89 [47] => 91 [48] => 90 [49] => 92 [50] => 93 [51] => 94 [52] => 95 ) [labels] => Array ( [0] => Fire & Explosions [1] => Work Environment [2] => Hazards [3] => Acoustical Ceiling Carpenter [4] => Trades [5] => Asbestos/Insulator [7] => Boilermaker [9] => Bricklayer [11] => Cabinetmaker [13] => Carpenter [15] => Carpet Layer [17] => Cement Mason [19] => Commercial Diver [21] => Concrete Polisher [23] => Drywall Applicator Specialist [25] => Electrical Worker [27] => Elevator Constructor [29] => Flagger [31] => Glazier [33] => Hazardous Waste Cleanup [35] => HVAC [37] => Interior Systems Carpenter [39] => Laborer [41] => Landscaper [43] => Lather [45] => Lead Abatement Worker [47] => Maintenance Worker [49] => Millwright [51] => Operating Engineer [53] => Painter [55] => Paper Hanger [57] => PCC/Restoration [59] => Pile Driver [61] => Plasterer [63] => Plumber/Pipefitter [65] => Refractory Worker [67] => Reinforcing Ironworker [69] => Roofer/Waterproofer [71] => Scaffold Erector [73] => Sheetmetal Worker [75] => Sprinkler Fitter [77] => Stonemason [79] => Structural Ironworker [81] => Terrazzo Worker [83] => Tile Setter [85] => Truck Driver [87] => Welder [89] => Commercial & Institutional [90] => Jobsites [91] => Demolition [93] => Disasters [95] => Heavy & Highway [97] => Industrial [99] => LEED/Green Construction [101] => Renovations [103] => Residential [105] => Underground ) [type] => [sub_category] => [url] => /document/4426/d001656/Construction%2BDive%2B--%2BDeWalt%2527s%2BJobsite%2BPro%2Bheadphones%2Brecalled%2Bfor%2Bfire%2Bhazards.html [item:protected] => DocumentRecord Object ( [records:protected] => Array ( ) [recordId:protected] => [searchWordClass:protected] => [searchWordPeerClass:protected] => [bok_record:protected] => [authors:protected] => [organizations:protected] => [collections:protected] => [categories:protected] => Array ( [16] => Category Object ( [languages:protected] => [bok_resources:protected] => [bok_topics:protected] => [bok_keywords:protected] => [id:protected] => 16 [type:protected] => category [parent:protected] => 7 [label:protected] => Fire & Explosions [alreadyInSave:protected] => [alreadyInValidation:protected] => [validationFailures:protected] => Array ( ) [_new:BaseObject:private] => [_deleted:BaseObject:private] => [modifiedColumns:protected] => Array ( ) ) [44] => Category Object ( [languages:protected] => [bok_resources:protected] => [bok_topics:protected] => [bok_keywords:protected] => [id:protected] => 44 [type:protected] => category [parent:protected] => 2 [label:protected] => Acoustical Ceiling Carpenter [alreadyInSave:protected] => [alreadyInValidation:protected] => [validationFailures:protected] => Array ( ) [_new:BaseObject:private] => [_deleted:BaseObject:private] => [modifiedColumns:protected] => Array ( ) ) [45] => Category Object ( [languages:protected] => [bok_resources:protected] => [bok_topics:protected] => [bok_keywords:protected] => [id:protected] => 45 [type:protected] => category [parent:protected] => 2 [label:protected] => Asbestos/Insulator [alreadyInSave:protected] => [alreadyInValidation:protected] => [validationFailures:protected] => Array ( ) [_new:BaseObject:private] => [_deleted:BaseObject:private] => [modifiedColumns:protected] => Array ( ) ) [46] => Category Object ( [languages:protected] => [bok_resources:protected] => [bok_topics:protected] => [bok_keywords:protected] => [id:protected] => 46 [type:protected] => category [parent:protected] => 2 [label:protected] => Boilermaker [alreadyInSave:protected] => [alreadyInValidation:protected] => [validationFailures:protected] => Array ( ) [_new:BaseObject:private] => [_deleted:BaseObject:private] => [modifiedColumns:protected] => Array ( ) ) [47] => Category Object ( [languages:protected] => [bok_resources:protected] => [bok_topics:protected] => [bok_keywords:protected] => [id:protected] => 47 [type:protected] => category [parent:protected] => 2 [label:protected] => Bricklayer [alreadyInSave:protected] => [alreadyInValidation:protected] => [validationFailures:protected] => Array ( ) [_new:BaseObject:private] => [_deleted:BaseObject:private] => [modifiedColumns:protected] => Array ( ) ) [48] => Category Object ( [languages:protected] => [bok_resources:protected] => [bok_topics:protected] => [bok_keywords:protected] => [id:protected] => 48 [type:protected] => category [parent:protected] => 2 [label:protected] => Cabinetmaker [alreadyInSave:protected] => [alreadyInValidation:protected] => [validationFailures:protected] => Array ( ) [_new:BaseObject:private] => [_deleted:BaseObject:private] => [modifiedColumns:protected] => Array ( ) ) [49] => Category Object ( [languages:protected] => [bok_resources:protected] => [bok_topics:protected] => [bok_keywords:protected] => [id:protected] => 49 [type:protected] => category [parent:protected] => 2 [label:protected] => Carpenter [alreadyInSave:protected] => [alreadyInValidation:protected] => [validationFailures:protected] => Array ( ) [_new:BaseObject:private] => [_deleted:BaseObject:private] => [modifiedColumns:protected] => Array ( ) ) [50] => Category Object ( [languages:protected] => [bok_resources:protected] => [bok_topics:protected] => [bok_keywords:protected] => [id:protected] => 50 [type:protected] => category [parent:protected] => 2 [label:protected] => Carpet Layer [alreadyInSave:protected] => [alreadyInValidation:protected] => [validationFailures:protected] => Array ( ) [_new:BaseObject:private] => [_deleted:BaseObject:private] => [modifiedColumns:protected] => Array ( ) ) [51] => Category Object ( [languages:protected] => [bok_resources:protected] => [bok_topics:protected] => [bok_keywords:protected] => [id:protected] => 51 [type:protected] => category [parent:protected] => 2 [label:protected] => Cement Mason [alreadyInSave:protected] => [alreadyInValidation:protected] => [validationFailures:protected] => Array ( ) [_new:BaseObject:private] => [_deleted:BaseObject:private] => [modifiedColumns:protected] => Array ( ) ) [52] => Category Object ( [languages:protected] => [bok_resources:protected] => [bok_topics:protected] => [bok_keywords:protected] => [id:protected] => 52 [type:protected] => category [parent:protected] => 2 [label:protected] => Commercial Diver [alreadyInSave:protected] => [alreadyInValidation:protected] => [validationFailures:protected] => Array ( ) [_new:BaseObject:private] => [_deleted:BaseObject:private] => [modifiedColumns:protected] => Array ( ) ) [53] => Category Object ( [languages:protected] => [bok_resources:protected] => [bok_topics:protected] => [bok_keywords:protected] => [id:protected] => 53 [type:protected] => category [parent:protected] => 2 [label:protected] => Concrete Polisher [alreadyInSave:protected] => [alreadyInValidation:protected] => [validationFailures:protected] => Array ( ) [_new:BaseObject:private] => [_deleted:BaseObject:private] => [modifiedColumns:protected] => Array ( ) ) [54] => Category Object ( [languages:protected] => [bok_resources:protected] => [bok_topics:protected] => [bok_keywords:protected] => [id:protected] => 54 [type:protected] => category [parent:protected] => 2 [label:protected] => Drywall Applicator Specialist [alreadyInSave:protected] => [alreadyInValidation:protected] => [validationFailures:protected] => Array ( ) [_new:BaseObject:private] => [_deleted:BaseObject:private] => [modifiedColumns:protected] => Array ( ) ) [55] => Category Object ( [languages:protected] => [bok_resources:protected] => [bok_topics:protected] => [bok_keywords:protected] => [id:protected] => 55 [type:protected] => category [parent:protected] => 2 [label:protected] => Electrical Worker [alreadyInSave:protected] => [alreadyInValidation:protected] => [validationFailures:protected] => Array ( ) [_new:BaseObject:private] => [_deleted:BaseObject:private] => [modifiedColumns:protected] => Array ( ) ) [56] => Category Object ( [languages:protected] => [bok_resources:protected] => [bok_topics:protected] => [bok_keywords:protected] => [id:protected] => 56 [type:protected] => category [parent:protected] => 2 [label:protected] => Elevator Constructor [alreadyInSave:protected] => [alreadyInValidation:protected] => [validationFailures:protected] => Array ( ) [_new:BaseObject:private] => [_deleted:BaseObject:private] => [modifiedColumns:protected] => Array ( ) ) [57] => Category Object ( [languages:protected] => [bok_resources:protected] => [bok_topics:protected] => [bok_keywords:protected] => [id:protected] => 57 [type:protected] => category [parent:protected] => 2 [label:protected] => Flagger [alreadyInSave:protected] => [alreadyInValidation:protected] => [validationFailures:protected] => Array ( ) [_new:BaseObject:private] => [_deleted:BaseObject:private] => [modifiedColumns:protected] => Array ( ) ) [58] => Category Object ( [languages:protected] => [bok_resources:protected] => [bok_topics:protected] => [bok_keywords:protected] => [id:protected] => 58 [type:protected] => category [parent:protected] => 2 [label:protected] => Glazier [alreadyInSave:protected] => [alreadyInValidation:protected] => [validationFailures:protected] => Array ( ) [_new:BaseObject:private] => [_deleted:BaseObject:private] => [modifiedColumns:protected] => Array ( ) ) [59] => Category Object ( [languages:protected] => [bok_resources:protected] => [bok_topics:protected] => [bok_keywords:protected] => [id:protected] => 59 [type:protected] => category [parent:protected] => 2 [label:protected] => Hazardous Waste Cleanup [alreadyInSave:protected] => [alreadyInValidation:protected] => [validationFailures:protected] => Array ( ) [_new:BaseObject:private] => [_deleted:BaseObject:private] => [modifiedColumns:protected] => Array ( ) ) [60] => Category Object ( [languages:protected] => [bok_resources:protected] => [bok_topics:protected] => [bok_keywords:protected] => [id:protected] => 60 [type:protected] => category [parent:protected] => 2 [label:protected] => HVAC [alreadyInSave:protected] => [alreadyInValidation:protected] => [validationFailures:protected] => Array ( ) [_new:BaseObject:private] => [_deleted:BaseObject:private] => [modifiedColumns:protected] => Array ( ) ) [61] => Category Object ( [languages:protected] => [bok_resources:protected] => [bok_topics:protected] => [bok_keywords:protected] => [id:protected] => 61 [type:protected] => category [parent:protected] => 2 [label:protected] => Interior Systems Carpenter [alreadyInSave:protected] => [alreadyInValidation:protected] => [validationFailures:protected] => Array ( ) [_new:BaseObject:private] => [_deleted:BaseObject:private] => [modifiedColumns:protected] => Array ( ) ) [64] => Category Object ( [languages:protected] => [bok_resources:protected] => [bok_topics:protected] => [bok_keywords:protected] => [id:protected] => 64 [type:protected] => category [parent:protected] => 2 [label:protected] => Laborer [alreadyInSave:protected] => [alreadyInValidation:protected] => [validationFailures:protected] => Array ( ) [_new:BaseObject:private] => [_deleted:BaseObject:private] => [modifiedColumns:protected] => Array ( ) ) [65] => Category Object ( [languages:protected] => [bok_resources:protected] => [bok_topics:protected] => [bok_keywords:protected] => [id:protected] => 65 [type:protected] => category [parent:protected] => 2 [label:protected] => Landscaper [alreadyInSave:protected] => [alreadyInValidation:protected] => [validationFailures:protected] => Array ( ) [_new:BaseObject:private] => [_deleted:BaseObject:private] => [modifiedColumns:protected] => Array ( ) ) [66] => Category Object ( [languages:protected] => [bok_resources:protected] => [bok_topics:protected] => [bok_keywords:protected] => [id:protected] => 66 [type:protected] => category [parent:protected] => 2 [label:protected] => Lather [alreadyInSave:protected] => [alreadyInValidation:protected] => [validationFailures:protected] => Array ( ) [_new:BaseObject:private] => [_deleted:BaseObject:private] => [modifiedColumns:protected] => Array ( ) ) [67] => Category Object ( [languages:protected] => [bok_resources:protected] => [bok_topics:protected] => [bok_keywords:protected] => [id:protected] => 67 [type:protected] => category [parent:protected] => 2 [label:protected] => Lead Abatement Worker [alreadyInSave:protected] => [alreadyInValidation:protected] => [validationFailures:protected] => Array ( ) [_new:BaseObject:private] => [_deleted:BaseObject:private] => [modifiedColumns:protected] => Array ( ) ) [68] => Category Object ( [languages:protected] => [bok_resources:protected] => [bok_topics:protected] => [bok_keywords:protected] => [id:protected] => 68 [type:protected] => category [parent:protected] => 2 [label:protected] => Maintenance Worker [alreadyInSave:protected] => [alreadyInValidation:protected] => [validationFailures:protected] => Array ( ) [_new:BaseObject:private] => [_deleted:BaseObject:private] => [modifiedColumns:protected] => Array ( ) ) [69] => Category Object ( [languages:protected] => [bok_resources:protected] => [bok_topics:protected] => [bok_keywords:protected] => [id:protected] => 69 [type:protected] => category [parent:protected] => 2 [label:protected] => Millwright [alreadyInSave:protected] => [alreadyInValidation:protected] => [validationFailures:protected] => Array ( ) [_new:BaseObject:private] => [_deleted:BaseObject:private] => [modifiedColumns:protected] => Array ( ) ) [70] => Category Object ( [languages:protected] => [bok_resources:protected] => [bok_topics:protected] => [bok_keywords:protected] => [id:protected] => 70 [type:protected] => category [parent:protected] => 2 [label:protected] => Operating Engineer [alreadyInSave:protected] => [alreadyInValidation:protected] => [validationFailures:protected] => Array ( ) [_new:BaseObject:private] => [_deleted:BaseObject:private] => [modifiedColumns:protected] => Array ( ) ) [71] => Category Object ( [languages:protected] => [bok_resources:protected] => [bok_topics:protected] => [bok_keywords:protected] => [id:protected] => 71 [type:protected] => category [parent:protected] => 2 [label:protected] => Painter [alreadyInSave:protected] => [alreadyInValidation:protected] => [validationFailures:protected] => Array ( ) [_new:BaseObject:private] => [_deleted:BaseObject:private] => [modifiedColumns:protected] => Array ( ) ) [72] => Category Object ( [languages:protected] => [bok_resources:protected] => [bok_topics:protected] => [bok_keywords:protected] => [id:protected] => 72 [type:protected] => category [parent:protected] => 2 [label:protected] => Paper Hanger [alreadyInSave:protected] => [alreadyInValidation:protected] => [validationFailures:protected] => Array ( ) [_new:BaseObject:private] => [_deleted:BaseObject:private] => [modifiedColumns:protected] => Array ( ) ) [73] => Category Object ( [languages:protected] => [bok_resources:protected] => [bok_topics:protected] => [bok_keywords:protected] => [id:protected] => 73 [type:protected] => category [parent:protected] => 2 [label:protected] => PCC/Restoration [alreadyInSave:protected] => [alreadyInValidation:protected] => [validationFailures:protected] => Array ( ) [_new:BaseObject:private] => [_deleted:BaseObject:private] => [modifiedColumns:protected] => Array ( ) ) [74] => Category Object ( [languages:protected] => [bok_resources:protected] => [bok_topics:protected] => [bok_keywords:protected] => [id:protected] => 74 [type:protected] => category [parent:protected] => 2 [label:protected] => Pile Driver [alreadyInSave:protected] => [alreadyInValidation:protected] => [validationFailures:protected] => Array ( ) [_new:BaseObject:private] => [_deleted:BaseObject:private] => [modifiedColumns:protected] => Array ( ) ) [75] => Category Object ( [languages:protected] => [bok_resources:protected] => [bok_topics:protected] => [bok_keywords:protected] => [id:protected] => 75 [type:protected] => category [parent:protected] => 2 [label:protected] => Plasterer [alreadyInSave:protected] => [alreadyInValidation:protected] => [validationFailures:protected] => Array ( ) [_new:BaseObject:private] => [_deleted:BaseObject:private] => [modifiedColumns:protected] => Array ( ) ) [76] => Category Object ( [languages:protected] => [bok_resources:protected] => [bok_topics:protected] => [bok_keywords:protected] => [id:protected] => 76 [type:protected] => category [parent:protected] => 2 [label:protected] => Plumber/Pipefitter [alreadyInSave:protected] => [alreadyInValidation:protected] => [validationFailures:protected] => Array ( ) [_new:BaseObject:private] => [_deleted:BaseObject:private] => [modifiedColumns:protected] => Array ( ) ) [77] => Category Object ( [languages:protected] => [bok_resources:protected] => [bok_topics:protected] => [bok_keywords:protected] => [id:protected] => 77 [type:protected] => category [parent:protected] => 2 [label:protected] => Refractory Worker [alreadyInSave:protected] => [alreadyInValidation:protected] => [validationFailures:protected] => Array ( ) [_new:BaseObject:private] => [_deleted:BaseObject:private] => [modifiedColumns:protected] => Array ( ) ) [63] => Category Object ( [languages:protected] => [bok_resources:protected] => [bok_topics:protected] => [bok_keywords:protected] => [id:protected] => 63 [type:protected] => category [parent:protected] => 2 [label:protected] => Reinforcing Ironworker [alreadyInSave:protected] => [alreadyInValidation:protected] => [validationFailures:protected] => Array ( ) [_new:BaseObject:private] => [_deleted:BaseObject:private] => [modifiedColumns:protected] => Array ( ) ) [78] => Category Object ( [languages:protected] => [bok_resources:protected] => [bok_topics:protected] => [bok_keywords:protected] => [id:protected] => 78 [type:protected] => category [parent:protected] => 2 [label:protected] => Roofer/Waterproofer [alreadyInSave:protected] => [alreadyInValidation:protected] => [validationFailures:protected] => Array ( ) [_new:BaseObject:private] => [_deleted:BaseObject:private] => [modifiedColumns:protected] => Array ( ) ) [79] => Category Object ( [languages:protected] => [bok_resources:protected] => [bok_topics:protected] => [bok_keywords:protected] => [id:protected] => 79 [type:protected] => category [parent:protected] => 2 [label:protected] => Scaffold Erector [alreadyInSave:protected] => [alreadyInValidation:protected] => [validationFailures:protected] => Array ( ) [_new:BaseObject:private] => [_deleted:BaseObject:private] => [modifiedColumns:protected] => Array ( ) ) [80] => Category Object ( [languages:protected] => [bok_resources:protected] => [bok_topics:protected] => [bok_keywords:protected] => [id:protected] => 80 [type:protected] => category [parent:protected] => 2 [label:protected] => Sheetmetal Worker [alreadyInSave:protected] => [alreadyInValidation:protected] => [validationFailures:protected] => Array ( ) [_new:BaseObject:private] => [_deleted:BaseObject:private] => [modifiedColumns:protected] => Array ( ) ) [81] => Category Object ( [languages:protected] => [bok_resources:protected] => [bok_topics:protected] => [bok_keywords:protected] => [id:protected] => 81 [type:protected] => category [parent:protected] => 2 [label:protected] => Sprinkler Fitter [alreadyInSave:protected] => [alreadyInValidation:protected] => [validationFailures:protected] => Array ( ) [_new:BaseObject:private] => [_deleted:BaseObject:private] => [modifiedColumns:protected] => Array ( ) ) [82] => Category Object ( [languages:protected] => [bok_resources:protected] => [bok_topics:protected] => [bok_keywords:protected] => [id:protected] => 82 [type:protected] => category [parent:protected] => 2 [label:protected] => Stonemason [alreadyInSave:protected] => [alreadyInValidation:protected] => [validationFailures:protected] => Array ( ) [_new:BaseObject:private] => [_deleted:BaseObject:private] => [modifiedColumns:protected] => Array ( ) ) [62] => Category Object ( [languages:protected] => [bok_resources:protected] => [bok_topics:protected] => [bok_keywords:protected] => [id:protected] => 62 [type:protected] => category [parent:protected] => 2 [label:protected] => Structural Ironworker [alreadyInSave:protected] => [alreadyInValidation:protected] => [validationFailures:protected] => Array ( ) [_new:BaseObject:private] => [_deleted:BaseObject:private] => [modifiedColumns:protected] => Array ( ) ) [83] => Category Object ( [languages:protected] => [bok_resources:protected] => [bok_topics:protected] => [bok_keywords:protected] => [id:protected] => 83 [type:protected] => category [parent:protected] => 2 [label:protected] => Terrazzo Worker [alreadyInSave:protected] => [alreadyInValidation:protected] => [validationFailures:protected] => Array ( ) [_new:BaseObject:private] => [_deleted:BaseObject:private] => [modifiedColumns:protected] => Array ( ) ) [84] => Category Object ( [languages:protected] => [bok_resources:protected] => [bok_topics:protected] => [bok_keywords:protected] => [id:protected] => 84 [type:protected] => category [parent:protected] => 2 [label:protected] => Tile Setter [alreadyInSave:protected] => [alreadyInValidation:protected] => [validationFailures:protected] => Array ( ) [_new:BaseObject:private] => [_deleted:BaseObject:private] => [modifiedColumns:protected] => Array ( ) ) [85] => Category Object ( [languages:protected] => [bok_resources:protected] => [bok_topics:protected] => [bok_keywords:protected] => [id:protected] => 85 [type:protected] => category [parent:protected] => 2 [label:protected] => Truck Driver [alreadyInSave:protected] => [alreadyInValidation:protected] => [validationFailures:protected] => Array ( ) [_new:BaseObject:private] => [_deleted:BaseObject:private] => [modifiedColumns:protected] => Array ( ) ) [86] => Category Object ( [languages:protected] => [bok_resources:protected] => [bok_topics:protected] => [bok_keywords:protected] => [id:protected] => 86 [type:protected] => category [parent:protected] => 2 [label:protected] => Welder [alreadyInSave:protected] => [alreadyInValidation:protected] => [validationFailures:protected] => Array ( ) [_new:BaseObject:private] => [_deleted:BaseObject:private] => [modifiedColumns:protected] => Array ( ) ) [87] => Category Object ( [languages:protected] => [bok_resources:protected] => [bok_topics:protected] => [bok_keywords:protected] => [id:protected] => 87 [type:protected] => category [parent:protected] => 3 [label:protected] => Commercial & Institutional [alreadyInSave:protected] => [alreadyInValidation:protected] => [validationFailures:protected] => Array ( ) [_new:BaseObject:private] => [_deleted:BaseObject:private] => [modifiedColumns:protected] => Array ( ) ) [88] => Category Object ( [languages:protected] => [bok_resources:protected] => [bok_topics:protected] => [bok_keywords:protected] => [id:protected] => 88 [type:protected] => category [parent:protected] => 3 [label:protected] => Demolition [alreadyInSave:protected] => [alreadyInValidation:protected] => [validationFailures:protected] => Array ( ) [_new:BaseObject:private] => [_deleted:BaseObject:private] => [modifiedColumns:protected] => Array ( ) ) [89] => Category Object ( [languages:protected] => [bok_resources:protected] => [bok_topics:protected] => [bok_keywords:protected] => [id:protected] => 89 [type:protected] => category [parent:protected] => 3 [label:protected] => Disasters [alreadyInSave:protected] => [alreadyInValidation:protected] => [validationFailures:protected] => Array ( ) [_new:BaseObject:private] => [_deleted:BaseObject:private] => [modifiedColumns:protected] => Array ( ) ) [91] => Category Object ( [languages:protected] => [bok_resources:protected] => [bok_topics:protected] => [bok_keywords:protected] => [id:protected] => 91 [type:protected] => category [parent:protected] => 3 [label:protected] => Heavy & Highway [alreadyInSave:protected] => [alreadyInValidation:protected] => [validationFailures:protected] => Array ( ) [_new:BaseObject:private] => [_deleted:BaseObject:private] => [modifiedColumns:protected] => Array ( ) ) [90] => Category Object ( [languages:protected] => [bok_resources:protected] => [bok_topics:protected] => [bok_keywords:protected] => [id:protected] => 90 [type:protected] => category [parent:protected] => 3 [label:protected] => Industrial [alreadyInSave:protected] => [alreadyInValidation:protected] => [validationFailures:protected] => Array ( ) [_new:BaseObject:private] => [_deleted:BaseObject:private] => [modifiedColumns:protected] => Array ( ) ) [92] => Category Object ( [languages:protected] => [bok_resources:protected] => [bok_topics:protected] => [bok_keywords:protected] => [id:protected] => 92 [type:protected] => category [parent:protected] => 3 [label:protected] => LEED/Green Construction [alreadyInSave:protected] => [alreadyInValidation:protected] => [validationFailures:protected] => Array ( ) [_new:BaseObject:private] => [_deleted:BaseObject:private] => [modifiedColumns:protected] => Array ( ) ) [93] => Category Object ( [languages:protected] => [bok_resources:protected] => [bok_topics:protected] => [bok_keywords:protected] => [id:protected] => 93 [type:protected] => category [parent:protected] => 3 [label:protected] => Renovations [alreadyInSave:protected] => [alreadyInValidation:protected] => [validationFailures:protected] => Array ( ) [_new:BaseObject:private] => [_deleted:BaseObject:private] => [modifiedColumns:protected] => Array ( ) ) [94] => Category Object ( [languages:protected] => [bok_resources:protected] => [bok_topics:protected] => [bok_keywords:protected] => [id:protected] => 94 [type:protected] => category [parent:protected] => 3 [label:protected] => Residential [alreadyInSave:protected] => [alreadyInValidation:protected] => [validationFailures:protected] => Array ( ) [_new:BaseObject:private] => [_deleted:BaseObject:private] => [modifiedColumns:protected] => Array ( ) ) [95] => Category Object ( [languages:protected] => [bok_resources:protected] => [bok_topics:protected] => [bok_keywords:protected] => [id:protected] => 95 [type:protected] => category [parent:protected] => 3 [label:protected] => Underground [alreadyInSave:protected] => [alreadyInValidation:protected] => [validationFailures:protected] => Array ( ) [_new:BaseObject:private] => [_deleted:BaseObject:private] => [modifiedColumns:protected] => Array ( ) ) ) [categories_initialized:protected] => 1 [mapped_items:protected] => [content:protected] => [files:protected] => [language:protected] => Language Object ( [id:protected] => 1 [code:protected] => en [name:protected] => English [alreadyInSave:protected] => [alreadyInValidation:protected] => [validationFailures:protected] => Array ( ) [_new:BaseObject:private] => [_deleted:BaseObject:private] => [modifiedColumns:protected] => Array ( ) ) [old_record:protected] => [id:protected] => 4426 [old_id:protected] => [elcosh_id:protected] => d001656 [type:protected] => document [display_type:protected] => HTML only (and links) [user_id:protected] => 0 [language_id:protected] => 1 [tagging_id:protected] => Mike Aguilar [priority_id:protected] => 1 [title:protected] => Construction Dive -- DeWalt's Jobsite Pro headphones recalled for fire hazards [total_pages:protected] => 1 [billed_pages:protected] => 1 [publication_number:protected] => [part_of:protected] => [keywords:protected] => DeWalt, Fire Hazards, recall, headphones [comments:protected] => [summary:protected] => A recall notice by the United States Consumer Product Safety Commission affects over 300,000 DeWalt Jobsite Pro Headphones. The recall is a result of a malfunction that can cause earbuds to overheat while charging or during use, leading to fire and burn hazards. [transition_comments:protected] => [external_link:protected] => https://www.constructiondive.com/news/dewalts-jobsite-pro-headphones-recalled-for-fire-hazards/611248/?utm_source=Sailthru&utm_medium=email&utm_campaign=Issue:%202021-12-10%20Construction%20Dive%20Newsletter%20%5Bissue:38532%5D&utm_term=Construction%20Dive [consol_link:protected] => [more_like_this:protected] => [permission_given_by:protected] => [published:protected] => T [billable:protected] => F [img_name:protected] => [img_ext:protected] => [img_width:protected] => [img_height:protected] => [img_credit:protected] => [img_practice:protected] => [vid_source_id:protected] => [vid_running_time:protected] => [vid_intended_audience:protected] => [vid_acquisition_info:protected] => [vid_cost:protected] => [vid_producer:protected] => [vid_filename:protected] => [vid_filename_downloadable:protected] => [date_summary:protected] => [date_permission_requested:protected] => [date_permission_received:protected] => [date_review_needed:protected] => [date_received:protected] => 12/13/21 [date_completed:protected] => 12/13/21 [date_billed:protected] => [date_modified:protected] => 12/13/21 [collBokExports:protected] => [lastBokExportCriteria:BaseElcoshItem:private] => [alreadyInSave:protected] => [alreadyInValidation:protected] => [validationFailures:protected] => Array ( ) [_new:BaseObject:private] => [_deleted:BaseObject:private] => [modifiedColumns:protected] => Array ( ) ) ) [3] => Search_Result Object ( [title] => Working in an Enclosed Cab [image] => /record/images/notavailable-p.png [blurb] => This CPWR Hazard Alert on Working in enclosed cabs provides information on protecting workers from silica dust, how to minimize exposures and the dang... [category] => Array ( [0] => 10 [1] => 16 [2] => 24 [3] => 37 [4] => 46 [5] => 48 [6] => 49 [7] => 51 [8] => 53 [9] => 54 [10] => 56 [11] => 58 [12] => 59 [13] => 60 [14] => 61 [15] => 64 [16] => 66 [17] => 68 [18] => 69 [19] => 71 [20] => 73 [21] => 74 [22] => 76 [23] => 77 [24] => 63 [25] => 80 [26] => 82 [27] => 62 [28] => 83 [29] => 84 [30] => 86 [31] => 88 [32] => 89 [33] => 95 [34] => 102 ) [labels] => Array ( [0] => Confined Spaces [1] => Work Environment [2] => Hazards [3] => Fire & Explosions [6] => Trenches & Excavations [9] => Silica /Construction Dust [10] => Inhalation/Skin Exposures [12] => Boilermaker [13] => Trades [14] => Cabinetmaker [16] => Carpenter [18] => Cement Mason [20] => Concrete Polisher [22] => Drywall Applicator Specialist [24] => Elevator Constructor [26] => Glazier [28] => Hazardous Waste Cleanup [30] => HVAC [32] => Interior Systems Carpenter [34] => Laborer [36] => Lather [38] => Maintenance Worker [40] => Millwright [42] => Painter [44] => PCC/Restoration [46] => Pile Driver [48] => Plumber/Pipefitter [50] => Refractory Worker [52] => Reinforcing Ironworker [54] => Sheetmetal Worker [56] => Stonemason [58] => Structural Ironworker [60] => Terrazzo Worker [62] => Tile Setter [64] => Welder [66] => Demolition [67] => Jobsites [68] => Disasters [70] => Underground [72] => Handouts [73] => Documents [74] => Media & Documents ) [type] => Handouts [sub_category] => [url] => /document/4415/d001651/Working%2Bin%2Ban%2BEnclosed%2BCab.html [item:protected] => DocumentRecord Object ( [records:protected] => Array ( ) [recordId:protected] => [searchWordClass:protected] => [searchWordPeerClass:protected] => [bok_record:protected] => [authors:protected] => [organizations:protected] => [collections:protected] => [categories:protected] => Array ( [10] => Category Object ( [languages:protected] => [bok_resources:protected] => [bok_topics:protected] => [bok_keywords:protected] => [id:protected] => 10 [type:protected] => category [parent:protected] => 7 [label:protected] => Confined Spaces [alreadyInSave:protected] => [alreadyInValidation:protected] => [validationFailures:protected] => Array ( ) [_new:BaseObject:private] => [_deleted:BaseObject:private] => [modifiedColumns:protected] => Array ( ) ) [16] => Category Object ( [languages:protected] => [bok_resources:protected] => [bok_topics:protected] => [bok_keywords:protected] => [id:protected] => 16 [type:protected] => category [parent:protected] => 7 [label:protected] => Fire & Explosions [alreadyInSave:protected] => [alreadyInValidation:protected] => [validationFailures:protected] => Array ( ) [_new:BaseObject:private] => [_deleted:BaseObject:private] => [modifiedColumns:protected] => Array ( ) ) [24] => Category Object ( [languages:protected] => [bok_resources:protected] => [bok_topics:protected] => [bok_keywords:protected] => [id:protected] => 24 [type:protected] => category [parent:protected] => 7 [label:protected] => Trenches & Excavations [alreadyInSave:protected] => [alreadyInValidation:protected] => [validationFailures:protected] => Array ( ) [_new:BaseObject:private] => [_deleted:BaseObject:private] => [modifiedColumns:protected] => Array ( ) ) [37] => Category Object ( [languages:protected] => [bok_resources:protected] => [bok_topics:protected] => [bok_keywords:protected] => [id:protected] => 37 [type:protected] => category [parent:protected] => 8 [label:protected] => Silica /Construction Dust [alreadyInSave:protected] => [alreadyInValidation:protected] => [validationFailures:protected] => Array ( ) [_new:BaseObject:private] => [_deleted:BaseObject:private] => [modifiedColumns:protected] => Array ( ) ) [46] => Category Object ( [languages:protected] => [bok_resources:protected] => [bok_topics:protected] => [bok_keywords:protected] => [id:protected] => 46 [type:protected] => category [parent:protected] => 2 [label:protected] => Boilermaker [alreadyInSave:protected] => [alreadyInValidation:protected] => [validationFailures:protected] => Array ( ) [_new:BaseObject:private] => [_deleted:BaseObject:private] => [modifiedColumns:protected] => Array ( ) ) [48] => Category Object ( [languages:protected] => [bok_resources:protected] => [bok_topics:protected] => [bok_keywords:protected] => [id:protected] => 48 [type:protected] => category [parent:protected] => 2 [label:protected] => Cabinetmaker [alreadyInSave:protected] => [alreadyInValidation:protected] => [validationFailures:protected] => Array ( ) [_new:BaseObject:private] => [_deleted:BaseObject:private] => [modifiedColumns:protected] => Array ( ) ) [49] => Category Object ( [languages:protected] => [bok_resources:protected] => [bok_topics:protected] => [bok_keywords:protected] => [id:protected] => 49 [type:protected] => category [parent:protected] => 2 [label:protected] => Carpenter [alreadyInSave:protected] => [alreadyInValidation:protected] => [validationFailures:protected] => Array ( ) [_new:BaseObject:private] => [_deleted:BaseObject:private] => [modifiedColumns:protected] => Array ( ) ) [51] => Category Object ( [languages:protected] => [bok_resources:protected] => [bok_topics:protected] => [bok_keywords:protected] => [id:protected] => 51 [type:protected] => category [parent:protected] => 2 [label:protected] => Cement Mason [alreadyInSave:protected] => [alreadyInValidation:protected] => [validationFailures:protected] => Array ( ) [_new:BaseObject:private] => [_deleted:BaseObject:private] => [modifiedColumns:protected] => Array ( ) ) [53] => Category Object ( [languages:protected] => [bok_resources:protected] => [bok_topics:protected] => [bok_keywords:protected] => [id:protected] => 53 [type:protected] => category [parent:protected] => 2 [label:protected] => Concrete Polisher [alreadyInSave:protected] => [alreadyInValidation:protected] => [validationFailures:protected] => Array ( ) [_new:BaseObject:private] => [_deleted:BaseObject:private] => [modifiedColumns:protected] => Array ( ) ) [54] => Category Object ( [languages:protected] => [bok_resources:protected] => [bok_topics:protected] => [bok_keywords:protected] => [id:protected] => 54 [type:protected] => category [parent:protected] => 2 [label:protected] => Drywall Applicator Specialist [alreadyInSave:protected] => [alreadyInValidation:protected] => [validationFailures:protected] => Array ( ) [_new:BaseObject:private] => [_deleted:BaseObject:private] => [modifiedColumns:protected] => Array ( ) ) [56] => Category Object ( [languages:protected] => [bok_resources:protected] => [bok_topics:protected] => [bok_keywords:protected] => [id:protected] => 56 [type:protected] => category [parent:protected] => 2 [label:protected] => Elevator Constructor [alreadyInSave:protected] => [alreadyInValidation:protected] => [validationFailures:protected] => Array ( ) [_new:BaseObject:private] => [_deleted:BaseObject:private] => [modifiedColumns:protected] => Array ( ) ) [58] => Category Object ( [languages:protected] => [bok_resources:protected] => [bok_topics:protected] => [bok_keywords:protected] => [id:protected] => 58 [type:protected] => category [parent:protected] => 2 [label:protected] => Glazier [alreadyInSave:protected] => [alreadyInValidation:protected] => [validationFailures:protected] => Array ( ) [_new:BaseObject:private] => [_deleted:BaseObject:private] => [modifiedColumns:protected] => Array ( ) ) [59] => Category Object ( [languages:protected] => [bok_resources:protected] => [bok_topics:protected] => [bok_keywords:protected] => [id:protected] => 59 [type:protected] => category [parent:protected] => 2 [label:protected] => Hazardous Waste Cleanup [alreadyInSave:protected] => [alreadyInValidation:protected] => [validationFailures:protected] => Array ( ) [_new:BaseObject:private] => [_deleted:BaseObject:private] => [modifiedColumns:protected] => Array ( ) ) [60] => Category Object ( [languages:protected] => [bok_resources:protected] => [bok_topics:protected] => [bok_keywords:protected] => [id:protected] => 60 [type:protected] => category [parent:protected] => 2 [label:protected] => HVAC [alreadyInSave:protected] => [alreadyInValidation:protected] => [validationFailures:protected] => Array ( ) [_new:BaseObject:private] => [_deleted:BaseObject:private] => [modifiedColumns:protected] => Array ( ) ) [61] => Category Object ( [languages:protected] => [bok_resources:protected] => [bok_topics:protected] => [bok_keywords:protected] => [id:protected] => 61 [type:protected] => category [parent:protected] => 2 [label:protected] => Interior Systems Carpenter [alreadyInSave:protected] => [alreadyInValidation:protected] => [validationFailures:protected] => Array ( ) [_new:BaseObject:private] => [_deleted:BaseObject:private] => [modifiedColumns:protected] => Array ( ) ) [64] => Category Object ( [languages:protected] => [bok_resources:protected] => [bok_topics:protected] => [bok_keywords:protected] => [id:protected] => 64 [type:protected] => category [parent:protected] => 2 [label:protected] => Laborer [alreadyInSave:protected] => [alreadyInValidation:protected] => [validationFailures:protected] => Array ( ) [_new:BaseObject:private] => [_deleted:BaseObject:private] => [modifiedColumns:protected] => Array ( ) ) [66] => Category Object ( [languages:protected] => [bok_resources:protected] => [bok_topics:protected] => [bok_keywords:protected] => [id:protected] => 66 [type:protected] => category [parent:protected] => 2 [label:protected] => Lather [alreadyInSave:protected] => [alreadyInValidation:protected] => [validationFailures:protected] => Array ( ) [_new:BaseObject:private] => [_deleted:BaseObject:private] => [modifiedColumns:protected] => Array ( ) ) [68] => Category Object ( [languages:protected] => [bok_resources:protected] => [bok_topics:protected] => [bok_keywords:protected] => [id:protected] => 68 [type:protected] => category [parent:protected] => 2 [label:protected] => Maintenance Worker [alreadyInSave:protected] => [alreadyInValidation:protected] => [validationFailures:protected] => Array ( ) [_new:BaseObject:private] => [_deleted:BaseObject:private] => [modifiedColumns:protected] => Array ( ) ) [69] => Category Object ( [languages:protected] => [bok_resources:protected] => [bok_topics:protected] => [bok_keywords:protected] => [id:protected] => 69 [type:protected] => category [parent:protected] => 2 [label:protected] => Millwright [alreadyInSave:protected] => [alreadyInValidation:protected] => [validationFailures:protected] => Array ( ) [_new:BaseObject:private] => [_deleted:BaseObject:private] => [modifiedColumns:protected] => Array ( ) ) [71] => Category Object ( [languages:protected] => [bok_resources:protected] => [bok_topics:protected] => [bok_keywords:protected] => [id:protected] => 71 [type:protected] => category [parent:protected] => 2 [label:protected] => Painter [alreadyInSave:protected] => [alreadyInValidation:protected] => [validationFailures:protected] => Array ( ) [_new:BaseObject:private] => [_deleted:BaseObject:private] => [modifiedColumns:protected] => Array ( ) ) [73] => Category Object ( [languages:protected] => [bok_resources:protected] => [bok_topics:protected] => [bok_keywords:protected] => [id:protected] => 73 [type:protected] => category [parent:protected] => 2 [label:protected] => PCC/Restoration [alreadyInSave:protected] => [alreadyInValidation:protected] => [validationFailures:protected] => Array ( ) [_new:BaseObject:private] => [_deleted:BaseObject:private] => [modifiedColumns:protected] => Array ( ) ) [74] => Category Object ( [languages:protected] => [bok_resources:protected] => [bok_topics:protected] => [bok_keywords:protected] => [id:protected] => 74 [type:protected] => category [parent:protected] => 2 [label:protected] => Pile Driver [alreadyInSave:protected] => [alreadyInValidation:protected] => [validationFailures:protected] => Array ( ) [_new:BaseObject:private] => [_deleted:BaseObject:private] => [modifiedColumns:protected] => Array ( ) ) [76] => Category Object ( [languages:protected] => [bok_resources:protected] => [bok_topics:protected] => [bok_keywords:protected] => [id:protected] => 76 [type:protected] => category [parent:protected] => 2 [label:protected] => Plumber/Pipefitter [alreadyInSave:protected] => [alreadyInValidation:protected] => [validationFailures:protected] => Array ( ) [_new:BaseObject:private] => [_deleted:BaseObject:private] => [modifiedColumns:protected] => Array ( ) ) [77] => Category Object ( [languages:protected] => [bok_resources:protected] => [bok_topics:protected] => [bok_keywords:protected] => [id:protected] => 77 [type:protected] => category [parent:protected] => 2 [label:protected] => Refractory Worker [alreadyInSave:protected] => [alreadyInValidation:protected] => [validationFailures:protected] => Array ( ) [_new:BaseObject:private] => [_deleted:BaseObject:private] => [modifiedColumns:protected] => Array ( ) ) [63] => Category Object ( [languages:protected] => [bok_resources:protected] => [bok_topics:protected] => [bok_keywords:protected] => [id:protected] => 63 [type:protected] => category [parent:protected] => 2 [label:protected] => Reinforcing Ironworker [alreadyInSave:protected] => [alreadyInValidation:protected] => [validationFailures:protected] => Array ( ) [_new:BaseObject:private] => [_deleted:BaseObject:private] => [modifiedColumns:protected] => Array ( ) ) [80] => Category Object ( [languages:protected] => [bok_resources:protected] => [bok_topics:protected] => [bok_keywords:protected] => [id:protected] => 80 [type:protected] => category [parent:protected] => 2 [label:protected] => Sheetmetal Worker [alreadyInSave:protected] => [alreadyInValidation:protected] => [validationFailures:protected] => Array ( ) [_new:BaseObject:private] => [_deleted:BaseObject:private] => [modifiedColumns:protected] => Array ( ) ) [82] => Category Object ( [languages:protected] => [bok_resources:protected] => [bok_topics:protected] => [bok_keywords:protected] => [id:protected] => 82 [type:protected] => category [parent:protected] => 2 [label:protected] => Stonemason [alreadyInSave:protected] => [alreadyInValidation:protected] => [validationFailures:protected] => Array ( ) [_new:BaseObject:private] => [_deleted:BaseObject:private] => [modifiedColumns:protected] => Array ( ) ) [62] => Category Object ( [languages:protected] => [bok_resources:protected] => [bok_topics:protected] => [bok_keywords:protected] => [id:protected] => 62 [type:protected] => category [parent:protected] => 2 [label:protected] => Structural Ironworker [alreadyInSave:protected] => [alreadyInValidation:protected] => [validationFailures:protected] => Array ( ) [_new:BaseObject:private] => [_deleted:BaseObject:private] => [modifiedColumns:protected] => Array ( ) ) [83] => Category Object ( [languages:protected] => [bok_resources:protected] => [bok_topics:protected] => [bok_keywords:protected] => [id:protected] => 83 [type:protected] => category [parent:protected] => 2 [label:protected] => Terrazzo Worker [alreadyInSave:protected] => [alreadyInValidation:protected] => [validationFailures:protected] => Array ( ) [_new:BaseObject:private] => [_deleted:BaseObject:private] => [modifiedColumns:protected] => Array ( ) ) [84] => Category Object ( [languages:protected] => [bok_resources:protected] => [bok_topics:protected] => [bok_keywords:protected] => [id:protected] => 84 [type:protected] => category [parent:protected] => 2 [label:protected] => Tile Setter [alreadyInSave:protected] => [alreadyInValidation:protected] => [validationFailures:protected] => Array ( ) [_new:BaseObject:private] => [_deleted:BaseObject:private] => [modifiedColumns:protected] => Array ( ) ) [86] => Category Object ( [languages:protected] => [bok_resources:protected] => [bok_topics:protected] => [bok_keywords:protected] => [id:protected] => 86 [type:protected] => category [parent:protected] => 2 [label:protected] => Welder [alreadyInSave:protected] => [alreadyInValidation:protected] => [validationFailures:protected] => Array ( ) [_new:BaseObject:private] => [_deleted:BaseObject:private] => [modifiedColumns:protected] => Array ( ) ) [88] => Category Object ( [languages:protected] => [bok_resources:protected] => [bok_topics:protected] => [bok_keywords:protected] => [id:protected] => 88 [type:protected] => category [parent:protected] => 3 [label:protected] => Demolition [alreadyInSave:protected] => [alreadyInValidation:protected] => [validationFailures:protected] => Array ( ) [_new:BaseObject:private] => [_deleted:BaseObject:private] => [modifiedColumns:protected] => Array ( ) ) [89] => Category Object ( [languages:protected] => [bok_resources:protected] => [bok_topics:protected] => [bok_keywords:protected] => [id:protected] => 89 [type:protected] => category [parent:protected] => 3 [label:protected] => Disasters [alreadyInSave:protected] => [alreadyInValidation:protected] => [validationFailures:protected] => Array ( ) [_new:BaseObject:private] => [_deleted:BaseObject:private] => [modifiedColumns:protected] => Array ( ) ) [95] => Category Object ( [languages:protected] => [bok_resources:protected] => [bok_topics:protected] => [bok_keywords:protected] => [id:protected] => 95 [type:protected] => category [parent:protected] => 3 [label:protected] => Underground [alreadyInSave:protected] => [alreadyInValidation:protected] => [validationFailures:protected] => Array ( ) [_new:BaseObject:private] => [_deleted:BaseObject:private] => [modifiedColumns:protected] => Array ( ) ) [102] => Category Object ( [languages:protected] => [bok_resources:protected] => [bok_topics:protected] => [bok_keywords:protected] => [id:protected] => 102 [type:protected] => category [parent:protected] => 6 [label:protected] => Handouts [alreadyInSave:protected] => [alreadyInValidation:protected] => [validationFailures:protected] => Array ( ) [_new:BaseObject:private] => [_deleted:BaseObject:private] => [modifiedColumns:protected] => Array ( ) ) ) [categories_initialized:protected] => 1 [mapped_items:protected] => [content:protected] => [files:protected] => [language:protected] => Language Object ( [id:protected] => 1 [code:protected] => en [name:protected] => English [alreadyInSave:protected] => [alreadyInValidation:protected] => [validationFailures:protected] => Array ( ) [_new:BaseObject:private] => [_deleted:BaseObject:private] => [modifiedColumns:protected] => Array ( ) ) [old_record:protected] => [id:protected] => 4415 [old_id:protected] => [elcosh_id:protected] => d001651 [type:protected] => document [display_type:protected] => HTML only (and links) [user_id:protected] => 0 [language_id:protected] => 1 [tagging_id:protected] => Valeria Contreras [priority_id:protected] => 1 [title:protected] => Working in an Enclosed Cab [total_pages:protected] => 1 [billed_pages:protected] => 1 [publication_number:protected] => [part_of:protected] => [keywords:protected] => Occupation, construction, safety, health, hazards, work, worker, workplace, OSHA, silicosis, mining, silica, DOE, EEOICPA, labor, lung, CBD, dust, cab, miner, mine [comments:protected] => [summary:protected] => This CPWR Hazard Alert on Working in enclosed cabs provides information on protecting workers from silica dust, how to minimize exposures and the dangers of silica dust. Click on the following links to access the English version and the Spanish version. [transition_comments:protected] => [external_link:protected] => [consol_link:protected] => [more_like_this:protected] => [permission_given_by:protected] => [published:protected] => T [billable:protected] => F [img_name:protected] => [img_ext:protected] => [img_width:protected] => [img_height:protected] => [img_credit:protected] => [img_practice:protected] => [vid_source_id:protected] => [vid_running_time:protected] => [vid_intended_audience:protected] => [vid_acquisition_info:protected] => [vid_cost:protected] => [vid_producer:protected] => [vid_filename:protected] => [vid_filename_downloadable:protected] => [date_summary:protected] => [date_permission_requested:protected] => [date_permission_received:protected] => [date_review_needed:protected] => [date_received:protected] => 10/08/20 [date_completed:protected] => 10/08/20 [date_billed:protected] => [date_modified:protected] => 10/08/20 [collBokExports:protected] => [lastBokExportCriteria:BaseElcoshItem:private] => [alreadyInSave:protected] => [alreadyInValidation:protected] => [validationFailures:protected] => Array ( ) [_new:BaseObject:private] => [_deleted:BaseObject:private] => [modifiedColumns:protected] => Array ( ) ) ) [4] => Search_Result Object ( [title] => Toolbox Talk: Suicide Prevention [image] => /record/images/notavailable-p.png [blurb] => The CPWR Toolbox Talk on Suicide Prevention addresses the prevalence of suicide among construction workers. The resource includes a brief case example... [category] => Array ( [0] => 13 [1] => 20 [2] => 23 [3] => 40 [4] => 44 [5] => 45 [6] => 46 [7] => 47 [8] => 48 [9] => 49 [10] => 50 [11] => 51 [12] => 52 [13] => 53 [14] => 54 [15] => 55 [16] => 56 [17] => 57 [18] => 58 [19] => 59 [20] => 60 [21] => 61 [22] => 64 [23] => 65 [24] => 66 [25] => 67 [26] => 68 [27] => 69 [28] => 70 [29] => 71 [30] => 72 [31] => 73 [32] => 74 [33] => 75 [34] => 76 [35] => 77 [36] => 63 [37] => 78 [38] => 79 [39] => 80 [40] => 81 [41] => 82 [42] => 62 [43] => 83 [44] => 84 [45] => 85 [46] => 86 [47] => 87 [48] => 88 [49] => 89 [50] => 91 [51] => 90 [52] => 92 [53] => 93 [54] => 94 [55] => 95 [56] => 100 ) [labels] => Array ( [0] => Drugs, Alcohol & Tobacco [1] => Work Environment [2] => Hazards [3] => Safety Culture [6] => Stress & Overtime [9] => Overexertion [10] => Ergonomic [12] => Acoustical Ceiling Carpenter [13] => Trades [14] => Asbestos/Insulator [16] => Boilermaker [18] => Bricklayer [20] => Cabinetmaker [22] => Carpenter [24] => Carpet Layer [26] => Cement Mason [28] => Commercial Diver [30] => Concrete Polisher [32] => Drywall Applicator Specialist [34] => Electrical Worker [36] => Elevator Constructor [38] => Flagger [40] => Glazier [42] => Hazardous Waste Cleanup [44] => HVAC [46] => Interior Systems Carpenter [48] => Laborer [50] => Landscaper [52] => Lather [54] => Lead Abatement Worker [56] => Maintenance Worker [58] => Millwright [60] => Operating Engineer [62] => Painter [64] => Paper Hanger [66] => PCC/Restoration [68] => Pile Driver [70] => Plasterer [72] => Plumber/Pipefitter [74] => Refractory Worker [76] => Reinforcing Ironworker [78] => Roofer/Waterproofer [80] => Scaffold Erector [82] => Sheetmetal Worker [84] => Sprinkler Fitter [86] => Stonemason [88] => Structural Ironworker [90] => Terrazzo Worker [92] => Tile Setter [94] => Truck Driver [96] => Welder [98] => Commercial & Institutional [99] => Jobsites [100] => Demolition [102] => Disasters [104] => Heavy & Highway [106] => Industrial [108] => LEED/Green Construction [110] => Renovations [112] => Residential [114] => Underground [116] => Toolbox Talks [117] => Documents [118] => Media & Documents ) [type] => Toolbox Talks [sub_category] => [url] => /document/4419/d001652/Toolbox%2BTalk%253A%2BSuicide%2BPrevention.html [item:protected] => DocumentRecord Object ( [records:protected] => Array ( ) [recordId:protected] => [searchWordClass:protected] => [searchWordPeerClass:protected] => [bok_record:protected] => [authors:protected] => [organizations:protected] => [collections:protected] => [categories:protected] => Array ( [13] => Category Object ( [languages:protected] => [bok_resources:protected] => [bok_topics:protected] => [bok_keywords:protected] => [id:protected] => 13 [type:protected] => category [parent:protected] => 7 [label:protected] => Drugs, Alcohol & Tobacco [alreadyInSave:protected] => [alreadyInValidation:protected] => [validationFailures:protected] => Array ( ) [_new:BaseObject:private] => [_deleted:BaseObject:private] => [modifiedColumns:protected] => Array ( ) ) [20] => Category Object ( [languages:protected] => [bok_resources:protected] => [bok_topics:protected] => [bok_keywords:protected] => [id:protected] => 20 [type:protected] => category [parent:protected] => 7 [label:protected] => Safety Culture [alreadyInSave:protected] => [alreadyInValidation:protected] => [validationFailures:protected] => Array ( ) [_new:BaseObject:private] => [_deleted:BaseObject:private] => [modifiedColumns:protected] => Array ( ) ) [23] => Category Object ( [languages:protected] => [bok_resources:protected] => [bok_topics:protected] => [bok_keywords:protected] => [id:protected] => 23 [type:protected] => category [parent:protected] => 7 [label:protected] => Stress & Overtime [alreadyInSave:protected] => [alreadyInValidation:protected] => [validationFailures:protected] => Array ( ) [_new:BaseObject:private] => [_deleted:BaseObject:private] => [modifiedColumns:protected] => Array ( ) ) [40] => Category Object ( [languages:protected] => [bok_resources:protected] => [bok_topics:protected] => [bok_keywords:protected] => [id:protected] => 40 [type:protected] => category [parent:protected] => 9 [label:protected] => Overexertion [alreadyInSave:protected] => [alreadyInValidation:protected] => [validationFailures:protected] => Array ( ) [_new:BaseObject:private] => [_deleted:BaseObject:private] => [modifiedColumns:protected] => Array ( ) ) [44] => Category Object ( [languages:protected] => [bok_resources:protected] => [bok_topics:protected] => [bok_keywords:protected] => [id:protected] => 44 [type:protected] => category [parent:protected] => 2 [label:protected] => Acoustical Ceiling Carpenter [alreadyInSave:protected] => [alreadyInValidation:protected] => [validationFailures:protected] => Array ( ) [_new:BaseObject:private] => [_deleted:BaseObject:private] => [modifiedColumns:protected] => Array ( ) ) [45] => Category Object ( [languages:protected] => [bok_resources:protected] => [bok_topics:protected] => [bok_keywords:protected] => [id:protected] => 45 [type:protected] => category [parent:protected] => 2 [label:protected] => Asbestos/Insulator [alreadyInSave:protected] => [alreadyInValidation:protected] => [validationFailures:protected] => Array ( ) [_new:BaseObject:private] => [_deleted:BaseObject:private] => [modifiedColumns:protected] => Array ( ) ) [46] => Category Object ( [languages:protected] => [bok_resources:protected] => [bok_topics:protected] => [bok_keywords:protected] => [id:protected] => 46 [type:protected] => category [parent:protected] => 2 [label:protected] => Boilermaker [alreadyInSave:protected] => [alreadyInValidation:protected] => [validationFailures:protected] => Array ( ) [_new:BaseObject:private] => [_deleted:BaseObject:private] => [modifiedColumns:protected] => Array ( ) ) [47] => Category Object ( [languages:protected] => [bok_resources:protected] => [bok_topics:protected] => [bok_keywords:protected] => [id:protected] => 47 [type:protected] => category [parent:protected] => 2 [label:protected] => Bricklayer [alreadyInSave:protected] => [alreadyInValidation:protected] => [validationFailures:protected] => Array ( ) [_new:BaseObject:private] => [_deleted:BaseObject:private] => [modifiedColumns:protected] => Array ( ) ) [48] => Category Object ( [languages:protected] => [bok_resources:protected] => [bok_topics:protected] => [bok_keywords:protected] => [id:protected] => 48 [type:protected] => category [parent:protected] => 2 [label:protected] => Cabinetmaker [alreadyInSave:protected] => [alreadyInValidation:protected] => [validationFailures:protected] => Array ( ) [_new:BaseObject:private] => [_deleted:BaseObject:private] => [modifiedColumns:protected] => Array ( ) ) [49] => Category Object ( [languages:protected] => [bok_resources:protected] => [bok_topics:protected] => [bok_keywords:protected] => [id:protected] => 49 [type:protected] => category [parent:protected] => 2 [label:protected] => Carpenter [alreadyInSave:protected] => [alreadyInValidation:protected] => [validationFailures:protected] => Array ( ) [_new:BaseObject:private] => [_deleted:BaseObject:private] => [modifiedColumns:protected] => Array ( ) ) [50] => Category Object ( [languages:protected] => [bok_resources:protected] => [bok_topics:protected] => [bok_keywords:protected] => [id:protected] => 50 [type:protected] => category [parent:protected] => 2 [label:protected] => Carpet Layer [alreadyInSave:protected] => [alreadyInValidation:protected] => [validationFailures:protected] => Array ( ) [_new:BaseObject:private] => [_deleted:BaseObject:private] => [modifiedColumns:protected] => Array ( ) ) [51] => Category Object ( [languages:protected] => [bok_resources:protected] => [bok_topics:protected] => [bok_keywords:protected] => [id:protected] => 51 [type:protected] => category [parent:protected] => 2 [label:protected] => Cement Mason [alreadyInSave:protected] => [alreadyInValidation:protected] => [validationFailures:protected] => Array ( ) [_new:BaseObject:private] => [_deleted:BaseObject:private] => [modifiedColumns:protected] => Array ( ) ) [52] => Category Object ( [languages:protected] => [bok_resources:protected] => [bok_topics:protected] => [bok_keywords:protected] => [id:protected] => 52 [type:protected] => category [parent:protected] => 2 [label:protected] => Commercial Diver [alreadyInSave:protected] => [alreadyInValidation:protected] => [validationFailures:protected] => Array ( ) [_new:BaseObject:private] => [_deleted:BaseObject:private] => [modifiedColumns:protected] => Array ( ) ) [53] => Category Object ( [languages:protected] => [bok_resources:protected] => [bok_topics:protected] => [bok_keywords:protected] => [id:protected] => 53 [type:protected] => category [parent:protected] => 2 [label:protected] => Concrete Polisher [alreadyInSave:protected] => [alreadyInValidation:protected] => [validationFailures:protected] => Array ( ) [_new:BaseObject:private] => [_deleted:BaseObject:private] => [modifiedColumns:protected] => Array ( ) ) [54] => Category Object ( [languages:protected] => [bok_resources:protected] => [bok_topics:protected] => [bok_keywords:protected] => [id:protected] => 54 [type:protected] => category [parent:protected] => 2 [label:protected] => Drywall Applicator Specialist [alreadyInSave:protected] => [alreadyInValidation:protected] => [validationFailures:protected] => Array ( ) [_new:BaseObject:private] => [_deleted:BaseObject:private] => [modifiedColumns:protected] => Array ( ) ) [55] => Category Object ( [languages:protected] => [bok_resources:protected] => [bok_topics:protected] => [bok_keywords:protected] => [id:protected] => 55 [type:protected] => category [parent:protected] => 2 [label:protected] => Electrical Worker [alreadyInSave:protected] => [alreadyInValidation:protected] => [validationFailures:protected] => Array ( ) [_new:BaseObject:private] => [_deleted:BaseObject:private] => [modifiedColumns:protected] => Array ( ) ) [56] => Category Object ( [languages:protected] => [bok_resources:protected] => [bok_topics:protected] => [bok_keywords:protected] => [id:protected] => 56 [type:protected] => category [parent:protected] => 2 [label:protected] => Elevator Constructor [alreadyInSave:protected] => [alreadyInValidation:protected] => [validationFailures:protected] => Array ( ) [_new:BaseObject:private] => [_deleted:BaseObject:private] => [modifiedColumns:protected] => Array ( ) ) [57] => Category Object ( [languages:protected] => [bok_resources:protected] => [bok_topics:protected] => [bok_keywords:protected] => [id:protected] => 57 [type:protected] => category [parent:protected] => 2 [label:protected] => Flagger [alreadyInSave:protected] => [alreadyInValidation:protected] => [validationFailures:protected] => Array ( ) [_new:BaseObject:private] => [_deleted:BaseObject:private] => [modifiedColumns:protected] => Array ( ) ) [58] => Category Object ( [languages:protected] => [bok_resources:protected] => [bok_topics:protected] => [bok_keywords:protected] => [id:protected] => 58 [type:protected] => category [parent:protected] => 2 [label:protected] => Glazier [alreadyInSave:protected] => [alreadyInValidation:protected] => [validationFailures:protected] => Array ( ) [_new:BaseObject:private] => [_deleted:BaseObject:private] => [modifiedColumns:protected] => Array ( ) ) [59] => Category Object ( [languages:protected] => [bok_resources:protected] => [bok_topics:protected] => [bok_keywords:protected] => [id:protected] => 59 [type:protected] => category [parent:protected] => 2 [label:protected] => Hazardous Waste Cleanup [alreadyInSave:protected] => [alreadyInValidation:protected] => [validationFailures:protected] => Array ( ) [_new:BaseObject:private] => [_deleted:BaseObject:private] => [modifiedColumns:protected] => Array ( ) ) [60] => Category Object ( [languages:protected] => [bok_resources:protected] => [bok_topics:protected] => [bok_keywords:protected] => [id:protected] => 60 [type:protected] => category [parent:protected] => 2 [label:protected] => HVAC [alreadyInSave:protected] => [alreadyInValidation:protected] => [validationFailures:protected] => Array ( ) [_new:BaseObject:private] => [_deleted:BaseObject:private] => [modifiedColumns:protected] => Array ( ) ) [61] => Category Object ( [languages:protected] => [bok_resources:protected] => [bok_topics:protected] => [bok_keywords:protected] => [id:protected] => 61 [type:protected] => category [parent:protected] => 2 [label:protected] => Interior Systems Carpenter [alreadyInSave:protected] => [alreadyInValidation:protected] => [validationFailures:protected] => Array ( ) [_new:BaseObject:private] => [_deleted:BaseObject:private] => [modifiedColumns:protected] => Array ( ) ) [64] => Category Object ( [languages:protected] => [bok_resources:protected] => [bok_topics:protected] => [bok_keywords:protected] => [id:protected] => 64 [type:protected] => category [parent:protected] => 2 [label:protected] => Laborer [alreadyInSave:protected] => [alreadyInValidation:protected] => [validationFailures:protected] => Array ( ) [_new:BaseObject:private] => [_deleted:BaseObject:private] => [modifiedColumns:protected] => Array ( ) ) [65] => Category Object ( [languages:protected] => [bok_resources:protected] => [bok_topics:protected] => [bok_keywords:protected] => [id:protected] => 65 [type:protected] => category [parent:protected] => 2 [label:protected] => Landscaper [alreadyInSave:protected] => [alreadyInValidation:protected] => [validationFailures:protected] => Array ( ) [_new:BaseObject:private] => [_deleted:BaseObject:private] => [modifiedColumns:protected] => Array ( ) ) [66] => Category Object ( [languages:protected] => [bok_resources:protected] => [bok_topics:protected] => [bok_keywords:protected] => [id:protected] => 66 [type:protected] => category [parent:protected] => 2 [label:protected] => Lather [alreadyInSave:protected] => [alreadyInValidation:protected] => [validationFailures:protected] => Array ( ) [_new:BaseObject:private] => [_deleted:BaseObject:private] => [modifiedColumns:protected] => Array ( ) ) [67] => Category Object ( [languages:protected] => [bok_resources:protected] => [bok_topics:protected] => [bok_keywords:protected] => [id:protected] => 67 [type:protected] => category [parent:protected] => 2 [label:protected] => Lead Abatement Worker [alreadyInSave:protected] => [alreadyInValidation:protected] => [validationFailures:protected] => Array ( ) [_new:BaseObject:private] => [_deleted:BaseObject:private] => [modifiedColumns:protected] => Array ( ) ) [68] => Category Object ( [languages:protected] => [bok_resources:protected] => [bok_topics:protected] => [bok_keywords:protected] => [id:protected] => 68 [type:protected] => category [parent:protected] => 2 [label:protected] => Maintenance Worker [alreadyInSave:protected] => [alreadyInValidation:protected] => [validationFailures:protected] => Array ( ) [_new:BaseObject:private] => [_deleted:BaseObject:private] => [modifiedColumns:protected] => Array ( ) ) [69] => Category Object ( [languages:protected] => [bok_resources:protected] => [bok_topics:protected] => [bok_keywords:protected] => [id:protected] => 69 [type:protected] => category [parent:protected] => 2 [label:protected] => Millwright [alreadyInSave:protected] => [alreadyInValidation:protected] => [validationFailures:protected] => Array ( ) [_new:BaseObject:private] => [_deleted:BaseObject:private] => [modifiedColumns:protected] => Array ( ) ) [70] => Category Object ( [languages:protected] => [bok_resources:protected] => [bok_topics:protected] => [bok_keywords:protected] => [id:protected] => 70 [type:protected] => category [parent:protected] => 2 [label:protected] => Operating Engineer [alreadyInSave:protected] => [alreadyInValidation:protected] => [validationFailures:protected] => Array ( ) [_new:BaseObject:private] => [_deleted:BaseObject:private] => [modifiedColumns:protected] => Array ( ) ) [71] => Category Object ( [languages:protected] => [bok_resources:protected] => [bok_topics:protected] => [bok_keywords:protected] => [id:protected] => 71 [type:protected] => category [parent:protected] => 2 [label:protected] => Painter [alreadyInSave:protected] => [alreadyInValidation:protected] => [validationFailures:protected] => Array ( ) [_new:BaseObject:private] => [_deleted:BaseObject:private] => [modifiedColumns:protected] => Array ( ) ) [72] => Category Object ( [languages:protected] => [bok_resources:protected] => [bok_topics:protected] => [bok_keywords:protected] => [id:protected] => 72 [type:protected] => category [parent:protected] => 2 [label:protected] => Paper Hanger [alreadyInSave:protected] => [alreadyInValidation:protected] => [validationFailures:protected] => Array ( ) [_new:BaseObject:private] => [_deleted:BaseObject:private] => [modifiedColumns:protected] => Array ( ) ) [73] => Category Object ( [languages:protected] => [bok_resources:protected] => [bok_topics:protected] => [bok_keywords:protected] => [id:protected] => 73 [type:protected] => category [parent:protected] => 2 [label:protected] => PCC/Restoration [alreadyInSave:protected] => [alreadyInValidation:protected] => [validationFailures:protected] => Array ( ) [_new:BaseObject:private] => [_deleted:BaseObject:private] => [modifiedColumns:protected] => Array ( ) ) [74] => Category Object ( [languages:protected] => [bok_resources:protected] => [bok_topics:protected] => [bok_keywords:protected] => [id:protected] => 74 [type:protected] => category [parent:protected] => 2 [label:protected] => Pile Driver [alreadyInSave:protected] => [alreadyInValidation:protected] => [validationFailures:protected] => Array ( ) [_new:BaseObject:private] => [_deleted:BaseObject:private] => [modifiedColumns:protected] => Array ( ) ) [75] => Category Object ( [languages:protected] => [bok_resources:protected] => [bok_topics:protected] => [bok_keywords:protected] => [id:protected] => 75 [type:protected] => category [parent:protected] => 2 [label:protected] => Plasterer [alreadyInSave:protected] => [alreadyInValidation:protected] => [validationFailures:protected] => Array ( ) [_new:BaseObject:private] => [_deleted:BaseObject:private] => [modifiedColumns:protected] => Array ( ) ) [76] => Category Object ( [languages:protected] => [bok_resources:protected] => [bok_topics:protected] => [bok_keywords:protected] => [id:protected] => 76 [type:protected] => category [parent:protected] => 2 [label:protected] => Plumber/Pipefitter [alreadyInSave:protected] => [alreadyInValidation:protected] => [validationFailures:protected] => Array ( ) [_new:BaseObject:private] => [_deleted:BaseObject:private] => [modifiedColumns:protected] => Array ( ) ) [77] => Category Object ( [languages:protected] => [bok_resources:protected] => [bok_topics:protected] => [bok_keywords:protected] => [id:protected] => 77 [type:protected] => category [parent:protected] => 2 [label:protected] => Refractory Worker [alreadyInSave:protected] => [alreadyInValidation:protected] => [validationFailures:protected] => Array ( ) [_new:BaseObject:private] => [_deleted:BaseObject:private] => [modifiedColumns:protected] => Array ( ) ) [63] => Category Object ( [languages:protected] => [bok_resources:protected] => [bok_topics:protected] => [bok_keywords:protected] => [id:protected] => 63 [type:protected] => category [parent:protected] => 2 [label:protected] => Reinforcing Ironworker [alreadyInSave:protected] => [alreadyInValidation:protected] => [validationFailures:protected] => Array ( ) [_new:BaseObject:private] => [_deleted:BaseObject:private] => [modifiedColumns:protected] => Array ( ) ) [78] => Category Object ( [languages:protected] => [bok_resources:protected] => [bok_topics:protected] => [bok_keywords:protected] => [id:protected] => 78 [type:protected] => category [parent:protected] => 2 [label:protected] => Roofer/Waterproofer [alreadyInSave:protected] => [alreadyInValidation:protected] => [validationFailures:protected] => Array ( ) [_new:BaseObject:private] => [_deleted:BaseObject:private] => [modifiedColumns:protected] => Array ( ) ) [79] => Category Object ( [languages:protected] => [bok_resources:protected] => [bok_topics:protected] => [bok_keywords:protected] => [id:protected] => 79 [type:protected] => category [parent:protected] => 2 [label:protected] => Scaffold Erector [alreadyInSave:protected] => [alreadyInValidation:protected] => [validationFailures:protected] => Array ( ) [_new:BaseObject:private] => [_deleted:BaseObject:private] => [modifiedColumns:protected] => Array ( ) ) [80] => Category Object ( [languages:protected] => [bok_resources:protected] => [bok_topics:protected] => [bok_keywords:protected] => [id:protected] => 80 [type:protected] => category [parent:protected] => 2 [label:protected] => Sheetmetal Worker [alreadyInSave:protected] => [alreadyInValidation:protected] => [validationFailures:protected] => Array ( ) [_new:BaseObject:private] => [_deleted:BaseObject:private] => [modifiedColumns:protected] => Array ( ) ) [81] => Category Object ( [languages:protected] => [bok_resources:protected] => [bok_topics:protected] => [bok_keywords:protected] => [id:protected] => 81 [type:protected] => category [parent:protected] => 2 [label:protected] => Sprinkler Fitter [alreadyInSave:protected] => [alreadyInValidation:protected] => [validationFailures:protected] => Array ( ) [_new:BaseObject:private] => [_deleted:BaseObject:private] => [modifiedColumns:protected] => Array ( ) ) [82] => Category Object ( [languages:protected] => [bok_resources:protected] => [bok_topics:protected] => [bok_keywords:protected] => [id:protected] => 82 [type:protected] => category [parent:protected] => 2 [label:protected] => Stonemason [alreadyInSave:protected] => [alreadyInValidation:protected] => [validationFailures:protected] => Array ( ) [_new:BaseObject:private] => [_deleted:BaseObject:private] => [modifiedColumns:protected] => Array ( ) ) [62] => Category Object ( [languages:protected] => [bok_resources:protected] => [bok_topics:protected] => [bok_keywords:protected] => [id:protected] => 62 [type:protected] => category [parent:protected] => 2 [label:protected] => Structural Ironworker [alreadyInSave:protected] => [alreadyInValidation:protected] => [validationFailures:protected] => Array ( ) [_new:BaseObject:private] => [_deleted:BaseObject:private] => [modifiedColumns:protected] => Array ( ) ) [83] => Category Object ( [languages:protected] => [bok_resources:protected] => [bok_topics:protected] => [bok_keywords:protected] => [id:protected] => 83 [type:protected] => category [parent:protected] => 2 [label:protected] => Terrazzo Worker [alreadyInSave:protected] => [alreadyInValidation:protected] => [validationFailures:protected] => Array ( ) [_new:BaseObject:private] => [_deleted:BaseObject:private] => [modifiedColumns:protected] => Array ( ) ) [84] => Category Object ( [languages:protected] => [bok_resources:protected] => [bok_topics:protected] => [bok_keywords:protected] => [id:protected] => 84 [type:protected] => category [parent:protected] => 2 [label:protected] => Tile Setter [alreadyInSave:protected] => [alreadyInValidation:protected] => [validationFailures:protected] => Array ( ) [_new:BaseObject:private] => [_deleted:BaseObject:private] => [modifiedColumns:protected] => Array ( ) ) [85] => Category Object ( [languages:protected] => [bok_resources:protected] => [bok_topics:protected] => [bok_keywords:protected] => [id:protected] => 85 [type:protected] => category [parent:protected] => 2 [label:protected] => Truck Driver [alreadyInSave:protected] => [alreadyInValidation:protected] => [validationFailures:protected] => Array ( ) [_new:BaseObject:private] => [_deleted:BaseObject:private] => [modifiedColumns:protected] => Array ( ) ) [86] => Category Object ( [languages:protected] => [bok_resources:protected] => [bok_topics:protected] => [bok_keywords:protected] => [id:protected] => 86 [type:protected] => category [parent:protected] => 2 [label:protected] => Welder [alreadyInSave:protected] => [alreadyInValidation:protected] => [validationFailures:protected] => Array ( ) [_new:BaseObject:private] => [_deleted:BaseObject:private] => [modifiedColumns:protected] => Array ( ) ) [87] => Category Object ( [languages:protected] => [bok_resources:protected] => [bok_topics:protected] => [bok_keywords:protected] => [id:protected] => 87 [type:protected] => category [parent:protected] => 3 [label:protected] => Commercial & Institutional [alreadyInSave:protected] => [alreadyInValidation:protected] => [validationFailures:protected] => Array ( ) [_new:BaseObject:private] => [_deleted:BaseObject:private] => [modifiedColumns:protected] => Array ( ) ) [88] => Category Object ( [languages:protected] => [bok_resources:protected] => [bok_topics:protected] => [bok_keywords:protected] => [id:protected] => 88 [type:protected] => category [parent:protected] => 3 [label:protected] => Demolition [alreadyInSave:protected] => [alreadyInValidation:protected] => [validationFailures:protected] => Array ( ) [_new:BaseObject:private] => [_deleted:BaseObject:private] => [modifiedColumns:protected] => Array ( ) ) [89] => Category Object ( [languages:protected] => [bok_resources:protected] => [bok_topics:protected] => [bok_keywords:protected] => [id:protected] => 89 [type:protected] => category [parent:protected] => 3 [label:protected] => Disasters [alreadyInSave:protected] => [alreadyInValidation:protected] => [validationFailures:protected] => Array ( ) [_new:BaseObject:private] => [_deleted:BaseObject:private] => [modifiedColumns:protected] => Array ( ) ) [91] => Category Object ( [languages:protected] => [bok_resources:protected] => [bok_topics:protected] => [bok_keywords:protected] => [id:protected] => 91 [type:protected] => category [parent:protected] => 3 [label:protected] => Heavy & Highway [alreadyInSave:protected] => [alreadyInValidation:protected] => [validationFailures:protected] => Array ( ) [_new:BaseObject:private] => [_deleted:BaseObject:private] => [modifiedColumns:protected] => Array ( ) ) [90] => Category Object ( [languages:protected] => [bok_resources:protected] => [bok_topics:protected] => [bok_keywords:protected] => [id:protected] => 90 [type:protected] => category [parent:protected] => 3 [label:protected] => Industrial [alreadyInSave:protected] => [alreadyInValidation:protected] => [validationFailures:protected] => Array ( ) [_new:BaseObject:private] => [_deleted:BaseObject:private] => [modifiedColumns:protected] => Array ( ) ) [92] => Category Object ( [languages:protected] => [bok_resources:protected] => [bok_topics:protected] => [bok_keywords:protected] => [id:protected] => 92 [type:protected] => category [parent:protected] => 3 [label:protected] => LEED/Green Construction [alreadyInSave:protected] => [alreadyInValidation:protected] => [validationFailures:protected] => Array ( ) [_new:BaseObject:private] => [_deleted:BaseObject:private] => [modifiedColumns:protected] => Array ( ) ) [93] => Category Object ( [languages:protected] => [bok_resources:protected] => [bok_topics:protected] => [bok_keywords:protected] => [id:protected] => 93 [type:protected] => category [parent:protected] => 3 [label:protected] => Renovations [alreadyInSave:protected] => [alreadyInValidation:protected] => [validationFailures:protected] => Array ( ) [_new:BaseObject:private] => [_deleted:BaseObject:private] => [modifiedColumns:protected] => Array ( ) ) [94] => Category Object ( [languages:protected] => [bok_resources:protected] => [bok_topics:protected] => [bok_keywords:protected] => [id:protected] => 94 [type:protected] => category [parent:protected] => 3 [label:protected] => Residential [alreadyInSave:protected] => [alreadyInValidation:protected] => [validationFailures:protected] => Array ( ) [_new:BaseObject:private] => [_deleted:BaseObject:private] => [modifiedColumns:protected] => Array ( ) ) [95] => Category Object ( [languages:protected] => [bok_resources:protected] => [bok_topics:protected] => [bok_keywords:protected] => [id:protected] => 95 [type:protected] => category [parent:protected] => 3 [label:protected] => Underground [alreadyInSave:protected] => [alreadyInValidation:protected] => [validationFailures:protected] => Array ( ) [_new:BaseObject:private] => [_deleted:BaseObject:private] => [modifiedColumns:protected] => Array ( ) ) [100] => Category Object ( [languages:protected] => [bok_resources:protected] => [bok_topics:protected] => [bok_keywords:protected] => [id:protected] => 100 [type:protected] => category [parent:protected] => 6 [label:protected] => Toolbox Talks [alreadyInSave:protected] => [alreadyInValidation:protected] => [validationFailures:protected] => Array ( ) [_new:BaseObject:private] => [_deleted:BaseObject:private] => [modifiedColumns:protected] => Array ( ) ) ) [categories_initialized:protected] => 1 [mapped_items:protected] => [content:protected] => [files:protected] => [language:protected] => Language Object ( [id:protected] => 1 [code:protected] => en [name:protected] => English [alreadyInSave:protected] => [alreadyInValidation:protected] => [validationFailures:protected] => Array ( ) [_new:BaseObject:private] => [_deleted:BaseObject:private] => [modifiedColumns:protected] => Array ( ) ) [old_record:protected] => [id:protected] => 4419 [old_id:protected] => [elcosh_id:protected] => d001652 [type:protected] => document [display_type:protected] => HTML only (and links) [user_id:protected] => 0 [language_id:protected] => 1 [tagging_id:protected] => Valeria Contreras [priority_id:protected] => 1 [title:protected] => Toolbox Talk: Suicide Prevention [total_pages:protected] => 1 [billed_pages:protected] => 1 [publication_number:protected] => [part_of:protected] => [keywords:protected] => suicide, suicide prevention, mental health, stress, depression, exhaustion, burnout, safety, support, emotional support, health [comments:protected] => [summary:protected] =>The CPWR Toolbox Talk on Suicide Prevention addresses the prevalence of suicide among construction workers. The resource includes a brief case example, steps to prevent a related injury or illness, and questions for discussion. It includes an image that illustrates the hazard, which can be posted in a central location as a reminder of steps to work safely.
Available in English and Spanish. [transition_comments:protected] => [external_link:protected] => [consol_link:protected] => [more_like_this:protected] => [permission_given_by:protected] => [published:protected] => T [billable:protected] => F [img_name:protected] => [img_ext:protected] => [img_width:protected] => [img_height:protected] => [img_credit:protected] => [img_practice:protected] => [vid_source_id:protected] => [vid_running_time:protected] => [vid_intended_audience:protected] => [vid_acquisition_info:protected] => [vid_cost:protected] => [vid_producer:protected] => [vid_filename:protected] => [vid_filename_downloadable:protected] => [date_summary:protected] => [date_permission_requested:protected] => [date_permission_received:protected] => [date_review_needed:protected] => [date_received:protected] => 10/08/20 [date_completed:protected] => 10/08/20 [date_billed:protected] => [date_modified:protected] => 05/19/23 [collBokExports:protected] => [lastBokExportCriteria:BaseElcoshItem:private] => [alreadyInSave:protected] => [alreadyInValidation:protected] => [validationFailures:protected] => Array ( ) [_new:BaseObject:private] => [_deleted:BaseObject:private] => [modifiedColumns:protected] => Array ( ) ) ) ) [new_images] => Array ( [0] => Search_Result Object ( [title] => Toolbox talk - crew view [image] => /record/images/4005-p.jpg [blurb] => Photo of crew listening to a toolbox safety talk before starting work.... [category] => Array ( [0] => 97 [1] => 20 [2] => 47 [3] => 49 [4] => 51 [5] => 55 [6] => 61 [7] => 64 [8] => 71 [9] => 75 [10] => 63 [11] => 79 [12] => 62 [13] => 87 [14] => 88 [15] => 91 [16] => 90 [17] => 93 [18] => 94 [19] => 95 ) [labels] => Array ( [0] => Images [1] => Media [2] => Media & Documents [3] => Safety Culture [4] => Work Environment [5] => Hazards [6] => Bricklayer [7] => Trades [8] => Carpenter [10] => Cement Mason [12] => Electrical Worker [14] => Interior Systems Carpenter [16] => Laborer [18] => Painter [20] => Plasterer [22] => Reinforcing Ironworker [24] => Scaffold Erector [26] => Structural Ironworker [28] => Commercial & Institutional [29] => Jobsites [30] => Demolition [32] => Heavy & Highway [34] => Industrial [36] => Renovations [38] => Residential [40] => Underground ) [type] => Images [sub_category] => [url] => /image/4005/i002692/Toolbox%2Btalk%2B-%2Bcrew%2Bview.html [item:protected] => ImageRecord Object ( [records:protected] => Array ( ) [recordId:protected] => [searchWordClass:protected] => [searchWordPeerClass:protected] => [bok_record:protected] => [authors:protected] => [organizations:protected] => [collections:protected] => [categories:protected] => Array ( [97] => Category Object ( [languages:protected] => [bok_resources:protected] => [bok_topics:protected] => [bok_keywords:protected] => [id:protected] => 97 [type:protected] => category [parent:protected] => 5 [label:protected] => Images [alreadyInSave:protected] => [alreadyInValidation:protected] => [validationFailures:protected] => Array ( ) [_new:BaseObject:private] => [_deleted:BaseObject:private] => [modifiedColumns:protected] => Array ( ) ) [20] => Category Object ( [languages:protected] => [bok_resources:protected] => [bok_topics:protected] => [bok_keywords:protected] => [id:protected] => 20 [type:protected] => category [parent:protected] => 7 [label:protected] => Safety Culture [alreadyInSave:protected] => [alreadyInValidation:protected] => [validationFailures:protected] => Array ( ) [_new:BaseObject:private] => [_deleted:BaseObject:private] => [modifiedColumns:protected] => Array ( ) ) [47] => Category Object ( [languages:protected] => [bok_resources:protected] => [bok_topics:protected] => [bok_keywords:protected] => [id:protected] => 47 [type:protected] => category [parent:protected] => 2 [label:protected] => Bricklayer [alreadyInSave:protected] => [alreadyInValidation:protected] => [validationFailures:protected] => Array ( ) [_new:BaseObject:private] => [_deleted:BaseObject:private] => [modifiedColumns:protected] => Array ( ) ) [49] => Category Object ( [languages:protected] => [bok_resources:protected] => [bok_topics:protected] => [bok_keywords:protected] => [id:protected] => 49 [type:protected] => category [parent:protected] => 2 [label:protected] => Carpenter [alreadyInSave:protected] => [alreadyInValidation:protected] => [validationFailures:protected] => Array ( ) [_new:BaseObject:private] => [_deleted:BaseObject:private] => [modifiedColumns:protected] => Array ( ) ) [51] => Category Object ( [languages:protected] => [bok_resources:protected] => [bok_topics:protected] => [bok_keywords:protected] => [id:protected] => 51 [type:protected] => category [parent:protected] => 2 [label:protected] => Cement Mason [alreadyInSave:protected] => [alreadyInValidation:protected] => [validationFailures:protected] => Array ( ) [_new:BaseObject:private] => [_deleted:BaseObject:private] => [modifiedColumns:protected] => Array ( ) ) [55] => Category Object ( [languages:protected] => [bok_resources:protected] => [bok_topics:protected] => [bok_keywords:protected] => [id:protected] => 55 [type:protected] => category [parent:protected] => 2 [label:protected] => Electrical Worker [alreadyInSave:protected] => [alreadyInValidation:protected] => [validationFailures:protected] => Array ( ) [_new:BaseObject:private] => [_deleted:BaseObject:private] => [modifiedColumns:protected] => Array ( ) ) [61] => Category Object ( [languages:protected] => [bok_resources:protected] => [bok_topics:protected] => [bok_keywords:protected] => [id:protected] => 61 [type:protected] => category [parent:protected] => 2 [label:protected] => Interior Systems Carpenter [alreadyInSave:protected] => [alreadyInValidation:protected] => [validationFailures:protected] => Array ( ) [_new:BaseObject:private] => [_deleted:BaseObject:private] => [modifiedColumns:protected] => Array ( ) ) [64] => Category Object ( [languages:protected] => [bok_resources:protected] => [bok_topics:protected] => [bok_keywords:protected] => [id:protected] => 64 [type:protected] => category [parent:protected] => 2 [label:protected] => Laborer [alreadyInSave:protected] => [alreadyInValidation:protected] => [validationFailures:protected] => Array ( ) [_new:BaseObject:private] => [_deleted:BaseObject:private] => [modifiedColumns:protected] => Array ( ) ) [71] => Category Object ( [languages:protected] => [bok_resources:protected] => [bok_topics:protected] => [bok_keywords:protected] => [id:protected] => 71 [type:protected] => category [parent:protected] => 2 [label:protected] => Painter [alreadyInSave:protected] => [alreadyInValidation:protected] => [validationFailures:protected] => Array ( ) [_new:BaseObject:private] => [_deleted:BaseObject:private] => [modifiedColumns:protected] => Array ( ) ) [75] => Category Object ( [languages:protected] => [bok_resources:protected] => [bok_topics:protected] => [bok_keywords:protected] => [id:protected] => 75 [type:protected] => category [parent:protected] => 2 [label:protected] => Plasterer [alreadyInSave:protected] => [alreadyInValidation:protected] => [validationFailures:protected] => Array ( ) [_new:BaseObject:private] => [_deleted:BaseObject:private] => [modifiedColumns:protected] => Array ( ) ) [63] => Category Object ( [languages:protected] => [bok_resources:protected] => [bok_topics:protected] => [bok_keywords:protected] => [id:protected] => 63 [type:protected] => category [parent:protected] => 2 [label:protected] => Reinforcing Ironworker [alreadyInSave:protected] => [alreadyInValidation:protected] => [validationFailures:protected] => Array ( ) [_new:BaseObject:private] => [_deleted:BaseObject:private] => [modifiedColumns:protected] => Array ( ) ) [79] => Category Object ( [languages:protected] => [bok_resources:protected] => [bok_topics:protected] => [bok_keywords:protected] => [id:protected] => 79 [type:protected] => category [parent:protected] => 2 [label:protected] => Scaffold Erector [alreadyInSave:protected] => [alreadyInValidation:protected] => [validationFailures:protected] => Array ( ) [_new:BaseObject:private] => [_deleted:BaseObject:private] => [modifiedColumns:protected] => Array ( ) ) [62] => Category Object ( [languages:protected] => [bok_resources:protected] => [bok_topics:protected] => [bok_keywords:protected] => [id:protected] => 62 [type:protected] => category [parent:protected] => 2 [label:protected] => Structural Ironworker [alreadyInSave:protected] => [alreadyInValidation:protected] => [validationFailures:protected] => Array ( ) [_new:BaseObject:private] => [_deleted:BaseObject:private] => [modifiedColumns:protected] => Array ( ) ) [87] => Category Object ( [languages:protected] => [bok_resources:protected] => [bok_topics:protected] => [bok_keywords:protected] => [id:protected] => 87 [type:protected] => category [parent:protected] => 3 [label:protected] => Commercial & Institutional [alreadyInSave:protected] => [alreadyInValidation:protected] => [validationFailures:protected] => Array ( ) [_new:BaseObject:private] => [_deleted:BaseObject:private] => [modifiedColumns:protected] => Array ( ) ) [88] => Category Object ( [languages:protected] => [bok_resources:protected] => [bok_topics:protected] => [bok_keywords:protected] => [id:protected] => 88 [type:protected] => category [parent:protected] => 3 [label:protected] => Demolition [alreadyInSave:protected] => [alreadyInValidation:protected] => [validationFailures:protected] => Array ( ) [_new:BaseObject:private] => [_deleted:BaseObject:private] => [modifiedColumns:protected] => Array ( ) ) [91] => Category Object ( [languages:protected] => [bok_resources:protected] => [bok_topics:protected] => [bok_keywords:protected] => [id:protected] => 91 [type:protected] => category [parent:protected] => 3 [label:protected] => Heavy & Highway [alreadyInSave:protected] => [alreadyInValidation:protected] => [validationFailures:protected] => Array ( ) [_new:BaseObject:private] => [_deleted:BaseObject:private] => [modifiedColumns:protected] => Array ( ) ) [90] => Category Object ( [languages:protected] => [bok_resources:protected] => [bok_topics:protected] => [bok_keywords:protected] => [id:protected] => 90 [type:protected] => category [parent:protected] => 3 [label:protected] => Industrial [alreadyInSave:protected] => [alreadyInValidation:protected] => [validationFailures:protected] => Array ( ) [_new:BaseObject:private] => [_deleted:BaseObject:private] => [modifiedColumns:protected] => Array ( ) ) [93] => Category Object ( [languages:protected] => [bok_resources:protected] => [bok_topics:protected] => [bok_keywords:protected] => [id:protected] => 93 [type:protected] => category [parent:protected] => 3 [label:protected] => Renovations [alreadyInSave:protected] => [alreadyInValidation:protected] => [validationFailures:protected] => Array ( ) [_new:BaseObject:private] => [_deleted:BaseObject:private] => [modifiedColumns:protected] => Array ( ) ) [94] => Category Object ( [languages:protected] => [bok_resources:protected] => [bok_topics:protected] => [bok_keywords:protected] => [id:protected] => 94 [type:protected] => category [parent:protected] => 3 [label:protected] => Residential [alreadyInSave:protected] => [alreadyInValidation:protected] => [validationFailures:protected] => Array ( ) [_new:BaseObject:private] => [_deleted:BaseObject:private] => [modifiedColumns:protected] => Array ( ) ) [95] => Category Object ( [languages:protected] => [bok_resources:protected] => [bok_topics:protected] => [bok_keywords:protected] => [id:protected] => 95 [type:protected] => category [parent:protected] => 3 [label:protected] => Underground [alreadyInSave:protected] => [alreadyInValidation:protected] => [validationFailures:protected] => Array ( ) [_new:BaseObject:private] => [_deleted:BaseObject:private] => [modifiedColumns:protected] => Array ( ) ) ) [categories_initialized:protected] => 1 [mapped_items:protected] => [content:protected] => [files:protected] => [language:protected] => Language Object ( [id:protected] => 1 [code:protected] => en [name:protected] => English [alreadyInSave:protected] => [alreadyInValidation:protected] => [validationFailures:protected] => Array ( ) [_new:BaseObject:private] => [_deleted:BaseObject:private] => [modifiedColumns:protected] => Array ( ) ) [old_record:protected] => [id:protected] => 4005 [old_id:protected] => [elcosh_id:protected] => i002692 [type:protected] => image [display_type:protected] => Image [user_id:protected] => 0 [language_id:protected] => 1 [tagging_id:protected] => Bruce Lippy [priority_id:protected] => 1 [title:protected] => Toolbox talk - crew view [total_pages:protected] => 0 [billed_pages:protected] => 0 [publication_number:protected] => [part_of:protected] => [keywords:protected] => toolbox talk, tailgate talk, safety talk, Spanish [comments:protected] => [summary:protected] => Photo of crew listening to a toolbox safety talk before starting work. [transition_comments:protected] => [external_link:protected] => [consol_link:protected] => http://www.cpwrconstructionsolutions.org/electrical/solution/662/worker-training.html [more_like_this:protected] => i002691,d001269, c000079, d001285 [permission_given_by:protected] => [published:protected] => T [billable:protected] => F [img_name:protected] => [img_ext:protected] => jpg [img_width:protected] => [img_height:protected] => [img_credit:protected] => Morgan Zavertnik and Hoar Construction [img_practice:protected] => good [vid_source_id:protected] => [vid_running_time:protected] => [vid_intended_audience:protected] => [vid_acquisition_info:protected] => [vid_cost:protected] => [vid_producer:protected] => [vid_filename:protected] => [vid_filename_downloadable:protected] => [date_summary:protected] => November 2015 [date_permission_requested:protected] => [date_permission_received:protected] => [date_review_needed:protected] => [date_received:protected] => 03/02/16 [date_completed:protected] => 03/02/16 [date_billed:protected] => [date_modified:protected] => 03/02/16 [collBokExports:protected] => [lastBokExportCriteria:BaseElcoshItem:private] => [alreadyInSave:protected] => [alreadyInValidation:protected] => [validationFailures:protected] => Array ( ) [_new:BaseObject:private] => [_deleted:BaseObject:private] => [modifiedColumns:protected] => Array ( ) ) ) [1] => Search_Result Object ( [title] => Toolbox talk - long shot [image] => /record/images/4006-p.jpg [blurb] => This crew gathered every morning before starting work to discuss a new safety topic.... [category] => Array ( [0] => 20 [1] => 47 [2] => 49 [3] => 51 [4] => 55 [5] => 64 [6] => 68 [7] => 75 [8] => 76 [9] => 63 [10] => 78 [11] => 79 [12] => 82 [13] => 62 [14] => 87 [15] => 88 [16] => 91 [17] => 90 [18] => 93 [19] => 94 [20] => 95 [21] => 97 ) [labels] => Array ( [0] => Safety Culture [1] => Work Environment [2] => Hazards [3] => Bricklayer [4] => Trades [5] => Carpenter [7] => Cement Mason [9] => Electrical Worker [11] => Laborer [13] => Maintenance Worker [15] => Plasterer [17] => Plumber/Pipefitter [19] => Reinforcing Ironworker [21] => Roofer/Waterproofer [23] => Scaffold Erector [25] => Stonemason [27] => Structural Ironworker [29] => Commercial & Institutional [30] => Jobsites [31] => Demolition [33] => Heavy & Highway [35] => Industrial [37] => Renovations [39] => Residential [41] => Underground [43] => Images [44] => Media [45] => Media & Documents ) [type] => Images [sub_category] => [url] => /image/4006/i002693/Toolbox%2Btalk%2B-%2Blong%2Bshot.html [item:protected] => ImageRecord Object ( [records:protected] => Array ( ) [recordId:protected] => [searchWordClass:protected] => [searchWordPeerClass:protected] => [bok_record:protected] => [authors:protected] => [organizations:protected] => [collections:protected] => [categories:protected] => Array ( [20] => Category Object ( [languages:protected] => [bok_resources:protected] => [bok_topics:protected] => [bok_keywords:protected] => [id:protected] => 20 [type:protected] => category [parent:protected] => 7 [label:protected] => Safety Culture [alreadyInSave:protected] => [alreadyInValidation:protected] => [validationFailures:protected] => Array ( ) [_new:BaseObject:private] => [_deleted:BaseObject:private] => [modifiedColumns:protected] => Array ( ) ) [47] => Category Object ( [languages:protected] => [bok_resources:protected] => [bok_topics:protected] => [bok_keywords:protected] => [id:protected] => 47 [type:protected] => category [parent:protected] => 2 [label:protected] => Bricklayer [alreadyInSave:protected] => [alreadyInValidation:protected] => [validationFailures:protected] => Array ( ) [_new:BaseObject:private] => [_deleted:BaseObject:private] => [modifiedColumns:protected] => Array ( ) ) [49] => Category Object ( [languages:protected] => [bok_resources:protected] => [bok_topics:protected] => [bok_keywords:protected] => [id:protected] => 49 [type:protected] => category [parent:protected] => 2 [label:protected] => Carpenter [alreadyInSave:protected] => [alreadyInValidation:protected] => [validationFailures:protected] => Array ( ) [_new:BaseObject:private] => [_deleted:BaseObject:private] => [modifiedColumns:protected] => Array ( ) ) [51] => Category Object ( [languages:protected] => [bok_resources:protected] => [bok_topics:protected] => [bok_keywords:protected] => [id:protected] => 51 [type:protected] => category [parent:protected] => 2 [label:protected] => Cement Mason [alreadyInSave:protected] => [alreadyInValidation:protected] => [validationFailures:protected] => Array ( ) [_new:BaseObject:private] => [_deleted:BaseObject:private] => [modifiedColumns:protected] => Array ( ) ) [55] => Category Object ( [languages:protected] => [bok_resources:protected] => [bok_topics:protected] => [bok_keywords:protected] => [id:protected] => 55 [type:protected] => category [parent:protected] => 2 [label:protected] => Electrical Worker [alreadyInSave:protected] => [alreadyInValidation:protected] => [validationFailures:protected] => Array ( ) [_new:BaseObject:private] => [_deleted:BaseObject:private] => [modifiedColumns:protected] => Array ( ) ) [64] => Category Object ( [languages:protected] => [bok_resources:protected] => [bok_topics:protected] => [bok_keywords:protected] => [id:protected] => 64 [type:protected] => category [parent:protected] => 2 [label:protected] => Laborer [alreadyInSave:protected] => [alreadyInValidation:protected] => [validationFailures:protected] => Array ( ) [_new:BaseObject:private] => [_deleted:BaseObject:private] => [modifiedColumns:protected] => Array ( ) ) [68] => Category Object ( [languages:protected] => [bok_resources:protected] => [bok_topics:protected] => [bok_keywords:protected] => [id:protected] => 68 [type:protected] => category [parent:protected] => 2 [label:protected] => Maintenance Worker [alreadyInSave:protected] => [alreadyInValidation:protected] => [validationFailures:protected] => Array ( ) [_new:BaseObject:private] => [_deleted:BaseObject:private] => [modifiedColumns:protected] => Array ( ) ) [75] => Category Object ( [languages:protected] => [bok_resources:protected] => [bok_topics:protected] => [bok_keywords:protected] => [id:protected] => 75 [type:protected] => category [parent:protected] => 2 [label:protected] => Plasterer [alreadyInSave:protected] => [alreadyInValidation:protected] => [validationFailures:protected] => Array ( ) [_new:BaseObject:private] => [_deleted:BaseObject:private] => [modifiedColumns:protected] => Array ( ) ) [76] => Category Object ( [languages:protected] => [bok_resources:protected] => [bok_topics:protected] => [bok_keywords:protected] => [id:protected] => 76 [type:protected] => category [parent:protected] => 2 [label:protected] => Plumber/Pipefitter [alreadyInSave:protected] => [alreadyInValidation:protected] => [validationFailures:protected] => Array ( ) [_new:BaseObject:private] => [_deleted:BaseObject:private] => [modifiedColumns:protected] => Array ( ) ) [63] => Category Object ( [languages:protected] => [bok_resources:protected] => [bok_topics:protected] => [bok_keywords:protected] => [id:protected] => 63 [type:protected] => category [parent:protected] => 2 [label:protected] => Reinforcing Ironworker [alreadyInSave:protected] => [alreadyInValidation:protected] => [validationFailures:protected] => Array ( ) [_new:BaseObject:private] => [_deleted:BaseObject:private] => [modifiedColumns:protected] => Array ( ) ) [78] => Category Object ( [languages:protected] => [bok_resources:protected] => [bok_topics:protected] => [bok_keywords:protected] => [id:protected] => 78 [type:protected] => category [parent:protected] => 2 [label:protected] => Roofer/Waterproofer [alreadyInSave:protected] => [alreadyInValidation:protected] => [validationFailures:protected] => Array ( ) [_new:BaseObject:private] => [_deleted:BaseObject:private] => [modifiedColumns:protected] => Array ( ) ) [79] => Category Object ( [languages:protected] => [bok_resources:protected] => [bok_topics:protected] => [bok_keywords:protected] => [id:protected] => 79 [type:protected] => category [parent:protected] => 2 [label:protected] => Scaffold Erector [alreadyInSave:protected] => [alreadyInValidation:protected] => [validationFailures:protected] => Array ( ) [_new:BaseObject:private] => [_deleted:BaseObject:private] => [modifiedColumns:protected] => Array ( ) ) [82] => Category Object ( [languages:protected] => [bok_resources:protected] => [bok_topics:protected] => [bok_keywords:protected] => [id:protected] => 82 [type:protected] => category [parent:protected] => 2 [label:protected] => Stonemason [alreadyInSave:protected] => [alreadyInValidation:protected] => [validationFailures:protected] => Array ( ) [_new:BaseObject:private] => [_deleted:BaseObject:private] => [modifiedColumns:protected] => Array ( ) ) [62] => Category Object ( [languages:protected] => [bok_resources:protected] => [bok_topics:protected] => [bok_keywords:protected] => [id:protected] => 62 [type:protected] => category [parent:protected] => 2 [label:protected] => Structural Ironworker [alreadyInSave:protected] => [alreadyInValidation:protected] => [validationFailures:protected] => Array ( ) [_new:BaseObject:private] => [_deleted:BaseObject:private] => [modifiedColumns:protected] => Array ( ) ) [87] => Category Object ( [languages:protected] => [bok_resources:protected] => [bok_topics:protected] => [bok_keywords:protected] => [id:protected] => 87 [type:protected] => category [parent:protected] => 3 [label:protected] => Commercial & Institutional [alreadyInSave:protected] => [alreadyInValidation:protected] => [validationFailures:protected] => Array ( ) [_new:BaseObject:private] => [_deleted:BaseObject:private] => [modifiedColumns:protected] => Array ( ) ) [88] => Category Object ( [languages:protected] => [bok_resources:protected] => [bok_topics:protected] => [bok_keywords:protected] => [id:protected] => 88 [type:protected] => category [parent:protected] => 3 [label:protected] => Demolition [alreadyInSave:protected] => [alreadyInValidation:protected] => [validationFailures:protected] => Array ( ) [_new:BaseObject:private] => [_deleted:BaseObject:private] => [modifiedColumns:protected] => Array ( ) ) [91] => Category Object ( [languages:protected] => [bok_resources:protected] => [bok_topics:protected] => [bok_keywords:protected] => [id:protected] => 91 [type:protected] => category [parent:protected] => 3 [label:protected] => Heavy & Highway [alreadyInSave:protected] => [alreadyInValidation:protected] => [validationFailures:protected] => Array ( ) [_new:BaseObject:private] => [_deleted:BaseObject:private] => [modifiedColumns:protected] => Array ( ) ) [90] => Category Object ( [languages:protected] => [bok_resources:protected] => [bok_topics:protected] => [bok_keywords:protected] => [id:protected] => 90 [type:protected] => category [parent:protected] => 3 [label:protected] => Industrial [alreadyInSave:protected] => [alreadyInValidation:protected] => [validationFailures:protected] => Array ( ) [_new:BaseObject:private] => [_deleted:BaseObject:private] => [modifiedColumns:protected] => Array ( ) ) [93] => Category Object ( [languages:protected] => [bok_resources:protected] => [bok_topics:protected] => [bok_keywords:protected] => [id:protected] => 93 [type:protected] => category [parent:protected] => 3 [label:protected] => Renovations [alreadyInSave:protected] => [alreadyInValidation:protected] => [validationFailures:protected] => Array ( ) [_new:BaseObject:private] => [_deleted:BaseObject:private] => [modifiedColumns:protected] => Array ( ) ) [94] => Category Object ( [languages:protected] => [bok_resources:protected] => [bok_topics:protected] => [bok_keywords:protected] => [id:protected] => 94 [type:protected] => category [parent:protected] => 3 [label:protected] => Residential [alreadyInSave:protected] => [alreadyInValidation:protected] => [validationFailures:protected] => Array ( ) [_new:BaseObject:private] => [_deleted:BaseObject:private] => [modifiedColumns:protected] => Array ( ) ) [95] => Category Object ( [languages:protected] => [bok_resources:protected] => [bok_topics:protected] => [bok_keywords:protected] => [id:protected] => 95 [type:protected] => category [parent:protected] => 3 [label:protected] => Underground [alreadyInSave:protected] => [alreadyInValidation:protected] => [validationFailures:protected] => Array ( ) [_new:BaseObject:private] => [_deleted:BaseObject:private] => [modifiedColumns:protected] => Array ( ) ) [97] => Category Object ( [languages:protected] => [bok_resources:protected] => [bok_topics:protected] => [bok_keywords:protected] => [id:protected] => 97 [type:protected] => category [parent:protected] => 5 [label:protected] => Images [alreadyInSave:protected] => [alreadyInValidation:protected] => [validationFailures:protected] => Array ( ) [_new:BaseObject:private] => [_deleted:BaseObject:private] => [modifiedColumns:protected] => Array ( ) ) ) [categories_initialized:protected] => 1 [mapped_items:protected] => [content:protected] => [files:protected] => [language:protected] => Language Object ( [id:protected] => 1 [code:protected] => en [name:protected] => English [alreadyInSave:protected] => [alreadyInValidation:protected] => [validationFailures:protected] => Array ( ) [_new:BaseObject:private] => [_deleted:BaseObject:private] => [modifiedColumns:protected] => Array ( ) ) [old_record:protected] => [id:protected] => 4006 [old_id:protected] => [elcosh_id:protected] => i002693 [type:protected] => image [display_type:protected] => Image [user_id:protected] => 0 [language_id:protected] => 1 [tagging_id:protected] => Bruce Lippy [priority_id:protected] => 1 [title:protected] => Toolbox talk - long shot [total_pages:protected] => 0 [billed_pages:protected] => 0 [publication_number:protected] => [part_of:protected] => [keywords:protected] => toolbox talk, tailgate talk, safety minute [comments:protected] => [summary:protected] => This crew gathered every morning before starting work to discuss a new safety topic. [transition_comments:protected] => [external_link:protected] => [consol_link:protected] => http://www.cpwrconstructionsolutions.org/electrical/solution/662/worker-training.html [more_like_this:protected] => i002691,i002692,d001269,d000527 [permission_given_by:protected] => [published:protected] => T [billable:protected] => F [img_name:protected] => [img_ext:protected] => jpg [img_width:protected] => [img_height:protected] => [img_credit:protected] => Morgan Zavertnik and Hoar Construction [img_practice:protected] => good [vid_source_id:protected] => [vid_running_time:protected] => [vid_intended_audience:protected] => [vid_acquisition_info:protected] => [vid_cost:protected] => [vid_producer:protected] => [vid_filename:protected] => [vid_filename_downloadable:protected] => [date_summary:protected] => November 2015 [date_permission_requested:protected] => [date_permission_received:protected] => [date_review_needed:protected] => [date_received:protected] => 03/02/16 [date_completed:protected] => 03/02/16 [date_billed:protected] => [date_modified:protected] => 03/02/16 [collBokExports:protected] => [lastBokExportCriteria:BaseElcoshItem:private] => [alreadyInSave:protected] => [alreadyInValidation:protected] => [validationFailures:protected] => Array ( ) [_new:BaseObject:private] => [_deleted:BaseObject:private] => [modifiedColumns:protected] => Array ( ) ) ) [2] => Search_Result Object ( [title] => Construction bracing [image] => /record/images/3995-p.jpg [blurb] => This shows structural support that prevents collapses during construction.... [category] => Array ( [0] => 12 [1] => 15 [2] => 21 [3] => 49 [4] => 51 [5] => 55 [6] => 56 [7] => 60 [8] => 64 [9] => 68 [10] => 74 [11] => 63 [12] => 78 [13] => 79 [14] => 80 [15] => 62 [16] => 87 [17] => 90 [18] => 97 ) [labels] => Array ( [0] => Crushed/Struck By [1] => Work Environment [2] => Hazards [3] => Falls [6] => Scaffolds [9] => Carpenter [10] => Trades [11] => Cement Mason [13] => Electrical Worker [15] => Elevator Constructor [17] => HVAC [19] => Laborer [21] => Maintenance Worker [23] => Pile Driver [25] => Reinforcing Ironworker [27] => Roofer/Waterproofer [29] => Scaffold Erector [31] => Sheetmetal Worker [33] => Structural Ironworker [35] => Commercial & Institutional [36] => Jobsites [37] => Industrial [39] => Images [40] => Media [41] => Media & Documents ) [type] => Images [sub_category] => [url] => /image/3995/i002690/Construction%2Bbracing.html [item:protected] => ImageRecord Object ( [records:protected] => Array ( ) [recordId:protected] => [searchWordClass:protected] => [searchWordPeerClass:protected] => [bok_record:protected] => [authors:protected] => [organizations:protected] => [collections:protected] => [categories:protected] => Array ( [12] => Category Object ( [languages:protected] => [bok_resources:protected] => [bok_topics:protected] => [bok_keywords:protected] => [id:protected] => 12 [type:protected] => category [parent:protected] => 7 [label:protected] => Crushed/Struck By [alreadyInSave:protected] => [alreadyInValidation:protected] => [validationFailures:protected] => Array ( ) [_new:BaseObject:private] => [_deleted:BaseObject:private] => [modifiedColumns:protected] => Array ( ) ) [15] => Category Object ( [languages:protected] => [bok_resources:protected] => [bok_topics:protected] => [bok_keywords:protected] => [id:protected] => 15 [type:protected] => category [parent:protected] => 7 [label:protected] => Falls [alreadyInSave:protected] => [alreadyInValidation:protected] => [validationFailures:protected] => Array ( ) [_new:BaseObject:private] => [_deleted:BaseObject:private] => [modifiedColumns:protected] => Array ( ) ) [21] => Category Object ( [languages:protected] => [bok_resources:protected] => [bok_topics:protected] => [bok_keywords:protected] => [id:protected] => 21 [type:protected] => category [parent:protected] => 7 [label:protected] => Scaffolds [alreadyInSave:protected] => [alreadyInValidation:protected] => [validationFailures:protected] => Array ( ) [_new:BaseObject:private] => [_deleted:BaseObject:private] => [modifiedColumns:protected] => Array ( ) ) [49] => Category Object ( [languages:protected] => [bok_resources:protected] => [bok_topics:protected] => [bok_keywords:protected] => [id:protected] => 49 [type:protected] => category [parent:protected] => 2 [label:protected] => Carpenter [alreadyInSave:protected] => [alreadyInValidation:protected] => [validationFailures:protected] => Array ( ) [_new:BaseObject:private] => [_deleted:BaseObject:private] => [modifiedColumns:protected] => Array ( ) ) [51] => Category Object ( [languages:protected] => [bok_resources:protected] => [bok_topics:protected] => [bok_keywords:protected] => [id:protected] => 51 [type:protected] => category [parent:protected] => 2 [label:protected] => Cement Mason [alreadyInSave:protected] => [alreadyInValidation:protected] => [validationFailures:protected] => Array ( ) [_new:BaseObject:private] => [_deleted:BaseObject:private] => [modifiedColumns:protected] => Array ( ) ) [55] => Category Object ( [languages:protected] => [bok_resources:protected] => [bok_topics:protected] => [bok_keywords:protected] => [id:protected] => 55 [type:protected] => category [parent:protected] => 2 [label:protected] => Electrical Worker [alreadyInSave:protected] => [alreadyInValidation:protected] => [validationFailures:protected] => Array ( ) [_new:BaseObject:private] => [_deleted:BaseObject:private] => [modifiedColumns:protected] => Array ( ) ) [56] => Category Object ( [languages:protected] => [bok_resources:protected] => [bok_topics:protected] => [bok_keywords:protected] => [id:protected] => 56 [type:protected] => category [parent:protected] => 2 [label:protected] => Elevator Constructor [alreadyInSave:protected] => [alreadyInValidation:protected] => [validationFailures:protected] => Array ( ) [_new:BaseObject:private] => [_deleted:BaseObject:private] => [modifiedColumns:protected] => Array ( ) ) [60] => Category Object ( [languages:protected] => [bok_resources:protected] => [bok_topics:protected] => [bok_keywords:protected] => [id:protected] => 60 [type:protected] => category [parent:protected] => 2 [label:protected] => HVAC [alreadyInSave:protected] => [alreadyInValidation:protected] => [validationFailures:protected] => Array ( ) [_new:BaseObject:private] => [_deleted:BaseObject:private] => [modifiedColumns:protected] => Array ( ) ) [64] => Category Object ( [languages:protected] => [bok_resources:protected] => [bok_topics:protected] => [bok_keywords:protected] => [id:protected] => 64 [type:protected] => category [parent:protected] => 2 [label:protected] => Laborer [alreadyInSave:protected] => [alreadyInValidation:protected] => [validationFailures:protected] => Array ( ) [_new:BaseObject:private] => [_deleted:BaseObject:private] => [modifiedColumns:protected] => Array ( ) ) [68] => Category Object ( [languages:protected] => [bok_resources:protected] => [bok_topics:protected] => [bok_keywords:protected] => [id:protected] => 68 [type:protected] => category [parent:protected] => 2 [label:protected] => Maintenance Worker [alreadyInSave:protected] => [alreadyInValidation:protected] => [validationFailures:protected] => Array ( ) [_new:BaseObject:private] => [_deleted:BaseObject:private] => [modifiedColumns:protected] => Array ( ) ) [74] => Category Object ( [languages:protected] => [bok_resources:protected] => [bok_topics:protected] => [bok_keywords:protected] => [id:protected] => 74 [type:protected] => category [parent:protected] => 2 [label:protected] => Pile Driver [alreadyInSave:protected] => [alreadyInValidation:protected] => [validationFailures:protected] => Array ( ) [_new:BaseObject:private] => [_deleted:BaseObject:private] => [modifiedColumns:protected] => Array ( ) ) [63] => Category Object ( [languages:protected] => [bok_resources:protected] => [bok_topics:protected] => [bok_keywords:protected] => [id:protected] => 63 [type:protected] => category [parent:protected] => 2 [label:protected] => Reinforcing Ironworker [alreadyInSave:protected] => [alreadyInValidation:protected] => [validationFailures:protected] => Array ( ) [_new:BaseObject:private] => [_deleted:BaseObject:private] => [modifiedColumns:protected] => Array ( ) ) [78] => Category Object ( [languages:protected] => [bok_resources:protected] => [bok_topics:protected] => [bok_keywords:protected] => [id:protected] => 78 [type:protected] => category [parent:protected] => 2 [label:protected] => Roofer/Waterproofer [alreadyInSave:protected] => [alreadyInValidation:protected] => [validationFailures:protected] => Array ( ) [_new:BaseObject:private] => [_deleted:BaseObject:private] => [modifiedColumns:protected] => Array ( ) ) [79] => Category Object ( [languages:protected] => [bok_resources:protected] => [bok_topics:protected] => [bok_keywords:protected] => [id:protected] => 79 [type:protected] => category [parent:protected] => 2 [label:protected] => Scaffold Erector [alreadyInSave:protected] => [alreadyInValidation:protected] => [validationFailures:protected] => Array ( ) [_new:BaseObject:private] => [_deleted:BaseObject:private] => [modifiedColumns:protected] => Array ( ) ) [80] => Category Object ( [languages:protected] => [bok_resources:protected] => [bok_topics:protected] => [bok_keywords:protected] => [id:protected] => 80 [type:protected] => category [parent:protected] => 2 [label:protected] => Sheetmetal Worker [alreadyInSave:protected] => [alreadyInValidation:protected] => [validationFailures:protected] => Array ( ) [_new:BaseObject:private] => [_deleted:BaseObject:private] => [modifiedColumns:protected] => Array ( ) ) [62] => Category Object ( [languages:protected] => [bok_resources:protected] => [bok_topics:protected] => [bok_keywords:protected] => [id:protected] => 62 [type:protected] => category [parent:protected] => 2 [label:protected] => Structural Ironworker [alreadyInSave:protected] => [alreadyInValidation:protected] => [validationFailures:protected] => Array ( ) [_new:BaseObject:private] => [_deleted:BaseObject:private] => [modifiedColumns:protected] => Array ( ) ) [87] => Category Object ( [languages:protected] => [bok_resources:protected] => [bok_topics:protected] => [bok_keywords:protected] => [id:protected] => 87 [type:protected] => category [parent:protected] => 3 [label:protected] => Commercial & Institutional [alreadyInSave:protected] => [alreadyInValidation:protected] => [validationFailures:protected] => Array ( ) [_new:BaseObject:private] => [_deleted:BaseObject:private] => [modifiedColumns:protected] => Array ( ) ) [90] => Category Object ( [languages:protected] => [bok_resources:protected] => [bok_topics:protected] => [bok_keywords:protected] => [id:protected] => 90 [type:protected] => category [parent:protected] => 3 [label:protected] => Industrial [alreadyInSave:protected] => [alreadyInValidation:protected] => [validationFailures:protected] => Array ( ) [_new:BaseObject:private] => [_deleted:BaseObject:private] => [modifiedColumns:protected] => Array ( ) ) [97] => Category Object ( [languages:protected] => [bok_resources:protected] => [bok_topics:protected] => [bok_keywords:protected] => [id:protected] => 97 [type:protected] => category [parent:protected] => 5 [label:protected] => Images [alreadyInSave:protected] => [alreadyInValidation:protected] => [validationFailures:protected] => Array ( ) [_new:BaseObject:private] => [_deleted:BaseObject:private] => [modifiedColumns:protected] => Array ( ) ) ) [categories_initialized:protected] => 1 [mapped_items:protected] => [content:protected] => [files:protected] => [language:protected] => Language Object ( [id:protected] => 1 [code:protected] => en [name:protected] => English [alreadyInSave:protected] => [alreadyInValidation:protected] => [validationFailures:protected] => Array ( ) [_new:BaseObject:private] => [_deleted:BaseObject:private] => [modifiedColumns:protected] => Array ( ) ) [old_record:protected] => [id:protected] => 3995 [old_id:protected] => [elcosh_id:protected] => i002690 [type:protected] => image [display_type:protected] => Image [user_id:protected] => 0 [language_id:protected] => 1 [tagging_id:protected] => Bruce Lippy [priority_id:protected] => 1 [title:protected] => Construction bracing [total_pages:protected] => 0 [billed_pages:protected] => 0 [publication_number:protected] => [part_of:protected] => [keywords:protected] => Bracing, support, scaffold [comments:protected] => [summary:protected] => This shows structural support that prevents collapses during construction. [transition_comments:protected] => [external_link:protected] => [consol_link:protected] => http://www.cpwrconstructionsolutions.org/masonry/solution/8/adjustable-tower-scaffold.html [more_like_this:protected] => i002660 [permission_given_by:protected] => [published:protected] => T [billable:protected] => F [img_name:protected] => [img_ext:protected] => jpg [img_width:protected] => [img_height:protected] => [img_credit:protected] => Photo by Pam Susi [img_practice:protected] => good [vid_source_id:protected] => [vid_running_time:protected] => [vid_intended_audience:protected] => [vid_acquisition_info:protected] => [vid_cost:protected] => [vid_producer:protected] => [vid_filename:protected] => [vid_filename_downloadable:protected] => [date_summary:protected] => January 2016 [date_permission_requested:protected] => [date_permission_received:protected] => [date_review_needed:protected] => [date_received:protected] => 02/01/16 [date_completed:protected] => 02/01/16 [date_billed:protected] => [date_modified:protected] => 02/01/16 [collBokExports:protected] => [lastBokExportCriteria:BaseElcoshItem:private] => [alreadyInSave:protected] => [alreadyInValidation:protected] => [validationFailures:protected] => Array ( ) [_new:BaseObject:private] => [_deleted:BaseObject:private] => [modifiedColumns:protected] => Array ( ) ) ) [3] => Search_Result Object ( [title] => Suspended Scaffold Outriggers [image] => /record/images/3975-p.jpg [blurb] => Suspended scaffolds systems must be designed by a qualified person and inspected daily by a competent person. The supports for the counterweight must... [category] => Array ( [0] => 97 [1] => 15 [2] => 47 [3] => 49 [4] => 79 [5] => 87 ) [labels] => Array ( [0] => Images [1] => Media [2] => Media & Documents [3] => Falls [4] => Work Environment [5] => Hazards [6] => Bricklayer [7] => Trades [8] => Carpenter [10] => Scaffold Erector [12] => Commercial & Institutional [13] => Jobsites ) [type] => Images [sub_category] => [url] => /image/3975/i002683/Suspended%2BScaffold%2BOutriggers.html [item:protected] => ImageRecord Object ( [records:protected] => Array ( ) [recordId:protected] => [searchWordClass:protected] => [searchWordPeerClass:protected] => [bok_record:protected] => [authors:protected] => [organizations:protected] => [collections:protected] => [categories:protected] => Array ( [97] => Category Object ( [languages:protected] => [bok_resources:protected] => [bok_topics:protected] => [bok_keywords:protected] => [id:protected] => 97 [type:protected] => category [parent:protected] => 5 [label:protected] => Images [alreadyInSave:protected] => [alreadyInValidation:protected] => [validationFailures:protected] => Array ( ) [_new:BaseObject:private] => [_deleted:BaseObject:private] => [modifiedColumns:protected] => Array ( ) ) [15] => Category Object ( [languages:protected] => [bok_resources:protected] => [bok_topics:protected] => [bok_keywords:protected] => [id:protected] => 15 [type:protected] => category [parent:protected] => 7 [label:protected] => Falls [alreadyInSave:protected] => [alreadyInValidation:protected] => [validationFailures:protected] => Array ( ) [_new:BaseObject:private] => [_deleted:BaseObject:private] => [modifiedColumns:protected] => Array ( ) ) [47] => Category Object ( [languages:protected] => [bok_resources:protected] => [bok_topics:protected] => [bok_keywords:protected] => [id:protected] => 47 [type:protected] => category [parent:protected] => 2 [label:protected] => Bricklayer [alreadyInSave:protected] => [alreadyInValidation:protected] => [validationFailures:protected] => Array ( ) [_new:BaseObject:private] => [_deleted:BaseObject:private] => [modifiedColumns:protected] => Array ( ) ) [49] => Category Object ( [languages:protected] => [bok_resources:protected] => [bok_topics:protected] => [bok_keywords:protected] => [id:protected] => 49 [type:protected] => category [parent:protected] => 2 [label:protected] => Carpenter [alreadyInSave:protected] => [alreadyInValidation:protected] => [validationFailures:protected] => Array ( ) [_new:BaseObject:private] => [_deleted:BaseObject:private] => [modifiedColumns:protected] => Array ( ) ) [79] => Category Object ( [languages:protected] => [bok_resources:protected] => [bok_topics:protected] => [bok_keywords:protected] => [id:protected] => 79 [type:protected] => category [parent:protected] => 2 [label:protected] => Scaffold Erector [alreadyInSave:protected] => [alreadyInValidation:protected] => [validationFailures:protected] => Array ( ) [_new:BaseObject:private] => [_deleted:BaseObject:private] => [modifiedColumns:protected] => Array ( ) ) [87] => Category Object ( [languages:protected] => [bok_resources:protected] => [bok_topics:protected] => [bok_keywords:protected] => [id:protected] => 87 [type:protected] => category [parent:protected] => 3 [label:protected] => Commercial & Institutional [alreadyInSave:protected] => [alreadyInValidation:protected] => [validationFailures:protected] => Array ( ) [_new:BaseObject:private] => [_deleted:BaseObject:private] => [modifiedColumns:protected] => Array ( ) ) ) [categories_initialized:protected] => 1 [mapped_items:protected] => [content:protected] => [files:protected] => [language:protected] => Language Object ( [id:protected] => 1 [code:protected] => en [name:protected] => English [alreadyInSave:protected] => [alreadyInValidation:protected] => [validationFailures:protected] => Array ( ) [_new:BaseObject:private] => [_deleted:BaseObject:private] => [modifiedColumns:protected] => Array ( ) ) [old_record:protected] => [id:protected] => 3975 [old_id:protected] => [elcosh_id:protected] => i002683 [type:protected] => image [display_type:protected] => Image [user_id:protected] => 0 [language_id:protected] => 1 [tagging_id:protected] => John Newquist [priority_id:protected] => 1 [title:protected] => Suspended Scaffold Outriggers [total_pages:protected] => 0 [billed_pages:protected] => 0 [publication_number:protected] => [part_of:protected] => [keywords:protected] => suspended, scaffold, swing, stage, fall, protection, counterweight, qualified, person [comments:protected] => [summary:protected] => Suspended scaffolds systems must be designed by a qualified person and inspected daily by a competent person. The supports for the counterweight must be designed with a safety factor of four. [transition_comments:protected] => [external_link:protected] => [consol_link:protected] => http://www.cpwrconstructionsolutions.org/task/Erect%2Band%2Bdismantle%2Bscaffolds/ [more_like_this:protected] => d000244,d000359,i000253,i000407 [permission_given_by:protected] => [published:protected] => T [billable:protected] => F [img_name:protected] => [img_ext:protected] => jpg [img_width:protected] => [img_height:protected] => [img_credit:protected] => MetroPark, Miller and Long [img_practice:protected] => not_applicable [vid_source_id:protected] => [vid_running_time:protected] => [vid_intended_audience:protected] => [vid_acquisition_info:protected] => [vid_cost:protected] => [vid_producer:protected] => [vid_filename:protected] => [vid_filename_downloadable:protected] => [date_summary:protected] => August 28 2015 [date_permission_requested:protected] => [date_permission_received:protected] => [date_review_needed:protected] => [date_received:protected] => 08/28/15 [date_completed:protected] => 08/28/15 [date_billed:protected] => [date_modified:protected] => 08/28/15 [collBokExports:protected] => [lastBokExportCriteria:BaseElcoshItem:private] => [alreadyInSave:protected] => [alreadyInValidation:protected] => [validationFailures:protected] => Array ( ) [_new:BaseObject:private] => [_deleted:BaseObject:private] => [modifiedColumns:protected] => Array ( ) ) ) [4] => Search_Result Object ( [title] => Suspended scaffold [image] => /record/images/3976-p.jpg [blurb] => Suspended scaffold outrigger beams must have stops to prevent the hangers from sliding of the end of the outriggers. Wire rope supported must be desig... [category] => Array ( [0] => 97 [1] => 15 [2] => 47 [3] => 50 [4] => 79 [5] => 87 ) [labels] => Array ( [0] => Images [1] => Media [2] => Media & Documents [3] => Falls [4] => Work Environment [5] => Hazards [6] => Bricklayer [7] => Trades [8] => Carpet Layer [10] => Scaffold Erector [12] => Commercial & Institutional [13] => Jobsites ) [type] => Images [sub_category] => [url] => /image/3976/i002684/Suspended%2Bscaffold.html [item:protected] => ImageRecord Object ( [records:protected] => Array ( ) [recordId:protected] => [searchWordClass:protected] => [searchWordPeerClass:protected] => [bok_record:protected] => [authors:protected] => [organizations:protected] => [collections:protected] => [categories:protected] => Array ( [97] => Category Object ( [languages:protected] => [bok_resources:protected] => [bok_topics:protected] => [bok_keywords:protected] => [id:protected] => 97 [type:protected] => category [parent:protected] => 5 [label:protected] => Images [alreadyInSave:protected] => [alreadyInValidation:protected] => [validationFailures:protected] => Array ( ) [_new:BaseObject:private] => [_deleted:BaseObject:private] => [modifiedColumns:protected] => Array ( ) ) [15] => Category Object ( [languages:protected] => [bok_resources:protected] => [bok_topics:protected] => [bok_keywords:protected] => [id:protected] => 15 [type:protected] => category [parent:protected] => 7 [label:protected] => Falls [alreadyInSave:protected] => [alreadyInValidation:protected] => [validationFailures:protected] => Array ( ) [_new:BaseObject:private] => [_deleted:BaseObject:private] => [modifiedColumns:protected] => Array ( ) ) [47] => Category Object ( [languages:protected] => [bok_resources:protected] => [bok_topics:protected] => [bok_keywords:protected] => [id:protected] => 47 [type:protected] => category [parent:protected] => 2 [label:protected] => Bricklayer [alreadyInSave:protected] => [alreadyInValidation:protected] => [validationFailures:protected] => Array ( ) [_new:BaseObject:private] => [_deleted:BaseObject:private] => [modifiedColumns:protected] => Array ( ) ) [50] => Category Object ( [languages:protected] => [bok_resources:protected] => [bok_topics:protected] => [bok_keywords:protected] => [id:protected] => 50 [type:protected] => category [parent:protected] => 2 [label:protected] => Carpet Layer [alreadyInSave:protected] => [alreadyInValidation:protected] => [validationFailures:protected] => Array ( ) [_new:BaseObject:private] => [_deleted:BaseObject:private] => [modifiedColumns:protected] => Array ( ) ) [79] => Category Object ( [languages:protected] => [bok_resources:protected] => [bok_topics:protected] => [bok_keywords:protected] => [id:protected] => 79 [type:protected] => category [parent:protected] => 2 [label:protected] => Scaffold Erector [alreadyInSave:protected] => [alreadyInValidation:protected] => [validationFailures:protected] => Array ( ) [_new:BaseObject:private] => [_deleted:BaseObject:private] => [modifiedColumns:protected] => Array ( ) ) [87] => Category Object ( [languages:protected] => [bok_resources:protected] => [bok_topics:protected] => [bok_keywords:protected] => [id:protected] => 87 [type:protected] => category [parent:protected] => 3 [label:protected] => Commercial & Institutional [alreadyInSave:protected] => [alreadyInValidation:protected] => [validationFailures:protected] => Array ( ) [_new:BaseObject:private] => [_deleted:BaseObject:private] => [modifiedColumns:protected] => Array ( ) ) ) [categories_initialized:protected] => 1 [mapped_items:protected] => [content:protected] => [files:protected] => [language:protected] => Language Object ( [id:protected] => 1 [code:protected] => en [name:protected] => English [alreadyInSave:protected] => [alreadyInValidation:protected] => [validationFailures:protected] => Array ( ) [_new:BaseObject:private] => [_deleted:BaseObject:private] => [modifiedColumns:protected] => Array ( ) ) [old_record:protected] => [id:protected] => 3976 [old_id:protected] => [elcosh_id:protected] => i002684 [type:protected] => image [display_type:protected] => Image [user_id:protected] => 0 [language_id:protected] => 1 [tagging_id:protected] => John Newquist [priority_id:protected] => 1 [title:protected] => Suspended scaffold [total_pages:protected] => 0 [billed_pages:protected] => 0 [publication_number:protected] => [part_of:protected] => [keywords:protected] => Suspended, scaffold, outrigger, beams, erection, wire, rope, inspection, swing, stage, [comments:protected] => [summary:protected] => Suspended scaffold outrigger beams must have stops to prevent the hangers from sliding of the end of the outriggers. Wire rope supported must be designed with a safety factor of 6. The scaffold must be inspected by a competent person daily. [transition_comments:protected] => [external_link:protected] => [consol_link:protected] => http://www.cpwrconstructionsolutions.org/task/Erect%2Band%2Bdismantle%2Bscaffolds/ [more_like_this:protected] => i002683, d000244, i000407, d000606 [permission_given_by:protected] => [published:protected] => T [billable:protected] => F [img_name:protected] => [img_ext:protected] => jpg [img_width:protected] => [img_height:protected] => [img_credit:protected] => Metropark, Miller and Long [img_practice:protected] => not_applicable [vid_source_id:protected] => [vid_running_time:protected] => [vid_intended_audience:protected] => [vid_acquisition_info:protected] => [vid_cost:protected] => [vid_producer:protected] => [vid_filename:protected] => [vid_filename_downloadable:protected] => [date_summary:protected] => [date_permission_requested:protected] => [date_permission_received:protected] => [date_review_needed:protected] => [date_received:protected] => 08/28/15 [date_completed:protected] => 08/28/15 [date_billed:protected] => [date_modified:protected] => 08/28/15 [collBokExports:protected] => [lastBokExportCriteria:BaseElcoshItem:private] => [alreadyInSave:protected] => [alreadyInValidation:protected] => [validationFailures:protected] => Array ( ) [_new:BaseObject:private] => [_deleted:BaseObject:private] => [modifiedColumns:protected] => Array ( ) ) ) [5] => Search_Result Object ( [title] => Three Tower Cranes [image] => /record/images/3979-p.jpg [blurb] => Whenever multiple tower cranes are used, there needs to be preplanning to ensure that the tower cranes cannot hit each other loads. This is accomplish... [category] => Array ( [0] => 97 [1] => 11 [2] => 64 [3] => 70 [4] => 62 [5] => 87 ) [labels] => Array ( [0] => Images [1] => Media [2] => Media & Documents [3] => Cranes & Hoists [4] => Work Environment [5] => Hazards [6] => Laborer [7] => Trades [8] => Operating Engineer [10] => Structural Ironworker [12] => Commercial & Institutional [13] => Jobsites ) [type] => Images [sub_category] => [url] => /image/3979/i002687/Three%2BTower%2BCranes.html [item:protected] => ImageRecord Object ( [records:protected] => Array ( ) [recordId:protected] => [searchWordClass:protected] => [searchWordPeerClass:protected] => [bok_record:protected] => [authors:protected] => [organizations:protected] => [collections:protected] => [categories:protected] => Array ( [97] => Category Object ( [languages:protected] => [bok_resources:protected] => [bok_topics:protected] => [bok_keywords:protected] => [id:protected] => 97 [type:protected] => category [parent:protected] => 5 [label:protected] => Images [alreadyInSave:protected] => [alreadyInValidation:protected] => [validationFailures:protected] => Array ( ) [_new:BaseObject:private] => [_deleted:BaseObject:private] => [modifiedColumns:protected] => Array ( ) ) [11] => Category Object ( [languages:protected] => [bok_resources:protected] => [bok_topics:protected] => [bok_keywords:protected] => [id:protected] => 11 [type:protected] => category [parent:protected] => 7 [label:protected] => Cranes & Hoists [alreadyInSave:protected] => [alreadyInValidation:protected] => [validationFailures:protected] => Array ( ) [_new:BaseObject:private] => [_deleted:BaseObject:private] => [modifiedColumns:protected] => Array ( ) ) [64] => Category Object ( [languages:protected] => [bok_resources:protected] => [bok_topics:protected] => [bok_keywords:protected] => [id:protected] => 64 [type:protected] => category [parent:protected] => 2 [label:protected] => Laborer [alreadyInSave:protected] => [alreadyInValidation:protected] => [validationFailures:protected] => Array ( ) [_new:BaseObject:private] => [_deleted:BaseObject:private] => [modifiedColumns:protected] => Array ( ) ) [70] => Category Object ( [languages:protected] => [bok_resources:protected] => [bok_topics:protected] => [bok_keywords:protected] => [id:protected] => 70 [type:protected] => category [parent:protected] => 2 [label:protected] => Operating Engineer [alreadyInSave:protected] => [alreadyInValidation:protected] => [validationFailures:protected] => Array ( ) [_new:BaseObject:private] => [_deleted:BaseObject:private] => [modifiedColumns:protected] => Array ( ) ) [62] => Category Object ( [languages:protected] => [bok_resources:protected] => [bok_topics:protected] => [bok_keywords:protected] => [id:protected] => 62 [type:protected] => category [parent:protected] => 2 [label:protected] => Structural Ironworker [alreadyInSave:protected] => [alreadyInValidation:protected] => [validationFailures:protected] => Array ( ) [_new:BaseObject:private] => [_deleted:BaseObject:private] => [modifiedColumns:protected] => Array ( ) ) [87] => Category Object ( [languages:protected] => [bok_resources:protected] => [bok_topics:protected] => [bok_keywords:protected] => [id:protected] => 87 [type:protected] => category [parent:protected] => 3 [label:protected] => Commercial & Institutional [alreadyInSave:protected] => [alreadyInValidation:protected] => [validationFailures:protected] => Array ( ) [_new:BaseObject:private] => [_deleted:BaseObject:private] => [modifiedColumns:protected] => Array ( ) ) ) [categories_initialized:protected] => 1 [mapped_items:protected] => [content:protected] => [files:protected] => [language:protected] => Language Object ( [id:protected] => 1 [code:protected] => en [name:protected] => English [alreadyInSave:protected] => [alreadyInValidation:protected] => [validationFailures:protected] => Array ( ) [_new:BaseObject:private] => [_deleted:BaseObject:private] => [modifiedColumns:protected] => Array ( ) ) [old_record:protected] => [id:protected] => 3979 [old_id:protected] => [elcosh_id:protected] => i002687 [type:protected] => image [display_type:protected] => Image [user_id:protected] => 0 [language_id:protected] => 1 [tagging_id:protected] => John Newquist [priority_id:protected] => 1 [title:protected] => Three Tower Cranes [total_pages:protected] => 0 [billed_pages:protected] => 0 [publication_number:protected] => [part_of:protected] => [keywords:protected] => [comments:protected] => [summary:protected] => Whenever multiple tower cranes are used, there needs to be preplanning to ensure that the tower cranes cannot hit each other loads. This is accomplished by setting swing restrictions, marking the ground for allowable crane travel and training of the crane signal persons. [transition_comments:protected] => [external_link:protected] => [consol_link:protected] => http://www.cpwrconstructionsolutions.org/work/6/184/ [more_like_this:protected] => d001029, d000010, i001280, i001221 [permission_given_by:protected] => [published:protected] => T [billable:protected] => F [img_name:protected] => [img_ext:protected] => jpg [img_width:protected] => [img_height:protected] => [img_credit:protected] => Metropark [img_practice:protected] => not_applicable [vid_source_id:protected] => [vid_running_time:protected] => [vid_intended_audience:protected] => [vid_acquisition_info:protected] => [vid_cost:protected] => [vid_producer:protected] => [vid_filename:protected] => [vid_filename_downloadable:protected] => [date_summary:protected] => August 28 2015 [date_permission_requested:protected] => [date_permission_received:protected] => [date_review_needed:protected] => [date_received:protected] => 08/28/15 [date_completed:protected] => 08/28/15 [date_billed:protected] => [date_modified:protected] => 08/28/15 [collBokExports:protected] => [lastBokExportCriteria:BaseElcoshItem:private] => [alreadyInSave:protected] => [alreadyInValidation:protected] => [validationFailures:protected] => Array ( ) [_new:BaseObject:private] => [_deleted:BaseObject:private] => [modifiedColumns:protected] => Array ( ) ) ) ) [preview_mode] => [description] => This third in a series of 6 Tool Box Talks on construction ergonomics focuses on proper positioning to avoid injuries. The TBT recommends: 1)prop up a task off of the floor by using a raised surface, cart, baker scaffold, saw horses to prep materials near waist height, 2)move the lift or ladder in the best position for the work, 3)position the lift in front of the area you plan to work without trying to reach too far on either side of the lift. [keywords] => position, positioning, ergonomics, ergo, carpal tunnel, MSD, musculoskeletal disorder [related_items] => Array ( [Handouts] => Array ( [0] => DocumentRecord Object ( [records:protected] => Array ( ) [recordId:protected] => [searchWordClass:protected] => [searchWordPeerClass:protected] => [bok_record:protected] => [authors:protected] => [organizations:protected] => [collections:protected] => [categories:protected] => [categories_initialized:protected] => [mapped_items:protected] => [content:protected] => [files:protected] => [language:protected] => Language Object ( [id:protected] => 1 [code:protected] => en [name:protected] => English [alreadyInSave:protected] => [alreadyInValidation:protected] => [validationFailures:protected] => Array ( ) [_new:BaseObject:private] => [_deleted:BaseObject:private] => [modifiedColumns:protected] => Array ( ) ) [old_record:protected] => [id:protected] => 3833 [old_id:protected] => [elcosh_id:protected] => d001303 [type:protected] => document [display_type:protected] => HTML w/ PDF [user_id:protected] => 25 [language_id:protected] => 1 [tagging_id:protected] => Bruce Lippy [priority_id:protected] => 1 [title:protected] => Overview of Toolbox Talks on Ergonomics Developed by Washington University in St. Louis [total_pages:protected] => 3 [billed_pages:protected] => 3 [publication_number:protected] => [part_of:protected] => [keywords:protected] => ergonomics, musculoskeletal disorders, MSDs [comments:protected] => 7-28-2014 - Originally submitted as "HTML w/ doc and PDF", Jeff Nelson asked Bruce Lippy for permission to switch it to "HTML w/ PDF" -- permission was given [summary:protected] => This overviews provides a background on how Washington University in St. Louis developed this series of six toolbox talks on ergonomics. It also describes how they tested the effectiveness of these communication tools, concluding that the guide was valuable for improving the delivery of ergonomics training and interaction between the safety representative and workers. The researchers recommend preparing site-specific information prior to the talk and interacting with workers to discuss problems and ergonomic solutions during the safety meetings. [transition_comments:protected] => [external_link:protected] => [consol_link:protected] => [more_like_this:protected] => [permission_given_by:protected] => Lisa Jaegers, Washington U. in St. Louis [published:protected] => T [billable:protected] => F [img_name:protected] => [img_ext:protected] => png [img_width:protected] => [img_height:protected] => [img_credit:protected] => [img_practice:protected] => [vid_source_id:protected] => [vid_running_time:protected] => [vid_intended_audience:protected] => [vid_acquisition_info:protected] => [vid_cost:protected] => [vid_producer:protected] => [vid_filename:protected] => [vid_filename_downloadable:protected] => [date_summary:protected] => 2014 [date_permission_requested:protected] => [date_permission_received:protected] => [date_review_needed:protected] => [date_received:protected] => 06/11/14 [date_completed:protected] => 07/29/14 [date_billed:protected] => [date_modified:protected] => 07/29/14 [collBokExports:protected] => [lastBokExportCriteria:BaseElcoshItem:private] => [alreadyInSave:protected] => [alreadyInValidation:protected] => [validationFailures:protected] => Array ( ) [_new:BaseObject:private] => [_deleted:BaseObject:private] => [modifiedColumns:protected] => Array ( ) ) ) [Toolbox Talks] => Array ( [0] => DocumentRecord Object ( [records:protected] => Array ( ) [recordId:protected] => [searchWordClass:protected] => [searchWordPeerClass:protected] => [bok_record:protected] => [authors:protected] => [organizations:protected] => [collections:protected] => [categories:protected] => [categories_initialized:protected] => [mapped_items:protected] => [content:protected] => [files:protected] => [language:protected] => Language Object ( [id:protected] => 1 [code:protected] => en [name:protected] => English [alreadyInSave:protected] => [alreadyInValidation:protected] => [validationFailures:protected] => Array ( ) [_new:BaseObject:private] => [_deleted:BaseObject:private] => [modifiedColumns:protected] => Array ( ) ) [old_record:protected] => [id:protected] => 3835 [old_id:protected] => [elcosh_id:protected] => d001304 [type:protected] => document [display_type:protected] => HTML w/ PDF [user_id:protected] => 25 [language_id:protected] => 1 [tagging_id:protected] => Bruce Lippy [priority_id:protected] => 1 [title:protected] => Ergonomics Tool Box Talks (TBT) Training Guide [total_pages:protected] => 2 [billed_pages:protected] => 2 [publication_number:protected] => [part_of:protected] => [keywords:protected] => Ergonomics, carpal tunnel, muscular skeletal disorders, msd [comments:protected] => [summary:protected] => CPWR-funded ergonomics research by Washington University at St. Louis led to the development of 6 tool box talks. This guide is an explanation of how to deliver the talks for maximum effectiveness. This guide should be reviewed before delivering any of the talks because it makes important recommendations like: • If possible, give the TBTs as a part of the crew’s regular safety meetings so that ergonomics is included in the safety discussion. • Try to locate an area with few distractions for gathering the crew. • For a team approach, invite the work crew, site superintendent, project manager and other general contractor and/or subcontractor reps who you feel may be helpful in supporting the training and ergonomics solutions. [transition_comments:protected] => [external_link:protected] => [consol_link:protected] => [more_like_this:protected] => d001303,d001305,d001306,d001307,d001308,d001309,d001310 [permission_given_by:protected] => [published:protected] => T [billable:protected] => F [img_name:protected] => [img_ext:protected] => png [img_width:protected] => [img_height:protected] => [img_credit:protected] => [img_practice:protected] => [vid_source_id:protected] => [vid_running_time:protected] => [vid_intended_audience:protected] => [vid_acquisition_info:protected] => [vid_cost:protected] => [vid_producer:protected] => [vid_filename:protected] => [vid_filename_downloadable:protected] => [date_summary:protected] => 2014 [date_permission_requested:protected] => [date_permission_received:protected] => [date_review_needed:protected] => [date_received:protected] => 06/12/14 [date_completed:protected] => 07/29/14 [date_billed:protected] => [date_modified:protected] => 07/29/14 [collBokExports:protected] => [lastBokExportCriteria:BaseElcoshItem:private] => [alreadyInSave:protected] => [alreadyInValidation:protected] => [validationFailures:protected] => Array ( ) [_new:BaseObject:private] => [_deleted:BaseObject:private] => [modifiedColumns:protected] => Array ( ) ) [1] => DocumentRecord Object ( [records:protected] => Array ( ) [recordId:protected] => [searchWordClass:protected] => [searchWordPeerClass:protected] => [bok_record:protected] => [authors:protected] => [organizations:protected] => [collections:protected] => [categories:protected] => [categories_initialized:protected] => [mapped_items:protected] => [content:protected] => [files:protected] => [language:protected] => Language Object ( [id:protected] => 1 [code:protected] => en [name:protected] => English [alreadyInSave:protected] => [alreadyInValidation:protected] => [validationFailures:protected] => Array ( ) [_new:BaseObject:private] => [_deleted:BaseObject:private] => [modifiedColumns:protected] => Array ( ) ) [old_record:protected] => [id:protected] => 3836 [old_id:protected] => [elcosh_id:protected] => d001305 [type:protected] => document [display_type:protected] => HTML w/ PDF [user_id:protected] => 25 [language_id:protected] => 1 [tagging_id:protected] => Bruce Lippy [priority_id:protected] => 1 [title:protected] => TBT1 Ergonomics in Construction [total_pages:protected] => 5 [billed_pages:protected] => 5 [publication_number:protected] => [part_of:protected] => [keywords:protected] => ergonomics, ergo, msd, musculoskeletal disorders, risk factors, lifting, carpal tunnel, repetition, awkward postures [comments:protected] => 7-28-2014 Jeff Nelson asked Bruce Lippy about what to do with a sentence included toward the top of the doc, "Fill them in on page 2 'Other Questions.'" -- Bruce said this sentence could be deleted from the HTML. [summary:protected] => This is the first in a series of 6 Tool Box Talks produced by Washington University in St. Louis on ergonomics in construction work. This one should be delivered first because it covers what ergonomics is, why construction workers need to talk about it, what the risk factors are for developing a health problem and how to prevent these problems. [transition_comments:protected] => [external_link:protected] => [consol_link:protected] => http://www.cpwrconstructionsolutions.org/pipes_vessels/solution/50/participatory-ergonomics-program.html [more_like_this:protected] => d001303,d001304,d001306,d001307,d001308,d001309 [permission_given_by:protected] => Lisa Jaegers, Washington U. in St. Louis [published:protected] => T [billable:protected] => F [img_name:protected] => [img_ext:protected] => png [img_width:protected] => [img_height:protected] => [img_credit:protected] => [img_practice:protected] => [vid_source_id:protected] => [vid_running_time:protected] => [vid_intended_audience:protected] => [vid_acquisition_info:protected] => [vid_cost:protected] => [vid_producer:protected] => [vid_filename:protected] => [vid_filename_downloadable:protected] => [date_summary:protected] => 2014 [date_permission_requested:protected] => [date_permission_received:protected] => [date_review_needed:protected] => [date_received:protected] => 06/12/14 [date_completed:protected] => 07/28/14 [date_billed:protected] => [date_modified:protected] => 10/09/15 [collBokExports:protected] => [lastBokExportCriteria:BaseElcoshItem:private] => [alreadyInSave:protected] => [alreadyInValidation:protected] => [validationFailures:protected] => Array ( ) [_new:BaseObject:private] => [_deleted:BaseObject:private] => [modifiedColumns:protected] => Array ( ) ) [2] => DocumentRecord Object ( [records:protected] => Array ( ) [recordId:protected] => [searchWordClass:protected] => [searchWordPeerClass:protected] => [bok_record:protected] => [authors:protected] => [organizations:protected] => [collections:protected] => [categories:protected] => [categories_initialized:protected] => [mapped_items:protected] => [content:protected] => [files:protected] => [language:protected] => Language Object ( [id:protected] => 1 [code:protected] => en [name:protected] => English [alreadyInSave:protected] => [alreadyInValidation:protected] => [validationFailures:protected] => Array ( ) [_new:BaseObject:private] => [_deleted:BaseObject:private] => [modifiedColumns:protected] => Array ( ) ) [old_record:protected] => [id:protected] => 3837 [old_id:protected] => [elcosh_id:protected] => d001306 [type:protected] => document [display_type:protected] => HTML w/ PDF [user_id:protected] => 25 [language_id:protected] => 1 [tagging_id:protected] => Bruce Lippy [priority_id:protected] => 1 [title:protected] => TBT2 Keep Reach Close [total_pages:protected] => 4 [billed_pages:protected] => 4 [publication_number:protected] => [part_of:protected] => [keywords:protected] => reach, ergonomic, ergo, MSD, carpal tunnel, repetition, awkward positions [comments:protected] => 7-28-2014 Jeff Nelson asked Bruce Lippy about what to do with a sentence included toward the top of the doc, "Fill them in on page 2 'Other Questions.'" -- Bruce said this sentence could be deleted from the HTML. [summary:protected] => This is the second of six Tool Box Talks created by Washington University in St. Louis on ergonomics in construction. There is a guide with the series that describes how to deliver these talks. This one deals with how to avoid awkward reaching during tasks to prevent injuries. try to work with your hands below your head and close to our body to reduce your risk of shoulder strains and back discomfort. This TBT recommends considering ways to move close to the task, keeping the work area free of obstacles, and talking with each other to provide constructive feedback about your working position. [transition_comments:protected] => [external_link:protected] => [consol_link:protected] => http://www.cpwrconstructionsolutions.org/hazard/959/lifting-and-carrying-manual-materials-handling.html [more_like_this:protected] => d001303,d001304,d001305,d001307,d001308,e001309 [permission_given_by:protected] => [published:protected] => T [billable:protected] => F [img_name:protected] => [img_ext:protected] => png [img_width:protected] => [img_height:protected] => [img_credit:protected] => [img_practice:protected] => [vid_source_id:protected] => [vid_running_time:protected] => [vid_intended_audience:protected] => [vid_acquisition_info:protected] => [vid_cost:protected] => [vid_producer:protected] => [vid_filename:protected] => [vid_filename_downloadable:protected] => [date_summary:protected] => 2014 [date_permission_requested:protected] => [date_permission_received:protected] => [date_review_needed:protected] => [date_received:protected] => 06/12/14 [date_completed:protected] => 07/28/14 [date_billed:protected] => [date_modified:protected] => 11/02/16 [collBokExports:protected] => [lastBokExportCriteria:BaseElcoshItem:private] => [alreadyInSave:protected] => [alreadyInValidation:protected] => [validationFailures:protected] => Array ( ) [_new:BaseObject:private] => [_deleted:BaseObject:private] => [modifiedColumns:protected] => Array ( ) ) [3] => DocumentRecord Object ( [records:protected] => Array ( ) [recordId:protected] => [searchWordClass:protected] => [searchWordPeerClass:protected] => [bok_record:protected] => [authors:protected] => [organizations:protected] => [collections:protected] => [categories:protected] => [categories_initialized:protected] => [mapped_items:protected] => [content:protected] => [files:protected] => [language:protected] => Language Object ( [id:protected] => 1 [code:protected] => en [name:protected] => English [alreadyInSave:protected] => [alreadyInValidation:protected] => [validationFailures:protected] => Array ( ) [_new:BaseObject:private] => [_deleted:BaseObject:private] => [modifiedColumns:protected] => Array ( ) ) [old_record:protected] => [id:protected] => 3839 [old_id:protected] => [elcosh_id:protected] => d001308 [type:protected] => document [display_type:protected] => HTML w/ PDF [user_id:protected] => 23 [language_id:protected] => 1 [tagging_id:protected] => Bruce Lippy [priority_id:protected] => 1 [title:protected] => TBT4 Move Materials With Assist [total_pages:protected] => 4 [billed_pages:protected] => 4 [publication_number:protected] => [part_of:protected] => [keywords:protected] => lifting, back injury, ergonomics, ergo, MSD, buddy system [comments:protected] => 7-28-2014 Jeff Nelson asked Bruce Lippy about what to do with a sentence included toward the top of the doc, "Fill them in on page 2 'Other Questions.'" -- Bruce said this sentence could be deleted from the HTML. [summary:protected] => This tool box talk is fourth in a series of 6 developed by Washington University in St. Louis on construction ergonomics. This one focuses on preventing back injuries by getting an assist when manually lifting. It recommends using a cart for transporting loads, taking less trips, avoiding carrying materials on the shoulder and helping each other to lift large or heavy materials when a cart or hoist is not available. [transition_comments:protected] => [external_link:protected] => [consol_link:protected] => http://www.cpwrconstructionsolutions.org/hazard/959/lifting-and-carrying-manual-materials-handling.html [more_like_this:protected] => d001303,d001304,d001305,d001306,d001307,d001309 [permission_given_by:protected] => Lisa Jaegers, Washington U. in St. Louis [published:protected] => T [billable:protected] => F [img_name:protected] => [img_ext:protected] => png [img_width:protected] => [img_height:protected] => [img_credit:protected] => [img_practice:protected] => [vid_source_id:protected] => [vid_running_time:protected] => [vid_intended_audience:protected] => [vid_acquisition_info:protected] => [vid_cost:protected] => [vid_producer:protected] => [vid_filename:protected] => [vid_filename_downloadable:protected] => [date_summary:protected] => 2014 [date_permission_requested:protected] => [date_permission_received:protected] => [date_review_needed:protected] => [date_received:protected] => 06/12/14 [date_completed:protected] => 07/29/14 [date_billed:protected] => [date_modified:protected] => 10/09/15 [collBokExports:protected] => [lastBokExportCriteria:BaseElcoshItem:private] => [alreadyInSave:protected] => [alreadyInValidation:protected] => [validationFailures:protected] => Array ( ) [_new:BaseObject:private] => [_deleted:BaseObject:private] => [modifiedColumns:protected] => Array ( ) ) [4] => DocumentRecord Object ( [records:protected] => Array ( ) [recordId:protected] => [searchWordClass:protected] => [searchWordPeerClass:protected] => [bok_record:protected] => [authors:protected] => [organizations:protected] => [collections:protected] => [categories:protected] => [categories_initialized:protected] => [mapped_items:protected] => [content:protected] => [files:protected] => [language:protected] => Language Object ( [id:protected] => 1 [code:protected] => en [name:protected] => English [alreadyInSave:protected] => [alreadyInValidation:protected] => [validationFailures:protected] => Array ( ) [_new:BaseObject:private] => [_deleted:BaseObject:private] => [modifiedColumns:protected] => Array ( ) ) [old_record:protected] => [id:protected] => 3840 [old_id:protected] => [elcosh_id:protected] => d001309 [type:protected] => document [display_type:protected] => HTML w/ PDF [user_id:protected] => 23 [language_id:protected] => 1 [tagging_id:protected] => Bruce Lippy [priority_id:protected] => 1 [title:protected] => TBT5 Manual Tools [total_pages:protected] => 4 [billed_pages:protected] => 4 [publication_number:protected] => [part_of:protected] => [keywords:protected] => ergonomic, hand tools, handles, MSD, musculoskeletal disorder, carpal tunnel [comments:protected] => 7-28-2014 Jeff Nelson asked Bruce Lippy about what to do with a sentence included toward the top of the doc, "Fill them in on page 2 'Other Questions.'" -- Bruce said this sentence could be deleted from the HTML. [summary:protected] => This is the fifth in a series of 6 tool box talks on construction ergonomics produced by the University of Washington in St. Louis. This one focuses on manual tools. It asks the following 6 key questions. Does the tool… 1. Fit the task? 2. Allow a good power grip? 3. Keep the wrist in a straight posture? 4. Feel comfortable? 5. Take less effort than other tools for the task? 6. Work effectively? [transition_comments:protected] => [external_link:protected] => [consol_link:protected] => http://www.cpwrconstructionsolutions.org/masonry/solution/383/ergonomic-hand-tools.html [more_like_this:protected] => d001303,d001304,d001305,d001306,d001307,d001308,d001310 [permission_given_by:protected] => Lisa Jaegers, U. Wash. St. Louis [published:protected] => T [billable:protected] => F [img_name:protected] => [img_ext:protected] => png [img_width:protected] => [img_height:protected] => [img_credit:protected] => [img_practice:protected] => [vid_source_id:protected] => [vid_running_time:protected] => [vid_intended_audience:protected] => [vid_acquisition_info:protected] => [vid_cost:protected] => [vid_producer:protected] => [vid_filename:protected] => [vid_filename_downloadable:protected] => [date_summary:protected] => 2014 [date_permission_requested:protected] => [date_permission_received:protected] => [date_review_needed:protected] => [date_received:protected] => 06/12/14 [date_completed:protected] => 07/29/14 [date_billed:protected] => [date_modified:protected] => 10/09/15 [collBokExports:protected] => [lastBokExportCriteria:BaseElcoshItem:private] => [alreadyInSave:protected] => [alreadyInValidation:protected] => [validationFailures:protected] => Array ( ) [_new:BaseObject:private] => [_deleted:BaseObject:private] => [modifiedColumns:protected] => Array ( ) ) ) ) [collections] => Array ( [3834] => ) [record] => DocumentRecord Object ( [records:protected] => Array ( ) [recordId:protected] => [searchWordClass:protected] => [searchWordPeerClass:protected] => [bok_record:protected] => [authors:protected] => Array ( ) [organizations:protected] => Array ( [182] => Organization Object ( [id:protected] => 182 [elcosh_id:protected] => o000205 [user_id:protected] => 14 [province_id:protected] => 0 [country_id:protected] => 0 [title:protected] => Washington University - St. Louis [address:protected] => [postal_code:protected] => [city:protected] => [department:protected] => [phone:protected] => [fax:protected] => [email:protected] => [website:protected] => [filename:protected] => [about:protected] => [comments:protected] => [logo_available:protected] => T [no_details:protected] => T [date_received:protected] => 2009-08-06 [date_completed:protected] => 2009-08-06 [date_billed:protected] => [alreadyInSave:protected] => [alreadyInValidation:protected] => [validationFailures:protected] => Array ( ) [_new:BaseObject:private] => [_deleted:BaseObject:private] => [modifiedColumns:protected] => Array ( ) ) ) [collections:protected] => Array ( [3834] => ) [categories:protected] => [categories_initialized:protected] => [mapped_items:protected] => Array ( [3833] => DocumentRecord Object ( [records:protected] => Array ( ) [recordId:protected] => [searchWordClass:protected] => [searchWordPeerClass:protected] => [bok_record:protected] => [authors:protected] => [organizations:protected] => [collections:protected] => [categories:protected] => [categories_initialized:protected] => [mapped_items:protected] => [content:protected] => [files:protected] => [language:protected] => [old_record:protected] => [id:protected] => 3833 [old_id:protected] => [elcosh_id:protected] => d001303 [type:protected] => document [display_type:protected] => HTML w/ PDF [user_id:protected] => 25 [language_id:protected] => 1 [tagging_id:protected] => Bruce Lippy [priority_id:protected] => 1 [title:protected] => Overview of Toolbox Talks on Ergonomics Developed by Washington University in St. Louis [total_pages:protected] => 3 [billed_pages:protected] => 3 [publication_number:protected] => [part_of:protected] => [keywords:protected] => ergonomics, musculoskeletal disorders, MSDs [comments:protected] => 7-28-2014 - Originally submitted as "HTML w/ doc and PDF", Jeff Nelson asked Bruce Lippy for permission to switch it to "HTML w/ PDF" -- permission was given [summary:protected] => This overviews provides a background on how Washington University in St. Louis developed this series of six toolbox talks on ergonomics. It also describes how they tested the effectiveness of these communication tools, concluding that the guide was valuable for improving the delivery of ergonomics training and interaction between the safety representative and workers. The researchers recommend preparing site-specific information prior to the talk and interacting with workers to discuss problems and ergonomic solutions during the safety meetings. [transition_comments:protected] => [external_link:protected] => [consol_link:protected] => [more_like_this:protected] => [permission_given_by:protected] => Lisa Jaegers, Washington U. in St. Louis [published:protected] => T [billable:protected] => F [img_name:protected] => [img_ext:protected] => png [img_width:protected] => [img_height:protected] => [img_credit:protected] => [img_practice:protected] => [vid_source_id:protected] => [vid_running_time:protected] => [vid_intended_audience:protected] => [vid_acquisition_info:protected] => [vid_cost:protected] => [vid_producer:protected] => [vid_filename:protected] => [vid_filename_downloadable:protected] => [date_summary:protected] => 2014 [date_permission_requested:protected] => [date_permission_received:protected] => [date_review_needed:protected] => [date_received:protected] => 06/11/14 [date_completed:protected] => 07/29/14 [date_billed:protected] => [date_modified:protected] => 07/29/14 [collBokExports:protected] => [lastBokExportCriteria:BaseElcoshItem:private] => [alreadyInSave:protected] => [alreadyInValidation:protected] => [validationFailures:protected] => Array ( ) [_new:BaseObject:private] => [_deleted:BaseObject:private] => [modifiedColumns:protected] => Array ( ) ) [3835] => DocumentRecord Object ( [records:protected] => Array ( ) [recordId:protected] => [searchWordClass:protected] => [searchWordPeerClass:protected] => [bok_record:protected] => [authors:protected] => [organizations:protected] => [collections:protected] => [categories:protected] => [categories_initialized:protected] => [mapped_items:protected] => [content:protected] => [files:protected] => [language:protected] => [old_record:protected] => [id:protected] => 3835 [old_id:protected] => [elcosh_id:protected] => d001304 [type:protected] => document [display_type:protected] => HTML w/ PDF [user_id:protected] => 25 [language_id:protected] => 1 [tagging_id:protected] => Bruce Lippy [priority_id:protected] => 1 [title:protected] => Ergonomics Tool Box Talks (TBT) Training Guide [total_pages:protected] => 2 [billed_pages:protected] => 2 [publication_number:protected] => [part_of:protected] => [keywords:protected] => Ergonomics, carpal tunnel, muscular skeletal disorders, msd [comments:protected] => [summary:protected] => CPWR-funded ergonomics research by Washington University at St. Louis led to the development of 6 tool box talks. This guide is an explanation of how to deliver the talks for maximum effectiveness. This guide should be reviewed before delivering any of the talks because it makes important recommendations like: • If possible, give the TBTs as a part of the crew’s regular safety meetings so that ergonomics is included in the safety discussion. • Try to locate an area with few distractions for gathering the crew. • For a team approach, invite the work crew, site superintendent, project manager and other general contractor and/or subcontractor reps who you feel may be helpful in supporting the training and ergonomics solutions. [transition_comments:protected] => [external_link:protected] => [consol_link:protected] => [more_like_this:protected] => d001303,d001305,d001306,d001307,d001308,d001309,d001310 [permission_given_by:protected] => [published:protected] => T [billable:protected] => F [img_name:protected] => [img_ext:protected] => png [img_width:protected] => [img_height:protected] => [img_credit:protected] => [img_practice:protected] => [vid_source_id:protected] => [vid_running_time:protected] => [vid_intended_audience:protected] => [vid_acquisition_info:protected] => [vid_cost:protected] => [vid_producer:protected] => [vid_filename:protected] => [vid_filename_downloadable:protected] => [date_summary:protected] => 2014 [date_permission_requested:protected] => [date_permission_received:protected] => [date_review_needed:protected] => [date_received:protected] => 06/12/14 [date_completed:protected] => 07/29/14 [date_billed:protected] => [date_modified:protected] => 07/29/14 [collBokExports:protected] => [lastBokExportCriteria:BaseElcoshItem:private] => [alreadyInSave:protected] => [alreadyInValidation:protected] => [validationFailures:protected] => Array ( ) [_new:BaseObject:private] => [_deleted:BaseObject:private] => [modifiedColumns:protected] => Array ( ) ) [3836] => DocumentRecord Object ( [records:protected] => Array ( ) [recordId:protected] => [searchWordClass:protected] => [searchWordPeerClass:protected] => [bok_record:protected] => [authors:protected] => [organizations:protected] => [collections:protected] => [categories:protected] => [categories_initialized:protected] => [mapped_items:protected] => [content:protected] => [files:protected] => [language:protected] => [old_record:protected] => [id:protected] => 3836 [old_id:protected] => [elcosh_id:protected] => d001305 [type:protected] => document [display_type:protected] => HTML w/ PDF [user_id:protected] => 25 [language_id:protected] => 1 [tagging_id:protected] => Bruce Lippy [priority_id:protected] => 1 [title:protected] => TBT1 Ergonomics in Construction [total_pages:protected] => 5 [billed_pages:protected] => 5 [publication_number:protected] => [part_of:protected] => [keywords:protected] => ergonomics, ergo, msd, musculoskeletal disorders, risk factors, lifting, carpal tunnel, repetition, awkward postures [comments:protected] => 7-28-2014 Jeff Nelson asked Bruce Lippy about what to do with a sentence included toward the top of the doc, "Fill them in on page 2 'Other Questions.'" -- Bruce said this sentence could be deleted from the HTML. [summary:protected] => This is the first in a series of 6 Tool Box Talks produced by Washington University in St. Louis on ergonomics in construction work. This one should be delivered first because it covers what ergonomics is, why construction workers need to talk about it, what the risk factors are for developing a health problem and how to prevent these problems. [transition_comments:protected] => [external_link:protected] => [consol_link:protected] => http://www.cpwrconstructionsolutions.org/pipes_vessels/solution/50/participatory-ergonomics-program.html [more_like_this:protected] => d001303,d001304,d001306,d001307,d001308,d001309 [permission_given_by:protected] => Lisa Jaegers, Washington U. in St. Louis [published:protected] => T [billable:protected] => F [img_name:protected] => [img_ext:protected] => png [img_width:protected] => [img_height:protected] => [img_credit:protected] => [img_practice:protected] => [vid_source_id:protected] => [vid_running_time:protected] => [vid_intended_audience:protected] => [vid_acquisition_info:protected] => [vid_cost:protected] => [vid_producer:protected] => [vid_filename:protected] => [vid_filename_downloadable:protected] => [date_summary:protected] => 2014 [date_permission_requested:protected] => [date_permission_received:protected] => [date_review_needed:protected] => [date_received:protected] => 06/12/14 [date_completed:protected] => 07/28/14 [date_billed:protected] => [date_modified:protected] => 10/09/15 [collBokExports:protected] => [lastBokExportCriteria:BaseElcoshItem:private] => [alreadyInSave:protected] => [alreadyInValidation:protected] => [validationFailures:protected] => Array ( ) [_new:BaseObject:private] => [_deleted:BaseObject:private] => [modifiedColumns:protected] => Array ( ) ) [3837] => DocumentRecord Object ( [records:protected] => Array ( ) [recordId:protected] => [searchWordClass:protected] => [searchWordPeerClass:protected] => [bok_record:protected] => [authors:protected] => [organizations:protected] => [collections:protected] => [categories:protected] => [categories_initialized:protected] => [mapped_items:protected] => [content:protected] => [files:protected] => [language:protected] => [old_record:protected] => [id:protected] => 3837 [old_id:protected] => [elcosh_id:protected] => d001306 [type:protected] => document [display_type:protected] => HTML w/ PDF [user_id:protected] => 25 [language_id:protected] => 1 [tagging_id:protected] => Bruce Lippy [priority_id:protected] => 1 [title:protected] => TBT2 Keep Reach Close [total_pages:protected] => 4 [billed_pages:protected] => 4 [publication_number:protected] => [part_of:protected] => [keywords:protected] => reach, ergonomic, ergo, MSD, carpal tunnel, repetition, awkward positions [comments:protected] => 7-28-2014 Jeff Nelson asked Bruce Lippy about what to do with a sentence included toward the top of the doc, "Fill them in on page 2 'Other Questions.'" -- Bruce said this sentence could be deleted from the HTML. [summary:protected] => This is the second of six Tool Box Talks created by Washington University in St. Louis on ergonomics in construction. There is a guide with the series that describes how to deliver these talks. This one deals with how to avoid awkward reaching during tasks to prevent injuries. try to work with your hands below your head and close to our body to reduce your risk of shoulder strains and back discomfort. This TBT recommends considering ways to move close to the task, keeping the work area free of obstacles, and talking with each other to provide constructive feedback about your working position. [transition_comments:protected] => [external_link:protected] => [consol_link:protected] => http://www.cpwrconstructionsolutions.org/hazard/959/lifting-and-carrying-manual-materials-handling.html [more_like_this:protected] => d001303,d001304,d001305,d001307,d001308,e001309 [permission_given_by:protected] => [published:protected] => T [billable:protected] => F [img_name:protected] => [img_ext:protected] => png [img_width:protected] => [img_height:protected] => [img_credit:protected] => [img_practice:protected] => [vid_source_id:protected] => [vid_running_time:protected] => [vid_intended_audience:protected] => [vid_acquisition_info:protected] => [vid_cost:protected] => [vid_producer:protected] => [vid_filename:protected] => [vid_filename_downloadable:protected] => [date_summary:protected] => 2014 [date_permission_requested:protected] => [date_permission_received:protected] => [date_review_needed:protected] => [date_received:protected] => 06/12/14 [date_completed:protected] => 07/28/14 [date_billed:protected] => [date_modified:protected] => 11/02/16 [collBokExports:protected] => [lastBokExportCriteria:BaseElcoshItem:private] => [alreadyInSave:protected] => [alreadyInValidation:protected] => [validationFailures:protected] => Array ( ) [_new:BaseObject:private] => [_deleted:BaseObject:private] => [modifiedColumns:protected] => Array ( ) ) [3839] => DocumentRecord Object ( [records:protected] => Array ( ) [recordId:protected] => [searchWordClass:protected] => [searchWordPeerClass:protected] => [bok_record:protected] => [authors:protected] => [organizations:protected] => [collections:protected] => [categories:protected] => [categories_initialized:protected] => [mapped_items:protected] => [content:protected] => [files:protected] => [language:protected] => [old_record:protected] => [id:protected] => 3839 [old_id:protected] => [elcosh_id:protected] => d001308 [type:protected] => document [display_type:protected] => HTML w/ PDF [user_id:protected] => 23 [language_id:protected] => 1 [tagging_id:protected] => Bruce Lippy [priority_id:protected] => 1 [title:protected] => TBT4 Move Materials With Assist [total_pages:protected] => 4 [billed_pages:protected] => 4 [publication_number:protected] => [part_of:protected] => [keywords:protected] => lifting, back injury, ergonomics, ergo, MSD, buddy system [comments:protected] => 7-28-2014 Jeff Nelson asked Bruce Lippy about what to do with a sentence included toward the top of the doc, "Fill them in on page 2 'Other Questions.'" -- Bruce said this sentence could be deleted from the HTML. [summary:protected] => This tool box talk is fourth in a series of 6 developed by Washington University in St. Louis on construction ergonomics. This one focuses on preventing back injuries by getting an assist when manually lifting. It recommends using a cart for transporting loads, taking less trips, avoiding carrying materials on the shoulder and helping each other to lift large or heavy materials when a cart or hoist is not available. [transition_comments:protected] => [external_link:protected] => [consol_link:protected] => http://www.cpwrconstructionsolutions.org/hazard/959/lifting-and-carrying-manual-materials-handling.html [more_like_this:protected] => d001303,d001304,d001305,d001306,d001307,d001309 [permission_given_by:protected] => Lisa Jaegers, Washington U. in St. Louis [published:protected] => T [billable:protected] => F [img_name:protected] => [img_ext:protected] => png [img_width:protected] => [img_height:protected] => [img_credit:protected] => [img_practice:protected] => [vid_source_id:protected] => [vid_running_time:protected] => [vid_intended_audience:protected] => [vid_acquisition_info:protected] => [vid_cost:protected] => [vid_producer:protected] => [vid_filename:protected] => [vid_filename_downloadable:protected] => [date_summary:protected] => 2014 [date_permission_requested:protected] => [date_permission_received:protected] => [date_review_needed:protected] => [date_received:protected] => 06/12/14 [date_completed:protected] => 07/29/14 [date_billed:protected] => [date_modified:protected] => 10/09/15 [collBokExports:protected] => [lastBokExportCriteria:BaseElcoshItem:private] => [alreadyInSave:protected] => [alreadyInValidation:protected] => [validationFailures:protected] => Array ( ) [_new:BaseObject:private] => [_deleted:BaseObject:private] => [modifiedColumns:protected] => Array ( ) ) [3840] => DocumentRecord Object ( [records:protected] => Array ( ) [recordId:protected] => [searchWordClass:protected] => [searchWordPeerClass:protected] => [bok_record:protected] => [authors:protected] => [organizations:protected] => [collections:protected] => [categories:protected] => [categories_initialized:protected] => [mapped_items:protected] => [content:protected] => [files:protected] => [language:protected] => [old_record:protected] => [id:protected] => 3840 [old_id:protected] => [elcosh_id:protected] => d001309 [type:protected] => document [display_type:protected] => HTML w/ PDF [user_id:protected] => 23 [language_id:protected] => 1 [tagging_id:protected] => Bruce Lippy [priority_id:protected] => 1 [title:protected] => TBT5 Manual Tools [total_pages:protected] => 4 [billed_pages:protected] => 4 [publication_number:protected] => [part_of:protected] => [keywords:protected] => ergonomic, hand tools, handles, MSD, musculoskeletal disorder, carpal tunnel [comments:protected] => 7-28-2014 Jeff Nelson asked Bruce Lippy about what to do with a sentence included toward the top of the doc, "Fill them in on page 2 'Other Questions.'" -- Bruce said this sentence could be deleted from the HTML. [summary:protected] => This is the fifth in a series of 6 tool box talks on construction ergonomics produced by the University of Washington in St. Louis. This one focuses on manual tools. It asks the following 6 key questions. Does the tool… 1. Fit the task? 2. Allow a good power grip? 3. Keep the wrist in a straight posture? 4. Feel comfortable? 5. Take less effort than other tools for the task? 6. Work effectively? [transition_comments:protected] => [external_link:protected] => [consol_link:protected] => http://www.cpwrconstructionsolutions.org/masonry/solution/383/ergonomic-hand-tools.html [more_like_this:protected] => d001303,d001304,d001305,d001306,d001307,d001308,d001310 [permission_given_by:protected] => Lisa Jaegers, U. Wash. St. Louis [published:protected] => T [billable:protected] => F [img_name:protected] => [img_ext:protected] => png [img_width:protected] => [img_height:protected] => [img_credit:protected] => [img_practice:protected] => [vid_source_id:protected] => [vid_running_time:protected] => [vid_intended_audience:protected] => [vid_acquisition_info:protected] => [vid_cost:protected] => [vid_producer:protected] => [vid_filename:protected] => [vid_filename_downloadable:protected] => [date_summary:protected] => 2014 [date_permission_requested:protected] => [date_permission_received:protected] => [date_review_needed:protected] => [date_received:protected] => 06/12/14 [date_completed:protected] => 07/29/14 [date_billed:protected] => [date_modified:protected] => 10/09/15 [collBokExports:protected] => [lastBokExportCriteria:BaseElcoshItem:private] => [alreadyInSave:protected] => [alreadyInValidation:protected] => [validationFailures:protected] => Array ( ) [_new:BaseObject:private] => [_deleted:BaseObject:private] => [modifiedColumns:protected] => Array ( ) ) ) [content:protected] => [files:protected] => Array ( [559] => [560] => [546] => File Object ( [id:protected] => 546 [filename:protected] => 3.jpg [downloadable:protected] => F [timestamp:protected] => 2009-07-03 12:54:22 [alreadyInSave:protected] => [alreadyInValidation:protected] => [validationFailures:protected] => Array ( ) [_new:BaseObject:private] => [_deleted:BaseObject:private] => [modifiedColumns:protected] => Array ( ) ) [9643] => File Object ( [id:protected] => 9643 [filename:protected] => d001307.pdf [downloadable:protected] => T [timestamp:protected] => 2014-07-27 19:09:19 [alreadyInSave:protected] => [alreadyInValidation:protected] => [validationFailures:protected] => Array ( ) [_new:BaseObject:private] => [_deleted:BaseObject:private] => [modifiedColumns:protected] => Array ( ) ) [566] => File Object ( [id:protected] => 566 [filename:protected] => 4.jpg [downloadable:protected] => F [timestamp:protected] => 2009-07-03 12:54:23 [alreadyInSave:protected] => [alreadyInValidation:protected] => [validationFailures:protected] => Array ( ) [_new:BaseObject:private] => [_deleted:BaseObject:private] => [modifiedColumns:protected] => Array ( ) ) ) [language:protected] => Language Object ( [id:protected] => 1 [code:protected] => en [name:protected] => English [alreadyInSave:protected] => [alreadyInValidation:protected] => [validationFailures:protected] => Array ( ) [_new:BaseObject:private] => [_deleted:BaseObject:private] => [modifiedColumns:protected] => Array ( ) ) [old_record:protected] => [id:protected] => 3838 [old_id:protected] => [elcosh_id:protected] => d001307 [type:protected] => document [display_type:protected] => HTML w/ PDF [user_id:protected] => 25 [language_id:protected] => 1 [tagging_id:protected] => Bruce Lippy [priority_id:protected] => 1 [title:protected] => TBT3 Positioning [total_pages:protected] => 4 [billed_pages:protected] => 4 [publication_number:protected] => [part_of:protected] => [keywords:protected] => position, positioning, ergonomics, ergo, carpal tunnel, MSD, musculoskeletal disorder [comments:protected] => 7-28-2014 Jeff Nelson asked Bruce Lippy about what to do with a sentence included toward the top of the doc, "Fill them in on page 2 'Other Questions.'" -- Bruce said this sentence could be deleted from the HTML. [summary:protected] => This third in a series of 6 Tool Box Talks on construction ergonomics focuses on proper positioning to avoid injuries. The TBT recommends: 1)prop up a task off of the floor by using a raised surface, cart, baker scaffold, saw horses to prep materials near waist height, 2)move the lift or ladder in the best position for the work, 3)position the lift in front of the area you plan to work without trying to reach too far on either side of the lift. [transition_comments:protected] => [external_link:protected] => [consol_link:protected] => http://www.cpwrconstructionsolutions.org/hazard/959/lifting-and-carrying-manual-materials-handling.html [more_like_this:protected] => d001303,d001304,d001305,d001306,d001308,d001309 [permission_given_by:protected] => Lisa Jaegers, WU-St. Louis [published:protected] => T [billable:protected] => F [img_name:protected] => [img_ext:protected] => png [img_width:protected] => [img_height:protected] => [img_credit:protected] => [img_practice:protected] => [vid_source_id:protected] => [vid_running_time:protected] => [vid_intended_audience:protected] => [vid_acquisition_info:protected] => [vid_cost:protected] => [vid_producer:protected] => [vid_filename:protected] => [vid_filename_downloadable:protected] => [date_summary:protected] => 2014 [date_permission_requested:protected] => [date_permission_received:protected] => [date_review_needed:protected] => [date_received:protected] => 06/12/14 [date_completed:protected] => 07/28/14 [date_billed:protected] => [date_modified:protected] => 10/09/15 [collBokExports:protected] => [lastBokExportCriteria:BaseElcoshItem:private] => [alreadyInSave:protected] => [alreadyInValidation:protected] => [validationFailures:protected] => Array ( ) [_new:BaseObject:private] => [_deleted:BaseObject:private] => [modifiedColumns:protected] => Array ( ) ) [show_text] => [document_content] => ElcoshItemDocumentContent Object ( [id:protected] => 2906 [item_id:protected] => 3838 [type:protected] => main [title:protected] => [content:protected] =>
Facilitator / Leader Tasks Before the Tool Box Talk (TBT)
- Read through this TBT guide.
- Walk the job site to find ergonomics examples based on the TBT. If possible, take photos of “safe” and “unsafe” examples at the site to be used during the TBT.
- Write down discussion questions to ask the group.
Learning Goals
After discussing this training topic, workers will have gained a general understanding of:
- Unsafe work positions.
- Solutions to improve work positioning.
TRAINING CARD
The last page of this PDF has directions for printing and laminating the training cards.
TRAINER’S TALKING POINTS
Why should we talk about positioning?
Construction work requires working in high, low, and tight spaces which often forces you to work in an awkward or uncomfortable position. Working in awkward reaching and bent positions can lead to shoulder and back discomfort and possible injury over time.
Demonstration: The training card provides examples of the range of reaching and the point at which the reach is unsafe. Hold your arms straight out in front of you. Look at your hands and wrists while I discuss each of the reach zones on the training card.
The Green Zone shows the ideal location for working with your hands. When possible, try to keep your work tasks as far out as your wrists.
The Orange Zone is for occasional work since it involves more weight on your shoulders and low back since your hands are away from your body. If needed, keep the reach distance as far as your fingertips.
The Red Zone is away from your body so far that it places you at higher risk for falls when in the air and shoulder and back discomfort. Limit the time you work reaching beyond your fingertips.
End of Demonstration
Discussion Question: Can anyone describe to us an awkward position that they work in or have seen someone work in?
- What does it feel like in your neck, back or arms when working in that position?
- Other Questions:_____________________________________________
Training Note: Here are examples of hazards in different construction trades. Choose your trade or one that is similar to your group’s line of work that can be used as hazards and solutions examples.
| Trade | Awkward Posture Hazards | Potential Solution |
|---|---|---|
| Carpenter-Drywall | Leaning over the side of a scissor lift to reach and operating a screw gun with the arm fully extended (reaching in the red zone past the fingertips). | Before starting to install the line of screws to the side of the lift, move the lift to re-center it for the next 2 lines of screws to be installed. |
| Floor Layer | Spreading mortar overhead on a wall with the bakers scaffold one foot away from the wall due to buckets on the floor below (reach in the red zone, past the fingertips). | Pre-plan this task by removing all objects in the path of the bakers scaffold. Having an open path allows you to work closer to the task. |
| Sheet Metal Worker | Prepping duct parts on the floor while bending the back and reaching to work on them. | Pre-plan this task by setting up a waist-height workstation on extra materials, a cart, or saw horses. |
Now let’s put this information into practice. What are some tricks or techniques that you use to work in a comfortable position?
- Other Questions:_____________________________________________
Here are a few other ideas that are listed on your training card:
Prop up your tasks off of the floor by using a raised surface, cart, baker scaffold, saw horses to prep materials near waist height.
Move the lift or ladder in the best position for the work – close to the work tasks.
For safety & comfort, try to position the lift in front of the area you plan to work without trying to reach too far on either side of the lift.
In summary, it is important to work in a safe position when possible in order to reduce the risk of falls and discomfort due to awkward working positions. Consider ways that you can work in the green/comfort zone and orange zone and avoid the unsafe red zone.
References
[Images modified from Grandjean & Eastman Kodak Co.]
1. Grandjean, E. 1988. Fitting the task to the man: A textbook of occupational ergonomics. 4th ed. Taylor & Francis.
2. Eastman Kodak Co. 1983. Ergonomic Design for People at Work. Vol 1. Wiley, John & Sons, Incorporated.
Refer to the resources at our website: oshr.im.wustl.edu for more Tool Box TIPS.
TRAINING ATTENDANCE SHEET
Training Topic: Ergonomics -- Positioning
Date:
| ATTENDEES | |
|---|---|
Directions for Making Laminated Training Cards
The last page of this PDF has directions for printing and laminating the training cards.
[content_transformed:protected] =>Facilitator / Leader Tasks Before the Tool Box Talk (TBT)
- Read through this TBT guide.
- Walk the job site to find ergonomics examples based on the TBT. If possible, take photos of “safe” and “unsafe” examples at the site to be used during the TBT.
- Write down discussion questions to ask the group.
Learning Goals
After discussing this training topic, workers will have gained a general understanding of:
- Unsafe work positions.
- Solutions to improve work positioning.
TRAINING CARD
The last page of this PDF has directions for printing and laminating the training cards.
TRAINER’S TALKING POINTS
Why should we talk about positioning?
Construction work requires working in high, low, and tight spaces which often forces you to work in an awkward or uncomfortable position. Working in awkward reaching and bent positions can lead to shoulder and back discomfort and possible injury over time.
Demonstration: The training card provides examples of the range of reaching and the point at which the reach is unsafe. Hold your arms straight out in front of you. Look at your hands and wrists while I discuss each of the reach zones on the training card.
The Green Zone shows the ideal location for working with your hands. When possible, try to keep your work tasks as far out as your wrists.
The Orange Zone is for occasional work since it involves more weight on your shoulders and low back since your hands are away from your body. If needed, keep the reach distance as far as your fingertips.
The Red Zone is away from your body so far that it places you at higher risk for falls when in the air and shoulder and back discomfort. Limit the time you work reaching beyond your fingertips.
End of Demonstration
Discussion Question: Can anyone describe to us an awkward position that they work in or have seen someone work in?
- What does it feel like in your neck, back or arms when working in that position?
- Other Questions:_____________________________________________
Training Note: Here are examples of hazards in different construction trades. Choose your trade or one that is similar to your group’s line of work that can be used as hazards and solutions examples.
| Trade | Awkward Posture Hazards | Potential Solution |
|---|---|---|
| Carpenter-Drywall | Leaning over the side of a scissor lift to reach and operating a screw gun with the arm fully extended (reaching in the red zone past the fingertips). | Before starting to install the line of screws to the side of the lift, move the lift to re-center it for the next 2 lines of screws to be installed. |
| Floor Layer | Spreading mortar overhead on a wall with the bakers scaffold one foot away from the wall due to buckets on the floor below (reach in the red zone, past the fingertips). | Pre-plan this task by removing all objects in the path of the bakers scaffold. Having an open path allows you to work closer to the task. |
| Sheet Metal Worker | Prepping duct parts on the floor while bending the back and reaching to work on them. | Pre-plan this task by setting up a waist-height workstation on extra materials, a cart, or saw horses. |
Now let’s put this information into practice. What are some tricks or techniques that you use to work in a comfortable position?
- Other Questions:_____________________________________________
Here are a few other ideas that are listed on your training card:
Prop up your tasks off of the floor by using a raised surface, cart, baker scaffold, saw horses to prep materials near waist height.
Move the lift or ladder in the best position for the work – close to the work tasks.
For safety & comfort, try to position the lift in front of the area you plan to work without trying to reach too far on either side of the lift.
In summary, it is important to work in a safe position when possible in order to reduce the risk of falls and discomfort due to awkward working positions. Consider ways that you can work in the green/comfort zone and orange zone and avoid the unsafe red zone.
References
[Images modified from Grandjean & Eastman Kodak Co.]
1. Grandjean, E. 1988. Fitting the task to the man: A textbook of occupational ergonomics. 4th ed. Taylor & Francis.
2. Eastman Kodak Co. 1983. Ergonomic Design for People at Work. Vol 1. Wiley, John & Sons, Incorporated.
Refer to the resources at our website: oshr.im.wustl.edu for more Tool Box TIPS.
TRAINING ATTENDANCE SHEET
Training Topic: Ergonomics -- Positioning
Date:
| ATTENDEES | |
|---|---|
Directions for Making Laminated Training Cards
The last page of this PDF has directions for printing and laminating the training cards.
[disclaimer:protected] => [disclaimer_transformed:protected] => [alreadyInSave:protected] => [alreadyInValidation:protected] => [validationFailures:protected] => Array ( ) [_new:BaseObject:private] => [_deleted:BaseObject:private] => [modifiedColumns:protected] => Array ( ) ) [template] => record ) [_globalContext:PHPTAL_Context:private] => stdClass Object ( ) [_echoDeclarations:PHPTAL_Context:private] => [referer] => http://elcosh.org/document/3838/d001307/TBT3%2BPositioning.html [curr_module] => Record [styles] => Array ( ) [javascript] => Array ( [0] => jquery.min.js ) [metas] => Array ( [language] => en [robots] => index, follow ) [user] => [curr_url] => https://elcosh.org/index.php?module=Record&id=3838&type=document [base_url] => https://elcosh.org/index.php?module=Record [title] => eLCOSH : TBT3 Positioning [language] => en [search_query] => [module] => Record [new_records] => Array ( [0] => Search_Result Object ( [title] => Toolbox Talk: Fixed Ladder [image] => /record/images/notavailable-p.png [blurb] => The CPWR Toolbox Talk on Fixed Ladders addresses the potential risks associated with using fixed ladders. The resource includes a brief case example,... [category] => Array ( [0] => 15 [1] => 47 [2] => 49 [3] => 51 [4] => 53 [5] => 55 [6] => 60 [7] => 64 [8] => 73 [9] => 76 [10] => 78 [11] => 80 [12] => 86 [13] => 87 [14] => 90 [15] => 92 [16] => 93 [17] => 94 [18] => 100 ) [labels] => Array ( [0] => Falls [1] => Work Environment [2] => Hazards [3] => Bricklayer [4] => Trades [5] => Carpenter [7] => Cement Mason [9] => Concrete Polisher [11] => Electrical Worker [13] => HVAC [15] => Laborer [17] => PCC/Restoration [19] => Plumber/Pipefitter [21] => Roofer/Waterproofer [23] => Sheetmetal Worker [25] => Welder [27] => Commercial & Institutional [28] => Jobsites [29] => Industrial [31] => LEED/Green Construction [33] => Renovations [35] => Residential [37] => Toolbox Talks [38] => Documents [39] => Media & Documents ) [type] => Toolbox Talks [sub_category] => [url] => /document/4430/d001660/Toolbox%2BTalk%253A%2BFixed%2BLadder.html [item:protected] => DocumentRecord Object ( [records:protected] => Array ( ) [recordId:protected] => [searchWordClass:protected] => [searchWordPeerClass:protected] => [bok_record:protected] => [authors:protected] => [organizations:protected] => [collections:protected] => [categories:protected] => Array ( [15] => Category Object ( [languages:protected] => [bok_resources:protected] => [bok_topics:protected] => [bok_keywords:protected] => [id:protected] => 15 [type:protected] => category [parent:protected] => 7 [label:protected] => Falls [alreadyInSave:protected] => [alreadyInValidation:protected] => [validationFailures:protected] => Array ( ) [_new:BaseObject:private] => [_deleted:BaseObject:private] => [modifiedColumns:protected] => Array ( ) ) [47] => Category Object ( [languages:protected] => [bok_resources:protected] => [bok_topics:protected] => [bok_keywords:protected] => [id:protected] => 47 [type:protected] => category [parent:protected] => 2 [label:protected] => Bricklayer [alreadyInSave:protected] => [alreadyInValidation:protected] => [validationFailures:protected] => Array ( ) [_new:BaseObject:private] => [_deleted:BaseObject:private] => [modifiedColumns:protected] => Array ( ) ) [49] => Category Object ( [languages:protected] => [bok_resources:protected] => [bok_topics:protected] => [bok_keywords:protected] => [id:protected] => 49 [type:protected] => category [parent:protected] => 2 [label:protected] => Carpenter [alreadyInSave:protected] => [alreadyInValidation:protected] => [validationFailures:protected] => Array ( ) [_new:BaseObject:private] => [_deleted:BaseObject:private] => [modifiedColumns:protected] => Array ( ) ) [51] => Category Object ( [languages:protected] => [bok_resources:protected] => [bok_topics:protected] => [bok_keywords:protected] => [id:protected] => 51 [type:protected] => category [parent:protected] => 2 [label:protected] => Cement Mason [alreadyInSave:protected] => [alreadyInValidation:protected] => [validationFailures:protected] => Array ( ) [_new:BaseObject:private] => [_deleted:BaseObject:private] => [modifiedColumns:protected] => Array ( ) ) [53] => Category Object ( [languages:protected] => [bok_resources:protected] => [bok_topics:protected] => [bok_keywords:protected] => [id:protected] => 53 [type:protected] => category [parent:protected] => 2 [label:protected] => Concrete Polisher [alreadyInSave:protected] => [alreadyInValidation:protected] => [validationFailures:protected] => Array ( ) [_new:BaseObject:private] => [_deleted:BaseObject:private] => [modifiedColumns:protected] => Array ( ) ) [55] => Category Object ( [languages:protected] => [bok_resources:protected] => [bok_topics:protected] => [bok_keywords:protected] => [id:protected] => 55 [type:protected] => category [parent:protected] => 2 [label:protected] => Electrical Worker [alreadyInSave:protected] => [alreadyInValidation:protected] => [validationFailures:protected] => Array ( ) [_new:BaseObject:private] => [_deleted:BaseObject:private] => [modifiedColumns:protected] => Array ( ) ) [60] => Category Object ( [languages:protected] => [bok_resources:protected] => [bok_topics:protected] => [bok_keywords:protected] => [id:protected] => 60 [type:protected] => category [parent:protected] => 2 [label:protected] => HVAC [alreadyInSave:protected] => [alreadyInValidation:protected] => [validationFailures:protected] => Array ( ) [_new:BaseObject:private] => [_deleted:BaseObject:private] => [modifiedColumns:protected] => Array ( ) ) [64] => Category Object ( [languages:protected] => [bok_resources:protected] => [bok_topics:protected] => [bok_keywords:protected] => [id:protected] => 64 [type:protected] => category [parent:protected] => 2 [label:protected] => Laborer [alreadyInSave:protected] => [alreadyInValidation:protected] => [validationFailures:protected] => Array ( ) [_new:BaseObject:private] => [_deleted:BaseObject:private] => [modifiedColumns:protected] => Array ( ) ) [73] => Category Object ( [languages:protected] => [bok_resources:protected] => [bok_topics:protected] => [bok_keywords:protected] => [id:protected] => 73 [type:protected] => category [parent:protected] => 2 [label:protected] => PCC/Restoration [alreadyInSave:protected] => [alreadyInValidation:protected] => [validationFailures:protected] => Array ( ) [_new:BaseObject:private] => [_deleted:BaseObject:private] => [modifiedColumns:protected] => Array ( ) ) [76] => Category Object ( [languages:protected] => [bok_resources:protected] => [bok_topics:protected] => [bok_keywords:protected] => [id:protected] => 76 [type:protected] => category [parent:protected] => 2 [label:protected] => Plumber/Pipefitter [alreadyInSave:protected] => [alreadyInValidation:protected] => [validationFailures:protected] => Array ( ) [_new:BaseObject:private] => [_deleted:BaseObject:private] => [modifiedColumns:protected] => Array ( ) ) [78] => Category Object ( [languages:protected] => [bok_resources:protected] => [bok_topics:protected] => [bok_keywords:protected] => [id:protected] => 78 [type:protected] => category [parent:protected] => 2 [label:protected] => Roofer/Waterproofer [alreadyInSave:protected] => [alreadyInValidation:protected] => [validationFailures:protected] => Array ( ) [_new:BaseObject:private] => [_deleted:BaseObject:private] => [modifiedColumns:protected] => Array ( ) ) [80] => Category Object ( [languages:protected] => [bok_resources:protected] => [bok_topics:protected] => [bok_keywords:protected] => [id:protected] => 80 [type:protected] => category [parent:protected] => 2 [label:protected] => Sheetmetal Worker [alreadyInSave:protected] => [alreadyInValidation:protected] => [validationFailures:protected] => Array ( ) [_new:BaseObject:private] => [_deleted:BaseObject:private] => [modifiedColumns:protected] => Array ( ) ) [86] => Category Object ( [languages:protected] => [bok_resources:protected] => [bok_topics:protected] => [bok_keywords:protected] => [id:protected] => 86 [type:protected] => category [parent:protected] => 2 [label:protected] => Welder [alreadyInSave:protected] => [alreadyInValidation:protected] => [validationFailures:protected] => Array ( ) [_new:BaseObject:private] => [_deleted:BaseObject:private] => [modifiedColumns:protected] => Array ( ) ) [87] => Category Object ( [languages:protected] => [bok_resources:protected] => [bok_topics:protected] => [bok_keywords:protected] => [id:protected] => 87 [type:protected] => category [parent:protected] => 3 [label:protected] => Commercial & Institutional [alreadyInSave:protected] => [alreadyInValidation:protected] => [validationFailures:protected] => Array ( ) [_new:BaseObject:private] => [_deleted:BaseObject:private] => [modifiedColumns:protected] => Array ( ) ) [90] => Category Object ( [languages:protected] => [bok_resources:protected] => [bok_topics:protected] => [bok_keywords:protected] => [id:protected] => 90 [type:protected] => category [parent:protected] => 3 [label:protected] => Industrial [alreadyInSave:protected] => [alreadyInValidation:protected] => [validationFailures:protected] => Array ( ) [_new:BaseObject:private] => [_deleted:BaseObject:private] => [modifiedColumns:protected] => Array ( ) ) [92] => Category Object ( [languages:protected] => [bok_resources:protected] => [bok_topics:protected] => [bok_keywords:protected] => [id:protected] => 92 [type:protected] => category [parent:protected] => 3 [label:protected] => LEED/Green Construction [alreadyInSave:protected] => [alreadyInValidation:protected] => [validationFailures:protected] => Array ( ) [_new:BaseObject:private] => [_deleted:BaseObject:private] => [modifiedColumns:protected] => Array ( ) ) [93] => Category Object ( [languages:protected] => [bok_resources:protected] => [bok_topics:protected] => [bok_keywords:protected] => [id:protected] => 93 [type:protected] => category [parent:protected] => 3 [label:protected] => Renovations [alreadyInSave:protected] => [alreadyInValidation:protected] => [validationFailures:protected] => Array ( ) [_new:BaseObject:private] => [_deleted:BaseObject:private] => [modifiedColumns:protected] => Array ( ) ) [94] => Category Object ( [languages:protected] => [bok_resources:protected] => [bok_topics:protected] => [bok_keywords:protected] => [id:protected] => 94 [type:protected] => category [parent:protected] => 3 [label:protected] => Residential [alreadyInSave:protected] => [alreadyInValidation:protected] => [validationFailures:protected] => Array ( ) [_new:BaseObject:private] => [_deleted:BaseObject:private] => [modifiedColumns:protected] => Array ( ) ) [100] => Category Object ( [languages:protected] => [bok_resources:protected] => [bok_topics:protected] => [bok_keywords:protected] => [id:protected] => 100 [type:protected] => category [parent:protected] => 6 [label:protected] => Toolbox Talks [alreadyInSave:protected] => [alreadyInValidation:protected] => [validationFailures:protected] => Array ( ) [_new:BaseObject:private] => [_deleted:BaseObject:private] => [modifiedColumns:protected] => Array ( ) ) ) [categories_initialized:protected] => 1 [mapped_items:protected] => [content:protected] => [files:protected] => [language:protected] => Language Object ( [id:protected] => 1 [code:protected] => en [name:protected] => English [alreadyInSave:protected] => [alreadyInValidation:protected] => [validationFailures:protected] => Array ( ) [_new:BaseObject:private] => [_deleted:BaseObject:private] => [modifiedColumns:protected] => Array ( ) ) [old_record:protected] => [id:protected] => 4430 [old_id:protected] => [elcosh_id:protected] => d001660 [type:protected] => document [display_type:protected] => HTML only (and links) [user_id:protected] => 0 [language_id:protected] => 1 [tagging_id:protected] => Mike Aguilar [priority_id:protected] => 1 [title:protected] => Toolbox Talk: Fixed Ladder [total_pages:protected] => 0 [billed_pages:protected] => 0 [publication_number:protected] => [part_of:protected] => [keywords:protected] => Fixed Ladders, Fall Prevention, Falls [comments:protected] => [summary:protected] => The CPWR Toolbox Talk on Fixed Ladders addresses the potential risks associated with using fixed ladders. The resource includes a brief case example, steps to prevent a related injury and questions for discussion. It includes an image that illustrates the hazard, which can be posted in a central location as a reminder of steps to work safely. Available in English and Spanish. [transition_comments:protected] => [external_link:protected] => [consol_link:protected] => [more_like_this:protected] => d001257,d001254,d001255,d001256,d001258,d001262,d001279 [permission_given_by:protected] => [published:protected] => T [billable:protected] => F [img_name:protected] => [img_ext:protected] => [img_width:protected] => [img_height:protected] => [img_credit:protected] => [img_practice:protected] => [vid_source_id:protected] => [vid_running_time:protected] => [vid_intended_audience:protected] => [vid_acquisition_info:protected] => [vid_cost:protected] => [vid_producer:protected] => [vid_filename:protected] => [vid_filename_downloadable:protected] => [date_summary:protected] => [date_permission_requested:protected] => [date_permission_received:protected] => [date_review_needed:protected] => [date_received:protected] => 06/10/22 [date_completed:protected] => 06/10/22 [date_billed:protected] => [date_modified:protected] => 06/16/25 [collBokExports:protected] => [lastBokExportCriteria:BaseElcoshItem:private] => [alreadyInSave:protected] => [alreadyInValidation:protected] => [validationFailures:protected] => Array ( ) [_new:BaseObject:private] => [_deleted:BaseObject:private] => [modifiedColumns:protected] => Array ( ) ) ) [1] => Search_Result Object ( [title] => Toolbox Talk: Work Zone Safety: Working Around Vehicles [image] => /record/images/notavailable-p.png [blurb] => The CPWR Toolbox Talk on Working Around Vehicles in the Work Zone addresses methods to avoid being struck-by a vehicle on a construction site. The res... [category] => Array ( [0] => 12 [1] => 18 [2] => 52 [3] => 57 [4] => 70 [5] => 85 [6] => 87 [7] => 88 [8] => 89 [9] => 91 [10] => 90 [11] => 92 [12] => 93 [13] => 94 [14] => 95 [15] => 100 ) [labels] => Array ( [0] => Crushed/Struck By [1] => Work Environment [2] => Hazards [3] => Motor Vehicles/Heavy Equipment [6] => Commercial Diver [7] => Trades [8] => Flagger [10] => Operating Engineer [12] => Truck Driver [14] => Commercial & Institutional [15] => Jobsites [16] => Demolition [18] => Disasters [20] => Heavy & Highway [22] => Industrial [24] => LEED/Green Construction [26] => Renovations [28] => Residential [30] => Underground [32] => Toolbox Talks [33] => Documents [34] => Media & Documents ) [type] => Toolbox Talks [sub_category] => [url] => /document/4428/d001658/Toolbox%2BTalk%253A%2BWork%2BZone%2BSafety%253A%2BWorking%2BAround%2BVehicles.html [item:protected] => DocumentRecord Object ( [records:protected] => Array ( ) [recordId:protected] => [searchWordClass:protected] => [searchWordPeerClass:protected] => [bok_record:protected] => [authors:protected] => [organizations:protected] => [collections:protected] => [categories:protected] => Array ( [12] => Category Object ( [languages:protected] => [bok_resources:protected] => [bok_topics:protected] => [bok_keywords:protected] => [id:protected] => 12 [type:protected] => category [parent:protected] => 7 [label:protected] => Crushed/Struck By [alreadyInSave:protected] => [alreadyInValidation:protected] => [validationFailures:protected] => Array ( ) [_new:BaseObject:private] => [_deleted:BaseObject:private] => [modifiedColumns:protected] => Array ( ) ) [18] => Category Object ( [languages:protected] => [bok_resources:protected] => [bok_topics:protected] => [bok_keywords:protected] => [id:protected] => 18 [type:protected] => category [parent:protected] => 7 [label:protected] => Motor Vehicles/Heavy Equipment [alreadyInSave:protected] => [alreadyInValidation:protected] => [validationFailures:protected] => Array ( ) [_new:BaseObject:private] => [_deleted:BaseObject:private] => [modifiedColumns:protected] => Array ( ) ) [52] => Category Object ( [languages:protected] => [bok_resources:protected] => [bok_topics:protected] => [bok_keywords:protected] => [id:protected] => 52 [type:protected] => category [parent:protected] => 2 [label:protected] => Commercial Diver [alreadyInSave:protected] => [alreadyInValidation:protected] => [validationFailures:protected] => Array ( ) [_new:BaseObject:private] => [_deleted:BaseObject:private] => [modifiedColumns:protected] => Array ( ) ) [57] => Category Object ( [languages:protected] => [bok_resources:protected] => [bok_topics:protected] => [bok_keywords:protected] => [id:protected] => 57 [type:protected] => category [parent:protected] => 2 [label:protected] => Flagger [alreadyInSave:protected] => [alreadyInValidation:protected] => [validationFailures:protected] => Array ( ) [_new:BaseObject:private] => [_deleted:BaseObject:private] => [modifiedColumns:protected] => Array ( ) ) [70] => Category Object ( [languages:protected] => [bok_resources:protected] => [bok_topics:protected] => [bok_keywords:protected] => [id:protected] => 70 [type:protected] => category [parent:protected] => 2 [label:protected] => Operating Engineer [alreadyInSave:protected] => [alreadyInValidation:protected] => [validationFailures:protected] => Array ( ) [_new:BaseObject:private] => [_deleted:BaseObject:private] => [modifiedColumns:protected] => Array ( ) ) [85] => Category Object ( [languages:protected] => [bok_resources:protected] => [bok_topics:protected] => [bok_keywords:protected] => [id:protected] => 85 [type:protected] => category [parent:protected] => 2 [label:protected] => Truck Driver [alreadyInSave:protected] => [alreadyInValidation:protected] => [validationFailures:protected] => Array ( ) [_new:BaseObject:private] => [_deleted:BaseObject:private] => [modifiedColumns:protected] => Array ( ) ) [87] => Category Object ( [languages:protected] => [bok_resources:protected] => [bok_topics:protected] => [bok_keywords:protected] => [id:protected] => 87 [type:protected] => category [parent:protected] => 3 [label:protected] => Commercial & Institutional [alreadyInSave:protected] => [alreadyInValidation:protected] => [validationFailures:protected] => Array ( ) [_new:BaseObject:private] => [_deleted:BaseObject:private] => [modifiedColumns:protected] => Array ( ) ) [88] => Category Object ( [languages:protected] => [bok_resources:protected] => [bok_topics:protected] => [bok_keywords:protected] => [id:protected] => 88 [type:protected] => category [parent:protected] => 3 [label:protected] => Demolition [alreadyInSave:protected] => [alreadyInValidation:protected] => [validationFailures:protected] => Array ( ) [_new:BaseObject:private] => [_deleted:BaseObject:private] => [modifiedColumns:protected] => Array ( ) ) [89] => Category Object ( [languages:protected] => [bok_resources:protected] => [bok_topics:protected] => [bok_keywords:protected] => [id:protected] => 89 [type:protected] => category [parent:protected] => 3 [label:protected] => Disasters [alreadyInSave:protected] => [alreadyInValidation:protected] => [validationFailures:protected] => Array ( ) [_new:BaseObject:private] => [_deleted:BaseObject:private] => [modifiedColumns:protected] => Array ( ) ) [91] => Category Object ( [languages:protected] => [bok_resources:protected] => [bok_topics:protected] => [bok_keywords:protected] => [id:protected] => 91 [type:protected] => category [parent:protected] => 3 [label:protected] => Heavy & Highway [alreadyInSave:protected] => [alreadyInValidation:protected] => [validationFailures:protected] => Array ( ) [_new:BaseObject:private] => [_deleted:BaseObject:private] => [modifiedColumns:protected] => Array ( ) ) [90] => Category Object ( [languages:protected] => [bok_resources:protected] => [bok_topics:protected] => [bok_keywords:protected] => [id:protected] => 90 [type:protected] => category [parent:protected] => 3 [label:protected] => Industrial [alreadyInSave:protected] => [alreadyInValidation:protected] => [validationFailures:protected] => Array ( ) [_new:BaseObject:private] => [_deleted:BaseObject:private] => [modifiedColumns:protected] => Array ( ) ) [92] => Category Object ( [languages:protected] => [bok_resources:protected] => [bok_topics:protected] => [bok_keywords:protected] => [id:protected] => 92 [type:protected] => category [parent:protected] => 3 [label:protected] => LEED/Green Construction [alreadyInSave:protected] => [alreadyInValidation:protected] => [validationFailures:protected] => Array ( ) [_new:BaseObject:private] => [_deleted:BaseObject:private] => [modifiedColumns:protected] => Array ( ) ) [93] => Category Object ( [languages:protected] => [bok_resources:protected] => [bok_topics:protected] => [bok_keywords:protected] => [id:protected] => 93 [type:protected] => category [parent:protected] => 3 [label:protected] => Renovations [alreadyInSave:protected] => [alreadyInValidation:protected] => [validationFailures:protected] => Array ( ) [_new:BaseObject:private] => [_deleted:BaseObject:private] => [modifiedColumns:protected] => Array ( ) ) [94] => Category Object ( [languages:protected] => [bok_resources:protected] => [bok_topics:protected] => [bok_keywords:protected] => [id:protected] => 94 [type:protected] => category [parent:protected] => 3 [label:protected] => Residential [alreadyInSave:protected] => [alreadyInValidation:protected] => [validationFailures:protected] => Array ( ) [_new:BaseObject:private] => [_deleted:BaseObject:private] => [modifiedColumns:protected] => Array ( ) ) [95] => Category Object ( [languages:protected] => [bok_resources:protected] => [bok_topics:protected] => [bok_keywords:protected] => [id:protected] => 95 [type:protected] => category [parent:protected] => 3 [label:protected] => Underground [alreadyInSave:protected] => [alreadyInValidation:protected] => [validationFailures:protected] => Array ( ) [_new:BaseObject:private] => [_deleted:BaseObject:private] => [modifiedColumns:protected] => Array ( ) ) [100] => Category Object ( [languages:protected] => [bok_resources:protected] => [bok_topics:protected] => [bok_keywords:protected] => [id:protected] => 100 [type:protected] => category [parent:protected] => 6 [label:protected] => Toolbox Talks [alreadyInSave:protected] => [alreadyInValidation:protected] => [validationFailures:protected] => Array ( ) [_new:BaseObject:private] => [_deleted:BaseObject:private] => [modifiedColumns:protected] => Array ( ) ) ) [categories_initialized:protected] => 1 [mapped_items:protected] => [content:protected] => [files:protected] => [language:protected] => Language Object ( [id:protected] => 1 [code:protected] => en [name:protected] => English [alreadyInSave:protected] => [alreadyInValidation:protected] => [validationFailures:protected] => Array ( ) [_new:BaseObject:private] => [_deleted:BaseObject:private] => [modifiedColumns:protected] => Array ( ) ) [old_record:protected] => [id:protected] => 4428 [old_id:protected] => [elcosh_id:protected] => d001658 [type:protected] => document [display_type:protected] => HTML only (and links) [user_id:protected] => 0 [language_id:protected] => 1 [tagging_id:protected] => Daniela Caceres [priority_id:protected] => 1 [title:protected] => Toolbox Talk: Work Zone Safety: Working Around Vehicles [total_pages:protected] => 0 [billed_pages:protected] => 0 [publication_number:protected] => [part_of:protected] => [keywords:protected] => Struck, Struck by, Vehicle, Work Zone Safety, Truck, Operator, Driver, Mobile Equipment [comments:protected] => [summary:protected] => The CPWR Toolbox Talk on Working Around Vehicles in the Work Zone addresses methods to avoid being struck-by a vehicle on a construction site. The resource includes a case example, steps to prevent a related injury, and questions for discussion. It includes a graphic that illustrates the hazard, which can be posted in a central location as a reminder of steps to work safely. Available in English and Spanish. [transition_comments:protected] => [external_link:protected] => [consol_link:protected] => [more_like_this:protected] => d001640 [permission_given_by:protected] => [published:protected] => T [billable:protected] => F [img_name:protected] => [img_ext:protected] => [img_width:protected] => [img_height:protected] => [img_credit:protected] => [img_practice:protected] => [vid_source_id:protected] => [vid_running_time:protected] => [vid_intended_audience:protected] => [vid_acquisition_info:protected] => [vid_cost:protected] => [vid_producer:protected] => [vid_filename:protected] => [vid_filename_downloadable:protected] => [date_summary:protected] => [date_permission_requested:protected] => [date_permission_received:protected] => [date_review_needed:protected] => [date_received:protected] => 12/23/21 [date_completed:protected] => 12/23/21 [date_billed:protected] => [date_modified:protected] => 05/19/23 [collBokExports:protected] => [lastBokExportCriteria:BaseElcoshItem:private] => [alreadyInSave:protected] => [alreadyInValidation:protected] => [validationFailures:protected] => Array ( ) [_new:BaseObject:private] => [_deleted:BaseObject:private] => [modifiedColumns:protected] => Array ( ) ) ) [2] => Search_Result Object ( [title] => Construction Dive -- DeWalt's Jobsite Pro headphones recalled for fire hazards [image] => /record/images/notavailable-p.png [blurb] => A recall notice by the United States Consumer Product Safety Commission affects over 300,000 DeWalt Jobsite Pro Headphones. The recall is a result of... [category] => Array ( [0] => 16 [1] => 44 [2] => 45 [3] => 46 [4] => 47 [5] => 48 [6] => 49 [7] => 50 [8] => 51 [9] => 52 [10] => 53 [11] => 54 [12] => 55 [13] => 56 [14] => 57 [15] => 58 [16] => 59 [17] => 60 [18] => 61 [19] => 64 [20] => 65 [21] => 66 [22] => 67 [23] => 68 [24] => 69 [25] => 70 [26] => 71 [27] => 72 [28] => 73 [29] => 74 [30] => 75 [31] => 76 [32] => 77 [33] => 63 [34] => 78 [35] => 79 [36] => 80 [37] => 81 [38] => 82 [39] => 62 [40] => 83 [41] => 84 [42] => 85 [43] => 86 [44] => 87 [45] => 88 [46] => 89 [47] => 91 [48] => 90 [49] => 92 [50] => 93 [51] => 94 [52] => 95 ) [labels] => Array ( [0] => Fire & Explosions [1] => Work Environment [2] => Hazards [3] => Acoustical Ceiling Carpenter [4] => Trades [5] => Asbestos/Insulator [7] => Boilermaker [9] => Bricklayer [11] => Cabinetmaker [13] => Carpenter [15] => Carpet Layer [17] => Cement Mason [19] => Commercial Diver [21] => Concrete Polisher [23] => Drywall Applicator Specialist [25] => Electrical Worker [27] => Elevator Constructor [29] => Flagger [31] => Glazier [33] => Hazardous Waste Cleanup [35] => HVAC [37] => Interior Systems Carpenter [39] => Laborer [41] => Landscaper [43] => Lather [45] => Lead Abatement Worker [47] => Maintenance Worker [49] => Millwright [51] => Operating Engineer [53] => Painter [55] => Paper Hanger [57] => PCC/Restoration [59] => Pile Driver [61] => Plasterer [63] => Plumber/Pipefitter [65] => Refractory Worker [67] => Reinforcing Ironworker [69] => Roofer/Waterproofer [71] => Scaffold Erector [73] => Sheetmetal Worker [75] => Sprinkler Fitter [77] => Stonemason [79] => Structural Ironworker [81] => Terrazzo Worker [83] => Tile Setter [85] => Truck Driver [87] => Welder [89] => Commercial & Institutional [90] => Jobsites [91] => Demolition [93] => Disasters [95] => Heavy & Highway [97] => Industrial [99] => LEED/Green Construction [101] => Renovations [103] => Residential [105] => Underground ) [type] => [sub_category] => [url] => /document/4426/d001656/Construction%2BDive%2B--%2BDeWalt%2527s%2BJobsite%2BPro%2Bheadphones%2Brecalled%2Bfor%2Bfire%2Bhazards.html [item:protected] => DocumentRecord Object ( [records:protected] => Array ( ) [recordId:protected] => [searchWordClass:protected] => [searchWordPeerClass:protected] => [bok_record:protected] => [authors:protected] => [organizations:protected] => [collections:protected] => [categories:protected] => Array ( [16] => Category Object ( [languages:protected] => [bok_resources:protected] => [bok_topics:protected] => [bok_keywords:protected] => [id:protected] => 16 [type:protected] => category [parent:protected] => 7 [label:protected] => Fire & Explosions [alreadyInSave:protected] => [alreadyInValidation:protected] => [validationFailures:protected] => Array ( ) [_new:BaseObject:private] => [_deleted:BaseObject:private] => [modifiedColumns:protected] => Array ( ) ) [44] => Category Object ( [languages:protected] => [bok_resources:protected] => [bok_topics:protected] => [bok_keywords:protected] => [id:protected] => 44 [type:protected] => category [parent:protected] => 2 [label:protected] => Acoustical Ceiling Carpenter [alreadyInSave:protected] => [alreadyInValidation:protected] => [validationFailures:protected] => Array ( ) [_new:BaseObject:private] => [_deleted:BaseObject:private] => [modifiedColumns:protected] => Array ( ) ) [45] => Category Object ( [languages:protected] => [bok_resources:protected] => [bok_topics:protected] => [bok_keywords:protected] => [id:protected] => 45 [type:protected] => category [parent:protected] => 2 [label:protected] => Asbestos/Insulator [alreadyInSave:protected] => [alreadyInValidation:protected] => [validationFailures:protected] => Array ( ) [_new:BaseObject:private] => [_deleted:BaseObject:private] => [modifiedColumns:protected] => Array ( ) ) [46] => Category Object ( [languages:protected] => [bok_resources:protected] => [bok_topics:protected] => [bok_keywords:protected] => [id:protected] => 46 [type:protected] => category [parent:protected] => 2 [label:protected] => Boilermaker [alreadyInSave:protected] => [alreadyInValidation:protected] => [validationFailures:protected] => Array ( ) [_new:BaseObject:private] => [_deleted:BaseObject:private] => [modifiedColumns:protected] => Array ( ) ) [47] => Category Object ( [languages:protected] => [bok_resources:protected] => [bok_topics:protected] => [bok_keywords:protected] => [id:protected] => 47 [type:protected] => category [parent:protected] => 2 [label:protected] => Bricklayer [alreadyInSave:protected] => [alreadyInValidation:protected] => [validationFailures:protected] => Array ( ) [_new:BaseObject:private] => [_deleted:BaseObject:private] => [modifiedColumns:protected] => Array ( ) ) [48] => Category Object ( [languages:protected] => [bok_resources:protected] => [bok_topics:protected] => [bok_keywords:protected] => [id:protected] => 48 [type:protected] => category [parent:protected] => 2 [label:protected] => Cabinetmaker [alreadyInSave:protected] => [alreadyInValidation:protected] => [validationFailures:protected] => Array ( ) [_new:BaseObject:private] => [_deleted:BaseObject:private] => [modifiedColumns:protected] => Array ( ) ) [49] => Category Object ( [languages:protected] => [bok_resources:protected] => [bok_topics:protected] => [bok_keywords:protected] => [id:protected] => 49 [type:protected] => category [parent:protected] => 2 [label:protected] => Carpenter [alreadyInSave:protected] => [alreadyInValidation:protected] => [validationFailures:protected] => Array ( ) [_new:BaseObject:private] => [_deleted:BaseObject:private] => [modifiedColumns:protected] => Array ( ) ) [50] => Category Object ( [languages:protected] => [bok_resources:protected] => [bok_topics:protected] => [bok_keywords:protected] => [id:protected] => 50 [type:protected] => category [parent:protected] => 2 [label:protected] => Carpet Layer [alreadyInSave:protected] => [alreadyInValidation:protected] => [validationFailures:protected] => Array ( ) [_new:BaseObject:private] => [_deleted:BaseObject:private] => [modifiedColumns:protected] => Array ( ) ) [51] => Category Object ( [languages:protected] => [bok_resources:protected] => [bok_topics:protected] => [bok_keywords:protected] => [id:protected] => 51 [type:protected] => category [parent:protected] => 2 [label:protected] => Cement Mason [alreadyInSave:protected] => [alreadyInValidation:protected] => [validationFailures:protected] => Array ( ) [_new:BaseObject:private] => [_deleted:BaseObject:private] => [modifiedColumns:protected] => Array ( ) ) [52] => Category Object ( [languages:protected] => [bok_resources:protected] => [bok_topics:protected] => [bok_keywords:protected] => [id:protected] => 52 [type:protected] => category [parent:protected] => 2 [label:protected] => Commercial Diver [alreadyInSave:protected] => [alreadyInValidation:protected] => [validationFailures:protected] => Array ( ) [_new:BaseObject:private] => [_deleted:BaseObject:private] => [modifiedColumns:protected] => Array ( ) ) [53] => Category Object ( [languages:protected] => [bok_resources:protected] => [bok_topics:protected] => [bok_keywords:protected] => [id:protected] => 53 [type:protected] => category [parent:protected] => 2 [label:protected] => Concrete Polisher [alreadyInSave:protected] => [alreadyInValidation:protected] => [validationFailures:protected] => Array ( ) [_new:BaseObject:private] => [_deleted:BaseObject:private] => [modifiedColumns:protected] => Array ( ) ) [54] => Category Object ( [languages:protected] => [bok_resources:protected] => [bok_topics:protected] => [bok_keywords:protected] => [id:protected] => 54 [type:protected] => category [parent:protected] => 2 [label:protected] => Drywall Applicator Specialist [alreadyInSave:protected] => [alreadyInValidation:protected] => [validationFailures:protected] => Array ( ) [_new:BaseObject:private] => [_deleted:BaseObject:private] => [modifiedColumns:protected] => Array ( ) ) [55] => Category Object ( [languages:protected] => [bok_resources:protected] => [bok_topics:protected] => [bok_keywords:protected] => [id:protected] => 55 [type:protected] => category [parent:protected] => 2 [label:protected] => Electrical Worker [alreadyInSave:protected] => [alreadyInValidation:protected] => [validationFailures:protected] => Array ( ) [_new:BaseObject:private] => [_deleted:BaseObject:private] => [modifiedColumns:protected] => Array ( ) ) [56] => Category Object ( [languages:protected] => [bok_resources:protected] => [bok_topics:protected] => [bok_keywords:protected] => [id:protected] => 56 [type:protected] => category [parent:protected] => 2 [label:protected] => Elevator Constructor [alreadyInSave:protected] => [alreadyInValidation:protected] => [validationFailures:protected] => Array ( ) [_new:BaseObject:private] => [_deleted:BaseObject:private] => [modifiedColumns:protected] => Array ( ) ) [57] => Category Object ( [languages:protected] => [bok_resources:protected] => [bok_topics:protected] => [bok_keywords:protected] => [id:protected] => 57 [type:protected] => category [parent:protected] => 2 [label:protected] => Flagger [alreadyInSave:protected] => [alreadyInValidation:protected] => [validationFailures:protected] => Array ( ) [_new:BaseObject:private] => [_deleted:BaseObject:private] => [modifiedColumns:protected] => Array ( ) ) [58] => Category Object ( [languages:protected] => [bok_resources:protected] => [bok_topics:protected] => [bok_keywords:protected] => [id:protected] => 58 [type:protected] => category [parent:protected] => 2 [label:protected] => Glazier [alreadyInSave:protected] => [alreadyInValidation:protected] => [validationFailures:protected] => Array ( ) [_new:BaseObject:private] => [_deleted:BaseObject:private] => [modifiedColumns:protected] => Array ( ) ) [59] => Category Object ( [languages:protected] => [bok_resources:protected] => [bok_topics:protected] => [bok_keywords:protected] => [id:protected] => 59 [type:protected] => category [parent:protected] => 2 [label:protected] => Hazardous Waste Cleanup [alreadyInSave:protected] => [alreadyInValidation:protected] => [validationFailures:protected] => Array ( ) [_new:BaseObject:private] => [_deleted:BaseObject:private] => [modifiedColumns:protected] => Array ( ) ) [60] => Category Object ( [languages:protected] => [bok_resources:protected] => [bok_topics:protected] => [bok_keywords:protected] => [id:protected] => 60 [type:protected] => category [parent:protected] => 2 [label:protected] => HVAC [alreadyInSave:protected] => [alreadyInValidation:protected] => [validationFailures:protected] => Array ( ) [_new:BaseObject:private] => [_deleted:BaseObject:private] => [modifiedColumns:protected] => Array ( ) ) [61] => Category Object ( [languages:protected] => [bok_resources:protected] => [bok_topics:protected] => [bok_keywords:protected] => [id:protected] => 61 [type:protected] => category [parent:protected] => 2 [label:protected] => Interior Systems Carpenter [alreadyInSave:protected] => [alreadyInValidation:protected] => [validationFailures:protected] => Array ( ) [_new:BaseObject:private] => [_deleted:BaseObject:private] => [modifiedColumns:protected] => Array ( ) ) [64] => Category Object ( [languages:protected] => [bok_resources:protected] => [bok_topics:protected] => [bok_keywords:protected] => [id:protected] => 64 [type:protected] => category [parent:protected] => 2 [label:protected] => Laborer [alreadyInSave:protected] => [alreadyInValidation:protected] => [validationFailures:protected] => Array ( ) [_new:BaseObject:private] => [_deleted:BaseObject:private] => [modifiedColumns:protected] => Array ( ) ) [65] => Category Object ( [languages:protected] => [bok_resources:protected] => [bok_topics:protected] => [bok_keywords:protected] => [id:protected] => 65 [type:protected] => category [parent:protected] => 2 [label:protected] => Landscaper [alreadyInSave:protected] => [alreadyInValidation:protected] => [validationFailures:protected] => Array ( ) [_new:BaseObject:private] => [_deleted:BaseObject:private] => [modifiedColumns:protected] => Array ( ) ) [66] => Category Object ( [languages:protected] => [bok_resources:protected] => [bok_topics:protected] => [bok_keywords:protected] => [id:protected] => 66 [type:protected] => category [parent:protected] => 2 [label:protected] => Lather [alreadyInSave:protected] => [alreadyInValidation:protected] => [validationFailures:protected] => Array ( ) [_new:BaseObject:private] => [_deleted:BaseObject:private] => [modifiedColumns:protected] => Array ( ) ) [67] => Category Object ( [languages:protected] => [bok_resources:protected] => [bok_topics:protected] => [bok_keywords:protected] => [id:protected] => 67 [type:protected] => category [parent:protected] => 2 [label:protected] => Lead Abatement Worker [alreadyInSave:protected] => [alreadyInValidation:protected] => [validationFailures:protected] => Array ( ) [_new:BaseObject:private] => [_deleted:BaseObject:private] => [modifiedColumns:protected] => Array ( ) ) [68] => Category Object ( [languages:protected] => [bok_resources:protected] => [bok_topics:protected] => [bok_keywords:protected] => [id:protected] => 68 [type:protected] => category [parent:protected] => 2 [label:protected] => Maintenance Worker [alreadyInSave:protected] => [alreadyInValidation:protected] => [validationFailures:protected] => Array ( ) [_new:BaseObject:private] => [_deleted:BaseObject:private] => [modifiedColumns:protected] => Array ( ) ) [69] => Category Object ( [languages:protected] => [bok_resources:protected] => [bok_topics:protected] => [bok_keywords:protected] => [id:protected] => 69 [type:protected] => category [parent:protected] => 2 [label:protected] => Millwright [alreadyInSave:protected] => [alreadyInValidation:protected] => [validationFailures:protected] => Array ( ) [_new:BaseObject:private] => [_deleted:BaseObject:private] => [modifiedColumns:protected] => Array ( ) ) [70] => Category Object ( [languages:protected] => [bok_resources:protected] => [bok_topics:protected] => [bok_keywords:protected] => [id:protected] => 70 [type:protected] => category [parent:protected] => 2 [label:protected] => Operating Engineer [alreadyInSave:protected] => [alreadyInValidation:protected] => [validationFailures:protected] => Array ( ) [_new:BaseObject:private] => [_deleted:BaseObject:private] => [modifiedColumns:protected] => Array ( ) ) [71] => Category Object ( [languages:protected] => [bok_resources:protected] => [bok_topics:protected] => [bok_keywords:protected] => [id:protected] => 71 [type:protected] => category [parent:protected] => 2 [label:protected] => Painter [alreadyInSave:protected] => [alreadyInValidation:protected] => [validationFailures:protected] => Array ( ) [_new:BaseObject:private] => [_deleted:BaseObject:private] => [modifiedColumns:protected] => Array ( ) ) [72] => Category Object ( [languages:protected] => [bok_resources:protected] => [bok_topics:protected] => [bok_keywords:protected] => [id:protected] => 72 [type:protected] => category [parent:protected] => 2 [label:protected] => Paper Hanger [alreadyInSave:protected] => [alreadyInValidation:protected] => [validationFailures:protected] => Array ( ) [_new:BaseObject:private] => [_deleted:BaseObject:private] => [modifiedColumns:protected] => Array ( ) ) [73] => Category Object ( [languages:protected] => [bok_resources:protected] => [bok_topics:protected] => [bok_keywords:protected] => [id:protected] => 73 [type:protected] => category [parent:protected] => 2 [label:protected] => PCC/Restoration [alreadyInSave:protected] => [alreadyInValidation:protected] => [validationFailures:protected] => Array ( ) [_new:BaseObject:private] => [_deleted:BaseObject:private] => [modifiedColumns:protected] => Array ( ) ) [74] => Category Object ( [languages:protected] => [bok_resources:protected] => [bok_topics:protected] => [bok_keywords:protected] => [id:protected] => 74 [type:protected] => category [parent:protected] => 2 [label:protected] => Pile Driver [alreadyInSave:protected] => [alreadyInValidation:protected] => [validationFailures:protected] => Array ( ) [_new:BaseObject:private] => [_deleted:BaseObject:private] => [modifiedColumns:protected] => Array ( ) ) [75] => Category Object ( [languages:protected] => [bok_resources:protected] => [bok_topics:protected] => [bok_keywords:protected] => [id:protected] => 75 [type:protected] => category [parent:protected] => 2 [label:protected] => Plasterer [alreadyInSave:protected] => [alreadyInValidation:protected] => [validationFailures:protected] => Array ( ) [_new:BaseObject:private] => [_deleted:BaseObject:private] => [modifiedColumns:protected] => Array ( ) ) [76] => Category Object ( [languages:protected] => [bok_resources:protected] => [bok_topics:protected] => [bok_keywords:protected] => [id:protected] => 76 [type:protected] => category [parent:protected] => 2 [label:protected] => Plumber/Pipefitter [alreadyInSave:protected] => [alreadyInValidation:protected] => [validationFailures:protected] => Array ( ) [_new:BaseObject:private] => [_deleted:BaseObject:private] => [modifiedColumns:protected] => Array ( ) ) [77] => Category Object ( [languages:protected] => [bok_resources:protected] => [bok_topics:protected] => [bok_keywords:protected] => [id:protected] => 77 [type:protected] => category [parent:protected] => 2 [label:protected] => Refractory Worker [alreadyInSave:protected] => [alreadyInValidation:protected] => [validationFailures:protected] => Array ( ) [_new:BaseObject:private] => [_deleted:BaseObject:private] => [modifiedColumns:protected] => Array ( ) ) [63] => Category Object ( [languages:protected] => [bok_resources:protected] => [bok_topics:protected] => [bok_keywords:protected] => [id:protected] => 63 [type:protected] => category [parent:protected] => 2 [label:protected] => Reinforcing Ironworker [alreadyInSave:protected] => [alreadyInValidation:protected] => [validationFailures:protected] => Array ( ) [_new:BaseObject:private] => [_deleted:BaseObject:private] => [modifiedColumns:protected] => Array ( ) ) [78] => Category Object ( [languages:protected] => [bok_resources:protected] => [bok_topics:protected] => [bok_keywords:protected] => [id:protected] => 78 [type:protected] => category [parent:protected] => 2 [label:protected] => Roofer/Waterproofer [alreadyInSave:protected] => [alreadyInValidation:protected] => [validationFailures:protected] => Array ( ) [_new:BaseObject:private] => [_deleted:BaseObject:private] => [modifiedColumns:protected] => Array ( ) ) [79] => Category Object ( [languages:protected] => [bok_resources:protected] => [bok_topics:protected] => [bok_keywords:protected] => [id:protected] => 79 [type:protected] => category [parent:protected] => 2 [label:protected] => Scaffold Erector [alreadyInSave:protected] => [alreadyInValidation:protected] => [validationFailures:protected] => Array ( ) [_new:BaseObject:private] => [_deleted:BaseObject:private] => [modifiedColumns:protected] => Array ( ) ) [80] => Category Object ( [languages:protected] => [bok_resources:protected] => [bok_topics:protected] => [bok_keywords:protected] => [id:protected] => 80 [type:protected] => category [parent:protected] => 2 [label:protected] => Sheetmetal Worker [alreadyInSave:protected] => [alreadyInValidation:protected] => [validationFailures:protected] => Array ( ) [_new:BaseObject:private] => [_deleted:BaseObject:private] => [modifiedColumns:protected] => Array ( ) ) [81] => Category Object ( [languages:protected] => [bok_resources:protected] => [bok_topics:protected] => [bok_keywords:protected] => [id:protected] => 81 [type:protected] => category [parent:protected] => 2 [label:protected] => Sprinkler Fitter [alreadyInSave:protected] => [alreadyInValidation:protected] => [validationFailures:protected] => Array ( ) [_new:BaseObject:private] => [_deleted:BaseObject:private] => [modifiedColumns:protected] => Array ( ) ) [82] => Category Object ( [languages:protected] => [bok_resources:protected] => [bok_topics:protected] => [bok_keywords:protected] => [id:protected] => 82 [type:protected] => category [parent:protected] => 2 [label:protected] => Stonemason [alreadyInSave:protected] => [alreadyInValidation:protected] => [validationFailures:protected] => Array ( ) [_new:BaseObject:private] => [_deleted:BaseObject:private] => [modifiedColumns:protected] => Array ( ) ) [62] => Category Object ( [languages:protected] => [bok_resources:protected] => [bok_topics:protected] => [bok_keywords:protected] => [id:protected] => 62 [type:protected] => category [parent:protected] => 2 [label:protected] => Structural Ironworker [alreadyInSave:protected] => [alreadyInValidation:protected] => [validationFailures:protected] => Array ( ) [_new:BaseObject:private] => [_deleted:BaseObject:private] => [modifiedColumns:protected] => Array ( ) ) [83] => Category Object ( [languages:protected] => [bok_resources:protected] => [bok_topics:protected] => [bok_keywords:protected] => [id:protected] => 83 [type:protected] => category [parent:protected] => 2 [label:protected] => Terrazzo Worker [alreadyInSave:protected] => [alreadyInValidation:protected] => [validationFailures:protected] => Array ( ) [_new:BaseObject:private] => [_deleted:BaseObject:private] => [modifiedColumns:protected] => Array ( ) ) [84] => Category Object ( [languages:protected] => [bok_resources:protected] => [bok_topics:protected] => [bok_keywords:protected] => [id:protected] => 84 [type:protected] => category [parent:protected] => 2 [label:protected] => Tile Setter [alreadyInSave:protected] => [alreadyInValidation:protected] => [validationFailures:protected] => Array ( ) [_new:BaseObject:private] => [_deleted:BaseObject:private] => [modifiedColumns:protected] => Array ( ) ) [85] => Category Object ( [languages:protected] => [bok_resources:protected] => [bok_topics:protected] => [bok_keywords:protected] => [id:protected] => 85 [type:protected] => category [parent:protected] => 2 [label:protected] => Truck Driver [alreadyInSave:protected] => [alreadyInValidation:protected] => [validationFailures:protected] => Array ( ) [_new:BaseObject:private] => [_deleted:BaseObject:private] => [modifiedColumns:protected] => Array ( ) ) [86] => Category Object ( [languages:protected] => [bok_resources:protected] => [bok_topics:protected] => [bok_keywords:protected] => [id:protected] => 86 [type:protected] => category [parent:protected] => 2 [label:protected] => Welder [alreadyInSave:protected] => [alreadyInValidation:protected] => [validationFailures:protected] => Array ( ) [_new:BaseObject:private] => [_deleted:BaseObject:private] => [modifiedColumns:protected] => Array ( ) ) [87] => Category Object ( [languages:protected] => [bok_resources:protected] => [bok_topics:protected] => [bok_keywords:protected] => [id:protected] => 87 [type:protected] => category [parent:protected] => 3 [label:protected] => Commercial & Institutional [alreadyInSave:protected] => [alreadyInValidation:protected] => [validationFailures:protected] => Array ( ) [_new:BaseObject:private] => [_deleted:BaseObject:private] => [modifiedColumns:protected] => Array ( ) ) [88] => Category Object ( [languages:protected] => [bok_resources:protected] => [bok_topics:protected] => [bok_keywords:protected] => [id:protected] => 88 [type:protected] => category [parent:protected] => 3 [label:protected] => Demolition [alreadyInSave:protected] => [alreadyInValidation:protected] => [validationFailures:protected] => Array ( ) [_new:BaseObject:private] => [_deleted:BaseObject:private] => [modifiedColumns:protected] => Array ( ) ) [89] => Category Object ( [languages:protected] => [bok_resources:protected] => [bok_topics:protected] => [bok_keywords:protected] => [id:protected] => 89 [type:protected] => category [parent:protected] => 3 [label:protected] => Disasters [alreadyInSave:protected] => [alreadyInValidation:protected] => [validationFailures:protected] => Array ( ) [_new:BaseObject:private] => [_deleted:BaseObject:private] => [modifiedColumns:protected] => Array ( ) ) [91] => Category Object ( [languages:protected] => [bok_resources:protected] => [bok_topics:protected] => [bok_keywords:protected] => [id:protected] => 91 [type:protected] => category [parent:protected] => 3 [label:protected] => Heavy & Highway [alreadyInSave:protected] => [alreadyInValidation:protected] => [validationFailures:protected] => Array ( ) [_new:BaseObject:private] => [_deleted:BaseObject:private] => [modifiedColumns:protected] => Array ( ) ) [90] => Category Object ( [languages:protected] => [bok_resources:protected] => [bok_topics:protected] => [bok_keywords:protected] => [id:protected] => 90 [type:protected] => category [parent:protected] => 3 [label:protected] => Industrial [alreadyInSave:protected] => [alreadyInValidation:protected] => [validationFailures:protected] => Array ( ) [_new:BaseObject:private] => [_deleted:BaseObject:private] => [modifiedColumns:protected] => Array ( ) ) [92] => Category Object ( [languages:protected] => [bok_resources:protected] => [bok_topics:protected] => [bok_keywords:protected] => [id:protected] => 92 [type:protected] => category [parent:protected] => 3 [label:protected] => LEED/Green Construction [alreadyInSave:protected] => [alreadyInValidation:protected] => [validationFailures:protected] => Array ( ) [_new:BaseObject:private] => [_deleted:BaseObject:private] => [modifiedColumns:protected] => Array ( ) ) [93] => Category Object ( [languages:protected] => [bok_resources:protected] => [bok_topics:protected] => [bok_keywords:protected] => [id:protected] => 93 [type:protected] => category [parent:protected] => 3 [label:protected] => Renovations [alreadyInSave:protected] => [alreadyInValidation:protected] => [validationFailures:protected] => Array ( ) [_new:BaseObject:private] => [_deleted:BaseObject:private] => [modifiedColumns:protected] => Array ( ) ) [94] => Category Object ( [languages:protected] => [bok_resources:protected] => [bok_topics:protected] => [bok_keywords:protected] => [id:protected] => 94 [type:protected] => category [parent:protected] => 3 [label:protected] => Residential [alreadyInSave:protected] => [alreadyInValidation:protected] => [validationFailures:protected] => Array ( ) [_new:BaseObject:private] => [_deleted:BaseObject:private] => [modifiedColumns:protected] => Array ( ) ) [95] => Category Object ( [languages:protected] => [bok_resources:protected] => [bok_topics:protected] => [bok_keywords:protected] => [id:protected] => 95 [type:protected] => category [parent:protected] => 3 [label:protected] => Underground [alreadyInSave:protected] => [alreadyInValidation:protected] => [validationFailures:protected] => Array ( ) [_new:BaseObject:private] => [_deleted:BaseObject:private] => [modifiedColumns:protected] => Array ( ) ) ) [categories_initialized:protected] => 1 [mapped_items:protected] => [content:protected] => [files:protected] => [language:protected] => Language Object ( [id:protected] => 1 [code:protected] => en [name:protected] => English [alreadyInSave:protected] => [alreadyInValidation:protected] => [validationFailures:protected] => Array ( ) [_new:BaseObject:private] => [_deleted:BaseObject:private] => [modifiedColumns:protected] => Array ( ) ) [old_record:protected] => [id:protected] => 4426 [old_id:protected] => [elcosh_id:protected] => d001656 [type:protected] => document [display_type:protected] => HTML only (and links) [user_id:protected] => 0 [language_id:protected] => 1 [tagging_id:protected] => Mike Aguilar [priority_id:protected] => 1 [title:protected] => Construction Dive -- DeWalt's Jobsite Pro headphones recalled for fire hazards [total_pages:protected] => 1 [billed_pages:protected] => 1 [publication_number:protected] => [part_of:protected] => [keywords:protected] => DeWalt, Fire Hazards, recall, headphones [comments:protected] => [summary:protected] => A recall notice by the United States Consumer Product Safety Commission affects over 300,000 DeWalt Jobsite Pro Headphones. The recall is a result of a malfunction that can cause earbuds to overheat while charging or during use, leading to fire and burn hazards. [transition_comments:protected] => [external_link:protected] => https://www.constructiondive.com/news/dewalts-jobsite-pro-headphones-recalled-for-fire-hazards/611248/?utm_source=Sailthru&utm_medium=email&utm_campaign=Issue:%202021-12-10%20Construction%20Dive%20Newsletter%20%5Bissue:38532%5D&utm_term=Construction%20Dive [consol_link:protected] => [more_like_this:protected] => [permission_given_by:protected] => [published:protected] => T [billable:protected] => F [img_name:protected] => [img_ext:protected] => [img_width:protected] => [img_height:protected] => [img_credit:protected] => [img_practice:protected] => [vid_source_id:protected] => [vid_running_time:protected] => [vid_intended_audience:protected] => [vid_acquisition_info:protected] => [vid_cost:protected] => [vid_producer:protected] => [vid_filename:protected] => [vid_filename_downloadable:protected] => [date_summary:protected] => [date_permission_requested:protected] => [date_permission_received:protected] => [date_review_needed:protected] => [date_received:protected] => 12/13/21 [date_completed:protected] => 12/13/21 [date_billed:protected] => [date_modified:protected] => 12/13/21 [collBokExports:protected] => [lastBokExportCriteria:BaseElcoshItem:private] => [alreadyInSave:protected] => [alreadyInValidation:protected] => [validationFailures:protected] => Array ( ) [_new:BaseObject:private] => [_deleted:BaseObject:private] => [modifiedColumns:protected] => Array ( ) ) ) [3] => Search_Result Object ( [title] => Working in an Enclosed Cab [image] => /record/images/notavailable-p.png [blurb] => This CPWR Hazard Alert on Working in enclosed cabs provides information on protecting workers from silica dust, how to minimize exposures and the dang... [category] => Array ( [0] => 10 [1] => 16 [2] => 24 [3] => 37 [4] => 46 [5] => 48 [6] => 49 [7] => 51 [8] => 53 [9] => 54 [10] => 56 [11] => 58 [12] => 59 [13] => 60 [14] => 61 [15] => 64 [16] => 66 [17] => 68 [18] => 69 [19] => 71 [20] => 73 [21] => 74 [22] => 76 [23] => 77 [24] => 63 [25] => 80 [26] => 82 [27] => 62 [28] => 83 [29] => 84 [30] => 86 [31] => 88 [32] => 89 [33] => 95 [34] => 102 ) [labels] => Array ( [0] => Confined Spaces [1] => Work Environment [2] => Hazards [3] => Fire & Explosions [6] => Trenches & Excavations [9] => Silica /Construction Dust [10] => Inhalation/Skin Exposures [12] => Boilermaker [13] => Trades [14] => Cabinetmaker [16] => Carpenter [18] => Cement Mason [20] => Concrete Polisher [22] => Drywall Applicator Specialist [24] => Elevator Constructor [26] => Glazier [28] => Hazardous Waste Cleanup [30] => HVAC [32] => Interior Systems Carpenter [34] => Laborer [36] => Lather [38] => Maintenance Worker [40] => Millwright [42] => Painter [44] => PCC/Restoration [46] => Pile Driver [48] => Plumber/Pipefitter [50] => Refractory Worker [52] => Reinforcing Ironworker [54] => Sheetmetal Worker [56] => Stonemason [58] => Structural Ironworker [60] => Terrazzo Worker [62] => Tile Setter [64] => Welder [66] => Demolition [67] => Jobsites [68] => Disasters [70] => Underground [72] => Handouts [73] => Documents [74] => Media & Documents ) [type] => Handouts [sub_category] => [url] => /document/4415/d001651/Working%2Bin%2Ban%2BEnclosed%2BCab.html [item:protected] => DocumentRecord Object ( [records:protected] => Array ( ) [recordId:protected] => [searchWordClass:protected] => [searchWordPeerClass:protected] => [bok_record:protected] => [authors:protected] => [organizations:protected] => [collections:protected] => [categories:protected] => Array ( [10] => Category Object ( [languages:protected] => [bok_resources:protected] => [bok_topics:protected] => [bok_keywords:protected] => [id:protected] => 10 [type:protected] => category [parent:protected] => 7 [label:protected] => Confined Spaces [alreadyInSave:protected] => [alreadyInValidation:protected] => [validationFailures:protected] => Array ( ) [_new:BaseObject:private] => [_deleted:BaseObject:private] => [modifiedColumns:protected] => Array ( ) ) [16] => Category Object ( [languages:protected] => [bok_resources:protected] => [bok_topics:protected] => [bok_keywords:protected] => [id:protected] => 16 [type:protected] => category [parent:protected] => 7 [label:protected] => Fire & Explosions [alreadyInSave:protected] => [alreadyInValidation:protected] => [validationFailures:protected] => Array ( ) [_new:BaseObject:private] => [_deleted:BaseObject:private] => [modifiedColumns:protected] => Array ( ) ) [24] => Category Object ( [languages:protected] => [bok_resources:protected] => [bok_topics:protected] => [bok_keywords:protected] => [id:protected] => 24 [type:protected] => category [parent:protected] => 7 [label:protected] => Trenches & Excavations [alreadyInSave:protected] => [alreadyInValidation:protected] => [validationFailures:protected] => Array ( ) [_new:BaseObject:private] => [_deleted:BaseObject:private] => [modifiedColumns:protected] => Array ( ) ) [37] => Category Object ( [languages:protected] => [bok_resources:protected] => [bok_topics:protected] => [bok_keywords:protected] => [id:protected] => 37 [type:protected] => category [parent:protected] => 8 [label:protected] => Silica /Construction Dust [alreadyInSave:protected] => [alreadyInValidation:protected] => [validationFailures:protected] => Array ( ) [_new:BaseObject:private] => [_deleted:BaseObject:private] => [modifiedColumns:protected] => Array ( ) ) [46] => Category Object ( [languages:protected] => [bok_resources:protected] => [bok_topics:protected] => [bok_keywords:protected] => [id:protected] => 46 [type:protected] => category [parent:protected] => 2 [label:protected] => Boilermaker [alreadyInSave:protected] => [alreadyInValidation:protected] => [validationFailures:protected] => Array ( ) [_new:BaseObject:private] => [_deleted:BaseObject:private] => [modifiedColumns:protected] => Array ( ) ) [48] => Category Object ( [languages:protected] => [bok_resources:protected] => [bok_topics:protected] => [bok_keywords:protected] => [id:protected] => 48 [type:protected] => category [parent:protected] => 2 [label:protected] => Cabinetmaker [alreadyInSave:protected] => [alreadyInValidation:protected] => [validationFailures:protected] => Array ( ) [_new:BaseObject:private] => [_deleted:BaseObject:private] => [modifiedColumns:protected] => Array ( ) ) [49] => Category Object ( [languages:protected] => [bok_resources:protected] => [bok_topics:protected] => [bok_keywords:protected] => [id:protected] => 49 [type:protected] => category [parent:protected] => 2 [label:protected] => Carpenter [alreadyInSave:protected] => [alreadyInValidation:protected] => [validationFailures:protected] => Array ( ) [_new:BaseObject:private] => [_deleted:BaseObject:private] => [modifiedColumns:protected] => Array ( ) ) [51] => Category Object ( [languages:protected] => [bok_resources:protected] => [bok_topics:protected] => [bok_keywords:protected] => [id:protected] => 51 [type:protected] => category [parent:protected] => 2 [label:protected] => Cement Mason [alreadyInSave:protected] => [alreadyInValidation:protected] => [validationFailures:protected] => Array ( ) [_new:BaseObject:private] => [_deleted:BaseObject:private] => [modifiedColumns:protected] => Array ( ) ) [53] => Category Object ( [languages:protected] => [bok_resources:protected] => [bok_topics:protected] => [bok_keywords:protected] => [id:protected] => 53 [type:protected] => category [parent:protected] => 2 [label:protected] => Concrete Polisher [alreadyInSave:protected] => [alreadyInValidation:protected] => [validationFailures:protected] => Array ( ) [_new:BaseObject:private] => [_deleted:BaseObject:private] => [modifiedColumns:protected] => Array ( ) ) [54] => Category Object ( [languages:protected] => [bok_resources:protected] => [bok_topics:protected] => [bok_keywords:protected] => [id:protected] => 54 [type:protected] => category [parent:protected] => 2 [label:protected] => Drywall Applicator Specialist [alreadyInSave:protected] => [alreadyInValidation:protected] => [validationFailures:protected] => Array ( ) [_new:BaseObject:private] => [_deleted:BaseObject:private] => [modifiedColumns:protected] => Array ( ) ) [56] => Category Object ( [languages:protected] => [bok_resources:protected] => [bok_topics:protected] => [bok_keywords:protected] => [id:protected] => 56 [type:protected] => category [parent:protected] => 2 [label:protected] => Elevator Constructor [alreadyInSave:protected] => [alreadyInValidation:protected] => [validationFailures:protected] => Array ( ) [_new:BaseObject:private] => [_deleted:BaseObject:private] => [modifiedColumns:protected] => Array ( ) ) [58] => Category Object ( [languages:protected] => [bok_resources:protected] => [bok_topics:protected] => [bok_keywords:protected] => [id:protected] => 58 [type:protected] => category [parent:protected] => 2 [label:protected] => Glazier [alreadyInSave:protected] => [alreadyInValidation:protected] => [validationFailures:protected] => Array ( ) [_new:BaseObject:private] => [_deleted:BaseObject:private] => [modifiedColumns:protected] => Array ( ) ) [59] => Category Object ( [languages:protected] => [bok_resources:protected] => [bok_topics:protected] => [bok_keywords:protected] => [id:protected] => 59 [type:protected] => category [parent:protected] => 2 [label:protected] => Hazardous Waste Cleanup [alreadyInSave:protected] => [alreadyInValidation:protected] => [validationFailures:protected] => Array ( ) [_new:BaseObject:private] => [_deleted:BaseObject:private] => [modifiedColumns:protected] => Array ( ) ) [60] => Category Object ( [languages:protected] => [bok_resources:protected] => [bok_topics:protected] => [bok_keywords:protected] => [id:protected] => 60 [type:protected] => category [parent:protected] => 2 [label:protected] => HVAC [alreadyInSave:protected] => [alreadyInValidation:protected] => [validationFailures:protected] => Array ( ) [_new:BaseObject:private] => [_deleted:BaseObject:private] => [modifiedColumns:protected] => Array ( ) ) [61] => Category Object ( [languages:protected] => [bok_resources:protected] => [bok_topics:protected] => [bok_keywords:protected] => [id:protected] => 61 [type:protected] => category [parent:protected] => 2 [label:protected] => Interior Systems Carpenter [alreadyInSave:protected] => [alreadyInValidation:protected] => [validationFailures:protected] => Array ( ) [_new:BaseObject:private] => [_deleted:BaseObject:private] => [modifiedColumns:protected] => Array ( ) ) [64] => Category Object ( [languages:protected] => [bok_resources:protected] => [bok_topics:protected] => [bok_keywords:protected] => [id:protected] => 64 [type:protected] => category [parent:protected] => 2 [label:protected] => Laborer [alreadyInSave:protected] => [alreadyInValidation:protected] => [validationFailures:protected] => Array ( ) [_new:BaseObject:private] => [_deleted:BaseObject:private] => [modifiedColumns:protected] => Array ( ) ) [66] => Category Object ( [languages:protected] => [bok_resources:protected] => [bok_topics:protected] => [bok_keywords:protected] => [id:protected] => 66 [type:protected] => category [parent:protected] => 2 [label:protected] => Lather [alreadyInSave:protected] => [alreadyInValidation:protected] => [validationFailures:protected] => Array ( ) [_new:BaseObject:private] => [_deleted:BaseObject:private] => [modifiedColumns:protected] => Array ( ) ) [68] => Category Object ( [languages:protected] => [bok_resources:protected] => [bok_topics:protected] => [bok_keywords:protected] => [id:protected] => 68 [type:protected] => category [parent:protected] => 2 [label:protected] => Maintenance Worker [alreadyInSave:protected] => [alreadyInValidation:protected] => [validationFailures:protected] => Array ( ) [_new:BaseObject:private] => [_deleted:BaseObject:private] => [modifiedColumns:protected] => Array ( ) ) [69] => Category Object ( [languages:protected] => [bok_resources:protected] => [bok_topics:protected] => [bok_keywords:protected] => [id:protected] => 69 [type:protected] => category [parent:protected] => 2 [label:protected] => Millwright [alreadyInSave:protected] => [alreadyInValidation:protected] => [validationFailures:protected] => Array ( ) [_new:BaseObject:private] => [_deleted:BaseObject:private] => [modifiedColumns:protected] => Array ( ) ) [71] => Category Object ( [languages:protected] => [bok_resources:protected] => [bok_topics:protected] => [bok_keywords:protected] => [id:protected] => 71 [type:protected] => category [parent:protected] => 2 [label:protected] => Painter [alreadyInSave:protected] => [alreadyInValidation:protected] => [validationFailures:protected] => Array ( ) [_new:BaseObject:private] => [_deleted:BaseObject:private] => [modifiedColumns:protected] => Array ( ) ) [73] => Category Object ( [languages:protected] => [bok_resources:protected] => [bok_topics:protected] => [bok_keywords:protected] => [id:protected] => 73 [type:protected] => category [parent:protected] => 2 [label:protected] => PCC/Restoration [alreadyInSave:protected] => [alreadyInValidation:protected] => [validationFailures:protected] => Array ( ) [_new:BaseObject:private] => [_deleted:BaseObject:private] => [modifiedColumns:protected] => Array ( ) ) [74] => Category Object ( [languages:protected] => [bok_resources:protected] => [bok_topics:protected] => [bok_keywords:protected] => [id:protected] => 74 [type:protected] => category [parent:protected] => 2 [label:protected] => Pile Driver [alreadyInSave:protected] => [alreadyInValidation:protected] => [validationFailures:protected] => Array ( ) [_new:BaseObject:private] => [_deleted:BaseObject:private] => [modifiedColumns:protected] => Array ( ) ) [76] => Category Object ( [languages:protected] => [bok_resources:protected] => [bok_topics:protected] => [bok_keywords:protected] => [id:protected] => 76 [type:protected] => category [parent:protected] => 2 [label:protected] => Plumber/Pipefitter [alreadyInSave:protected] => [alreadyInValidation:protected] => [validationFailures:protected] => Array ( ) [_new:BaseObject:private] => [_deleted:BaseObject:private] => [modifiedColumns:protected] => Array ( ) ) [77] => Category Object ( [languages:protected] => [bok_resources:protected] => [bok_topics:protected] => [bok_keywords:protected] => [id:protected] => 77 [type:protected] => category [parent:protected] => 2 [label:protected] => Refractory Worker [alreadyInSave:protected] => [alreadyInValidation:protected] => [validationFailures:protected] => Array ( ) [_new:BaseObject:private] => [_deleted:BaseObject:private] => [modifiedColumns:protected] => Array ( ) ) [63] => Category Object ( [languages:protected] => [bok_resources:protected] => [bok_topics:protected] => [bok_keywords:protected] => [id:protected] => 63 [type:protected] => category [parent:protected] => 2 [label:protected] => Reinforcing Ironworker [alreadyInSave:protected] => [alreadyInValidation:protected] => [validationFailures:protected] => Array ( ) [_new:BaseObject:private] => [_deleted:BaseObject:private] => [modifiedColumns:protected] => Array ( ) ) [80] => Category Object ( [languages:protected] => [bok_resources:protected] => [bok_topics:protected] => [bok_keywords:protected] => [id:protected] => 80 [type:protected] => category [parent:protected] => 2 [label:protected] => Sheetmetal Worker [alreadyInSave:protected] => [alreadyInValidation:protected] => [validationFailures:protected] => Array ( ) [_new:BaseObject:private] => [_deleted:BaseObject:private] => [modifiedColumns:protected] => Array ( ) ) [82] => Category Object ( [languages:protected] => [bok_resources:protected] => [bok_topics:protected] => [bok_keywords:protected] => [id:protected] => 82 [type:protected] => category [parent:protected] => 2 [label:protected] => Stonemason [alreadyInSave:protected] => [alreadyInValidation:protected] => [validationFailures:protected] => Array ( ) [_new:BaseObject:private] => [_deleted:BaseObject:private] => [modifiedColumns:protected] => Array ( ) ) [62] => Category Object ( [languages:protected] => [bok_resources:protected] => [bok_topics:protected] => [bok_keywords:protected] => [id:protected] => 62 [type:protected] => category [parent:protected] => 2 [label:protected] => Structural Ironworker [alreadyInSave:protected] => [alreadyInValidation:protected] => [validationFailures:protected] => Array ( ) [_new:BaseObject:private] => [_deleted:BaseObject:private] => [modifiedColumns:protected] => Array ( ) ) [83] => Category Object ( [languages:protected] => [bok_resources:protected] => [bok_topics:protected] => [bok_keywords:protected] => [id:protected] => 83 [type:protected] => category [parent:protected] => 2 [label:protected] => Terrazzo Worker [alreadyInSave:protected] => [alreadyInValidation:protected] => [validationFailures:protected] => Array ( ) [_new:BaseObject:private] => [_deleted:BaseObject:private] => [modifiedColumns:protected] => Array ( ) ) [84] => Category Object ( [languages:protected] => [bok_resources:protected] => [bok_topics:protected] => [bok_keywords:protected] => [id:protected] => 84 [type:protected] => category [parent:protected] => 2 [label:protected] => Tile Setter [alreadyInSave:protected] => [alreadyInValidation:protected] => [validationFailures:protected] => Array ( ) [_new:BaseObject:private] => [_deleted:BaseObject:private] => [modifiedColumns:protected] => Array ( ) ) [86] => Category Object ( [languages:protected] => [bok_resources:protected] => [bok_topics:protected] => [bok_keywords:protected] => [id:protected] => 86 [type:protected] => category [parent:protected] => 2 [label:protected] => Welder [alreadyInSave:protected] => [alreadyInValidation:protected] => [validationFailures:protected] => Array ( ) [_new:BaseObject:private] => [_deleted:BaseObject:private] => [modifiedColumns:protected] => Array ( ) ) [88] => Category Object ( [languages:protected] => [bok_resources:protected] => [bok_topics:protected] => [bok_keywords:protected] => [id:protected] => 88 [type:protected] => category [parent:protected] => 3 [label:protected] => Demolition [alreadyInSave:protected] => [alreadyInValidation:protected] => [validationFailures:protected] => Array ( ) [_new:BaseObject:private] => [_deleted:BaseObject:private] => [modifiedColumns:protected] => Array ( ) ) [89] => Category Object ( [languages:protected] => [bok_resources:protected] => [bok_topics:protected] => [bok_keywords:protected] => [id:protected] => 89 [type:protected] => category [parent:protected] => 3 [label:protected] => Disasters [alreadyInSave:protected] => [alreadyInValidation:protected] => [validationFailures:protected] => Array ( ) [_new:BaseObject:private] => [_deleted:BaseObject:private] => [modifiedColumns:protected] => Array ( ) ) [95] => Category Object ( [languages:protected] => [bok_resources:protected] => [bok_topics:protected] => [bok_keywords:protected] => [id:protected] => 95 [type:protected] => category [parent:protected] => 3 [label:protected] => Underground [alreadyInSave:protected] => [alreadyInValidation:protected] => [validationFailures:protected] => Array ( ) [_new:BaseObject:private] => [_deleted:BaseObject:private] => [modifiedColumns:protected] => Array ( ) ) [102] => Category Object ( [languages:protected] => [bok_resources:protected] => [bok_topics:protected] => [bok_keywords:protected] => [id:protected] => 102 [type:protected] => category [parent:protected] => 6 [label:protected] => Handouts [alreadyInSave:protected] => [alreadyInValidation:protected] => [validationFailures:protected] => Array ( ) [_new:BaseObject:private] => [_deleted:BaseObject:private] => [modifiedColumns:protected] => Array ( ) ) ) [categories_initialized:protected] => 1 [mapped_items:protected] => [content:protected] => [files:protected] => [language:protected] => Language Object ( [id:protected] => 1 [code:protected] => en [name:protected] => English [alreadyInSave:protected] => [alreadyInValidation:protected] => [validationFailures:protected] => Array ( ) [_new:BaseObject:private] => [_deleted:BaseObject:private] => [modifiedColumns:protected] => Array ( ) ) [old_record:protected] => [id:protected] => 4415 [old_id:protected] => [elcosh_id:protected] => d001651 [type:protected] => document [display_type:protected] => HTML only (and links) [user_id:protected] => 0 [language_id:protected] => 1 [tagging_id:protected] => Valeria Contreras [priority_id:protected] => 1 [title:protected] => Working in an Enclosed Cab [total_pages:protected] => 1 [billed_pages:protected] => 1 [publication_number:protected] => [part_of:protected] => [keywords:protected] => Occupation, construction, safety, health, hazards, work, worker, workplace, OSHA, silicosis, mining, silica, DOE, EEOICPA, labor, lung, CBD, dust, cab, miner, mine [comments:protected] => [summary:protected] => This CPWR Hazard Alert on Working in enclosed cabs provides information on protecting workers from silica dust, how to minimize exposures and the dangers of silica dust. Click on the following links to access the English version and the Spanish version. [transition_comments:protected] => [external_link:protected] => [consol_link:protected] => [more_like_this:protected] => [permission_given_by:protected] => [published:protected] => T [billable:protected] => F [img_name:protected] => [img_ext:protected] => [img_width:protected] => [img_height:protected] => [img_credit:protected] => [img_practice:protected] => [vid_source_id:protected] => [vid_running_time:protected] => [vid_intended_audience:protected] => [vid_acquisition_info:protected] => [vid_cost:protected] => [vid_producer:protected] => [vid_filename:protected] => [vid_filename_downloadable:protected] => [date_summary:protected] => [date_permission_requested:protected] => [date_permission_received:protected] => [date_review_needed:protected] => [date_received:protected] => 10/08/20 [date_completed:protected] => 10/08/20 [date_billed:protected] => [date_modified:protected] => 10/08/20 [collBokExports:protected] => [lastBokExportCriteria:BaseElcoshItem:private] => [alreadyInSave:protected] => [alreadyInValidation:protected] => [validationFailures:protected] => Array ( ) [_new:BaseObject:private] => [_deleted:BaseObject:private] => [modifiedColumns:protected] => Array ( ) ) ) [4] => Search_Result Object ( [title] => Toolbox Talk: Suicide Prevention [image] => /record/images/notavailable-p.png [blurb] => The CPWR Toolbox Talk on Suicide Prevention addresses the prevalence of suicide among construction workers. The resource includes a brief case example... [category] => Array ( [0] => 13 [1] => 20 [2] => 23 [3] => 40 [4] => 44 [5] => 45 [6] => 46 [7] => 47 [8] => 48 [9] => 49 [10] => 50 [11] => 51 [12] => 52 [13] => 53 [14] => 54 [15] => 55 [16] => 56 [17] => 57 [18] => 58 [19] => 59 [20] => 60 [21] => 61 [22] => 64 [23] => 65 [24] => 66 [25] => 67 [26] => 68 [27] => 69 [28] => 70 [29] => 71 [30] => 72 [31] => 73 [32] => 74 [33] => 75 [34] => 76 [35] => 77 [36] => 63 [37] => 78 [38] => 79 [39] => 80 [40] => 81 [41] => 82 [42] => 62 [43] => 83 [44] => 84 [45] => 85 [46] => 86 [47] => 87 [48] => 88 [49] => 89 [50] => 91 [51] => 90 [52] => 92 [53] => 93 [54] => 94 [55] => 95 [56] => 100 ) [labels] => Array ( [0] => Drugs, Alcohol & Tobacco [1] => Work Environment [2] => Hazards [3] => Safety Culture [6] => Stress & Overtime [9] => Overexertion [10] => Ergonomic [12] => Acoustical Ceiling Carpenter [13] => Trades [14] => Asbestos/Insulator [16] => Boilermaker [18] => Bricklayer [20] => Cabinetmaker [22] => Carpenter [24] => Carpet Layer [26] => Cement Mason [28] => Commercial Diver [30] => Concrete Polisher [32] => Drywall Applicator Specialist [34] => Electrical Worker [36] => Elevator Constructor [38] => Flagger [40] => Glazier [42] => Hazardous Waste Cleanup [44] => HVAC [46] => Interior Systems Carpenter [48] => Laborer [50] => Landscaper [52] => Lather [54] => Lead Abatement Worker [56] => Maintenance Worker [58] => Millwright [60] => Operating Engineer [62] => Painter [64] => Paper Hanger [66] => PCC/Restoration [68] => Pile Driver [70] => Plasterer [72] => Plumber/Pipefitter [74] => Refractory Worker [76] => Reinforcing Ironworker [78] => Roofer/Waterproofer [80] => Scaffold Erector [82] => Sheetmetal Worker [84] => Sprinkler Fitter [86] => Stonemason [88] => Structural Ironworker [90] => Terrazzo Worker [92] => Tile Setter [94] => Truck Driver [96] => Welder [98] => Commercial & Institutional [99] => Jobsites [100] => Demolition [102] => Disasters [104] => Heavy & Highway [106] => Industrial [108] => LEED/Green Construction [110] => Renovations [112] => Residential [114] => Underground [116] => Toolbox Talks [117] => Documents [118] => Media & Documents ) [type] => Toolbox Talks [sub_category] => [url] => /document/4419/d001652/Toolbox%2BTalk%253A%2BSuicide%2BPrevention.html [item:protected] => DocumentRecord Object ( [records:protected] => Array ( ) [recordId:protected] => [searchWordClass:protected] => [searchWordPeerClass:protected] => [bok_record:protected] => [authors:protected] => [organizations:protected] => [collections:protected] => [categories:protected] => Array ( [13] => Category Object ( [languages:protected] => [bok_resources:protected] => [bok_topics:protected] => [bok_keywords:protected] => [id:protected] => 13 [type:protected] => category [parent:protected] => 7 [label:protected] => Drugs, Alcohol & Tobacco [alreadyInSave:protected] => [alreadyInValidation:protected] => [validationFailures:protected] => Array ( ) [_new:BaseObject:private] => [_deleted:BaseObject:private] => [modifiedColumns:protected] => Array ( ) ) [20] => Category Object ( [languages:protected] => [bok_resources:protected] => [bok_topics:protected] => [bok_keywords:protected] => [id:protected] => 20 [type:protected] => category [parent:protected] => 7 [label:protected] => Safety Culture [alreadyInSave:protected] => [alreadyInValidation:protected] => [validationFailures:protected] => Array ( ) [_new:BaseObject:private] => [_deleted:BaseObject:private] => [modifiedColumns:protected] => Array ( ) ) [23] => Category Object ( [languages:protected] => [bok_resources:protected] => [bok_topics:protected] => [bok_keywords:protected] => [id:protected] => 23 [type:protected] => category [parent:protected] => 7 [label:protected] => Stress & Overtime [alreadyInSave:protected] => [alreadyInValidation:protected] => [validationFailures:protected] => Array ( ) [_new:BaseObject:private] => [_deleted:BaseObject:private] => [modifiedColumns:protected] => Array ( ) ) [40] => Category Object ( [languages:protected] => [bok_resources:protected] => [bok_topics:protected] => [bok_keywords:protected] => [id:protected] => 40 [type:protected] => category [parent:protected] => 9 [label:protected] => Overexertion [alreadyInSave:protected] => [alreadyInValidation:protected] => [validationFailures:protected] => Array ( ) [_new:BaseObject:private] => [_deleted:BaseObject:private] => [modifiedColumns:protected] => Array ( ) ) [44] => Category Object ( [languages:protected] => [bok_resources:protected] => [bok_topics:protected] => [bok_keywords:protected] => [id:protected] => 44 [type:protected] => category [parent:protected] => 2 [label:protected] => Acoustical Ceiling Carpenter [alreadyInSave:protected] => [alreadyInValidation:protected] => [validationFailures:protected] => Array ( ) [_new:BaseObject:private] => [_deleted:BaseObject:private] => [modifiedColumns:protected] => Array ( ) ) [45] => Category Object ( [languages:protected] => [bok_resources:protected] => [bok_topics:protected] => [bok_keywords:protected] => [id:protected] => 45 [type:protected] => category [parent:protected] => 2 [label:protected] => Asbestos/Insulator [alreadyInSave:protected] => [alreadyInValidation:protected] => [validationFailures:protected] => Array ( ) [_new:BaseObject:private] => [_deleted:BaseObject:private] => [modifiedColumns:protected] => Array ( ) ) [46] => Category Object ( [languages:protected] => [bok_resources:protected] => [bok_topics:protected] => [bok_keywords:protected] => [id:protected] => 46 [type:protected] => category [parent:protected] => 2 [label:protected] => Boilermaker [alreadyInSave:protected] => [alreadyInValidation:protected] => [validationFailures:protected] => Array ( ) [_new:BaseObject:private] => [_deleted:BaseObject:private] => [modifiedColumns:protected] => Array ( ) ) [47] => Category Object ( [languages:protected] => [bok_resources:protected] => [bok_topics:protected] => [bok_keywords:protected] => [id:protected] => 47 [type:protected] => category [parent:protected] => 2 [label:protected] => Bricklayer [alreadyInSave:protected] => [alreadyInValidation:protected] => [validationFailures:protected] => Array ( ) [_new:BaseObject:private] => [_deleted:BaseObject:private] => [modifiedColumns:protected] => Array ( ) ) [48] => Category Object ( [languages:protected] => [bok_resources:protected] => [bok_topics:protected] => [bok_keywords:protected] => [id:protected] => 48 [type:protected] => category [parent:protected] => 2 [label:protected] => Cabinetmaker [alreadyInSave:protected] => [alreadyInValidation:protected] => [validationFailures:protected] => Array ( ) [_new:BaseObject:private] => [_deleted:BaseObject:private] => [modifiedColumns:protected] => Array ( ) ) [49] => Category Object ( [languages:protected] => [bok_resources:protected] => [bok_topics:protected] => [bok_keywords:protected] => [id:protected] => 49 [type:protected] => category [parent:protected] => 2 [label:protected] => Carpenter [alreadyInSave:protected] => [alreadyInValidation:protected] => [validationFailures:protected] => Array ( ) [_new:BaseObject:private] => [_deleted:BaseObject:private] => [modifiedColumns:protected] => Array ( ) ) [50] => Category Object ( [languages:protected] => [bok_resources:protected] => [bok_topics:protected] => [bok_keywords:protected] => [id:protected] => 50 [type:protected] => category [parent:protected] => 2 [label:protected] => Carpet Layer [alreadyInSave:protected] => [alreadyInValidation:protected] => [validationFailures:protected] => Array ( ) [_new:BaseObject:private] => [_deleted:BaseObject:private] => [modifiedColumns:protected] => Array ( ) ) [51] => Category Object ( [languages:protected] => [bok_resources:protected] => [bok_topics:protected] => [bok_keywords:protected] => [id:protected] => 51 [type:protected] => category [parent:protected] => 2 [label:protected] => Cement Mason [alreadyInSave:protected] => [alreadyInValidation:protected] => [validationFailures:protected] => Array ( ) [_new:BaseObject:private] => [_deleted:BaseObject:private] => [modifiedColumns:protected] => Array ( ) ) [52] => Category Object ( [languages:protected] => [bok_resources:protected] => [bok_topics:protected] => [bok_keywords:protected] => [id:protected] => 52 [type:protected] => category [parent:protected] => 2 [label:protected] => Commercial Diver [alreadyInSave:protected] => [alreadyInValidation:protected] => [validationFailures:protected] => Array ( ) [_new:BaseObject:private] => [_deleted:BaseObject:private] => [modifiedColumns:protected] => Array ( ) ) [53] => Category Object ( [languages:protected] => [bok_resources:protected] => [bok_topics:protected] => [bok_keywords:protected] => [id:protected] => 53 [type:protected] => category [parent:protected] => 2 [label:protected] => Concrete Polisher [alreadyInSave:protected] => [alreadyInValidation:protected] => [validationFailures:protected] => Array ( ) [_new:BaseObject:private] => [_deleted:BaseObject:private] => [modifiedColumns:protected] => Array ( ) ) [54] => Category Object ( [languages:protected] => [bok_resources:protected] => [bok_topics:protected] => [bok_keywords:protected] => [id:protected] => 54 [type:protected] => category [parent:protected] => 2 [label:protected] => Drywall Applicator Specialist [alreadyInSave:protected] => [alreadyInValidation:protected] => [validationFailures:protected] => Array ( ) [_new:BaseObject:private] => [_deleted:BaseObject:private] => [modifiedColumns:protected] => Array ( ) ) [55] => Category Object ( [languages:protected] => [bok_resources:protected] => [bok_topics:protected] => [bok_keywords:protected] => [id:protected] => 55 [type:protected] => category [parent:protected] => 2 [label:protected] => Electrical Worker [alreadyInSave:protected] => [alreadyInValidation:protected] => [validationFailures:protected] => Array ( ) [_new:BaseObject:private] => [_deleted:BaseObject:private] => [modifiedColumns:protected] => Array ( ) ) [56] => Category Object ( [languages:protected] => [bok_resources:protected] => [bok_topics:protected] => [bok_keywords:protected] => [id:protected] => 56 [type:protected] => category [parent:protected] => 2 [label:protected] => Elevator Constructor [alreadyInSave:protected] => [alreadyInValidation:protected] => [validationFailures:protected] => Array ( ) [_new:BaseObject:private] => [_deleted:BaseObject:private] => [modifiedColumns:protected] => Array ( ) ) [57] => Category Object ( [languages:protected] => [bok_resources:protected] => [bok_topics:protected] => [bok_keywords:protected] => [id:protected] => 57 [type:protected] => category [parent:protected] => 2 [label:protected] => Flagger [alreadyInSave:protected] => [alreadyInValidation:protected] => [validationFailures:protected] => Array ( ) [_new:BaseObject:private] => [_deleted:BaseObject:private] => [modifiedColumns:protected] => Array ( ) ) [58] => Category Object ( [languages:protected] => [bok_resources:protected] => [bok_topics:protected] => [bok_keywords:protected] => [id:protected] => 58 [type:protected] => category [parent:protected] => 2 [label:protected] => Glazier [alreadyInSave:protected] => [alreadyInValidation:protected] => [validationFailures:protected] => Array ( ) [_new:BaseObject:private] => [_deleted:BaseObject:private] => [modifiedColumns:protected] => Array ( ) ) [59] => Category Object ( [languages:protected] => [bok_resources:protected] => [bok_topics:protected] => [bok_keywords:protected] => [id:protected] => 59 [type:protected] => category [parent:protected] => 2 [label:protected] => Hazardous Waste Cleanup [alreadyInSave:protected] => [alreadyInValidation:protected] => [validationFailures:protected] => Array ( ) [_new:BaseObject:private] => [_deleted:BaseObject:private] => [modifiedColumns:protected] => Array ( ) ) [60] => Category Object ( [languages:protected] => [bok_resources:protected] => [bok_topics:protected] => [bok_keywords:protected] => [id:protected] => 60 [type:protected] => category [parent:protected] => 2 [label:protected] => HVAC [alreadyInSave:protected] => [alreadyInValidation:protected] => [validationFailures:protected] => Array ( ) [_new:BaseObject:private] => [_deleted:BaseObject:private] => [modifiedColumns:protected] => Array ( ) ) [61] => Category Object ( [languages:protected] => [bok_resources:protected] => [bok_topics:protected] => [bok_keywords:protected] => [id:protected] => 61 [type:protected] => category [parent:protected] => 2 [label:protected] => Interior Systems Carpenter [alreadyInSave:protected] => [alreadyInValidation:protected] => [validationFailures:protected] => Array ( ) [_new:BaseObject:private] => [_deleted:BaseObject:private] => [modifiedColumns:protected] => Array ( ) ) [64] => Category Object ( [languages:protected] => [bok_resources:protected] => [bok_topics:protected] => [bok_keywords:protected] => [id:protected] => 64 [type:protected] => category [parent:protected] => 2 [label:protected] => Laborer [alreadyInSave:protected] => [alreadyInValidation:protected] => [validationFailures:protected] => Array ( ) [_new:BaseObject:private] => [_deleted:BaseObject:private] => [modifiedColumns:protected] => Array ( ) ) [65] => Category Object ( [languages:protected] => [bok_resources:protected] => [bok_topics:protected] => [bok_keywords:protected] => [id:protected] => 65 [type:protected] => category [parent:protected] => 2 [label:protected] => Landscaper [alreadyInSave:protected] => [alreadyInValidation:protected] => [validationFailures:protected] => Array ( ) [_new:BaseObject:private] => [_deleted:BaseObject:private] => [modifiedColumns:protected] => Array ( ) ) [66] => Category Object ( [languages:protected] => [bok_resources:protected] => [bok_topics:protected] => [bok_keywords:protected] => [id:protected] => 66 [type:protected] => category [parent:protected] => 2 [label:protected] => Lather [alreadyInSave:protected] => [alreadyInValidation:protected] => [validationFailures:protected] => Array ( ) [_new:BaseObject:private] => [_deleted:BaseObject:private] => [modifiedColumns:protected] => Array ( ) ) [67] => Category Object ( [languages:protected] => [bok_resources:protected] => [bok_topics:protected] => [bok_keywords:protected] => [id:protected] => 67 [type:protected] => category [parent:protected] => 2 [label:protected] => Lead Abatement Worker [alreadyInSave:protected] => [alreadyInValidation:protected] => [validationFailures:protected] => Array ( ) [_new:BaseObject:private] => [_deleted:BaseObject:private] => [modifiedColumns:protected] => Array ( ) ) [68] => Category Object ( [languages:protected] => [bok_resources:protected] => [bok_topics:protected] => [bok_keywords:protected] => [id:protected] => 68 [type:protected] => category [parent:protected] => 2 [label:protected] => Maintenance Worker [alreadyInSave:protected] => [alreadyInValidation:protected] => [validationFailures:protected] => Array ( ) [_new:BaseObject:private] => [_deleted:BaseObject:private] => [modifiedColumns:protected] => Array ( ) ) [69] => Category Object ( [languages:protected] => [bok_resources:protected] => [bok_topics:protected] => [bok_keywords:protected] => [id:protected] => 69 [type:protected] => category [parent:protected] => 2 [label:protected] => Millwright [alreadyInSave:protected] => [alreadyInValidation:protected] => [validationFailures:protected] => Array ( ) [_new:BaseObject:private] => [_deleted:BaseObject:private] => [modifiedColumns:protected] => Array ( ) ) [70] => Category Object ( [languages:protected] => [bok_resources:protected] => [bok_topics:protected] => [bok_keywords:protected] => [id:protected] => 70 [type:protected] => category [parent:protected] => 2 [label:protected] => Operating Engineer [alreadyInSave:protected] => [alreadyInValidation:protected] => [validationFailures:protected] => Array ( ) [_new:BaseObject:private] => [_deleted:BaseObject:private] => [modifiedColumns:protected] => Array ( ) ) [71] => Category Object ( [languages:protected] => [bok_resources:protected] => [bok_topics:protected] => [bok_keywords:protected] => [id:protected] => 71 [type:protected] => category [parent:protected] => 2 [label:protected] => Painter [alreadyInSave:protected] => [alreadyInValidation:protected] => [validationFailures:protected] => Array ( ) [_new:BaseObject:private] => [_deleted:BaseObject:private] => [modifiedColumns:protected] => Array ( ) ) [72] => Category Object ( [languages:protected] => [bok_resources:protected] => [bok_topics:protected] => [bok_keywords:protected] => [id:protected] => 72 [type:protected] => category [parent:protected] => 2 [label:protected] => Paper Hanger [alreadyInSave:protected] => [alreadyInValidation:protected] => [validationFailures:protected] => Array ( ) [_new:BaseObject:private] => [_deleted:BaseObject:private] => [modifiedColumns:protected] => Array ( ) ) [73] => Category Object ( [languages:protected] => [bok_resources:protected] => [bok_topics:protected] => [bok_keywords:protected] => [id:protected] => 73 [type:protected] => category [parent:protected] => 2 [label:protected] => PCC/Restoration [alreadyInSave:protected] => [alreadyInValidation:protected] => [validationFailures:protected] => Array ( ) [_new:BaseObject:private] => [_deleted:BaseObject:private] => [modifiedColumns:protected] => Array ( ) ) [74] => Category Object ( [languages:protected] => [bok_resources:protected] => [bok_topics:protected] => [bok_keywords:protected] => [id:protected] => 74 [type:protected] => category [parent:protected] => 2 [label:protected] => Pile Driver [alreadyInSave:protected] => [alreadyInValidation:protected] => [validationFailures:protected] => Array ( ) [_new:BaseObject:private] => [_deleted:BaseObject:private] => [modifiedColumns:protected] => Array ( ) ) [75] => Category Object ( [languages:protected] => [bok_resources:protected] => [bok_topics:protected] => [bok_keywords:protected] => [id:protected] => 75 [type:protected] => category [parent:protected] => 2 [label:protected] => Plasterer [alreadyInSave:protected] => [alreadyInValidation:protected] => [validationFailures:protected] => Array ( ) [_new:BaseObject:private] => [_deleted:BaseObject:private] => [modifiedColumns:protected] => Array ( ) ) [76] => Category Object ( [languages:protected] => [bok_resources:protected] => [bok_topics:protected] => [bok_keywords:protected] => [id:protected] => 76 [type:protected] => category [parent:protected] => 2 [label:protected] => Plumber/Pipefitter [alreadyInSave:protected] => [alreadyInValidation:protected] => [validationFailures:protected] => Array ( ) [_new:BaseObject:private] => [_deleted:BaseObject:private] => [modifiedColumns:protected] => Array ( ) ) [77] => Category Object ( [languages:protected] => [bok_resources:protected] => [bok_topics:protected] => [bok_keywords:protected] => [id:protected] => 77 [type:protected] => category [parent:protected] => 2 [label:protected] => Refractory Worker [alreadyInSave:protected] => [alreadyInValidation:protected] => [validationFailures:protected] => Array ( ) [_new:BaseObject:private] => [_deleted:BaseObject:private] => [modifiedColumns:protected] => Array ( ) ) [63] => Category Object ( [languages:protected] => [bok_resources:protected] => [bok_topics:protected] => [bok_keywords:protected] => [id:protected] => 63 [type:protected] => category [parent:protected] => 2 [label:protected] => Reinforcing Ironworker [alreadyInSave:protected] => [alreadyInValidation:protected] => [validationFailures:protected] => Array ( ) [_new:BaseObject:private] => [_deleted:BaseObject:private] => [modifiedColumns:protected] => Array ( ) ) [78] => Category Object ( [languages:protected] => [bok_resources:protected] => [bok_topics:protected] => [bok_keywords:protected] => [id:protected] => 78 [type:protected] => category [parent:protected] => 2 [label:protected] => Roofer/Waterproofer [alreadyInSave:protected] => [alreadyInValidation:protected] => [validationFailures:protected] => Array ( ) [_new:BaseObject:private] => [_deleted:BaseObject:private] => [modifiedColumns:protected] => Array ( ) ) [79] => Category Object ( [languages:protected] => [bok_resources:protected] => [bok_topics:protected] => [bok_keywords:protected] => [id:protected] => 79 [type:protected] => category [parent:protected] => 2 [label:protected] => Scaffold Erector [alreadyInSave:protected] => [alreadyInValidation:protected] => [validationFailures:protected] => Array ( ) [_new:BaseObject:private] => [_deleted:BaseObject:private] => [modifiedColumns:protected] => Array ( ) ) [80] => Category Object ( [languages:protected] => [bok_resources:protected] => [bok_topics:protected] => [bok_keywords:protected] => [id:protected] => 80 [type:protected] => category [parent:protected] => 2 [label:protected] => Sheetmetal Worker [alreadyInSave:protected] => [alreadyInValidation:protected] => [validationFailures:protected] => Array ( ) [_new:BaseObject:private] => [_deleted:BaseObject:private] => [modifiedColumns:protected] => Array ( ) ) [81] => Category Object ( [languages:protected] => [bok_resources:protected] => [bok_topics:protected] => [bok_keywords:protected] => [id:protected] => 81 [type:protected] => category [parent:protected] => 2 [label:protected] => Sprinkler Fitter [alreadyInSave:protected] => [alreadyInValidation:protected] => [validationFailures:protected] => Array ( ) [_new:BaseObject:private] => [_deleted:BaseObject:private] => [modifiedColumns:protected] => Array ( ) ) [82] => Category Object ( [languages:protected] => [bok_resources:protected] => [bok_topics:protected] => [bok_keywords:protected] => [id:protected] => 82 [type:protected] => category [parent:protected] => 2 [label:protected] => Stonemason [alreadyInSave:protected] => [alreadyInValidation:protected] => [validationFailures:protected] => Array ( ) [_new:BaseObject:private] => [_deleted:BaseObject:private] => [modifiedColumns:protected] => Array ( ) ) [62] => Category Object ( [languages:protected] => [bok_resources:protected] => [bok_topics:protected] => [bok_keywords:protected] => [id:protected] => 62 [type:protected] => category [parent:protected] => 2 [label:protected] => Structural Ironworker [alreadyInSave:protected] => [alreadyInValidation:protected] => [validationFailures:protected] => Array ( ) [_new:BaseObject:private] => [_deleted:BaseObject:private] => [modifiedColumns:protected] => Array ( ) ) [83] => Category Object ( [languages:protected] => [bok_resources:protected] => [bok_topics:protected] => [bok_keywords:protected] => [id:protected] => 83 [type:protected] => category [parent:protected] => 2 [label:protected] => Terrazzo Worker [alreadyInSave:protected] => [alreadyInValidation:protected] => [validationFailures:protected] => Array ( ) [_new:BaseObject:private] => [_deleted:BaseObject:private] => [modifiedColumns:protected] => Array ( ) ) [84] => Category Object ( [languages:protected] => [bok_resources:protected] => [bok_topics:protected] => [bok_keywords:protected] => [id:protected] => 84 [type:protected] => category [parent:protected] => 2 [label:protected] => Tile Setter [alreadyInSave:protected] => [alreadyInValidation:protected] => [validationFailures:protected] => Array ( ) [_new:BaseObject:private] => [_deleted:BaseObject:private] => [modifiedColumns:protected] => Array ( ) ) [85] => Category Object ( [languages:protected] => [bok_resources:protected] => [bok_topics:protected] => [bok_keywords:protected] => [id:protected] => 85 [type:protected] => category [parent:protected] => 2 [label:protected] => Truck Driver [alreadyInSave:protected] => [alreadyInValidation:protected] => [validationFailures:protected] => Array ( ) [_new:BaseObject:private] => [_deleted:BaseObject:private] => [modifiedColumns:protected] => Array ( ) ) [86] => Category Object ( [languages:protected] => [bok_resources:protected] => [bok_topics:protected] => [bok_keywords:protected] => [id:protected] => 86 [type:protected] => category [parent:protected] => 2 [label:protected] => Welder [alreadyInSave:protected] => [alreadyInValidation:protected] => [validationFailures:protected] => Array ( ) [_new:BaseObject:private] => [_deleted:BaseObject:private] => [modifiedColumns:protected] => Array ( ) ) [87] => Category Object ( [languages:protected] => [bok_resources:protected] => [bok_topics:protected] => [bok_keywords:protected] => [id:protected] => 87 [type:protected] => category [parent:protected] => 3 [label:protected] => Commercial & Institutional [alreadyInSave:protected] => [alreadyInValidation:protected] => [validationFailures:protected] => Array ( ) [_new:BaseObject:private] => [_deleted:BaseObject:private] => [modifiedColumns:protected] => Array ( ) ) [88] => Category Object ( [languages:protected] => [bok_resources:protected] => [bok_topics:protected] => [bok_keywords:protected] => [id:protected] => 88 [type:protected] => category [parent:protected] => 3 [label:protected] => Demolition [alreadyInSave:protected] => [alreadyInValidation:protected] => [validationFailures:protected] => Array ( ) [_new:BaseObject:private] => [_deleted:BaseObject:private] => [modifiedColumns:protected] => Array ( ) ) [89] => Category Object ( [languages:protected] => [bok_resources:protected] => [bok_topics:protected] => [bok_keywords:protected] => [id:protected] => 89 [type:protected] => category [parent:protected] => 3 [label:protected] => Disasters [alreadyInSave:protected] => [alreadyInValidation:protected] => [validationFailures:protected] => Array ( ) [_new:BaseObject:private] => [_deleted:BaseObject:private] => [modifiedColumns:protected] => Array ( ) ) [91] => Category Object ( [languages:protected] => [bok_resources:protected] => [bok_topics:protected] => [bok_keywords:protected] => [id:protected] => 91 [type:protected] => category [parent:protected] => 3 [label:protected] => Heavy & Highway [alreadyInSave:protected] => [alreadyInValidation:protected] => [validationFailures:protected] => Array ( ) [_new:BaseObject:private] => [_deleted:BaseObject:private] => [modifiedColumns:protected] => Array ( ) ) [90] => Category Object ( [languages:protected] => [bok_resources:protected] => [bok_topics:protected] => [bok_keywords:protected] => [id:protected] => 90 [type:protected] => category [parent:protected] => 3 [label:protected] => Industrial [alreadyInSave:protected] => [alreadyInValidation:protected] => [validationFailures:protected] => Array ( ) [_new:BaseObject:private] => [_deleted:BaseObject:private] => [modifiedColumns:protected] => Array ( ) ) [92] => Category Object ( [languages:protected] => [bok_resources:protected] => [bok_topics:protected] => [bok_keywords:protected] => [id:protected] => 92 [type:protected] => category [parent:protected] => 3 [label:protected] => LEED/Green Construction [alreadyInSave:protected] => [alreadyInValidation:protected] => [validationFailures:protected] => Array ( ) [_new:BaseObject:private] => [_deleted:BaseObject:private] => [modifiedColumns:protected] => Array ( ) ) [93] => Category Object ( [languages:protected] => [bok_resources:protected] => [bok_topics:protected] => [bok_keywords:protected] => [id:protected] => 93 [type:protected] => category [parent:protected] => 3 [label:protected] => Renovations [alreadyInSave:protected] => [alreadyInValidation:protected] => [validationFailures:protected] => Array ( ) [_new:BaseObject:private] => [_deleted:BaseObject:private] => [modifiedColumns:protected] => Array ( ) ) [94] => Category Object ( [languages:protected] => [bok_resources:protected] => [bok_topics:protected] => [bok_keywords:protected] => [id:protected] => 94 [type:protected] => category [parent:protected] => 3 [label:protected] => Residential [alreadyInSave:protected] => [alreadyInValidation:protected] => [validationFailures:protected] => Array ( ) [_new:BaseObject:private] => [_deleted:BaseObject:private] => [modifiedColumns:protected] => Array ( ) ) [95] => Category Object ( [languages:protected] => [bok_resources:protected] => [bok_topics:protected] => [bok_keywords:protected] => [id:protected] => 95 [type:protected] => category [parent:protected] => 3 [label:protected] => Underground [alreadyInSave:protected] => [alreadyInValidation:protected] => [validationFailures:protected] => Array ( ) [_new:BaseObject:private] => [_deleted:BaseObject:private] => [modifiedColumns:protected] => Array ( ) ) [100] => Category Object ( [languages:protected] => [bok_resources:protected] => [bok_topics:protected] => [bok_keywords:protected] => [id:protected] => 100 [type:protected] => category [parent:protected] => 6 [label:protected] => Toolbox Talks [alreadyInSave:protected] => [alreadyInValidation:protected] => [validationFailures:protected] => Array ( ) [_new:BaseObject:private] => [_deleted:BaseObject:private] => [modifiedColumns:protected] => Array ( ) ) ) [categories_initialized:protected] => 1 [mapped_items:protected] => [content:protected] => [files:protected] => [language:protected] => Language Object ( [id:protected] => 1 [code:protected] => en [name:protected] => English [alreadyInSave:protected] => [alreadyInValidation:protected] => [validationFailures:protected] => Array ( ) [_new:BaseObject:private] => [_deleted:BaseObject:private] => [modifiedColumns:protected] => Array ( ) ) [old_record:protected] => [id:protected] => 4419 [old_id:protected] => [elcosh_id:protected] => d001652 [type:protected] => document [display_type:protected] => HTML only (and links) [user_id:protected] => 0 [language_id:protected] => 1 [tagging_id:protected] => Valeria Contreras [priority_id:protected] => 1 [title:protected] => Toolbox Talk: Suicide Prevention [total_pages:protected] => 1 [billed_pages:protected] => 1 [publication_number:protected] => [part_of:protected] => [keywords:protected] => suicide, suicide prevention, mental health, stress, depression, exhaustion, burnout, safety, support, emotional support, health [comments:protected] => [summary:protected] =>The CPWR Toolbox Talk on Suicide Prevention addresses the prevalence of suicide among construction workers. The resource includes a brief case example, steps to prevent a related injury or illness, and questions for discussion. It includes an image that illustrates the hazard, which can be posted in a central location as a reminder of steps to work safely.
Available in English and Spanish. [transition_comments:protected] => [external_link:protected] => [consol_link:protected] => [more_like_this:protected] => [permission_given_by:protected] => [published:protected] => T [billable:protected] => F [img_name:protected] => [img_ext:protected] => [img_width:protected] => [img_height:protected] => [img_credit:protected] => [img_practice:protected] => [vid_source_id:protected] => [vid_running_time:protected] => [vid_intended_audience:protected] => [vid_acquisition_info:protected] => [vid_cost:protected] => [vid_producer:protected] => [vid_filename:protected] => [vid_filename_downloadable:protected] => [date_summary:protected] => [date_permission_requested:protected] => [date_permission_received:protected] => [date_review_needed:protected] => [date_received:protected] => 10/08/20 [date_completed:protected] => 10/08/20 [date_billed:protected] => [date_modified:protected] => 05/19/23 [collBokExports:protected] => [lastBokExportCriteria:BaseElcoshItem:private] => [alreadyInSave:protected] => [alreadyInValidation:protected] => [validationFailures:protected] => Array ( ) [_new:BaseObject:private] => [_deleted:BaseObject:private] => [modifiedColumns:protected] => Array ( ) ) ) ) [new_images] => Array ( [0] => Search_Result Object ( [title] => Toolbox talk - crew view [image] => /record/images/4005-p.jpg [blurb] => Photo of crew listening to a toolbox safety talk before starting work.... [category] => Array ( [0] => 97 [1] => 20 [2] => 47 [3] => 49 [4] => 51 [5] => 55 [6] => 61 [7] => 64 [8] => 71 [9] => 75 [10] => 63 [11] => 79 [12] => 62 [13] => 87 [14] => 88 [15] => 91 [16] => 90 [17] => 93 [18] => 94 [19] => 95 ) [labels] => Array ( [0] => Images [1] => Media [2] => Media & Documents [3] => Safety Culture [4] => Work Environment [5] => Hazards [6] => Bricklayer [7] => Trades [8] => Carpenter [10] => Cement Mason [12] => Electrical Worker [14] => Interior Systems Carpenter [16] => Laborer [18] => Painter [20] => Plasterer [22] => Reinforcing Ironworker [24] => Scaffold Erector [26] => Structural Ironworker [28] => Commercial & Institutional [29] => Jobsites [30] => Demolition [32] => Heavy & Highway [34] => Industrial [36] => Renovations [38] => Residential [40] => Underground ) [type] => Images [sub_category] => [url] => /image/4005/i002692/Toolbox%2Btalk%2B-%2Bcrew%2Bview.html [item:protected] => ImageRecord Object ( [records:protected] => Array ( ) [recordId:protected] => [searchWordClass:protected] => [searchWordPeerClass:protected] => [bok_record:protected] => [authors:protected] => [organizations:protected] => [collections:protected] => [categories:protected] => Array ( [97] => Category Object ( [languages:protected] => [bok_resources:protected] => [bok_topics:protected] => [bok_keywords:protected] => [id:protected] => 97 [type:protected] => category [parent:protected] => 5 [label:protected] => Images [alreadyInSave:protected] => [alreadyInValidation:protected] => [validationFailures:protected] => Array ( ) [_new:BaseObject:private] => [_deleted:BaseObject:private] => [modifiedColumns:protected] => Array ( ) ) [20] => Category Object ( [languages:protected] => [bok_resources:protected] => [bok_topics:protected] => [bok_keywords:protected] => [id:protected] => 20 [type:protected] => category [parent:protected] => 7 [label:protected] => Safety Culture [alreadyInSave:protected] => [alreadyInValidation:protected] => [validationFailures:protected] => Array ( ) [_new:BaseObject:private] => [_deleted:BaseObject:private] => [modifiedColumns:protected] => Array ( ) ) [47] => Category Object ( [languages:protected] => [bok_resources:protected] => [bok_topics:protected] => [bok_keywords:protected] => [id:protected] => 47 [type:protected] => category [parent:protected] => 2 [label:protected] => Bricklayer [alreadyInSave:protected] => [alreadyInValidation:protected] => [validationFailures:protected] => Array ( ) [_new:BaseObject:private] => [_deleted:BaseObject:private] => [modifiedColumns:protected] => Array ( ) ) [49] => Category Object ( [languages:protected] => [bok_resources:protected] => [bok_topics:protected] => [bok_keywords:protected] => [id:protected] => 49 [type:protected] => category [parent:protected] => 2 [label:protected] => Carpenter [alreadyInSave:protected] => [alreadyInValidation:protected] => [validationFailures:protected] => Array ( ) [_new:BaseObject:private] => [_deleted:BaseObject:private] => [modifiedColumns:protected] => Array ( ) ) [51] => Category Object ( [languages:protected] => [bok_resources:protected] => [bok_topics:protected] => [bok_keywords:protected] => [id:protected] => 51 [type:protected] => category [parent:protected] => 2 [label:protected] => Cement Mason [alreadyInSave:protected] => [alreadyInValidation:protected] => [validationFailures:protected] => Array ( ) [_new:BaseObject:private] => [_deleted:BaseObject:private] => [modifiedColumns:protected] => Array ( ) ) [55] => Category Object ( [languages:protected] => [bok_resources:protected] => [bok_topics:protected] => [bok_keywords:protected] => [id:protected] => 55 [type:protected] => category [parent:protected] => 2 [label:protected] => Electrical Worker [alreadyInSave:protected] => [alreadyInValidation:protected] => [validationFailures:protected] => Array ( ) [_new:BaseObject:private] => [_deleted:BaseObject:private] => [modifiedColumns:protected] => Array ( ) ) [61] => Category Object ( [languages:protected] => [bok_resources:protected] => [bok_topics:protected] => [bok_keywords:protected] => [id:protected] => 61 [type:protected] => category [parent:protected] => 2 [label:protected] => Interior Systems Carpenter [alreadyInSave:protected] => [alreadyInValidation:protected] => [validationFailures:protected] => Array ( ) [_new:BaseObject:private] => [_deleted:BaseObject:private] => [modifiedColumns:protected] => Array ( ) ) [64] => Category Object ( [languages:protected] => [bok_resources:protected] => [bok_topics:protected] => [bok_keywords:protected] => [id:protected] => 64 [type:protected] => category [parent:protected] => 2 [label:protected] => Laborer [alreadyInSave:protected] => [alreadyInValidation:protected] => [validationFailures:protected] => Array ( ) [_new:BaseObject:private] => [_deleted:BaseObject:private] => [modifiedColumns:protected] => Array ( ) ) [71] => Category Object ( [languages:protected] => [bok_resources:protected] => [bok_topics:protected] => [bok_keywords:protected] => [id:protected] => 71 [type:protected] => category [parent:protected] => 2 [label:protected] => Painter [alreadyInSave:protected] => [alreadyInValidation:protected] => [validationFailures:protected] => Array ( ) [_new:BaseObject:private] => [_deleted:BaseObject:private] => [modifiedColumns:protected] => Array ( ) ) [75] => Category Object ( [languages:protected] => [bok_resources:protected] => [bok_topics:protected] => [bok_keywords:protected] => [id:protected] => 75 [type:protected] => category [parent:protected] => 2 [label:protected] => Plasterer [alreadyInSave:protected] => [alreadyInValidation:protected] => [validationFailures:protected] => Array ( ) [_new:BaseObject:private] => [_deleted:BaseObject:private] => [modifiedColumns:protected] => Array ( ) ) [63] => Category Object ( [languages:protected] => [bok_resources:protected] => [bok_topics:protected] => [bok_keywords:protected] => [id:protected] => 63 [type:protected] => category [parent:protected] => 2 [label:protected] => Reinforcing Ironworker [alreadyInSave:protected] => [alreadyInValidation:protected] => [validationFailures:protected] => Array ( ) [_new:BaseObject:private] => [_deleted:BaseObject:private] => [modifiedColumns:protected] => Array ( ) ) [79] => Category Object ( [languages:protected] => [bok_resources:protected] => [bok_topics:protected] => [bok_keywords:protected] => [id:protected] => 79 [type:protected] => category [parent:protected] => 2 [label:protected] => Scaffold Erector [alreadyInSave:protected] => [alreadyInValidation:protected] => [validationFailures:protected] => Array ( ) [_new:BaseObject:private] => [_deleted:BaseObject:private] => [modifiedColumns:protected] => Array ( ) ) [62] => Category Object ( [languages:protected] => [bok_resources:protected] => [bok_topics:protected] => [bok_keywords:protected] => [id:protected] => 62 [type:protected] => category [parent:protected] => 2 [label:protected] => Structural Ironworker [alreadyInSave:protected] => [alreadyInValidation:protected] => [validationFailures:protected] => Array ( ) [_new:BaseObject:private] => [_deleted:BaseObject:private] => [modifiedColumns:protected] => Array ( ) ) [87] => Category Object ( [languages:protected] => [bok_resources:protected] => [bok_topics:protected] => [bok_keywords:protected] => [id:protected] => 87 [type:protected] => category [parent:protected] => 3 [label:protected] => Commercial & Institutional [alreadyInSave:protected] => [alreadyInValidation:protected] => [validationFailures:protected] => Array ( ) [_new:BaseObject:private] => [_deleted:BaseObject:private] => [modifiedColumns:protected] => Array ( ) ) [88] => Category Object ( [languages:protected] => [bok_resources:protected] => [bok_topics:protected] => [bok_keywords:protected] => [id:protected] => 88 [type:protected] => category [parent:protected] => 3 [label:protected] => Demolition [alreadyInSave:protected] => [alreadyInValidation:protected] => [validationFailures:protected] => Array ( ) [_new:BaseObject:private] => [_deleted:BaseObject:private] => [modifiedColumns:protected] => Array ( ) ) [91] => Category Object ( [languages:protected] => [bok_resources:protected] => [bok_topics:protected] => [bok_keywords:protected] => [id:protected] => 91 [type:protected] => category [parent:protected] => 3 [label:protected] => Heavy & Highway [alreadyInSave:protected] => [alreadyInValidation:protected] => [validationFailures:protected] => Array ( ) [_new:BaseObject:private] => [_deleted:BaseObject:private] => [modifiedColumns:protected] => Array ( ) ) [90] => Category Object ( [languages:protected] => [bok_resources:protected] => [bok_topics:protected] => [bok_keywords:protected] => [id:protected] => 90 [type:protected] => category [parent:protected] => 3 [label:protected] => Industrial [alreadyInSave:protected] => [alreadyInValidation:protected] => [validationFailures:protected] => Array ( ) [_new:BaseObject:private] => [_deleted:BaseObject:private] => [modifiedColumns:protected] => Array ( ) ) [93] => Category Object ( [languages:protected] => [bok_resources:protected] => [bok_topics:protected] => [bok_keywords:protected] => [id:protected] => 93 [type:protected] => category [parent:protected] => 3 [label:protected] => Renovations [alreadyInSave:protected] => [alreadyInValidation:protected] => [validationFailures:protected] => Array ( ) [_new:BaseObject:private] => [_deleted:BaseObject:private] => [modifiedColumns:protected] => Array ( ) ) [94] => Category Object ( [languages:protected] => [bok_resources:protected] => [bok_topics:protected] => [bok_keywords:protected] => [id:protected] => 94 [type:protected] => category [parent:protected] => 3 [label:protected] => Residential [alreadyInSave:protected] => [alreadyInValidation:protected] => [validationFailures:protected] => Array ( ) [_new:BaseObject:private] => [_deleted:BaseObject:private] => [modifiedColumns:protected] => Array ( ) ) [95] => Category Object ( [languages:protected] => [bok_resources:protected] => [bok_topics:protected] => [bok_keywords:protected] => [id:protected] => 95 [type:protected] => category [parent:protected] => 3 [label:protected] => Underground [alreadyInSave:protected] => [alreadyInValidation:protected] => [validationFailures:protected] => Array ( ) [_new:BaseObject:private] => [_deleted:BaseObject:private] => [modifiedColumns:protected] => Array ( ) ) ) [categories_initialized:protected] => 1 [mapped_items:protected] => [content:protected] => [files:protected] => [language:protected] => Language Object ( [id:protected] => 1 [code:protected] => en [name:protected] => English [alreadyInSave:protected] => [alreadyInValidation:protected] => [validationFailures:protected] => Array ( ) [_new:BaseObject:private] => [_deleted:BaseObject:private] => [modifiedColumns:protected] => Array ( ) ) [old_record:protected] => [id:protected] => 4005 [old_id:protected] => [elcosh_id:protected] => i002692 [type:protected] => image [display_type:protected] => Image [user_id:protected] => 0 [language_id:protected] => 1 [tagging_id:protected] => Bruce Lippy [priority_id:protected] => 1 [title:protected] => Toolbox talk - crew view [total_pages:protected] => 0 [billed_pages:protected] => 0 [publication_number:protected] => [part_of:protected] => [keywords:protected] => toolbox talk, tailgate talk, safety talk, Spanish [comments:protected] => [summary:protected] => Photo of crew listening to a toolbox safety talk before starting work. [transition_comments:protected] => [external_link:protected] => [consol_link:protected] => http://www.cpwrconstructionsolutions.org/electrical/solution/662/worker-training.html [more_like_this:protected] => i002691,d001269, c000079, d001285 [permission_given_by:protected] => [published:protected] => T [billable:protected] => F [img_name:protected] => [img_ext:protected] => jpg [img_width:protected] => [img_height:protected] => [img_credit:protected] => Morgan Zavertnik and Hoar Construction [img_practice:protected] => good [vid_source_id:protected] => [vid_running_time:protected] => [vid_intended_audience:protected] => [vid_acquisition_info:protected] => [vid_cost:protected] => [vid_producer:protected] => [vid_filename:protected] => [vid_filename_downloadable:protected] => [date_summary:protected] => November 2015 [date_permission_requested:protected] => [date_permission_received:protected] => [date_review_needed:protected] => [date_received:protected] => 03/02/16 [date_completed:protected] => 03/02/16 [date_billed:protected] => [date_modified:protected] => 03/02/16 [collBokExports:protected] => [lastBokExportCriteria:BaseElcoshItem:private] => [alreadyInSave:protected] => [alreadyInValidation:protected] => [validationFailures:protected] => Array ( ) [_new:BaseObject:private] => [_deleted:BaseObject:private] => [modifiedColumns:protected] => Array ( ) ) ) [1] => Search_Result Object ( [title] => Toolbox talk - long shot [image] => /record/images/4006-p.jpg [blurb] => This crew gathered every morning before starting work to discuss a new safety topic.... [category] => Array ( [0] => 20 [1] => 47 [2] => 49 [3] => 51 [4] => 55 [5] => 64 [6] => 68 [7] => 75 [8] => 76 [9] => 63 [10] => 78 [11] => 79 [12] => 82 [13] => 62 [14] => 87 [15] => 88 [16] => 91 [17] => 90 [18] => 93 [19] => 94 [20] => 95 [21] => 97 ) [labels] => Array ( [0] => Safety Culture [1] => Work Environment [2] => Hazards [3] => Bricklayer [4] => Trades [5] => Carpenter [7] => Cement Mason [9] => Electrical Worker [11] => Laborer [13] => Maintenance Worker [15] => Plasterer [17] => Plumber/Pipefitter [19] => Reinforcing Ironworker [21] => Roofer/Waterproofer [23] => Scaffold Erector [25] => Stonemason [27] => Structural Ironworker [29] => Commercial & Institutional [30] => Jobsites [31] => Demolition [33] => Heavy & Highway [35] => Industrial [37] => Renovations [39] => Residential [41] => Underground [43] => Images [44] => Media [45] => Media & Documents ) [type] => Images [sub_category] => [url] => /image/4006/i002693/Toolbox%2Btalk%2B-%2Blong%2Bshot.html [item:protected] => ImageRecord Object ( [records:protected] => Array ( ) [recordId:protected] => [searchWordClass:protected] => [searchWordPeerClass:protected] => [bok_record:protected] => [authors:protected] => [organizations:protected] => [collections:protected] => [categories:protected] => Array ( [20] => Category Object ( [languages:protected] => [bok_resources:protected] => [bok_topics:protected] => [bok_keywords:protected] => [id:protected] => 20 [type:protected] => category [parent:protected] => 7 [label:protected] => Safety Culture [alreadyInSave:protected] => [alreadyInValidation:protected] => [validationFailures:protected] => Array ( ) [_new:BaseObject:private] => [_deleted:BaseObject:private] => [modifiedColumns:protected] => Array ( ) ) [47] => Category Object ( [languages:protected] => [bok_resources:protected] => [bok_topics:protected] => [bok_keywords:protected] => [id:protected] => 47 [type:protected] => category [parent:protected] => 2 [label:protected] => Bricklayer [alreadyInSave:protected] => [alreadyInValidation:protected] => [validationFailures:protected] => Array ( ) [_new:BaseObject:private] => [_deleted:BaseObject:private] => [modifiedColumns:protected] => Array ( ) ) [49] => Category Object ( [languages:protected] => [bok_resources:protected] => [bok_topics:protected] => [bok_keywords:protected] => [id:protected] => 49 [type:protected] => category [parent:protected] => 2 [label:protected] => Carpenter [alreadyInSave:protected] => [alreadyInValidation:protected] => [validationFailures:protected] => Array ( ) [_new:BaseObject:private] => [_deleted:BaseObject:private] => [modifiedColumns:protected] => Array ( ) ) [51] => Category Object ( [languages:protected] => [bok_resources:protected] => [bok_topics:protected] => [bok_keywords:protected] => [id:protected] => 51 [type:protected] => category [parent:protected] => 2 [label:protected] => Cement Mason [alreadyInSave:protected] => [alreadyInValidation:protected] => [validationFailures:protected] => Array ( ) [_new:BaseObject:private] => [_deleted:BaseObject:private] => [modifiedColumns:protected] => Array ( ) ) [55] => Category Object ( [languages:protected] => [bok_resources:protected] => [bok_topics:protected] => [bok_keywords:protected] => [id:protected] => 55 [type:protected] => category [parent:protected] => 2 [label:protected] => Electrical Worker [alreadyInSave:protected] => [alreadyInValidation:protected] => [validationFailures:protected] => Array ( ) [_new:BaseObject:private] => [_deleted:BaseObject:private] => [modifiedColumns:protected] => Array ( ) ) [64] => Category Object ( [languages:protected] => [bok_resources:protected] => [bok_topics:protected] => [bok_keywords:protected] => [id:protected] => 64 [type:protected] => category [parent:protected] => 2 [label:protected] => Laborer [alreadyInSave:protected] => [alreadyInValidation:protected] => [validationFailures:protected] => Array ( ) [_new:BaseObject:private] => [_deleted:BaseObject:private] => [modifiedColumns:protected] => Array ( ) ) [68] => Category Object ( [languages:protected] => [bok_resources:protected] => [bok_topics:protected] => [bok_keywords:protected] => [id:protected] => 68 [type:protected] => category [parent:protected] => 2 [label:protected] => Maintenance Worker [alreadyInSave:protected] => [alreadyInValidation:protected] => [validationFailures:protected] => Array ( ) [_new:BaseObject:private] => [_deleted:BaseObject:private] => [modifiedColumns:protected] => Array ( ) ) [75] => Category Object ( [languages:protected] => [bok_resources:protected] => [bok_topics:protected] => [bok_keywords:protected] => [id:protected] => 75 [type:protected] => category [parent:protected] => 2 [label:protected] => Plasterer [alreadyInSave:protected] => [alreadyInValidation:protected] => [validationFailures:protected] => Array ( ) [_new:BaseObject:private] => [_deleted:BaseObject:private] => [modifiedColumns:protected] => Array ( ) ) [76] => Category Object ( [languages:protected] => [bok_resources:protected] => [bok_topics:protected] => [bok_keywords:protected] => [id:protected] => 76 [type:protected] => category [parent:protected] => 2 [label:protected] => Plumber/Pipefitter [alreadyInSave:protected] => [alreadyInValidation:protected] => [validationFailures:protected] => Array ( ) [_new:BaseObject:private] => [_deleted:BaseObject:private] => [modifiedColumns:protected] => Array ( ) ) [63] => Category Object ( [languages:protected] => [bok_resources:protected] => [bok_topics:protected] => [bok_keywords:protected] => [id:protected] => 63 [type:protected] => category [parent:protected] => 2 [label:protected] => Reinforcing Ironworker [alreadyInSave:protected] => [alreadyInValidation:protected] => [validationFailures:protected] => Array ( ) [_new:BaseObject:private] => [_deleted:BaseObject:private] => [modifiedColumns:protected] => Array ( ) ) [78] => Category Object ( [languages:protected] => [bok_resources:protected] => [bok_topics:protected] => [bok_keywords:protected] => [id:protected] => 78 [type:protected] => category [parent:protected] => 2 [label:protected] => Roofer/Waterproofer [alreadyInSave:protected] => [alreadyInValidation:protected] => [validationFailures:protected] => Array ( ) [_new:BaseObject:private] => [_deleted:BaseObject:private] => [modifiedColumns:protected] => Array ( ) ) [79] => Category Object ( [languages:protected] => [bok_resources:protected] => [bok_topics:protected] => [bok_keywords:protected] => [id:protected] => 79 [type:protected] => category [parent:protected] => 2 [label:protected] => Scaffold Erector [alreadyInSave:protected] => [alreadyInValidation:protected] => [validationFailures:protected] => Array ( ) [_new:BaseObject:private] => [_deleted:BaseObject:private] => [modifiedColumns:protected] => Array ( ) ) [82] => Category Object ( [languages:protected] => [bok_resources:protected] => [bok_topics:protected] => [bok_keywords:protected] => [id:protected] => 82 [type:protected] => category [parent:protected] => 2 [label:protected] => Stonemason [alreadyInSave:protected] => [alreadyInValidation:protected] => [validationFailures:protected] => Array ( ) [_new:BaseObject:private] => [_deleted:BaseObject:private] => [modifiedColumns:protected] => Array ( ) ) [62] => Category Object ( [languages:protected] => [bok_resources:protected] => [bok_topics:protected] => [bok_keywords:protected] => [id:protected] => 62 [type:protected] => category [parent:protected] => 2 [label:protected] => Structural Ironworker [alreadyInSave:protected] => [alreadyInValidation:protected] => [validationFailures:protected] => Array ( ) [_new:BaseObject:private] => [_deleted:BaseObject:private] => [modifiedColumns:protected] => Array ( ) ) [87] => Category Object ( [languages:protected] => [bok_resources:protected] => [bok_topics:protected] => [bok_keywords:protected] => [id:protected] => 87 [type:protected] => category [parent:protected] => 3 [label:protected] => Commercial & Institutional [alreadyInSave:protected] => [alreadyInValidation:protected] => [validationFailures:protected] => Array ( ) [_new:BaseObject:private] => [_deleted:BaseObject:private] => [modifiedColumns:protected] => Array ( ) ) [88] => Category Object ( [languages:protected] => [bok_resources:protected] => [bok_topics:protected] => [bok_keywords:protected] => [id:protected] => 88 [type:protected] => category [parent:protected] => 3 [label:protected] => Demolition [alreadyInSave:protected] => [alreadyInValidation:protected] => [validationFailures:protected] => Array ( ) [_new:BaseObject:private] => [_deleted:BaseObject:private] => [modifiedColumns:protected] => Array ( ) ) [91] => Category Object ( [languages:protected] => [bok_resources:protected] => [bok_topics:protected] => [bok_keywords:protected] => [id:protected] => 91 [type:protected] => category [parent:protected] => 3 [label:protected] => Heavy & Highway [alreadyInSave:protected] => [alreadyInValidation:protected] => [validationFailures:protected] => Array ( ) [_new:BaseObject:private] => [_deleted:BaseObject:private] => [modifiedColumns:protected] => Array ( ) ) [90] => Category Object ( [languages:protected] => [bok_resources:protected] => [bok_topics:protected] => [bok_keywords:protected] => [id:protected] => 90 [type:protected] => category [parent:protected] => 3 [label:protected] => Industrial [alreadyInSave:protected] => [alreadyInValidation:protected] => [validationFailures:protected] => Array ( ) [_new:BaseObject:private] => [_deleted:BaseObject:private] => [modifiedColumns:protected] => Array ( ) ) [93] => Category Object ( [languages:protected] => [bok_resources:protected] => [bok_topics:protected] => [bok_keywords:protected] => [id:protected] => 93 [type:protected] => category [parent:protected] => 3 [label:protected] => Renovations [alreadyInSave:protected] => [alreadyInValidation:protected] => [validationFailures:protected] => Array ( ) [_new:BaseObject:private] => [_deleted:BaseObject:private] => [modifiedColumns:protected] => Array ( ) ) [94] => Category Object ( [languages:protected] => [bok_resources:protected] => [bok_topics:protected] => [bok_keywords:protected] => [id:protected] => 94 [type:protected] => category [parent:protected] => 3 [label:protected] => Residential [alreadyInSave:protected] => [alreadyInValidation:protected] => [validationFailures:protected] => Array ( ) [_new:BaseObject:private] => [_deleted:BaseObject:private] => [modifiedColumns:protected] => Array ( ) ) [95] => Category Object ( [languages:protected] => [bok_resources:protected] => [bok_topics:protected] => [bok_keywords:protected] => [id:protected] => 95 [type:protected] => category [parent:protected] => 3 [label:protected] => Underground [alreadyInSave:protected] => [alreadyInValidation:protected] => [validationFailures:protected] => Array ( ) [_new:BaseObject:private] => [_deleted:BaseObject:private] => [modifiedColumns:protected] => Array ( ) ) [97] => Category Object ( [languages:protected] => [bok_resources:protected] => [bok_topics:protected] => [bok_keywords:protected] => [id:protected] => 97 [type:protected] => category [parent:protected] => 5 [label:protected] => Images [alreadyInSave:protected] => [alreadyInValidation:protected] => [validationFailures:protected] => Array ( ) [_new:BaseObject:private] => [_deleted:BaseObject:private] => [modifiedColumns:protected] => Array ( ) ) ) [categories_initialized:protected] => 1 [mapped_items:protected] => [content:protected] => [files:protected] => [language:protected] => Language Object ( [id:protected] => 1 [code:protected] => en [name:protected] => English [alreadyInSave:protected] => [alreadyInValidation:protected] => [validationFailures:protected] => Array ( ) [_new:BaseObject:private] => [_deleted:BaseObject:private] => [modifiedColumns:protected] => Array ( ) ) [old_record:protected] => [id:protected] => 4006 [old_id:protected] => [elcosh_id:protected] => i002693 [type:protected] => image [display_type:protected] => Image [user_id:protected] => 0 [language_id:protected] => 1 [tagging_id:protected] => Bruce Lippy [priority_id:protected] => 1 [title:protected] => Toolbox talk - long shot [total_pages:protected] => 0 [billed_pages:protected] => 0 [publication_number:protected] => [part_of:protected] => [keywords:protected] => toolbox talk, tailgate talk, safety minute [comments:protected] => [summary:protected] => This crew gathered every morning before starting work to discuss a new safety topic. [transition_comments:protected] => [external_link:protected] => [consol_link:protected] => http://www.cpwrconstructionsolutions.org/electrical/solution/662/worker-training.html [more_like_this:protected] => i002691,i002692,d001269,d000527 [permission_given_by:protected] => [published:protected] => T [billable:protected] => F [img_name:protected] => [img_ext:protected] => jpg [img_width:protected] => [img_height:protected] => [img_credit:protected] => Morgan Zavertnik and Hoar Construction [img_practice:protected] => good [vid_source_id:protected] => [vid_running_time:protected] => [vid_intended_audience:protected] => [vid_acquisition_info:protected] => [vid_cost:protected] => [vid_producer:protected] => [vid_filename:protected] => [vid_filename_downloadable:protected] => [date_summary:protected] => November 2015 [date_permission_requested:protected] => [date_permission_received:protected] => [date_review_needed:protected] => [date_received:protected] => 03/02/16 [date_completed:protected] => 03/02/16 [date_billed:protected] => [date_modified:protected] => 03/02/16 [collBokExports:protected] => [lastBokExportCriteria:BaseElcoshItem:private] => [alreadyInSave:protected] => [alreadyInValidation:protected] => [validationFailures:protected] => Array ( ) [_new:BaseObject:private] => [_deleted:BaseObject:private] => [modifiedColumns:protected] => Array ( ) ) ) [2] => Search_Result Object ( [title] => Construction bracing [image] => /record/images/3995-p.jpg [blurb] => This shows structural support that prevents collapses during construction.... [category] => Array ( [0] => 12 [1] => 15 [2] => 21 [3] => 49 [4] => 51 [5] => 55 [6] => 56 [7] => 60 [8] => 64 [9] => 68 [10] => 74 [11] => 63 [12] => 78 [13] => 79 [14] => 80 [15] => 62 [16] => 87 [17] => 90 [18] => 97 ) [labels] => Array ( [0] => Crushed/Struck By [1] => Work Environment [2] => Hazards [3] => Falls [6] => Scaffolds [9] => Carpenter [10] => Trades [11] => Cement Mason [13] => Electrical Worker [15] => Elevator Constructor [17] => HVAC [19] => Laborer [21] => Maintenance Worker [23] => Pile Driver [25] => Reinforcing Ironworker [27] => Roofer/Waterproofer [29] => Scaffold Erector [31] => Sheetmetal Worker [33] => Structural Ironworker [35] => Commercial & Institutional [36] => Jobsites [37] => Industrial [39] => Images [40] => Media [41] => Media & Documents ) [type] => Images [sub_category] => [url] => /image/3995/i002690/Construction%2Bbracing.html [item:protected] => ImageRecord Object ( [records:protected] => Array ( ) [recordId:protected] => [searchWordClass:protected] => [searchWordPeerClass:protected] => [bok_record:protected] => [authors:protected] => [organizations:protected] => [collections:protected] => [categories:protected] => Array ( [12] => Category Object ( [languages:protected] => [bok_resources:protected] => [bok_topics:protected] => [bok_keywords:protected] => [id:protected] => 12 [type:protected] => category [parent:protected] => 7 [label:protected] => Crushed/Struck By [alreadyInSave:protected] => [alreadyInValidation:protected] => [validationFailures:protected] => Array ( ) [_new:BaseObject:private] => [_deleted:BaseObject:private] => [modifiedColumns:protected] => Array ( ) ) [15] => Category Object ( [languages:protected] => [bok_resources:protected] => [bok_topics:protected] => [bok_keywords:protected] => [id:protected] => 15 [type:protected] => category [parent:protected] => 7 [label:protected] => Falls [alreadyInSave:protected] => [alreadyInValidation:protected] => [validationFailures:protected] => Array ( ) [_new:BaseObject:private] => [_deleted:BaseObject:private] => [modifiedColumns:protected] => Array ( ) ) [21] => Category Object ( [languages:protected] => [bok_resources:protected] => [bok_topics:protected] => [bok_keywords:protected] => [id:protected] => 21 [type:protected] => category [parent:protected] => 7 [label:protected] => Scaffolds [alreadyInSave:protected] => [alreadyInValidation:protected] => [validationFailures:protected] => Array ( ) [_new:BaseObject:private] => [_deleted:BaseObject:private] => [modifiedColumns:protected] => Array ( ) ) [49] => Category Object ( [languages:protected] => [bok_resources:protected] => [bok_topics:protected] => [bok_keywords:protected] => [id:protected] => 49 [type:protected] => category [parent:protected] => 2 [label:protected] => Carpenter [alreadyInSave:protected] => [alreadyInValidation:protected] => [validationFailures:protected] => Array ( ) [_new:BaseObject:private] => [_deleted:BaseObject:private] => [modifiedColumns:protected] => Array ( ) ) [51] => Category Object ( [languages:protected] => [bok_resources:protected] => [bok_topics:protected] => [bok_keywords:protected] => [id:protected] => 51 [type:protected] => category [parent:protected] => 2 [label:protected] => Cement Mason [alreadyInSave:protected] => [alreadyInValidation:protected] => [validationFailures:protected] => Array ( ) [_new:BaseObject:private] => [_deleted:BaseObject:private] => [modifiedColumns:protected] => Array ( ) ) [55] => Category Object ( [languages:protected] => [bok_resources:protected] => [bok_topics:protected] => [bok_keywords:protected] => [id:protected] => 55 [type:protected] => category [parent:protected] => 2 [label:protected] => Electrical Worker [alreadyInSave:protected] => [alreadyInValidation:protected] => [validationFailures:protected] => Array ( ) [_new:BaseObject:private] => [_deleted:BaseObject:private] => [modifiedColumns:protected] => Array ( ) ) [56] => Category Object ( [languages:protected] => [bok_resources:protected] => [bok_topics:protected] => [bok_keywords:protected] => [id:protected] => 56 [type:protected] => category [parent:protected] => 2 [label:protected] => Elevator Constructor [alreadyInSave:protected] => [alreadyInValidation:protected] => [validationFailures:protected] => Array ( ) [_new:BaseObject:private] => [_deleted:BaseObject:private] => [modifiedColumns:protected] => Array ( ) ) [60] => Category Object ( [languages:protected] => [bok_resources:protected] => [bok_topics:protected] => [bok_keywords:protected] => [id:protected] => 60 [type:protected] => category [parent:protected] => 2 [label:protected] => HVAC [alreadyInSave:protected] => [alreadyInValidation:protected] => [validationFailures:protected] => Array ( ) [_new:BaseObject:private] => [_deleted:BaseObject:private] => [modifiedColumns:protected] => Array ( ) ) [64] => Category Object ( [languages:protected] => [bok_resources:protected] => [bok_topics:protected] => [bok_keywords:protected] => [id:protected] => 64 [type:protected] => category [parent:protected] => 2 [label:protected] => Laborer [alreadyInSave:protected] => [alreadyInValidation:protected] => [validationFailures:protected] => Array ( ) [_new:BaseObject:private] => [_deleted:BaseObject:private] => [modifiedColumns:protected] => Array ( ) ) [68] => Category Object ( [languages:protected] => [bok_resources:protected] => [bok_topics:protected] => [bok_keywords:protected] => [id:protected] => 68 [type:protected] => category [parent:protected] => 2 [label:protected] => Maintenance Worker [alreadyInSave:protected] => [alreadyInValidation:protected] => [validationFailures:protected] => Array ( ) [_new:BaseObject:private] => [_deleted:BaseObject:private] => [modifiedColumns:protected] => Array ( ) ) [74] => Category Object ( [languages:protected] => [bok_resources:protected] => [bok_topics:protected] => [bok_keywords:protected] => [id:protected] => 74 [type:protected] => category [parent:protected] => 2 [label:protected] => Pile Driver [alreadyInSave:protected] => [alreadyInValidation:protected] => [validationFailures:protected] => Array ( ) [_new:BaseObject:private] => [_deleted:BaseObject:private] => [modifiedColumns:protected] => Array ( ) ) [63] => Category Object ( [languages:protected] => [bok_resources:protected] => [bok_topics:protected] => [bok_keywords:protected] => [id:protected] => 63 [type:protected] => category [parent:protected] => 2 [label:protected] => Reinforcing Ironworker [alreadyInSave:protected] => [alreadyInValidation:protected] => [validationFailures:protected] => Array ( ) [_new:BaseObject:private] => [_deleted:BaseObject:private] => [modifiedColumns:protected] => Array ( ) ) [78] => Category Object ( [languages:protected] => [bok_resources:protected] => [bok_topics:protected] => [bok_keywords:protected] => [id:protected] => 78 [type:protected] => category [parent:protected] => 2 [label:protected] => Roofer/Waterproofer [alreadyInSave:protected] => [alreadyInValidation:protected] => [validationFailures:protected] => Array ( ) [_new:BaseObject:private] => [_deleted:BaseObject:private] => [modifiedColumns:protected] => Array ( ) ) [79] => Category Object ( [languages:protected] => [bok_resources:protected] => [bok_topics:protected] => [bok_keywords:protected] => [id:protected] => 79 [type:protected] => category [parent:protected] => 2 [label:protected] => Scaffold Erector [alreadyInSave:protected] => [alreadyInValidation:protected] => [validationFailures:protected] => Array ( ) [_new:BaseObject:private] => [_deleted:BaseObject:private] => [modifiedColumns:protected] => Array ( ) ) [80] => Category Object ( [languages:protected] => [bok_resources:protected] => [bok_topics:protected] => [bok_keywords:protected] => [id:protected] => 80 [type:protected] => category [parent:protected] => 2 [label:protected] => Sheetmetal Worker [alreadyInSave:protected] => [alreadyInValidation:protected] => [validationFailures:protected] => Array ( ) [_new:BaseObject:private] => [_deleted:BaseObject:private] => [modifiedColumns:protected] => Array ( ) ) [62] => Category Object ( [languages:protected] => [bok_resources:protected] => [bok_topics:protected] => [bok_keywords:protected] => [id:protected] => 62 [type:protected] => category [parent:protected] => 2 [label:protected] => Structural Ironworker [alreadyInSave:protected] => [alreadyInValidation:protected] => [validationFailures:protected] => Array ( ) [_new:BaseObject:private] => [_deleted:BaseObject:private] => [modifiedColumns:protected] => Array ( ) ) [87] => Category Object ( [languages:protected] => [bok_resources:protected] => [bok_topics:protected] => [bok_keywords:protected] => [id:protected] => 87 [type:protected] => category [parent:protected] => 3 [label:protected] => Commercial & Institutional [alreadyInSave:protected] => [alreadyInValidation:protected] => [validationFailures:protected] => Array ( ) [_new:BaseObject:private] => [_deleted:BaseObject:private] => [modifiedColumns:protected] => Array ( ) ) [90] => Category Object ( [languages:protected] => [bok_resources:protected] => [bok_topics:protected] => [bok_keywords:protected] => [id:protected] => 90 [type:protected] => category [parent:protected] => 3 [label:protected] => Industrial [alreadyInSave:protected] => [alreadyInValidation:protected] => [validationFailures:protected] => Array ( ) [_new:BaseObject:private] => [_deleted:BaseObject:private] => [modifiedColumns:protected] => Array ( ) ) [97] => Category Object ( [languages:protected] => [bok_resources:protected] => [bok_topics:protected] => [bok_keywords:protected] => [id:protected] => 97 [type:protected] => category [parent:protected] => 5 [label:protected] => Images [alreadyInSave:protected] => [alreadyInValidation:protected] => [validationFailures:protected] => Array ( ) [_new:BaseObject:private] => [_deleted:BaseObject:private] => [modifiedColumns:protected] => Array ( ) ) ) [categories_initialized:protected] => 1 [mapped_items:protected] => [content:protected] => [files:protected] => [language:protected] => Language Object ( [id:protected] => 1 [code:protected] => en [name:protected] => English [alreadyInSave:protected] => [alreadyInValidation:protected] => [validationFailures:protected] => Array ( ) [_new:BaseObject:private] => [_deleted:BaseObject:private] => [modifiedColumns:protected] => Array ( ) ) [old_record:protected] => [id:protected] => 3995 [old_id:protected] => [elcosh_id:protected] => i002690 [type:protected] => image [display_type:protected] => Image [user_id:protected] => 0 [language_id:protected] => 1 [tagging_id:protected] => Bruce Lippy [priority_id:protected] => 1 [title:protected] => Construction bracing [total_pages:protected] => 0 [billed_pages:protected] => 0 [publication_number:protected] => [part_of:protected] => [keywords:protected] => Bracing, support, scaffold [comments:protected] => [summary:protected] => This shows structural support that prevents collapses during construction. [transition_comments:protected] => [external_link:protected] => [consol_link:protected] => http://www.cpwrconstructionsolutions.org/masonry/solution/8/adjustable-tower-scaffold.html [more_like_this:protected] => i002660 [permission_given_by:protected] => [published:protected] => T [billable:protected] => F [img_name:protected] => [img_ext:protected] => jpg [img_width:protected] => [img_height:protected] => [img_credit:protected] => Photo by Pam Susi [img_practice:protected] => good [vid_source_id:protected] => [vid_running_time:protected] => [vid_intended_audience:protected] => [vid_acquisition_info:protected] => [vid_cost:protected] => [vid_producer:protected] => [vid_filename:protected] => [vid_filename_downloadable:protected] => [date_summary:protected] => January 2016 [date_permission_requested:protected] => [date_permission_received:protected] => [date_review_needed:protected] => [date_received:protected] => 02/01/16 [date_completed:protected] => 02/01/16 [date_billed:protected] => [date_modified:protected] => 02/01/16 [collBokExports:protected] => [lastBokExportCriteria:BaseElcoshItem:private] => [alreadyInSave:protected] => [alreadyInValidation:protected] => [validationFailures:protected] => Array ( ) [_new:BaseObject:private] => [_deleted:BaseObject:private] => [modifiedColumns:protected] => Array ( ) ) ) [3] => Search_Result Object ( [title] => Suspended Scaffold Outriggers [image] => /record/images/3975-p.jpg [blurb] => Suspended scaffolds systems must be designed by a qualified person and inspected daily by a competent person. The supports for the counterweight must... [category] => Array ( [0] => 97 [1] => 15 [2] => 47 [3] => 49 [4] => 79 [5] => 87 ) [labels] => Array ( [0] => Images [1] => Media [2] => Media & Documents [3] => Falls [4] => Work Environment [5] => Hazards [6] => Bricklayer [7] => Trades [8] => Carpenter [10] => Scaffold Erector [12] => Commercial & Institutional [13] => Jobsites ) [type] => Images [sub_category] => [url] => /image/3975/i002683/Suspended%2BScaffold%2BOutriggers.html [item:protected] => ImageRecord Object ( [records:protected] => Array ( ) [recordId:protected] => [searchWordClass:protected] => [searchWordPeerClass:protected] => [bok_record:protected] => [authors:protected] => [organizations:protected] => [collections:protected] => [categories:protected] => Array ( [97] => Category Object ( [languages:protected] => [bok_resources:protected] => [bok_topics:protected] => [bok_keywords:protected] => [id:protected] => 97 [type:protected] => category [parent:protected] => 5 [label:protected] => Images [alreadyInSave:protected] => [alreadyInValidation:protected] => [validationFailures:protected] => Array ( ) [_new:BaseObject:private] => [_deleted:BaseObject:private] => [modifiedColumns:protected] => Array ( ) ) [15] => Category Object ( [languages:protected] => [bok_resources:protected] => [bok_topics:protected] => [bok_keywords:protected] => [id:protected] => 15 [type:protected] => category [parent:protected] => 7 [label:protected] => Falls [alreadyInSave:protected] => [alreadyInValidation:protected] => [validationFailures:protected] => Array ( ) [_new:BaseObject:private] => [_deleted:BaseObject:private] => [modifiedColumns:protected] => Array ( ) ) [47] => Category Object ( [languages:protected] => [bok_resources:protected] => [bok_topics:protected] => [bok_keywords:protected] => [id:protected] => 47 [type:protected] => category [parent:protected] => 2 [label:protected] => Bricklayer [alreadyInSave:protected] => [alreadyInValidation:protected] => [validationFailures:protected] => Array ( ) [_new:BaseObject:private] => [_deleted:BaseObject:private] => [modifiedColumns:protected] => Array ( ) ) [49] => Category Object ( [languages:protected] => [bok_resources:protected] => [bok_topics:protected] => [bok_keywords:protected] => [id:protected] => 49 [type:protected] => category [parent:protected] => 2 [label:protected] => Carpenter [alreadyInSave:protected] => [alreadyInValidation:protected] => [validationFailures:protected] => Array ( ) [_new:BaseObject:private] => [_deleted:BaseObject:private] => [modifiedColumns:protected] => Array ( ) ) [79] => Category Object ( [languages:protected] => [bok_resources:protected] => [bok_topics:protected] => [bok_keywords:protected] => [id:protected] => 79 [type:protected] => category [parent:protected] => 2 [label:protected] => Scaffold Erector [alreadyInSave:protected] => [alreadyInValidation:protected] => [validationFailures:protected] => Array ( ) [_new:BaseObject:private] => [_deleted:BaseObject:private] => [modifiedColumns:protected] => Array ( ) ) [87] => Category Object ( [languages:protected] => [bok_resources:protected] => [bok_topics:protected] => [bok_keywords:protected] => [id:protected] => 87 [type:protected] => category [parent:protected] => 3 [label:protected] => Commercial & Institutional [alreadyInSave:protected] => [alreadyInValidation:protected] => [validationFailures:protected] => Array ( ) [_new:BaseObject:private] => [_deleted:BaseObject:private] => [modifiedColumns:protected] => Array ( ) ) ) [categories_initialized:protected] => 1 [mapped_items:protected] => [content:protected] => [files:protected] => [language:protected] => Language Object ( [id:protected] => 1 [code:protected] => en [name:protected] => English [alreadyInSave:protected] => [alreadyInValidation:protected] => [validationFailures:protected] => Array ( ) [_new:BaseObject:private] => [_deleted:BaseObject:private] => [modifiedColumns:protected] => Array ( ) ) [old_record:protected] => [id:protected] => 3975 [old_id:protected] => [elcosh_id:protected] => i002683 [type:protected] => image [display_type:protected] => Image [user_id:protected] => 0 [language_id:protected] => 1 [tagging_id:protected] => John Newquist [priority_id:protected] => 1 [title:protected] => Suspended Scaffold Outriggers [total_pages:protected] => 0 [billed_pages:protected] => 0 [publication_number:protected] => [part_of:protected] => [keywords:protected] => suspended, scaffold, swing, stage, fall, protection, counterweight, qualified, person [comments:protected] => [summary:protected] => Suspended scaffolds systems must be designed by a qualified person and inspected daily by a competent person. The supports for the counterweight must be designed with a safety factor of four. [transition_comments:protected] => [external_link:protected] => [consol_link:protected] => http://www.cpwrconstructionsolutions.org/task/Erect%2Band%2Bdismantle%2Bscaffolds/ [more_like_this:protected] => d000244,d000359,i000253,i000407 [permission_given_by:protected] => [published:protected] => T [billable:protected] => F [img_name:protected] => [img_ext:protected] => jpg [img_width:protected] => [img_height:protected] => [img_credit:protected] => MetroPark, Miller and Long [img_practice:protected] => not_applicable [vid_source_id:protected] => [vid_running_time:protected] => [vid_intended_audience:protected] => [vid_acquisition_info:protected] => [vid_cost:protected] => [vid_producer:protected] => [vid_filename:protected] => [vid_filename_downloadable:protected] => [date_summary:protected] => August 28 2015 [date_permission_requested:protected] => [date_permission_received:protected] => [date_review_needed:protected] => [date_received:protected] => 08/28/15 [date_completed:protected] => 08/28/15 [date_billed:protected] => [date_modified:protected] => 08/28/15 [collBokExports:protected] => [lastBokExportCriteria:BaseElcoshItem:private] => [alreadyInSave:protected] => [alreadyInValidation:protected] => [validationFailures:protected] => Array ( ) [_new:BaseObject:private] => [_deleted:BaseObject:private] => [modifiedColumns:protected] => Array ( ) ) ) [4] => Search_Result Object ( [title] => Suspended scaffold [image] => /record/images/3976-p.jpg [blurb] => Suspended scaffold outrigger beams must have stops to prevent the hangers from sliding of the end of the outriggers. Wire rope supported must be desig... [category] => Array ( [0] => 97 [1] => 15 [2] => 47 [3] => 50 [4] => 79 [5] => 87 ) [labels] => Array ( [0] => Images [1] => Media [2] => Media & Documents [3] => Falls [4] => Work Environment [5] => Hazards [6] => Bricklayer [7] => Trades [8] => Carpet Layer [10] => Scaffold Erector [12] => Commercial & Institutional [13] => Jobsites ) [type] => Images [sub_category] => [url] => /image/3976/i002684/Suspended%2Bscaffold.html [item:protected] => ImageRecord Object ( [records:protected] => Array ( ) [recordId:protected] => [searchWordClass:protected] => [searchWordPeerClass:protected] => [bok_record:protected] => [authors:protected] => [organizations:protected] => [collections:protected] => [categories:protected] => Array ( [97] => Category Object ( [languages:protected] => [bok_resources:protected] => [bok_topics:protected] => [bok_keywords:protected] => [id:protected] => 97 [type:protected] => category [parent:protected] => 5 [label:protected] => Images [alreadyInSave:protected] => [alreadyInValidation:protected] => [validationFailures:protected] => Array ( ) [_new:BaseObject:private] => [_deleted:BaseObject:private] => [modifiedColumns:protected] => Array ( ) ) [15] => Category Object ( [languages:protected] => [bok_resources:protected] => [bok_topics:protected] => [bok_keywords:protected] => [id:protected] => 15 [type:protected] => category [parent:protected] => 7 [label:protected] => Falls [alreadyInSave:protected] => [alreadyInValidation:protected] => [validationFailures:protected] => Array ( ) [_new:BaseObject:private] => [_deleted:BaseObject:private] => [modifiedColumns:protected] => Array ( ) ) [47] => Category Object ( [languages:protected] => [bok_resources:protected] => [bok_topics:protected] => [bok_keywords:protected] => [id:protected] => 47 [type:protected] => category [parent:protected] => 2 [label:protected] => Bricklayer [alreadyInSave:protected] => [alreadyInValidation:protected] => [validationFailures:protected] => Array ( ) [_new:BaseObject:private] => [_deleted:BaseObject:private] => [modifiedColumns:protected] => Array ( ) ) [50] => Category Object ( [languages:protected] => [bok_resources:protected] => [bok_topics:protected] => [bok_keywords:protected] => [id:protected] => 50 [type:protected] => category [parent:protected] => 2 [label:protected] => Carpet Layer [alreadyInSave:protected] => [alreadyInValidation:protected] => [validationFailures:protected] => Array ( ) [_new:BaseObject:private] => [_deleted:BaseObject:private] => [modifiedColumns:protected] => Array ( ) ) [79] => Category Object ( [languages:protected] => [bok_resources:protected] => [bok_topics:protected] => [bok_keywords:protected] => [id:protected] => 79 [type:protected] => category [parent:protected] => 2 [label:protected] => Scaffold Erector [alreadyInSave:protected] => [alreadyInValidation:protected] => [validationFailures:protected] => Array ( ) [_new:BaseObject:private] => [_deleted:BaseObject:private] => [modifiedColumns:protected] => Array ( ) ) [87] => Category Object ( [languages:protected] => [bok_resources:protected] => [bok_topics:protected] => [bok_keywords:protected] => [id:protected] => 87 [type:protected] => category [parent:protected] => 3 [label:protected] => Commercial & Institutional [alreadyInSave:protected] => [alreadyInValidation:protected] => [validationFailures:protected] => Array ( ) [_new:BaseObject:private] => [_deleted:BaseObject:private] => [modifiedColumns:protected] => Array ( ) ) ) [categories_initialized:protected] => 1 [mapped_items:protected] => [content:protected] => [files:protected] => [language:protected] => Language Object ( [id:protected] => 1 [code:protected] => en [name:protected] => English [alreadyInSave:protected] => [alreadyInValidation:protected] => [validationFailures:protected] => Array ( ) [_new:BaseObject:private] => [_deleted:BaseObject:private] => [modifiedColumns:protected] => Array ( ) ) [old_record:protected] => [id:protected] => 3976 [old_id:protected] => [elcosh_id:protected] => i002684 [type:protected] => image [display_type:protected] => Image [user_id:protected] => 0 [language_id:protected] => 1 [tagging_id:protected] => John Newquist [priority_id:protected] => 1 [title:protected] => Suspended scaffold [total_pages:protected] => 0 [billed_pages:protected] => 0 [publication_number:protected] => [part_of:protected] => [keywords:protected] => Suspended, scaffold, outrigger, beams, erection, wire, rope, inspection, swing, stage, [comments:protected] => [summary:protected] => Suspended scaffold outrigger beams must have stops to prevent the hangers from sliding of the end of the outriggers. Wire rope supported must be designed with a safety factor of 6. The scaffold must be inspected by a competent person daily. [transition_comments:protected] => [external_link:protected] => [consol_link:protected] => http://www.cpwrconstructionsolutions.org/task/Erect%2Band%2Bdismantle%2Bscaffolds/ [more_like_this:protected] => i002683, d000244, i000407, d000606 [permission_given_by:protected] => [published:protected] => T [billable:protected] => F [img_name:protected] => [img_ext:protected] => jpg [img_width:protected] => [img_height:protected] => [img_credit:protected] => Metropark, Miller and Long [img_practice:protected] => not_applicable [vid_source_id:protected] => [vid_running_time:protected] => [vid_intended_audience:protected] => [vid_acquisition_info:protected] => [vid_cost:protected] => [vid_producer:protected] => [vid_filename:protected] => [vid_filename_downloadable:protected] => [date_summary:protected] => [date_permission_requested:protected] => [date_permission_received:protected] => [date_review_needed:protected] => [date_received:protected] => 08/28/15 [date_completed:protected] => 08/28/15 [date_billed:protected] => [date_modified:protected] => 08/28/15 [collBokExports:protected] => [lastBokExportCriteria:BaseElcoshItem:private] => [alreadyInSave:protected] => [alreadyInValidation:protected] => [validationFailures:protected] => Array ( ) [_new:BaseObject:private] => [_deleted:BaseObject:private] => [modifiedColumns:protected] => Array ( ) ) ) [5] => Search_Result Object ( [title] => Three Tower Cranes [image] => /record/images/3979-p.jpg [blurb] => Whenever multiple tower cranes are used, there needs to be preplanning to ensure that the tower cranes cannot hit each other loads. This is accomplish... [category] => Array ( [0] => 97 [1] => 11 [2] => 64 [3] => 70 [4] => 62 [5] => 87 ) [labels] => Array ( [0] => Images [1] => Media [2] => Media & Documents [3] => Cranes & Hoists [4] => Work Environment [5] => Hazards [6] => Laborer [7] => Trades [8] => Operating Engineer [10] => Structural Ironworker [12] => Commercial & Institutional [13] => Jobsites ) [type] => Images [sub_category] => [url] => /image/3979/i002687/Three%2BTower%2BCranes.html [item:protected] => ImageRecord Object ( [records:protected] => Array ( ) [recordId:protected] => [searchWordClass:protected] => [searchWordPeerClass:protected] => [bok_record:protected] => [authors:protected] => [organizations:protected] => [collections:protected] => [categories:protected] => Array ( [97] => Category Object ( [languages:protected] => [bok_resources:protected] => [bok_topics:protected] => [bok_keywords:protected] => [id:protected] => 97 [type:protected] => category [parent:protected] => 5 [label:protected] => Images [alreadyInSave:protected] => [alreadyInValidation:protected] => [validationFailures:protected] => Array ( ) [_new:BaseObject:private] => [_deleted:BaseObject:private] => [modifiedColumns:protected] => Array ( ) ) [11] => Category Object ( [languages:protected] => [bok_resources:protected] => [bok_topics:protected] => [bok_keywords:protected] => [id:protected] => 11 [type:protected] => category [parent:protected] => 7 [label:protected] => Cranes & Hoists [alreadyInSave:protected] => [alreadyInValidation:protected] => [validationFailures:protected] => Array ( ) [_new:BaseObject:private] => [_deleted:BaseObject:private] => [modifiedColumns:protected] => Array ( ) ) [64] => Category Object ( [languages:protected] => [bok_resources:protected] => [bok_topics:protected] => [bok_keywords:protected] => [id:protected] => 64 [type:protected] => category [parent:protected] => 2 [label:protected] => Laborer [alreadyInSave:protected] => [alreadyInValidation:protected] => [validationFailures:protected] => Array ( ) [_new:BaseObject:private] => [_deleted:BaseObject:private] => [modifiedColumns:protected] => Array ( ) ) [70] => Category Object ( [languages:protected] => [bok_resources:protected] => [bok_topics:protected] => [bok_keywords:protected] => [id:protected] => 70 [type:protected] => category [parent:protected] => 2 [label:protected] => Operating Engineer [alreadyInSave:protected] => [alreadyInValidation:protected] => [validationFailures:protected] => Array ( ) [_new:BaseObject:private] => [_deleted:BaseObject:private] => [modifiedColumns:protected] => Array ( ) ) [62] => Category Object ( [languages:protected] => [bok_resources:protected] => [bok_topics:protected] => [bok_keywords:protected] => [id:protected] => 62 [type:protected] => category [parent:protected] => 2 [label:protected] => Structural Ironworker [alreadyInSave:protected] => [alreadyInValidation:protected] => [validationFailures:protected] => Array ( ) [_new:BaseObject:private] => [_deleted:BaseObject:private] => [modifiedColumns:protected] => Array ( ) ) [87] => Category Object ( [languages:protected] => [bok_resources:protected] => [bok_topics:protected] => [bok_keywords:protected] => [id:protected] => 87 [type:protected] => category [parent:protected] => 3 [label:protected] => Commercial & Institutional [alreadyInSave:protected] => [alreadyInValidation:protected] => [validationFailures:protected] => Array ( ) [_new:BaseObject:private] => [_deleted:BaseObject:private] => [modifiedColumns:protected] => Array ( ) ) ) [categories_initialized:protected] => 1 [mapped_items:protected] => [content:protected] => [files:protected] => [language:protected] => Language Object ( [id:protected] => 1 [code:protected] => en [name:protected] => English [alreadyInSave:protected] => [alreadyInValidation:protected] => [validationFailures:protected] => Array ( ) [_new:BaseObject:private] => [_deleted:BaseObject:private] => [modifiedColumns:protected] => Array ( ) ) [old_record:protected] => [id:protected] => 3979 [old_id:protected] => [elcosh_id:protected] => i002687 [type:protected] => image [display_type:protected] => Image [user_id:protected] => 0 [language_id:protected] => 1 [tagging_id:protected] => John Newquist [priority_id:protected] => 1 [title:protected] => Three Tower Cranes [total_pages:protected] => 0 [billed_pages:protected] => 0 [publication_number:protected] => [part_of:protected] => [keywords:protected] => [comments:protected] => [summary:protected] => Whenever multiple tower cranes are used, there needs to be preplanning to ensure that the tower cranes cannot hit each other loads. This is accomplished by setting swing restrictions, marking the ground for allowable crane travel and training of the crane signal persons. [transition_comments:protected] => [external_link:protected] => [consol_link:protected] => http://www.cpwrconstructionsolutions.org/work/6/184/ [more_like_this:protected] => d001029, d000010, i001280, i001221 [permission_given_by:protected] => [published:protected] => T [billable:protected] => F [img_name:protected] => [img_ext:protected] => jpg [img_width:protected] => [img_height:protected] => [img_credit:protected] => Metropark [img_practice:protected] => not_applicable [vid_source_id:protected] => [vid_running_time:protected] => [vid_intended_audience:protected] => [vid_acquisition_info:protected] => [vid_cost:protected] => [vid_producer:protected] => [vid_filename:protected] => [vid_filename_downloadable:protected] => [date_summary:protected] => August 28 2015 [date_permission_requested:protected] => [date_permission_received:protected] => [date_review_needed:protected] => [date_received:protected] => 08/28/15 [date_completed:protected] => 08/28/15 [date_billed:protected] => [date_modified:protected] => 08/28/15 [collBokExports:protected] => [lastBokExportCriteria:BaseElcoshItem:private] => [alreadyInSave:protected] => [alreadyInValidation:protected] => [validationFailures:protected] => Array ( ) [_new:BaseObject:private] => [_deleted:BaseObject:private] => [modifiedColumns:protected] => Array ( ) ) ) ) [preview_mode] => [description] => This third in a series of 6 Tool Box Talks on construction ergonomics focuses on proper positioning to avoid injuries. The TBT recommends: 1)prop up a task off of the floor by using a raised surface, cart, baker scaffold, saw horses to prep materials near waist height, 2)move the lift or ladder in the best position for the work, 3)position the lift in front of the area you plan to work without trying to reach too far on either side of the lift. [keywords] => position, positioning, ergonomics, ergo, carpal tunnel, MSD, musculoskeletal disorder [related_items] => Array ( [Handouts] => Array ( [0] => DocumentRecord Object ( [records:protected] => Array ( ) [recordId:protected] => [searchWordClass:protected] => [searchWordPeerClass:protected] => [bok_record:protected] => [authors:protected] => [organizations:protected] => [collections:protected] => [categories:protected] => [categories_initialized:protected] => [mapped_items:protected] => [content:protected] => [files:protected] => [language:protected] => Language Object ( [id:protected] => 1 [code:protected] => en [name:protected] => English [alreadyInSave:protected] => [alreadyInValidation:protected] => [validationFailures:protected] => Array ( ) [_new:BaseObject:private] => [_deleted:BaseObject:private] => [modifiedColumns:protected] => Array ( ) ) [old_record:protected] => [id:protected] => 3833 [old_id:protected] => [elcosh_id:protected] => d001303 [type:protected] => document [display_type:protected] => HTML w/ PDF [user_id:protected] => 25 [language_id:protected] => 1 [tagging_id:protected] => Bruce Lippy [priority_id:protected] => 1 [title:protected] => Overview of Toolbox Talks on Ergonomics Developed by Washington University in St. Louis [total_pages:protected] => 3 [billed_pages:protected] => 3 [publication_number:protected] => [part_of:protected] => [keywords:protected] => ergonomics, musculoskeletal disorders, MSDs [comments:protected] => 7-28-2014 - Originally submitted as "HTML w/ doc and PDF", Jeff Nelson asked Bruce Lippy for permission to switch it to "HTML w/ PDF" -- permission was given [summary:protected] => This overviews provides a background on how Washington University in St. Louis developed this series of six toolbox talks on ergonomics. It also describes how they tested the effectiveness of these communication tools, concluding that the guide was valuable for improving the delivery of ergonomics training and interaction between the safety representative and workers. The researchers recommend preparing site-specific information prior to the talk and interacting with workers to discuss problems and ergonomic solutions during the safety meetings. [transition_comments:protected] => [external_link:protected] => [consol_link:protected] => [more_like_this:protected] => [permission_given_by:protected] => Lisa Jaegers, Washington U. in St. Louis [published:protected] => T [billable:protected] => F [img_name:protected] => [img_ext:protected] => png [img_width:protected] => [img_height:protected] => [img_credit:protected] => [img_practice:protected] => [vid_source_id:protected] => [vid_running_time:protected] => [vid_intended_audience:protected] => [vid_acquisition_info:protected] => [vid_cost:protected] => [vid_producer:protected] => [vid_filename:protected] => [vid_filename_downloadable:protected] => [date_summary:protected] => 2014 [date_permission_requested:protected] => [date_permission_received:protected] => [date_review_needed:protected] => [date_received:protected] => 06/11/14 [date_completed:protected] => 07/29/14 [date_billed:protected] => [date_modified:protected] => 07/29/14 [collBokExports:protected] => [lastBokExportCriteria:BaseElcoshItem:private] => [alreadyInSave:protected] => [alreadyInValidation:protected] => [validationFailures:protected] => Array ( ) [_new:BaseObject:private] => [_deleted:BaseObject:private] => [modifiedColumns:protected] => Array ( ) ) ) [Toolbox Talks] => Array ( [0] => DocumentRecord Object ( [records:protected] => Array ( ) [recordId:protected] => [searchWordClass:protected] => [searchWordPeerClass:protected] => [bok_record:protected] => [authors:protected] => [organizations:protected] => [collections:protected] => [categories:protected] => [categories_initialized:protected] => [mapped_items:protected] => [content:protected] => [files:protected] => [language:protected] => Language Object ( [id:protected] => 1 [code:protected] => en [name:protected] => English [alreadyInSave:protected] => [alreadyInValidation:protected] => [validationFailures:protected] => Array ( ) [_new:BaseObject:private] => [_deleted:BaseObject:private] => [modifiedColumns:protected] => Array ( ) ) [old_record:protected] => [id:protected] => 3835 [old_id:protected] => [elcosh_id:protected] => d001304 [type:protected] => document [display_type:protected] => HTML w/ PDF [user_id:protected] => 25 [language_id:protected] => 1 [tagging_id:protected] => Bruce Lippy [priority_id:protected] => 1 [title:protected] => Ergonomics Tool Box Talks (TBT) Training Guide [total_pages:protected] => 2 [billed_pages:protected] => 2 [publication_number:protected] => [part_of:protected] => [keywords:protected] => Ergonomics, carpal tunnel, muscular skeletal disorders, msd [comments:protected] => [summary:protected] => CPWR-funded ergonomics research by Washington University at St. Louis led to the development of 6 tool box talks. This guide is an explanation of how to deliver the talks for maximum effectiveness. This guide should be reviewed before delivering any of the talks because it makes important recommendations like: • If possible, give the TBTs as a part of the crew’s regular safety meetings so that ergonomics is included in the safety discussion. • Try to locate an area with few distractions for gathering the crew. • For a team approach, invite the work crew, site superintendent, project manager and other general contractor and/or subcontractor reps who you feel may be helpful in supporting the training and ergonomics solutions. [transition_comments:protected] => [external_link:protected] => [consol_link:protected] => [more_like_this:protected] => d001303,d001305,d001306,d001307,d001308,d001309,d001310 [permission_given_by:protected] => [published:protected] => T [billable:protected] => F [img_name:protected] => [img_ext:protected] => png [img_width:protected] => [img_height:protected] => [img_credit:protected] => [img_practice:protected] => [vid_source_id:protected] => [vid_running_time:protected] => [vid_intended_audience:protected] => [vid_acquisition_info:protected] => [vid_cost:protected] => [vid_producer:protected] => [vid_filename:protected] => [vid_filename_downloadable:protected] => [date_summary:protected] => 2014 [date_permission_requested:protected] => [date_permission_received:protected] => [date_review_needed:protected] => [date_received:protected] => 06/12/14 [date_completed:protected] => 07/29/14 [date_billed:protected] => [date_modified:protected] => 07/29/14 [collBokExports:protected] => [lastBokExportCriteria:BaseElcoshItem:private] => [alreadyInSave:protected] => [alreadyInValidation:protected] => [validationFailures:protected] => Array ( ) [_new:BaseObject:private] => [_deleted:BaseObject:private] => [modifiedColumns:protected] => Array ( ) ) [1] => DocumentRecord Object ( [records:protected] => Array ( ) [recordId:protected] => [searchWordClass:protected] => [searchWordPeerClass:protected] => [bok_record:protected] => [authors:protected] => [organizations:protected] => [collections:protected] => [categories:protected] => [categories_initialized:protected] => [mapped_items:protected] => [content:protected] => [files:protected] => [language:protected] => Language Object ( [id:protected] => 1 [code:protected] => en [name:protected] => English [alreadyInSave:protected] => [alreadyInValidation:protected] => [validationFailures:protected] => Array ( ) [_new:BaseObject:private] => [_deleted:BaseObject:private] => [modifiedColumns:protected] => Array ( ) ) [old_record:protected] => [id:protected] => 3836 [old_id:protected] => [elcosh_id:protected] => d001305 [type:protected] => document [display_type:protected] => HTML w/ PDF [user_id:protected] => 25 [language_id:protected] => 1 [tagging_id:protected] => Bruce Lippy [priority_id:protected] => 1 [title:protected] => TBT1 Ergonomics in Construction [total_pages:protected] => 5 [billed_pages:protected] => 5 [publication_number:protected] => [part_of:protected] => [keywords:protected] => ergonomics, ergo, msd, musculoskeletal disorders, risk factors, lifting, carpal tunnel, repetition, awkward postures [comments:protected] => 7-28-2014 Jeff Nelson asked Bruce Lippy about what to do with a sentence included toward the top of the doc, "Fill them in on page 2 'Other Questions.'" -- Bruce said this sentence could be deleted from the HTML. [summary:protected] => This is the first in a series of 6 Tool Box Talks produced by Washington University in St. Louis on ergonomics in construction work. This one should be delivered first because it covers what ergonomics is, why construction workers need to talk about it, what the risk factors are for developing a health problem and how to prevent these problems. [transition_comments:protected] => [external_link:protected] => [consol_link:protected] => http://www.cpwrconstructionsolutions.org/pipes_vessels/solution/50/participatory-ergonomics-program.html [more_like_this:protected] => d001303,d001304,d001306,d001307,d001308,d001309 [permission_given_by:protected] => Lisa Jaegers, Washington U. in St. Louis [published:protected] => T [billable:protected] => F [img_name:protected] => [img_ext:protected] => png [img_width:protected] => [img_height:protected] => [img_credit:protected] => [img_practice:protected] => [vid_source_id:protected] => [vid_running_time:protected] => [vid_intended_audience:protected] => [vid_acquisition_info:protected] => [vid_cost:protected] => [vid_producer:protected] => [vid_filename:protected] => [vid_filename_downloadable:protected] => [date_summary:protected] => 2014 [date_permission_requested:protected] => [date_permission_received:protected] => [date_review_needed:protected] => [date_received:protected] => 06/12/14 [date_completed:protected] => 07/28/14 [date_billed:protected] => [date_modified:protected] => 10/09/15 [collBokExports:protected] => [lastBokExportCriteria:BaseElcoshItem:private] => [alreadyInSave:protected] => [alreadyInValidation:protected] => [validationFailures:protected] => Array ( ) [_new:BaseObject:private] => [_deleted:BaseObject:private] => [modifiedColumns:protected] => Array ( ) ) [2] => DocumentRecord Object ( [records:protected] => Array ( ) [recordId:protected] => [searchWordClass:protected] => [searchWordPeerClass:protected] => [bok_record:protected] => [authors:protected] => [organizations:protected] => [collections:protected] => [categories:protected] => [categories_initialized:protected] => [mapped_items:protected] => [content:protected] => [files:protected] => [language:protected] => Language Object ( [id:protected] => 1 [code:protected] => en [name:protected] => English [alreadyInSave:protected] => [alreadyInValidation:protected] => [validationFailures:protected] => Array ( ) [_new:BaseObject:private] => [_deleted:BaseObject:private] => [modifiedColumns:protected] => Array ( ) ) [old_record:protected] => [id:protected] => 3837 [old_id:protected] => [elcosh_id:protected] => d001306 [type:protected] => document [display_type:protected] => HTML w/ PDF [user_id:protected] => 25 [language_id:protected] => 1 [tagging_id:protected] => Bruce Lippy [priority_id:protected] => 1 [title:protected] => TBT2 Keep Reach Close [total_pages:protected] => 4 [billed_pages:protected] => 4 [publication_number:protected] => [part_of:protected] => [keywords:protected] => reach, ergonomic, ergo, MSD, carpal tunnel, repetition, awkward positions [comments:protected] => 7-28-2014 Jeff Nelson asked Bruce Lippy about what to do with a sentence included toward the top of the doc, "Fill them in on page 2 'Other Questions.'" -- Bruce said this sentence could be deleted from the HTML. [summary:protected] => This is the second of six Tool Box Talks created by Washington University in St. Louis on ergonomics in construction. There is a guide with the series that describes how to deliver these talks. This one deals with how to avoid awkward reaching during tasks to prevent injuries. try to work with your hands below your head and close to our body to reduce your risk of shoulder strains and back discomfort. This TBT recommends considering ways to move close to the task, keeping the work area free of obstacles, and talking with each other to provide constructive feedback about your working position. [transition_comments:protected] => [external_link:protected] => [consol_link:protected] => http://www.cpwrconstructionsolutions.org/hazard/959/lifting-and-carrying-manual-materials-handling.html [more_like_this:protected] => d001303,d001304,d001305,d001307,d001308,e001309 [permission_given_by:protected] => [published:protected] => T [billable:protected] => F [img_name:protected] => [img_ext:protected] => png [img_width:protected] => [img_height:protected] => [img_credit:protected] => [img_practice:protected] => [vid_source_id:protected] => [vid_running_time:protected] => [vid_intended_audience:protected] => [vid_acquisition_info:protected] => [vid_cost:protected] => [vid_producer:protected] => [vid_filename:protected] => [vid_filename_downloadable:protected] => [date_summary:protected] => 2014 [date_permission_requested:protected] => [date_permission_received:protected] => [date_review_needed:protected] => [date_received:protected] => 06/12/14 [date_completed:protected] => 07/28/14 [date_billed:protected] => [date_modified:protected] => 11/02/16 [collBokExports:protected] => [lastBokExportCriteria:BaseElcoshItem:private] => [alreadyInSave:protected] => [alreadyInValidation:protected] => [validationFailures:protected] => Array ( ) [_new:BaseObject:private] => [_deleted:BaseObject:private] => [modifiedColumns:protected] => Array ( ) ) [3] => DocumentRecord Object ( [records:protected] => Array ( ) [recordId:protected] => [searchWordClass:protected] => [searchWordPeerClass:protected] => [bok_record:protected] => [authors:protected] => [organizations:protected] => [collections:protected] => [categories:protected] => [categories_initialized:protected] => [mapped_items:protected] => [content:protected] => [files:protected] => [language:protected] => Language Object ( [id:protected] => 1 [code:protected] => en [name:protected] => English [alreadyInSave:protected] => [alreadyInValidation:protected] => [validationFailures:protected] => Array ( ) [_new:BaseObject:private] => [_deleted:BaseObject:private] => [modifiedColumns:protected] => Array ( ) ) [old_record:protected] => [id:protected] => 3839 [old_id:protected] => [elcosh_id:protected] => d001308 [type:protected] => document [display_type:protected] => HTML w/ PDF [user_id:protected] => 23 [language_id:protected] => 1 [tagging_id:protected] => Bruce Lippy [priority_id:protected] => 1 [title:protected] => TBT4 Move Materials With Assist [total_pages:protected] => 4 [billed_pages:protected] => 4 [publication_number:protected] => [part_of:protected] => [keywords:protected] => lifting, back injury, ergonomics, ergo, MSD, buddy system [comments:protected] => 7-28-2014 Jeff Nelson asked Bruce Lippy about what to do with a sentence included toward the top of the doc, "Fill them in on page 2 'Other Questions.'" -- Bruce said this sentence could be deleted from the HTML. [summary:protected] => This tool box talk is fourth in a series of 6 developed by Washington University in St. Louis on construction ergonomics. This one focuses on preventing back injuries by getting an assist when manually lifting. It recommends using a cart for transporting loads, taking less trips, avoiding carrying materials on the shoulder and helping each other to lift large or heavy materials when a cart or hoist is not available. [transition_comments:protected] => [external_link:protected] => [consol_link:protected] => http://www.cpwrconstructionsolutions.org/hazard/959/lifting-and-carrying-manual-materials-handling.html [more_like_this:protected] => d001303,d001304,d001305,d001306,d001307,d001309 [permission_given_by:protected] => Lisa Jaegers, Washington U. in St. Louis [published:protected] => T [billable:protected] => F [img_name:protected] => [img_ext:protected] => png [img_width:protected] => [img_height:protected] => [img_credit:protected] => [img_practice:protected] => [vid_source_id:protected] => [vid_running_time:protected] => [vid_intended_audience:protected] => [vid_acquisition_info:protected] => [vid_cost:protected] => [vid_producer:protected] => [vid_filename:protected] => [vid_filename_downloadable:protected] => [date_summary:protected] => 2014 [date_permission_requested:protected] => [date_permission_received:protected] => [date_review_needed:protected] => [date_received:protected] => 06/12/14 [date_completed:protected] => 07/29/14 [date_billed:protected] => [date_modified:protected] => 10/09/15 [collBokExports:protected] => [lastBokExportCriteria:BaseElcoshItem:private] => [alreadyInSave:protected] => [alreadyInValidation:protected] => [validationFailures:protected] => Array ( ) [_new:BaseObject:private] => [_deleted:BaseObject:private] => [modifiedColumns:protected] => Array ( ) ) [4] => DocumentRecord Object ( [records:protected] => Array ( ) [recordId:protected] => [searchWordClass:protected] => [searchWordPeerClass:protected] => [bok_record:protected] => [authors:protected] => [organizations:protected] => [collections:protected] => [categories:protected] => [categories_initialized:protected] => [mapped_items:protected] => [content:protected] => [files:protected] => [language:protected] => Language Object ( [id:protected] => 1 [code:protected] => en [name:protected] => English [alreadyInSave:protected] => [alreadyInValidation:protected] => [validationFailures:protected] => Array ( ) [_new:BaseObject:private] => [_deleted:BaseObject:private] => [modifiedColumns:protected] => Array ( ) ) [old_record:protected] => [id:protected] => 3840 [old_id:protected] => [elcosh_id:protected] => d001309 [type:protected] => document [display_type:protected] => HTML w/ PDF [user_id:protected] => 23 [language_id:protected] => 1 [tagging_id:protected] => Bruce Lippy [priority_id:protected] => 1 [title:protected] => TBT5 Manual Tools [total_pages:protected] => 4 [billed_pages:protected] => 4 [publication_number:protected] => [part_of:protected] => [keywords:protected] => ergonomic, hand tools, handles, MSD, musculoskeletal disorder, carpal tunnel [comments:protected] => 7-28-2014 Jeff Nelson asked Bruce Lippy about what to do with a sentence included toward the top of the doc, "Fill them in on page 2 'Other Questions.'" -- Bruce said this sentence could be deleted from the HTML. [summary:protected] => This is the fifth in a series of 6 tool box talks on construction ergonomics produced by the University of Washington in St. Louis. This one focuses on manual tools. It asks the following 6 key questions. Does the tool… 1. Fit the task? 2. Allow a good power grip? 3. Keep the wrist in a straight posture? 4. Feel comfortable? 5. Take less effort than other tools for the task? 6. Work effectively? [transition_comments:protected] => [external_link:protected] => [consol_link:protected] => http://www.cpwrconstructionsolutions.org/masonry/solution/383/ergonomic-hand-tools.html [more_like_this:protected] => d001303,d001304,d001305,d001306,d001307,d001308,d001310 [permission_given_by:protected] => Lisa Jaegers, U. Wash. St. Louis [published:protected] => T [billable:protected] => F [img_name:protected] => [img_ext:protected] => png [img_width:protected] => [img_height:protected] => [img_credit:protected] => [img_practice:protected] => [vid_source_id:protected] => [vid_running_time:protected] => [vid_intended_audience:protected] => [vid_acquisition_info:protected] => [vid_cost:protected] => [vid_producer:protected] => [vid_filename:protected] => [vid_filename_downloadable:protected] => [date_summary:protected] => 2014 [date_permission_requested:protected] => [date_permission_received:protected] => [date_review_needed:protected] => [date_received:protected] => 06/12/14 [date_completed:protected] => 07/29/14 [date_billed:protected] => [date_modified:protected] => 10/09/15 [collBokExports:protected] => [lastBokExportCriteria:BaseElcoshItem:private] => [alreadyInSave:protected] => [alreadyInValidation:protected] => [validationFailures:protected] => Array ( ) [_new:BaseObject:private] => [_deleted:BaseObject:private] => [modifiedColumns:protected] => Array ( ) ) ) ) [collections] => Array ( [3834] => ) [record] => DocumentRecord Object ( [records:protected] => Array ( ) [recordId:protected] => [searchWordClass:protected] => [searchWordPeerClass:protected] => [bok_record:protected] => [authors:protected] => Array ( ) [organizations:protected] => Array ( [182] => Organization Object ( [id:protected] => 182 [elcosh_id:protected] => o000205 [user_id:protected] => 14 [province_id:protected] => 0 [country_id:protected] => 0 [title:protected] => Washington University - St. Louis [address:protected] => [postal_code:protected] => [city:protected] => [department:protected] => [phone:protected] => [fax:protected] => [email:protected] => [website:protected] => [filename:protected] => [about:protected] => [comments:protected] => [logo_available:protected] => T [no_details:protected] => T [date_received:protected] => 2009-08-06 [date_completed:protected] => 2009-08-06 [date_billed:protected] => [alreadyInSave:protected] => [alreadyInValidation:protected] => [validationFailures:protected] => Array ( ) [_new:BaseObject:private] => [_deleted:BaseObject:private] => [modifiedColumns:protected] => Array ( ) ) ) [collections:protected] => Array ( [3834] => ) [categories:protected] => [categories_initialized:protected] => [mapped_items:protected] => Array ( [3833] => DocumentRecord Object ( [records:protected] => Array ( ) [recordId:protected] => [searchWordClass:protected] => [searchWordPeerClass:protected] => [bok_record:protected] => [authors:protected] => [organizations:protected] => [collections:protected] => [categories:protected] => [categories_initialized:protected] => [mapped_items:protected] => [content:protected] => [files:protected] => [language:protected] => [old_record:protected] => [id:protected] => 3833 [old_id:protected] => [elcosh_id:protected] => d001303 [type:protected] => document [display_type:protected] => HTML w/ PDF [user_id:protected] => 25 [language_id:protected] => 1 [tagging_id:protected] => Bruce Lippy [priority_id:protected] => 1 [title:protected] => Overview of Toolbox Talks on Ergonomics Developed by Washington University in St. Louis [total_pages:protected] => 3 [billed_pages:protected] => 3 [publication_number:protected] => [part_of:protected] => [keywords:protected] => ergonomics, musculoskeletal disorders, MSDs [comments:protected] => 7-28-2014 - Originally submitted as "HTML w/ doc and PDF", Jeff Nelson asked Bruce Lippy for permission to switch it to "HTML w/ PDF" -- permission was given [summary:protected] => This overviews provides a background on how Washington University in St. Louis developed this series of six toolbox talks on ergonomics. It also describes how they tested the effectiveness of these communication tools, concluding that the guide was valuable for improving the delivery of ergonomics training and interaction between the safety representative and workers. The researchers recommend preparing site-specific information prior to the talk and interacting with workers to discuss problems and ergonomic solutions during the safety meetings. [transition_comments:protected] => [external_link:protected] => [consol_link:protected] => [more_like_this:protected] => [permission_given_by:protected] => Lisa Jaegers, Washington U. in St. Louis [published:protected] => T [billable:protected] => F [img_name:protected] => [img_ext:protected] => png [img_width:protected] => [img_height:protected] => [img_credit:protected] => [img_practice:protected] => [vid_source_id:protected] => [vid_running_time:protected] => [vid_intended_audience:protected] => [vid_acquisition_info:protected] => [vid_cost:protected] => [vid_producer:protected] => [vid_filename:protected] => [vid_filename_downloadable:protected] => [date_summary:protected] => 2014 [date_permission_requested:protected] => [date_permission_received:protected] => [date_review_needed:protected] => [date_received:protected] => 06/11/14 [date_completed:protected] => 07/29/14 [date_billed:protected] => [date_modified:protected] => 07/29/14 [collBokExports:protected] => [lastBokExportCriteria:BaseElcoshItem:private] => [alreadyInSave:protected] => [alreadyInValidation:protected] => [validationFailures:protected] => Array ( ) [_new:BaseObject:private] => [_deleted:BaseObject:private] => [modifiedColumns:protected] => Array ( ) ) [3835] => DocumentRecord Object ( [records:protected] => Array ( ) [recordId:protected] => [searchWordClass:protected] => [searchWordPeerClass:protected] => [bok_record:protected] => [authors:protected] => [organizations:protected] => [collections:protected] => [categories:protected] => [categories_initialized:protected] => [mapped_items:protected] => [content:protected] => [files:protected] => [language:protected] => [old_record:protected] => [id:protected] => 3835 [old_id:protected] => [elcosh_id:protected] => d001304 [type:protected] => document [display_type:protected] => HTML w/ PDF [user_id:protected] => 25 [language_id:protected] => 1 [tagging_id:protected] => Bruce Lippy [priority_id:protected] => 1 [title:protected] => Ergonomics Tool Box Talks (TBT) Training Guide [total_pages:protected] => 2 [billed_pages:protected] => 2 [publication_number:protected] => [part_of:protected] => [keywords:protected] => Ergonomics, carpal tunnel, muscular skeletal disorders, msd [comments:protected] => [summary:protected] => CPWR-funded ergonomics research by Washington University at St. Louis led to the development of 6 tool box talks. This guide is an explanation of how to deliver the talks for maximum effectiveness. This guide should be reviewed before delivering any of the talks because it makes important recommendations like: • If possible, give the TBTs as a part of the crew’s regular safety meetings so that ergonomics is included in the safety discussion. • Try to locate an area with few distractions for gathering the crew. • For a team approach, invite the work crew, site superintendent, project manager and other general contractor and/or subcontractor reps who you feel may be helpful in supporting the training and ergonomics solutions. [transition_comments:protected] => [external_link:protected] => [consol_link:protected] => [more_like_this:protected] => d001303,d001305,d001306,d001307,d001308,d001309,d001310 [permission_given_by:protected] => [published:protected] => T [billable:protected] => F [img_name:protected] => [img_ext:protected] => png [img_width:protected] => [img_height:protected] => [img_credit:protected] => [img_practice:protected] => [vid_source_id:protected] => [vid_running_time:protected] => [vid_intended_audience:protected] => [vid_acquisition_info:protected] => [vid_cost:protected] => [vid_producer:protected] => [vid_filename:protected] => [vid_filename_downloadable:protected] => [date_summary:protected] => 2014 [date_permission_requested:protected] => [date_permission_received:protected] => [date_review_needed:protected] => [date_received:protected] => 06/12/14 [date_completed:protected] => 07/29/14 [date_billed:protected] => [date_modified:protected] => 07/29/14 [collBokExports:protected] => [lastBokExportCriteria:BaseElcoshItem:private] => [alreadyInSave:protected] => [alreadyInValidation:protected] => [validationFailures:protected] => Array ( ) [_new:BaseObject:private] => [_deleted:BaseObject:private] => [modifiedColumns:protected] => Array ( ) ) [3836] => DocumentRecord Object ( [records:protected] => Array ( ) [recordId:protected] => [searchWordClass:protected] => [searchWordPeerClass:protected] => [bok_record:protected] => [authors:protected] => [organizations:protected] => [collections:protected] => [categories:protected] => [categories_initialized:protected] => [mapped_items:protected] => [content:protected] => [files:protected] => [language:protected] => [old_record:protected] => [id:protected] => 3836 [old_id:protected] => [elcosh_id:protected] => d001305 [type:protected] => document [display_type:protected] => HTML w/ PDF [user_id:protected] => 25 [language_id:protected] => 1 [tagging_id:protected] => Bruce Lippy [priority_id:protected] => 1 [title:protected] => TBT1 Ergonomics in Construction [total_pages:protected] => 5 [billed_pages:protected] => 5 [publication_number:protected] => [part_of:protected] => [keywords:protected] => ergonomics, ergo, msd, musculoskeletal disorders, risk factors, lifting, carpal tunnel, repetition, awkward postures [comments:protected] => 7-28-2014 Jeff Nelson asked Bruce Lippy about what to do with a sentence included toward the top of the doc, "Fill them in on page 2 'Other Questions.'" -- Bruce said this sentence could be deleted from the HTML. [summary:protected] => This is the first in a series of 6 Tool Box Talks produced by Washington University in St. Louis on ergonomics in construction work. This one should be delivered first because it covers what ergonomics is, why construction workers need to talk about it, what the risk factors are for developing a health problem and how to prevent these problems. [transition_comments:protected] => [external_link:protected] => [consol_link:protected] => http://www.cpwrconstructionsolutions.org/pipes_vessels/solution/50/participatory-ergonomics-program.html [more_like_this:protected] => d001303,d001304,d001306,d001307,d001308,d001309 [permission_given_by:protected] => Lisa Jaegers, Washington U. in St. Louis [published:protected] => T [billable:protected] => F [img_name:protected] => [img_ext:protected] => png [img_width:protected] => [img_height:protected] => [img_credit:protected] => [img_practice:protected] => [vid_source_id:protected] => [vid_running_time:protected] => [vid_intended_audience:protected] => [vid_acquisition_info:protected] => [vid_cost:protected] => [vid_producer:protected] => [vid_filename:protected] => [vid_filename_downloadable:protected] => [date_summary:protected] => 2014 [date_permission_requested:protected] => [date_permission_received:protected] => [date_review_needed:protected] => [date_received:protected] => 06/12/14 [date_completed:protected] => 07/28/14 [date_billed:protected] => [date_modified:protected] => 10/09/15 [collBokExports:protected] => [lastBokExportCriteria:BaseElcoshItem:private] => [alreadyInSave:protected] => [alreadyInValidation:protected] => [validationFailures:protected] => Array ( ) [_new:BaseObject:private] => [_deleted:BaseObject:private] => [modifiedColumns:protected] => Array ( ) ) [3837] => DocumentRecord Object ( [records:protected] => Array ( ) [recordId:protected] => [searchWordClass:protected] => [searchWordPeerClass:protected] => [bok_record:protected] => [authors:protected] => [organizations:protected] => [collections:protected] => [categories:protected] => [categories_initialized:protected] => [mapped_items:protected] => [content:protected] => [files:protected] => [language:protected] => [old_record:protected] => [id:protected] => 3837 [old_id:protected] => [elcosh_id:protected] => d001306 [type:protected] => document [display_type:protected] => HTML w/ PDF [user_id:protected] => 25 [language_id:protected] => 1 [tagging_id:protected] => Bruce Lippy [priority_id:protected] => 1 [title:protected] => TBT2 Keep Reach Close [total_pages:protected] => 4 [billed_pages:protected] => 4 [publication_number:protected] => [part_of:protected] => [keywords:protected] => reach, ergonomic, ergo, MSD, carpal tunnel, repetition, awkward positions [comments:protected] => 7-28-2014 Jeff Nelson asked Bruce Lippy about what to do with a sentence included toward the top of the doc, "Fill them in on page 2 'Other Questions.'" -- Bruce said this sentence could be deleted from the HTML. [summary:protected] => This is the second of six Tool Box Talks created by Washington University in St. Louis on ergonomics in construction. There is a guide with the series that describes how to deliver these talks. This one deals with how to avoid awkward reaching during tasks to prevent injuries. try to work with your hands below your head and close to our body to reduce your risk of shoulder strains and back discomfort. This TBT recommends considering ways to move close to the task, keeping the work area free of obstacles, and talking with each other to provide constructive feedback about your working position. [transition_comments:protected] => [external_link:protected] => [consol_link:protected] => http://www.cpwrconstructionsolutions.org/hazard/959/lifting-and-carrying-manual-materials-handling.html [more_like_this:protected] => d001303,d001304,d001305,d001307,d001308,e001309 [permission_given_by:protected] => [published:protected] => T [billable:protected] => F [img_name:protected] => [img_ext:protected] => png [img_width:protected] => [img_height:protected] => [img_credit:protected] => [img_practice:protected] => [vid_source_id:protected] => [vid_running_time:protected] => [vid_intended_audience:protected] => [vid_acquisition_info:protected] => [vid_cost:protected] => [vid_producer:protected] => [vid_filename:protected] => [vid_filename_downloadable:protected] => [date_summary:protected] => 2014 [date_permission_requested:protected] => [date_permission_received:protected] => [date_review_needed:protected] => [date_received:protected] => 06/12/14 [date_completed:protected] => 07/28/14 [date_billed:protected] => [date_modified:protected] => 11/02/16 [collBokExports:protected] => [lastBokExportCriteria:BaseElcoshItem:private] => [alreadyInSave:protected] => [alreadyInValidation:protected] => [validationFailures:protected] => Array ( ) [_new:BaseObject:private] => [_deleted:BaseObject:private] => [modifiedColumns:protected] => Array ( ) ) [3839] => DocumentRecord Object ( [records:protected] => Array ( ) [recordId:protected] => [searchWordClass:protected] => [searchWordPeerClass:protected] => [bok_record:protected] => [authors:protected] => [organizations:protected] => [collections:protected] => [categories:protected] => [categories_initialized:protected] => [mapped_items:protected] => [content:protected] => [files:protected] => [language:protected] => [old_record:protected] => [id:protected] => 3839 [old_id:protected] => [elcosh_id:protected] => d001308 [type:protected] => document [display_type:protected] => HTML w/ PDF [user_id:protected] => 23 [language_id:protected] => 1 [tagging_id:protected] => Bruce Lippy [priority_id:protected] => 1 [title:protected] => TBT4 Move Materials With Assist [total_pages:protected] => 4 [billed_pages:protected] => 4 [publication_number:protected] => [part_of:protected] => [keywords:protected] => lifting, back injury, ergonomics, ergo, MSD, buddy system [comments:protected] => 7-28-2014 Jeff Nelson asked Bruce Lippy about what to do with a sentence included toward the top of the doc, "Fill them in on page 2 'Other Questions.'" -- Bruce said this sentence could be deleted from the HTML. [summary:protected] => This tool box talk is fourth in a series of 6 developed by Washington University in St. Louis on construction ergonomics. This one focuses on preventing back injuries by getting an assist when manually lifting. It recommends using a cart for transporting loads, taking less trips, avoiding carrying materials on the shoulder and helping each other to lift large or heavy materials when a cart or hoist is not available. [transition_comments:protected] => [external_link:protected] => [consol_link:protected] => http://www.cpwrconstructionsolutions.org/hazard/959/lifting-and-carrying-manual-materials-handling.html [more_like_this:protected] => d001303,d001304,d001305,d001306,d001307,d001309 [permission_given_by:protected] => Lisa Jaegers, Washington U. in St. Louis [published:protected] => T [billable:protected] => F [img_name:protected] => [img_ext:protected] => png [img_width:protected] => [img_height:protected] => [img_credit:protected] => [img_practice:protected] => [vid_source_id:protected] => [vid_running_time:protected] => [vid_intended_audience:protected] => [vid_acquisition_info:protected] => [vid_cost:protected] => [vid_producer:protected] => [vid_filename:protected] => [vid_filename_downloadable:protected] => [date_summary:protected] => 2014 [date_permission_requested:protected] => [date_permission_received:protected] => [date_review_needed:protected] => [date_received:protected] => 06/12/14 [date_completed:protected] => 07/29/14 [date_billed:protected] => [date_modified:protected] => 10/09/15 [collBokExports:protected] => [lastBokExportCriteria:BaseElcoshItem:private] => [alreadyInSave:protected] => [alreadyInValidation:protected] => [validationFailures:protected] => Array ( ) [_new:BaseObject:private] => [_deleted:BaseObject:private] => [modifiedColumns:protected] => Array ( ) ) [3840] => DocumentRecord Object ( [records:protected] => Array ( ) [recordId:protected] => [searchWordClass:protected] => [searchWordPeerClass:protected] => [bok_record:protected] => [authors:protected] => [organizations:protected] => [collections:protected] => [categories:protected] => [categories_initialized:protected] => [mapped_items:protected] => [content:protected] => [files:protected] => [language:protected] => [old_record:protected] => [id:protected] => 3840 [old_id:protected] => [elcosh_id:protected] => d001309 [type:protected] => document [display_type:protected] => HTML w/ PDF [user_id:protected] => 23 [language_id:protected] => 1 [tagging_id:protected] => Bruce Lippy [priority_id:protected] => 1 [title:protected] => TBT5 Manual Tools [total_pages:protected] => 4 [billed_pages:protected] => 4 [publication_number:protected] => [part_of:protected] => [keywords:protected] => ergonomic, hand tools, handles, MSD, musculoskeletal disorder, carpal tunnel [comments:protected] => 7-28-2014 Jeff Nelson asked Bruce Lippy about what to do with a sentence included toward the top of the doc, "Fill them in on page 2 'Other Questions.'" -- Bruce said this sentence could be deleted from the HTML. [summary:protected] => This is the fifth in a series of 6 tool box talks on construction ergonomics produced by the University of Washington in St. Louis. This one focuses on manual tools. It asks the following 6 key questions. Does the tool… 1. Fit the task? 2. Allow a good power grip? 3. Keep the wrist in a straight posture? 4. Feel comfortable? 5. Take less effort than other tools for the task? 6. Work effectively? [transition_comments:protected] => [external_link:protected] => [consol_link:protected] => http://www.cpwrconstructionsolutions.org/masonry/solution/383/ergonomic-hand-tools.html [more_like_this:protected] => d001303,d001304,d001305,d001306,d001307,d001308,d001310 [permission_given_by:protected] => Lisa Jaegers, U. Wash. St. Louis [published:protected] => T [billable:protected] => F [img_name:protected] => [img_ext:protected] => png [img_width:protected] => [img_height:protected] => [img_credit:protected] => [img_practice:protected] => [vid_source_id:protected] => [vid_running_time:protected] => [vid_intended_audience:protected] => [vid_acquisition_info:protected] => [vid_cost:protected] => [vid_producer:protected] => [vid_filename:protected] => [vid_filename_downloadable:protected] => [date_summary:protected] => 2014 [date_permission_requested:protected] => [date_permission_received:protected] => [date_review_needed:protected] => [date_received:protected] => 06/12/14 [date_completed:protected] => 07/29/14 [date_billed:protected] => [date_modified:protected] => 10/09/15 [collBokExports:protected] => [lastBokExportCriteria:BaseElcoshItem:private] => [alreadyInSave:protected] => [alreadyInValidation:protected] => [validationFailures:protected] => Array ( ) [_new:BaseObject:private] => [_deleted:BaseObject:private] => [modifiedColumns:protected] => Array ( ) ) ) [content:protected] => [files:protected] => Array ( [559] => [560] => [546] => File Object ( [id:protected] => 546 [filename:protected] => 3.jpg [downloadable:protected] => F [timestamp:protected] => 2009-07-03 12:54:22 [alreadyInSave:protected] => [alreadyInValidation:protected] => [validationFailures:protected] => Array ( ) [_new:BaseObject:private] => [_deleted:BaseObject:private] => [modifiedColumns:protected] => Array ( ) ) [9643] => File Object ( [id:protected] => 9643 [filename:protected] => d001307.pdf [downloadable:protected] => T [timestamp:protected] => 2014-07-27 19:09:19 [alreadyInSave:protected] => [alreadyInValidation:protected] => [validationFailures:protected] => Array ( ) [_new:BaseObject:private] => [_deleted:BaseObject:private] => [modifiedColumns:protected] => Array ( ) ) [566] => File Object ( [id:protected] => 566 [filename:protected] => 4.jpg [downloadable:protected] => F [timestamp:protected] => 2009-07-03 12:54:23 [alreadyInSave:protected] => [alreadyInValidation:protected] => [validationFailures:protected] => Array ( ) [_new:BaseObject:private] => [_deleted:BaseObject:private] => [modifiedColumns:protected] => Array ( ) ) ) [language:protected] => Language Object ( [id:protected] => 1 [code:protected] => en [name:protected] => English [alreadyInSave:protected] => [alreadyInValidation:protected] => [validationFailures:protected] => Array ( ) [_new:BaseObject:private] => [_deleted:BaseObject:private] => [modifiedColumns:protected] => Array ( ) ) [old_record:protected] => [id:protected] => 3838 [old_id:protected] => [elcosh_id:protected] => d001307 [type:protected] => document [display_type:protected] => HTML w/ PDF [user_id:protected] => 25 [language_id:protected] => 1 [tagging_id:protected] => Bruce Lippy [priority_id:protected] => 1 [title:protected] => TBT3 Positioning [total_pages:protected] => 4 [billed_pages:protected] => 4 [publication_number:protected] => [part_of:protected] => [keywords:protected] => position, positioning, ergonomics, ergo, carpal tunnel, MSD, musculoskeletal disorder [comments:protected] => 7-28-2014 Jeff Nelson asked Bruce Lippy about what to do with a sentence included toward the top of the doc, "Fill them in on page 2 'Other Questions.'" -- Bruce said this sentence could be deleted from the HTML. [summary:protected] => This third in a series of 6 Tool Box Talks on construction ergonomics focuses on proper positioning to avoid injuries. The TBT recommends: 1)prop up a task off of the floor by using a raised surface, cart, baker scaffold, saw horses to prep materials near waist height, 2)move the lift or ladder in the best position for the work, 3)position the lift in front of the area you plan to work without trying to reach too far on either side of the lift. [transition_comments:protected] => [external_link:protected] => [consol_link:protected] => http://www.cpwrconstructionsolutions.org/hazard/959/lifting-and-carrying-manual-materials-handling.html [more_like_this:protected] => d001303,d001304,d001305,d001306,d001308,d001309 [permission_given_by:protected] => Lisa Jaegers, WU-St. Louis [published:protected] => T [billable:protected] => F [img_name:protected] => [img_ext:protected] => png [img_width:protected] => [img_height:protected] => [img_credit:protected] => [img_practice:protected] => [vid_source_id:protected] => [vid_running_time:protected] => [vid_intended_audience:protected] => [vid_acquisition_info:protected] => [vid_cost:protected] => [vid_producer:protected] => [vid_filename:protected] => [vid_filename_downloadable:protected] => [date_summary:protected] => 2014 [date_permission_requested:protected] => [date_permission_received:protected] => [date_review_needed:protected] => [date_received:protected] => 06/12/14 [date_completed:protected] => 07/28/14 [date_billed:protected] => [date_modified:protected] => 10/09/15 [collBokExports:protected] => [lastBokExportCriteria:BaseElcoshItem:private] => [alreadyInSave:protected] => [alreadyInValidation:protected] => [validationFailures:protected] => Array ( ) [_new:BaseObject:private] => [_deleted:BaseObject:private] => [modifiedColumns:protected] => Array ( ) ) [show_text] => [document_content] => ElcoshItemDocumentContent Object ( [id:protected] => 2906 [item_id:protected] => 3838 [type:protected] => main [title:protected] => [content:protected] =>
Facilitator / Leader Tasks Before the Tool Box Talk (TBT)
- Read through this TBT guide.
- Walk the job site to find ergonomics examples based on the TBT. If possible, take photos of “safe” and “unsafe” examples at the site to be used during the TBT.
- Write down discussion questions to ask the group.
Learning Goals
After discussing this training topic, workers will have gained a general understanding of:
- Unsafe work positions.
- Solutions to improve work positioning.
TRAINING CARD
The last page of this PDF has directions for printing and laminating the training cards.
TRAINER’S TALKING POINTS
Why should we talk about positioning?
Construction work requires working in high, low, and tight spaces which often forces you to work in an awkward or uncomfortable position. Working in awkward reaching and bent positions can lead to shoulder and back discomfort and possible injury over time.
Demonstration: The training card provides examples of the range of reaching and the point at which the reach is unsafe. Hold your arms straight out in front of you. Look at your hands and wrists while I discuss each of the reach zones on the training card.
The Green Zone shows the ideal location for working with your hands. When possible, try to keep your work tasks as far out as your wrists.
The Orange Zone is for occasional work since it involves more weight on your shoulders and low back since your hands are away from your body. If needed, keep the reach distance as far as your fingertips.
The Red Zone is away from your body so far that it places you at higher risk for falls when in the air and shoulder and back discomfort. Limit the time you work reaching beyond your fingertips.
End of Demonstration
Discussion Question: Can anyone describe to us an awkward position that they work in or have seen someone work in?
- What does it feel like in your neck, back or arms when working in that position?
- Other Questions:_____________________________________________
Training Note: Here are examples of hazards in different construction trades. Choose your trade or one that is similar to your group’s line of work that can be used as hazards and solutions examples.
| Trade | Awkward Posture Hazards | Potential Solution |
|---|---|---|
| Carpenter-Drywall | Leaning over the side of a scissor lift to reach and operating a screw gun with the arm fully extended (reaching in the red zone past the fingertips). | Before starting to install the line of screws to the side of the lift, move the lift to re-center it for the next 2 lines of screws to be installed. |
| Floor Layer | Spreading mortar overhead on a wall with the bakers scaffold one foot away from the wall due to buckets on the floor below (reach in the red zone, past the fingertips). | Pre-plan this task by removing all objects in the path of the bakers scaffold. Having an open path allows you to work closer to the task. |
| Sheet Metal Worker | Prepping duct parts on the floor while bending the back and reaching to work on them. | Pre-plan this task by setting up a waist-height workstation on extra materials, a cart, or saw horses. |
Now let’s put this information into practice. What are some tricks or techniques that you use to work in a comfortable position?
- Other Questions:_____________________________________________
Here are a few other ideas that are listed on your training card:
Prop up your tasks off of the floor by using a raised surface, cart, baker scaffold, saw horses to prep materials near waist height.
Move the lift or ladder in the best position for the work – close to the work tasks.
For safety & comfort, try to position the lift in front of the area you plan to work without trying to reach too far on either side of the lift.
In summary, it is important to work in a safe position when possible in order to reduce the risk of falls and discomfort due to awkward working positions. Consider ways that you can work in the green/comfort zone and orange zone and avoid the unsafe red zone.
References
[Images modified from Grandjean & Eastman Kodak Co.]
1. Grandjean, E. 1988. Fitting the task to the man: A textbook of occupational ergonomics. 4th ed. Taylor & Francis.
2. Eastman Kodak Co. 1983. Ergonomic Design for People at Work. Vol 1. Wiley, John & Sons, Incorporated.
Refer to the resources at our website: oshr.im.wustl.edu for more Tool Box TIPS.
TRAINING ATTENDANCE SHEET
Training Topic: Ergonomics -- Positioning
Date:
| ATTENDEES | |
|---|---|
Directions for Making Laminated Training Cards
The last page of this PDF has directions for printing and laminating the training cards.
[content_transformed:protected] =>Facilitator / Leader Tasks Before the Tool Box Talk (TBT)
- Read through this TBT guide.
- Walk the job site to find ergonomics examples based on the TBT. If possible, take photos of “safe” and “unsafe” examples at the site to be used during the TBT.
- Write down discussion questions to ask the group.
Learning Goals
After discussing this training topic, workers will have gained a general understanding of:
- Unsafe work positions.
- Solutions to improve work positioning.
TRAINING CARD
The last page of this PDF has directions for printing and laminating the training cards.
TRAINER’S TALKING POINTS
Why should we talk about positioning?
Construction work requires working in high, low, and tight spaces which often forces you to work in an awkward or uncomfortable position. Working in awkward reaching and bent positions can lead to shoulder and back discomfort and possible injury over time.
Demonstration: The training card provides examples of the range of reaching and the point at which the reach is unsafe. Hold your arms straight out in front of you. Look at your hands and wrists while I discuss each of the reach zones on the training card.
The Green Zone shows the ideal location for working with your hands. When possible, try to keep your work tasks as far out as your wrists.
The Orange Zone is for occasional work since it involves more weight on your shoulders and low back since your hands are away from your body. If needed, keep the reach distance as far as your fingertips.
The Red Zone is away from your body so far that it places you at higher risk for falls when in the air and shoulder and back discomfort. Limit the time you work reaching beyond your fingertips.
End of Demonstration
Discussion Question: Can anyone describe to us an awkward position that they work in or have seen someone work in?
- What does it feel like in your neck, back or arms when working in that position?
- Other Questions:_____________________________________________
Training Note: Here are examples of hazards in different construction trades. Choose your trade or one that is similar to your group’s line of work that can be used as hazards and solutions examples.
| Trade | Awkward Posture Hazards | Potential Solution |
|---|---|---|
| Carpenter-Drywall | Leaning over the side of a scissor lift to reach and operating a screw gun with the arm fully extended (reaching in the red zone past the fingertips). | Before starting to install the line of screws to the side of the lift, move the lift to re-center it for the next 2 lines of screws to be installed. |
| Floor Layer | Spreading mortar overhead on a wall with the bakers scaffold one foot away from the wall due to buckets on the floor below (reach in the red zone, past the fingertips). | Pre-plan this task by removing all objects in the path of the bakers scaffold. Having an open path allows you to work closer to the task. |
| Sheet Metal Worker | Prepping duct parts on the floor while bending the back and reaching to work on them. | Pre-plan this task by setting up a waist-height workstation on extra materials, a cart, or saw horses. |
Now let’s put this information into practice. What are some tricks or techniques that you use to work in a comfortable position?
- Other Questions:_____________________________________________
Here are a few other ideas that are listed on your training card:
Prop up your tasks off of the floor by using a raised surface, cart, baker scaffold, saw horses to prep materials near waist height.
Move the lift or ladder in the best position for the work – close to the work tasks.
For safety & comfort, try to position the lift in front of the area you plan to work without trying to reach too far on either side of the lift.
In summary, it is important to work in a safe position when possible in order to reduce the risk of falls and discomfort due to awkward working positions. Consider ways that you can work in the green/comfort zone and orange zone and avoid the unsafe red zone.
References
[Images modified from Grandjean & Eastman Kodak Co.]
1. Grandjean, E. 1988. Fitting the task to the man: A textbook of occupational ergonomics. 4th ed. Taylor & Francis.
2. Eastman Kodak Co. 1983. Ergonomic Design for People at Work. Vol 1. Wiley, John & Sons, Incorporated.
Refer to the resources at our website: oshr.im.wustl.edu for more Tool Box TIPS.
TRAINING ATTENDANCE SHEET
Training Topic: Ergonomics -- Positioning
Date:
| ATTENDEES | |
|---|---|
Directions for Making Laminated Training Cards
The last page of this PDF has directions for printing and laminating the training cards.
[disclaimer:protected] => [disclaimer_transformed:protected] => [alreadyInSave:protected] => [alreadyInValidation:protected] => [validationFailures:protected] => Array ( ) [_new:BaseObject:private] => [_deleted:BaseObject:private] => [modifiedColumns:protected] => Array ( ) ) [template] => record ) [_file] => /home/agsafe5/repositories/elcosh/live/templates/elcosh/macros.html [_errors:protected] => Array ( ) [_encoding:protected] => UTF-8 [_outputMode:protected] => 11 [_forceReparse:protected] => [_phpCodeDestination:protected] => /tmp/ [_phpCodeExtension:protected] => php [_cacheLifetime:protected] => 30 [_cachePurgeFrequency:protected] => 30 [externalMacroTemplatesCache:PHPTAL:private] => Array ( ) ) [record_macros.html] => PHPTAL Object ( [_prefilters:protected] => Array ( ) [_prefilter:PHPTAL:private] => REMOVED: DO NOT USE [_postfilter:protected] => [_repositories:protected] => Array ( [0] => /home/agsafe5/repositories/elcosh/live/templates/elcosh ) [_path:protected] => record_macros.html [_resolvers:protected] => Array ( ) [_source:protected] => PHPTAL_FileSource Object ( [_path:PHPTAL_FileSource:private] => /home/agsafe5/repositories/elcosh/live/templates/elcosh/record_macros.html ) [_codeFile:protected] => /tmp/tpl_61515a6c_record_macros__gMFg5NvPLybiFfYjAv9Aag.php [_functionName:protected] => tpl_61515a6c_record_macros__gMFg5NvPLybiFfYjAv9Aag [_prepared:protected] => 1 [_triggers:protected] => Array ( ) [_translator:protected] => [_globalContext:protected] => stdClass Object ( ) [_context:protected] => PHPTAL_Context Object ( [_line] => [_file] => /home/agsafe5/repositories/elcosh/live/templates/elcosh/record.html [repeat] => stdClass Object ( ) [_xmlDeclaration] => [_docType] => [_nothrow:PHPTAL_Context:private] => [_slots:PHPTAL_Context:private] => Array ( ) [_slotsStack:PHPTAL_Context:private] => Array ( [0] => Array ( ) [1] => Array ( ) ) [_parentContext:PHPTAL_Context:private] => PHPTAL_Context Object ( [_line] => [_file] => /home/agsafe5/repositories/elcosh/live/templates/elcosh/record.html [repeat] => stdClass Object ( ) [_xmlDeclaration] => [_docType] => [_nothrow:PHPTAL_Context:private] => [_slots:PHPTAL_Context:private] => Array ( ) [_slotsStack:PHPTAL_Context:private] => Array ( [0] => Array ( ) [1] => Array ( ) ) [_parentContext:PHPTAL_Context:private] => [_globalContext:PHPTAL_Context:private] => stdClass Object ( ) [_echoDeclarations:PHPTAL_Context:private] => [referer] => http://elcosh.org/document/3838/d001307/TBT3%2BPositioning.html [curr_module] => Record [styles] => Array ( ) [javascript] => Array ( [0] => jquery.min.js ) [metas] => Array ( [language] => en [robots] => index, follow ) [user] => [curr_url] => https://elcosh.org/index.php?module=Record&id=3838&type=document [base_url] => https://elcosh.org/index.php?module=Record [title] => eLCOSH : TBT3 Positioning [language] => en [search_query] => [module] => Record [new_records] => Array ( [0] => Search_Result Object ( [title] => Toolbox Talk: Fixed Ladder [image] => /record/images/notavailable-p.png [blurb] => The CPWR Toolbox Talk on Fixed Ladders addresses the potential risks associated with using fixed ladders. The resource includes a brief case example,... [category] => Array ( [0] => 15 [1] => 47 [2] => 49 [3] => 51 [4] => 53 [5] => 55 [6] => 60 [7] => 64 [8] => 73 [9] => 76 [10] => 78 [11] => 80 [12] => 86 [13] => 87 [14] => 90 [15] => 92 [16] => 93 [17] => 94 [18] => 100 ) [labels] => Array ( [0] => Falls [1] => Work Environment [2] => Hazards [3] => Bricklayer [4] => Trades [5] => Carpenter [7] => Cement Mason [9] => Concrete Polisher [11] => Electrical Worker [13] => HVAC [15] => Laborer [17] => PCC/Restoration [19] => Plumber/Pipefitter [21] => Roofer/Waterproofer [23] => Sheetmetal Worker [25] => Welder [27] => Commercial & Institutional [28] => Jobsites [29] => Industrial [31] => LEED/Green Construction [33] => Renovations [35] => Residential [37] => Toolbox Talks [38] => Documents [39] => Media & Documents ) [type] => Toolbox Talks [sub_category] => [url] => /document/4430/d001660/Toolbox%2BTalk%253A%2BFixed%2BLadder.html [item:protected] => DocumentRecord Object ( [records:protected] => Array ( ) [recordId:protected] => [searchWordClass:protected] => [searchWordPeerClass:protected] => [bok_record:protected] => [authors:protected] => [organizations:protected] => [collections:protected] => [categories:protected] => Array ( [15] => Category Object ( [languages:protected] => [bok_resources:protected] => [bok_topics:protected] => [bok_keywords:protected] => [id:protected] => 15 [type:protected] => category [parent:protected] => 7 [label:protected] => Falls [alreadyInSave:protected] => [alreadyInValidation:protected] => [validationFailures:protected] => Array ( ) [_new:BaseObject:private] => [_deleted:BaseObject:private] => [modifiedColumns:protected] => Array ( ) ) [47] => Category Object ( [languages:protected] => [bok_resources:protected] => [bok_topics:protected] => [bok_keywords:protected] => [id:protected] => 47 [type:protected] => category [parent:protected] => 2 [label:protected] => Bricklayer [alreadyInSave:protected] => [alreadyInValidation:protected] => [validationFailures:protected] => Array ( ) [_new:BaseObject:private] => [_deleted:BaseObject:private] => [modifiedColumns:protected] => Array ( ) ) [49] => Category Object ( [languages:protected] => [bok_resources:protected] => [bok_topics:protected] => [bok_keywords:protected] => [id:protected] => 49 [type:protected] => category [parent:protected] => 2 [label:protected] => Carpenter [alreadyInSave:protected] => [alreadyInValidation:protected] => [validationFailures:protected] => Array ( ) [_new:BaseObject:private] => [_deleted:BaseObject:private] => [modifiedColumns:protected] => Array ( ) ) [51] => Category Object ( [languages:protected] => [bok_resources:protected] => [bok_topics:protected] => [bok_keywords:protected] => [id:protected] => 51 [type:protected] => category [parent:protected] => 2 [label:protected] => Cement Mason [alreadyInSave:protected] => [alreadyInValidation:protected] => [validationFailures:protected] => Array ( ) [_new:BaseObject:private] => [_deleted:BaseObject:private] => [modifiedColumns:protected] => Array ( ) ) [53] => Category Object ( [languages:protected] => [bok_resources:protected] => [bok_topics:protected] => [bok_keywords:protected] => [id:protected] => 53 [type:protected] => category [parent:protected] => 2 [label:protected] => Concrete Polisher [alreadyInSave:protected] => [alreadyInValidation:protected] => [validationFailures:protected] => Array ( ) [_new:BaseObject:private] => [_deleted:BaseObject:private] => [modifiedColumns:protected] => Array ( ) ) [55] => Category Object ( [languages:protected] => [bok_resources:protected] => [bok_topics:protected] => [bok_keywords:protected] => [id:protected] => 55 [type:protected] => category [parent:protected] => 2 [label:protected] => Electrical Worker [alreadyInSave:protected] => [alreadyInValidation:protected] => [validationFailures:protected] => Array ( ) [_new:BaseObject:private] => [_deleted:BaseObject:private] => [modifiedColumns:protected] => Array ( ) ) [60] => Category Object ( [languages:protected] => [bok_resources:protected] => [bok_topics:protected] => [bok_keywords:protected] => [id:protected] => 60 [type:protected] => category [parent:protected] => 2 [label:protected] => HVAC [alreadyInSave:protected] => [alreadyInValidation:protected] => [validationFailures:protected] => Array ( ) [_new:BaseObject:private] => [_deleted:BaseObject:private] => [modifiedColumns:protected] => Array ( ) ) [64] => Category Object ( [languages:protected] => [bok_resources:protected] => [bok_topics:protected] => [bok_keywords:protected] => [id:protected] => 64 [type:protected] => category [parent:protected] => 2 [label:protected] => Laborer [alreadyInSave:protected] => [alreadyInValidation:protected] => [validationFailures:protected] => Array ( ) [_new:BaseObject:private] => [_deleted:BaseObject:private] => [modifiedColumns:protected] => Array ( ) ) [73] => Category Object ( [languages:protected] => [bok_resources:protected] => [bok_topics:protected] => [bok_keywords:protected] => [id:protected] => 73 [type:protected] => category [parent:protected] => 2 [label:protected] => PCC/Restoration [alreadyInSave:protected] => [alreadyInValidation:protected] => [validationFailures:protected] => Array ( ) [_new:BaseObject:private] => [_deleted:BaseObject:private] => [modifiedColumns:protected] => Array ( ) ) [76] => Category Object ( [languages:protected] => [bok_resources:protected] => [bok_topics:protected] => [bok_keywords:protected] => [id:protected] => 76 [type:protected] => category [parent:protected] => 2 [label:protected] => Plumber/Pipefitter [alreadyInSave:protected] => [alreadyInValidation:protected] => [validationFailures:protected] => Array ( ) [_new:BaseObject:private] => [_deleted:BaseObject:private] => [modifiedColumns:protected] => Array ( ) ) [78] => Category Object ( [languages:protected] => [bok_resources:protected] => [bok_topics:protected] => [bok_keywords:protected] => [id:protected] => 78 [type:protected] => category [parent:protected] => 2 [label:protected] => Roofer/Waterproofer [alreadyInSave:protected] => [alreadyInValidation:protected] => [validationFailures:protected] => Array ( ) [_new:BaseObject:private] => [_deleted:BaseObject:private] => [modifiedColumns:protected] => Array ( ) ) [80] => Category Object ( [languages:protected] => [bok_resources:protected] => [bok_topics:protected] => [bok_keywords:protected] => [id:protected] => 80 [type:protected] => category [parent:protected] => 2 [label:protected] => Sheetmetal Worker [alreadyInSave:protected] => [alreadyInValidation:protected] => [validationFailures:protected] => Array ( ) [_new:BaseObject:private] => [_deleted:BaseObject:private] => [modifiedColumns:protected] => Array ( ) ) [86] => Category Object ( [languages:protected] => [bok_resources:protected] => [bok_topics:protected] => [bok_keywords:protected] => [id:protected] => 86 [type:protected] => category [parent:protected] => 2 [label:protected] => Welder [alreadyInSave:protected] => [alreadyInValidation:protected] => [validationFailures:protected] => Array ( ) [_new:BaseObject:private] => [_deleted:BaseObject:private] => [modifiedColumns:protected] => Array ( ) ) [87] => Category Object ( [languages:protected] => [bok_resources:protected] => [bok_topics:protected] => [bok_keywords:protected] => [id:protected] => 87 [type:protected] => category [parent:protected] => 3 [label:protected] => Commercial & Institutional [alreadyInSave:protected] => [alreadyInValidation:protected] => [validationFailures:protected] => Array ( ) [_new:BaseObject:private] => [_deleted:BaseObject:private] => [modifiedColumns:protected] => Array ( ) ) [90] => Category Object ( [languages:protected] => [bok_resources:protected] => [bok_topics:protected] => [bok_keywords:protected] => [id:protected] => 90 [type:protected] => category [parent:protected] => 3 [label:protected] => Industrial [alreadyInSave:protected] => [alreadyInValidation:protected] => [validationFailures:protected] => Array ( ) [_new:BaseObject:private] => [_deleted:BaseObject:private] => [modifiedColumns:protected] => Array ( ) ) [92] => Category Object ( [languages:protected] => [bok_resources:protected] => [bok_topics:protected] => [bok_keywords:protected] => [id:protected] => 92 [type:protected] => category [parent:protected] => 3 [label:protected] => LEED/Green Construction [alreadyInSave:protected] => [alreadyInValidation:protected] => [validationFailures:protected] => Array ( ) [_new:BaseObject:private] => [_deleted:BaseObject:private] => [modifiedColumns:protected] => Array ( ) ) [93] => Category Object ( [languages:protected] => [bok_resources:protected] => [bok_topics:protected] => [bok_keywords:protected] => [id:protected] => 93 [type:protected] => category [parent:protected] => 3 [label:protected] => Renovations [alreadyInSave:protected] => [alreadyInValidation:protected] => [validationFailures:protected] => Array ( ) [_new:BaseObject:private] => [_deleted:BaseObject:private] => [modifiedColumns:protected] => Array ( ) ) [94] => Category Object ( [languages:protected] => [bok_resources:protected] => [bok_topics:protected] => [bok_keywords:protected] => [id:protected] => 94 [type:protected] => category [parent:protected] => 3 [label:protected] => Residential [alreadyInSave:protected] => [alreadyInValidation:protected] => [validationFailures:protected] => Array ( ) [_new:BaseObject:private] => [_deleted:BaseObject:private] => [modifiedColumns:protected] => Array ( ) ) [100] => Category Object ( [languages:protected] => [bok_resources:protected] => [bok_topics:protected] => [bok_keywords:protected] => [id:protected] => 100 [type:protected] => category [parent:protected] => 6 [label:protected] => Toolbox Talks [alreadyInSave:protected] => [alreadyInValidation:protected] => [validationFailures:protected] => Array ( ) [_new:BaseObject:private] => [_deleted:BaseObject:private] => [modifiedColumns:protected] => Array ( ) ) ) [categories_initialized:protected] => 1 [mapped_items:protected] => [content:protected] => [files:protected] => [language:protected] => Language Object ( [id:protected] => 1 [code:protected] => en [name:protected] => English [alreadyInSave:protected] => [alreadyInValidation:protected] => [validationFailures:protected] => Array ( ) [_new:BaseObject:private] => [_deleted:BaseObject:private] => [modifiedColumns:protected] => Array ( ) ) [old_record:protected] => [id:protected] => 4430 [old_id:protected] => [elcosh_id:protected] => d001660 [type:protected] => document [display_type:protected] => HTML only (and links) [user_id:protected] => 0 [language_id:protected] => 1 [tagging_id:protected] => Mike Aguilar [priority_id:protected] => 1 [title:protected] => Toolbox Talk: Fixed Ladder [total_pages:protected] => 0 [billed_pages:protected] => 0 [publication_number:protected] => [part_of:protected] => [keywords:protected] => Fixed Ladders, Fall Prevention, Falls [comments:protected] => [summary:protected] => The CPWR Toolbox Talk on Fixed Ladders addresses the potential risks associated with using fixed ladders. The resource includes a brief case example, steps to prevent a related injury and questions for discussion. It includes an image that illustrates the hazard, which can be posted in a central location as a reminder of steps to work safely. Available in English and Spanish. [transition_comments:protected] => [external_link:protected] => [consol_link:protected] => [more_like_this:protected] => d001257,d001254,d001255,d001256,d001258,d001262,d001279 [permission_given_by:protected] => [published:protected] => T [billable:protected] => F [img_name:protected] => [img_ext:protected] => [img_width:protected] => [img_height:protected] => [img_credit:protected] => [img_practice:protected] => [vid_source_id:protected] => [vid_running_time:protected] => [vid_intended_audience:protected] => [vid_acquisition_info:protected] => [vid_cost:protected] => [vid_producer:protected] => [vid_filename:protected] => [vid_filename_downloadable:protected] => [date_summary:protected] => [date_permission_requested:protected] => [date_permission_received:protected] => [date_review_needed:protected] => [date_received:protected] => 06/10/22 [date_completed:protected] => 06/10/22 [date_billed:protected] => [date_modified:protected] => 06/16/25 [collBokExports:protected] => [lastBokExportCriteria:BaseElcoshItem:private] => [alreadyInSave:protected] => [alreadyInValidation:protected] => [validationFailures:protected] => Array ( ) [_new:BaseObject:private] => [_deleted:BaseObject:private] => [modifiedColumns:protected] => Array ( ) ) ) [1] => Search_Result Object ( [title] => Toolbox Talk: Work Zone Safety: Working Around Vehicles [image] => /record/images/notavailable-p.png [blurb] => The CPWR Toolbox Talk on Working Around Vehicles in the Work Zone addresses methods to avoid being struck-by a vehicle on a construction site. The res... [category] => Array ( [0] => 12 [1] => 18 [2] => 52 [3] => 57 [4] => 70 [5] => 85 [6] => 87 [7] => 88 [8] => 89 [9] => 91 [10] => 90 [11] => 92 [12] => 93 [13] => 94 [14] => 95 [15] => 100 ) [labels] => Array ( [0] => Crushed/Struck By [1] => Work Environment [2] => Hazards [3] => Motor Vehicles/Heavy Equipment [6] => Commercial Diver [7] => Trades [8] => Flagger [10] => Operating Engineer [12] => Truck Driver [14] => Commercial & Institutional [15] => Jobsites [16] => Demolition [18] => Disasters [20] => Heavy & Highway [22] => Industrial [24] => LEED/Green Construction [26] => Renovations [28] => Residential [30] => Underground [32] => Toolbox Talks [33] => Documents [34] => Media & Documents ) [type] => Toolbox Talks [sub_category] => [url] => /document/4428/d001658/Toolbox%2BTalk%253A%2BWork%2BZone%2BSafety%253A%2BWorking%2BAround%2BVehicles.html [item:protected] => DocumentRecord Object ( [records:protected] => Array ( ) [recordId:protected] => [searchWordClass:protected] => [searchWordPeerClass:protected] => [bok_record:protected] => [authors:protected] => [organizations:protected] => [collections:protected] => [categories:protected] => Array ( [12] => Category Object ( [languages:protected] => [bok_resources:protected] => [bok_topics:protected] => [bok_keywords:protected] => [id:protected] => 12 [type:protected] => category [parent:protected] => 7 [label:protected] => Crushed/Struck By [alreadyInSave:protected] => [alreadyInValidation:protected] => [validationFailures:protected] => Array ( ) [_new:BaseObject:private] => [_deleted:BaseObject:private] => [modifiedColumns:protected] => Array ( ) ) [18] => Category Object ( [languages:protected] => [bok_resources:protected] => [bok_topics:protected] => [bok_keywords:protected] => [id:protected] => 18 [type:protected] => category [parent:protected] => 7 [label:protected] => Motor Vehicles/Heavy Equipment [alreadyInSave:protected] => [alreadyInValidation:protected] => [validationFailures:protected] => Array ( ) [_new:BaseObject:private] => [_deleted:BaseObject:private] => [modifiedColumns:protected] => Array ( ) ) [52] => Category Object ( [languages:protected] => [bok_resources:protected] => [bok_topics:protected] => [bok_keywords:protected] => [id:protected] => 52 [type:protected] => category [parent:protected] => 2 [label:protected] => Commercial Diver [alreadyInSave:protected] => [alreadyInValidation:protected] => [validationFailures:protected] => Array ( ) [_new:BaseObject:private] => [_deleted:BaseObject:private] => [modifiedColumns:protected] => Array ( ) ) [57] => Category Object ( [languages:protected] => [bok_resources:protected] => [bok_topics:protected] => [bok_keywords:protected] => [id:protected] => 57 [type:protected] => category [parent:protected] => 2 [label:protected] => Flagger [alreadyInSave:protected] => [alreadyInValidation:protected] => [validationFailures:protected] => Array ( ) [_new:BaseObject:private] => [_deleted:BaseObject:private] => [modifiedColumns:protected] => Array ( ) ) [70] => Category Object ( [languages:protected] => [bok_resources:protected] => [bok_topics:protected] => [bok_keywords:protected] => [id:protected] => 70 [type:protected] => category [parent:protected] => 2 [label:protected] => Operating Engineer [alreadyInSave:protected] => [alreadyInValidation:protected] => [validationFailures:protected] => Array ( ) [_new:BaseObject:private] => [_deleted:BaseObject:private] => [modifiedColumns:protected] => Array ( ) ) [85] => Category Object ( [languages:protected] => [bok_resources:protected] => [bok_topics:protected] => [bok_keywords:protected] => [id:protected] => 85 [type:protected] => category [parent:protected] => 2 [label:protected] => Truck Driver [alreadyInSave:protected] => [alreadyInValidation:protected] => [validationFailures:protected] => Array ( ) [_new:BaseObject:private] => [_deleted:BaseObject:private] => [modifiedColumns:protected] => Array ( ) ) [87] => Category Object ( [languages:protected] => [bok_resources:protected] => [bok_topics:protected] => [bok_keywords:protected] => [id:protected] => 87 [type:protected] => category [parent:protected] => 3 [label:protected] => Commercial & Institutional [alreadyInSave:protected] => [alreadyInValidation:protected] => [validationFailures:protected] => Array ( ) [_new:BaseObject:private] => [_deleted:BaseObject:private] => [modifiedColumns:protected] => Array ( ) ) [88] => Category Object ( [languages:protected] => [bok_resources:protected] => [bok_topics:protected] => [bok_keywords:protected] => [id:protected] => 88 [type:protected] => category [parent:protected] => 3 [label:protected] => Demolition [alreadyInSave:protected] => [alreadyInValidation:protected] => [validationFailures:protected] => Array ( ) [_new:BaseObject:private] => [_deleted:BaseObject:private] => [modifiedColumns:protected] => Array ( ) ) [89] => Category Object ( [languages:protected] => [bok_resources:protected] => [bok_topics:protected] => [bok_keywords:protected] => [id:protected] => 89 [type:protected] => category [parent:protected] => 3 [label:protected] => Disasters [alreadyInSave:protected] => [alreadyInValidation:protected] => [validationFailures:protected] => Array ( ) [_new:BaseObject:private] => [_deleted:BaseObject:private] => [modifiedColumns:protected] => Array ( ) ) [91] => Category Object ( [languages:protected] => [bok_resources:protected] => [bok_topics:protected] => [bok_keywords:protected] => [id:protected] => 91 [type:protected] => category [parent:protected] => 3 [label:protected] => Heavy & Highway [alreadyInSave:protected] => [alreadyInValidation:protected] => [validationFailures:protected] => Array ( ) [_new:BaseObject:private] => [_deleted:BaseObject:private] => [modifiedColumns:protected] => Array ( ) ) [90] => Category Object ( [languages:protected] => [bok_resources:protected] => [bok_topics:protected] => [bok_keywords:protected] => [id:protected] => 90 [type:protected] => category [parent:protected] => 3 [label:protected] => Industrial [alreadyInSave:protected] => [alreadyInValidation:protected] => [validationFailures:protected] => Array ( ) [_new:BaseObject:private] => [_deleted:BaseObject:private] => [modifiedColumns:protected] => Array ( ) ) [92] => Category Object ( [languages:protected] => [bok_resources:protected] => [bok_topics:protected] => [bok_keywords:protected] => [id:protected] => 92 [type:protected] => category [parent:protected] => 3 [label:protected] => LEED/Green Construction [alreadyInSave:protected] => [alreadyInValidation:protected] => [validationFailures:protected] => Array ( ) [_new:BaseObject:private] => [_deleted:BaseObject:private] => [modifiedColumns:protected] => Array ( ) ) [93] => Category Object ( [languages:protected] => [bok_resources:protected] => [bok_topics:protected] => [bok_keywords:protected] => [id:protected] => 93 [type:protected] => category [parent:protected] => 3 [label:protected] => Renovations [alreadyInSave:protected] => [alreadyInValidation:protected] => [validationFailures:protected] => Array ( ) [_new:BaseObject:private] => [_deleted:BaseObject:private] => [modifiedColumns:protected] => Array ( ) ) [94] => Category Object ( [languages:protected] => [bok_resources:protected] => [bok_topics:protected] => [bok_keywords:protected] => [id:protected] => 94 [type:protected] => category [parent:protected] => 3 [label:protected] => Residential [alreadyInSave:protected] => [alreadyInValidation:protected] => [validationFailures:protected] => Array ( ) [_new:BaseObject:private] => [_deleted:BaseObject:private] => [modifiedColumns:protected] => Array ( ) ) [95] => Category Object ( [languages:protected] => [bok_resources:protected] => [bok_topics:protected] => [bok_keywords:protected] => [id:protected] => 95 [type:protected] => category [parent:protected] => 3 [label:protected] => Underground [alreadyInSave:protected] => [alreadyInValidation:protected] => [validationFailures:protected] => Array ( ) [_new:BaseObject:private] => [_deleted:BaseObject:private] => [modifiedColumns:protected] => Array ( ) ) [100] => Category Object ( [languages:protected] => [bok_resources:protected] => [bok_topics:protected] => [bok_keywords:protected] => [id:protected] => 100 [type:protected] => category [parent:protected] => 6 [label:protected] => Toolbox Talks [alreadyInSave:protected] => [alreadyInValidation:protected] => [validationFailures:protected] => Array ( ) [_new:BaseObject:private] => [_deleted:BaseObject:private] => [modifiedColumns:protected] => Array ( ) ) ) [categories_initialized:protected] => 1 [mapped_items:protected] => [content:protected] => [files:protected] => [language:protected] => Language Object ( [id:protected] => 1 [code:protected] => en [name:protected] => English [alreadyInSave:protected] => [alreadyInValidation:protected] => [validationFailures:protected] => Array ( ) [_new:BaseObject:private] => [_deleted:BaseObject:private] => [modifiedColumns:protected] => Array ( ) ) [old_record:protected] => [id:protected] => 4428 [old_id:protected] => [elcosh_id:protected] => d001658 [type:protected] => document [display_type:protected] => HTML only (and links) [user_id:protected] => 0 [language_id:protected] => 1 [tagging_id:protected] => Daniela Caceres [priority_id:protected] => 1 [title:protected] => Toolbox Talk: Work Zone Safety: Working Around Vehicles [total_pages:protected] => 0 [billed_pages:protected] => 0 [publication_number:protected] => [part_of:protected] => [keywords:protected] => Struck, Struck by, Vehicle, Work Zone Safety, Truck, Operator, Driver, Mobile Equipment [comments:protected] => [summary:protected] => The CPWR Toolbox Talk on Working Around Vehicles in the Work Zone addresses methods to avoid being struck-by a vehicle on a construction site. The resource includes a case example, steps to prevent a related injury, and questions for discussion. It includes a graphic that illustrates the hazard, which can be posted in a central location as a reminder of steps to work safely. Available in English and Spanish. [transition_comments:protected] => [external_link:protected] => [consol_link:protected] => [more_like_this:protected] => d001640 [permission_given_by:protected] => [published:protected] => T [billable:protected] => F [img_name:protected] => [img_ext:protected] => [img_width:protected] => [img_height:protected] => [img_credit:protected] => [img_practice:protected] => [vid_source_id:protected] => [vid_running_time:protected] => [vid_intended_audience:protected] => [vid_acquisition_info:protected] => [vid_cost:protected] => [vid_producer:protected] => [vid_filename:protected] => [vid_filename_downloadable:protected] => [date_summary:protected] => [date_permission_requested:protected] => [date_permission_received:protected] => [date_review_needed:protected] => [date_received:protected] => 12/23/21 [date_completed:protected] => 12/23/21 [date_billed:protected] => [date_modified:protected] => 05/19/23 [collBokExports:protected] => [lastBokExportCriteria:BaseElcoshItem:private] => [alreadyInSave:protected] => [alreadyInValidation:protected] => [validationFailures:protected] => Array ( ) [_new:BaseObject:private] => [_deleted:BaseObject:private] => [modifiedColumns:protected] => Array ( ) ) ) [2] => Search_Result Object ( [title] => Construction Dive -- DeWalt's Jobsite Pro headphones recalled for fire hazards [image] => /record/images/notavailable-p.png [blurb] => A recall notice by the United States Consumer Product Safety Commission affects over 300,000 DeWalt Jobsite Pro Headphones. The recall is a result of... [category] => Array ( [0] => 16 [1] => 44 [2] => 45 [3] => 46 [4] => 47 [5] => 48 [6] => 49 [7] => 50 [8] => 51 [9] => 52 [10] => 53 [11] => 54 [12] => 55 [13] => 56 [14] => 57 [15] => 58 [16] => 59 [17] => 60 [18] => 61 [19] => 64 [20] => 65 [21] => 66 [22] => 67 [23] => 68 [24] => 69 [25] => 70 [26] => 71 [27] => 72 [28] => 73 [29] => 74 [30] => 75 [31] => 76 [32] => 77 [33] => 63 [34] => 78 [35] => 79 [36] => 80 [37] => 81 [38] => 82 [39] => 62 [40] => 83 [41] => 84 [42] => 85 [43] => 86 [44] => 87 [45] => 88 [46] => 89 [47] => 91 [48] => 90 [49] => 92 [50] => 93 [51] => 94 [52] => 95 ) [labels] => Array ( [0] => Fire & Explosions [1] => Work Environment [2] => Hazards [3] => Acoustical Ceiling Carpenter [4] => Trades [5] => Asbestos/Insulator [7] => Boilermaker [9] => Bricklayer [11] => Cabinetmaker [13] => Carpenter [15] => Carpet Layer [17] => Cement Mason [19] => Commercial Diver [21] => Concrete Polisher [23] => Drywall Applicator Specialist [25] => Electrical Worker [27] => Elevator Constructor [29] => Flagger [31] => Glazier [33] => Hazardous Waste Cleanup [35] => HVAC [37] => Interior Systems Carpenter [39] => Laborer [41] => Landscaper [43] => Lather [45] => Lead Abatement Worker [47] => Maintenance Worker [49] => Millwright [51] => Operating Engineer [53] => Painter [55] => Paper Hanger [57] => PCC/Restoration [59] => Pile Driver [61] => Plasterer [63] => Plumber/Pipefitter [65] => Refractory Worker [67] => Reinforcing Ironworker [69] => Roofer/Waterproofer [71] => Scaffold Erector [73] => Sheetmetal Worker [75] => Sprinkler Fitter [77] => Stonemason [79] => Structural Ironworker [81] => Terrazzo Worker [83] => Tile Setter [85] => Truck Driver [87] => Welder [89] => Commercial & Institutional [90] => Jobsites [91] => Demolition [93] => Disasters [95] => Heavy & Highway [97] => Industrial [99] => LEED/Green Construction [101] => Renovations [103] => Residential [105] => Underground ) [type] => [sub_category] => [url] => /document/4426/d001656/Construction%2BDive%2B--%2BDeWalt%2527s%2BJobsite%2BPro%2Bheadphones%2Brecalled%2Bfor%2Bfire%2Bhazards.html [item:protected] => DocumentRecord Object ( [records:protected] => Array ( ) [recordId:protected] => [searchWordClass:protected] => [searchWordPeerClass:protected] => [bok_record:protected] => [authors:protected] => [organizations:protected] => [collections:protected] => [categories:protected] => Array ( [16] => Category Object ( [languages:protected] => [bok_resources:protected] => [bok_topics:protected] => [bok_keywords:protected] => [id:protected] => 16 [type:protected] => category [parent:protected] => 7 [label:protected] => Fire & Explosions [alreadyInSave:protected] => [alreadyInValidation:protected] => [validationFailures:protected] => Array ( ) [_new:BaseObject:private] => [_deleted:BaseObject:private] => [modifiedColumns:protected] => Array ( ) ) [44] => Category Object ( [languages:protected] => [bok_resources:protected] => [bok_topics:protected] => [bok_keywords:protected] => [id:protected] => 44 [type:protected] => category [parent:protected] => 2 [label:protected] => Acoustical Ceiling Carpenter [alreadyInSave:protected] => [alreadyInValidation:protected] => [validationFailures:protected] => Array ( ) [_new:BaseObject:private] => [_deleted:BaseObject:private] => [modifiedColumns:protected] => Array ( ) ) [45] => Category Object ( [languages:protected] => [bok_resources:protected] => [bok_topics:protected] => [bok_keywords:protected] => [id:protected] => 45 [type:protected] => category [parent:protected] => 2 [label:protected] => Asbestos/Insulator [alreadyInSave:protected] => [alreadyInValidation:protected] => [validationFailures:protected] => Array ( ) [_new:BaseObject:private] => [_deleted:BaseObject:private] => [modifiedColumns:protected] => Array ( ) ) [46] => Category Object ( [languages:protected] => [bok_resources:protected] => [bok_topics:protected] => [bok_keywords:protected] => [id:protected] => 46 [type:protected] => category [parent:protected] => 2 [label:protected] => Boilermaker [alreadyInSave:protected] => [alreadyInValidation:protected] => [validationFailures:protected] => Array ( ) [_new:BaseObject:private] => [_deleted:BaseObject:private] => [modifiedColumns:protected] => Array ( ) ) [47] => Category Object ( [languages:protected] => [bok_resources:protected] => [bok_topics:protected] => [bok_keywords:protected] => [id:protected] => 47 [type:protected] => category [parent:protected] => 2 [label:protected] => Bricklayer [alreadyInSave:protected] => [alreadyInValidation:protected] => [validationFailures:protected] => Array ( ) [_new:BaseObject:private] => [_deleted:BaseObject:private] => [modifiedColumns:protected] => Array ( ) ) [48] => Category Object ( [languages:protected] => [bok_resources:protected] => [bok_topics:protected] => [bok_keywords:protected] => [id:protected] => 48 [type:protected] => category [parent:protected] => 2 [label:protected] => Cabinetmaker [alreadyInSave:protected] => [alreadyInValidation:protected] => [validationFailures:protected] => Array ( ) [_new:BaseObject:private] => [_deleted:BaseObject:private] => [modifiedColumns:protected] => Array ( ) ) [49] => Category Object ( [languages:protected] => [bok_resources:protected] => [bok_topics:protected] => [bok_keywords:protected] => [id:protected] => 49 [type:protected] => category [parent:protected] => 2 [label:protected] => Carpenter [alreadyInSave:protected] => [alreadyInValidation:protected] => [validationFailures:protected] => Array ( ) [_new:BaseObject:private] => [_deleted:BaseObject:private] => [modifiedColumns:protected] => Array ( ) ) [50] => Category Object ( [languages:protected] => [bok_resources:protected] => [bok_topics:protected] => [bok_keywords:protected] => [id:protected] => 50 [type:protected] => category [parent:protected] => 2 [label:protected] => Carpet Layer [alreadyInSave:protected] => [alreadyInValidation:protected] => [validationFailures:protected] => Array ( ) [_new:BaseObject:private] => [_deleted:BaseObject:private] => [modifiedColumns:protected] => Array ( ) ) [51] => Category Object ( [languages:protected] => [bok_resources:protected] => [bok_topics:protected] => [bok_keywords:protected] => [id:protected] => 51 [type:protected] => category [parent:protected] => 2 [label:protected] => Cement Mason [alreadyInSave:protected] => [alreadyInValidation:protected] => [validationFailures:protected] => Array ( ) [_new:BaseObject:private] => [_deleted:BaseObject:private] => [modifiedColumns:protected] => Array ( ) ) [52] => Category Object ( [languages:protected] => [bok_resources:protected] => [bok_topics:protected] => [bok_keywords:protected] => [id:protected] => 52 [type:protected] => category [parent:protected] => 2 [label:protected] => Commercial Diver [alreadyInSave:protected] => [alreadyInValidation:protected] => [validationFailures:protected] => Array ( ) [_new:BaseObject:private] => [_deleted:BaseObject:private] => [modifiedColumns:protected] => Array ( ) ) [53] => Category Object ( [languages:protected] => [bok_resources:protected] => [bok_topics:protected] => [bok_keywords:protected] => [id:protected] => 53 [type:protected] => category [parent:protected] => 2 [label:protected] => Concrete Polisher [alreadyInSave:protected] => [alreadyInValidation:protected] => [validationFailures:protected] => Array ( ) [_new:BaseObject:private] => [_deleted:BaseObject:private] => [modifiedColumns:protected] => Array ( ) ) [54] => Category Object ( [languages:protected] => [bok_resources:protected] => [bok_topics:protected] => [bok_keywords:protected] => [id:protected] => 54 [type:protected] => category [parent:protected] => 2 [label:protected] => Drywall Applicator Specialist [alreadyInSave:protected] => [alreadyInValidation:protected] => [validationFailures:protected] => Array ( ) [_new:BaseObject:private] => [_deleted:BaseObject:private] => [modifiedColumns:protected] => Array ( ) ) [55] => Category Object ( [languages:protected] => [bok_resources:protected] => [bok_topics:protected] => [bok_keywords:protected] => [id:protected] => 55 [type:protected] => category [parent:protected] => 2 [label:protected] => Electrical Worker [alreadyInSave:protected] => [alreadyInValidation:protected] => [validationFailures:protected] => Array ( ) [_new:BaseObject:private] => [_deleted:BaseObject:private] => [modifiedColumns:protected] => Array ( ) ) [56] => Category Object ( [languages:protected] => [bok_resources:protected] => [bok_topics:protected] => [bok_keywords:protected] => [id:protected] => 56 [type:protected] => category [parent:protected] => 2 [label:protected] => Elevator Constructor [alreadyInSave:protected] => [alreadyInValidation:protected] => [validationFailures:protected] => Array ( ) [_new:BaseObject:private] => [_deleted:BaseObject:private] => [modifiedColumns:protected] => Array ( ) ) [57] => Category Object ( [languages:protected] => [bok_resources:protected] => [bok_topics:protected] => [bok_keywords:protected] => [id:protected] => 57 [type:protected] => category [parent:protected] => 2 [label:protected] => Flagger [alreadyInSave:protected] => [alreadyInValidation:protected] => [validationFailures:protected] => Array ( ) [_new:BaseObject:private] => [_deleted:BaseObject:private] => [modifiedColumns:protected] => Array ( ) ) [58] => Category Object ( [languages:protected] => [bok_resources:protected] => [bok_topics:protected] => [bok_keywords:protected] => [id:protected] => 58 [type:protected] => category [parent:protected] => 2 [label:protected] => Glazier [alreadyInSave:protected] => [alreadyInValidation:protected] => [validationFailures:protected] => Array ( ) [_new:BaseObject:private] => [_deleted:BaseObject:private] => [modifiedColumns:protected] => Array ( ) ) [59] => Category Object ( [languages:protected] => [bok_resources:protected] => [bok_topics:protected] => [bok_keywords:protected] => [id:protected] => 59 [type:protected] => category [parent:protected] => 2 [label:protected] => Hazardous Waste Cleanup [alreadyInSave:protected] => [alreadyInValidation:protected] => [validationFailures:protected] => Array ( ) [_new:BaseObject:private] => [_deleted:BaseObject:private] => [modifiedColumns:protected] => Array ( ) ) [60] => Category Object ( [languages:protected] => [bok_resources:protected] => [bok_topics:protected] => [bok_keywords:protected] => [id:protected] => 60 [type:protected] => category [parent:protected] => 2 [label:protected] => HVAC [alreadyInSave:protected] => [alreadyInValidation:protected] => [validationFailures:protected] => Array ( ) [_new:BaseObject:private] => [_deleted:BaseObject:private] => [modifiedColumns:protected] => Array ( ) ) [61] => Category Object ( [languages:protected] => [bok_resources:protected] => [bok_topics:protected] => [bok_keywords:protected] => [id:protected] => 61 [type:protected] => category [parent:protected] => 2 [label:protected] => Interior Systems Carpenter [alreadyInSave:protected] => [alreadyInValidation:protected] => [validationFailures:protected] => Array ( ) [_new:BaseObject:private] => [_deleted:BaseObject:private] => [modifiedColumns:protected] => Array ( ) ) [64] => Category Object ( [languages:protected] => [bok_resources:protected] => [bok_topics:protected] => [bok_keywords:protected] => [id:protected] => 64 [type:protected] => category [parent:protected] => 2 [label:protected] => Laborer [alreadyInSave:protected] => [alreadyInValidation:protected] => [validationFailures:protected] => Array ( ) [_new:BaseObject:private] => [_deleted:BaseObject:private] => [modifiedColumns:protected] => Array ( ) ) [65] => Category Object ( [languages:protected] => [bok_resources:protected] => [bok_topics:protected] => [bok_keywords:protected] => [id:protected] => 65 [type:protected] => category [parent:protected] => 2 [label:protected] => Landscaper [alreadyInSave:protected] => [alreadyInValidation:protected] => [validationFailures:protected] => Array ( ) [_new:BaseObject:private] => [_deleted:BaseObject:private] => [modifiedColumns:protected] => Array ( ) ) [66] => Category Object ( [languages:protected] => [bok_resources:protected] => [bok_topics:protected] => [bok_keywords:protected] => [id:protected] => 66 [type:protected] => category [parent:protected] => 2 [label:protected] => Lather [alreadyInSave:protected] => [alreadyInValidation:protected] => [validationFailures:protected] => Array ( ) [_new:BaseObject:private] => [_deleted:BaseObject:private] => [modifiedColumns:protected] => Array ( ) ) [67] => Category Object ( [languages:protected] => [bok_resources:protected] => [bok_topics:protected] => [bok_keywords:protected] => [id:protected] => 67 [type:protected] => category [parent:protected] => 2 [label:protected] => Lead Abatement Worker [alreadyInSave:protected] => [alreadyInValidation:protected] => [validationFailures:protected] => Array ( ) [_new:BaseObject:private] => [_deleted:BaseObject:private] => [modifiedColumns:protected] => Array ( ) ) [68] => Category Object ( [languages:protected] => [bok_resources:protected] => [bok_topics:protected] => [bok_keywords:protected] => [id:protected] => 68 [type:protected] => category [parent:protected] => 2 [label:protected] => Maintenance Worker [alreadyInSave:protected] => [alreadyInValidation:protected] => [validationFailures:protected] => Array ( ) [_new:BaseObject:private] => [_deleted:BaseObject:private] => [modifiedColumns:protected] => Array ( ) ) [69] => Category Object ( [languages:protected] => [bok_resources:protected] => [bok_topics:protected] => [bok_keywords:protected] => [id:protected] => 69 [type:protected] => category [parent:protected] => 2 [label:protected] => Millwright [alreadyInSave:protected] => [alreadyInValidation:protected] => [validationFailures:protected] => Array ( ) [_new:BaseObject:private] => [_deleted:BaseObject:private] => [modifiedColumns:protected] => Array ( ) ) [70] => Category Object ( [languages:protected] => [bok_resources:protected] => [bok_topics:protected] => [bok_keywords:protected] => [id:protected] => 70 [type:protected] => category [parent:protected] => 2 [label:protected] => Operating Engineer [alreadyInSave:protected] => [alreadyInValidation:protected] => [validationFailures:protected] => Array ( ) [_new:BaseObject:private] => [_deleted:BaseObject:private] => [modifiedColumns:protected] => Array ( ) ) [71] => Category Object ( [languages:protected] => [bok_resources:protected] => [bok_topics:protected] => [bok_keywords:protected] => [id:protected] => 71 [type:protected] => category [parent:protected] => 2 [label:protected] => Painter [alreadyInSave:protected] => [alreadyInValidation:protected] => [validationFailures:protected] => Array ( ) [_new:BaseObject:private] => [_deleted:BaseObject:private] => [modifiedColumns:protected] => Array ( ) ) [72] => Category Object ( [languages:protected] => [bok_resources:protected] => [bok_topics:protected] => [bok_keywords:protected] => [id:protected] => 72 [type:protected] => category [parent:protected] => 2 [label:protected] => Paper Hanger [alreadyInSave:protected] => [alreadyInValidation:protected] => [validationFailures:protected] => Array ( ) [_new:BaseObject:private] => [_deleted:BaseObject:private] => [modifiedColumns:protected] => Array ( ) ) [73] => Category Object ( [languages:protected] => [bok_resources:protected] => [bok_topics:protected] => [bok_keywords:protected] => [id:protected] => 73 [type:protected] => category [parent:protected] => 2 [label:protected] => PCC/Restoration [alreadyInSave:protected] => [alreadyInValidation:protected] => [validationFailures:protected] => Array ( ) [_new:BaseObject:private] => [_deleted:BaseObject:private] => [modifiedColumns:protected] => Array ( ) ) [74] => Category Object ( [languages:protected] => [bok_resources:protected] => [bok_topics:protected] => [bok_keywords:protected] => [id:protected] => 74 [type:protected] => category [parent:protected] => 2 [label:protected] => Pile Driver [alreadyInSave:protected] => [alreadyInValidation:protected] => [validationFailures:protected] => Array ( ) [_new:BaseObject:private] => [_deleted:BaseObject:private] => [modifiedColumns:protected] => Array ( ) ) [75] => Category Object ( [languages:protected] => [bok_resources:protected] => [bok_topics:protected] => [bok_keywords:protected] => [id:protected] => 75 [type:protected] => category [parent:protected] => 2 [label:protected] => Plasterer [alreadyInSave:protected] => [alreadyInValidation:protected] => [validationFailures:protected] => Array ( ) [_new:BaseObject:private] => [_deleted:BaseObject:private] => [modifiedColumns:protected] => Array ( ) ) [76] => Category Object ( [languages:protected] => [bok_resources:protected] => [bok_topics:protected] => [bok_keywords:protected] => [id:protected] => 76 [type:protected] => category [parent:protected] => 2 [label:protected] => Plumber/Pipefitter [alreadyInSave:protected] => [alreadyInValidation:protected] => [validationFailures:protected] => Array ( ) [_new:BaseObject:private] => [_deleted:BaseObject:private] => [modifiedColumns:protected] => Array ( ) ) [77] => Category Object ( [languages:protected] => [bok_resources:protected] => [bok_topics:protected] => [bok_keywords:protected] => [id:protected] => 77 [type:protected] => category [parent:protected] => 2 [label:protected] => Refractory Worker [alreadyInSave:protected] => [alreadyInValidation:protected] => [validationFailures:protected] => Array ( ) [_new:BaseObject:private] => [_deleted:BaseObject:private] => [modifiedColumns:protected] => Array ( ) ) [63] => Category Object ( [languages:protected] => [bok_resources:protected] => [bok_topics:protected] => [bok_keywords:protected] => [id:protected] => 63 [type:protected] => category [parent:protected] => 2 [label:protected] => Reinforcing Ironworker [alreadyInSave:protected] => [alreadyInValidation:protected] => [validationFailures:protected] => Array ( ) [_new:BaseObject:private] => [_deleted:BaseObject:private] => [modifiedColumns:protected] => Array ( ) ) [78] => Category Object ( [languages:protected] => [bok_resources:protected] => [bok_topics:protected] => [bok_keywords:protected] => [id:protected] => 78 [type:protected] => category [parent:protected] => 2 [label:protected] => Roofer/Waterproofer [alreadyInSave:protected] => [alreadyInValidation:protected] => [validationFailures:protected] => Array ( ) [_new:BaseObject:private] => [_deleted:BaseObject:private] => [modifiedColumns:protected] => Array ( ) ) [79] => Category Object ( [languages:protected] => [bok_resources:protected] => [bok_topics:protected] => [bok_keywords:protected] => [id:protected] => 79 [type:protected] => category [parent:protected] => 2 [label:protected] => Scaffold Erector [alreadyInSave:protected] => [alreadyInValidation:protected] => [validationFailures:protected] => Array ( ) [_new:BaseObject:private] => [_deleted:BaseObject:private] => [modifiedColumns:protected] => Array ( ) ) [80] => Category Object ( [languages:protected] => [bok_resources:protected] => [bok_topics:protected] => [bok_keywords:protected] => [id:protected] => 80 [type:protected] => category [parent:protected] => 2 [label:protected] => Sheetmetal Worker [alreadyInSave:protected] => [alreadyInValidation:protected] => [validationFailures:protected] => Array ( ) [_new:BaseObject:private] => [_deleted:BaseObject:private] => [modifiedColumns:protected] => Array ( ) ) [81] => Category Object ( [languages:protected] => [bok_resources:protected] => [bok_topics:protected] => [bok_keywords:protected] => [id:protected] => 81 [type:protected] => category [parent:protected] => 2 [label:protected] => Sprinkler Fitter [alreadyInSave:protected] => [alreadyInValidation:protected] => [validationFailures:protected] => Array ( ) [_new:BaseObject:private] => [_deleted:BaseObject:private] => [modifiedColumns:protected] => Array ( ) ) [82] => Category Object ( [languages:protected] => [bok_resources:protected] => [bok_topics:protected] => [bok_keywords:protected] => [id:protected] => 82 [type:protected] => category [parent:protected] => 2 [label:protected] => Stonemason [alreadyInSave:protected] => [alreadyInValidation:protected] => [validationFailures:protected] => Array ( ) [_new:BaseObject:private] => [_deleted:BaseObject:private] => [modifiedColumns:protected] => Array ( ) ) [62] => Category Object ( [languages:protected] => [bok_resources:protected] => [bok_topics:protected] => [bok_keywords:protected] => [id:protected] => 62 [type:protected] => category [parent:protected] => 2 [label:protected] => Structural Ironworker [alreadyInSave:protected] => [alreadyInValidation:protected] => [validationFailures:protected] => Array ( ) [_new:BaseObject:private] => [_deleted:BaseObject:private] => [modifiedColumns:protected] => Array ( ) ) [83] => Category Object ( [languages:protected] => [bok_resources:protected] => [bok_topics:protected] => [bok_keywords:protected] => [id:protected] => 83 [type:protected] => category [parent:protected] => 2 [label:protected] => Terrazzo Worker [alreadyInSave:protected] => [alreadyInValidation:protected] => [validationFailures:protected] => Array ( ) [_new:BaseObject:private] => [_deleted:BaseObject:private] => [modifiedColumns:protected] => Array ( ) ) [84] => Category Object ( [languages:protected] => [bok_resources:protected] => [bok_topics:protected] => [bok_keywords:protected] => [id:protected] => 84 [type:protected] => category [parent:protected] => 2 [label:protected] => Tile Setter [alreadyInSave:protected] => [alreadyInValidation:protected] => [validationFailures:protected] => Array ( ) [_new:BaseObject:private] => [_deleted:BaseObject:private] => [modifiedColumns:protected] => Array ( ) ) [85] => Category Object ( [languages:protected] => [bok_resources:protected] => [bok_topics:protected] => [bok_keywords:protected] => [id:protected] => 85 [type:protected] => category [parent:protected] => 2 [label:protected] => Truck Driver [alreadyInSave:protected] => [alreadyInValidation:protected] => [validationFailures:protected] => Array ( ) [_new:BaseObject:private] => [_deleted:BaseObject:private] => [modifiedColumns:protected] => Array ( ) ) [86] => Category Object ( [languages:protected] => [bok_resources:protected] => [bok_topics:protected] => [bok_keywords:protected] => [id:protected] => 86 [type:protected] => category [parent:protected] => 2 [label:protected] => Welder [alreadyInSave:protected] => [alreadyInValidation:protected] => [validationFailures:protected] => Array ( ) [_new:BaseObject:private] => [_deleted:BaseObject:private] => [modifiedColumns:protected] => Array ( ) ) [87] => Category Object ( [languages:protected] => [bok_resources:protected] => [bok_topics:protected] => [bok_keywords:protected] => [id:protected] => 87 [type:protected] => category [parent:protected] => 3 [label:protected] => Commercial & Institutional [alreadyInSave:protected] => [alreadyInValidation:protected] => [validationFailures:protected] => Array ( ) [_new:BaseObject:private] => [_deleted:BaseObject:private] => [modifiedColumns:protected] => Array ( ) ) [88] => Category Object ( [languages:protected] => [bok_resources:protected] => [bok_topics:protected] => [bok_keywords:protected] => [id:protected] => 88 [type:protected] => category [parent:protected] => 3 [label:protected] => Demolition [alreadyInSave:protected] => [alreadyInValidation:protected] => [validationFailures:protected] => Array ( ) [_new:BaseObject:private] => [_deleted:BaseObject:private] => [modifiedColumns:protected] => Array ( ) ) [89] => Category Object ( [languages:protected] => [bok_resources:protected] => [bok_topics:protected] => [bok_keywords:protected] => [id:protected] => 89 [type:protected] => category [parent:protected] => 3 [label:protected] => Disasters [alreadyInSave:protected] => [alreadyInValidation:protected] => [validationFailures:protected] => Array ( ) [_new:BaseObject:private] => [_deleted:BaseObject:private] => [modifiedColumns:protected] => Array ( ) ) [91] => Category Object ( [languages:protected] => [bok_resources:protected] => [bok_topics:protected] => [bok_keywords:protected] => [id:protected] => 91 [type:protected] => category [parent:protected] => 3 [label:protected] => Heavy & Highway [alreadyInSave:protected] => [alreadyInValidation:protected] => [validationFailures:protected] => Array ( ) [_new:BaseObject:private] => [_deleted:BaseObject:private] => [modifiedColumns:protected] => Array ( ) ) [90] => Category Object ( [languages:protected] => [bok_resources:protected] => [bok_topics:protected] => [bok_keywords:protected] => [id:protected] => 90 [type:protected] => category [parent:protected] => 3 [label:protected] => Industrial [alreadyInSave:protected] => [alreadyInValidation:protected] => [validationFailures:protected] => Array ( ) [_new:BaseObject:private] => [_deleted:BaseObject:private] => [modifiedColumns:protected] => Array ( ) ) [92] => Category Object ( [languages:protected] => [bok_resources:protected] => [bok_topics:protected] => [bok_keywords:protected] => [id:protected] => 92 [type:protected] => category [parent:protected] => 3 [label:protected] => LEED/Green Construction [alreadyInSave:protected] => [alreadyInValidation:protected] => [validationFailures:protected] => Array ( ) [_new:BaseObject:private] => [_deleted:BaseObject:private] => [modifiedColumns:protected] => Array ( ) ) [93] => Category Object ( [languages:protected] => [bok_resources:protected] => [bok_topics:protected] => [bok_keywords:protected] => [id:protected] => 93 [type:protected] => category [parent:protected] => 3 [label:protected] => Renovations [alreadyInSave:protected] => [alreadyInValidation:protected] => [validationFailures:protected] => Array ( ) [_new:BaseObject:private] => [_deleted:BaseObject:private] => [modifiedColumns:protected] => Array ( ) ) [94] => Category Object ( [languages:protected] => [bok_resources:protected] => [bok_topics:protected] => [bok_keywords:protected] => [id:protected] => 94 [type:protected] => category [parent:protected] => 3 [label:protected] => Residential [alreadyInSave:protected] => [alreadyInValidation:protected] => [validationFailures:protected] => Array ( ) [_new:BaseObject:private] => [_deleted:BaseObject:private] => [modifiedColumns:protected] => Array ( ) ) [95] => Category Object ( [languages:protected] => [bok_resources:protected] => [bok_topics:protected] => [bok_keywords:protected] => [id:protected] => 95 [type:protected] => category [parent:protected] => 3 [label:protected] => Underground [alreadyInSave:protected] => [alreadyInValidation:protected] => [validationFailures:protected] => Array ( ) [_new:BaseObject:private] => [_deleted:BaseObject:private] => [modifiedColumns:protected] => Array ( ) ) ) [categories_initialized:protected] => 1 [mapped_items:protected] => [content:protected] => [files:protected] => [language:protected] => Language Object ( [id:protected] => 1 [code:protected] => en [name:protected] => English [alreadyInSave:protected] => [alreadyInValidation:protected] => [validationFailures:protected] => Array ( ) [_new:BaseObject:private] => [_deleted:BaseObject:private] => [modifiedColumns:protected] => Array ( ) ) [old_record:protected] => [id:protected] => 4426 [old_id:protected] => [elcosh_id:protected] => d001656 [type:protected] => document [display_type:protected] => HTML only (and links) [user_id:protected] => 0 [language_id:protected] => 1 [tagging_id:protected] => Mike Aguilar [priority_id:protected] => 1 [title:protected] => Construction Dive -- DeWalt's Jobsite Pro headphones recalled for fire hazards [total_pages:protected] => 1 [billed_pages:protected] => 1 [publication_number:protected] => [part_of:protected] => [keywords:protected] => DeWalt, Fire Hazards, recall, headphones [comments:protected] => [summary:protected] => A recall notice by the United States Consumer Product Safety Commission affects over 300,000 DeWalt Jobsite Pro Headphones. The recall is a result of a malfunction that can cause earbuds to overheat while charging or during use, leading to fire and burn hazards. [transition_comments:protected] => [external_link:protected] => https://www.constructiondive.com/news/dewalts-jobsite-pro-headphones-recalled-for-fire-hazards/611248/?utm_source=Sailthru&utm_medium=email&utm_campaign=Issue:%202021-12-10%20Construction%20Dive%20Newsletter%20%5Bissue:38532%5D&utm_term=Construction%20Dive [consol_link:protected] => [more_like_this:protected] => [permission_given_by:protected] => [published:protected] => T [billable:protected] => F [img_name:protected] => [img_ext:protected] => [img_width:protected] => [img_height:protected] => [img_credit:protected] => [img_practice:protected] => [vid_source_id:protected] => [vid_running_time:protected] => [vid_intended_audience:protected] => [vid_acquisition_info:protected] => [vid_cost:protected] => [vid_producer:protected] => [vid_filename:protected] => [vid_filename_downloadable:protected] => [date_summary:protected] => [date_permission_requested:protected] => [date_permission_received:protected] => [date_review_needed:protected] => [date_received:protected] => 12/13/21 [date_completed:protected] => 12/13/21 [date_billed:protected] => [date_modified:protected] => 12/13/21 [collBokExports:protected] => [lastBokExportCriteria:BaseElcoshItem:private] => [alreadyInSave:protected] => [alreadyInValidation:protected] => [validationFailures:protected] => Array ( ) [_new:BaseObject:private] => [_deleted:BaseObject:private] => [modifiedColumns:protected] => Array ( ) ) ) [3] => Search_Result Object ( [title] => Working in an Enclosed Cab [image] => /record/images/notavailable-p.png [blurb] => This CPWR Hazard Alert on Working in enclosed cabs provides information on protecting workers from silica dust, how to minimize exposures and the dang... [category] => Array ( [0] => 10 [1] => 16 [2] => 24 [3] => 37 [4] => 46 [5] => 48 [6] => 49 [7] => 51 [8] => 53 [9] => 54 [10] => 56 [11] => 58 [12] => 59 [13] => 60 [14] => 61 [15] => 64 [16] => 66 [17] => 68 [18] => 69 [19] => 71 [20] => 73 [21] => 74 [22] => 76 [23] => 77 [24] => 63 [25] => 80 [26] => 82 [27] => 62 [28] => 83 [29] => 84 [30] => 86 [31] => 88 [32] => 89 [33] => 95 [34] => 102 ) [labels] => Array ( [0] => Confined Spaces [1] => Work Environment [2] => Hazards [3] => Fire & Explosions [6] => Trenches & Excavations [9] => Silica /Construction Dust [10] => Inhalation/Skin Exposures [12] => Boilermaker [13] => Trades [14] => Cabinetmaker [16] => Carpenter [18] => Cement Mason [20] => Concrete Polisher [22] => Drywall Applicator Specialist [24] => Elevator Constructor [26] => Glazier [28] => Hazardous Waste Cleanup [30] => HVAC [32] => Interior Systems Carpenter [34] => Laborer [36] => Lather [38] => Maintenance Worker [40] => Millwright [42] => Painter [44] => PCC/Restoration [46] => Pile Driver [48] => Plumber/Pipefitter [50] => Refractory Worker [52] => Reinforcing Ironworker [54] => Sheetmetal Worker [56] => Stonemason [58] => Structural Ironworker [60] => Terrazzo Worker [62] => Tile Setter [64] => Welder [66] => Demolition [67] => Jobsites [68] => Disasters [70] => Underground [72] => Handouts [73] => Documents [74] => Media & Documents ) [type] => Handouts [sub_category] => [url] => /document/4415/d001651/Working%2Bin%2Ban%2BEnclosed%2BCab.html [item:protected] => DocumentRecord Object ( [records:protected] => Array ( ) [recordId:protected] => [searchWordClass:protected] => [searchWordPeerClass:protected] => [bok_record:protected] => [authors:protected] => [organizations:protected] => [collections:protected] => [categories:protected] => Array ( [10] => Category Object ( [languages:protected] => [bok_resources:protected] => [bok_topics:protected] => [bok_keywords:protected] => [id:protected] => 10 [type:protected] => category [parent:protected] => 7 [label:protected] => Confined Spaces [alreadyInSave:protected] => [alreadyInValidation:protected] => [validationFailures:protected] => Array ( ) [_new:BaseObject:private] => [_deleted:BaseObject:private] => [modifiedColumns:protected] => Array ( ) ) [16] => Category Object ( [languages:protected] => [bok_resources:protected] => [bok_topics:protected] => [bok_keywords:protected] => [id:protected] => 16 [type:protected] => category [parent:protected] => 7 [label:protected] => Fire & Explosions [alreadyInSave:protected] => [alreadyInValidation:protected] => [validationFailures:protected] => Array ( ) [_new:BaseObject:private] => [_deleted:BaseObject:private] => [modifiedColumns:protected] => Array ( ) ) [24] => Category Object ( [languages:protected] => [bok_resources:protected] => [bok_topics:protected] => [bok_keywords:protected] => [id:protected] => 24 [type:protected] => category [parent:protected] => 7 [label:protected] => Trenches & Excavations [alreadyInSave:protected] => [alreadyInValidation:protected] => [validationFailures:protected] => Array ( ) [_new:BaseObject:private] => [_deleted:BaseObject:private] => [modifiedColumns:protected] => Array ( ) ) [37] => Category Object ( [languages:protected] => [bok_resources:protected] => [bok_topics:protected] => [bok_keywords:protected] => [id:protected] => 37 [type:protected] => category [parent:protected] => 8 [label:protected] => Silica /Construction Dust [alreadyInSave:protected] => [alreadyInValidation:protected] => [validationFailures:protected] => Array ( ) [_new:BaseObject:private] => [_deleted:BaseObject:private] => [modifiedColumns:protected] => Array ( ) ) [46] => Category Object ( [languages:protected] => [bok_resources:protected] => [bok_topics:protected] => [bok_keywords:protected] => [id:protected] => 46 [type:protected] => category [parent:protected] => 2 [label:protected] => Boilermaker [alreadyInSave:protected] => [alreadyInValidation:protected] => [validationFailures:protected] => Array ( ) [_new:BaseObject:private] => [_deleted:BaseObject:private] => [modifiedColumns:protected] => Array ( ) ) [48] => Category Object ( [languages:protected] => [bok_resources:protected] => [bok_topics:protected] => [bok_keywords:protected] => [id:protected] => 48 [type:protected] => category [parent:protected] => 2 [label:protected] => Cabinetmaker [alreadyInSave:protected] => [alreadyInValidation:protected] => [validationFailures:protected] => Array ( ) [_new:BaseObject:private] => [_deleted:BaseObject:private] => [modifiedColumns:protected] => Array ( ) ) [49] => Category Object ( [languages:protected] => [bok_resources:protected] => [bok_topics:protected] => [bok_keywords:protected] => [id:protected] => 49 [type:protected] => category [parent:protected] => 2 [label:protected] => Carpenter [alreadyInSave:protected] => [alreadyInValidation:protected] => [validationFailures:protected] => Array ( ) [_new:BaseObject:private] => [_deleted:BaseObject:private] => [modifiedColumns:protected] => Array ( ) ) [51] => Category Object ( [languages:protected] => [bok_resources:protected] => [bok_topics:protected] => [bok_keywords:protected] => [id:protected] => 51 [type:protected] => category [parent:protected] => 2 [label:protected] => Cement Mason [alreadyInSave:protected] => [alreadyInValidation:protected] => [validationFailures:protected] => Array ( ) [_new:BaseObject:private] => [_deleted:BaseObject:private] => [modifiedColumns:protected] => Array ( ) ) [53] => Category Object ( [languages:protected] => [bok_resources:protected] => [bok_topics:protected] => [bok_keywords:protected] => [id:protected] => 53 [type:protected] => category [parent:protected] => 2 [label:protected] => Concrete Polisher [alreadyInSave:protected] => [alreadyInValidation:protected] => [validationFailures:protected] => Array ( ) [_new:BaseObject:private] => [_deleted:BaseObject:private] => [modifiedColumns:protected] => Array ( ) ) [54] => Category Object ( [languages:protected] => [bok_resources:protected] => [bok_topics:protected] => [bok_keywords:protected] => [id:protected] => 54 [type:protected] => category [parent:protected] => 2 [label:protected] => Drywall Applicator Specialist [alreadyInSave:protected] => [alreadyInValidation:protected] => [validationFailures:protected] => Array ( ) [_new:BaseObject:private] => [_deleted:BaseObject:private] => [modifiedColumns:protected] => Array ( ) ) [56] => Category Object ( [languages:protected] => [bok_resources:protected] => [bok_topics:protected] => [bok_keywords:protected] => [id:protected] => 56 [type:protected] => category [parent:protected] => 2 [label:protected] => Elevator Constructor [alreadyInSave:protected] => [alreadyInValidation:protected] => [validationFailures:protected] => Array ( ) [_new:BaseObject:private] => [_deleted:BaseObject:private] => [modifiedColumns:protected] => Array ( ) ) [58] => Category Object ( [languages:protected] => [bok_resources:protected] => [bok_topics:protected] => [bok_keywords:protected] => [id:protected] => 58 [type:protected] => category [parent:protected] => 2 [label:protected] => Glazier [alreadyInSave:protected] => [alreadyInValidation:protected] => [validationFailures:protected] => Array ( ) [_new:BaseObject:private] => [_deleted:BaseObject:private] => [modifiedColumns:protected] => Array ( ) ) [59] => Category Object ( [languages:protected] => [bok_resources:protected] => [bok_topics:protected] => [bok_keywords:protected] => [id:protected] => 59 [type:protected] => category [parent:protected] => 2 [label:protected] => Hazardous Waste Cleanup [alreadyInSave:protected] => [alreadyInValidation:protected] => [validationFailures:protected] => Array ( ) [_new:BaseObject:private] => [_deleted:BaseObject:private] => [modifiedColumns:protected] => Array ( ) ) [60] => Category Object ( [languages:protected] => [bok_resources:protected] => [bok_topics:protected] => [bok_keywords:protected] => [id:protected] => 60 [type:protected] => category [parent:protected] => 2 [label:protected] => HVAC [alreadyInSave:protected] => [alreadyInValidation:protected] => [validationFailures:protected] => Array ( ) [_new:BaseObject:private] => [_deleted:BaseObject:private] => [modifiedColumns:protected] => Array ( ) ) [61] => Category Object ( [languages:protected] => [bok_resources:protected] => [bok_topics:protected] => [bok_keywords:protected] => [id:protected] => 61 [type:protected] => category [parent:protected] => 2 [label:protected] => Interior Systems Carpenter [alreadyInSave:protected] => [alreadyInValidation:protected] => [validationFailures:protected] => Array ( ) [_new:BaseObject:private] => [_deleted:BaseObject:private] => [modifiedColumns:protected] => Array ( ) ) [64] => Category Object ( [languages:protected] => [bok_resources:protected] => [bok_topics:protected] => [bok_keywords:protected] => [id:protected] => 64 [type:protected] => category [parent:protected] => 2 [label:protected] => Laborer [alreadyInSave:protected] => [alreadyInValidation:protected] => [validationFailures:protected] => Array ( ) [_new:BaseObject:private] => [_deleted:BaseObject:private] => [modifiedColumns:protected] => Array ( ) ) [66] => Category Object ( [languages:protected] => [bok_resources:protected] => [bok_topics:protected] => [bok_keywords:protected] => [id:protected] => 66 [type:protected] => category [parent:protected] => 2 [label:protected] => Lather [alreadyInSave:protected] => [alreadyInValidation:protected] => [validationFailures:protected] => Array ( ) [_new:BaseObject:private] => [_deleted:BaseObject:private] => [modifiedColumns:protected] => Array ( ) ) [68] => Category Object ( [languages:protected] => [bok_resources:protected] => [bok_topics:protected] => [bok_keywords:protected] => [id:protected] => 68 [type:protected] => category [parent:protected] => 2 [label:protected] => Maintenance Worker [alreadyInSave:protected] => [alreadyInValidation:protected] => [validationFailures:protected] => Array ( ) [_new:BaseObject:private] => [_deleted:BaseObject:private] => [modifiedColumns:protected] => Array ( ) ) [69] => Category Object ( [languages:protected] => [bok_resources:protected] => [bok_topics:protected] => [bok_keywords:protected] => [id:protected] => 69 [type:protected] => category [parent:protected] => 2 [label:protected] => Millwright [alreadyInSave:protected] => [alreadyInValidation:protected] => [validationFailures:protected] => Array ( ) [_new:BaseObject:private] => [_deleted:BaseObject:private] => [modifiedColumns:protected] => Array ( ) ) [71] => Category Object ( [languages:protected] => [bok_resources:protected] => [bok_topics:protected] => [bok_keywords:protected] => [id:protected] => 71 [type:protected] => category [parent:protected] => 2 [label:protected] => Painter [alreadyInSave:protected] => [alreadyInValidation:protected] => [validationFailures:protected] => Array ( ) [_new:BaseObject:private] => [_deleted:BaseObject:private] => [modifiedColumns:protected] => Array ( ) ) [73] => Category Object ( [languages:protected] => [bok_resources:protected] => [bok_topics:protected] => [bok_keywords:protected] => [id:protected] => 73 [type:protected] => category [parent:protected] => 2 [label:protected] => PCC/Restoration [alreadyInSave:protected] => [alreadyInValidation:protected] => [validationFailures:protected] => Array ( ) [_new:BaseObject:private] => [_deleted:BaseObject:private] => [modifiedColumns:protected] => Array ( ) ) [74] => Category Object ( [languages:protected] => [bok_resources:protected] => [bok_topics:protected] => [bok_keywords:protected] => [id:protected] => 74 [type:protected] => category [parent:protected] => 2 [label:protected] => Pile Driver [alreadyInSave:protected] => [alreadyInValidation:protected] => [validationFailures:protected] => Array ( ) [_new:BaseObject:private] => [_deleted:BaseObject:private] => [modifiedColumns:protected] => Array ( ) ) [76] => Category Object ( [languages:protected] => [bok_resources:protected] => [bok_topics:protected] => [bok_keywords:protected] => [id:protected] => 76 [type:protected] => category [parent:protected] => 2 [label:protected] => Plumber/Pipefitter [alreadyInSave:protected] => [alreadyInValidation:protected] => [validationFailures:protected] => Array ( ) [_new:BaseObject:private] => [_deleted:BaseObject:private] => [modifiedColumns:protected] => Array ( ) ) [77] => Category Object ( [languages:protected] => [bok_resources:protected] => [bok_topics:protected] => [bok_keywords:protected] => [id:protected] => 77 [type:protected] => category [parent:protected] => 2 [label:protected] => Refractory Worker [alreadyInSave:protected] => [alreadyInValidation:protected] => [validationFailures:protected] => Array ( ) [_new:BaseObject:private] => [_deleted:BaseObject:private] => [modifiedColumns:protected] => Array ( ) ) [63] => Category Object ( [languages:protected] => [bok_resources:protected] => [bok_topics:protected] => [bok_keywords:protected] => [id:protected] => 63 [type:protected] => category [parent:protected] => 2 [label:protected] => Reinforcing Ironworker [alreadyInSave:protected] => [alreadyInValidation:protected] => [validationFailures:protected] => Array ( ) [_new:BaseObject:private] => [_deleted:BaseObject:private] => [modifiedColumns:protected] => Array ( ) ) [80] => Category Object ( [languages:protected] => [bok_resources:protected] => [bok_topics:protected] => [bok_keywords:protected] => [id:protected] => 80 [type:protected] => category [parent:protected] => 2 [label:protected] => Sheetmetal Worker [alreadyInSave:protected] => [alreadyInValidation:protected] => [validationFailures:protected] => Array ( ) [_new:BaseObject:private] => [_deleted:BaseObject:private] => [modifiedColumns:protected] => Array ( ) ) [82] => Category Object ( [languages:protected] => [bok_resources:protected] => [bok_topics:protected] => [bok_keywords:protected] => [id:protected] => 82 [type:protected] => category [parent:protected] => 2 [label:protected] => Stonemason [alreadyInSave:protected] => [alreadyInValidation:protected] => [validationFailures:protected] => Array ( ) [_new:BaseObject:private] => [_deleted:BaseObject:private] => [modifiedColumns:protected] => Array ( ) ) [62] => Category Object ( [languages:protected] => [bok_resources:protected] => [bok_topics:protected] => [bok_keywords:protected] => [id:protected] => 62 [type:protected] => category [parent:protected] => 2 [label:protected] => Structural Ironworker [alreadyInSave:protected] => [alreadyInValidation:protected] => [validationFailures:protected] => Array ( ) [_new:BaseObject:private] => [_deleted:BaseObject:private] => [modifiedColumns:protected] => Array ( ) ) [83] => Category Object ( [languages:protected] => [bok_resources:protected] => [bok_topics:protected] => [bok_keywords:protected] => [id:protected] => 83 [type:protected] => category [parent:protected] => 2 [label:protected] => Terrazzo Worker [alreadyInSave:protected] => [alreadyInValidation:protected] => [validationFailures:protected] => Array ( ) [_new:BaseObject:private] => [_deleted:BaseObject:private] => [modifiedColumns:protected] => Array ( ) ) [84] => Category Object ( [languages:protected] => [bok_resources:protected] => [bok_topics:protected] => [bok_keywords:protected] => [id:protected] => 84 [type:protected] => category [parent:protected] => 2 [label:protected] => Tile Setter [alreadyInSave:protected] => [alreadyInValidation:protected] => [validationFailures:protected] => Array ( ) [_new:BaseObject:private] => [_deleted:BaseObject:private] => [modifiedColumns:protected] => Array ( ) ) [86] => Category Object ( [languages:protected] => [bok_resources:protected] => [bok_topics:protected] => [bok_keywords:protected] => [id:protected] => 86 [type:protected] => category [parent:protected] => 2 [label:protected] => Welder [alreadyInSave:protected] => [alreadyInValidation:protected] => [validationFailures:protected] => Array ( ) [_new:BaseObject:private] => [_deleted:BaseObject:private] => [modifiedColumns:protected] => Array ( ) ) [88] => Category Object ( [languages:protected] => [bok_resources:protected] => [bok_topics:protected] => [bok_keywords:protected] => [id:protected] => 88 [type:protected] => category [parent:protected] => 3 [label:protected] => Demolition [alreadyInSave:protected] => [alreadyInValidation:protected] => [validationFailures:protected] => Array ( ) [_new:BaseObject:private] => [_deleted:BaseObject:private] => [modifiedColumns:protected] => Array ( ) ) [89] => Category Object ( [languages:protected] => [bok_resources:protected] => [bok_topics:protected] => [bok_keywords:protected] => [id:protected] => 89 [type:protected] => category [parent:protected] => 3 [label:protected] => Disasters [alreadyInSave:protected] => [alreadyInValidation:protected] => [validationFailures:protected] => Array ( ) [_new:BaseObject:private] => [_deleted:BaseObject:private] => [modifiedColumns:protected] => Array ( ) ) [95] => Category Object ( [languages:protected] => [bok_resources:protected] => [bok_topics:protected] => [bok_keywords:protected] => [id:protected] => 95 [type:protected] => category [parent:protected] => 3 [label:protected] => Underground [alreadyInSave:protected] => [alreadyInValidation:protected] => [validationFailures:protected] => Array ( ) [_new:BaseObject:private] => [_deleted:BaseObject:private] => [modifiedColumns:protected] => Array ( ) ) [102] => Category Object ( [languages:protected] => [bok_resources:protected] => [bok_topics:protected] => [bok_keywords:protected] => [id:protected] => 102 [type:protected] => category [parent:protected] => 6 [label:protected] => Handouts [alreadyInSave:protected] => [alreadyInValidation:protected] => [validationFailures:protected] => Array ( ) [_new:BaseObject:private] => [_deleted:BaseObject:private] => [modifiedColumns:protected] => Array ( ) ) ) [categories_initialized:protected] => 1 [mapped_items:protected] => [content:protected] => [files:protected] => [language:protected] => Language Object ( [id:protected] => 1 [code:protected] => en [name:protected] => English [alreadyInSave:protected] => [alreadyInValidation:protected] => [validationFailures:protected] => Array ( ) [_new:BaseObject:private] => [_deleted:BaseObject:private] => [modifiedColumns:protected] => Array ( ) ) [old_record:protected] => [id:protected] => 4415 [old_id:protected] => [elcosh_id:protected] => d001651 [type:protected] => document [display_type:protected] => HTML only (and links) [user_id:protected] => 0 [language_id:protected] => 1 [tagging_id:protected] => Valeria Contreras [priority_id:protected] => 1 [title:protected] => Working in an Enclosed Cab [total_pages:protected] => 1 [billed_pages:protected] => 1 [publication_number:protected] => [part_of:protected] => [keywords:protected] => Occupation, construction, safety, health, hazards, work, worker, workplace, OSHA, silicosis, mining, silica, DOE, EEOICPA, labor, lung, CBD, dust, cab, miner, mine [comments:protected] => [summary:protected] => This CPWR Hazard Alert on Working in enclosed cabs provides information on protecting workers from silica dust, how to minimize exposures and the dangers of silica dust. Click on the following links to access the English version and the Spanish version. [transition_comments:protected] => [external_link:protected] => [consol_link:protected] => [more_like_this:protected] => [permission_given_by:protected] => [published:protected] => T [billable:protected] => F [img_name:protected] => [img_ext:protected] => [img_width:protected] => [img_height:protected] => [img_credit:protected] => [img_practice:protected] => [vid_source_id:protected] => [vid_running_time:protected] => [vid_intended_audience:protected] => [vid_acquisition_info:protected] => [vid_cost:protected] => [vid_producer:protected] => [vid_filename:protected] => [vid_filename_downloadable:protected] => [date_summary:protected] => [date_permission_requested:protected] => [date_permission_received:protected] => [date_review_needed:protected] => [date_received:protected] => 10/08/20 [date_completed:protected] => 10/08/20 [date_billed:protected] => [date_modified:protected] => 10/08/20 [collBokExports:protected] => [lastBokExportCriteria:BaseElcoshItem:private] => [alreadyInSave:protected] => [alreadyInValidation:protected] => [validationFailures:protected] => Array ( ) [_new:BaseObject:private] => [_deleted:BaseObject:private] => [modifiedColumns:protected] => Array ( ) ) ) [4] => Search_Result Object ( [title] => Toolbox Talk: Suicide Prevention [image] => /record/images/notavailable-p.png [blurb] => The CPWR Toolbox Talk on Suicide Prevention addresses the prevalence of suicide among construction workers. The resource includes a brief case example... [category] => Array ( [0] => 13 [1] => 20 [2] => 23 [3] => 40 [4] => 44 [5] => 45 [6] => 46 [7] => 47 [8] => 48 [9] => 49 [10] => 50 [11] => 51 [12] => 52 [13] => 53 [14] => 54 [15] => 55 [16] => 56 [17] => 57 [18] => 58 [19] => 59 [20] => 60 [21] => 61 [22] => 64 [23] => 65 [24] => 66 [25] => 67 [26] => 68 [27] => 69 [28] => 70 [29] => 71 [30] => 72 [31] => 73 [32] => 74 [33] => 75 [34] => 76 [35] => 77 [36] => 63 [37] => 78 [38] => 79 [39] => 80 [40] => 81 [41] => 82 [42] => 62 [43] => 83 [44] => 84 [45] => 85 [46] => 86 [47] => 87 [48] => 88 [49] => 89 [50] => 91 [51] => 90 [52] => 92 [53] => 93 [54] => 94 [55] => 95 [56] => 100 ) [labels] => Array ( [0] => Drugs, Alcohol & Tobacco [1] => Work Environment [2] => Hazards [3] => Safety Culture [6] => Stress & Overtime [9] => Overexertion [10] => Ergonomic [12] => Acoustical Ceiling Carpenter [13] => Trades [14] => Asbestos/Insulator [16] => Boilermaker [18] => Bricklayer [20] => Cabinetmaker [22] => Carpenter [24] => Carpet Layer [26] => Cement Mason [28] => Commercial Diver [30] => Concrete Polisher [32] => Drywall Applicator Specialist [34] => Electrical Worker [36] => Elevator Constructor [38] => Flagger [40] => Glazier [42] => Hazardous Waste Cleanup [44] => HVAC [46] => Interior Systems Carpenter [48] => Laborer [50] => Landscaper [52] => Lather [54] => Lead Abatement Worker [56] => Maintenance Worker [58] => Millwright [60] => Operating Engineer [62] => Painter [64] => Paper Hanger [66] => PCC/Restoration [68] => Pile Driver [70] => Plasterer [72] => Plumber/Pipefitter [74] => Refractory Worker [76] => Reinforcing Ironworker [78] => Roofer/Waterproofer [80] => Scaffold Erector [82] => Sheetmetal Worker [84] => Sprinkler Fitter [86] => Stonemason [88] => Structural Ironworker [90] => Terrazzo Worker [92] => Tile Setter [94] => Truck Driver [96] => Welder [98] => Commercial & Institutional [99] => Jobsites [100] => Demolition [102] => Disasters [104] => Heavy & Highway [106] => Industrial [108] => LEED/Green Construction [110] => Renovations [112] => Residential [114] => Underground [116] => Toolbox Talks [117] => Documents [118] => Media & Documents ) [type] => Toolbox Talks [sub_category] => [url] => /document/4419/d001652/Toolbox%2BTalk%253A%2BSuicide%2BPrevention.html [item:protected] => DocumentRecord Object ( [records:protected] => Array ( ) [recordId:protected] => [searchWordClass:protected] => [searchWordPeerClass:protected] => [bok_record:protected] => [authors:protected] => [organizations:protected] => [collections:protected] => [categories:protected] => Array ( [13] => Category Object ( [languages:protected] => [bok_resources:protected] => [bok_topics:protected] => [bok_keywords:protected] => [id:protected] => 13 [type:protected] => category [parent:protected] => 7 [label:protected] => Drugs, Alcohol & Tobacco [alreadyInSave:protected] => [alreadyInValidation:protected] => [validationFailures:protected] => Array ( ) [_new:BaseObject:private] => [_deleted:BaseObject:private] => [modifiedColumns:protected] => Array ( ) ) [20] => Category Object ( [languages:protected] => [bok_resources:protected] => [bok_topics:protected] => [bok_keywords:protected] => [id:protected] => 20 [type:protected] => category [parent:protected] => 7 [label:protected] => Safety Culture [alreadyInSave:protected] => [alreadyInValidation:protected] => [validationFailures:protected] => Array ( ) [_new:BaseObject:private] => [_deleted:BaseObject:private] => [modifiedColumns:protected] => Array ( ) ) [23] => Category Object ( [languages:protected] => [bok_resources:protected] => [bok_topics:protected] => [bok_keywords:protected] => [id:protected] => 23 [type:protected] => category [parent:protected] => 7 [label:protected] => Stress & Overtime [alreadyInSave:protected] => [alreadyInValidation:protected] => [validationFailures:protected] => Array ( ) [_new:BaseObject:private] => [_deleted:BaseObject:private] => [modifiedColumns:protected] => Array ( ) ) [40] => Category Object ( [languages:protected] => [bok_resources:protected] => [bok_topics:protected] => [bok_keywords:protected] => [id:protected] => 40 [type:protected] => category [parent:protected] => 9 [label:protected] => Overexertion [alreadyInSave:protected] => [alreadyInValidation:protected] => [validationFailures:protected] => Array ( ) [_new:BaseObject:private] => [_deleted:BaseObject:private] => [modifiedColumns:protected] => Array ( ) ) [44] => Category Object ( [languages:protected] => [bok_resources:protected] => [bok_topics:protected] => [bok_keywords:protected] => [id:protected] => 44 [type:protected] => category [parent:protected] => 2 [label:protected] => Acoustical Ceiling Carpenter [alreadyInSave:protected] => [alreadyInValidation:protected] => [validationFailures:protected] => Array ( ) [_new:BaseObject:private] => [_deleted:BaseObject:private] => [modifiedColumns:protected] => Array ( ) ) [45] => Category Object ( [languages:protected] => [bok_resources:protected] => [bok_topics:protected] => [bok_keywords:protected] => [id:protected] => 45 [type:protected] => category [parent:protected] => 2 [label:protected] => Asbestos/Insulator [alreadyInSave:protected] => [alreadyInValidation:protected] => [validationFailures:protected] => Array ( ) [_new:BaseObject:private] => [_deleted:BaseObject:private] => [modifiedColumns:protected] => Array ( ) ) [46] => Category Object ( [languages:protected] => [bok_resources:protected] => [bok_topics:protected] => [bok_keywords:protected] => [id:protected] => 46 [type:protected] => category [parent:protected] => 2 [label:protected] => Boilermaker [alreadyInSave:protected] => [alreadyInValidation:protected] => [validationFailures:protected] => Array ( ) [_new:BaseObject:private] => [_deleted:BaseObject:private] => [modifiedColumns:protected] => Array ( ) ) [47] => Category Object ( [languages:protected] => [bok_resources:protected] => [bok_topics:protected] => [bok_keywords:protected] => [id:protected] => 47 [type:protected] => category [parent:protected] => 2 [label:protected] => Bricklayer [alreadyInSave:protected] => [alreadyInValidation:protected] => [validationFailures:protected] => Array ( ) [_new:BaseObject:private] => [_deleted:BaseObject:private] => [modifiedColumns:protected] => Array ( ) ) [48] => Category Object ( [languages:protected] => [bok_resources:protected] => [bok_topics:protected] => [bok_keywords:protected] => [id:protected] => 48 [type:protected] => category [parent:protected] => 2 [label:protected] => Cabinetmaker [alreadyInSave:protected] => [alreadyInValidation:protected] => [validationFailures:protected] => Array ( ) [_new:BaseObject:private] => [_deleted:BaseObject:private] => [modifiedColumns:protected] => Array ( ) ) [49] => Category Object ( [languages:protected] => [bok_resources:protected] => [bok_topics:protected] => [bok_keywords:protected] => [id:protected] => 49 [type:protected] => category [parent:protected] => 2 [label:protected] => Carpenter [alreadyInSave:protected] => [alreadyInValidation:protected] => [validationFailures:protected] => Array ( ) [_new:BaseObject:private] => [_deleted:BaseObject:private] => [modifiedColumns:protected] => Array ( ) ) [50] => Category Object ( [languages:protected] => [bok_resources:protected] => [bok_topics:protected] => [bok_keywords:protected] => [id:protected] => 50 [type:protected] => category [parent:protected] => 2 [label:protected] => Carpet Layer [alreadyInSave:protected] => [alreadyInValidation:protected] => [validationFailures:protected] => Array ( ) [_new:BaseObject:private] => [_deleted:BaseObject:private] => [modifiedColumns:protected] => Array ( ) ) [51] => Category Object ( [languages:protected] => [bok_resources:protected] => [bok_topics:protected] => [bok_keywords:protected] => [id:protected] => 51 [type:protected] => category [parent:protected] => 2 [label:protected] => Cement Mason [alreadyInSave:protected] => [alreadyInValidation:protected] => [validationFailures:protected] => Array ( ) [_new:BaseObject:private] => [_deleted:BaseObject:private] => [modifiedColumns:protected] => Array ( ) ) [52] => Category Object ( [languages:protected] => [bok_resources:protected] => [bok_topics:protected] => [bok_keywords:protected] => [id:protected] => 52 [type:protected] => category [parent:protected] => 2 [label:protected] => Commercial Diver [alreadyInSave:protected] => [alreadyInValidation:protected] => [validationFailures:protected] => Array ( ) [_new:BaseObject:private] => [_deleted:BaseObject:private] => [modifiedColumns:protected] => Array ( ) ) [53] => Category Object ( [languages:protected] => [bok_resources:protected] => [bok_topics:protected] => [bok_keywords:protected] => [id:protected] => 53 [type:protected] => category [parent:protected] => 2 [label:protected] => Concrete Polisher [alreadyInSave:protected] => [alreadyInValidation:protected] => [validationFailures:protected] => Array ( ) [_new:BaseObject:private] => [_deleted:BaseObject:private] => [modifiedColumns:protected] => Array ( ) ) [54] => Category Object ( [languages:protected] => [bok_resources:protected] => [bok_topics:protected] => [bok_keywords:protected] => [id:protected] => 54 [type:protected] => category [parent:protected] => 2 [label:protected] => Drywall Applicator Specialist [alreadyInSave:protected] => [alreadyInValidation:protected] => [validationFailures:protected] => Array ( ) [_new:BaseObject:private] => [_deleted:BaseObject:private] => [modifiedColumns:protected] => Array ( ) ) [55] => Category Object ( [languages:protected] => [bok_resources:protected] => [bok_topics:protected] => [bok_keywords:protected] => [id:protected] => 55 [type:protected] => category [parent:protected] => 2 [label:protected] => Electrical Worker [alreadyInSave:protected] => [alreadyInValidation:protected] => [validationFailures:protected] => Array ( ) [_new:BaseObject:private] => [_deleted:BaseObject:private] => [modifiedColumns:protected] => Array ( ) ) [56] => Category Object ( [languages:protected] => [bok_resources:protected] => [bok_topics:protected] => [bok_keywords:protected] => [id:protected] => 56 [type:protected] => category [parent:protected] => 2 [label:protected] => Elevator Constructor [alreadyInSave:protected] => [alreadyInValidation:protected] => [validationFailures:protected] => Array ( ) [_new:BaseObject:private] => [_deleted:BaseObject:private] => [modifiedColumns:protected] => Array ( ) ) [57] => Category Object ( [languages:protected] => [bok_resources:protected] => [bok_topics:protected] => [bok_keywords:protected] => [id:protected] => 57 [type:protected] => category [parent:protected] => 2 [label:protected] => Flagger [alreadyInSave:protected] => [alreadyInValidation:protected] => [validationFailures:protected] => Array ( ) [_new:BaseObject:private] => [_deleted:BaseObject:private] => [modifiedColumns:protected] => Array ( ) ) [58] => Category Object ( [languages:protected] => [bok_resources:protected] => [bok_topics:protected] => [bok_keywords:protected] => [id:protected] => 58 [type:protected] => category [parent:protected] => 2 [label:protected] => Glazier [alreadyInSave:protected] => [alreadyInValidation:protected] => [validationFailures:protected] => Array ( ) [_new:BaseObject:private] => [_deleted:BaseObject:private] => [modifiedColumns:protected] => Array ( ) ) [59] => Category Object ( [languages:protected] => [bok_resources:protected] => [bok_topics:protected] => [bok_keywords:protected] => [id:protected] => 59 [type:protected] => category [parent:protected] => 2 [label:protected] => Hazardous Waste Cleanup [alreadyInSave:protected] => [alreadyInValidation:protected] => [validationFailures:protected] => Array ( ) [_new:BaseObject:private] => [_deleted:BaseObject:private] => [modifiedColumns:protected] => Array ( ) ) [60] => Category Object ( [languages:protected] => [bok_resources:protected] => [bok_topics:protected] => [bok_keywords:protected] => [id:protected] => 60 [type:protected] => category [parent:protected] => 2 [label:protected] => HVAC [alreadyInSave:protected] => [alreadyInValidation:protected] => [validationFailures:protected] => Array ( ) [_new:BaseObject:private] => [_deleted:BaseObject:private] => [modifiedColumns:protected] => Array ( ) ) [61] => Category Object ( [languages:protected] => [bok_resources:protected] => [bok_topics:protected] => [bok_keywords:protected] => [id:protected] => 61 [type:protected] => category [parent:protected] => 2 [label:protected] => Interior Systems Carpenter [alreadyInSave:protected] => [alreadyInValidation:protected] => [validationFailures:protected] => Array ( ) [_new:BaseObject:private] => [_deleted:BaseObject:private] => [modifiedColumns:protected] => Array ( ) ) [64] => Category Object ( [languages:protected] => [bok_resources:protected] => [bok_topics:protected] => [bok_keywords:protected] => [id:protected] => 64 [type:protected] => category [parent:protected] => 2 [label:protected] => Laborer [alreadyInSave:protected] => [alreadyInValidation:protected] => [validationFailures:protected] => Array ( ) [_new:BaseObject:private] => [_deleted:BaseObject:private] => [modifiedColumns:protected] => Array ( ) ) [65] => Category Object ( [languages:protected] => [bok_resources:protected] => [bok_topics:protected] => [bok_keywords:protected] => [id:protected] => 65 [type:protected] => category [parent:protected] => 2 [label:protected] => Landscaper [alreadyInSave:protected] => [alreadyInValidation:protected] => [validationFailures:protected] => Array ( ) [_new:BaseObject:private] => [_deleted:BaseObject:private] => [modifiedColumns:protected] => Array ( ) ) [66] => Category Object ( [languages:protected] => [bok_resources:protected] => [bok_topics:protected] => [bok_keywords:protected] => [id:protected] => 66 [type:protected] => category [parent:protected] => 2 [label:protected] => Lather [alreadyInSave:protected] => [alreadyInValidation:protected] => [validationFailures:protected] => Array ( ) [_new:BaseObject:private] => [_deleted:BaseObject:private] => [modifiedColumns:protected] => Array ( ) ) [67] => Category Object ( [languages:protected] => [bok_resources:protected] => [bok_topics:protected] => [bok_keywords:protected] => [id:protected] => 67 [type:protected] => category [parent:protected] => 2 [label:protected] => Lead Abatement Worker [alreadyInSave:protected] => [alreadyInValidation:protected] => [validationFailures:protected] => Array ( ) [_new:BaseObject:private] => [_deleted:BaseObject:private] => [modifiedColumns:protected] => Array ( ) ) [68] => Category Object ( [languages:protected] => [bok_resources:protected] => [bok_topics:protected] => [bok_keywords:protected] => [id:protected] => 68 [type:protected] => category [parent:protected] => 2 [label:protected] => Maintenance Worker [alreadyInSave:protected] => [alreadyInValidation:protected] => [validationFailures:protected] => Array ( ) [_new:BaseObject:private] => [_deleted:BaseObject:private] => [modifiedColumns:protected] => Array ( ) ) [69] => Category Object ( [languages:protected] => [bok_resources:protected] => [bok_topics:protected] => [bok_keywords:protected] => [id:protected] => 69 [type:protected] => category [parent:protected] => 2 [label:protected] => Millwright [alreadyInSave:protected] => [alreadyInValidation:protected] => [validationFailures:protected] => Array ( ) [_new:BaseObject:private] => [_deleted:BaseObject:private] => [modifiedColumns:protected] => Array ( ) ) [70] => Category Object ( [languages:protected] => [bok_resources:protected] => [bok_topics:protected] => [bok_keywords:protected] => [id:protected] => 70 [type:protected] => category [parent:protected] => 2 [label:protected] => Operating Engineer [alreadyInSave:protected] => [alreadyInValidation:protected] => [validationFailures:protected] => Array ( ) [_new:BaseObject:private] => [_deleted:BaseObject:private] => [modifiedColumns:protected] => Array ( ) ) [71] => Category Object ( [languages:protected] => [bok_resources:protected] => [bok_topics:protected] => [bok_keywords:protected] => [id:protected] => 71 [type:protected] => category [parent:protected] => 2 [label:protected] => Painter [alreadyInSave:protected] => [alreadyInValidation:protected] => [validationFailures:protected] => Array ( ) [_new:BaseObject:private] => [_deleted:BaseObject:private] => [modifiedColumns:protected] => Array ( ) ) [72] => Category Object ( [languages:protected] => [bok_resources:protected] => [bok_topics:protected] => [bok_keywords:protected] => [id:protected] => 72 [type:protected] => category [parent:protected] => 2 [label:protected] => Paper Hanger [alreadyInSave:protected] => [alreadyInValidation:protected] => [validationFailures:protected] => Array ( ) [_new:BaseObject:private] => [_deleted:BaseObject:private] => [modifiedColumns:protected] => Array ( ) ) [73] => Category Object ( [languages:protected] => [bok_resources:protected] => [bok_topics:protected] => [bok_keywords:protected] => [id:protected] => 73 [type:protected] => category [parent:protected] => 2 [label:protected] => PCC/Restoration [alreadyInSave:protected] => [alreadyInValidation:protected] => [validationFailures:protected] => Array ( ) [_new:BaseObject:private] => [_deleted:BaseObject:private] => [modifiedColumns:protected] => Array ( ) ) [74] => Category Object ( [languages:protected] => [bok_resources:protected] => [bok_topics:protected] => [bok_keywords:protected] => [id:protected] => 74 [type:protected] => category [parent:protected] => 2 [label:protected] => Pile Driver [alreadyInSave:protected] => [alreadyInValidation:protected] => [validationFailures:protected] => Array ( ) [_new:BaseObject:private] => [_deleted:BaseObject:private] => [modifiedColumns:protected] => Array ( ) ) [75] => Category Object ( [languages:protected] => [bok_resources:protected] => [bok_topics:protected] => [bok_keywords:protected] => [id:protected] => 75 [type:protected] => category [parent:protected] => 2 [label:protected] => Plasterer [alreadyInSave:protected] => [alreadyInValidation:protected] => [validationFailures:protected] => Array ( ) [_new:BaseObject:private] => [_deleted:BaseObject:private] => [modifiedColumns:protected] => Array ( ) ) [76] => Category Object ( [languages:protected] => [bok_resources:protected] => [bok_topics:protected] => [bok_keywords:protected] => [id:protected] => 76 [type:protected] => category [parent:protected] => 2 [label:protected] => Plumber/Pipefitter [alreadyInSave:protected] => [alreadyInValidation:protected] => [validationFailures:protected] => Array ( ) [_new:BaseObject:private] => [_deleted:BaseObject:private] => [modifiedColumns:protected] => Array ( ) ) [77] => Category Object ( [languages:protected] => [bok_resources:protected] => [bok_topics:protected] => [bok_keywords:protected] => [id:protected] => 77 [type:protected] => category [parent:protected] => 2 [label:protected] => Refractory Worker [alreadyInSave:protected] => [alreadyInValidation:protected] => [validationFailures:protected] => Array ( ) [_new:BaseObject:private] => [_deleted:BaseObject:private] => [modifiedColumns:protected] => Array ( ) ) [63] => Category Object ( [languages:protected] => [bok_resources:protected] => [bok_topics:protected] => [bok_keywords:protected] => [id:protected] => 63 [type:protected] => category [parent:protected] => 2 [label:protected] => Reinforcing Ironworker [alreadyInSave:protected] => [alreadyInValidation:protected] => [validationFailures:protected] => Array ( ) [_new:BaseObject:private] => [_deleted:BaseObject:private] => [modifiedColumns:protected] => Array ( ) ) [78] => Category Object ( [languages:protected] => [bok_resources:protected] => [bok_topics:protected] => [bok_keywords:protected] => [id:protected] => 78 [type:protected] => category [parent:protected] => 2 [label:protected] => Roofer/Waterproofer [alreadyInSave:protected] => [alreadyInValidation:protected] => [validationFailures:protected] => Array ( ) [_new:BaseObject:private] => [_deleted:BaseObject:private] => [modifiedColumns:protected] => Array ( ) ) [79] => Category Object ( [languages:protected] => [bok_resources:protected] => [bok_topics:protected] => [bok_keywords:protected] => [id:protected] => 79 [type:protected] => category [parent:protected] => 2 [label:protected] => Scaffold Erector [alreadyInSave:protected] => [alreadyInValidation:protected] => [validationFailures:protected] => Array ( ) [_new:BaseObject:private] => [_deleted:BaseObject:private] => [modifiedColumns:protected] => Array ( ) ) [80] => Category Object ( [languages:protected] => [bok_resources:protected] => [bok_topics:protected] => [bok_keywords:protected] => [id:protected] => 80 [type:protected] => category [parent:protected] => 2 [label:protected] => Sheetmetal Worker [alreadyInSave:protected] => [alreadyInValidation:protected] => [validationFailures:protected] => Array ( ) [_new:BaseObject:private] => [_deleted:BaseObject:private] => [modifiedColumns:protected] => Array ( ) ) [81] => Category Object ( [languages:protected] => [bok_resources:protected] => [bok_topics:protected] => [bok_keywords:protected] => [id:protected] => 81 [type:protected] => category [parent:protected] => 2 [label:protected] => Sprinkler Fitter [alreadyInSave:protected] => [alreadyInValidation:protected] => [validationFailures:protected] => Array ( ) [_new:BaseObject:private] => [_deleted:BaseObject:private] => [modifiedColumns:protected] => Array ( ) ) [82] => Category Object ( [languages:protected] => [bok_resources:protected] => [bok_topics:protected] => [bok_keywords:protected] => [id:protected] => 82 [type:protected] => category [parent:protected] => 2 [label:protected] => Stonemason [alreadyInSave:protected] => [alreadyInValidation:protected] => [validationFailures:protected] => Array ( ) [_new:BaseObject:private] => [_deleted:BaseObject:private] => [modifiedColumns:protected] => Array ( ) ) [62] => Category Object ( [languages:protected] => [bok_resources:protected] => [bok_topics:protected] => [bok_keywords:protected] => [id:protected] => 62 [type:protected] => category [parent:protected] => 2 [label:protected] => Structural Ironworker [alreadyInSave:protected] => [alreadyInValidation:protected] => [validationFailures:protected] => Array ( ) [_new:BaseObject:private] => [_deleted:BaseObject:private] => [modifiedColumns:protected] => Array ( ) ) [83] => Category Object ( [languages:protected] => [bok_resources:protected] => [bok_topics:protected] => [bok_keywords:protected] => [id:protected] => 83 [type:protected] => category [parent:protected] => 2 [label:protected] => Terrazzo Worker [alreadyInSave:protected] => [alreadyInValidation:protected] => [validationFailures:protected] => Array ( ) [_new:BaseObject:private] => [_deleted:BaseObject:private] => [modifiedColumns:protected] => Array ( ) ) [84] => Category Object ( [languages:protected] => [bok_resources:protected] => [bok_topics:protected] => [bok_keywords:protected] => [id:protected] => 84 [type:protected] => category [parent:protected] => 2 [label:protected] => Tile Setter [alreadyInSave:protected] => [alreadyInValidation:protected] => [validationFailures:protected] => Array ( ) [_new:BaseObject:private] => [_deleted:BaseObject:private] => [modifiedColumns:protected] => Array ( ) ) [85] => Category Object ( [languages:protected] => [bok_resources:protected] => [bok_topics:protected] => [bok_keywords:protected] => [id:protected] => 85 [type:protected] => category [parent:protected] => 2 [label:protected] => Truck Driver [alreadyInSave:protected] => [alreadyInValidation:protected] => [validationFailures:protected] => Array ( ) [_new:BaseObject:private] => [_deleted:BaseObject:private] => [modifiedColumns:protected] => Array ( ) ) [86] => Category Object ( [languages:protected] => [bok_resources:protected] => [bok_topics:protected] => [bok_keywords:protected] => [id:protected] => 86 [type:protected] => category [parent:protected] => 2 [label:protected] => Welder [alreadyInSave:protected] => [alreadyInValidation:protected] => [validationFailures:protected] => Array ( ) [_new:BaseObject:private] => [_deleted:BaseObject:private] => [modifiedColumns:protected] => Array ( ) ) [87] => Category Object ( [languages:protected] => [bok_resources:protected] => [bok_topics:protected] => [bok_keywords:protected] => [id:protected] => 87 [type:protected] => category [parent:protected] => 3 [label:protected] => Commercial & Institutional [alreadyInSave:protected] => [alreadyInValidation:protected] => [validationFailures:protected] => Array ( ) [_new:BaseObject:private] => [_deleted:BaseObject:private] => [modifiedColumns:protected] => Array ( ) ) [88] => Category Object ( [languages:protected] => [bok_resources:protected] => [bok_topics:protected] => [bok_keywords:protected] => [id:protected] => 88 [type:protected] => category [parent:protected] => 3 [label:protected] => Demolition [alreadyInSave:protected] => [alreadyInValidation:protected] => [validationFailures:protected] => Array ( ) [_new:BaseObject:private] => [_deleted:BaseObject:private] => [modifiedColumns:protected] => Array ( ) ) [89] => Category Object ( [languages:protected] => [bok_resources:protected] => [bok_topics:protected] => [bok_keywords:protected] => [id:protected] => 89 [type:protected] => category [parent:protected] => 3 [label:protected] => Disasters [alreadyInSave:protected] => [alreadyInValidation:protected] => [validationFailures:protected] => Array ( ) [_new:BaseObject:private] => [_deleted:BaseObject:private] => [modifiedColumns:protected] => Array ( ) ) [91] => Category Object ( [languages:protected] => [bok_resources:protected] => [bok_topics:protected] => [bok_keywords:protected] => [id:protected] => 91 [type:protected] => category [parent:protected] => 3 [label:protected] => Heavy & Highway [alreadyInSave:protected] => [alreadyInValidation:protected] => [validationFailures:protected] => Array ( ) [_new:BaseObject:private] => [_deleted:BaseObject:private] => [modifiedColumns:protected] => Array ( ) ) [90] => Category Object ( [languages:protected] => [bok_resources:protected] => [bok_topics:protected] => [bok_keywords:protected] => [id:protected] => 90 [type:protected] => category [parent:protected] => 3 [label:protected] => Industrial [alreadyInSave:protected] => [alreadyInValidation:protected] => [validationFailures:protected] => Array ( ) [_new:BaseObject:private] => [_deleted:BaseObject:private] => [modifiedColumns:protected] => Array ( ) ) [92] => Category Object ( [languages:protected] => [bok_resources:protected] => [bok_topics:protected] => [bok_keywords:protected] => [id:protected] => 92 [type:protected] => category [parent:protected] => 3 [label:protected] => LEED/Green Construction [alreadyInSave:protected] => [alreadyInValidation:protected] => [validationFailures:protected] => Array ( ) [_new:BaseObject:private] => [_deleted:BaseObject:private] => [modifiedColumns:protected] => Array ( ) ) [93] => Category Object ( [languages:protected] => [bok_resources:protected] => [bok_topics:protected] => [bok_keywords:protected] => [id:protected] => 93 [type:protected] => category [parent:protected] => 3 [label:protected] => Renovations [alreadyInSave:protected] => [alreadyInValidation:protected] => [validationFailures:protected] => Array ( ) [_new:BaseObject:private] => [_deleted:BaseObject:private] => [modifiedColumns:protected] => Array ( ) ) [94] => Category Object ( [languages:protected] => [bok_resources:protected] => [bok_topics:protected] => [bok_keywords:protected] => [id:protected] => 94 [type:protected] => category [parent:protected] => 3 [label:protected] => Residential [alreadyInSave:protected] => [alreadyInValidation:protected] => [validationFailures:protected] => Array ( ) [_new:BaseObject:private] => [_deleted:BaseObject:private] => [modifiedColumns:protected] => Array ( ) ) [95] => Category Object ( [languages:protected] => [bok_resources:protected] => [bok_topics:protected] => [bok_keywords:protected] => [id:protected] => 95 [type:protected] => category [parent:protected] => 3 [label:protected] => Underground [alreadyInSave:protected] => [alreadyInValidation:protected] => [validationFailures:protected] => Array ( ) [_new:BaseObject:private] => [_deleted:BaseObject:private] => [modifiedColumns:protected] => Array ( ) ) [100] => Category Object ( [languages:protected] => [bok_resources:protected] => [bok_topics:protected] => [bok_keywords:protected] => [id:protected] => 100 [type:protected] => category [parent:protected] => 6 [label:protected] => Toolbox Talks [alreadyInSave:protected] => [alreadyInValidation:protected] => [validationFailures:protected] => Array ( ) [_new:BaseObject:private] => [_deleted:BaseObject:private] => [modifiedColumns:protected] => Array ( ) ) ) [categories_initialized:protected] => 1 [mapped_items:protected] => [content:protected] => [files:protected] => [language:protected] => Language Object ( [id:protected] => 1 [code:protected] => en [name:protected] => English [alreadyInSave:protected] => [alreadyInValidation:protected] => [validationFailures:protected] => Array ( ) [_new:BaseObject:private] => [_deleted:BaseObject:private] => [modifiedColumns:protected] => Array ( ) ) [old_record:protected] => [id:protected] => 4419 [old_id:protected] => [elcosh_id:protected] => d001652 [type:protected] => document [display_type:protected] => HTML only (and links) [user_id:protected] => 0 [language_id:protected] => 1 [tagging_id:protected] => Valeria Contreras [priority_id:protected] => 1 [title:protected] => Toolbox Talk: Suicide Prevention [total_pages:protected] => 1 [billed_pages:protected] => 1 [publication_number:protected] => [part_of:protected] => [keywords:protected] => suicide, suicide prevention, mental health, stress, depression, exhaustion, burnout, safety, support, emotional support, health [comments:protected] => [summary:protected] =>The CPWR Toolbox Talk on Suicide Prevention addresses the prevalence of suicide among construction workers. The resource includes a brief case example, steps to prevent a related injury or illness, and questions for discussion. It includes an image that illustrates the hazard, which can be posted in a central location as a reminder of steps to work safely.
Available in English and Spanish. [transition_comments:protected] => [external_link:protected] => [consol_link:protected] => [more_like_this:protected] => [permission_given_by:protected] => [published:protected] => T [billable:protected] => F [img_name:protected] => [img_ext:protected] => [img_width:protected] => [img_height:protected] => [img_credit:protected] => [img_practice:protected] => [vid_source_id:protected] => [vid_running_time:protected] => [vid_intended_audience:protected] => [vid_acquisition_info:protected] => [vid_cost:protected] => [vid_producer:protected] => [vid_filename:protected] => [vid_filename_downloadable:protected] => [date_summary:protected] => [date_permission_requested:protected] => [date_permission_received:protected] => [date_review_needed:protected] => [date_received:protected] => 10/08/20 [date_completed:protected] => 10/08/20 [date_billed:protected] => [date_modified:protected] => 05/19/23 [collBokExports:protected] => [lastBokExportCriteria:BaseElcoshItem:private] => [alreadyInSave:protected] => [alreadyInValidation:protected] => [validationFailures:protected] => Array ( ) [_new:BaseObject:private] => [_deleted:BaseObject:private] => [modifiedColumns:protected] => Array ( ) ) ) ) [new_images] => Array ( [0] => Search_Result Object ( [title] => Toolbox talk - crew view [image] => /record/images/4005-p.jpg [blurb] => Photo of crew listening to a toolbox safety talk before starting work.... [category] => Array ( [0] => 97 [1] => 20 [2] => 47 [3] => 49 [4] => 51 [5] => 55 [6] => 61 [7] => 64 [8] => 71 [9] => 75 [10] => 63 [11] => 79 [12] => 62 [13] => 87 [14] => 88 [15] => 91 [16] => 90 [17] => 93 [18] => 94 [19] => 95 ) [labels] => Array ( [0] => Images [1] => Media [2] => Media & Documents [3] => Safety Culture [4] => Work Environment [5] => Hazards [6] => Bricklayer [7] => Trades [8] => Carpenter [10] => Cement Mason [12] => Electrical Worker [14] => Interior Systems Carpenter [16] => Laborer [18] => Painter [20] => Plasterer [22] => Reinforcing Ironworker [24] => Scaffold Erector [26] => Structural Ironworker [28] => Commercial & Institutional [29] => Jobsites [30] => Demolition [32] => Heavy & Highway [34] => Industrial [36] => Renovations [38] => Residential [40] => Underground ) [type] => Images [sub_category] => [url] => /image/4005/i002692/Toolbox%2Btalk%2B-%2Bcrew%2Bview.html [item:protected] => ImageRecord Object ( [records:protected] => Array ( ) [recordId:protected] => [searchWordClass:protected] => [searchWordPeerClass:protected] => [bok_record:protected] => [authors:protected] => [organizations:protected] => [collections:protected] => [categories:protected] => Array ( [97] => Category Object ( [languages:protected] => [bok_resources:protected] => [bok_topics:protected] => [bok_keywords:protected] => [id:protected] => 97 [type:protected] => category [parent:protected] => 5 [label:protected] => Images [alreadyInSave:protected] => [alreadyInValidation:protected] => [validationFailures:protected] => Array ( ) [_new:BaseObject:private] => [_deleted:BaseObject:private] => [modifiedColumns:protected] => Array ( ) ) [20] => Category Object ( [languages:protected] => [bok_resources:protected] => [bok_topics:protected] => [bok_keywords:protected] => [id:protected] => 20 [type:protected] => category [parent:protected] => 7 [label:protected] => Safety Culture [alreadyInSave:protected] => [alreadyInValidation:protected] => [validationFailures:protected] => Array ( ) [_new:BaseObject:private] => [_deleted:BaseObject:private] => [modifiedColumns:protected] => Array ( ) ) [47] => Category Object ( [languages:protected] => [bok_resources:protected] => [bok_topics:protected] => [bok_keywords:protected] => [id:protected] => 47 [type:protected] => category [parent:protected] => 2 [label:protected] => Bricklayer [alreadyInSave:protected] => [alreadyInValidation:protected] => [validationFailures:protected] => Array ( ) [_new:BaseObject:private] => [_deleted:BaseObject:private] => [modifiedColumns:protected] => Array ( ) ) [49] => Category Object ( [languages:protected] => [bok_resources:protected] => [bok_topics:protected] => [bok_keywords:protected] => [id:protected] => 49 [type:protected] => category [parent:protected] => 2 [label:protected] => Carpenter [alreadyInSave:protected] => [alreadyInValidation:protected] => [validationFailures:protected] => Array ( ) [_new:BaseObject:private] => [_deleted:BaseObject:private] => [modifiedColumns:protected] => Array ( ) ) [51] => Category Object ( [languages:protected] => [bok_resources:protected] => [bok_topics:protected] => [bok_keywords:protected] => [id:protected] => 51 [type:protected] => category [parent:protected] => 2 [label:protected] => Cement Mason [alreadyInSave:protected] => [alreadyInValidation:protected] => [validationFailures:protected] => Array ( ) [_new:BaseObject:private] => [_deleted:BaseObject:private] => [modifiedColumns:protected] => Array ( ) ) [55] => Category Object ( [languages:protected] => [bok_resources:protected] => [bok_topics:protected] => [bok_keywords:protected] => [id:protected] => 55 [type:protected] => category [parent:protected] => 2 [label:protected] => Electrical Worker [alreadyInSave:protected] => [alreadyInValidation:protected] => [validationFailures:protected] => Array ( ) [_new:BaseObject:private] => [_deleted:BaseObject:private] => [modifiedColumns:protected] => Array ( ) ) [61] => Category Object ( [languages:protected] => [bok_resources:protected] => [bok_topics:protected] => [bok_keywords:protected] => [id:protected] => 61 [type:protected] => category [parent:protected] => 2 [label:protected] => Interior Systems Carpenter [alreadyInSave:protected] => [alreadyInValidation:protected] => [validationFailures:protected] => Array ( ) [_new:BaseObject:private] => [_deleted:BaseObject:private] => [modifiedColumns:protected] => Array ( ) ) [64] => Category Object ( [languages:protected] => [bok_resources:protected] => [bok_topics:protected] => [bok_keywords:protected] => [id:protected] => 64 [type:protected] => category [parent:protected] => 2 [label:protected] => Laborer [alreadyInSave:protected] => [alreadyInValidation:protected] => [validationFailures:protected] => Array ( ) [_new:BaseObject:private] => [_deleted:BaseObject:private] => [modifiedColumns:protected] => Array ( ) ) [71] => Category Object ( [languages:protected] => [bok_resources:protected] => [bok_topics:protected] => [bok_keywords:protected] => [id:protected] => 71 [type:protected] => category [parent:protected] => 2 [label:protected] => Painter [alreadyInSave:protected] => [alreadyInValidation:protected] => [validationFailures:protected] => Array ( ) [_new:BaseObject:private] => [_deleted:BaseObject:private] => [modifiedColumns:protected] => Array ( ) ) [75] => Category Object ( [languages:protected] => [bok_resources:protected] => [bok_topics:protected] => [bok_keywords:protected] => [id:protected] => 75 [type:protected] => category [parent:protected] => 2 [label:protected] => Plasterer [alreadyInSave:protected] => [alreadyInValidation:protected] => [validationFailures:protected] => Array ( ) [_new:BaseObject:private] => [_deleted:BaseObject:private] => [modifiedColumns:protected] => Array ( ) ) [63] => Category Object ( [languages:protected] => [bok_resources:protected] => [bok_topics:protected] => [bok_keywords:protected] => [id:protected] => 63 [type:protected] => category [parent:protected] => 2 [label:protected] => Reinforcing Ironworker [alreadyInSave:protected] => [alreadyInValidation:protected] => [validationFailures:protected] => Array ( ) [_new:BaseObject:private] => [_deleted:BaseObject:private] => [modifiedColumns:protected] => Array ( ) ) [79] => Category Object ( [languages:protected] => [bok_resources:protected] => [bok_topics:protected] => [bok_keywords:protected] => [id:protected] => 79 [type:protected] => category [parent:protected] => 2 [label:protected] => Scaffold Erector [alreadyInSave:protected] => [alreadyInValidation:protected] => [validationFailures:protected] => Array ( ) [_new:BaseObject:private] => [_deleted:BaseObject:private] => [modifiedColumns:protected] => Array ( ) ) [62] => Category Object ( [languages:protected] => [bok_resources:protected] => [bok_topics:protected] => [bok_keywords:protected] => [id:protected] => 62 [type:protected] => category [parent:protected] => 2 [label:protected] => Structural Ironworker [alreadyInSave:protected] => [alreadyInValidation:protected] => [validationFailures:protected] => Array ( ) [_new:BaseObject:private] => [_deleted:BaseObject:private] => [modifiedColumns:protected] => Array ( ) ) [87] => Category Object ( [languages:protected] => [bok_resources:protected] => [bok_topics:protected] => [bok_keywords:protected] => [id:protected] => 87 [type:protected] => category [parent:protected] => 3 [label:protected] => Commercial & Institutional [alreadyInSave:protected] => [alreadyInValidation:protected] => [validationFailures:protected] => Array ( ) [_new:BaseObject:private] => [_deleted:BaseObject:private] => [modifiedColumns:protected] => Array ( ) ) [88] => Category Object ( [languages:protected] => [bok_resources:protected] => [bok_topics:protected] => [bok_keywords:protected] => [id:protected] => 88 [type:protected] => category [parent:protected] => 3 [label:protected] => Demolition [alreadyInSave:protected] => [alreadyInValidation:protected] => [validationFailures:protected] => Array ( ) [_new:BaseObject:private] => [_deleted:BaseObject:private] => [modifiedColumns:protected] => Array ( ) ) [91] => Category Object ( [languages:protected] => [bok_resources:protected] => [bok_topics:protected] => [bok_keywords:protected] => [id:protected] => 91 [type:protected] => category [parent:protected] => 3 [label:protected] => Heavy & Highway [alreadyInSave:protected] => [alreadyInValidation:protected] => [validationFailures:protected] => Array ( ) [_new:BaseObject:private] => [_deleted:BaseObject:private] => [modifiedColumns:protected] => Array ( ) ) [90] => Category Object ( [languages:protected] => [bok_resources:protected] => [bok_topics:protected] => [bok_keywords:protected] => [id:protected] => 90 [type:protected] => category [parent:protected] => 3 [label:protected] => Industrial [alreadyInSave:protected] => [alreadyInValidation:protected] => [validationFailures:protected] => Array ( ) [_new:BaseObject:private] => [_deleted:BaseObject:private] => [modifiedColumns:protected] => Array ( ) ) [93] => Category Object ( [languages:protected] => [bok_resources:protected] => [bok_topics:protected] => [bok_keywords:protected] => [id:protected] => 93 [type:protected] => category [parent:protected] => 3 [label:protected] => Renovations [alreadyInSave:protected] => [alreadyInValidation:protected] => [validationFailures:protected] => Array ( ) [_new:BaseObject:private] => [_deleted:BaseObject:private] => [modifiedColumns:protected] => Array ( ) ) [94] => Category Object ( [languages:protected] => [bok_resources:protected] => [bok_topics:protected] => [bok_keywords:protected] => [id:protected] => 94 [type:protected] => category [parent:protected] => 3 [label:protected] => Residential [alreadyInSave:protected] => [alreadyInValidation:protected] => [validationFailures:protected] => Array ( ) [_new:BaseObject:private] => [_deleted:BaseObject:private] => [modifiedColumns:protected] => Array ( ) ) [95] => Category Object ( [languages:protected] => [bok_resources:protected] => [bok_topics:protected] => [bok_keywords:protected] => [id:protected] => 95 [type:protected] => category [parent:protected] => 3 [label:protected] => Underground [alreadyInSave:protected] => [alreadyInValidation:protected] => [validationFailures:protected] => Array ( ) [_new:BaseObject:private] => [_deleted:BaseObject:private] => [modifiedColumns:protected] => Array ( ) ) ) [categories_initialized:protected] => 1 [mapped_items:protected] => [content:protected] => [files:protected] => [language:protected] => Language Object ( [id:protected] => 1 [code:protected] => en [name:protected] => English [alreadyInSave:protected] => [alreadyInValidation:protected] => [validationFailures:protected] => Array ( ) [_new:BaseObject:private] => [_deleted:BaseObject:private] => [modifiedColumns:protected] => Array ( ) ) [old_record:protected] => [id:protected] => 4005 [old_id:protected] => [elcosh_id:protected] => i002692 [type:protected] => image [display_type:protected] => Image [user_id:protected] => 0 [language_id:protected] => 1 [tagging_id:protected] => Bruce Lippy [priority_id:protected] => 1 [title:protected] => Toolbox talk - crew view [total_pages:protected] => 0 [billed_pages:protected] => 0 [publication_number:protected] => [part_of:protected] => [keywords:protected] => toolbox talk, tailgate talk, safety talk, Spanish [comments:protected] => [summary:protected] => Photo of crew listening to a toolbox safety talk before starting work. [transition_comments:protected] => [external_link:protected] => [consol_link:protected] => http://www.cpwrconstructionsolutions.org/electrical/solution/662/worker-training.html [more_like_this:protected] => i002691,d001269, c000079, d001285 [permission_given_by:protected] => [published:protected] => T [billable:protected] => F [img_name:protected] => [img_ext:protected] => jpg [img_width:protected] => [img_height:protected] => [img_credit:protected] => Morgan Zavertnik and Hoar Construction [img_practice:protected] => good [vid_source_id:protected] => [vid_running_time:protected] => [vid_intended_audience:protected] => [vid_acquisition_info:protected] => [vid_cost:protected] => [vid_producer:protected] => [vid_filename:protected] => [vid_filename_downloadable:protected] => [date_summary:protected] => November 2015 [date_permission_requested:protected] => [date_permission_received:protected] => [date_review_needed:protected] => [date_received:protected] => 03/02/16 [date_completed:protected] => 03/02/16 [date_billed:protected] => [date_modified:protected] => 03/02/16 [collBokExports:protected] => [lastBokExportCriteria:BaseElcoshItem:private] => [alreadyInSave:protected] => [alreadyInValidation:protected] => [validationFailures:protected] => Array ( ) [_new:BaseObject:private] => [_deleted:BaseObject:private] => [modifiedColumns:protected] => Array ( ) ) ) [1] => Search_Result Object ( [title] => Toolbox talk - long shot [image] => /record/images/4006-p.jpg [blurb] => This crew gathered every morning before starting work to discuss a new safety topic.... [category] => Array ( [0] => 20 [1] => 47 [2] => 49 [3] => 51 [4] => 55 [5] => 64 [6] => 68 [7] => 75 [8] => 76 [9] => 63 [10] => 78 [11] => 79 [12] => 82 [13] => 62 [14] => 87 [15] => 88 [16] => 91 [17] => 90 [18] => 93 [19] => 94 [20] => 95 [21] => 97 ) [labels] => Array ( [0] => Safety Culture [1] => Work Environment [2] => Hazards [3] => Bricklayer [4] => Trades [5] => Carpenter [7] => Cement Mason [9] => Electrical Worker [11] => Laborer [13] => Maintenance Worker [15] => Plasterer [17] => Plumber/Pipefitter [19] => Reinforcing Ironworker [21] => Roofer/Waterproofer [23] => Scaffold Erector [25] => Stonemason [27] => Structural Ironworker [29] => Commercial & Institutional [30] => Jobsites [31] => Demolition [33] => Heavy & Highway [35] => Industrial [37] => Renovations [39] => Residential [41] => Underground [43] => Images [44] => Media [45] => Media & Documents ) [type] => Images [sub_category] => [url] => /image/4006/i002693/Toolbox%2Btalk%2B-%2Blong%2Bshot.html [item:protected] => ImageRecord Object ( [records:protected] => Array ( ) [recordId:protected] => [searchWordClass:protected] => [searchWordPeerClass:protected] => [bok_record:protected] => [authors:protected] => [organizations:protected] => [collections:protected] => [categories:protected] => Array ( [20] => Category Object ( [languages:protected] => [bok_resources:protected] => [bok_topics:protected] => [bok_keywords:protected] => [id:protected] => 20 [type:protected] => category [parent:protected] => 7 [label:protected] => Safety Culture [alreadyInSave:protected] => [alreadyInValidation:protected] => [validationFailures:protected] => Array ( ) [_new:BaseObject:private] => [_deleted:BaseObject:private] => [modifiedColumns:protected] => Array ( ) ) [47] => Category Object ( [languages:protected] => [bok_resources:protected] => [bok_topics:protected] => [bok_keywords:protected] => [id:protected] => 47 [type:protected] => category [parent:protected] => 2 [label:protected] => Bricklayer [alreadyInSave:protected] => [alreadyInValidation:protected] => [validationFailures:protected] => Array ( ) [_new:BaseObject:private] => [_deleted:BaseObject:private] => [modifiedColumns:protected] => Array ( ) ) [49] => Category Object ( [languages:protected] => [bok_resources:protected] => [bok_topics:protected] => [bok_keywords:protected] => [id:protected] => 49 [type:protected] => category [parent:protected] => 2 [label:protected] => Carpenter [alreadyInSave:protected] => [alreadyInValidation:protected] => [validationFailures:protected] => Array ( ) [_new:BaseObject:private] => [_deleted:BaseObject:private] => [modifiedColumns:protected] => Array ( ) ) [51] => Category Object ( [languages:protected] => [bok_resources:protected] => [bok_topics:protected] => [bok_keywords:protected] => [id:protected] => 51 [type:protected] => category [parent:protected] => 2 [label:protected] => Cement Mason [alreadyInSave:protected] => [alreadyInValidation:protected] => [validationFailures:protected] => Array ( ) [_new:BaseObject:private] => [_deleted:BaseObject:private] => [modifiedColumns:protected] => Array ( ) ) [55] => Category Object ( [languages:protected] => [bok_resources:protected] => [bok_topics:protected] => [bok_keywords:protected] => [id:protected] => 55 [type:protected] => category [parent:protected] => 2 [label:protected] => Electrical Worker [alreadyInSave:protected] => [alreadyInValidation:protected] => [validationFailures:protected] => Array ( ) [_new:BaseObject:private] => [_deleted:BaseObject:private] => [modifiedColumns:protected] => Array ( ) ) [64] => Category Object ( [languages:protected] => [bok_resources:protected] => [bok_topics:protected] => [bok_keywords:protected] => [id:protected] => 64 [type:protected] => category [parent:protected] => 2 [label:protected] => Laborer [alreadyInSave:protected] => [alreadyInValidation:protected] => [validationFailures:protected] => Array ( ) [_new:BaseObject:private] => [_deleted:BaseObject:private] => [modifiedColumns:protected] => Array ( ) ) [68] => Category Object ( [languages:protected] => [bok_resources:protected] => [bok_topics:protected] => [bok_keywords:protected] => [id:protected] => 68 [type:protected] => category [parent:protected] => 2 [label:protected] => Maintenance Worker [alreadyInSave:protected] => [alreadyInValidation:protected] => [validationFailures:protected] => Array ( ) [_new:BaseObject:private] => [_deleted:BaseObject:private] => [modifiedColumns:protected] => Array ( ) ) [75] => Category Object ( [languages:protected] => [bok_resources:protected] => [bok_topics:protected] => [bok_keywords:protected] => [id:protected] => 75 [type:protected] => category [parent:protected] => 2 [label:protected] => Plasterer [alreadyInSave:protected] => [alreadyInValidation:protected] => [validationFailures:protected] => Array ( ) [_new:BaseObject:private] => [_deleted:BaseObject:private] => [modifiedColumns:protected] => Array ( ) ) [76] => Category Object ( [languages:protected] => [bok_resources:protected] => [bok_topics:protected] => [bok_keywords:protected] => [id:protected] => 76 [type:protected] => category [parent:protected] => 2 [label:protected] => Plumber/Pipefitter [alreadyInSave:protected] => [alreadyInValidation:protected] => [validationFailures:protected] => Array ( ) [_new:BaseObject:private] => [_deleted:BaseObject:private] => [modifiedColumns:protected] => Array ( ) ) [63] => Category Object ( [languages:protected] => [bok_resources:protected] => [bok_topics:protected] => [bok_keywords:protected] => [id:protected] => 63 [type:protected] => category [parent:protected] => 2 [label:protected] => Reinforcing Ironworker [alreadyInSave:protected] => [alreadyInValidation:protected] => [validationFailures:protected] => Array ( ) [_new:BaseObject:private] => [_deleted:BaseObject:private] => [modifiedColumns:protected] => Array ( ) ) [78] => Category Object ( [languages:protected] => [bok_resources:protected] => [bok_topics:protected] => [bok_keywords:protected] => [id:protected] => 78 [type:protected] => category [parent:protected] => 2 [label:protected] => Roofer/Waterproofer [alreadyInSave:protected] => [alreadyInValidation:protected] => [validationFailures:protected] => Array ( ) [_new:BaseObject:private] => [_deleted:BaseObject:private] => [modifiedColumns:protected] => Array ( ) ) [79] => Category Object ( [languages:protected] => [bok_resources:protected] => [bok_topics:protected] => [bok_keywords:protected] => [id:protected] => 79 [type:protected] => category [parent:protected] => 2 [label:protected] => Scaffold Erector [alreadyInSave:protected] => [alreadyInValidation:protected] => [validationFailures:protected] => Array ( ) [_new:BaseObject:private] => [_deleted:BaseObject:private] => [modifiedColumns:protected] => Array ( ) ) [82] => Category Object ( [languages:protected] => [bok_resources:protected] => [bok_topics:protected] => [bok_keywords:protected] => [id:protected] => 82 [type:protected] => category [parent:protected] => 2 [label:protected] => Stonemason [alreadyInSave:protected] => [alreadyInValidation:protected] => [validationFailures:protected] => Array ( ) [_new:BaseObject:private] => [_deleted:BaseObject:private] => [modifiedColumns:protected] => Array ( ) ) [62] => Category Object ( [languages:protected] => [bok_resources:protected] => [bok_topics:protected] => [bok_keywords:protected] => [id:protected] => 62 [type:protected] => category [parent:protected] => 2 [label:protected] => Structural Ironworker [alreadyInSave:protected] => [alreadyInValidation:protected] => [validationFailures:protected] => Array ( ) [_new:BaseObject:private] => [_deleted:BaseObject:private] => [modifiedColumns:protected] => Array ( ) ) [87] => Category Object ( [languages:protected] => [bok_resources:protected] => [bok_topics:protected] => [bok_keywords:protected] => [id:protected] => 87 [type:protected] => category [parent:protected] => 3 [label:protected] => Commercial & Institutional [alreadyInSave:protected] => [alreadyInValidation:protected] => [validationFailures:protected] => Array ( ) [_new:BaseObject:private] => [_deleted:BaseObject:private] => [modifiedColumns:protected] => Array ( ) ) [88] => Category Object ( [languages:protected] => [bok_resources:protected] => [bok_topics:protected] => [bok_keywords:protected] => [id:protected] => 88 [type:protected] => category [parent:protected] => 3 [label:protected] => Demolition [alreadyInSave:protected] => [alreadyInValidation:protected] => [validationFailures:protected] => Array ( ) [_new:BaseObject:private] => [_deleted:BaseObject:private] => [modifiedColumns:protected] => Array ( ) ) [91] => Category Object ( [languages:protected] => [bok_resources:protected] => [bok_topics:protected] => [bok_keywords:protected] => [id:protected] => 91 [type:protected] => category [parent:protected] => 3 [label:protected] => Heavy & Highway [alreadyInSave:protected] => [alreadyInValidation:protected] => [validationFailures:protected] => Array ( ) [_new:BaseObject:private] => [_deleted:BaseObject:private] => [modifiedColumns:protected] => Array ( ) ) [90] => Category Object ( [languages:protected] => [bok_resources:protected] => [bok_topics:protected] => [bok_keywords:protected] => [id:protected] => 90 [type:protected] => category [parent:protected] => 3 [label:protected] => Industrial [alreadyInSave:protected] => [alreadyInValidation:protected] => [validationFailures:protected] => Array ( ) [_new:BaseObject:private] => [_deleted:BaseObject:private] => [modifiedColumns:protected] => Array ( ) ) [93] => Category Object ( [languages:protected] => [bok_resources:protected] => [bok_topics:protected] => [bok_keywords:protected] => [id:protected] => 93 [type:protected] => category [parent:protected] => 3 [label:protected] => Renovations [alreadyInSave:protected] => [alreadyInValidation:protected] => [validationFailures:protected] => Array ( ) [_new:BaseObject:private] => [_deleted:BaseObject:private] => [modifiedColumns:protected] => Array ( ) ) [94] => Category Object ( [languages:protected] => [bok_resources:protected] => [bok_topics:protected] => [bok_keywords:protected] => [id:protected] => 94 [type:protected] => category [parent:protected] => 3 [label:protected] => Residential [alreadyInSave:protected] => [alreadyInValidation:protected] => [validationFailures:protected] => Array ( ) [_new:BaseObject:private] => [_deleted:BaseObject:private] => [modifiedColumns:protected] => Array ( ) ) [95] => Category Object ( [languages:protected] => [bok_resources:protected] => [bok_topics:protected] => [bok_keywords:protected] => [id:protected] => 95 [type:protected] => category [parent:protected] => 3 [label:protected] => Underground [alreadyInSave:protected] => [alreadyInValidation:protected] => [validationFailures:protected] => Array ( ) [_new:BaseObject:private] => [_deleted:BaseObject:private] => [modifiedColumns:protected] => Array ( ) ) [97] => Category Object ( [languages:protected] => [bok_resources:protected] => [bok_topics:protected] => [bok_keywords:protected] => [id:protected] => 97 [type:protected] => category [parent:protected] => 5 [label:protected] => Images [alreadyInSave:protected] => [alreadyInValidation:protected] => [validationFailures:protected] => Array ( ) [_new:BaseObject:private] => [_deleted:BaseObject:private] => [modifiedColumns:protected] => Array ( ) ) ) [categories_initialized:protected] => 1 [mapped_items:protected] => [content:protected] => [files:protected] => [language:protected] => Language Object ( [id:protected] => 1 [code:protected] => en [name:protected] => English [alreadyInSave:protected] => [alreadyInValidation:protected] => [validationFailures:protected] => Array ( ) [_new:BaseObject:private] => [_deleted:BaseObject:private] => [modifiedColumns:protected] => Array ( ) ) [old_record:protected] => [id:protected] => 4006 [old_id:protected] => [elcosh_id:protected] => i002693 [type:protected] => image [display_type:protected] => Image [user_id:protected] => 0 [language_id:protected] => 1 [tagging_id:protected] => Bruce Lippy [priority_id:protected] => 1 [title:protected] => Toolbox talk - long shot [total_pages:protected] => 0 [billed_pages:protected] => 0 [publication_number:protected] => [part_of:protected] => [keywords:protected] => toolbox talk, tailgate talk, safety minute [comments:protected] => [summary:protected] => This crew gathered every morning before starting work to discuss a new safety topic. [transition_comments:protected] => [external_link:protected] => [consol_link:protected] => http://www.cpwrconstructionsolutions.org/electrical/solution/662/worker-training.html [more_like_this:protected] => i002691,i002692,d001269,d000527 [permission_given_by:protected] => [published:protected] => T [billable:protected] => F [img_name:protected] => [img_ext:protected] => jpg [img_width:protected] => [img_height:protected] => [img_credit:protected] => Morgan Zavertnik and Hoar Construction [img_practice:protected] => good [vid_source_id:protected] => [vid_running_time:protected] => [vid_intended_audience:protected] => [vid_acquisition_info:protected] => [vid_cost:protected] => [vid_producer:protected] => [vid_filename:protected] => [vid_filename_downloadable:protected] => [date_summary:protected] => November 2015 [date_permission_requested:protected] => [date_permission_received:protected] => [date_review_needed:protected] => [date_received:protected] => 03/02/16 [date_completed:protected] => 03/02/16 [date_billed:protected] => [date_modified:protected] => 03/02/16 [collBokExports:protected] => [lastBokExportCriteria:BaseElcoshItem:private] => [alreadyInSave:protected] => [alreadyInValidation:protected] => [validationFailures:protected] => Array ( ) [_new:BaseObject:private] => [_deleted:BaseObject:private] => [modifiedColumns:protected] => Array ( ) ) ) [2] => Search_Result Object ( [title] => Construction bracing [image] => /record/images/3995-p.jpg [blurb] => This shows structural support that prevents collapses during construction.... [category] => Array ( [0] => 12 [1] => 15 [2] => 21 [3] => 49 [4] => 51 [5] => 55 [6] => 56 [7] => 60 [8] => 64 [9] => 68 [10] => 74 [11] => 63 [12] => 78 [13] => 79 [14] => 80 [15] => 62 [16] => 87 [17] => 90 [18] => 97 ) [labels] => Array ( [0] => Crushed/Struck By [1] => Work Environment [2] => Hazards [3] => Falls [6] => Scaffolds [9] => Carpenter [10] => Trades [11] => Cement Mason [13] => Electrical Worker [15] => Elevator Constructor [17] => HVAC [19] => Laborer [21] => Maintenance Worker [23] => Pile Driver [25] => Reinforcing Ironworker [27] => Roofer/Waterproofer [29] => Scaffold Erector [31] => Sheetmetal Worker [33] => Structural Ironworker [35] => Commercial & Institutional [36] => Jobsites [37] => Industrial [39] => Images [40] => Media [41] => Media & Documents ) [type] => Images [sub_category] => [url] => /image/3995/i002690/Construction%2Bbracing.html [item:protected] => ImageRecord Object ( [records:protected] => Array ( ) [recordId:protected] => [searchWordClass:protected] => [searchWordPeerClass:protected] => [bok_record:protected] => [authors:protected] => [organizations:protected] => [collections:protected] => [categories:protected] => Array ( [12] => Category Object ( [languages:protected] => [bok_resources:protected] => [bok_topics:protected] => [bok_keywords:protected] => [id:protected] => 12 [type:protected] => category [parent:protected] => 7 [label:protected] => Crushed/Struck By [alreadyInSave:protected] => [alreadyInValidation:protected] => [validationFailures:protected] => Array ( ) [_new:BaseObject:private] => [_deleted:BaseObject:private] => [modifiedColumns:protected] => Array ( ) ) [15] => Category Object ( [languages:protected] => [bok_resources:protected] => [bok_topics:protected] => [bok_keywords:protected] => [id:protected] => 15 [type:protected] => category [parent:protected] => 7 [label:protected] => Falls [alreadyInSave:protected] => [alreadyInValidation:protected] => [validationFailures:protected] => Array ( ) [_new:BaseObject:private] => [_deleted:BaseObject:private] => [modifiedColumns:protected] => Array ( ) ) [21] => Category Object ( [languages:protected] => [bok_resources:protected] => [bok_topics:protected] => [bok_keywords:protected] => [id:protected] => 21 [type:protected] => category [parent:protected] => 7 [label:protected] => Scaffolds [alreadyInSave:protected] => [alreadyInValidation:protected] => [validationFailures:protected] => Array ( ) [_new:BaseObject:private] => [_deleted:BaseObject:private] => [modifiedColumns:protected] => Array ( ) ) [49] => Category Object ( [languages:protected] => [bok_resources:protected] => [bok_topics:protected] => [bok_keywords:protected] => [id:protected] => 49 [type:protected] => category [parent:protected] => 2 [label:protected] => Carpenter [alreadyInSave:protected] => [alreadyInValidation:protected] => [validationFailures:protected] => Array ( ) [_new:BaseObject:private] => [_deleted:BaseObject:private] => [modifiedColumns:protected] => Array ( ) ) [51] => Category Object ( [languages:protected] => [bok_resources:protected] => [bok_topics:protected] => [bok_keywords:protected] => [id:protected] => 51 [type:protected] => category [parent:protected] => 2 [label:protected] => Cement Mason [alreadyInSave:protected] => [alreadyInValidation:protected] => [validationFailures:protected] => Array ( ) [_new:BaseObject:private] => [_deleted:BaseObject:private] => [modifiedColumns:protected] => Array ( ) ) [55] => Category Object ( [languages:protected] => [bok_resources:protected] => [bok_topics:protected] => [bok_keywords:protected] => [id:protected] => 55 [type:protected] => category [parent:protected] => 2 [label:protected] => Electrical Worker [alreadyInSave:protected] => [alreadyInValidation:protected] => [validationFailures:protected] => Array ( ) [_new:BaseObject:private] => [_deleted:BaseObject:private] => [modifiedColumns:protected] => Array ( ) ) [56] => Category Object ( [languages:protected] => [bok_resources:protected] => [bok_topics:protected] => [bok_keywords:protected] => [id:protected] => 56 [type:protected] => category [parent:protected] => 2 [label:protected] => Elevator Constructor [alreadyInSave:protected] => [alreadyInValidation:protected] => [validationFailures:protected] => Array ( ) [_new:BaseObject:private] => [_deleted:BaseObject:private] => [modifiedColumns:protected] => Array ( ) ) [60] => Category Object ( [languages:protected] => [bok_resources:protected] => [bok_topics:protected] => [bok_keywords:protected] => [id:protected] => 60 [type:protected] => category [parent:protected] => 2 [label:protected] => HVAC [alreadyInSave:protected] => [alreadyInValidation:protected] => [validationFailures:protected] => Array ( ) [_new:BaseObject:private] => [_deleted:BaseObject:private] => [modifiedColumns:protected] => Array ( ) ) [64] => Category Object ( [languages:protected] => [bok_resources:protected] => [bok_topics:protected] => [bok_keywords:protected] => [id:protected] => 64 [type:protected] => category [parent:protected] => 2 [label:protected] => Laborer [alreadyInSave:protected] => [alreadyInValidation:protected] => [validationFailures:protected] => Array ( ) [_new:BaseObject:private] => [_deleted:BaseObject:private] => [modifiedColumns:protected] => Array ( ) ) [68] => Category Object ( [languages:protected] => [bok_resources:protected] => [bok_topics:protected] => [bok_keywords:protected] => [id:protected] => 68 [type:protected] => category [parent:protected] => 2 [label:protected] => Maintenance Worker [alreadyInSave:protected] => [alreadyInValidation:protected] => [validationFailures:protected] => Array ( ) [_new:BaseObject:private] => [_deleted:BaseObject:private] => [modifiedColumns:protected] => Array ( ) ) [74] => Category Object ( [languages:protected] => [bok_resources:protected] => [bok_topics:protected] => [bok_keywords:protected] => [id:protected] => 74 [type:protected] => category [parent:protected] => 2 [label:protected] => Pile Driver [alreadyInSave:protected] => [alreadyInValidation:protected] => [validationFailures:protected] => Array ( ) [_new:BaseObject:private] => [_deleted:BaseObject:private] => [modifiedColumns:protected] => Array ( ) ) [63] => Category Object ( [languages:protected] => [bok_resources:protected] => [bok_topics:protected] => [bok_keywords:protected] => [id:protected] => 63 [type:protected] => category [parent:protected] => 2 [label:protected] => Reinforcing Ironworker [alreadyInSave:protected] => [alreadyInValidation:protected] => [validationFailures:protected] => Array ( ) [_new:BaseObject:private] => [_deleted:BaseObject:private] => [modifiedColumns:protected] => Array ( ) ) [78] => Category Object ( [languages:protected] => [bok_resources:protected] => [bok_topics:protected] => [bok_keywords:protected] => [id:protected] => 78 [type:protected] => category [parent:protected] => 2 [label:protected] => Roofer/Waterproofer [alreadyInSave:protected] => [alreadyInValidation:protected] => [validationFailures:protected] => Array ( ) [_new:BaseObject:private] => [_deleted:BaseObject:private] => [modifiedColumns:protected] => Array ( ) ) [79] => Category Object ( [languages:protected] => [bok_resources:protected] => [bok_topics:protected] => [bok_keywords:protected] => [id:protected] => 79 [type:protected] => category [parent:protected] => 2 [label:protected] => Scaffold Erector [alreadyInSave:protected] => [alreadyInValidation:protected] => [validationFailures:protected] => Array ( ) [_new:BaseObject:private] => [_deleted:BaseObject:private] => [modifiedColumns:protected] => Array ( ) ) [80] => Category Object ( [languages:protected] => [bok_resources:protected] => [bok_topics:protected] => [bok_keywords:protected] => [id:protected] => 80 [type:protected] => category [parent:protected] => 2 [label:protected] => Sheetmetal Worker [alreadyInSave:protected] => [alreadyInValidation:protected] => [validationFailures:protected] => Array ( ) [_new:BaseObject:private] => [_deleted:BaseObject:private] => [modifiedColumns:protected] => Array ( ) ) [62] => Category Object ( [languages:protected] => [bok_resources:protected] => [bok_topics:protected] => [bok_keywords:protected] => [id:protected] => 62 [type:protected] => category [parent:protected] => 2 [label:protected] => Structural Ironworker [alreadyInSave:protected] => [alreadyInValidation:protected] => [validationFailures:protected] => Array ( ) [_new:BaseObject:private] => [_deleted:BaseObject:private] => [modifiedColumns:protected] => Array ( ) ) [87] => Category Object ( [languages:protected] => [bok_resources:protected] => [bok_topics:protected] => [bok_keywords:protected] => [id:protected] => 87 [type:protected] => category [parent:protected] => 3 [label:protected] => Commercial & Institutional [alreadyInSave:protected] => [alreadyInValidation:protected] => [validationFailures:protected] => Array ( ) [_new:BaseObject:private] => [_deleted:BaseObject:private] => [modifiedColumns:protected] => Array ( ) ) [90] => Category Object ( [languages:protected] => [bok_resources:protected] => [bok_topics:protected] => [bok_keywords:protected] => [id:protected] => 90 [type:protected] => category [parent:protected] => 3 [label:protected] => Industrial [alreadyInSave:protected] => [alreadyInValidation:protected] => [validationFailures:protected] => Array ( ) [_new:BaseObject:private] => [_deleted:BaseObject:private] => [modifiedColumns:protected] => Array ( ) ) [97] => Category Object ( [languages:protected] => [bok_resources:protected] => [bok_topics:protected] => [bok_keywords:protected] => [id:protected] => 97 [type:protected] => category [parent:protected] => 5 [label:protected] => Images [alreadyInSave:protected] => [alreadyInValidation:protected] => [validationFailures:protected] => Array ( ) [_new:BaseObject:private] => [_deleted:BaseObject:private] => [modifiedColumns:protected] => Array ( ) ) ) [categories_initialized:protected] => 1 [mapped_items:protected] => [content:protected] => [files:protected] => [language:protected] => Language Object ( [id:protected] => 1 [code:protected] => en [name:protected] => English [alreadyInSave:protected] => [alreadyInValidation:protected] => [validationFailures:protected] => Array ( ) [_new:BaseObject:private] => [_deleted:BaseObject:private] => [modifiedColumns:protected] => Array ( ) ) [old_record:protected] => [id:protected] => 3995 [old_id:protected] => [elcosh_id:protected] => i002690 [type:protected] => image [display_type:protected] => Image [user_id:protected] => 0 [language_id:protected] => 1 [tagging_id:protected] => Bruce Lippy [priority_id:protected] => 1 [title:protected] => Construction bracing [total_pages:protected] => 0 [billed_pages:protected] => 0 [publication_number:protected] => [part_of:protected] => [keywords:protected] => Bracing, support, scaffold [comments:protected] => [summary:protected] => This shows structural support that prevents collapses during construction. [transition_comments:protected] => [external_link:protected] => [consol_link:protected] => http://www.cpwrconstructionsolutions.org/masonry/solution/8/adjustable-tower-scaffold.html [more_like_this:protected] => i002660 [permission_given_by:protected] => [published:protected] => T [billable:protected] => F [img_name:protected] => [img_ext:protected] => jpg [img_width:protected] => [img_height:protected] => [img_credit:protected] => Photo by Pam Susi [img_practice:protected] => good [vid_source_id:protected] => [vid_running_time:protected] => [vid_intended_audience:protected] => [vid_acquisition_info:protected] => [vid_cost:protected] => [vid_producer:protected] => [vid_filename:protected] => [vid_filename_downloadable:protected] => [date_summary:protected] => January 2016 [date_permission_requested:protected] => [date_permission_received:protected] => [date_review_needed:protected] => [date_received:protected] => 02/01/16 [date_completed:protected] => 02/01/16 [date_billed:protected] => [date_modified:protected] => 02/01/16 [collBokExports:protected] => [lastBokExportCriteria:BaseElcoshItem:private] => [alreadyInSave:protected] => [alreadyInValidation:protected] => [validationFailures:protected] => Array ( ) [_new:BaseObject:private] => [_deleted:BaseObject:private] => [modifiedColumns:protected] => Array ( ) ) ) [3] => Search_Result Object ( [title] => Suspended Scaffold Outriggers [image] => /record/images/3975-p.jpg [blurb] => Suspended scaffolds systems must be designed by a qualified person and inspected daily by a competent person. The supports for the counterweight must... [category] => Array ( [0] => 97 [1] => 15 [2] => 47 [3] => 49 [4] => 79 [5] => 87 ) [labels] => Array ( [0] => Images [1] => Media [2] => Media & Documents [3] => Falls [4] => Work Environment [5] => Hazards [6] => Bricklayer [7] => Trades [8] => Carpenter [10] => Scaffold Erector [12] => Commercial & Institutional [13] => Jobsites ) [type] => Images [sub_category] => [url] => /image/3975/i002683/Suspended%2BScaffold%2BOutriggers.html [item:protected] => ImageRecord Object ( [records:protected] => Array ( ) [recordId:protected] => [searchWordClass:protected] => [searchWordPeerClass:protected] => [bok_record:protected] => [authors:protected] => [organizations:protected] => [collections:protected] => [categories:protected] => Array ( [97] => Category Object ( [languages:protected] => [bok_resources:protected] => [bok_topics:protected] => [bok_keywords:protected] => [id:protected] => 97 [type:protected] => category [parent:protected] => 5 [label:protected] => Images [alreadyInSave:protected] => [alreadyInValidation:protected] => [validationFailures:protected] => Array ( ) [_new:BaseObject:private] => [_deleted:BaseObject:private] => [modifiedColumns:protected] => Array ( ) ) [15] => Category Object ( [languages:protected] => [bok_resources:protected] => [bok_topics:protected] => [bok_keywords:protected] => [id:protected] => 15 [type:protected] => category [parent:protected] => 7 [label:protected] => Falls [alreadyInSave:protected] => [alreadyInValidation:protected] => [validationFailures:protected] => Array ( ) [_new:BaseObject:private] => [_deleted:BaseObject:private] => [modifiedColumns:protected] => Array ( ) ) [47] => Category Object ( [languages:protected] => [bok_resources:protected] => [bok_topics:protected] => [bok_keywords:protected] => [id:protected] => 47 [type:protected] => category [parent:protected] => 2 [label:protected] => Bricklayer [alreadyInSave:protected] => [alreadyInValidation:protected] => [validationFailures:protected] => Array ( ) [_new:BaseObject:private] => [_deleted:BaseObject:private] => [modifiedColumns:protected] => Array ( ) ) [49] => Category Object ( [languages:protected] => [bok_resources:protected] => [bok_topics:protected] => [bok_keywords:protected] => [id:protected] => 49 [type:protected] => category [parent:protected] => 2 [label:protected] => Carpenter [alreadyInSave:protected] => [alreadyInValidation:protected] => [validationFailures:protected] => Array ( ) [_new:BaseObject:private] => [_deleted:BaseObject:private] => [modifiedColumns:protected] => Array ( ) ) [79] => Category Object ( [languages:protected] => [bok_resources:protected] => [bok_topics:protected] => [bok_keywords:protected] => [id:protected] => 79 [type:protected] => category [parent:protected] => 2 [label:protected] => Scaffold Erector [alreadyInSave:protected] => [alreadyInValidation:protected] => [validationFailures:protected] => Array ( ) [_new:BaseObject:private] => [_deleted:BaseObject:private] => [modifiedColumns:protected] => Array ( ) ) [87] => Category Object ( [languages:protected] => [bok_resources:protected] => [bok_topics:protected] => [bok_keywords:protected] => [id:protected] => 87 [type:protected] => category [parent:protected] => 3 [label:protected] => Commercial & Institutional [alreadyInSave:protected] => [alreadyInValidation:protected] => [validationFailures:protected] => Array ( ) [_new:BaseObject:private] => [_deleted:BaseObject:private] => [modifiedColumns:protected] => Array ( ) ) ) [categories_initialized:protected] => 1 [mapped_items:protected] => [content:protected] => [files:protected] => [language:protected] => Language Object ( [id:protected] => 1 [code:protected] => en [name:protected] => English [alreadyInSave:protected] => [alreadyInValidation:protected] => [validationFailures:protected] => Array ( ) [_new:BaseObject:private] => [_deleted:BaseObject:private] => [modifiedColumns:protected] => Array ( ) ) [old_record:protected] => [id:protected] => 3975 [old_id:protected] => [elcosh_id:protected] => i002683 [type:protected] => image [display_type:protected] => Image [user_id:protected] => 0 [language_id:protected] => 1 [tagging_id:protected] => John Newquist [priority_id:protected] => 1 [title:protected] => Suspended Scaffold Outriggers [total_pages:protected] => 0 [billed_pages:protected] => 0 [publication_number:protected] => [part_of:protected] => [keywords:protected] => suspended, scaffold, swing, stage, fall, protection, counterweight, qualified, person [comments:protected] => [summary:protected] => Suspended scaffolds systems must be designed by a qualified person and inspected daily by a competent person. The supports for the counterweight must be designed with a safety factor of four. [transition_comments:protected] => [external_link:protected] => [consol_link:protected] => http://www.cpwrconstructionsolutions.org/task/Erect%2Band%2Bdismantle%2Bscaffolds/ [more_like_this:protected] => d000244,d000359,i000253,i000407 [permission_given_by:protected] => [published:protected] => T [billable:protected] => F [img_name:protected] => [img_ext:protected] => jpg [img_width:protected] => [img_height:protected] => [img_credit:protected] => MetroPark, Miller and Long [img_practice:protected] => not_applicable [vid_source_id:protected] => [vid_running_time:protected] => [vid_intended_audience:protected] => [vid_acquisition_info:protected] => [vid_cost:protected] => [vid_producer:protected] => [vid_filename:protected] => [vid_filename_downloadable:protected] => [date_summary:protected] => August 28 2015 [date_permission_requested:protected] => [date_permission_received:protected] => [date_review_needed:protected] => [date_received:protected] => 08/28/15 [date_completed:protected] => 08/28/15 [date_billed:protected] => [date_modified:protected] => 08/28/15 [collBokExports:protected] => [lastBokExportCriteria:BaseElcoshItem:private] => [alreadyInSave:protected] => [alreadyInValidation:protected] => [validationFailures:protected] => Array ( ) [_new:BaseObject:private] => [_deleted:BaseObject:private] => [modifiedColumns:protected] => Array ( ) ) ) [4] => Search_Result Object ( [title] => Suspended scaffold [image] => /record/images/3976-p.jpg [blurb] => Suspended scaffold outrigger beams must have stops to prevent the hangers from sliding of the end of the outriggers. Wire rope supported must be desig... [category] => Array ( [0] => 97 [1] => 15 [2] => 47 [3] => 50 [4] => 79 [5] => 87 ) [labels] => Array ( [0] => Images [1] => Media [2] => Media & Documents [3] => Falls [4] => Work Environment [5] => Hazards [6] => Bricklayer [7] => Trades [8] => Carpet Layer [10] => Scaffold Erector [12] => Commercial & Institutional [13] => Jobsites ) [type] => Images [sub_category] => [url] => /image/3976/i002684/Suspended%2Bscaffold.html [item:protected] => ImageRecord Object ( [records:protected] => Array ( ) [recordId:protected] => [searchWordClass:protected] => [searchWordPeerClass:protected] => [bok_record:protected] => [authors:protected] => [organizations:protected] => [collections:protected] => [categories:protected] => Array ( [97] => Category Object ( [languages:protected] => [bok_resources:protected] => [bok_topics:protected] => [bok_keywords:protected] => [id:protected] => 97 [type:protected] => category [parent:protected] => 5 [label:protected] => Images [alreadyInSave:protected] => [alreadyInValidation:protected] => [validationFailures:protected] => Array ( ) [_new:BaseObject:private] => [_deleted:BaseObject:private] => [modifiedColumns:protected] => Array ( ) ) [15] => Category Object ( [languages:protected] => [bok_resources:protected] => [bok_topics:protected] => [bok_keywords:protected] => [id:protected] => 15 [type:protected] => category [parent:protected] => 7 [label:protected] => Falls [alreadyInSave:protected] => [alreadyInValidation:protected] => [validationFailures:protected] => Array ( ) [_new:BaseObject:private] => [_deleted:BaseObject:private] => [modifiedColumns:protected] => Array ( ) ) [47] => Category Object ( [languages:protected] => [bok_resources:protected] => [bok_topics:protected] => [bok_keywords:protected] => [id:protected] => 47 [type:protected] => category [parent:protected] => 2 [label:protected] => Bricklayer [alreadyInSave:protected] => [alreadyInValidation:protected] => [validationFailures:protected] => Array ( ) [_new:BaseObject:private] => [_deleted:BaseObject:private] => [modifiedColumns:protected] => Array ( ) ) [50] => Category Object ( [languages:protected] => [bok_resources:protected] => [bok_topics:protected] => [bok_keywords:protected] => [id:protected] => 50 [type:protected] => category [parent:protected] => 2 [label:protected] => Carpet Layer [alreadyInSave:protected] => [alreadyInValidation:protected] => [validationFailures:protected] => Array ( ) [_new:BaseObject:private] => [_deleted:BaseObject:private] => [modifiedColumns:protected] => Array ( ) ) [79] => Category Object ( [languages:protected] => [bok_resources:protected] => [bok_topics:protected] => [bok_keywords:protected] => [id:protected] => 79 [type:protected] => category [parent:protected] => 2 [label:protected] => Scaffold Erector [alreadyInSave:protected] => [alreadyInValidation:protected] => [validationFailures:protected] => Array ( ) [_new:BaseObject:private] => [_deleted:BaseObject:private] => [modifiedColumns:protected] => Array ( ) ) [87] => Category Object ( [languages:protected] => [bok_resources:protected] => [bok_topics:protected] => [bok_keywords:protected] => [id:protected] => 87 [type:protected] => category [parent:protected] => 3 [label:protected] => Commercial & Institutional [alreadyInSave:protected] => [alreadyInValidation:protected] => [validationFailures:protected] => Array ( ) [_new:BaseObject:private] => [_deleted:BaseObject:private] => [modifiedColumns:protected] => Array ( ) ) ) [categories_initialized:protected] => 1 [mapped_items:protected] => [content:protected] => [files:protected] => [language:protected] => Language Object ( [id:protected] => 1 [code:protected] => en [name:protected] => English [alreadyInSave:protected] => [alreadyInValidation:protected] => [validationFailures:protected] => Array ( ) [_new:BaseObject:private] => [_deleted:BaseObject:private] => [modifiedColumns:protected] => Array ( ) ) [old_record:protected] => [id:protected] => 3976 [old_id:protected] => [elcosh_id:protected] => i002684 [type:protected] => image [display_type:protected] => Image [user_id:protected] => 0 [language_id:protected] => 1 [tagging_id:protected] => John Newquist [priority_id:protected] => 1 [title:protected] => Suspended scaffold [total_pages:protected] => 0 [billed_pages:protected] => 0 [publication_number:protected] => [part_of:protected] => [keywords:protected] => Suspended, scaffold, outrigger, beams, erection, wire, rope, inspection, swing, stage, [comments:protected] => [summary:protected] => Suspended scaffold outrigger beams must have stops to prevent the hangers from sliding of the end of the outriggers. Wire rope supported must be designed with a safety factor of 6. The scaffold must be inspected by a competent person daily. [transition_comments:protected] => [external_link:protected] => [consol_link:protected] => http://www.cpwrconstructionsolutions.org/task/Erect%2Band%2Bdismantle%2Bscaffolds/ [more_like_this:protected] => i002683, d000244, i000407, d000606 [permission_given_by:protected] => [published:protected] => T [billable:protected] => F [img_name:protected] => [img_ext:protected] => jpg [img_width:protected] => [img_height:protected] => [img_credit:protected] => Metropark, Miller and Long [img_practice:protected] => not_applicable [vid_source_id:protected] => [vid_running_time:protected] => [vid_intended_audience:protected] => [vid_acquisition_info:protected] => [vid_cost:protected] => [vid_producer:protected] => [vid_filename:protected] => [vid_filename_downloadable:protected] => [date_summary:protected] => [date_permission_requested:protected] => [date_permission_received:protected] => [date_review_needed:protected] => [date_received:protected] => 08/28/15 [date_completed:protected] => 08/28/15 [date_billed:protected] => [date_modified:protected] => 08/28/15 [collBokExports:protected] => [lastBokExportCriteria:BaseElcoshItem:private] => [alreadyInSave:protected] => [alreadyInValidation:protected] => [validationFailures:protected] => Array ( ) [_new:BaseObject:private] => [_deleted:BaseObject:private] => [modifiedColumns:protected] => Array ( ) ) ) [5] => Search_Result Object ( [title] => Three Tower Cranes [image] => /record/images/3979-p.jpg [blurb] => Whenever multiple tower cranes are used, there needs to be preplanning to ensure that the tower cranes cannot hit each other loads. This is accomplish... [category] => Array ( [0] => 97 [1] => 11 [2] => 64 [3] => 70 [4] => 62 [5] => 87 ) [labels] => Array ( [0] => Images [1] => Media [2] => Media & Documents [3] => Cranes & Hoists [4] => Work Environment [5] => Hazards [6] => Laborer [7] => Trades [8] => Operating Engineer [10] => Structural Ironworker [12] => Commercial & Institutional [13] => Jobsites ) [type] => Images [sub_category] => [url] => /image/3979/i002687/Three%2BTower%2BCranes.html [item:protected] => ImageRecord Object ( [records:protected] => Array ( ) [recordId:protected] => [searchWordClass:protected] => [searchWordPeerClass:protected] => [bok_record:protected] => [authors:protected] => [organizations:protected] => [collections:protected] => [categories:protected] => Array ( [97] => Category Object ( [languages:protected] => [bok_resources:protected] => [bok_topics:protected] => [bok_keywords:protected] => [id:protected] => 97 [type:protected] => category [parent:protected] => 5 [label:protected] => Images [alreadyInSave:protected] => [alreadyInValidation:protected] => [validationFailures:protected] => Array ( ) [_new:BaseObject:private] => [_deleted:BaseObject:private] => [modifiedColumns:protected] => Array ( ) ) [11] => Category Object ( [languages:protected] => [bok_resources:protected] => [bok_topics:protected] => [bok_keywords:protected] => [id:protected] => 11 [type:protected] => category [parent:protected] => 7 [label:protected] => Cranes & Hoists [alreadyInSave:protected] => [alreadyInValidation:protected] => [validationFailures:protected] => Array ( ) [_new:BaseObject:private] => [_deleted:BaseObject:private] => [modifiedColumns:protected] => Array ( ) ) [64] => Category Object ( [languages:protected] => [bok_resources:protected] => [bok_topics:protected] => [bok_keywords:protected] => [id:protected] => 64 [type:protected] => category [parent:protected] => 2 [label:protected] => Laborer [alreadyInSave:protected] => [alreadyInValidation:protected] => [validationFailures:protected] => Array ( ) [_new:BaseObject:private] => [_deleted:BaseObject:private] => [modifiedColumns:protected] => Array ( ) ) [70] => Category Object ( [languages:protected] => [bok_resources:protected] => [bok_topics:protected] => [bok_keywords:protected] => [id:protected] => 70 [type:protected] => category [parent:protected] => 2 [label:protected] => Operating Engineer [alreadyInSave:protected] => [alreadyInValidation:protected] => [validationFailures:protected] => Array ( ) [_new:BaseObject:private] => [_deleted:BaseObject:private] => [modifiedColumns:protected] => Array ( ) ) [62] => Category Object ( [languages:protected] => [bok_resources:protected] => [bok_topics:protected] => [bok_keywords:protected] => [id:protected] => 62 [type:protected] => category [parent:protected] => 2 [label:protected] => Structural Ironworker [alreadyInSave:protected] => [alreadyInValidation:protected] => [validationFailures:protected] => Array ( ) [_new:BaseObject:private] => [_deleted:BaseObject:private] => [modifiedColumns:protected] => Array ( ) ) [87] => Category Object ( [languages:protected] => [bok_resources:protected] => [bok_topics:protected] => [bok_keywords:protected] => [id:protected] => 87 [type:protected] => category [parent:protected] => 3 [label:protected] => Commercial & Institutional [alreadyInSave:protected] => [alreadyInValidation:protected] => [validationFailures:protected] => Array ( ) [_new:BaseObject:private] => [_deleted:BaseObject:private] => [modifiedColumns:protected] => Array ( ) ) ) [categories_initialized:protected] => 1 [mapped_items:protected] => [content:protected] => [files:protected] => [language:protected] => Language Object ( [id:protected] => 1 [code:protected] => en [name:protected] => English [alreadyInSave:protected] => [alreadyInValidation:protected] => [validationFailures:protected] => Array ( ) [_new:BaseObject:private] => [_deleted:BaseObject:private] => [modifiedColumns:protected] => Array ( ) ) [old_record:protected] => [id:protected] => 3979 [old_id:protected] => [elcosh_id:protected] => i002687 [type:protected] => image [display_type:protected] => Image [user_id:protected] => 0 [language_id:protected] => 1 [tagging_id:protected] => John Newquist [priority_id:protected] => 1 [title:protected] => Three Tower Cranes [total_pages:protected] => 0 [billed_pages:protected] => 0 [publication_number:protected] => [part_of:protected] => [keywords:protected] => [comments:protected] => [summary:protected] => Whenever multiple tower cranes are used, there needs to be preplanning to ensure that the tower cranes cannot hit each other loads. This is accomplished by setting swing restrictions, marking the ground for allowable crane travel and training of the crane signal persons. [transition_comments:protected] => [external_link:protected] => [consol_link:protected] => http://www.cpwrconstructionsolutions.org/work/6/184/ [more_like_this:protected] => d001029, d000010, i001280, i001221 [permission_given_by:protected] => [published:protected] => T [billable:protected] => F [img_name:protected] => [img_ext:protected] => jpg [img_width:protected] => [img_height:protected] => [img_credit:protected] => Metropark [img_practice:protected] => not_applicable [vid_source_id:protected] => [vid_running_time:protected] => [vid_intended_audience:protected] => [vid_acquisition_info:protected] => [vid_cost:protected] => [vid_producer:protected] => [vid_filename:protected] => [vid_filename_downloadable:protected] => [date_summary:protected] => August 28 2015 [date_permission_requested:protected] => [date_permission_received:protected] => [date_review_needed:protected] => [date_received:protected] => 08/28/15 [date_completed:protected] => 08/28/15 [date_billed:protected] => [date_modified:protected] => 08/28/15 [collBokExports:protected] => [lastBokExportCriteria:BaseElcoshItem:private] => [alreadyInSave:protected] => [alreadyInValidation:protected] => [validationFailures:protected] => Array ( ) [_new:BaseObject:private] => [_deleted:BaseObject:private] => [modifiedColumns:protected] => Array ( ) ) ) ) [preview_mode] => [description] => This third in a series of 6 Tool Box Talks on construction ergonomics focuses on proper positioning to avoid injuries. The TBT recommends: 1)prop up a task off of the floor by using a raised surface, cart, baker scaffold, saw horses to prep materials near waist height, 2)move the lift or ladder in the best position for the work, 3)position the lift in front of the area you plan to work without trying to reach too far on either side of the lift. [keywords] => position, positioning, ergonomics, ergo, carpal tunnel, MSD, musculoskeletal disorder [related_items] => Array ( [Handouts] => Array ( [0] => DocumentRecord Object ( [records:protected] => Array ( ) [recordId:protected] => [searchWordClass:protected] => [searchWordPeerClass:protected] => [bok_record:protected] => [authors:protected] => [organizations:protected] => [collections:protected] => [categories:protected] => [categories_initialized:protected] => [mapped_items:protected] => [content:protected] => [files:protected] => [language:protected] => Language Object ( [id:protected] => 1 [code:protected] => en [name:protected] => English [alreadyInSave:protected] => [alreadyInValidation:protected] => [validationFailures:protected] => Array ( ) [_new:BaseObject:private] => [_deleted:BaseObject:private] => [modifiedColumns:protected] => Array ( ) ) [old_record:protected] => [id:protected] => 3833 [old_id:protected] => [elcosh_id:protected] => d001303 [type:protected] => document [display_type:protected] => HTML w/ PDF [user_id:protected] => 25 [language_id:protected] => 1 [tagging_id:protected] => Bruce Lippy [priority_id:protected] => 1 [title:protected] => Overview of Toolbox Talks on Ergonomics Developed by Washington University in St. Louis [total_pages:protected] => 3 [billed_pages:protected] => 3 [publication_number:protected] => [part_of:protected] => [keywords:protected] => ergonomics, musculoskeletal disorders, MSDs [comments:protected] => 7-28-2014 - Originally submitted as "HTML w/ doc and PDF", Jeff Nelson asked Bruce Lippy for permission to switch it to "HTML w/ PDF" -- permission was given [summary:protected] => This overviews provides a background on how Washington University in St. Louis developed this series of six toolbox talks on ergonomics. It also describes how they tested the effectiveness of these communication tools, concluding that the guide was valuable for improving the delivery of ergonomics training and interaction between the safety representative and workers. The researchers recommend preparing site-specific information prior to the talk and interacting with workers to discuss problems and ergonomic solutions during the safety meetings. [transition_comments:protected] => [external_link:protected] => [consol_link:protected] => [more_like_this:protected] => [permission_given_by:protected] => Lisa Jaegers, Washington U. in St. Louis [published:protected] => T [billable:protected] => F [img_name:protected] => [img_ext:protected] => png [img_width:protected] => [img_height:protected] => [img_credit:protected] => [img_practice:protected] => [vid_source_id:protected] => [vid_running_time:protected] => [vid_intended_audience:protected] => [vid_acquisition_info:protected] => [vid_cost:protected] => [vid_producer:protected] => [vid_filename:protected] => [vid_filename_downloadable:protected] => [date_summary:protected] => 2014 [date_permission_requested:protected] => [date_permission_received:protected] => [date_review_needed:protected] => [date_received:protected] => 06/11/14 [date_completed:protected] => 07/29/14 [date_billed:protected] => [date_modified:protected] => 07/29/14 [collBokExports:protected] => [lastBokExportCriteria:BaseElcoshItem:private] => [alreadyInSave:protected] => [alreadyInValidation:protected] => [validationFailures:protected] => Array ( ) [_new:BaseObject:private] => [_deleted:BaseObject:private] => [modifiedColumns:protected] => Array ( ) ) ) [Toolbox Talks] => Array ( [0] => DocumentRecord Object ( [records:protected] => Array ( ) [recordId:protected] => [searchWordClass:protected] => [searchWordPeerClass:protected] => [bok_record:protected] => [authors:protected] => [organizations:protected] => [collections:protected] => [categories:protected] => [categories_initialized:protected] => [mapped_items:protected] => [content:protected] => [files:protected] => [language:protected] => Language Object ( [id:protected] => 1 [code:protected] => en [name:protected] => English [alreadyInSave:protected] => [alreadyInValidation:protected] => [validationFailures:protected] => Array ( ) [_new:BaseObject:private] => [_deleted:BaseObject:private] => [modifiedColumns:protected] => Array ( ) ) [old_record:protected] => [id:protected] => 3835 [old_id:protected] => [elcosh_id:protected] => d001304 [type:protected] => document [display_type:protected] => HTML w/ PDF [user_id:protected] => 25 [language_id:protected] => 1 [tagging_id:protected] => Bruce Lippy [priority_id:protected] => 1 [title:protected] => Ergonomics Tool Box Talks (TBT) Training Guide [total_pages:protected] => 2 [billed_pages:protected] => 2 [publication_number:protected] => [part_of:protected] => [keywords:protected] => Ergonomics, carpal tunnel, muscular skeletal disorders, msd [comments:protected] => [summary:protected] => CPWR-funded ergonomics research by Washington University at St. Louis led to the development of 6 tool box talks. This guide is an explanation of how to deliver the talks for maximum effectiveness. This guide should be reviewed before delivering any of the talks because it makes important recommendations like: • If possible, give the TBTs as a part of the crew’s regular safety meetings so that ergonomics is included in the safety discussion. • Try to locate an area with few distractions for gathering the crew. • For a team approach, invite the work crew, site superintendent, project manager and other general contractor and/or subcontractor reps who you feel may be helpful in supporting the training and ergonomics solutions. [transition_comments:protected] => [external_link:protected] => [consol_link:protected] => [more_like_this:protected] => d001303,d001305,d001306,d001307,d001308,d001309,d001310 [permission_given_by:protected] => [published:protected] => T [billable:protected] => F [img_name:protected] => [img_ext:protected] => png [img_width:protected] => [img_height:protected] => [img_credit:protected] => [img_practice:protected] => [vid_source_id:protected] => [vid_running_time:protected] => [vid_intended_audience:protected] => [vid_acquisition_info:protected] => [vid_cost:protected] => [vid_producer:protected] => [vid_filename:protected] => [vid_filename_downloadable:protected] => [date_summary:protected] => 2014 [date_permission_requested:protected] => [date_permission_received:protected] => [date_review_needed:protected] => [date_received:protected] => 06/12/14 [date_completed:protected] => 07/29/14 [date_billed:protected] => [date_modified:protected] => 07/29/14 [collBokExports:protected] => [lastBokExportCriteria:BaseElcoshItem:private] => [alreadyInSave:protected] => [alreadyInValidation:protected] => [validationFailures:protected] => Array ( ) [_new:BaseObject:private] => [_deleted:BaseObject:private] => [modifiedColumns:protected] => Array ( ) ) [1] => DocumentRecord Object ( [records:protected] => Array ( ) [recordId:protected] => [searchWordClass:protected] => [searchWordPeerClass:protected] => [bok_record:protected] => [authors:protected] => [organizations:protected] => [collections:protected] => [categories:protected] => [categories_initialized:protected] => [mapped_items:protected] => [content:protected] => [files:protected] => [language:protected] => Language Object ( [id:protected] => 1 [code:protected] => en [name:protected] => English [alreadyInSave:protected] => [alreadyInValidation:protected] => [validationFailures:protected] => Array ( ) [_new:BaseObject:private] => [_deleted:BaseObject:private] => [modifiedColumns:protected] => Array ( ) ) [old_record:protected] => [id:protected] => 3836 [old_id:protected] => [elcosh_id:protected] => d001305 [type:protected] => document [display_type:protected] => HTML w/ PDF [user_id:protected] => 25 [language_id:protected] => 1 [tagging_id:protected] => Bruce Lippy [priority_id:protected] => 1 [title:protected] => TBT1 Ergonomics in Construction [total_pages:protected] => 5 [billed_pages:protected] => 5 [publication_number:protected] => [part_of:protected] => [keywords:protected] => ergonomics, ergo, msd, musculoskeletal disorders, risk factors, lifting, carpal tunnel, repetition, awkward postures [comments:protected] => 7-28-2014 Jeff Nelson asked Bruce Lippy about what to do with a sentence included toward the top of the doc, "Fill them in on page 2 'Other Questions.'" -- Bruce said this sentence could be deleted from the HTML. [summary:protected] => This is the first in a series of 6 Tool Box Talks produced by Washington University in St. Louis on ergonomics in construction work. This one should be delivered first because it covers what ergonomics is, why construction workers need to talk about it, what the risk factors are for developing a health problem and how to prevent these problems. [transition_comments:protected] => [external_link:protected] => [consol_link:protected] => http://www.cpwrconstructionsolutions.org/pipes_vessels/solution/50/participatory-ergonomics-program.html [more_like_this:protected] => d001303,d001304,d001306,d001307,d001308,d001309 [permission_given_by:protected] => Lisa Jaegers, Washington U. in St. Louis [published:protected] => T [billable:protected] => F [img_name:protected] => [img_ext:protected] => png [img_width:protected] => [img_height:protected] => [img_credit:protected] => [img_practice:protected] => [vid_source_id:protected] => [vid_running_time:protected] => [vid_intended_audience:protected] => [vid_acquisition_info:protected] => [vid_cost:protected] => [vid_producer:protected] => [vid_filename:protected] => [vid_filename_downloadable:protected] => [date_summary:protected] => 2014 [date_permission_requested:protected] => [date_permission_received:protected] => [date_review_needed:protected] => [date_received:protected] => 06/12/14 [date_completed:protected] => 07/28/14 [date_billed:protected] => [date_modified:protected] => 10/09/15 [collBokExports:protected] => [lastBokExportCriteria:BaseElcoshItem:private] => [alreadyInSave:protected] => [alreadyInValidation:protected] => [validationFailures:protected] => Array ( ) [_new:BaseObject:private] => [_deleted:BaseObject:private] => [modifiedColumns:protected] => Array ( ) ) [2] => DocumentRecord Object ( [records:protected] => Array ( ) [recordId:protected] => [searchWordClass:protected] => [searchWordPeerClass:protected] => [bok_record:protected] => [authors:protected] => [organizations:protected] => [collections:protected] => [categories:protected] => [categories_initialized:protected] => [mapped_items:protected] => [content:protected] => [files:protected] => [language:protected] => Language Object ( [id:protected] => 1 [code:protected] => en [name:protected] => English [alreadyInSave:protected] => [alreadyInValidation:protected] => [validationFailures:protected] => Array ( ) [_new:BaseObject:private] => [_deleted:BaseObject:private] => [modifiedColumns:protected] => Array ( ) ) [old_record:protected] => [id:protected] => 3837 [old_id:protected] => [elcosh_id:protected] => d001306 [type:protected] => document [display_type:protected] => HTML w/ PDF [user_id:protected] => 25 [language_id:protected] => 1 [tagging_id:protected] => Bruce Lippy [priority_id:protected] => 1 [title:protected] => TBT2 Keep Reach Close [total_pages:protected] => 4 [billed_pages:protected] => 4 [publication_number:protected] => [part_of:protected] => [keywords:protected] => reach, ergonomic, ergo, MSD, carpal tunnel, repetition, awkward positions [comments:protected] => 7-28-2014 Jeff Nelson asked Bruce Lippy about what to do with a sentence included toward the top of the doc, "Fill them in on page 2 'Other Questions.'" -- Bruce said this sentence could be deleted from the HTML. [summary:protected] => This is the second of six Tool Box Talks created by Washington University in St. Louis on ergonomics in construction. There is a guide with the series that describes how to deliver these talks. This one deals with how to avoid awkward reaching during tasks to prevent injuries. try to work with your hands below your head and close to our body to reduce your risk of shoulder strains and back discomfort. This TBT recommends considering ways to move close to the task, keeping the work area free of obstacles, and talking with each other to provide constructive feedback about your working position. [transition_comments:protected] => [external_link:protected] => [consol_link:protected] => http://www.cpwrconstructionsolutions.org/hazard/959/lifting-and-carrying-manual-materials-handling.html [more_like_this:protected] => d001303,d001304,d001305,d001307,d001308,e001309 [permission_given_by:protected] => [published:protected] => T [billable:protected] => F [img_name:protected] => [img_ext:protected] => png [img_width:protected] => [img_height:protected] => [img_credit:protected] => [img_practice:protected] => [vid_source_id:protected] => [vid_running_time:protected] => [vid_intended_audience:protected] => [vid_acquisition_info:protected] => [vid_cost:protected] => [vid_producer:protected] => [vid_filename:protected] => [vid_filename_downloadable:protected] => [date_summary:protected] => 2014 [date_permission_requested:protected] => [date_permission_received:protected] => [date_review_needed:protected] => [date_received:protected] => 06/12/14 [date_completed:protected] => 07/28/14 [date_billed:protected] => [date_modified:protected] => 11/02/16 [collBokExports:protected] => [lastBokExportCriteria:BaseElcoshItem:private] => [alreadyInSave:protected] => [alreadyInValidation:protected] => [validationFailures:protected] => Array ( ) [_new:BaseObject:private] => [_deleted:BaseObject:private] => [modifiedColumns:protected] => Array ( ) ) [3] => DocumentRecord Object ( [records:protected] => Array ( ) [recordId:protected] => [searchWordClass:protected] => [searchWordPeerClass:protected] => [bok_record:protected] => [authors:protected] => [organizations:protected] => [collections:protected] => [categories:protected] => [categories_initialized:protected] => [mapped_items:protected] => [content:protected] => [files:protected] => [language:protected] => Language Object ( [id:protected] => 1 [code:protected] => en [name:protected] => English [alreadyInSave:protected] => [alreadyInValidation:protected] => [validationFailures:protected] => Array ( ) [_new:BaseObject:private] => [_deleted:BaseObject:private] => [modifiedColumns:protected] => Array ( ) ) [old_record:protected] => [id:protected] => 3839 [old_id:protected] => [elcosh_id:protected] => d001308 [type:protected] => document [display_type:protected] => HTML w/ PDF [user_id:protected] => 23 [language_id:protected] => 1 [tagging_id:protected] => Bruce Lippy [priority_id:protected] => 1 [title:protected] => TBT4 Move Materials With Assist [total_pages:protected] => 4 [billed_pages:protected] => 4 [publication_number:protected] => [part_of:protected] => [keywords:protected] => lifting, back injury, ergonomics, ergo, MSD, buddy system [comments:protected] => 7-28-2014 Jeff Nelson asked Bruce Lippy about what to do with a sentence included toward the top of the doc, "Fill them in on page 2 'Other Questions.'" -- Bruce said this sentence could be deleted from the HTML. [summary:protected] => This tool box talk is fourth in a series of 6 developed by Washington University in St. Louis on construction ergonomics. This one focuses on preventing back injuries by getting an assist when manually lifting. It recommends using a cart for transporting loads, taking less trips, avoiding carrying materials on the shoulder and helping each other to lift large or heavy materials when a cart or hoist is not available. [transition_comments:protected] => [external_link:protected] => [consol_link:protected] => http://www.cpwrconstructionsolutions.org/hazard/959/lifting-and-carrying-manual-materials-handling.html [more_like_this:protected] => d001303,d001304,d001305,d001306,d001307,d001309 [permission_given_by:protected] => Lisa Jaegers, Washington U. in St. Louis [published:protected] => T [billable:protected] => F [img_name:protected] => [img_ext:protected] => png [img_width:protected] => [img_height:protected] => [img_credit:protected] => [img_practice:protected] => [vid_source_id:protected] => [vid_running_time:protected] => [vid_intended_audience:protected] => [vid_acquisition_info:protected] => [vid_cost:protected] => [vid_producer:protected] => [vid_filename:protected] => [vid_filename_downloadable:protected] => [date_summary:protected] => 2014 [date_permission_requested:protected] => [date_permission_received:protected] => [date_review_needed:protected] => [date_received:protected] => 06/12/14 [date_completed:protected] => 07/29/14 [date_billed:protected] => [date_modified:protected] => 10/09/15 [collBokExports:protected] => [lastBokExportCriteria:BaseElcoshItem:private] => [alreadyInSave:protected] => [alreadyInValidation:protected] => [validationFailures:protected] => Array ( ) [_new:BaseObject:private] => [_deleted:BaseObject:private] => [modifiedColumns:protected] => Array ( ) ) [4] => DocumentRecord Object ( [records:protected] => Array ( ) [recordId:protected] => [searchWordClass:protected] => [searchWordPeerClass:protected] => [bok_record:protected] => [authors:protected] => [organizations:protected] => [collections:protected] => [categories:protected] => [categories_initialized:protected] => [mapped_items:protected] => [content:protected] => [files:protected] => [language:protected] => Language Object ( [id:protected] => 1 [code:protected] => en [name:protected] => English [alreadyInSave:protected] => [alreadyInValidation:protected] => [validationFailures:protected] => Array ( ) [_new:BaseObject:private] => [_deleted:BaseObject:private] => [modifiedColumns:protected] => Array ( ) ) [old_record:protected] => [id:protected] => 3840 [old_id:protected] => [elcosh_id:protected] => d001309 [type:protected] => document [display_type:protected] => HTML w/ PDF [user_id:protected] => 23 [language_id:protected] => 1 [tagging_id:protected] => Bruce Lippy [priority_id:protected] => 1 [title:protected] => TBT5 Manual Tools [total_pages:protected] => 4 [billed_pages:protected] => 4 [publication_number:protected] => [part_of:protected] => [keywords:protected] => ergonomic, hand tools, handles, MSD, musculoskeletal disorder, carpal tunnel [comments:protected] => 7-28-2014 Jeff Nelson asked Bruce Lippy about what to do with a sentence included toward the top of the doc, "Fill them in on page 2 'Other Questions.'" -- Bruce said this sentence could be deleted from the HTML. [summary:protected] => This is the fifth in a series of 6 tool box talks on construction ergonomics produced by the University of Washington in St. Louis. This one focuses on manual tools. It asks the following 6 key questions. Does the tool… 1. Fit the task? 2. Allow a good power grip? 3. Keep the wrist in a straight posture? 4. Feel comfortable? 5. Take less effort than other tools for the task? 6. Work effectively? [transition_comments:protected] => [external_link:protected] => [consol_link:protected] => http://www.cpwrconstructionsolutions.org/masonry/solution/383/ergonomic-hand-tools.html [more_like_this:protected] => d001303,d001304,d001305,d001306,d001307,d001308,d001310 [permission_given_by:protected] => Lisa Jaegers, U. Wash. St. Louis [published:protected] => T [billable:protected] => F [img_name:protected] => [img_ext:protected] => png [img_width:protected] => [img_height:protected] => [img_credit:protected] => [img_practice:protected] => [vid_source_id:protected] => [vid_running_time:protected] => [vid_intended_audience:protected] => [vid_acquisition_info:protected] => [vid_cost:protected] => [vid_producer:protected] => [vid_filename:protected] => [vid_filename_downloadable:protected] => [date_summary:protected] => 2014 [date_permission_requested:protected] => [date_permission_received:protected] => [date_review_needed:protected] => [date_received:protected] => 06/12/14 [date_completed:protected] => 07/29/14 [date_billed:protected] => [date_modified:protected] => 10/09/15 [collBokExports:protected] => [lastBokExportCriteria:BaseElcoshItem:private] => [alreadyInSave:protected] => [alreadyInValidation:protected] => [validationFailures:protected] => Array ( ) [_new:BaseObject:private] => [_deleted:BaseObject:private] => [modifiedColumns:protected] => Array ( ) ) ) ) [collections] => Array ( [3834] => ) [record] => DocumentRecord Object ( [records:protected] => Array ( ) [recordId:protected] => [searchWordClass:protected] => [searchWordPeerClass:protected] => [bok_record:protected] => [authors:protected] => Array ( ) [organizations:protected] => Array ( [182] => Organization Object ( [id:protected] => 182 [elcosh_id:protected] => o000205 [user_id:protected] => 14 [province_id:protected] => 0 [country_id:protected] => 0 [title:protected] => Washington University - St. Louis [address:protected] => [postal_code:protected] => [city:protected] => [department:protected] => [phone:protected] => [fax:protected] => [email:protected] => [website:protected] => [filename:protected] => [about:protected] => [comments:protected] => [logo_available:protected] => T [no_details:protected] => T [date_received:protected] => 2009-08-06 [date_completed:protected] => 2009-08-06 [date_billed:protected] => [alreadyInSave:protected] => [alreadyInValidation:protected] => [validationFailures:protected] => Array ( ) [_new:BaseObject:private] => [_deleted:BaseObject:private] => [modifiedColumns:protected] => Array ( ) ) ) [collections:protected] => Array ( [3834] => ) [categories:protected] => [categories_initialized:protected] => [mapped_items:protected] => Array ( [3833] => DocumentRecord Object ( [records:protected] => Array ( ) [recordId:protected] => [searchWordClass:protected] => [searchWordPeerClass:protected] => [bok_record:protected] => [authors:protected] => [organizations:protected] => [collections:protected] => [categories:protected] => [categories_initialized:protected] => [mapped_items:protected] => [content:protected] => [files:protected] => [language:protected] => [old_record:protected] => [id:protected] => 3833 [old_id:protected] => [elcosh_id:protected] => d001303 [type:protected] => document [display_type:protected] => HTML w/ PDF [user_id:protected] => 25 [language_id:protected] => 1 [tagging_id:protected] => Bruce Lippy [priority_id:protected] => 1 [title:protected] => Overview of Toolbox Talks on Ergonomics Developed by Washington University in St. Louis [total_pages:protected] => 3 [billed_pages:protected] => 3 [publication_number:protected] => [part_of:protected] => [keywords:protected] => ergonomics, musculoskeletal disorders, MSDs [comments:protected] => 7-28-2014 - Originally submitted as "HTML w/ doc and PDF", Jeff Nelson asked Bruce Lippy for permission to switch it to "HTML w/ PDF" -- permission was given [summary:protected] => This overviews provides a background on how Washington University in St. Louis developed this series of six toolbox talks on ergonomics. It also describes how they tested the effectiveness of these communication tools, concluding that the guide was valuable for improving the delivery of ergonomics training and interaction between the safety representative and workers. The researchers recommend preparing site-specific information prior to the talk and interacting with workers to discuss problems and ergonomic solutions during the safety meetings. [transition_comments:protected] => [external_link:protected] => [consol_link:protected] => [more_like_this:protected] => [permission_given_by:protected] => Lisa Jaegers, Washington U. in St. Louis [published:protected] => T [billable:protected] => F [img_name:protected] => [img_ext:protected] => png [img_width:protected] => [img_height:protected] => [img_credit:protected] => [img_practice:protected] => [vid_source_id:protected] => [vid_running_time:protected] => [vid_intended_audience:protected] => [vid_acquisition_info:protected] => [vid_cost:protected] => [vid_producer:protected] => [vid_filename:protected] => [vid_filename_downloadable:protected] => [date_summary:protected] => 2014 [date_permission_requested:protected] => [date_permission_received:protected] => [date_review_needed:protected] => [date_received:protected] => 06/11/14 [date_completed:protected] => 07/29/14 [date_billed:protected] => [date_modified:protected] => 07/29/14 [collBokExports:protected] => [lastBokExportCriteria:BaseElcoshItem:private] => [alreadyInSave:protected] => [alreadyInValidation:protected] => [validationFailures:protected] => Array ( ) [_new:BaseObject:private] => [_deleted:BaseObject:private] => [modifiedColumns:protected] => Array ( ) ) [3835] => DocumentRecord Object ( [records:protected] => Array ( ) [recordId:protected] => [searchWordClass:protected] => [searchWordPeerClass:protected] => [bok_record:protected] => [authors:protected] => [organizations:protected] => [collections:protected] => [categories:protected] => [categories_initialized:protected] => [mapped_items:protected] => [content:protected] => [files:protected] => [language:protected] => [old_record:protected] => [id:protected] => 3835 [old_id:protected] => [elcosh_id:protected] => d001304 [type:protected] => document [display_type:protected] => HTML w/ PDF [user_id:protected] => 25 [language_id:protected] => 1 [tagging_id:protected] => Bruce Lippy [priority_id:protected] => 1 [title:protected] => Ergonomics Tool Box Talks (TBT) Training Guide [total_pages:protected] => 2 [billed_pages:protected] => 2 [publication_number:protected] => [part_of:protected] => [keywords:protected] => Ergonomics, carpal tunnel, muscular skeletal disorders, msd [comments:protected] => [summary:protected] => CPWR-funded ergonomics research by Washington University at St. Louis led to the development of 6 tool box talks. This guide is an explanation of how to deliver the talks for maximum effectiveness. This guide should be reviewed before delivering any of the talks because it makes important recommendations like: • If possible, give the TBTs as a part of the crew’s regular safety meetings so that ergonomics is included in the safety discussion. • Try to locate an area with few distractions for gathering the crew. • For a team approach, invite the work crew, site superintendent, project manager and other general contractor and/or subcontractor reps who you feel may be helpful in supporting the training and ergonomics solutions. [transition_comments:protected] => [external_link:protected] => [consol_link:protected] => [more_like_this:protected] => d001303,d001305,d001306,d001307,d001308,d001309,d001310 [permission_given_by:protected] => [published:protected] => T [billable:protected] => F [img_name:protected] => [img_ext:protected] => png [img_width:protected] => [img_height:protected] => [img_credit:protected] => [img_practice:protected] => [vid_source_id:protected] => [vid_running_time:protected] => [vid_intended_audience:protected] => [vid_acquisition_info:protected] => [vid_cost:protected] => [vid_producer:protected] => [vid_filename:protected] => [vid_filename_downloadable:protected] => [date_summary:protected] => 2014 [date_permission_requested:protected] => [date_permission_received:protected] => [date_review_needed:protected] => [date_received:protected] => 06/12/14 [date_completed:protected] => 07/29/14 [date_billed:protected] => [date_modified:protected] => 07/29/14 [collBokExports:protected] => [lastBokExportCriteria:BaseElcoshItem:private] => [alreadyInSave:protected] => [alreadyInValidation:protected] => [validationFailures:protected] => Array ( ) [_new:BaseObject:private] => [_deleted:BaseObject:private] => [modifiedColumns:protected] => Array ( ) ) [3836] => DocumentRecord Object ( [records:protected] => Array ( ) [recordId:protected] => [searchWordClass:protected] => [searchWordPeerClass:protected] => [bok_record:protected] => [authors:protected] => [organizations:protected] => [collections:protected] => [categories:protected] => [categories_initialized:protected] => [mapped_items:protected] => [content:protected] => [files:protected] => [language:protected] => [old_record:protected] => [id:protected] => 3836 [old_id:protected] => [elcosh_id:protected] => d001305 [type:protected] => document [display_type:protected] => HTML w/ PDF [user_id:protected] => 25 [language_id:protected] => 1 [tagging_id:protected] => Bruce Lippy [priority_id:protected] => 1 [title:protected] => TBT1 Ergonomics in Construction [total_pages:protected] => 5 [billed_pages:protected] => 5 [publication_number:protected] => [part_of:protected] => [keywords:protected] => ergonomics, ergo, msd, musculoskeletal disorders, risk factors, lifting, carpal tunnel, repetition, awkward postures [comments:protected] => 7-28-2014 Jeff Nelson asked Bruce Lippy about what to do with a sentence included toward the top of the doc, "Fill them in on page 2 'Other Questions.'" -- Bruce said this sentence could be deleted from the HTML. [summary:protected] => This is the first in a series of 6 Tool Box Talks produced by Washington University in St. Louis on ergonomics in construction work. This one should be delivered first because it covers what ergonomics is, why construction workers need to talk about it, what the risk factors are for developing a health problem and how to prevent these problems. [transition_comments:protected] => [external_link:protected] => [consol_link:protected] => http://www.cpwrconstructionsolutions.org/pipes_vessels/solution/50/participatory-ergonomics-program.html [more_like_this:protected] => d001303,d001304,d001306,d001307,d001308,d001309 [permission_given_by:protected] => Lisa Jaegers, Washington U. in St. Louis [published:protected] => T [billable:protected] => F [img_name:protected] => [img_ext:protected] => png [img_width:protected] => [img_height:protected] => [img_credit:protected] => [img_practice:protected] => [vid_source_id:protected] => [vid_running_time:protected] => [vid_intended_audience:protected] => [vid_acquisition_info:protected] => [vid_cost:protected] => [vid_producer:protected] => [vid_filename:protected] => [vid_filename_downloadable:protected] => [date_summary:protected] => 2014 [date_permission_requested:protected] => [date_permission_received:protected] => [date_review_needed:protected] => [date_received:protected] => 06/12/14 [date_completed:protected] => 07/28/14 [date_billed:protected] => [date_modified:protected] => 10/09/15 [collBokExports:protected] => [lastBokExportCriteria:BaseElcoshItem:private] => [alreadyInSave:protected] => [alreadyInValidation:protected] => [validationFailures:protected] => Array ( ) [_new:BaseObject:private] => [_deleted:BaseObject:private] => [modifiedColumns:protected] => Array ( ) ) [3837] => DocumentRecord Object ( [records:protected] => Array ( ) [recordId:protected] => [searchWordClass:protected] => [searchWordPeerClass:protected] => [bok_record:protected] => [authors:protected] => [organizations:protected] => [collections:protected] => [categories:protected] => [categories_initialized:protected] => [mapped_items:protected] => [content:protected] => [files:protected] => [language:protected] => [old_record:protected] => [id:protected] => 3837 [old_id:protected] => [elcosh_id:protected] => d001306 [type:protected] => document [display_type:protected] => HTML w/ PDF [user_id:protected] => 25 [language_id:protected] => 1 [tagging_id:protected] => Bruce Lippy [priority_id:protected] => 1 [title:protected] => TBT2 Keep Reach Close [total_pages:protected] => 4 [billed_pages:protected] => 4 [publication_number:protected] => [part_of:protected] => [keywords:protected] => reach, ergonomic, ergo, MSD, carpal tunnel, repetition, awkward positions [comments:protected] => 7-28-2014 Jeff Nelson asked Bruce Lippy about what to do with a sentence included toward the top of the doc, "Fill them in on page 2 'Other Questions.'" -- Bruce said this sentence could be deleted from the HTML. [summary:protected] => This is the second of six Tool Box Talks created by Washington University in St. Louis on ergonomics in construction. There is a guide with the series that describes how to deliver these talks. This one deals with how to avoid awkward reaching during tasks to prevent injuries. try to work with your hands below your head and close to our body to reduce your risk of shoulder strains and back discomfort. This TBT recommends considering ways to move close to the task, keeping the work area free of obstacles, and talking with each other to provide constructive feedback about your working position. [transition_comments:protected] => [external_link:protected] => [consol_link:protected] => http://www.cpwrconstructionsolutions.org/hazard/959/lifting-and-carrying-manual-materials-handling.html [more_like_this:protected] => d001303,d001304,d001305,d001307,d001308,e001309 [permission_given_by:protected] => [published:protected] => T [billable:protected] => F [img_name:protected] => [img_ext:protected] => png [img_width:protected] => [img_height:protected] => [img_credit:protected] => [img_practice:protected] => [vid_source_id:protected] => [vid_running_time:protected] => [vid_intended_audience:protected] => [vid_acquisition_info:protected] => [vid_cost:protected] => [vid_producer:protected] => [vid_filename:protected] => [vid_filename_downloadable:protected] => [date_summary:protected] => 2014 [date_permission_requested:protected] => [date_permission_received:protected] => [date_review_needed:protected] => [date_received:protected] => 06/12/14 [date_completed:protected] => 07/28/14 [date_billed:protected] => [date_modified:protected] => 11/02/16 [collBokExports:protected] => [lastBokExportCriteria:BaseElcoshItem:private] => [alreadyInSave:protected] => [alreadyInValidation:protected] => [validationFailures:protected] => Array ( ) [_new:BaseObject:private] => [_deleted:BaseObject:private] => [modifiedColumns:protected] => Array ( ) ) [3839] => DocumentRecord Object ( [records:protected] => Array ( ) [recordId:protected] => [searchWordClass:protected] => [searchWordPeerClass:protected] => [bok_record:protected] => [authors:protected] => [organizations:protected] => [collections:protected] => [categories:protected] => [categories_initialized:protected] => [mapped_items:protected] => [content:protected] => [files:protected] => [language:protected] => [old_record:protected] => [id:protected] => 3839 [old_id:protected] => [elcosh_id:protected] => d001308 [type:protected] => document [display_type:protected] => HTML w/ PDF [user_id:protected] => 23 [language_id:protected] => 1 [tagging_id:protected] => Bruce Lippy [priority_id:protected] => 1 [title:protected] => TBT4 Move Materials With Assist [total_pages:protected] => 4 [billed_pages:protected] => 4 [publication_number:protected] => [part_of:protected] => [keywords:protected] => lifting, back injury, ergonomics, ergo, MSD, buddy system [comments:protected] => 7-28-2014 Jeff Nelson asked Bruce Lippy about what to do with a sentence included toward the top of the doc, "Fill them in on page 2 'Other Questions.'" -- Bruce said this sentence could be deleted from the HTML. [summary:protected] => This tool box talk is fourth in a series of 6 developed by Washington University in St. Louis on construction ergonomics. This one focuses on preventing back injuries by getting an assist when manually lifting. It recommends using a cart for transporting loads, taking less trips, avoiding carrying materials on the shoulder and helping each other to lift large or heavy materials when a cart or hoist is not available. [transition_comments:protected] => [external_link:protected] => [consol_link:protected] => http://www.cpwrconstructionsolutions.org/hazard/959/lifting-and-carrying-manual-materials-handling.html [more_like_this:protected] => d001303,d001304,d001305,d001306,d001307,d001309 [permission_given_by:protected] => Lisa Jaegers, Washington U. in St. Louis [published:protected] => T [billable:protected] => F [img_name:protected] => [img_ext:protected] => png [img_width:protected] => [img_height:protected] => [img_credit:protected] => [img_practice:protected] => [vid_source_id:protected] => [vid_running_time:protected] => [vid_intended_audience:protected] => [vid_acquisition_info:protected] => [vid_cost:protected] => [vid_producer:protected] => [vid_filename:protected] => [vid_filename_downloadable:protected] => [date_summary:protected] => 2014 [date_permission_requested:protected] => [date_permission_received:protected] => [date_review_needed:protected] => [date_received:protected] => 06/12/14 [date_completed:protected] => 07/29/14 [date_billed:protected] => [date_modified:protected] => 10/09/15 [collBokExports:protected] => [lastBokExportCriteria:BaseElcoshItem:private] => [alreadyInSave:protected] => [alreadyInValidation:protected] => [validationFailures:protected] => Array ( ) [_new:BaseObject:private] => [_deleted:BaseObject:private] => [modifiedColumns:protected] => Array ( ) ) [3840] => DocumentRecord Object ( [records:protected] => Array ( ) [recordId:protected] => [searchWordClass:protected] => [searchWordPeerClass:protected] => [bok_record:protected] => [authors:protected] => [organizations:protected] => [collections:protected] => [categories:protected] => [categories_initialized:protected] => [mapped_items:protected] => [content:protected] => [files:protected] => [language:protected] => [old_record:protected] => [id:protected] => 3840 [old_id:protected] => [elcosh_id:protected] => d001309 [type:protected] => document [display_type:protected] => HTML w/ PDF [user_id:protected] => 23 [language_id:protected] => 1 [tagging_id:protected] => Bruce Lippy [priority_id:protected] => 1 [title:protected] => TBT5 Manual Tools [total_pages:protected] => 4 [billed_pages:protected] => 4 [publication_number:protected] => [part_of:protected] => [keywords:protected] => ergonomic, hand tools, handles, MSD, musculoskeletal disorder, carpal tunnel [comments:protected] => 7-28-2014 Jeff Nelson asked Bruce Lippy about what to do with a sentence included toward the top of the doc, "Fill them in on page 2 'Other Questions.'" -- Bruce said this sentence could be deleted from the HTML. [summary:protected] => This is the fifth in a series of 6 tool box talks on construction ergonomics produced by the University of Washington in St. Louis. This one focuses on manual tools. It asks the following 6 key questions. Does the tool… 1. Fit the task? 2. Allow a good power grip? 3. Keep the wrist in a straight posture? 4. Feel comfortable? 5. Take less effort than other tools for the task? 6. Work effectively? [transition_comments:protected] => [external_link:protected] => [consol_link:protected] => http://www.cpwrconstructionsolutions.org/masonry/solution/383/ergonomic-hand-tools.html [more_like_this:protected] => d001303,d001304,d001305,d001306,d001307,d001308,d001310 [permission_given_by:protected] => Lisa Jaegers, U. Wash. St. Louis [published:protected] => T [billable:protected] => F [img_name:protected] => [img_ext:protected] => png [img_width:protected] => [img_height:protected] => [img_credit:protected] => [img_practice:protected] => [vid_source_id:protected] => [vid_running_time:protected] => [vid_intended_audience:protected] => [vid_acquisition_info:protected] => [vid_cost:protected] => [vid_producer:protected] => [vid_filename:protected] => [vid_filename_downloadable:protected] => [date_summary:protected] => 2014 [date_permission_requested:protected] => [date_permission_received:protected] => [date_review_needed:protected] => [date_received:protected] => 06/12/14 [date_completed:protected] => 07/29/14 [date_billed:protected] => [date_modified:protected] => 10/09/15 [collBokExports:protected] => [lastBokExportCriteria:BaseElcoshItem:private] => [alreadyInSave:protected] => [alreadyInValidation:protected] => [validationFailures:protected] => Array ( ) [_new:BaseObject:private] => [_deleted:BaseObject:private] => [modifiedColumns:protected] => Array ( ) ) ) [content:protected] => [files:protected] => Array ( [559] => [560] => [546] => File Object ( [id:protected] => 546 [filename:protected] => 3.jpg [downloadable:protected] => F [timestamp:protected] => 2009-07-03 12:54:22 [alreadyInSave:protected] => [alreadyInValidation:protected] => [validationFailures:protected] => Array ( ) [_new:BaseObject:private] => [_deleted:BaseObject:private] => [modifiedColumns:protected] => Array ( ) ) [9643] => File Object ( [id:protected] => 9643 [filename:protected] => d001307.pdf [downloadable:protected] => T [timestamp:protected] => 2014-07-27 19:09:19 [alreadyInSave:protected] => [alreadyInValidation:protected] => [validationFailures:protected] => Array ( ) [_new:BaseObject:private] => [_deleted:BaseObject:private] => [modifiedColumns:protected] => Array ( ) ) [566] => File Object ( [id:protected] => 566 [filename:protected] => 4.jpg [downloadable:protected] => F [timestamp:protected] => 2009-07-03 12:54:23 [alreadyInSave:protected] => [alreadyInValidation:protected] => [validationFailures:protected] => Array ( ) [_new:BaseObject:private] => [_deleted:BaseObject:private] => [modifiedColumns:protected] => Array ( ) ) ) [language:protected] => Language Object ( [id:protected] => 1 [code:protected] => en [name:protected] => English [alreadyInSave:protected] => [alreadyInValidation:protected] => [validationFailures:protected] => Array ( ) [_new:BaseObject:private] => [_deleted:BaseObject:private] => [modifiedColumns:protected] => Array ( ) ) [old_record:protected] => [id:protected] => 3838 [old_id:protected] => [elcosh_id:protected] => d001307 [type:protected] => document [display_type:protected] => HTML w/ PDF [user_id:protected] => 25 [language_id:protected] => 1 [tagging_id:protected] => Bruce Lippy [priority_id:protected] => 1 [title:protected] => TBT3 Positioning [total_pages:protected] => 4 [billed_pages:protected] => 4 [publication_number:protected] => [part_of:protected] => [keywords:protected] => position, positioning, ergonomics, ergo, carpal tunnel, MSD, musculoskeletal disorder [comments:protected] => 7-28-2014 Jeff Nelson asked Bruce Lippy about what to do with a sentence included toward the top of the doc, "Fill them in on page 2 'Other Questions.'" -- Bruce said this sentence could be deleted from the HTML. [summary:protected] => This third in a series of 6 Tool Box Talks on construction ergonomics focuses on proper positioning to avoid injuries. The TBT recommends: 1)prop up a task off of the floor by using a raised surface, cart, baker scaffold, saw horses to prep materials near waist height, 2)move the lift or ladder in the best position for the work, 3)position the lift in front of the area you plan to work without trying to reach too far on either side of the lift. [transition_comments:protected] => [external_link:protected] => [consol_link:protected] => http://www.cpwrconstructionsolutions.org/hazard/959/lifting-and-carrying-manual-materials-handling.html [more_like_this:protected] => d001303,d001304,d001305,d001306,d001308,d001309 [permission_given_by:protected] => Lisa Jaegers, WU-St. Louis [published:protected] => T [billable:protected] => F [img_name:protected] => [img_ext:protected] => png [img_width:protected] => [img_height:protected] => [img_credit:protected] => [img_practice:protected] => [vid_source_id:protected] => [vid_running_time:protected] => [vid_intended_audience:protected] => [vid_acquisition_info:protected] => [vid_cost:protected] => [vid_producer:protected] => [vid_filename:protected] => [vid_filename_downloadable:protected] => [date_summary:protected] => 2014 [date_permission_requested:protected] => [date_permission_received:protected] => [date_review_needed:protected] => [date_received:protected] => 06/12/14 [date_completed:protected] => 07/28/14 [date_billed:protected] => [date_modified:protected] => 10/09/15 [collBokExports:protected] => [lastBokExportCriteria:BaseElcoshItem:private] => [alreadyInSave:protected] => [alreadyInValidation:protected] => [validationFailures:protected] => Array ( ) [_new:BaseObject:private] => [_deleted:BaseObject:private] => [modifiedColumns:protected] => Array ( ) ) [show_text] => [document_content] => ElcoshItemDocumentContent Object ( [id:protected] => 2906 [item_id:protected] => 3838 [type:protected] => main [title:protected] => [content:protected] =>
Facilitator / Leader Tasks Before the Tool Box Talk (TBT)
- Read through this TBT guide.
- Walk the job site to find ergonomics examples based on the TBT. If possible, take photos of “safe” and “unsafe” examples at the site to be used during the TBT.
- Write down discussion questions to ask the group.
Learning Goals
After discussing this training topic, workers will have gained a general understanding of:
- Unsafe work positions.
- Solutions to improve work positioning.
TRAINING CARD
The last page of this PDF has directions for printing and laminating the training cards.
TRAINER’S TALKING POINTS
Why should we talk about positioning?
Construction work requires working in high, low, and tight spaces which often forces you to work in an awkward or uncomfortable position. Working in awkward reaching and bent positions can lead to shoulder and back discomfort and possible injury over time.
Demonstration: The training card provides examples of the range of reaching and the point at which the reach is unsafe. Hold your arms straight out in front of you. Look at your hands and wrists while I discuss each of the reach zones on the training card.
The Green Zone shows the ideal location for working with your hands. When possible, try to keep your work tasks as far out as your wrists.
The Orange Zone is for occasional work since it involves more weight on your shoulders and low back since your hands are away from your body. If needed, keep the reach distance as far as your fingertips.
The Red Zone is away from your body so far that it places you at higher risk for falls when in the air and shoulder and back discomfort. Limit the time you work reaching beyond your fingertips.
End of Demonstration
Discussion Question: Can anyone describe to us an awkward position that they work in or have seen someone work in?
- What does it feel like in your neck, back or arms when working in that position?
- Other Questions:_____________________________________________
Training Note: Here are examples of hazards in different construction trades. Choose your trade or one that is similar to your group’s line of work that can be used as hazards and solutions examples.
| Trade | Awkward Posture Hazards | Potential Solution |
|---|---|---|
| Carpenter-Drywall | Leaning over the side of a scissor lift to reach and operating a screw gun with the arm fully extended (reaching in the red zone past the fingertips). | Before starting to install the line of screws to the side of the lift, move the lift to re-center it for the next 2 lines of screws to be installed. |
| Floor Layer | Spreading mortar overhead on a wall with the bakers scaffold one foot away from the wall due to buckets on the floor below (reach in the red zone, past the fingertips). | Pre-plan this task by removing all objects in the path of the bakers scaffold. Having an open path allows you to work closer to the task. |
| Sheet Metal Worker | Prepping duct parts on the floor while bending the back and reaching to work on them. | Pre-plan this task by setting up a waist-height workstation on extra materials, a cart, or saw horses. |
Now let’s put this information into practice. What are some tricks or techniques that you use to work in a comfortable position?
- Other Questions:_____________________________________________
Here are a few other ideas that are listed on your training card:
Prop up your tasks off of the floor by using a raised surface, cart, baker scaffold, saw horses to prep materials near waist height.
Move the lift or ladder in the best position for the work – close to the work tasks.
For safety & comfort, try to position the lift in front of the area you plan to work without trying to reach too far on either side of the lift.
In summary, it is important to work in a safe position when possible in order to reduce the risk of falls and discomfort due to awkward working positions. Consider ways that you can work in the green/comfort zone and orange zone and avoid the unsafe red zone.
References
[Images modified from Grandjean & Eastman Kodak Co.]
1. Grandjean, E. 1988. Fitting the task to the man: A textbook of occupational ergonomics. 4th ed. Taylor & Francis.
2. Eastman Kodak Co. 1983. Ergonomic Design for People at Work. Vol 1. Wiley, John & Sons, Incorporated.
Refer to the resources at our website: oshr.im.wustl.edu for more Tool Box TIPS.
TRAINING ATTENDANCE SHEET
Training Topic: Ergonomics -- Positioning
Date:
| ATTENDEES | |
|---|---|
Directions for Making Laminated Training Cards
The last page of this PDF has directions for printing and laminating the training cards.
[content_transformed:protected] =>Facilitator / Leader Tasks Before the Tool Box Talk (TBT)
- Read through this TBT guide.
- Walk the job site to find ergonomics examples based on the TBT. If possible, take photos of “safe” and “unsafe” examples at the site to be used during the TBT.
- Write down discussion questions to ask the group.
Learning Goals
After discussing this training topic, workers will have gained a general understanding of:
- Unsafe work positions.
- Solutions to improve work positioning.
TRAINING CARD
The last page of this PDF has directions for printing and laminating the training cards.
TRAINER’S TALKING POINTS
Why should we talk about positioning?
Construction work requires working in high, low, and tight spaces which often forces you to work in an awkward or uncomfortable position. Working in awkward reaching and bent positions can lead to shoulder and back discomfort and possible injury over time.
Demonstration: The training card provides examples of the range of reaching and the point at which the reach is unsafe. Hold your arms straight out in front of you. Look at your hands and wrists while I discuss each of the reach zones on the training card.
The Green Zone shows the ideal location for working with your hands. When possible, try to keep your work tasks as far out as your wrists.
The Orange Zone is for occasional work since it involves more weight on your shoulders and low back since your hands are away from your body. If needed, keep the reach distance as far as your fingertips.
The Red Zone is away from your body so far that it places you at higher risk for falls when in the air and shoulder and back discomfort. Limit the time you work reaching beyond your fingertips.
End of Demonstration
Discussion Question: Can anyone describe to us an awkward position that they work in or have seen someone work in?
- What does it feel like in your neck, back or arms when working in that position?
- Other Questions:_____________________________________________
Training Note: Here are examples of hazards in different construction trades. Choose your trade or one that is similar to your group’s line of work that can be used as hazards and solutions examples.
| Trade | Awkward Posture Hazards | Potential Solution |
|---|---|---|
| Carpenter-Drywall | Leaning over the side of a scissor lift to reach and operating a screw gun with the arm fully extended (reaching in the red zone past the fingertips). | Before starting to install the line of screws to the side of the lift, move the lift to re-center it for the next 2 lines of screws to be installed. |
| Floor Layer | Spreading mortar overhead on a wall with the bakers scaffold one foot away from the wall due to buckets on the floor below (reach in the red zone, past the fingertips). | Pre-plan this task by removing all objects in the path of the bakers scaffold. Having an open path allows you to work closer to the task. |
| Sheet Metal Worker | Prepping duct parts on the floor while bending the back and reaching to work on them. | Pre-plan this task by setting up a waist-height workstation on extra materials, a cart, or saw horses. |
Now let’s put this information into practice. What are some tricks or techniques that you use to work in a comfortable position?
- Other Questions:_____________________________________________
Here are a few other ideas that are listed on your training card:
Prop up your tasks off of the floor by using a raised surface, cart, baker scaffold, saw horses to prep materials near waist height.
Move the lift or ladder in the best position for the work – close to the work tasks.
For safety & comfort, try to position the lift in front of the area you plan to work without trying to reach too far on either side of the lift.
In summary, it is important to work in a safe position when possible in order to reduce the risk of falls and discomfort due to awkward working positions. Consider ways that you can work in the green/comfort zone and orange zone and avoid the unsafe red zone.
References
[Images modified from Grandjean & Eastman Kodak Co.]
1. Grandjean, E. 1988. Fitting the task to the man: A textbook of occupational ergonomics. 4th ed. Taylor & Francis.
2. Eastman Kodak Co. 1983. Ergonomic Design for People at Work. Vol 1. Wiley, John & Sons, Incorporated.
Refer to the resources at our website: oshr.im.wustl.edu for more Tool Box TIPS.
TRAINING ATTENDANCE SHEET
Training Topic: Ergonomics -- Positioning
Date:
| ATTENDEES | |
|---|---|
Directions for Making Laminated Training Cards
The last page of this PDF has directions for printing and laminating the training cards.
[disclaimer:protected] => [disclaimer_transformed:protected] => [alreadyInSave:protected] => [alreadyInValidation:protected] => [validationFailures:protected] => Array ( ) [_new:BaseObject:private] => [_deleted:BaseObject:private] => [modifiedColumns:protected] => Array ( ) ) [template] => record ) [_globalContext:PHPTAL_Context:private] => stdClass Object ( ) [_echoDeclarations:PHPTAL_Context:private] => [referer] => http://elcosh.org/document/3838/d001307/TBT3%2BPositioning.html [curr_module] => Record [styles] => Array ( ) [javascript] => Array ( [0] => jquery.min.js ) [metas] => Array ( [language] => en [robots] => index, follow ) [user] => [curr_url] => https://elcosh.org/index.php?module=Record&id=3838&type=document [base_url] => https://elcosh.org/index.php?module=Record [title] => eLCOSH : TBT3 Positioning [language] => en [search_query] => [module] => Record [new_records] => Array ( [0] => Search_Result Object ( [title] => Toolbox Talk: Fixed Ladder [image] => /record/images/notavailable-p.png [blurb] => The CPWR Toolbox Talk on Fixed Ladders addresses the potential risks associated with using fixed ladders. The resource includes a brief case example,... [category] => Array ( [0] => 15 [1] => 47 [2] => 49 [3] => 51 [4] => 53 [5] => 55 [6] => 60 [7] => 64 [8] => 73 [9] => 76 [10] => 78 [11] => 80 [12] => 86 [13] => 87 [14] => 90 [15] => 92 [16] => 93 [17] => 94 [18] => 100 ) [labels] => Array ( [0] => Falls [1] => Work Environment [2] => Hazards [3] => Bricklayer [4] => Trades [5] => Carpenter [7] => Cement Mason [9] => Concrete Polisher [11] => Electrical Worker [13] => HVAC [15] => Laborer [17] => PCC/Restoration [19] => Plumber/Pipefitter [21] => Roofer/Waterproofer [23] => Sheetmetal Worker [25] => Welder [27] => Commercial & Institutional [28] => Jobsites [29] => Industrial [31] => LEED/Green Construction [33] => Renovations [35] => Residential [37] => Toolbox Talks [38] => Documents [39] => Media & Documents ) [type] => Toolbox Talks [sub_category] => [url] => /document/4430/d001660/Toolbox%2BTalk%253A%2BFixed%2BLadder.html [item:protected] => DocumentRecord Object ( [records:protected] => Array ( ) [recordId:protected] => [searchWordClass:protected] => [searchWordPeerClass:protected] => [bok_record:protected] => [authors:protected] => [organizations:protected] => [collections:protected] => [categories:protected] => Array ( [15] => Category Object ( [languages:protected] => [bok_resources:protected] => [bok_topics:protected] => [bok_keywords:protected] => [id:protected] => 15 [type:protected] => category [parent:protected] => 7 [label:protected] => Falls [alreadyInSave:protected] => [alreadyInValidation:protected] => [validationFailures:protected] => Array ( ) [_new:BaseObject:private] => [_deleted:BaseObject:private] => [modifiedColumns:protected] => Array ( ) ) [47] => Category Object ( [languages:protected] => [bok_resources:protected] => [bok_topics:protected] => [bok_keywords:protected] => [id:protected] => 47 [type:protected] => category [parent:protected] => 2 [label:protected] => Bricklayer [alreadyInSave:protected] => [alreadyInValidation:protected] => [validationFailures:protected] => Array ( ) [_new:BaseObject:private] => [_deleted:BaseObject:private] => [modifiedColumns:protected] => Array ( ) ) [49] => Category Object ( [languages:protected] => [bok_resources:protected] => [bok_topics:protected] => [bok_keywords:protected] => [id:protected] => 49 [type:protected] => category [parent:protected] => 2 [label:protected] => Carpenter [alreadyInSave:protected] => [alreadyInValidation:protected] => [validationFailures:protected] => Array ( ) [_new:BaseObject:private] => [_deleted:BaseObject:private] => [modifiedColumns:protected] => Array ( ) ) [51] => Category Object ( [languages:protected] => [bok_resources:protected] => [bok_topics:protected] => [bok_keywords:protected] => [id:protected] => 51 [type:protected] => category [parent:protected] => 2 [label:protected] => Cement Mason [alreadyInSave:protected] => [alreadyInValidation:protected] => [validationFailures:protected] => Array ( ) [_new:BaseObject:private] => [_deleted:BaseObject:private] => [modifiedColumns:protected] => Array ( ) ) [53] => Category Object ( [languages:protected] => [bok_resources:protected] => [bok_topics:protected] => [bok_keywords:protected] => [id:protected] => 53 [type:protected] => category [parent:protected] => 2 [label:protected] => Concrete Polisher [alreadyInSave:protected] => [alreadyInValidation:protected] => [validationFailures:protected] => Array ( ) [_new:BaseObject:private] => [_deleted:BaseObject:private] => [modifiedColumns:protected] => Array ( ) ) [55] => Category Object ( [languages:protected] => [bok_resources:protected] => [bok_topics:protected] => [bok_keywords:protected] => [id:protected] => 55 [type:protected] => category [parent:protected] => 2 [label:protected] => Electrical Worker [alreadyInSave:protected] => [alreadyInValidation:protected] => [validationFailures:protected] => Array ( ) [_new:BaseObject:private] => [_deleted:BaseObject:private] => [modifiedColumns:protected] => Array ( ) ) [60] => Category Object ( [languages:protected] => [bok_resources:protected] => [bok_topics:protected] => [bok_keywords:protected] => [id:protected] => 60 [type:protected] => category [parent:protected] => 2 [label:protected] => HVAC [alreadyInSave:protected] => [alreadyInValidation:protected] => [validationFailures:protected] => Array ( ) [_new:BaseObject:private] => [_deleted:BaseObject:private] => [modifiedColumns:protected] => Array ( ) ) [64] => Category Object ( [languages:protected] => [bok_resources:protected] => [bok_topics:protected] => [bok_keywords:protected] => [id:protected] => 64 [type:protected] => category [parent:protected] => 2 [label:protected] => Laborer [alreadyInSave:protected] => [alreadyInValidation:protected] => [validationFailures:protected] => Array ( ) [_new:BaseObject:private] => [_deleted:BaseObject:private] => [modifiedColumns:protected] => Array ( ) ) [73] => Category Object ( [languages:protected] => [bok_resources:protected] => [bok_topics:protected] => [bok_keywords:protected] => [id:protected] => 73 [type:protected] => category [parent:protected] => 2 [label:protected] => PCC/Restoration [alreadyInSave:protected] => [alreadyInValidation:protected] => [validationFailures:protected] => Array ( ) [_new:BaseObject:private] => [_deleted:BaseObject:private] => [modifiedColumns:protected] => Array ( ) ) [76] => Category Object ( [languages:protected] => [bok_resources:protected] => [bok_topics:protected] => [bok_keywords:protected] => [id:protected] => 76 [type:protected] => category [parent:protected] => 2 [label:protected] => Plumber/Pipefitter [alreadyInSave:protected] => [alreadyInValidation:protected] => [validationFailures:protected] => Array ( ) [_new:BaseObject:private] => [_deleted:BaseObject:private] => [modifiedColumns:protected] => Array ( ) ) [78] => Category Object ( [languages:protected] => [bok_resources:protected] => [bok_topics:protected] => [bok_keywords:protected] => [id:protected] => 78 [type:protected] => category [parent:protected] => 2 [label:protected] => Roofer/Waterproofer [alreadyInSave:protected] => [alreadyInValidation:protected] => [validationFailures:protected] => Array ( ) [_new:BaseObject:private] => [_deleted:BaseObject:private] => [modifiedColumns:protected] => Array ( ) ) [80] => Category Object ( [languages:protected] => [bok_resources:protected] => [bok_topics:protected] => [bok_keywords:protected] => [id:protected] => 80 [type:protected] => category [parent:protected] => 2 [label:protected] => Sheetmetal Worker [alreadyInSave:protected] => [alreadyInValidation:protected] => [validationFailures:protected] => Array ( ) [_new:BaseObject:private] => [_deleted:BaseObject:private] => [modifiedColumns:protected] => Array ( ) ) [86] => Category Object ( [languages:protected] => [bok_resources:protected] => [bok_topics:protected] => [bok_keywords:protected] => [id:protected] => 86 [type:protected] => category [parent:protected] => 2 [label:protected] => Welder [alreadyInSave:protected] => [alreadyInValidation:protected] => [validationFailures:protected] => Array ( ) [_new:BaseObject:private] => [_deleted:BaseObject:private] => [modifiedColumns:protected] => Array ( ) ) [87] => Category Object ( [languages:protected] => [bok_resources:protected] => [bok_topics:protected] => [bok_keywords:protected] => [id:protected] => 87 [type:protected] => category [parent:protected] => 3 [label:protected] => Commercial & Institutional [alreadyInSave:protected] => [alreadyInValidation:protected] => [validationFailures:protected] => Array ( ) [_new:BaseObject:private] => [_deleted:BaseObject:private] => [modifiedColumns:protected] => Array ( ) ) [90] => Category Object ( [languages:protected] => [bok_resources:protected] => [bok_topics:protected] => [bok_keywords:protected] => [id:protected] => 90 [type:protected] => category [parent:protected] => 3 [label:protected] => Industrial [alreadyInSave:protected] => [alreadyInValidation:protected] => [validationFailures:protected] => Array ( ) [_new:BaseObject:private] => [_deleted:BaseObject:private] => [modifiedColumns:protected] => Array ( ) ) [92] => Category Object ( [languages:protected] => [bok_resources:protected] => [bok_topics:protected] => [bok_keywords:protected] => [id:protected] => 92 [type:protected] => category [parent:protected] => 3 [label:protected] => LEED/Green Construction [alreadyInSave:protected] => [alreadyInValidation:protected] => [validationFailures:protected] => Array ( ) [_new:BaseObject:private] => [_deleted:BaseObject:private] => [modifiedColumns:protected] => Array ( ) ) [93] => Category Object ( [languages:protected] => [bok_resources:protected] => [bok_topics:protected] => [bok_keywords:protected] => [id:protected] => 93 [type:protected] => category [parent:protected] => 3 [label:protected] => Renovations [alreadyInSave:protected] => [alreadyInValidation:protected] => [validationFailures:protected] => Array ( ) [_new:BaseObject:private] => [_deleted:BaseObject:private] => [modifiedColumns:protected] => Array ( ) ) [94] => Category Object ( [languages:protected] => [bok_resources:protected] => [bok_topics:protected] => [bok_keywords:protected] => [id:protected] => 94 [type:protected] => category [parent:protected] => 3 [label:protected] => Residential [alreadyInSave:protected] => [alreadyInValidation:protected] => [validationFailures:protected] => Array ( ) [_new:BaseObject:private] => [_deleted:BaseObject:private] => [modifiedColumns:protected] => Array ( ) ) [100] => Category Object ( [languages:protected] => [bok_resources:protected] => [bok_topics:protected] => [bok_keywords:protected] => [id:protected] => 100 [type:protected] => category [parent:protected] => 6 [label:protected] => Toolbox Talks [alreadyInSave:protected] => [alreadyInValidation:protected] => [validationFailures:protected] => Array ( ) [_new:BaseObject:private] => [_deleted:BaseObject:private] => [modifiedColumns:protected] => Array ( ) ) ) [categories_initialized:protected] => 1 [mapped_items:protected] => [content:protected] => [files:protected] => [language:protected] => Language Object ( [id:protected] => 1 [code:protected] => en [name:protected] => English [alreadyInSave:protected] => [alreadyInValidation:protected] => [validationFailures:protected] => Array ( ) [_new:BaseObject:private] => [_deleted:BaseObject:private] => [modifiedColumns:protected] => Array ( ) ) [old_record:protected] => [id:protected] => 4430 [old_id:protected] => [elcosh_id:protected] => d001660 [type:protected] => document [display_type:protected] => HTML only (and links) [user_id:protected] => 0 [language_id:protected] => 1 [tagging_id:protected] => Mike Aguilar [priority_id:protected] => 1 [title:protected] => Toolbox Talk: Fixed Ladder [total_pages:protected] => 0 [billed_pages:protected] => 0 [publication_number:protected] => [part_of:protected] => [keywords:protected] => Fixed Ladders, Fall Prevention, Falls [comments:protected] => [summary:protected] => The CPWR Toolbox Talk on Fixed Ladders addresses the potential risks associated with using fixed ladders. The resource includes a brief case example, steps to prevent a related injury and questions for discussion. It includes an image that illustrates the hazard, which can be posted in a central location as a reminder of steps to work safely. Available in English and Spanish. [transition_comments:protected] => [external_link:protected] => [consol_link:protected] => [more_like_this:protected] => d001257,d001254,d001255,d001256,d001258,d001262,d001279 [permission_given_by:protected] => [published:protected] => T [billable:protected] => F [img_name:protected] => [img_ext:protected] => [img_width:protected] => [img_height:protected] => [img_credit:protected] => [img_practice:protected] => [vid_source_id:protected] => [vid_running_time:protected] => [vid_intended_audience:protected] => [vid_acquisition_info:protected] => [vid_cost:protected] => [vid_producer:protected] => [vid_filename:protected] => [vid_filename_downloadable:protected] => [date_summary:protected] => [date_permission_requested:protected] => [date_permission_received:protected] => [date_review_needed:protected] => [date_received:protected] => 06/10/22 [date_completed:protected] => 06/10/22 [date_billed:protected] => [date_modified:protected] => 06/16/25 [collBokExports:protected] => [lastBokExportCriteria:BaseElcoshItem:private] => [alreadyInSave:protected] => [alreadyInValidation:protected] => [validationFailures:protected] => Array ( ) [_new:BaseObject:private] => [_deleted:BaseObject:private] => [modifiedColumns:protected] => Array ( ) ) ) [1] => Search_Result Object ( [title] => Toolbox Talk: Work Zone Safety: Working Around Vehicles [image] => /record/images/notavailable-p.png [blurb] => The CPWR Toolbox Talk on Working Around Vehicles in the Work Zone addresses methods to avoid being struck-by a vehicle on a construction site. The res... [category] => Array ( [0] => 12 [1] => 18 [2] => 52 [3] => 57 [4] => 70 [5] => 85 [6] => 87 [7] => 88 [8] => 89 [9] => 91 [10] => 90 [11] => 92 [12] => 93 [13] => 94 [14] => 95 [15] => 100 ) [labels] => Array ( [0] => Crushed/Struck By [1] => Work Environment [2] => Hazards [3] => Motor Vehicles/Heavy Equipment [6] => Commercial Diver [7] => Trades [8] => Flagger [10] => Operating Engineer [12] => Truck Driver [14] => Commercial & Institutional [15] => Jobsites [16] => Demolition [18] => Disasters [20] => Heavy & Highway [22] => Industrial [24] => LEED/Green Construction [26] => Renovations [28] => Residential [30] => Underground [32] => Toolbox Talks [33] => Documents [34] => Media & Documents ) [type] => Toolbox Talks [sub_category] => [url] => /document/4428/d001658/Toolbox%2BTalk%253A%2BWork%2BZone%2BSafety%253A%2BWorking%2BAround%2BVehicles.html [item:protected] => DocumentRecord Object ( [records:protected] => Array ( ) [recordId:protected] => [searchWordClass:protected] => [searchWordPeerClass:protected] => [bok_record:protected] => [authors:protected] => [organizations:protected] => [collections:protected] => [categories:protected] => Array ( [12] => Category Object ( [languages:protected] => [bok_resources:protected] => [bok_topics:protected] => [bok_keywords:protected] => [id:protected] => 12 [type:protected] => category [parent:protected] => 7 [label:protected] => Crushed/Struck By [alreadyInSave:protected] => [alreadyInValidation:protected] => [validationFailures:protected] => Array ( ) [_new:BaseObject:private] => [_deleted:BaseObject:private] => [modifiedColumns:protected] => Array ( ) ) [18] => Category Object ( [languages:protected] => [bok_resources:protected] => [bok_topics:protected] => [bok_keywords:protected] => [id:protected] => 18 [type:protected] => category [parent:protected] => 7 [label:protected] => Motor Vehicles/Heavy Equipment [alreadyInSave:protected] => [alreadyInValidation:protected] => [validationFailures:protected] => Array ( ) [_new:BaseObject:private] => [_deleted:BaseObject:private] => [modifiedColumns:protected] => Array ( ) ) [52] => Category Object ( [languages:protected] => [bok_resources:protected] => [bok_topics:protected] => [bok_keywords:protected] => [id:protected] => 52 [type:protected] => category [parent:protected] => 2 [label:protected] => Commercial Diver [alreadyInSave:protected] => [alreadyInValidation:protected] => [validationFailures:protected] => Array ( ) [_new:BaseObject:private] => [_deleted:BaseObject:private] => [modifiedColumns:protected] => Array ( ) ) [57] => Category Object ( [languages:protected] => [bok_resources:protected] => [bok_topics:protected] => [bok_keywords:protected] => [id:protected] => 57 [type:protected] => category [parent:protected] => 2 [label:protected] => Flagger [alreadyInSave:protected] => [alreadyInValidation:protected] => [validationFailures:protected] => Array ( ) [_new:BaseObject:private] => [_deleted:BaseObject:private] => [modifiedColumns:protected] => Array ( ) ) [70] => Category Object ( [languages:protected] => [bok_resources:protected] => [bok_topics:protected] => [bok_keywords:protected] => [id:protected] => 70 [type:protected] => category [parent:protected] => 2 [label:protected] => Operating Engineer [alreadyInSave:protected] => [alreadyInValidation:protected] => [validationFailures:protected] => Array ( ) [_new:BaseObject:private] => [_deleted:BaseObject:private] => [modifiedColumns:protected] => Array ( ) ) [85] => Category Object ( [languages:protected] => [bok_resources:protected] => [bok_topics:protected] => [bok_keywords:protected] => [id:protected] => 85 [type:protected] => category [parent:protected] => 2 [label:protected] => Truck Driver [alreadyInSave:protected] => [alreadyInValidation:protected] => [validationFailures:protected] => Array ( ) [_new:BaseObject:private] => [_deleted:BaseObject:private] => [modifiedColumns:protected] => Array ( ) ) [87] => Category Object ( [languages:protected] => [bok_resources:protected] => [bok_topics:protected] => [bok_keywords:protected] => [id:protected] => 87 [type:protected] => category [parent:protected] => 3 [label:protected] => Commercial & Institutional [alreadyInSave:protected] => [alreadyInValidation:protected] => [validationFailures:protected] => Array ( ) [_new:BaseObject:private] => [_deleted:BaseObject:private] => [modifiedColumns:protected] => Array ( ) ) [88] => Category Object ( [languages:protected] => [bok_resources:protected] => [bok_topics:protected] => [bok_keywords:protected] => [id:protected] => 88 [type:protected] => category [parent:protected] => 3 [label:protected] => Demolition [alreadyInSave:protected] => [alreadyInValidation:protected] => [validationFailures:protected] => Array ( ) [_new:BaseObject:private] => [_deleted:BaseObject:private] => [modifiedColumns:protected] => Array ( ) ) [89] => Category Object ( [languages:protected] => [bok_resources:protected] => [bok_topics:protected] => [bok_keywords:protected] => [id:protected] => 89 [type:protected] => category [parent:protected] => 3 [label:protected] => Disasters [alreadyInSave:protected] => [alreadyInValidation:protected] => [validationFailures:protected] => Array ( ) [_new:BaseObject:private] => [_deleted:BaseObject:private] => [modifiedColumns:protected] => Array ( ) ) [91] => Category Object ( [languages:protected] => [bok_resources:protected] => [bok_topics:protected] => [bok_keywords:protected] => [id:protected] => 91 [type:protected] => category [parent:protected] => 3 [label:protected] => Heavy & Highway [alreadyInSave:protected] => [alreadyInValidation:protected] => [validationFailures:protected] => Array ( ) [_new:BaseObject:private] => [_deleted:BaseObject:private] => [modifiedColumns:protected] => Array ( ) ) [90] => Category Object ( [languages:protected] => [bok_resources:protected] => [bok_topics:protected] => [bok_keywords:protected] => [id:protected] => 90 [type:protected] => category [parent:protected] => 3 [label:protected] => Industrial [alreadyInSave:protected] => [alreadyInValidation:protected] => [validationFailures:protected] => Array ( ) [_new:BaseObject:private] => [_deleted:BaseObject:private] => [modifiedColumns:protected] => Array ( ) ) [92] => Category Object ( [languages:protected] => [bok_resources:protected] => [bok_topics:protected] => [bok_keywords:protected] => [id:protected] => 92 [type:protected] => category [parent:protected] => 3 [label:protected] => LEED/Green Construction [alreadyInSave:protected] => [alreadyInValidation:protected] => [validationFailures:protected] => Array ( ) [_new:BaseObject:private] => [_deleted:BaseObject:private] => [modifiedColumns:protected] => Array ( ) ) [93] => Category Object ( [languages:protected] => [bok_resources:protected] => [bok_topics:protected] => [bok_keywords:protected] => [id:protected] => 93 [type:protected] => category [parent:protected] => 3 [label:protected] => Renovations [alreadyInSave:protected] => [alreadyInValidation:protected] => [validationFailures:protected] => Array ( ) [_new:BaseObject:private] => [_deleted:BaseObject:private] => [modifiedColumns:protected] => Array ( ) ) [94] => Category Object ( [languages:protected] => [bok_resources:protected] => [bok_topics:protected] => [bok_keywords:protected] => [id:protected] => 94 [type:protected] => category [parent:protected] => 3 [label:protected] => Residential [alreadyInSave:protected] => [alreadyInValidation:protected] => [validationFailures:protected] => Array ( ) [_new:BaseObject:private] => [_deleted:BaseObject:private] => [modifiedColumns:protected] => Array ( ) ) [95] => Category Object ( [languages:protected] => [bok_resources:protected] => [bok_topics:protected] => [bok_keywords:protected] => [id:protected] => 95 [type:protected] => category [parent:protected] => 3 [label:protected] => Underground [alreadyInSave:protected] => [alreadyInValidation:protected] => [validationFailures:protected] => Array ( ) [_new:BaseObject:private] => [_deleted:BaseObject:private] => [modifiedColumns:protected] => Array ( ) ) [100] => Category Object ( [languages:protected] => [bok_resources:protected] => [bok_topics:protected] => [bok_keywords:protected] => [id:protected] => 100 [type:protected] => category [parent:protected] => 6 [label:protected] => Toolbox Talks [alreadyInSave:protected] => [alreadyInValidation:protected] => [validationFailures:protected] => Array ( ) [_new:BaseObject:private] => [_deleted:BaseObject:private] => [modifiedColumns:protected] => Array ( ) ) ) [categories_initialized:protected] => 1 [mapped_items:protected] => [content:protected] => [files:protected] => [language:protected] => Language Object ( [id:protected] => 1 [code:protected] => en [name:protected] => English [alreadyInSave:protected] => [alreadyInValidation:protected] => [validationFailures:protected] => Array ( ) [_new:BaseObject:private] => [_deleted:BaseObject:private] => [modifiedColumns:protected] => Array ( ) ) [old_record:protected] => [id:protected] => 4428 [old_id:protected] => [elcosh_id:protected] => d001658 [type:protected] => document [display_type:protected] => HTML only (and links) [user_id:protected] => 0 [language_id:protected] => 1 [tagging_id:protected] => Daniela Caceres [priority_id:protected] => 1 [title:protected] => Toolbox Talk: Work Zone Safety: Working Around Vehicles [total_pages:protected] => 0 [billed_pages:protected] => 0 [publication_number:protected] => [part_of:protected] => [keywords:protected] => Struck, Struck by, Vehicle, Work Zone Safety, Truck, Operator, Driver, Mobile Equipment [comments:protected] => [summary:protected] => The CPWR Toolbox Talk on Working Around Vehicles in the Work Zone addresses methods to avoid being struck-by a vehicle on a construction site. The resource includes a case example, steps to prevent a related injury, and questions for discussion. It includes a graphic that illustrates the hazard, which can be posted in a central location as a reminder of steps to work safely. Available in English and Spanish. [transition_comments:protected] => [external_link:protected] => [consol_link:protected] => [more_like_this:protected] => d001640 [permission_given_by:protected] => [published:protected] => T [billable:protected] => F [img_name:protected] => [img_ext:protected] => [img_width:protected] => [img_height:protected] => [img_credit:protected] => [img_practice:protected] => [vid_source_id:protected] => [vid_running_time:protected] => [vid_intended_audience:protected] => [vid_acquisition_info:protected] => [vid_cost:protected] => [vid_producer:protected] => [vid_filename:protected] => [vid_filename_downloadable:protected] => [date_summary:protected] => [date_permission_requested:protected] => [date_permission_received:protected] => [date_review_needed:protected] => [date_received:protected] => 12/23/21 [date_completed:protected] => 12/23/21 [date_billed:protected] => [date_modified:protected] => 05/19/23 [collBokExports:protected] => [lastBokExportCriteria:BaseElcoshItem:private] => [alreadyInSave:protected] => [alreadyInValidation:protected] => [validationFailures:protected] => Array ( ) [_new:BaseObject:private] => [_deleted:BaseObject:private] => [modifiedColumns:protected] => Array ( ) ) ) [2] => Search_Result Object ( [title] => Construction Dive -- DeWalt's Jobsite Pro headphones recalled for fire hazards [image] => /record/images/notavailable-p.png [blurb] => A recall notice by the United States Consumer Product Safety Commission affects over 300,000 DeWalt Jobsite Pro Headphones. The recall is a result of... [category] => Array ( [0] => 16 [1] => 44 [2] => 45 [3] => 46 [4] => 47 [5] => 48 [6] => 49 [7] => 50 [8] => 51 [9] => 52 [10] => 53 [11] => 54 [12] => 55 [13] => 56 [14] => 57 [15] => 58 [16] => 59 [17] => 60 [18] => 61 [19] => 64 [20] => 65 [21] => 66 [22] => 67 [23] => 68 [24] => 69 [25] => 70 [26] => 71 [27] => 72 [28] => 73 [29] => 74 [30] => 75 [31] => 76 [32] => 77 [33] => 63 [34] => 78 [35] => 79 [36] => 80 [37] => 81 [38] => 82 [39] => 62 [40] => 83 [41] => 84 [42] => 85 [43] => 86 [44] => 87 [45] => 88 [46] => 89 [47] => 91 [48] => 90 [49] => 92 [50] => 93 [51] => 94 [52] => 95 ) [labels] => Array ( [0] => Fire & Explosions [1] => Work Environment [2] => Hazards [3] => Acoustical Ceiling Carpenter [4] => Trades [5] => Asbestos/Insulator [7] => Boilermaker [9] => Bricklayer [11] => Cabinetmaker [13] => Carpenter [15] => Carpet Layer [17] => Cement Mason [19] => Commercial Diver [21] => Concrete Polisher [23] => Drywall Applicator Specialist [25] => Electrical Worker [27] => Elevator Constructor [29] => Flagger [31] => Glazier [33] => Hazardous Waste Cleanup [35] => HVAC [37] => Interior Systems Carpenter [39] => Laborer [41] => Landscaper [43] => Lather [45] => Lead Abatement Worker [47] => Maintenance Worker [49] => Millwright [51] => Operating Engineer [53] => Painter [55] => Paper Hanger [57] => PCC/Restoration [59] => Pile Driver [61] => Plasterer [63] => Plumber/Pipefitter [65] => Refractory Worker [67] => Reinforcing Ironworker [69] => Roofer/Waterproofer [71] => Scaffold Erector [73] => Sheetmetal Worker [75] => Sprinkler Fitter [77] => Stonemason [79] => Structural Ironworker [81] => Terrazzo Worker [83] => Tile Setter [85] => Truck Driver [87] => Welder [89] => Commercial & Institutional [90] => Jobsites [91] => Demolition [93] => Disasters [95] => Heavy & Highway [97] => Industrial [99] => LEED/Green Construction [101] => Renovations [103] => Residential [105] => Underground ) [type] => [sub_category] => [url] => /document/4426/d001656/Construction%2BDive%2B--%2BDeWalt%2527s%2BJobsite%2BPro%2Bheadphones%2Brecalled%2Bfor%2Bfire%2Bhazards.html [item:protected] => DocumentRecord Object ( [records:protected] => Array ( ) [recordId:protected] => [searchWordClass:protected] => [searchWordPeerClass:protected] => [bok_record:protected] => [authors:protected] => [organizations:protected] => [collections:protected] => [categories:protected] => Array ( [16] => Category Object ( [languages:protected] => [bok_resources:protected] => [bok_topics:protected] => [bok_keywords:protected] => [id:protected] => 16 [type:protected] => category [parent:protected] => 7 [label:protected] => Fire & Explosions [alreadyInSave:protected] => [alreadyInValidation:protected] => [validationFailures:protected] => Array ( ) [_new:BaseObject:private] => [_deleted:BaseObject:private] => [modifiedColumns:protected] => Array ( ) ) [44] => Category Object ( [languages:protected] => [bok_resources:protected] => [bok_topics:protected] => [bok_keywords:protected] => [id:protected] => 44 [type:protected] => category [parent:protected] => 2 [label:protected] => Acoustical Ceiling Carpenter [alreadyInSave:protected] => [alreadyInValidation:protected] => [validationFailures:protected] => Array ( ) [_new:BaseObject:private] => [_deleted:BaseObject:private] => [modifiedColumns:protected] => Array ( ) ) [45] => Category Object ( [languages:protected] => [bok_resources:protected] => [bok_topics:protected] => [bok_keywords:protected] => [id:protected] => 45 [type:protected] => category [parent:protected] => 2 [label:protected] => Asbestos/Insulator [alreadyInSave:protected] => [alreadyInValidation:protected] => [validationFailures:protected] => Array ( ) [_new:BaseObject:private] => [_deleted:BaseObject:private] => [modifiedColumns:protected] => Array ( ) ) [46] => Category Object ( [languages:protected] => [bok_resources:protected] => [bok_topics:protected] => [bok_keywords:protected] => [id:protected] => 46 [type:protected] => category [parent:protected] => 2 [label:protected] => Boilermaker [alreadyInSave:protected] => [alreadyInValidation:protected] => [validationFailures:protected] => Array ( ) [_new:BaseObject:private] => [_deleted:BaseObject:private] => [modifiedColumns:protected] => Array ( ) ) [47] => Category Object ( [languages:protected] => [bok_resources:protected] => [bok_topics:protected] => [bok_keywords:protected] => [id:protected] => 47 [type:protected] => category [parent:protected] => 2 [label:protected] => Bricklayer [alreadyInSave:protected] => [alreadyInValidation:protected] => [validationFailures:protected] => Array ( ) [_new:BaseObject:private] => [_deleted:BaseObject:private] => [modifiedColumns:protected] => Array ( ) ) [48] => Category Object ( [languages:protected] => [bok_resources:protected] => [bok_topics:protected] => [bok_keywords:protected] => [id:protected] => 48 [type:protected] => category [parent:protected] => 2 [label:protected] => Cabinetmaker [alreadyInSave:protected] => [alreadyInValidation:protected] => [validationFailures:protected] => Array ( ) [_new:BaseObject:private] => [_deleted:BaseObject:private] => [modifiedColumns:protected] => Array ( ) ) [49] => Category Object ( [languages:protected] => [bok_resources:protected] => [bok_topics:protected] => [bok_keywords:protected] => [id:protected] => 49 [type:protected] => category [parent:protected] => 2 [label:protected] => Carpenter [alreadyInSave:protected] => [alreadyInValidation:protected] => [validationFailures:protected] => Array ( ) [_new:BaseObject:private] => [_deleted:BaseObject:private] => [modifiedColumns:protected] => Array ( ) ) [50] => Category Object ( [languages:protected] => [bok_resources:protected] => [bok_topics:protected] => [bok_keywords:protected] => [id:protected] => 50 [type:protected] => category [parent:protected] => 2 [label:protected] => Carpet Layer [alreadyInSave:protected] => [alreadyInValidation:protected] => [validationFailures:protected] => Array ( ) [_new:BaseObject:private] => [_deleted:BaseObject:private] => [modifiedColumns:protected] => Array ( ) ) [51] => Category Object ( [languages:protected] => [bok_resources:protected] => [bok_topics:protected] => [bok_keywords:protected] => [id:protected] => 51 [type:protected] => category [parent:protected] => 2 [label:protected] => Cement Mason [alreadyInSave:protected] => [alreadyInValidation:protected] => [validationFailures:protected] => Array ( ) [_new:BaseObject:private] => [_deleted:BaseObject:private] => [modifiedColumns:protected] => Array ( ) ) [52] => Category Object ( [languages:protected] => [bok_resources:protected] => [bok_topics:protected] => [bok_keywords:protected] => [id:protected] => 52 [type:protected] => category [parent:protected] => 2 [label:protected] => Commercial Diver [alreadyInSave:protected] => [alreadyInValidation:protected] => [validationFailures:protected] => Array ( ) [_new:BaseObject:private] => [_deleted:BaseObject:private] => [modifiedColumns:protected] => Array ( ) ) [53] => Category Object ( [languages:protected] => [bok_resources:protected] => [bok_topics:protected] => [bok_keywords:protected] => [id:protected] => 53 [type:protected] => category [parent:protected] => 2 [label:protected] => Concrete Polisher [alreadyInSave:protected] => [alreadyInValidation:protected] => [validationFailures:protected] => Array ( ) [_new:BaseObject:private] => [_deleted:BaseObject:private] => [modifiedColumns:protected] => Array ( ) ) [54] => Category Object ( [languages:protected] => [bok_resources:protected] => [bok_topics:protected] => [bok_keywords:protected] => [id:protected] => 54 [type:protected] => category [parent:protected] => 2 [label:protected] => Drywall Applicator Specialist [alreadyInSave:protected] => [alreadyInValidation:protected] => [validationFailures:protected] => Array ( ) [_new:BaseObject:private] => [_deleted:BaseObject:private] => [modifiedColumns:protected] => Array ( ) ) [55] => Category Object ( [languages:protected] => [bok_resources:protected] => [bok_topics:protected] => [bok_keywords:protected] => [id:protected] => 55 [type:protected] => category [parent:protected] => 2 [label:protected] => Electrical Worker [alreadyInSave:protected] => [alreadyInValidation:protected] => [validationFailures:protected] => Array ( ) [_new:BaseObject:private] => [_deleted:BaseObject:private] => [modifiedColumns:protected] => Array ( ) ) [56] => Category Object ( [languages:protected] => [bok_resources:protected] => [bok_topics:protected] => [bok_keywords:protected] => [id:protected] => 56 [type:protected] => category [parent:protected] => 2 [label:protected] => Elevator Constructor [alreadyInSave:protected] => [alreadyInValidation:protected] => [validationFailures:protected] => Array ( ) [_new:BaseObject:private] => [_deleted:BaseObject:private] => [modifiedColumns:protected] => Array ( ) ) [57] => Category Object ( [languages:protected] => [bok_resources:protected] => [bok_topics:protected] => [bok_keywords:protected] => [id:protected] => 57 [type:protected] => category [parent:protected] => 2 [label:protected] => Flagger [alreadyInSave:protected] => [alreadyInValidation:protected] => [validationFailures:protected] => Array ( ) [_new:BaseObject:private] => [_deleted:BaseObject:private] => [modifiedColumns:protected] => Array ( ) ) [58] => Category Object ( [languages:protected] => [bok_resources:protected] => [bok_topics:protected] => [bok_keywords:protected] => [id:protected] => 58 [type:protected] => category [parent:protected] => 2 [label:protected] => Glazier [alreadyInSave:protected] => [alreadyInValidation:protected] => [validationFailures:protected] => Array ( ) [_new:BaseObject:private] => [_deleted:BaseObject:private] => [modifiedColumns:protected] => Array ( ) ) [59] => Category Object ( [languages:protected] => [bok_resources:protected] => [bok_topics:protected] => [bok_keywords:protected] => [id:protected] => 59 [type:protected] => category [parent:protected] => 2 [label:protected] => Hazardous Waste Cleanup [alreadyInSave:protected] => [alreadyInValidation:protected] => [validationFailures:protected] => Array ( ) [_new:BaseObject:private] => [_deleted:BaseObject:private] => [modifiedColumns:protected] => Array ( ) ) [60] => Category Object ( [languages:protected] => [bok_resources:protected] => [bok_topics:protected] => [bok_keywords:protected] => [id:protected] => 60 [type:protected] => category [parent:protected] => 2 [label:protected] => HVAC [alreadyInSave:protected] => [alreadyInValidation:protected] => [validationFailures:protected] => Array ( ) [_new:BaseObject:private] => [_deleted:BaseObject:private] => [modifiedColumns:protected] => Array ( ) ) [61] => Category Object ( [languages:protected] => [bok_resources:protected] => [bok_topics:protected] => [bok_keywords:protected] => [id:protected] => 61 [type:protected] => category [parent:protected] => 2 [label:protected] => Interior Systems Carpenter [alreadyInSave:protected] => [alreadyInValidation:protected] => [validationFailures:protected] => Array ( ) [_new:BaseObject:private] => [_deleted:BaseObject:private] => [modifiedColumns:protected] => Array ( ) ) [64] => Category Object ( [languages:protected] => [bok_resources:protected] => [bok_topics:protected] => [bok_keywords:protected] => [id:protected] => 64 [type:protected] => category [parent:protected] => 2 [label:protected] => Laborer [alreadyInSave:protected] => [alreadyInValidation:protected] => [validationFailures:protected] => Array ( ) [_new:BaseObject:private] => [_deleted:BaseObject:private] => [modifiedColumns:protected] => Array ( ) ) [65] => Category Object ( [languages:protected] => [bok_resources:protected] => [bok_topics:protected] => [bok_keywords:protected] => [id:protected] => 65 [type:protected] => category [parent:protected] => 2 [label:protected] => Landscaper [alreadyInSave:protected] => [alreadyInValidation:protected] => [validationFailures:protected] => Array ( ) [_new:BaseObject:private] => [_deleted:BaseObject:private] => [modifiedColumns:protected] => Array ( ) ) [66] => Category Object ( [languages:protected] => [bok_resources:protected] => [bok_topics:protected] => [bok_keywords:protected] => [id:protected] => 66 [type:protected] => category [parent:protected] => 2 [label:protected] => Lather [alreadyInSave:protected] => [alreadyInValidation:protected] => [validationFailures:protected] => Array ( ) [_new:BaseObject:private] => [_deleted:BaseObject:private] => [modifiedColumns:protected] => Array ( ) ) [67] => Category Object ( [languages:protected] => [bok_resources:protected] => [bok_topics:protected] => [bok_keywords:protected] => [id:protected] => 67 [type:protected] => category [parent:protected] => 2 [label:protected] => Lead Abatement Worker [alreadyInSave:protected] => [alreadyInValidation:protected] => [validationFailures:protected] => Array ( ) [_new:BaseObject:private] => [_deleted:BaseObject:private] => [modifiedColumns:protected] => Array ( ) ) [68] => Category Object ( [languages:protected] => [bok_resources:protected] => [bok_topics:protected] => [bok_keywords:protected] => [id:protected] => 68 [type:protected] => category [parent:protected] => 2 [label:protected] => Maintenance Worker [alreadyInSave:protected] => [alreadyInValidation:protected] => [validationFailures:protected] => Array ( ) [_new:BaseObject:private] => [_deleted:BaseObject:private] => [modifiedColumns:protected] => Array ( ) ) [69] => Category Object ( [languages:protected] => [bok_resources:protected] => [bok_topics:protected] => [bok_keywords:protected] => [id:protected] => 69 [type:protected] => category [parent:protected] => 2 [label:protected] => Millwright [alreadyInSave:protected] => [alreadyInValidation:protected] => [validationFailures:protected] => Array ( ) [_new:BaseObject:private] => [_deleted:BaseObject:private] => [modifiedColumns:protected] => Array ( ) ) [70] => Category Object ( [languages:protected] => [bok_resources:protected] => [bok_topics:protected] => [bok_keywords:protected] => [id:protected] => 70 [type:protected] => category [parent:protected] => 2 [label:protected] => Operating Engineer [alreadyInSave:protected] => [alreadyInValidation:protected] => [validationFailures:protected] => Array ( ) [_new:BaseObject:private] => [_deleted:BaseObject:private] => [modifiedColumns:protected] => Array ( ) ) [71] => Category Object ( [languages:protected] => [bok_resources:protected] => [bok_topics:protected] => [bok_keywords:protected] => [id:protected] => 71 [type:protected] => category [parent:protected] => 2 [label:protected] => Painter [alreadyInSave:protected] => [alreadyInValidation:protected] => [validationFailures:protected] => Array ( ) [_new:BaseObject:private] => [_deleted:BaseObject:private] => [modifiedColumns:protected] => Array ( ) ) [72] => Category Object ( [languages:protected] => [bok_resources:protected] => [bok_topics:protected] => [bok_keywords:protected] => [id:protected] => 72 [type:protected] => category [parent:protected] => 2 [label:protected] => Paper Hanger [alreadyInSave:protected] => [alreadyInValidation:protected] => [validationFailures:protected] => Array ( ) [_new:BaseObject:private] => [_deleted:BaseObject:private] => [modifiedColumns:protected] => Array ( ) ) [73] => Category Object ( [languages:protected] => [bok_resources:protected] => [bok_topics:protected] => [bok_keywords:protected] => [id:protected] => 73 [type:protected] => category [parent:protected] => 2 [label:protected] => PCC/Restoration [alreadyInSave:protected] => [alreadyInValidation:protected] => [validationFailures:protected] => Array ( ) [_new:BaseObject:private] => [_deleted:BaseObject:private] => [modifiedColumns:protected] => Array ( ) ) [74] => Category Object ( [languages:protected] => [bok_resources:protected] => [bok_topics:protected] => [bok_keywords:protected] => [id:protected] => 74 [type:protected] => category [parent:protected] => 2 [label:protected] => Pile Driver [alreadyInSave:protected] => [alreadyInValidation:protected] => [validationFailures:protected] => Array ( ) [_new:BaseObject:private] => [_deleted:BaseObject:private] => [modifiedColumns:protected] => Array ( ) ) [75] => Category Object ( [languages:protected] => [bok_resources:protected] => [bok_topics:protected] => [bok_keywords:protected] => [id:protected] => 75 [type:protected] => category [parent:protected] => 2 [label:protected] => Plasterer [alreadyInSave:protected] => [alreadyInValidation:protected] => [validationFailures:protected] => Array ( ) [_new:BaseObject:private] => [_deleted:BaseObject:private] => [modifiedColumns:protected] => Array ( ) ) [76] => Category Object ( [languages:protected] => [bok_resources:protected] => [bok_topics:protected] => [bok_keywords:protected] => [id:protected] => 76 [type:protected] => category [parent:protected] => 2 [label:protected] => Plumber/Pipefitter [alreadyInSave:protected] => [alreadyInValidation:protected] => [validationFailures:protected] => Array ( ) [_new:BaseObject:private] => [_deleted:BaseObject:private] => [modifiedColumns:protected] => Array ( ) ) [77] => Category Object ( [languages:protected] => [bok_resources:protected] => [bok_topics:protected] => [bok_keywords:protected] => [id:protected] => 77 [type:protected] => category [parent:protected] => 2 [label:protected] => Refractory Worker [alreadyInSave:protected] => [alreadyInValidation:protected] => [validationFailures:protected] => Array ( ) [_new:BaseObject:private] => [_deleted:BaseObject:private] => [modifiedColumns:protected] => Array ( ) ) [63] => Category Object ( [languages:protected] => [bok_resources:protected] => [bok_topics:protected] => [bok_keywords:protected] => [id:protected] => 63 [type:protected] => category [parent:protected] => 2 [label:protected] => Reinforcing Ironworker [alreadyInSave:protected] => [alreadyInValidation:protected] => [validationFailures:protected] => Array ( ) [_new:BaseObject:private] => [_deleted:BaseObject:private] => [modifiedColumns:protected] => Array ( ) ) [78] => Category Object ( [languages:protected] => [bok_resources:protected] => [bok_topics:protected] => [bok_keywords:protected] => [id:protected] => 78 [type:protected] => category [parent:protected] => 2 [label:protected] => Roofer/Waterproofer [alreadyInSave:protected] => [alreadyInValidation:protected] => [validationFailures:protected] => Array ( ) [_new:BaseObject:private] => [_deleted:BaseObject:private] => [modifiedColumns:protected] => Array ( ) ) [79] => Category Object ( [languages:protected] => [bok_resources:protected] => [bok_topics:protected] => [bok_keywords:protected] => [id:protected] => 79 [type:protected] => category [parent:protected] => 2 [label:protected] => Scaffold Erector [alreadyInSave:protected] => [alreadyInValidation:protected] => [validationFailures:protected] => Array ( ) [_new:BaseObject:private] => [_deleted:BaseObject:private] => [modifiedColumns:protected] => Array ( ) ) [80] => Category Object ( [languages:protected] => [bok_resources:protected] => [bok_topics:protected] => [bok_keywords:protected] => [id:protected] => 80 [type:protected] => category [parent:protected] => 2 [label:protected] => Sheetmetal Worker [alreadyInSave:protected] => [alreadyInValidation:protected] => [validationFailures:protected] => Array ( ) [_new:BaseObject:private] => [_deleted:BaseObject:private] => [modifiedColumns:protected] => Array ( ) ) [81] => Category Object ( [languages:protected] => [bok_resources:protected] => [bok_topics:protected] => [bok_keywords:protected] => [id:protected] => 81 [type:protected] => category [parent:protected] => 2 [label:protected] => Sprinkler Fitter [alreadyInSave:protected] => [alreadyInValidation:protected] => [validationFailures:protected] => Array ( ) [_new:BaseObject:private] => [_deleted:BaseObject:private] => [modifiedColumns:protected] => Array ( ) ) [82] => Category Object ( [languages:protected] => [bok_resources:protected] => [bok_topics:protected] => [bok_keywords:protected] => [id:protected] => 82 [type:protected] => category [parent:protected] => 2 [label:protected] => Stonemason [alreadyInSave:protected] => [alreadyInValidation:protected] => [validationFailures:protected] => Array ( ) [_new:BaseObject:private] => [_deleted:BaseObject:private] => [modifiedColumns:protected] => Array ( ) ) [62] => Category Object ( [languages:protected] => [bok_resources:protected] => [bok_topics:protected] => [bok_keywords:protected] => [id:protected] => 62 [type:protected] => category [parent:protected] => 2 [label:protected] => Structural Ironworker [alreadyInSave:protected] => [alreadyInValidation:protected] => [validationFailures:protected] => Array ( ) [_new:BaseObject:private] => [_deleted:BaseObject:private] => [modifiedColumns:protected] => Array ( ) ) [83] => Category Object ( [languages:protected] => [bok_resources:protected] => [bok_topics:protected] => [bok_keywords:protected] => [id:protected] => 83 [type:protected] => category [parent:protected] => 2 [label:protected] => Terrazzo Worker [alreadyInSave:protected] => [alreadyInValidation:protected] => [validationFailures:protected] => Array ( ) [_new:BaseObject:private] => [_deleted:BaseObject:private] => [modifiedColumns:protected] => Array ( ) ) [84] => Category Object ( [languages:protected] => [bok_resources:protected] => [bok_topics:protected] => [bok_keywords:protected] => [id:protected] => 84 [type:protected] => category [parent:protected] => 2 [label:protected] => Tile Setter [alreadyInSave:protected] => [alreadyInValidation:protected] => [validationFailures:protected] => Array ( ) [_new:BaseObject:private] => [_deleted:BaseObject:private] => [modifiedColumns:protected] => Array ( ) ) [85] => Category Object ( [languages:protected] => [bok_resources:protected] => [bok_topics:protected] => [bok_keywords:protected] => [id:protected] => 85 [type:protected] => category [parent:protected] => 2 [label:protected] => Truck Driver [alreadyInSave:protected] => [alreadyInValidation:protected] => [validationFailures:protected] => Array ( ) [_new:BaseObject:private] => [_deleted:BaseObject:private] => [modifiedColumns:protected] => Array ( ) ) [86] => Category Object ( [languages:protected] => [bok_resources:protected] => [bok_topics:protected] => [bok_keywords:protected] => [id:protected] => 86 [type:protected] => category [parent:protected] => 2 [label:protected] => Welder [alreadyInSave:protected] => [alreadyInValidation:protected] => [validationFailures:protected] => Array ( ) [_new:BaseObject:private] => [_deleted:BaseObject:private] => [modifiedColumns:protected] => Array ( ) ) [87] => Category Object ( [languages:protected] => [bok_resources:protected] => [bok_topics:protected] => [bok_keywords:protected] => [id:protected] => 87 [type:protected] => category [parent:protected] => 3 [label:protected] => Commercial & Institutional [alreadyInSave:protected] => [alreadyInValidation:protected] => [validationFailures:protected] => Array ( ) [_new:BaseObject:private] => [_deleted:BaseObject:private] => [modifiedColumns:protected] => Array ( ) ) [88] => Category Object ( [languages:protected] => [bok_resources:protected] => [bok_topics:protected] => [bok_keywords:protected] => [id:protected] => 88 [type:protected] => category [parent:protected] => 3 [label:protected] => Demolition [alreadyInSave:protected] => [alreadyInValidation:protected] => [validationFailures:protected] => Array ( ) [_new:BaseObject:private] => [_deleted:BaseObject:private] => [modifiedColumns:protected] => Array ( ) ) [89] => Category Object ( [languages:protected] => [bok_resources:protected] => [bok_topics:protected] => [bok_keywords:protected] => [id:protected] => 89 [type:protected] => category [parent:protected] => 3 [label:protected] => Disasters [alreadyInSave:protected] => [alreadyInValidation:protected] => [validationFailures:protected] => Array ( ) [_new:BaseObject:private] => [_deleted:BaseObject:private] => [modifiedColumns:protected] => Array ( ) ) [91] => Category Object ( [languages:protected] => [bok_resources:protected] => [bok_topics:protected] => [bok_keywords:protected] => [id:protected] => 91 [type:protected] => category [parent:protected] => 3 [label:protected] => Heavy & Highway [alreadyInSave:protected] => [alreadyInValidation:protected] => [validationFailures:protected] => Array ( ) [_new:BaseObject:private] => [_deleted:BaseObject:private] => [modifiedColumns:protected] => Array ( ) ) [90] => Category Object ( [languages:protected] => [bok_resources:protected] => [bok_topics:protected] => [bok_keywords:protected] => [id:protected] => 90 [type:protected] => category [parent:protected] => 3 [label:protected] => Industrial [alreadyInSave:protected] => [alreadyInValidation:protected] => [validationFailures:protected] => Array ( ) [_new:BaseObject:private] => [_deleted:BaseObject:private] => [modifiedColumns:protected] => Array ( ) ) [92] => Category Object ( [languages:protected] => [bok_resources:protected] => [bok_topics:protected] => [bok_keywords:protected] => [id:protected] => 92 [type:protected] => category [parent:protected] => 3 [label:protected] => LEED/Green Construction [alreadyInSave:protected] => [alreadyInValidation:protected] => [validationFailures:protected] => Array ( ) [_new:BaseObject:private] => [_deleted:BaseObject:private] => [modifiedColumns:protected] => Array ( ) ) [93] => Category Object ( [languages:protected] => [bok_resources:protected] => [bok_topics:protected] => [bok_keywords:protected] => [id:protected] => 93 [type:protected] => category [parent:protected] => 3 [label:protected] => Renovations [alreadyInSave:protected] => [alreadyInValidation:protected] => [validationFailures:protected] => Array ( ) [_new:BaseObject:private] => [_deleted:BaseObject:private] => [modifiedColumns:protected] => Array ( ) ) [94] => Category Object ( [languages:protected] => [bok_resources:protected] => [bok_topics:protected] => [bok_keywords:protected] => [id:protected] => 94 [type:protected] => category [parent:protected] => 3 [label:protected] => Residential [alreadyInSave:protected] => [alreadyInValidation:protected] => [validationFailures:protected] => Array ( ) [_new:BaseObject:private] => [_deleted:BaseObject:private] => [modifiedColumns:protected] => Array ( ) ) [95] => Category Object ( [languages:protected] => [bok_resources:protected] => [bok_topics:protected] => [bok_keywords:protected] => [id:protected] => 95 [type:protected] => category [parent:protected] => 3 [label:protected] => Underground [alreadyInSave:protected] => [alreadyInValidation:protected] => [validationFailures:protected] => Array ( ) [_new:BaseObject:private] => [_deleted:BaseObject:private] => [modifiedColumns:protected] => Array ( ) ) ) [categories_initialized:protected] => 1 [mapped_items:protected] => [content:protected] => [files:protected] => [language:protected] => Language Object ( [id:protected] => 1 [code:protected] => en [name:protected] => English [alreadyInSave:protected] => [alreadyInValidation:protected] => [validationFailures:protected] => Array ( ) [_new:BaseObject:private] => [_deleted:BaseObject:private] => [modifiedColumns:protected] => Array ( ) ) [old_record:protected] => [id:protected] => 4426 [old_id:protected] => [elcosh_id:protected] => d001656 [type:protected] => document [display_type:protected] => HTML only (and links) [user_id:protected] => 0 [language_id:protected] => 1 [tagging_id:protected] => Mike Aguilar [priority_id:protected] => 1 [title:protected] => Construction Dive -- DeWalt's Jobsite Pro headphones recalled for fire hazards [total_pages:protected] => 1 [billed_pages:protected] => 1 [publication_number:protected] => [part_of:protected] => [keywords:protected] => DeWalt, Fire Hazards, recall, headphones [comments:protected] => [summary:protected] => A recall notice by the United States Consumer Product Safety Commission affects over 300,000 DeWalt Jobsite Pro Headphones. The recall is a result of a malfunction that can cause earbuds to overheat while charging or during use, leading to fire and burn hazards. [transition_comments:protected] => [external_link:protected] => https://www.constructiondive.com/news/dewalts-jobsite-pro-headphones-recalled-for-fire-hazards/611248/?utm_source=Sailthru&utm_medium=email&utm_campaign=Issue:%202021-12-10%20Construction%20Dive%20Newsletter%20%5Bissue:38532%5D&utm_term=Construction%20Dive [consol_link:protected] => [more_like_this:protected] => [permission_given_by:protected] => [published:protected] => T [billable:protected] => F [img_name:protected] => [img_ext:protected] => [img_width:protected] => [img_height:protected] => [img_credit:protected] => [img_practice:protected] => [vid_source_id:protected] => [vid_running_time:protected] => [vid_intended_audience:protected] => [vid_acquisition_info:protected] => [vid_cost:protected] => [vid_producer:protected] => [vid_filename:protected] => [vid_filename_downloadable:protected] => [date_summary:protected] => [date_permission_requested:protected] => [date_permission_received:protected] => [date_review_needed:protected] => [date_received:protected] => 12/13/21 [date_completed:protected] => 12/13/21 [date_billed:protected] => [date_modified:protected] => 12/13/21 [collBokExports:protected] => [lastBokExportCriteria:BaseElcoshItem:private] => [alreadyInSave:protected] => [alreadyInValidation:protected] => [validationFailures:protected] => Array ( ) [_new:BaseObject:private] => [_deleted:BaseObject:private] => [modifiedColumns:protected] => Array ( ) ) ) [3] => Search_Result Object ( [title] => Working in an Enclosed Cab [image] => /record/images/notavailable-p.png [blurb] => This CPWR Hazard Alert on Working in enclosed cabs provides information on protecting workers from silica dust, how to minimize exposures and the dang... [category] => Array ( [0] => 10 [1] => 16 [2] => 24 [3] => 37 [4] => 46 [5] => 48 [6] => 49 [7] => 51 [8] => 53 [9] => 54 [10] => 56 [11] => 58 [12] => 59 [13] => 60 [14] => 61 [15] => 64 [16] => 66 [17] => 68 [18] => 69 [19] => 71 [20] => 73 [21] => 74 [22] => 76 [23] => 77 [24] => 63 [25] => 80 [26] => 82 [27] => 62 [28] => 83 [29] => 84 [30] => 86 [31] => 88 [32] => 89 [33] => 95 [34] => 102 ) [labels] => Array ( [0] => Confined Spaces [1] => Work Environment [2] => Hazards [3] => Fire & Explosions [6] => Trenches & Excavations [9] => Silica /Construction Dust [10] => Inhalation/Skin Exposures [12] => Boilermaker [13] => Trades [14] => Cabinetmaker [16] => Carpenter [18] => Cement Mason [20] => Concrete Polisher [22] => Drywall Applicator Specialist [24] => Elevator Constructor [26] => Glazier [28] => Hazardous Waste Cleanup [30] => HVAC [32] => Interior Systems Carpenter [34] => Laborer [36] => Lather [38] => Maintenance Worker [40] => Millwright [42] => Painter [44] => PCC/Restoration [46] => Pile Driver [48] => Plumber/Pipefitter [50] => Refractory Worker [52] => Reinforcing Ironworker [54] => Sheetmetal Worker [56] => Stonemason [58] => Structural Ironworker [60] => Terrazzo Worker [62] => Tile Setter [64] => Welder [66] => Demolition [67] => Jobsites [68] => Disasters [70] => Underground [72] => Handouts [73] => Documents [74] => Media & Documents ) [type] => Handouts [sub_category] => [url] => /document/4415/d001651/Working%2Bin%2Ban%2BEnclosed%2BCab.html [item:protected] => DocumentRecord Object ( [records:protected] => Array ( ) [recordId:protected] => [searchWordClass:protected] => [searchWordPeerClass:protected] => [bok_record:protected] => [authors:protected] => [organizations:protected] => [collections:protected] => [categories:protected] => Array ( [10] => Category Object ( [languages:protected] => [bok_resources:protected] => [bok_topics:protected] => [bok_keywords:protected] => [id:protected] => 10 [type:protected] => category [parent:protected] => 7 [label:protected] => Confined Spaces [alreadyInSave:protected] => [alreadyInValidation:protected] => [validationFailures:protected] => Array ( ) [_new:BaseObject:private] => [_deleted:BaseObject:private] => [modifiedColumns:protected] => Array ( ) ) [16] => Category Object ( [languages:protected] => [bok_resources:protected] => [bok_topics:protected] => [bok_keywords:protected] => [id:protected] => 16 [type:protected] => category [parent:protected] => 7 [label:protected] => Fire & Explosions [alreadyInSave:protected] => [alreadyInValidation:protected] => [validationFailures:protected] => Array ( ) [_new:BaseObject:private] => [_deleted:BaseObject:private] => [modifiedColumns:protected] => Array ( ) ) [24] => Category Object ( [languages:protected] => [bok_resources:protected] => [bok_topics:protected] => [bok_keywords:protected] => [id:protected] => 24 [type:protected] => category [parent:protected] => 7 [label:protected] => Trenches & Excavations [alreadyInSave:protected] => [alreadyInValidation:protected] => [validationFailures:protected] => Array ( ) [_new:BaseObject:private] => [_deleted:BaseObject:private] => [modifiedColumns:protected] => Array ( ) ) [37] => Category Object ( [languages:protected] => [bok_resources:protected] => [bok_topics:protected] => [bok_keywords:protected] => [id:protected] => 37 [type:protected] => category [parent:protected] => 8 [label:protected] => Silica /Construction Dust [alreadyInSave:protected] => [alreadyInValidation:protected] => [validationFailures:protected] => Array ( ) [_new:BaseObject:private] => [_deleted:BaseObject:private] => [modifiedColumns:protected] => Array ( ) ) [46] => Category Object ( [languages:protected] => [bok_resources:protected] => [bok_topics:protected] => [bok_keywords:protected] => [id:protected] => 46 [type:protected] => category [parent:protected] => 2 [label:protected] => Boilermaker [alreadyInSave:protected] => [alreadyInValidation:protected] => [validationFailures:protected] => Array ( ) [_new:BaseObject:private] => [_deleted:BaseObject:private] => [modifiedColumns:protected] => Array ( ) ) [48] => Category Object ( [languages:protected] => [bok_resources:protected] => [bok_topics:protected] => [bok_keywords:protected] => [id:protected] => 48 [type:protected] => category [parent:protected] => 2 [label:protected] => Cabinetmaker [alreadyInSave:protected] => [alreadyInValidation:protected] => [validationFailures:protected] => Array ( ) [_new:BaseObject:private] => [_deleted:BaseObject:private] => [modifiedColumns:protected] => Array ( ) ) [49] => Category Object ( [languages:protected] => [bok_resources:protected] => [bok_topics:protected] => [bok_keywords:protected] => [id:protected] => 49 [type:protected] => category [parent:protected] => 2 [label:protected] => Carpenter [alreadyInSave:protected] => [alreadyInValidation:protected] => [validationFailures:protected] => Array ( ) [_new:BaseObject:private] => [_deleted:BaseObject:private] => [modifiedColumns:protected] => Array ( ) ) [51] => Category Object ( [languages:protected] => [bok_resources:protected] => [bok_topics:protected] => [bok_keywords:protected] => [id:protected] => 51 [type:protected] => category [parent:protected] => 2 [label:protected] => Cement Mason [alreadyInSave:protected] => [alreadyInValidation:protected] => [validationFailures:protected] => Array ( ) [_new:BaseObject:private] => [_deleted:BaseObject:private] => [modifiedColumns:protected] => Array ( ) ) [53] => Category Object ( [languages:protected] => [bok_resources:protected] => [bok_topics:protected] => [bok_keywords:protected] => [id:protected] => 53 [type:protected] => category [parent:protected] => 2 [label:protected] => Concrete Polisher [alreadyInSave:protected] => [alreadyInValidation:protected] => [validationFailures:protected] => Array ( ) [_new:BaseObject:private] => [_deleted:BaseObject:private] => [modifiedColumns:protected] => Array ( ) ) [54] => Category Object ( [languages:protected] => [bok_resources:protected] => [bok_topics:protected] => [bok_keywords:protected] => [id:protected] => 54 [type:protected] => category [parent:protected] => 2 [label:protected] => Drywall Applicator Specialist [alreadyInSave:protected] => [alreadyInValidation:protected] => [validationFailures:protected] => Array ( ) [_new:BaseObject:private] => [_deleted:BaseObject:private] => [modifiedColumns:protected] => Array ( ) ) [56] => Category Object ( [languages:protected] => [bok_resources:protected] => [bok_topics:protected] => [bok_keywords:protected] => [id:protected] => 56 [type:protected] => category [parent:protected] => 2 [label:protected] => Elevator Constructor [alreadyInSave:protected] => [alreadyInValidation:protected] => [validationFailures:protected] => Array ( ) [_new:BaseObject:private] => [_deleted:BaseObject:private] => [modifiedColumns:protected] => Array ( ) ) [58] => Category Object ( [languages:protected] => [bok_resources:protected] => [bok_topics:protected] => [bok_keywords:protected] => [id:protected] => 58 [type:protected] => category [parent:protected] => 2 [label:protected] => Glazier [alreadyInSave:protected] => [alreadyInValidation:protected] => [validationFailures:protected] => Array ( ) [_new:BaseObject:private] => [_deleted:BaseObject:private] => [modifiedColumns:protected] => Array ( ) ) [59] => Category Object ( [languages:protected] => [bok_resources:protected] => [bok_topics:protected] => [bok_keywords:protected] => [id:protected] => 59 [type:protected] => category [parent:protected] => 2 [label:protected] => Hazardous Waste Cleanup [alreadyInSave:protected] => [alreadyInValidation:protected] => [validationFailures:protected] => Array ( ) [_new:BaseObject:private] => [_deleted:BaseObject:private] => [modifiedColumns:protected] => Array ( ) ) [60] => Category Object ( [languages:protected] => [bok_resources:protected] => [bok_topics:protected] => [bok_keywords:protected] => [id:protected] => 60 [type:protected] => category [parent:protected] => 2 [label:protected] => HVAC [alreadyInSave:protected] => [alreadyInValidation:protected] => [validationFailures:protected] => Array ( ) [_new:BaseObject:private] => [_deleted:BaseObject:private] => [modifiedColumns:protected] => Array ( ) ) [61] => Category Object ( [languages:protected] => [bok_resources:protected] => [bok_topics:protected] => [bok_keywords:protected] => [id:protected] => 61 [type:protected] => category [parent:protected] => 2 [label:protected] => Interior Systems Carpenter [alreadyInSave:protected] => [alreadyInValidation:protected] => [validationFailures:protected] => Array ( ) [_new:BaseObject:private] => [_deleted:BaseObject:private] => [modifiedColumns:protected] => Array ( ) ) [64] => Category Object ( [languages:protected] => [bok_resources:protected] => [bok_topics:protected] => [bok_keywords:protected] => [id:protected] => 64 [type:protected] => category [parent:protected] => 2 [label:protected] => Laborer [alreadyInSave:protected] => [alreadyInValidation:protected] => [validationFailures:protected] => Array ( ) [_new:BaseObject:private] => [_deleted:BaseObject:private] => [modifiedColumns:protected] => Array ( ) ) [66] => Category Object ( [languages:protected] => [bok_resources:protected] => [bok_topics:protected] => [bok_keywords:protected] => [id:protected] => 66 [type:protected] => category [parent:protected] => 2 [label:protected] => Lather [alreadyInSave:protected] => [alreadyInValidation:protected] => [validationFailures:protected] => Array ( ) [_new:BaseObject:private] => [_deleted:BaseObject:private] => [modifiedColumns:protected] => Array ( ) ) [68] => Category Object ( [languages:protected] => [bok_resources:protected] => [bok_topics:protected] => [bok_keywords:protected] => [id:protected] => 68 [type:protected] => category [parent:protected] => 2 [label:protected] => Maintenance Worker [alreadyInSave:protected] => [alreadyInValidation:protected] => [validationFailures:protected] => Array ( ) [_new:BaseObject:private] => [_deleted:BaseObject:private] => [modifiedColumns:protected] => Array ( ) ) [69] => Category Object ( [languages:protected] => [bok_resources:protected] => [bok_topics:protected] => [bok_keywords:protected] => [id:protected] => 69 [type:protected] => category [parent:protected] => 2 [label:protected] => Millwright [alreadyInSave:protected] => [alreadyInValidation:protected] => [validationFailures:protected] => Array ( ) [_new:BaseObject:private] => [_deleted:BaseObject:private] => [modifiedColumns:protected] => Array ( ) ) [71] => Category Object ( [languages:protected] => [bok_resources:protected] => [bok_topics:protected] => [bok_keywords:protected] => [id:protected] => 71 [type:protected] => category [parent:protected] => 2 [label:protected] => Painter [alreadyInSave:protected] => [alreadyInValidation:protected] => [validationFailures:protected] => Array ( ) [_new:BaseObject:private] => [_deleted:BaseObject:private] => [modifiedColumns:protected] => Array ( ) ) [73] => Category Object ( [languages:protected] => [bok_resources:protected] => [bok_topics:protected] => [bok_keywords:protected] => [id:protected] => 73 [type:protected] => category [parent:protected] => 2 [label:protected] => PCC/Restoration [alreadyInSave:protected] => [alreadyInValidation:protected] => [validationFailures:protected] => Array ( ) [_new:BaseObject:private] => [_deleted:BaseObject:private] => [modifiedColumns:protected] => Array ( ) ) [74] => Category Object ( [languages:protected] => [bok_resources:protected] => [bok_topics:protected] => [bok_keywords:protected] => [id:protected] => 74 [type:protected] => category [parent:protected] => 2 [label:protected] => Pile Driver [alreadyInSave:protected] => [alreadyInValidation:protected] => [validationFailures:protected] => Array ( ) [_new:BaseObject:private] => [_deleted:BaseObject:private] => [modifiedColumns:protected] => Array ( ) ) [76] => Category Object ( [languages:protected] => [bok_resources:protected] => [bok_topics:protected] => [bok_keywords:protected] => [id:protected] => 76 [type:protected] => category [parent:protected] => 2 [label:protected] => Plumber/Pipefitter [alreadyInSave:protected] => [alreadyInValidation:protected] => [validationFailures:protected] => Array ( ) [_new:BaseObject:private] => [_deleted:BaseObject:private] => [modifiedColumns:protected] => Array ( ) ) [77] => Category Object ( [languages:protected] => [bok_resources:protected] => [bok_topics:protected] => [bok_keywords:protected] => [id:protected] => 77 [type:protected] => category [parent:protected] => 2 [label:protected] => Refractory Worker [alreadyInSave:protected] => [alreadyInValidation:protected] => [validationFailures:protected] => Array ( ) [_new:BaseObject:private] => [_deleted:BaseObject:private] => [modifiedColumns:protected] => Array ( ) ) [63] => Category Object ( [languages:protected] => [bok_resources:protected] => [bok_topics:protected] => [bok_keywords:protected] => [id:protected] => 63 [type:protected] => category [parent:protected] => 2 [label:protected] => Reinforcing Ironworker [alreadyInSave:protected] => [alreadyInValidation:protected] => [validationFailures:protected] => Array ( ) [_new:BaseObject:private] => [_deleted:BaseObject:private] => [modifiedColumns:protected] => Array ( ) ) [80] => Category Object ( [languages:protected] => [bok_resources:protected] => [bok_topics:protected] => [bok_keywords:protected] => [id:protected] => 80 [type:protected] => category [parent:protected] => 2 [label:protected] => Sheetmetal Worker [alreadyInSave:protected] => [alreadyInValidation:protected] => [validationFailures:protected] => Array ( ) [_new:BaseObject:private] => [_deleted:BaseObject:private] => [modifiedColumns:protected] => Array ( ) ) [82] => Category Object ( [languages:protected] => [bok_resources:protected] => [bok_topics:protected] => [bok_keywords:protected] => [id:protected] => 82 [type:protected] => category [parent:protected] => 2 [label:protected] => Stonemason [alreadyInSave:protected] => [alreadyInValidation:protected] => [validationFailures:protected] => Array ( ) [_new:BaseObject:private] => [_deleted:BaseObject:private] => [modifiedColumns:protected] => Array ( ) ) [62] => Category Object ( [languages:protected] => [bok_resources:protected] => [bok_topics:protected] => [bok_keywords:protected] => [id:protected] => 62 [type:protected] => category [parent:protected] => 2 [label:protected] => Structural Ironworker [alreadyInSave:protected] => [alreadyInValidation:protected] => [validationFailures:protected] => Array ( ) [_new:BaseObject:private] => [_deleted:BaseObject:private] => [modifiedColumns:protected] => Array ( ) ) [83] => Category Object ( [languages:protected] => [bok_resources:protected] => [bok_topics:protected] => [bok_keywords:protected] => [id:protected] => 83 [type:protected] => category [parent:protected] => 2 [label:protected] => Terrazzo Worker [alreadyInSave:protected] => [alreadyInValidation:protected] => [validationFailures:protected] => Array ( ) [_new:BaseObject:private] => [_deleted:BaseObject:private] => [modifiedColumns:protected] => Array ( ) ) [84] => Category Object ( [languages:protected] => [bok_resources:protected] => [bok_topics:protected] => [bok_keywords:protected] => [id:protected] => 84 [type:protected] => category [parent:protected] => 2 [label:protected] => Tile Setter [alreadyInSave:protected] => [alreadyInValidation:protected] => [validationFailures:protected] => Array ( ) [_new:BaseObject:private] => [_deleted:BaseObject:private] => [modifiedColumns:protected] => Array ( ) ) [86] => Category Object ( [languages:protected] => [bok_resources:protected] => [bok_topics:protected] => [bok_keywords:protected] => [id:protected] => 86 [type:protected] => category [parent:protected] => 2 [label:protected] => Welder [alreadyInSave:protected] => [alreadyInValidation:protected] => [validationFailures:protected] => Array ( ) [_new:BaseObject:private] => [_deleted:BaseObject:private] => [modifiedColumns:protected] => Array ( ) ) [88] => Category Object ( [languages:protected] => [bok_resources:protected] => [bok_topics:protected] => [bok_keywords:protected] => [id:protected] => 88 [type:protected] => category [parent:protected] => 3 [label:protected] => Demolition [alreadyInSave:protected] => [alreadyInValidation:protected] => [validationFailures:protected] => Array ( ) [_new:BaseObject:private] => [_deleted:BaseObject:private] => [modifiedColumns:protected] => Array ( ) ) [89] => Category Object ( [languages:protected] => [bok_resources:protected] => [bok_topics:protected] => [bok_keywords:protected] => [id:protected] => 89 [type:protected] => category [parent:protected] => 3 [label:protected] => Disasters [alreadyInSave:protected] => [alreadyInValidation:protected] => [validationFailures:protected] => Array ( ) [_new:BaseObject:private] => [_deleted:BaseObject:private] => [modifiedColumns:protected] => Array ( ) ) [95] => Category Object ( [languages:protected] => [bok_resources:protected] => [bok_topics:protected] => [bok_keywords:protected] => [id:protected] => 95 [type:protected] => category [parent:protected] => 3 [label:protected] => Underground [alreadyInSave:protected] => [alreadyInValidation:protected] => [validationFailures:protected] => Array ( ) [_new:BaseObject:private] => [_deleted:BaseObject:private] => [modifiedColumns:protected] => Array ( ) ) [102] => Category Object ( [languages:protected] => [bok_resources:protected] => [bok_topics:protected] => [bok_keywords:protected] => [id:protected] => 102 [type:protected] => category [parent:protected] => 6 [label:protected] => Handouts [alreadyInSave:protected] => [alreadyInValidation:protected] => [validationFailures:protected] => Array ( ) [_new:BaseObject:private] => [_deleted:BaseObject:private] => [modifiedColumns:protected] => Array ( ) ) ) [categories_initialized:protected] => 1 [mapped_items:protected] => [content:protected] => [files:protected] => [language:protected] => Language Object ( [id:protected] => 1 [code:protected] => en [name:protected] => English [alreadyInSave:protected] => [alreadyInValidation:protected] => [validationFailures:protected] => Array ( ) [_new:BaseObject:private] => [_deleted:BaseObject:private] => [modifiedColumns:protected] => Array ( ) ) [old_record:protected] => [id:protected] => 4415 [old_id:protected] => [elcosh_id:protected] => d001651 [type:protected] => document [display_type:protected] => HTML only (and links) [user_id:protected] => 0 [language_id:protected] => 1 [tagging_id:protected] => Valeria Contreras [priority_id:protected] => 1 [title:protected] => Working in an Enclosed Cab [total_pages:protected] => 1 [billed_pages:protected] => 1 [publication_number:protected] => [part_of:protected] => [keywords:protected] => Occupation, construction, safety, health, hazards, work, worker, workplace, OSHA, silicosis, mining, silica, DOE, EEOICPA, labor, lung, CBD, dust, cab, miner, mine [comments:protected] => [summary:protected] => This CPWR Hazard Alert on Working in enclosed cabs provides information on protecting workers from silica dust, how to minimize exposures and the dangers of silica dust. Click on the following links to access the English version and the Spanish version. [transition_comments:protected] => [external_link:protected] => [consol_link:protected] => [more_like_this:protected] => [permission_given_by:protected] => [published:protected] => T [billable:protected] => F [img_name:protected] => [img_ext:protected] => [img_width:protected] => [img_height:protected] => [img_credit:protected] => [img_practice:protected] => [vid_source_id:protected] => [vid_running_time:protected] => [vid_intended_audience:protected] => [vid_acquisition_info:protected] => [vid_cost:protected] => [vid_producer:protected] => [vid_filename:protected] => [vid_filename_downloadable:protected] => [date_summary:protected] => [date_permission_requested:protected] => [date_permission_received:protected] => [date_review_needed:protected] => [date_received:protected] => 10/08/20 [date_completed:protected] => 10/08/20 [date_billed:protected] => [date_modified:protected] => 10/08/20 [collBokExports:protected] => [lastBokExportCriteria:BaseElcoshItem:private] => [alreadyInSave:protected] => [alreadyInValidation:protected] => [validationFailures:protected] => Array ( ) [_new:BaseObject:private] => [_deleted:BaseObject:private] => [modifiedColumns:protected] => Array ( ) ) ) [4] => Search_Result Object ( [title] => Toolbox Talk: Suicide Prevention [image] => /record/images/notavailable-p.png [blurb] => The CPWR Toolbox Talk on Suicide Prevention addresses the prevalence of suicide among construction workers. The resource includes a brief case example... [category] => Array ( [0] => 13 [1] => 20 [2] => 23 [3] => 40 [4] => 44 [5] => 45 [6] => 46 [7] => 47 [8] => 48 [9] => 49 [10] => 50 [11] => 51 [12] => 52 [13] => 53 [14] => 54 [15] => 55 [16] => 56 [17] => 57 [18] => 58 [19] => 59 [20] => 60 [21] => 61 [22] => 64 [23] => 65 [24] => 66 [25] => 67 [26] => 68 [27] => 69 [28] => 70 [29] => 71 [30] => 72 [31] => 73 [32] => 74 [33] => 75 [34] => 76 [35] => 77 [36] => 63 [37] => 78 [38] => 79 [39] => 80 [40] => 81 [41] => 82 [42] => 62 [43] => 83 [44] => 84 [45] => 85 [46] => 86 [47] => 87 [48] => 88 [49] => 89 [50] => 91 [51] => 90 [52] => 92 [53] => 93 [54] => 94 [55] => 95 [56] => 100 ) [labels] => Array ( [0] => Drugs, Alcohol & Tobacco [1] => Work Environment [2] => Hazards [3] => Safety Culture [6] => Stress & Overtime [9] => Overexertion [10] => Ergonomic [12] => Acoustical Ceiling Carpenter [13] => Trades [14] => Asbestos/Insulator [16] => Boilermaker [18] => Bricklayer [20] => Cabinetmaker [22] => Carpenter [24] => Carpet Layer [26] => Cement Mason [28] => Commercial Diver [30] => Concrete Polisher [32] => Drywall Applicator Specialist [34] => Electrical Worker [36] => Elevator Constructor [38] => Flagger [40] => Glazier [42] => Hazardous Waste Cleanup [44] => HVAC [46] => Interior Systems Carpenter [48] => Laborer [50] => Landscaper [52] => Lather [54] => Lead Abatement Worker [56] => Maintenance Worker [58] => Millwright [60] => Operating Engineer [62] => Painter [64] => Paper Hanger [66] => PCC/Restoration [68] => Pile Driver [70] => Plasterer [72] => Plumber/Pipefitter [74] => Refractory Worker [76] => Reinforcing Ironworker [78] => Roofer/Waterproofer [80] => Scaffold Erector [82] => Sheetmetal Worker [84] => Sprinkler Fitter [86] => Stonemason [88] => Structural Ironworker [90] => Terrazzo Worker [92] => Tile Setter [94] => Truck Driver [96] => Welder [98] => Commercial & Institutional [99] => Jobsites [100] => Demolition [102] => Disasters [104] => Heavy & Highway [106] => Industrial [108] => LEED/Green Construction [110] => Renovations [112] => Residential [114] => Underground [116] => Toolbox Talks [117] => Documents [118] => Media & Documents ) [type] => Toolbox Talks [sub_category] => [url] => /document/4419/d001652/Toolbox%2BTalk%253A%2BSuicide%2BPrevention.html [item:protected] => DocumentRecord Object ( [records:protected] => Array ( ) [recordId:protected] => [searchWordClass:protected] => [searchWordPeerClass:protected] => [bok_record:protected] => [authors:protected] => [organizations:protected] => [collections:protected] => [categories:protected] => Array ( [13] => Category Object ( [languages:protected] => [bok_resources:protected] => [bok_topics:protected] => [bok_keywords:protected] => [id:protected] => 13 [type:protected] => category [parent:protected] => 7 [label:protected] => Drugs, Alcohol & Tobacco [alreadyInSave:protected] => [alreadyInValidation:protected] => [validationFailures:protected] => Array ( ) [_new:BaseObject:private] => [_deleted:BaseObject:private] => [modifiedColumns:protected] => Array ( ) ) [20] => Category Object ( [languages:protected] => [bok_resources:protected] => [bok_topics:protected] => [bok_keywords:protected] => [id:protected] => 20 [type:protected] => category [parent:protected] => 7 [label:protected] => Safety Culture [alreadyInSave:protected] => [alreadyInValidation:protected] => [validationFailures:protected] => Array ( ) [_new:BaseObject:private] => [_deleted:BaseObject:private] => [modifiedColumns:protected] => Array ( ) ) [23] => Category Object ( [languages:protected] => [bok_resources:protected] => [bok_topics:protected] => [bok_keywords:protected] => [id:protected] => 23 [type:protected] => category [parent:protected] => 7 [label:protected] => Stress & Overtime [alreadyInSave:protected] => [alreadyInValidation:protected] => [validationFailures:protected] => Array ( ) [_new:BaseObject:private] => [_deleted:BaseObject:private] => [modifiedColumns:protected] => Array ( ) ) [40] => Category Object ( [languages:protected] => [bok_resources:protected] => [bok_topics:protected] => [bok_keywords:protected] => [id:protected] => 40 [type:protected] => category [parent:protected] => 9 [label:protected] => Overexertion [alreadyInSave:protected] => [alreadyInValidation:protected] => [validationFailures:protected] => Array ( ) [_new:BaseObject:private] => [_deleted:BaseObject:private] => [modifiedColumns:protected] => Array ( ) ) [44] => Category Object ( [languages:protected] => [bok_resources:protected] => [bok_topics:protected] => [bok_keywords:protected] => [id:protected] => 44 [type:protected] => category [parent:protected] => 2 [label:protected] => Acoustical Ceiling Carpenter [alreadyInSave:protected] => [alreadyInValidation:protected] => [validationFailures:protected] => Array ( ) [_new:BaseObject:private] => [_deleted:BaseObject:private] => [modifiedColumns:protected] => Array ( ) ) [45] => Category Object ( [languages:protected] => [bok_resources:protected] => [bok_topics:protected] => [bok_keywords:protected] => [id:protected] => 45 [type:protected] => category [parent:protected] => 2 [label:protected] => Asbestos/Insulator [alreadyInSave:protected] => [alreadyInValidation:protected] => [validationFailures:protected] => Array ( ) [_new:BaseObject:private] => [_deleted:BaseObject:private] => [modifiedColumns:protected] => Array ( ) ) [46] => Category Object ( [languages:protected] => [bok_resources:protected] => [bok_topics:protected] => [bok_keywords:protected] => [id:protected] => 46 [type:protected] => category [parent:protected] => 2 [label:protected] => Boilermaker [alreadyInSave:protected] => [alreadyInValidation:protected] => [validationFailures:protected] => Array ( ) [_new:BaseObject:private] => [_deleted:BaseObject:private] => [modifiedColumns:protected] => Array ( ) ) [47] => Category Object ( [languages:protected] => [bok_resources:protected] => [bok_topics:protected] => [bok_keywords:protected] => [id:protected] => 47 [type:protected] => category [parent:protected] => 2 [label:protected] => Bricklayer [alreadyInSave:protected] => [alreadyInValidation:protected] => [validationFailures:protected] => Array ( ) [_new:BaseObject:private] => [_deleted:BaseObject:private] => [modifiedColumns:protected] => Array ( ) ) [48] => Category Object ( [languages:protected] => [bok_resources:protected] => [bok_topics:protected] => [bok_keywords:protected] => [id:protected] => 48 [type:protected] => category [parent:protected] => 2 [label:protected] => Cabinetmaker [alreadyInSave:protected] => [alreadyInValidation:protected] => [validationFailures:protected] => Array ( ) [_new:BaseObject:private] => [_deleted:BaseObject:private] => [modifiedColumns:protected] => Array ( ) ) [49] => Category Object ( [languages:protected] => [bok_resources:protected] => [bok_topics:protected] => [bok_keywords:protected] => [id:protected] => 49 [type:protected] => category [parent:protected] => 2 [label:protected] => Carpenter [alreadyInSave:protected] => [alreadyInValidation:protected] => [validationFailures:protected] => Array ( ) [_new:BaseObject:private] => [_deleted:BaseObject:private] => [modifiedColumns:protected] => Array ( ) ) [50] => Category Object ( [languages:protected] => [bok_resources:protected] => [bok_topics:protected] => [bok_keywords:protected] => [id:protected] => 50 [type:protected] => category [parent:protected] => 2 [label:protected] => Carpet Layer [alreadyInSave:protected] => [alreadyInValidation:protected] => [validationFailures:protected] => Array ( ) [_new:BaseObject:private] => [_deleted:BaseObject:private] => [modifiedColumns:protected] => Array ( ) ) [51] => Category Object ( [languages:protected] => [bok_resources:protected] => [bok_topics:protected] => [bok_keywords:protected] => [id:protected] => 51 [type:protected] => category [parent:protected] => 2 [label:protected] => Cement Mason [alreadyInSave:protected] => [alreadyInValidation:protected] => [validationFailures:protected] => Array ( ) [_new:BaseObject:private] => [_deleted:BaseObject:private] => [modifiedColumns:protected] => Array ( ) ) [52] => Category Object ( [languages:protected] => [bok_resources:protected] => [bok_topics:protected] => [bok_keywords:protected] => [id:protected] => 52 [type:protected] => category [parent:protected] => 2 [label:protected] => Commercial Diver [alreadyInSave:protected] => [alreadyInValidation:protected] => [validationFailures:protected] => Array ( ) [_new:BaseObject:private] => [_deleted:BaseObject:private] => [modifiedColumns:protected] => Array ( ) ) [53] => Category Object ( [languages:protected] => [bok_resources:protected] => [bok_topics:protected] => [bok_keywords:protected] => [id:protected] => 53 [type:protected] => category [parent:protected] => 2 [label:protected] => Concrete Polisher [alreadyInSave:protected] => [alreadyInValidation:protected] => [validationFailures:protected] => Array ( ) [_new:BaseObject:private] => [_deleted:BaseObject:private] => [modifiedColumns:protected] => Array ( ) ) [54] => Category Object ( [languages:protected] => [bok_resources:protected] => [bok_topics:protected] => [bok_keywords:protected] => [id:protected] => 54 [type:protected] => category [parent:protected] => 2 [label:protected] => Drywall Applicator Specialist [alreadyInSave:protected] => [alreadyInValidation:protected] => [validationFailures:protected] => Array ( ) [_new:BaseObject:private] => [_deleted:BaseObject:private] => [modifiedColumns:protected] => Array ( ) ) [55] => Category Object ( [languages:protected] => [bok_resources:protected] => [bok_topics:protected] => [bok_keywords:protected] => [id:protected] => 55 [type:protected] => category [parent:protected] => 2 [label:protected] => Electrical Worker [alreadyInSave:protected] => [alreadyInValidation:protected] => [validationFailures:protected] => Array ( ) [_new:BaseObject:private] => [_deleted:BaseObject:private] => [modifiedColumns:protected] => Array ( ) ) [56] => Category Object ( [languages:protected] => [bok_resources:protected] => [bok_topics:protected] => [bok_keywords:protected] => [id:protected] => 56 [type:protected] => category [parent:protected] => 2 [label:protected] => Elevator Constructor [alreadyInSave:protected] => [alreadyInValidation:protected] => [validationFailures:protected] => Array ( ) [_new:BaseObject:private] => [_deleted:BaseObject:private] => [modifiedColumns:protected] => Array ( ) ) [57] => Category Object ( [languages:protected] => [bok_resources:protected] => [bok_topics:protected] => [bok_keywords:protected] => [id:protected] => 57 [type:protected] => category [parent:protected] => 2 [label:protected] => Flagger [alreadyInSave:protected] => [alreadyInValidation:protected] => [validationFailures:protected] => Array ( ) [_new:BaseObject:private] => [_deleted:BaseObject:private] => [modifiedColumns:protected] => Array ( ) ) [58] => Category Object ( [languages:protected] => [bok_resources:protected] => [bok_topics:protected] => [bok_keywords:protected] => [id:protected] => 58 [type:protected] => category [parent:protected] => 2 [label:protected] => Glazier [alreadyInSave:protected] => [alreadyInValidation:protected] => [validationFailures:protected] => Array ( ) [_new:BaseObject:private] => [_deleted:BaseObject:private] => [modifiedColumns:protected] => Array ( ) ) [59] => Category Object ( [languages:protected] => [bok_resources:protected] => [bok_topics:protected] => [bok_keywords:protected] => [id:protected] => 59 [type:protected] => category [parent:protected] => 2 [label:protected] => Hazardous Waste Cleanup [alreadyInSave:protected] => [alreadyInValidation:protected] => [validationFailures:protected] => Array ( ) [_new:BaseObject:private] => [_deleted:BaseObject:private] => [modifiedColumns:protected] => Array ( ) ) [60] => Category Object ( [languages:protected] => [bok_resources:protected] => [bok_topics:protected] => [bok_keywords:protected] => [id:protected] => 60 [type:protected] => category [parent:protected] => 2 [label:protected] => HVAC [alreadyInSave:protected] => [alreadyInValidation:protected] => [validationFailures:protected] => Array ( ) [_new:BaseObject:private] => [_deleted:BaseObject:private] => [modifiedColumns:protected] => Array ( ) ) [61] => Category Object ( [languages:protected] => [bok_resources:protected] => [bok_topics:protected] => [bok_keywords:protected] => [id:protected] => 61 [type:protected] => category [parent:protected] => 2 [label:protected] => Interior Systems Carpenter [alreadyInSave:protected] => [alreadyInValidation:protected] => [validationFailures:protected] => Array ( ) [_new:BaseObject:private] => [_deleted:BaseObject:private] => [modifiedColumns:protected] => Array ( ) ) [64] => Category Object ( [languages:protected] => [bok_resources:protected] => [bok_topics:protected] => [bok_keywords:protected] => [id:protected] => 64 [type:protected] => category [parent:protected] => 2 [label:protected] => Laborer [alreadyInSave:protected] => [alreadyInValidation:protected] => [validationFailures:protected] => Array ( ) [_new:BaseObject:private] => [_deleted:BaseObject:private] => [modifiedColumns:protected] => Array ( ) ) [65] => Category Object ( [languages:protected] => [bok_resources:protected] => [bok_topics:protected] => [bok_keywords:protected] => [id:protected] => 65 [type:protected] => category [parent:protected] => 2 [label:protected] => Landscaper [alreadyInSave:protected] => [alreadyInValidation:protected] => [validationFailures:protected] => Array ( ) [_new:BaseObject:private] => [_deleted:BaseObject:private] => [modifiedColumns:protected] => Array ( ) ) [66] => Category Object ( [languages:protected] => [bok_resources:protected] => [bok_topics:protected] => [bok_keywords:protected] => [id:protected] => 66 [type:protected] => category [parent:protected] => 2 [label:protected] => Lather [alreadyInSave:protected] => [alreadyInValidation:protected] => [validationFailures:protected] => Array ( ) [_new:BaseObject:private] => [_deleted:BaseObject:private] => [modifiedColumns:protected] => Array ( ) ) [67] => Category Object ( [languages:protected] => [bok_resources:protected] => [bok_topics:protected] => [bok_keywords:protected] => [id:protected] => 67 [type:protected] => category [parent:protected] => 2 [label:protected] => Lead Abatement Worker [alreadyInSave:protected] => [alreadyInValidation:protected] => [validationFailures:protected] => Array ( ) [_new:BaseObject:private] => [_deleted:BaseObject:private] => [modifiedColumns:protected] => Array ( ) ) [68] => Category Object ( [languages:protected] => [bok_resources:protected] => [bok_topics:protected] => [bok_keywords:protected] => [id:protected] => 68 [type:protected] => category [parent:protected] => 2 [label:protected] => Maintenance Worker [alreadyInSave:protected] => [alreadyInValidation:protected] => [validationFailures:protected] => Array ( ) [_new:BaseObject:private] => [_deleted:BaseObject:private] => [modifiedColumns:protected] => Array ( ) ) [69] => Category Object ( [languages:protected] => [bok_resources:protected] => [bok_topics:protected] => [bok_keywords:protected] => [id:protected] => 69 [type:protected] => category [parent:protected] => 2 [label:protected] => Millwright [alreadyInSave:protected] => [alreadyInValidation:protected] => [validationFailures:protected] => Array ( ) [_new:BaseObject:private] => [_deleted:BaseObject:private] => [modifiedColumns:protected] => Array ( ) ) [70] => Category Object ( [languages:protected] => [bok_resources:protected] => [bok_topics:protected] => [bok_keywords:protected] => [id:protected] => 70 [type:protected] => category [parent:protected] => 2 [label:protected] => Operating Engineer [alreadyInSave:protected] => [alreadyInValidation:protected] => [validationFailures:protected] => Array ( ) [_new:BaseObject:private] => [_deleted:BaseObject:private] => [modifiedColumns:protected] => Array ( ) ) [71] => Category Object ( [languages:protected] => [bok_resources:protected] => [bok_topics:protected] => [bok_keywords:protected] => [id:protected] => 71 [type:protected] => category [parent:protected] => 2 [label:protected] => Painter [alreadyInSave:protected] => [alreadyInValidation:protected] => [validationFailures:protected] => Array ( ) [_new:BaseObject:private] => [_deleted:BaseObject:private] => [modifiedColumns:protected] => Array ( ) ) [72] => Category Object ( [languages:protected] => [bok_resources:protected] => [bok_topics:protected] => [bok_keywords:protected] => [id:protected] => 72 [type:protected] => category [parent:protected] => 2 [label:protected] => Paper Hanger [alreadyInSave:protected] => [alreadyInValidation:protected] => [validationFailures:protected] => Array ( ) [_new:BaseObject:private] => [_deleted:BaseObject:private] => [modifiedColumns:protected] => Array ( ) ) [73] => Category Object ( [languages:protected] => [bok_resources:protected] => [bok_topics:protected] => [bok_keywords:protected] => [id:protected] => 73 [type:protected] => category [parent:protected] => 2 [label:protected] => PCC/Restoration [alreadyInSave:protected] => [alreadyInValidation:protected] => [validationFailures:protected] => Array ( ) [_new:BaseObject:private] => [_deleted:BaseObject:private] => [modifiedColumns:protected] => Array ( ) ) [74] => Category Object ( [languages:protected] => [bok_resources:protected] => [bok_topics:protected] => [bok_keywords:protected] => [id:protected] => 74 [type:protected] => category [parent:protected] => 2 [label:protected] => Pile Driver [alreadyInSave:protected] => [alreadyInValidation:protected] => [validationFailures:protected] => Array ( ) [_new:BaseObject:private] => [_deleted:BaseObject:private] => [modifiedColumns:protected] => Array ( ) ) [75] => Category Object ( [languages:protected] => [bok_resources:protected] => [bok_topics:protected] => [bok_keywords:protected] => [id:protected] => 75 [type:protected] => category [parent:protected] => 2 [label:protected] => Plasterer [alreadyInSave:protected] => [alreadyInValidation:protected] => [validationFailures:protected] => Array ( ) [_new:BaseObject:private] => [_deleted:BaseObject:private] => [modifiedColumns:protected] => Array ( ) ) [76] => Category Object ( [languages:protected] => [bok_resources:protected] => [bok_topics:protected] => [bok_keywords:protected] => [id:protected] => 76 [type:protected] => category [parent:protected] => 2 [label:protected] => Plumber/Pipefitter [alreadyInSave:protected] => [alreadyInValidation:protected] => [validationFailures:protected] => Array ( ) [_new:BaseObject:private] => [_deleted:BaseObject:private] => [modifiedColumns:protected] => Array ( ) ) [77] => Category Object ( [languages:protected] => [bok_resources:protected] => [bok_topics:protected] => [bok_keywords:protected] => [id:protected] => 77 [type:protected] => category [parent:protected] => 2 [label:protected] => Refractory Worker [alreadyInSave:protected] => [alreadyInValidation:protected] => [validationFailures:protected] => Array ( ) [_new:BaseObject:private] => [_deleted:BaseObject:private] => [modifiedColumns:protected] => Array ( ) ) [63] => Category Object ( [languages:protected] => [bok_resources:protected] => [bok_topics:protected] => [bok_keywords:protected] => [id:protected] => 63 [type:protected] => category [parent:protected] => 2 [label:protected] => Reinforcing Ironworker [alreadyInSave:protected] => [alreadyInValidation:protected] => [validationFailures:protected] => Array ( ) [_new:BaseObject:private] => [_deleted:BaseObject:private] => [modifiedColumns:protected] => Array ( ) ) [78] => Category Object ( [languages:protected] => [bok_resources:protected] => [bok_topics:protected] => [bok_keywords:protected] => [id:protected] => 78 [type:protected] => category [parent:protected] => 2 [label:protected] => Roofer/Waterproofer [alreadyInSave:protected] => [alreadyInValidation:protected] => [validationFailures:protected] => Array ( ) [_new:BaseObject:private] => [_deleted:BaseObject:private] => [modifiedColumns:protected] => Array ( ) ) [79] => Category Object ( [languages:protected] => [bok_resources:protected] => [bok_topics:protected] => [bok_keywords:protected] => [id:protected] => 79 [type:protected] => category [parent:protected] => 2 [label:protected] => Scaffold Erector [alreadyInSave:protected] => [alreadyInValidation:protected] => [validationFailures:protected] => Array ( ) [_new:BaseObject:private] => [_deleted:BaseObject:private] => [modifiedColumns:protected] => Array ( ) ) [80] => Category Object ( [languages:protected] => [bok_resources:protected] => [bok_topics:protected] => [bok_keywords:protected] => [id:protected] => 80 [type:protected] => category [parent:protected] => 2 [label:protected] => Sheetmetal Worker [alreadyInSave:protected] => [alreadyInValidation:protected] => [validationFailures:protected] => Array ( ) [_new:BaseObject:private] => [_deleted:BaseObject:private] => [modifiedColumns:protected] => Array ( ) ) [81] => Category Object ( [languages:protected] => [bok_resources:protected] => [bok_topics:protected] => [bok_keywords:protected] => [id:protected] => 81 [type:protected] => category [parent:protected] => 2 [label:protected] => Sprinkler Fitter [alreadyInSave:protected] => [alreadyInValidation:protected] => [validationFailures:protected] => Array ( ) [_new:BaseObject:private] => [_deleted:BaseObject:private] => [modifiedColumns:protected] => Array ( ) ) [82] => Category Object ( [languages:protected] => [bok_resources:protected] => [bok_topics:protected] => [bok_keywords:protected] => [id:protected] => 82 [type:protected] => category [parent:protected] => 2 [label:protected] => Stonemason [alreadyInSave:protected] => [alreadyInValidation:protected] => [validationFailures:protected] => Array ( ) [_new:BaseObject:private] => [_deleted:BaseObject:private] => [modifiedColumns:protected] => Array ( ) ) [62] => Category Object ( [languages:protected] => [bok_resources:protected] => [bok_topics:protected] => [bok_keywords:protected] => [id:protected] => 62 [type:protected] => category [parent:protected] => 2 [label:protected] => Structural Ironworker [alreadyInSave:protected] => [alreadyInValidation:protected] => [validationFailures:protected] => Array ( ) [_new:BaseObject:private] => [_deleted:BaseObject:private] => [modifiedColumns:protected] => Array ( ) ) [83] => Category Object ( [languages:protected] => [bok_resources:protected] => [bok_topics:protected] => [bok_keywords:protected] => [id:protected] => 83 [type:protected] => category [parent:protected] => 2 [label:protected] => Terrazzo Worker [alreadyInSave:protected] => [alreadyInValidation:protected] => [validationFailures:protected] => Array ( ) [_new:BaseObject:private] => [_deleted:BaseObject:private] => [modifiedColumns:protected] => Array ( ) ) [84] => Category Object ( [languages:protected] => [bok_resources:protected] => [bok_topics:protected] => [bok_keywords:protected] => [id:protected] => 84 [type:protected] => category [parent:protected] => 2 [label:protected] => Tile Setter [alreadyInSave:protected] => [alreadyInValidation:protected] => [validationFailures:protected] => Array ( ) [_new:BaseObject:private] => [_deleted:BaseObject:private] => [modifiedColumns:protected] => Array ( ) ) [85] => Category Object ( [languages:protected] => [bok_resources:protected] => [bok_topics:protected] => [bok_keywords:protected] => [id:protected] => 85 [type:protected] => category [parent:protected] => 2 [label:protected] => Truck Driver [alreadyInSave:protected] => [alreadyInValidation:protected] => [validationFailures:protected] => Array ( ) [_new:BaseObject:private] => [_deleted:BaseObject:private] => [modifiedColumns:protected] => Array ( ) ) [86] => Category Object ( [languages:protected] => [bok_resources:protected] => [bok_topics:protected] => [bok_keywords:protected] => [id:protected] => 86 [type:protected] => category [parent:protected] => 2 [label:protected] => Welder [alreadyInSave:protected] => [alreadyInValidation:protected] => [validationFailures:protected] => Array ( ) [_new:BaseObject:private] => [_deleted:BaseObject:private] => [modifiedColumns:protected] => Array ( ) ) [87] => Category Object ( [languages:protected] => [bok_resources:protected] => [bok_topics:protected] => [bok_keywords:protected] => [id:protected] => 87 [type:protected] => category [parent:protected] => 3 [label:protected] => Commercial & Institutional [alreadyInSave:protected] => [alreadyInValidation:protected] => [validationFailures:protected] => Array ( ) [_new:BaseObject:private] => [_deleted:BaseObject:private] => [modifiedColumns:protected] => Array ( ) ) [88] => Category Object ( [languages:protected] => [bok_resources:protected] => [bok_topics:protected] => [bok_keywords:protected] => [id:protected] => 88 [type:protected] => category [parent:protected] => 3 [label:protected] => Demolition [alreadyInSave:protected] => [alreadyInValidation:protected] => [validationFailures:protected] => Array ( ) [_new:BaseObject:private] => [_deleted:BaseObject:private] => [modifiedColumns:protected] => Array ( ) ) [89] => Category Object ( [languages:protected] => [bok_resources:protected] => [bok_topics:protected] => [bok_keywords:protected] => [id:protected] => 89 [type:protected] => category [parent:protected] => 3 [label:protected] => Disasters [alreadyInSave:protected] => [alreadyInValidation:protected] => [validationFailures:protected] => Array ( ) [_new:BaseObject:private] => [_deleted:BaseObject:private] => [modifiedColumns:protected] => Array ( ) ) [91] => Category Object ( [languages:protected] => [bok_resources:protected] => [bok_topics:protected] => [bok_keywords:protected] => [id:protected] => 91 [type:protected] => category [parent:protected] => 3 [label:protected] => Heavy & Highway [alreadyInSave:protected] => [alreadyInValidation:protected] => [validationFailures:protected] => Array ( ) [_new:BaseObject:private] => [_deleted:BaseObject:private] => [modifiedColumns:protected] => Array ( ) ) [90] => Category Object ( [languages:protected] => [bok_resources:protected] => [bok_topics:protected] => [bok_keywords:protected] => [id:protected] => 90 [type:protected] => category [parent:protected] => 3 [label:protected] => Industrial [alreadyInSave:protected] => [alreadyInValidation:protected] => [validationFailures:protected] => Array ( ) [_new:BaseObject:private] => [_deleted:BaseObject:private] => [modifiedColumns:protected] => Array ( ) ) [92] => Category Object ( [languages:protected] => [bok_resources:protected] => [bok_topics:protected] => [bok_keywords:protected] => [id:protected] => 92 [type:protected] => category [parent:protected] => 3 [label:protected] => LEED/Green Construction [alreadyInSave:protected] => [alreadyInValidation:protected] => [validationFailures:protected] => Array ( ) [_new:BaseObject:private] => [_deleted:BaseObject:private] => [modifiedColumns:protected] => Array ( ) ) [93] => Category Object ( [languages:protected] => [bok_resources:protected] => [bok_topics:protected] => [bok_keywords:protected] => [id:protected] => 93 [type:protected] => category [parent:protected] => 3 [label:protected] => Renovations [alreadyInSave:protected] => [alreadyInValidation:protected] => [validationFailures:protected] => Array ( ) [_new:BaseObject:private] => [_deleted:BaseObject:private] => [modifiedColumns:protected] => Array ( ) ) [94] => Category Object ( [languages:protected] => [bok_resources:protected] => [bok_topics:protected] => [bok_keywords:protected] => [id:protected] => 94 [type:protected] => category [parent:protected] => 3 [label:protected] => Residential [alreadyInSave:protected] => [alreadyInValidation:protected] => [validationFailures:protected] => Array ( ) [_new:BaseObject:private] => [_deleted:BaseObject:private] => [modifiedColumns:protected] => Array ( ) ) [95] => Category Object ( [languages:protected] => [bok_resources:protected] => [bok_topics:protected] => [bok_keywords:protected] => [id:protected] => 95 [type:protected] => category [parent:protected] => 3 [label:protected] => Underground [alreadyInSave:protected] => [alreadyInValidation:protected] => [validationFailures:protected] => Array ( ) [_new:BaseObject:private] => [_deleted:BaseObject:private] => [modifiedColumns:protected] => Array ( ) ) [100] => Category Object ( [languages:protected] => [bok_resources:protected] => [bok_topics:protected] => [bok_keywords:protected] => [id:protected] => 100 [type:protected] => category [parent:protected] => 6 [label:protected] => Toolbox Talks [alreadyInSave:protected] => [alreadyInValidation:protected] => [validationFailures:protected] => Array ( ) [_new:BaseObject:private] => [_deleted:BaseObject:private] => [modifiedColumns:protected] => Array ( ) ) ) [categories_initialized:protected] => 1 [mapped_items:protected] => [content:protected] => [files:protected] => [language:protected] => Language Object ( [id:protected] => 1 [code:protected] => en [name:protected] => English [alreadyInSave:protected] => [alreadyInValidation:protected] => [validationFailures:protected] => Array ( ) [_new:BaseObject:private] => [_deleted:BaseObject:private] => [modifiedColumns:protected] => Array ( ) ) [old_record:protected] => [id:protected] => 4419 [old_id:protected] => [elcosh_id:protected] => d001652 [type:protected] => document [display_type:protected] => HTML only (and links) [user_id:protected] => 0 [language_id:protected] => 1 [tagging_id:protected] => Valeria Contreras [priority_id:protected] => 1 [title:protected] => Toolbox Talk: Suicide Prevention [total_pages:protected] => 1 [billed_pages:protected] => 1 [publication_number:protected] => [part_of:protected] => [keywords:protected] => suicide, suicide prevention, mental health, stress, depression, exhaustion, burnout, safety, support, emotional support, health [comments:protected] => [summary:protected] =>The CPWR Toolbox Talk on Suicide Prevention addresses the prevalence of suicide among construction workers. The resource includes a brief case example, steps to prevent a related injury or illness, and questions for discussion. It includes an image that illustrates the hazard, which can be posted in a central location as a reminder of steps to work safely.
Available in English and Spanish. [transition_comments:protected] => [external_link:protected] => [consol_link:protected] => [more_like_this:protected] => [permission_given_by:protected] => [published:protected] => T [billable:protected] => F [img_name:protected] => [img_ext:protected] => [img_width:protected] => [img_height:protected] => [img_credit:protected] => [img_practice:protected] => [vid_source_id:protected] => [vid_running_time:protected] => [vid_intended_audience:protected] => [vid_acquisition_info:protected] => [vid_cost:protected] => [vid_producer:protected] => [vid_filename:protected] => [vid_filename_downloadable:protected] => [date_summary:protected] => [date_permission_requested:protected] => [date_permission_received:protected] => [date_review_needed:protected] => [date_received:protected] => 10/08/20 [date_completed:protected] => 10/08/20 [date_billed:protected] => [date_modified:protected] => 05/19/23 [collBokExports:protected] => [lastBokExportCriteria:BaseElcoshItem:private] => [alreadyInSave:protected] => [alreadyInValidation:protected] => [validationFailures:protected] => Array ( ) [_new:BaseObject:private] => [_deleted:BaseObject:private] => [modifiedColumns:protected] => Array ( ) ) ) ) [new_images] => Array ( [0] => Search_Result Object ( [title] => Toolbox talk - crew view [image] => /record/images/4005-p.jpg [blurb] => Photo of crew listening to a toolbox safety talk before starting work.... [category] => Array ( [0] => 97 [1] => 20 [2] => 47 [3] => 49 [4] => 51 [5] => 55 [6] => 61 [7] => 64 [8] => 71 [9] => 75 [10] => 63 [11] => 79 [12] => 62 [13] => 87 [14] => 88 [15] => 91 [16] => 90 [17] => 93 [18] => 94 [19] => 95 ) [labels] => Array ( [0] => Images [1] => Media [2] => Media & Documents [3] => Safety Culture [4] => Work Environment [5] => Hazards [6] => Bricklayer [7] => Trades [8] => Carpenter [10] => Cement Mason [12] => Electrical Worker [14] => Interior Systems Carpenter [16] => Laborer [18] => Painter [20] => Plasterer [22] => Reinforcing Ironworker [24] => Scaffold Erector [26] => Structural Ironworker [28] => Commercial & Institutional [29] => Jobsites [30] => Demolition [32] => Heavy & Highway [34] => Industrial [36] => Renovations [38] => Residential [40] => Underground ) [type] => Images [sub_category] => [url] => /image/4005/i002692/Toolbox%2Btalk%2B-%2Bcrew%2Bview.html [item:protected] => ImageRecord Object ( [records:protected] => Array ( ) [recordId:protected] => [searchWordClass:protected] => [searchWordPeerClass:protected] => [bok_record:protected] => [authors:protected] => [organizations:protected] => [collections:protected] => [categories:protected] => Array ( [97] => Category Object ( [languages:protected] => [bok_resources:protected] => [bok_topics:protected] => [bok_keywords:protected] => [id:protected] => 97 [type:protected] => category [parent:protected] => 5 [label:protected] => Images [alreadyInSave:protected] => [alreadyInValidation:protected] => [validationFailures:protected] => Array ( ) [_new:BaseObject:private] => [_deleted:BaseObject:private] => [modifiedColumns:protected] => Array ( ) ) [20] => Category Object ( [languages:protected] => [bok_resources:protected] => [bok_topics:protected] => [bok_keywords:protected] => [id:protected] => 20 [type:protected] => category [parent:protected] => 7 [label:protected] => Safety Culture [alreadyInSave:protected] => [alreadyInValidation:protected] => [validationFailures:protected] => Array ( ) [_new:BaseObject:private] => [_deleted:BaseObject:private] => [modifiedColumns:protected] => Array ( ) ) [47] => Category Object ( [languages:protected] => [bok_resources:protected] => [bok_topics:protected] => [bok_keywords:protected] => [id:protected] => 47 [type:protected] => category [parent:protected] => 2 [label:protected] => Bricklayer [alreadyInSave:protected] => [alreadyInValidation:protected] => [validationFailures:protected] => Array ( ) [_new:BaseObject:private] => [_deleted:BaseObject:private] => [modifiedColumns:protected] => Array ( ) ) [49] => Category Object ( [languages:protected] => [bok_resources:protected] => [bok_topics:protected] => [bok_keywords:protected] => [id:protected] => 49 [type:protected] => category [parent:protected] => 2 [label:protected] => Carpenter [alreadyInSave:protected] => [alreadyInValidation:protected] => [validationFailures:protected] => Array ( ) [_new:BaseObject:private] => [_deleted:BaseObject:private] => [modifiedColumns:protected] => Array ( ) ) [51] => Category Object ( [languages:protected] => [bok_resources:protected] => [bok_topics:protected] => [bok_keywords:protected] => [id:protected] => 51 [type:protected] => category [parent:protected] => 2 [label:protected] => Cement Mason [alreadyInSave:protected] => [alreadyInValidation:protected] => [validationFailures:protected] => Array ( ) [_new:BaseObject:private] => [_deleted:BaseObject:private] => [modifiedColumns:protected] => Array ( ) ) [55] => Category Object ( [languages:protected] => [bok_resources:protected] => [bok_topics:protected] => [bok_keywords:protected] => [id:protected] => 55 [type:protected] => category [parent:protected] => 2 [label:protected] => Electrical Worker [alreadyInSave:protected] => [alreadyInValidation:protected] => [validationFailures:protected] => Array ( ) [_new:BaseObject:private] => [_deleted:BaseObject:private] => [modifiedColumns:protected] => Array ( ) ) [61] => Category Object ( [languages:protected] => [bok_resources:protected] => [bok_topics:protected] => [bok_keywords:protected] => [id:protected] => 61 [type:protected] => category [parent:protected] => 2 [label:protected] => Interior Systems Carpenter [alreadyInSave:protected] => [alreadyInValidation:protected] => [validationFailures:protected] => Array ( ) [_new:BaseObject:private] => [_deleted:BaseObject:private] => [modifiedColumns:protected] => Array ( ) ) [64] => Category Object ( [languages:protected] => [bok_resources:protected] => [bok_topics:protected] => [bok_keywords:protected] => [id:protected] => 64 [type:protected] => category [parent:protected] => 2 [label:protected] => Laborer [alreadyInSave:protected] => [alreadyInValidation:protected] => [validationFailures:protected] => Array ( ) [_new:BaseObject:private] => [_deleted:BaseObject:private] => [modifiedColumns:protected] => Array ( ) ) [71] => Category Object ( [languages:protected] => [bok_resources:protected] => [bok_topics:protected] => [bok_keywords:protected] => [id:protected] => 71 [type:protected] => category [parent:protected] => 2 [label:protected] => Painter [alreadyInSave:protected] => [alreadyInValidation:protected] => [validationFailures:protected] => Array ( ) [_new:BaseObject:private] => [_deleted:BaseObject:private] => [modifiedColumns:protected] => Array ( ) ) [75] => Category Object ( [languages:protected] => [bok_resources:protected] => [bok_topics:protected] => [bok_keywords:protected] => [id:protected] => 75 [type:protected] => category [parent:protected] => 2 [label:protected] => Plasterer [alreadyInSave:protected] => [alreadyInValidation:protected] => [validationFailures:protected] => Array ( ) [_new:BaseObject:private] => [_deleted:BaseObject:private] => [modifiedColumns:protected] => Array ( ) ) [63] => Category Object ( [languages:protected] => [bok_resources:protected] => [bok_topics:protected] => [bok_keywords:protected] => [id:protected] => 63 [type:protected] => category [parent:protected] => 2 [label:protected] => Reinforcing Ironworker [alreadyInSave:protected] => [alreadyInValidation:protected] => [validationFailures:protected] => Array ( ) [_new:BaseObject:private] => [_deleted:BaseObject:private] => [modifiedColumns:protected] => Array ( ) ) [79] => Category Object ( [languages:protected] => [bok_resources:protected] => [bok_topics:protected] => [bok_keywords:protected] => [id:protected] => 79 [type:protected] => category [parent:protected] => 2 [label:protected] => Scaffold Erector [alreadyInSave:protected] => [alreadyInValidation:protected] => [validationFailures:protected] => Array ( ) [_new:BaseObject:private] => [_deleted:BaseObject:private] => [modifiedColumns:protected] => Array ( ) ) [62] => Category Object ( [languages:protected] => [bok_resources:protected] => [bok_topics:protected] => [bok_keywords:protected] => [id:protected] => 62 [type:protected] => category [parent:protected] => 2 [label:protected] => Structural Ironworker [alreadyInSave:protected] => [alreadyInValidation:protected] => [validationFailures:protected] => Array ( ) [_new:BaseObject:private] => [_deleted:BaseObject:private] => [modifiedColumns:protected] => Array ( ) ) [87] => Category Object ( [languages:protected] => [bok_resources:protected] => [bok_topics:protected] => [bok_keywords:protected] => [id:protected] => 87 [type:protected] => category [parent:protected] => 3 [label:protected] => Commercial & Institutional [alreadyInSave:protected] => [alreadyInValidation:protected] => [validationFailures:protected] => Array ( ) [_new:BaseObject:private] => [_deleted:BaseObject:private] => [modifiedColumns:protected] => Array ( ) ) [88] => Category Object ( [languages:protected] => [bok_resources:protected] => [bok_topics:protected] => [bok_keywords:protected] => [id:protected] => 88 [type:protected] => category [parent:protected] => 3 [label:protected] => Demolition [alreadyInSave:protected] => [alreadyInValidation:protected] => [validationFailures:protected] => Array ( ) [_new:BaseObject:private] => [_deleted:BaseObject:private] => [modifiedColumns:protected] => Array ( ) ) [91] => Category Object ( [languages:protected] => [bok_resources:protected] => [bok_topics:protected] => [bok_keywords:protected] => [id:protected] => 91 [type:protected] => category [parent:protected] => 3 [label:protected] => Heavy & Highway [alreadyInSave:protected] => [alreadyInValidation:protected] => [validationFailures:protected] => Array ( ) [_new:BaseObject:private] => [_deleted:BaseObject:private] => [modifiedColumns:protected] => Array ( ) ) [90] => Category Object ( [languages:protected] => [bok_resources:protected] => [bok_topics:protected] => [bok_keywords:protected] => [id:protected] => 90 [type:protected] => category [parent:protected] => 3 [label:protected] => Industrial [alreadyInSave:protected] => [alreadyInValidation:protected] => [validationFailures:protected] => Array ( ) [_new:BaseObject:private] => [_deleted:BaseObject:private] => [modifiedColumns:protected] => Array ( ) ) [93] => Category Object ( [languages:protected] => [bok_resources:protected] => [bok_topics:protected] => [bok_keywords:protected] => [id:protected] => 93 [type:protected] => category [parent:protected] => 3 [label:protected] => Renovations [alreadyInSave:protected] => [alreadyInValidation:protected] => [validationFailures:protected] => Array ( ) [_new:BaseObject:private] => [_deleted:BaseObject:private] => [modifiedColumns:protected] => Array ( ) ) [94] => Category Object ( [languages:protected] => [bok_resources:protected] => [bok_topics:protected] => [bok_keywords:protected] => [id:protected] => 94 [type:protected] => category [parent:protected] => 3 [label:protected] => Residential [alreadyInSave:protected] => [alreadyInValidation:protected] => [validationFailures:protected] => Array ( ) [_new:BaseObject:private] => [_deleted:BaseObject:private] => [modifiedColumns:protected] => Array ( ) ) [95] => Category Object ( [languages:protected] => [bok_resources:protected] => [bok_topics:protected] => [bok_keywords:protected] => [id:protected] => 95 [type:protected] => category [parent:protected] => 3 [label:protected] => Underground [alreadyInSave:protected] => [alreadyInValidation:protected] => [validationFailures:protected] => Array ( ) [_new:BaseObject:private] => [_deleted:BaseObject:private] => [modifiedColumns:protected] => Array ( ) ) ) [categories_initialized:protected] => 1 [mapped_items:protected] => [content:protected] => [files:protected] => [language:protected] => Language Object ( [id:protected] => 1 [code:protected] => en [name:protected] => English [alreadyInSave:protected] => [alreadyInValidation:protected] => [validationFailures:protected] => Array ( ) [_new:BaseObject:private] => [_deleted:BaseObject:private] => [modifiedColumns:protected] => Array ( ) ) [old_record:protected] => [id:protected] => 4005 [old_id:protected] => [elcosh_id:protected] => i002692 [type:protected] => image [display_type:protected] => Image [user_id:protected] => 0 [language_id:protected] => 1 [tagging_id:protected] => Bruce Lippy [priority_id:protected] => 1 [title:protected] => Toolbox talk - crew view [total_pages:protected] => 0 [billed_pages:protected] => 0 [publication_number:protected] => [part_of:protected] => [keywords:protected] => toolbox talk, tailgate talk, safety talk, Spanish [comments:protected] => [summary:protected] => Photo of crew listening to a toolbox safety talk before starting work. [transition_comments:protected] => [external_link:protected] => [consol_link:protected] => http://www.cpwrconstructionsolutions.org/electrical/solution/662/worker-training.html [more_like_this:protected] => i002691,d001269, c000079, d001285 [permission_given_by:protected] => [published:protected] => T [billable:protected] => F [img_name:protected] => [img_ext:protected] => jpg [img_width:protected] => [img_height:protected] => [img_credit:protected] => Morgan Zavertnik and Hoar Construction [img_practice:protected] => good [vid_source_id:protected] => [vid_running_time:protected] => [vid_intended_audience:protected] => [vid_acquisition_info:protected] => [vid_cost:protected] => [vid_producer:protected] => [vid_filename:protected] => [vid_filename_downloadable:protected] => [date_summary:protected] => November 2015 [date_permission_requested:protected] => [date_permission_received:protected] => [date_review_needed:protected] => [date_received:protected] => 03/02/16 [date_completed:protected] => 03/02/16 [date_billed:protected] => [date_modified:protected] => 03/02/16 [collBokExports:protected] => [lastBokExportCriteria:BaseElcoshItem:private] => [alreadyInSave:protected] => [alreadyInValidation:protected] => [validationFailures:protected] => Array ( ) [_new:BaseObject:private] => [_deleted:BaseObject:private] => [modifiedColumns:protected] => Array ( ) ) ) [1] => Search_Result Object ( [title] => Toolbox talk - long shot [image] => /record/images/4006-p.jpg [blurb] => This crew gathered every morning before starting work to discuss a new safety topic.... [category] => Array ( [0] => 20 [1] => 47 [2] => 49 [3] => 51 [4] => 55 [5] => 64 [6] => 68 [7] => 75 [8] => 76 [9] => 63 [10] => 78 [11] => 79 [12] => 82 [13] => 62 [14] => 87 [15] => 88 [16] => 91 [17] => 90 [18] => 93 [19] => 94 [20] => 95 [21] => 97 ) [labels] => Array ( [0] => Safety Culture [1] => Work Environment [2] => Hazards [3] => Bricklayer [4] => Trades [5] => Carpenter [7] => Cement Mason [9] => Electrical Worker [11] => Laborer [13] => Maintenance Worker [15] => Plasterer [17] => Plumber/Pipefitter [19] => Reinforcing Ironworker [21] => Roofer/Waterproofer [23] => Scaffold Erector [25] => Stonemason [27] => Structural Ironworker [29] => Commercial & Institutional [30] => Jobsites [31] => Demolition [33] => Heavy & Highway [35] => Industrial [37] => Renovations [39] => Residential [41] => Underground [43] => Images [44] => Media [45] => Media & Documents ) [type] => Images [sub_category] => [url] => /image/4006/i002693/Toolbox%2Btalk%2B-%2Blong%2Bshot.html [item:protected] => ImageRecord Object ( [records:protected] => Array ( ) [recordId:protected] => [searchWordClass:protected] => [searchWordPeerClass:protected] => [bok_record:protected] => [authors:protected] => [organizations:protected] => [collections:protected] => [categories:protected] => Array ( [20] => Category Object ( [languages:protected] => [bok_resources:protected] => [bok_topics:protected] => [bok_keywords:protected] => [id:protected] => 20 [type:protected] => category [parent:protected] => 7 [label:protected] => Safety Culture [alreadyInSave:protected] => [alreadyInValidation:protected] => [validationFailures:protected] => Array ( ) [_new:BaseObject:private] => [_deleted:BaseObject:private] => [modifiedColumns:protected] => Array ( ) ) [47] => Category Object ( [languages:protected] => [bok_resources:protected] => [bok_topics:protected] => [bok_keywords:protected] => [id:protected] => 47 [type:protected] => category [parent:protected] => 2 [label:protected] => Bricklayer [alreadyInSave:protected] => [alreadyInValidation:protected] => [validationFailures:protected] => Array ( ) [_new:BaseObject:private] => [_deleted:BaseObject:private] => [modifiedColumns:protected] => Array ( ) ) [49] => Category Object ( [languages:protected] => [bok_resources:protected] => [bok_topics:protected] => [bok_keywords:protected] => [id:protected] => 49 [type:protected] => category [parent:protected] => 2 [label:protected] => Carpenter [alreadyInSave:protected] => [alreadyInValidation:protected] => [validationFailures:protected] => Array ( ) [_new:BaseObject:private] => [_deleted:BaseObject:private] => [modifiedColumns:protected] => Array ( ) ) [51] => Category Object ( [languages:protected] => [bok_resources:protected] => [bok_topics:protected] => [bok_keywords:protected] => [id:protected] => 51 [type:protected] => category [parent:protected] => 2 [label:protected] => Cement Mason [alreadyInSave:protected] => [alreadyInValidation:protected] => [validationFailures:protected] => Array ( ) [_new:BaseObject:private] => [_deleted:BaseObject:private] => [modifiedColumns:protected] => Array ( ) ) [55] => Category Object ( [languages:protected] => [bok_resources:protected] => [bok_topics:protected] => [bok_keywords:protected] => [id:protected] => 55 [type:protected] => category [parent:protected] => 2 [label:protected] => Electrical Worker [alreadyInSave:protected] => [alreadyInValidation:protected] => [validationFailures:protected] => Array ( ) [_new:BaseObject:private] => [_deleted:BaseObject:private] => [modifiedColumns:protected] => Array ( ) ) [64] => Category Object ( [languages:protected] => [bok_resources:protected] => [bok_topics:protected] => [bok_keywords:protected] => [id:protected] => 64 [type:protected] => category [parent:protected] => 2 [label:protected] => Laborer [alreadyInSave:protected] => [alreadyInValidation:protected] => [validationFailures:protected] => Array ( ) [_new:BaseObject:private] => [_deleted:BaseObject:private] => [modifiedColumns:protected] => Array ( ) ) [68] => Category Object ( [languages:protected] => [bok_resources:protected] => [bok_topics:protected] => [bok_keywords:protected] => [id:protected] => 68 [type:protected] => category [parent:protected] => 2 [label:protected] => Maintenance Worker [alreadyInSave:protected] => [alreadyInValidation:protected] => [validationFailures:protected] => Array ( ) [_new:BaseObject:private] => [_deleted:BaseObject:private] => [modifiedColumns:protected] => Array ( ) ) [75] => Category Object ( [languages:protected] => [bok_resources:protected] => [bok_topics:protected] => [bok_keywords:protected] => [id:protected] => 75 [type:protected] => category [parent:protected] => 2 [label:protected] => Plasterer [alreadyInSave:protected] => [alreadyInValidation:protected] => [validationFailures:protected] => Array ( ) [_new:BaseObject:private] => [_deleted:BaseObject:private] => [modifiedColumns:protected] => Array ( ) ) [76] => Category Object ( [languages:protected] => [bok_resources:protected] => [bok_topics:protected] => [bok_keywords:protected] => [id:protected] => 76 [type:protected] => category [parent:protected] => 2 [label:protected] => Plumber/Pipefitter [alreadyInSave:protected] => [alreadyInValidation:protected] => [validationFailures:protected] => Array ( ) [_new:BaseObject:private] => [_deleted:BaseObject:private] => [modifiedColumns:protected] => Array ( ) ) [63] => Category Object ( [languages:protected] => [bok_resources:protected] => [bok_topics:protected] => [bok_keywords:protected] => [id:protected] => 63 [type:protected] => category [parent:protected] => 2 [label:protected] => Reinforcing Ironworker [alreadyInSave:protected] => [alreadyInValidation:protected] => [validationFailures:protected] => Array ( ) [_new:BaseObject:private] => [_deleted:BaseObject:private] => [modifiedColumns:protected] => Array ( ) ) [78] => Category Object ( [languages:protected] => [bok_resources:protected] => [bok_topics:protected] => [bok_keywords:protected] => [id:protected] => 78 [type:protected] => category [parent:protected] => 2 [label:protected] => Roofer/Waterproofer [alreadyInSave:protected] => [alreadyInValidation:protected] => [validationFailures:protected] => Array ( ) [_new:BaseObject:private] => [_deleted:BaseObject:private] => [modifiedColumns:protected] => Array ( ) ) [79] => Category Object ( [languages:protected] => [bok_resources:protected] => [bok_topics:protected] => [bok_keywords:protected] => [id:protected] => 79 [type:protected] => category [parent:protected] => 2 [label:protected] => Scaffold Erector [alreadyInSave:protected] => [alreadyInValidation:protected] => [validationFailures:protected] => Array ( ) [_new:BaseObject:private] => [_deleted:BaseObject:private] => [modifiedColumns:protected] => Array ( ) ) [82] => Category Object ( [languages:protected] => [bok_resources:protected] => [bok_topics:protected] => [bok_keywords:protected] => [id:protected] => 82 [type:protected] => category [parent:protected] => 2 [label:protected] => Stonemason [alreadyInSave:protected] => [alreadyInValidation:protected] => [validationFailures:protected] => Array ( ) [_new:BaseObject:private] => [_deleted:BaseObject:private] => [modifiedColumns:protected] => Array ( ) ) [62] => Category Object ( [languages:protected] => [bok_resources:protected] => [bok_topics:protected] => [bok_keywords:protected] => [id:protected] => 62 [type:protected] => category [parent:protected] => 2 [label:protected] => Structural Ironworker [alreadyInSave:protected] => [alreadyInValidation:protected] => [validationFailures:protected] => Array ( ) [_new:BaseObject:private] => [_deleted:BaseObject:private] => [modifiedColumns:protected] => Array ( ) ) [87] => Category Object ( [languages:protected] => [bok_resources:protected] => [bok_topics:protected] => [bok_keywords:protected] => [id:protected] => 87 [type:protected] => category [parent:protected] => 3 [label:protected] => Commercial & Institutional [alreadyInSave:protected] => [alreadyInValidation:protected] => [validationFailures:protected] => Array ( ) [_new:BaseObject:private] => [_deleted:BaseObject:private] => [modifiedColumns:protected] => Array ( ) ) [88] => Category Object ( [languages:protected] => [bok_resources:protected] => [bok_topics:protected] => [bok_keywords:protected] => [id:protected] => 88 [type:protected] => category [parent:protected] => 3 [label:protected] => Demolition [alreadyInSave:protected] => [alreadyInValidation:protected] => [validationFailures:protected] => Array ( ) [_new:BaseObject:private] => [_deleted:BaseObject:private] => [modifiedColumns:protected] => Array ( ) ) [91] => Category Object ( [languages:protected] => [bok_resources:protected] => [bok_topics:protected] => [bok_keywords:protected] => [id:protected] => 91 [type:protected] => category [parent:protected] => 3 [label:protected] => Heavy & Highway [alreadyInSave:protected] => [alreadyInValidation:protected] => [validationFailures:protected] => Array ( ) [_new:BaseObject:private] => [_deleted:BaseObject:private] => [modifiedColumns:protected] => Array ( ) ) [90] => Category Object ( [languages:protected] => [bok_resources:protected] => [bok_topics:protected] => [bok_keywords:protected] => [id:protected] => 90 [type:protected] => category [parent:protected] => 3 [label:protected] => Industrial [alreadyInSave:protected] => [alreadyInValidation:protected] => [validationFailures:protected] => Array ( ) [_new:BaseObject:private] => [_deleted:BaseObject:private] => [modifiedColumns:protected] => Array ( ) ) [93] => Category Object ( [languages:protected] => [bok_resources:protected] => [bok_topics:protected] => [bok_keywords:protected] => [id:protected] => 93 [type:protected] => category [parent:protected] => 3 [label:protected] => Renovations [alreadyInSave:protected] => [alreadyInValidation:protected] => [validationFailures:protected] => Array ( ) [_new:BaseObject:private] => [_deleted:BaseObject:private] => [modifiedColumns:protected] => Array ( ) ) [94] => Category Object ( [languages:protected] => [bok_resources:protected] => [bok_topics:protected] => [bok_keywords:protected] => [id:protected] => 94 [type:protected] => category [parent:protected] => 3 [label:protected] => Residential [alreadyInSave:protected] => [alreadyInValidation:protected] => [validationFailures:protected] => Array ( ) [_new:BaseObject:private] => [_deleted:BaseObject:private] => [modifiedColumns:protected] => Array ( ) ) [95] => Category Object ( [languages:protected] => [bok_resources:protected] => [bok_topics:protected] => [bok_keywords:protected] => [id:protected] => 95 [type:protected] => category [parent:protected] => 3 [label:protected] => Underground [alreadyInSave:protected] => [alreadyInValidation:protected] => [validationFailures:protected] => Array ( ) [_new:BaseObject:private] => [_deleted:BaseObject:private] => [modifiedColumns:protected] => Array ( ) ) [97] => Category Object ( [languages:protected] => [bok_resources:protected] => [bok_topics:protected] => [bok_keywords:protected] => [id:protected] => 97 [type:protected] => category [parent:protected] => 5 [label:protected] => Images [alreadyInSave:protected] => [alreadyInValidation:protected] => [validationFailures:protected] => Array ( ) [_new:BaseObject:private] => [_deleted:BaseObject:private] => [modifiedColumns:protected] => Array ( ) ) ) [categories_initialized:protected] => 1 [mapped_items:protected] => [content:protected] => [files:protected] => [language:protected] => Language Object ( [id:protected] => 1 [code:protected] => en [name:protected] => English [alreadyInSave:protected] => [alreadyInValidation:protected] => [validationFailures:protected] => Array ( ) [_new:BaseObject:private] => [_deleted:BaseObject:private] => [modifiedColumns:protected] => Array ( ) ) [old_record:protected] => [id:protected] => 4006 [old_id:protected] => [elcosh_id:protected] => i002693 [type:protected] => image [display_type:protected] => Image [user_id:protected] => 0 [language_id:protected] => 1 [tagging_id:protected] => Bruce Lippy [priority_id:protected] => 1 [title:protected] => Toolbox talk - long shot [total_pages:protected] => 0 [billed_pages:protected] => 0 [publication_number:protected] => [part_of:protected] => [keywords:protected] => toolbox talk, tailgate talk, safety minute [comments:protected] => [summary:protected] => This crew gathered every morning before starting work to discuss a new safety topic. [transition_comments:protected] => [external_link:protected] => [consol_link:protected] => http://www.cpwrconstructionsolutions.org/electrical/solution/662/worker-training.html [more_like_this:protected] => i002691,i002692,d001269,d000527 [permission_given_by:protected] => [published:protected] => T [billable:protected] => F [img_name:protected] => [img_ext:protected] => jpg [img_width:protected] => [img_height:protected] => [img_credit:protected] => Morgan Zavertnik and Hoar Construction [img_practice:protected] => good [vid_source_id:protected] => [vid_running_time:protected] => [vid_intended_audience:protected] => [vid_acquisition_info:protected] => [vid_cost:protected] => [vid_producer:protected] => [vid_filename:protected] => [vid_filename_downloadable:protected] => [date_summary:protected] => November 2015 [date_permission_requested:protected] => [date_permission_received:protected] => [date_review_needed:protected] => [date_received:protected] => 03/02/16 [date_completed:protected] => 03/02/16 [date_billed:protected] => [date_modified:protected] => 03/02/16 [collBokExports:protected] => [lastBokExportCriteria:BaseElcoshItem:private] => [alreadyInSave:protected] => [alreadyInValidation:protected] => [validationFailures:protected] => Array ( ) [_new:BaseObject:private] => [_deleted:BaseObject:private] => [modifiedColumns:protected] => Array ( ) ) ) [2] => Search_Result Object ( [title] => Construction bracing [image] => /record/images/3995-p.jpg [blurb] => This shows structural support that prevents collapses during construction.... [category] => Array ( [0] => 12 [1] => 15 [2] => 21 [3] => 49 [4] => 51 [5] => 55 [6] => 56 [7] => 60 [8] => 64 [9] => 68 [10] => 74 [11] => 63 [12] => 78 [13] => 79 [14] => 80 [15] => 62 [16] => 87 [17] => 90 [18] => 97 ) [labels] => Array ( [0] => Crushed/Struck By [1] => Work Environment [2] => Hazards [3] => Falls [6] => Scaffolds [9] => Carpenter [10] => Trades [11] => Cement Mason [13] => Electrical Worker [15] => Elevator Constructor [17] => HVAC [19] => Laborer [21] => Maintenance Worker [23] => Pile Driver [25] => Reinforcing Ironworker [27] => Roofer/Waterproofer [29] => Scaffold Erector [31] => Sheetmetal Worker [33] => Structural Ironworker [35] => Commercial & Institutional [36] => Jobsites [37] => Industrial [39] => Images [40] => Media [41] => Media & Documents ) [type] => Images [sub_category] => [url] => /image/3995/i002690/Construction%2Bbracing.html [item:protected] => ImageRecord Object ( [records:protected] => Array ( ) [recordId:protected] => [searchWordClass:protected] => [searchWordPeerClass:protected] => [bok_record:protected] => [authors:protected] => [organizations:protected] => [collections:protected] => [categories:protected] => Array ( [12] => Category Object ( [languages:protected] => [bok_resources:protected] => [bok_topics:protected] => [bok_keywords:protected] => [id:protected] => 12 [type:protected] => category [parent:protected] => 7 [label:protected] => Crushed/Struck By [alreadyInSave:protected] => [alreadyInValidation:protected] => [validationFailures:protected] => Array ( ) [_new:BaseObject:private] => [_deleted:BaseObject:private] => [modifiedColumns:protected] => Array ( ) ) [15] => Category Object ( [languages:protected] => [bok_resources:protected] => [bok_topics:protected] => [bok_keywords:protected] => [id:protected] => 15 [type:protected] => category [parent:protected] => 7 [label:protected] => Falls [alreadyInSave:protected] => [alreadyInValidation:protected] => [validationFailures:protected] => Array ( ) [_new:BaseObject:private] => [_deleted:BaseObject:private] => [modifiedColumns:protected] => Array ( ) ) [21] => Category Object ( [languages:protected] => [bok_resources:protected] => [bok_topics:protected] => [bok_keywords:protected] => [id:protected] => 21 [type:protected] => category [parent:protected] => 7 [label:protected] => Scaffolds [alreadyInSave:protected] => [alreadyInValidation:protected] => [validationFailures:protected] => Array ( ) [_new:BaseObject:private] => [_deleted:BaseObject:private] => [modifiedColumns:protected] => Array ( ) ) [49] => Category Object ( [languages:protected] => [bok_resources:protected] => [bok_topics:protected] => [bok_keywords:protected] => [id:protected] => 49 [type:protected] => category [parent:protected] => 2 [label:protected] => Carpenter [alreadyInSave:protected] => [alreadyInValidation:protected] => [validationFailures:protected] => Array ( ) [_new:BaseObject:private] => [_deleted:BaseObject:private] => [modifiedColumns:protected] => Array ( ) ) [51] => Category Object ( [languages:protected] => [bok_resources:protected] => [bok_topics:protected] => [bok_keywords:protected] => [id:protected] => 51 [type:protected] => category [parent:protected] => 2 [label:protected] => Cement Mason [alreadyInSave:protected] => [alreadyInValidation:protected] => [validationFailures:protected] => Array ( ) [_new:BaseObject:private] => [_deleted:BaseObject:private] => [modifiedColumns:protected] => Array ( ) ) [55] => Category Object ( [languages:protected] => [bok_resources:protected] => [bok_topics:protected] => [bok_keywords:protected] => [id:protected] => 55 [type:protected] => category [parent:protected] => 2 [label:protected] => Electrical Worker [alreadyInSave:protected] => [alreadyInValidation:protected] => [validationFailures:protected] => Array ( ) [_new:BaseObject:private] => [_deleted:BaseObject:private] => [modifiedColumns:protected] => Array ( ) ) [56] => Category Object ( [languages:protected] => [bok_resources:protected] => [bok_topics:protected] => [bok_keywords:protected] => [id:protected] => 56 [type:protected] => category [parent:protected] => 2 [label:protected] => Elevator Constructor [alreadyInSave:protected] => [alreadyInValidation:protected] => [validationFailures:protected] => Array ( ) [_new:BaseObject:private] => [_deleted:BaseObject:private] => [modifiedColumns:protected] => Array ( ) ) [60] => Category Object ( [languages:protected] => [bok_resources:protected] => [bok_topics:protected] => [bok_keywords:protected] => [id:protected] => 60 [type:protected] => category [parent:protected] => 2 [label:protected] => HVAC [alreadyInSave:protected] => [alreadyInValidation:protected] => [validationFailures:protected] => Array ( ) [_new:BaseObject:private] => [_deleted:BaseObject:private] => [modifiedColumns:protected] => Array ( ) ) [64] => Category Object ( [languages:protected] => [bok_resources:protected] => [bok_topics:protected] => [bok_keywords:protected] => [id:protected] => 64 [type:protected] => category [parent:protected] => 2 [label:protected] => Laborer [alreadyInSave:protected] => [alreadyInValidation:protected] => [validationFailures:protected] => Array ( ) [_new:BaseObject:private] => [_deleted:BaseObject:private] => [modifiedColumns:protected] => Array ( ) ) [68] => Category Object ( [languages:protected] => [bok_resources:protected] => [bok_topics:protected] => [bok_keywords:protected] => [id:protected] => 68 [type:protected] => category [parent:protected] => 2 [label:protected] => Maintenance Worker [alreadyInSave:protected] => [alreadyInValidation:protected] => [validationFailures:protected] => Array ( ) [_new:BaseObject:private] => [_deleted:BaseObject:private] => [modifiedColumns:protected] => Array ( ) ) [74] => Category Object ( [languages:protected] => [bok_resources:protected] => [bok_topics:protected] => [bok_keywords:protected] => [id:protected] => 74 [type:protected] => category [parent:protected] => 2 [label:protected] => Pile Driver [alreadyInSave:protected] => [alreadyInValidation:protected] => [validationFailures:protected] => Array ( ) [_new:BaseObject:private] => [_deleted:BaseObject:private] => [modifiedColumns:protected] => Array ( ) ) [63] => Category Object ( [languages:protected] => [bok_resources:protected] => [bok_topics:protected] => [bok_keywords:protected] => [id:protected] => 63 [type:protected] => category [parent:protected] => 2 [label:protected] => Reinforcing Ironworker [alreadyInSave:protected] => [alreadyInValidation:protected] => [validationFailures:protected] => Array ( ) [_new:BaseObject:private] => [_deleted:BaseObject:private] => [modifiedColumns:protected] => Array ( ) ) [78] => Category Object ( [languages:protected] => [bok_resources:protected] => [bok_topics:protected] => [bok_keywords:protected] => [id:protected] => 78 [type:protected] => category [parent:protected] => 2 [label:protected] => Roofer/Waterproofer [alreadyInSave:protected] => [alreadyInValidation:protected] => [validationFailures:protected] => Array ( ) [_new:BaseObject:private] => [_deleted:BaseObject:private] => [modifiedColumns:protected] => Array ( ) ) [79] => Category Object ( [languages:protected] => [bok_resources:protected] => [bok_topics:protected] => [bok_keywords:protected] => [id:protected] => 79 [type:protected] => category [parent:protected] => 2 [label:protected] => Scaffold Erector [alreadyInSave:protected] => [alreadyInValidation:protected] => [validationFailures:protected] => Array ( ) [_new:BaseObject:private] => [_deleted:BaseObject:private] => [modifiedColumns:protected] => Array ( ) ) [80] => Category Object ( [languages:protected] => [bok_resources:protected] => [bok_topics:protected] => [bok_keywords:protected] => [id:protected] => 80 [type:protected] => category [parent:protected] => 2 [label:protected] => Sheetmetal Worker [alreadyInSave:protected] => [alreadyInValidation:protected] => [validationFailures:protected] => Array ( ) [_new:BaseObject:private] => [_deleted:BaseObject:private] => [modifiedColumns:protected] => Array ( ) ) [62] => Category Object ( [languages:protected] => [bok_resources:protected] => [bok_topics:protected] => [bok_keywords:protected] => [id:protected] => 62 [type:protected] => category [parent:protected] => 2 [label:protected] => Structural Ironworker [alreadyInSave:protected] => [alreadyInValidation:protected] => [validationFailures:protected] => Array ( ) [_new:BaseObject:private] => [_deleted:BaseObject:private] => [modifiedColumns:protected] => Array ( ) ) [87] => Category Object ( [languages:protected] => [bok_resources:protected] => [bok_topics:protected] => [bok_keywords:protected] => [id:protected] => 87 [type:protected] => category [parent:protected] => 3 [label:protected] => Commercial & Institutional [alreadyInSave:protected] => [alreadyInValidation:protected] => [validationFailures:protected] => Array ( ) [_new:BaseObject:private] => [_deleted:BaseObject:private] => [modifiedColumns:protected] => Array ( ) ) [90] => Category Object ( [languages:protected] => [bok_resources:protected] => [bok_topics:protected] => [bok_keywords:protected] => [id:protected] => 90 [type:protected] => category [parent:protected] => 3 [label:protected] => Industrial [alreadyInSave:protected] => [alreadyInValidation:protected] => [validationFailures:protected] => Array ( ) [_new:BaseObject:private] => [_deleted:BaseObject:private] => [modifiedColumns:protected] => Array ( ) ) [97] => Category Object ( [languages:protected] => [bok_resources:protected] => [bok_topics:protected] => [bok_keywords:protected] => [id:protected] => 97 [type:protected] => category [parent:protected] => 5 [label:protected] => Images [alreadyInSave:protected] => [alreadyInValidation:protected] => [validationFailures:protected] => Array ( ) [_new:BaseObject:private] => [_deleted:BaseObject:private] => [modifiedColumns:protected] => Array ( ) ) ) [categories_initialized:protected] => 1 [mapped_items:protected] => [content:protected] => [files:protected] => [language:protected] => Language Object ( [id:protected] => 1 [code:protected] => en [name:protected] => English [alreadyInSave:protected] => [alreadyInValidation:protected] => [validationFailures:protected] => Array ( ) [_new:BaseObject:private] => [_deleted:BaseObject:private] => [modifiedColumns:protected] => Array ( ) ) [old_record:protected] => [id:protected] => 3995 [old_id:protected] => [elcosh_id:protected] => i002690 [type:protected] => image [display_type:protected] => Image [user_id:protected] => 0 [language_id:protected] => 1 [tagging_id:protected] => Bruce Lippy [priority_id:protected] => 1 [title:protected] => Construction bracing [total_pages:protected] => 0 [billed_pages:protected] => 0 [publication_number:protected] => [part_of:protected] => [keywords:protected] => Bracing, support, scaffold [comments:protected] => [summary:protected] => This shows structural support that prevents collapses during construction. [transition_comments:protected] => [external_link:protected] => [consol_link:protected] => http://www.cpwrconstructionsolutions.org/masonry/solution/8/adjustable-tower-scaffold.html [more_like_this:protected] => i002660 [permission_given_by:protected] => [published:protected] => T [billable:protected] => F [img_name:protected] => [img_ext:protected] => jpg [img_width:protected] => [img_height:protected] => [img_credit:protected] => Photo by Pam Susi [img_practice:protected] => good [vid_source_id:protected] => [vid_running_time:protected] => [vid_intended_audience:protected] => [vid_acquisition_info:protected] => [vid_cost:protected] => [vid_producer:protected] => [vid_filename:protected] => [vid_filename_downloadable:protected] => [date_summary:protected] => January 2016 [date_permission_requested:protected] => [date_permission_received:protected] => [date_review_needed:protected] => [date_received:protected] => 02/01/16 [date_completed:protected] => 02/01/16 [date_billed:protected] => [date_modified:protected] => 02/01/16 [collBokExports:protected] => [lastBokExportCriteria:BaseElcoshItem:private] => [alreadyInSave:protected] => [alreadyInValidation:protected] => [validationFailures:protected] => Array ( ) [_new:BaseObject:private] => [_deleted:BaseObject:private] => [modifiedColumns:protected] => Array ( ) ) ) [3] => Search_Result Object ( [title] => Suspended Scaffold Outriggers [image] => /record/images/3975-p.jpg [blurb] => Suspended scaffolds systems must be designed by a qualified person and inspected daily by a competent person. The supports for the counterweight must... [category] => Array ( [0] => 97 [1] => 15 [2] => 47 [3] => 49 [4] => 79 [5] => 87 ) [labels] => Array ( [0] => Images [1] => Media [2] => Media & Documents [3] => Falls [4] => Work Environment [5] => Hazards [6] => Bricklayer [7] => Trades [8] => Carpenter [10] => Scaffold Erector [12] => Commercial & Institutional [13] => Jobsites ) [type] => Images [sub_category] => [url] => /image/3975/i002683/Suspended%2BScaffold%2BOutriggers.html [item:protected] => ImageRecord Object ( [records:protected] => Array ( ) [recordId:protected] => [searchWordClass:protected] => [searchWordPeerClass:protected] => [bok_record:protected] => [authors:protected] => [organizations:protected] => [collections:protected] => [categories:protected] => Array ( [97] => Category Object ( [languages:protected] => [bok_resources:protected] => [bok_topics:protected] => [bok_keywords:protected] => [id:protected] => 97 [type:protected] => category [parent:protected] => 5 [label:protected] => Images [alreadyInSave:protected] => [alreadyInValidation:protected] => [validationFailures:protected] => Array ( ) [_new:BaseObject:private] => [_deleted:BaseObject:private] => [modifiedColumns:protected] => Array ( ) ) [15] => Category Object ( [languages:protected] => [bok_resources:protected] => [bok_topics:protected] => [bok_keywords:protected] => [id:protected] => 15 [type:protected] => category [parent:protected] => 7 [label:protected] => Falls [alreadyInSave:protected] => [alreadyInValidation:protected] => [validationFailures:protected] => Array ( ) [_new:BaseObject:private] => [_deleted:BaseObject:private] => [modifiedColumns:protected] => Array ( ) ) [47] => Category Object ( [languages:protected] => [bok_resources:protected] => [bok_topics:protected] => [bok_keywords:protected] => [id:protected] => 47 [type:protected] => category [parent:protected] => 2 [label:protected] => Bricklayer [alreadyInSave:protected] => [alreadyInValidation:protected] => [validationFailures:protected] => Array ( ) [_new:BaseObject:private] => [_deleted:BaseObject:private] => [modifiedColumns:protected] => Array ( ) ) [49] => Category Object ( [languages:protected] => [bok_resources:protected] => [bok_topics:protected] => [bok_keywords:protected] => [id:protected] => 49 [type:protected] => category [parent:protected] => 2 [label:protected] => Carpenter [alreadyInSave:protected] => [alreadyInValidation:protected] => [validationFailures:protected] => Array ( ) [_new:BaseObject:private] => [_deleted:BaseObject:private] => [modifiedColumns:protected] => Array ( ) ) [79] => Category Object ( [languages:protected] => [bok_resources:protected] => [bok_topics:protected] => [bok_keywords:protected] => [id:protected] => 79 [type:protected] => category [parent:protected] => 2 [label:protected] => Scaffold Erector [alreadyInSave:protected] => [alreadyInValidation:protected] => [validationFailures:protected] => Array ( ) [_new:BaseObject:private] => [_deleted:BaseObject:private] => [modifiedColumns:protected] => Array ( ) ) [87] => Category Object ( [languages:protected] => [bok_resources:protected] => [bok_topics:protected] => [bok_keywords:protected] => [id:protected] => 87 [type:protected] => category [parent:protected] => 3 [label:protected] => Commercial & Institutional [alreadyInSave:protected] => [alreadyInValidation:protected] => [validationFailures:protected] => Array ( ) [_new:BaseObject:private] => [_deleted:BaseObject:private] => [modifiedColumns:protected] => Array ( ) ) ) [categories_initialized:protected] => 1 [mapped_items:protected] => [content:protected] => [files:protected] => [language:protected] => Language Object ( [id:protected] => 1 [code:protected] => en [name:protected] => English [alreadyInSave:protected] => [alreadyInValidation:protected] => [validationFailures:protected] => Array ( ) [_new:BaseObject:private] => [_deleted:BaseObject:private] => [modifiedColumns:protected] => Array ( ) ) [old_record:protected] => [id:protected] => 3975 [old_id:protected] => [elcosh_id:protected] => i002683 [type:protected] => image [display_type:protected] => Image [user_id:protected] => 0 [language_id:protected] => 1 [tagging_id:protected] => John Newquist [priority_id:protected] => 1 [title:protected] => Suspended Scaffold Outriggers [total_pages:protected] => 0 [billed_pages:protected] => 0 [publication_number:protected] => [part_of:protected] => [keywords:protected] => suspended, scaffold, swing, stage, fall, protection, counterweight, qualified, person [comments:protected] => [summary:protected] => Suspended scaffolds systems must be designed by a qualified person and inspected daily by a competent person. The supports for the counterweight must be designed with a safety factor of four. [transition_comments:protected] => [external_link:protected] => [consol_link:protected] => http://www.cpwrconstructionsolutions.org/task/Erect%2Band%2Bdismantle%2Bscaffolds/ [more_like_this:protected] => d000244,d000359,i000253,i000407 [permission_given_by:protected] => [published:protected] => T [billable:protected] => F [img_name:protected] => [img_ext:protected] => jpg [img_width:protected] => [img_height:protected] => [img_credit:protected] => MetroPark, Miller and Long [img_practice:protected] => not_applicable [vid_source_id:protected] => [vid_running_time:protected] => [vid_intended_audience:protected] => [vid_acquisition_info:protected] => [vid_cost:protected] => [vid_producer:protected] => [vid_filename:protected] => [vid_filename_downloadable:protected] => [date_summary:protected] => August 28 2015 [date_permission_requested:protected] => [date_permission_received:protected] => [date_review_needed:protected] => [date_received:protected] => 08/28/15 [date_completed:protected] => 08/28/15 [date_billed:protected] => [date_modified:protected] => 08/28/15 [collBokExports:protected] => [lastBokExportCriteria:BaseElcoshItem:private] => [alreadyInSave:protected] => [alreadyInValidation:protected] => [validationFailures:protected] => Array ( ) [_new:BaseObject:private] => [_deleted:BaseObject:private] => [modifiedColumns:protected] => Array ( ) ) ) [4] => Search_Result Object ( [title] => Suspended scaffold [image] => /record/images/3976-p.jpg [blurb] => Suspended scaffold outrigger beams must have stops to prevent the hangers from sliding of the end of the outriggers. Wire rope supported must be desig... [category] => Array ( [0] => 97 [1] => 15 [2] => 47 [3] => 50 [4] => 79 [5] => 87 ) [labels] => Array ( [0] => Images [1] => Media [2] => Media & Documents [3] => Falls [4] => Work Environment [5] => Hazards [6] => Bricklayer [7] => Trades [8] => Carpet Layer [10] => Scaffold Erector [12] => Commercial & Institutional [13] => Jobsites ) [type] => Images [sub_category] => [url] => /image/3976/i002684/Suspended%2Bscaffold.html [item:protected] => ImageRecord Object ( [records:protected] => Array ( ) [recordId:protected] => [searchWordClass:protected] => [searchWordPeerClass:protected] => [bok_record:protected] => [authors:protected] => [organizations:protected] => [collections:protected] => [categories:protected] => Array ( [97] => Category Object ( [languages:protected] => [bok_resources:protected] => [bok_topics:protected] => [bok_keywords:protected] => [id:protected] => 97 [type:protected] => category [parent:protected] => 5 [label:protected] => Images [alreadyInSave:protected] => [alreadyInValidation:protected] => [validationFailures:protected] => Array ( ) [_new:BaseObject:private] => [_deleted:BaseObject:private] => [modifiedColumns:protected] => Array ( ) ) [15] => Category Object ( [languages:protected] => [bok_resources:protected] => [bok_topics:protected] => [bok_keywords:protected] => [id:protected] => 15 [type:protected] => category [parent:protected] => 7 [label:protected] => Falls [alreadyInSave:protected] => [alreadyInValidation:protected] => [validationFailures:protected] => Array ( ) [_new:BaseObject:private] => [_deleted:BaseObject:private] => [modifiedColumns:protected] => Array ( ) ) [47] => Category Object ( [languages:protected] => [bok_resources:protected] => [bok_topics:protected] => [bok_keywords:protected] => [id:protected] => 47 [type:protected] => category [parent:protected] => 2 [label:protected] => Bricklayer [alreadyInSave:protected] => [alreadyInValidation:protected] => [validationFailures:protected] => Array ( ) [_new:BaseObject:private] => [_deleted:BaseObject:private] => [modifiedColumns:protected] => Array ( ) ) [50] => Category Object ( [languages:protected] => [bok_resources:protected] => [bok_topics:protected] => [bok_keywords:protected] => [id:protected] => 50 [type:protected] => category [parent:protected] => 2 [label:protected] => Carpet Layer [alreadyInSave:protected] => [alreadyInValidation:protected] => [validationFailures:protected] => Array ( ) [_new:BaseObject:private] => [_deleted:BaseObject:private] => [modifiedColumns:protected] => Array ( ) ) [79] => Category Object ( [languages:protected] => [bok_resources:protected] => [bok_topics:protected] => [bok_keywords:protected] => [id:protected] => 79 [type:protected] => category [parent:protected] => 2 [label:protected] => Scaffold Erector [alreadyInSave:protected] => [alreadyInValidation:protected] => [validationFailures:protected] => Array ( ) [_new:BaseObject:private] => [_deleted:BaseObject:private] => [modifiedColumns:protected] => Array ( ) ) [87] => Category Object ( [languages:protected] => [bok_resources:protected] => [bok_topics:protected] => [bok_keywords:protected] => [id:protected] => 87 [type:protected] => category [parent:protected] => 3 [label:protected] => Commercial & Institutional [alreadyInSave:protected] => [alreadyInValidation:protected] => [validationFailures:protected] => Array ( ) [_new:BaseObject:private] => [_deleted:BaseObject:private] => [modifiedColumns:protected] => Array ( ) ) ) [categories_initialized:protected] => 1 [mapped_items:protected] => [content:protected] => [files:protected] => [language:protected] => Language Object ( [id:protected] => 1 [code:protected] => en [name:protected] => English [alreadyInSave:protected] => [alreadyInValidation:protected] => [validationFailures:protected] => Array ( ) [_new:BaseObject:private] => [_deleted:BaseObject:private] => [modifiedColumns:protected] => Array ( ) ) [old_record:protected] => [id:protected] => 3976 [old_id:protected] => [elcosh_id:protected] => i002684 [type:protected] => image [display_type:protected] => Image [user_id:protected] => 0 [language_id:protected] => 1 [tagging_id:protected] => John Newquist [priority_id:protected] => 1 [title:protected] => Suspended scaffold [total_pages:protected] => 0 [billed_pages:protected] => 0 [publication_number:protected] => [part_of:protected] => [keywords:protected] => Suspended, scaffold, outrigger, beams, erection, wire, rope, inspection, swing, stage, [comments:protected] => [summary:protected] => Suspended scaffold outrigger beams must have stops to prevent the hangers from sliding of the end of the outriggers. Wire rope supported must be designed with a safety factor of 6. The scaffold must be inspected by a competent person daily. [transition_comments:protected] => [external_link:protected] => [consol_link:protected] => http://www.cpwrconstructionsolutions.org/task/Erect%2Band%2Bdismantle%2Bscaffolds/ [more_like_this:protected] => i002683, d000244, i000407, d000606 [permission_given_by:protected] => [published:protected] => T [billable:protected] => F [img_name:protected] => [img_ext:protected] => jpg [img_width:protected] => [img_height:protected] => [img_credit:protected] => Metropark, Miller and Long [img_practice:protected] => not_applicable [vid_source_id:protected] => [vid_running_time:protected] => [vid_intended_audience:protected] => [vid_acquisition_info:protected] => [vid_cost:protected] => [vid_producer:protected] => [vid_filename:protected] => [vid_filename_downloadable:protected] => [date_summary:protected] => [date_permission_requested:protected] => [date_permission_received:protected] => [date_review_needed:protected] => [date_received:protected] => 08/28/15 [date_completed:protected] => 08/28/15 [date_billed:protected] => [date_modified:protected] => 08/28/15 [collBokExports:protected] => [lastBokExportCriteria:BaseElcoshItem:private] => [alreadyInSave:protected] => [alreadyInValidation:protected] => [validationFailures:protected] => Array ( ) [_new:BaseObject:private] => [_deleted:BaseObject:private] => [modifiedColumns:protected] => Array ( ) ) ) [5] => Search_Result Object ( [title] => Three Tower Cranes [image] => /record/images/3979-p.jpg [blurb] => Whenever multiple tower cranes are used, there needs to be preplanning to ensure that the tower cranes cannot hit each other loads. This is accomplish... [category] => Array ( [0] => 97 [1] => 11 [2] => 64 [3] => 70 [4] => 62 [5] => 87 ) [labels] => Array ( [0] => Images [1] => Media [2] => Media & Documents [3] => Cranes & Hoists [4] => Work Environment [5] => Hazards [6] => Laborer [7] => Trades [8] => Operating Engineer [10] => Structural Ironworker [12] => Commercial & Institutional [13] => Jobsites ) [type] => Images [sub_category] => [url] => /image/3979/i002687/Three%2BTower%2BCranes.html [item:protected] => ImageRecord Object ( [records:protected] => Array ( ) [recordId:protected] => [searchWordClass:protected] => [searchWordPeerClass:protected] => [bok_record:protected] => [authors:protected] => [organizations:protected] => [collections:protected] => [categories:protected] => Array ( [97] => Category Object ( [languages:protected] => [bok_resources:protected] => [bok_topics:protected] => [bok_keywords:protected] => [id:protected] => 97 [type:protected] => category [parent:protected] => 5 [label:protected] => Images [alreadyInSave:protected] => [alreadyInValidation:protected] => [validationFailures:protected] => Array ( ) [_new:BaseObject:private] => [_deleted:BaseObject:private] => [modifiedColumns:protected] => Array ( ) ) [11] => Category Object ( [languages:protected] => [bok_resources:protected] => [bok_topics:protected] => [bok_keywords:protected] => [id:protected] => 11 [type:protected] => category [parent:protected] => 7 [label:protected] => Cranes & Hoists [alreadyInSave:protected] => [alreadyInValidation:protected] => [validationFailures:protected] => Array ( ) [_new:BaseObject:private] => [_deleted:BaseObject:private] => [modifiedColumns:protected] => Array ( ) ) [64] => Category Object ( [languages:protected] => [bok_resources:protected] => [bok_topics:protected] => [bok_keywords:protected] => [id:protected] => 64 [type:protected] => category [parent:protected] => 2 [label:protected] => Laborer [alreadyInSave:protected] => [alreadyInValidation:protected] => [validationFailures:protected] => Array ( ) [_new:BaseObject:private] => [_deleted:BaseObject:private] => [modifiedColumns:protected] => Array ( ) ) [70] => Category Object ( [languages:protected] => [bok_resources:protected] => [bok_topics:protected] => [bok_keywords:protected] => [id:protected] => 70 [type:protected] => category [parent:protected] => 2 [label:protected] => Operating Engineer [alreadyInSave:protected] => [alreadyInValidation:protected] => [validationFailures:protected] => Array ( ) [_new:BaseObject:private] => [_deleted:BaseObject:private] => [modifiedColumns:protected] => Array ( ) ) [62] => Category Object ( [languages:protected] => [bok_resources:protected] => [bok_topics:protected] => [bok_keywords:protected] => [id:protected] => 62 [type:protected] => category [parent:protected] => 2 [label:protected] => Structural Ironworker [alreadyInSave:protected] => [alreadyInValidation:protected] => [validationFailures:protected] => Array ( ) [_new:BaseObject:private] => [_deleted:BaseObject:private] => [modifiedColumns:protected] => Array ( ) ) [87] => Category Object ( [languages:protected] => [bok_resources:protected] => [bok_topics:protected] => [bok_keywords:protected] => [id:protected] => 87 [type:protected] => category [parent:protected] => 3 [label:protected] => Commercial & Institutional [alreadyInSave:protected] => [alreadyInValidation:protected] => [validationFailures:protected] => Array ( ) [_new:BaseObject:private] => [_deleted:BaseObject:private] => [modifiedColumns:protected] => Array ( ) ) ) [categories_initialized:protected] => 1 [mapped_items:protected] => [content:protected] => [files:protected] => [language:protected] => Language Object ( [id:protected] => 1 [code:protected] => en [name:protected] => English [alreadyInSave:protected] => [alreadyInValidation:protected] => [validationFailures:protected] => Array ( ) [_new:BaseObject:private] => [_deleted:BaseObject:private] => [modifiedColumns:protected] => Array ( ) ) [old_record:protected] => [id:protected] => 3979 [old_id:protected] => [elcosh_id:protected] => i002687 [type:protected] => image [display_type:protected] => Image [user_id:protected] => 0 [language_id:protected] => 1 [tagging_id:protected] => John Newquist [priority_id:protected] => 1 [title:protected] => Three Tower Cranes [total_pages:protected] => 0 [billed_pages:protected] => 0 [publication_number:protected] => [part_of:protected] => [keywords:protected] => [comments:protected] => [summary:protected] => Whenever multiple tower cranes are used, there needs to be preplanning to ensure that the tower cranes cannot hit each other loads. This is accomplished by setting swing restrictions, marking the ground for allowable crane travel and training of the crane signal persons. [transition_comments:protected] => [external_link:protected] => [consol_link:protected] => http://www.cpwrconstructionsolutions.org/work/6/184/ [more_like_this:protected] => d001029, d000010, i001280, i001221 [permission_given_by:protected] => [published:protected] => T [billable:protected] => F [img_name:protected] => [img_ext:protected] => jpg [img_width:protected] => [img_height:protected] => [img_credit:protected] => Metropark [img_practice:protected] => not_applicable [vid_source_id:protected] => [vid_running_time:protected] => [vid_intended_audience:protected] => [vid_acquisition_info:protected] => [vid_cost:protected] => [vid_producer:protected] => [vid_filename:protected] => [vid_filename_downloadable:protected] => [date_summary:protected] => August 28 2015 [date_permission_requested:protected] => [date_permission_received:protected] => [date_review_needed:protected] => [date_received:protected] => 08/28/15 [date_completed:protected] => 08/28/15 [date_billed:protected] => [date_modified:protected] => 08/28/15 [collBokExports:protected] => [lastBokExportCriteria:BaseElcoshItem:private] => [alreadyInSave:protected] => [alreadyInValidation:protected] => [validationFailures:protected] => Array ( ) [_new:BaseObject:private] => [_deleted:BaseObject:private] => [modifiedColumns:protected] => Array ( ) ) ) ) [preview_mode] => [description] => This third in a series of 6 Tool Box Talks on construction ergonomics focuses on proper positioning to avoid injuries. The TBT recommends: 1)prop up a task off of the floor by using a raised surface, cart, baker scaffold, saw horses to prep materials near waist height, 2)move the lift or ladder in the best position for the work, 3)position the lift in front of the area you plan to work without trying to reach too far on either side of the lift. [keywords] => position, positioning, ergonomics, ergo, carpal tunnel, MSD, musculoskeletal disorder [related_items] => Array ( [Handouts] => Array ( [0] => DocumentRecord Object ( [records:protected] => Array ( ) [recordId:protected] => [searchWordClass:protected] => [searchWordPeerClass:protected] => [bok_record:protected] => [authors:protected] => [organizations:protected] => [collections:protected] => [categories:protected] => [categories_initialized:protected] => [mapped_items:protected] => [content:protected] => [files:protected] => [language:protected] => Language Object ( [id:protected] => 1 [code:protected] => en [name:protected] => English [alreadyInSave:protected] => [alreadyInValidation:protected] => [validationFailures:protected] => Array ( ) [_new:BaseObject:private] => [_deleted:BaseObject:private] => [modifiedColumns:protected] => Array ( ) ) [old_record:protected] => [id:protected] => 3833 [old_id:protected] => [elcosh_id:protected] => d001303 [type:protected] => document [display_type:protected] => HTML w/ PDF [user_id:protected] => 25 [language_id:protected] => 1 [tagging_id:protected] => Bruce Lippy [priority_id:protected] => 1 [title:protected] => Overview of Toolbox Talks on Ergonomics Developed by Washington University in St. Louis [total_pages:protected] => 3 [billed_pages:protected] => 3 [publication_number:protected] => [part_of:protected] => [keywords:protected] => ergonomics, musculoskeletal disorders, MSDs [comments:protected] => 7-28-2014 - Originally submitted as "HTML w/ doc and PDF", Jeff Nelson asked Bruce Lippy for permission to switch it to "HTML w/ PDF" -- permission was given [summary:protected] => This overviews provides a background on how Washington University in St. Louis developed this series of six toolbox talks on ergonomics. It also describes how they tested the effectiveness of these communication tools, concluding that the guide was valuable for improving the delivery of ergonomics training and interaction between the safety representative and workers. The researchers recommend preparing site-specific information prior to the talk and interacting with workers to discuss problems and ergonomic solutions during the safety meetings. [transition_comments:protected] => [external_link:protected] => [consol_link:protected] => [more_like_this:protected] => [permission_given_by:protected] => Lisa Jaegers, Washington U. in St. Louis [published:protected] => T [billable:protected] => F [img_name:protected] => [img_ext:protected] => png [img_width:protected] => [img_height:protected] => [img_credit:protected] => [img_practice:protected] => [vid_source_id:protected] => [vid_running_time:protected] => [vid_intended_audience:protected] => [vid_acquisition_info:protected] => [vid_cost:protected] => [vid_producer:protected] => [vid_filename:protected] => [vid_filename_downloadable:protected] => [date_summary:protected] => 2014 [date_permission_requested:protected] => [date_permission_received:protected] => [date_review_needed:protected] => [date_received:protected] => 06/11/14 [date_completed:protected] => 07/29/14 [date_billed:protected] => [date_modified:protected] => 07/29/14 [collBokExports:protected] => [lastBokExportCriteria:BaseElcoshItem:private] => [alreadyInSave:protected] => [alreadyInValidation:protected] => [validationFailures:protected] => Array ( ) [_new:BaseObject:private] => [_deleted:BaseObject:private] => [modifiedColumns:protected] => Array ( ) ) ) [Toolbox Talks] => Array ( [0] => DocumentRecord Object ( [records:protected] => Array ( ) [recordId:protected] => [searchWordClass:protected] => [searchWordPeerClass:protected] => [bok_record:protected] => [authors:protected] => [organizations:protected] => [collections:protected] => [categories:protected] => [categories_initialized:protected] => [mapped_items:protected] => [content:protected] => [files:protected] => [language:protected] => Language Object ( [id:protected] => 1 [code:protected] => en [name:protected] => English [alreadyInSave:protected] => [alreadyInValidation:protected] => [validationFailures:protected] => Array ( ) [_new:BaseObject:private] => [_deleted:BaseObject:private] => [modifiedColumns:protected] => Array ( ) ) [old_record:protected] => [id:protected] => 3835 [old_id:protected] => [elcosh_id:protected] => d001304 [type:protected] => document [display_type:protected] => HTML w/ PDF [user_id:protected] => 25 [language_id:protected] => 1 [tagging_id:protected] => Bruce Lippy [priority_id:protected] => 1 [title:protected] => Ergonomics Tool Box Talks (TBT) Training Guide [total_pages:protected] => 2 [billed_pages:protected] => 2 [publication_number:protected] => [part_of:protected] => [keywords:protected] => Ergonomics, carpal tunnel, muscular skeletal disorders, msd [comments:protected] => [summary:protected] => CPWR-funded ergonomics research by Washington University at St. Louis led to the development of 6 tool box talks. This guide is an explanation of how to deliver the talks for maximum effectiveness. This guide should be reviewed before delivering any of the talks because it makes important recommendations like: • If possible, give the TBTs as a part of the crew’s regular safety meetings so that ergonomics is included in the safety discussion. • Try to locate an area with few distractions for gathering the crew. • For a team approach, invite the work crew, site superintendent, project manager and other general contractor and/or subcontractor reps who you feel may be helpful in supporting the training and ergonomics solutions. [transition_comments:protected] => [external_link:protected] => [consol_link:protected] => [more_like_this:protected] => d001303,d001305,d001306,d001307,d001308,d001309,d001310 [permission_given_by:protected] => [published:protected] => T [billable:protected] => F [img_name:protected] => [img_ext:protected] => png [img_width:protected] => [img_height:protected] => [img_credit:protected] => [img_practice:protected] => [vid_source_id:protected] => [vid_running_time:protected] => [vid_intended_audience:protected] => [vid_acquisition_info:protected] => [vid_cost:protected] => [vid_producer:protected] => [vid_filename:protected] => [vid_filename_downloadable:protected] => [date_summary:protected] => 2014 [date_permission_requested:protected] => [date_permission_received:protected] => [date_review_needed:protected] => [date_received:protected] => 06/12/14 [date_completed:protected] => 07/29/14 [date_billed:protected] => [date_modified:protected] => 07/29/14 [collBokExports:protected] => [lastBokExportCriteria:BaseElcoshItem:private] => [alreadyInSave:protected] => [alreadyInValidation:protected] => [validationFailures:protected] => Array ( ) [_new:BaseObject:private] => [_deleted:BaseObject:private] => [modifiedColumns:protected] => Array ( ) ) [1] => DocumentRecord Object ( [records:protected] => Array ( ) [recordId:protected] => [searchWordClass:protected] => [searchWordPeerClass:protected] => [bok_record:protected] => [authors:protected] => [organizations:protected] => [collections:protected] => [categories:protected] => [categories_initialized:protected] => [mapped_items:protected] => [content:protected] => [files:protected] => [language:protected] => Language Object ( [id:protected] => 1 [code:protected] => en [name:protected] => English [alreadyInSave:protected] => [alreadyInValidation:protected] => [validationFailures:protected] => Array ( ) [_new:BaseObject:private] => [_deleted:BaseObject:private] => [modifiedColumns:protected] => Array ( ) ) [old_record:protected] => [id:protected] => 3836 [old_id:protected] => [elcosh_id:protected] => d001305 [type:protected] => document [display_type:protected] => HTML w/ PDF [user_id:protected] => 25 [language_id:protected] => 1 [tagging_id:protected] => Bruce Lippy [priority_id:protected] => 1 [title:protected] => TBT1 Ergonomics in Construction [total_pages:protected] => 5 [billed_pages:protected] => 5 [publication_number:protected] => [part_of:protected] => [keywords:protected] => ergonomics, ergo, msd, musculoskeletal disorders, risk factors, lifting, carpal tunnel, repetition, awkward postures [comments:protected] => 7-28-2014 Jeff Nelson asked Bruce Lippy about what to do with a sentence included toward the top of the doc, "Fill them in on page 2 'Other Questions.'" -- Bruce said this sentence could be deleted from the HTML. [summary:protected] => This is the first in a series of 6 Tool Box Talks produced by Washington University in St. Louis on ergonomics in construction work. This one should be delivered first because it covers what ergonomics is, why construction workers need to talk about it, what the risk factors are for developing a health problem and how to prevent these problems. [transition_comments:protected] => [external_link:protected] => [consol_link:protected] => http://www.cpwrconstructionsolutions.org/pipes_vessels/solution/50/participatory-ergonomics-program.html [more_like_this:protected] => d001303,d001304,d001306,d001307,d001308,d001309 [permission_given_by:protected] => Lisa Jaegers, Washington U. in St. Louis [published:protected] => T [billable:protected] => F [img_name:protected] => [img_ext:protected] => png [img_width:protected] => [img_height:protected] => [img_credit:protected] => [img_practice:protected] => [vid_source_id:protected] => [vid_running_time:protected] => [vid_intended_audience:protected] => [vid_acquisition_info:protected] => [vid_cost:protected] => [vid_producer:protected] => [vid_filename:protected] => [vid_filename_downloadable:protected] => [date_summary:protected] => 2014 [date_permission_requested:protected] => [date_permission_received:protected] => [date_review_needed:protected] => [date_received:protected] => 06/12/14 [date_completed:protected] => 07/28/14 [date_billed:protected] => [date_modified:protected] => 10/09/15 [collBokExports:protected] => [lastBokExportCriteria:BaseElcoshItem:private] => [alreadyInSave:protected] => [alreadyInValidation:protected] => [validationFailures:protected] => Array ( ) [_new:BaseObject:private] => [_deleted:BaseObject:private] => [modifiedColumns:protected] => Array ( ) ) [2] => DocumentRecord Object ( [records:protected] => Array ( ) [recordId:protected] => [searchWordClass:protected] => [searchWordPeerClass:protected] => [bok_record:protected] => [authors:protected] => [organizations:protected] => [collections:protected] => [categories:protected] => [categories_initialized:protected] => [mapped_items:protected] => [content:protected] => [files:protected] => [language:protected] => Language Object ( [id:protected] => 1 [code:protected] => en [name:protected] => English [alreadyInSave:protected] => [alreadyInValidation:protected] => [validationFailures:protected] => Array ( ) [_new:BaseObject:private] => [_deleted:BaseObject:private] => [modifiedColumns:protected] => Array ( ) ) [old_record:protected] => [id:protected] => 3837 [old_id:protected] => [elcosh_id:protected] => d001306 [type:protected] => document [display_type:protected] => HTML w/ PDF [user_id:protected] => 25 [language_id:protected] => 1 [tagging_id:protected] => Bruce Lippy [priority_id:protected] => 1 [title:protected] => TBT2 Keep Reach Close [total_pages:protected] => 4 [billed_pages:protected] => 4 [publication_number:protected] => [part_of:protected] => [keywords:protected] => reach, ergonomic, ergo, MSD, carpal tunnel, repetition, awkward positions [comments:protected] => 7-28-2014 Jeff Nelson asked Bruce Lippy about what to do with a sentence included toward the top of the doc, "Fill them in on page 2 'Other Questions.'" -- Bruce said this sentence could be deleted from the HTML. [summary:protected] => This is the second of six Tool Box Talks created by Washington University in St. Louis on ergonomics in construction. There is a guide with the series that describes how to deliver these talks. This one deals with how to avoid awkward reaching during tasks to prevent injuries. try to work with your hands below your head and close to our body to reduce your risk of shoulder strains and back discomfort. This TBT recommends considering ways to move close to the task, keeping the work area free of obstacles, and talking with each other to provide constructive feedback about your working position. [transition_comments:protected] => [external_link:protected] => [consol_link:protected] => http://www.cpwrconstructionsolutions.org/hazard/959/lifting-and-carrying-manual-materials-handling.html [more_like_this:protected] => d001303,d001304,d001305,d001307,d001308,e001309 [permission_given_by:protected] => [published:protected] => T [billable:protected] => F [img_name:protected] => [img_ext:protected] => png [img_width:protected] => [img_height:protected] => [img_credit:protected] => [img_practice:protected] => [vid_source_id:protected] => [vid_running_time:protected] => [vid_intended_audience:protected] => [vid_acquisition_info:protected] => [vid_cost:protected] => [vid_producer:protected] => [vid_filename:protected] => [vid_filename_downloadable:protected] => [date_summary:protected] => 2014 [date_permission_requested:protected] => [date_permission_received:protected] => [date_review_needed:protected] => [date_received:protected] => 06/12/14 [date_completed:protected] => 07/28/14 [date_billed:protected] => [date_modified:protected] => 11/02/16 [collBokExports:protected] => [lastBokExportCriteria:BaseElcoshItem:private] => [alreadyInSave:protected] => [alreadyInValidation:protected] => [validationFailures:protected] => Array ( ) [_new:BaseObject:private] => [_deleted:BaseObject:private] => [modifiedColumns:protected] => Array ( ) ) [3] => DocumentRecord Object ( [records:protected] => Array ( ) [recordId:protected] => [searchWordClass:protected] => [searchWordPeerClass:protected] => [bok_record:protected] => [authors:protected] => [organizations:protected] => [collections:protected] => [categories:protected] => [categories_initialized:protected] => [mapped_items:protected] => [content:protected] => [files:protected] => [language:protected] => Language Object ( [id:protected] => 1 [code:protected] => en [name:protected] => English [alreadyInSave:protected] => [alreadyInValidation:protected] => [validationFailures:protected] => Array ( ) [_new:BaseObject:private] => [_deleted:BaseObject:private] => [modifiedColumns:protected] => Array ( ) ) [old_record:protected] => [id:protected] => 3839 [old_id:protected] => [elcosh_id:protected] => d001308 [type:protected] => document [display_type:protected] => HTML w/ PDF [user_id:protected] => 23 [language_id:protected] => 1 [tagging_id:protected] => Bruce Lippy [priority_id:protected] => 1 [title:protected] => TBT4 Move Materials With Assist [total_pages:protected] => 4 [billed_pages:protected] => 4 [publication_number:protected] => [part_of:protected] => [keywords:protected] => lifting, back injury, ergonomics, ergo, MSD, buddy system [comments:protected] => 7-28-2014 Jeff Nelson asked Bruce Lippy about what to do with a sentence included toward the top of the doc, "Fill them in on page 2 'Other Questions.'" -- Bruce said this sentence could be deleted from the HTML. [summary:protected] => This tool box talk is fourth in a series of 6 developed by Washington University in St. Louis on construction ergonomics. This one focuses on preventing back injuries by getting an assist when manually lifting. It recommends using a cart for transporting loads, taking less trips, avoiding carrying materials on the shoulder and helping each other to lift large or heavy materials when a cart or hoist is not available. [transition_comments:protected] => [external_link:protected] => [consol_link:protected] => http://www.cpwrconstructionsolutions.org/hazard/959/lifting-and-carrying-manual-materials-handling.html [more_like_this:protected] => d001303,d001304,d001305,d001306,d001307,d001309 [permission_given_by:protected] => Lisa Jaegers, Washington U. in St. Louis [published:protected] => T [billable:protected] => F [img_name:protected] => [img_ext:protected] => png [img_width:protected] => [img_height:protected] => [img_credit:protected] => [img_practice:protected] => [vid_source_id:protected] => [vid_running_time:protected] => [vid_intended_audience:protected] => [vid_acquisition_info:protected] => [vid_cost:protected] => [vid_producer:protected] => [vid_filename:protected] => [vid_filename_downloadable:protected] => [date_summary:protected] => 2014 [date_permission_requested:protected] => [date_permission_received:protected] => [date_review_needed:protected] => [date_received:protected] => 06/12/14 [date_completed:protected] => 07/29/14 [date_billed:protected] => [date_modified:protected] => 10/09/15 [collBokExports:protected] => [lastBokExportCriteria:BaseElcoshItem:private] => [alreadyInSave:protected] => [alreadyInValidation:protected] => [validationFailures:protected] => Array ( ) [_new:BaseObject:private] => [_deleted:BaseObject:private] => [modifiedColumns:protected] => Array ( ) ) [4] => DocumentRecord Object ( [records:protected] => Array ( ) [recordId:protected] => [searchWordClass:protected] => [searchWordPeerClass:protected] => [bok_record:protected] => [authors:protected] => [organizations:protected] => [collections:protected] => [categories:protected] => [categories_initialized:protected] => [mapped_items:protected] => [content:protected] => [files:protected] => [language:protected] => Language Object ( [id:protected] => 1 [code:protected] => en [name:protected] => English [alreadyInSave:protected] => [alreadyInValidation:protected] => [validationFailures:protected] => Array ( ) [_new:BaseObject:private] => [_deleted:BaseObject:private] => [modifiedColumns:protected] => Array ( ) ) [old_record:protected] => [id:protected] => 3840 [old_id:protected] => [elcosh_id:protected] => d001309 [type:protected] => document [display_type:protected] => HTML w/ PDF [user_id:protected] => 23 [language_id:protected] => 1 [tagging_id:protected] => Bruce Lippy [priority_id:protected] => 1 [title:protected] => TBT5 Manual Tools [total_pages:protected] => 4 [billed_pages:protected] => 4 [publication_number:protected] => [part_of:protected] => [keywords:protected] => ergonomic, hand tools, handles, MSD, musculoskeletal disorder, carpal tunnel [comments:protected] => 7-28-2014 Jeff Nelson asked Bruce Lippy about what to do with a sentence included toward the top of the doc, "Fill them in on page 2 'Other Questions.'" -- Bruce said this sentence could be deleted from the HTML. [summary:protected] => This is the fifth in a series of 6 tool box talks on construction ergonomics produced by the University of Washington in St. Louis. This one focuses on manual tools. It asks the following 6 key questions. Does the tool… 1. Fit the task? 2. Allow a good power grip? 3. Keep the wrist in a straight posture? 4. Feel comfortable? 5. Take less effort than other tools for the task? 6. Work effectively? [transition_comments:protected] => [external_link:protected] => [consol_link:protected] => http://www.cpwrconstructionsolutions.org/masonry/solution/383/ergonomic-hand-tools.html [more_like_this:protected] => d001303,d001304,d001305,d001306,d001307,d001308,d001310 [permission_given_by:protected] => Lisa Jaegers, U. Wash. St. Louis [published:protected] => T [billable:protected] => F [img_name:protected] => [img_ext:protected] => png [img_width:protected] => [img_height:protected] => [img_credit:protected] => [img_practice:protected] => [vid_source_id:protected] => [vid_running_time:protected] => [vid_intended_audience:protected] => [vid_acquisition_info:protected] => [vid_cost:protected] => [vid_producer:protected] => [vid_filename:protected] => [vid_filename_downloadable:protected] => [date_summary:protected] => 2014 [date_permission_requested:protected] => [date_permission_received:protected] => [date_review_needed:protected] => [date_received:protected] => 06/12/14 [date_completed:protected] => 07/29/14 [date_billed:protected] => [date_modified:protected] => 10/09/15 [collBokExports:protected] => [lastBokExportCriteria:BaseElcoshItem:private] => [alreadyInSave:protected] => [alreadyInValidation:protected] => [validationFailures:protected] => Array ( ) [_new:BaseObject:private] => [_deleted:BaseObject:private] => [modifiedColumns:protected] => Array ( ) ) ) ) [collections] => Array ( [3834] => ) [record] => DocumentRecord Object ( [records:protected] => Array ( ) [recordId:protected] => [searchWordClass:protected] => [searchWordPeerClass:protected] => [bok_record:protected] => [authors:protected] => Array ( ) [organizations:protected] => Array ( [182] => Organization Object ( [id:protected] => 182 [elcosh_id:protected] => o000205 [user_id:protected] => 14 [province_id:protected] => 0 [country_id:protected] => 0 [title:protected] => Washington University - St. Louis [address:protected] => [postal_code:protected] => [city:protected] => [department:protected] => [phone:protected] => [fax:protected] => [email:protected] => [website:protected] => [filename:protected] => [about:protected] => [comments:protected] => [logo_available:protected] => T [no_details:protected] => T [date_received:protected] => 2009-08-06 [date_completed:protected] => 2009-08-06 [date_billed:protected] => [alreadyInSave:protected] => [alreadyInValidation:protected] => [validationFailures:protected] => Array ( ) [_new:BaseObject:private] => [_deleted:BaseObject:private] => [modifiedColumns:protected] => Array ( ) ) ) [collections:protected] => Array ( [3834] => ) [categories:protected] => [categories_initialized:protected] => [mapped_items:protected] => Array ( [3833] => DocumentRecord Object ( [records:protected] => Array ( ) [recordId:protected] => [searchWordClass:protected] => [searchWordPeerClass:protected] => [bok_record:protected] => [authors:protected] => [organizations:protected] => [collections:protected] => [categories:protected] => [categories_initialized:protected] => [mapped_items:protected] => [content:protected] => [files:protected] => [language:protected] => [old_record:protected] => [id:protected] => 3833 [old_id:protected] => [elcosh_id:protected] => d001303 [type:protected] => document [display_type:protected] => HTML w/ PDF [user_id:protected] => 25 [language_id:protected] => 1 [tagging_id:protected] => Bruce Lippy [priority_id:protected] => 1 [title:protected] => Overview of Toolbox Talks on Ergonomics Developed by Washington University in St. Louis [total_pages:protected] => 3 [billed_pages:protected] => 3 [publication_number:protected] => [part_of:protected] => [keywords:protected] => ergonomics, musculoskeletal disorders, MSDs [comments:protected] => 7-28-2014 - Originally submitted as "HTML w/ doc and PDF", Jeff Nelson asked Bruce Lippy for permission to switch it to "HTML w/ PDF" -- permission was given [summary:protected] => This overviews provides a background on how Washington University in St. Louis developed this series of six toolbox talks on ergonomics. It also describes how they tested the effectiveness of these communication tools, concluding that the guide was valuable for improving the delivery of ergonomics training and interaction between the safety representative and workers. The researchers recommend preparing site-specific information prior to the talk and interacting with workers to discuss problems and ergonomic solutions during the safety meetings. [transition_comments:protected] => [external_link:protected] => [consol_link:protected] => [more_like_this:protected] => [permission_given_by:protected] => Lisa Jaegers, Washington U. in St. Louis [published:protected] => T [billable:protected] => F [img_name:protected] => [img_ext:protected] => png [img_width:protected] => [img_height:protected] => [img_credit:protected] => [img_practice:protected] => [vid_source_id:protected] => [vid_running_time:protected] => [vid_intended_audience:protected] => [vid_acquisition_info:protected] => [vid_cost:protected] => [vid_producer:protected] => [vid_filename:protected] => [vid_filename_downloadable:protected] => [date_summary:protected] => 2014 [date_permission_requested:protected] => [date_permission_received:protected] => [date_review_needed:protected] => [date_received:protected] => 06/11/14 [date_completed:protected] => 07/29/14 [date_billed:protected] => [date_modified:protected] => 07/29/14 [collBokExports:protected] => [lastBokExportCriteria:BaseElcoshItem:private] => [alreadyInSave:protected] => [alreadyInValidation:protected] => [validationFailures:protected] => Array ( ) [_new:BaseObject:private] => [_deleted:BaseObject:private] => [modifiedColumns:protected] => Array ( ) ) [3835] => DocumentRecord Object ( [records:protected] => Array ( ) [recordId:protected] => [searchWordClass:protected] => [searchWordPeerClass:protected] => [bok_record:protected] => [authors:protected] => [organizations:protected] => [collections:protected] => [categories:protected] => [categories_initialized:protected] => [mapped_items:protected] => [content:protected] => [files:protected] => [language:protected] => [old_record:protected] => [id:protected] => 3835 [old_id:protected] => [elcosh_id:protected] => d001304 [type:protected] => document [display_type:protected] => HTML w/ PDF [user_id:protected] => 25 [language_id:protected] => 1 [tagging_id:protected] => Bruce Lippy [priority_id:protected] => 1 [title:protected] => Ergonomics Tool Box Talks (TBT) Training Guide [total_pages:protected] => 2 [billed_pages:protected] => 2 [publication_number:protected] => [part_of:protected] => [keywords:protected] => Ergonomics, carpal tunnel, muscular skeletal disorders, msd [comments:protected] => [summary:protected] => CPWR-funded ergonomics research by Washington University at St. Louis led to the development of 6 tool box talks. This guide is an explanation of how to deliver the talks for maximum effectiveness. This guide should be reviewed before delivering any of the talks because it makes important recommendations like: • If possible, give the TBTs as a part of the crew’s regular safety meetings so that ergonomics is included in the safety discussion. • Try to locate an area with few distractions for gathering the crew. • For a team approach, invite the work crew, site superintendent, project manager and other general contractor and/or subcontractor reps who you feel may be helpful in supporting the training and ergonomics solutions. [transition_comments:protected] => [external_link:protected] => [consol_link:protected] => [more_like_this:protected] => d001303,d001305,d001306,d001307,d001308,d001309,d001310 [permission_given_by:protected] => [published:protected] => T [billable:protected] => F [img_name:protected] => [img_ext:protected] => png [img_width:protected] => [img_height:protected] => [img_credit:protected] => [img_practice:protected] => [vid_source_id:protected] => [vid_running_time:protected] => [vid_intended_audience:protected] => [vid_acquisition_info:protected] => [vid_cost:protected] => [vid_producer:protected] => [vid_filename:protected] => [vid_filename_downloadable:protected] => [date_summary:protected] => 2014 [date_permission_requested:protected] => [date_permission_received:protected] => [date_review_needed:protected] => [date_received:protected] => 06/12/14 [date_completed:protected] => 07/29/14 [date_billed:protected] => [date_modified:protected] => 07/29/14 [collBokExports:protected] => [lastBokExportCriteria:BaseElcoshItem:private] => [alreadyInSave:protected] => [alreadyInValidation:protected] => [validationFailures:protected] => Array ( ) [_new:BaseObject:private] => [_deleted:BaseObject:private] => [modifiedColumns:protected] => Array ( ) ) [3836] => DocumentRecord Object ( [records:protected] => Array ( ) [recordId:protected] => [searchWordClass:protected] => [searchWordPeerClass:protected] => [bok_record:protected] => [authors:protected] => [organizations:protected] => [collections:protected] => [categories:protected] => [categories_initialized:protected] => [mapped_items:protected] => [content:protected] => [files:protected] => [language:protected] => [old_record:protected] => [id:protected] => 3836 [old_id:protected] => [elcosh_id:protected] => d001305 [type:protected] => document [display_type:protected] => HTML w/ PDF [user_id:protected] => 25 [language_id:protected] => 1 [tagging_id:protected] => Bruce Lippy [priority_id:protected] => 1 [title:protected] => TBT1 Ergonomics in Construction [total_pages:protected] => 5 [billed_pages:protected] => 5 [publication_number:protected] => [part_of:protected] => [keywords:protected] => ergonomics, ergo, msd, musculoskeletal disorders, risk factors, lifting, carpal tunnel, repetition, awkward postures [comments:protected] => 7-28-2014 Jeff Nelson asked Bruce Lippy about what to do with a sentence included toward the top of the doc, "Fill them in on page 2 'Other Questions.'" -- Bruce said this sentence could be deleted from the HTML. [summary:protected] => This is the first in a series of 6 Tool Box Talks produced by Washington University in St. Louis on ergonomics in construction work. This one should be delivered first because it covers what ergonomics is, why construction workers need to talk about it, what the risk factors are for developing a health problem and how to prevent these problems. [transition_comments:protected] => [external_link:protected] => [consol_link:protected] => http://www.cpwrconstructionsolutions.org/pipes_vessels/solution/50/participatory-ergonomics-program.html [more_like_this:protected] => d001303,d001304,d001306,d001307,d001308,d001309 [permission_given_by:protected] => Lisa Jaegers, Washington U. in St. Louis [published:protected] => T [billable:protected] => F [img_name:protected] => [img_ext:protected] => png [img_width:protected] => [img_height:protected] => [img_credit:protected] => [img_practice:protected] => [vid_source_id:protected] => [vid_running_time:protected] => [vid_intended_audience:protected] => [vid_acquisition_info:protected] => [vid_cost:protected] => [vid_producer:protected] => [vid_filename:protected] => [vid_filename_downloadable:protected] => [date_summary:protected] => 2014 [date_permission_requested:protected] => [date_permission_received:protected] => [date_review_needed:protected] => [date_received:protected] => 06/12/14 [date_completed:protected] => 07/28/14 [date_billed:protected] => [date_modified:protected] => 10/09/15 [collBokExports:protected] => [lastBokExportCriteria:BaseElcoshItem:private] => [alreadyInSave:protected] => [alreadyInValidation:protected] => [validationFailures:protected] => Array ( ) [_new:BaseObject:private] => [_deleted:BaseObject:private] => [modifiedColumns:protected] => Array ( ) ) [3837] => DocumentRecord Object ( [records:protected] => Array ( ) [recordId:protected] => [searchWordClass:protected] => [searchWordPeerClass:protected] => [bok_record:protected] => [authors:protected] => [organizations:protected] => [collections:protected] => [categories:protected] => [categories_initialized:protected] => [mapped_items:protected] => [content:protected] => [files:protected] => [language:protected] => [old_record:protected] => [id:protected] => 3837 [old_id:protected] => [elcosh_id:protected] => d001306 [type:protected] => document [display_type:protected] => HTML w/ PDF [user_id:protected] => 25 [language_id:protected] => 1 [tagging_id:protected] => Bruce Lippy [priority_id:protected] => 1 [title:protected] => TBT2 Keep Reach Close [total_pages:protected] => 4 [billed_pages:protected] => 4 [publication_number:protected] => [part_of:protected] => [keywords:protected] => reach, ergonomic, ergo, MSD, carpal tunnel, repetition, awkward positions [comments:protected] => 7-28-2014 Jeff Nelson asked Bruce Lippy about what to do with a sentence included toward the top of the doc, "Fill them in on page 2 'Other Questions.'" -- Bruce said this sentence could be deleted from the HTML. [summary:protected] => This is the second of six Tool Box Talks created by Washington University in St. Louis on ergonomics in construction. There is a guide with the series that describes how to deliver these talks. This one deals with how to avoid awkward reaching during tasks to prevent injuries. try to work with your hands below your head and close to our body to reduce your risk of shoulder strains and back discomfort. This TBT recommends considering ways to move close to the task, keeping the work area free of obstacles, and talking with each other to provide constructive feedback about your working position. [transition_comments:protected] => [external_link:protected] => [consol_link:protected] => http://www.cpwrconstructionsolutions.org/hazard/959/lifting-and-carrying-manual-materials-handling.html [more_like_this:protected] => d001303,d001304,d001305,d001307,d001308,e001309 [permission_given_by:protected] => [published:protected] => T [billable:protected] => F [img_name:protected] => [img_ext:protected] => png [img_width:protected] => [img_height:protected] => [img_credit:protected] => [img_practice:protected] => [vid_source_id:protected] => [vid_running_time:protected] => [vid_intended_audience:protected] => [vid_acquisition_info:protected] => [vid_cost:protected] => [vid_producer:protected] => [vid_filename:protected] => [vid_filename_downloadable:protected] => [date_summary:protected] => 2014 [date_permission_requested:protected] => [date_permission_received:protected] => [date_review_needed:protected] => [date_received:protected] => 06/12/14 [date_completed:protected] => 07/28/14 [date_billed:protected] => [date_modified:protected] => 11/02/16 [collBokExports:protected] => [lastBokExportCriteria:BaseElcoshItem:private] => [alreadyInSave:protected] => [alreadyInValidation:protected] => [validationFailures:protected] => Array ( ) [_new:BaseObject:private] => [_deleted:BaseObject:private] => [modifiedColumns:protected] => Array ( ) ) [3839] => DocumentRecord Object ( [records:protected] => Array ( ) [recordId:protected] => [searchWordClass:protected] => [searchWordPeerClass:protected] => [bok_record:protected] => [authors:protected] => [organizations:protected] => [collections:protected] => [categories:protected] => [categories_initialized:protected] => [mapped_items:protected] => [content:protected] => [files:protected] => [language:protected] => [old_record:protected] => [id:protected] => 3839 [old_id:protected] => [elcosh_id:protected] => d001308 [type:protected] => document [display_type:protected] => HTML w/ PDF [user_id:protected] => 23 [language_id:protected] => 1 [tagging_id:protected] => Bruce Lippy [priority_id:protected] => 1 [title:protected] => TBT4 Move Materials With Assist [total_pages:protected] => 4 [billed_pages:protected] => 4 [publication_number:protected] => [part_of:protected] => [keywords:protected] => lifting, back injury, ergonomics, ergo, MSD, buddy system [comments:protected] => 7-28-2014 Jeff Nelson asked Bruce Lippy about what to do with a sentence included toward the top of the doc, "Fill them in on page 2 'Other Questions.'" -- Bruce said this sentence could be deleted from the HTML. [summary:protected] => This tool box talk is fourth in a series of 6 developed by Washington University in St. Louis on construction ergonomics. This one focuses on preventing back injuries by getting an assist when manually lifting. It recommends using a cart for transporting loads, taking less trips, avoiding carrying materials on the shoulder and helping each other to lift large or heavy materials when a cart or hoist is not available. [transition_comments:protected] => [external_link:protected] => [consol_link:protected] => http://www.cpwrconstructionsolutions.org/hazard/959/lifting-and-carrying-manual-materials-handling.html [more_like_this:protected] => d001303,d001304,d001305,d001306,d001307,d001309 [permission_given_by:protected] => Lisa Jaegers, Washington U. in St. Louis [published:protected] => T [billable:protected] => F [img_name:protected] => [img_ext:protected] => png [img_width:protected] => [img_height:protected] => [img_credit:protected] => [img_practice:protected] => [vid_source_id:protected] => [vid_running_time:protected] => [vid_intended_audience:protected] => [vid_acquisition_info:protected] => [vid_cost:protected] => [vid_producer:protected] => [vid_filename:protected] => [vid_filename_downloadable:protected] => [date_summary:protected] => 2014 [date_permission_requested:protected] => [date_permission_received:protected] => [date_review_needed:protected] => [date_received:protected] => 06/12/14 [date_completed:protected] => 07/29/14 [date_billed:protected] => [date_modified:protected] => 10/09/15 [collBokExports:protected] => [lastBokExportCriteria:BaseElcoshItem:private] => [alreadyInSave:protected] => [alreadyInValidation:protected] => [validationFailures:protected] => Array ( ) [_new:BaseObject:private] => [_deleted:BaseObject:private] => [modifiedColumns:protected] => Array ( ) ) [3840] => DocumentRecord Object ( [records:protected] => Array ( ) [recordId:protected] => [searchWordClass:protected] => [searchWordPeerClass:protected] => [bok_record:protected] => [authors:protected] => [organizations:protected] => [collections:protected] => [categories:protected] => [categories_initialized:protected] => [mapped_items:protected] => [content:protected] => [files:protected] => [language:protected] => [old_record:protected] => [id:protected] => 3840 [old_id:protected] => [elcosh_id:protected] => d001309 [type:protected] => document [display_type:protected] => HTML w/ PDF [user_id:protected] => 23 [language_id:protected] => 1 [tagging_id:protected] => Bruce Lippy [priority_id:protected] => 1 [title:protected] => TBT5 Manual Tools [total_pages:protected] => 4 [billed_pages:protected] => 4 [publication_number:protected] => [part_of:protected] => [keywords:protected] => ergonomic, hand tools, handles, MSD, musculoskeletal disorder, carpal tunnel [comments:protected] => 7-28-2014 Jeff Nelson asked Bruce Lippy about what to do with a sentence included toward the top of the doc, "Fill them in on page 2 'Other Questions.'" -- Bruce said this sentence could be deleted from the HTML. [summary:protected] => This is the fifth in a series of 6 tool box talks on construction ergonomics produced by the University of Washington in St. Louis. This one focuses on manual tools. It asks the following 6 key questions. Does the tool… 1. Fit the task? 2. Allow a good power grip? 3. Keep the wrist in a straight posture? 4. Feel comfortable? 5. Take less effort than other tools for the task? 6. Work effectively? [transition_comments:protected] => [external_link:protected] => [consol_link:protected] => http://www.cpwrconstructionsolutions.org/masonry/solution/383/ergonomic-hand-tools.html [more_like_this:protected] => d001303,d001304,d001305,d001306,d001307,d001308,d001310 [permission_given_by:protected] => Lisa Jaegers, U. Wash. St. Louis [published:protected] => T [billable:protected] => F [img_name:protected] => [img_ext:protected] => png [img_width:protected] => [img_height:protected] => [img_credit:protected] => [img_practice:protected] => [vid_source_id:protected] => [vid_running_time:protected] => [vid_intended_audience:protected] => [vid_acquisition_info:protected] => [vid_cost:protected] => [vid_producer:protected] => [vid_filename:protected] => [vid_filename_downloadable:protected] => [date_summary:protected] => 2014 [date_permission_requested:protected] => [date_permission_received:protected] => [date_review_needed:protected] => [date_received:protected] => 06/12/14 [date_completed:protected] => 07/29/14 [date_billed:protected] => [date_modified:protected] => 10/09/15 [collBokExports:protected] => [lastBokExportCriteria:BaseElcoshItem:private] => [alreadyInSave:protected] => [alreadyInValidation:protected] => [validationFailures:protected] => Array ( ) [_new:BaseObject:private] => [_deleted:BaseObject:private] => [modifiedColumns:protected] => Array ( ) ) ) [content:protected] => [files:protected] => Array ( [559] => [560] => [546] => File Object ( [id:protected] => 546 [filename:protected] => 3.jpg [downloadable:protected] => F [timestamp:protected] => 2009-07-03 12:54:22 [alreadyInSave:protected] => [alreadyInValidation:protected] => [validationFailures:protected] => Array ( ) [_new:BaseObject:private] => [_deleted:BaseObject:private] => [modifiedColumns:protected] => Array ( ) ) [9643] => File Object ( [id:protected] => 9643 [filename:protected] => d001307.pdf [downloadable:protected] => T [timestamp:protected] => 2014-07-27 19:09:19 [alreadyInSave:protected] => [alreadyInValidation:protected] => [validationFailures:protected] => Array ( ) [_new:BaseObject:private] => [_deleted:BaseObject:private] => [modifiedColumns:protected] => Array ( ) ) [566] => File Object ( [id:protected] => 566 [filename:protected] => 4.jpg [downloadable:protected] => F [timestamp:protected] => 2009-07-03 12:54:23 [alreadyInSave:protected] => [alreadyInValidation:protected] => [validationFailures:protected] => Array ( ) [_new:BaseObject:private] => [_deleted:BaseObject:private] => [modifiedColumns:protected] => Array ( ) ) ) [language:protected] => Language Object ( [id:protected] => 1 [code:protected] => en [name:protected] => English [alreadyInSave:protected] => [alreadyInValidation:protected] => [validationFailures:protected] => Array ( ) [_new:BaseObject:private] => [_deleted:BaseObject:private] => [modifiedColumns:protected] => Array ( ) ) [old_record:protected] => [id:protected] => 3838 [old_id:protected] => [elcosh_id:protected] => d001307 [type:protected] => document [display_type:protected] => HTML w/ PDF [user_id:protected] => 25 [language_id:protected] => 1 [tagging_id:protected] => Bruce Lippy [priority_id:protected] => 1 [title:protected] => TBT3 Positioning [total_pages:protected] => 4 [billed_pages:protected] => 4 [publication_number:protected] => [part_of:protected] => [keywords:protected] => position, positioning, ergonomics, ergo, carpal tunnel, MSD, musculoskeletal disorder [comments:protected] => 7-28-2014 Jeff Nelson asked Bruce Lippy about what to do with a sentence included toward the top of the doc, "Fill them in on page 2 'Other Questions.'" -- Bruce said this sentence could be deleted from the HTML. [summary:protected] => This third in a series of 6 Tool Box Talks on construction ergonomics focuses on proper positioning to avoid injuries. The TBT recommends: 1)prop up a task off of the floor by using a raised surface, cart, baker scaffold, saw horses to prep materials near waist height, 2)move the lift or ladder in the best position for the work, 3)position the lift in front of the area you plan to work without trying to reach too far on either side of the lift. [transition_comments:protected] => [external_link:protected] => [consol_link:protected] => http://www.cpwrconstructionsolutions.org/hazard/959/lifting-and-carrying-manual-materials-handling.html [more_like_this:protected] => d001303,d001304,d001305,d001306,d001308,d001309 [permission_given_by:protected] => Lisa Jaegers, WU-St. Louis [published:protected] => T [billable:protected] => F [img_name:protected] => [img_ext:protected] => png [img_width:protected] => [img_height:protected] => [img_credit:protected] => [img_practice:protected] => [vid_source_id:protected] => [vid_running_time:protected] => [vid_intended_audience:protected] => [vid_acquisition_info:protected] => [vid_cost:protected] => [vid_producer:protected] => [vid_filename:protected] => [vid_filename_downloadable:protected] => [date_summary:protected] => 2014 [date_permission_requested:protected] => [date_permission_received:protected] => [date_review_needed:protected] => [date_received:protected] => 06/12/14 [date_completed:protected] => 07/28/14 [date_billed:protected] => [date_modified:protected] => 10/09/15 [collBokExports:protected] => [lastBokExportCriteria:BaseElcoshItem:private] => [alreadyInSave:protected] => [alreadyInValidation:protected] => [validationFailures:protected] => Array ( ) [_new:BaseObject:private] => [_deleted:BaseObject:private] => [modifiedColumns:protected] => Array ( ) ) [show_text] => [document_content] => ElcoshItemDocumentContent Object ( [id:protected] => 2906 [item_id:protected] => 3838 [type:protected] => main [title:protected] => [content:protected] =>
Facilitator / Leader Tasks Before the Tool Box Talk (TBT)
- Read through this TBT guide.
- Walk the job site to find ergonomics examples based on the TBT. If possible, take photos of “safe” and “unsafe” examples at the site to be used during the TBT.
- Write down discussion questions to ask the group.
Learning Goals
After discussing this training topic, workers will have gained a general understanding of:
- Unsafe work positions.
- Solutions to improve work positioning.
TRAINING CARD
The last page of this PDF has directions for printing and laminating the training cards.
TRAINER’S TALKING POINTS
Why should we talk about positioning?
Construction work requires working in high, low, and tight spaces which often forces you to work in an awkward or uncomfortable position. Working in awkward reaching and bent positions can lead to shoulder and back discomfort and possible injury over time.
Demonstration: The training card provides examples of the range of reaching and the point at which the reach is unsafe. Hold your arms straight out in front of you. Look at your hands and wrists while I discuss each of the reach zones on the training card.
The Green Zone shows the ideal location for working with your hands. When possible, try to keep your work tasks as far out as your wrists.
The Orange Zone is for occasional work since it involves more weight on your shoulders and low back since your hands are away from your body. If needed, keep the reach distance as far as your fingertips.
The Red Zone is away from your body so far that it places you at higher risk for falls when in the air and shoulder and back discomfort. Limit the time you work reaching beyond your fingertips.
End of Demonstration
Discussion Question: Can anyone describe to us an awkward position that they work in or have seen someone work in?
- What does it feel like in your neck, back or arms when working in that position?
- Other Questions:_____________________________________________
Training Note: Here are examples of hazards in different construction trades. Choose your trade or one that is similar to your group’s line of work that can be used as hazards and solutions examples.
| Trade | Awkward Posture Hazards | Potential Solution |
|---|---|---|
| Carpenter-Drywall | Leaning over the side of a scissor lift to reach and operating a screw gun with the arm fully extended (reaching in the red zone past the fingertips). | Before starting to install the line of screws to the side of the lift, move the lift to re-center it for the next 2 lines of screws to be installed. |
| Floor Layer | Spreading mortar overhead on a wall with the bakers scaffold one foot away from the wall due to buckets on the floor below (reach in the red zone, past the fingertips). | Pre-plan this task by removing all objects in the path of the bakers scaffold. Having an open path allows you to work closer to the task. |
| Sheet Metal Worker | Prepping duct parts on the floor while bending the back and reaching to work on them. | Pre-plan this task by setting up a waist-height workstation on extra materials, a cart, or saw horses. |
Now let’s put this information into practice. What are some tricks or techniques that you use to work in a comfortable position?
- Other Questions:_____________________________________________
Here are a few other ideas that are listed on your training card:
Prop up your tasks off of the floor by using a raised surface, cart, baker scaffold, saw horses to prep materials near waist height.
Move the lift or ladder in the best position for the work – close to the work tasks.
For safety & comfort, try to position the lift in front of the area you plan to work without trying to reach too far on either side of the lift.
In summary, it is important to work in a safe position when possible in order to reduce the risk of falls and discomfort due to awkward working positions. Consider ways that you can work in the green/comfort zone and orange zone and avoid the unsafe red zone.
References
[Images modified from Grandjean & Eastman Kodak Co.]
1. Grandjean, E. 1988. Fitting the task to the man: A textbook of occupational ergonomics. 4th ed. Taylor & Francis.
2. Eastman Kodak Co. 1983. Ergonomic Design for People at Work. Vol 1. Wiley, John & Sons, Incorporated.
Refer to the resources at our website: oshr.im.wustl.edu for more Tool Box TIPS.
TRAINING ATTENDANCE SHEET
Training Topic: Ergonomics -- Positioning
Date:
| ATTENDEES | |
|---|---|
Directions for Making Laminated Training Cards
The last page of this PDF has directions for printing and laminating the training cards.
[content_transformed:protected] =>Facilitator / Leader Tasks Before the Tool Box Talk (TBT)
- Read through this TBT guide.
- Walk the job site to find ergonomics examples based on the TBT. If possible, take photos of “safe” and “unsafe” examples at the site to be used during the TBT.
- Write down discussion questions to ask the group.
Learning Goals
After discussing this training topic, workers will have gained a general understanding of:
- Unsafe work positions.
- Solutions to improve work positioning.
TRAINING CARD
The last page of this PDF has directions for printing and laminating the training cards.
TRAINER’S TALKING POINTS
Why should we talk about positioning?
Construction work requires working in high, low, and tight spaces which often forces you to work in an awkward or uncomfortable position. Working in awkward reaching and bent positions can lead to shoulder and back discomfort and possible injury over time.
Demonstration: The training card provides examples of the range of reaching and the point at which the reach is unsafe. Hold your arms straight out in front of you. Look at your hands and wrists while I discuss each of the reach zones on the training card.
The Green Zone shows the ideal location for working with your hands. When possible, try to keep your work tasks as far out as your wrists.
The Orange Zone is for occasional work since it involves more weight on your shoulders and low back since your hands are away from your body. If needed, keep the reach distance as far as your fingertips.
The Red Zone is away from your body so far that it places you at higher risk for falls when in the air and shoulder and back discomfort. Limit the time you work reaching beyond your fingertips.
End of Demonstration
Discussion Question: Can anyone describe to us an awkward position that they work in or have seen someone work in?
- What does it feel like in your neck, back or arms when working in that position?
- Other Questions:_____________________________________________
Training Note: Here are examples of hazards in different construction trades. Choose your trade or one that is similar to your group’s line of work that can be used as hazards and solutions examples.
| Trade | Awkward Posture Hazards | Potential Solution |
|---|---|---|
| Carpenter-Drywall | Leaning over the side of a scissor lift to reach and operating a screw gun with the arm fully extended (reaching in the red zone past the fingertips). | Before starting to install the line of screws to the side of the lift, move the lift to re-center it for the next 2 lines of screws to be installed. |
| Floor Layer | Spreading mortar overhead on a wall with the bakers scaffold one foot away from the wall due to buckets on the floor below (reach in the red zone, past the fingertips). | Pre-plan this task by removing all objects in the path of the bakers scaffold. Having an open path allows you to work closer to the task. |
| Sheet Metal Worker | Prepping duct parts on the floor while bending the back and reaching to work on them. | Pre-plan this task by setting up a waist-height workstation on extra materials, a cart, or saw horses. |
Now let’s put this information into practice. What are some tricks or techniques that you use to work in a comfortable position?
- Other Questions:_____________________________________________
Here are a few other ideas that are listed on your training card:
Prop up your tasks off of the floor by using a raised surface, cart, baker scaffold, saw horses to prep materials near waist height.
Move the lift or ladder in the best position for the work – close to the work tasks.
For safety & comfort, try to position the lift in front of the area you plan to work without trying to reach too far on either side of the lift.
In summary, it is important to work in a safe position when possible in order to reduce the risk of falls and discomfort due to awkward working positions. Consider ways that you can work in the green/comfort zone and orange zone and avoid the unsafe red zone.
References
[Images modified from Grandjean & Eastman Kodak Co.]
1. Grandjean, E. 1988. Fitting the task to the man: A textbook of occupational ergonomics. 4th ed. Taylor & Francis.
2. Eastman Kodak Co. 1983. Ergonomic Design for People at Work. Vol 1. Wiley, John & Sons, Incorporated.
Refer to the resources at our website: oshr.im.wustl.edu for more Tool Box TIPS.
TRAINING ATTENDANCE SHEET
Training Topic: Ergonomics -- Positioning
Date:
| ATTENDEES | |
|---|---|
Directions for Making Laminated Training Cards
The last page of this PDF has directions for printing and laminating the training cards.
[disclaimer:protected] => [disclaimer_transformed:protected] => [alreadyInSave:protected] => [alreadyInValidation:protected] => [validationFailures:protected] => Array ( ) [_new:BaseObject:private] => [_deleted:BaseObject:private] => [modifiedColumns:protected] => Array ( ) ) [template] => record ) [_file] => /home/agsafe5/repositories/elcosh/live/templates/elcosh/record_macros.html [_errors:protected] => Array ( ) [_encoding:protected] => UTF-8 [_outputMode:protected] => 11 [_forceReparse:protected] => [_phpCodeDestination:protected] => /tmp/ [_phpCodeExtension:protected] => php [_cacheLifetime:protected] => 30 [_cachePurgeFrequency:protected] => 30 [externalMacroTemplatesCache:PHPTAL:private] => Array ( ) ) ) ) [1] => PHPTAL_Context Object ( [_line] => [_file] => /home/agsafe5/repositories/elcosh/live/templates/elcosh/record.html [repeat] => stdClass Object ( ) [_xmlDeclaration] => [_docType] => [_nothrow:PHPTAL_Context:private] => [_slots:PHPTAL_Context:private] => Array ( ) [_slotsStack:PHPTAL_Context:private] => Array ( [0] => Array ( ) [1] => Array ( ) ) [_parentContext:PHPTAL_Context:private] => [_globalContext:PHPTAL_Context:private] => stdClass Object ( ) [_echoDeclarations:PHPTAL_Context:private] => [referer] => http://elcosh.org/document/3838/d001307/TBT3%2BPositioning.html [curr_module] => Record [styles] => Array ( ) [javascript] => Array ( [0] => jquery.min.js ) [metas] => Array ( [language] => en [robots] => index, follow ) [user] => [curr_url] => https://elcosh.org/index.php?module=Record&id=3838&type=document [base_url] => https://elcosh.org/index.php?module=Record [title] => eLCOSH : TBT3 Positioning [language] => en [search_query] => [module] => Record [new_records] => Array ( [0] => Search_Result Object ( [title] => Toolbox Talk: Fixed Ladder [image] => /record/images/notavailable-p.png [blurb] => The CPWR Toolbox Talk on Fixed Ladders addresses the potential risks associated with using fixed ladders. The resource includes a brief case example,... [category] => Array ( [0] => 15 [1] => 47 [2] => 49 [3] => 51 [4] => 53 [5] => 55 [6] => 60 [7] => 64 [8] => 73 [9] => 76 [10] => 78 [11] => 80 [12] => 86 [13] => 87 [14] => 90 [15] => 92 [16] => 93 [17] => 94 [18] => 100 ) [labels] => Array ( [0] => Falls [1] => Work Environment [2] => Hazards [3] => Bricklayer [4] => Trades [5] => Carpenter [7] => Cement Mason [9] => Concrete Polisher [11] => Electrical Worker [13] => HVAC [15] => Laborer [17] => PCC/Restoration [19] => Plumber/Pipefitter [21] => Roofer/Waterproofer [23] => Sheetmetal Worker [25] => Welder [27] => Commercial & Institutional [28] => Jobsites [29] => Industrial [31] => LEED/Green Construction [33] => Renovations [35] => Residential [37] => Toolbox Talks [38] => Documents [39] => Media & Documents ) [type] => Toolbox Talks [sub_category] => [url] => /document/4430/d001660/Toolbox%2BTalk%253A%2BFixed%2BLadder.html [item:protected] => DocumentRecord Object ( [records:protected] => Array ( ) [recordId:protected] => [searchWordClass:protected] => [searchWordPeerClass:protected] => [bok_record:protected] => [authors:protected] => [organizations:protected] => [collections:protected] => [categories:protected] => Array ( [15] => Category Object ( [languages:protected] => [bok_resources:protected] => [bok_topics:protected] => [bok_keywords:protected] => [id:protected] => 15 [type:protected] => category [parent:protected] => 7 [label:protected] => Falls [alreadyInSave:protected] => [alreadyInValidation:protected] => [validationFailures:protected] => Array ( ) [_new:BaseObject:private] => [_deleted:BaseObject:private] => [modifiedColumns:protected] => Array ( ) ) [47] => Category Object ( [languages:protected] => [bok_resources:protected] => [bok_topics:protected] => [bok_keywords:protected] => [id:protected] => 47 [type:protected] => category [parent:protected] => 2 [label:protected] => Bricklayer [alreadyInSave:protected] => [alreadyInValidation:protected] => [validationFailures:protected] => Array ( ) [_new:BaseObject:private] => [_deleted:BaseObject:private] => [modifiedColumns:protected] => Array ( ) ) [49] => Category Object ( [languages:protected] => [bok_resources:protected] => [bok_topics:protected] => [bok_keywords:protected] => [id:protected] => 49 [type:protected] => category [parent:protected] => 2 [label:protected] => Carpenter [alreadyInSave:protected] => [alreadyInValidation:protected] => [validationFailures:protected] => Array ( ) [_new:BaseObject:private] => [_deleted:BaseObject:private] => [modifiedColumns:protected] => Array ( ) ) [51] => Category Object ( [languages:protected] => [bok_resources:protected] => [bok_topics:protected] => [bok_keywords:protected] => [id:protected] => 51 [type:protected] => category [parent:protected] => 2 [label:protected] => Cement Mason [alreadyInSave:protected] => [alreadyInValidation:protected] => [validationFailures:protected] => Array ( ) [_new:BaseObject:private] => [_deleted:BaseObject:private] => [modifiedColumns:protected] => Array ( ) ) [53] => Category Object ( [languages:protected] => [bok_resources:protected] => [bok_topics:protected] => [bok_keywords:protected] => [id:protected] => 53 [type:protected] => category [parent:protected] => 2 [label:protected] => Concrete Polisher [alreadyInSave:protected] => [alreadyInValidation:protected] => [validationFailures:protected] => Array ( ) [_new:BaseObject:private] => [_deleted:BaseObject:private] => [modifiedColumns:protected] => Array ( ) ) [55] => Category Object ( [languages:protected] => [bok_resources:protected] => [bok_topics:protected] => [bok_keywords:protected] => [id:protected] => 55 [type:protected] => category [parent:protected] => 2 [label:protected] => Electrical Worker [alreadyInSave:protected] => [alreadyInValidation:protected] => [validationFailures:protected] => Array ( ) [_new:BaseObject:private] => [_deleted:BaseObject:private] => [modifiedColumns:protected] => Array ( ) ) [60] => Category Object ( [languages:protected] => [bok_resources:protected] => [bok_topics:protected] => [bok_keywords:protected] => [id:protected] => 60 [type:protected] => category [parent:protected] => 2 [label:protected] => HVAC [alreadyInSave:protected] => [alreadyInValidation:protected] => [validationFailures:protected] => Array ( ) [_new:BaseObject:private] => [_deleted:BaseObject:private] => [modifiedColumns:protected] => Array ( ) ) [64] => Category Object ( [languages:protected] => [bok_resources:protected] => [bok_topics:protected] => [bok_keywords:protected] => [id:protected] => 64 [type:protected] => category [parent:protected] => 2 [label:protected] => Laborer [alreadyInSave:protected] => [alreadyInValidation:protected] => [validationFailures:protected] => Array ( ) [_new:BaseObject:private] => [_deleted:BaseObject:private] => [modifiedColumns:protected] => Array ( ) ) [73] => Category Object ( [languages:protected] => [bok_resources:protected] => [bok_topics:protected] => [bok_keywords:protected] => [id:protected] => 73 [type:protected] => category [parent:protected] => 2 [label:protected] => PCC/Restoration [alreadyInSave:protected] => [alreadyInValidation:protected] => [validationFailures:protected] => Array ( ) [_new:BaseObject:private] => [_deleted:BaseObject:private] => [modifiedColumns:protected] => Array ( ) ) [76] => Category Object ( [languages:protected] => [bok_resources:protected] => [bok_topics:protected] => [bok_keywords:protected] => [id:protected] => 76 [type:protected] => category [parent:protected] => 2 [label:protected] => Plumber/Pipefitter [alreadyInSave:protected] => [alreadyInValidation:protected] => [validationFailures:protected] => Array ( ) [_new:BaseObject:private] => [_deleted:BaseObject:private] => [modifiedColumns:protected] => Array ( ) ) [78] => Category Object ( [languages:protected] => [bok_resources:protected] => [bok_topics:protected] => [bok_keywords:protected] => [id:protected] => 78 [type:protected] => category [parent:protected] => 2 [label:protected] => Roofer/Waterproofer [alreadyInSave:protected] => [alreadyInValidation:protected] => [validationFailures:protected] => Array ( ) [_new:BaseObject:private] => [_deleted:BaseObject:private] => [modifiedColumns:protected] => Array ( ) ) [80] => Category Object ( [languages:protected] => [bok_resources:protected] => [bok_topics:protected] => [bok_keywords:protected] => [id:protected] => 80 [type:protected] => category [parent:protected] => 2 [label:protected] => Sheetmetal Worker [alreadyInSave:protected] => [alreadyInValidation:protected] => [validationFailures:protected] => Array ( ) [_new:BaseObject:private] => [_deleted:BaseObject:private] => [modifiedColumns:protected] => Array ( ) ) [86] => Category Object ( [languages:protected] => [bok_resources:protected] => [bok_topics:protected] => [bok_keywords:protected] => [id:protected] => 86 [type:protected] => category [parent:protected] => 2 [label:protected] => Welder [alreadyInSave:protected] => [alreadyInValidation:protected] => [validationFailures:protected] => Array ( ) [_new:BaseObject:private] => [_deleted:BaseObject:private] => [modifiedColumns:protected] => Array ( ) ) [87] => Category Object ( [languages:protected] => [bok_resources:protected] => [bok_topics:protected] => [bok_keywords:protected] => [id:protected] => 87 [type:protected] => category [parent:protected] => 3 [label:protected] => Commercial & Institutional [alreadyInSave:protected] => [alreadyInValidation:protected] => [validationFailures:protected] => Array ( ) [_new:BaseObject:private] => [_deleted:BaseObject:private] => [modifiedColumns:protected] => Array ( ) ) [90] => Category Object ( [languages:protected] => [bok_resources:protected] => [bok_topics:protected] => [bok_keywords:protected] => [id:protected] => 90 [type:protected] => category [parent:protected] => 3 [label:protected] => Industrial [alreadyInSave:protected] => [alreadyInValidation:protected] => [validationFailures:protected] => Array ( ) [_new:BaseObject:private] => [_deleted:BaseObject:private] => [modifiedColumns:protected] => Array ( ) ) [92] => Category Object ( [languages:protected] => [bok_resources:protected] => [bok_topics:protected] => [bok_keywords:protected] => [id:protected] => 92 [type:protected] => category [parent:protected] => 3 [label:protected] => LEED/Green Construction [alreadyInSave:protected] => [alreadyInValidation:protected] => [validationFailures:protected] => Array ( ) [_new:BaseObject:private] => [_deleted:BaseObject:private] => [modifiedColumns:protected] => Array ( ) ) [93] => Category Object ( [languages:protected] => [bok_resources:protected] => [bok_topics:protected] => [bok_keywords:protected] => [id:protected] => 93 [type:protected] => category [parent:protected] => 3 [label:protected] => Renovations [alreadyInSave:protected] => [alreadyInValidation:protected] => [validationFailures:protected] => Array ( ) [_new:BaseObject:private] => [_deleted:BaseObject:private] => [modifiedColumns:protected] => Array ( ) ) [94] => Category Object ( [languages:protected] => [bok_resources:protected] => [bok_topics:protected] => [bok_keywords:protected] => [id:protected] => 94 [type:protected] => category [parent:protected] => 3 [label:protected] => Residential [alreadyInSave:protected] => [alreadyInValidation:protected] => [validationFailures:protected] => Array ( ) [_new:BaseObject:private] => [_deleted:BaseObject:private] => [modifiedColumns:protected] => Array ( ) ) [100] => Category Object ( [languages:protected] => [bok_resources:protected] => [bok_topics:protected] => [bok_keywords:protected] => [id:protected] => 100 [type:protected] => category [parent:protected] => 6 [label:protected] => Toolbox Talks [alreadyInSave:protected] => [alreadyInValidation:protected] => [validationFailures:protected] => Array ( ) [_new:BaseObject:private] => [_deleted:BaseObject:private] => [modifiedColumns:protected] => Array ( ) ) ) [categories_initialized:protected] => 1 [mapped_items:protected] => [content:protected] => [files:protected] => [language:protected] => Language Object ( [id:protected] => 1 [code:protected] => en [name:protected] => English [alreadyInSave:protected] => [alreadyInValidation:protected] => [validationFailures:protected] => Array ( ) [_new:BaseObject:private] => [_deleted:BaseObject:private] => [modifiedColumns:protected] => Array ( ) ) [old_record:protected] => [id:protected] => 4430 [old_id:protected] => [elcosh_id:protected] => d001660 [type:protected] => document [display_type:protected] => HTML only (and links) [user_id:protected] => 0 [language_id:protected] => 1 [tagging_id:protected] => Mike Aguilar [priority_id:protected] => 1 [title:protected] => Toolbox Talk: Fixed Ladder [total_pages:protected] => 0 [billed_pages:protected] => 0 [publication_number:protected] => [part_of:protected] => [keywords:protected] => Fixed Ladders, Fall Prevention, Falls [comments:protected] => [summary:protected] => The CPWR Toolbox Talk on Fixed Ladders addresses the potential risks associated with using fixed ladders. The resource includes a brief case example, steps to prevent a related injury and questions for discussion. It includes an image that illustrates the hazard, which can be posted in a central location as a reminder of steps to work safely. Available in English and Spanish. [transition_comments:protected] => [external_link:protected] => [consol_link:protected] => [more_like_this:protected] => d001257,d001254,d001255,d001256,d001258,d001262,d001279 [permission_given_by:protected] => [published:protected] => T [billable:protected] => F [img_name:protected] => [img_ext:protected] => [img_width:protected] => [img_height:protected] => [img_credit:protected] => [img_practice:protected] => [vid_source_id:protected] => [vid_running_time:protected] => [vid_intended_audience:protected] => [vid_acquisition_info:protected] => [vid_cost:protected] => [vid_producer:protected] => [vid_filename:protected] => [vid_filename_downloadable:protected] => [date_summary:protected] => [date_permission_requested:protected] => [date_permission_received:protected] => [date_review_needed:protected] => [date_received:protected] => 06/10/22 [date_completed:protected] => 06/10/22 [date_billed:protected] => [date_modified:protected] => 06/16/25 [collBokExports:protected] => [lastBokExportCriteria:BaseElcoshItem:private] => [alreadyInSave:protected] => [alreadyInValidation:protected] => [validationFailures:protected] => Array ( ) [_new:BaseObject:private] => [_deleted:BaseObject:private] => [modifiedColumns:protected] => Array ( ) ) ) [1] => Search_Result Object ( [title] => Toolbox Talk: Work Zone Safety: Working Around Vehicles [image] => /record/images/notavailable-p.png [blurb] => The CPWR Toolbox Talk on Working Around Vehicles in the Work Zone addresses methods to avoid being struck-by a vehicle on a construction site. The res... [category] => Array ( [0] => 12 [1] => 18 [2] => 52 [3] => 57 [4] => 70 [5] => 85 [6] => 87 [7] => 88 [8] => 89 [9] => 91 [10] => 90 [11] => 92 [12] => 93 [13] => 94 [14] => 95 [15] => 100 ) [labels] => Array ( [0] => Crushed/Struck By [1] => Work Environment [2] => Hazards [3] => Motor Vehicles/Heavy Equipment [6] => Commercial Diver [7] => Trades [8] => Flagger [10] => Operating Engineer [12] => Truck Driver [14] => Commercial & Institutional [15] => Jobsites [16] => Demolition [18] => Disasters [20] => Heavy & Highway [22] => Industrial [24] => LEED/Green Construction [26] => Renovations [28] => Residential [30] => Underground [32] => Toolbox Talks [33] => Documents [34] => Media & Documents ) [type] => Toolbox Talks [sub_category] => [url] => /document/4428/d001658/Toolbox%2BTalk%253A%2BWork%2BZone%2BSafety%253A%2BWorking%2BAround%2BVehicles.html [item:protected] => DocumentRecord Object ( [records:protected] => Array ( ) [recordId:protected] => [searchWordClass:protected] => [searchWordPeerClass:protected] => [bok_record:protected] => [authors:protected] => [organizations:protected] => [collections:protected] => [categories:protected] => Array ( [12] => Category Object ( [languages:protected] => [bok_resources:protected] => [bok_topics:protected] => [bok_keywords:protected] => [id:protected] => 12 [type:protected] => category [parent:protected] => 7 [label:protected] => Crushed/Struck By [alreadyInSave:protected] => [alreadyInValidation:protected] => [validationFailures:protected] => Array ( ) [_new:BaseObject:private] => [_deleted:BaseObject:private] => [modifiedColumns:protected] => Array ( ) ) [18] => Category Object ( [languages:protected] => [bok_resources:protected] => [bok_topics:protected] => [bok_keywords:protected] => [id:protected] => 18 [type:protected] => category [parent:protected] => 7 [label:protected] => Motor Vehicles/Heavy Equipment [alreadyInSave:protected] => [alreadyInValidation:protected] => [validationFailures:protected] => Array ( ) [_new:BaseObject:private] => [_deleted:BaseObject:private] => [modifiedColumns:protected] => Array ( ) ) [52] => Category Object ( [languages:protected] => [bok_resources:protected] => [bok_topics:protected] => [bok_keywords:protected] => [id:protected] => 52 [type:protected] => category [parent:protected] => 2 [label:protected] => Commercial Diver [alreadyInSave:protected] => [alreadyInValidation:protected] => [validationFailures:protected] => Array ( ) [_new:BaseObject:private] => [_deleted:BaseObject:private] => [modifiedColumns:protected] => Array ( ) ) [57] => Category Object ( [languages:protected] => [bok_resources:protected] => [bok_topics:protected] => [bok_keywords:protected] => [id:protected] => 57 [type:protected] => category [parent:protected] => 2 [label:protected] => Flagger [alreadyInSave:protected] => [alreadyInValidation:protected] => [validationFailures:protected] => Array ( ) [_new:BaseObject:private] => [_deleted:BaseObject:private] => [modifiedColumns:protected] => Array ( ) ) [70] => Category Object ( [languages:protected] => [bok_resources:protected] => [bok_topics:protected] => [bok_keywords:protected] => [id:protected] => 70 [type:protected] => category [parent:protected] => 2 [label:protected] => Operating Engineer [alreadyInSave:protected] => [alreadyInValidation:protected] => [validationFailures:protected] => Array ( ) [_new:BaseObject:private] => [_deleted:BaseObject:private] => [modifiedColumns:protected] => Array ( ) ) [85] => Category Object ( [languages:protected] => [bok_resources:protected] => [bok_topics:protected] => [bok_keywords:protected] => [id:protected] => 85 [type:protected] => category [parent:protected] => 2 [label:protected] => Truck Driver [alreadyInSave:protected] => [alreadyInValidation:protected] => [validationFailures:protected] => Array ( ) [_new:BaseObject:private] => [_deleted:BaseObject:private] => [modifiedColumns:protected] => Array ( ) ) [87] => Category Object ( [languages:protected] => [bok_resources:protected] => [bok_topics:protected] => [bok_keywords:protected] => [id:protected] => 87 [type:protected] => category [parent:protected] => 3 [label:protected] => Commercial & Institutional [alreadyInSave:protected] => [alreadyInValidation:protected] => [validationFailures:protected] => Array ( ) [_new:BaseObject:private] => [_deleted:BaseObject:private] => [modifiedColumns:protected] => Array ( ) ) [88] => Category Object ( [languages:protected] => [bok_resources:protected] => [bok_topics:protected] => [bok_keywords:protected] => [id:protected] => 88 [type:protected] => category [parent:protected] => 3 [label:protected] => Demolition [alreadyInSave:protected] => [alreadyInValidation:protected] => [validationFailures:protected] => Array ( ) [_new:BaseObject:private] => [_deleted:BaseObject:private] => [modifiedColumns:protected] => Array ( ) ) [89] => Category Object ( [languages:protected] => [bok_resources:protected] => [bok_topics:protected] => [bok_keywords:protected] => [id:protected] => 89 [type:protected] => category [parent:protected] => 3 [label:protected] => Disasters [alreadyInSave:protected] => [alreadyInValidation:protected] => [validationFailures:protected] => Array ( ) [_new:BaseObject:private] => [_deleted:BaseObject:private] => [modifiedColumns:protected] => Array ( ) ) [91] => Category Object ( [languages:protected] => [bok_resources:protected] => [bok_topics:protected] => [bok_keywords:protected] => [id:protected] => 91 [type:protected] => category [parent:protected] => 3 [label:protected] => Heavy & Highway [alreadyInSave:protected] => [alreadyInValidation:protected] => [validationFailures:protected] => Array ( ) [_new:BaseObject:private] => [_deleted:BaseObject:private] => [modifiedColumns:protected] => Array ( ) ) [90] => Category Object ( [languages:protected] => [bok_resources:protected] => [bok_topics:protected] => [bok_keywords:protected] => [id:protected] => 90 [type:protected] => category [parent:protected] => 3 [label:protected] => Industrial [alreadyInSave:protected] => [alreadyInValidation:protected] => [validationFailures:protected] => Array ( ) [_new:BaseObject:private] => [_deleted:BaseObject:private] => [modifiedColumns:protected] => Array ( ) ) [92] => Category Object ( [languages:protected] => [bok_resources:protected] => [bok_topics:protected] => [bok_keywords:protected] => [id:protected] => 92 [type:protected] => category [parent:protected] => 3 [label:protected] => LEED/Green Construction [alreadyInSave:protected] => [alreadyInValidation:protected] => [validationFailures:protected] => Array ( ) [_new:BaseObject:private] => [_deleted:BaseObject:private] => [modifiedColumns:protected] => Array ( ) ) [93] => Category Object ( [languages:protected] => [bok_resources:protected] => [bok_topics:protected] => [bok_keywords:protected] => [id:protected] => 93 [type:protected] => category [parent:protected] => 3 [label:protected] => Renovations [alreadyInSave:protected] => [alreadyInValidation:protected] => [validationFailures:protected] => Array ( ) [_new:BaseObject:private] => [_deleted:BaseObject:private] => [modifiedColumns:protected] => Array ( ) ) [94] => Category Object ( [languages:protected] => [bok_resources:protected] => [bok_topics:protected] => [bok_keywords:protected] => [id:protected] => 94 [type:protected] => category [parent:protected] => 3 [label:protected] => Residential [alreadyInSave:protected] => [alreadyInValidation:protected] => [validationFailures:protected] => Array ( ) [_new:BaseObject:private] => [_deleted:BaseObject:private] => [modifiedColumns:protected] => Array ( ) ) [95] => Category Object ( [languages:protected] => [bok_resources:protected] => [bok_topics:protected] => [bok_keywords:protected] => [id:protected] => 95 [type:protected] => category [parent:protected] => 3 [label:protected] => Underground [alreadyInSave:protected] => [alreadyInValidation:protected] => [validationFailures:protected] => Array ( ) [_new:BaseObject:private] => [_deleted:BaseObject:private] => [modifiedColumns:protected] => Array ( ) ) [100] => Category Object ( [languages:protected] => [bok_resources:protected] => [bok_topics:protected] => [bok_keywords:protected] => [id:protected] => 100 [type:protected] => category [parent:protected] => 6 [label:protected] => Toolbox Talks [alreadyInSave:protected] => [alreadyInValidation:protected] => [validationFailures:protected] => Array ( ) [_new:BaseObject:private] => [_deleted:BaseObject:private] => [modifiedColumns:protected] => Array ( ) ) ) [categories_initialized:protected] => 1 [mapped_items:protected] => [content:protected] => [files:protected] => [language:protected] => Language Object ( [id:protected] => 1 [code:protected] => en [name:protected] => English [alreadyInSave:protected] => [alreadyInValidation:protected] => [validationFailures:protected] => Array ( ) [_new:BaseObject:private] => [_deleted:BaseObject:private] => [modifiedColumns:protected] => Array ( ) ) [old_record:protected] => [id:protected] => 4428 [old_id:protected] => [elcosh_id:protected] => d001658 [type:protected] => document [display_type:protected] => HTML only (and links) [user_id:protected] => 0 [language_id:protected] => 1 [tagging_id:protected] => Daniela Caceres [priority_id:protected] => 1 [title:protected] => Toolbox Talk: Work Zone Safety: Working Around Vehicles [total_pages:protected] => 0 [billed_pages:protected] => 0 [publication_number:protected] => [part_of:protected] => [keywords:protected] => Struck, Struck by, Vehicle, Work Zone Safety, Truck, Operator, Driver, Mobile Equipment [comments:protected] => [summary:protected] => The CPWR Toolbox Talk on Working Around Vehicles in the Work Zone addresses methods to avoid being struck-by a vehicle on a construction site. The resource includes a case example, steps to prevent a related injury, and questions for discussion. It includes a graphic that illustrates the hazard, which can be posted in a central location as a reminder of steps to work safely. Available in English and Spanish. [transition_comments:protected] => [external_link:protected] => [consol_link:protected] => [more_like_this:protected] => d001640 [permission_given_by:protected] => [published:protected] => T [billable:protected] => F [img_name:protected] => [img_ext:protected] => [img_width:protected] => [img_height:protected] => [img_credit:protected] => [img_practice:protected] => [vid_source_id:protected] => [vid_running_time:protected] => [vid_intended_audience:protected] => [vid_acquisition_info:protected] => [vid_cost:protected] => [vid_producer:protected] => [vid_filename:protected] => [vid_filename_downloadable:protected] => [date_summary:protected] => [date_permission_requested:protected] => [date_permission_received:protected] => [date_review_needed:protected] => [date_received:protected] => 12/23/21 [date_completed:protected] => 12/23/21 [date_billed:protected] => [date_modified:protected] => 05/19/23 [collBokExports:protected] => [lastBokExportCriteria:BaseElcoshItem:private] => [alreadyInSave:protected] => [alreadyInValidation:protected] => [validationFailures:protected] => Array ( ) [_new:BaseObject:private] => [_deleted:BaseObject:private] => [modifiedColumns:protected] => Array ( ) ) ) [2] => Search_Result Object ( [title] => Construction Dive -- DeWalt's Jobsite Pro headphones recalled for fire hazards [image] => /record/images/notavailable-p.png [blurb] => A recall notice by the United States Consumer Product Safety Commission affects over 300,000 DeWalt Jobsite Pro Headphones. The recall is a result of... [category] => Array ( [0] => 16 [1] => 44 [2] => 45 [3] => 46 [4] => 47 [5] => 48 [6] => 49 [7] => 50 [8] => 51 [9] => 52 [10] => 53 [11] => 54 [12] => 55 [13] => 56 [14] => 57 [15] => 58 [16] => 59 [17] => 60 [18] => 61 [19] => 64 [20] => 65 [21] => 66 [22] => 67 [23] => 68 [24] => 69 [25] => 70 [26] => 71 [27] => 72 [28] => 73 [29] => 74 [30] => 75 [31] => 76 [32] => 77 [33] => 63 [34] => 78 [35] => 79 [36] => 80 [37] => 81 [38] => 82 [39] => 62 [40] => 83 [41] => 84 [42] => 85 [43] => 86 [44] => 87 [45] => 88 [46] => 89 [47] => 91 [48] => 90 [49] => 92 [50] => 93 [51] => 94 [52] => 95 ) [labels] => Array ( [0] => Fire & Explosions [1] => Work Environment [2] => Hazards [3] => Acoustical Ceiling Carpenter [4] => Trades [5] => Asbestos/Insulator [7] => Boilermaker [9] => Bricklayer [11] => Cabinetmaker [13] => Carpenter [15] => Carpet Layer [17] => Cement Mason [19] => Commercial Diver [21] => Concrete Polisher [23] => Drywall Applicator Specialist [25] => Electrical Worker [27] => Elevator Constructor [29] => Flagger [31] => Glazier [33] => Hazardous Waste Cleanup [35] => HVAC [37] => Interior Systems Carpenter [39] => Laborer [41] => Landscaper [43] => Lather [45] => Lead Abatement Worker [47] => Maintenance Worker [49] => Millwright [51] => Operating Engineer [53] => Painter [55] => Paper Hanger [57] => PCC/Restoration [59] => Pile Driver [61] => Plasterer [63] => Plumber/Pipefitter [65] => Refractory Worker [67] => Reinforcing Ironworker [69] => Roofer/Waterproofer [71] => Scaffold Erector [73] => Sheetmetal Worker [75] => Sprinkler Fitter [77] => Stonemason [79] => Structural Ironworker [81] => Terrazzo Worker [83] => Tile Setter [85] => Truck Driver [87] => Welder [89] => Commercial & Institutional [90] => Jobsites [91] => Demolition [93] => Disasters [95] => Heavy & Highway [97] => Industrial [99] => LEED/Green Construction [101] => Renovations [103] => Residential [105] => Underground ) [type] => [sub_category] => [url] => /document/4426/d001656/Construction%2BDive%2B--%2BDeWalt%2527s%2BJobsite%2BPro%2Bheadphones%2Brecalled%2Bfor%2Bfire%2Bhazards.html [item:protected] => DocumentRecord Object ( [records:protected] => Array ( ) [recordId:protected] => [searchWordClass:protected] => [searchWordPeerClass:protected] => [bok_record:protected] => [authors:protected] => [organizations:protected] => [collections:protected] => [categories:protected] => Array ( [16] => Category Object ( [languages:protected] => [bok_resources:protected] => [bok_topics:protected] => [bok_keywords:protected] => [id:protected] => 16 [type:protected] => category [parent:protected] => 7 [label:protected] => Fire & Explosions [alreadyInSave:protected] => [alreadyInValidation:protected] => [validationFailures:protected] => Array ( ) [_new:BaseObject:private] => [_deleted:BaseObject:private] => [modifiedColumns:protected] => Array ( ) ) [44] => Category Object ( [languages:protected] => [bok_resources:protected] => [bok_topics:protected] => [bok_keywords:protected] => [id:protected] => 44 [type:protected] => category [parent:protected] => 2 [label:protected] => Acoustical Ceiling Carpenter [alreadyInSave:protected] => [alreadyInValidation:protected] => [validationFailures:protected] => Array ( ) [_new:BaseObject:private] => [_deleted:BaseObject:private] => [modifiedColumns:protected] => Array ( ) ) [45] => Category Object ( [languages:protected] => [bok_resources:protected] => [bok_topics:protected] => [bok_keywords:protected] => [id:protected] => 45 [type:protected] => category [parent:protected] => 2 [label:protected] => Asbestos/Insulator [alreadyInSave:protected] => [alreadyInValidation:protected] => [validationFailures:protected] => Array ( ) [_new:BaseObject:private] => [_deleted:BaseObject:private] => [modifiedColumns:protected] => Array ( ) ) [46] => Category Object ( [languages:protected] => [bok_resources:protected] => [bok_topics:protected] => [bok_keywords:protected] => [id:protected] => 46 [type:protected] => category [parent:protected] => 2 [label:protected] => Boilermaker [alreadyInSave:protected] => [alreadyInValidation:protected] => [validationFailures:protected] => Array ( ) [_new:BaseObject:private] => [_deleted:BaseObject:private] => [modifiedColumns:protected] => Array ( ) ) [47] => Category Object ( [languages:protected] => [bok_resources:protected] => [bok_topics:protected] => [bok_keywords:protected] => [id:protected] => 47 [type:protected] => category [parent:protected] => 2 [label:protected] => Bricklayer [alreadyInSave:protected] => [alreadyInValidation:protected] => [validationFailures:protected] => Array ( ) [_new:BaseObject:private] => [_deleted:BaseObject:private] => [modifiedColumns:protected] => Array ( ) ) [48] => Category Object ( [languages:protected] => [bok_resources:protected] => [bok_topics:protected] => [bok_keywords:protected] => [id:protected] => 48 [type:protected] => category [parent:protected] => 2 [label:protected] => Cabinetmaker [alreadyInSave:protected] => [alreadyInValidation:protected] => [validationFailures:protected] => Array ( ) [_new:BaseObject:private] => [_deleted:BaseObject:private] => [modifiedColumns:protected] => Array ( ) ) [49] => Category Object ( [languages:protected] => [bok_resources:protected] => [bok_topics:protected] => [bok_keywords:protected] => [id:protected] => 49 [type:protected] => category [parent:protected] => 2 [label:protected] => Carpenter [alreadyInSave:protected] => [alreadyInValidation:protected] => [validationFailures:protected] => Array ( ) [_new:BaseObject:private] => [_deleted:BaseObject:private] => [modifiedColumns:protected] => Array ( ) ) [50] => Category Object ( [languages:protected] => [bok_resources:protected] => [bok_topics:protected] => [bok_keywords:protected] => [id:protected] => 50 [type:protected] => category [parent:protected] => 2 [label:protected] => Carpet Layer [alreadyInSave:protected] => [alreadyInValidation:protected] => [validationFailures:protected] => Array ( ) [_new:BaseObject:private] => [_deleted:BaseObject:private] => [modifiedColumns:protected] => Array ( ) ) [51] => Category Object ( [languages:protected] => [bok_resources:protected] => [bok_topics:protected] => [bok_keywords:protected] => [id:protected] => 51 [type:protected] => category [parent:protected] => 2 [label:protected] => Cement Mason [alreadyInSave:protected] => [alreadyInValidation:protected] => [validationFailures:protected] => Array ( ) [_new:BaseObject:private] => [_deleted:BaseObject:private] => [modifiedColumns:protected] => Array ( ) ) [52] => Category Object ( [languages:protected] => [bok_resources:protected] => [bok_topics:protected] => [bok_keywords:protected] => [id:protected] => 52 [type:protected] => category [parent:protected] => 2 [label:protected] => Commercial Diver [alreadyInSave:protected] => [alreadyInValidation:protected] => [validationFailures:protected] => Array ( ) [_new:BaseObject:private] => [_deleted:BaseObject:private] => [modifiedColumns:protected] => Array ( ) ) [53] => Category Object ( [languages:protected] => [bok_resources:protected] => [bok_topics:protected] => [bok_keywords:protected] => [id:protected] => 53 [type:protected] => category [parent:protected] => 2 [label:protected] => Concrete Polisher [alreadyInSave:protected] => [alreadyInValidation:protected] => [validationFailures:protected] => Array ( ) [_new:BaseObject:private] => [_deleted:BaseObject:private] => [modifiedColumns:protected] => Array ( ) ) [54] => Category Object ( [languages:protected] => [bok_resources:protected] => [bok_topics:protected] => [bok_keywords:protected] => [id:protected] => 54 [type:protected] => category [parent:protected] => 2 [label:protected] => Drywall Applicator Specialist [alreadyInSave:protected] => [alreadyInValidation:protected] => [validationFailures:protected] => Array ( ) [_new:BaseObject:private] => [_deleted:BaseObject:private] => [modifiedColumns:protected] => Array ( ) ) [55] => Category Object ( [languages:protected] => [bok_resources:protected] => [bok_topics:protected] => [bok_keywords:protected] => [id:protected] => 55 [type:protected] => category [parent:protected] => 2 [label:protected] => Electrical Worker [alreadyInSave:protected] => [alreadyInValidation:protected] => [validationFailures:protected] => Array ( ) [_new:BaseObject:private] => [_deleted:BaseObject:private] => [modifiedColumns:protected] => Array ( ) ) [56] => Category Object ( [languages:protected] => [bok_resources:protected] => [bok_topics:protected] => [bok_keywords:protected] => [id:protected] => 56 [type:protected] => category [parent:protected] => 2 [label:protected] => Elevator Constructor [alreadyInSave:protected] => [alreadyInValidation:protected] => [validationFailures:protected] => Array ( ) [_new:BaseObject:private] => [_deleted:BaseObject:private] => [modifiedColumns:protected] => Array ( ) ) [57] => Category Object ( [languages:protected] => [bok_resources:protected] => [bok_topics:protected] => [bok_keywords:protected] => [id:protected] => 57 [type:protected] => category [parent:protected] => 2 [label:protected] => Flagger [alreadyInSave:protected] => [alreadyInValidation:protected] => [validationFailures:protected] => Array ( ) [_new:BaseObject:private] => [_deleted:BaseObject:private] => [modifiedColumns:protected] => Array ( ) ) [58] => Category Object ( [languages:protected] => [bok_resources:protected] => [bok_topics:protected] => [bok_keywords:protected] => [id:protected] => 58 [type:protected] => category [parent:protected] => 2 [label:protected] => Glazier [alreadyInSave:protected] => [alreadyInValidation:protected] => [validationFailures:protected] => Array ( ) [_new:BaseObject:private] => [_deleted:BaseObject:private] => [modifiedColumns:protected] => Array ( ) ) [59] => Category Object ( [languages:protected] => [bok_resources:protected] => [bok_topics:protected] => [bok_keywords:protected] => [id:protected] => 59 [type:protected] => category [parent:protected] => 2 [label:protected] => Hazardous Waste Cleanup [alreadyInSave:protected] => [alreadyInValidation:protected] => [validationFailures:protected] => Array ( ) [_new:BaseObject:private] => [_deleted:BaseObject:private] => [modifiedColumns:protected] => Array ( ) ) [60] => Category Object ( [languages:protected] => [bok_resources:protected] => [bok_topics:protected] => [bok_keywords:protected] => [id:protected] => 60 [type:protected] => category [parent:protected] => 2 [label:protected] => HVAC [alreadyInSave:protected] => [alreadyInValidation:protected] => [validationFailures:protected] => Array ( ) [_new:BaseObject:private] => [_deleted:BaseObject:private] => [modifiedColumns:protected] => Array ( ) ) [61] => Category Object ( [languages:protected] => [bok_resources:protected] => [bok_topics:protected] => [bok_keywords:protected] => [id:protected] => 61 [type:protected] => category [parent:protected] => 2 [label:protected] => Interior Systems Carpenter [alreadyInSave:protected] => [alreadyInValidation:protected] => [validationFailures:protected] => Array ( ) [_new:BaseObject:private] => [_deleted:BaseObject:private] => [modifiedColumns:protected] => Array ( ) ) [64] => Category Object ( [languages:protected] => [bok_resources:protected] => [bok_topics:protected] => [bok_keywords:protected] => [id:protected] => 64 [type:protected] => category [parent:protected] => 2 [label:protected] => Laborer [alreadyInSave:protected] => [alreadyInValidation:protected] => [validationFailures:protected] => Array ( ) [_new:BaseObject:private] => [_deleted:BaseObject:private] => [modifiedColumns:protected] => Array ( ) ) [65] => Category Object ( [languages:protected] => [bok_resources:protected] => [bok_topics:protected] => [bok_keywords:protected] => [id:protected] => 65 [type:protected] => category [parent:protected] => 2 [label:protected] => Landscaper [alreadyInSave:protected] => [alreadyInValidation:protected] => [validationFailures:protected] => Array ( ) [_new:BaseObject:private] => [_deleted:BaseObject:private] => [modifiedColumns:protected] => Array ( ) ) [66] => Category Object ( [languages:protected] => [bok_resources:protected] => [bok_topics:protected] => [bok_keywords:protected] => [id:protected] => 66 [type:protected] => category [parent:protected] => 2 [label:protected] => Lather [alreadyInSave:protected] => [alreadyInValidation:protected] => [validationFailures:protected] => Array ( ) [_new:BaseObject:private] => [_deleted:BaseObject:private] => [modifiedColumns:protected] => Array ( ) ) [67] => Category Object ( [languages:protected] => [bok_resources:protected] => [bok_topics:protected] => [bok_keywords:protected] => [id:protected] => 67 [type:protected] => category [parent:protected] => 2 [label:protected] => Lead Abatement Worker [alreadyInSave:protected] => [alreadyInValidation:protected] => [validationFailures:protected] => Array ( ) [_new:BaseObject:private] => [_deleted:BaseObject:private] => [modifiedColumns:protected] => Array ( ) ) [68] => Category Object ( [languages:protected] => [bok_resources:protected] => [bok_topics:protected] => [bok_keywords:protected] => [id:protected] => 68 [type:protected] => category [parent:protected] => 2 [label:protected] => Maintenance Worker [alreadyInSave:protected] => [alreadyInValidation:protected] => [validationFailures:protected] => Array ( ) [_new:BaseObject:private] => [_deleted:BaseObject:private] => [modifiedColumns:protected] => Array ( ) ) [69] => Category Object ( [languages:protected] => [bok_resources:protected] => [bok_topics:protected] => [bok_keywords:protected] => [id:protected] => 69 [type:protected] => category [parent:protected] => 2 [label:protected] => Millwright [alreadyInSave:protected] => [alreadyInValidation:protected] => [validationFailures:protected] => Array ( ) [_new:BaseObject:private] => [_deleted:BaseObject:private] => [modifiedColumns:protected] => Array ( ) ) [70] => Category Object ( [languages:protected] => [bok_resources:protected] => [bok_topics:protected] => [bok_keywords:protected] => [id:protected] => 70 [type:protected] => category [parent:protected] => 2 [label:protected] => Operating Engineer [alreadyInSave:protected] => [alreadyInValidation:protected] => [validationFailures:protected] => Array ( ) [_new:BaseObject:private] => [_deleted:BaseObject:private] => [modifiedColumns:protected] => Array ( ) ) [71] => Category Object ( [languages:protected] => [bok_resources:protected] => [bok_topics:protected] => [bok_keywords:protected] => [id:protected] => 71 [type:protected] => category [parent:protected] => 2 [label:protected] => Painter [alreadyInSave:protected] => [alreadyInValidation:protected] => [validationFailures:protected] => Array ( ) [_new:BaseObject:private] => [_deleted:BaseObject:private] => [modifiedColumns:protected] => Array ( ) ) [72] => Category Object ( [languages:protected] => [bok_resources:protected] => [bok_topics:protected] => [bok_keywords:protected] => [id:protected] => 72 [type:protected] => category [parent:protected] => 2 [label:protected] => Paper Hanger [alreadyInSave:protected] => [alreadyInValidation:protected] => [validationFailures:protected] => Array ( ) [_new:BaseObject:private] => [_deleted:BaseObject:private] => [modifiedColumns:protected] => Array ( ) ) [73] => Category Object ( [languages:protected] => [bok_resources:protected] => [bok_topics:protected] => [bok_keywords:protected] => [id:protected] => 73 [type:protected] => category [parent:protected] => 2 [label:protected] => PCC/Restoration [alreadyInSave:protected] => [alreadyInValidation:protected] => [validationFailures:protected] => Array ( ) [_new:BaseObject:private] => [_deleted:BaseObject:private] => [modifiedColumns:protected] => Array ( ) ) [74] => Category Object ( [languages:protected] => [bok_resources:protected] => [bok_topics:protected] => [bok_keywords:protected] => [id:protected] => 74 [type:protected] => category [parent:protected] => 2 [label:protected] => Pile Driver [alreadyInSave:protected] => [alreadyInValidation:protected] => [validationFailures:protected] => Array ( ) [_new:BaseObject:private] => [_deleted:BaseObject:private] => [modifiedColumns:protected] => Array ( ) ) [75] => Category Object ( [languages:protected] => [bok_resources:protected] => [bok_topics:protected] => [bok_keywords:protected] => [id:protected] => 75 [type:protected] => category [parent:protected] => 2 [label:protected] => Plasterer [alreadyInSave:protected] => [alreadyInValidation:protected] => [validationFailures:protected] => Array ( ) [_new:BaseObject:private] => [_deleted:BaseObject:private] => [modifiedColumns:protected] => Array ( ) ) [76] => Category Object ( [languages:protected] => [bok_resources:protected] => [bok_topics:protected] => [bok_keywords:protected] => [id:protected] => 76 [type:protected] => category [parent:protected] => 2 [label:protected] => Plumber/Pipefitter [alreadyInSave:protected] => [alreadyInValidation:protected] => [validationFailures:protected] => Array ( ) [_new:BaseObject:private] => [_deleted:BaseObject:private] => [modifiedColumns:protected] => Array ( ) ) [77] => Category Object ( [languages:protected] => [bok_resources:protected] => [bok_topics:protected] => [bok_keywords:protected] => [id:protected] => 77 [type:protected] => category [parent:protected] => 2 [label:protected] => Refractory Worker [alreadyInSave:protected] => [alreadyInValidation:protected] => [validationFailures:protected] => Array ( ) [_new:BaseObject:private] => [_deleted:BaseObject:private] => [modifiedColumns:protected] => Array ( ) ) [63] => Category Object ( [languages:protected] => [bok_resources:protected] => [bok_topics:protected] => [bok_keywords:protected] => [id:protected] => 63 [type:protected] => category [parent:protected] => 2 [label:protected] => Reinforcing Ironworker [alreadyInSave:protected] => [alreadyInValidation:protected] => [validationFailures:protected] => Array ( ) [_new:BaseObject:private] => [_deleted:BaseObject:private] => [modifiedColumns:protected] => Array ( ) ) [78] => Category Object ( [languages:protected] => [bok_resources:protected] => [bok_topics:protected] => [bok_keywords:protected] => [id:protected] => 78 [type:protected] => category [parent:protected] => 2 [label:protected] => Roofer/Waterproofer [alreadyInSave:protected] => [alreadyInValidation:protected] => [validationFailures:protected] => Array ( ) [_new:BaseObject:private] => [_deleted:BaseObject:private] => [modifiedColumns:protected] => Array ( ) ) [79] => Category Object ( [languages:protected] => [bok_resources:protected] => [bok_topics:protected] => [bok_keywords:protected] => [id:protected] => 79 [type:protected] => category [parent:protected] => 2 [label:protected] => Scaffold Erector [alreadyInSave:protected] => [alreadyInValidation:protected] => [validationFailures:protected] => Array ( ) [_new:BaseObject:private] => [_deleted:BaseObject:private] => [modifiedColumns:protected] => Array ( ) ) [80] => Category Object ( [languages:protected] => [bok_resources:protected] => [bok_topics:protected] => [bok_keywords:protected] => [id:protected] => 80 [type:protected] => category [parent:protected] => 2 [label:protected] => Sheetmetal Worker [alreadyInSave:protected] => [alreadyInValidation:protected] => [validationFailures:protected] => Array ( ) [_new:BaseObject:private] => [_deleted:BaseObject:private] => [modifiedColumns:protected] => Array ( ) ) [81] => Category Object ( [languages:protected] => [bok_resources:protected] => [bok_topics:protected] => [bok_keywords:protected] => [id:protected] => 81 [type:protected] => category [parent:protected] => 2 [label:protected] => Sprinkler Fitter [alreadyInSave:protected] => [alreadyInValidation:protected] => [validationFailures:protected] => Array ( ) [_new:BaseObject:private] => [_deleted:BaseObject:private] => [modifiedColumns:protected] => Array ( ) ) [82] => Category Object ( [languages:protected] => [bok_resources:protected] => [bok_topics:protected] => [bok_keywords:protected] => [id:protected] => 82 [type:protected] => category [parent:protected] => 2 [label:protected] => Stonemason [alreadyInSave:protected] => [alreadyInValidation:protected] => [validationFailures:protected] => Array ( ) [_new:BaseObject:private] => [_deleted:BaseObject:private] => [modifiedColumns:protected] => Array ( ) ) [62] => Category Object ( [languages:protected] => [bok_resources:protected] => [bok_topics:protected] => [bok_keywords:protected] => [id:protected] => 62 [type:protected] => category [parent:protected] => 2 [label:protected] => Structural Ironworker [alreadyInSave:protected] => [alreadyInValidation:protected] => [validationFailures:protected] => Array ( ) [_new:BaseObject:private] => [_deleted:BaseObject:private] => [modifiedColumns:protected] => Array ( ) ) [83] => Category Object ( [languages:protected] => [bok_resources:protected] => [bok_topics:protected] => [bok_keywords:protected] => [id:protected] => 83 [type:protected] => category [parent:protected] => 2 [label:protected] => Terrazzo Worker [alreadyInSave:protected] => [alreadyInValidation:protected] => [validationFailures:protected] => Array ( ) [_new:BaseObject:private] => [_deleted:BaseObject:private] => [modifiedColumns:protected] => Array ( ) ) [84] => Category Object ( [languages:protected] => [bok_resources:protected] => [bok_topics:protected] => [bok_keywords:protected] => [id:protected] => 84 [type:protected] => category [parent:protected] => 2 [label:protected] => Tile Setter [alreadyInSave:protected] => [alreadyInValidation:protected] => [validationFailures:protected] => Array ( ) [_new:BaseObject:private] => [_deleted:BaseObject:private] => [modifiedColumns:protected] => Array ( ) ) [85] => Category Object ( [languages:protected] => [bok_resources:protected] => [bok_topics:protected] => [bok_keywords:protected] => [id:protected] => 85 [type:protected] => category [parent:protected] => 2 [label:protected] => Truck Driver [alreadyInSave:protected] => [alreadyInValidation:protected] => [validationFailures:protected] => Array ( ) [_new:BaseObject:private] => [_deleted:BaseObject:private] => [modifiedColumns:protected] => Array ( ) ) [86] => Category Object ( [languages:protected] => [bok_resources:protected] => [bok_topics:protected] => [bok_keywords:protected] => [id:protected] => 86 [type:protected] => category [parent:protected] => 2 [label:protected] => Welder [alreadyInSave:protected] => [alreadyInValidation:protected] => [validationFailures:protected] => Array ( ) [_new:BaseObject:private] => [_deleted:BaseObject:private] => [modifiedColumns:protected] => Array ( ) ) [87] => Category Object ( [languages:protected] => [bok_resources:protected] => [bok_topics:protected] => [bok_keywords:protected] => [id:protected] => 87 [type:protected] => category [parent:protected] => 3 [label:protected] => Commercial & Institutional [alreadyInSave:protected] => [alreadyInValidation:protected] => [validationFailures:protected] => Array ( ) [_new:BaseObject:private] => [_deleted:BaseObject:private] => [modifiedColumns:protected] => Array ( ) ) [88] => Category Object ( [languages:protected] => [bok_resources:protected] => [bok_topics:protected] => [bok_keywords:protected] => [id:protected] => 88 [type:protected] => category [parent:protected] => 3 [label:protected] => Demolition [alreadyInSave:protected] => [alreadyInValidation:protected] => [validationFailures:protected] => Array ( ) [_new:BaseObject:private] => [_deleted:BaseObject:private] => [modifiedColumns:protected] => Array ( ) ) [89] => Category Object ( [languages:protected] => [bok_resources:protected] => [bok_topics:protected] => [bok_keywords:protected] => [id:protected] => 89 [type:protected] => category [parent:protected] => 3 [label:protected] => Disasters [alreadyInSave:protected] => [alreadyInValidation:protected] => [validationFailures:protected] => Array ( ) [_new:BaseObject:private] => [_deleted:BaseObject:private] => [modifiedColumns:protected] => Array ( ) ) [91] => Category Object ( [languages:protected] => [bok_resources:protected] => [bok_topics:protected] => [bok_keywords:protected] => [id:protected] => 91 [type:protected] => category [parent:protected] => 3 [label:protected] => Heavy & Highway [alreadyInSave:protected] => [alreadyInValidation:protected] => [validationFailures:protected] => Array ( ) [_new:BaseObject:private] => [_deleted:BaseObject:private] => [modifiedColumns:protected] => Array ( ) ) [90] => Category Object ( [languages:protected] => [bok_resources:protected] => [bok_topics:protected] => [bok_keywords:protected] => [id:protected] => 90 [type:protected] => category [parent:protected] => 3 [label:protected] => Industrial [alreadyInSave:protected] => [alreadyInValidation:protected] => [validationFailures:protected] => Array ( ) [_new:BaseObject:private] => [_deleted:BaseObject:private] => [modifiedColumns:protected] => Array ( ) ) [92] => Category Object ( [languages:protected] => [bok_resources:protected] => [bok_topics:protected] => [bok_keywords:protected] => [id:protected] => 92 [type:protected] => category [parent:protected] => 3 [label:protected] => LEED/Green Construction [alreadyInSave:protected] => [alreadyInValidation:protected] => [validationFailures:protected] => Array ( ) [_new:BaseObject:private] => [_deleted:BaseObject:private] => [modifiedColumns:protected] => Array ( ) ) [93] => Category Object ( [languages:protected] => [bok_resources:protected] => [bok_topics:protected] => [bok_keywords:protected] => [id:protected] => 93 [type:protected] => category [parent:protected] => 3 [label:protected] => Renovations [alreadyInSave:protected] => [alreadyInValidation:protected] => [validationFailures:protected] => Array ( ) [_new:BaseObject:private] => [_deleted:BaseObject:private] => [modifiedColumns:protected] => Array ( ) ) [94] => Category Object ( [languages:protected] => [bok_resources:protected] => [bok_topics:protected] => [bok_keywords:protected] => [id:protected] => 94 [type:protected] => category [parent:protected] => 3 [label:protected] => Residential [alreadyInSave:protected] => [alreadyInValidation:protected] => [validationFailures:protected] => Array ( ) [_new:BaseObject:private] => [_deleted:BaseObject:private] => [modifiedColumns:protected] => Array ( ) ) [95] => Category Object ( [languages:protected] => [bok_resources:protected] => [bok_topics:protected] => [bok_keywords:protected] => [id:protected] => 95 [type:protected] => category [parent:protected] => 3 [label:protected] => Underground [alreadyInSave:protected] => [alreadyInValidation:protected] => [validationFailures:protected] => Array ( ) [_new:BaseObject:private] => [_deleted:BaseObject:private] => [modifiedColumns:protected] => Array ( ) ) ) [categories_initialized:protected] => 1 [mapped_items:protected] => [content:protected] => [files:protected] => [language:protected] => Language Object ( [id:protected] => 1 [code:protected] => en [name:protected] => English [alreadyInSave:protected] => [alreadyInValidation:protected] => [validationFailures:protected] => Array ( ) [_new:BaseObject:private] => [_deleted:BaseObject:private] => [modifiedColumns:protected] => Array ( ) ) [old_record:protected] => [id:protected] => 4426 [old_id:protected] => [elcosh_id:protected] => d001656 [type:protected] => document [display_type:protected] => HTML only (and links) [user_id:protected] => 0 [language_id:protected] => 1 [tagging_id:protected] => Mike Aguilar [priority_id:protected] => 1 [title:protected] => Construction Dive -- DeWalt's Jobsite Pro headphones recalled for fire hazards [total_pages:protected] => 1 [billed_pages:protected] => 1 [publication_number:protected] => [part_of:protected] => [keywords:protected] => DeWalt, Fire Hazards, recall, headphones [comments:protected] => [summary:protected] => A recall notice by the United States Consumer Product Safety Commission affects over 300,000 DeWalt Jobsite Pro Headphones. The recall is a result of a malfunction that can cause earbuds to overheat while charging or during use, leading to fire and burn hazards. [transition_comments:protected] => [external_link:protected] => https://www.constructiondive.com/news/dewalts-jobsite-pro-headphones-recalled-for-fire-hazards/611248/?utm_source=Sailthru&utm_medium=email&utm_campaign=Issue:%202021-12-10%20Construction%20Dive%20Newsletter%20%5Bissue:38532%5D&utm_term=Construction%20Dive [consol_link:protected] => [more_like_this:protected] => [permission_given_by:protected] => [published:protected] => T [billable:protected] => F [img_name:protected] => [img_ext:protected] => [img_width:protected] => [img_height:protected] => [img_credit:protected] => [img_practice:protected] => [vid_source_id:protected] => [vid_running_time:protected] => [vid_intended_audience:protected] => [vid_acquisition_info:protected] => [vid_cost:protected] => [vid_producer:protected] => [vid_filename:protected] => [vid_filename_downloadable:protected] => [date_summary:protected] => [date_permission_requested:protected] => [date_permission_received:protected] => [date_review_needed:protected] => [date_received:protected] => 12/13/21 [date_completed:protected] => 12/13/21 [date_billed:protected] => [date_modified:protected] => 12/13/21 [collBokExports:protected] => [lastBokExportCriteria:BaseElcoshItem:private] => [alreadyInSave:protected] => [alreadyInValidation:protected] => [validationFailures:protected] => Array ( ) [_new:BaseObject:private] => [_deleted:BaseObject:private] => [modifiedColumns:protected] => Array ( ) ) ) [3] => Search_Result Object ( [title] => Working in an Enclosed Cab [image] => /record/images/notavailable-p.png [blurb] => This CPWR Hazard Alert on Working in enclosed cabs provides information on protecting workers from silica dust, how to minimize exposures and the dang... [category] => Array ( [0] => 10 [1] => 16 [2] => 24 [3] => 37 [4] => 46 [5] => 48 [6] => 49 [7] => 51 [8] => 53 [9] => 54 [10] => 56 [11] => 58 [12] => 59 [13] => 60 [14] => 61 [15] => 64 [16] => 66 [17] => 68 [18] => 69 [19] => 71 [20] => 73 [21] => 74 [22] => 76 [23] => 77 [24] => 63 [25] => 80 [26] => 82 [27] => 62 [28] => 83 [29] => 84 [30] => 86 [31] => 88 [32] => 89 [33] => 95 [34] => 102 ) [labels] => Array ( [0] => Confined Spaces [1] => Work Environment [2] => Hazards [3] => Fire & Explosions [6] => Trenches & Excavations [9] => Silica /Construction Dust [10] => Inhalation/Skin Exposures [12] => Boilermaker [13] => Trades [14] => Cabinetmaker [16] => Carpenter [18] => Cement Mason [20] => Concrete Polisher [22] => Drywall Applicator Specialist [24] => Elevator Constructor [26] => Glazier [28] => Hazardous Waste Cleanup [30] => HVAC [32] => Interior Systems Carpenter [34] => Laborer [36] => Lather [38] => Maintenance Worker [40] => Millwright [42] => Painter [44] => PCC/Restoration [46] => Pile Driver [48] => Plumber/Pipefitter [50] => Refractory Worker [52] => Reinforcing Ironworker [54] => Sheetmetal Worker [56] => Stonemason [58] => Structural Ironworker [60] => Terrazzo Worker [62] => Tile Setter [64] => Welder [66] => Demolition [67] => Jobsites [68] => Disasters [70] => Underground [72] => Handouts [73] => Documents [74] => Media & Documents ) [type] => Handouts [sub_category] => [url] => /document/4415/d001651/Working%2Bin%2Ban%2BEnclosed%2BCab.html [item:protected] => DocumentRecord Object ( [records:protected] => Array ( ) [recordId:protected] => [searchWordClass:protected] => [searchWordPeerClass:protected] => [bok_record:protected] => [authors:protected] => [organizations:protected] => [collections:protected] => [categories:protected] => Array ( [10] => Category Object ( [languages:protected] => [bok_resources:protected] => [bok_topics:protected] => [bok_keywords:protected] => [id:protected] => 10 [type:protected] => category [parent:protected] => 7 [label:protected] => Confined Spaces [alreadyInSave:protected] => [alreadyInValidation:protected] => [validationFailures:protected] => Array ( ) [_new:BaseObject:private] => [_deleted:BaseObject:private] => [modifiedColumns:protected] => Array ( ) ) [16] => Category Object ( [languages:protected] => [bok_resources:protected] => [bok_topics:protected] => [bok_keywords:protected] => [id:protected] => 16 [type:protected] => category [parent:protected] => 7 [label:protected] => Fire & Explosions [alreadyInSave:protected] => [alreadyInValidation:protected] => [validationFailures:protected] => Array ( ) [_new:BaseObject:private] => [_deleted:BaseObject:private] => [modifiedColumns:protected] => Array ( ) ) [24] => Category Object ( [languages:protected] => [bok_resources:protected] => [bok_topics:protected] => [bok_keywords:protected] => [id:protected] => 24 [type:protected] => category [parent:protected] => 7 [label:protected] => Trenches & Excavations [alreadyInSave:protected] => [alreadyInValidation:protected] => [validationFailures:protected] => Array ( ) [_new:BaseObject:private] => [_deleted:BaseObject:private] => [modifiedColumns:protected] => Array ( ) ) [37] => Category Object ( [languages:protected] => [bok_resources:protected] => [bok_topics:protected] => [bok_keywords:protected] => [id:protected] => 37 [type:protected] => category [parent:protected] => 8 [label:protected] => Silica /Construction Dust [alreadyInSave:protected] => [alreadyInValidation:protected] => [validationFailures:protected] => Array ( ) [_new:BaseObject:private] => [_deleted:BaseObject:private] => [modifiedColumns:protected] => Array ( ) ) [46] => Category Object ( [languages:protected] => [bok_resources:protected] => [bok_topics:protected] => [bok_keywords:protected] => [id:protected] => 46 [type:protected] => category [parent:protected] => 2 [label:protected] => Boilermaker [alreadyInSave:protected] => [alreadyInValidation:protected] => [validationFailures:protected] => Array ( ) [_new:BaseObject:private] => [_deleted:BaseObject:private] => [modifiedColumns:protected] => Array ( ) ) [48] => Category Object ( [languages:protected] => [bok_resources:protected] => [bok_topics:protected] => [bok_keywords:protected] => [id:protected] => 48 [type:protected] => category [parent:protected] => 2 [label:protected] => Cabinetmaker [alreadyInSave:protected] => [alreadyInValidation:protected] => [validationFailures:protected] => Array ( ) [_new:BaseObject:private] => [_deleted:BaseObject:private] => [modifiedColumns:protected] => Array ( ) ) [49] => Category Object ( [languages:protected] => [bok_resources:protected] => [bok_topics:protected] => [bok_keywords:protected] => [id:protected] => 49 [type:protected] => category [parent:protected] => 2 [label:protected] => Carpenter [alreadyInSave:protected] => [alreadyInValidation:protected] => [validationFailures:protected] => Array ( ) [_new:BaseObject:private] => [_deleted:BaseObject:private] => [modifiedColumns:protected] => Array ( ) ) [51] => Category Object ( [languages:protected] => [bok_resources:protected] => [bok_topics:protected] => [bok_keywords:protected] => [id:protected] => 51 [type:protected] => category [parent:protected] => 2 [label:protected] => Cement Mason [alreadyInSave:protected] => [alreadyInValidation:protected] => [validationFailures:protected] => Array ( ) [_new:BaseObject:private] => [_deleted:BaseObject:private] => [modifiedColumns:protected] => Array ( ) ) [53] => Category Object ( [languages:protected] => [bok_resources:protected] => [bok_topics:protected] => [bok_keywords:protected] => [id:protected] => 53 [type:protected] => category [parent:protected] => 2 [label:protected] => Concrete Polisher [alreadyInSave:protected] => [alreadyInValidation:protected] => [validationFailures:protected] => Array ( ) [_new:BaseObject:private] => [_deleted:BaseObject:private] => [modifiedColumns:protected] => Array ( ) ) [54] => Category Object ( [languages:protected] => [bok_resources:protected] => [bok_topics:protected] => [bok_keywords:protected] => [id:protected] => 54 [type:protected] => category [parent:protected] => 2 [label:protected] => Drywall Applicator Specialist [alreadyInSave:protected] => [alreadyInValidation:protected] => [validationFailures:protected] => Array ( ) [_new:BaseObject:private] => [_deleted:BaseObject:private] => [modifiedColumns:protected] => Array ( ) ) [56] => Category Object ( [languages:protected] => [bok_resources:protected] => [bok_topics:protected] => [bok_keywords:protected] => [id:protected] => 56 [type:protected] => category [parent:protected] => 2 [label:protected] => Elevator Constructor [alreadyInSave:protected] => [alreadyInValidation:protected] => [validationFailures:protected] => Array ( ) [_new:BaseObject:private] => [_deleted:BaseObject:private] => [modifiedColumns:protected] => Array ( ) ) [58] => Category Object ( [languages:protected] => [bok_resources:protected] => [bok_topics:protected] => [bok_keywords:protected] => [id:protected] => 58 [type:protected] => category [parent:protected] => 2 [label:protected] => Glazier [alreadyInSave:protected] => [alreadyInValidation:protected] => [validationFailures:protected] => Array ( ) [_new:BaseObject:private] => [_deleted:BaseObject:private] => [modifiedColumns:protected] => Array ( ) ) [59] => Category Object ( [languages:protected] => [bok_resources:protected] => [bok_topics:protected] => [bok_keywords:protected] => [id:protected] => 59 [type:protected] => category [parent:protected] => 2 [label:protected] => Hazardous Waste Cleanup [alreadyInSave:protected] => [alreadyInValidation:protected] => [validationFailures:protected] => Array ( ) [_new:BaseObject:private] => [_deleted:BaseObject:private] => [modifiedColumns:protected] => Array ( ) ) [60] => Category Object ( [languages:protected] => [bok_resources:protected] => [bok_topics:protected] => [bok_keywords:protected] => [id:protected] => 60 [type:protected] => category [parent:protected] => 2 [label:protected] => HVAC [alreadyInSave:protected] => [alreadyInValidation:protected] => [validationFailures:protected] => Array ( ) [_new:BaseObject:private] => [_deleted:BaseObject:private] => [modifiedColumns:protected] => Array ( ) ) [61] => Category Object ( [languages:protected] => [bok_resources:protected] => [bok_topics:protected] => [bok_keywords:protected] => [id:protected] => 61 [type:protected] => category [parent:protected] => 2 [label:protected] => Interior Systems Carpenter [alreadyInSave:protected] => [alreadyInValidation:protected] => [validationFailures:protected] => Array ( ) [_new:BaseObject:private] => [_deleted:BaseObject:private] => [modifiedColumns:protected] => Array ( ) ) [64] => Category Object ( [languages:protected] => [bok_resources:protected] => [bok_topics:protected] => [bok_keywords:protected] => [id:protected] => 64 [type:protected] => category [parent:protected] => 2 [label:protected] => Laborer [alreadyInSave:protected] => [alreadyInValidation:protected] => [validationFailures:protected] => Array ( ) [_new:BaseObject:private] => [_deleted:BaseObject:private] => [modifiedColumns:protected] => Array ( ) ) [66] => Category Object ( [languages:protected] => [bok_resources:protected] => [bok_topics:protected] => [bok_keywords:protected] => [id:protected] => 66 [type:protected] => category [parent:protected] => 2 [label:protected] => Lather [alreadyInSave:protected] => [alreadyInValidation:protected] => [validationFailures:protected] => Array ( ) [_new:BaseObject:private] => [_deleted:BaseObject:private] => [modifiedColumns:protected] => Array ( ) ) [68] => Category Object ( [languages:protected] => [bok_resources:protected] => [bok_topics:protected] => [bok_keywords:protected] => [id:protected] => 68 [type:protected] => category [parent:protected] => 2 [label:protected] => Maintenance Worker [alreadyInSave:protected] => [alreadyInValidation:protected] => [validationFailures:protected] => Array ( ) [_new:BaseObject:private] => [_deleted:BaseObject:private] => [modifiedColumns:protected] => Array ( ) ) [69] => Category Object ( [languages:protected] => [bok_resources:protected] => [bok_topics:protected] => [bok_keywords:protected] => [id:protected] => 69 [type:protected] => category [parent:protected] => 2 [label:protected] => Millwright [alreadyInSave:protected] => [alreadyInValidation:protected] => [validationFailures:protected] => Array ( ) [_new:BaseObject:private] => [_deleted:BaseObject:private] => [modifiedColumns:protected] => Array ( ) ) [71] => Category Object ( [languages:protected] => [bok_resources:protected] => [bok_topics:protected] => [bok_keywords:protected] => [id:protected] => 71 [type:protected] => category [parent:protected] => 2 [label:protected] => Painter [alreadyInSave:protected] => [alreadyInValidation:protected] => [validationFailures:protected] => Array ( ) [_new:BaseObject:private] => [_deleted:BaseObject:private] => [modifiedColumns:protected] => Array ( ) ) [73] => Category Object ( [languages:protected] => [bok_resources:protected] => [bok_topics:protected] => [bok_keywords:protected] => [id:protected] => 73 [type:protected] => category [parent:protected] => 2 [label:protected] => PCC/Restoration [alreadyInSave:protected] => [alreadyInValidation:protected] => [validationFailures:protected] => Array ( ) [_new:BaseObject:private] => [_deleted:BaseObject:private] => [modifiedColumns:protected] => Array ( ) ) [74] => Category Object ( [languages:protected] => [bok_resources:protected] => [bok_topics:protected] => [bok_keywords:protected] => [id:protected] => 74 [type:protected] => category [parent:protected] => 2 [label:protected] => Pile Driver [alreadyInSave:protected] => [alreadyInValidation:protected] => [validationFailures:protected] => Array ( ) [_new:BaseObject:private] => [_deleted:BaseObject:private] => [modifiedColumns:protected] => Array ( ) ) [76] => Category Object ( [languages:protected] => [bok_resources:protected] => [bok_topics:protected] => [bok_keywords:protected] => [id:protected] => 76 [type:protected] => category [parent:protected] => 2 [label:protected] => Plumber/Pipefitter [alreadyInSave:protected] => [alreadyInValidation:protected] => [validationFailures:protected] => Array ( ) [_new:BaseObject:private] => [_deleted:BaseObject:private] => [modifiedColumns:protected] => Array ( ) ) [77] => Category Object ( [languages:protected] => [bok_resources:protected] => [bok_topics:protected] => [bok_keywords:protected] => [id:protected] => 77 [type:protected] => category [parent:protected] => 2 [label:protected] => Refractory Worker [alreadyInSave:protected] => [alreadyInValidation:protected] => [validationFailures:protected] => Array ( ) [_new:BaseObject:private] => [_deleted:BaseObject:private] => [modifiedColumns:protected] => Array ( ) ) [63] => Category Object ( [languages:protected] => [bok_resources:protected] => [bok_topics:protected] => [bok_keywords:protected] => [id:protected] => 63 [type:protected] => category [parent:protected] => 2 [label:protected] => Reinforcing Ironworker [alreadyInSave:protected] => [alreadyInValidation:protected] => [validationFailures:protected] => Array ( ) [_new:BaseObject:private] => [_deleted:BaseObject:private] => [modifiedColumns:protected] => Array ( ) ) [80] => Category Object ( [languages:protected] => [bok_resources:protected] => [bok_topics:protected] => [bok_keywords:protected] => [id:protected] => 80 [type:protected] => category [parent:protected] => 2 [label:protected] => Sheetmetal Worker [alreadyInSave:protected] => [alreadyInValidation:protected] => [validationFailures:protected] => Array ( ) [_new:BaseObject:private] => [_deleted:BaseObject:private] => [modifiedColumns:protected] => Array ( ) ) [82] => Category Object ( [languages:protected] => [bok_resources:protected] => [bok_topics:protected] => [bok_keywords:protected] => [id:protected] => 82 [type:protected] => category [parent:protected] => 2 [label:protected] => Stonemason [alreadyInSave:protected] => [alreadyInValidation:protected] => [validationFailures:protected] => Array ( ) [_new:BaseObject:private] => [_deleted:BaseObject:private] => [modifiedColumns:protected] => Array ( ) ) [62] => Category Object ( [languages:protected] => [bok_resources:protected] => [bok_topics:protected] => [bok_keywords:protected] => [id:protected] => 62 [type:protected] => category [parent:protected] => 2 [label:protected] => Structural Ironworker [alreadyInSave:protected] => [alreadyInValidation:protected] => [validationFailures:protected] => Array ( ) [_new:BaseObject:private] => [_deleted:BaseObject:private] => [modifiedColumns:protected] => Array ( ) ) [83] => Category Object ( [languages:protected] => [bok_resources:protected] => [bok_topics:protected] => [bok_keywords:protected] => [id:protected] => 83 [type:protected] => category [parent:protected] => 2 [label:protected] => Terrazzo Worker [alreadyInSave:protected] => [alreadyInValidation:protected] => [validationFailures:protected] => Array ( ) [_new:BaseObject:private] => [_deleted:BaseObject:private] => [modifiedColumns:protected] => Array ( ) ) [84] => Category Object ( [languages:protected] => [bok_resources:protected] => [bok_topics:protected] => [bok_keywords:protected] => [id:protected] => 84 [type:protected] => category [parent:protected] => 2 [label:protected] => Tile Setter [alreadyInSave:protected] => [alreadyInValidation:protected] => [validationFailures:protected] => Array ( ) [_new:BaseObject:private] => [_deleted:BaseObject:private] => [modifiedColumns:protected] => Array ( ) ) [86] => Category Object ( [languages:protected] => [bok_resources:protected] => [bok_topics:protected] => [bok_keywords:protected] => [id:protected] => 86 [type:protected] => category [parent:protected] => 2 [label:protected] => Welder [alreadyInSave:protected] => [alreadyInValidation:protected] => [validationFailures:protected] => Array ( ) [_new:BaseObject:private] => [_deleted:BaseObject:private] => [modifiedColumns:protected] => Array ( ) ) [88] => Category Object ( [languages:protected] => [bok_resources:protected] => [bok_topics:protected] => [bok_keywords:protected] => [id:protected] => 88 [type:protected] => category [parent:protected] => 3 [label:protected] => Demolition [alreadyInSave:protected] => [alreadyInValidation:protected] => [validationFailures:protected] => Array ( ) [_new:BaseObject:private] => [_deleted:BaseObject:private] => [modifiedColumns:protected] => Array ( ) ) [89] => Category Object ( [languages:protected] => [bok_resources:protected] => [bok_topics:protected] => [bok_keywords:protected] => [id:protected] => 89 [type:protected] => category [parent:protected] => 3 [label:protected] => Disasters [alreadyInSave:protected] => [alreadyInValidation:protected] => [validationFailures:protected] => Array ( ) [_new:BaseObject:private] => [_deleted:BaseObject:private] => [modifiedColumns:protected] => Array ( ) ) [95] => Category Object ( [languages:protected] => [bok_resources:protected] => [bok_topics:protected] => [bok_keywords:protected] => [id:protected] => 95 [type:protected] => category [parent:protected] => 3 [label:protected] => Underground [alreadyInSave:protected] => [alreadyInValidation:protected] => [validationFailures:protected] => Array ( ) [_new:BaseObject:private] => [_deleted:BaseObject:private] => [modifiedColumns:protected] => Array ( ) ) [102] => Category Object ( [languages:protected] => [bok_resources:protected] => [bok_topics:protected] => [bok_keywords:protected] => [id:protected] => 102 [type:protected] => category [parent:protected] => 6 [label:protected] => Handouts [alreadyInSave:protected] => [alreadyInValidation:protected] => [validationFailures:protected] => Array ( ) [_new:BaseObject:private] => [_deleted:BaseObject:private] => [modifiedColumns:protected] => Array ( ) ) ) [categories_initialized:protected] => 1 [mapped_items:protected] => [content:protected] => [files:protected] => [language:protected] => Language Object ( [id:protected] => 1 [code:protected] => en [name:protected] => English [alreadyInSave:protected] => [alreadyInValidation:protected] => [validationFailures:protected] => Array ( ) [_new:BaseObject:private] => [_deleted:BaseObject:private] => [modifiedColumns:protected] => Array ( ) ) [old_record:protected] => [id:protected] => 4415 [old_id:protected] => [elcosh_id:protected] => d001651 [type:protected] => document [display_type:protected] => HTML only (and links) [user_id:protected] => 0 [language_id:protected] => 1 [tagging_id:protected] => Valeria Contreras [priority_id:protected] => 1 [title:protected] => Working in an Enclosed Cab [total_pages:protected] => 1 [billed_pages:protected] => 1 [publication_number:protected] => [part_of:protected] => [keywords:protected] => Occupation, construction, safety, health, hazards, work, worker, workplace, OSHA, silicosis, mining, silica, DOE, EEOICPA, labor, lung, CBD, dust, cab, miner, mine [comments:protected] => [summary:protected] => This CPWR Hazard Alert on Working in enclosed cabs provides information on protecting workers from silica dust, how to minimize exposures and the dangers of silica dust. Click on the following links to access the English version and the Spanish version. [transition_comments:protected] => [external_link:protected] => [consol_link:protected] => [more_like_this:protected] => [permission_given_by:protected] => [published:protected] => T [billable:protected] => F [img_name:protected] => [img_ext:protected] => [img_width:protected] => [img_height:protected] => [img_credit:protected] => [img_practice:protected] => [vid_source_id:protected] => [vid_running_time:protected] => [vid_intended_audience:protected] => [vid_acquisition_info:protected] => [vid_cost:protected] => [vid_producer:protected] => [vid_filename:protected] => [vid_filename_downloadable:protected] => [date_summary:protected] => [date_permission_requested:protected] => [date_permission_received:protected] => [date_review_needed:protected] => [date_received:protected] => 10/08/20 [date_completed:protected] => 10/08/20 [date_billed:protected] => [date_modified:protected] => 10/08/20 [collBokExports:protected] => [lastBokExportCriteria:BaseElcoshItem:private] => [alreadyInSave:protected] => [alreadyInValidation:protected] => [validationFailures:protected] => Array ( ) [_new:BaseObject:private] => [_deleted:BaseObject:private] => [modifiedColumns:protected] => Array ( ) ) ) [4] => Search_Result Object ( [title] => Toolbox Talk: Suicide Prevention [image] => /record/images/notavailable-p.png [blurb] => The CPWR Toolbox Talk on Suicide Prevention addresses the prevalence of suicide among construction workers. The resource includes a brief case example... [category] => Array ( [0] => 13 [1] => 20 [2] => 23 [3] => 40 [4] => 44 [5] => 45 [6] => 46 [7] => 47 [8] => 48 [9] => 49 [10] => 50 [11] => 51 [12] => 52 [13] => 53 [14] => 54 [15] => 55 [16] => 56 [17] => 57 [18] => 58 [19] => 59 [20] => 60 [21] => 61 [22] => 64 [23] => 65 [24] => 66 [25] => 67 [26] => 68 [27] => 69 [28] => 70 [29] => 71 [30] => 72 [31] => 73 [32] => 74 [33] => 75 [34] => 76 [35] => 77 [36] => 63 [37] => 78 [38] => 79 [39] => 80 [40] => 81 [41] => 82 [42] => 62 [43] => 83 [44] => 84 [45] => 85 [46] => 86 [47] => 87 [48] => 88 [49] => 89 [50] => 91 [51] => 90 [52] => 92 [53] => 93 [54] => 94 [55] => 95 [56] => 100 ) [labels] => Array ( [0] => Drugs, Alcohol & Tobacco [1] => Work Environment [2] => Hazards [3] => Safety Culture [6] => Stress & Overtime [9] => Overexertion [10] => Ergonomic [12] => Acoustical Ceiling Carpenter [13] => Trades [14] => Asbestos/Insulator [16] => Boilermaker [18] => Bricklayer [20] => Cabinetmaker [22] => Carpenter [24] => Carpet Layer [26] => Cement Mason [28] => Commercial Diver [30] => Concrete Polisher [32] => Drywall Applicator Specialist [34] => Electrical Worker [36] => Elevator Constructor [38] => Flagger [40] => Glazier [42] => Hazardous Waste Cleanup [44] => HVAC [46] => Interior Systems Carpenter [48] => Laborer [50] => Landscaper [52] => Lather [54] => Lead Abatement Worker [56] => Maintenance Worker [58] => Millwright [60] => Operating Engineer [62] => Painter [64] => Paper Hanger [66] => PCC/Restoration [68] => Pile Driver [70] => Plasterer [72] => Plumber/Pipefitter [74] => Refractory Worker [76] => Reinforcing Ironworker [78] => Roofer/Waterproofer [80] => Scaffold Erector [82] => Sheetmetal Worker [84] => Sprinkler Fitter [86] => Stonemason [88] => Structural Ironworker [90] => Terrazzo Worker [92] => Tile Setter [94] => Truck Driver [96] => Welder [98] => Commercial & Institutional [99] => Jobsites [100] => Demolition [102] => Disasters [104] => Heavy & Highway [106] => Industrial [108] => LEED/Green Construction [110] => Renovations [112] => Residential [114] => Underground [116] => Toolbox Talks [117] => Documents [118] => Media & Documents ) [type] => Toolbox Talks [sub_category] => [url] => /document/4419/d001652/Toolbox%2BTalk%253A%2BSuicide%2BPrevention.html [item:protected] => DocumentRecord Object ( [records:protected] => Array ( ) [recordId:protected] => [searchWordClass:protected] => [searchWordPeerClass:protected] => [bok_record:protected] => [authors:protected] => [organizations:protected] => [collections:protected] => [categories:protected] => Array ( [13] => Category Object ( [languages:protected] => [bok_resources:protected] => [bok_topics:protected] => [bok_keywords:protected] => [id:protected] => 13 [type:protected] => category [parent:protected] => 7 [label:protected] => Drugs, Alcohol & Tobacco [alreadyInSave:protected] => [alreadyInValidation:protected] => [validationFailures:protected] => Array ( ) [_new:BaseObject:private] => [_deleted:BaseObject:private] => [modifiedColumns:protected] => Array ( ) ) [20] => Category Object ( [languages:protected] => [bok_resources:protected] => [bok_topics:protected] => [bok_keywords:protected] => [id:protected] => 20 [type:protected] => category [parent:protected] => 7 [label:protected] => Safety Culture [alreadyInSave:protected] => [alreadyInValidation:protected] => [validationFailures:protected] => Array ( ) [_new:BaseObject:private] => [_deleted:BaseObject:private] => [modifiedColumns:protected] => Array ( ) ) [23] => Category Object ( [languages:protected] => [bok_resources:protected] => [bok_topics:protected] => [bok_keywords:protected] => [id:protected] => 23 [type:protected] => category [parent:protected] => 7 [label:protected] => Stress & Overtime [alreadyInSave:protected] => [alreadyInValidation:protected] => [validationFailures:protected] => Array ( ) [_new:BaseObject:private] => [_deleted:BaseObject:private] => [modifiedColumns:protected] => Array ( ) ) [40] => Category Object ( [languages:protected] => [bok_resources:protected] => [bok_topics:protected] => [bok_keywords:protected] => [id:protected] => 40 [type:protected] => category [parent:protected] => 9 [label:protected] => Overexertion [alreadyInSave:protected] => [alreadyInValidation:protected] => [validationFailures:protected] => Array ( ) [_new:BaseObject:private] => [_deleted:BaseObject:private] => [modifiedColumns:protected] => Array ( ) ) [44] => Category Object ( [languages:protected] => [bok_resources:protected] => [bok_topics:protected] => [bok_keywords:protected] => [id:protected] => 44 [type:protected] => category [parent:protected] => 2 [label:protected] => Acoustical Ceiling Carpenter [alreadyInSave:protected] => [alreadyInValidation:protected] => [validationFailures:protected] => Array ( ) [_new:BaseObject:private] => [_deleted:BaseObject:private] => [modifiedColumns:protected] => Array ( ) ) [45] => Category Object ( [languages:protected] => [bok_resources:protected] => [bok_topics:protected] => [bok_keywords:protected] => [id:protected] => 45 [type:protected] => category [parent:protected] => 2 [label:protected] => Asbestos/Insulator [alreadyInSave:protected] => [alreadyInValidation:protected] => [validationFailures:protected] => Array ( ) [_new:BaseObject:private] => [_deleted:BaseObject:private] => [modifiedColumns:protected] => Array ( ) ) [46] => Category Object ( [languages:protected] => [bok_resources:protected] => [bok_topics:protected] => [bok_keywords:protected] => [id:protected] => 46 [type:protected] => category [parent:protected] => 2 [label:protected] => Boilermaker [alreadyInSave:protected] => [alreadyInValidation:protected] => [validationFailures:protected] => Array ( ) [_new:BaseObject:private] => [_deleted:BaseObject:private] => [modifiedColumns:protected] => Array ( ) ) [47] => Category Object ( [languages:protected] => [bok_resources:protected] => [bok_topics:protected] => [bok_keywords:protected] => [id:protected] => 47 [type:protected] => category [parent:protected] => 2 [label:protected] => Bricklayer [alreadyInSave:protected] => [alreadyInValidation:protected] => [validationFailures:protected] => Array ( ) [_new:BaseObject:private] => [_deleted:BaseObject:private] => [modifiedColumns:protected] => Array ( ) ) [48] => Category Object ( [languages:protected] => [bok_resources:protected] => [bok_topics:protected] => [bok_keywords:protected] => [id:protected] => 48 [type:protected] => category [parent:protected] => 2 [label:protected] => Cabinetmaker [alreadyInSave:protected] => [alreadyInValidation:protected] => [validationFailures:protected] => Array ( ) [_new:BaseObject:private] => [_deleted:BaseObject:private] => [modifiedColumns:protected] => Array ( ) ) [49] => Category Object ( [languages:protected] => [bok_resources:protected] => [bok_topics:protected] => [bok_keywords:protected] => [id:protected] => 49 [type:protected] => category [parent:protected] => 2 [label:protected] => Carpenter [alreadyInSave:protected] => [alreadyInValidation:protected] => [validationFailures:protected] => Array ( ) [_new:BaseObject:private] => [_deleted:BaseObject:private] => [modifiedColumns:protected] => Array ( ) ) [50] => Category Object ( [languages:protected] => [bok_resources:protected] => [bok_topics:protected] => [bok_keywords:protected] => [id:protected] => 50 [type:protected] => category [parent:protected] => 2 [label:protected] => Carpet Layer [alreadyInSave:protected] => [alreadyInValidation:protected] => [validationFailures:protected] => Array ( ) [_new:BaseObject:private] => [_deleted:BaseObject:private] => [modifiedColumns:protected] => Array ( ) ) [51] => Category Object ( [languages:protected] => [bok_resources:protected] => [bok_topics:protected] => [bok_keywords:protected] => [id:protected] => 51 [type:protected] => category [parent:protected] => 2 [label:protected] => Cement Mason [alreadyInSave:protected] => [alreadyInValidation:protected] => [validationFailures:protected] => Array ( ) [_new:BaseObject:private] => [_deleted:BaseObject:private] => [modifiedColumns:protected] => Array ( ) ) [52] => Category Object ( [languages:protected] => [bok_resources:protected] => [bok_topics:protected] => [bok_keywords:protected] => [id:protected] => 52 [type:protected] => category [parent:protected] => 2 [label:protected] => Commercial Diver [alreadyInSave:protected] => [alreadyInValidation:protected] => [validationFailures:protected] => Array ( ) [_new:BaseObject:private] => [_deleted:BaseObject:private] => [modifiedColumns:protected] => Array ( ) ) [53] => Category Object ( [languages:protected] => [bok_resources:protected] => [bok_topics:protected] => [bok_keywords:protected] => [id:protected] => 53 [type:protected] => category [parent:protected] => 2 [label:protected] => Concrete Polisher [alreadyInSave:protected] => [alreadyInValidation:protected] => [validationFailures:protected] => Array ( ) [_new:BaseObject:private] => [_deleted:BaseObject:private] => [modifiedColumns:protected] => Array ( ) ) [54] => Category Object ( [languages:protected] => [bok_resources:protected] => [bok_topics:protected] => [bok_keywords:protected] => [id:protected] => 54 [type:protected] => category [parent:protected] => 2 [label:protected] => Drywall Applicator Specialist [alreadyInSave:protected] => [alreadyInValidation:protected] => [validationFailures:protected] => Array ( ) [_new:BaseObject:private] => [_deleted:BaseObject:private] => [modifiedColumns:protected] => Array ( ) ) [55] => Category Object ( [languages:protected] => [bok_resources:protected] => [bok_topics:protected] => [bok_keywords:protected] => [id:protected] => 55 [type:protected] => category [parent:protected] => 2 [label:protected] => Electrical Worker [alreadyInSave:protected] => [alreadyInValidation:protected] => [validationFailures:protected] => Array ( ) [_new:BaseObject:private] => [_deleted:BaseObject:private] => [modifiedColumns:protected] => Array ( ) ) [56] => Category Object ( [languages:protected] => [bok_resources:protected] => [bok_topics:protected] => [bok_keywords:protected] => [id:protected] => 56 [type:protected] => category [parent:protected] => 2 [label:protected] => Elevator Constructor [alreadyInSave:protected] => [alreadyInValidation:protected] => [validationFailures:protected] => Array ( ) [_new:BaseObject:private] => [_deleted:BaseObject:private] => [modifiedColumns:protected] => Array ( ) ) [57] => Category Object ( [languages:protected] => [bok_resources:protected] => [bok_topics:protected] => [bok_keywords:protected] => [id:protected] => 57 [type:protected] => category [parent:protected] => 2 [label:protected] => Flagger [alreadyInSave:protected] => [alreadyInValidation:protected] => [validationFailures:protected] => Array ( ) [_new:BaseObject:private] => [_deleted:BaseObject:private] => [modifiedColumns:protected] => Array ( ) ) [58] => Category Object ( [languages:protected] => [bok_resources:protected] => [bok_topics:protected] => [bok_keywords:protected] => [id:protected] => 58 [type:protected] => category [parent:protected] => 2 [label:protected] => Glazier [alreadyInSave:protected] => [alreadyInValidation:protected] => [validationFailures:protected] => Array ( ) [_new:BaseObject:private] => [_deleted:BaseObject:private] => [modifiedColumns:protected] => Array ( ) ) [59] => Category Object ( [languages:protected] => [bok_resources:protected] => [bok_topics:protected] => [bok_keywords:protected] => [id:protected] => 59 [type:protected] => category [parent:protected] => 2 [label:protected] => Hazardous Waste Cleanup [alreadyInSave:protected] => [alreadyInValidation:protected] => [validationFailures:protected] => Array ( ) [_new:BaseObject:private] => [_deleted:BaseObject:private] => [modifiedColumns:protected] => Array ( ) ) [60] => Category Object ( [languages:protected] => [bok_resources:protected] => [bok_topics:protected] => [bok_keywords:protected] => [id:protected] => 60 [type:protected] => category [parent:protected] => 2 [label:protected] => HVAC [alreadyInSave:protected] => [alreadyInValidation:protected] => [validationFailures:protected] => Array ( ) [_new:BaseObject:private] => [_deleted:BaseObject:private] => [modifiedColumns:protected] => Array ( ) ) [61] => Category Object ( [languages:protected] => [bok_resources:protected] => [bok_topics:protected] => [bok_keywords:protected] => [id:protected] => 61 [type:protected] => category [parent:protected] => 2 [label:protected] => Interior Systems Carpenter [alreadyInSave:protected] => [alreadyInValidation:protected] => [validationFailures:protected] => Array ( ) [_new:BaseObject:private] => [_deleted:BaseObject:private] => [modifiedColumns:protected] => Array ( ) ) [64] => Category Object ( [languages:protected] => [bok_resources:protected] => [bok_topics:protected] => [bok_keywords:protected] => [id:protected] => 64 [type:protected] => category [parent:protected] => 2 [label:protected] => Laborer [alreadyInSave:protected] => [alreadyInValidation:protected] => [validationFailures:protected] => Array ( ) [_new:BaseObject:private] => [_deleted:BaseObject:private] => [modifiedColumns:protected] => Array ( ) ) [65] => Category Object ( [languages:protected] => [bok_resources:protected] => [bok_topics:protected] => [bok_keywords:protected] => [id:protected] => 65 [type:protected] => category [parent:protected] => 2 [label:protected] => Landscaper [alreadyInSave:protected] => [alreadyInValidation:protected] => [validationFailures:protected] => Array ( ) [_new:BaseObject:private] => [_deleted:BaseObject:private] => [modifiedColumns:protected] => Array ( ) ) [66] => Category Object ( [languages:protected] => [bok_resources:protected] => [bok_topics:protected] => [bok_keywords:protected] => [id:protected] => 66 [type:protected] => category [parent:protected] => 2 [label:protected] => Lather [alreadyInSave:protected] => [alreadyInValidation:protected] => [validationFailures:protected] => Array ( ) [_new:BaseObject:private] => [_deleted:BaseObject:private] => [modifiedColumns:protected] => Array ( ) ) [67] => Category Object ( [languages:protected] => [bok_resources:protected] => [bok_topics:protected] => [bok_keywords:protected] => [id:protected] => 67 [type:protected] => category [parent:protected] => 2 [label:protected] => Lead Abatement Worker [alreadyInSave:protected] => [alreadyInValidation:protected] => [validationFailures:protected] => Array ( ) [_new:BaseObject:private] => [_deleted:BaseObject:private] => [modifiedColumns:protected] => Array ( ) ) [68] => Category Object ( [languages:protected] => [bok_resources:protected] => [bok_topics:protected] => [bok_keywords:protected] => [id:protected] => 68 [type:protected] => category [parent:protected] => 2 [label:protected] => Maintenance Worker [alreadyInSave:protected] => [alreadyInValidation:protected] => [validationFailures:protected] => Array ( ) [_new:BaseObject:private] => [_deleted:BaseObject:private] => [modifiedColumns:protected] => Array ( ) ) [69] => Category Object ( [languages:protected] => [bok_resources:protected] => [bok_topics:protected] => [bok_keywords:protected] => [id:protected] => 69 [type:protected] => category [parent:protected] => 2 [label:protected] => Millwright [alreadyInSave:protected] => [alreadyInValidation:protected] => [validationFailures:protected] => Array ( ) [_new:BaseObject:private] => [_deleted:BaseObject:private] => [modifiedColumns:protected] => Array ( ) ) [70] => Category Object ( [languages:protected] => [bok_resources:protected] => [bok_topics:protected] => [bok_keywords:protected] => [id:protected] => 70 [type:protected] => category [parent:protected] => 2 [label:protected] => Operating Engineer [alreadyInSave:protected] => [alreadyInValidation:protected] => [validationFailures:protected] => Array ( ) [_new:BaseObject:private] => [_deleted:BaseObject:private] => [modifiedColumns:protected] => Array ( ) ) [71] => Category Object ( [languages:protected] => [bok_resources:protected] => [bok_topics:protected] => [bok_keywords:protected] => [id:protected] => 71 [type:protected] => category [parent:protected] => 2 [label:protected] => Painter [alreadyInSave:protected] => [alreadyInValidation:protected] => [validationFailures:protected] => Array ( ) [_new:BaseObject:private] => [_deleted:BaseObject:private] => [modifiedColumns:protected] => Array ( ) ) [72] => Category Object ( [languages:protected] => [bok_resources:protected] => [bok_topics:protected] => [bok_keywords:protected] => [id:protected] => 72 [type:protected] => category [parent:protected] => 2 [label:protected] => Paper Hanger [alreadyInSave:protected] => [alreadyInValidation:protected] => [validationFailures:protected] => Array ( ) [_new:BaseObject:private] => [_deleted:BaseObject:private] => [modifiedColumns:protected] => Array ( ) ) [73] => Category Object ( [languages:protected] => [bok_resources:protected] => [bok_topics:protected] => [bok_keywords:protected] => [id:protected] => 73 [type:protected] => category [parent:protected] => 2 [label:protected] => PCC/Restoration [alreadyInSave:protected] => [alreadyInValidation:protected] => [validationFailures:protected] => Array ( ) [_new:BaseObject:private] => [_deleted:BaseObject:private] => [modifiedColumns:protected] => Array ( ) ) [74] => Category Object ( [languages:protected] => [bok_resources:protected] => [bok_topics:protected] => [bok_keywords:protected] => [id:protected] => 74 [type:protected] => category [parent:protected] => 2 [label:protected] => Pile Driver [alreadyInSave:protected] => [alreadyInValidation:protected] => [validationFailures:protected] => Array ( ) [_new:BaseObject:private] => [_deleted:BaseObject:private] => [modifiedColumns:protected] => Array ( ) ) [75] => Category Object ( [languages:protected] => [bok_resources:protected] => [bok_topics:protected] => [bok_keywords:protected] => [id:protected] => 75 [type:protected] => category [parent:protected] => 2 [label:protected] => Plasterer [alreadyInSave:protected] => [alreadyInValidation:protected] => [validationFailures:protected] => Array ( ) [_new:BaseObject:private] => [_deleted:BaseObject:private] => [modifiedColumns:protected] => Array ( ) ) [76] => Category Object ( [languages:protected] => [bok_resources:protected] => [bok_topics:protected] => [bok_keywords:protected] => [id:protected] => 76 [type:protected] => category [parent:protected] => 2 [label:protected] => Plumber/Pipefitter [alreadyInSave:protected] => [alreadyInValidation:protected] => [validationFailures:protected] => Array ( ) [_new:BaseObject:private] => [_deleted:BaseObject:private] => [modifiedColumns:protected] => Array ( ) ) [77] => Category Object ( [languages:protected] => [bok_resources:protected] => [bok_topics:protected] => [bok_keywords:protected] => [id:protected] => 77 [type:protected] => category [parent:protected] => 2 [label:protected] => Refractory Worker [alreadyInSave:protected] => [alreadyInValidation:protected] => [validationFailures:protected] => Array ( ) [_new:BaseObject:private] => [_deleted:BaseObject:private] => [modifiedColumns:protected] => Array ( ) ) [63] => Category Object ( [languages:protected] => [bok_resources:protected] => [bok_topics:protected] => [bok_keywords:protected] => [id:protected] => 63 [type:protected] => category [parent:protected] => 2 [label:protected] => Reinforcing Ironworker [alreadyInSave:protected] => [alreadyInValidation:protected] => [validationFailures:protected] => Array ( ) [_new:BaseObject:private] => [_deleted:BaseObject:private] => [modifiedColumns:protected] => Array ( ) ) [78] => Category Object ( [languages:protected] => [bok_resources:protected] => [bok_topics:protected] => [bok_keywords:protected] => [id:protected] => 78 [type:protected] => category [parent:protected] => 2 [label:protected] => Roofer/Waterproofer [alreadyInSave:protected] => [alreadyInValidation:protected] => [validationFailures:protected] => Array ( ) [_new:BaseObject:private] => [_deleted:BaseObject:private] => [modifiedColumns:protected] => Array ( ) ) [79] => Category Object ( [languages:protected] => [bok_resources:protected] => [bok_topics:protected] => [bok_keywords:protected] => [id:protected] => 79 [type:protected] => category [parent:protected] => 2 [label:protected] => Scaffold Erector [alreadyInSave:protected] => [alreadyInValidation:protected] => [validationFailures:protected] => Array ( ) [_new:BaseObject:private] => [_deleted:BaseObject:private] => [modifiedColumns:protected] => Array ( ) ) [80] => Category Object ( [languages:protected] => [bok_resources:protected] => [bok_topics:protected] => [bok_keywords:protected] => [id:protected] => 80 [type:protected] => category [parent:protected] => 2 [label:protected] => Sheetmetal Worker [alreadyInSave:protected] => [alreadyInValidation:protected] => [validationFailures:protected] => Array ( ) [_new:BaseObject:private] => [_deleted:BaseObject:private] => [modifiedColumns:protected] => Array ( ) ) [81] => Category Object ( [languages:protected] => [bok_resources:protected] => [bok_topics:protected] => [bok_keywords:protected] => [id:protected] => 81 [type:protected] => category [parent:protected] => 2 [label:protected] => Sprinkler Fitter [alreadyInSave:protected] => [alreadyInValidation:protected] => [validationFailures:protected] => Array ( ) [_new:BaseObject:private] => [_deleted:BaseObject:private] => [modifiedColumns:protected] => Array ( ) ) [82] => Category Object ( [languages:protected] => [bok_resources:protected] => [bok_topics:protected] => [bok_keywords:protected] => [id:protected] => 82 [type:protected] => category [parent:protected] => 2 [label:protected] => Stonemason [alreadyInSave:protected] => [alreadyInValidation:protected] => [validationFailures:protected] => Array ( ) [_new:BaseObject:private] => [_deleted:BaseObject:private] => [modifiedColumns:protected] => Array ( ) ) [62] => Category Object ( [languages:protected] => [bok_resources:protected] => [bok_topics:protected] => [bok_keywords:protected] => [id:protected] => 62 [type:protected] => category [parent:protected] => 2 [label:protected] => Structural Ironworker [alreadyInSave:protected] => [alreadyInValidation:protected] => [validationFailures:protected] => Array ( ) [_new:BaseObject:private] => [_deleted:BaseObject:private] => [modifiedColumns:protected] => Array ( ) ) [83] => Category Object ( [languages:protected] => [bok_resources:protected] => [bok_topics:protected] => [bok_keywords:protected] => [id:protected] => 83 [type:protected] => category [parent:protected] => 2 [label:protected] => Terrazzo Worker [alreadyInSave:protected] => [alreadyInValidation:protected] => [validationFailures:protected] => Array ( ) [_new:BaseObject:private] => [_deleted:BaseObject:private] => [modifiedColumns:protected] => Array ( ) ) [84] => Category Object ( [languages:protected] => [bok_resources:protected] => [bok_topics:protected] => [bok_keywords:protected] => [id:protected] => 84 [type:protected] => category [parent:protected] => 2 [label:protected] => Tile Setter [alreadyInSave:protected] => [alreadyInValidation:protected] => [validationFailures:protected] => Array ( ) [_new:BaseObject:private] => [_deleted:BaseObject:private] => [modifiedColumns:protected] => Array ( ) ) [85] => Category Object ( [languages:protected] => [bok_resources:protected] => [bok_topics:protected] => [bok_keywords:protected] => [id:protected] => 85 [type:protected] => category [parent:protected] => 2 [label:protected] => Truck Driver [alreadyInSave:protected] => [alreadyInValidation:protected] => [validationFailures:protected] => Array ( ) [_new:BaseObject:private] => [_deleted:BaseObject:private] => [modifiedColumns:protected] => Array ( ) ) [86] => Category Object ( [languages:protected] => [bok_resources:protected] => [bok_topics:protected] => [bok_keywords:protected] => [id:protected] => 86 [type:protected] => category [parent:protected] => 2 [label:protected] => Welder [alreadyInSave:protected] => [alreadyInValidation:protected] => [validationFailures:protected] => Array ( ) [_new:BaseObject:private] => [_deleted:BaseObject:private] => [modifiedColumns:protected] => Array ( ) ) [87] => Category Object ( [languages:protected] => [bok_resources:protected] => [bok_topics:protected] => [bok_keywords:protected] => [id:protected] => 87 [type:protected] => category [parent:protected] => 3 [label:protected] => Commercial & Institutional [alreadyInSave:protected] => [alreadyInValidation:protected] => [validationFailures:protected] => Array ( ) [_new:BaseObject:private] => [_deleted:BaseObject:private] => [modifiedColumns:protected] => Array ( ) ) [88] => Category Object ( [languages:protected] => [bok_resources:protected] => [bok_topics:protected] => [bok_keywords:protected] => [id:protected] => 88 [type:protected] => category [parent:protected] => 3 [label:protected] => Demolition [alreadyInSave:protected] => [alreadyInValidation:protected] => [validationFailures:protected] => Array ( ) [_new:BaseObject:private] => [_deleted:BaseObject:private] => [modifiedColumns:protected] => Array ( ) ) [89] => Category Object ( [languages:protected] => [bok_resources:protected] => [bok_topics:protected] => [bok_keywords:protected] => [id:protected] => 89 [type:protected] => category [parent:protected] => 3 [label:protected] => Disasters [alreadyInSave:protected] => [alreadyInValidation:protected] => [validationFailures:protected] => Array ( ) [_new:BaseObject:private] => [_deleted:BaseObject:private] => [modifiedColumns:protected] => Array ( ) ) [91] => Category Object ( [languages:protected] => [bok_resources:protected] => [bok_topics:protected] => [bok_keywords:protected] => [id:protected] => 91 [type:protected] => category [parent:protected] => 3 [label:protected] => Heavy & Highway [alreadyInSave:protected] => [alreadyInValidation:protected] => [validationFailures:protected] => Array ( ) [_new:BaseObject:private] => [_deleted:BaseObject:private] => [modifiedColumns:protected] => Array ( ) ) [90] => Category Object ( [languages:protected] => [bok_resources:protected] => [bok_topics:protected] => [bok_keywords:protected] => [id:protected] => 90 [type:protected] => category [parent:protected] => 3 [label:protected] => Industrial [alreadyInSave:protected] => [alreadyInValidation:protected] => [validationFailures:protected] => Array ( ) [_new:BaseObject:private] => [_deleted:BaseObject:private] => [modifiedColumns:protected] => Array ( ) ) [92] => Category Object ( [languages:protected] => [bok_resources:protected] => [bok_topics:protected] => [bok_keywords:protected] => [id:protected] => 92 [type:protected] => category [parent:protected] => 3 [label:protected] => LEED/Green Construction [alreadyInSave:protected] => [alreadyInValidation:protected] => [validationFailures:protected] => Array ( ) [_new:BaseObject:private] => [_deleted:BaseObject:private] => [modifiedColumns:protected] => Array ( ) ) [93] => Category Object ( [languages:protected] => [bok_resources:protected] => [bok_topics:protected] => [bok_keywords:protected] => [id:protected] => 93 [type:protected] => category [parent:protected] => 3 [label:protected] => Renovations [alreadyInSave:protected] => [alreadyInValidation:protected] => [validationFailures:protected] => Array ( ) [_new:BaseObject:private] => [_deleted:BaseObject:private] => [modifiedColumns:protected] => Array ( ) ) [94] => Category Object ( [languages:protected] => [bok_resources:protected] => [bok_topics:protected] => [bok_keywords:protected] => [id:protected] => 94 [type:protected] => category [parent:protected] => 3 [label:protected] => Residential [alreadyInSave:protected] => [alreadyInValidation:protected] => [validationFailures:protected] => Array ( ) [_new:BaseObject:private] => [_deleted:BaseObject:private] => [modifiedColumns:protected] => Array ( ) ) [95] => Category Object ( [languages:protected] => [bok_resources:protected] => [bok_topics:protected] => [bok_keywords:protected] => [id:protected] => 95 [type:protected] => category [parent:protected] => 3 [label:protected] => Underground [alreadyInSave:protected] => [alreadyInValidation:protected] => [validationFailures:protected] => Array ( ) [_new:BaseObject:private] => [_deleted:BaseObject:private] => [modifiedColumns:protected] => Array ( ) ) [100] => Category Object ( [languages:protected] => [bok_resources:protected] => [bok_topics:protected] => [bok_keywords:protected] => [id:protected] => 100 [type:protected] => category [parent:protected] => 6 [label:protected] => Toolbox Talks [alreadyInSave:protected] => [alreadyInValidation:protected] => [validationFailures:protected] => Array ( ) [_new:BaseObject:private] => [_deleted:BaseObject:private] => [modifiedColumns:protected] => Array ( ) ) ) [categories_initialized:protected] => 1 [mapped_items:protected] => [content:protected] => [files:protected] => [language:protected] => Language Object ( [id:protected] => 1 [code:protected] => en [name:protected] => English [alreadyInSave:protected] => [alreadyInValidation:protected] => [validationFailures:protected] => Array ( ) [_new:BaseObject:private] => [_deleted:BaseObject:private] => [modifiedColumns:protected] => Array ( ) ) [old_record:protected] => [id:protected] => 4419 [old_id:protected] => [elcosh_id:protected] => d001652 [type:protected] => document [display_type:protected] => HTML only (and links) [user_id:protected] => 0 [language_id:protected] => 1 [tagging_id:protected] => Valeria Contreras [priority_id:protected] => 1 [title:protected] => Toolbox Talk: Suicide Prevention [total_pages:protected] => 1 [billed_pages:protected] => 1 [publication_number:protected] => [part_of:protected] => [keywords:protected] => suicide, suicide prevention, mental health, stress, depression, exhaustion, burnout, safety, support, emotional support, health [comments:protected] => [summary:protected] =>The CPWR Toolbox Talk on Suicide Prevention addresses the prevalence of suicide among construction workers. The resource includes a brief case example, steps to prevent a related injury or illness, and questions for discussion. It includes an image that illustrates the hazard, which can be posted in a central location as a reminder of steps to work safely.
Available in English and Spanish. [transition_comments:protected] => [external_link:protected] => [consol_link:protected] => [more_like_this:protected] => [permission_given_by:protected] => [published:protected] => T [billable:protected] => F [img_name:protected] => [img_ext:protected] => [img_width:protected] => [img_height:protected] => [img_credit:protected] => [img_practice:protected] => [vid_source_id:protected] => [vid_running_time:protected] => [vid_intended_audience:protected] => [vid_acquisition_info:protected] => [vid_cost:protected] => [vid_producer:protected] => [vid_filename:protected] => [vid_filename_downloadable:protected] => [date_summary:protected] => [date_permission_requested:protected] => [date_permission_received:protected] => [date_review_needed:protected] => [date_received:protected] => 10/08/20 [date_completed:protected] => 10/08/20 [date_billed:protected] => [date_modified:protected] => 05/19/23 [collBokExports:protected] => [lastBokExportCriteria:BaseElcoshItem:private] => [alreadyInSave:protected] => [alreadyInValidation:protected] => [validationFailures:protected] => Array ( ) [_new:BaseObject:private] => [_deleted:BaseObject:private] => [modifiedColumns:protected] => Array ( ) ) ) ) [new_images] => Array ( [0] => Search_Result Object ( [title] => Toolbox talk - crew view [image] => /record/images/4005-p.jpg [blurb] => Photo of crew listening to a toolbox safety talk before starting work.... [category] => Array ( [0] => 97 [1] => 20 [2] => 47 [3] => 49 [4] => 51 [5] => 55 [6] => 61 [7] => 64 [8] => 71 [9] => 75 [10] => 63 [11] => 79 [12] => 62 [13] => 87 [14] => 88 [15] => 91 [16] => 90 [17] => 93 [18] => 94 [19] => 95 ) [labels] => Array ( [0] => Images [1] => Media [2] => Media & Documents [3] => Safety Culture [4] => Work Environment [5] => Hazards [6] => Bricklayer [7] => Trades [8] => Carpenter [10] => Cement Mason [12] => Electrical Worker [14] => Interior Systems Carpenter [16] => Laborer [18] => Painter [20] => Plasterer [22] => Reinforcing Ironworker [24] => Scaffold Erector [26] => Structural Ironworker [28] => Commercial & Institutional [29] => Jobsites [30] => Demolition [32] => Heavy & Highway [34] => Industrial [36] => Renovations [38] => Residential [40] => Underground ) [type] => Images [sub_category] => [url] => /image/4005/i002692/Toolbox%2Btalk%2B-%2Bcrew%2Bview.html [item:protected] => ImageRecord Object ( [records:protected] => Array ( ) [recordId:protected] => [searchWordClass:protected] => [searchWordPeerClass:protected] => [bok_record:protected] => [authors:protected] => [organizations:protected] => [collections:protected] => [categories:protected] => Array ( [97] => Category Object ( [languages:protected] => [bok_resources:protected] => [bok_topics:protected] => [bok_keywords:protected] => [id:protected] => 97 [type:protected] => category [parent:protected] => 5 [label:protected] => Images [alreadyInSave:protected] => [alreadyInValidation:protected] => [validationFailures:protected] => Array ( ) [_new:BaseObject:private] => [_deleted:BaseObject:private] => [modifiedColumns:protected] => Array ( ) ) [20] => Category Object ( [languages:protected] => [bok_resources:protected] => [bok_topics:protected] => [bok_keywords:protected] => [id:protected] => 20 [type:protected] => category [parent:protected] => 7 [label:protected] => Safety Culture [alreadyInSave:protected] => [alreadyInValidation:protected] => [validationFailures:protected] => Array ( ) [_new:BaseObject:private] => [_deleted:BaseObject:private] => [modifiedColumns:protected] => Array ( ) ) [47] => Category Object ( [languages:protected] => [bok_resources:protected] => [bok_topics:protected] => [bok_keywords:protected] => [id:protected] => 47 [type:protected] => category [parent:protected] => 2 [label:protected] => Bricklayer [alreadyInSave:protected] => [alreadyInValidation:protected] => [validationFailures:protected] => Array ( ) [_new:BaseObject:private] => [_deleted:BaseObject:private] => [modifiedColumns:protected] => Array ( ) ) [49] => Category Object ( [languages:protected] => [bok_resources:protected] => [bok_topics:protected] => [bok_keywords:protected] => [id:protected] => 49 [type:protected] => category [parent:protected] => 2 [label:protected] => Carpenter [alreadyInSave:protected] => [alreadyInValidation:protected] => [validationFailures:protected] => Array ( ) [_new:BaseObject:private] => [_deleted:BaseObject:private] => [modifiedColumns:protected] => Array ( ) ) [51] => Category Object ( [languages:protected] => [bok_resources:protected] => [bok_topics:protected] => [bok_keywords:protected] => [id:protected] => 51 [type:protected] => category [parent:protected] => 2 [label:protected] => Cement Mason [alreadyInSave:protected] => [alreadyInValidation:protected] => [validationFailures:protected] => Array ( ) [_new:BaseObject:private] => [_deleted:BaseObject:private] => [modifiedColumns:protected] => Array ( ) ) [55] => Category Object ( [languages:protected] => [bok_resources:protected] => [bok_topics:protected] => [bok_keywords:protected] => [id:protected] => 55 [type:protected] => category [parent:protected] => 2 [label:protected] => Electrical Worker [alreadyInSave:protected] => [alreadyInValidation:protected] => [validationFailures:protected] => Array ( ) [_new:BaseObject:private] => [_deleted:BaseObject:private] => [modifiedColumns:protected] => Array ( ) ) [61] => Category Object ( [languages:protected] => [bok_resources:protected] => [bok_topics:protected] => [bok_keywords:protected] => [id:protected] => 61 [type:protected] => category [parent:protected] => 2 [label:protected] => Interior Systems Carpenter [alreadyInSave:protected] => [alreadyInValidation:protected] => [validationFailures:protected] => Array ( ) [_new:BaseObject:private] => [_deleted:BaseObject:private] => [modifiedColumns:protected] => Array ( ) ) [64] => Category Object ( [languages:protected] => [bok_resources:protected] => [bok_topics:protected] => [bok_keywords:protected] => [id:protected] => 64 [type:protected] => category [parent:protected] => 2 [label:protected] => Laborer [alreadyInSave:protected] => [alreadyInValidation:protected] => [validationFailures:protected] => Array ( ) [_new:BaseObject:private] => [_deleted:BaseObject:private] => [modifiedColumns:protected] => Array ( ) ) [71] => Category Object ( [languages:protected] => [bok_resources:protected] => [bok_topics:protected] => [bok_keywords:protected] => [id:protected] => 71 [type:protected] => category [parent:protected] => 2 [label:protected] => Painter [alreadyInSave:protected] => [alreadyInValidation:protected] => [validationFailures:protected] => Array ( ) [_new:BaseObject:private] => [_deleted:BaseObject:private] => [modifiedColumns:protected] => Array ( ) ) [75] => Category Object ( [languages:protected] => [bok_resources:protected] => [bok_topics:protected] => [bok_keywords:protected] => [id:protected] => 75 [type:protected] => category [parent:protected] => 2 [label:protected] => Plasterer [alreadyInSave:protected] => [alreadyInValidation:protected] => [validationFailures:protected] => Array ( ) [_new:BaseObject:private] => [_deleted:BaseObject:private] => [modifiedColumns:protected] => Array ( ) ) [63] => Category Object ( [languages:protected] => [bok_resources:protected] => [bok_topics:protected] => [bok_keywords:protected] => [id:protected] => 63 [type:protected] => category [parent:protected] => 2 [label:protected] => Reinforcing Ironworker [alreadyInSave:protected] => [alreadyInValidation:protected] => [validationFailures:protected] => Array ( ) [_new:BaseObject:private] => [_deleted:BaseObject:private] => [modifiedColumns:protected] => Array ( ) ) [79] => Category Object ( [languages:protected] => [bok_resources:protected] => [bok_topics:protected] => [bok_keywords:protected] => [id:protected] => 79 [type:protected] => category [parent:protected] => 2 [label:protected] => Scaffold Erector [alreadyInSave:protected] => [alreadyInValidation:protected] => [validationFailures:protected] => Array ( ) [_new:BaseObject:private] => [_deleted:BaseObject:private] => [modifiedColumns:protected] => Array ( ) ) [62] => Category Object ( [languages:protected] => [bok_resources:protected] => [bok_topics:protected] => [bok_keywords:protected] => [id:protected] => 62 [type:protected] => category [parent:protected] => 2 [label:protected] => Structural Ironworker [alreadyInSave:protected] => [alreadyInValidation:protected] => [validationFailures:protected] => Array ( ) [_new:BaseObject:private] => [_deleted:BaseObject:private] => [modifiedColumns:protected] => Array ( ) ) [87] => Category Object ( [languages:protected] => [bok_resources:protected] => [bok_topics:protected] => [bok_keywords:protected] => [id:protected] => 87 [type:protected] => category [parent:protected] => 3 [label:protected] => Commercial & Institutional [alreadyInSave:protected] => [alreadyInValidation:protected] => [validationFailures:protected] => Array ( ) [_new:BaseObject:private] => [_deleted:BaseObject:private] => [modifiedColumns:protected] => Array ( ) ) [88] => Category Object ( [languages:protected] => [bok_resources:protected] => [bok_topics:protected] => [bok_keywords:protected] => [id:protected] => 88 [type:protected] => category [parent:protected] => 3 [label:protected] => Demolition [alreadyInSave:protected] => [alreadyInValidation:protected] => [validationFailures:protected] => Array ( ) [_new:BaseObject:private] => [_deleted:BaseObject:private] => [modifiedColumns:protected] => Array ( ) ) [91] => Category Object ( [languages:protected] => [bok_resources:protected] => [bok_topics:protected] => [bok_keywords:protected] => [id:protected] => 91 [type:protected] => category [parent:protected] => 3 [label:protected] => Heavy & Highway [alreadyInSave:protected] => [alreadyInValidation:protected] => [validationFailures:protected] => Array ( ) [_new:BaseObject:private] => [_deleted:BaseObject:private] => [modifiedColumns:protected] => Array ( ) ) [90] => Category Object ( [languages:protected] => [bok_resources:protected] => [bok_topics:protected] => [bok_keywords:protected] => [id:protected] => 90 [type:protected] => category [parent:protected] => 3 [label:protected] => Industrial [alreadyInSave:protected] => [alreadyInValidation:protected] => [validationFailures:protected] => Array ( ) [_new:BaseObject:private] => [_deleted:BaseObject:private] => [modifiedColumns:protected] => Array ( ) ) [93] => Category Object ( [languages:protected] => [bok_resources:protected] => [bok_topics:protected] => [bok_keywords:protected] => [id:protected] => 93 [type:protected] => category [parent:protected] => 3 [label:protected] => Renovations [alreadyInSave:protected] => [alreadyInValidation:protected] => [validationFailures:protected] => Array ( ) [_new:BaseObject:private] => [_deleted:BaseObject:private] => [modifiedColumns:protected] => Array ( ) ) [94] => Category Object ( [languages:protected] => [bok_resources:protected] => [bok_topics:protected] => [bok_keywords:protected] => [id:protected] => 94 [type:protected] => category [parent:protected] => 3 [label:protected] => Residential [alreadyInSave:protected] => [alreadyInValidation:protected] => [validationFailures:protected] => Array ( ) [_new:BaseObject:private] => [_deleted:BaseObject:private] => [modifiedColumns:protected] => Array ( ) ) [95] => Category Object ( [languages:protected] => [bok_resources:protected] => [bok_topics:protected] => [bok_keywords:protected] => [id:protected] => 95 [type:protected] => category [parent:protected] => 3 [label:protected] => Underground [alreadyInSave:protected] => [alreadyInValidation:protected] => [validationFailures:protected] => Array ( ) [_new:BaseObject:private] => [_deleted:BaseObject:private] => [modifiedColumns:protected] => Array ( ) ) ) [categories_initialized:protected] => 1 [mapped_items:protected] => [content:protected] => [files:protected] => [language:protected] => Language Object ( [id:protected] => 1 [code:protected] => en [name:protected] => English [alreadyInSave:protected] => [alreadyInValidation:protected] => [validationFailures:protected] => Array ( ) [_new:BaseObject:private] => [_deleted:BaseObject:private] => [modifiedColumns:protected] => Array ( ) ) [old_record:protected] => [id:protected] => 4005 [old_id:protected] => [elcosh_id:protected] => i002692 [type:protected] => image [display_type:protected] => Image [user_id:protected] => 0 [language_id:protected] => 1 [tagging_id:protected] => Bruce Lippy [priority_id:protected] => 1 [title:protected] => Toolbox talk - crew view [total_pages:protected] => 0 [billed_pages:protected] => 0 [publication_number:protected] => [part_of:protected] => [keywords:protected] => toolbox talk, tailgate talk, safety talk, Spanish [comments:protected] => [summary:protected] => Photo of crew listening to a toolbox safety talk before starting work. [transition_comments:protected] => [external_link:protected] => [consol_link:protected] => http://www.cpwrconstructionsolutions.org/electrical/solution/662/worker-training.html [more_like_this:protected] => i002691,d001269, c000079, d001285 [permission_given_by:protected] => [published:protected] => T [billable:protected] => F [img_name:protected] => [img_ext:protected] => jpg [img_width:protected] => [img_height:protected] => [img_credit:protected] => Morgan Zavertnik and Hoar Construction [img_practice:protected] => good [vid_source_id:protected] => [vid_running_time:protected] => [vid_intended_audience:protected] => [vid_acquisition_info:protected] => [vid_cost:protected] => [vid_producer:protected] => [vid_filename:protected] => [vid_filename_downloadable:protected] => [date_summary:protected] => November 2015 [date_permission_requested:protected] => [date_permission_received:protected] => [date_review_needed:protected] => [date_received:protected] => 03/02/16 [date_completed:protected] => 03/02/16 [date_billed:protected] => [date_modified:protected] => 03/02/16 [collBokExports:protected] => [lastBokExportCriteria:BaseElcoshItem:private] => [alreadyInSave:protected] => [alreadyInValidation:protected] => [validationFailures:protected] => Array ( ) [_new:BaseObject:private] => [_deleted:BaseObject:private] => [modifiedColumns:protected] => Array ( ) ) ) [1] => Search_Result Object ( [title] => Toolbox talk - long shot [image] => /record/images/4006-p.jpg [blurb] => This crew gathered every morning before starting work to discuss a new safety topic.... [category] => Array ( [0] => 20 [1] => 47 [2] => 49 [3] => 51 [4] => 55 [5] => 64 [6] => 68 [7] => 75 [8] => 76 [9] => 63 [10] => 78 [11] => 79 [12] => 82 [13] => 62 [14] => 87 [15] => 88 [16] => 91 [17] => 90 [18] => 93 [19] => 94 [20] => 95 [21] => 97 ) [labels] => Array ( [0] => Safety Culture [1] => Work Environment [2] => Hazards [3] => Bricklayer [4] => Trades [5] => Carpenter [7] => Cement Mason [9] => Electrical Worker [11] => Laborer [13] => Maintenance Worker [15] => Plasterer [17] => Plumber/Pipefitter [19] => Reinforcing Ironworker [21] => Roofer/Waterproofer [23] => Scaffold Erector [25] => Stonemason [27] => Structural Ironworker [29] => Commercial & Institutional [30] => Jobsites [31] => Demolition [33] => Heavy & Highway [35] => Industrial [37] => Renovations [39] => Residential [41] => Underground [43] => Images [44] => Media [45] => Media & Documents ) [type] => Images [sub_category] => [url] => /image/4006/i002693/Toolbox%2Btalk%2B-%2Blong%2Bshot.html [item:protected] => ImageRecord Object ( [records:protected] => Array ( ) [recordId:protected] => [searchWordClass:protected] => [searchWordPeerClass:protected] => [bok_record:protected] => [authors:protected] => [organizations:protected] => [collections:protected] => [categories:protected] => Array ( [20] => Category Object ( [languages:protected] => [bok_resources:protected] => [bok_topics:protected] => [bok_keywords:protected] => [id:protected] => 20 [type:protected] => category [parent:protected] => 7 [label:protected] => Safety Culture [alreadyInSave:protected] => [alreadyInValidation:protected] => [validationFailures:protected] => Array ( ) [_new:BaseObject:private] => [_deleted:BaseObject:private] => [modifiedColumns:protected] => Array ( ) ) [47] => Category Object ( [languages:protected] => [bok_resources:protected] => [bok_topics:protected] => [bok_keywords:protected] => [id:protected] => 47 [type:protected] => category [parent:protected] => 2 [label:protected] => Bricklayer [alreadyInSave:protected] => [alreadyInValidation:protected] => [validationFailures:protected] => Array ( ) [_new:BaseObject:private] => [_deleted:BaseObject:private] => [modifiedColumns:protected] => Array ( ) ) [49] => Category Object ( [languages:protected] => [bok_resources:protected] => [bok_topics:protected] => [bok_keywords:protected] => [id:protected] => 49 [type:protected] => category [parent:protected] => 2 [label:protected] => Carpenter [alreadyInSave:protected] => [alreadyInValidation:protected] => [validationFailures:protected] => Array ( ) [_new:BaseObject:private] => [_deleted:BaseObject:private] => [modifiedColumns:protected] => Array ( ) ) [51] => Category Object ( [languages:protected] => [bok_resources:protected] => [bok_topics:protected] => [bok_keywords:protected] => [id:protected] => 51 [type:protected] => category [parent:protected] => 2 [label:protected] => Cement Mason [alreadyInSave:protected] => [alreadyInValidation:protected] => [validationFailures:protected] => Array ( ) [_new:BaseObject:private] => [_deleted:BaseObject:private] => [modifiedColumns:protected] => Array ( ) ) [55] => Category Object ( [languages:protected] => [bok_resources:protected] => [bok_topics:protected] => [bok_keywords:protected] => [id:protected] => 55 [type:protected] => category [parent:protected] => 2 [label:protected] => Electrical Worker [alreadyInSave:protected] => [alreadyInValidation:protected] => [validationFailures:protected] => Array ( ) [_new:BaseObject:private] => [_deleted:BaseObject:private] => [modifiedColumns:protected] => Array ( ) ) [64] => Category Object ( [languages:protected] => [bok_resources:protected] => [bok_topics:protected] => [bok_keywords:protected] => [id:protected] => 64 [type:protected] => category [parent:protected] => 2 [label:protected] => Laborer [alreadyInSave:protected] => [alreadyInValidation:protected] => [validationFailures:protected] => Array ( ) [_new:BaseObject:private] => [_deleted:BaseObject:private] => [modifiedColumns:protected] => Array ( ) ) [68] => Category Object ( [languages:protected] => [bok_resources:protected] => [bok_topics:protected] => [bok_keywords:protected] => [id:protected] => 68 [type:protected] => category [parent:protected] => 2 [label:protected] => Maintenance Worker [alreadyInSave:protected] => [alreadyInValidation:protected] => [validationFailures:protected] => Array ( ) [_new:BaseObject:private] => [_deleted:BaseObject:private] => [modifiedColumns:protected] => Array ( ) ) [75] => Category Object ( [languages:protected] => [bok_resources:protected] => [bok_topics:protected] => [bok_keywords:protected] => [id:protected] => 75 [type:protected] => category [parent:protected] => 2 [label:protected] => Plasterer [alreadyInSave:protected] => [alreadyInValidation:protected] => [validationFailures:protected] => Array ( ) [_new:BaseObject:private] => [_deleted:BaseObject:private] => [modifiedColumns:protected] => Array ( ) ) [76] => Category Object ( [languages:protected] => [bok_resources:protected] => [bok_topics:protected] => [bok_keywords:protected] => [id:protected] => 76 [type:protected] => category [parent:protected] => 2 [label:protected] => Plumber/Pipefitter [alreadyInSave:protected] => [alreadyInValidation:protected] => [validationFailures:protected] => Array ( ) [_new:BaseObject:private] => [_deleted:BaseObject:private] => [modifiedColumns:protected] => Array ( ) ) [63] => Category Object ( [languages:protected] => [bok_resources:protected] => [bok_topics:protected] => [bok_keywords:protected] => [id:protected] => 63 [type:protected] => category [parent:protected] => 2 [label:protected] => Reinforcing Ironworker [alreadyInSave:protected] => [alreadyInValidation:protected] => [validationFailures:protected] => Array ( ) [_new:BaseObject:private] => [_deleted:BaseObject:private] => [modifiedColumns:protected] => Array ( ) ) [78] => Category Object ( [languages:protected] => [bok_resources:protected] => [bok_topics:protected] => [bok_keywords:protected] => [id:protected] => 78 [type:protected] => category [parent:protected] => 2 [label:protected] => Roofer/Waterproofer [alreadyInSave:protected] => [alreadyInValidation:protected] => [validationFailures:protected] => Array ( ) [_new:BaseObject:private] => [_deleted:BaseObject:private] => [modifiedColumns:protected] => Array ( ) ) [79] => Category Object ( [languages:protected] => [bok_resources:protected] => [bok_topics:protected] => [bok_keywords:protected] => [id:protected] => 79 [type:protected] => category [parent:protected] => 2 [label:protected] => Scaffold Erector [alreadyInSave:protected] => [alreadyInValidation:protected] => [validationFailures:protected] => Array ( ) [_new:BaseObject:private] => [_deleted:BaseObject:private] => [modifiedColumns:protected] => Array ( ) ) [82] => Category Object ( [languages:protected] => [bok_resources:protected] => [bok_topics:protected] => [bok_keywords:protected] => [id:protected] => 82 [type:protected] => category [parent:protected] => 2 [label:protected] => Stonemason [alreadyInSave:protected] => [alreadyInValidation:protected] => [validationFailures:protected] => Array ( ) [_new:BaseObject:private] => [_deleted:BaseObject:private] => [modifiedColumns:protected] => Array ( ) ) [62] => Category Object ( [languages:protected] => [bok_resources:protected] => [bok_topics:protected] => [bok_keywords:protected] => [id:protected] => 62 [type:protected] => category [parent:protected] => 2 [label:protected] => Structural Ironworker [alreadyInSave:protected] => [alreadyInValidation:protected] => [validationFailures:protected] => Array ( ) [_new:BaseObject:private] => [_deleted:BaseObject:private] => [modifiedColumns:protected] => Array ( ) ) [87] => Category Object ( [languages:protected] => [bok_resources:protected] => [bok_topics:protected] => [bok_keywords:protected] => [id:protected] => 87 [type:protected] => category [parent:protected] => 3 [label:protected] => Commercial & Institutional [alreadyInSave:protected] => [alreadyInValidation:protected] => [validationFailures:protected] => Array ( ) [_new:BaseObject:private] => [_deleted:BaseObject:private] => [modifiedColumns:protected] => Array ( ) ) [88] => Category Object ( [languages:protected] => [bok_resources:protected] => [bok_topics:protected] => [bok_keywords:protected] => [id:protected] => 88 [type:protected] => category [parent:protected] => 3 [label:protected] => Demolition [alreadyInSave:protected] => [alreadyInValidation:protected] => [validationFailures:protected] => Array ( ) [_new:BaseObject:private] => [_deleted:BaseObject:private] => [modifiedColumns:protected] => Array ( ) ) [91] => Category Object ( [languages:protected] => [bok_resources:protected] => [bok_topics:protected] => [bok_keywords:protected] => [id:protected] => 91 [type:protected] => category [parent:protected] => 3 [label:protected] => Heavy & Highway [alreadyInSave:protected] => [alreadyInValidation:protected] => [validationFailures:protected] => Array ( ) [_new:BaseObject:private] => [_deleted:BaseObject:private] => [modifiedColumns:protected] => Array ( ) ) [90] => Category Object ( [languages:protected] => [bok_resources:protected] => [bok_topics:protected] => [bok_keywords:protected] => [id:protected] => 90 [type:protected] => category [parent:protected] => 3 [label:protected] => Industrial [alreadyInSave:protected] => [alreadyInValidation:protected] => [validationFailures:protected] => Array ( ) [_new:BaseObject:private] => [_deleted:BaseObject:private] => [modifiedColumns:protected] => Array ( ) ) [93] => Category Object ( [languages:protected] => [bok_resources:protected] => [bok_topics:protected] => [bok_keywords:protected] => [id:protected] => 93 [type:protected] => category [parent:protected] => 3 [label:protected] => Renovations [alreadyInSave:protected] => [alreadyInValidation:protected] => [validationFailures:protected] => Array ( ) [_new:BaseObject:private] => [_deleted:BaseObject:private] => [modifiedColumns:protected] => Array ( ) ) [94] => Category Object ( [languages:protected] => [bok_resources:protected] => [bok_topics:protected] => [bok_keywords:protected] => [id:protected] => 94 [type:protected] => category [parent:protected] => 3 [label:protected] => Residential [alreadyInSave:protected] => [alreadyInValidation:protected] => [validationFailures:protected] => Array ( ) [_new:BaseObject:private] => [_deleted:BaseObject:private] => [modifiedColumns:protected] => Array ( ) ) [95] => Category Object ( [languages:protected] => [bok_resources:protected] => [bok_topics:protected] => [bok_keywords:protected] => [id:protected] => 95 [type:protected] => category [parent:protected] => 3 [label:protected] => Underground [alreadyInSave:protected] => [alreadyInValidation:protected] => [validationFailures:protected] => Array ( ) [_new:BaseObject:private] => [_deleted:BaseObject:private] => [modifiedColumns:protected] => Array ( ) ) [97] => Category Object ( [languages:protected] => [bok_resources:protected] => [bok_topics:protected] => [bok_keywords:protected] => [id:protected] => 97 [type:protected] => category [parent:protected] => 5 [label:protected] => Images [alreadyInSave:protected] => [alreadyInValidation:protected] => [validationFailures:protected] => Array ( ) [_new:BaseObject:private] => [_deleted:BaseObject:private] => [modifiedColumns:protected] => Array ( ) ) ) [categories_initialized:protected] => 1 [mapped_items:protected] => [content:protected] => [files:protected] => [language:protected] => Language Object ( [id:protected] => 1 [code:protected] => en [name:protected] => English [alreadyInSave:protected] => [alreadyInValidation:protected] => [validationFailures:protected] => Array ( ) [_new:BaseObject:private] => [_deleted:BaseObject:private] => [modifiedColumns:protected] => Array ( ) ) [old_record:protected] => [id:protected] => 4006 [old_id:protected] => [elcosh_id:protected] => i002693 [type:protected] => image [display_type:protected] => Image [user_id:protected] => 0 [language_id:protected] => 1 [tagging_id:protected] => Bruce Lippy [priority_id:protected] => 1 [title:protected] => Toolbox talk - long shot [total_pages:protected] => 0 [billed_pages:protected] => 0 [publication_number:protected] => [part_of:protected] => [keywords:protected] => toolbox talk, tailgate talk, safety minute [comments:protected] => [summary:protected] => This crew gathered every morning before starting work to discuss a new safety topic. [transition_comments:protected] => [external_link:protected] => [consol_link:protected] => http://www.cpwrconstructionsolutions.org/electrical/solution/662/worker-training.html [more_like_this:protected] => i002691,i002692,d001269,d000527 [permission_given_by:protected] => [published:protected] => T [billable:protected] => F [img_name:protected] => [img_ext:protected] => jpg [img_width:protected] => [img_height:protected] => [img_credit:protected] => Morgan Zavertnik and Hoar Construction [img_practice:protected] => good [vid_source_id:protected] => [vid_running_time:protected] => [vid_intended_audience:protected] => [vid_acquisition_info:protected] => [vid_cost:protected] => [vid_producer:protected] => [vid_filename:protected] => [vid_filename_downloadable:protected] => [date_summary:protected] => November 2015 [date_permission_requested:protected] => [date_permission_received:protected] => [date_review_needed:protected] => [date_received:protected] => 03/02/16 [date_completed:protected] => 03/02/16 [date_billed:protected] => [date_modified:protected] => 03/02/16 [collBokExports:protected] => [lastBokExportCriteria:BaseElcoshItem:private] => [alreadyInSave:protected] => [alreadyInValidation:protected] => [validationFailures:protected] => Array ( ) [_new:BaseObject:private] => [_deleted:BaseObject:private] => [modifiedColumns:protected] => Array ( ) ) ) [2] => Search_Result Object ( [title] => Construction bracing [image] => /record/images/3995-p.jpg [blurb] => This shows structural support that prevents collapses during construction.... [category] => Array ( [0] => 12 [1] => 15 [2] => 21 [3] => 49 [4] => 51 [5] => 55 [6] => 56 [7] => 60 [8] => 64 [9] => 68 [10] => 74 [11] => 63 [12] => 78 [13] => 79 [14] => 80 [15] => 62 [16] => 87 [17] => 90 [18] => 97 ) [labels] => Array ( [0] => Crushed/Struck By [1] => Work Environment [2] => Hazards [3] => Falls [6] => Scaffolds [9] => Carpenter [10] => Trades [11] => Cement Mason [13] => Electrical Worker [15] => Elevator Constructor [17] => HVAC [19] => Laborer [21] => Maintenance Worker [23] => Pile Driver [25] => Reinforcing Ironworker [27] => Roofer/Waterproofer [29] => Scaffold Erector [31] => Sheetmetal Worker [33] => Structural Ironworker [35] => Commercial & Institutional [36] => Jobsites [37] => Industrial [39] => Images [40] => Media [41] => Media & Documents ) [type] => Images [sub_category] => [url] => /image/3995/i002690/Construction%2Bbracing.html [item:protected] => ImageRecord Object ( [records:protected] => Array ( ) [recordId:protected] => [searchWordClass:protected] => [searchWordPeerClass:protected] => [bok_record:protected] => [authors:protected] => [organizations:protected] => [collections:protected] => [categories:protected] => Array ( [12] => Category Object ( [languages:protected] => [bok_resources:protected] => [bok_topics:protected] => [bok_keywords:protected] => [id:protected] => 12 [type:protected] => category [parent:protected] => 7 [label:protected] => Crushed/Struck By [alreadyInSave:protected] => [alreadyInValidation:protected] => [validationFailures:protected] => Array ( ) [_new:BaseObject:private] => [_deleted:BaseObject:private] => [modifiedColumns:protected] => Array ( ) ) [15] => Category Object ( [languages:protected] => [bok_resources:protected] => [bok_topics:protected] => [bok_keywords:protected] => [id:protected] => 15 [type:protected] => category [parent:protected] => 7 [label:protected] => Falls [alreadyInSave:protected] => [alreadyInValidation:protected] => [validationFailures:protected] => Array ( ) [_new:BaseObject:private] => [_deleted:BaseObject:private] => [modifiedColumns:protected] => Array ( ) ) [21] => Category Object ( [languages:protected] => [bok_resources:protected] => [bok_topics:protected] => [bok_keywords:protected] => [id:protected] => 21 [type:protected] => category [parent:protected] => 7 [label:protected] => Scaffolds [alreadyInSave:protected] => [alreadyInValidation:protected] => [validationFailures:protected] => Array ( ) [_new:BaseObject:private] => [_deleted:BaseObject:private] => [modifiedColumns:protected] => Array ( ) ) [49] => Category Object ( [languages:protected] => [bok_resources:protected] => [bok_topics:protected] => [bok_keywords:protected] => [id:protected] => 49 [type:protected] => category [parent:protected] => 2 [label:protected] => Carpenter [alreadyInSave:protected] => [alreadyInValidation:protected] => [validationFailures:protected] => Array ( ) [_new:BaseObject:private] => [_deleted:BaseObject:private] => [modifiedColumns:protected] => Array ( ) ) [51] => Category Object ( [languages:protected] => [bok_resources:protected] => [bok_topics:protected] => [bok_keywords:protected] => [id:protected] => 51 [type:protected] => category [parent:protected] => 2 [label:protected] => Cement Mason [alreadyInSave:protected] => [alreadyInValidation:protected] => [validationFailures:protected] => Array ( ) [_new:BaseObject:private] => [_deleted:BaseObject:private] => [modifiedColumns:protected] => Array ( ) ) [55] => Category Object ( [languages:protected] => [bok_resources:protected] => [bok_topics:protected] => [bok_keywords:protected] => [id:protected] => 55 [type:protected] => category [parent:protected] => 2 [label:protected] => Electrical Worker [alreadyInSave:protected] => [alreadyInValidation:protected] => [validationFailures:protected] => Array ( ) [_new:BaseObject:private] => [_deleted:BaseObject:private] => [modifiedColumns:protected] => Array ( ) ) [56] => Category Object ( [languages:protected] => [bok_resources:protected] => [bok_topics:protected] => [bok_keywords:protected] => [id:protected] => 56 [type:protected] => category [parent:protected] => 2 [label:protected] => Elevator Constructor [alreadyInSave:protected] => [alreadyInValidation:protected] => [validationFailures:protected] => Array ( ) [_new:BaseObject:private] => [_deleted:BaseObject:private] => [modifiedColumns:protected] => Array ( ) ) [60] => Category Object ( [languages:protected] => [bok_resources:protected] => [bok_topics:protected] => [bok_keywords:protected] => [id:protected] => 60 [type:protected] => category [parent:protected] => 2 [label:protected] => HVAC [alreadyInSave:protected] => [alreadyInValidation:protected] => [validationFailures:protected] => Array ( ) [_new:BaseObject:private] => [_deleted:BaseObject:private] => [modifiedColumns:protected] => Array ( ) ) [64] => Category Object ( [languages:protected] => [bok_resources:protected] => [bok_topics:protected] => [bok_keywords:protected] => [id:protected] => 64 [type:protected] => category [parent:protected] => 2 [label:protected] => Laborer [alreadyInSave:protected] => [alreadyInValidation:protected] => [validationFailures:protected] => Array ( ) [_new:BaseObject:private] => [_deleted:BaseObject:private] => [modifiedColumns:protected] => Array ( ) ) [68] => Category Object ( [languages:protected] => [bok_resources:protected] => [bok_topics:protected] => [bok_keywords:protected] => [id:protected] => 68 [type:protected] => category [parent:protected] => 2 [label:protected] => Maintenance Worker [alreadyInSave:protected] => [alreadyInValidation:protected] => [validationFailures:protected] => Array ( ) [_new:BaseObject:private] => [_deleted:BaseObject:private] => [modifiedColumns:protected] => Array ( ) ) [74] => Category Object ( [languages:protected] => [bok_resources:protected] => [bok_topics:protected] => [bok_keywords:protected] => [id:protected] => 74 [type:protected] => category [parent:protected] => 2 [label:protected] => Pile Driver [alreadyInSave:protected] => [alreadyInValidation:protected] => [validationFailures:protected] => Array ( ) [_new:BaseObject:private] => [_deleted:BaseObject:private] => [modifiedColumns:protected] => Array ( ) ) [63] => Category Object ( [languages:protected] => [bok_resources:protected] => [bok_topics:protected] => [bok_keywords:protected] => [id:protected] => 63 [type:protected] => category [parent:protected] => 2 [label:protected] => Reinforcing Ironworker [alreadyInSave:protected] => [alreadyInValidation:protected] => [validationFailures:protected] => Array ( ) [_new:BaseObject:private] => [_deleted:BaseObject:private] => [modifiedColumns:protected] => Array ( ) ) [78] => Category Object ( [languages:protected] => [bok_resources:protected] => [bok_topics:protected] => [bok_keywords:protected] => [id:protected] => 78 [type:protected] => category [parent:protected] => 2 [label:protected] => Roofer/Waterproofer [alreadyInSave:protected] => [alreadyInValidation:protected] => [validationFailures:protected] => Array ( ) [_new:BaseObject:private] => [_deleted:BaseObject:private] => [modifiedColumns:protected] => Array ( ) ) [79] => Category Object ( [languages:protected] => [bok_resources:protected] => [bok_topics:protected] => [bok_keywords:protected] => [id:protected] => 79 [type:protected] => category [parent:protected] => 2 [label:protected] => Scaffold Erector [alreadyInSave:protected] => [alreadyInValidation:protected] => [validationFailures:protected] => Array ( ) [_new:BaseObject:private] => [_deleted:BaseObject:private] => [modifiedColumns:protected] => Array ( ) ) [80] => Category Object ( [languages:protected] => [bok_resources:protected] => [bok_topics:protected] => [bok_keywords:protected] => [id:protected] => 80 [type:protected] => category [parent:protected] => 2 [label:protected] => Sheetmetal Worker [alreadyInSave:protected] => [alreadyInValidation:protected] => [validationFailures:protected] => Array ( ) [_new:BaseObject:private] => [_deleted:BaseObject:private] => [modifiedColumns:protected] => Array ( ) ) [62] => Category Object ( [languages:protected] => [bok_resources:protected] => [bok_topics:protected] => [bok_keywords:protected] => [id:protected] => 62 [type:protected] => category [parent:protected] => 2 [label:protected] => Structural Ironworker [alreadyInSave:protected] => [alreadyInValidation:protected] => [validationFailures:protected] => Array ( ) [_new:BaseObject:private] => [_deleted:BaseObject:private] => [modifiedColumns:protected] => Array ( ) ) [87] => Category Object ( [languages:protected] => [bok_resources:protected] => [bok_topics:protected] => [bok_keywords:protected] => [id:protected] => 87 [type:protected] => category [parent:protected] => 3 [label:protected] => Commercial & Institutional [alreadyInSave:protected] => [alreadyInValidation:protected] => [validationFailures:protected] => Array ( ) [_new:BaseObject:private] => [_deleted:BaseObject:private] => [modifiedColumns:protected] => Array ( ) ) [90] => Category Object ( [languages:protected] => [bok_resources:protected] => [bok_topics:protected] => [bok_keywords:protected] => [id:protected] => 90 [type:protected] => category [parent:protected] => 3 [label:protected] => Industrial [alreadyInSave:protected] => [alreadyInValidation:protected] => [validationFailures:protected] => Array ( ) [_new:BaseObject:private] => [_deleted:BaseObject:private] => [modifiedColumns:protected] => Array ( ) ) [97] => Category Object ( [languages:protected] => [bok_resources:protected] => [bok_topics:protected] => [bok_keywords:protected] => [id:protected] => 97 [type:protected] => category [parent:protected] => 5 [label:protected] => Images [alreadyInSave:protected] => [alreadyInValidation:protected] => [validationFailures:protected] => Array ( ) [_new:BaseObject:private] => [_deleted:BaseObject:private] => [modifiedColumns:protected] => Array ( ) ) ) [categories_initialized:protected] => 1 [mapped_items:protected] => [content:protected] => [files:protected] => [language:protected] => Language Object ( [id:protected] => 1 [code:protected] => en [name:protected] => English [alreadyInSave:protected] => [alreadyInValidation:protected] => [validationFailures:protected] => Array ( ) [_new:BaseObject:private] => [_deleted:BaseObject:private] => [modifiedColumns:protected] => Array ( ) ) [old_record:protected] => [id:protected] => 3995 [old_id:protected] => [elcosh_id:protected] => i002690 [type:protected] => image [display_type:protected] => Image [user_id:protected] => 0 [language_id:protected] => 1 [tagging_id:protected] => Bruce Lippy [priority_id:protected] => 1 [title:protected] => Construction bracing [total_pages:protected] => 0 [billed_pages:protected] => 0 [publication_number:protected] => [part_of:protected] => [keywords:protected] => Bracing, support, scaffold [comments:protected] => [summary:protected] => This shows structural support that prevents collapses during construction. [transition_comments:protected] => [external_link:protected] => [consol_link:protected] => http://www.cpwrconstructionsolutions.org/masonry/solution/8/adjustable-tower-scaffold.html [more_like_this:protected] => i002660 [permission_given_by:protected] => [published:protected] => T [billable:protected] => F [img_name:protected] => [img_ext:protected] => jpg [img_width:protected] => [img_height:protected] => [img_credit:protected] => Photo by Pam Susi [img_practice:protected] => good [vid_source_id:protected] => [vid_running_time:protected] => [vid_intended_audience:protected] => [vid_acquisition_info:protected] => [vid_cost:protected] => [vid_producer:protected] => [vid_filename:protected] => [vid_filename_downloadable:protected] => [date_summary:protected] => January 2016 [date_permission_requested:protected] => [date_permission_received:protected] => [date_review_needed:protected] => [date_received:protected] => 02/01/16 [date_completed:protected] => 02/01/16 [date_billed:protected] => [date_modified:protected] => 02/01/16 [collBokExports:protected] => [lastBokExportCriteria:BaseElcoshItem:private] => [alreadyInSave:protected] => [alreadyInValidation:protected] => [validationFailures:protected] => Array ( ) [_new:BaseObject:private] => [_deleted:BaseObject:private] => [modifiedColumns:protected] => Array ( ) ) ) [3] => Search_Result Object ( [title] => Suspended Scaffold Outriggers [image] => /record/images/3975-p.jpg [blurb] => Suspended scaffolds systems must be designed by a qualified person and inspected daily by a competent person. The supports for the counterweight must... [category] => Array ( [0] => 97 [1] => 15 [2] => 47 [3] => 49 [4] => 79 [5] => 87 ) [labels] => Array ( [0] => Images [1] => Media [2] => Media & Documents [3] => Falls [4] => Work Environment [5] => Hazards [6] => Bricklayer [7] => Trades [8] => Carpenter [10] => Scaffold Erector [12] => Commercial & Institutional [13] => Jobsites ) [type] => Images [sub_category] => [url] => /image/3975/i002683/Suspended%2BScaffold%2BOutriggers.html [item:protected] => ImageRecord Object ( [records:protected] => Array ( ) [recordId:protected] => [searchWordClass:protected] => [searchWordPeerClass:protected] => [bok_record:protected] => [authors:protected] => [organizations:protected] => [collections:protected] => [categories:protected] => Array ( [97] => Category Object ( [languages:protected] => [bok_resources:protected] => [bok_topics:protected] => [bok_keywords:protected] => [id:protected] => 97 [type:protected] => category [parent:protected] => 5 [label:protected] => Images [alreadyInSave:protected] => [alreadyInValidation:protected] => [validationFailures:protected] => Array ( ) [_new:BaseObject:private] => [_deleted:BaseObject:private] => [modifiedColumns:protected] => Array ( ) ) [15] => Category Object ( [languages:protected] => [bok_resources:protected] => [bok_topics:protected] => [bok_keywords:protected] => [id:protected] => 15 [type:protected] => category [parent:protected] => 7 [label:protected] => Falls [alreadyInSave:protected] => [alreadyInValidation:protected] => [validationFailures:protected] => Array ( ) [_new:BaseObject:private] => [_deleted:BaseObject:private] => [modifiedColumns:protected] => Array ( ) ) [47] => Category Object ( [languages:protected] => [bok_resources:protected] => [bok_topics:protected] => [bok_keywords:protected] => [id:protected] => 47 [type:protected] => category [parent:protected] => 2 [label:protected] => Bricklayer [alreadyInSave:protected] => [alreadyInValidation:protected] => [validationFailures:protected] => Array ( ) [_new:BaseObject:private] => [_deleted:BaseObject:private] => [modifiedColumns:protected] => Array ( ) ) [49] => Category Object ( [languages:protected] => [bok_resources:protected] => [bok_topics:protected] => [bok_keywords:protected] => [id:protected] => 49 [type:protected] => category [parent:protected] => 2 [label:protected] => Carpenter [alreadyInSave:protected] => [alreadyInValidation:protected] => [validationFailures:protected] => Array ( ) [_new:BaseObject:private] => [_deleted:BaseObject:private] => [modifiedColumns:protected] => Array ( ) ) [79] => Category Object ( [languages:protected] => [bok_resources:protected] => [bok_topics:protected] => [bok_keywords:protected] => [id:protected] => 79 [type:protected] => category [parent:protected] => 2 [label:protected] => Scaffold Erector [alreadyInSave:protected] => [alreadyInValidation:protected] => [validationFailures:protected] => Array ( ) [_new:BaseObject:private] => [_deleted:BaseObject:private] => [modifiedColumns:protected] => Array ( ) ) [87] => Category Object ( [languages:protected] => [bok_resources:protected] => [bok_topics:protected] => [bok_keywords:protected] => [id:protected] => 87 [type:protected] => category [parent:protected] => 3 [label:protected] => Commercial & Institutional [alreadyInSave:protected] => [alreadyInValidation:protected] => [validationFailures:protected] => Array ( ) [_new:BaseObject:private] => [_deleted:BaseObject:private] => [modifiedColumns:protected] => Array ( ) ) ) [categories_initialized:protected] => 1 [mapped_items:protected] => [content:protected] => [files:protected] => [language:protected] => Language Object ( [id:protected] => 1 [code:protected] => en [name:protected] => English [alreadyInSave:protected] => [alreadyInValidation:protected] => [validationFailures:protected] => Array ( ) [_new:BaseObject:private] => [_deleted:BaseObject:private] => [modifiedColumns:protected] => Array ( ) ) [old_record:protected] => [id:protected] => 3975 [old_id:protected] => [elcosh_id:protected] => i002683 [type:protected] => image [display_type:protected] => Image [user_id:protected] => 0 [language_id:protected] => 1 [tagging_id:protected] => John Newquist [priority_id:protected] => 1 [title:protected] => Suspended Scaffold Outriggers [total_pages:protected] => 0 [billed_pages:protected] => 0 [publication_number:protected] => [part_of:protected] => [keywords:protected] => suspended, scaffold, swing, stage, fall, protection, counterweight, qualified, person [comments:protected] => [summary:protected] => Suspended scaffolds systems must be designed by a qualified person and inspected daily by a competent person. The supports for the counterweight must be designed with a safety factor of four. [transition_comments:protected] => [external_link:protected] => [consol_link:protected] => http://www.cpwrconstructionsolutions.org/task/Erect%2Band%2Bdismantle%2Bscaffolds/ [more_like_this:protected] => d000244,d000359,i000253,i000407 [permission_given_by:protected] => [published:protected] => T [billable:protected] => F [img_name:protected] => [img_ext:protected] => jpg [img_width:protected] => [img_height:protected] => [img_credit:protected] => MetroPark, Miller and Long [img_practice:protected] => not_applicable [vid_source_id:protected] => [vid_running_time:protected] => [vid_intended_audience:protected] => [vid_acquisition_info:protected] => [vid_cost:protected] => [vid_producer:protected] => [vid_filename:protected] => [vid_filename_downloadable:protected] => [date_summary:protected] => August 28 2015 [date_permission_requested:protected] => [date_permission_received:protected] => [date_review_needed:protected] => [date_received:protected] => 08/28/15 [date_completed:protected] => 08/28/15 [date_billed:protected] => [date_modified:protected] => 08/28/15 [collBokExports:protected] => [lastBokExportCriteria:BaseElcoshItem:private] => [alreadyInSave:protected] => [alreadyInValidation:protected] => [validationFailures:protected] => Array ( ) [_new:BaseObject:private] => [_deleted:BaseObject:private] => [modifiedColumns:protected] => Array ( ) ) ) [4] => Search_Result Object ( [title] => Suspended scaffold [image] => /record/images/3976-p.jpg [blurb] => Suspended scaffold outrigger beams must have stops to prevent the hangers from sliding of the end of the outriggers. Wire rope supported must be desig... [category] => Array ( [0] => 97 [1] => 15 [2] => 47 [3] => 50 [4] => 79 [5] => 87 ) [labels] => Array ( [0] => Images [1] => Media [2] => Media & Documents [3] => Falls [4] => Work Environment [5] => Hazards [6] => Bricklayer [7] => Trades [8] => Carpet Layer [10] => Scaffold Erector [12] => Commercial & Institutional [13] => Jobsites ) [type] => Images [sub_category] => [url] => /image/3976/i002684/Suspended%2Bscaffold.html [item:protected] => ImageRecord Object ( [records:protected] => Array ( ) [recordId:protected] => [searchWordClass:protected] => [searchWordPeerClass:protected] => [bok_record:protected] => [authors:protected] => [organizations:protected] => [collections:protected] => [categories:protected] => Array ( [97] => Category Object ( [languages:protected] => [bok_resources:protected] => [bok_topics:protected] => [bok_keywords:protected] => [id:protected] => 97 [type:protected] => category [parent:protected] => 5 [label:protected] => Images [alreadyInSave:protected] => [alreadyInValidation:protected] => [validationFailures:protected] => Array ( ) [_new:BaseObject:private] => [_deleted:BaseObject:private] => [modifiedColumns:protected] => Array ( ) ) [15] => Category Object ( [languages:protected] => [bok_resources:protected] => [bok_topics:protected] => [bok_keywords:protected] => [id:protected] => 15 [type:protected] => category [parent:protected] => 7 [label:protected] => Falls [alreadyInSave:protected] => [alreadyInValidation:protected] => [validationFailures:protected] => Array ( ) [_new:BaseObject:private] => [_deleted:BaseObject:private] => [modifiedColumns:protected] => Array ( ) ) [47] => Category Object ( [languages:protected] => [bok_resources:protected] => [bok_topics:protected] => [bok_keywords:protected] => [id:protected] => 47 [type:protected] => category [parent:protected] => 2 [label:protected] => Bricklayer [alreadyInSave:protected] => [alreadyInValidation:protected] => [validationFailures:protected] => Array ( ) [_new:BaseObject:private] => [_deleted:BaseObject:private] => [modifiedColumns:protected] => Array ( ) ) [50] => Category Object ( [languages:protected] => [bok_resources:protected] => [bok_topics:protected] => [bok_keywords:protected] => [id:protected] => 50 [type:protected] => category [parent:protected] => 2 [label:protected] => Carpet Layer [alreadyInSave:protected] => [alreadyInValidation:protected] => [validationFailures:protected] => Array ( ) [_new:BaseObject:private] => [_deleted:BaseObject:private] => [modifiedColumns:protected] => Array ( ) ) [79] => Category Object ( [languages:protected] => [bok_resources:protected] => [bok_topics:protected] => [bok_keywords:protected] => [id:protected] => 79 [type:protected] => category [parent:protected] => 2 [label:protected] => Scaffold Erector [alreadyInSave:protected] => [alreadyInValidation:protected] => [validationFailures:protected] => Array ( ) [_new:BaseObject:private] => [_deleted:BaseObject:private] => [modifiedColumns:protected] => Array ( ) ) [87] => Category Object ( [languages:protected] => [bok_resources:protected] => [bok_topics:protected] => [bok_keywords:protected] => [id:protected] => 87 [type:protected] => category [parent:protected] => 3 [label:protected] => Commercial & Institutional [alreadyInSave:protected] => [alreadyInValidation:protected] => [validationFailures:protected] => Array ( ) [_new:BaseObject:private] => [_deleted:BaseObject:private] => [modifiedColumns:protected] => Array ( ) ) ) [categories_initialized:protected] => 1 [mapped_items:protected] => [content:protected] => [files:protected] => [language:protected] => Language Object ( [id:protected] => 1 [code:protected] => en [name:protected] => English [alreadyInSave:protected] => [alreadyInValidation:protected] => [validationFailures:protected] => Array ( ) [_new:BaseObject:private] => [_deleted:BaseObject:private] => [modifiedColumns:protected] => Array ( ) ) [old_record:protected] => [id:protected] => 3976 [old_id:protected] => [elcosh_id:protected] => i002684 [type:protected] => image [display_type:protected] => Image [user_id:protected] => 0 [language_id:protected] => 1 [tagging_id:protected] => John Newquist [priority_id:protected] => 1 [title:protected] => Suspended scaffold [total_pages:protected] => 0 [billed_pages:protected] => 0 [publication_number:protected] => [part_of:protected] => [keywords:protected] => Suspended, scaffold, outrigger, beams, erection, wire, rope, inspection, swing, stage, [comments:protected] => [summary:protected] => Suspended scaffold outrigger beams must have stops to prevent the hangers from sliding of the end of the outriggers. Wire rope supported must be designed with a safety factor of 6. The scaffold must be inspected by a competent person daily. [transition_comments:protected] => [external_link:protected] => [consol_link:protected] => http://www.cpwrconstructionsolutions.org/task/Erect%2Band%2Bdismantle%2Bscaffolds/ [more_like_this:protected] => i002683, d000244, i000407, d000606 [permission_given_by:protected] => [published:protected] => T [billable:protected] => F [img_name:protected] => [img_ext:protected] => jpg [img_width:protected] => [img_height:protected] => [img_credit:protected] => Metropark, Miller and Long [img_practice:protected] => not_applicable [vid_source_id:protected] => [vid_running_time:protected] => [vid_intended_audience:protected] => [vid_acquisition_info:protected] => [vid_cost:protected] => [vid_producer:protected] => [vid_filename:protected] => [vid_filename_downloadable:protected] => [date_summary:protected] => [date_permission_requested:protected] => [date_permission_received:protected] => [date_review_needed:protected] => [date_received:protected] => 08/28/15 [date_completed:protected] => 08/28/15 [date_billed:protected] => [date_modified:protected] => 08/28/15 [collBokExports:protected] => [lastBokExportCriteria:BaseElcoshItem:private] => [alreadyInSave:protected] => [alreadyInValidation:protected] => [validationFailures:protected] => Array ( ) [_new:BaseObject:private] => [_deleted:BaseObject:private] => [modifiedColumns:protected] => Array ( ) ) ) [5] => Search_Result Object ( [title] => Three Tower Cranes [image] => /record/images/3979-p.jpg [blurb] => Whenever multiple tower cranes are used, there needs to be preplanning to ensure that the tower cranes cannot hit each other loads. This is accomplish... [category] => Array ( [0] => 97 [1] => 11 [2] => 64 [3] => 70 [4] => 62 [5] => 87 ) [labels] => Array ( [0] => Images [1] => Media [2] => Media & Documents [3] => Cranes & Hoists [4] => Work Environment [5] => Hazards [6] => Laborer [7] => Trades [8] => Operating Engineer [10] => Structural Ironworker [12] => Commercial & Institutional [13] => Jobsites ) [type] => Images [sub_category] => [url] => /image/3979/i002687/Three%2BTower%2BCranes.html [item:protected] => ImageRecord Object ( [records:protected] => Array ( ) [recordId:protected] => [searchWordClass:protected] => [searchWordPeerClass:protected] => [bok_record:protected] => [authors:protected] => [organizations:protected] => [collections:protected] => [categories:protected] => Array ( [97] => Category Object ( [languages:protected] => [bok_resources:protected] => [bok_topics:protected] => [bok_keywords:protected] => [id:protected] => 97 [type:protected] => category [parent:protected] => 5 [label:protected] => Images [alreadyInSave:protected] => [alreadyInValidation:protected] => [validationFailures:protected] => Array ( ) [_new:BaseObject:private] => [_deleted:BaseObject:private] => [modifiedColumns:protected] => Array ( ) ) [11] => Category Object ( [languages:protected] => [bok_resources:protected] => [bok_topics:protected] => [bok_keywords:protected] => [id:protected] => 11 [type:protected] => category [parent:protected] => 7 [label:protected] => Cranes & Hoists [alreadyInSave:protected] => [alreadyInValidation:protected] => [validationFailures:protected] => Array ( ) [_new:BaseObject:private] => [_deleted:BaseObject:private] => [modifiedColumns:protected] => Array ( ) ) [64] => Category Object ( [languages:protected] => [bok_resources:protected] => [bok_topics:protected] => [bok_keywords:protected] => [id:protected] => 64 [type:protected] => category [parent:protected] => 2 [label:protected] => Laborer [alreadyInSave:protected] => [alreadyInValidation:protected] => [validationFailures:protected] => Array ( ) [_new:BaseObject:private] => [_deleted:BaseObject:private] => [modifiedColumns:protected] => Array ( ) ) [70] => Category Object ( [languages:protected] => [bok_resources:protected] => [bok_topics:protected] => [bok_keywords:protected] => [id:protected] => 70 [type:protected] => category [parent:protected] => 2 [label:protected] => Operating Engineer [alreadyInSave:protected] => [alreadyInValidation:protected] => [validationFailures:protected] => Array ( ) [_new:BaseObject:private] => [_deleted:BaseObject:private] => [modifiedColumns:protected] => Array ( ) ) [62] => Category Object ( [languages:protected] => [bok_resources:protected] => [bok_topics:protected] => [bok_keywords:protected] => [id:protected] => 62 [type:protected] => category [parent:protected] => 2 [label:protected] => Structural Ironworker [alreadyInSave:protected] => [alreadyInValidation:protected] => [validationFailures:protected] => Array ( ) [_new:BaseObject:private] => [_deleted:BaseObject:private] => [modifiedColumns:protected] => Array ( ) ) [87] => Category Object ( [languages:protected] => [bok_resources:protected] => [bok_topics:protected] => [bok_keywords:protected] => [id:protected] => 87 [type:protected] => category [parent:protected] => 3 [label:protected] => Commercial & Institutional [alreadyInSave:protected] => [alreadyInValidation:protected] => [validationFailures:protected] => Array ( ) [_new:BaseObject:private] => [_deleted:BaseObject:private] => [modifiedColumns:protected] => Array ( ) ) ) [categories_initialized:protected] => 1 [mapped_items:protected] => [content:protected] => [files:protected] => [language:protected] => Language Object ( [id:protected] => 1 [code:protected] => en [name:protected] => English [alreadyInSave:protected] => [alreadyInValidation:protected] => [validationFailures:protected] => Array ( ) [_new:BaseObject:private] => [_deleted:BaseObject:private] => [modifiedColumns:protected] => Array ( ) ) [old_record:protected] => [id:protected] => 3979 [old_id:protected] => [elcosh_id:protected] => i002687 [type:protected] => image [display_type:protected] => Image [user_id:protected] => 0 [language_id:protected] => 1 [tagging_id:protected] => John Newquist [priority_id:protected] => 1 [title:protected] => Three Tower Cranes [total_pages:protected] => 0 [billed_pages:protected] => 0 [publication_number:protected] => [part_of:protected] => [keywords:protected] => [comments:protected] => [summary:protected] => Whenever multiple tower cranes are used, there needs to be preplanning to ensure that the tower cranes cannot hit each other loads. This is accomplished by setting swing restrictions, marking the ground for allowable crane travel and training of the crane signal persons. [transition_comments:protected] => [external_link:protected] => [consol_link:protected] => http://www.cpwrconstructionsolutions.org/work/6/184/ [more_like_this:protected] => d001029, d000010, i001280, i001221 [permission_given_by:protected] => [published:protected] => T [billable:protected] => F [img_name:protected] => [img_ext:protected] => jpg [img_width:protected] => [img_height:protected] => [img_credit:protected] => Metropark [img_practice:protected] => not_applicable [vid_source_id:protected] => [vid_running_time:protected] => [vid_intended_audience:protected] => [vid_acquisition_info:protected] => [vid_cost:protected] => [vid_producer:protected] => [vid_filename:protected] => [vid_filename_downloadable:protected] => [date_summary:protected] => August 28 2015 [date_permission_requested:protected] => [date_permission_received:protected] => [date_review_needed:protected] => [date_received:protected] => 08/28/15 [date_completed:protected] => 08/28/15 [date_billed:protected] => [date_modified:protected] => 08/28/15 [collBokExports:protected] => [lastBokExportCriteria:BaseElcoshItem:private] => [alreadyInSave:protected] => [alreadyInValidation:protected] => [validationFailures:protected] => Array ( ) [_new:BaseObject:private] => [_deleted:BaseObject:private] => [modifiedColumns:protected] => Array ( ) ) ) ) [preview_mode] => [description] => This third in a series of 6 Tool Box Talks on construction ergonomics focuses on proper positioning to avoid injuries. The TBT recommends: 1)prop up a task off of the floor by using a raised surface, cart, baker scaffold, saw horses to prep materials near waist height, 2)move the lift or ladder in the best position for the work, 3)position the lift in front of the area you plan to work without trying to reach too far on either side of the lift. [keywords] => position, positioning, ergonomics, ergo, carpal tunnel, MSD, musculoskeletal disorder [related_items] => Array ( [Handouts] => Array ( [0] => DocumentRecord Object ( [records:protected] => Array ( ) [recordId:protected] => [searchWordClass:protected] => [searchWordPeerClass:protected] => [bok_record:protected] => [authors:protected] => [organizations:protected] => [collections:protected] => [categories:protected] => [categories_initialized:protected] => [mapped_items:protected] => [content:protected] => [files:protected] => [language:protected] => Language Object ( [id:protected] => 1 [code:protected] => en [name:protected] => English [alreadyInSave:protected] => [alreadyInValidation:protected] => [validationFailures:protected] => Array ( ) [_new:BaseObject:private] => [_deleted:BaseObject:private] => [modifiedColumns:protected] => Array ( ) ) [old_record:protected] => [id:protected] => 3833 [old_id:protected] => [elcosh_id:protected] => d001303 [type:protected] => document [display_type:protected] => HTML w/ PDF [user_id:protected] => 25 [language_id:protected] => 1 [tagging_id:protected] => Bruce Lippy [priority_id:protected] => 1 [title:protected] => Overview of Toolbox Talks on Ergonomics Developed by Washington University in St. Louis [total_pages:protected] => 3 [billed_pages:protected] => 3 [publication_number:protected] => [part_of:protected] => [keywords:protected] => ergonomics, musculoskeletal disorders, MSDs [comments:protected] => 7-28-2014 - Originally submitted as "HTML w/ doc and PDF", Jeff Nelson asked Bruce Lippy for permission to switch it to "HTML w/ PDF" -- permission was given [summary:protected] => This overviews provides a background on how Washington University in St. Louis developed this series of six toolbox talks on ergonomics. It also describes how they tested the effectiveness of these communication tools, concluding that the guide was valuable for improving the delivery of ergonomics training and interaction between the safety representative and workers. The researchers recommend preparing site-specific information prior to the talk and interacting with workers to discuss problems and ergonomic solutions during the safety meetings. [transition_comments:protected] => [external_link:protected] => [consol_link:protected] => [more_like_this:protected] => [permission_given_by:protected] => Lisa Jaegers, Washington U. in St. Louis [published:protected] => T [billable:protected] => F [img_name:protected] => [img_ext:protected] => png [img_width:protected] => [img_height:protected] => [img_credit:protected] => [img_practice:protected] => [vid_source_id:protected] => [vid_running_time:protected] => [vid_intended_audience:protected] => [vid_acquisition_info:protected] => [vid_cost:protected] => [vid_producer:protected] => [vid_filename:protected] => [vid_filename_downloadable:protected] => [date_summary:protected] => 2014 [date_permission_requested:protected] => [date_permission_received:protected] => [date_review_needed:protected] => [date_received:protected] => 06/11/14 [date_completed:protected] => 07/29/14 [date_billed:protected] => [date_modified:protected] => 07/29/14 [collBokExports:protected] => [lastBokExportCriteria:BaseElcoshItem:private] => [alreadyInSave:protected] => [alreadyInValidation:protected] => [validationFailures:protected] => Array ( ) [_new:BaseObject:private] => [_deleted:BaseObject:private] => [modifiedColumns:protected] => Array ( ) ) ) [Toolbox Talks] => Array ( [0] => DocumentRecord Object ( [records:protected] => Array ( ) [recordId:protected] => [searchWordClass:protected] => [searchWordPeerClass:protected] => [bok_record:protected] => [authors:protected] => [organizations:protected] => [collections:protected] => [categories:protected] => [categories_initialized:protected] => [mapped_items:protected] => [content:protected] => [files:protected] => [language:protected] => Language Object ( [id:protected] => 1 [code:protected] => en [name:protected] => English [alreadyInSave:protected] => [alreadyInValidation:protected] => [validationFailures:protected] => Array ( ) [_new:BaseObject:private] => [_deleted:BaseObject:private] => [modifiedColumns:protected] => Array ( ) ) [old_record:protected] => [id:protected] => 3835 [old_id:protected] => [elcosh_id:protected] => d001304 [type:protected] => document [display_type:protected] => HTML w/ PDF [user_id:protected] => 25 [language_id:protected] => 1 [tagging_id:protected] => Bruce Lippy [priority_id:protected] => 1 [title:protected] => Ergonomics Tool Box Talks (TBT) Training Guide [total_pages:protected] => 2 [billed_pages:protected] => 2 [publication_number:protected] => [part_of:protected] => [keywords:protected] => Ergonomics, carpal tunnel, muscular skeletal disorders, msd [comments:protected] => [summary:protected] => CPWR-funded ergonomics research by Washington University at St. Louis led to the development of 6 tool box talks. This guide is an explanation of how to deliver the talks for maximum effectiveness. This guide should be reviewed before delivering any of the talks because it makes important recommendations like: • If possible, give the TBTs as a part of the crew’s regular safety meetings so that ergonomics is included in the safety discussion. • Try to locate an area with few distractions for gathering the crew. • For a team approach, invite the work crew, site superintendent, project manager and other general contractor and/or subcontractor reps who you feel may be helpful in supporting the training and ergonomics solutions. [transition_comments:protected] => [external_link:protected] => [consol_link:protected] => [more_like_this:protected] => d001303,d001305,d001306,d001307,d001308,d001309,d001310 [permission_given_by:protected] => [published:protected] => T [billable:protected] => F [img_name:protected] => [img_ext:protected] => png [img_width:protected] => [img_height:protected] => [img_credit:protected] => [img_practice:protected] => [vid_source_id:protected] => [vid_running_time:protected] => [vid_intended_audience:protected] => [vid_acquisition_info:protected] => [vid_cost:protected] => [vid_producer:protected] => [vid_filename:protected] => [vid_filename_downloadable:protected] => [date_summary:protected] => 2014 [date_permission_requested:protected] => [date_permission_received:protected] => [date_review_needed:protected] => [date_received:protected] => 06/12/14 [date_completed:protected] => 07/29/14 [date_billed:protected] => [date_modified:protected] => 07/29/14 [collBokExports:protected] => [lastBokExportCriteria:BaseElcoshItem:private] => [alreadyInSave:protected] => [alreadyInValidation:protected] => [validationFailures:protected] => Array ( ) [_new:BaseObject:private] => [_deleted:BaseObject:private] => [modifiedColumns:protected] => Array ( ) ) [1] => DocumentRecord Object ( [records:protected] => Array ( ) [recordId:protected] => [searchWordClass:protected] => [searchWordPeerClass:protected] => [bok_record:protected] => [authors:protected] => [organizations:protected] => [collections:protected] => [categories:protected] => [categories_initialized:protected] => [mapped_items:protected] => [content:protected] => [files:protected] => [language:protected] => Language Object ( [id:protected] => 1 [code:protected] => en [name:protected] => English [alreadyInSave:protected] => [alreadyInValidation:protected] => [validationFailures:protected] => Array ( ) [_new:BaseObject:private] => [_deleted:BaseObject:private] => [modifiedColumns:protected] => Array ( ) ) [old_record:protected] => [id:protected] => 3836 [old_id:protected] => [elcosh_id:protected] => d001305 [type:protected] => document [display_type:protected] => HTML w/ PDF [user_id:protected] => 25 [language_id:protected] => 1 [tagging_id:protected] => Bruce Lippy [priority_id:protected] => 1 [title:protected] => TBT1 Ergonomics in Construction [total_pages:protected] => 5 [billed_pages:protected] => 5 [publication_number:protected] => [part_of:protected] => [keywords:protected] => ergonomics, ergo, msd, musculoskeletal disorders, risk factors, lifting, carpal tunnel, repetition, awkward postures [comments:protected] => 7-28-2014 Jeff Nelson asked Bruce Lippy about what to do with a sentence included toward the top of the doc, "Fill them in on page 2 'Other Questions.'" -- Bruce said this sentence could be deleted from the HTML. [summary:protected] => This is the first in a series of 6 Tool Box Talks produced by Washington University in St. Louis on ergonomics in construction work. This one should be delivered first because it covers what ergonomics is, why construction workers need to talk about it, what the risk factors are for developing a health problem and how to prevent these problems. [transition_comments:protected] => [external_link:protected] => [consol_link:protected] => http://www.cpwrconstructionsolutions.org/pipes_vessels/solution/50/participatory-ergonomics-program.html [more_like_this:protected] => d001303,d001304,d001306,d001307,d001308,d001309 [permission_given_by:protected] => Lisa Jaegers, Washington U. in St. Louis [published:protected] => T [billable:protected] => F [img_name:protected] => [img_ext:protected] => png [img_width:protected] => [img_height:protected] => [img_credit:protected] => [img_practice:protected] => [vid_source_id:protected] => [vid_running_time:protected] => [vid_intended_audience:protected] => [vid_acquisition_info:protected] => [vid_cost:protected] => [vid_producer:protected] => [vid_filename:protected] => [vid_filename_downloadable:protected] => [date_summary:protected] => 2014 [date_permission_requested:protected] => [date_permission_received:protected] => [date_review_needed:protected] => [date_received:protected] => 06/12/14 [date_completed:protected] => 07/28/14 [date_billed:protected] => [date_modified:protected] => 10/09/15 [collBokExports:protected] => [lastBokExportCriteria:BaseElcoshItem:private] => [alreadyInSave:protected] => [alreadyInValidation:protected] => [validationFailures:protected] => Array ( ) [_new:BaseObject:private] => [_deleted:BaseObject:private] => [modifiedColumns:protected] => Array ( ) ) [2] => DocumentRecord Object ( [records:protected] => Array ( ) [recordId:protected] => [searchWordClass:protected] => [searchWordPeerClass:protected] => [bok_record:protected] => [authors:protected] => [organizations:protected] => [collections:protected] => [categories:protected] => [categories_initialized:protected] => [mapped_items:protected] => [content:protected] => [files:protected] => [language:protected] => Language Object ( [id:protected] => 1 [code:protected] => en [name:protected] => English [alreadyInSave:protected] => [alreadyInValidation:protected] => [validationFailures:protected] => Array ( ) [_new:BaseObject:private] => [_deleted:BaseObject:private] => [modifiedColumns:protected] => Array ( ) ) [old_record:protected] => [id:protected] => 3837 [old_id:protected] => [elcosh_id:protected] => d001306 [type:protected] => document [display_type:protected] => HTML w/ PDF [user_id:protected] => 25 [language_id:protected] => 1 [tagging_id:protected] => Bruce Lippy [priority_id:protected] => 1 [title:protected] => TBT2 Keep Reach Close [total_pages:protected] => 4 [billed_pages:protected] => 4 [publication_number:protected] => [part_of:protected] => [keywords:protected] => reach, ergonomic, ergo, MSD, carpal tunnel, repetition, awkward positions [comments:protected] => 7-28-2014 Jeff Nelson asked Bruce Lippy about what to do with a sentence included toward the top of the doc, "Fill them in on page 2 'Other Questions.'" -- Bruce said this sentence could be deleted from the HTML. [summary:protected] => This is the second of six Tool Box Talks created by Washington University in St. Louis on ergonomics in construction. There is a guide with the series that describes how to deliver these talks. This one deals with how to avoid awkward reaching during tasks to prevent injuries. try to work with your hands below your head and close to our body to reduce your risk of shoulder strains and back discomfort. This TBT recommends considering ways to move close to the task, keeping the work area free of obstacles, and talking with each other to provide constructive feedback about your working position. [transition_comments:protected] => [external_link:protected] => [consol_link:protected] => http://www.cpwrconstructionsolutions.org/hazard/959/lifting-and-carrying-manual-materials-handling.html [more_like_this:protected] => d001303,d001304,d001305,d001307,d001308,e001309 [permission_given_by:protected] => [published:protected] => T [billable:protected] => F [img_name:protected] => [img_ext:protected] => png [img_width:protected] => [img_height:protected] => [img_credit:protected] => [img_practice:protected] => [vid_source_id:protected] => [vid_running_time:protected] => [vid_intended_audience:protected] => [vid_acquisition_info:protected] => [vid_cost:protected] => [vid_producer:protected] => [vid_filename:protected] => [vid_filename_downloadable:protected] => [date_summary:protected] => 2014 [date_permission_requested:protected] => [date_permission_received:protected] => [date_review_needed:protected] => [date_received:protected] => 06/12/14 [date_completed:protected] => 07/28/14 [date_billed:protected] => [date_modified:protected] => 11/02/16 [collBokExports:protected] => [lastBokExportCriteria:BaseElcoshItem:private] => [alreadyInSave:protected] => [alreadyInValidation:protected] => [validationFailures:protected] => Array ( ) [_new:BaseObject:private] => [_deleted:BaseObject:private] => [modifiedColumns:protected] => Array ( ) ) [3] => DocumentRecord Object ( [records:protected] => Array ( ) [recordId:protected] => [searchWordClass:protected] => [searchWordPeerClass:protected] => [bok_record:protected] => [authors:protected] => [organizations:protected] => [collections:protected] => [categories:protected] => [categories_initialized:protected] => [mapped_items:protected] => [content:protected] => [files:protected] => [language:protected] => Language Object ( [id:protected] => 1 [code:protected] => en [name:protected] => English [alreadyInSave:protected] => [alreadyInValidation:protected] => [validationFailures:protected] => Array ( ) [_new:BaseObject:private] => [_deleted:BaseObject:private] => [modifiedColumns:protected] => Array ( ) ) [old_record:protected] => [id:protected] => 3839 [old_id:protected] => [elcosh_id:protected] => d001308 [type:protected] => document [display_type:protected] => HTML w/ PDF [user_id:protected] => 23 [language_id:protected] => 1 [tagging_id:protected] => Bruce Lippy [priority_id:protected] => 1 [title:protected] => TBT4 Move Materials With Assist [total_pages:protected] => 4 [billed_pages:protected] => 4 [publication_number:protected] => [part_of:protected] => [keywords:protected] => lifting, back injury, ergonomics, ergo, MSD, buddy system [comments:protected] => 7-28-2014 Jeff Nelson asked Bruce Lippy about what to do with a sentence included toward the top of the doc, "Fill them in on page 2 'Other Questions.'" -- Bruce said this sentence could be deleted from the HTML. [summary:protected] => This tool box talk is fourth in a series of 6 developed by Washington University in St. Louis on construction ergonomics. This one focuses on preventing back injuries by getting an assist when manually lifting. It recommends using a cart for transporting loads, taking less trips, avoiding carrying materials on the shoulder and helping each other to lift large or heavy materials when a cart or hoist is not available. [transition_comments:protected] => [external_link:protected] => [consol_link:protected] => http://www.cpwrconstructionsolutions.org/hazard/959/lifting-and-carrying-manual-materials-handling.html [more_like_this:protected] => d001303,d001304,d001305,d001306,d001307,d001309 [permission_given_by:protected] => Lisa Jaegers, Washington U. in St. Louis [published:protected] => T [billable:protected] => F [img_name:protected] => [img_ext:protected] => png [img_width:protected] => [img_height:protected] => [img_credit:protected] => [img_practice:protected] => [vid_source_id:protected] => [vid_running_time:protected] => [vid_intended_audience:protected] => [vid_acquisition_info:protected] => [vid_cost:protected] => [vid_producer:protected] => [vid_filename:protected] => [vid_filename_downloadable:protected] => [date_summary:protected] => 2014 [date_permission_requested:protected] => [date_permission_received:protected] => [date_review_needed:protected] => [date_received:protected] => 06/12/14 [date_completed:protected] => 07/29/14 [date_billed:protected] => [date_modified:protected] => 10/09/15 [collBokExports:protected] => [lastBokExportCriteria:BaseElcoshItem:private] => [alreadyInSave:protected] => [alreadyInValidation:protected] => [validationFailures:protected] => Array ( ) [_new:BaseObject:private] => [_deleted:BaseObject:private] => [modifiedColumns:protected] => Array ( ) ) [4] => DocumentRecord Object ( [records:protected] => Array ( ) [recordId:protected] => [searchWordClass:protected] => [searchWordPeerClass:protected] => [bok_record:protected] => [authors:protected] => [organizations:protected] => [collections:protected] => [categories:protected] => [categories_initialized:protected] => [mapped_items:protected] => [content:protected] => [files:protected] => [language:protected] => Language Object ( [id:protected] => 1 [code:protected] => en [name:protected] => English [alreadyInSave:protected] => [alreadyInValidation:protected] => [validationFailures:protected] => Array ( ) [_new:BaseObject:private] => [_deleted:BaseObject:private] => [modifiedColumns:protected] => Array ( ) ) [old_record:protected] => [id:protected] => 3840 [old_id:protected] => [elcosh_id:protected] => d001309 [type:protected] => document [display_type:protected] => HTML w/ PDF [user_id:protected] => 23 [language_id:protected] => 1 [tagging_id:protected] => Bruce Lippy [priority_id:protected] => 1 [title:protected] => TBT5 Manual Tools [total_pages:protected] => 4 [billed_pages:protected] => 4 [publication_number:protected] => [part_of:protected] => [keywords:protected] => ergonomic, hand tools, handles, MSD, musculoskeletal disorder, carpal tunnel [comments:protected] => 7-28-2014 Jeff Nelson asked Bruce Lippy about what to do with a sentence included toward the top of the doc, "Fill them in on page 2 'Other Questions.'" -- Bruce said this sentence could be deleted from the HTML. [summary:protected] => This is the fifth in a series of 6 tool box talks on construction ergonomics produced by the University of Washington in St. Louis. This one focuses on manual tools. It asks the following 6 key questions. Does the tool… 1. Fit the task? 2. Allow a good power grip? 3. Keep the wrist in a straight posture? 4. Feel comfortable? 5. Take less effort than other tools for the task? 6. Work effectively? [transition_comments:protected] => [external_link:protected] => [consol_link:protected] => http://www.cpwrconstructionsolutions.org/masonry/solution/383/ergonomic-hand-tools.html [more_like_this:protected] => d001303,d001304,d001305,d001306,d001307,d001308,d001310 [permission_given_by:protected] => Lisa Jaegers, U. Wash. St. Louis [published:protected] => T [billable:protected] => F [img_name:protected] => [img_ext:protected] => png [img_width:protected] => [img_height:protected] => [img_credit:protected] => [img_practice:protected] => [vid_source_id:protected] => [vid_running_time:protected] => [vid_intended_audience:protected] => [vid_acquisition_info:protected] => [vid_cost:protected] => [vid_producer:protected] => [vid_filename:protected] => [vid_filename_downloadable:protected] => [date_summary:protected] => 2014 [date_permission_requested:protected] => [date_permission_received:protected] => [date_review_needed:protected] => [date_received:protected] => 06/12/14 [date_completed:protected] => 07/29/14 [date_billed:protected] => [date_modified:protected] => 10/09/15 [collBokExports:protected] => [lastBokExportCriteria:BaseElcoshItem:private] => [alreadyInSave:protected] => [alreadyInValidation:protected] => [validationFailures:protected] => Array ( ) [_new:BaseObject:private] => [_deleted:BaseObject:private] => [modifiedColumns:protected] => Array ( ) ) ) ) [collections] => Array ( [3834] => ) [record] => DocumentRecord Object ( [records:protected] => Array ( ) [recordId:protected] => [searchWordClass:protected] => [searchWordPeerClass:protected] => [bok_record:protected] => [authors:protected] => Array ( ) [organizations:protected] => Array ( [182] => Organization Object ( [id:protected] => 182 [elcosh_id:protected] => o000205 [user_id:protected] => 14 [province_id:protected] => 0 [country_id:protected] => 0 [title:protected] => Washington University - St. Louis [address:protected] => [postal_code:protected] => [city:protected] => [department:protected] => [phone:protected] => [fax:protected] => [email:protected] => [website:protected] => [filename:protected] => [about:protected] => [comments:protected] => [logo_available:protected] => T [no_details:protected] => T [date_received:protected] => 2009-08-06 [date_completed:protected] => 2009-08-06 [date_billed:protected] => [alreadyInSave:protected] => [alreadyInValidation:protected] => [validationFailures:protected] => Array ( ) [_new:BaseObject:private] => [_deleted:BaseObject:private] => [modifiedColumns:protected] => Array ( ) ) ) [collections:protected] => Array ( [3834] => ) [categories:protected] => [categories_initialized:protected] => [mapped_items:protected] => Array ( [3833] => DocumentRecord Object ( [records:protected] => Array ( ) [recordId:protected] => [searchWordClass:protected] => [searchWordPeerClass:protected] => [bok_record:protected] => [authors:protected] => [organizations:protected] => [collections:protected] => [categories:protected] => [categories_initialized:protected] => [mapped_items:protected] => [content:protected] => [files:protected] => [language:protected] => [old_record:protected] => [id:protected] => 3833 [old_id:protected] => [elcosh_id:protected] => d001303 [type:protected] => document [display_type:protected] => HTML w/ PDF [user_id:protected] => 25 [language_id:protected] => 1 [tagging_id:protected] => Bruce Lippy [priority_id:protected] => 1 [title:protected] => Overview of Toolbox Talks on Ergonomics Developed by Washington University in St. Louis [total_pages:protected] => 3 [billed_pages:protected] => 3 [publication_number:protected] => [part_of:protected] => [keywords:protected] => ergonomics, musculoskeletal disorders, MSDs [comments:protected] => 7-28-2014 - Originally submitted as "HTML w/ doc and PDF", Jeff Nelson asked Bruce Lippy for permission to switch it to "HTML w/ PDF" -- permission was given [summary:protected] => This overviews provides a background on how Washington University in St. Louis developed this series of six toolbox talks on ergonomics. It also describes how they tested the effectiveness of these communication tools, concluding that the guide was valuable for improving the delivery of ergonomics training and interaction between the safety representative and workers. The researchers recommend preparing site-specific information prior to the talk and interacting with workers to discuss problems and ergonomic solutions during the safety meetings. [transition_comments:protected] => [external_link:protected] => [consol_link:protected] => [more_like_this:protected] => [permission_given_by:protected] => Lisa Jaegers, Washington U. in St. Louis [published:protected] => T [billable:protected] => F [img_name:protected] => [img_ext:protected] => png [img_width:protected] => [img_height:protected] => [img_credit:protected] => [img_practice:protected] => [vid_source_id:protected] => [vid_running_time:protected] => [vid_intended_audience:protected] => [vid_acquisition_info:protected] => [vid_cost:protected] => [vid_producer:protected] => [vid_filename:protected] => [vid_filename_downloadable:protected] => [date_summary:protected] => 2014 [date_permission_requested:protected] => [date_permission_received:protected] => [date_review_needed:protected] => [date_received:protected] => 06/11/14 [date_completed:protected] => 07/29/14 [date_billed:protected] => [date_modified:protected] => 07/29/14 [collBokExports:protected] => [lastBokExportCriteria:BaseElcoshItem:private] => [alreadyInSave:protected] => [alreadyInValidation:protected] => [validationFailures:protected] => Array ( ) [_new:BaseObject:private] => [_deleted:BaseObject:private] => [modifiedColumns:protected] => Array ( ) ) [3835] => DocumentRecord Object ( [records:protected] => Array ( ) [recordId:protected] => [searchWordClass:protected] => [searchWordPeerClass:protected] => [bok_record:protected] => [authors:protected] => [organizations:protected] => [collections:protected] => [categories:protected] => [categories_initialized:protected] => [mapped_items:protected] => [content:protected] => [files:protected] => [language:protected] => [old_record:protected] => [id:protected] => 3835 [old_id:protected] => [elcosh_id:protected] => d001304 [type:protected] => document [display_type:protected] => HTML w/ PDF [user_id:protected] => 25 [language_id:protected] => 1 [tagging_id:protected] => Bruce Lippy [priority_id:protected] => 1 [title:protected] => Ergonomics Tool Box Talks (TBT) Training Guide [total_pages:protected] => 2 [billed_pages:protected] => 2 [publication_number:protected] => [part_of:protected] => [keywords:protected] => Ergonomics, carpal tunnel, muscular skeletal disorders, msd [comments:protected] => [summary:protected] => CPWR-funded ergonomics research by Washington University at St. Louis led to the development of 6 tool box talks. This guide is an explanation of how to deliver the talks for maximum effectiveness. This guide should be reviewed before delivering any of the talks because it makes important recommendations like: • If possible, give the TBTs as a part of the crew’s regular safety meetings so that ergonomics is included in the safety discussion. • Try to locate an area with few distractions for gathering the crew. • For a team approach, invite the work crew, site superintendent, project manager and other general contractor and/or subcontractor reps who you feel may be helpful in supporting the training and ergonomics solutions. [transition_comments:protected] => [external_link:protected] => [consol_link:protected] => [more_like_this:protected] => d001303,d001305,d001306,d001307,d001308,d001309,d001310 [permission_given_by:protected] => [published:protected] => T [billable:protected] => F [img_name:protected] => [img_ext:protected] => png [img_width:protected] => [img_height:protected] => [img_credit:protected] => [img_practice:protected] => [vid_source_id:protected] => [vid_running_time:protected] => [vid_intended_audience:protected] => [vid_acquisition_info:protected] => [vid_cost:protected] => [vid_producer:protected] => [vid_filename:protected] => [vid_filename_downloadable:protected] => [date_summary:protected] => 2014 [date_permission_requested:protected] => [date_permission_received:protected] => [date_review_needed:protected] => [date_received:protected] => 06/12/14 [date_completed:protected] => 07/29/14 [date_billed:protected] => [date_modified:protected] => 07/29/14 [collBokExports:protected] => [lastBokExportCriteria:BaseElcoshItem:private] => [alreadyInSave:protected] => [alreadyInValidation:protected] => [validationFailures:protected] => Array ( ) [_new:BaseObject:private] => [_deleted:BaseObject:private] => [modifiedColumns:protected] => Array ( ) ) [3836] => DocumentRecord Object ( [records:protected] => Array ( ) [recordId:protected] => [searchWordClass:protected] => [searchWordPeerClass:protected] => [bok_record:protected] => [authors:protected] => [organizations:protected] => [collections:protected] => [categories:protected] => [categories_initialized:protected] => [mapped_items:protected] => [content:protected] => [files:protected] => [language:protected] => [old_record:protected] => [id:protected] => 3836 [old_id:protected] => [elcosh_id:protected] => d001305 [type:protected] => document [display_type:protected] => HTML w/ PDF [user_id:protected] => 25 [language_id:protected] => 1 [tagging_id:protected] => Bruce Lippy [priority_id:protected] => 1 [title:protected] => TBT1 Ergonomics in Construction [total_pages:protected] => 5 [billed_pages:protected] => 5 [publication_number:protected] => [part_of:protected] => [keywords:protected] => ergonomics, ergo, msd, musculoskeletal disorders, risk factors, lifting, carpal tunnel, repetition, awkward postures [comments:protected] => 7-28-2014 Jeff Nelson asked Bruce Lippy about what to do with a sentence included toward the top of the doc, "Fill them in on page 2 'Other Questions.'" -- Bruce said this sentence could be deleted from the HTML. [summary:protected] => This is the first in a series of 6 Tool Box Talks produced by Washington University in St. Louis on ergonomics in construction work. This one should be delivered first because it covers what ergonomics is, why construction workers need to talk about it, what the risk factors are for developing a health problem and how to prevent these problems. [transition_comments:protected] => [external_link:protected] => [consol_link:protected] => http://www.cpwrconstructionsolutions.org/pipes_vessels/solution/50/participatory-ergonomics-program.html [more_like_this:protected] => d001303,d001304,d001306,d001307,d001308,d001309 [permission_given_by:protected] => Lisa Jaegers, Washington U. in St. Louis [published:protected] => T [billable:protected] => F [img_name:protected] => [img_ext:protected] => png [img_width:protected] => [img_height:protected] => [img_credit:protected] => [img_practice:protected] => [vid_source_id:protected] => [vid_running_time:protected] => [vid_intended_audience:protected] => [vid_acquisition_info:protected] => [vid_cost:protected] => [vid_producer:protected] => [vid_filename:protected] => [vid_filename_downloadable:protected] => [date_summary:protected] => 2014 [date_permission_requested:protected] => [date_permission_received:protected] => [date_review_needed:protected] => [date_received:protected] => 06/12/14 [date_completed:protected] => 07/28/14 [date_billed:protected] => [date_modified:protected] => 10/09/15 [collBokExports:protected] => [lastBokExportCriteria:BaseElcoshItem:private] => [alreadyInSave:protected] => [alreadyInValidation:protected] => [validationFailures:protected] => Array ( ) [_new:BaseObject:private] => [_deleted:BaseObject:private] => [modifiedColumns:protected] => Array ( ) ) [3837] => DocumentRecord Object ( [records:protected] => Array ( ) [recordId:protected] => [searchWordClass:protected] => [searchWordPeerClass:protected] => [bok_record:protected] => [authors:protected] => [organizations:protected] => [collections:protected] => [categories:protected] => [categories_initialized:protected] => [mapped_items:protected] => [content:protected] => [files:protected] => [language:protected] => [old_record:protected] => [id:protected] => 3837 [old_id:protected] => [elcosh_id:protected] => d001306 [type:protected] => document [display_type:protected] => HTML w/ PDF [user_id:protected] => 25 [language_id:protected] => 1 [tagging_id:protected] => Bruce Lippy [priority_id:protected] => 1 [title:protected] => TBT2 Keep Reach Close [total_pages:protected] => 4 [billed_pages:protected] => 4 [publication_number:protected] => [part_of:protected] => [keywords:protected] => reach, ergonomic, ergo, MSD, carpal tunnel, repetition, awkward positions [comments:protected] => 7-28-2014 Jeff Nelson asked Bruce Lippy about what to do with a sentence included toward the top of the doc, "Fill them in on page 2 'Other Questions.'" -- Bruce said this sentence could be deleted from the HTML. [summary:protected] => This is the second of six Tool Box Talks created by Washington University in St. Louis on ergonomics in construction. There is a guide with the series that describes how to deliver these talks. This one deals with how to avoid awkward reaching during tasks to prevent injuries. try to work with your hands below your head and close to our body to reduce your risk of shoulder strains and back discomfort. This TBT recommends considering ways to move close to the task, keeping the work area free of obstacles, and talking with each other to provide constructive feedback about your working position. [transition_comments:protected] => [external_link:protected] => [consol_link:protected] => http://www.cpwrconstructionsolutions.org/hazard/959/lifting-and-carrying-manual-materials-handling.html [more_like_this:protected] => d001303,d001304,d001305,d001307,d001308,e001309 [permission_given_by:protected] => [published:protected] => T [billable:protected] => F [img_name:protected] => [img_ext:protected] => png [img_width:protected] => [img_height:protected] => [img_credit:protected] => [img_practice:protected] => [vid_source_id:protected] => [vid_running_time:protected] => [vid_intended_audience:protected] => [vid_acquisition_info:protected] => [vid_cost:protected] => [vid_producer:protected] => [vid_filename:protected] => [vid_filename_downloadable:protected] => [date_summary:protected] => 2014 [date_permission_requested:protected] => [date_permission_received:protected] => [date_review_needed:protected] => [date_received:protected] => 06/12/14 [date_completed:protected] => 07/28/14 [date_billed:protected] => [date_modified:protected] => 11/02/16 [collBokExports:protected] => [lastBokExportCriteria:BaseElcoshItem:private] => [alreadyInSave:protected] => [alreadyInValidation:protected] => [validationFailures:protected] => Array ( ) [_new:BaseObject:private] => [_deleted:BaseObject:private] => [modifiedColumns:protected] => Array ( ) ) [3839] => DocumentRecord Object ( [records:protected] => Array ( ) [recordId:protected] => [searchWordClass:protected] => [searchWordPeerClass:protected] => [bok_record:protected] => [authors:protected] => [organizations:protected] => [collections:protected] => [categories:protected] => [categories_initialized:protected] => [mapped_items:protected] => [content:protected] => [files:protected] => [language:protected] => [old_record:protected] => [id:protected] => 3839 [old_id:protected] => [elcosh_id:protected] => d001308 [type:protected] => document [display_type:protected] => HTML w/ PDF [user_id:protected] => 23 [language_id:protected] => 1 [tagging_id:protected] => Bruce Lippy [priority_id:protected] => 1 [title:protected] => TBT4 Move Materials With Assist [total_pages:protected] => 4 [billed_pages:protected] => 4 [publication_number:protected] => [part_of:protected] => [keywords:protected] => lifting, back injury, ergonomics, ergo, MSD, buddy system [comments:protected] => 7-28-2014 Jeff Nelson asked Bruce Lippy about what to do with a sentence included toward the top of the doc, "Fill them in on page 2 'Other Questions.'" -- Bruce said this sentence could be deleted from the HTML. [summary:protected] => This tool box talk is fourth in a series of 6 developed by Washington University in St. Louis on construction ergonomics. This one focuses on preventing back injuries by getting an assist when manually lifting. It recommends using a cart for transporting loads, taking less trips, avoiding carrying materials on the shoulder and helping each other to lift large or heavy materials when a cart or hoist is not available. [transition_comments:protected] => [external_link:protected] => [consol_link:protected] => http://www.cpwrconstructionsolutions.org/hazard/959/lifting-and-carrying-manual-materials-handling.html [more_like_this:protected] => d001303,d001304,d001305,d001306,d001307,d001309 [permission_given_by:protected] => Lisa Jaegers, Washington U. in St. Louis [published:protected] => T [billable:protected] => F [img_name:protected] => [img_ext:protected] => png [img_width:protected] => [img_height:protected] => [img_credit:protected] => [img_practice:protected] => [vid_source_id:protected] => [vid_running_time:protected] => [vid_intended_audience:protected] => [vid_acquisition_info:protected] => [vid_cost:protected] => [vid_producer:protected] => [vid_filename:protected] => [vid_filename_downloadable:protected] => [date_summary:protected] => 2014 [date_permission_requested:protected] => [date_permission_received:protected] => [date_review_needed:protected] => [date_received:protected] => 06/12/14 [date_completed:protected] => 07/29/14 [date_billed:protected] => [date_modified:protected] => 10/09/15 [collBokExports:protected] => [lastBokExportCriteria:BaseElcoshItem:private] => [alreadyInSave:protected] => [alreadyInValidation:protected] => [validationFailures:protected] => Array ( ) [_new:BaseObject:private] => [_deleted:BaseObject:private] => [modifiedColumns:protected] => Array ( ) ) [3840] => DocumentRecord Object ( [records:protected] => Array ( ) [recordId:protected] => [searchWordClass:protected] => [searchWordPeerClass:protected] => [bok_record:protected] => [authors:protected] => [organizations:protected] => [collections:protected] => [categories:protected] => [categories_initialized:protected] => [mapped_items:protected] => [content:protected] => [files:protected] => [language:protected] => [old_record:protected] => [id:protected] => 3840 [old_id:protected] => [elcosh_id:protected] => d001309 [type:protected] => document [display_type:protected] => HTML w/ PDF [user_id:protected] => 23 [language_id:protected] => 1 [tagging_id:protected] => Bruce Lippy [priority_id:protected] => 1 [title:protected] => TBT5 Manual Tools [total_pages:protected] => 4 [billed_pages:protected] => 4 [publication_number:protected] => [part_of:protected] => [keywords:protected] => ergonomic, hand tools, handles, MSD, musculoskeletal disorder, carpal tunnel [comments:protected] => 7-28-2014 Jeff Nelson asked Bruce Lippy about what to do with a sentence included toward the top of the doc, "Fill them in on page 2 'Other Questions.'" -- Bruce said this sentence could be deleted from the HTML. [summary:protected] => This is the fifth in a series of 6 tool box talks on construction ergonomics produced by the University of Washington in St. Louis. This one focuses on manual tools. It asks the following 6 key questions. Does the tool… 1. Fit the task? 2. Allow a good power grip? 3. Keep the wrist in a straight posture? 4. Feel comfortable? 5. Take less effort than other tools for the task? 6. Work effectively? [transition_comments:protected] => [external_link:protected] => [consol_link:protected] => http://www.cpwrconstructionsolutions.org/masonry/solution/383/ergonomic-hand-tools.html [more_like_this:protected] => d001303,d001304,d001305,d001306,d001307,d001308,d001310 [permission_given_by:protected] => Lisa Jaegers, U. Wash. St. Louis [published:protected] => T [billable:protected] => F [img_name:protected] => [img_ext:protected] => png [img_width:protected] => [img_height:protected] => [img_credit:protected] => [img_practice:protected] => [vid_source_id:protected] => [vid_running_time:protected] => [vid_intended_audience:protected] => [vid_acquisition_info:protected] => [vid_cost:protected] => [vid_producer:protected] => [vid_filename:protected] => [vid_filename_downloadable:protected] => [date_summary:protected] => 2014 [date_permission_requested:protected] => [date_permission_received:protected] => [date_review_needed:protected] => [date_received:protected] => 06/12/14 [date_completed:protected] => 07/29/14 [date_billed:protected] => [date_modified:protected] => 10/09/15 [collBokExports:protected] => [lastBokExportCriteria:BaseElcoshItem:private] => [alreadyInSave:protected] => [alreadyInValidation:protected] => [validationFailures:protected] => Array ( ) [_new:BaseObject:private] => [_deleted:BaseObject:private] => [modifiedColumns:protected] => Array ( ) ) ) [content:protected] => [files:protected] => Array ( [559] => [560] => [546] => File Object ( [id:protected] => 546 [filename:protected] => 3.jpg [downloadable:protected] => F [timestamp:protected] => 2009-07-03 12:54:22 [alreadyInSave:protected] => [alreadyInValidation:protected] => [validationFailures:protected] => Array ( ) [_new:BaseObject:private] => [_deleted:BaseObject:private] => [modifiedColumns:protected] => Array ( ) ) [9643] => File Object ( [id:protected] => 9643 [filename:protected] => d001307.pdf [downloadable:protected] => T [timestamp:protected] => 2014-07-27 19:09:19 [alreadyInSave:protected] => [alreadyInValidation:protected] => [validationFailures:protected] => Array ( ) [_new:BaseObject:private] => [_deleted:BaseObject:private] => [modifiedColumns:protected] => Array ( ) ) [566] => File Object ( [id:protected] => 566 [filename:protected] => 4.jpg [downloadable:protected] => F [timestamp:protected] => 2009-07-03 12:54:23 [alreadyInSave:protected] => [alreadyInValidation:protected] => [validationFailures:protected] => Array ( ) [_new:BaseObject:private] => [_deleted:BaseObject:private] => [modifiedColumns:protected] => Array ( ) ) ) [language:protected] => Language Object ( [id:protected] => 1 [code:protected] => en [name:protected] => English [alreadyInSave:protected] => [alreadyInValidation:protected] => [validationFailures:protected] => Array ( ) [_new:BaseObject:private] => [_deleted:BaseObject:private] => [modifiedColumns:protected] => Array ( ) ) [old_record:protected] => [id:protected] => 3838 [old_id:protected] => [elcosh_id:protected] => d001307 [type:protected] => document [display_type:protected] => HTML w/ PDF [user_id:protected] => 25 [language_id:protected] => 1 [tagging_id:protected] => Bruce Lippy [priority_id:protected] => 1 [title:protected] => TBT3 Positioning [total_pages:protected] => 4 [billed_pages:protected] => 4 [publication_number:protected] => [part_of:protected] => [keywords:protected] => position, positioning, ergonomics, ergo, carpal tunnel, MSD, musculoskeletal disorder [comments:protected] => 7-28-2014 Jeff Nelson asked Bruce Lippy about what to do with a sentence included toward the top of the doc, "Fill them in on page 2 'Other Questions.'" -- Bruce said this sentence could be deleted from the HTML. [summary:protected] => This third in a series of 6 Tool Box Talks on construction ergonomics focuses on proper positioning to avoid injuries. The TBT recommends: 1)prop up a task off of the floor by using a raised surface, cart, baker scaffold, saw horses to prep materials near waist height, 2)move the lift or ladder in the best position for the work, 3)position the lift in front of the area you plan to work without trying to reach too far on either side of the lift. [transition_comments:protected] => [external_link:protected] => [consol_link:protected] => http://www.cpwrconstructionsolutions.org/hazard/959/lifting-and-carrying-manual-materials-handling.html [more_like_this:protected] => d001303,d001304,d001305,d001306,d001308,d001309 [permission_given_by:protected] => Lisa Jaegers, WU-St. Louis [published:protected] => T [billable:protected] => F [img_name:protected] => [img_ext:protected] => png [img_width:protected] => [img_height:protected] => [img_credit:protected] => [img_practice:protected] => [vid_source_id:protected] => [vid_running_time:protected] => [vid_intended_audience:protected] => [vid_acquisition_info:protected] => [vid_cost:protected] => [vid_producer:protected] => [vid_filename:protected] => [vid_filename_downloadable:protected] => [date_summary:protected] => 2014 [date_permission_requested:protected] => [date_permission_received:protected] => [date_review_needed:protected] => [date_received:protected] => 06/12/14 [date_completed:protected] => 07/28/14 [date_billed:protected] => [date_modified:protected] => 10/09/15 [collBokExports:protected] => [lastBokExportCriteria:BaseElcoshItem:private] => [alreadyInSave:protected] => [alreadyInValidation:protected] => [validationFailures:protected] => Array ( ) [_new:BaseObject:private] => [_deleted:BaseObject:private] => [modifiedColumns:protected] => Array ( ) ) [show_text] => [document_content] => ElcoshItemDocumentContent Object ( [id:protected] => 2906 [item_id:protected] => 3838 [type:protected] => main [title:protected] => [content:protected] =>
Facilitator / Leader Tasks Before the Tool Box Talk (TBT)
- Read through this TBT guide.
- Walk the job site to find ergonomics examples based on the TBT. If possible, take photos of “safe” and “unsafe” examples at the site to be used during the TBT.
- Write down discussion questions to ask the group.
Learning Goals
After discussing this training topic, workers will have gained a general understanding of:
- Unsafe work positions.
- Solutions to improve work positioning.
TRAINING CARD
The last page of this PDF has directions for printing and laminating the training cards.
TRAINER’S TALKING POINTS
Why should we talk about positioning?
Construction work requires working in high, low, and tight spaces which often forces you to work in an awkward or uncomfortable position. Working in awkward reaching and bent positions can lead to shoulder and back discomfort and possible injury over time.
Demonstration: The training card provides examples of the range of reaching and the point at which the reach is unsafe. Hold your arms straight out in front of you. Look at your hands and wrists while I discuss each of the reach zones on the training card.
The Green Zone shows the ideal location for working with your hands. When possible, try to keep your work tasks as far out as your wrists.
The Orange Zone is for occasional work since it involves more weight on your shoulders and low back since your hands are away from your body. If needed, keep the reach distance as far as your fingertips.
The Red Zone is away from your body so far that it places you at higher risk for falls when in the air and shoulder and back discomfort. Limit the time you work reaching beyond your fingertips.
End of Demonstration
Discussion Question: Can anyone describe to us an awkward position that they work in or have seen someone work in?
- What does it feel like in your neck, back or arms when working in that position?
- Other Questions:_____________________________________________
Training Note: Here are examples of hazards in different construction trades. Choose your trade or one that is similar to your group’s line of work that can be used as hazards and solutions examples.
| Trade | Awkward Posture Hazards | Potential Solution |
|---|---|---|
| Carpenter-Drywall | Leaning over the side of a scissor lift to reach and operating a screw gun with the arm fully extended (reaching in the red zone past the fingertips). | Before starting to install the line of screws to the side of the lift, move the lift to re-center it for the next 2 lines of screws to be installed. |
| Floor Layer | Spreading mortar overhead on a wall with the bakers scaffold one foot away from the wall due to buckets on the floor below (reach in the red zone, past the fingertips). | Pre-plan this task by removing all objects in the path of the bakers scaffold. Having an open path allows you to work closer to the task. |
| Sheet Metal Worker | Prepping duct parts on the floor while bending the back and reaching to work on them. | Pre-plan this task by setting up a waist-height workstation on extra materials, a cart, or saw horses. |
Now let’s put this information into practice. What are some tricks or techniques that you use to work in a comfortable position?
- Other Questions:_____________________________________________
Here are a few other ideas that are listed on your training card:
Prop up your tasks off of the floor by using a raised surface, cart, baker scaffold, saw horses to prep materials near waist height.
Move the lift or ladder in the best position for the work – close to the work tasks.
For safety & comfort, try to position the lift in front of the area you plan to work without trying to reach too far on either side of the lift.
In summary, it is important to work in a safe position when possible in order to reduce the risk of falls and discomfort due to awkward working positions. Consider ways that you can work in the green/comfort zone and orange zone and avoid the unsafe red zone.
References
[Images modified from Grandjean & Eastman Kodak Co.]
1. Grandjean, E. 1988. Fitting the task to the man: A textbook of occupational ergonomics. 4th ed. Taylor & Francis.
2. Eastman Kodak Co. 1983. Ergonomic Design for People at Work. Vol 1. Wiley, John & Sons, Incorporated.
Refer to the resources at our website: oshr.im.wustl.edu for more Tool Box TIPS.
TRAINING ATTENDANCE SHEET
Training Topic: Ergonomics -- Positioning
Date:
| ATTENDEES | |
|---|---|
Directions for Making Laminated Training Cards
The last page of this PDF has directions for printing and laminating the training cards.
[content_transformed:protected] =>Facilitator / Leader Tasks Before the Tool Box Talk (TBT)
- Read through this TBT guide.
- Walk the job site to find ergonomics examples based on the TBT. If possible, take photos of “safe” and “unsafe” examples at the site to be used during the TBT.
- Write down discussion questions to ask the group.
Learning Goals
After discussing this training topic, workers will have gained a general understanding of:
- Unsafe work positions.
- Solutions to improve work positioning.
TRAINING CARD
The last page of this PDF has directions for printing and laminating the training cards.
TRAINER’S TALKING POINTS
Why should we talk about positioning?
Construction work requires working in high, low, and tight spaces which often forces you to work in an awkward or uncomfortable position. Working in awkward reaching and bent positions can lead to shoulder and back discomfort and possible injury over time.
Demonstration: The training card provides examples of the range of reaching and the point at which the reach is unsafe. Hold your arms straight out in front of you. Look at your hands and wrists while I discuss each of the reach zones on the training card.
The Green Zone shows the ideal location for working with your hands. When possible, try to keep your work tasks as far out as your wrists.
The Orange Zone is for occasional work since it involves more weight on your shoulders and low back since your hands are away from your body. If needed, keep the reach distance as far as your fingertips.
The Red Zone is away from your body so far that it places you at higher risk for falls when in the air and shoulder and back discomfort. Limit the time you work reaching beyond your fingertips.
End of Demonstration
Discussion Question: Can anyone describe to us an awkward position that they work in or have seen someone work in?
- What does it feel like in your neck, back or arms when working in that position?
- Other Questions:_____________________________________________
Training Note: Here are examples of hazards in different construction trades. Choose your trade or one that is similar to your group’s line of work that can be used as hazards and solutions examples.
| Trade | Awkward Posture Hazards | Potential Solution |
|---|---|---|
| Carpenter-Drywall | Leaning over the side of a scissor lift to reach and operating a screw gun with the arm fully extended (reaching in the red zone past the fingertips). | Before starting to install the line of screws to the side of the lift, move the lift to re-center it for the next 2 lines of screws to be installed. |
| Floor Layer | Spreading mortar overhead on a wall with the bakers scaffold one foot away from the wall due to buckets on the floor below (reach in the red zone, past the fingertips). | Pre-plan this task by removing all objects in the path of the bakers scaffold. Having an open path allows you to work closer to the task. |
| Sheet Metal Worker | Prepping duct parts on the floor while bending the back and reaching to work on them. | Pre-plan this task by setting up a waist-height workstation on extra materials, a cart, or saw horses. |
Now let’s put this information into practice. What are some tricks or techniques that you use to work in a comfortable position?
- Other Questions:_____________________________________________
Here are a few other ideas that are listed on your training card:
Prop up your tasks off of the floor by using a raised surface, cart, baker scaffold, saw horses to prep materials near waist height.
Move the lift or ladder in the best position for the work – close to the work tasks.
For safety & comfort, try to position the lift in front of the area you plan to work without trying to reach too far on either side of the lift.
In summary, it is important to work in a safe position when possible in order to reduce the risk of falls and discomfort due to awkward working positions. Consider ways that you can work in the green/comfort zone and orange zone and avoid the unsafe red zone.
References
[Images modified from Grandjean & Eastman Kodak Co.]
1. Grandjean, E. 1988. Fitting the task to the man: A textbook of occupational ergonomics. 4th ed. Taylor & Francis.
2. Eastman Kodak Co. 1983. Ergonomic Design for People at Work. Vol 1. Wiley, John & Sons, Incorporated.
Refer to the resources at our website: oshr.im.wustl.edu for more Tool Box TIPS.
TRAINING ATTENDANCE SHEET
Training Topic: Ergonomics -- Positioning
Date:
| ATTENDEES | |
|---|---|
Directions for Making Laminated Training Cards
The last page of this PDF has directions for printing and laminating the training cards.
[disclaimer:protected] => [disclaimer_transformed:protected] => [alreadyInSave:protected] => [alreadyInValidation:protected] => [validationFailures:protected] => Array ( ) [_new:BaseObject:private] => [_deleted:BaseObject:private] => [modifiedColumns:protected] => Array ( ) ) [template] => record ) ) ) [5] => Array ( [file] => /home/agsafe5/repositories/elcosh/live/sblib/core/SB_Engine/page/PHPTAL_Page.php [line] => 38 [function] => execute [class] => PHPTAL [type] => -> [args] => Array ( ) ) [6] => Array ( [file] => /home/agsafe5/repositories/elcosh/live/sblib/core/SB_Engine/page/Decorator_Page.php [line] => 34 [function] => render [class] => SB_PHPTAL_Page [type] => -> [args] => Array ( ) ) [7] => Array ( [file] => /home/agsafe5/repositories/elcosh/live/sblib/core/SB_Engine/page/Decorator_Page.php [line] => 23 [function] => render [class] => SB_Decorator_Page [type] => -> [args] => Array ( ) ) [8] => Array ( [file] => /home/agsafe5/repositories/elcosh/live/sblib/core/SB_Engine/module/Module.php [line] => 35 [function] => display [class] => SB_Decorator_Page [type] => -> [args] => Array ( ) ) [9] => Array ( [file] => /home/agsafe5/repositories/elcosh/live/sblib/core/SB_Engine/Controller.php [line] => 48 [function] => display [class] => SB_Module [type] => -> [args] => Array ( ) ) [10] => Array ( [file] => /home/agsafe5/repositories/elcosh/live/sblib/core/SB_Engine/Controller.php [line] => 36 [function] => main [class] => SBE_Controller [type] => -> [args] => Array ( [0] => [1] => Array ( ) ) ) [11] => Array ( [file] => /home/agsafe5/repositories/elcosh/live/web_root/elcosh/index.php [line] => 14 [function] => run [class] => SBE_Controller [type] => -> [args] => Array ( ) ) ) [previous:Exception:private] => )